We’ve wrecked more pairs of shoes than we’d like to admit on the road.
There was the time my sandals gave out in the middle of a jungle trail in Costa Rica. The soles literally peeling off with every muddy step until I was half sliding my way back to the car.
Then there was my “genius” idea to wear cute but flimsy flats through Madrid. After a day of cobblestones and standing in line, I swear my feet were plotting revenge.
And let’s not forget the endless search for good hiking shoes in Ecuador.
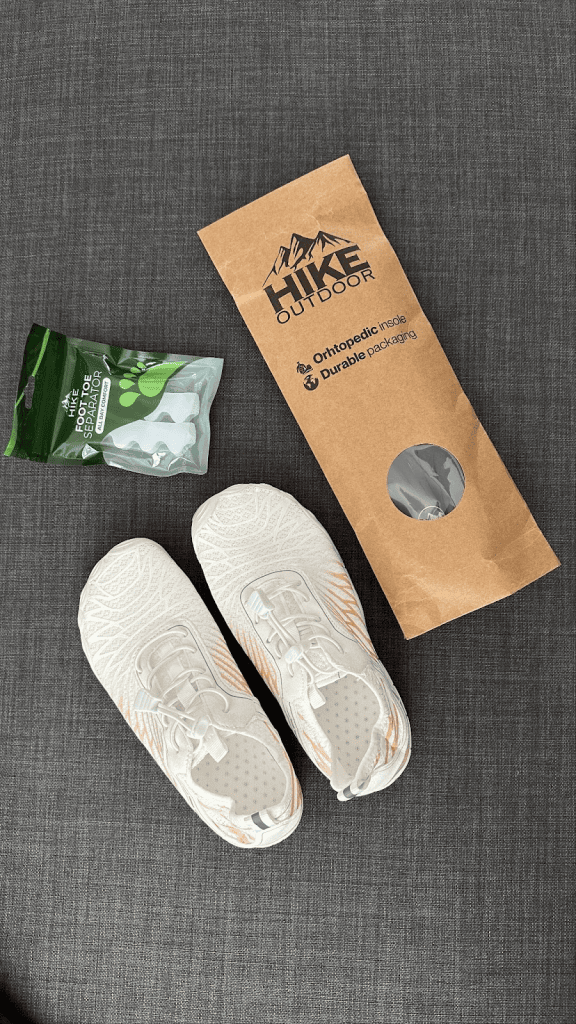
Charles’ hiking shoes wore out just as we reached Ecuador, and with the Galapagos on our radar, he was desparate to buy a new pair. Unfortunately, he’s hard to fit, and we searched high and low for quality shoes that could handle hiking. It took us endless trips to local malls, and Google searches, but we finally found a pair.
He used them for another five years! Some of the best shoes he ever owned.
If you travel long enough, you’ll realize your shoes become one of your most important pieces of gear. They carry you through airports, hikes, city explorations, and those days when you somehow end up walking 20,000 steps even though you swore it would be an “easy day.”
So it makes sense that people start to wonder: where are these things actually made?
Take Hike Footwear, for example. A quick search will turn up plenty of people asking, “Are Hike shoes made in China?” The short answer is: sometimes, yes. But the longer answer is much more interesting, and honestly, a lot more normal than most of us think.
Designed at Home, Built Around the World
Hike Footwear is a U.S. brand that designs all of its shoes around barefoot principles: wide toe boxes, zero-drop soles, and flexible construction that lets your feet move naturally. The design work and brand management are all done in the USA.
But when it comes to actually making the shoes? Like almost every footwear brand out there, the production happens overseas in factories that specialize in minimalist and barefoot footwear. These aren’t fly-by-night operations. They’re places with decades of experience, skilled workers, and the infrastructure to turn designs into durable, travel-ready shoes.
Why Global Manufacturing Is the Norm
Here’s the thing: if you check the tags on your sneakers, hiking boots, or even high-end barefoot shoes like Vivobarefoot, you’ll almost always see a “Made in Vietnam,” “Made in China,” or “Made in Indonesia” label. It’s not because brands are hiding something shady. It’s because the global footwear industry is set up that way.
The expertise, supply chains, and materials for large-scale shoe production are concentrated in specific parts of the world. These factories have been building shoes for decades. They know how to handle the flexible materials and designs that barefoot shoes require.
In other words, it’s less about cutting costs and more about going where the skills and resources already exist.
What Hike Footwear Focuses On
Instead of trying to do everything in-house, Hike Footwear puts its energy into:
Design and quality standards: Shoes are tested for comfort, durability, and barefoot design principles before they ever hit your feet.
Ethical partnerships: The factories they work with are vetted for worker safety and fair practices.
Sustainability: Materials are chosen to balance performance with long-term environmental impact.
That’s the kind of thing most travelers care about. Not just a label, but whether the shoes are made well, last through the miles, and are created responsibly.
Why It Matters Less Than You Think
At the end of the day, the country stamped on your shoe isn’t what determines whether it holds up through a rainy trek in Ireland or a day wandering the backstreets of Bangkok. What matters is the design, the oversight, and the care that goes into making them.
Almost all of us are wearing globally made shoes, whether we realize it or not. The real difference comes down to transparency and values. And in Hike Footwear’s case, they’re clear: designed in the U.S., produced by skilled international partners, and made to last for travelers who actually put their gear to the test.
Spain has long been associated with sun-drenched beaches, vibrant cities, and world-famous cuisine. While Barcelona, Madrid, and Ibiza are famous for a reason, the true soul of Spain is often found in its remote corners. One of the areas I love the best is Northern Spain, with its green mountains, rugged coastline, and medieval villages, offers an entirely different perspective. It doesn’t get as many visitors as the hotspots in the south but it is just as beautiful in my opinion.
If you want to see a quieter side of Spain, consider stepping off the usual tourist trail and heading north after your flight to Madrid. Spend a few days in Madrid (which is amazing) and then train it north for a week or more to wander along paths the Romans once carved into mountains, explore deserts few travelers know, and hike to villages where traditions persist centuries after empires have fallen.
Today, I want to share three destinations that I love: Las Médulas, the Bardenas Reales, and Santillana del Mar. Each offers a unique blend of history, natural beauty, and cultural immersion, and each is accessible enough from Madrid.
1. Las Médulas
Nearly two millennia ago, Roman engineers transformed this landscape in search of gold. Using a technique called ruina montium (“wrecking of mountains”), they channeled water through tunnels to collapse entire hillsides, revealing the region’s gold deposits. The result is a surreal landscape of jagged red cliffs, hollows, and gullies, softened by forests of chestnut trees and dotted with walking trails. Today, Las Médulas is a UNESCO World Heritage Site and a testament to human ingenuity and the enduring power of nature. Hiking through the gullies and Roman galleries, it’s easy to imagine the labor and vision required to reshape this rugged terrain.
What I love about Las Médulas is the quiet. Even in high season, you can find stretches of trail where the only sounds are your footsteps and the rustle of leaves. The views from the ridges are spectacular, and the scent of chestnuts lingers in the air. It is a place that makes you slow down, not just to take photos but to let the history and the stillness sink in.
Highlights and Trails
Senda de las Valiñas (4km loop): This gentle trail winds through shady chestnut groves and past openings to Roman tunnels. It is perfect for an easy morning walk that still gives you a sense of the site’s scope. Stop often to look up at the cliffs; the red soil against the greenery makes for striking photos.
Mirador de Orellán: A short but steep climb leads to a platform overlooking the scarlet ridges and valleys. Sunset is my favorite time here when the fading light turns the cliffs almost orange. There is also a small gallery where you can see how the Romans dug into the rock.
Galería de Orellán: If you enjoy a bit of adventure, explore this restored mining tunnel. Standing inside, you can imagine workers hauling out earth by torchlight.
Senda Perimetral (14km loop): For committed hikers, this path circles the whole archaeological area. You will pass secluded forests, small farms, and the occasional wild boar track. It is long but not difficult, and you will often have it to yourself.
Castro de Chano: A short drive away, this pre-Roman hillfort shows that the story of Las Médulas stretches back much further than the Romans.
Mirador de Reirigo: A lesser-known lookout with a quiet bench and sweeping views across chestnut forests and distant hills.
Practical Details Where to Stay: Ponferrada is only half an hour away and has a wide range of hotels and guesthouses.
Best Season: Autumn for golden foliage and crisp air. Spring brings mild weather and blooming wildflowers.
Tip: Bring water and a snack, especially if you plan to attempt the longer hikes. Maps or a GPS app will help you stick to the marked trails.
2. Bardenas Reales
Heading south from Pamplona, the landscape changes dramatically. Rolling farmland gives way to dry plains and eventually a semi-desert of ochre mesas and dramatic ravines. This is the Bardenas Reales, a 42,000-hectare natural park in Navarre. This place is a UNESCO Biosphere Reserve and an area of active military use, yet shepherds still graze their flocks across the plains, and wildlife such as griffon vultures and foxes thrive. The park’s isolation means you will often have most of the trails to yourself.
The first time I visited, I was surprised at how varied the scenery was. From a distance, it looks barren, but once inside, you notice details: rippling patterns in the clay, hardy flowers clinging to cracks, the occasional sheepdog trotting behind a herd. The sense of space is exhilarating. It is a destination that invites wandering and rewards those who take their time.
Sights and Routes
Castildetierra: This slender rock pinnacle is the park’s symbol. Photographers love it at dawn when soft light highlights its delicate shape. Even if you are not chasing the perfect shot, it is worth lingering to watch shadows shift across the flats.
La Blanca Baja Loop (34km): A drive or bike ride along this track gives you a full tour of the park’s central zone. Stop at overlooks to admire canyons, mesas, and wide basins where storms sometimes leave shallow pools.
Piskerra and El Rallón Hike: This moderate route climbs into the heart of the badlands. Expect rugged paths and thrilling views from the top ridges. Bring plenty of water, as there is no shade once you leave the lowlands.
Balcón de Pilatos: A high vantage point where griffon vultures wheel on warm air currents. Watching them soar over the ravines is an unforgettable experience.
Cabezo de las Cortinillas: A quieter formation reached by a short track. The colors of the rocks shift from pale cream to copper depending on the sun.
Río Aragón Corridor: Follow the green strip along the river for a softer side of the park. It is good for birdwatching and a break from the dry heat.
Practical Details Where to Stay: Tudela is the nearest town, with comfortable lodgings and excellent local restaurants serving Navarra specialties.
Best Season: Visit in spring or early autumn for pleasant temperatures. Wildflowers appear after rain, adding touches of color to the plain. Summer can be extremely hot.
Tip: There are no services inside the park, so stock up on water, sunscreen, and snacks beforehand.
3. Santillana del Mar
Santillana del Mar is one of my favorite spots in northern Spain. It is located in Cantabria, roughly 30 minutes inland from the coast. Its cobbled streets, well-preserved medieval architecture, and charming plazas make it one of the most picturesque villages in the region. The town also serves as a gateway to one of the most important prehistoric sites in Europe, the Altamira Cave, famous for its Paleolithic paintings. Wandering its narrow streets is like stepping back in time, and staying overnight allows visitors to enjoy the tranquility once the day-trippers depart.
What makes Santillana special is how alive it feels. Despite its ancient walls, there is nothing dusty about it. Small bakeries sell buttery sobaos, shopkeepers greet you as you pass, and horses sometimes clop through the lanes. The rhythm is unhurried and warm.
Things to See and Do
Collegiate Church of Santa Juliana: A Romanesque gem with serene cloisters and intricate capitals. Take your time exploring the arches and stone carvings.
Altamira Cave Replica: The original cave is closed to preserve the art, but the replica is impressive. Standing beneath the ceiling of bison and horses gives you a glimpse of human creativity from 14,000 years ago.
Museo de Altamira: A museum next to the cave that expands on the region’s prehistoric culture. The exhibits are engaging and family-friendly.
Plaza Mayor: The central square is framed by stone houses with wooden balconies. It is a perfect spot for coffee or a late-afternoon glass of cider.
Nearby Trails: From the village, you can wander into the surrounding hills where meadows meet oak woods. Some paths continue toward the coast, giving sweeping views of the Cantabrian Sea.
Cuevas de El Soplao: A short drive away, this cavern is filled with spectacular stalactites, stalagmites, and unusual formations called helictites.
Comillas: A neighboring town with Modernist architecture, including Gaudí’s Capricho, only 20 minutes by car.
Practical Details Getting There: Buses run from Santander or Bilbao in about 45 minutes. Renting a car gives freedom to explore nearby coves and valleys.
Best Season: Spring and autumn bring mild temperatures and fewer crowds.
***
Spain’s headline attractions deserve attention, yet its lesser-known landscapes and towns reveal something richer. They remind us that beyond Spain’s beaches and bustling cities lies a country where history, geography, and everyday life converge into experiences worth lingering over. Whether you are tracing Roman tunnels in Las Médulas, riding a bike across the dusty tracks of the Bardenas, or sipping cider in a Cantabrian plaza, each moment adds a new layer to your understanding of Spain.
Get Your In-Depth Budget Guide to Europe!
My detailed 200+ page guidebook is made for budget travelers like you! It cuts out the fluff found in other guides and gets straight to the practical information you need to travel while in Europe. It has suggested itineraries, budgets, ways to save money, on and off the beaten path things to see and do, non-touristy restaurants, markets, bars, safety tips, and much more! Click here to learn more and get your copy today.
Plan your trip to Europe like a pro
Get all my best Europe travel tips as well as free planning guides sent straight to you and see more of the country for less!
Book Your Trip to Spain: Logistical Tips and Tricks
Book Your Flight Use Skyscanner to find a cheap flight. They are my favorite search engine because they search websites and airlines around the globe so you always know no stone is left unturned.
Book Your Accommodation You can book your hostel with Hostelworld as they have the biggest inventory and best deals. If you want to stay somewhere other than a hostel, use Booking.com as they consistently return the cheapest rates for guesthouses and cheap hotels.
Don’t Forget Travel Insurance Travel insurance will protect you against illness, injury, theft, and cancellations. It’s comprehensive protection in case anything goes wrong. I never go on a trip without it as I’ve had to use it many times in the past. My favorite companies that offer the best service and value are:
Looking for the Best Companies to Save Money With? Check out my resource page for the best companies to use when you travel. I list all the ones I use to save money when I’m on the road. They will save you money when you travel too.
There’s nothing like Sweden in the summer. Light hangs in the air for hours, boats nose through island-studded bays, and cafés spill onto sidewalks as Swedes take advantage of the fleeting warm weather.
With so much of the year spent in the cold and dark, the never-ending light that summer brings does not go to waste. Whether it’s on the many islands that dot the country’s coast, at their rustic cabins in the woods, or lounging in the city parks, Swedes flock outdoors.
I’ve been to Sweden many times (including spending an entire summer in Stockholm) but have always focused on the southern part of the country. However, with a desire to see something different this visit, I decided to explore the north, starting at the top in Luleå and working my day down.
If you want to get off the beaten path in Sweden, this itinerary gets you out of the main tourist hubs and highlights the less-touristy side of the country. Here’s my suggested 10-day itinerary:
Day 1 & 2: Luleå
Luleå is home to just 50,000 people and is the last “big” city in the north before you get into Lapland (the northernmost region of the country and home to the indigenous Sami). The city doesn’t take long to see but the surrounding area is what most visitors come for. It’s known for the Gammelstad Church Town as well as its diverse and expansive landscape, ranging from dense forests and tranquil lakes to an archipelago that has over 1,300 islands!
Here’s my suggested things to see and do in Luleå:
The Archipelago – Luleå’s archipelago is a hotspot during the summer. Lots of people come from the south to stay here and you can lounge on beaches, go sea kayaking, boating, and hiking and area locals spend many weekends here to take advantage of the nice weather. The most popular islands are Kluntarna, Brändöskär, Junkön, and Småskär.
Gammelstad Church Town – Gammelstad Church Town has over 400 red wooden cottages surrounding 15th-century church. It was originally built as overnight lodging for parishioners who traveled long distances and offers a glimpse into Sweden’s rural past. You can wander through narrow lanes with well-preserved cottages, see the medieval stone church, and learn about the traditions of church towns.
Gammelstadsviken – Gammelstadsviken is a nature reserve with a large freshwater lake and vast marshlands and one of the best birdwatching spots in Sweden as over 80 different species live here. There’s lots of trails to choose from and it’s not too far from Lulea.
Norrbotten Museum – This museum showcases the region’s culture and history. It’s a small, free museum with displays from Sami culture to industrial heritage that gives you a well-rounded picture of northern Sweden.
Hike – Summer is the perfect season for hiking in and around Luleå. The area has numerous trails that are ideal for easy-going day hikes, and Visit Luleå provides an excellent hiking guide to help you choose a route. A few suggested hikes are Hertsöleden (easy, 8km), Fäbodaleden (intermediate, 10km), and Vitån (challenging, 12km).
The Ice Track – In winter, a six-kilometer ice track is made around the city center. You can skate or kicksled around it. The track is free to use and is carefully maintained throughout the winter. Kicksleds are free to borrow as well.
Where to Stay in Luleå – Clarion Hotel Sense is an affordable hotel right in the center of town. The rooms are comfy, there’s lots of space, and the breakfast buffet has everything you could ever want. There’s even a gym too.
If you’re looking for a good place to eat, the harbor has a number of nice restaurants. I particularly enjoyed Bistron.
Day 3 & 4: Umeå
Head south four hours to Umeå. Founded in 1622 by Swedish King Gustav II Adolf, Umeå is the cultural capital of northern Sweden. It is now a city of 100,000 people known for its huge university (almost a third of the city’s population are students). With so many students here, the city has a young, vibrant feel and there’s lots of affordable restaurants and bars. (And, like everywhere on the coast, there’s easy access to nature.)
Here are my suggested things to see and do in Umeå:
VästerbottensMuseum – Here you can explore the cultural and natural history of the Västerbotten region, from local traditions to its maritime heritage. There are documents, textiles, and over 8 million photographs here. The museum also features an open-air section with historic buildings from across the country.
Guitars the Museum – Guitars houses one of the world’s largest private collections of guitars and rock memorabilia, with an emphasis on the 1950s and 60s. Even if you don’t know a lot about guitars (I certainly don’t), it’s still a cool place to visit as you’ll learn a ton about the rock and roll scene. Guided tours are available, which I highly recommend as you’ll get much more out of the experience.
Kulturväven –Kulturväven is Umeå’s cultural hub, hosting everything from concerts and performances to art exhibitions and community events. Inside, you’ll find a library, cinema, and event spaces. Check the website to see what’s on during your visit as there is always tons happening.
Umedalens Skulpturpark – This is a vast outdoor art park featuring sculptures by renowned Swedish and international artists. The works are set against a serene backdrop of meadows, forests, and open landscapes. It’s free to visit.
Hike – From short woodland walks to longer routes along rivers and hills, there’s lots of hikes around the area. Popular hikes include sections of Isälvsleden, a 60-kilometer trail that follows an old glacier path (you can do it in sections); Tavelsjöleden, which boasts lots of caves and mountaintops; and Holmörundan, a 13-kilometer hike on the near island Holmön. To get these trails though, you’ll need to rent a car.
Strömbäck Kont – This nature reserve just south of Umeå is easily accessible by (infrequent) buses if you don’t have a car. The reserve blends smooth rock outcrops, sandy coves, and quiet pine forests, offering a mix of trails that range from rugged to stroller-friendly. There’s lots of bays around, you can go swimming, and, depending on the time of year, gorge on wild blueberries.
Strandpromenaden – Strandpromenaden is a relaxing riverside walkway perfect for a stroll, complete with benches and cafés along the way. The path connects several parts of Umeå, making it a pleasant way to get around the city on foot. I came here at sunset and it was especially pretty, with golden light reflecting off the river.
Where to Stay – Hotell Björken is right next to the university and is just a five-minute drive to the central station. The rooms are stylish, modern, and well-lit and the hotel won’t break the bank either.
For places to eat, check out Bodegan and Eljest. Facit Bar is a great spot for inventive drinks.
Day 5: Örnsköldsvik
Head south to Örnsköldsvik, the gateway to the High Coast. Called “Ö-vik” by locals, Örnsköldsvik is a coastal town known for its mix of outdoor adventure and modern industry, with hiking, kayaking, and skiing all within easy reach. There’s not a lot to do here so I recommend just spending one night in the town.
Here’s some suggested things to see and do during your visit:
High Coast Trail – This 130-kilometer trail takes 5–7 days to complete but covers the entire High Coast, making it an epic and incredibly scenic adventure over mountains, rugged coastlines, and forests. If you want a shorter hike, it’s possible to just hike sections of it. There’s lots of options.
Kayaking& Swimming – The waters here are calm and there’s lots to see around the archipelago. A two-hour rental is 300 SEK, while tandem kayaks cost 400 SEK. If you prefer to swim, Gullviks havsbad is the best beach in the area. It’s a sandy beach with volleyball nets, food nearby, and a BBQ area.
Where to Stay – If you’re staying in town, you can stay at Elite Plaza Hotel, which is a beautiful hotel on the harbor with a huge and delicious breakfast. If you want to stay out of town, FriluftsByn is an expansive campsite with a great restaurant and bar and a hot spot for campers and roadtrippers.
Day 6: Skuleskogen National Park
Skuleskogen National Park, set along Sweden’s High Coast, is a sprawling wilderness where ancient forests meet the rugged Baltic shoreline. Visiting here was easily the highlight of my recent trip. Located just thirty minutes south of Örnsköldsvik, this park spans over 7,400 acres and has birch and pine forests, marshes, coastal beaches, granite mountains, and awesome views of the Baltic.
The highlight of the park is Slåttdalsskrevan, a massive rock crevice that cuts through the bedrock. It’s around 200 meters long and 30 meters deep. For safety reasons, you can’t walk through it anymore but, if you come via the north side, you get a better view and can walk in a little bit. (The south entrance is completely closed off.)
You could easily spend a few days here if you like to hike and camp, but at a minimum you’ll want one full day. To help you make the most of your visit, here are a few tips and considerations:
There are three entrances: South, North, and West, with the South gate being the busiest. Get there early if you’re driving as the parking lot is very small. To get to the park, you will definitely need a car. There are no other options.
The South gate trail to Slåttdalsskrevan is the shortest, however, the West gate trail provides the best diversity of landscapes (and fewest crowds).
If you want a relaxing hike, the coastal trail is not strenuous and has serene pebble beaches, rocky headlands, and quiet pine forests. It sees the fewest hikers too.
Hiking north to south (or vice versa) takes about five hours. Doing the South Gate to the crevice and back takes around three hours. There and back on the West trail is about four hours. I’m pretty fit and hike a bit fast so take that into consideration but I found the trails a lot easier than the suggested times (I stopped a lot for photos and video content).
Bring your own food and water as there are no facilities once you’re inside. Double check the weather too so you can dress appropriately.
If you’re visiting in summer, bring bug spray as I found there to be loads of mosquitoes.
Day 7 & 8: Sundsvall
Home to just under 60,000 people, Sundsvall is just a 90-minute drive south of Skuleskogen National Park. After being devastated by fire in 1888, the city was rebuilt almost entirely in stone, earning its elegant nickname Stenstaden (“the Stone City”). Perched between forested hills and the Gulf of Bothnia (the northern part of the Baltic Sea), the city was historically a hub of the timber and paper industries. Today, it’s best known for its easy access to outdoor activities like hiking, skiing, and exploring the nearby High Coast.
Some things to see and do during your visit include:
Kulturmagasinet (The Culture Warehouse) – This cultural center is housed in old harbor warehouses that have been converted into a museum, library, and art space. Inside, visitors can explore exhibitions on Sundsvall’s history and local art, as well as take in temporary exhibitions and events. Be sure to check the website for the latest events.
Norra Berget (The Northern Mountain) – This is an open-air museum and park located on a hill overlooking the city. It features 40 historic buildings from around the region, including wooden houses and farmsteads. There are lots of exhibits that showcase historic life and culture in northern Sweden. It’s a really good spot to bring kids.
Himlabadet Water Park – This family-friendly water park has indoor pools, saunas, and multiple water slides. There’s a small toddler area, a climbing wall that curves out over the pool, and even a surfing simulator that lets you try your hand at surfing real waves.
Sidsjön Lake – Just a 10-minute drive from the city center, Sidsjön is a peaceful lake surrounded by walking and cycling trails. In summer, you can swim, fish, and paddle here, making it the perfect place to lounge away an afternoon (if you’re visiting in winter, you can skate or cross-country ski here).
Alnön Island – Connected to Sundsvall by a bridge, Alnön is known for its sandy beaches and volcanic geology. The island is perfect for a day trip, offering swimming, small villages to explore, and scenic drives.
Where to Stay – Lilla Hotellet is an affordable locally-owned three-star hotel. It’s quiet, small, and has a cozy breakfast nook where you can fill up before you head out to explore.
Day 8 & 9: Uppsala
Uppsala, Sweden’s fourth-largest city, is just under four hours south of Sundsvall by car. It’s a lively, energetic city home to almost 250,000 people and is known for its big student population (Uppsala University is here, a prestigious university founded in the 15th century). Owing to its big student population (and larger population in general), there’s much more to see and do here beyond just enjoying nature and there’s a lot of affordable restaurants and bars.
Here are some of my favorite things to do:
Uppsala Cathedral (Domkyrkan) – Scandinavia’s largest church, this impressive Gothic structure dates back to the 13th century. It’s the final resting place of Swedish kings, scientists, and archbishops, with soaring spires that dominate the city’s skyline. Inside, visitors can explore ornate chapels, admire medieval frescoes, and see the tombs of King Gustav Vasa and Carl Linnaeus (a famous scientist known as “the father of modern taxonomy”).
Uppsala University & Gustavianum – Founded in 1477, this is Sweden’s oldest university. With over 50,000 students, it’s a massive institution with lots to see and do in its own right. The Gustavianum Museum, for example, showcases artifacts and Viking treasures. If you’re on a budget, this area of town is where you’re going to want to eat as all the cheapest bars and restaurants are here.
Uppsala Castle (Uppsala Slott) – A Renaissance-era castle overlooking the city, Uppsala Castle was once the site of royal coronations and political intrigue. The castle was actually built after a peasant uprising, as King Vasa I decided more fortifications were needed to prevent future uprisings. Today, it’s home to museums and exhibitions where you can explore the original remains of the first castle built here, learn about the castle’s history, and even admire historic art.
Botanical Garden & Linnaeus Garden – Dating back to the 18th century, this is the largest botanical garden of its kind in Sweden. The Linnaeus Garden, a reconstruction of famed botanist Carl Linnaeus’s own 18th-century teaching garden, offers insight into how he classified species during his time as a botanist. In spring and summer, these gardens are particularly lively and colorful, making for a calming place to relax with a book or take a stroll when the sun is shining.
Gamla Uppsala (Old Uppsala) – Just north of the city, this ancient site features massive Viking burial mounds, a museum, and a church that was once a pagan religious center. This was a key political and spiritual site during the Viking Age, with ties to Norse mythology and early Swedish kings. Visitors can climb the burial mounds for sweeping views of the landscape. If you want to dive deeper into Viking-era history, the small Gamla Uppsala Museum is a short but worthwhile stop.
Carolina Rediviva Library – The university’s main library, housing treasures like the Codex Argenteus (“Silver Bible”). Built in the 19th century, it is one of the largest research libraries in Scandinavia, with over five million volumes. Its exhibitions display rare manuscripts, maps, and early printed books. For anyone interested in history, literature, or rare artifacts, this library is a must-see (if you’re not a history buff, though, you can probably skip it).
Where to Stay – If you’re backpacking, Uppsala City Hostel is the best hostel in the city. While the bunks are basic, it’s in a great location so you can easily get around. If you prefer a hotel, Botanika Uppsala is located right next to the botanical garden, which is the oldest in the country.
***
This trip is best done by car, but it could also be done by train and bus if you don’t want to rent a car. And, depending how much you want to hike, you can easily add in more days (there are a ton of multi-day hikes here, after all). Plus, there’s plenty of islands in the archipelago to stop at, so you could really turn this itinerary into a multi-week trip if you wanted. It’s really up to you!
Get Your In-Depth Budget Guide to Europe!
My detailed 200+ page guidebook is made for budget travelers like you! It cuts out the fluff found in other guides and gets straight to the practical information you need to travel while in Europe. It has suggested itineraries, budgets, ways to save money, on and off the beaten path things to see and do, non-touristy restaurants, markets, bars, safety tips, and much more! Click here to learn more and get your copy today.
Plan your trip to Europe like a pro
Get all my best Europe travel tips as well as free planning guides sent straight to you and see more of the country for less!
Book Your Trip to Sweden: Logistical Tips and Tricks
Book Your Flight Use Skyscanner to find a cheap flight. It is my favorite search engine because it searches websites and airlines around the globe, so you always know no stone is being left unturned!
Book Your Accommodation You can book your hostel with Hostelworld as it has the biggest inventory and best deals. If you want to stay somewhere other than a hostel, use Booking.com as it consistently returns the cheapest rates for guesthouses and hotels.
Don’t Forget Travel Insurance Travel insurance will protect you against illness, injury, theft, and cancellations. It’s comprehensive protection in case anything goes wrong. I never go on a trip without it, as I’ve had to use it many times in the past. My favorite companies that offer the best service and value are:
Looking for the Best Companies to Save Money With? Check out my resource page for the best companies to use when you travel. I list all the ones I use to save money when I’m on the road. They will save you money too.
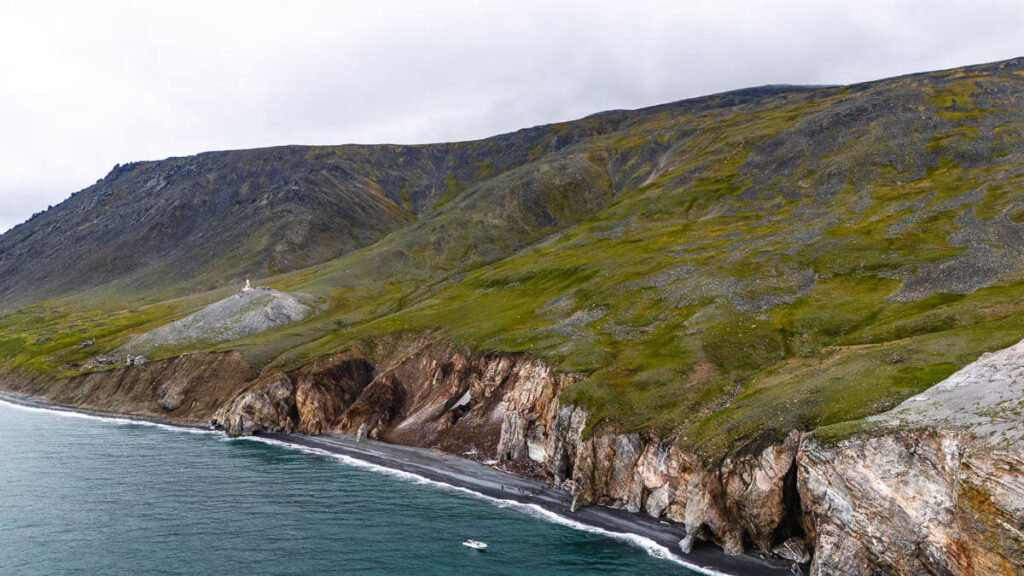
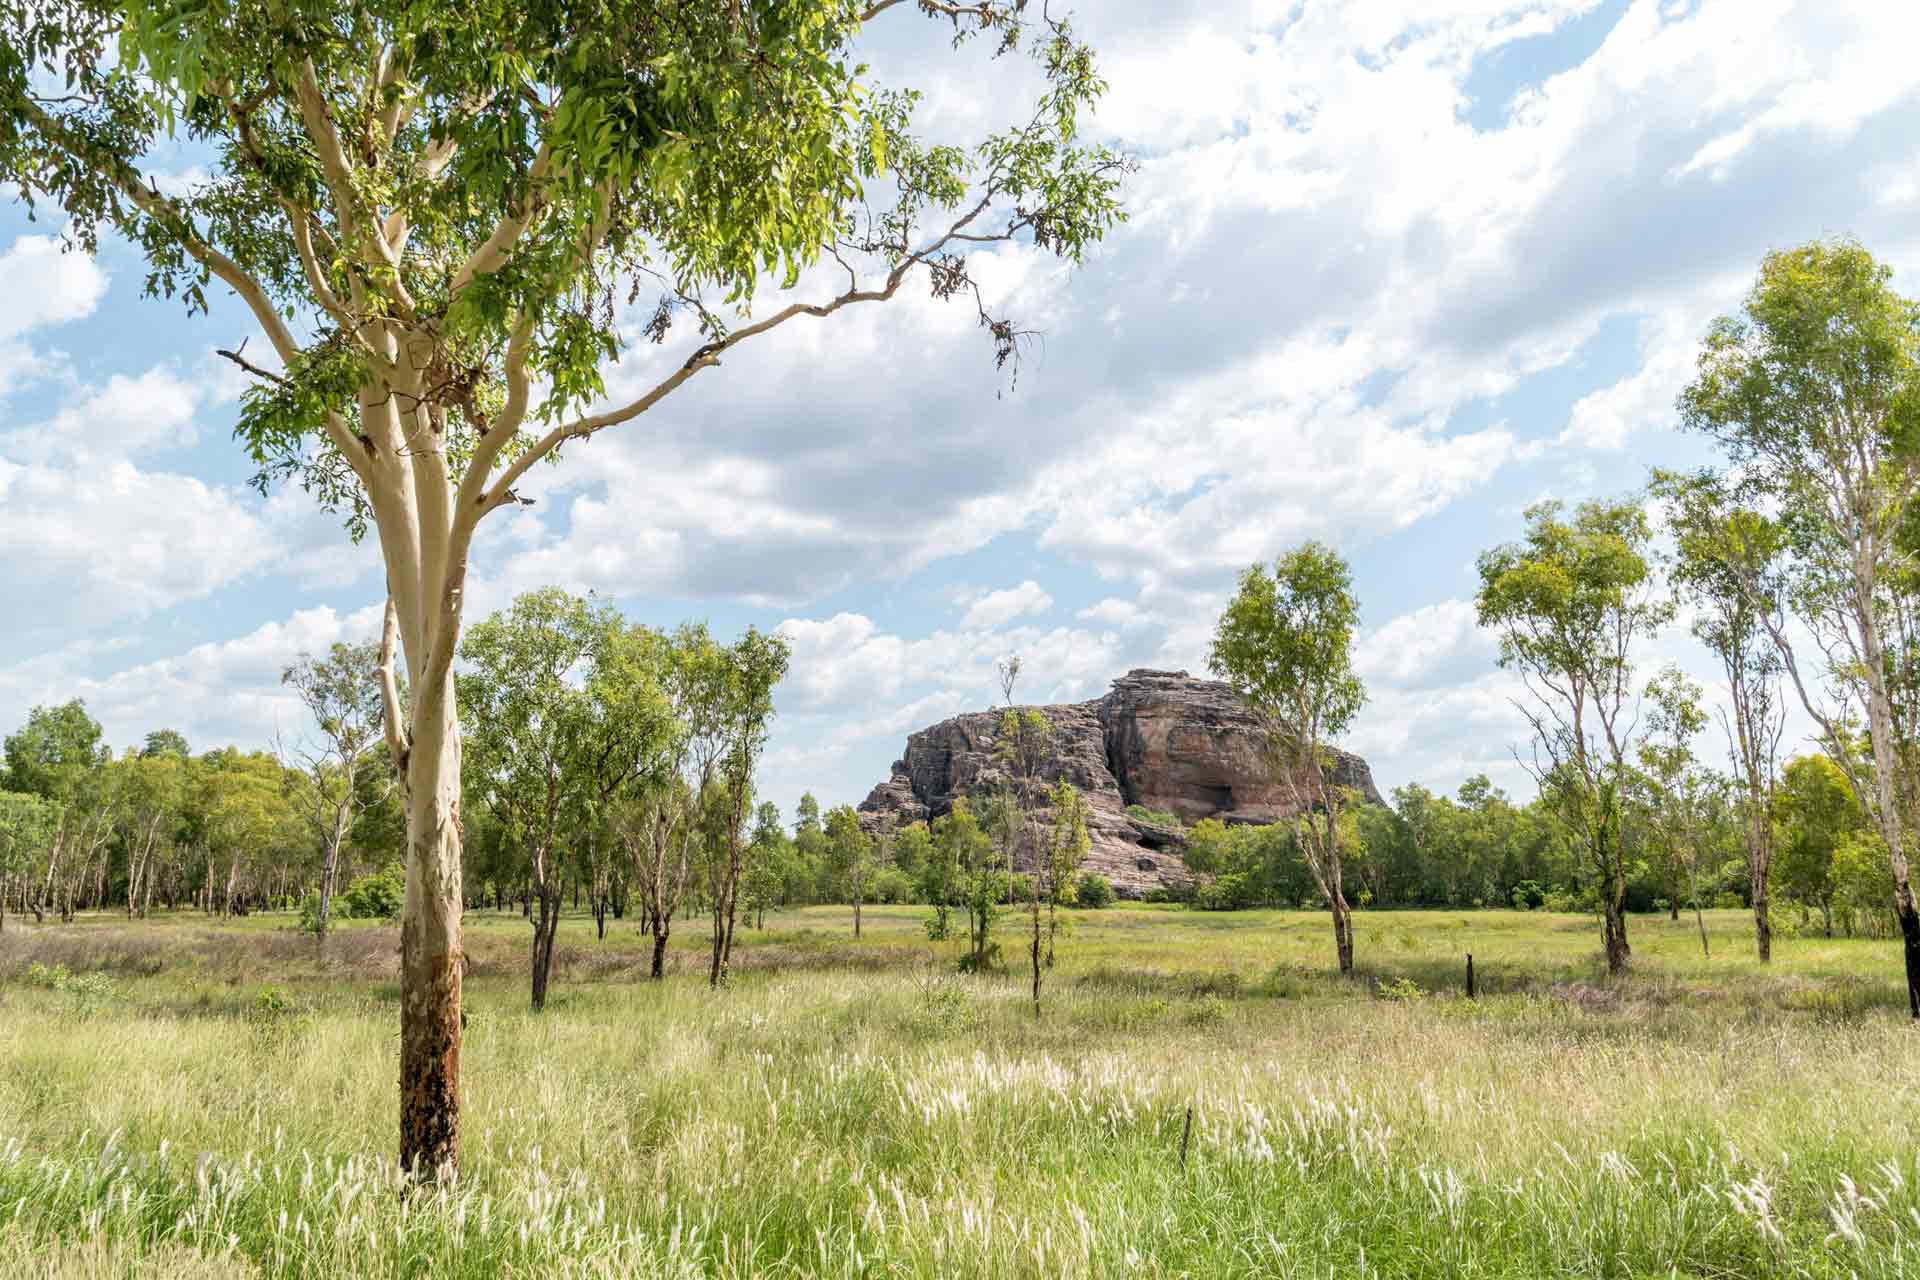
Chukotka is Russia’s most remote region and the easternmost point of Eurasia.
It’s an intriguing land whose ancient traditions have been shaped by the large presence of whales, walruses and reindeers, animals that feature in local folklore, songs, music, customs, cuisine, and daily life.
Chukotka is so remote that it truly feels like the end of the world, a land that remains almost unknown even to most Russians, and where the Chukchi culture survives in one of the planet’s most isolated environments, sustained by reindeer herding and marine mammal hunting.
Visiting Chukotka has been one of the most fascinating travel experiences of my life.
This travel guide will tell you everything you need to know for traveling to Chukotka.
85 km, between Cape Dezhnev (Chukotka, Russia) and Cape Prince of Wales
Size
Roughly the size of Turkey, 737,700 km²
Time zone
Chukotka Time (UTC+12), 10 hours ahead of Wester Europe
Introduction: Why I traveled to Chukotka, and why you should travel there as well
I’ve always been drawn to places that are unknown and remote, and for years, I was intrigued by what might be hidden in this remote corner of Russia, a region that nobody knows, and where nobody goes.
Interesting to mention is that even the Russia edition of Lonely Planet doesn’t mention Chukotka once.
Traveling to Chukotka came by chance. I was offered a spot on an exploratory expedition with a group of Russians, and I didn’t think twice.
However, Chukotka isn’t just epically remote, but it’s home to a culture that has survived in total isolation, in the harshest conditions ever. The Chukchi still herd reindeer and hunt marine mammals, holding on to traditions that have lasted for centuries.
We’re used to seeing animals like walruses or whales in uninhabited places, but in Chukotka it’s striking to witness how these mammals shape every part of local life.
Remoteness, a unique living culture, and the chance to explore a place almost no foreigner has seen—those are the reasons that took me to Chukotka.
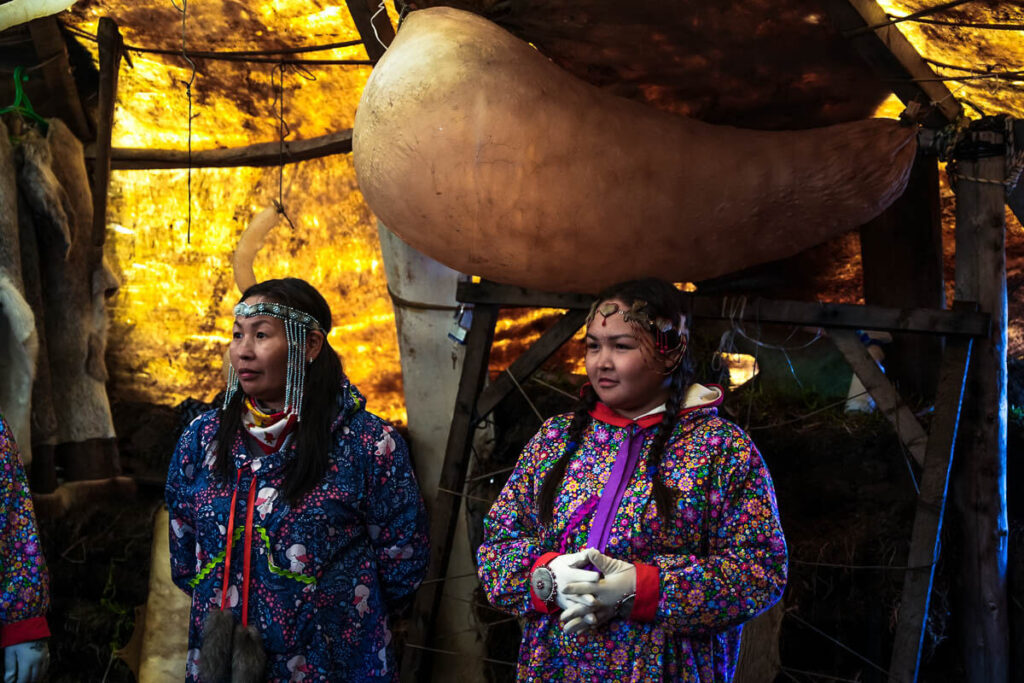
The Chukchi are the main ethnic group of Chukotka. They are closely related to the Arctic peoples commonly known as Eskimos – today referred to as Inuit in Canada and Greenland – and Yupik in Russia, with whom they share a common culture.
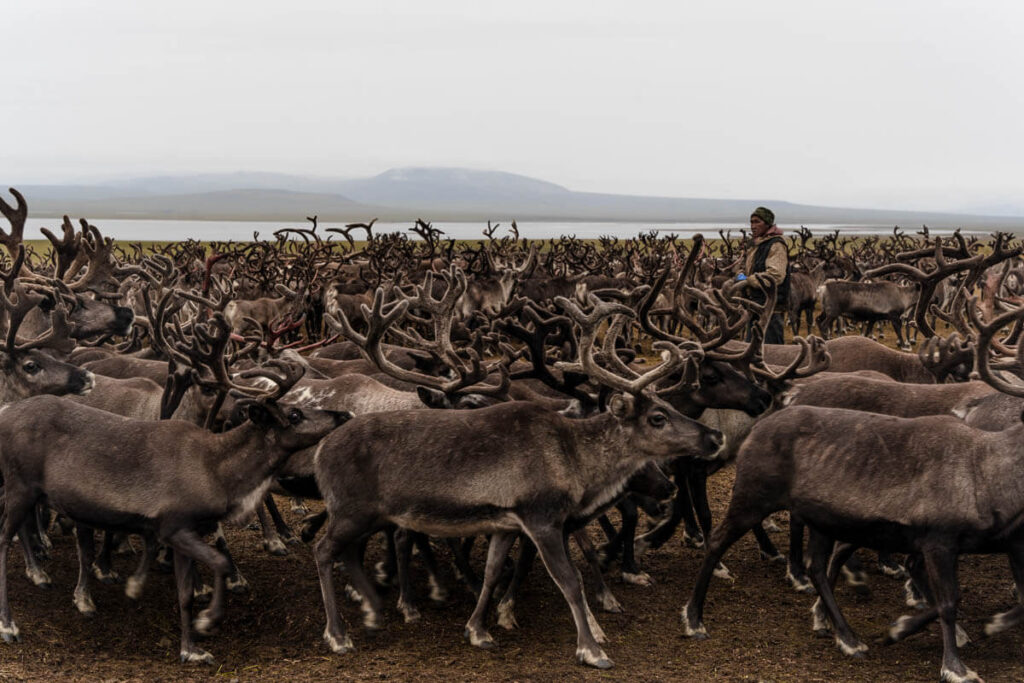
Traditionally, the Chukchi are divided into two groups: reindeer Chukchi, who live across the tundra with their herds, and maritime Chukchi, who live along the coast and depend on hunting whales, walruses, and seals.
Reindeer ChukchiMaritime Chukchi
Chukchi culture has been deeply shaped by the Arctic environment, visible in their songs and folklore, as well as in a cuisine which heavily relies on whale, walrus and reindeer.
Despite Soviet efforts of sedentarization and assimilation into the Russian culture, Chukchi traditions, language and culture prevales, and reindeer herding and whale hunting continues to be central to their identity and survival.
This is the stomach of a walrus
Traveling to such a remote area is incredibly epic, but coexisting with these isolated communities and learning about their customs is such a uniquely rewarding experience.
A Chukchi person with his reindeers
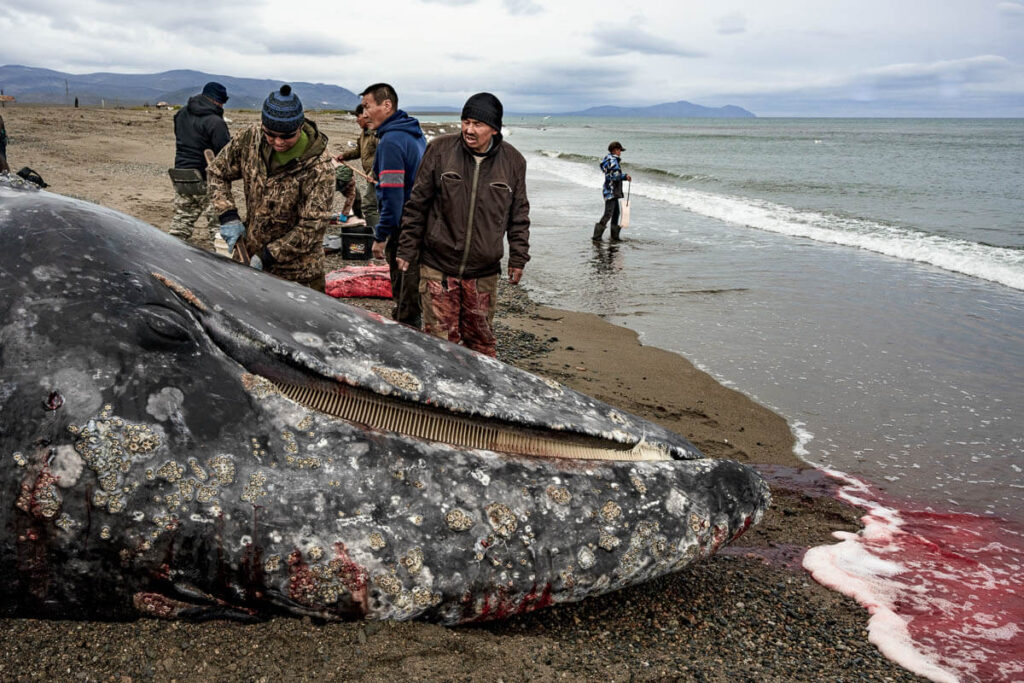
The Chukchi and their whale hunting in Chukotka
The Chukchi people practice a very controversial activity: whale hunting.
Today, travelers can spend a few days with the community of whalers, learn about their traditions, and, if weather allows, join one of their hunting expeditions.
A dead gray whale on the shore of Lorino in Chukotka
As a traveler, however, it is important to understand the context behind this practice
Chukotka is extremely remote and isolated, with permafrost making the land unsuitable for farming
Basic goods are super expensive, there’s shortage of fruits and vegetables and small settlements receive supplies only once a year to last through winter.
On this conditions, whale meat is an essential part of the Chukchi diet, consumed every day in pretty much all their meals as a source of vitamins.
The International Whaling Commission (IWC) is aware of this issue, which is why Chukchi people are legally allowed to hunt whales, but on the following conditions:
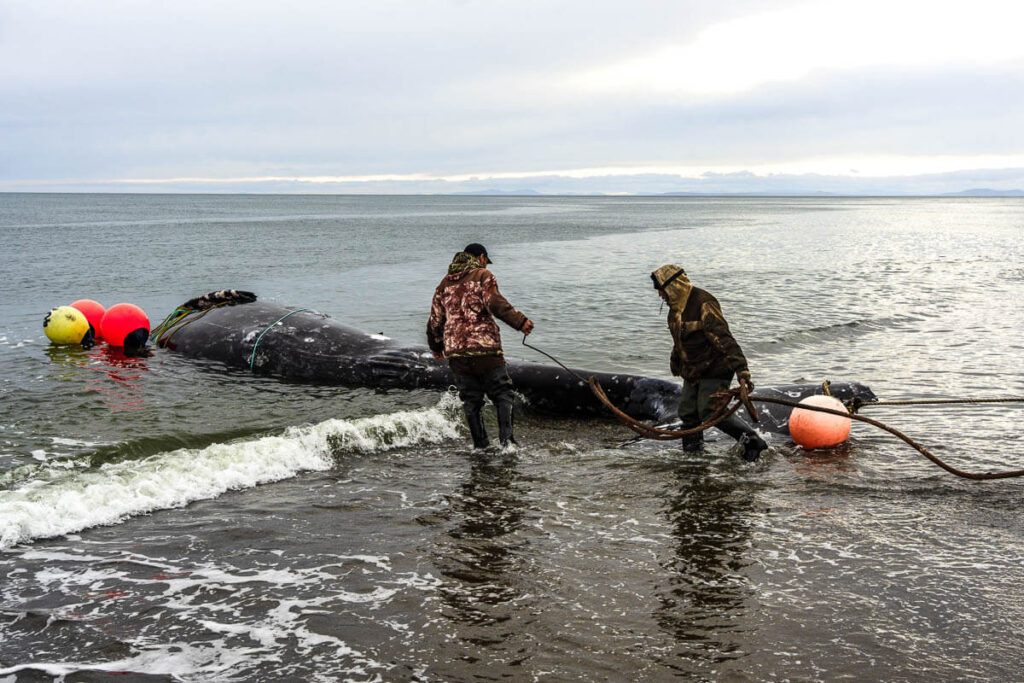
Only traditional methods
Whales can only be hunted using traditional methods: by hand, with spears, and without machinery.
That is how they hunt, with this big harpoon
Limited yearly quota
The yearly quota for the entire Chukotka region is:
130 gray whales
2-3 Greenland (bowhead) whales
18 belugas
It is strictly forbidden to hunt orcas or humpback whales because they are considered endangered.
Trade is not allowed
All whale products are for personal consumption. Trade is strictly forbidden by both the International Whaling Commission and Russian law.
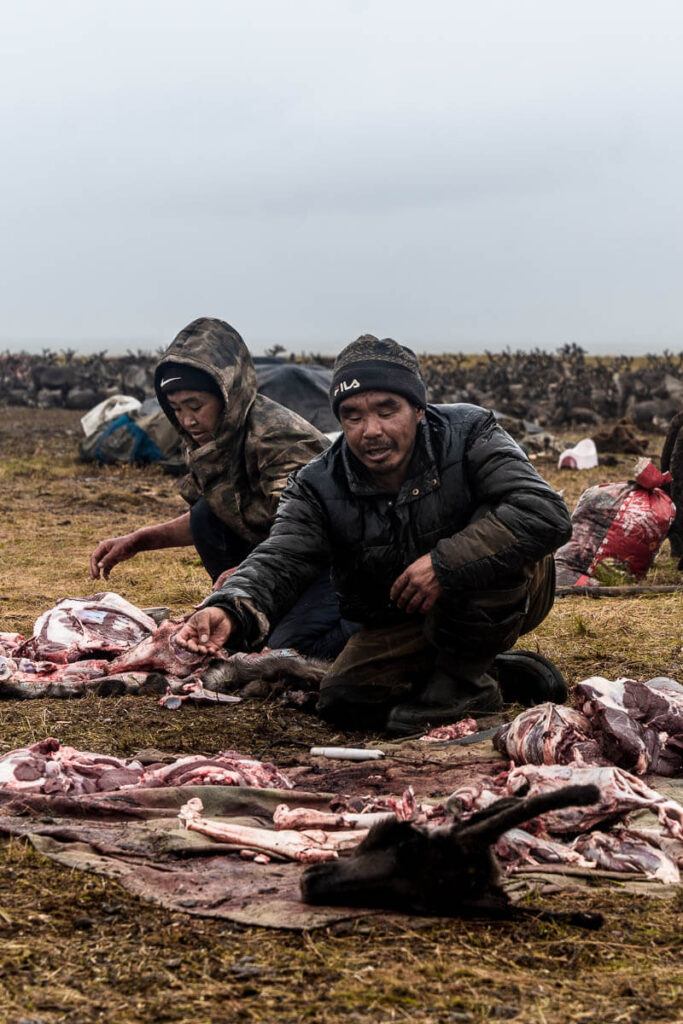
Dragging a whale into the shore
It’s for the local people, and it’s for free
After catching a whale, hunters drag it to the shore where the entire village gathers to claim their share of meat, completely free. The whale is usually butchered in less than three hours, leaving nothing but the tail.
Witnessing this process is astonishing.
The whalers themselves work for a legal entity recognized by the authorities and receive a salary for their efforts, but the meat are distributed to the people without charge.
Chukotka is so remote that there are no roads or railways linking it with the rest of Russia — and there probably never will be.
The closest train station is in Yakutsk, the capital of Yakutia, more than 2,300 km away from Anadyr, both capitals separated by endless frozen tundra, where no road will ever be built.
The only way in is to fly. From Moscow, Aeroflot operates just one or two flights a week to Anadyr Airport (DYR).
It’s an 8-hour flight journey.
By the way, you may also fly into Anadyr from Krasnoyarsk (heart of Siberia), Khabarovsk (near Vladivostok) and Petropavlovsk-Kamchatskiy (Kamchatka).
Remember that because of the sanctions, it’s not possible to book directly through Aeroflot’s website, but you can still get your tickets via aviasales.com.
The airport of Anadyr features some pretty cool stuff
How to travel around Chukotka
You made it to Anadyr, and that’s amazing. You should already be proud of yourself, since not many foreign travelers can actually brag about getting here.
But Anadyr, like the rest of Chukotka, is just a tiny town lost in the middle of frozen tundra. No roads, no trains, nothing. If you want to travel to other parts of the region, your only option is to fly.
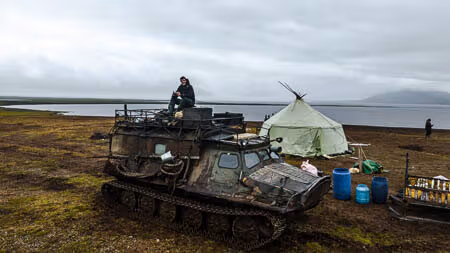
To make things even more challenging, the only airline in Chukotka is Chukotavia, a local carrier that operates with small, Soviet-style 26-seat aircrafts.
You can check their website (only in Russian) here, just for your curiosity, since reservations are only taken by phone, plus flights don’t really follow a regular schedule, but they are based on demand and weather. In winter, they might not fly at all.
Even Russians struggle to book a ticket with them, especially because one must book seats several months in advance.
That’s why independent travel is so hard in Chukotka.
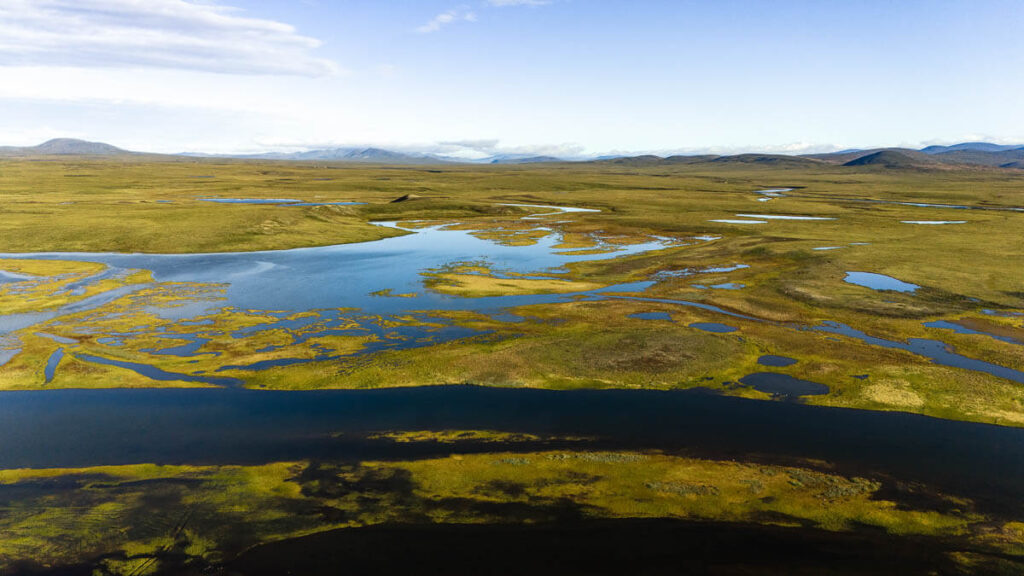
This is the typical terrain of Chukotka, wet tundra, impossible to travel around on normal
cars
Money & budget in Chukotka
In Chukotka, they use the Russian Ruble, just like in the rest of Russia. For further information currency and payment restrictions in Russia, check the money section of our Russia travel guide.
Because of the sanctions, foreign bank cards are useless in Russia, and that includes Chukotka.
Can you exchange Euros or US dollars in Chukotka?
You might be able to exchange foreign currency into Russian rubles at Sberbank in Anadyr, although I haven’t tried it myself — so it’s safer to exchange your money in Moscow before flying in.
What I can confirm is that outside Anadyr you will not be able to exchange or use foreign currency at all, so I strongly recommend bringing enough cash in rubles for the entire trip, especially since local banks have very limited opening hours.
How much money do you need to bring for Chukotka?
Chukotka is really expensive compared to anywhere else in Russia, especially
Where to stay in Chukotka
Accommodation options are very limited in Chukotka, and often difficult to arrange.
Where to stay in Anadyr
There is one hotel in Anadyr available on Ostrovok app (Russian equivalent of booking.com) but it’s quite expensive, usually around 150 EUR a night.
There are a few more hotels in the city, but booking them in advance is difficult, since most rooms are reserved for airline crew or people coming for a specific business purpose.
Tourists can only stay there if those rooms are free, something you won’t know until the very last minute.
As an alternative, most travelers stay in private apartments. However, these are not listed on any platform and can only be arranged through a local contact.
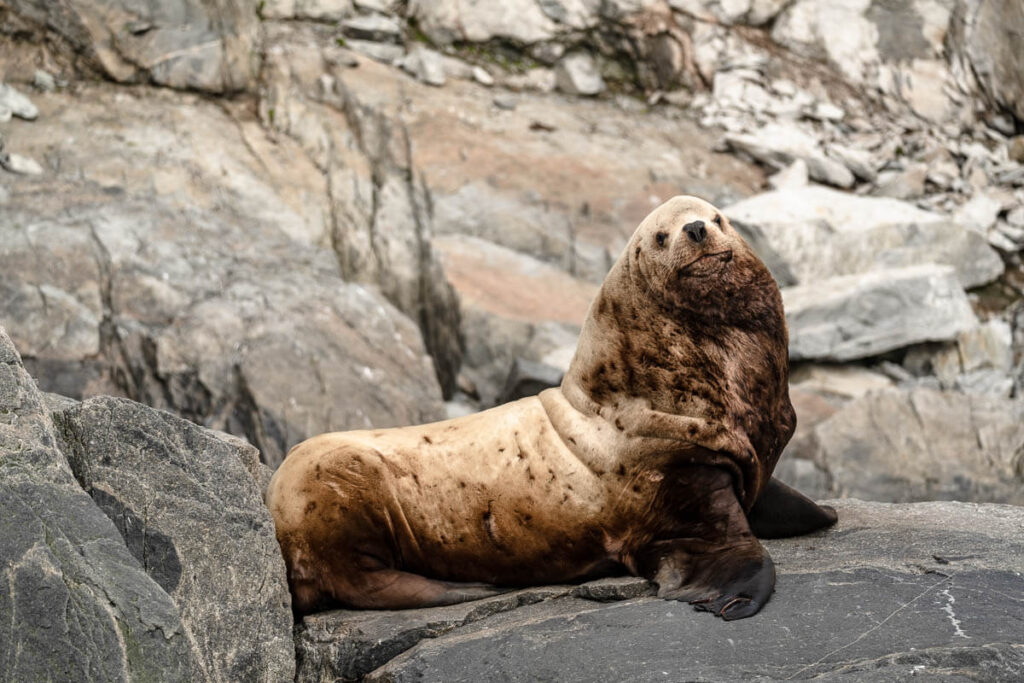
A very big seal, somewhere in Chukotka
Where to stay outside of Anadyr
In the villages across Chukotka, there aren’t any hotels, but the only option is staying in local apartments.
However, these are not “tourist apartments” but actual lived-in homes. You’ll have the whole place to yourself, but it often feels as if the people living there just stepped out a few minutes before your arrival.
How clean and tidy your apartment is will highly depend on your host. In my case, when I stayed in Lorino for a week, the assigned apartment was messy: toothbrushes left behind, underwear drying on the heater, etc. Yet, we were paying €1,000 per week for a very basic two-bedroom apartment with a shared bathroom.
Once again, having a local contact is essential if you want to arrange accommodation in Chukotka.
Internet in Chukotka
I bought the HolaFly eSIM for Russia. It worked in Anadyr, but I had no service anywhere outside the capital.
I also had a physical SIM card from Megafon, which is supposed to have the best coverage in the region. I managed weak 3G in Lavrentiya, but there was zero coverage in Lorino, where we stayed for a week.
Some apartments in Lorino had Wi-Fi, but if it worked at all, it was extremely slow, not even good for WhatsApp.
Therefore, just assume you’ll be offline anywhere outside of Anadyr.
For more information on how to get a SIM card, blocked websites, etc., check the internet section of our travel guide to Russia.
Places to visit in Chukotka
This is a personal travel blog, and this travel guide to Chukotka is based on my own trip.
I spent 2 weeks in different towns from the southeastern coast of Chukotka, coexisting with the Chukchi communities settled on the shores of the Pacific. Visiting that part of Chukotka is a different trip, usually done by cruise, with prices similar to those of Antarctica or Svalbard.
My trip to Chukotka was different, more ethnographic. We spent most of our time with local communities, even though we also encountered a lot of wildlife and even reached the easternmost cape.
Here are the places I visited on my trip to Chukotka.
Map of the places to visit in Chukotka
Anadyr, capital of Chukotka
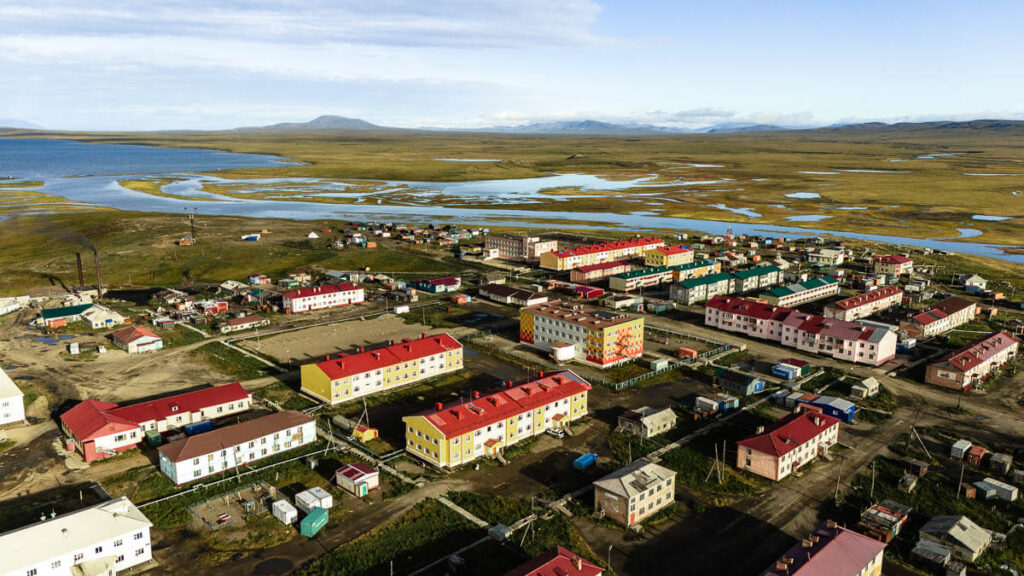
Home to around 15,000 people, Anadyr is the capital of Chukotka and the main port of entry into the region.
Surrounded by endless tundra, and inaccessible by anything other than a plane or a boat, intrepid travelers will find Anadyr fascinating, a frozen city made up of Soviet blocks colored in random colors, and where’s virtually nothing to do other than walking around a desolate harbour while spotting seals and belugas in the bay.
Anadyr is as stark as you probably imagined, and that’s what is cool about it.
Chukchi people make up only about 15% of the population here, with the rest being Russians from all over the country. I even met a guy from North Ossetia (in the Caucasus) who had been living in Anadyr for 8 years.
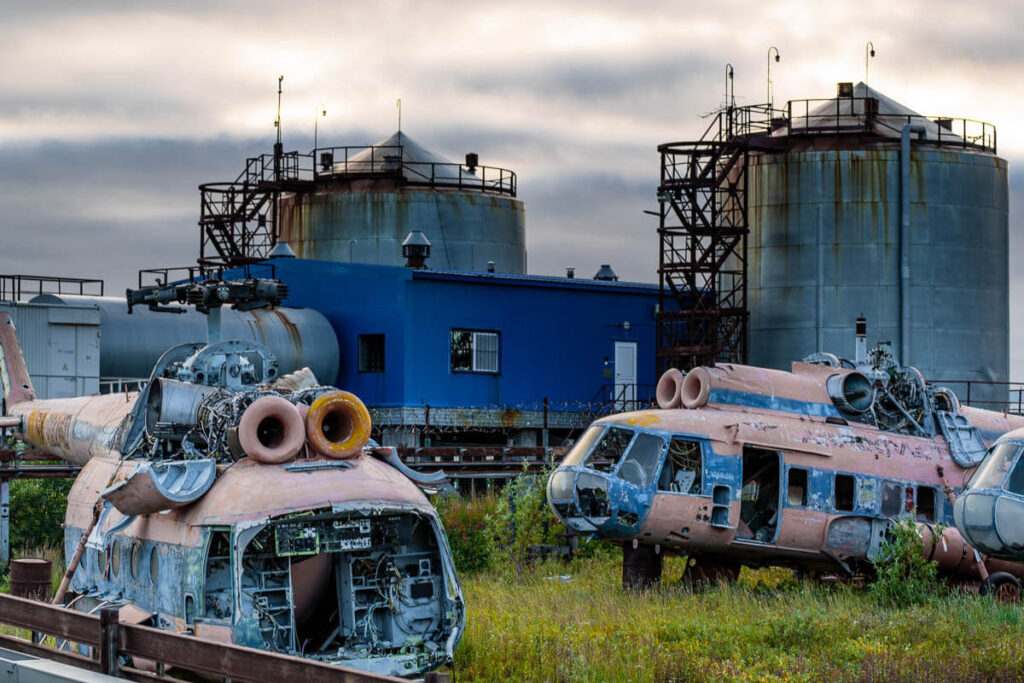
Abandoned nuclear facilities in Anadyr Due to its strategic position near Alaska, Chukotka was heavily militarized during the Soviet Union, especially during the Cold War. The legacy is still visible in abandoned military settlements and in an underground nuclear base near Anadyr. Formerly called Anadyr-1, the base consists of a set of underground tunnels built into the permafrost, where nuclear missiles were kept on standby and aimed at Anchorage and Seattle. Today, you can visit the site on a guided tour, walking through several kilometers of tunnels where much of the old machinery and infrastructure still remains.
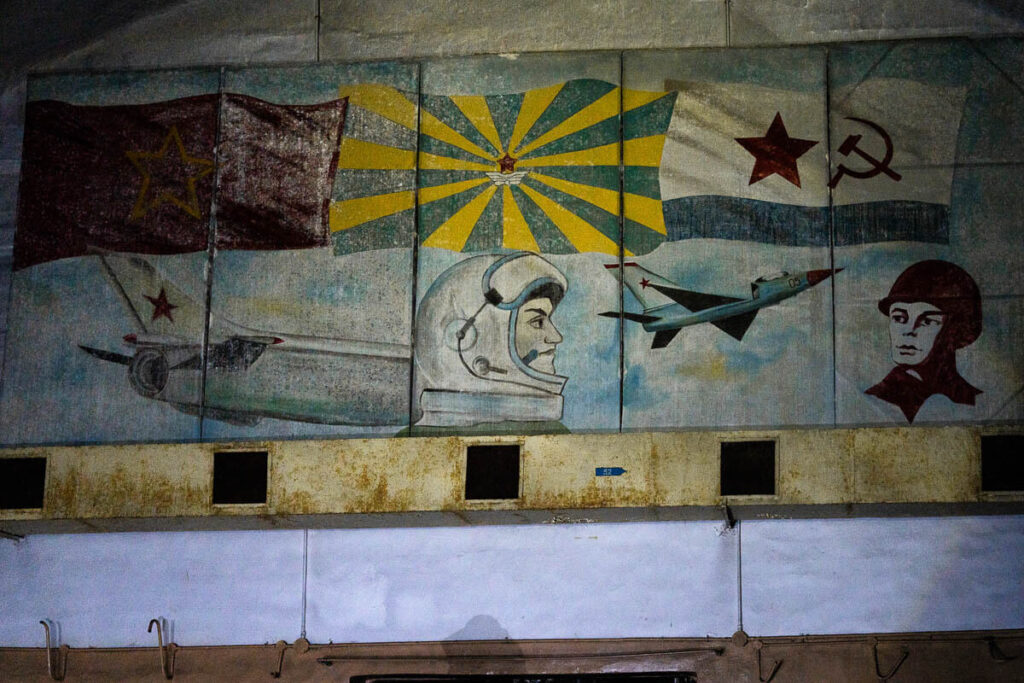
A pretty cool mural from the nuclear base at Anadyr-1
Lorino, the main hub for whaling
This settlement of around 1,500 people is the place to go if you want to learn about marine Chukchi culture and meet the local community of whalers.
As mentioned earlier, the International Whaling Commission grants the Chukchi people a quota of about 150 whales for the entire region each year, the vast majority of which takes place in Lorino.
The whaling community here is also very welcoming to the few tourists who make it this far. With the right local connections, you can arrange a stay of several days, taking part in community life and joining activities that give you an authentic insight into this unique way of life.
During my trip to Chukotka, I spent seven nights in Lorino, using it as a base for day trips to Cape Dezhnev, Mapyk, and nearby nomadic camps.
The village of Lorino on the only sunny day we had
Lavrentiya, Chukchi’s largest settlement
Lavrentiya has a small airport with direct flights to Anadyr operated by Chukot Avia.
If you want to visit Lorino, this is where you must fly into first. From Lavrentiya, it takes about 1.5 hours by car to reach Lorino.
Lavrentiya is like a bigger version of Lorino, still a small settlement, but with an airport and a few more services. While there are no large shops, the small convenience store is definitely better stocked than the one in Lorino.
There are also a few murals worth checking out and a Lenin statue, which by the time I went there was all surrounded by constructions palets, making it the most lame Lenin statue ever seen.
The village of Lavrentiya
Uelen, the easternmost settlement in the world
Uelen is the easternmost settlement in Chukotka and the last village before the Bering Strait. With only a few hundred residents, it is also known as a historic center for Chukchi and Yupik communities.
Visiting Uelen was part of our plan after reaching Cape Dezhnev, but due to rough seas, we were unable to continue, and unfortunately had to turn back.
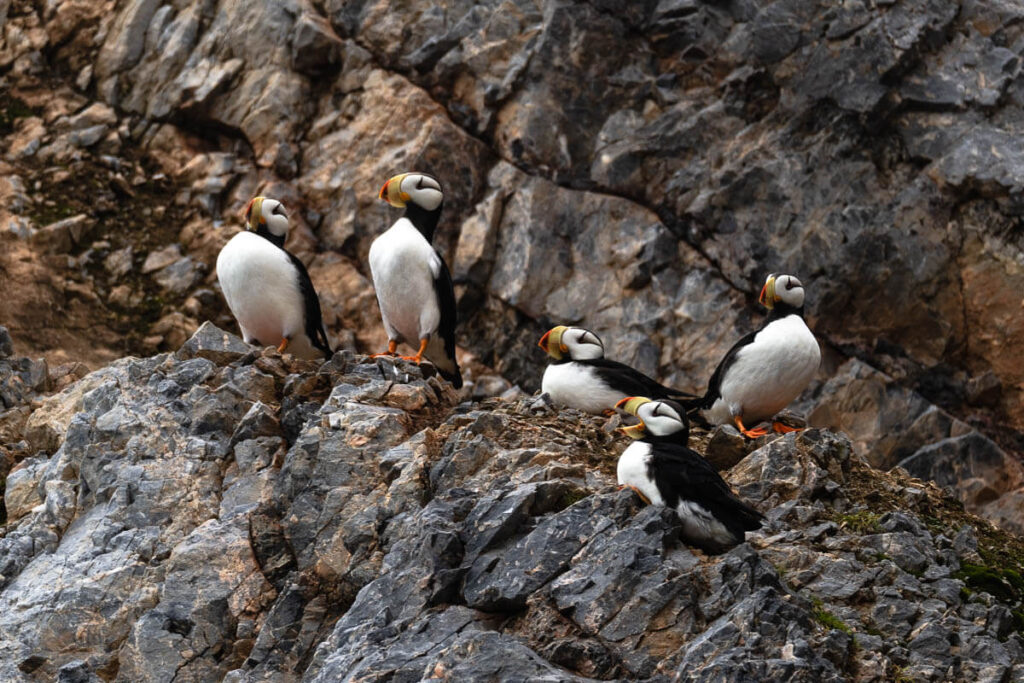
A colony puffins just a few kilometers from Uelen
Mapyk, ancient Yupik settlement.
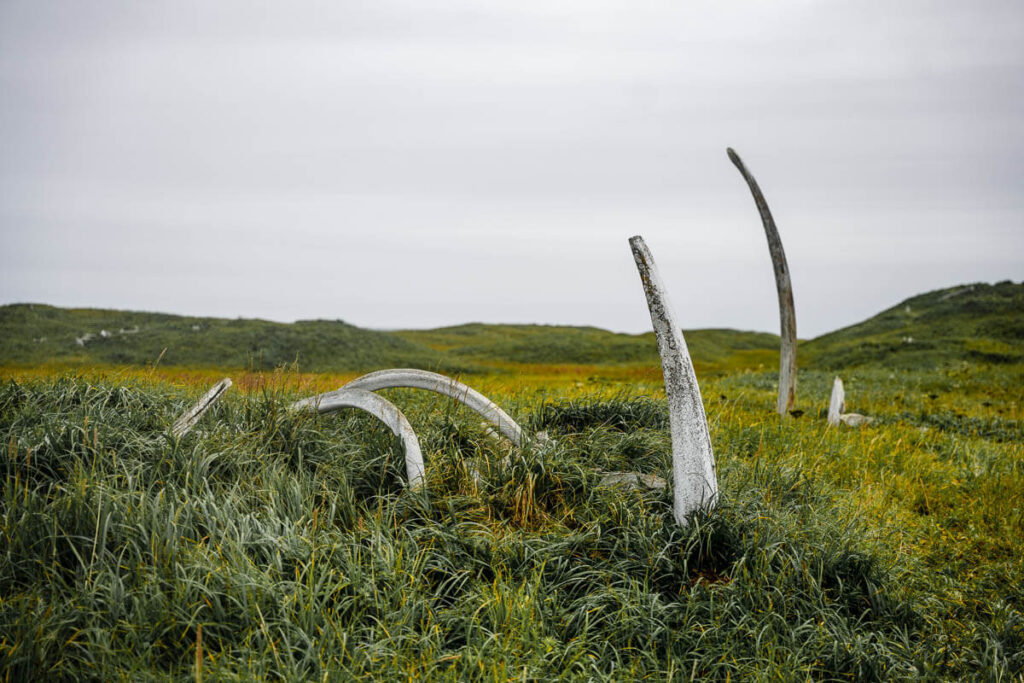
Mapyk is an abandoned Yupik settlement located in the tundra, about an hour by boat from Lorino. It has been deserted for decades—perhaps even a few centuries—but the remains are still visible in the house structures and buildings made from whale bones, including massive jaws and ribs.
Visiting Mapyk can be extremely dangerous due to the high density of bears in the area, so it should never be attempted without a local armed guide.
Ancient buildings made from whale bones
Nomadic camp of reindeer herders.
The Chukchi reindeer herders are full time nomads, they move constantly across the tundra throughout the year, just like the Nenets in western Siberia, never staying in a fixed place.
When I visited, I was lucky to meet a reindeer camp in the area marked on the map above, but it’s important to understand that the location of the herders changes all the time.
If you wish to visit them, your local guide or translator should be able to get in touch with the nomads in advance to coordinate a visit. Encounters, however, can’t be guaranteed, since by the time you come, they might be too far away.
For me, it was very interesting to compare the reindeer Chukchi with other reindeer-herding peoples such as the Nenets in Yamal or the Tsaatan in Mongolia. They all depend on their herds for survival, yet their lifestyles and cultures couldn’t be more different.
We travelled to the camp with a group of marine Chukchi, and it was fascinating to watch them interact and exchange meat (whale meat for reindeer meat).
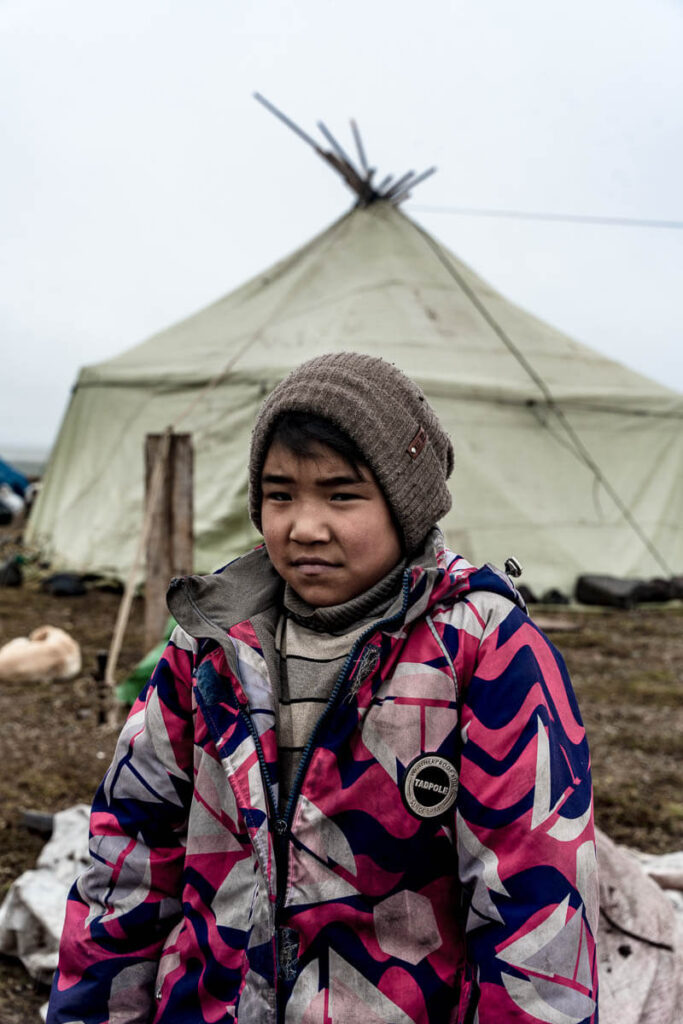
Nomadic Chukchi girl somewhere in the tundra
Cape Dezhnev, the easternmost place in the world
Cape Dezhnev is the easternmost point of the Eurasian continent, located right at the Bering Strait. We arrived on a very clear day, so we could see the coast of mainland Alaska, just 84km across the water.
The cape is named after Semyon Dezhnev, a 17th-century Russian explorer who was the first European to sail through the Bering Strait
At the site, you find a ohitigenic Soviet-era lighthouse and a small military base. Soldiers will approach you, but they are quite friendly.
The area is also rich in wildlife. Seeing colonies of puffins is guaranteed and if you are lucky, you might spot groups of seals and walruses.
Cape Dezhnev
More information
📢 In my Travel Resources Page you can find the list of all the sites and services I use to book hotels, tours, travel insurance and more.
All guides and articles for traveling in Russia destination
We’ve been to Bacolod several times, and most of our trips, our main motivation is none other than…FOOD! From the city’s famed chicken inasal to its decadent sweet treats, Bacolod never fails to satisfy our craving — from appetizers to desserts.
In this article, we’ll be sharing the dishes, restaurants, and food spots we tried and loved during our most recent visit. This list is arranged in no particular order. Also, our choices and opinions may differ from yours, as taste is subjective. We are in no way food experts; we simply love eating and discovering good food.
WAIT, WAIT, WAIT! If you have a trip soon, please also visit our The Poor Traveler Masterlist. Here, we compiled travel essentials, including immigration requirements and all our recommended hotels and attractions. Just visit this page: TPT Masterlist. We also have a compilation for other destinations around the world.
When we asked our three Bacolod-based friends what they thought was the best chicken inasal in the city, we got three very different answers. Somehow, we weren’t surprised. Given the sheer number of great inasal places in the City of Smiles, it seems everyone has their own favorite spot — and they’ll defend it with the same passion people usually reserve for love teams, BTS, or Taylor Swift.
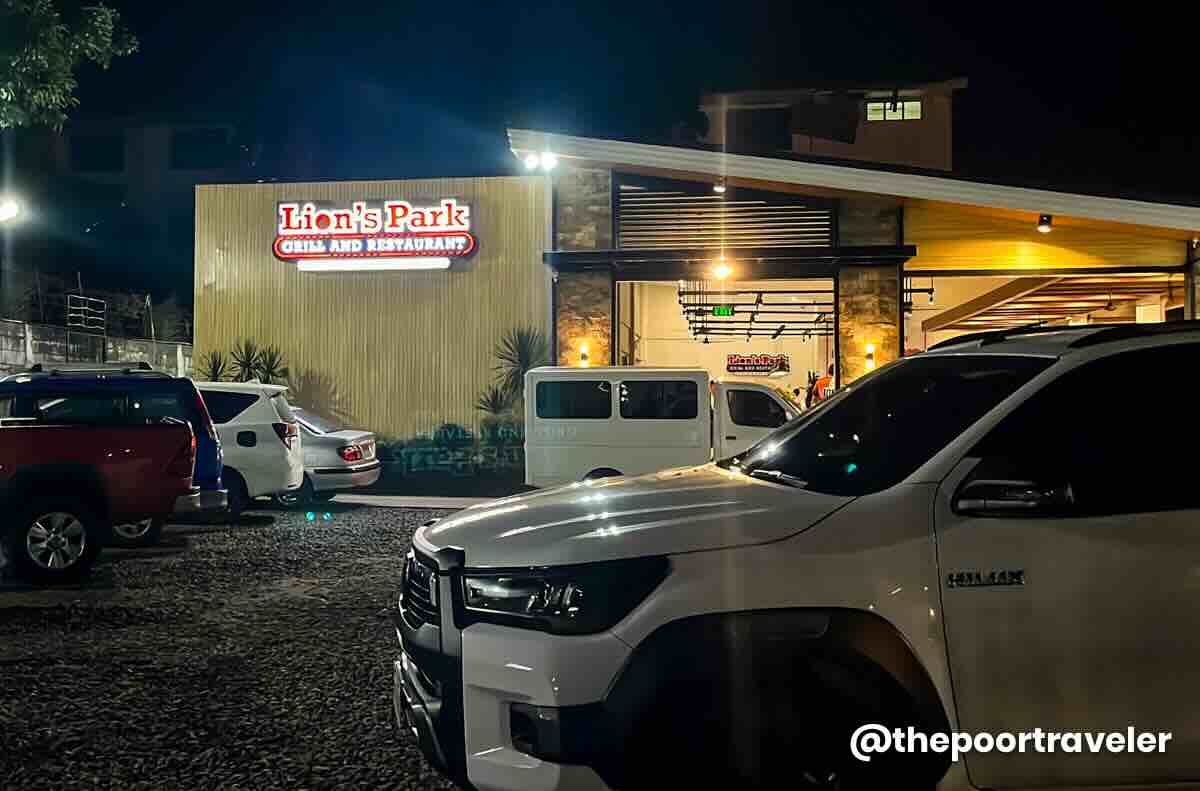
Lion’s Park Grill and Restaurant Lizares Branch
That’s the good thing about Bacolod — you surely won’t leave without tasting delicious, perfectly grilled chicken inasal. On our previous trips, we usually ate at Manokan Country. We’ve already tried Aida’s and Nena’s Rose, so this time we wanted something different. Our friend Mark highly recommended Lion’s Park Grill Haus, a local institution that has been serving inasal since 1981.
Its original location was at the famous Manokan Country, which was demolished and rebuilt as part of SM City Bacolod. But we ate at the site along Lizares Avenue. Not sure if it transferred to this spot or it’s an additional branch. Most of the tables are in the open-air area, but it does have an air-conditioned section now. Either way, the smell of grilled chicken hits you before you even sit down.
Chicken Inasal Pechopak, Grilled Chicken Liver, and Isaw
Aside from the cut (pechopak is the best, still), it also offers native chicken variant. Both options are smoky, flavorful, and best paired with rice drowned in chicken oil and sinamak (spiced vinegar).
We also enjoyed its isaw, locally called isaw/tinae, which was cut open and thoroughly cleaned, so there was no funky aftertaste. We also had chicken liver or atay and pork sisig, both of which were your usual fare — good enough but won’t exactly steal the spotlight from the inasal.
It’s funny because on our last Bacolod trip, there were also three of us in the group, and each had our own favorite and a different take on which one was the best. For Vins, Lion’s Park is his top pick, while our teammate Asta (@ganitofriend) and I placed our bets on other chicken inasal contenders.
Chicken House got the highest mark on Asta’s scorecard. The chicken inasal that we tried here had a tastier marinade, with the vinegar being more intense and balancing out the saltiness.
Chicken Inasal Pechopak and Pork BBQ
The serving was smaller, though, and the piece Vins got was a bit on the dry side. The chicken we had at Lion’s Park was juicier, making it Vins’s top preference, but only by a slim margin.
We also had grilled squid or inihaw na pusit, which was perfectly grilled and not chewy at all. The lemongrass stuffing helped tone down the strong seafood taste of the squid. As for the pork barbecue, it was just okay.
Address: Chicken House Main Branch, 24th Lacson Street, Bacolod, 6100 Negros Occidental Opening Hours: Monday to Friday, 11:00 AM – 10:00 PM; Saturday, 11:00 AM – 12:00 AM; Sunday, 12:00 AM – 10:00 AM; 11:00 AM – 10:00 PM What We Ordered: Chicken Inasal Pecho, P140; Grilled Squid, P160; Pork BBQ, P50/stick
Sugba Sugba Inasal & Seafood
For me, the best inasal I tried on our most recent trip was from Sugba Sugba Inasal & Seafood. Actually, it was tied for #1 with Vins’s pick. We just made him pick only one.
Of all the chicken inasals we tried on this trip, this was by far the juiciest and the most flavorful. It was also the cheapest, at P115-125 apiece. But it wasn’t just the inasal. Every single dish that was served on our table was fantastic.
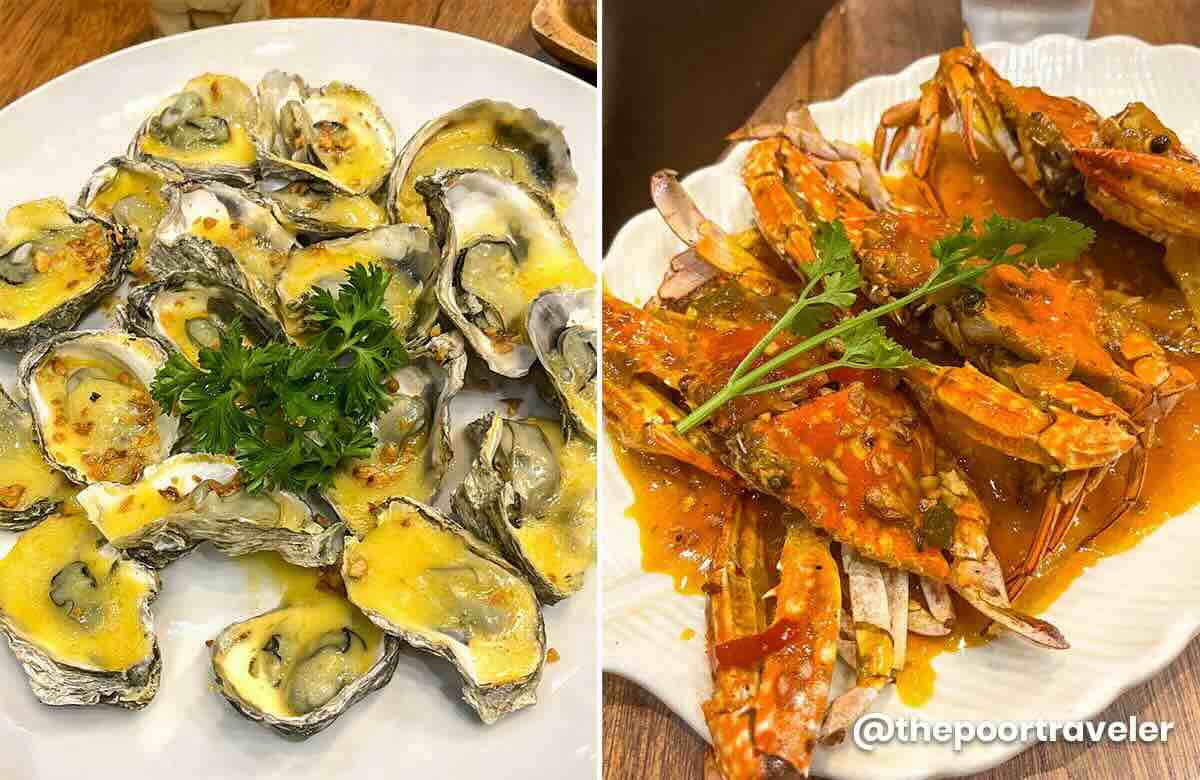
Baked Oysters and Chili Garlic Crabs
From the usual grilled innards like isaw and atay to its seafood bestsellers. The chili garlic crabs were so fresh, made even tastier by the sauce, which was like a mix of sweet chili and sarciado. And of course, the baked oysters. The oyster meat was small, but there were 20 of them, profusely complemented by the rich, cheesy sauce. This was our best meal in Bacolod on this trip.
The place was also air-conditioned, so we dined comfortably even when it was really hot outside.
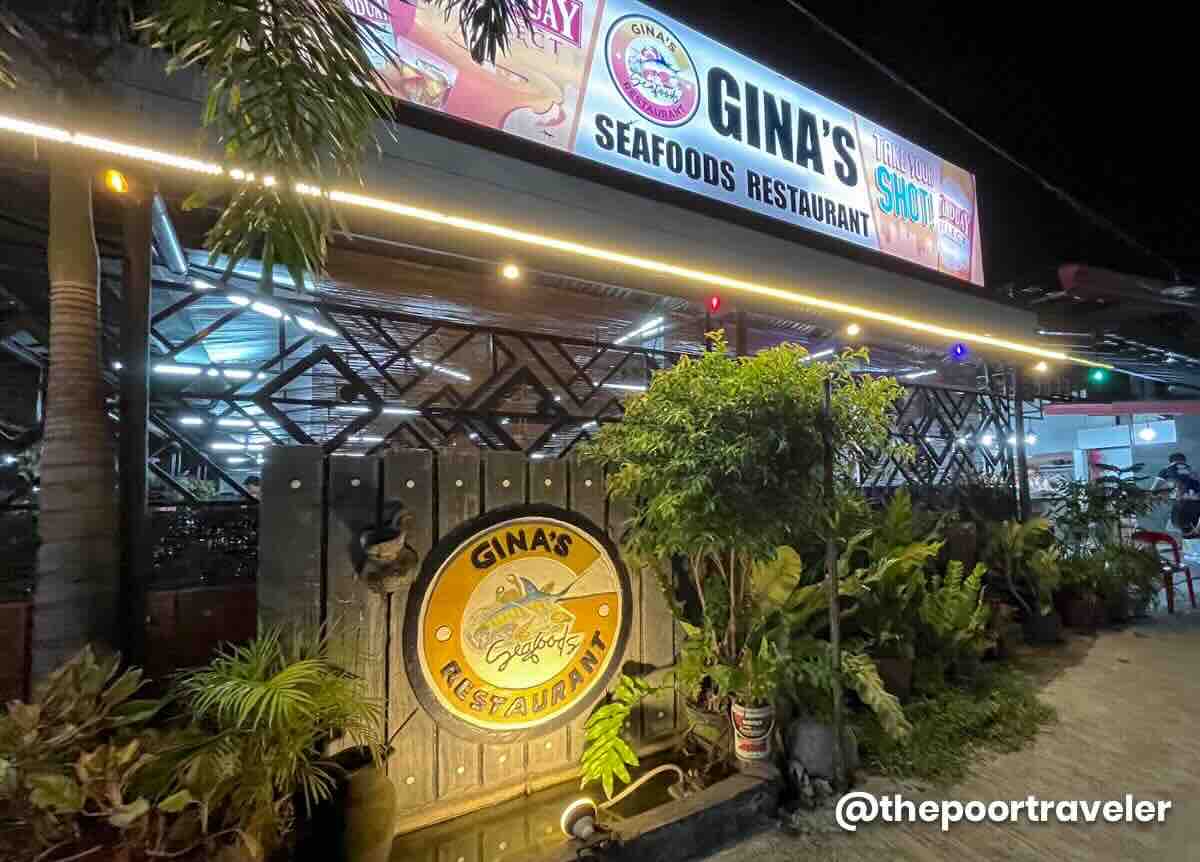
If you want more fresh ocean bounty, look no further than Gina’s Seafoods Restaurant. It’s a spacious open-air restaurant, fronted by a parade of squid, shrimps, prawns, and various types of fish. Diwal or angel wing clams were also on the menu. It’s my favorite, but it was not available at the time.
Gina’s is a paluto restaurant, where you pick your seafood then decide how you want it cooked (grilled, steamed, sizzling, sweet and sour, sinigang, etc).
We asked the staff for their bestsellers, and they mentioned grilled blue marlin, garlic butter shrimp, and sizzling squid, so that’s exactly what we ordered.
Garlic Butter Shrimps (Top Left), Grilled Blue Marlin (Bottom Left), and Sizzling Squid (Right)
Every single thing we ordered was so fresh. There was no funny or funky smell or aftertaste at all. They were also perfectly cooked. The blue marlin was tender. It was easy to appreciate its natural flavors; we didn’t even need a dip or sauce for it. Meanwhile, the shrimp dish didn’t disappoint either. The garlic made the crustaceans sing. But our unanimous standout pick here was the sizzling squid! Technically, it was cuttlefish or pusit lumot, which made me nervous because it could easily turn rubbery, but this one didn’t. It was very soft, and its sauce had the right blend of sweet and salty.
Address: Gina’s Seafoods, San Juan Street, Bacolod, 6100 Negros Occidental Opening Hours: Daily, 10:00 AM – 11:00 PM What We Ordered: Blue Marlin, P275 for 1/4 kg; Shrimps Steamed with Garlic Butter, P225 for 1/4 kg; Squid, P225 for 1/4 kg
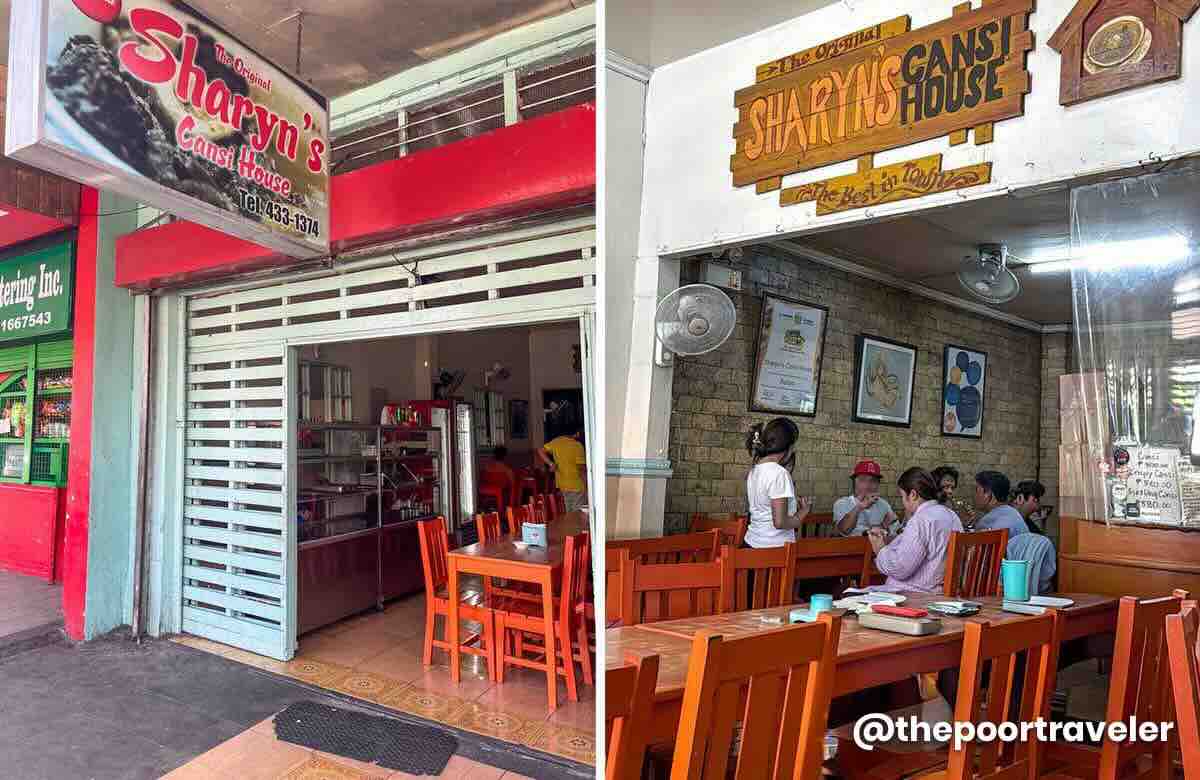
Sharyn’s Cansi House
If there’s one place in Bacolod you want to go for a bowl of cansi, Sharyn’s is it. Located on Narra Avenue, Barangay Villamonte, this no-frills eatery has been serving up its signature beef soup since 1985, and in 2017 it was even recognized by the World Street Food Congress as one of the Top 50 Street Food Masters in the world.
The beef shank is stewed until it’s fall-off-the-bone tender, the broth is deeply beefy, and there’s a sour kick from batuan, a souring fruit native to Negros and Panay, which gives the soup its distinct flavor. Every order is good for a group, usually served in a big bowl with extra mugs of soup for refill. If you’re going solo, I doubt you’d be able to finish it.
On our recent visit, the first thing the staff told us as we entered was that they didn’t have bone marrow anymore. We really appreciated them informing us before we could even sit down or order. But we still went ahead. This was our third time here, and while the bone marrow takes it to another level of richness, we’re totally fine without. When we had our first sip, we were reminded why we came back! Their cansi is really comforting.
Sharyn’s Cansi House
We also ordered their “crispy” version of cansi, which is basically the cansi’s shank meat deep fried until it’s crunchy. But to be honest, the crispy cansi in our memory was better than what we got this time. This one was much tougher than I remember.
If you decide to visit, manage your expectations. It’s basically a specialized carinderia. It’s simple, modest, and not air-conditioned. It’s casual and often busy, especially around lunch or dinner.
Address: Sharyn’s Cansi House, Narra Avenue, Barangay Villamonte, Bacolod, 6100 Negros Occidental Opening Hours: Daily, 8:00 AM – 8:00 PM What We Ordered: Cansi, P500; Crispy Cansi, P580
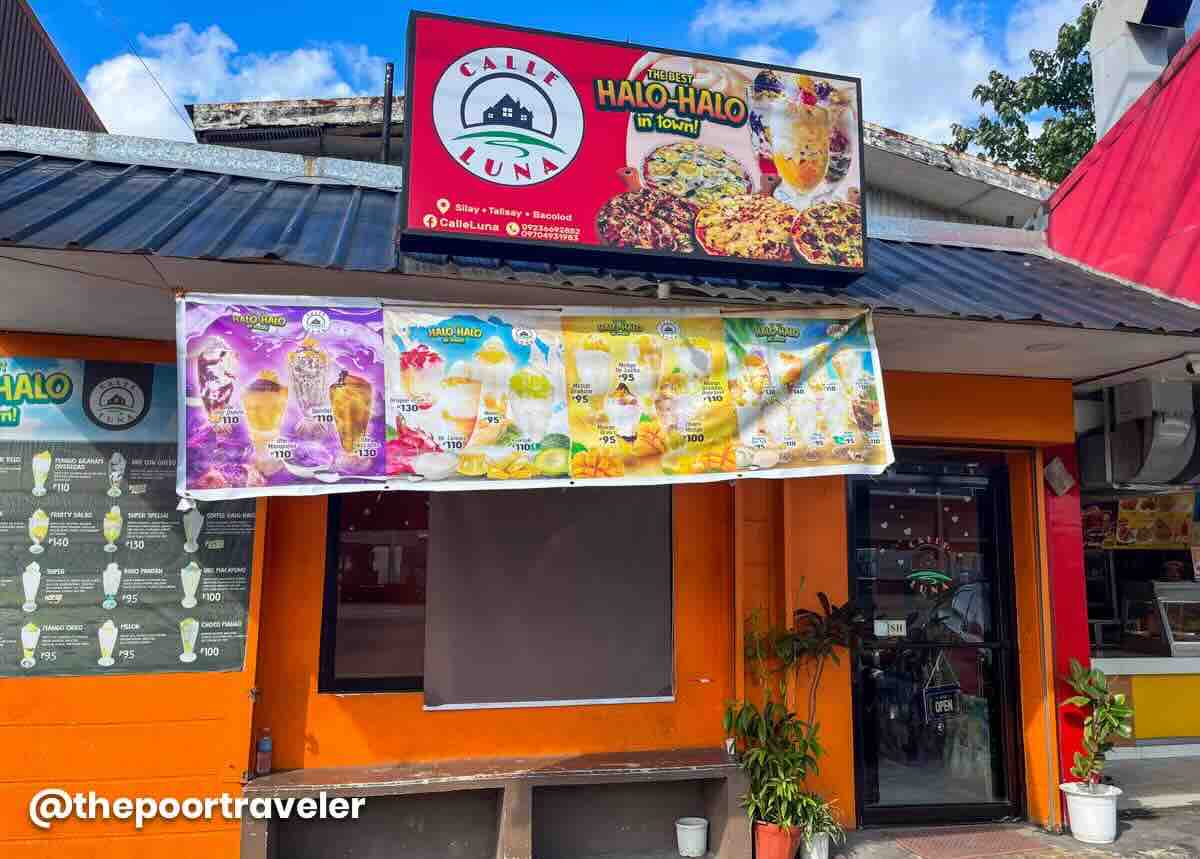
Calle Luna Halo-Halo
Just a short walk from Sharyn’s stands Calle Luna, a dessert spot originally from Silay City, with a branch also in Talisay and Bacolod. It’s known mostly for its wide, wide selection of halo-halo and other icy desserts.
What sets it apart from the typical halo-halo is that it uses so-called milky ice, which is finer, smoother and milkier. Instead of the usual basic shaved ice drizzled with evaporated milk, the milk is more infused in the ice.
Vins ordered their bestseller called Super Special, which has sweetened banana, sweet buko strips, jelly bits, corn kernels, mango, ube halaya, and then topped with ube ice cream, leche flan, and cheese. According to him, it was good — very creamy, with well-balanced ingredients. Nothing was overpowering. It was just a bit unusual for him to have mango in halo-halo, but once he got used to it, it turned out okay.
De Langka Halo-Halo (Left), Super Special Halo-Halo (Middle), and Mango de Leche Halo-Halo (Right)
Meanwhile, Asta got the De Langka. This flavor is seasonal, but thankfully, it was available that time. Of course, langka or jackfruit took the spotlight, as it should. It also came with sweetened banana, buko or coconut, corn, and crowned with vanilla ice cream.
I ordered Mango de Leche, which has mango caramel syrup and jelly bits, then topped with mango ice cream and leche flan. I liked it but didn’t really live for the mango ice cream as it overpowered the natural flavor of the real mango. I enjoyed Asta’s Langka and Vins’s Super Special halo-halo much better. But overall, it was very satisfying, especially after a bowl of cansi. It was also scorching hot that day!
We also wanted to try La Arte’s halo-halo, but it was out of the way, and we didn’t have much time, so we just skipped it for now. Maybe next time!
Address: Calle Luna Halo-Halo, BS Aquino Drive, Bacolod, 6100 Negros Occidental Opening Hours: Daily, 11:30 AM – 7:00 PM What We Ordered: Super Special Halo-Halo, P130; De Langka, P110; Mango de Leche, P110
21 Restaurant
Located at 21 Lacson Street, corner 21st Street (hence the name), 21 Restaurant used to be a humble merienda spot but has evolved into one of Bacolod’s more upscale casual dining spots. A few years ago, I first visited this place with Vins and Asta, and we ordered a lot. I remember we had a great meal overall.
Signature Batchoy Special
But this time around, I came alone, and I came for one thing and one thing only — a bowl of its signature batchoy! The broth isn’t clear-clear but not opaque either, but surprisingly packed with flavor! It’s simmered until it soaks up all the umami goodness, then layered with noodles, tender bits of meat, and generous slices of liver, and then sprinkled crunchy chicharón on top. It’s less rich and less garlicky than the ones I tried in Iloilo and more refined than usual, but still very comforting.
Although I went for the batchoy, I also ordered its Lola Nitang’s Bibingka, which was a bit inconspicuous in the menu. But I’m obsessed with bibingka in general, so I just had to try it. And my gosh, this was really good. It was soft, moist, and tasty. It had just the right amount of sweetness.
Address: 21 Restaurant, 21 Lacson Street corner 21st Street, Bacolod, 6100 Negros Occidental Opening Hours: Daily, 10:00 AM – 10:00 PM What We Ordered: Batchoy Special , P180 (w/ egg, +P25); Lola Nitang’s Bibingka, P170
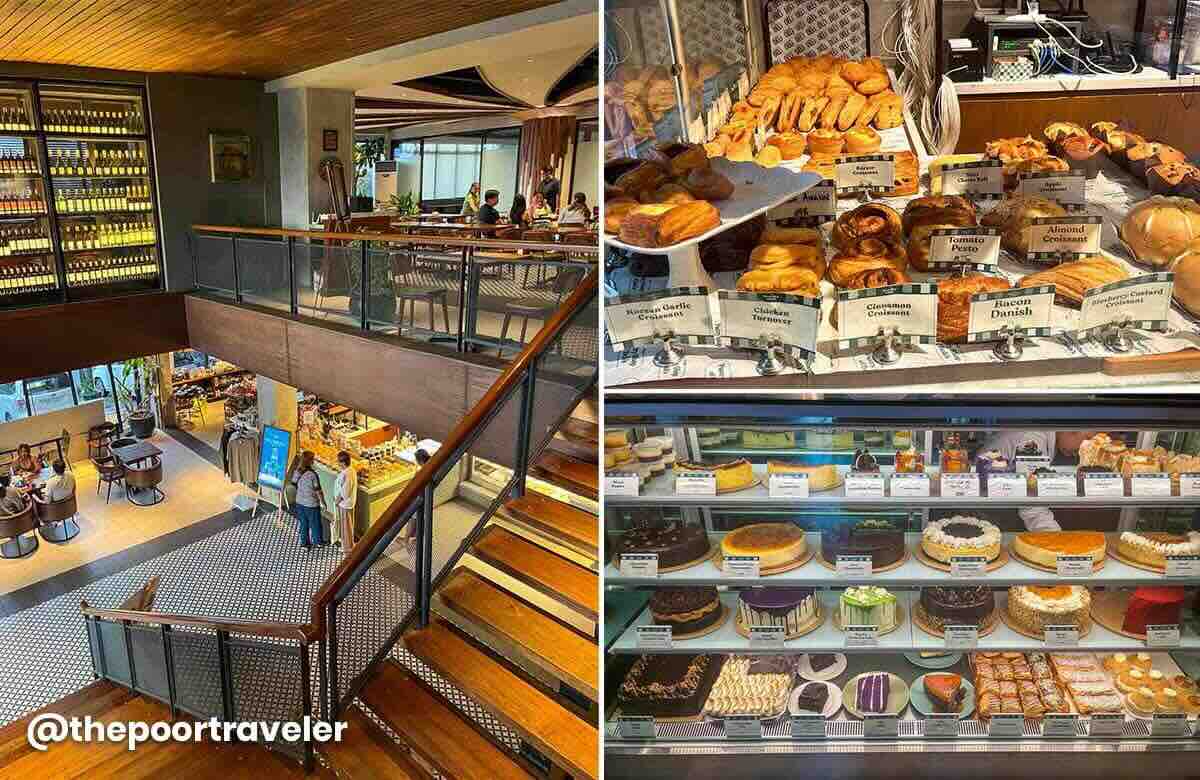
Café Bobs
And since we’re already talking about sweets, let’s cross to the next item, literally. Located just across the street from 21 Restaurant sits the flagship store of Café Bobs. Honestly, it was our first time hearing about it, so we’re not too familiar with its legacy. Apparently, it started back in 2003, so it’s been part of Bacolod’s food scene for over 20 years, serving specialty coffee, pastries, and casual café culture in the city. The name “Bobs” comes from owner Bobby Magalona and his wife’s passion for baking and coffee.
Café Bobs Flagship Store
We asked the staff for their bestsellers on the iced drinks menu, and they recommended the Iced Spanish Latte. Normally, this drink is quite sweet because of the condensed milk, but their version — as Tito it may sound — was not too sweet at all. It was just right, with the espresso and milk really standing out.
We also got a slice of Burnt Cheesecake. The burnt-ness adds extra flavor and makes it more complex, but since it didn’t have a crust, it tasted a bit one-dimensional and it lacked the texture to cut through its richness. It did get quite overwhelming after a while.
Choco Carrot Cake and Burnt Cheesecake
We also had a piece of Choco Carrot Cake, and we actually enjoyed this more than the burnt cheesecake. We love carrot cake, so by default, it was a “yes” for us. This one was moist, with a layer of chocolate icing. And maybe it’s just us, but we picked a strong cinnamon notes, which we really liked.
But if cakes are what you’re really after, you should also check out the next two items on this list.
Address: Café Bobs, 21 Lacson Sreet, Bacolod, 6100 Negros Occidental Opening Hours: Monday to Thursday, 8:00 AM – 10:00 PM; Friday to Sunday, 8:00 AM – 11:00 PM What We Ordered: Iced Spanish Latte, P175; Burnt Cheesecake, P135; Choco Carrot Cake, P120
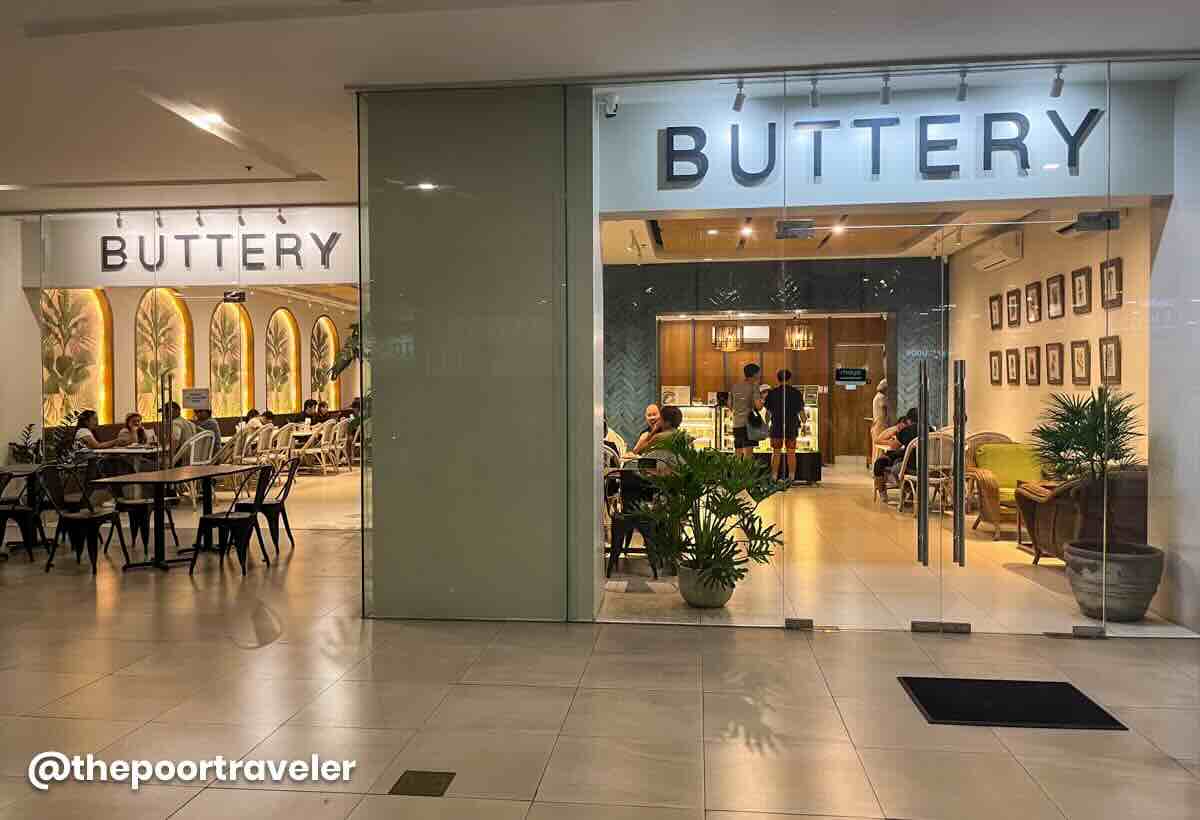
Buttery Negros
We had a hard time here at Buttery, not because we didn’t like anything, but because we couldn’t decide what to order. Their cakes were on full display near the cashier, and we wanted to taste them all. They all looked so good!
When we asked the staff, they recommended the Lemon Chill and Pistachi-oh Craze cakes. But I also ordered Galleta de Leche for good measure. As someone who likes my cakes simple, it really appealed to me, and I was also told it was a signature creation of theirs too.
The Lemon Chill was a combination of calamansi cake and lemon square with creamy lemon mousse in between and topped with pieces of almond. Meanwhile, the Pistachi-oh Craze was composed of crunchy lumpia wrapper coated in Nutella, covered in pistachio mousse and pistachio cream, sitting on an Oreo crust and drizzled with more Nutella and dark chocolate, and sprinkled with more pistachio bits. I was a bit skeptical in the beginning because these cakes sound like they’re too complicated and too decadent for their own good. But because we always follow staff recommendations, we did just that, and they didn’t disappoint. They were truly delicious!
Lemon Chill and Pistachi-oh Craze
But the Galleta de Leche was my favorite. It’s basically just creamy caramel flan on a salty cracker crust, topped with whipped cream. I appreciated the simplicity of it! The richness and sweetness were just right, not saturated.
Oh, we also ordered the Ube Cheesecake. Told you we couldn’t make up our minds, so we ended up ordering a lot. This is ube-flavored cheesecake sitting on polvoron crust and topped with queso de bola.
Ube Cheesecake (Left), Galleta de Leche (Top Right), and Matcha Tiramisu (Bottom Right)
Here at Buttery, we were accompanied by our college friend Ry, who is a Bacolod local. He had the Matcha Tiramisu, which is green tea-flavored tiramisu with white chocolate and almonds. We also got a taste of it because we all shared cakes. Both the ube cheesecake and matcha tiramisu delivered, too. We ended up having a different favorite!
Buttery’s roots can be traced back to Dumaguete, but the Bacolod locals had embraced it, and no surprise there, really. Every single thing on our plates was unforgettable.
But if you’re looking for desserts that are truly local and homegrown, then the place to be is…
Address: Buttery, Lacson Street corner C.L. Montelibano Avenue, Bacolod, 6100 Negros Occidental Opening Hours: Daily, 9:00 AM – 9:00 PM What We Ordered: Lemon Chill, P130; Pistachi-oh Craze, P180; Galleta de Leche, P130; Ube Cheesecake, P150; Matcha Tiramisu (P120)
Calea
Calea is one of Bacolod’s iconic bakery-cafés, located along Lacson Street. Every time we’re in Bacolod, we visit to get at least three slices from its massive selection of cakes, ice cream cakes, and cheesecakes. But prior to our visit last month, it had been years since we last set foot here, so as always, we asked the staff for recommendations. They suggested the Choco Mud Pie, Imported Chocolate Cake, and Blueberry Cheesecake.
Chocolate Mud Pie and Imported Chocolate Cake
The Imported Chocolate Cake is among their bestsellers. It’s the very first item on their cake menu. It’s a dark chocolate cake with rich custard filling and covered in dark chocolate icing. It’s so moist, we couldn’t stop digging in. It’s dark chocolate, but still pretty sweet. We always order this when we’re here, and it never fails to delight us!
But it was our first time trying their Chocolate Mud Pie. It’s a big chunk of chocolate ice cream sitting on Oreo crust, clad in fudge, bits of almond, and Oreo powder.
Blueberry Cheesecake (Left), White Chocolate Cheesecake (Top Right), and Fruity Cheesecake (Bottom Right)
But I was most excited about the cheesecake. In the past, I tried their White Chocolate Cheesecake (P120) with raspberry sauce and Fruity Cheesecake (P110), which was topped with blueberries, raspberries, and strawberries. Both were delectable! I was expecting this Blueberry Cheesecake to be similar, but no, it was much more delightful! First of all, the crust was different. It had a lot more texture, which was great because it complemented the smooth and rich cheesecake.
After all these years, Calea is still the same dessert powerhouse that I remember. Big servings and spectacular tastes at affordable prices. Please don’t change, Calea! Honestly, if we’re going to rank our favorite spood spots in Bacolod, Calea sits comfortably on top.
Address: Calea, Balay Quince, Lacson Street corner 15th Street, Bacolod, 6100 Negros Occidental Opening Hours: Monday to Thursday, 9:00 AM – 9:30 PM; Friday to Sunday, 9:00 AM – 10:00 PM What We Ordered: Choco Mud Pie, P130; Imported Chocolate Cake, P125; Blueberry Cheesecake, P125
Where to Stay in Bacolod
The capital of Negros Occidental, Bacolod City makes an excellent base for exploring Metro Bacolod and its neighboring towns. It offers a wide range of accommodations across different budgets and types, so you’ll never run short of options. Here are some of the top-rated hotels in Bacolod City according to online traveler reviews.
🔥🔥🔥 Use AGODATPT for 10% off on select hotels! 🔥🔥🔥
The Poor Traveler readers and followers can now use a special discount code to score 10% discount, up to USD 100 (roughly PHP 5700)! To apply and avail of the promo code, visit AGODATPT Promo Code.
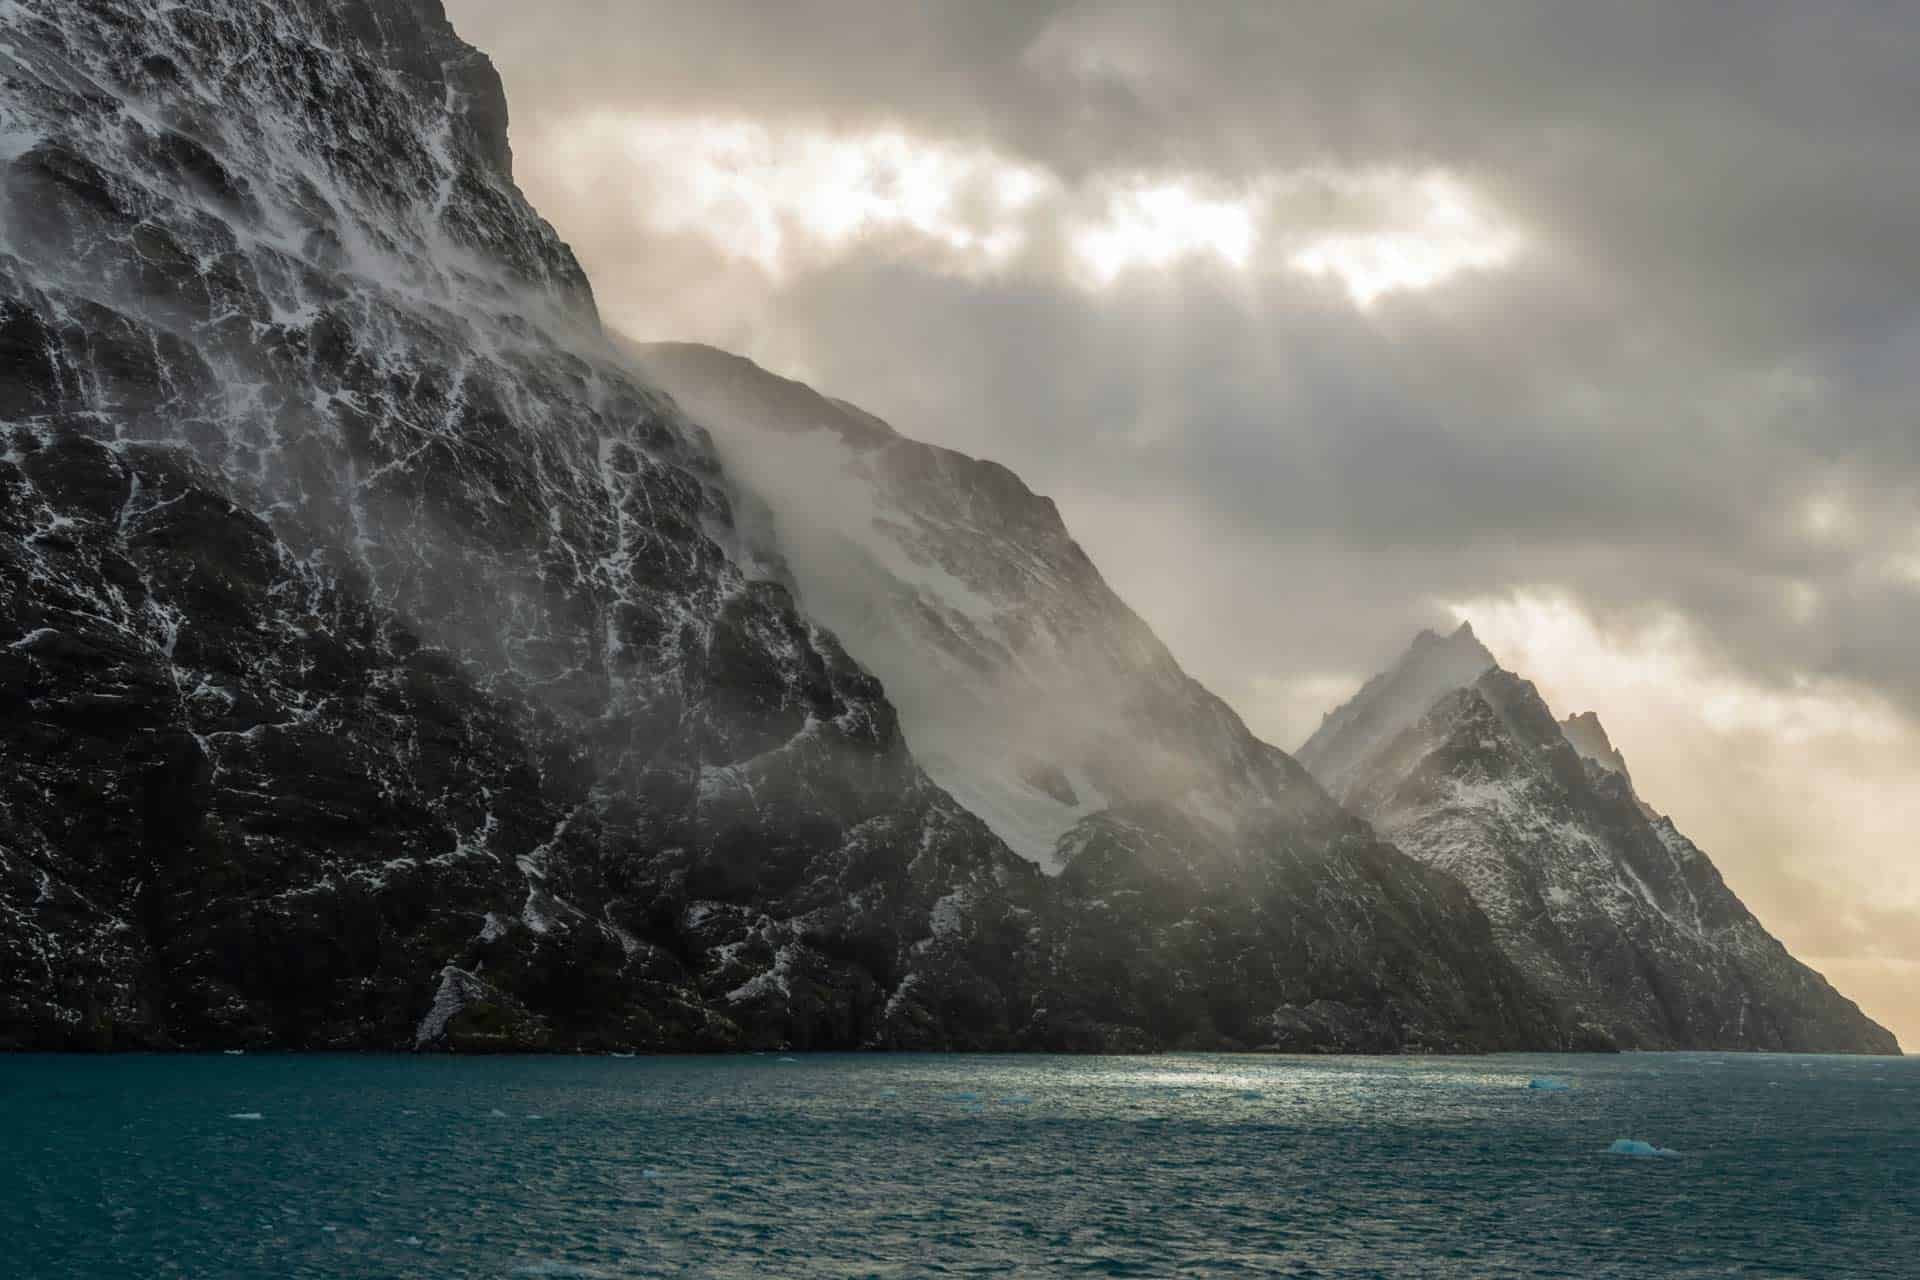
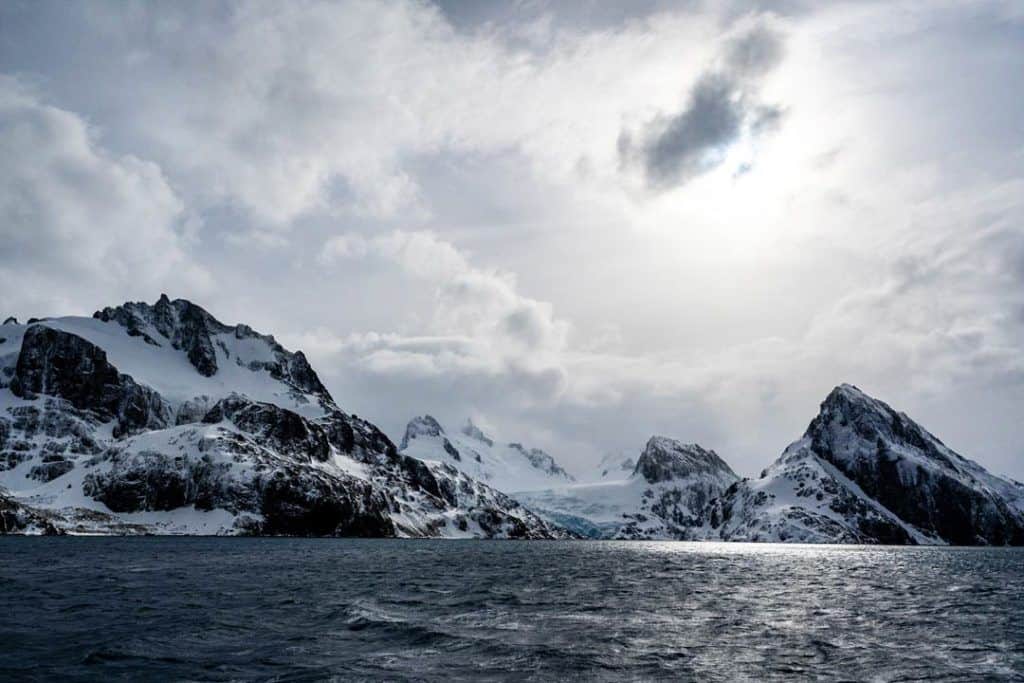
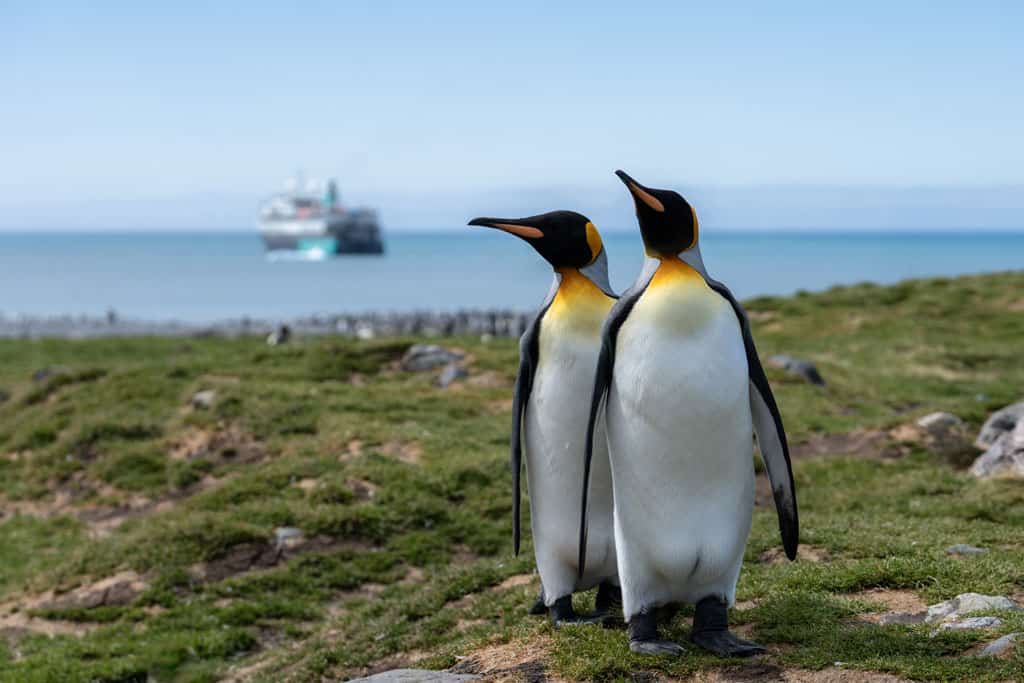
If you’re visiting South Georgia, don’t miss a visit to Drygalski Fjord! This majestic natural landmark boasts some of the best views in the area.
To see breathtaking glaciers, frolicking penguins, and rugged mountains against the backdrop of the Southern Ocean, be sure to check out Drygalski Fjord!
Located off the southeastern coast of South Georgia, this beautiful inlet is framed by dramatic mountains and ice-covered cliffs.
This remote environment is rich in wildlife, with seals, penguins, and seabirds commonly seen along its shores and on the ice.
The stunning scenery and abundant wildlife make Drygalski Fjord a highlight for visitors on polar expedition cruises.
Here is everything you need to know about the gorgeous Drygalski Fjord on South Georgia Island! A journey to South Georgia, one of the most pristine environments in the world, is well worth the trek.
Important Note! Before you book any international trip, we honestly recommend getting travel insurance. You never know when things will go wrong, and medical bills can add up quickly if you get sick or injure yourself overseas.
Our personal recommendation based on our own experience is World Nomads.
Where is Drygalski Fjord?
Drygalski Fjord sits at the southeastern tip of South Georgia Island in the South Atlantic Ocean.
It lies near Cape Disappointment, opening into the Southern Ocean, and is surrounded by the incredible views of South Georgia’s mountainous terrain.
Reaching Drygalski Fjord typically takes several days by ship, depending on the starting point.
From the Falkland Islands, it usually takes 3 to 4 days of sailing across the South Atlantic to reach South Georgia Island.
From Ushuaia, Argentina, it can take 4 to 6 days to reach South Georgia.
Once at South Georgia, reaching Drygalski Fjord itself may take another day or two, as ships often visit other key landing sites (like Grytviken or St. Andrews Bay) before circling to the island’s southeastern end.
Because Drygalski Fjord is one of the southernmost points of the island, it’s often visited toward the end of the itinerary, depending on sea ice and weather.
The beauty of Drygalski Fjord
Drygalski Fjord Landscape and Nearby Landmarks
As part of the sub-Antarctic region, the fjord is filled with glaciers and sheer cliffs, creating a narrow and enclosed passageway.
The fjord stretches about 14 kilometers inland, with some other notable landmarks nearby:
Risting Glacier: Located at the head of the fjord, this massive glacier often calves into the sea.
Mount Worsley: Part of the rugged mountain terrain nearby, this peak honors Frank Worsley, the captain of Shackleton’s Endurance.
Cooper Bay: Situated northeast of Drygalski Fjord, Cooper Bay is known for its rich wildlife, including colonies of macaroni and chinstrap penguins, and its steep, scenic cliffs.
Larsen Harbour: A narrow, glacier-fed inlet branching off the west side of the fjord. Larsen Harbour is often used as a safe anchorage for small vessels.
Cape Disappointment: A headland named by Captain James Cook during his 1775 voyage, when he realised South Georgia was not part of the fabled Southern Continent that he was looking for. A fitting name for his emotions at the time!
The history of Drygalski Fjord is closely tied to the era of polar exploration and early scientific expeditions in the South Atlantic.
It was named after Professor Erich von Drygalski, a German geographer and polar scientist who led the First German Antarctic Expedition (1901–1903) aboard the ship Gauss.
Although Drygalski himself never visited South Georgia, the fjord was named in his honour by later German explorers who admired his contributions to polar research.
The fjord and surrounding region were charted in more detail during the early 20th century, particularly by the Discovery Investigations—a British scientific program studying the Southern Ocean and whaling grounds around South Georgia from the 1920s onward.
While Drygalski Fjord never hosted permanent settlements or whaling stations, it was occasionally visited by vessels seeking shelter or conducting scientific surveys.
Today, its history is preserved in its name and in its role as a destination for modern expedition cruise ships.
The wildlife at Drygalski Fjord is incredible, with lots of amazing creatures that are well-adapted to the harsh sub-Antarctic environment.
Though the steep terrain filled with glaciers limits extensive breeding colonies, the fjord and its surrounding waters support a rich array of marine and bird life.
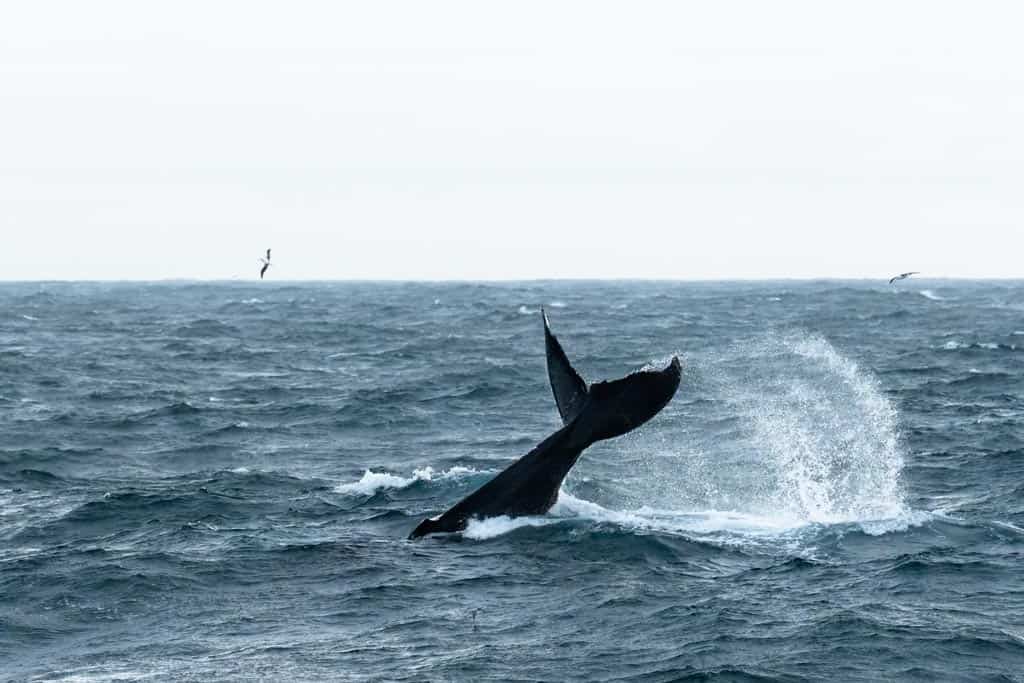
Humpback whale off the coast of South Georgia
Seals
Weddell seals, fur seals, and elephant seals often haul out on the rocky shores and floating ice around the fjord.
Weddell seals, in particular, are well-suited to the icy fjord environment and may be seen resting near the glacier fronts. Larsen Harbour, within Drygalski Fjord, is one of the few places where Weddell seals are known to breed on South Georgia.
Elephant seals and fur seals don’t breed in the area, but are still commonly spotted!
Penguins
Large penguin colonies are rare in Drygalski Fjord because of the steep and sometimes treacherous cliffs.
But chinstrap and macaroni penguins are frequently spotted in nearby areas like Cooper Bay, and individual penguins may be seen swimming or exploring rocky outcrops.
Gentoo penguins are also found on South Georgia and can occasionally be spotted in surrounding coastal regions.
South Georgia is also famous for its incredible colonies of king penguins. Though the colonies mostly congregate in flat, grassy places like St. Andrews Bay, Gold Harbour, and Salisbury Plain, king penguins can occasionally be spotted in the waters around Drygalski Fjord.
King penguins on South Georgia
Seabirds
The skies and cliffs around the fjord are frequented by sub-Antarctic bird species such as light-mantled sooty albatross, snow petrels, wilson’s storm petrels, and skuas.
These birds nest on nearby cliffs to escape the strong winds, but you can also see them flying on calmer days or hunting in the sea.
Whales and dolphins
The deep, nutrient-rich waters around South Georgia, including those near Drygalski Fjord, can attract humpback whales, fin whales, and orca, especially during the austral summer when feeding conditions are ideal.
Zodiac cruises around the island are amazing ways to see the beauty of the marine life on your trip!
Visiting Drygalski Fjord, South Georgia, is a rare and awe-inspiring experience, typically possible only as part of a polar expedition cruise that includes Antarctica.
Booking your cruise
The only practical way to reach the fjord is by booking a multi-day expedition cruise that includes South Georgia in its itinerary. These cruises often depart from Ushuaia, Argentina, or occasionally from Stanley in the Falkland Islands, and they usually include Antarctica as well.
Not all South Georgia cruises visit Drygalski Fjord, as it lies at the island’s remote southeastern tip. Look for itineraries that include specific mentions of Drygalski Fjord, Cape Disappointment, or Larsen Harbour, which are all in the area.
Due to its steep cliffs, strong wind, icy conditions, and lack of flat ground, most visits to Drygalski Fjord involve Zodiac cruises.
This type of trip means you will explore the fjord from small inflatable boats, getting close to glaciers, icebergs, and wildlife. Going ashore is rare.
Expedition routes are always subject to weather, and snow, wind, or sea ice can disrupt a trip at any given moment. So even if Drygalski is on the planned itinerary, a visit isn’t guaranteed.
Operators prioritise safety for everyone and adapt routes daily!
The fjord can be harder to pass through in stormy weather.
Travel Season
The best time to visit Drygalski Fjord is during the austral summer, from November to March, when the weather is not too cold and wildlife activity is at its peak.
November to early December: This is early in the season, when the landscape is still snowy and dramatic. Animals are active, which is an incredible sight. Fewer ships visit during this time, offering a quieter experience.
Mid-December to January: Peak summer brings the warmest temperatures (still cold by most standards), longer daylight hours, and increased wildlife activity. Penguin chicks hatch, and many species are actively feeding.
February to March: This is the best time for whale sightings, as species like humpbacks and orcas are more common in South Georgia’s waters. Penguin colonies are still active, and the melting icebergs reveal more of the land.
DISCLAIMER: Some of the links in this article are affiliate links, which means if you book accommodation, tours or buy a product, we will receive a small commission at no extra cost to you. These commissions help us keep creating more free travel content to help people plan their holidays and adventures. We only recommend the best accommodations, tours and products that ourselves or our fantastic editorial team have personally experienced, and regularly review these. Thanks for your support, kind friend!
Craving inasal and something sweet? Bacolod is waving with a big, welcoming smile! Prepare to indulge not only in signature grilled chicken and irresistible desserts, but also in the rich culture and history. And if you’re up for more, sprinkle in a dash of adventure as you give in to the warm invitation of the Philippines’ “City of Smiles.”
In this article, we’ll take you through the top things to do and tourist spots in and around Metro Bacolod, which covers Bacolod City (the provincial capital of Negros Occidental), Talisay, and Silay. This list also includes other noteworthy attractions in nearby municipalities.
WAIT, WAIT, WAIT! If you have a trip soon, please also visit our The Poor Traveler Masterlist. Here, we compiled travel essentials, including immigration requirements and all our recommended hotels and attractions. Just visit this page: TPT Masterlist. We also have a compilation for other destinations around the world.
No trip to Bacolod is complete without sinking your teeth into its signature dish — chicken inasal. Treat yourself to the smoky, tangy flavor of original Bacolod inasal.
On our visit in 2017, Manokan Country was the place to be for an authentic experience. It was a complex that housed 24 stalls serving chicken inasal and other grilled delicacies. After serving locals and tourists for over 40 years, it was demolished in February 2025 to give way to a redevelopment project. The original tenants were relocated to SM Bacolod’s North Wing Parking Hub, just across its original site.
Popular restaurants and eateries, which locals swear by, are Aida’s, Nena’s, Lion’s Park, Chicken House, and Sugba Sugba Inasal & Seafood, to name a few. We’ve tried most of them, and we’ll share more details on each of them in a separate food-centric Bacolod article.
If you want to fully immerse yourself in chicken inasal goodness, time your visit in May, when the city celebrates the Bacolod Chicken Inasal Festival.
Sweets & Desserts
Bacolod is a haven for sweet tooth and dessert lovers. With so many cafés and dessert places around the city, you’ll never run out of choices! Swing by local favorites like Calea for their cakes, Felicia’s for their pastries, and Cafe Bob’s for their classic sweet bites.
Calea (Left), Bob’s Cafe (Top Right), and Felicia’s (Bottom Right)
If dessert hopping is in your itinerary, you’re in the right place! So, go ahead and give in to the tempting array of sugary delights and baked goodies. And, maybe it’s just us, pastries and confections are often much cheaper here compared to Manila! Again, we’ll list down all the cafés and dessert spots we’ve tried and will share more information in a separate article.
Cansi
When in Bacolod, make sure to warm up your belly with cansi! Even in the heat of summer, this Negrense specialty is worth every drop of your sweat. A steaming bowl of cansi is the go-to comfort food of the locals. Its flavor is a marriage between bulalo and sinigang.
Sharyn’s Cansi House
Whenever our team visits Bacolod, a stop (sometimes two) at Sharyn’s Cansi House is non-negotiable. Aside from the classic version, we always go for the crispy cansi too. And our tummies always approve!
San Sebastian Cathedral
The 19th-century San Sebastian Cathedral is more than just a religious structure — it’s a historical landmark found in the heart of Bacolod. The original church, built in 1825, was made of wood, but the structure we see today dates back to 1882. It features a coral-stone facade and two bell towers, which underwent reconstruction in the 1960s. The bells have since been relocated to the Centennial Belfry in the churchyard.
Address: 1755 Rizal Street, Bacolod, 6100 Negros Occidental Opening Hours: Monday to Saturday, 6:00 AM – 7:00 PM; Sunday, 5:00 AM – 8:30 PM Mass Schedule: For updated schedules, check the official Facebook page of San Sebastian Cathedral.
Bacolod Public Plaza
Just across San Sebastian Cathedral sits the Bacolod Public Plaza, a two-hectare green space where locals love to unwind — whether students hanging out after class, workers taking a breather, or friends and families enjoying the outdoors. It also hosts various events, including the MassKara Festival.
At the heart of the plaza stands the music-themed Bandstand, a gazebo-like structure that serves as the centerpiece. Nearby, you’ll spot the huge “BACOLOD” ground-level marker, where tourists can have their photo ops. You’ll also find the “Welcome Bacolod City” Arch and a couple of fountains.
If you want to dive deeper into the region’s culture and history, drop by the Negros Museum. Inaugurated in 1996, it was originally housed in the building now occupied by the Provincial Capitol. In 2003, it moved to its present home — the former Provincial Agriculture Building, a neoclassical building built in 1925.
The museum’s first level usually hosts temporary art exhibits featuring both local talents and foreign artists based in the region. Meanwhile, the second level showcases permanent displays highlighting local history, including the island’s sugar industry, and items that reflect Negrense lifestyle and culture.
Since the museum is privately managed, an entrance fee applies. Walk-ins are welcome!
Capitol Park lies in front of the Negros Occidental Provincial Capitol — the seat of the provincial government and the core of the Capitol Central, previously named Negros Occidental Provincial Capitol Complex.
Besides the Capitol Building, this verdant urban park is dotted with several other landmarks and attractions, such as the sprawling man-made lagoon flanked by a pair of sculptures, an open-air auditorium, a children’s playground, the Paghimud-os Monument, and the Negros Occidental Kilometer 0 Marker.
On any given day, you’ll find locals jogging, feeding fish, picnicking, or simply hanging out with friends. Expect it to be especially lively on weekends.
Before you leave Bacolod, don’t forget to shop for pasalubong! If you still can’t get enough of the sweets, stock up on Negrense delicacies like napoleones, piaya, and barquillos from BongBong’s and Merczi, two staple names when it comes to Bacolod souvenir shops. You’ll find numerous branches of both shops scattered around Metro Bacolod — even at the airport!
Masskara Festival
If you’re visiting in October, brace yourself for a festive and colorful time as the city celebrates the annual MassKara Festival, one of the biggest cultural festivals in the Philippines! Witness the city abuzz with upbeat music, exciting activities, art and trade exhibitions, vibrant street parades, and of course, a flood of kaleidoscopic smiling masks!
Kick-started in the 1980s, the festival served as the city’s beacon of hope during a tough economic crisis, when sugar, the province’s main source of livelihood, hit rock-bottom prices. What started as a way to uplift people’s spirits has since grown into one of the country’s most anticipated festivals, drawing both local and international tourists.
So, let this celebration fill your trip with fun and excitement. After all, Bacolod is not called the “City of Smiles” for nothing!
Reminder! When planning your visit, remember to check the official Masskara Festival Facebook page for the calendar of events.
TALISAY CITY
The Ruins
The Lacson Ruins, most famously known as The Ruins, is a tangible ode to Don Mariano Lacson’s beloved wife, Maria Braga Lacson. In the early 1900s, the patriarch spearheaded the construction of the mansion on the family’s vast sugar plantation to honor her memory. Don Mariano tapped local engineer Luis Puentevella to work together with one of his sons, Felipe, whom he asked to supervise the construction. The mansion was inspired by Italian architecture, with its Neo-Romanesque columns.
During the early years of the Second World War, local guerrillas were forced to burn the mansion down to prevent the Japanese forces from making it their headquarters. The mansion’s skeletal frame remains standing to this day and is now widely called “The Ruins”.
Today, you can visit and marvel at the former mansion’s architecture and structure. If you’re looking for keepsakes, a gift shop is conveniently located inside. As you wander through the interiors, keep your eyes peeled for these interesting details:
Veranda Lighting (Top Left), Small Arched Window (Top Right), Floor Tiles (Bottom Left), and Belvedere (Bottom Right)
A-Grade Concrete. This was the material used for the foundations and walls of the mansion.
Veranda Lighting/Chandeliers. The original electrical pipes were embedded in the ceiling, the same technique we use today, leaving no exposed wires.
Small Arched Window. This used to connect the kitchen to the dining area for the smooth handling and delivery of food.
Wooden Floors. The floorings were long-span, two-inch thick hardwood planks, stretching continuously from the main entrance (facing the fountain) to the dining room.
Floor Tiles. All tiles you see in the mansion are original.
Belvedere. This used to be an upstairs room facing west — a great spot for the family to view the sunset.
Beyond the mansion, you’ll find an expansive garden with a fountain, a grotto, a café, and The Ruins marker. Near the main entrance lies the beautifully landscaped Marapara Garden, where you can relax and snap more photos. You can also try the fresh sugarcane juice for P100. The stall is located near the entrance, between the café and the mansion’s ruins.
Garden Fountain (Left) and Marapara Garden (Right)
The Ruins is not just a tourist attraction but also a sough-after venue for weddings, photoshoots, and other events.
Address: Don Mariano L. Lacson Highway, Barangay Zone 15, Talisay, 6115 Negros Occidental Opening Hours: Daily, 9:00 AM – 8:00 PM. This may change, so it’s best to check the official Facebook page for announcements before going. Entrance Fee: Adults, P150; Senior/PWD, P100; Students, P80; Children (Below 8y/o), FREE.
How to Get to The Ruins: From Bacolod City, take a modern/traditional Jeep to Bata. Alight at Acropolis Garden, then hail a tricycle to Octagon Village. Tell the driver you are going to The Ruins. Alternatively, you can just book a Grab ride for P150 – P200.
Campuestohan Highland Resort
About an hour from Bacolod city center, Campuestohan Highland Resort is a popular family-friendly destination in the cool highlands of Talisay. Combining the concepts of a theme park and a mountain getaway, it boasts swimming pools, playgrounds, rides, and zip lines. Officially opened in May 2014, it was recognized by the Department of Tourism in 2023 as one of the top destinations in the region.
The resort park is marked by gigantic structures — the most iconic of which is the Manok ni Cano Gwapo hotel, which bagged the Guinness World Record for the largest building in the shape of a chicken on September 8, 2024. It measures 34.931m in height, 12.127m in width, and 28.172m in length.
You can either do a day trip or stay overnight in one of the cabins. If you’re only going on a day trip and you prefer to travel conveniently, you can book a tour from Klook! This already includes the round-trip transportation between Bacolod and Campuestohan, driver/guide, insurance, and bottled water.
You can use our promo code THEPOORTRAVELERKLOOK for up to P300 OFF or TPTKLOOK5 for up to P500 OFF. These codes might change in the future, so best to just visit thepoortraveler.net/klook to redeem updated discount codes!
Address: Sitio Campuestohan, Barangay Cabatangan, Talisay, 6115 Negros Occidental Day Trip Hours: Daily, 7:00 AM – 6:00 PM Day Trip Entrance Fee: Regular (3y/o and above), P20/head; Children (2y/o and below), FREE. This covers the use of the swimming pool and children’s playground. Overnight Rates and Other Fees: Check the official Facebook Page. As of writing, the rates for day trip cottages, activities/rides, and overnight accommodations are listed in the cover photo.
How to Get to Campuestohan Highland Resort: Head to IMART Caltex East, where the terminal for the Campuestohan Shuttle services is located. The fare is P90 per person. Travel time is about an hour. Check the resort’s Facebook page for the updated trip schedules.
SILAY CITY
Silay Ancestral Houses
Rizal Street, Silay City Center
If you are flying to Bacolod, chances are you’ll first set foot in Silay, since the airport is situated here. You might as well explore the city, right? Silay is like a living open-air museum, with its remarkable collection of well-preserved ancestral houses and historical landmarks.
Walking the streets of Silay, especially the city center, gives you a glimpse of the opulent lifestyle of sugar barons in the early 1900s. In fact, more than thirty ancestral houses have been declared historical landmarks, making Silay a worthy destination for history enthusiasts. Here’s a list and map from the official Silay Tourism Office Facebook page. On our last visit, we were short on time, so we only managed to see the following:
Photo Credit: Silay Tourism Office Facebook Page
Balay Negrense Museum, or Victor Fernandez Gaston Ancestral House. The Gaston family lived here from 1901 to 1927. It was inaugurated as the Balay Negrense Museum on October 6, 1990, and later declared a National Historical Landmark by the National Historical Institute in 1994. Since 2023, the museum has been temporarily closed for renovation.
Bernandino Lopez Jalandoni Ancestral House (Museum). Completed in 1908, it was declared a National Historical Landmark on November 6, 1993. Entrance Fee: Regular, P150. Opening Hours: Tuesday to Sunday, 9:00 AM – 5:00 PM.
Manuel Severino Hofileña Ancestral House (Museum). Built in the 1930s, it was the first house in Silay to open its doors to the public back in 1962. It was inscribed as a National Historical Landmark on April 6, 1993. Entrance Fee: Regular, P150. Opening Hours, Tuesday to Sunday, 9:30 AM – 4:00 PM.
Hofileña Ancestral House (TL), Balay Negrense (TM), Jalandoni Ancestral House (TR), Gamboa Ancestral House (BL), Morada Ancestral House (BM), and Golez Ancestral House (BR)
Cesar Lacson Locsin Ancestral House (El Ideal)
Josefita Tionko Lacson Ancestral House
Manuel De La Rama Locsin Ancestral House
Carlos Arceo Ledesma Ancestral House
Kapitan Marciano Montelibano Lacson Ancestral House
Maria Ledesma Golez Ancestral House
Generoso Reyes Gamboa Ancestral House
Digna Locsin Consing Ancestral House
Teodoro Pig-ao Morada Ancestral House
Benita Hara Ancestral House
Herardo Sigaton Gaston Ancestral House
Next time, we’ll make it our goal to complete the list. Some of the houses, particularly those along Rizal Street, are leased to businesses. Other notable buildings on the main road are:
Lino-Lope Severino Building
Cine Silay
Lino-Lope Severino Building
How to Get to Silay City: From Bacolod city center, take a modern/traditional jeep (via Bata, Mandalagan, or Northbound) to the North Bus Terminal (P15-20). Then, take a Ceres bus to Silay (P35). Alternatively, if you want to travel conveniently, you can just book a Grab for around P350.
Cinco de Noviembre
This historical marker commemorates the Negros Revolution, also known as Cinco de Noviembre, which ended Spanish rule on the island in 1898. The Farmacia Locsin, which used to stand on this site, served as the secret headquarters of the natives who plotted the revolution, which led to the establishment of a short-lived republic governed by the Negrense people. The republic came to an end in February 1899 with the arrival of the American forces.
The marker also bears the names of the revolutionary leaders:
Nicolas Golez
Leandro Locsin
Timoteo Unson
Melecio Severino
Vicente Gamboa
Olympia Severino
Address: Cinco de Noviembre Street, Silay City Heritage Zone, Silay, 6116 Negros Occidental
San Diego Pro Cathedral
The San Diego Pro-Cathedral stands as a testament to Silay’s deep Catholic heritage. It is the only domed church in Negros Occidental and the only pro-cathedral outside Metro Manila, making it a must-visit landmark in the city. Its designation as a pro-cathedral was made official in December 1994.
The present Romanesque structure was completed in 1927 through the initiative of sugar baron Don Jose Ledesma, who also employed Italian architect Lucio Bernasconi to design the church.
Address: Zamora Street corner Rizal Street, Silay City Heritage Zone, Silay, 6116 Negros Occidental Opening Hours: Monday to Saturday, 6:00 AM – 6:00 PM; Sunday, 5:00 AM – 7:00 PM Mass Schedule: For updated schedules, check the official Facebook page of San Diego Pro-Cathedral.
El Ideal
Housed in Cesar Lacson Locsin Ancestral House, El Ideal is the oldest bakery in Silay. It still serves homemade products and other local delicacies, including their signature guapple pie — a combination of guava and apple pie. You can also buy pasalubong here!
Address: 118 Rizal Street, Silay City Heritage Zone, Silay, 6116 Negros Occidental Opening Hours: Daily, 8:00 AM – 6:30 PM
If you want to cover the highlights of Metro Bacolod in one go, you can book a tour via Klook!
This includes entrance fees, lunch, bottled water, guide/driver, basic insurance, and round-trip transfers. The stops include:
Provincial Capitol Building & Lagoon
Balay Negrense
Ramon Hofileña Ancestral Home
Silay Pro Cathedral and Mini Ruins
Lunch at Manokan Country or Balaring Floating Restaurant
Mambukal Resort & Wildlife Sanctuary is geographically situated in the municipality of Murcia, but is governed and managed by the Negros Occidental Provincial Government. Nestled at the foot of Mount Kanlaon, the resort is famous for its therapeutic hot springs.
The highlights are the Warm Sulfur Dipping Pool, the Japanese Ofuro, and the nearly century-old Ishiwata Bathhouse (built in 1927), which won a Pillar Award at the 1st Philippine Tourism Awards (PTA) of the Department of Tourism (DOT) on September 8, 2025. The bathhouse is temporarily closed for renovation.
Kiddie & Adult Pool (Left) and Small Pool (Right)
Other attractions include seven waterfalls, a boating lagoon, a kiddie and adult pool, and a small pool. You’ll also find amenities, such as camping grounds, picnic areas, Convention Hall & Hotel, Spa Natura, food park, day trip huts, overnight accommodations, and a clinic.
Mambukal is about an hour away from Bacolod City, with direct buses from Libertad. If you are a big group and traveling with kids and elderly people, consider booking a tour with Klook! This is inclusive of round-trip transfers, insurance, local guide/driver, and entrance fee.
Address: Barangay Minoyan, Murcia, 6129 Negros Occidental Day Trip Hours: Daily, 7:00 AM – 8:00 PM Entrance Fee: Adults, P140/head; Children (11y/o and below), 80. The rates already include the 20-peso environmental fee and the use of the swimming pools and the dipping pool. If you want to access the Japanese Ofuro, you need to pay an additional P100 per person. Overnight Rates and Other Fees: Check the official Facebook Page for the updated rates.
How to Get to Mambukal Resort: Make your way to the Mambukal – Bacolod Bus Terminal in Libertad. It’s across Savemore Libertad. Board a bus bound for Mambukal. The bus stops right at the entrance gate of the resort. The fare is P60 per head, and the travel time is over an hour. Note: The last trip for the bus heading back to Bacolod City is 5PM.
Don Salvador Benedicto
Looking for mountain views and pine trees just 40 minutes from Bacolod City? Welcome to Don Salvador Benedicto, the Summer Capital of Negros Occidental! Our friend, Mark Roa, who hails from Bacolod, suggested this destination when we asked for recommendations. Sadly, we couldn’t squeeze it into our last trip due to time constraints, but that gives us the perfect excuse to visit again! Have you been here? We’d love to hear your thoughts in the comments.
WHERE TO STAY IN BACOLOD
The capital of Negros Occidental, Bacolod City makes an excellent base for exploring Metro Bacolod and its neighboring towns. It offers a wide range of accommodations across different budgets and types, so you’ll never run short of options. Here are some of the top-rated hotels in Bacolod City according to online traveler reviews.
🔥🔥🔥 Use AGODATPT for 10% off on select hotels! 🔥🔥🔥
The Poor Traveler readers and followers can now use a special discount code to score 10% discount, up to USD 100 (roughly PHP 5700)! To apply and avail of the promo code, visit AGODATPT Promo Code.
Here is your guide to the best Kakadu National Park walks, including scenic lookouts, ancient Aboriginal rock art sites, and more.
Located in the Northern Territory, about three hours from Darwin, Kakadu National Park is Australia’s largest national park.
With stunning waterfalls tumbling into natural swimming holes, ancient rock art older than the pyramids, and lush landscapes that change with the seasons, Kakadu is also one of the country’s most impressive parks.
Kakadu National Park is also a UNESCO World Heritage site, celebrated for its cultural significance and breathtaking natural beauty. One of the best ways to truly appreciate it is on foot.
During your walks, expect to find bird-filled wetlands, dramatic escarpments, tranquil billabongs, and lush patches of monsoon forest.
In addition, Kakadu is home to the world’s oldest living culture. The park is jointly managed by traditional Aboriginal owners and Parks Australia, which makes a visit here even more meaningful.
If you’re into hiking, you’re definitely in for a treat. The walks here range from short and easy to long and rewarding.
There’s no better way to experience the magic of Kakadu than by hitting its trails. The park has a variety of walking tracks that showcase its most iconic landscapes and cultural sites.
From breathtaking escarpment views to wildlife-rich wetlands and fascinating rock art, these walks take you deep into the heart of Australia’s Top End, where you can watch the beauty of Kakadu unfold before your eyes.
We’ve put together this list to help you choose the best walks for your visit, whether you’re up for a short scenic stroll or a more challenging adventure.
Please note that some trailheads are only accessible by 4-wheel drive, especially during certain times of the year. Check the national parks website for alerts and other info!
The best way to get around is to rent a car and explore on your own! We recommend Rental Cars, which has the largest range of vehicles for the best value on the market.
1. Burrungkuy (Nourlangie) Rock Art Walk
Distance – 1.5 km loop
Duration – 45 minutes
Difficulty – easy
Start / Finish Points – Burrungkuy (Nourlangie) car park
If you’re interested in the area’s culture and history, the Burrungkuy (Nourlangie) Rock Art Walk is a great trail to explore. This easy 1.5 km loop takes you through ancient rock shelters and escarpments where you can view some of the park’s most impressive rock art.
One of the highlights along this trail is the Anbangbang Gallery, a well-known rock art site featuring vibrant depictions of ancestral beings, including Namarrgon, the Lightning Man, and traditional hunting scenes.
The galleries, created by Aboriginal people over thousands of years, offer a powerful glimpse into their stories, spirituality, and way of life.
Interpretive signs along the trail help bring the artwork to life and explain the deep connection between the Traditional Owners and the surrounding landscape.
The Burrungkuy Rock Art Walk is accessible year-round, including during the wet season, when the escarpment country bursts into color. It is suitable for a reasonably fit person and can be completed in under an hour.
Kakadu is home to rugged cliffs and ancient artworks.
2. Gubara Pools Walk
Distance – 6 km return
Duration – 2 to 3 hours
Difficulty – moderate
Start / Finish Points – Gubara car park (accessed via Nourlangie Road)
The Gubara Pools Walk is a rewarding 6 km return trail that takes you through savanna woodland and stone country to a series of shady rock pools fed by stunning waterfalls during the wet season.
This relatively gentle walk takes you to sun-exposed stretches and sheltered sections of rainforest, making it a great choice for those looking to escape the crowds and soak in Kakadu’s more tranquil side.
At the end of your adventure, you’ll reach the plunge pool area. Stop by for a refreshing dip when water levels allow.
While the waterfalls here are most active during or after the wet season, there’s water at the plunge pool year-round. It’s one of Kakadu’s quieter gems, ideal for those seeking nature, solitude, and a bit of swimming along the way.
3. Bowali Track
Distance – 4 km return
Duration – 1 to 1.5 hours
Difficulty – easy
Start / Finish Points – start at the opposite of the Mercure Kakadu Crocodile Hotel in Jabiru and end in the visitor centre
The Bowali Track links the Bowali Visitor Centre with the township of Jabiru. It’s perfect for stretching your legs while taking in some of Kakadu’s natural beauty at a relaxed pace.
The hiking trail winds through open woodland and clusters of paperbarks, where you can spot fascinating bird life, especially in the late afternoon when the area comes alive with movement and birdsong.
As you set out on your walks, take a moment to appreciate the deep connection the traditional owners, the Bininj/Mungguy people, have with this land.
The visitor centre itself is a fantastic place to learn more about their culture, as well as the plants, animals, and landscapes that make Kakadu so amazing.
4. Nawurlandja Lookout Walk
Distance – 600 m return
Duration – 30 minutes
Difficulty – easy
Start / Finish Points – Nawurlandja car park (near Burrungkuy/Nourlangie)
The Nawurlandja Lookout Walk may be a short hike, but it is a rewarding one. It’s a gentle climb up a sandstone slope that leads to one of the most breathtaking views in Kakadu National Park.
From the top, enjoy sweeping vistas over the Arnhem Land escarpment, Anbangbang Billabong, and the surrounding stone country.
The Nawurlandja Lookout may require a climb, but it’s one of those spots that gives you a real sense of Kakadu’s scale and ancient beauty, something you might also glimpse on a Kakadu scenic flight.
But hiking allows you to experience it up close, with the stillness and birdsong in the background. The lookout is especially magical around sunset, when the escarpment glows gold and red.
Although the trail is short, it’s important to come prepared, as conditions can be unpredictable.
5. Ubirr Walk
Distance – 1 km loop + 250 m optional lookout
Duration – 1 hour
Difficulty – easy to moderate
Start / Finish Points – Ubirr car park
The Ubirr Walk is one of the most iconic hiking trails in Kakadu National Park, and for good reason. This easy/moderate loop takes you through Ubirr rock, a site known for its stunning Aboriginal rock art, some of which is believed to be over 20,000 years old.
As you walk among the ancient galleries, you can gain insight into the stories and traditions of the traditional owners, the Bininj/Mungguy people, who have cared for this land for countless generations.
The hiking trail finishes with a short climb to the top of Ubirr rock, where you’ll be met with incredible sunset views over the Nadab floodplain and the distant Arnhem Land escarpment. This hiking adventure perfectly captures the sheer scale and beauty of this World Heritage area.
Kakadu National Park has some amazing lookouts.
6. Jim Jim Falls Walk
Distance – 2 km return
Duration – 1 to 2 hours
Difficulty – moderate to difficult
Start / Finish Points – Jim Jim Falls car park (dry season access only; 4WD required)
The Jim Jim Falls Walk takes you deep into Kakadu’s dramatic stone country, where towering cliffs and lush forest surround one of the park’s most stunning waterfalls.
The 2 km return trail is a bit of a rocky scramble in parts, but the reward at the end is well worth it, especially in the dry season, when you can reach the plunge pool and gaze up at the sheer cliffs where the water drops from 200 meters above!
During the wet season, hiking trips to the plunge pool is not permitted. However, you can still take in their full glory on a scenic flight, an exciting way to see this iconic spot and appreciate the scale of Kakadu’s wild terrain.
7. Twin Falls Gorge Walk (via boat shuttle and boardwalk)
Distance – 1.8 km return
Duration – 1 hour
Difficulty – moderate
Start / Finish Points – After the boat shuttle, via Twin Falls car park (4WD + seasonal access)
The Twin Falls Gorge Walk is a true Kakadu highlight, leading you into one of the most spectacular corners of the national park.
After a short boat shuttle through the gorge (operates in the dry season), follow a scenic hiking trail that winds over rocks and alongside the crystal-clear creek. At the end, you’re rewarded with views of the stunning waterfalls that give the trail its name – twin streams plunging over towering cliffs into a shady gorge.
While swimming may not always be possible at the base of the falls, the views of these stunning waterfalls are epic! Plus, there are designated spots nearby where you can relax and dip your feet.
A park pass is required to visit this area. And if you’re coming here during the dry season, a 4WD vehicle may be necessary to access the site.
The Gunlom Lookout Walk is one of the most iconic trails in Kakadu National Park, featuring incredible views over the southern hills and stone country. The short but steep walk rewards you with panoramic scenery and access to the famous Gunlom plunge pool at the top.
As you go hiking along the Gunlom Lookout Walk, you’ll pass through classic outback terrain before reaching the natural infinity-edge plunge pool, which has become a favorite for many visitors to the national park.
Please note that the Gunlom plunge pool may be closed for cultural reasons at the request of Traditional Owners.
When planning your visit, check the official Kakadu National Park website for current access status and other info to help you plan a safe and respectful trip.
The Gunlom Lookout Walk is also considered one of the trickiest trails in the park due to its steep incline and rugged surface. For a safer and more enjoyable adventure, consider booking tours through operators like Willis’s Walkabouts. They have in-depth knowledge of the area and offer guided tours.
If you’re looking for a peaceful hiking experience with a high chance of spotting wildlife, the Mardukal Billabong Walk is a great trail to tackle.
Due to its flat terrain, it’s considered one of the easiest walks in the park, winding through thick woodlands and alongside tranquil billabongs.
Located near the famous Yellow Water Billabong, this walk is ideal for birdwatchers. During your hiking adventure, keep an eye out for magpie geese, kingfishers, and even the occasional jabiru.
Many visitors also choose to take a Yellow Water cruise to explore the billabong by boat, which offers a unique and equally stunning perspective of the wetlands and their wildlife.
Some travellers who book nature tours or stay at a nearby camp would walk this trail for its calm, accessible setting.
If you’ve done similar trips in Yellow Water, this walk makes a perfect addition. It’s a lovely way to start or end your day at Kakadu Park and a great chance to spot local wildlife without needing to go far.
10. Nanguluwurr Rock Art Site Walk
Distance – 3.4 km return
Duration – 1.5 to 2 hours
Difficulty – easy to moderate
Start / Finish Points – just off the Kakadu Highway, west of Burrungkuy (Nourlangie)
Nanguluwurr Rock Art Site Walk is a fantastic trail for those interested in hiking through Kakadu’s ancient landscapes while diving deep into its cultural history.
The 3.4 km return trail leads you through sparse bushland to a rock shelter that features a stunning collection of Aboriginal rock art.
The Nanguluwurr Rock Art Site features hand stencils, animal figures, and even contact-era depictions, such as sailing ships, which provide a powerful glimpse into thousands of years of storytelling and tradition.
This is one of those trails that have become a favorite stop on cultural walks with Willis’s Walkabouts, which offer immersive adventure experiences across Northern Australia.
Start / Finish Points – Maguk car park (4WD access only)
If you’re craving a bit of adventure in Kakadu National Park, the Maguk (Barramundi Gorge) Walk should be on your list.
This short but rewarding hiking trail leads you through light-dappled woodlands and over gentle rock crossings before arriving at a spectacular plunge pool.
At the end of your adventure, you’ll be greeted by one of the most stunning waterfalls in the park, cascading into a crystal-clear plunge pool that’s perfect for a refreshing swim.
Maguk offers that quintessential Australian outback experience. It’s raw, rugged, and incredibly spectacular!
This is one of those Kakadu walking trips that appeal to nature lovers, photographers, and anyone looking to escape the crowds and enjoy the peaceful side of the national park. If you want to explore with a guide, join a 3-day camping tour from Darwin!
12. Mamukala Wetlands Walk
Distance – 3 km loop
Duration – 1.5 hours
Difficulty – easy
Start / Finish Points – Mamukala Wetlands car park, off the South Alligator Road
The Mamukala Wetlands Walk is one of the best ways to experience the amazing wildlife and birdlife of Kakadu National Park. Located just a short drive from Jabiru, this easy walk takes you through different areas of wetland and woodland, with incredible views and a peaceful atmosphere that’s perfect for nature lovers.
Expect to see thousands of birds and other interesting wildlife species during your walks, especially at the end of the dry season. You will usually find them gathering around the water’s edge.
There are interpretive signs along the trail that help you understand the area’s delicate ecosystems, making this an ideal stop for educational trips, self-guided walks, or guided tours.
Kakadu’s wetlands are stunning!
13. Bardedjilidji Walk
Distance – 3.4 km return
Duration – 1.5 to 2 hours
Difficulty – easy to moderate
Start / Finish Points – small car park located 500 m from the upstream boat ramp on the East Alligator River
If you’re seeking a real adventure in the heart of Australia, hike along the Bardedjilidji Walk.
This loop trail winds through sandstone formations, lush forested pockets, and paperbark groves near the East Alligator River, creating a landscape that feels otherworldly and deeply connected to the land.
Along the way, you’ll have the chance to explore caves and crevices, many of which were used by Aboriginal people for thousands of years. The area is rich in wildlife, so keep an eye out for birds, reptiles, and other creatures that thrive in this unique habitat.
Ideal for short trips or daytime hiking tours, the Bardedjilidji Walk is a true adventure for those wanting to connect with Kakadu’s rugged beauty and vibrant wildlife.
DISCLAIMER: Some of the links in this article are affiliate links, which means if you book accommodation, tours or buy a product, we will receive a small commission at no extra cost to you. These commissions help us keep creating more free travel content to help people plan their holidays and adventures. We only recommend the best accommodations, tours and products that ourselves or our fantastic editorial team have personally experienced, and regularly review these. Thanks for your support, kind friend!
We all know that Hong Kong can be expensive, so if you are traveling there and looking for ways to save money, you might want to explore its numerous FREE attractions. In this article, we’ll list them down; however, note that when we say free attractions, we meant those without entrance fees. Of course, you still have to pay for the transportation to get there.
And if you want to buy anything, whether food or souvenir, that will come from your own pocket. This list only covers attractions you can visit in Hong Kong without admission fees. Also, the number is not an indication of any particular ranking and is only for easy reference.
WAIT, WAIT, WAIT! If your are looking for hotels and other attractions in Hong Kong, please also visit our The Poor Traveler Masterlist. Here, we compiled travel essentials, including immigration requirements and all our recommended hotels and attractions. Just visit this page: TPT Masterlist. Then, scroll until you see the section about Hong Kong. We also have a compilation for other destinations around the world.
Did you know that Victoria Peak in Hong Kong has no entrance fee?
When people think of Victoria Peak, they often imagine the Peak Tram and the pricey Sky Terrace 428. But here’s a secret: you don’t need to pay a single cent to get to the peak and enjoy the same world-famous view. There is no entrance fee for it. What people are usually paying for is the ticket to the tram. But there are other ways to get there.
If you’re on a budget and you’re coming from Central, instead of hopping on the tram, you can take Bus #15 from Exchange Square and alight at The Peak. The bus Fare is HKD 9.80, just a tiny fraction of the HKD 82 Peak Tram price. But the travel time is 41 minutes.
Taking the mini-bus is faster. Find the mini-bus terminal in Central, and look for Mini-Bus #1. The Octopus card is accepted. It will take you straight to the Peak Galleria. The fare is HKD 11.8, and the travel time is 20 minutes.
Better yet, if you’re into hiking, take the Morning Trail from the Mid-Levels. It’s a steady uphill walk that doubles as free cardio, but might be challenging on hot, humid summer afternoons.
Once you’re up there, you’ll find a lot of viewpoints that do not require an entrance fee. Of course, most tourists are drawn to the Sky Terrace 428, and the view here is really breathtaking. But if budget is an issue, you can totally skip it and go to Peak Galleria instead. It is a shopping mall right across the Peak Tower, and yes, it has a viewing deck too, and access is completely free of charge.
From the ground floor, you can take the elevator to the top floor. But recently, this has always been out of service. In that case, go inside the mall and find your way to the top. Just beside the Monopoly Dreams is a lookout. From here, you can also enjoy a fantastic view of Hong Kong’s skyline and Victoria Harbour with the iconic tram in the foreground.
Other viewpoints around the area include Lugard Road Lookout and Lions Pavilion.
How to Get to Victoria Peak
Peak Tram: From Central Terminal to The Peak Terminal. Fare: HKD 82 | ✅ Get Your Peak Tram Ticket Here! Travel Time: 10 minutes
Bus #15: From Central’s Exchange Square to The Peak Fare: HKD 9.80 Travel Time: 41 minutes
Mini-Bus #1: From Central to Peak Galleria Fare: HKD 11.8 Travel Time: 20 minutes
Morning Trail: From Mid-Levels Trailhead to Victoria Peak
2. Avenue of Stars
As a film enthusiast, this is the first attraction that I visited on my very first time in Hong Kong. Think of the Avenue of Stars as Hong Kong’s love letter to its film industry. Inspired by the Hollywood Walk of Fame, this promenade along the Tsim Sha Tsui waterfront pays tribute to the city’s cinematic icons.
You’ll spot bronze handprints from local stars, a statue of the legendary Bruce Lee striking his signature martial arts pose, and another of Cantopop queen Anita Mui. Also nearby stands the Clock Tower, the only thing that remains of the former Kowloon rail station. And yes, walking around here is completely FREE.
But I think most tourists come here for the stunning view of Victoria Harbour. By day, you get a clear line of sight to Hong Kong Island’s skyscrapers, framed by mountains in the background. By night, the whole skyline transforms into a neon wonderland that makes you wonder if Hong Kong runs on electricity and caffeine alone.
View of Central from Avenue of Stars
And if you time it right, you’ll get the ultimate freebie: the Symphony of Lights. Every night at 8PM, more than 40 buildings on both sides of the harbor synchronize their lights, lasers, and projections into a 10-minute show. The best part? You don’t need tickets or reservations. Just grab a spot along the railings, maybe with milk tea or coffee in hand, and enjoy the spectacle.
Address: Avenue of Stars, Tsim Sha Tsui, Kowloon, Hong Kong Nearest MTR Station: East Tsim Sha Tsui Station
3. Tsz Shan Monastery
While the Tian Tan Buddha often graces Hong Kong’s postcards, another gigantic structure of a Buddhist divinity can be found in the city’s Tai Po District. Here at the Tsz Shan Monastery, all eyes are on the 76-meter tall statue of Guan Yin, one of the most revered deities in Buddhism. Like the Big Buddha, it is made of bronze but this one is coated in stunningly white fluorocarbon self-cleaning paint.
The colossal Guan Yin clutches a vase in her left hand, symbolizing purification, and a pearl in the other, representing wisdom. It stands on a three-tier lotus flower, crowning the Buddhist Art Museum, which showcases an impressive collection of Buddhist images, relics, and other artifacts.
The monastery was officially opened in 2015 as a sanctuary that offers spaces for tranquility, meditation, and spiritual purification. Hence, the number of visitors allowed is limited to only 400 per day. Advance registration is required, and it can be done online by visiting this page.
Address: 88 Universal Gate Road, Tai Po, New Territories, Hong Kong Operating Hours: 9:30 AM – 5:00 PM How to Get to Tsz Shan Monastery: Take the MTR East Rail Line to Tai Po Market Station. Then, take Bus 75K bound for Tai Mei Tuk. Alight at San Tau Kok stop. Fare is HKD 6.40. Walk for 10 minutes along Tong Tsz Road until you reach Universal Gate Road. Turn right and walk for 20 minutes.
4.Big Buddha & Po Lin Monastery (Ngong Ping)
Ngong Ping is another noteworthy attraction on Lantau Island. Most tourists associate it with the cable car ride known as Ngong Ping 360. But Ngong Ping actually refers to the area where you’ll find the Po Lin Monastery and the Tian Tan Buddha.
Po Lin Monastery is a Buddhist site built in 1906. Meanwhile, the Tian Tan Buddha, also referred to as Big Buddha, is a 34-meter bronze statue that has become Hong Kong’s icon. Both are popular destinations for casual tourists and Buddhists making a pilgrimage. And yes, both can be visited free of charge, although donations are appreciated.
You can actually see Big Buddha all the way from Ngong Ping Village, located right beside the cable car station, and which you can also explore for free!
What really costs a lot here is the cable car ride. But there are other ways to get here. It’s much cheaper if you take the bus from Tung Chung, which is close to the cable car station. The fare is only HKD 20.4, which is much more affordable compared to the cable car, which costs HKD 172 (one-way).
We’ve tried this option before, and the experience was okay. Of course, it was not as scenic as a cable car ride, but if you are really on a budget, this is your best bet. The only downside is that it takes longer. Travel time is roughly an hour, one way.
But if money is not an issue and you’re pressed for time, go for the cable car because, honestly, it’s worth it. The views are stunning, especially those gondolas with a glass floor. If you prefer this option, you can book it on Klook!
You can use our promo code THEPOORTRAVELERKLOOK for up to P300 OFF or TPTKLOOK5 for up to P500 OFF. These codes might change in the future, so best to just visit thepoortraveler.net/klook to redeem updated discount codes!
Location: Ngong Ping, Lantau Island, New Territories, Hong Kong Nearest MTR Station: Tung Chung Station.
How to Get to Ngong Ping
Option 1: From Tung Chung Station, board Bus 23. Fare: HKD 20.4 Travel Time: Around 1 hour
Option 2: From Tung Chung Station, take Ngong Ping 360 for overlooking scenic views of the surroundings. Fare: One way, HKD 172 Travel Time: 25 minutes
5. Tai-O Fishing Village
If you want a taste of “old Hong Kong,” head to Tai O Fishing Village on Lantau Island, famous for its stilt houses — wooden homes propped up above the tidal flats — that look like something straight out of a postcard. Wandering through the narrow alleys and bridges gives you a glimpse of what life used to be like in a traditional fishing community.
Just being here is free. You can stroll around the waterfront, watch fishermen mend their nets, and soak up the laid-back atmosphere that’s so different from Central or Tsim Sha Tsui. The markets are a whole experience too — piles of dried seafood, shrimp paste jars, and snacks you’ve probably never seen before. Even if you don’t buy anything, it’s like walking through a living museum of local culture.
If you want to splurge a little, you can hop on a boat ride to spot the elusive pink dolphins or cruise past the stilt houses, but honestly, just exploring on foot is already rewarding. Pairing Tai O with a trip to Ngong Ping makes for a full day of adventure: morning with the Big Buddha and afternoon in a fishing village. Don’t worry — there’s a bus connecting the two sites.
But if you have moolah to spare, you can also book the Ngong Ping Tai-O Pass from Klook! This package includes a roundtrip cable car ride, a roundtrip bus between Ngong Ping and Tai-O Village, a boat tour, and meal vouchers.
Location: Tai-O Fishing Village, Lantau Island, New Territories, Hong Kong How to Get to Tai-O Fishing Village: From Ngong Ping bus terminal, take the New Lantao Bus 21 to Tai-O bus terminal. The fare is HKD 7.9. Travel time is 15-20 minutes.
6. Nan Lian Garden
Nan Lian Garden
On a separate occasion, we were also able to drop by Nan Lian Garden, a peaceful 3.5-hectare oasis in the middle of the vast urban jungle that is Kowloon.
The garden is designed in classical Tang dynasty fashion. It is adorned with manicured trees surrounding the tranquil “Blue Pond” that is straddled by a vermillion bridge that leads to a small pagoda called the “Pavilion of Absolute Perfection”.
Inside its buildings are various exhibits, including the Chinese Timber Architecture Gallery, which showcases the traditional way of building timber houses during the Tang dynasty.
The garden is situated just next to Chi Lin Nunnery, so keep quiet within the vicinity. Big group photos are also prohibited inside.
Address: Nan Lian Garden, Fung Tak Road, Diamond Hill, Kowloon, Hong Kong Operating Hours: 7:00 AM – 9:00 PM, but the exhibits are open from 10:00 AM to 5:00 PM. How to Get to Nan Lian Garden: Take the MTR Tuen Ma Line to Diamond Hill Station. Entrance to the Nan Lian Garden is roughly 350 meters from here (about 4-minute walk).
7. Man Mo Temple
Man Mo Temple
Tucked between modern buildings in Sheung Wan, Man Mo Temple is one of Hong Kong’s oldest and most atmospheric temples — and it won’t cost you a thing to enter. Built in the mid-1800s, it was dedicated to two deities: Man Cheong, the god of literature, and Kwan Tai, the god of war and brotherhood. Back in the day, locals would come here to pray for success in civil exams, and even today, students sometimes drop by before a big test.
Step inside and you’ll feel instantly transported. The air is thick with the scent of incense, as giant spiral coils burn slowly from the ceiling. The light filtering through creates a moody, almost cinematic atmosphere that makes you forget the busy streets just outside.
Best of all, it’s right in Central, so you can easily pop in during a day of sightseeing or shopping. There are several Man Mo temples in Hong Kong, but this one in Sheung Wan is the largest and was declared as a historic building and monument.
Address: Man Mo Temple, 124-130 Hollywood Road, Sheung Wan, Central, Hong Kong Island, Hong Kong Opening Hours: Daily, 8:00 AM – 6:00 PM Nearest MTR Station: Sheung Wan Station How to Get to Man Mo Temple: Take the MTR Island Line to Sheung Wan Station. Walk to your destination.
8. Central-Mid Levels Escalator
Only in Hong Kong would you find the world’s longest outdoor covered escalator system — and yes, you can ride it for free. Stretching over 800 meters, the Central–Mid-Levels Escalator isn’t just a way to get around; it’s practically a sightseeing tour on conveyor belts. It connects the busy streets of Central to the more residential Mid-Levels, saving locals from trudging up those brutally steep hills.
For travelers, though, it’s more than just transport. Riding the escalators takes you past buzzing neighborhoods filled with restaurants, cafés, and street art. You’ll glide through SoHo (South of Hollywood Road), one of Hong Kong’s trendiest dining spots, and past old tong lau buildings that give you a glimpse of the city’s past. The view changes with every section, making it feel like a moving balcony over Central’s urban jungle.
Here’s a tip: in the mornings, the escalator runs downhill to help commuters get to work. But from late morning until midnight, it switches and goes uphill, so time your ride accordingly. Whether you’re using it as a shortcut or just for the novelty of saying you’ve ridden the world’s longest outdoor escalator, this quirky urban attraction is a free, fun way to see Hong Kong from a different perspective.
Location: Central-Mid Levels Escalator, Central and Mid Levels, Hong Kong Island, Hong Kong Opening Hours: Dowhill – Monday to Sunday, 6:00 AM – 10:00 AM; Uphill – Monday to Sunday, 10:30 AM – 12:00 AM. Note that the schedule may change without prior notice. Nearest MTR Station: Central Station, Hong Kong Station, or Sheung Wan Station
9. Street Art & Historical Trail
Hong Kong may be best known for its towering skyline and neon-drenched nights, but scratch beneath the surface and you’ll find another side of the city: bold, colorful street art. One of the most recognizable pieces sits on the side of Hotel Madera Hollywood in Central: a massive mural, with its vibrant pop-art style and larger-than-life characters.
Not far away is Shing Wong Street, a steep staircase-turned-art canvas. Instead of plain grey steps, you’ll find bursts of painted patterns that make climbing the hill a lot more fun (and a lot more Instagrammable). The street itself is quiet compared to nearby Hollywood Road, so you can slow down, snap photos, and take in the creativity without the usual city chaos buzzing around you.
This spot is also part of the Sun Yat Sen Historical Trail, which weaves through the neighborhood, marked by bronze plaques, signs, and installations that highlight the revolutionary leader’s time in Hong Kong. Following the trail gives you a sense of how the city shaped Sun Yat Sen’s early years while also letting you discover tucked-away corners that most tourists miss. Pair that with the surrounding murals, and you’ve got this unique mash-up of modern street culture and deep-rooted history — something very “Hong Kong” in its own right.
The beauty of exploring this area is that it’s always changing. Street art gets refreshed, new murals pop up, and the energy evolves with each visit. It costs nothing to wander through, but the mix of visuals, stories, and atmosphere makes it one of the most rewarding ways to spend an afternoon in the city.
Location: Central, Hong Kong Island, Hong Kong
10. Mong Kok
If you love shopping or just being surrounded by frenetic energy, don’t miss Mong Kok. Walking through its streets feels like plugging yourself straight into the city’s electric pulse.
The area is famous for its street markets, each with its own personality. The Ladies’ Market is packed with souvenirs, knock-off handbags, and quirky trinkets. Sneakers Street (Fa Yuen Street) is paradise if you’re into shoes, lined with shop after shop of the latest releases and hard-to-find kicks.
Then there’s the Goldfish Market, which is exactly what it sounds like — an entire street dedicated to aquarium fish and pets, with plastic bags of colorful goldfish hanging like decorations.
At night, the neon signs kick in, and Mong Kok transforms into the classic Hong Kong scene you’ve seen in movies and travel posters.
The good news? It’s completely free to experience — unless, of course, you get tempted by the endless shopping stalls. Even if you don’t buy a thing, it’s a visual overload you won’t forget. Between the buzzing crowds, flashing lights, and the constant aroma of street food, the whole area feels like a free attraction in itself. It’s chaotic, it’s overwhelming, and it’s absolutely unmissable.
Location: Mong Kok, Kowloon, Hong Kong
11. Sham Shui Po
On Hong Kong’s Kowloon side, most tourists only get to explore Tsim Sha Tsui, Yau Ma Tei, and Mong Kok. But north of Mong Kok lies Sham Shui Po, which is brimming with compelling attractions on its own.
Some of the places worth checking out include:
Sam Tai Tsz and Pak Tai Temple
We were also able to visit the Jockey Club Creative Arts Centre (JCCAC), which was originally built in 1977 as a complex of tiny family-run factories but was transformed into an artist village.
Jockey Club Creative Arts Centre
Location: Sham Shui Po, Kowloon, Hong Kong Nearest MTR Station: Sham Shui Po Station How to Get to Sham Shui Po: Take the MTR to Sham Shui Po Station (on Tsuen Wan Line). Most attractions are within walking distance from the MTR Station.
12. Peng Chau
Tai Lei Island off Peng Chau
Aside from the peninsula, Hong Kong also covers several outlying islands off its coast. One of them is Peng Chau or “flat island”. The island is quite small, spanning only one square kilometer. But some of its main attractions include:
Lung Mo Temple
Lung Mo Temple, dedicated to the Chinese goddess of water, who is revered by local residents.
Tai Lei, a small island connected to Peng Chau by a bridge with a jagged offshoot called “Turtle Rock” and a sandy mini-beach.
Tung Wan Beach, a long sandy stretch close to the temple.
Fook Yuen Leather Factory, the island’s most visited attraction, thanks to the heritage building that houses it and its history. It’s no longer functioning as a workshop but an creative “secret garden” which features various installations and graffiti.
Bridge scene filming location of “Under Parallel Skies”
If you’ve seen the film Under Parallel Skies, starring Janella Salvador and Metawin Opas-iamkajorn, you’ll probably find some of its key attractions familiar like the Peng Chau Bridge and a small Asian ingredient store.
Location: Peng Chau Island, Islands District, New Territories, Hong Kong How to Get to Peng Chau: From the MTR Hong Kong Station, make your way to Central Pier No. 6. Catch a ferry to Peng Chau. Travel time is 30-40 minutes.
13. Cheung Chau
Cheung Chau Observation Deck
If you wish to go off the beaten path, another outer island that you might want to include in your itinerary is Cheung Chau, south of Lantau Island.
With an area of three square kilometers, Cheung Chau is bone-shaped, which looks like two separate islands connected by a narrow beach-laced strip of settlement. Among Hong Kong locals who wish to escape the constant jolt of the city, it is known for its hiking trails and relaxing beaches.
Lucky buns at Guo Jinji Bakery
On our day trip in Cheng Chau, we were able to visit the following:
Location: Cheung Chau Island, Islands District, New Territories, Hong Kong
How to Get to Cheung Chau
From Hong Kong city center: Take the MRT to Hong Kong Station and make your way to Central Pier No. 5. Catch a ferry to Cheung Chau. Fare: HKD 14.80 – HKD 42.30 (depending on the vessel and day of the week) Travel Time: 35-60 minutes (depending on the vessel) See schedule and more details here
From Ngong Ping/Po Lin Monastery: It’s possible to visit the Big Buddha/Ngong Ping 360 and Cheung Chau on the same day. Just board Lantau Bus #2, which makes a stop at Mui Wo ferry pier. Then catch the inter-island ferry to Cheung Chau.
14. Sha Tau Kok
Of all the towns within Hong Kong, Shau Tau Kok is perhaps the most curious. For many outsiders, it is almost unheard of. It is the territory’s northernmost settlement. And it is a closed town.
Wait, what? A “closed” town? What does it mean?
Located just south of the boundary with Shenzhen, Shau Tau Kok is within a regulated border zone called Frontier Closed Area. According to the South China Morning Post, it was closed off by the British colonial government in the 1950s in an effort to combat smuggling, espionage, and illegal immigration.
It is the last remaining major town in the zone, and is accessible only to local residents and those with the proper permit. Hence, unsurprisingly, only a limited number of tourists get to see and step into it, and they are allowed to stay in the area from 7:00 AM to 9:00 PM only.
But what’s in Sha Tau Kok? Novelty, mostly. Don’t expect exciting theme parks, giant shopping malls or vibrant food markets. What’s waiting for you here:
Chung Ying Street Garden
Sun Moon Pavilion, a simple bayside nook where you could spend a quiet morning.
Fish Lantern Square, where mascots Enggue Pup and Arttie Kitty stand, symbolizing the Sha Tau Kok fish lantern dance, which has been traditionally performed for over 300 years and has been declared a national intangible heritage.
Chung Ying Street, which straddles the border with Shenzhen. One part of it is in Hong Kong while the other in mainland China. A garden next to it if often a tour stop, as it is a good spot to watch the street.
Murals are all around town — on the walls, in the corners, on the ground — depicting mostly festivals and characters.
Salmon House, built in 1988 as relocation for many indigenous residents.
Shau Tau Kok Pier, the longest pier in Hong Kong, spanning 280 meters. It was constructed in the 1960s. It is also the gateway to Lai Chi Wo, which I will be discussing in the next section.
To manage your expectations: None of these are particularly exhilarating, overwhelming or dramatic. But altogether, they represent a side of Hong Kong that one could say is often overlooked, almost forgotten, and near isolated, away from the chaos of downtown. They also lend a cultural look into closed border towns that many people get to see.
Location: Sha Tau Kok, North District, New Territories, Hong Kong
Reminders
Sha Tau Kok is open to visitors but only if they have a Tourism Closed Area Permit, which is FREE of charge.
You can apply for one online on Hong Kong Police Force’s official website at least three working days before your intended arrival. The online application system opens at the start of each month for visits scheduled in the following month. (For example, slots for February visits are made available starting January 1.) It’s on a first come, first served basis.
15. Lai Chi Wo
Established around 400 years ago, Lai Chi Wo is one of the oldest but best preserved Hakka settlements in Hong Kong. At one point in its history, the village’s prosperity started to decline, so the feng shui masters recommended constructing walls around it to keep good fortune in and bad fortune out. Today, this walled village encircles over 200 houses neatly arranged in rows.
Because of its remote location, much of the rural settlement has not changed, as though it’s been frozen in time. Just outside its walls, the Hok Shan Monastery and Hip Tin Temple remain standing.
Hip Tin Temple and Hok Shan Monastery
You can go inside the village and walk down its centuries-old alleys, follow the Lai Chi Wo Nature Trail and admire the mangroves surrounding it. You can also just explore and get wrapped in its old-world charm or join a guided tour to learn more about Hakka history and culture.
In 2020, the village was awarded a UNESCO Special Recognition for Sustainable Development for promoting cultural conservation. It’s also part of the Hong Kong UNESCO Global Geopark.
Location: Lai Chi Wo, North District, New Territories, Hong Kong
How to Get to Lai Chi Wo
From Downtown Hong Kong: Catch a train on the MTR East Rail Line to University Station and take Exit B. Hop onto Bus 272K and alight at Ma Lui Shui Pier, the first stop. Travel on foot for 100 meters to Ma Liu Shui Landing No. 3 and board the kaito ferry bound for Lai Chi Wo. Alternatively, you can also just walk straight from the MTR University Station to the pier to catch the same ferry, which should take roughly 12 minutes. Kaito ferries are available on Saturdays and Sundays. Ferry travel time: 1.5 hours.
From Sha Tau Kok: If you’re visiting Sha Tau Kok and Lai Chi Wo on the same day trip, you can board a ferry from Sha Tau Kok Public Pier straight to Lai Chi Wo. Ferries from here are available daily. Travel time: 30 minutes. Note that a Closed Area Permit is required to access Sha Tau Kok and its pier.
Where to Stay in Hong Kong
For more details about different areas to stay in Hong Kong, you can check out our Where to Stay in Hong Kong article. But you may also check out these top accommodations in Hong Kong based on online user reviews for recommendations.
Getting a travel insurance is optional, but we highly recommend this, especially when traveling abroad. Travel can be unpredictable, and though we hope we’ll never use it, having it gives us peace of mind in case of unexpected delays, cancellations, or emergencies.
For international destinations, consider PGA Sompo’s TravelJOY Plus insurance. You can GET IT HERE. Don’t forget to use WORTHIT for a special affordable rate.
So, you have decided to visit Hong Kong Disneyland! You now have a list of the rides and attractions you want to experience. It’s a very long list, and you want to try as many as you can. Which ride should you go on first? What’s the best way to go about it? In this article, we’ll share with you what we feel is the best Hong Kong Disneyland itinerary to help you make the most of your time at the happiest place on earth.
We have been to Hong Kong Disneyland six times. And I’m not saying this to brag. I’m saying it, so you know that the itinerary I’m about to share with you is based on real, personal experience. Almost every time we visit, we get to experience at least 11 rides. Sometimes 12, sometimes 14 or 15, but never below 11.
Note: We’re not saying that following this itinerary will make you experience all of the rides because that still depends on a whole lot of variables, such as wait times, weather, and show schedules. Think of it as more like a route. You need to make your own decisions when you’re already there, given the circumstances.
Before we share with you the itinerary, there are some things you need to do BEFORE you even visit:
Have a good breakfast. First of all, before going to Disneyland, make sure you have good, sufficient breakfast. Walking around any Disney park isn’t like any other walk in the park. It can be pretty exhausting, especially when it’s hot and sunny, so come prepared with enough energy. Also, it’s best to eat before entering Disneyland because, as we have established in our previous videos, food inside the park is darn expensive.
Download the Hong Kong Disneyland app. It will show you not just the map of the park and directions but also the wait time for each attraction, which will be crucial in making decisions. Yes, we follow this itinerary we’re about to share, but feel free to adjust. If the wait time for an attraction is too long, you can rearrange a few items on this itinerary.
Visit on a weekday. To ensure you get to try as many rides as possible, avoid the weekends, Mondays, and holidays. Tuesday to Thursday is the best period. It’s cheaper too!
Familiarize yourself with the park’s layout. Be familiar with the lay of the land, so you won’t be going around in circles.
Hong Kong Disneyland Zones
Hong Kong Disneyland is the smallest Disney resort in the world, but it has eight themed areas or zones that you can explore: [HK DL map]
Main Street, U.S.A. A turn-of-the-century American street where vintage charm meets souvenir shopping and parade views. This is the first zone that will greet you immediately after the entrance.
Adventureland. A lush jungle escape with river cruises, tribal drums, and Tarzan’s treehouse.
Fantasyland. Classic fairytales come alive with whimsical rides, royal castles, and magical meet-and-greets.
Tomorrowland. A sleek sci-fi playground packed with Marvel action and intergalactic adventures.
Toy Story Land. Step into Andy’s backyard and feel like a toy among giant props and playful rides.
Grizzly Gulch. A wild west mining town with runaway mine trains and bear-sized surprises.
Mystic Point. A mysterious land of optical illusions, jungle gardens, and the legendary Mystic Manor.
Arendelle: World of Frozen. A snowy Scandinavian kingdom where Frozen comes to life through rides and immersive scenery. This is the newest and currently the most popular.
Early Park Entry
One thing you have to know is, currently, Hong Kong Disneyland is offering an Early Park Entry add-on on top of the regular ticket. For an additional fee, around HKD 100, this pass will allow you to access the World of Frozen zone one hour earlier than the official opening time of the park. So, let’s say the park opens at 10AM, you can already explore World of Frozen as early as 9AM. That’s just one hour, but that’s a big head start. It should be enough to explore the zone.
This sample itinerary will still work even without the Early Park Entry, so you don’t really have to get it if you don’t want to spend more. But if your budget allows, go for it because it’s worth it.
You can use our promo code THEPOORTRAVELERKLOOK for up to P300 OFF or TPTKLOOK5 for up to P500 OFF. These codes might change in the future, so best to just visit thepoortraveler.net/klook to redeem updated discount codes!
If you have this pass, arrive at Hong Kong Disneyland at least an hour before the scheduled opening time. Then look for staff members holding signs because they have a special entrance route for those who avail of the pass. Once in, you’ll get to see Disneyland without the crowd, too, as you make your way to World of Frozen on the other end of the park.
If you don’t have an Early Park Entry Pass, that’s OK. Show up early and make your way to World of Frozen just the same.
By the way, if your are looking for hotels and attractions in Hong Kong, please also visit our TPT Masterlist. Here, we compiled all our recommended hotels and attractions. Just visit and scroll until you see the section about Hong Kong. We also have a compilation for other destinations around the world.
1. World of Frozen
You might be asking, “But Yosh, if I don’t have an early park entry pass, why would I go to World of Frozen first? That’s literally on the other side of the park from the entrance!”
Frozen Ever After
Because it is one of the most popular zones right now, especially this ride: Frozen Ever After. And the line here just keeps getting longer as the day progresses, until maybe the late afternoon. But by then you’ll probably be too tired to return to it. So for me, it’s best to prioritize it because it is really, really good — arguably the hottest ride at Hong Kong Disneyland these days — and it’s really a crowd drawer. Just get it out of the way first.
Here, you’ll go on a boat cruise across a charming snowy village while the animatronics of Elsa, Anna, Kristoff, and Olaf sing the movie’s iconic soundtrack. But beware, it has a few surprises up its sleeves. Not too wild, but it’s so much fun.
Wandering Oaken’s Sliding Sleighs
And while you’re already here in Arendelle, take the time also to try the Wandering Oaken’s Sliding Sleighs, a family-friendly roller coaster also inspired by Frozen.
If you still have time left…
Once you’re done with Frozen, make your way out to Fantasyland. If you still have time left within the one-hour head start, go ride whatever you can here, like Dumbo Flying Elephant and Many Adventures of Winnie the Pooh, since they are already open as well.
But if you already used up your first hour, just keep walking south until you see a giant statue of Woody…
2. Toy Story Land
Welcome to Toy Story Land!
RC Racer
Toy Story Land has only three rides. The one we suggest that should be on top of your priority list is RC Racer — and let me tell you, this one looks way friendlier than it feels. It’s basically a giant orange half-pipe where you’re strapped into RC, Andy’s car, and launched back and forth until you’re dangling almost vertically at the top. Think Anchors Away at Enchanted Kingdom, but way wilder.
My stomach dropped with every swing, and half the time I couldn’t decide if I should scream or laugh. I did both at the same time! That’s how insane it was for me. We want you to prioritize this because the line here moves the slowest. It’s also the most fun.
Toy Soldier Parachute Drop
Then walk to Toy Soldier Parachute Drop. You get strapped in with the Green Army Men and lifted up high before bouncing down like a parachute in training. It’s not as terrifying as RC Racer, but the slow climb builds up just enough suspense, and the view of the park from the top is actually pretty sweet. The drops give you that fun little tummy tickle—like being on a kiddie-free-fall ride but with better theming.
It’s also very popular, so expect the lines to be long and they move incredibly slow too. If you’re taking this on alone, good. You can easily bypass the line because this is the only ride at Hong Kong Disneyland that has a special solo-rider lane. This is how it works: Every gondola has six seats, and sometimes, when the riders on the main line are settled, some seats remain vacant. The staff members fill them out by getting solo riders. And normally, there are very few solo riders, so the wait times for them are significantly shorter.
If you’re a party of two or more, you can still take advantage of it. But know that you will be separated from your group. If you want to save time, go for it.
Slinky Dog Spin
Right across from the Parachute Drop is the Slinky Dog Spin, which is the tamest and mildest of the three. Very demure. It’s just Slinky trying to catch his tail. It’s super fun for small kids, but I, as a grown man, don’t enjoy this, to be honest with you. It’s giving me nothing. Zero thrills at all. I always just get dizzy.
Once you’re done with all three, continue walking forward to the next zone…
3. Mystic Point
You’ll know you’ve stepped into Mystic Point because it is a drastic change from Toy Story Land or even Fantasyland.
Garden of Wonders
The air seems thicker here, the trees shadier, and everywhere you look, there are strange statues and odd relics, especially at the Garden of Wonders, where optical illusions make statues twist and contort depending on where you stand.
Mystic Manor
But at the heart of it all looms the grand Mystic Manor, the home of Lord Henry Mystic, Hong Kong Disneyland’s very own eccentric explorer. I love this ride, one of my all-time favorites. It’s so family-friendly and so, so fun. It’s storytelling at its finest. It’s also an original concept, not some familiar Disney movie retelling.
The second you board the trackless carriage, the magic begins. The story unfolds as Lord Henry proudly shows off his artifacts, while his pet monkey Albert, curious as ever, fiddles with a mysterious music box. Suddenly, the whole collection springs to life. Paintings move, statues dance, and entire rooms transform before your eyes. With the trackless ride system, every turn feels unpredictable, like the mansion itself is leading you on a wayward detour. And it’s indoors, so it will give you a break from the sun.
Mystic Point is one of the smallest zones here at Disneyland, so just walk a few minutes and you’ll be out of it. Then, you’ll be greeted by a mining town. Enter…
4. Grizzly Gulch
This themed land can only be found in Hong Kong Disneyland. Walking in, you’ll see clapboard buildings, dusty props, and a big, rocky mountain. You’ll pass by the very tempting Lucky Nugget Saloon, which is a restaurant that has a takeout counter. As appetizing as it may be, don’t pay attention to it for now. You don’t want to fill your tummy before braving our next ride, which is…
Big Grizzly Mountain Runaway Mine Cars
At first glance, Big Grizzly Mountain Runaway Mine Cars looks like a classic runaway mine train. I hopped on expecting the usual twists and turns, but this coaster is full of surprises. Midway through the ride, the track literally shifts beneath you, sending your cart backwards into the dark before shooting you forward again at high speed. And just when you think it’s over, a couple of grizzly animatronics pop up, causing even more “accidents” that push the ride into pure chaos. It’s thrilling, hilarious, and completely different from the coasters you’ll find in other Disney parks.
Lunch Break
Once you’ve conquered it, then you can have lunch. Walk back to the Lucky Nugget Saloon and grab something to eat. It’s best to keep your lunch light, as we still have a lot of rides to try, and you don’t want a party in your tummy. This food stall is okay because they have chicken, fries, Caesar salad, and pasta salad.
We’re not recommending this because of the taste or flavor, but only because it’s the closest one in the area, and it’s more convenient than a proper restaurant. Also, because they sell Hong Kong milk tea slush with soft serve (HKD 62, PHP 450), which is my favorite!
Just find a bench or table in the vicinity. Looking for a completely shaded area? You can walk to this bridge, and under it you’ll find a set of benches.
If you don’t like the menu at the Lucky Nugget Saloon, don’t worry. Close to this bridge, you’ll find Karibuni Grill, which serves Honey Soy Sticky Chicken Wings, Elote “Corn on Cob” Tajin, Cheddar Cheese Hot Dog, and Korean Squid. They also sell those giant turkey legs (HKD 160, PHP 1165). Lots of options in this area, which is why we love having lunch here.
But at this point, we have already stepped into another themed land.
5. Adventureland
Welcome to Adventureland!
This is Disneyland’s version of a wild, tropical paradise. The entire place is wrapped in lush greenery and jungle sounds and the echoing of the drums. This is great because it’s high noon or early afternoon at this point, and you would want to escape the sun. And we have the best solution for that.
Festival of the Lion King
This is the Theater in the Wild, where you can catch the Festival of the Lion King, an indoor live Broadway-ish musical with acrobats, fire dancers, and larger-than-life costumes and floats. It’s a 30-minute show, and it’s really great, so be sure to see it.
Attention! The Festival of the Lion King is temporarily suspended from September 3, 2025 onwards. Check the official website for updates.
Again, feel free to adjust your itinerary. If you finish your Runaway Mine Carts ride before noon and you’re not hungry yet, catch the noontime performance and grab your lunch later instead.
They fill the entire theater, so there are usually no long lines, and if there are, they can usually accommodate everyone.
Jungle River Cruise
After the show, head over to the Jungle River Cruise. It’s campy, it’s funny, and somehow it never gets old, especially with the little surprises the skippers throw in along the way. This is also a great afternoon ride because the heat isn’t too harsh here as you’re surrounded by trees and water.
Tarzan’s Treehouse
Across the land, towering above the treetops, is Tarzan’s Treehouse. It’s more of an exploration play area than a ride. You can climb up the rope bridges and wooden walkways, which provide little vignettes from Tarzan’s story. I haven’t visited this in a long time, as I usually skip it. I’ve seen it once before, and I felt like that was enough, so we don’t have any recent footage. And as of writing, this attraction is still closed until further notice. It’s best to check the official website for the announcement regarding the reopening.
Once you’ve had your dose of jungle fever, it’s time to re-enter Fantasyland.
6. Fantasyland
If there’s one place in Hong Kong Disneyland that screams “classic Disney,” it’s Fantasyland. Here, you’ll be surrounded by carousels, pastel facades, and the kind of whimsical soundtrack that makes you feel like you’ve stepped into a childhood dream.
It’s the heart of the park, and honestly, it’s impossible not to feel a little giddy here, especially as you stare at Castle of Magical Dreams, looming above you. Originally Sleeping Beauty’s Castle, it was completely reimagined into a soaring, multi-towered centerpiece that represents 13 Disney princesses. Each tower reflects a different princess, from Ariel’s seashells to Mulan’s cherry blossoms.
At this point, forget about the order and play it by ear. Go where the line is the shortest. But there are two attractions that I want to highlight.
Mickey’s PhilharMagic
First is Mickey’s PhilharMagic, a 4D musical show where Donald Duck gets into trouble with Mickey’s magical orchestra. With water sprays, scents, and a whirlwind of Disney movie scenes, it’s the perfect spot to sit down, cool off, and be swept up in some nostalgia. I absolutely love this show! I always watch it when I visit any Disneyland theme park.
The Many Adventures of Winnie the Pooh
Second is The Many Adventures of Winnie the Pooh, a family-friendly dark ride that’s surprisingly popular. If you see that the wait time here is not that bad, grab the chance because the line here fills up fast. Here, you hop into a honey pot and follow Pooh and friends through the Hundred Acre Wood. It’s cute, cozy, and a little bit trippy.
Kid-Approved Rides
Fantasyland is also quite small, but it is packed with attractions, although most of them are for small children, but adults are also welcome, of course. If you have kids, then you won’t have a choice. Your kids WILL insist on riding:
Cinderella Carousel. This is basically just that — a grand carousel.
Mad Hatter Tea Cups. A ride where you can spin yourself silly under colorful lanterns.
Dumbo the Flying Elephant. Here, you hop onto your own Flying Dumbo. It’s like a carousel, but you soar in the air and you control how high or how low you go. I actually quite enjoy the Dumbo ride, even as an adult.
But often, when I visit, I usually just skip these three rides.
It’s a Small World
And of course, as you exit Fantasyland, don’t miss to make a stop at It’s a Small World! The ride takes you on a boat through colorful sets filled with dolls in traditional costumes from all over the world. Hong Kong’s version is extra special because it includes Disney characters woven into the scenes. Spot Mulan in China, Aladdin and Jasmine in the Middle East, and even Lilo & Stitch in Hawaii. And the Philippines is featured here, too!
And yes — the song will get stuck in your head. But not for too long because soon you’ll be replacing it with other Disney songs.
7. Main Street, U.S.A.
When you exit Fantasyland, you’ll find yourself close to the front of the castle and Main Street, U.S.A. There are two events that you might want to catch here.
Disney Friends Live: Party at the Castle!
First, Disney Friends Live: Party at the Castle! This is a 15-minute high-energy concert-style show featuring Mickey and Friends, Duffy and Friends, and of course some of our fave Disney Princesses like Belle, Tiana, and Aurora. The schedules vary daly, so it’s best to check this page for the exact times: Disney Friends Live: Party at the Castle Schedule.
I actually saw the 11:30 AM performance before, but it’s way too hot, so what I’m recommending is to catch the late afternoon or even the evening performance, which I feel is a more comfortable choice.
Friendtastic! Parade
Same with the Friendtastic! Parade, which you can also catch from Main Street, U.S.A. This is the biggest parade in Hong Kong Disneyland history, showcasing 11 larger-than-life floats, featuring Mickey and friends and your favorite characters from Toy Story, Zootopia, Encanto, Monsters Inc., Up, and of course, Inside Out. Over 100 performers make the atmosphere really grand and festive!
As of writing, it only happens once daily, falling between 1:00 PM and 2:30 PM. Other months or seasons have late afternoon or evening schedules, too. You can go to this page for the show’s exact time: Friendtastic! Parade Schedule.
I saw the 1PM parade before, but I feel like the late afternoon or the evening schedule is better to avoid the sun.
After the parade, it’s time to enter another dimension. Well, sort of.
8. Tomorrowland
Walking into Tomorrowland feels like stepping into a sleek, futuristic sci-fi city. It’s like you’ve time-traveled.
Hyperspace Mountain
What I recommend that you prioritize here is Hyperspace Mountain because it draws in the biggest crowd. This is a Star Wars-themed indoor roller coaster. You start in almost pitch darkness, then you weave through tie fighters and laser blasts. The soundtrack booms, the turns are sharp, and by the end, you’re screaming and cheering. It’s easily one of the most exhilarating rides in the whole park.
Iron Man Experience
After this, walk all the way to the other end, and you’ll find the Iron Man Experience, which also happens to be Marvel’s very first Disney ride in the world. You strap into a “StarkVision” flight vehicle, slip on your 3D glasses, and suddenly you’re soaring over Hong Kong with Iron Man himself, blasting drones and dodging explosions. It’s part simulator, part action movie, and seeing familiar Hong Kong landmarks in the middle of the battle gives it a really cool local twist.
Ant-Man and The Wasp: Nano Battle
Then just next door is Ant-Man and The Wasp: Nano Battle, which is basically a high-tech shooting game turned ride. You shrink down to the size of an ant, grab a laser blaster, and help the heroes fight off swarms of Hydra bots. It’s frantic, fun, interactive, and also competitive because you can compare scores with your seatmate. This is also suitable for kids and seniors, as it doesn’t have drops and twists.
Orbitron
Lastly, Orbitron, where you pilot your own retro-styled spaceship. I’ve tried it just once before. But now I always skip it, probably because it’s too similar to the Dumbo ride. Also, because I’m usually completely exhausted at this point. And to me, it looks like I’m not the only one.
I have explored Tomorrowland in the morning and early afternoon too, and no, it wasn’t too crowded. But even less so in the late afternoon or early evening. In fact, at the Iron Man and Ant-Man rides, I virtually just walked straight into the ride because the lines were too short. It happened to us twice.
Dinner Time
If you’re hungry, you can grab dinner here at Starliner Diner, which offers burgers and fried chicken with fries. We had Marvel burger meal (HKD 140, PHP 1020) and 2-pc fried chicken meal (HKD 140, PHP 1020)
9. Momentous Nighttime Spectacular
And once you had your dinner, make your way back to Main Street or the area in front of the castle to catch the Momentous Nighttime Spectacular, which happens at either 8:00 PM, 8:30 PM, or 9:00 PM, depending on the season.
This is HK Disneyland’s jaw-dropping evening show. Think of it as Disney’s greatest hits album brought to life: the castle transforms into a massive projection screen, scenes from classics like The Lion King and Mulan, all the way to Frozen and Coco, play out with music that gives you goosebumps.
Fireworks explode overhead, fountains dance in sync, lasers cut through the night sky, and — the cherry on top, this year as it celebrates its 20th anniversary — hundreds of drones form dazzling shapes above the park.
10. Exit HK Disneyland
As soon as Momentous Nighttime Spectacular is over, people will start flooding out of the park. You can join them, or you can stay a little bit and let the madness pass, so you can exit more peacefully.
The last train leaves the Disney Resort Station at 12:40 AM, way past midnight, as of writing. So there’s really no need to hurry or join the crowd, unless you need to be elsewhere that night.
Reminders
If at any point you want to buy a souvenir, go for it. There’s usually a store at the exit point of every ride.
As you can imagine, this itinerary is so packed. It is possible if you’re visiting on a weekday of an off-peak season. But it might be challenging on a weekend.
Keep an eye on the wait times and decide based on those. If you feel like you’re running short of time, feel free to skip some of these and again, play it by ear.
Hong Kong Disneyland Itinerary Summary
Here’s a quick rundown of the route and itinerary. As always, you can customize or tweak this to suit your interests and preferences.
World of Frozen 1: Frozen Ever After 2: Wandering Oaken’s Sliding Sleighs
Toy Story Land 3: RC Racer 4: Toy Soldier Parachute Drop 5: Slinky Dog Spin
Mystic Point 6: Garden of Wonders 7: Mystic Manor
Grizzly Gulch 8: Big Grizzly Mountain Runaway Mine Cars
Lunch
Adventureland 9: Festival of the Lion King 10: Jungle River Cruise 11: Tarzan’s Treehouse
Fantasyland 12: Mickey’s PhilharMagic 13: The Many Adventures of Winnie the Pooh 14: Cinderella Carousel 15: Mad Hatter Tea Cups 16: Dumbo the Flying Elephant 17: It’s a Small World
Main Street, USA 18: Disney Friends Live: Party at the Castle 19: Friendtastic! Parade
Tomorrowland 20: Hyperspace Mountain 21: Iron Man Experience 22: Ant-Man and The Wasp: Nano Battle 23: Orbitron
Dinner
Castle of Magical Dreams/Main Street, USA 24: Momentous Nighttime Spectacular
Exit HK Disneyland: Last train leaves at 12:40 AM.
Where to Stay Near Hong Kong Disneyland
For an even more magical Disney experience, book your stay at one of the Disney hotels at Hong Kong Disneyland Resort. Below are the three hotels to choose from.
Disney Explorer’s Lodge
Where to Stay in Hong Kong
Outside of Disneyland, the closest area to Disneyland is Tung Chung and Hong Kong SkyCity. These areas are also near the airport. However, if you’re also exploring other parts of Hong Kong during your trip, you may also consider other areas like Tsim Sha Tsui or Central.
For more details about different areas to stay in Hong Kong, you can check out our Where to Stay in Hong Kong article. But you may also check out these top accommodations in Hong Kong based on online user reviews for recommendations.
Getting a travel insurance is optional, but we highly recommend this, especially when traveling abroad. Travel can be unpredictable, and though we hope we’ll never use it, having it gives us peace of mind in case of unexpected delays, cancellations, or emergencies.
For international destinations, consider PGA Sompo’s TravelJOY Plus insurance. You can GET IT HERE. Don’t forget to use WORTHIT for a special affordable rate.