This discount is only available for Agoda app users. To download the official app, use the links below:
If you don’t have an Agoda account yet, you can use the app to sign up for one.
Once you have an account, go to the DEALS page of the Agoda app. This is usually the default landing page. If not, just tap on the COUPONS icon on the bottom of the page. In other versions, this button is labeled DEALS. They’re the same. Under the COUPONS tab, enter AGODATPT. Then, tap on the checkmark.
The promo code will be added to your Agoda account.
If you wish to book a hotel or activity, just search and select as usual. For hotels, it usually works like this:
Enter a destination, city or a specific hotel, and your travel dates.
Once you’ve found a hotel you want, click on it and choose a room.
Once you come to a decision, enter the number of rooms/beds and click BOOK NOW to make a reservation.
You will be taken to the Agoda Booking Form.
Fill out this form by supplying your name and contact details.
When you scroll down, just above the PRICE, you’ll find the COUPONS section with a field asking for a PROMO CODE. Enter the promo code again: AGODATPT.
You can also select from the list of codes saved in your account, but it’s generally easier to type the promo code again.
The discount amount for the coupon code and the actual price paid after the discount should be applied and displayed in the PRICE section below it.
Click on the NEXT: FINAL STEP button.
On the next page, you’ll be asked for payment details.
Terms apply to American Express benefits and offers. Enrollment may be required for select American Express benefits and offers. Visit americanexpress.com to learn more.
If you fly Delta frequently and want to earn toward elite status while enjoying more travel perks than their Gold card offers but don’t want to pay the high fee of the Reserve, the Delta SkyMiles® Platinum American Express Card is likely the best fit for you. It’s a step up in both annual fee and benefits, giving you tools to reach Medallion status faster, plus credits that can offset travel costs.
Here’s my review of the card!
Delta SkyMiles® Platinum American Express Card Overview
The Delta SkyMiles® Platinum American Express Card has an annual fee of $350. (See Rates and Feees.) That is a pretty high annual fee for a lot of people but I would say that if you fly the airline enough to hit their gold status then you are definitely going to want this card over their other ones as it will give you a lot of perks and make your Delta flying experience better.
This card offers:
Earn 60,000 Bonus Miles after you spend $3,000 in eligible purchases on your new Card in your first 6 months of Card Membership.
3X Miles on Delta purchases and purchases made directly with hotels
2X Miles at restaurants worldwide including takeout and delivery in the U.S., and at U.S. supermarkets.
1x Miles on all other purchases
Companion Certificate on a Main Cabin round-trip flight to select destinations each year after renewal of your Card.
$2,500 Medallion® Qualification Dollars with MQD Headstart each Medallion Qualification Year
1 MQD for each $20 in purchases on your Delta SkyMiles® Platinum American Express Card with MQD Boost to get closer to Status next Medallion Year.
$120 statement credit every 4 years for a Global Entry application fee or a statement credit up to $85 every 4.5 years for a TSA PreCheck® (through a TSA official enrollment provider) application fee
15% off award travel redemptions on Delta flights
Up to $120 Resy credit (up to $10 monthly in statement credits)
Up to $120 Rideshare credit(up to $10 monthly in statement credits)
First checked back free
How to Redeem Delta SkyMiles
Delta uses dynamic pricing for their rewards. That means that the number of points it takes to book a flight isn’t a set number. Instead, the rate varies based on the cash price of a flight. You can also redeem your points as cash at checkout at the rate of 1 cent per mile but I never find that a good redemption and only rarely ever do that. I only ever do this if I am low on points and don’t have enough to redeem a flight but want to save money off the cash price.
The 15% off on award redemptions makes flights a lot more affordable so be sure to have your card connected to your SkyMiles account. If you are flexible with your dates, you can use their award calendar to see the best points fare as mixing and matching your dates can lead to better deals.
Additionally, Delta offers a lot of award sales so keep an eye out for them. Thrifty Traveler and Point.me are two good websites that can send you alerts. I find Delta miles to be the best for U.S. domestic economy and comfort plus redemptions. Unless there’s a sale, I never book for business or international flights. The redemption value is terrible.
Is the Delta SkyMiles Platinum Worth It?
For regular Delta flyers aiming for Medallion status, the The Delta SkyMiles® Platinum American Express Card is a clear upgrade from the Gold card. The companion certificate alone can offset the annual fee. Add in the TSA PreCheck credit, higher earning rates, and MQD boosts, statement credits, and the 15% off rewards and the card pays for itself. I’m a huge fan of this one. I have the business version of it as I have the Reserve for personal use since I am heavy Delta flier but if you’re not, then get this Platinum card.
Pros and Cons
Pros:
Companion certificate each year
MQD earning through card spend
Higher earn rates on Delta and hotel purchases
TSA PreCheck/Global Entry credit
Free checked bag for you and companions
15% off award flights
Cons:
Higher annual fee at $350
No Sky Club lounge access
Companion certificate is domestic main cabin only
***
The Delta SkyMiles® Platinum American Express Card is best for travelers who fly Delta often and are either chasing or maintaining Medallion status. Between the companion certificate, free checked bags, and the ability to earn MQDs on spending, it offers more than enough perks to justify the higher fee for frequent flyers. If you want lounge access or premium upgrades, however, you might want to look at the Delta SkyMiles® Reserve American Express Card card instead.
Download my free guide to points and miles and learn how to use points and miles for free travel! It’s how all the pros travel so much! In this guide, I’ll show you:
How to Pick a Credit Card
How to Earn Up to 10x Miles on Your Spending
How to Redeem Your Points
And a Ton of Other Money Saving Tips!
Book Your Trip: Logistical Tips and Tricks
Book Your Flight Find a cheap flight by using Skyscanner. It’s my favorite search engine because it searches websites and airlines around the globe so you always know no stone is being left unturned.
Book Your Accommodation You can book your hostel with Hostelworld. If you want to stay somewhere other than a hostel, use Booking.com as it consistently returns the cheapest rates for guesthouses and hotels.
Don’t Forget Travel Insurance Travel insurance will protect you against illness, injury, theft, and cancellations. It’s comprehensive protection in case anything goes wrong. I never go on a trip without it as I’ve had to use it many times in the past. My favorite companies that offer the best service and value are:
Want to Travel for Free? Travel credit cards allow you to earn points that can be redeemed for free flights and accommodation — all without any extra spending. Check out my guide to picking the right card and my current favorites to get started and see the latest best deals.
Need a Rental Car? Discover Cars is a budget-friendly international car rental website. No matter where you’re headed, they’ll be able to find the best — and cheapest — rental for your trip!
Need Help Finding Activities for Your Trip? Get Your Guide is a huge online marketplace where you can find cool walking tours, fun excursions, skip-the-line tickets, private guides, and more.
Ready to Book Your Trip? Check out my resource page for the best companies to use when you travel. I list all the ones I use when I travel. They are the best in class and you can’t go wrong using them on your trip.
This is a guest post by Raimee Iacofano from Raimeetravel.
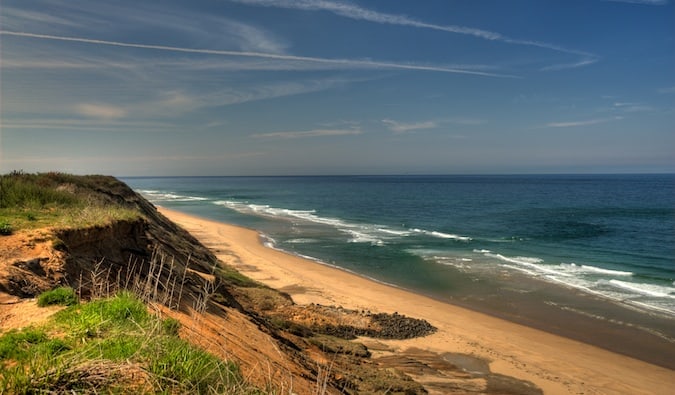
Growing up in Michigan, Ludington was THE place to be. Every summer, my family would pack up the car, blast some classic rock (think Tom Petty, Fleetwood Mac, and the occasional Lynyrd Skynyrd singalong), and head west for beach days, lighthouse climbs, and the BEST Superman ice cream you’ll ever have. It was tradition for us each year because my grandparents called Ludington home.
As a kid, it felt like pure magic. Falling asleep to the sound of waves, chasing seagulls barefoot in the sand, and sticky fingers from melting cones that somehow always dripped down to my elbow. Ludington wasn’t just a vacation spot for us, it was a special place to make our family memories!
But then life happened. I grew up. Things changed. I started traveling the world, chasing new coastlines, and eventually moved across the country to California. My summers became less about beach towels and bonfires on Lake Michigan and more about airports, new countries, and ticking places off my bucket list.
And yet, Ludington was always tucked in the back of my mind. No matter how many cliffs I hiked in Ireland, or temples I wandered through in Asia, part of me wanted to come back. To see if it still held the same magic or if I’d outgrown it.
Finally, this summer, I returned for the first time in over a decade. And… WOW. Ludington is even more special now. It’s charming and peaceful, yet absolutely packed with things to do. If you’ve been sleeping on West Michigan (or Michigan in general), this is your official wake-up call.
I thought this trip would be a little nostalgic, maybe a quiet walk down memory lane. Instead, Ludington completely surprised me with rooftop dinners, breweries with fire pits, gorgeous hiking trails, and so many nearby adventures. Honestly, there’s so much here that you could stay for a week and still leave with a list of things for “next time.”
Here’s how I spent my time and everything I’d recommend if you’re planning your own trip to Ludington.
Things to Do in Ludington
1. Beach Days & Lighthouse Treks
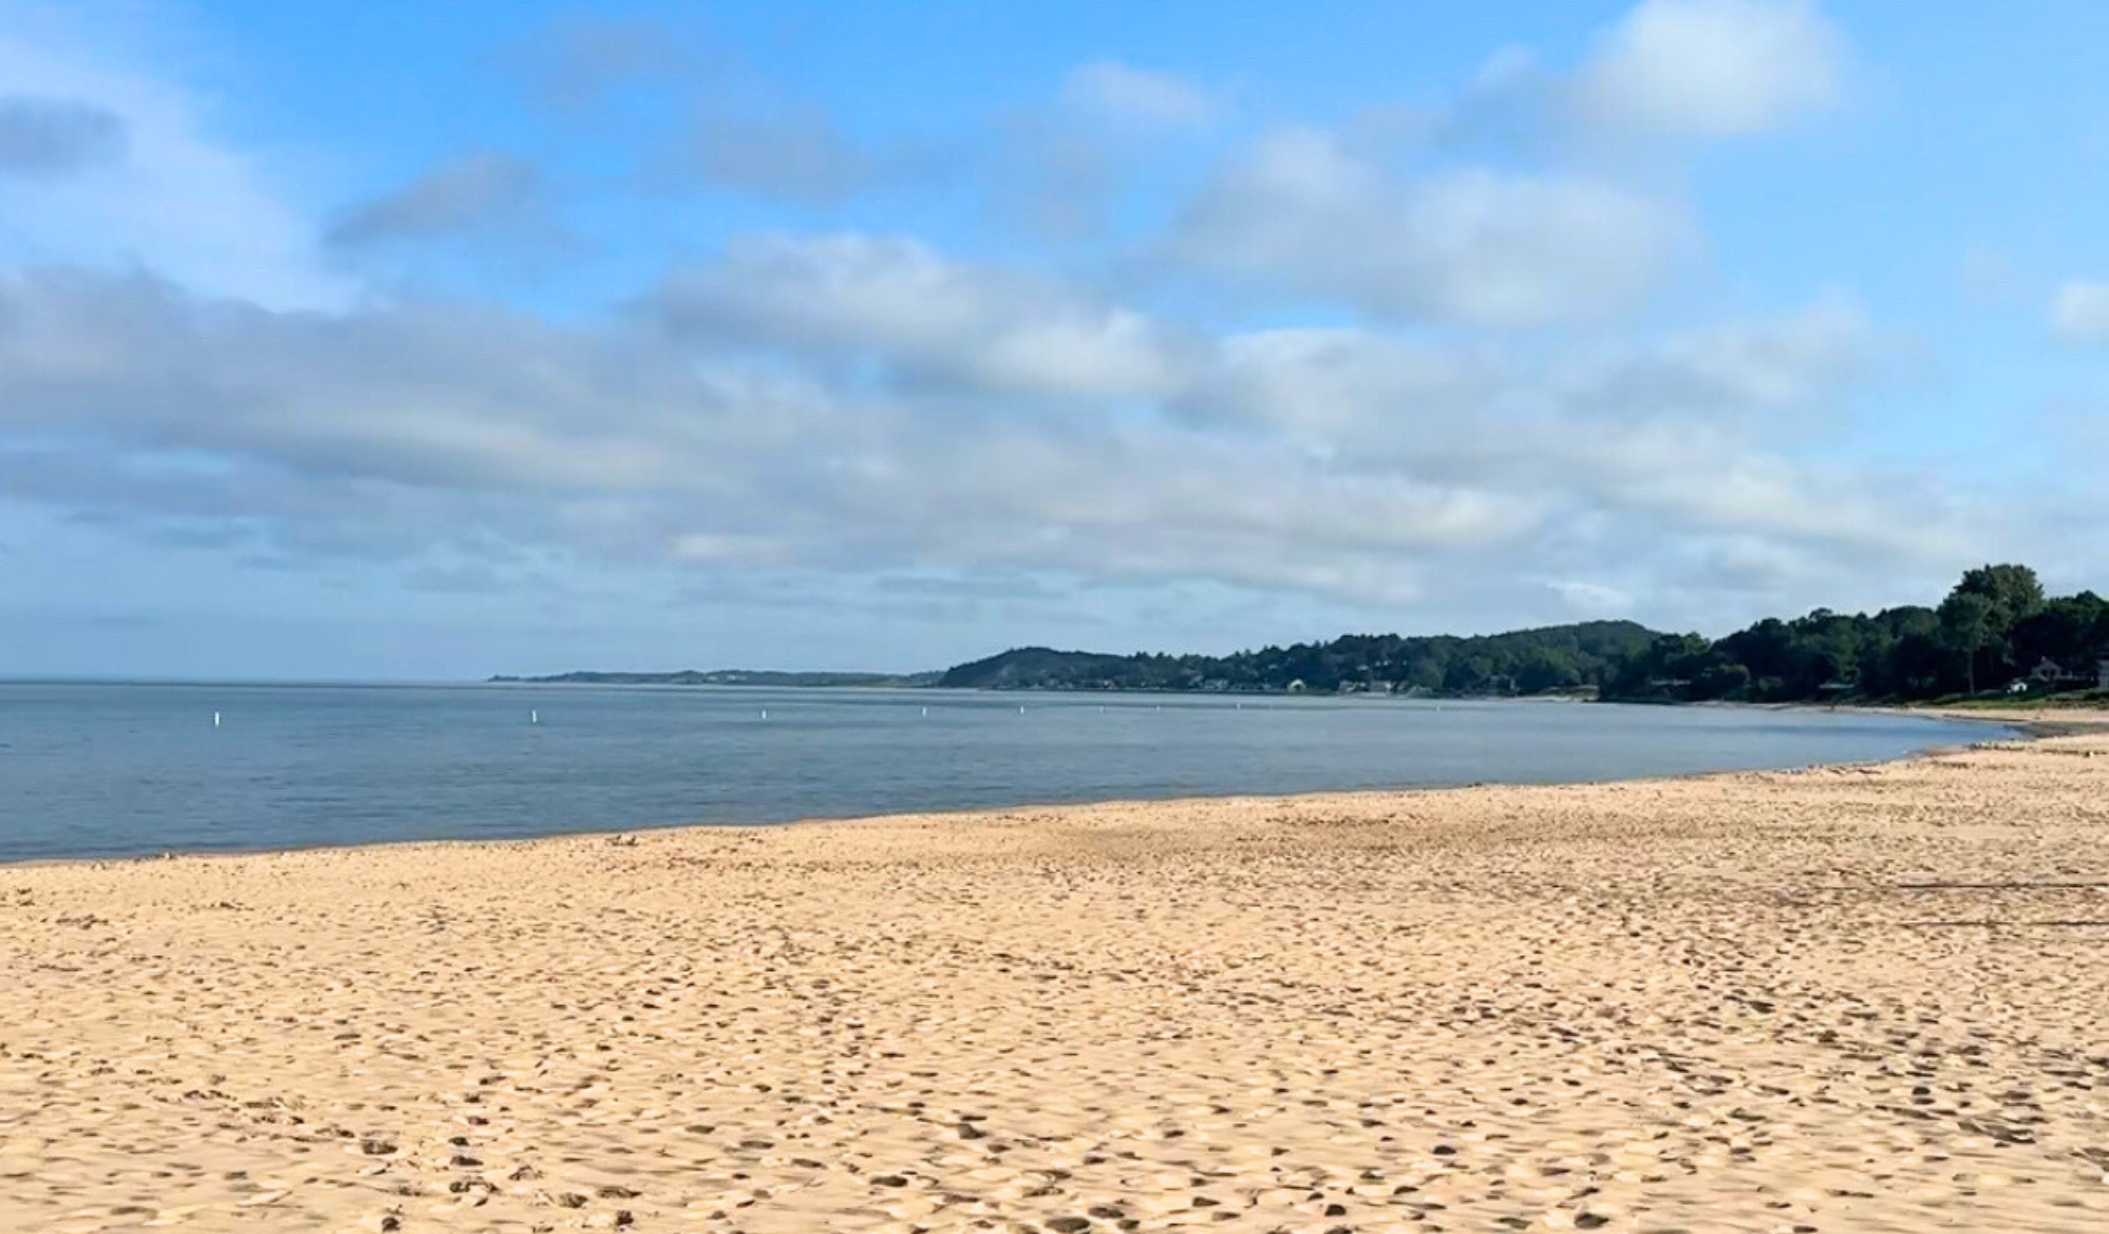
First stop: Stearns Park Beach. It’s totally free and walkable from downtown, which I love. We set up with a ton of snacks, people-watched, and even played a little shuffleboard (yes, there’s free shuffleboard courts right by the beach!). The sand is soft, the vibe is laid back, and the water is that endless deep blue that makes you forget you’re not at the ocean.
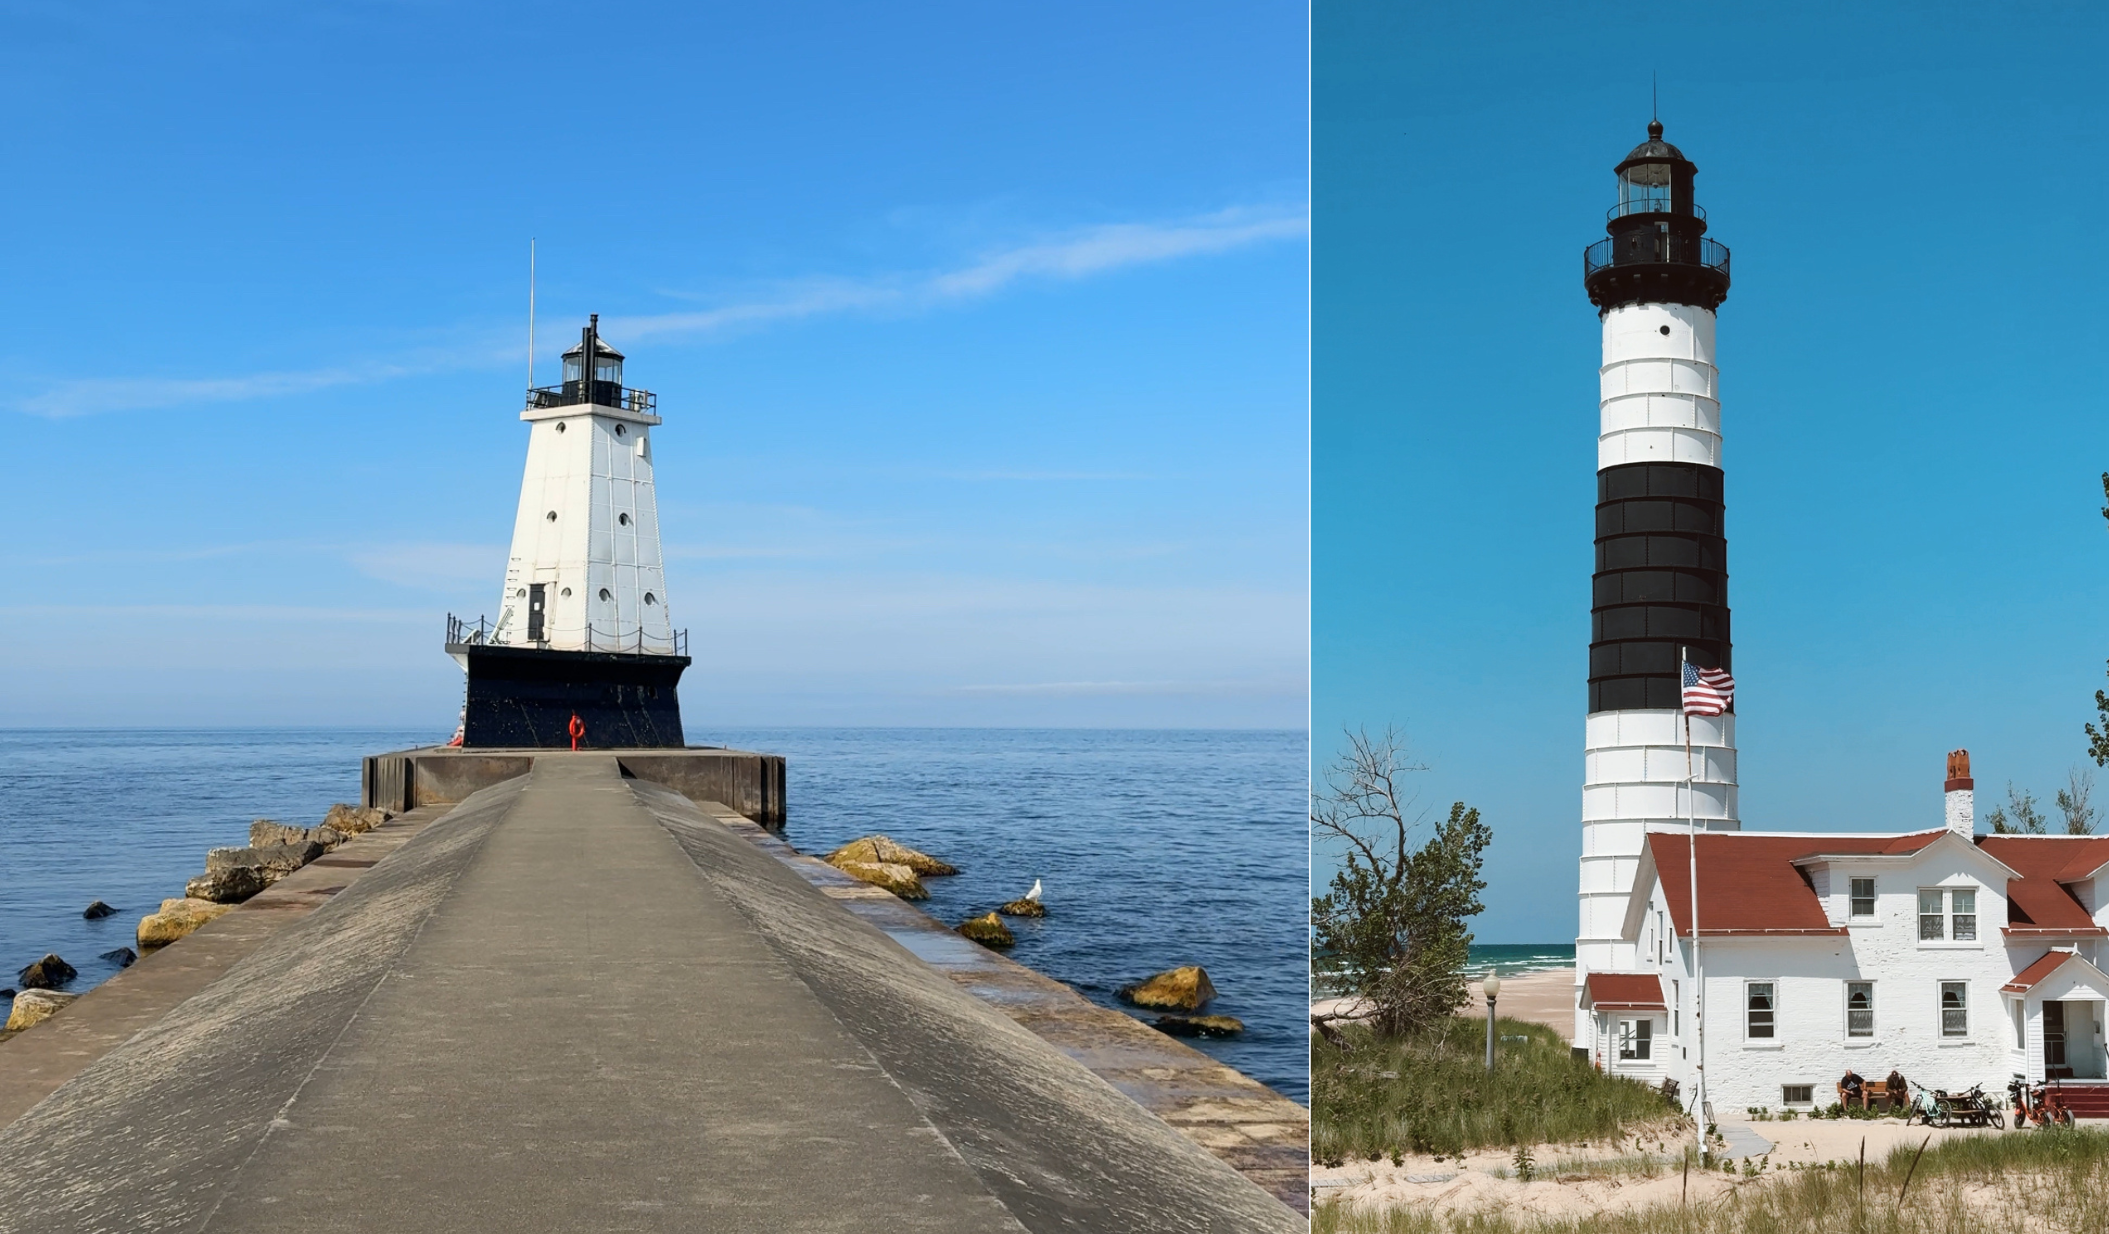
If you’re up early, or willing to stay late, walk the breakwall to the Ludington North Breakwater Light. The lighthouse is stunning during both sunrise and sunset, and each gives the lake a completely different mood. Pro tip: if you head out around 9 a.m., you’ll catch the SS Badger, a historic coal-fired car ferry, making its way across Lake Michigan to Wisconsin. The tradition is to wave goodbye to the passengers onboard, and it feels like stepping into a moment straight out of small-town Americana.
For something more adventurous, head to Ludington State Park. It’s often called the “crown jewel” of Michigan’s state parks—and I get it now. Twenty-five miles of trails wind through forests, dunes, and beaches, with stops at both Lake Michigan and Hamlin Lake. The highlight? Hiking out to Big Sable Point Lighthouse. It’s about two miles each way, but the walk is gorgeous and the payoff is huge: a tall, striped lighthouse from the 1800s standing guard against the waves. It’s the kind of spot that makes you pause and think, “Wow, I can’t believe this is in Michigan.”
2. Museum Time (because I secretly love history) One of my favorite travel quirks is that I always end up in at least one museum—no matter where I go. In Ludington, I found two gems:
Historic White Pine Village: An outdoor museum with over 30 historic buildings, from a one-room schoolhouse to an old-fashioned courthouse. Walking around felt like stepping back into a simpler time, and it gave me a whole new appreciation for Michigan’s roots.
Port of Ludington Maritime Museum: Perfect if you love Great Lakes history, lighthouses, or boats. It’s in a former Coast Guard station and has such a fun mix of interactive exhibits and vintage charm.
Bonus: both spots are super photogenic so bring your camera.
3. Water Adventures & Nature Fix If you’re an outdoorsy person, Ludington is basically paradise. You can rent kayaks at Hamlin Lake for a peaceful paddle, or grab a pontoon boat if you want more of a party-on-the-water vibe. Paddleboards are another fun option—great workout, and you get a totally different perspective of the lake.
Not into water? There’s also mountain biking, disc golf, and plenty of hiking trails. Ludington really is the best of both worlds: small-town charm mixed with endless outdoor adventures.
Where to Eat & Drink in Ludington
I’ll be honest: I wasn’t expecting Ludington’s food scene to be this good. But WOW. From breakfast spots to breweries, I was seriously impressed.
Breakfast & Casual Bites
Café 106: Cozy and cute, perfect for brunch. Their omelets hit the spot after a morning walk.
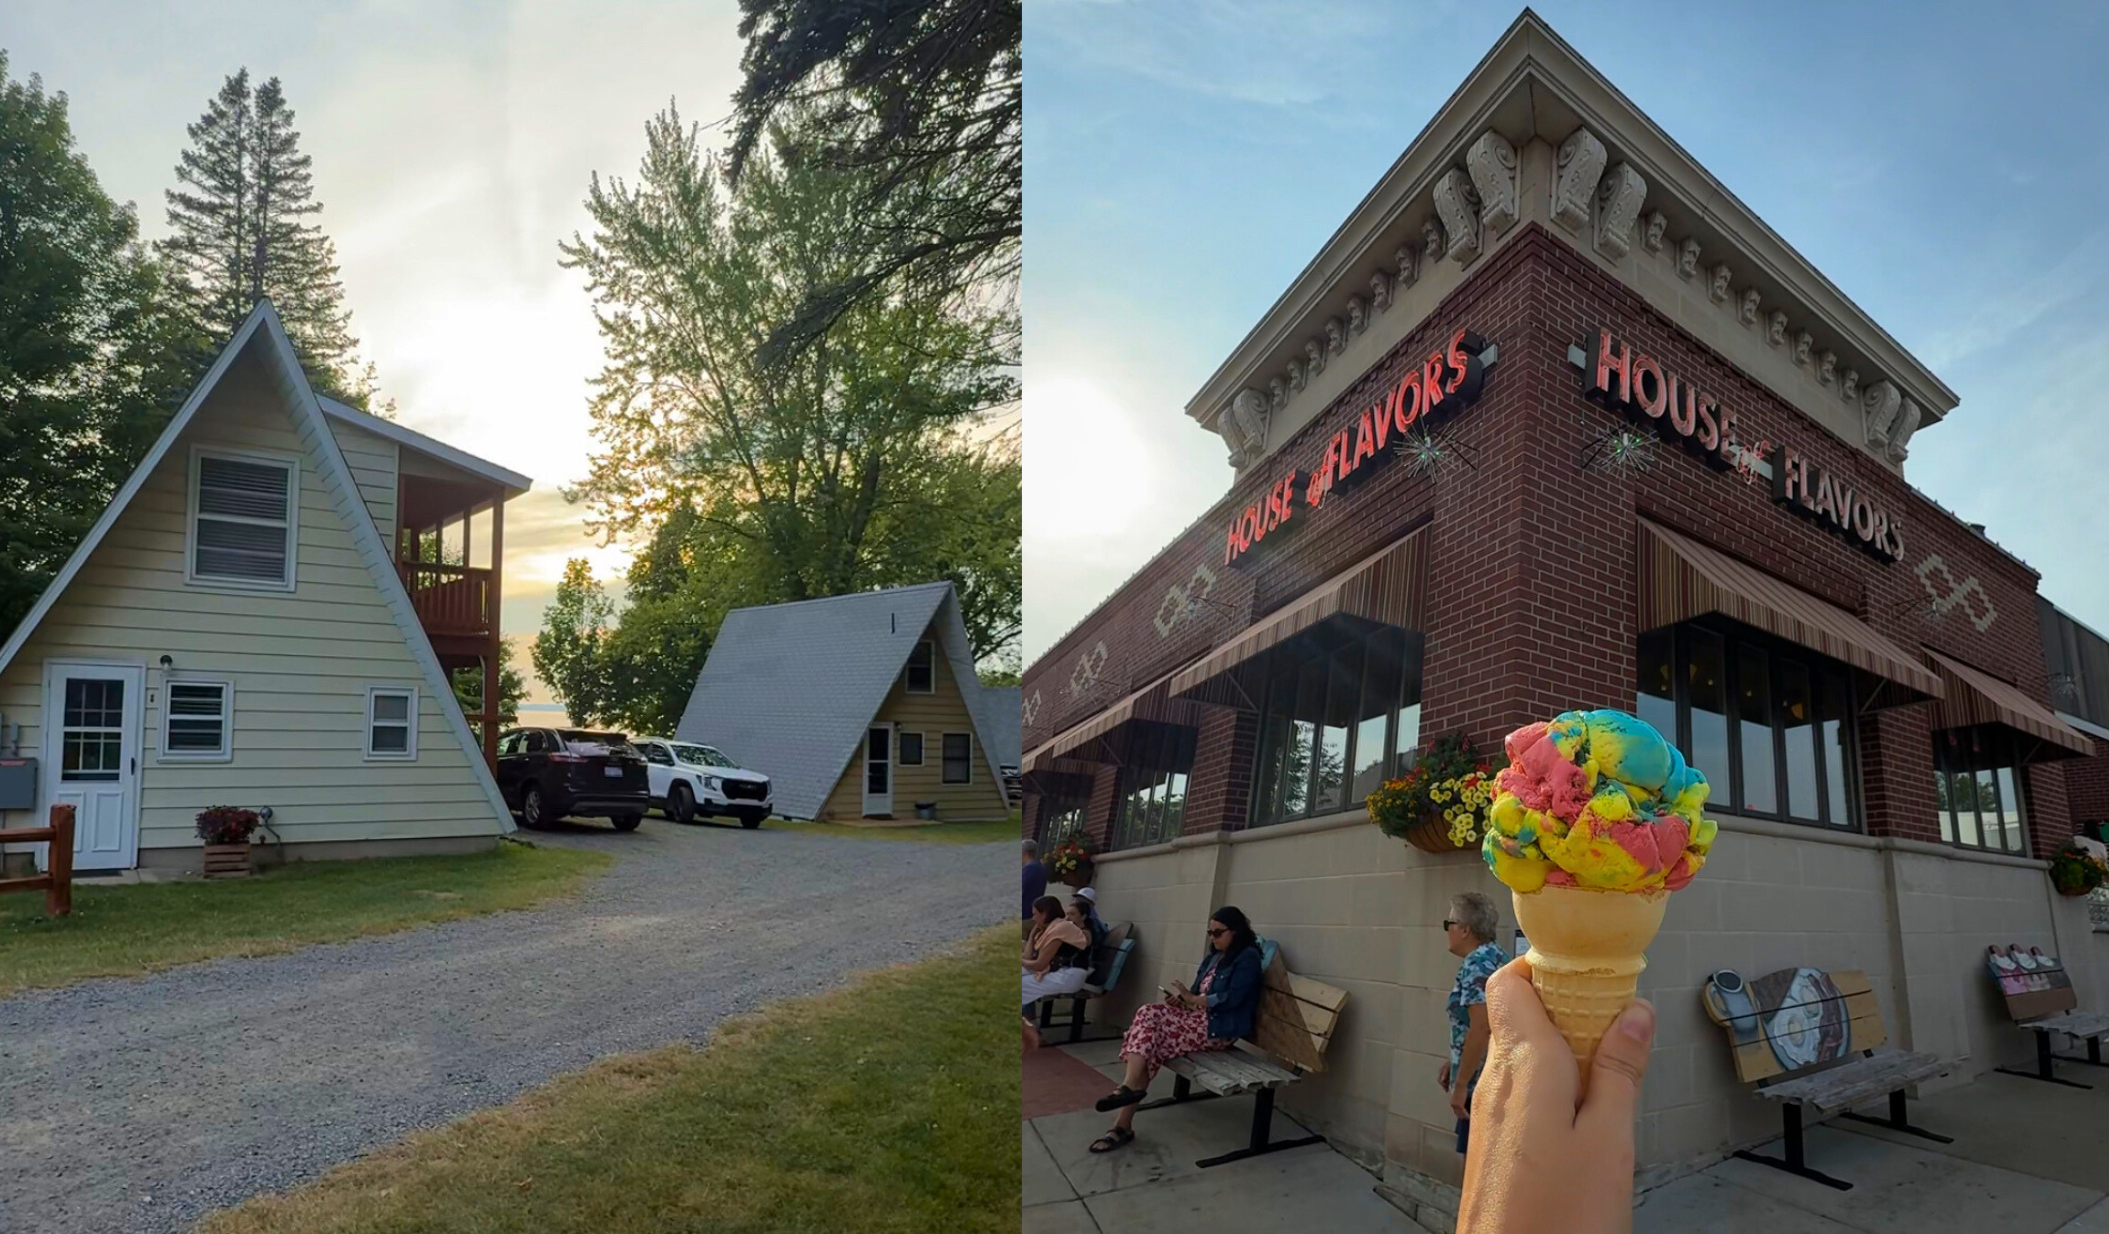
House of Flavors: The most iconic ice cream shop in town. I grew up eating Superman here, but this trip I discovered Carrot Cake ice cream and let me tell you—it changed my life.
The Sandbox at Stearns Beach: Right by the water, serving gourmet sliders, seasoned fries, and ice cream. Perfect beach & chill food!
Dinner with a View
STIX: Near the state park, with a massive biergarten, live music, and even lawn games. It’s part-restaurant, part-entertainment hub.
Blu Moon Bistro: Adorable rooftop patio with seasonal dishes. This is where I had the best Reuben sandwich of my life (and I don’t say that lightly).
Jamesport Brewing Co. & Ludington Bay Brewing: Two great breweries with outdoor patios—perfect for golden hour.
The Perch on Hamlin Lake: A newer spot perched (literally) on a bluff overlooking the lake. Come for dinner, or just grab cocktails on their lower-level patio. Bonus: you can even arrive by boat.
Something Sweet + Coffee
Kilwin’s: Fudge + chocolates = heaven.
Red Rooster Coffee: Cozy, friendly, with iced lattes that hit the spot after a hot day.
HumaniTea: If you’re a tea drinker, or just need a reset between activities, this place is perfect.
Where to Stay in Ludington
There’s a vibe for every type of traveler here.
Camping: Ludington State Park has beautiful campgrounds that keep you close to nature.
Downtown: Stay at a historic inn, hotel, or B&B for easy access to beaches and restaurants.
Lakefront: For something special, look at Hamlin Lake rentals. I stayed at Sunset Bluff Resort, and it was perfect.
We had a little yellow A-frame house with cozy cabin vibes but all the essentials. The best part? A private fire pit right by the water. Every night, we roasted s’mores, watched cotton candy sunsets, and cracked open local beers from Ludington Bay Brewing. It was the kind of place that instantly melts the stress away and makes you feel like you’re exactly where you’re supposed to be.
Best Local Shops in Ludington
I always carve out time to wander through local shops when I travel—it’s one of the best ways to get a feel for a town. In Ludington, I found some gems along Ludington Avenue and South James Street:
Sexy Nomad: My favorite! A beautifully curated shop with vintage clothing, Moroccan jewelry, ceramics, and handmade treasures. It felt like stepping into a global market—but right here in Michigan.
Sister Bees: Women-owned and full of natural skincare, beeswax products, and Michigan honey. Such a thoughtful place for gifts.
The Windowsill Used & New Books: Cozy, welcoming, and filled with great reads. I picked up a romantasy novel (obviously). The staff was so kind, and it reminded me why I always stop at indie bookstores when I travel.
Coming back to Ludington as an adult was like re-reading a childhood book and discovering new magic between the lines. It felt grounding, nostalgic, and fresh all at once. There’s something powerful about revisiting the places that shaped you and realizing they’re just as beautiful—sometimes even better—than you remembered.
If you’ve never been to West Michigan, or it’s been a while, put Ludington at the top of your list. It’s a small town with a big heart, stunning landscapes, and a community that makes you feel right at home.
Trust me! I’m already planning my next trip back. And maybe, just maybe, it’ll become a tradition again.
Raimee Iacofano grew up in Michigan. Eight years ago, she set off to travel the world and has worked helping creators improve their social media (she even worked for me for a few years). She’s since started her own enterprise helping people travel smarter and off the beaten path. When she’s not roaming the world, she lives in LA. Follow her amazing videos on Instagram and TikTok and download her free guides on her website, Raimeetravel.
Book Your Trip: Logistical Tips and Tricks
Book Your Flight Find a cheap flight by using Skyscanner. It’s my favorite search engine because it searches websites and airlines around the globe so you always know no stone is being left unturned.
Book Your Accommodation You can book your hostel with Hostelworld. If you want to stay somewhere other than a hostel, use Booking.com as it consistently returns the cheapest rates for guesthouses and hotels.
Don’t Forget Travel Insurance Travel insurance will protect you against illness, injury, theft, and cancellations. It’s comprehensive protection in case anything goes wrong. I never go on a trip without it as I’ve had to use it many times in the past. My favorite companies that offer the best service and value are:
Want to Travel for Free? Travel credit cards allow you to earn points that can be redeemed for free flights and accommodation — all without any extra spending. Check out my guide to picking the right card and my current favorites to get started and see the latest best deals.
Need a Rental Car? Discover Cars is a budget-friendly international car rental website. No matter where you’re headed, they’ll be able to find the best — and cheapest — rental for your trip!
Need Help Finding Activities for Your Trip? Get Your Guide is a huge online marketplace where you can find cool walking tours, fun excursions, skip-the-line tickets, private guides, and more.
Ready to Book Your Trip? Check out my resource page for the best companies to use when you travel. I list all the ones I use when I travel. They are the best in class and you can’t go wrong using them on your trip.
From the Great Barrier Reef to the lush rainforests to the sunburnt Outback, here are the best places to visit in Queensland.
Queensland is Australia’s sun-soaked playground, brimming with natural wonders, lively cities, and fun adventures. There’s no shortage of exciting things to see and do here.
Its lively capital, Brisbane, enjoys an incredible average of 283 sunny days a year, making it an ideal year-round getaway.
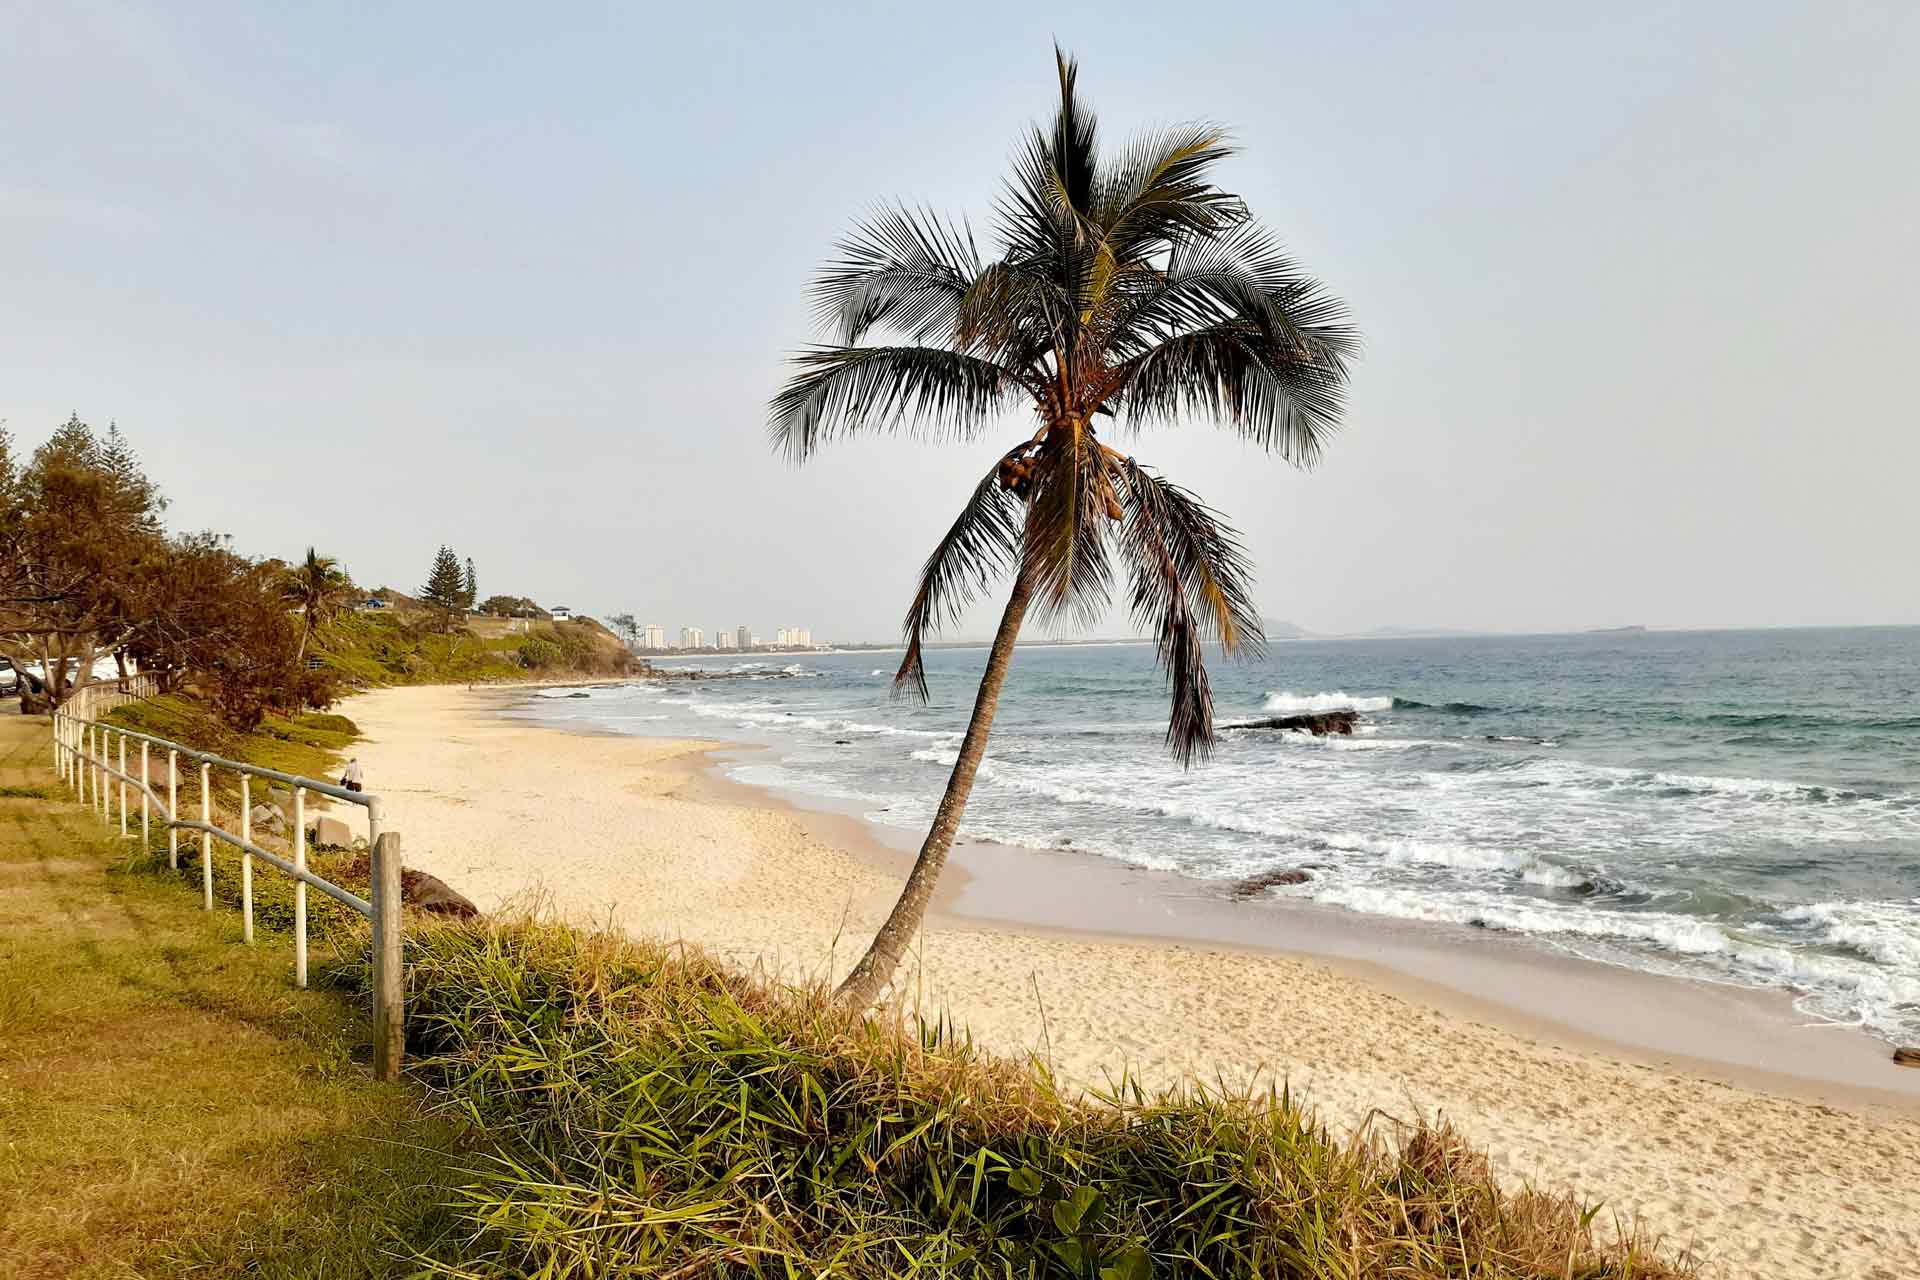
Queensland’s coastline is sprinkled with sun kissed beaches, from the bustling shores of the Gold Coast to the relaxed, sun-soaked sands of Noosa.
Besides iconic places like the Great Barrier Reef and Whitsunday Islands, Queensland reveals countless hidden gems.
There are secluded waterfalls, colorful local markets, quirky art galleries, and spectacular wildlife encounters, from cuddling koalas to spotting crocodiles in the wild!
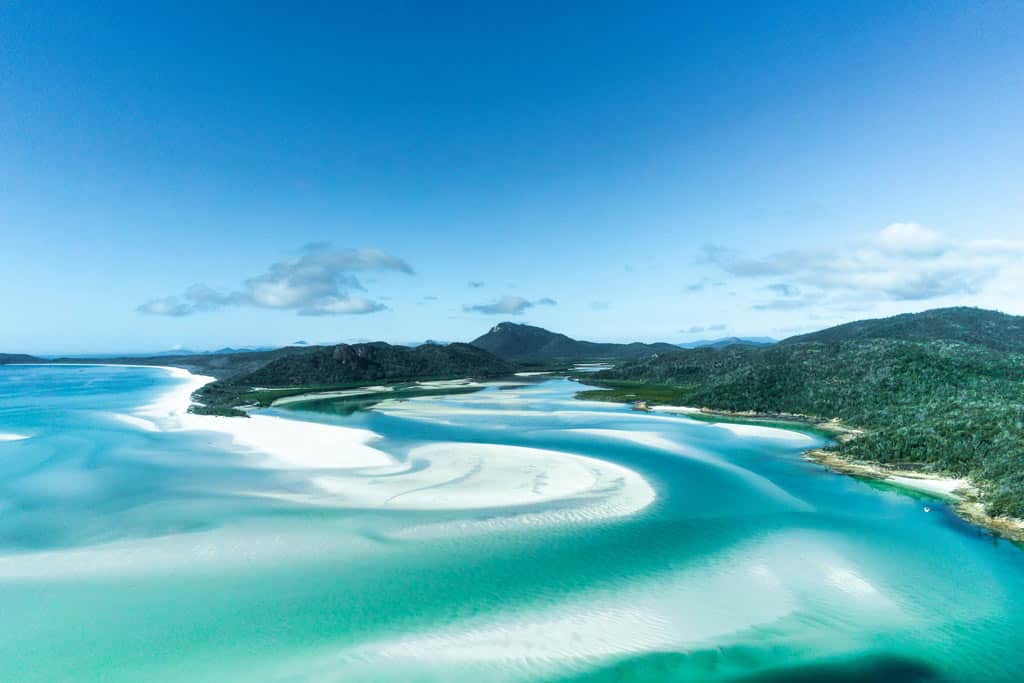
The famous swirling sands of Whitehaven Beach, Queensland
17 Best Places To Visit in Queensland
Be it chasing waves, delving into timeless Aboriginal stories, or venturing into the rugged heart of the outback, Queensland offers countless ways to explore, relax, and soak up the simple pleasures of its sunlit paradise.
To help you plan your adventure, here’s a guide to the best spots to see in Queensland. There are of course many more destinations that didn’t make the list, but this is just a brief overview.
The best way to explore Queensland, Australia, is with your own car! But if you don’t have a vehicle or want to rent one, you can still get to the most popular places via flights and public transport.
The best way to get around is to rent a car and explore on your own! We recommend Rental Cars, which has the largest range of vehicles for the best value on the market.
1. Brisbane
Brisbane, Queensland’s lively capital, is well worth a stop on your visit to the state.
Here, you’ll experience vibrant city life at its fullest, from buzzing laneways lined with street art and quirky cafes to rooftop bars that serve up stunning sunset views over the skyline.
The city’s bustling markets and thriving dining scene spill out onto sunny streets, inviting you to linger over local produce, artisan goods, or a lazy brunch.
Take time to wander along the Brisbane River, which winds gracefully through the heart of the city. It’s the perfect place to embark on riverside walks, bike rides, or a scenic cruise aboard a CityCat ferry.
If you’re into history, stop by the grand City Hall in King George Square, a beautiful heritage building that still hosts concerts and exhibitions.
Besides the city hall, there are many other historic sites in Brisbane, such as the Old Windmill, Queensland’s oldest surviving building, and the striking Story Bridge, which you can even climb for incredible views.
Meanwhile, art enthusiasts will find world-class collections at the nearby galleries in South Bank, including the impressive QAGOMA, which showcases contemporary works and thought-provoking installations.
No trip to Queensland is complete without spending some time on the Gold Coast, Australia’s glittering playground where laid-back beach culture meets big-city energy.
Just an hour south of Brisbane, this sun-soaked region is famous for its endless sandy beaches, world-class surf breaks, and vibrant nightlife.
The heart of the Gold Coast is Surfers Paradise, a bustling hub where high-rise towers overlook golden shores, and the streets buzz with shops, restaurants, bars, and entertainment. Here, you can catch a wave, relax on the beach, or wander through beachfront markets by day and dive into lively nightspots after dark.
Beyond the beautiful beaches, there’s plenty to enjoy on the Gold Coast. Head to the city centre for stylish dining and boutique shopping, or venture into the lush hinterland where you’ll find waterfalls, rainforest walks, and charming mountain villages.
Families visiting the Gold Coast can spend the day at famous theme parks like Dreamworld and Movie World, while animal lovers should stop by the Currumbin Wildlife Sanctuary to meet kangaroos, koalas, and other native animals.
Gold Coast has the perfect blend of nature and city life!
Tucked along the stunning Sunshine Coast, this coastal gem is celebrated for its natural beauty and laid-back atmosphere, making it one of the most popular attractions outside of Tropical North Queensland and the Great Barrier Reef.
Start your exploration in Noosa National Park, famous for its scenic walking trails that weave through lush forests and open up to breathtaking ocean vistas.
One of the best ways to experience Noosa National Park is by hiking the coastal track, where you’ll wander along rugged cliffs with the sea sparkling below. Keep your eyes peeled for dolphins riding the waves and turtles popping up in the crystal-clear water, a classic Sunshine Coast moment!
Along the way, you’ll discover idyllic spots like Tea Tree Bay, a peaceful cove perfect for a swim, a lazy afternoon on the sand, or simply watching surfers glide across the gentle breaks.
After your walk, you can easily pop back into Noosa’s lively town centre for boutique shopping, a local coffee, or a fresh seafood lunch overlooking the water.
4. Great Barrier Reef
The Great Barrier Reef is hands down one of the most visited attractions in Queensland, and it’s easy to see why.
Stretching over 2,300 km along the Coral Sea, this dazzling underwater ecosystem is not only the world’s largest reef system but also one of Australia’s most treasured UNESCO World Heritage sites.
It’s a bucket-list destination that draws avid divers and snorkelers from all over the globe.
Most people picture the reef as part of Tropical North Queensland, and they’re right. Places like Cairns and Port Douglas are classic jumping-off points to explore the Great Barrier Reef.
You’ll also find plenty of reef tours departing from Port Douglas and Airlie Beach. Besides snorkeling, you can try scuba diving, cruising over vibrant coral gardens on a glass-bottom boat, or relaxing for a day on a floating reef pontoon right in the middle of the ocean.
Don’t overlook the Southern Great Barrier Reef. This part of the Great Barrier Reef has a more laid-back vibe and often fewer crowds, perfect for couples and those who prefer a tranquil vacation.
The Southern Great Barrier Reef is home to some of Queensland’s hidden gems, like Heron Island and Lady Elliot Island, where you can quite literally step off the beach and be snorkeling in crystal-clear waters teeming with marine life.
The Southern Great Barrier Reef also boasts fantastic dive sites, offering unforgettable encounters with vibrant marine life.
5. Cairns
Cairns is often the first stop for those exploring Tropical North Queensland, and it’s easy to see why.
This laid-back city serves as the primary gateway to the Great Barrier Reef, making it one of the top attractions in all of Queensland.
From here, you can hop on countless reef tours and enjoy snorkeling, scuba diving, or sailing over dazzling coral gardens on a glass-bottom boat.
But there’s more to enjoy in Cairns beyond the Great Barrier Reef. Stroll along its lively Esplanade, take a dip in the waterfront lagoon, and soak up the sunshine that Queensland is famous for.
For those craving even more adventure, head north to Port Douglas, a stylish coastal town that also serves up easy access to the reef and the ancient Daintree Rainforest. Or take the ferry to an offshore island paradise like Fitzroy Island or Green Island.
And if you’re after something uniquely enchanting, don’t miss a visit to Paronella Park. It’s an extraordinary heritage-listed site where a Spanish-style castle stands hidden in the rainforest near Mena Creek.
There are also lots of waterfalls, beaches, and cultural attractions around the Cairns area.
Fitzroy Island near Cairns
6. Whitsunday Islands
The Whitsunday Islands are one of Queensland’s true showstoppers, a collection of idyllic islands scattered across the turquoise Coral Sea, just off the coast from Airlie Beach.
Known for their breathtaking natural beauty, the Whitsundays offer a dreamy contrast to the bustling Gold Coast and the relaxed charm of the Sunshine Coast.
Most visitors kick things off in Airlie Beach, a lively resort town that serves as the perfect gateway to the islands.
From here, you can join sailing tours, snorkel or dive the vibrant fringing reefs, or take a scenic flight for an unforgettable view of the swirling sands of Whitehaven Beach.
If you’re keen to see one of the region’s most iconic sights from above, consider booking an Airlie Beach: Whitsunday Islands & Heart Reef Scenic Flight, a fantastic way to admire the breathtaking patterns of the coral and turquoise lagoons.
Don’t miss Whitehaven Beach, famous for its dazzling white silica sand and crystal-clear waters. It’s a breathtaking scene that looks like it was lifted straight from a postcard.
Another top attraction is Hamilton Island, the most developed of the Whitsundays, where you’ll find upscale resorts, marina-front dining, and even opportunities to meet Aussie wildlife up close.
7. Sunshine Coast
The Sunshine Coast is one of Queensland’s most beloved regions. It is more laid-back than the bustling Gold Coast and a perfect complement to adventures in Tropical North Queensland and the Great Barrier Reef.
Just a short drive north of Brisbane, the Sunshine Coast greets you with breathtaking natural scenery, friendly coastal towns, and a laid-back vibe that makes it easy to unwind.
Stretching along a beautiful coastline, the Sunshine Coast is famous for its golden beaches, from the family-friendly shores of Mooloolaba to the legendary surf breaks at Noosa. Spend your days soaking up the sun, trying your hand at surfing, or simply strolling along the sand with an ice cream in hand.
But there’s more to the Sunshine Coast than just its beaches. Head inland and you’ll discover the lush hinterland, dotted with charming villages like Montville and Maleny, where you can browse local art galleries, sip on fresh coffee, and enjoy sweeping views.
Nature lovers can hike through Sunshine Coast’s rainforest trails or chase waterfalls in nearby national parks.
Noosa, a highlight of the Sunshine Coast
8. K’gari (Fraser Island)
K’gari is one of Queensland’s true natural wonders and an absolute must for anyone exploring the state.
Recognised as one of Australia’s remarkable UNESCO World Heritage Sites, K’gari (Fraser Island) is the largest sand island in the world, stretching over 120 kilometres along the beautiful Fraser Coast.
Most visitors kick off their adventure from Hervey Bay, a charming town on the Fraser Coast that’s famous as the main jumping-off point for tours and ferry rides to K’gari (Fraser Island).
Between July and November, Hervey Bay also becomes one of the best places in the world for whale watching, with humpback whales using the sheltered waters of the Fraser Coast to rest and play.
Once you arrive on K’gari (Fraser Island), you’ll quickly see why this unique spot draws visitors from all over. Drive along the iconic 75 Mile Beach, a stretch of sand along the Fraser Coast that doubles as both a highway and a landing strip.
As you drive along 75 Mile Beach, stop to explore the rusting hull of the Maheno Shipwreck, take a dip in the naturally bubbling Champagne Pools, or cool off in the crystal-clear freshwater of Eli Creek.
There’s more to K’gari (Fraser Island) beyond the 75 Mile Beach. Venture inland to discover towering rainforests growing straight out of the sand and pay a visit to Lake McKenzie, famous for its dazzling turquoise water and pure white silica shores.
Wildlife lovers will also be in for a treat, spotting everything from dingos trotting along the shore to colourful birds flitting through the forest canopy.
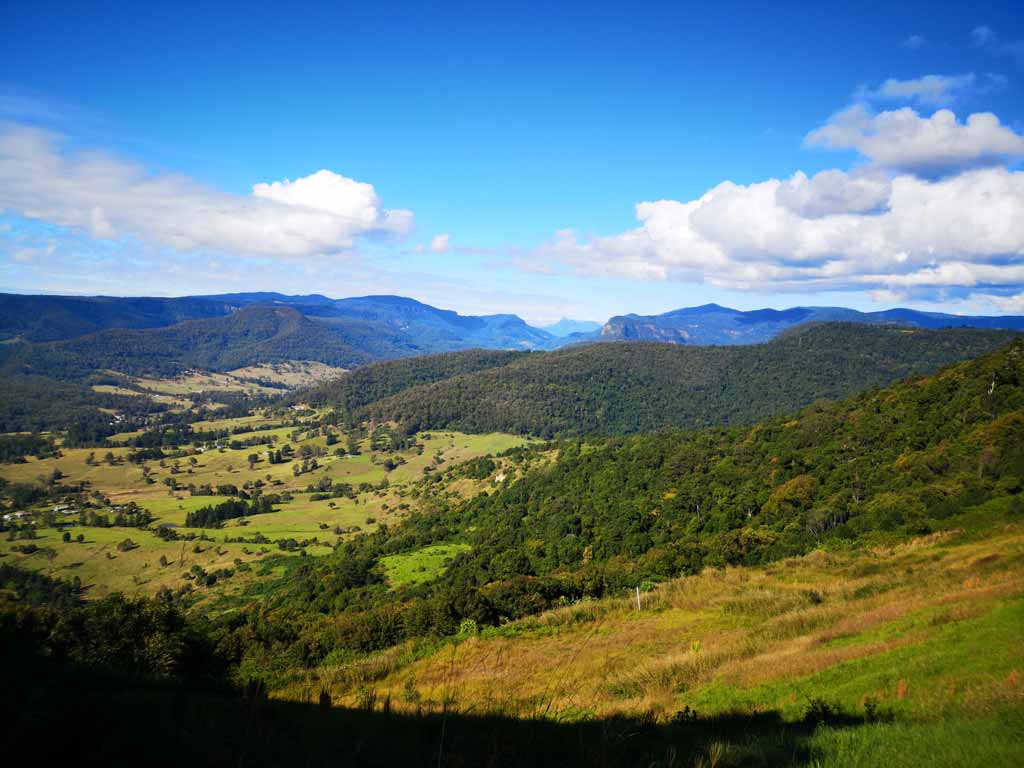
9. Lamington National Park
Just a short drive from the buzz of the Gold Coast, you’ll find yourself in the tranquil Gold Coast Hinterland, home to Lamington National Park.
This stunning national park is one of Queensland’s best natural attractions, famous for its lush scenery, ancient trees, and incredible biodiversity.
Wander under a spectacular rainforest canopy that feels a world away from the sandy beaches below. Here, towering Antarctic beech trees and tangled vines shelter everything from brilliant king parrots to shy pademelons.
The park is crisscrossed with walking tracks, ranging from easy strolls to longer hikes that lead you past cascading waterfalls, mossy creeks, and dramatic lookouts over endless green valleys.
If you’re up for a real adventure, try the treetop walk at O’Reilly’s, where you can literally stroll through the canopy on a series of suspension bridges, a highlight for adventurous visitors!
Lamington’s natural surroundings make it an incredible place to reconnect with nature. Plus, it’s so close to the Gold Coast that you can easily combine a rainforest day trip with a visit to the coast’s golden beaches.
Explore the incredible hinterland scenery!
10. Townsville
Townsville is one of Queensland’s most underrated attractions. Set along the stunning coastline of North Queensland, it’s a lively hub that serves as a jumping-off point to explore the Great Barrier Reef, without the bigger crowds of Cairns.
One of the standout features of Townsville is Castle Hill, a giant pink-granite monolith that towers over the city. Hike or drive to the top to witness panoramic views stretching from the city streets to the sparkling sea.
Back in town, you’ll find plenty of attractions to fill your days, from the bustling Strand waterfront promenade lined with cafes and palm trees to the fascinating Reef HQ Aquarium, which showcases the wonders of the nearby reef.
And if you’re road-tripping further down the coast, don’t miss a stop in Mackay to cool off at the Bluewater Lagoon, a unique swimming spot that’s perfect for a break under the tropical sun.
Visiting Daintree National Park is like stepping into another world, where time stands still and ancient secrets whisper through the trees.
Tucked away in North Queensland, the Daintree Rainforest is part of the Wet Tropics, a spectacular region recognized as one of the world’s UNESCO World Heritage sites for its incredible biodiversity and cultural significance.
The Daintree Rainforest is over 180 million years old, making it one of the oldest continually surviving ancient rainforests on Earth. Walking beneath its emerald canopy, you’ll pass giant ferns, twisting vines, and crystal-clear streams teeming with unique marine life.
Top attractions at the Daintree Rainforest include exploring the magical Mossman Gorge, where you can stroll along elevated boardwalks or take a refreshing dip in pristine waters surrounded by towering trees.
For an unforgettable way to see the highlights of the Daintree Rainforest, consider booking this Daintree Rainforest and Mossman Gorge Tour, which takes you deeper into the forest’s heart with local guides who share the area’s rich Indigenous stories and natural wonders.
12. Mission Beach
If you’re dreaming of a laid-back destination where tropical rainforest spills right down to beautiful beaches, look no further than Mission Beach.
Tucked between Cairns and Townsville in Tropical North Queensland, this relaxed coastal village is a true gem, offering a perfect blend of lush jungle and golden sand.
Mission Beach is made up of four small beach communities stretched along 14 kilometres of palm-fringed coastline, giving you plenty of space to find your own slice of paradise.
One of the top things to do here is simply relaxing on the sand. It’s also a fantastic place to spot cassowaries, the colourful (and slightly prehistoric) giant birds that love to wander through the rainforest.
Located off the coast of Townsville in North Queensland, Magnetic Island is a tropical gem with a laid-back island life and rugged Aussie charm.
It’s famous for its golden beaches, with more than 20 of them scattered throughout the island.
Magnetic Island is home to a large population of wild koalas, and one of the best attractions here is hiking the Forts Walk, where you’re almost guaranteed to spot them dozing in eucalyptus trees.
The walk also rewards you with panoramic views over turquoise bays and rocky headlands.
Spend your days exploring secluded coves, kayaking alongside turtles, or enjoying a sunset sail.
Radical Bay – Just one of the gorgeous spots you can visit on Magnetic Island.
14. Longreach
If you’re looking to experience the rugged heart of the Sunshine State, head west to Longreach, one of the must-see destinations in Outback Queensland.
This legendary outback town is home to incredible attractions that celebrate Australia’s pioneering spirit and wide-open spaces.
Step into the stories of stockmen and bush life at the Australian Stockman’s Hall of Fame, or discover the remarkable history of aviation at the Qantas Founders Museum, where you can even tour inside a jumbo jet.
In the evenings, enjoy a sunset cruise along the Thomson River or tuck into a hearty camp oven dinner under a canopy of stars.
15. Carnarvon Gorge
Tucked away in Outback Queensland, Carnarvon Gorge is one of those magical destinations where you can witness the beauty of nature.
This lush oasis is hidden among rugged sandstone cliffs and dry plains, with an unexpected burst of greenery in the heart of Queensland’s outback.
There are so many exciting things to do here. Wander along shady trails beneath towering fan palms and fig trees, splash through cool creek crossings, and discover ancient Aboriginal rock art sites that tell stories thousands of years old.
You’ll also come across plenty of fascinating wildlife here. Watch for wallabies hopping through the undergrowth, bright parrots flitting overhead, and if you’re lucky, you might even spot a shy platypus gliding through the crystal-clear pools!
Springbrook National Park, located in Queensland’s Gold Coast hinterland, is a UNESCO World Heritage-listed site celebrated for its lush rainforests, cascading waterfalls, and ancient geological formations.
As part of the Gondwana Rainforests of Australia, the park offers a glimpse into Earth’s prehistoric past with its ancient Antarctic beech trees and diverse ecosystems.
Visitors can explore several sections, including the Springbrook Plateau, known for its panoramic views and waterfalls like Purling Brook Falls; the Natural Bridge, a unique rock formation housing a glowworm colony; and Mount Cougal, featuring twin peaks and historical sites.
The park’s rich biodiversity and scenic trails make it a haven for nature enthusiasts and hikers alike. Join a guided tour to make the most of your trip and let an expert guide show you around!
17. Maryborough
Nestled on the Fraser Coast, Maryborough is one of Queensland’s most charming heritage destinations. Once one of Queensland’s busiest ports, today Maryborough draws visitors with its beautifully preserved colonial streetscapes, riverside parks, and warm country-town vibe.
Maryborough is also famously linked to one of the world’s most beloved stories, as the birthplace of P.L. Travers, author of Mary Poppins. The town proudly celebrates its connection with a whimsical Mary Poppins Statue right in the heart of town.
You’ll also find gracious old buildings in Maryborough that whisper tales of the past, vibrant local markets, and cozy cafés.
DISCLAIMER: Some of the links in this article are affiliate links, which means if you book accommodation, tours or buy a product, we will receive a small commission at no extra cost to you. These commissions help us keep creating more free travel content to help people plan their holidays and adventures. We only recommend the best accommodations, tours and products that ourselves or our fantastic editorial team have personally experienced, and regularly review these. Thanks for your support, kind friend!
Kansai International Airport is your gateway to one of the most wonderful regions of Japan, including Kansai’s most energetic and delicious city — Osaka. But how do you get to Osaka’s city center from here?
So, let’s say you’ve just arrived at the airport. your legs are numb, your brain is running on airplane meals, and now you’ve got one mission — get to Osaka’s city center without a hitch and without accidentally ending up in, say, Kobe or Wakayama.
But hey, you’ve got options — albeit a little too many. So many, it can get really overwhelming and confusing sometimes, especially for first timers. You got train, bus, taxi, and private transfer — each with its own pros and cons. Should you take the super-efficient train? The super-chill airport bus? Or just throw your luggage in a taxi and worry about expenses later? Spoiler alert: Not the taxi. It’s way too expensive, we’re not even gonna discuss it here. We’ll be focusing on just the train and the bus.
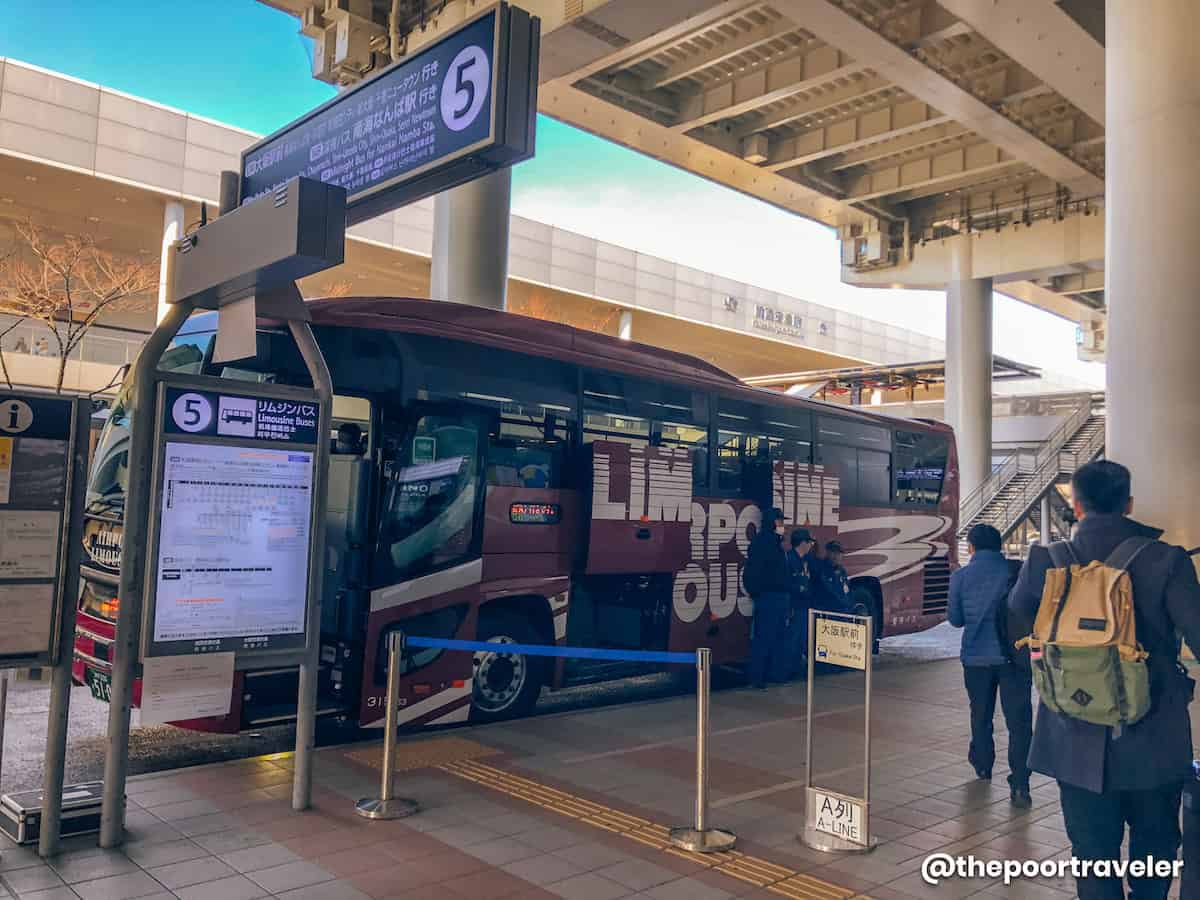
Just right in front of Terminal 1 is the Kansai Airport Train Station, which serves two railway companies: JR and Nankai. And you’ll also find buses close to the Arrival Hall.
First, let’s break it down. Osaka’s city center is roughly an hour to an hour-and-a-half away from Kansai Airport. But where in the city center are you going? There are three areas in particular that we think are most ideal for tourists, especially first-timers in the city: Namba, Umeda, and the area surrounding Shin-Osaka Station.
Kansai Airport to Namba
The Namba District refers to the bustling area that straddles the border of Naniwa Ward and Chuo Ward. “Chuo” means center or middle in Japanese, but think of Namba as the southern counterpart of Umeda. It is here that you’ll find two places that I bet, if you’re the one planning the trip, you have heard of or read about before: Dotonbori and Shinsaibashi.
These two districts are attractions on their own. These areas are always lively, crowded, and full of energy. They lie next to and are within walking distance of each other.
By Train
Nankai has a direct train line to Namba and they operate two main types of trains: the Nankai Airport Express and the Nankai Limited Express Rapi:t (Rapit).
NANKAI AIRPORT EXPRESS
The Nankai Airport Express is the regular train. It’s cheaper but also 10 minutes slower. But it’s not complicated at all. Just board the train and find a seat. No seat reservation needed. But on super peak hours, you might end up standing through the entire journey.
Travel Time: About 45 minutes Fare: ¥970 (P375)
NANKAI LIMITED EXPRESS RAPI:T
The other Nankai train that can take you straight to Namba is the Nankai Limited Express RAPI:T. It’s called RAPIT but stylized as RAPI:T. It’s faster, more convenient, more high end. It’s easy to identify too. It’s glaringly blue, and it kind of looks like it has arrived from the future. If you prefer this upscale train instead, know that you’ll also need to settle an additional seat fee, which costs ¥520.
Both these trains can take you directly to Namba Station and are covered by the Kansai Railway Pass (formerly known as Kansai Thru Pass), which works on most NON-JR Trains in Osaka and the region. This is different from the JR Kansai Area Pass. But unlike the JR counterpart, this pass can be used on non-consecutive days, making it more flexible.
Note that while the Kansai Railway Pass can be used on the Limited Express RAPI:T, the 520-yen seat or reservation fee is not covered.
By the way, if you’re interested in the Kansai Railway Pass, you can book with Klook. You can use our promo code THEPOORTRAVELERKLOOK for 5% OFF, capped at P300 pesos. You can also redeem discount vouchers at www.thepoortraveler.net/300discount and www.thepoortraveler.net/500discount
If you’d rather take the bus to Namba, find one that will take you to the Osaka City Air Terminal (OCAT), which is Namba’s main bus terminal. When you arrive at the airport, proceed to the counter for OCAT Airport bus located at the Arrival Hall of Terminal 1.
It usually takes about an hour, sometimes longer, depending on traffic condition. You’ll find the schedule here.
Travel Time: About 1 hour Trip Schedule: First Trip, 6:10 AM; Last trip, 10:40 PM Fare: ¥1300 (P503)
Where to Stay in Namba
If you are still looking for hotels in Osaka, especially around the Namba area, here are some of the top-rated accommodations reviewed by travelers online.
🔥🔥🔥 Use AGODATPT for 10% off on select hotels! 🔥🔥🔥
Kansai Airport to Umeda (Osaka Station)
By Train
The Umeda District is one of the busiest in Osaka. It is here that you’ll find Umeda Station and Osaka Station, two of the most widely connected train hubs in the region. That’s why even though it’s located in Kita Ward or North Ward, it is often regarded as the heart of the city.
JR KANSAI AIRPORT LINE
If your hotel is in Umeda or close to Osaka Station, you can take the JR Kansai Airport Line (JR Kansaikuko Line). For the regular train, you only need to pay the fare. No seat reservation required. This train can take you directly to Osaka Station in about 75 minutes. It’s slow but you’ll reach your destination regardless.
But if for whatever reason you want to reach the city fast or you’re holding a JR Pass anyway, you can hop onto the JR Limited Express HARUKA train. It stops at Osaka Station.
Fare is significantly higher. Haruka trains have RESERVED and NON-RESERVED SEATS. The price is the same. To reserve a seat, you can use the machines close to the entrance gates.
The Haruka Train is covered by most JR Kansai pass like the JR Kansai Area Pass, JR Kansai Area WIDE Pass, and JR Sanyo San’in Pass. Klook promo codes don’t work on JR Passes, but I’ll still add the links to the TPT Masterlist, where we compile all our travel essentials and recommendations.
Travel Time: 46 minutes Fare: ¥2940 (P1137)
By Bus
You can also board the Airport Limousine Bus to Umeda. There are three stops just around Osaka Station. All of these stops are at hotels, but you don’t need to book a room at these hotels to be able to ride these buses. Just figure out which of these three hotels is closest to your destination. Here are the stops:
Hotel New Hankyu (Osaka Station)
Hotel Hankyu Respire (Yodobashi Umeda Tower)
Herbis Osaka (Osaka Station)
Some buses skip stops, so to be sure to consult the ever-reliable Google Maps or visit this page.
Travel Time: 60-75 minutes Fare: ¥1800 (P696)
Where to Stay in Umeda
If you prefer to stay in Osaka, and are still looking for a place to stay, here are some of the top hotels in Umeda based on user reviews online.
🔥🔥🔥 Use AGODATPT for 10% off on select hotels! 🔥🔥🔥
Kansai Airport to Shin-Osaka Station
By Train
If you intend to travel to other prefectures by Shinkansen or bullet train, an ideal place to stay is the area surrounding the Shin-Osaka Station. Emphasis on SHIN, which means NEW in Japanese.
On top of the regular trains, this station also serves bullet trains. In contrast, Osaka Station – without SHIN – is NOT a Shinkansen Station.
JR LIMITED EXPRESS HARUKA
Shin-Osaka is also easily accessible from the airport. It can be reached directly by taking the same JR Limited Express Haruka train that I mentioned earlier.
It takes 52 minutes and only three stops. No transfers needed, but the fare is considerably higher — more than double the regular train at times.
If you’re on a budget, you can also go the same route to Osaka Station. Take the JR Airport Line, but after you alight at Osaka Station, transfer to another train to Shin-Osaka Station.
The best way to explore the beaches of New South Wales is with your own car. Check out our list of the best NSW road trips for some fun exploration ideas, or browse our favourite things to do in NSW.
However you choose to get around, New South Wales is a stunning state that is sure to impress.
The best way to get around is to rent a car and explore on your own! We recommend Rental Cars, which has the largest range of vehicles for the best value on the market.
Hyams Beach, Jervis Bay
What better way to start the list than with the beach that boasts the whitest sand in the world? That’s not a matter of personal opinion. That’s according to the Guinness World Records.
It’s not just the sand that people visit Hyams Beach for. The calm, clear waters are perfect for swimming, snorkelling, and stand-up paddleboarding. Plus, the scenery is divine.
Hyams Beach gets quite busy during summer and long weekends, but there’s plenty of room to spread out across the 2.8 km stretch, so you don’t have to worry about elbowing fellow beachgoers for space.
The main issue will be finding parking, especially between midday and mid-afternoon. As a quick fix, you can park at Greenfield Beach and then hike the White Sands Walking Track to Hyams Beach.
The idyllic white sands and blue waters of Hyams Beach
Murrays Beach, Jervis Bay
Murrays Beach, located in Booderee National Park, is almost the spitting image of Hyams Beach.
It has the same blue waters and sugar-white sand backed by lush bushland. The difference is that it has fewer people.
If you’re looking for a family-friendly beach in Jervis Bay, Murrays Beach is your best bet. Protected by Bowen Island, the waters are calm and suitable for casual swimmers and young children. It also abounds with rich marine life, making it great for snorkelling.
For hikers, the beach offers self-guided walks, like the low-tide trail, where you can explore the shoreline and its marine life.
You can access Murrays via the Jervis Bay Road. Please note that there’s a fee to enter the national park.
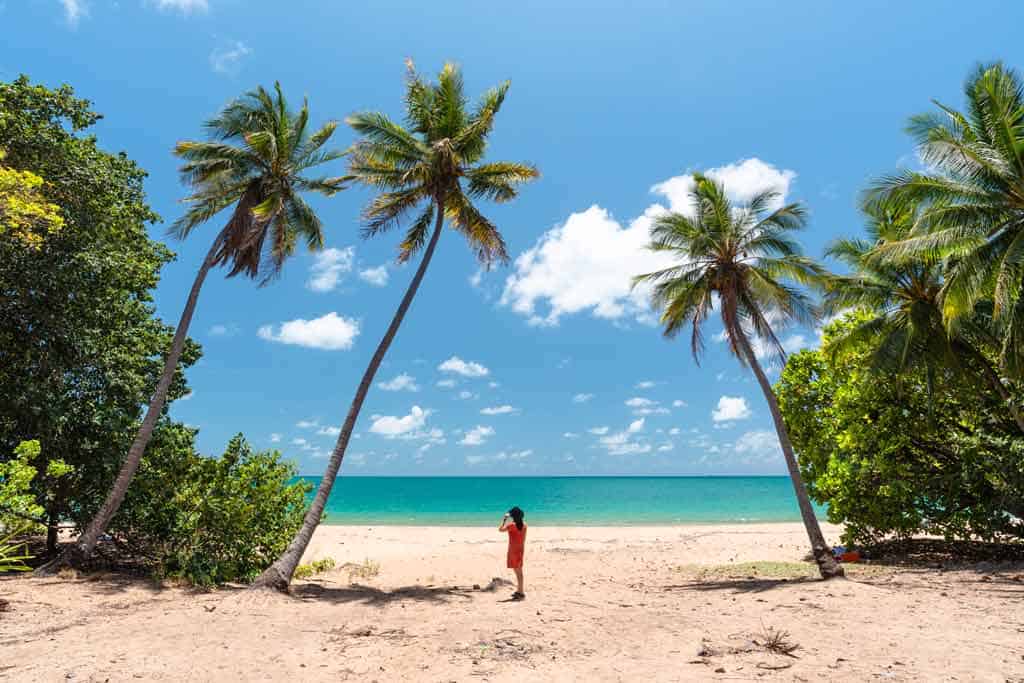
Sydney is iconic for its cosmopolitan charm, but it also has some of the best beaches in NSW. Among these is Palm Beach, roughly 41 km from the city centre.
Palm Beach is the northernmost of Sydney’s beaches. It’s mostly quiet and uncrowded, thanks to its remote location.
Because Palm Beach faces the ocean, it often has big waves. This makes it popular among surfers but not so much with swimmers.
If you want to swim, head to the southeastern end of the beach, where you’ll find a 50-metre-long rock pool with relatively calm waters.
Nearby is the Bible Garden, a set of well-manicured terraces overlooking the ocean and the shore.
Don’t skip a hike to the Barrenjoey Lighthouse, known for its spectacular scenery and whale sightings in winter.
Shelly Beach, Sydney
Just a 20-minute walk from Manly Beach, you’ll reach Shelly Beach. This small swath of sand is a quieter alternative to Manly, one of the busiest beaches in NSW.
Shelly Beach is part of Cabbage Tree Bay, a protected marine reserve. It’s popular among scuba divers and snorkellers mainly because of its rich sea life, which is visible in shallow water.
If you’d rather stay on land, hike the bush trail around the headland for incredible views. You can also sunbathe or have a picnic on the sand.
Shelly Beach has free electric barbecues, showers, and toilets. There’s also a café called The Boathouse.
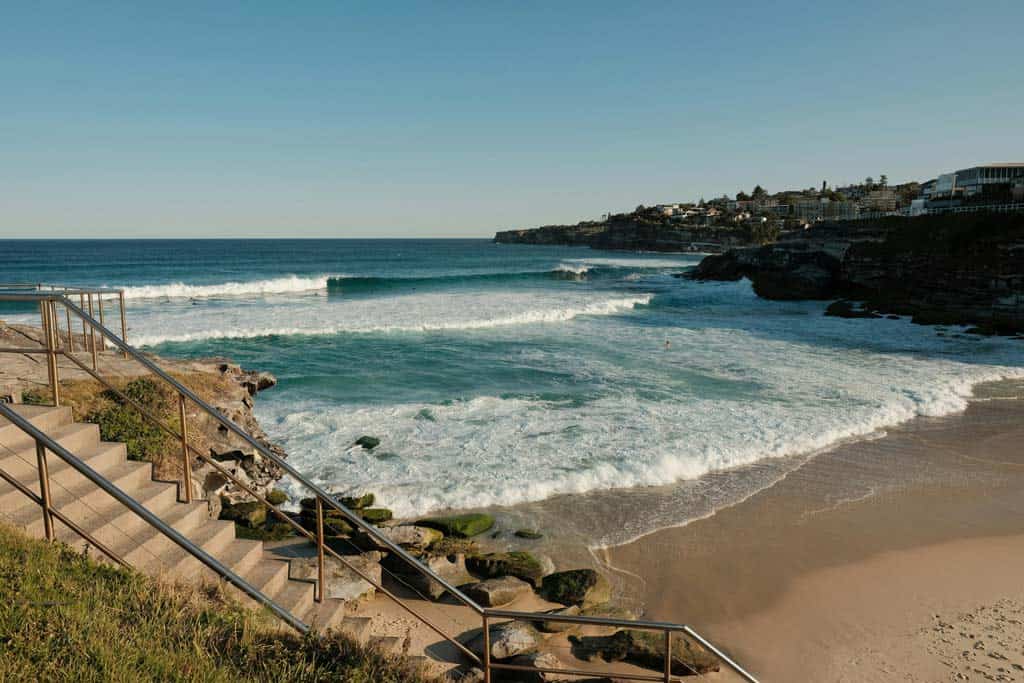
Tamarama Beach, Sydney
Tamarama is the perfect beach for people-watching. This 80-metre narrow strip is a favourite hangout among the trendy and attractive, often A-listers, earning it the nickname Glamarama.
Celebrity sightings or not, we think Tamarama is one of the best beaches in NSW because of its scenery. Nestled between two headlands, it offers gorgeous ocean views.
The beach is a well-known stop on the Bondi Beach to Coogee Coastal Walk. Backing the beach is a grassy parkland with a playground, barbecue facilities, picnic areas, toilets, and changing rooms.
Tamarama Beach is an iconic stop on the Bondi to Coogee Coastal Walk.
Bondi Beach, Sydney
Of course, a list of the best New South Wales beaches is incomplete without mentioning Bondi!
Possibly Australia’s most famous beach, Bondi Beach is a dazzling strip of sand with lots of nearby attractions.
Walk along the Esplanade and stop at the skate park, admire the colourful murals, or hit the outdoor gym.
Just a short walk south of Bondi, Bronte is perhaps the most family-friendly among the Sydney beaches.
At the southern end, you’ll find a kid-friendly rock pool and an ocean-fed lap pool, both free to use.
Confident surfers can chase waves near the rocky headland. Everyone else can relax in the grassy park behind the sand for picnics, frisbee, or a barbecue.
Bronte Beach also has a kiosk, changing rooms, toilets, and even the world’s oldest surf lifesaving club.
Avoca Beach is a 1.7 km stretch of golden sand tucked between two giant sandstone headlands and fringed by Norfolk Island Pines.
It’s mainly a surfing beach. The more sheltered northern end is ideal for beginners, while the southern part, with its point break, is suitable for expert surfers.
The waters can be rough, so always seek the advice of the lifesavers if you want to swim.
There’s also an ocean rock pool at the southern end of the beach, near the Surf Life Saving Club, where recreational swimmers and young kids can splash safely.
Umina Beach, Central Coast
Perched on the Central Coast’s southern coastline, Umina is another popular family beach in New South Wales.
Not only is the beach patrolled, but the waters are also calm and shallow, with waves that never get too big for swimmers and novice surfers.
If you want to take a break from splashing in the water, head to the playground near the Surf Life Saving Club. It’s the biggest one on the Central Coast and features a skate park, bike track, climbing rocks, and more.
For adults, there’s an outdoor café beside the playground that serves brunch, coffee, and ice cream.
Added perk? Umina is dog-friendly, with designated off-leash areas, including the northern end leading up to Ocean Beach.
Try to catch the sunrise at Umina Beach!
Mollymook Beach, South Coast
Mollymook Beach boasts a 2.3 km sweep of golden sand and swells that can get as high as 1.5 metres along its southern reef.
On the southern end of the beach, you’ll find a natural rock pool that’s great for swimming and snorkelling. The rocky headland on the opposite side is ideal for fishing and diving.
Mollymook is mostly quiet, but in summer, it turns into one of the liveliest NSW beaches as it hosts markets and surfing events.
From September to October, you can spot humpback and southern right whales passing by the beach. Dolphins are also a common sight, no matter the season.
Surfing kangaroos? Pebbly Beach, one of the jewels of Murramarang National Park, is the place to go to see these intriguing critters on the shore.
No, they won’t be swimming, let alone surfing (that was a myth). But they’ll be close enough to the water to appear like it.
If you’re looking for a spot to sunbake, swim, or surf, Pebbly Beach is not the best option. It’s unpatrolled, and the waters often get choppy. Plus, the pebbles make it uncomfortable to sunbathe.
Still, Pebbly Beach is one of our favourite beaches in NSW. The views are stunning, the ambience serene, and it’s great for camping.
Zenith Beach, Port Stephens
Flanked by two colossal headlands, Zenith Beach in Tomaree National Park is one of the best beaches in NSW, purely for its sheer beauty.
It’s small, just 400 metres long, but it plays a huge role in wildlife conservation as a sanctuary for birds and dolphins.
The waters look inviting, but Zenith is unpatrolled, and high tide often brings strong rips. So, take extra caution if you swim or surf.
Zenith is the perfect strolling beach. Walk to the summit of Tomaree Head to enjoy jaw-dropping vistas of the shore, the ocean, and the offshore islands around Port Stephens.
Zenith Beach is one of the best places in Port Stephens.
Anna Bay, Port Stephens
Anna Bay is not one beach but two: One Mile Beach and Birubi Beach. The bay, however, is best known as the gateway to the massive sand dunes in the Worimi Conservation Lands.
Here, you can surf and spot dolphins one minute, then sandboard down a sandy slope the next. At sunset, you can go on a camel or horse ride along the shore.
Anna Bay also has dozens of rock pools you can explore. For more marine life encounters, visit the Irukandji Shark and Ray Encounters to pet and feed sharks and rays.
Caves Beach, Lake Macquarie
Love caves? Then Caves Beach should be on your list of the top places to visit in New South Wales.
This 300-metre beach got its name from the network of sea caves at its southern end. The northern part is more sandy and quieter.
You can access the caves only at low tide. When the water is out, you’ll also find rock pools along the shore.
The beach is patrolled on weekends and in summer, so it’s safe for swimming.
There are barbecue facilities, toilets, picnic areas, and a surf life saving club on the beach.
Treachery Beach, Seal Rocks
Secluded, spectacular, and “secret”, Treachery Beach is hands down one of the most beautiful beaches in New South Wales. But barely anyone knows where it is.
Treachery Beach is on the southern end of Seal Rocks, a small coastal settlement three hours from Sydney. You can access the beach in two ways: via the Treachery Camp or through the Treachery Headland walking trail.
The coast is serene, pristine, and made for long beach walks. It boasts consistent swells and big waves. Despite this, you’ll rarely see anybody else on the shore except for a few spirited surfers.
Bongil Beach, Bundagen
Set in Bongil Bongil National Park near Coffs Harbour, this 7 km, nearly empty stretch is a haven for nature lovers.
Bongil Beach is a tranquil escape from the busier beaches on the NSW north coast. It’s also popular among seasoned surfers and anglers.
But what we love most about this quiet beach is the wildlife. It’s one of the best beaches on the north coast for birdwatching and dolphin spotting from the shore.
And if you venture off the beach into the national park’s eucalyptus forest, you might find koalas perched in the trees.
Wategos Beach, Byron Bay
A long, crescent-shaped strip of white sand, Wategos is one of the prettiest beaches in Byron Bay.
It’s the ultimate family beach, with calm waters, barbecues, picnic tables, and plenty of space to sprawl on.
Sheltered by a headland, Wategos Beach has gentle waves. It’s an excellent spot for longboarding and learning to surf.
Lounge on the sand and keep an eye out for bottlenose dolphins, which are known to play in the rolling waves. You can also take the 3.7 km Cape Byron Walking Track to the Cape Byron Lighthouse.
Ride the waves at Wategos Beach, Byron Bay!
Main Beach, Byron Bay
Right smack in the heart of Byron Bay, Main Beach is arguably the most popular beach on the NSW north coast.
Patrolled every day year-round, Main Beach has calm waters and mild waves that are good not only for swimming but also for learning to surf.
The beach itself has barbecues, showers, a playground, and a grassy area with picnic tables. Across the street are shops, cafés, a swimming pool, and the iconic Beach Hotel.
Main Beach, being the centre of Byron Bay, is often a jump-off point for many tours, including kayak tours.
In summer, the beach can get crowded. For somewhere quieter, head to the nearby Wategos Beach, only a short walk away.
Tallow Beach, Byron Bay
This 2.5 km beach spans between Cape Byron and Broken Head Beach. While it has its share of bustle during summer, it’s nearly deserted outside the peak season.
Tallow is a lovely beach for birdwatching. White-bellied sea eagles and ospreys are the most popular residents here. In spring and winter, you can watch humpback whales from the shore.
As Tallow is an exposed beach, the waves often get rough. It’s also unpatrolled, so recreational swimming is not recommended.
Named after the red rock formations dotting the shore, this 5.2 km cove is one of the most amazing north coast beaches in New South Wales. Red Rock is a short drive from the buzzing Coffs Harbour, but it’s way more tranquil.
Surf lifesavers patrol the beach during summer. There are plenty of sandy spots where you can relax. At low tide, you can hike to the tiny Red Rock Island.
Red Rock is also fantastic for stand-up paddle boarding, kayaking, and fishing. If you want to surf, head to the reef at the northern end of the beach.
Seven Mile Beach, Shoalhaven
This unspoiled sweep of almost white sand is one of those NSW beaches that caters to all kinds of beach lovers, whether they’re looking for adventure or a secluded spot to unwind.
Seven Mile Beach is a long beach, so you’ll find plenty of space to surf. It’s also known for windsurfing and kitesurfing.
If you want to swim or kayak, stay in the area near the mouth of the Crooked River, where the waters are calmer and the waves are gentler.
What makes Austinmer one of the best beaches in NSW? We say it’s the vibe. No, it isn’t your typical secluded beach, but it’s a local favourite with serious charm.
Just over an hour from Sydney via the famous Sea Cliff Bridge, Austinmer is perfect for a chill afternoon or an adventurous day out.
It has golden sand, clear waters, and not one but two ocean rock pools for casual swimming and cooling off. There’s also a playground, picnic areas, and ample parking.
Austinmer is a stunning beach in the Wollongong area.
Bennetts Beach, Hawks Nest
Bennetts Beach in Hawks Nest is big, beautiful, and often surprisingly empty. One of the loveliest NSW beaches, it spans over 14 km and boasts sparkling white sand.
The northern end offers calmer waters, while the southern end, known as the Dolphin’s Playground, is perfect for catching waves. Nearby is the Yacaaba Headland, from where you can bask in sweeping views.
The beach is patrolled during the swimming season and even has a surf club with parking and toilets. Dogs are welcome, with off-leash zones north and south.
Jibbon Beach, Royal National Park
Jibbon Beach is an 800-metre crescent-shaped stretch of sand with calm waters that sparkle like turquoise in the sun.
The beach is the starting point for scenic coastal walks, including the Jibbon Loop Track and the multi-day Coast Track.
Along the way, you’ll find Aboriginal rock engravings, including images of kangaroos, whales, and the sky spirit Baiame.
Tucked inside Bouddi National Park on the NSW Central Coast, Maitland Bay is a secluded beach that rewards those willing to hike for it.
This peaceful 600-meter beach is only accessible by foot via a 1-km trail that winds through lush bushland. Two headlands protect the bay, so the waters are generally calm.
You’ll often have the beach to yourself. There are no lifeguards, and even mobile phone reception can be limited.
At low tide, you can walk to Bouddi Point and see the wreck of the SS Maitland.
DISCLAIMER: Some of the links in this article are affiliate links, which means if you book accommodation, tours or buy a product, we will receive a small commission at no extra cost to you. These commissions help us keep creating more free travel content to help people plan their holidays and adventures. We only recommend the best accommodations, tours and products that ourselves or our fantastic editorial team have personally experienced, and regularly review these. Thanks for your support, kind friend!
When Jess and I moved to the USA, one of the things I was most excited about was the opportunity to explore more of this huge country at our leisure. There is so much to see and do across all the states, and we now have the time and opportunity to do just that.
One of the locations we have visited recently is the city of Chattanooga, Tennessee. It’s only a few hours’ drive from where we live, making Chattanooga an easy 1- or 2-day trip. Jess had visited before, but as a child, so didn’t have much memory of it other than seeing an underground waterfall.
Before we visited, we reached out to our newsletter subscribers for tips on what to see and where to eat. Many Chattanooga locals got back to us and gave us some awesome suggestions.
So, without further ado, let me present our guide to spending a day in Chattanooga, Tennessee. This isn’t going to be a deep dive into everything the city has to offer (which is a lot, by the way, there’s even a museum of International Towing and Recovery).
However, if you’re visiting the city for a short break, as we were, this will cover the must-see spots and highlights of Chattanooga. We’ll also offer our recommendations of where to stay, and tips on getting around. Hopefully, everything you need to plan your own quick getaway to Chattanooga.
Let’s get started!
1 Day Chattanooga Itinerary
One day in Chattanooga won’t let you see everything the city has to offer, but you’ll be able to see many of the highlights. As always, feel free to adjust this itinerary based on your own personal preferences and interests!
We also recommend checking opening hours and pricing on the official website before setting out, as attractions can close or change operating hours for various reasons. For attractions with tickets, some of these will be cheaper if purchased in advance.
Breakfast: 9am
If you’re hotel or accommodation doesn’t offer breakfast, or you would simply prefer to have breakfast in town somewhere, we have two options for you. These would be Frothy Monkey, in the Choo Choo District, or The Daily Ration in the Northshore part of town.
Both offer a great selection of southern breakfast options, with items such as Shrimp and Grits and Fried Chicken and Waffles. Naturally they both also have a good coffee selection to start your day right.
Explore Downtown Chattanooga: 10am
After breakfast, we’d suggest setting out to explore the city’s downtown. With limited time on your hands you won’t have time to visit all the downtown attractions, but you should be able to include at least one in your visit. Of course, if you are more interested in the downtown attractions than some of the other locations we suggest later on in the day then you might consider switching a downtown attraction with one of our later options. You could also easily spend all day just exploring the attractions in the downtown!
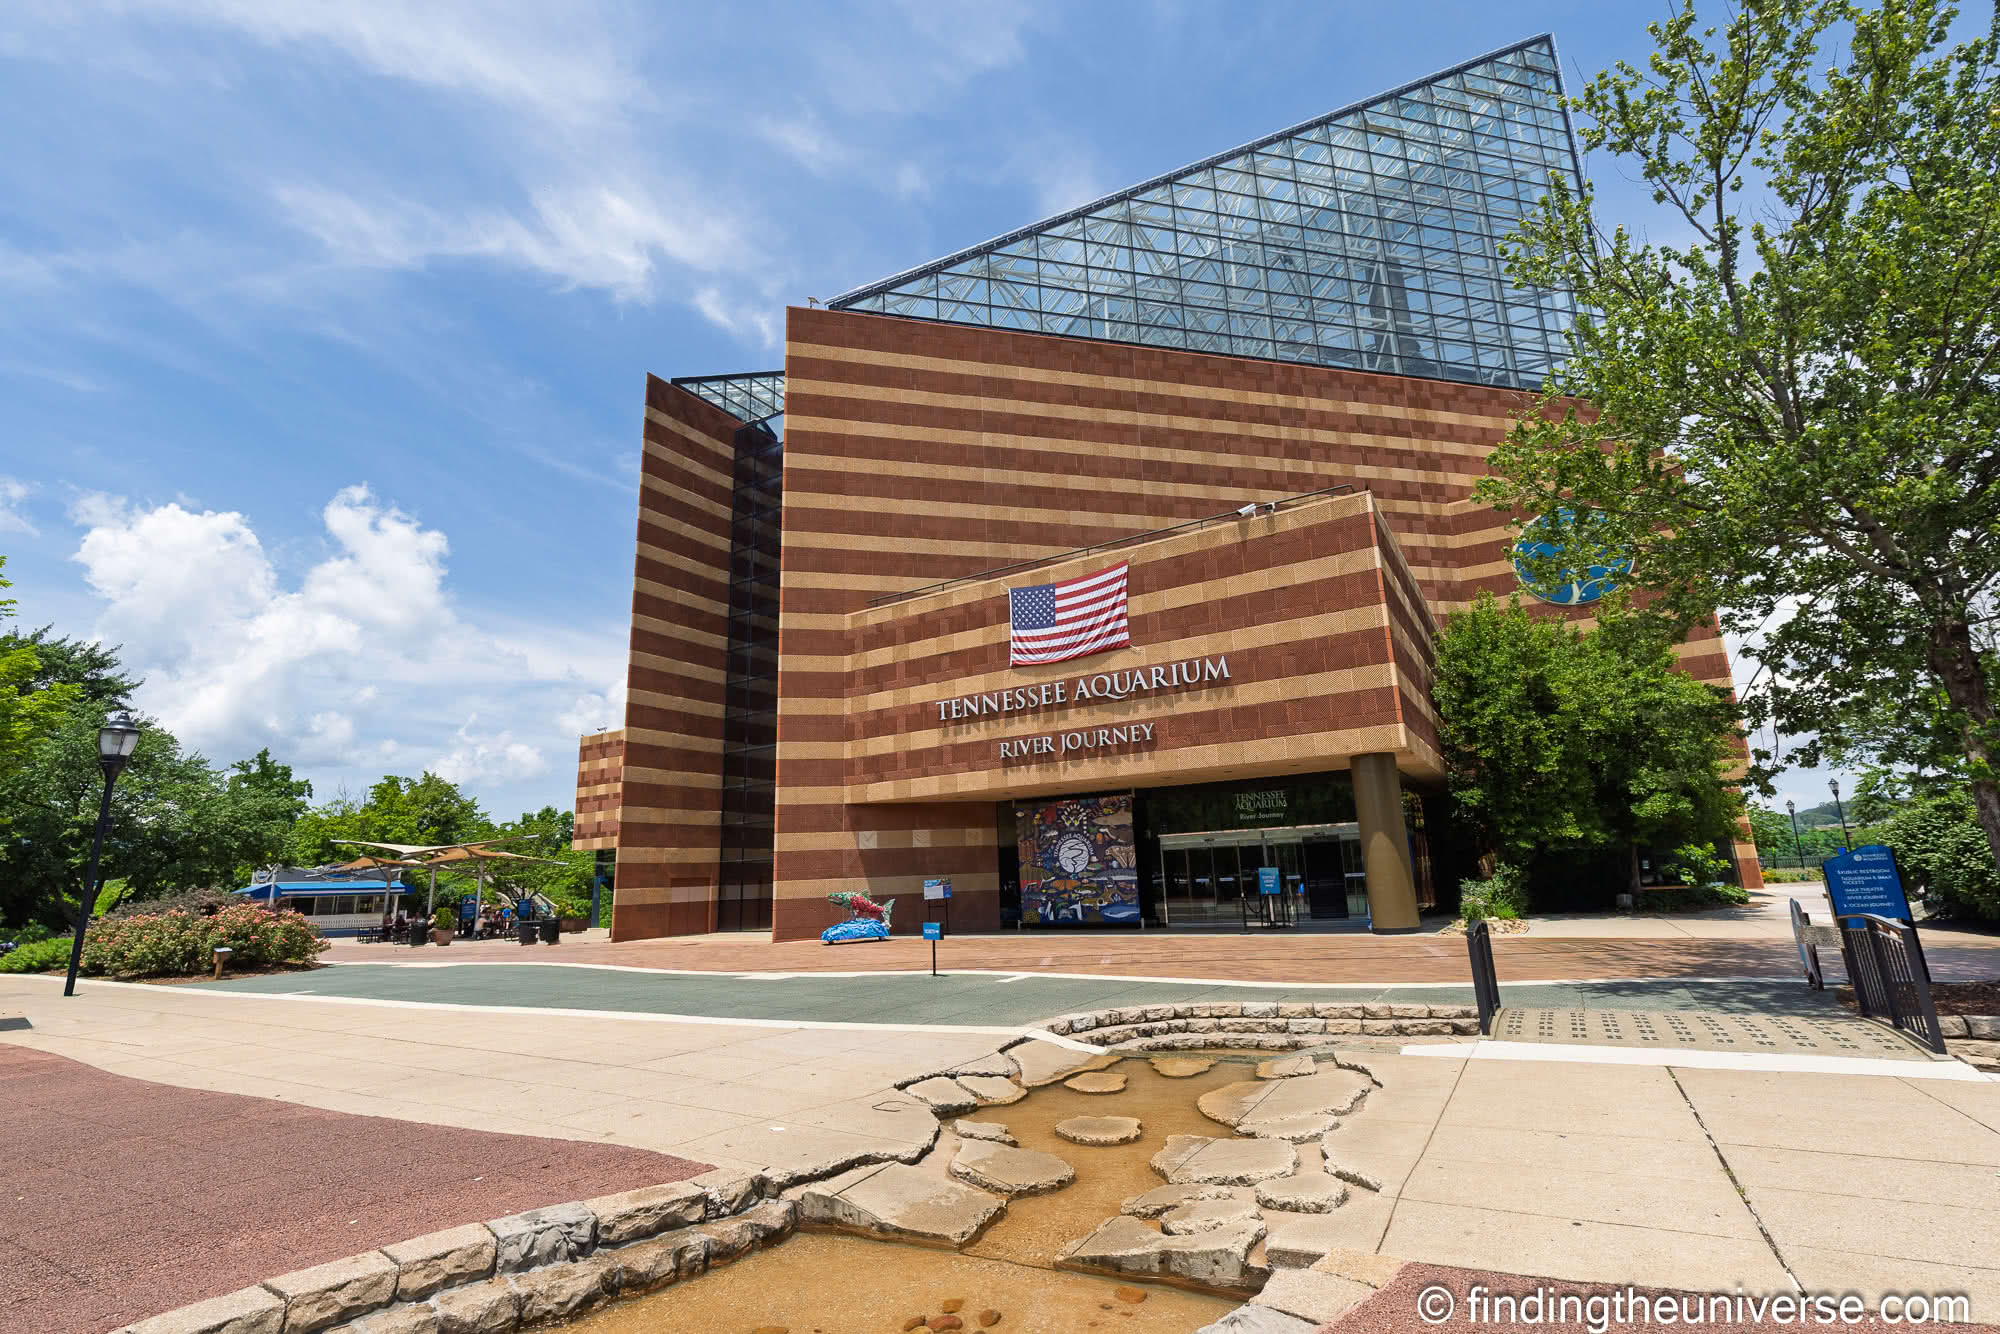
In terms of downtown attractions, there are plenty to choose from. Some of the main sights we suggest checking out would be the Tennessee Aquarium, the Hunter Museum of American Art or the Creative Discovery Museum. That last one would be a great option if you’re visiting Chattanooga with kids.
Once you’re done exploring the downtown, it’s time to head out of town for the attractions on Lookout Mountain.
Lookout Mountain Attractions: from 12pm
Lookout Mountain is a mountain ridge a few miles southwest of the Chattanooga city center. It is home to some of Chattanooga’s most popular attractions, as well as walking trails and viewpoints offering excellent views of the surrounding landscape. There are also a number of places to stay on the mountain itself.
Much of Lookout Mountain is taken up by the Lookout Mountain Battlefield, which forms a part of the Chickamauga and Chattanooga National Military Park. This was the location of major events during the American Civil War, and those interested in military history may want to visit the Point Park location for information on those events.
Point Park is a paid attraction, you can see more here. We didn’t include it on our itinerary, but feel free to include it if you like the sound of it rather than one of our other options!
The rest of the Lookout Mountain Battlefield area is free to visit and it is home to around 30 miles of trails. So if you want to just explore nature and do some hiking, that is certainly an option. Just find a parking spot, choose a trail, and get going. There’s a good trail map on the National Parks site here.
Introduction to Lookout Mountain aside, let’s dive into the attractions that we recommend you visit on your first trip to Lookout Mountain. These are paid, but we think they are definitely worth it.
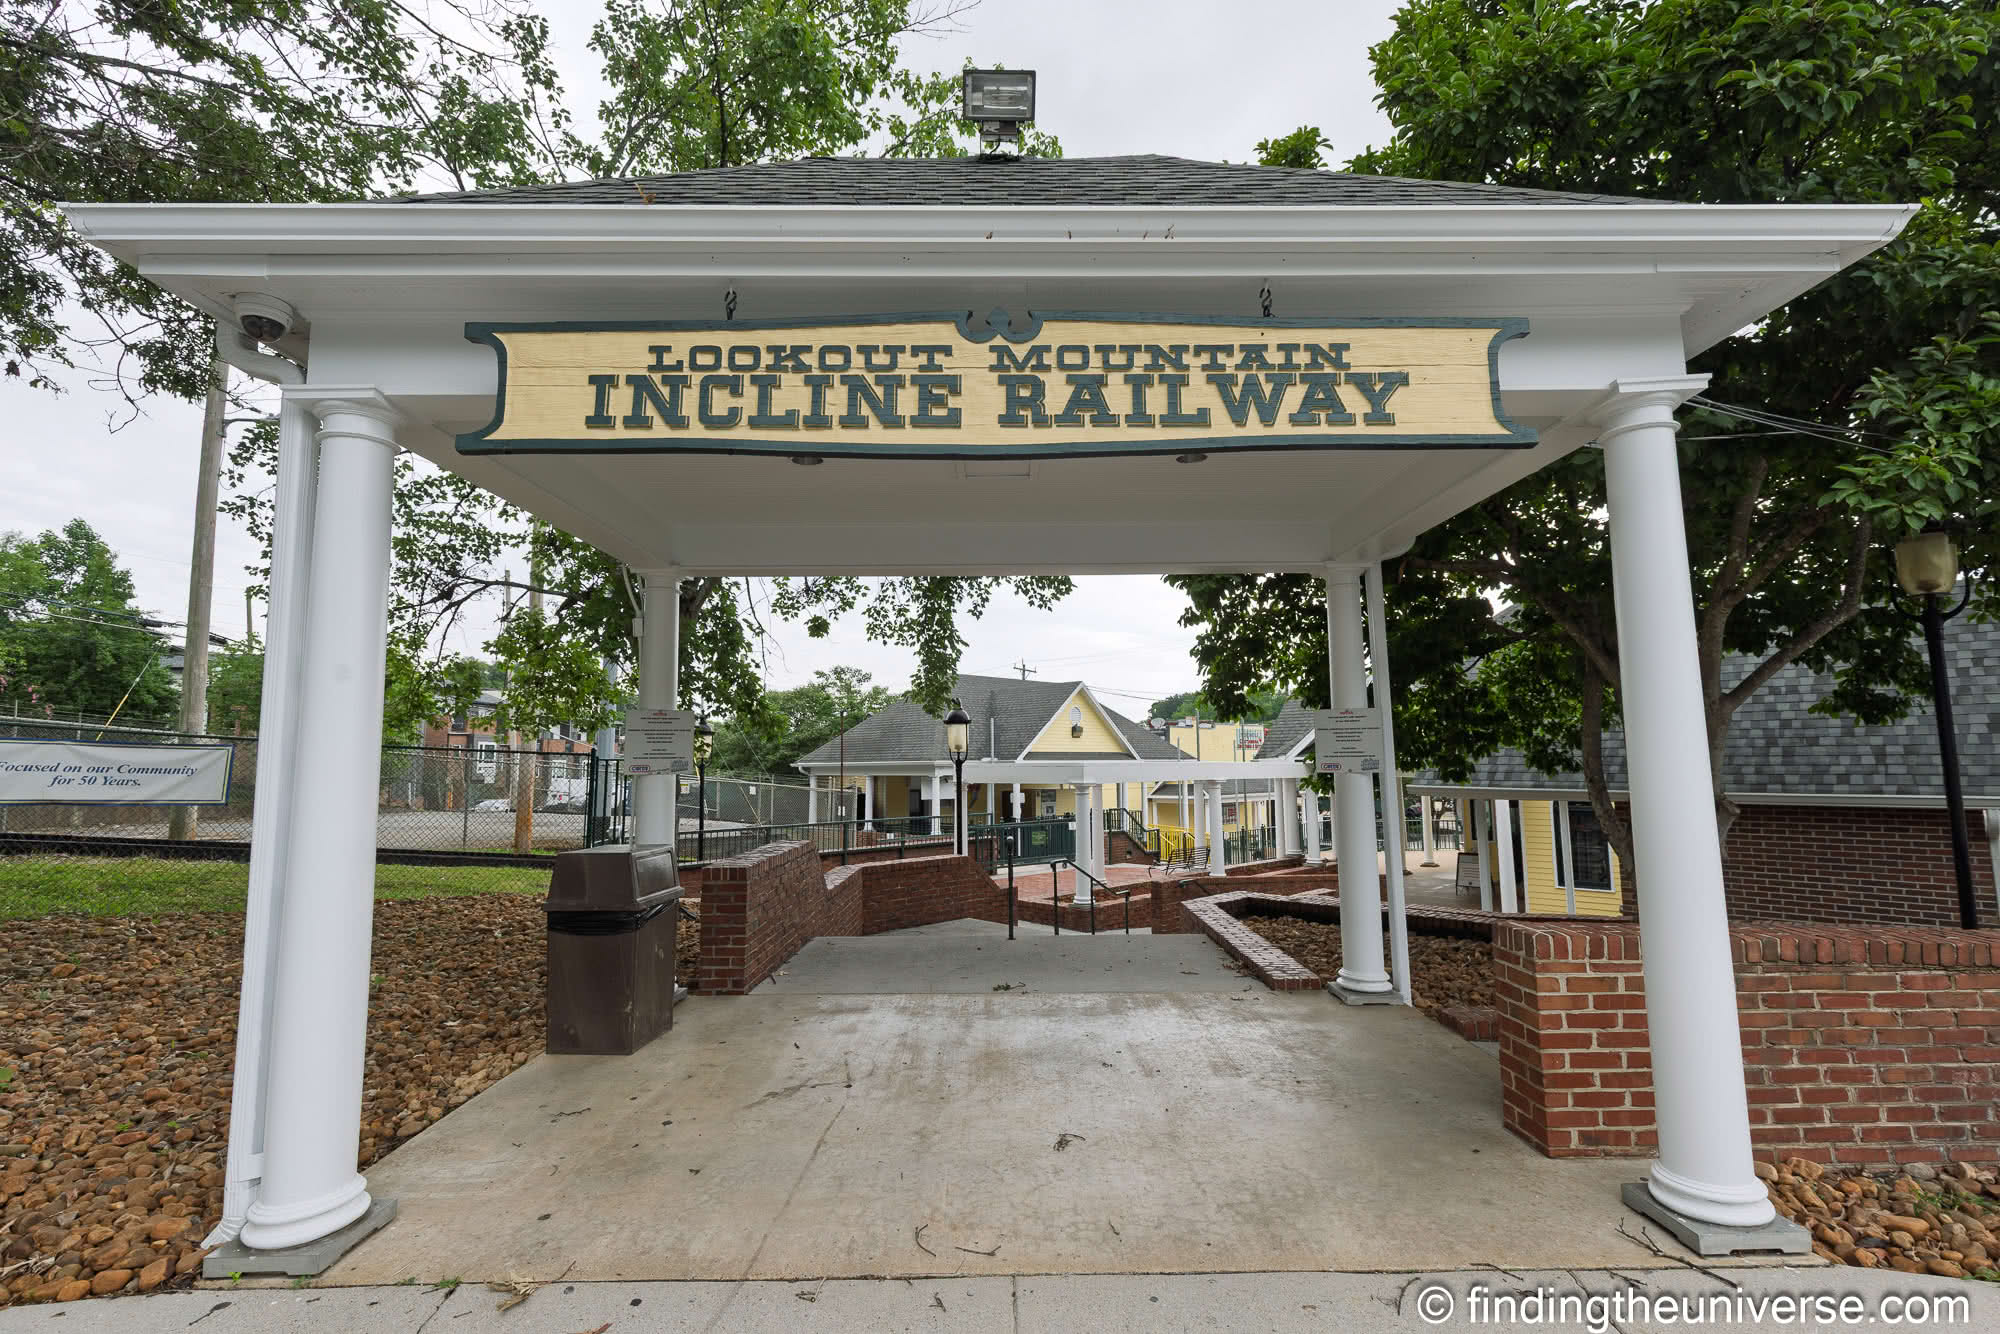
Incline Railway: 12pm
The first stop we recommend on your Lookout Mountain adventure is the Incline Railway. Built in 1895, this mile long railway will whisk you to the upper part of the mountain. Whilst the upper station of the incline railway isn’t technically at the highest point of Lookout Mountain (that honor belongs to High Point, a way further south), it is still pretty high up on the mountain, and you will get great views of the city.
There’s a viewing platform at the upper station, and the ride on this historic railway is well worth the admission price.
The ride takes around 10 minutes each way, and you’ll want to spend some time at the top enjoying the view, so we’d suggest planning to spend around 45 minutes to an hour visiting the Incline Railway.
If you’re hungry, there are also a few dining options around the lower station. It’s also here where you’ll find the next stop on our itinerary, home to a tasty treat which will keep you going with your Chattanooga sightseeing adventure!
You can book tickets for the Incline Railway here. There’s a parking lot on site, which has a small fee for parking. Note that pets are not allowed on the railway.
Ice Cream at Clumpies: 1pm
Clumpies Ice Cream was highly recommended as a Chattanooga local favorite to try from our readers, and we are so glad that we took them up on that recommendation.
Founded in Chattanooga in 1999, Clumpies focus on handmade ice cream made with fresh ingredients in small batches. As of the time of writing, it’s available in three locations. There’s one in the Northshore area, one by the Chattanooga Choo Choo, and, conveniently for this itinerary, one right by the base of the Incline Railway.
They have a huge range of delicious flavors to choose from, and we highly recommend stopping off to try this classic dish out.
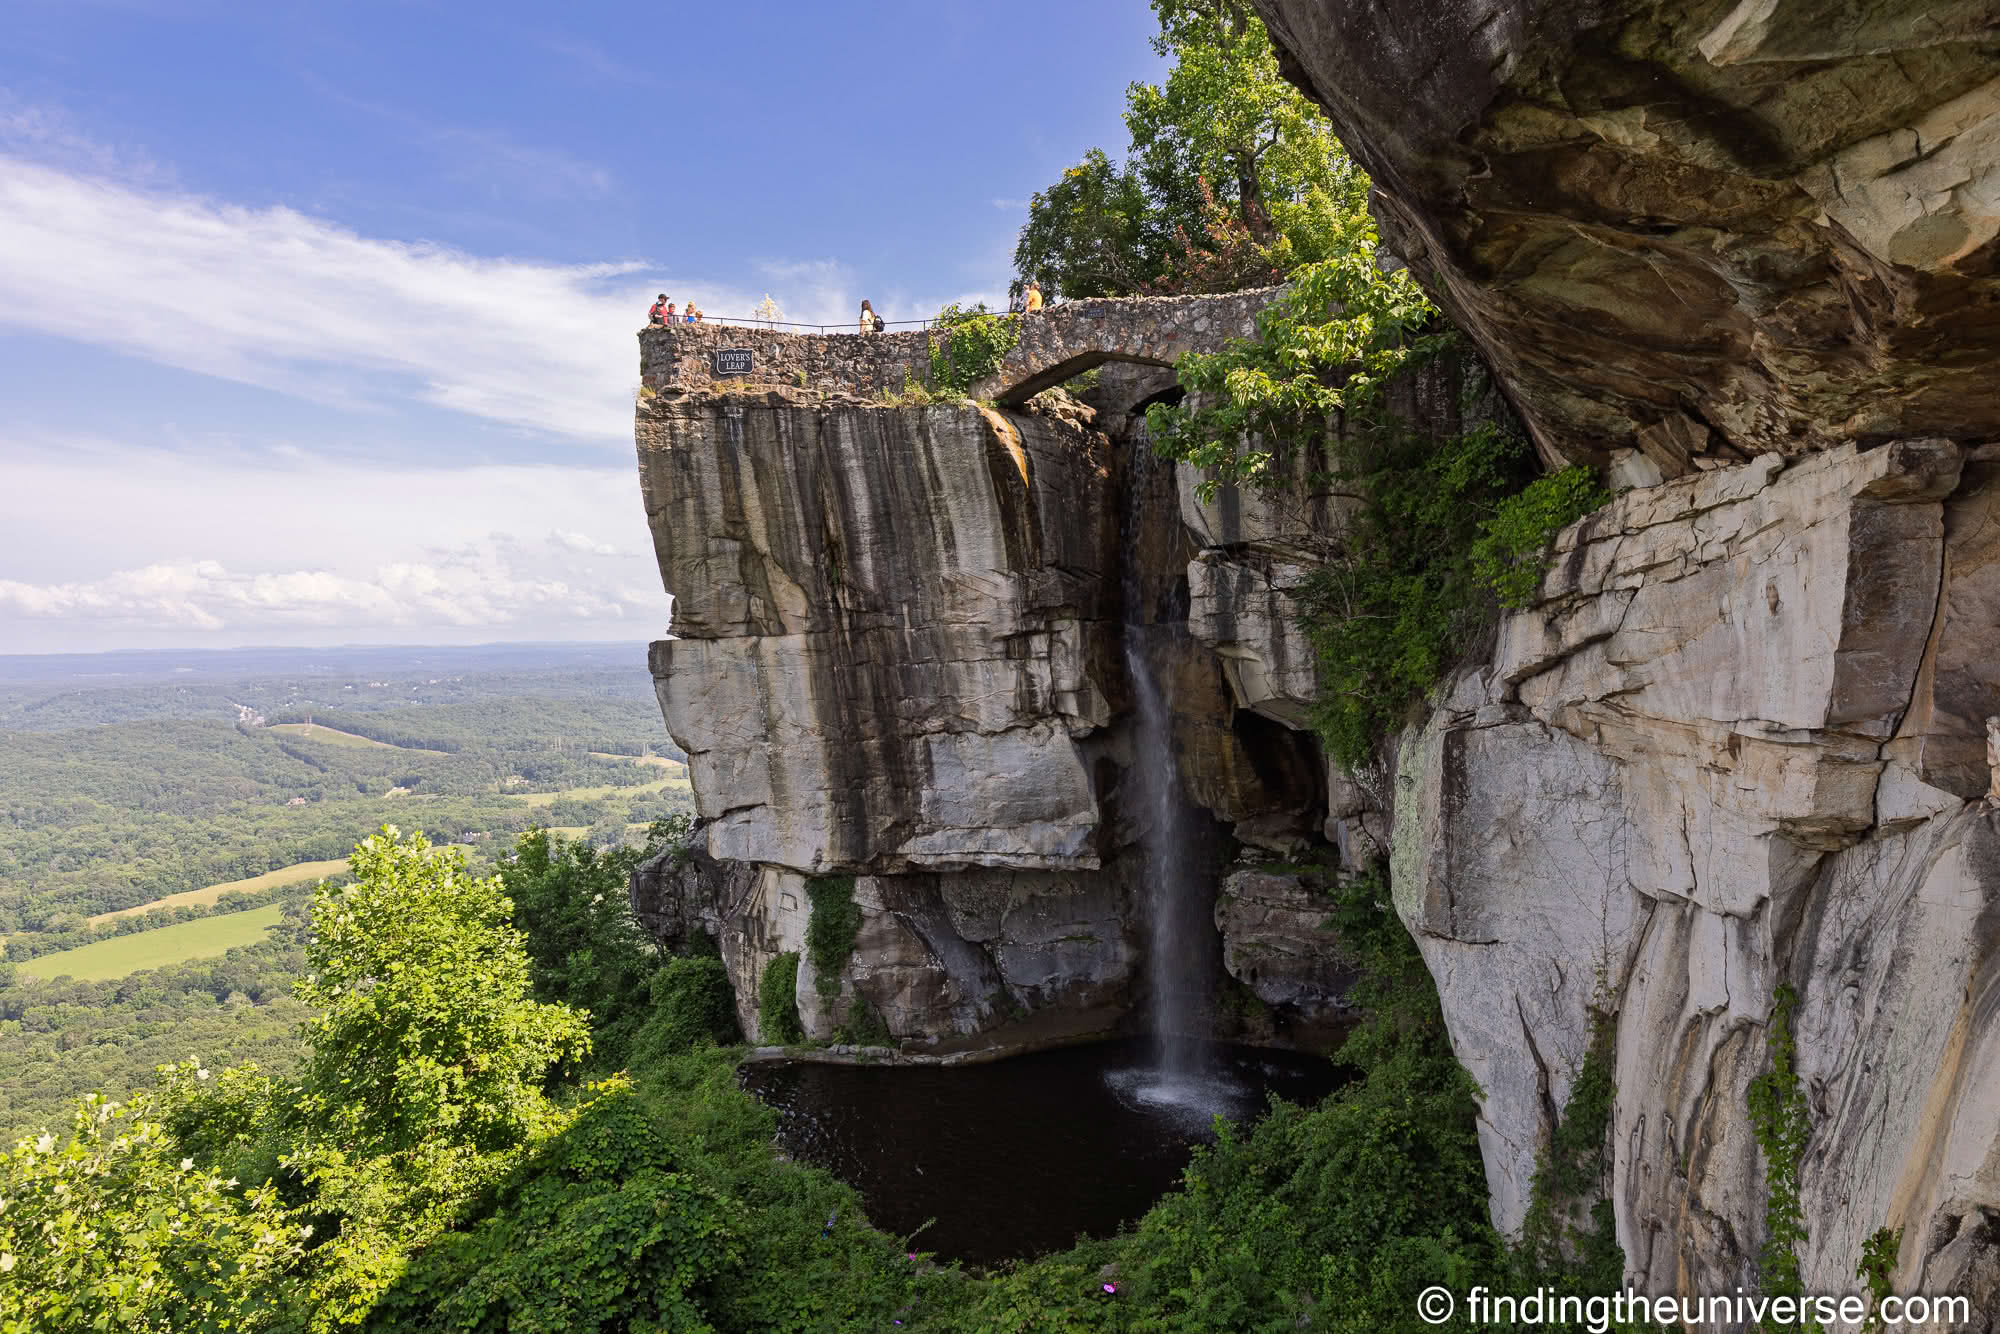
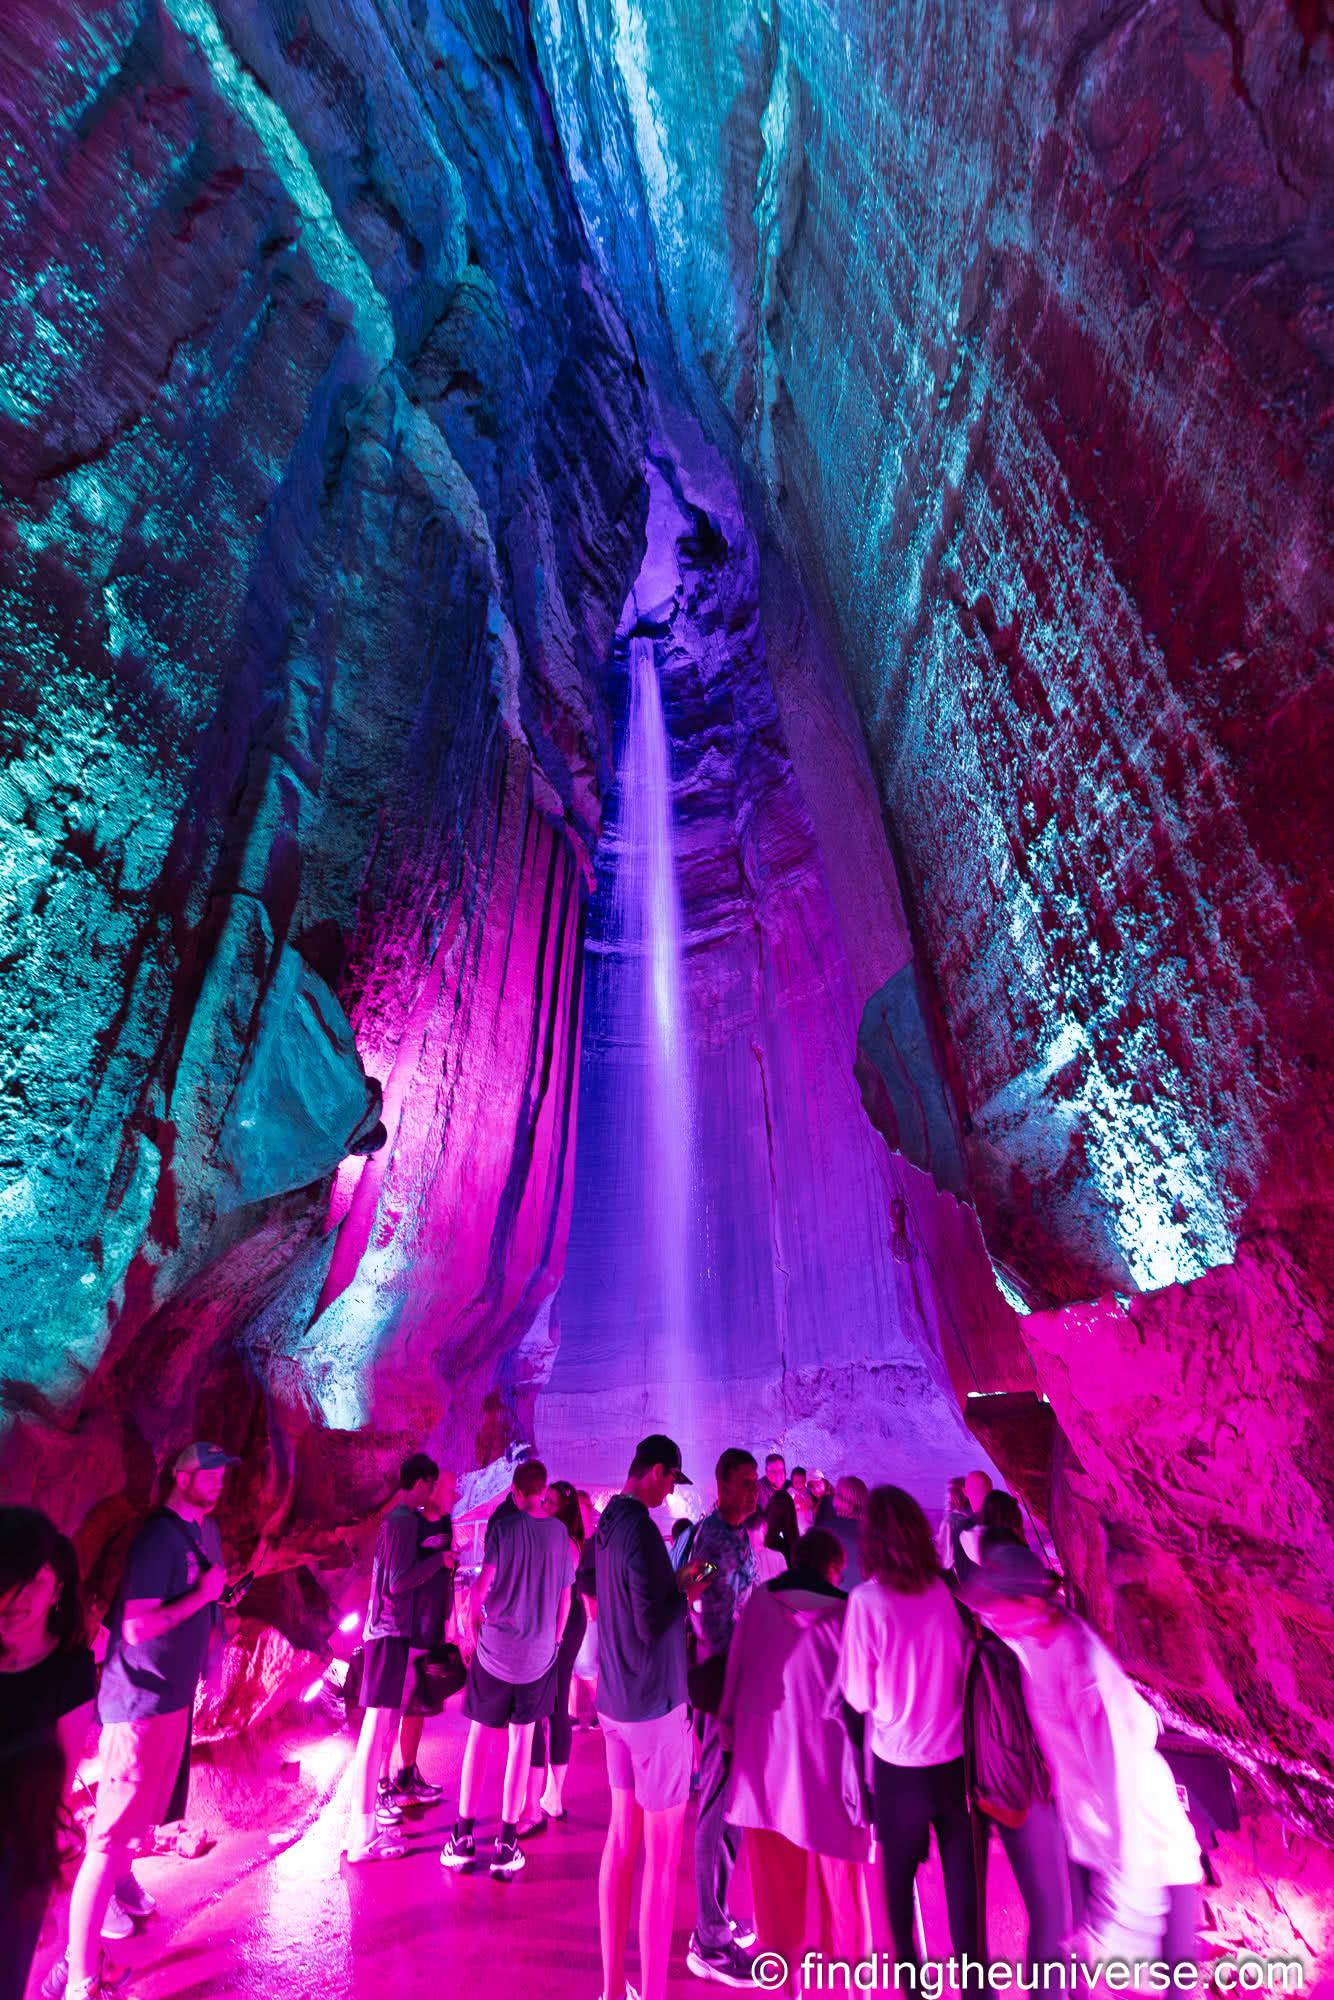
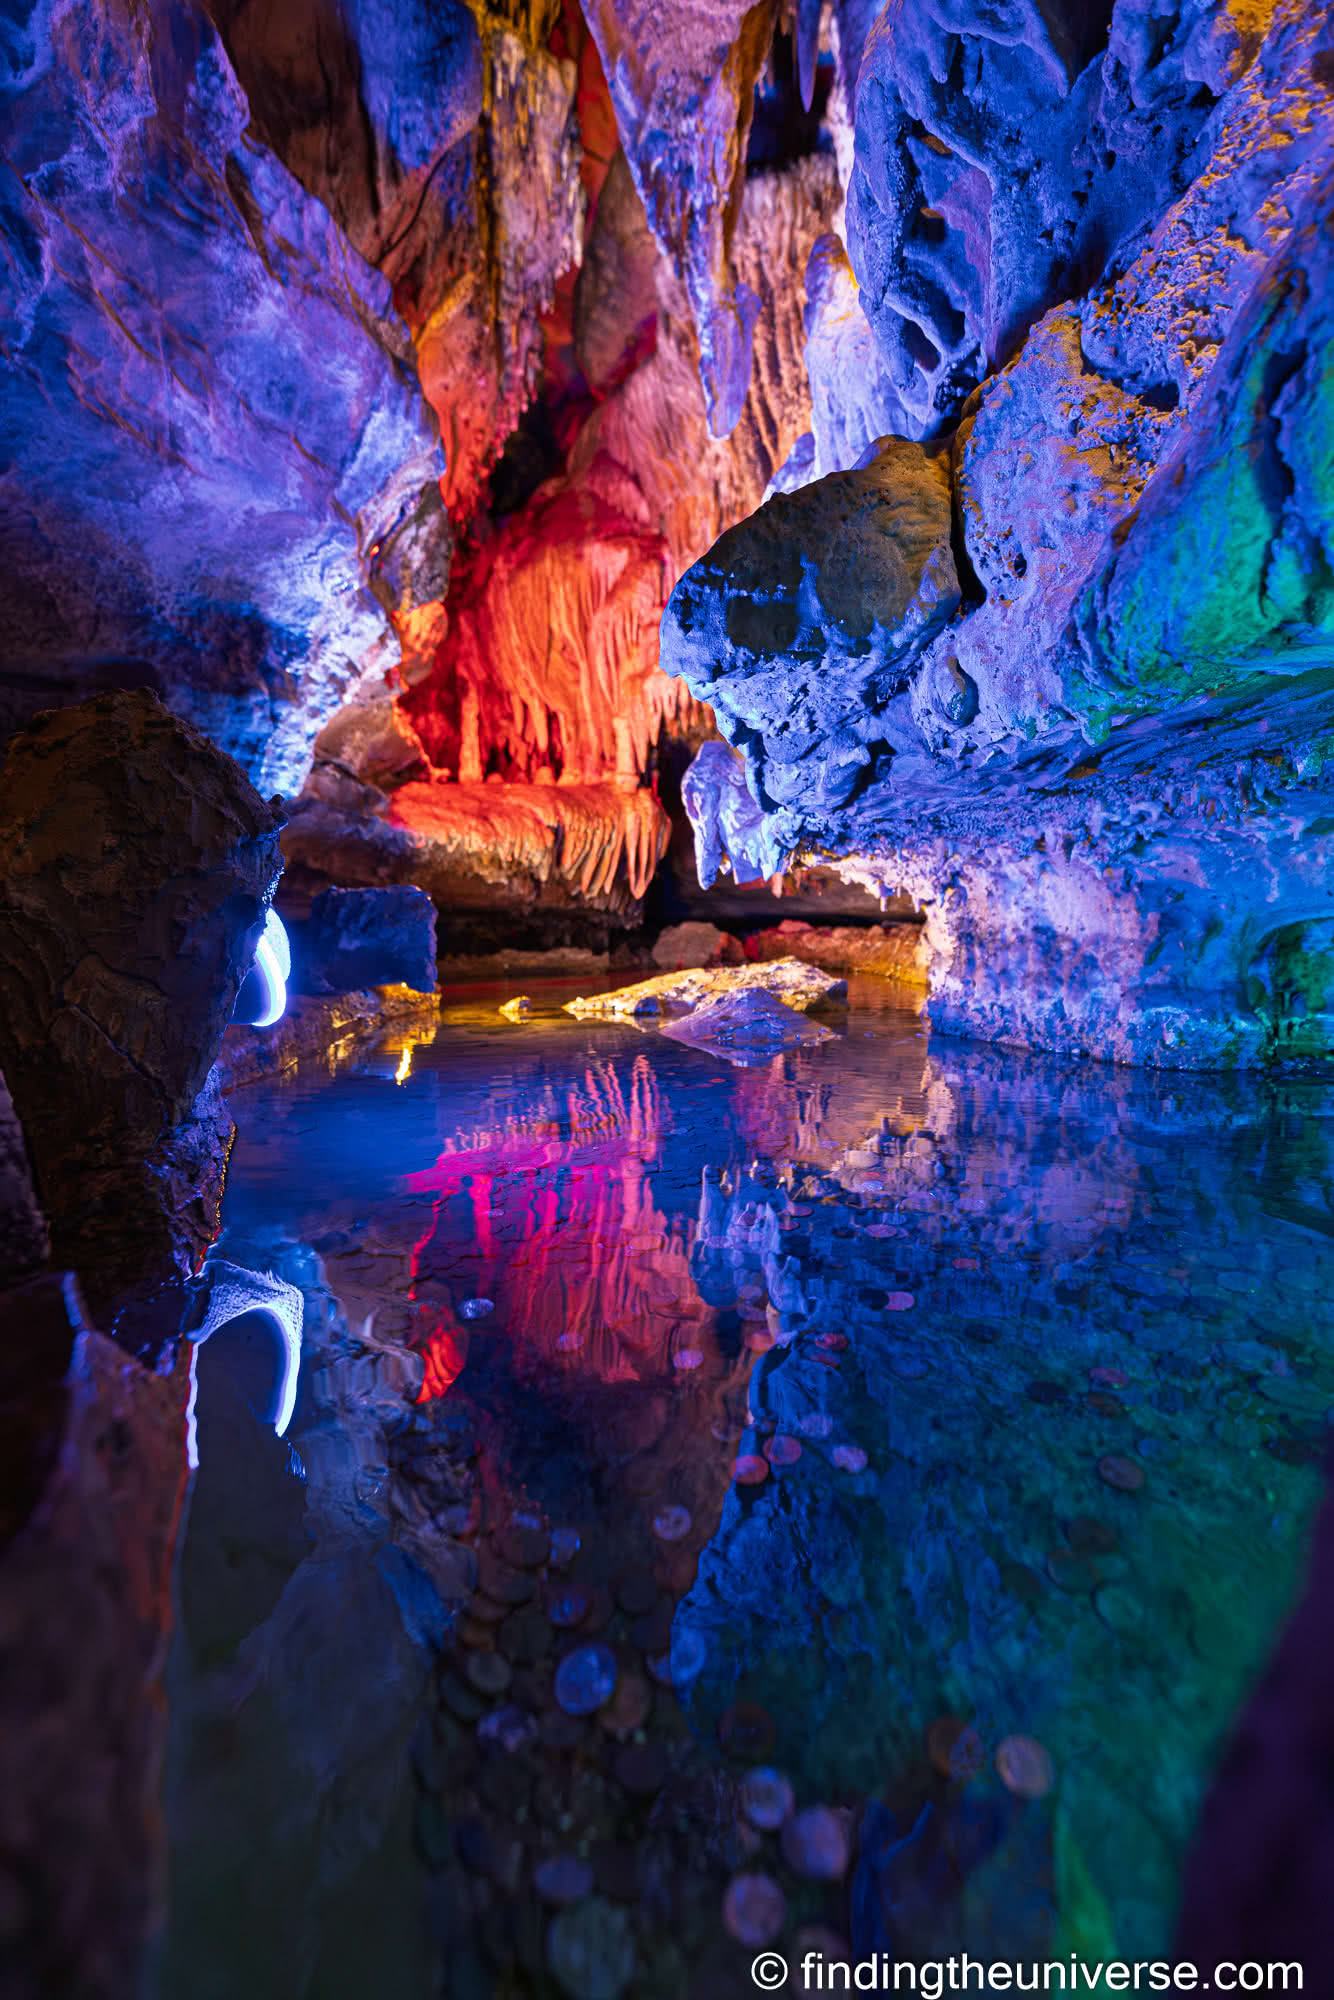
Ruby Falls: 1.30pm
As I mentioned at the start of this guide, Jess visited Chattanooga when she was young, and the only thing she really remembers from that visit was that her family had a souvenir from Ruby Falls. So obviously we had to return to refresh her memory of what she saw, and so I could see what it’s all about.
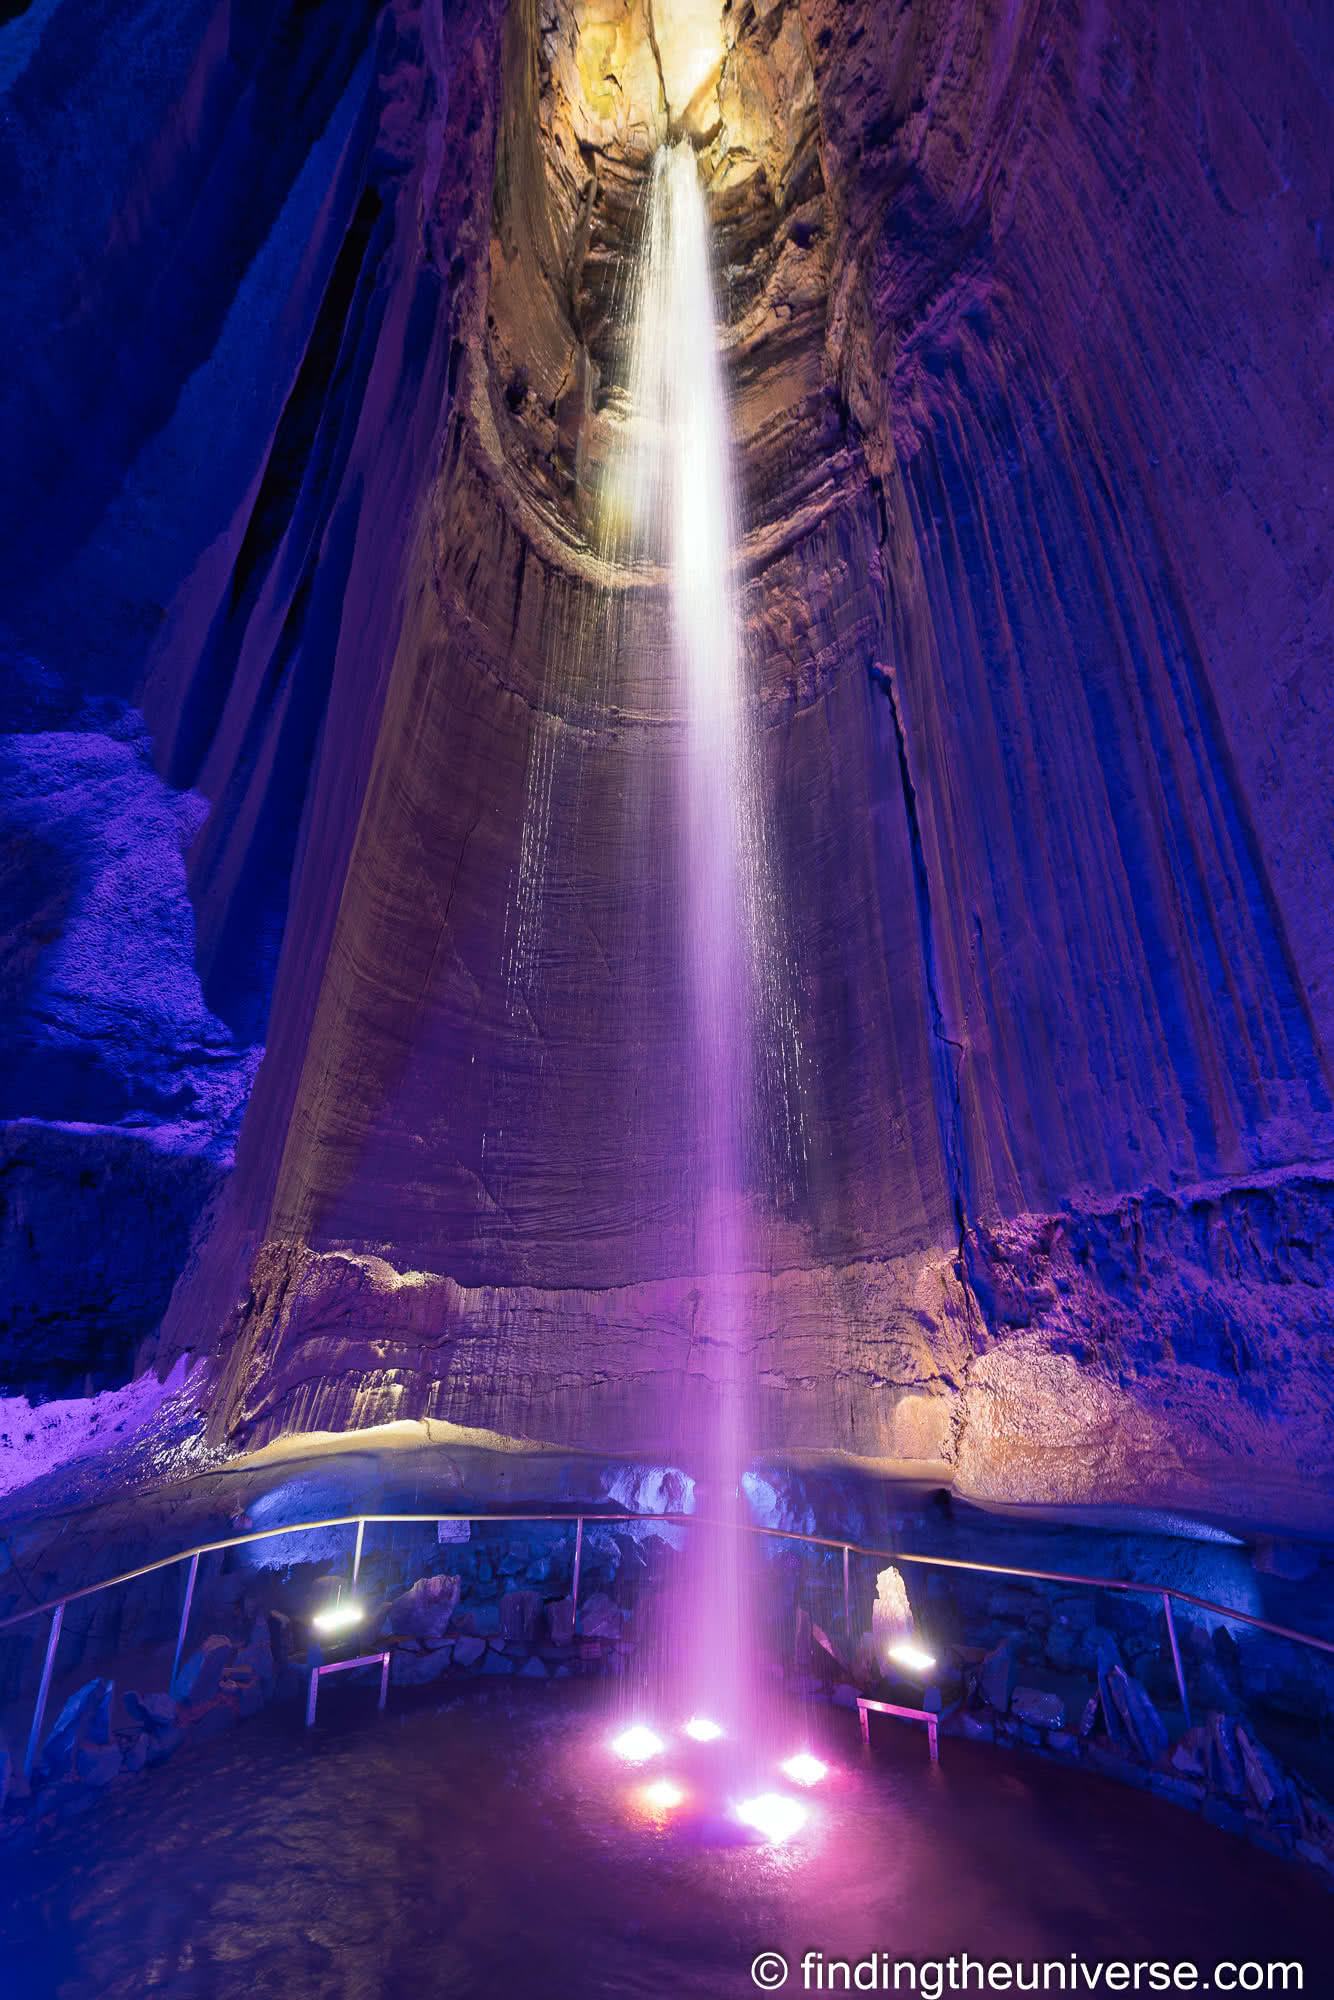
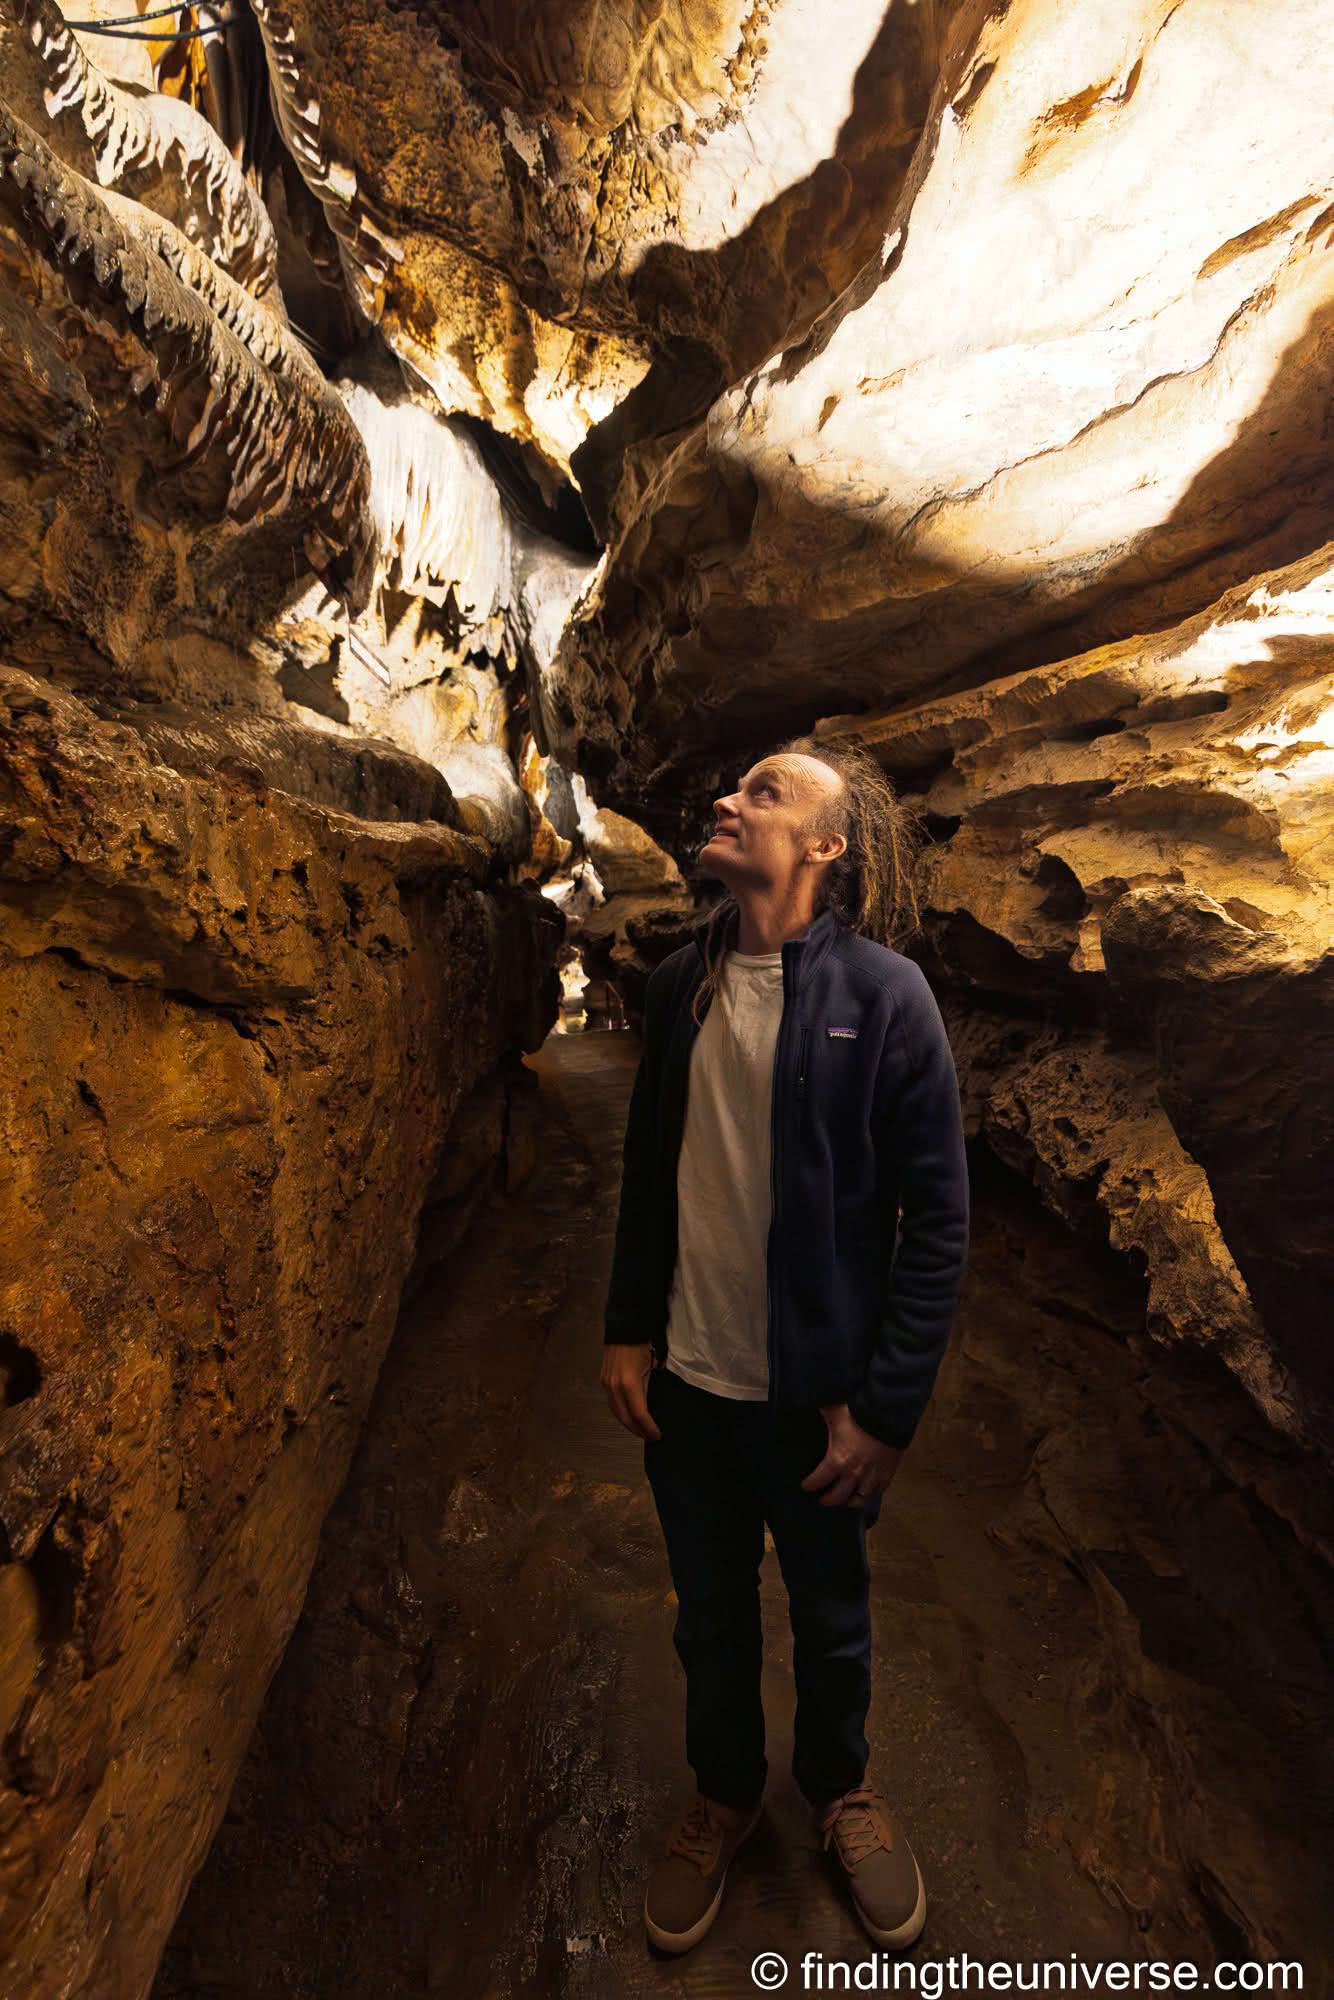
Ruby Falls has been one of the most popular sights in Chattanooga since it opened to the public in 1930. The main attraction is the 90ft high waterfall, named Ruby Falls, which is actually found over 1,000ft underground. An underground waterfall is definitely a neat attraction!
The Ruby Falls experience works as follows. You sign up for a tour time, which is best if booked in advance on their website here. All visits are by guided tour, with tour group sizes ranging up to around 30 people. At the tour time you take an elevator down 260ft into the mountain, after which your guide will lead you along a trail to the waterfall. There’s also a video near the start of the tour where you’ll learn about the history of how the attraction was developed, which is pretty interesting.
The trail is just under a mile round trip, and there are lots of interesting cave formations to see on the way, which your guide will point out. The trail is easy to follow and fairly even, although this being a cave there are of course low points, outcrops and some steps to navigate. There are also times when you will have to let another group going the other way pass.
Of course, the highlight of the trip is the waterfall, which is pretty impressive. It cascades down around 90ft, and the chamber it is in is plenty large enough for the group. It’s also illuminated with different colors and there’s music as well.
For us the entire underground experience lasted around an hour, with the time at the falls lasting around 8 to 10 minutes. This was plenty of time to get all the photos we wanted and also to just enjoy watching the water.
Now, you might be wondering if visiting Ruby Falls is worth it. We personally enjoyed it, but it is obviously a fairly busy attraction where you have to follow a set path and itinerary.
I think a lot of how good your experience will be will come down to your guide. The groups are not huge, but with 30 or so people stretched along a narrow pathway, you will want to try to be near the front of your group to hear everything your guide has to say as you go. There are points where your group will stop and the guide will talk to you all, but there are also points of interest along the way which you may miss if you’re near the back of the group.
Our guide was ok, but we have read reviews where people found the guides to be very entertaining and verbose, which wasn’t the case with our guide. Still, we did enjoy the experience overall, which was pretty unique. It also has historic attraction interest – we always love to visit attractions that have been drawing a crowd for decades, as it feels like we’re following in the footsteps of many other travelers.
That said, if you prefer to have a bit more time to explore at your leisure, are claustrophobic, or if the sound of an underground waterfall doesn’t float your boat, then that’s totally fine!
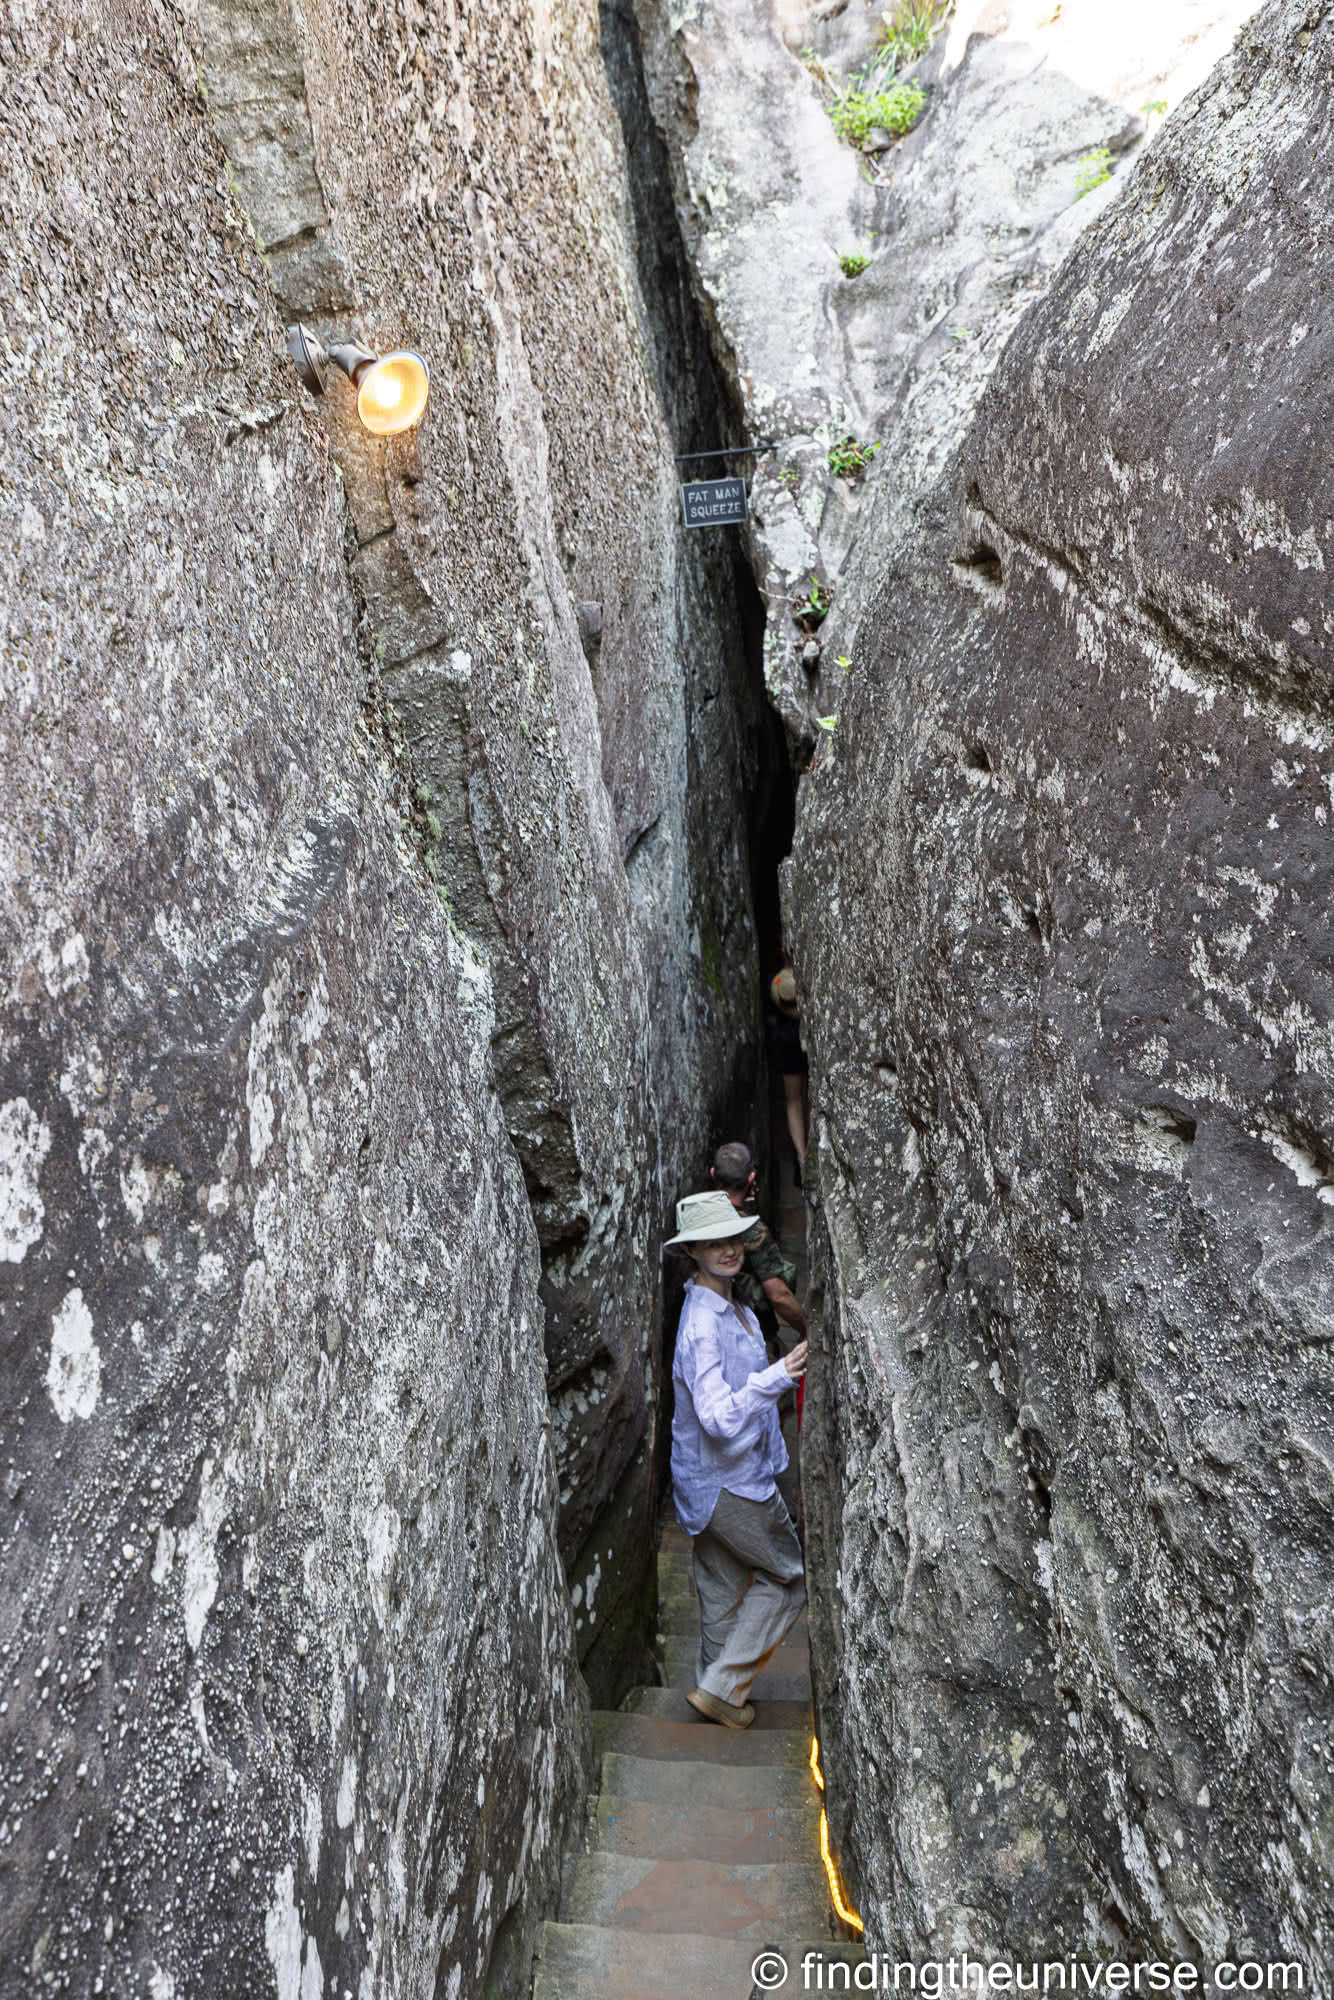
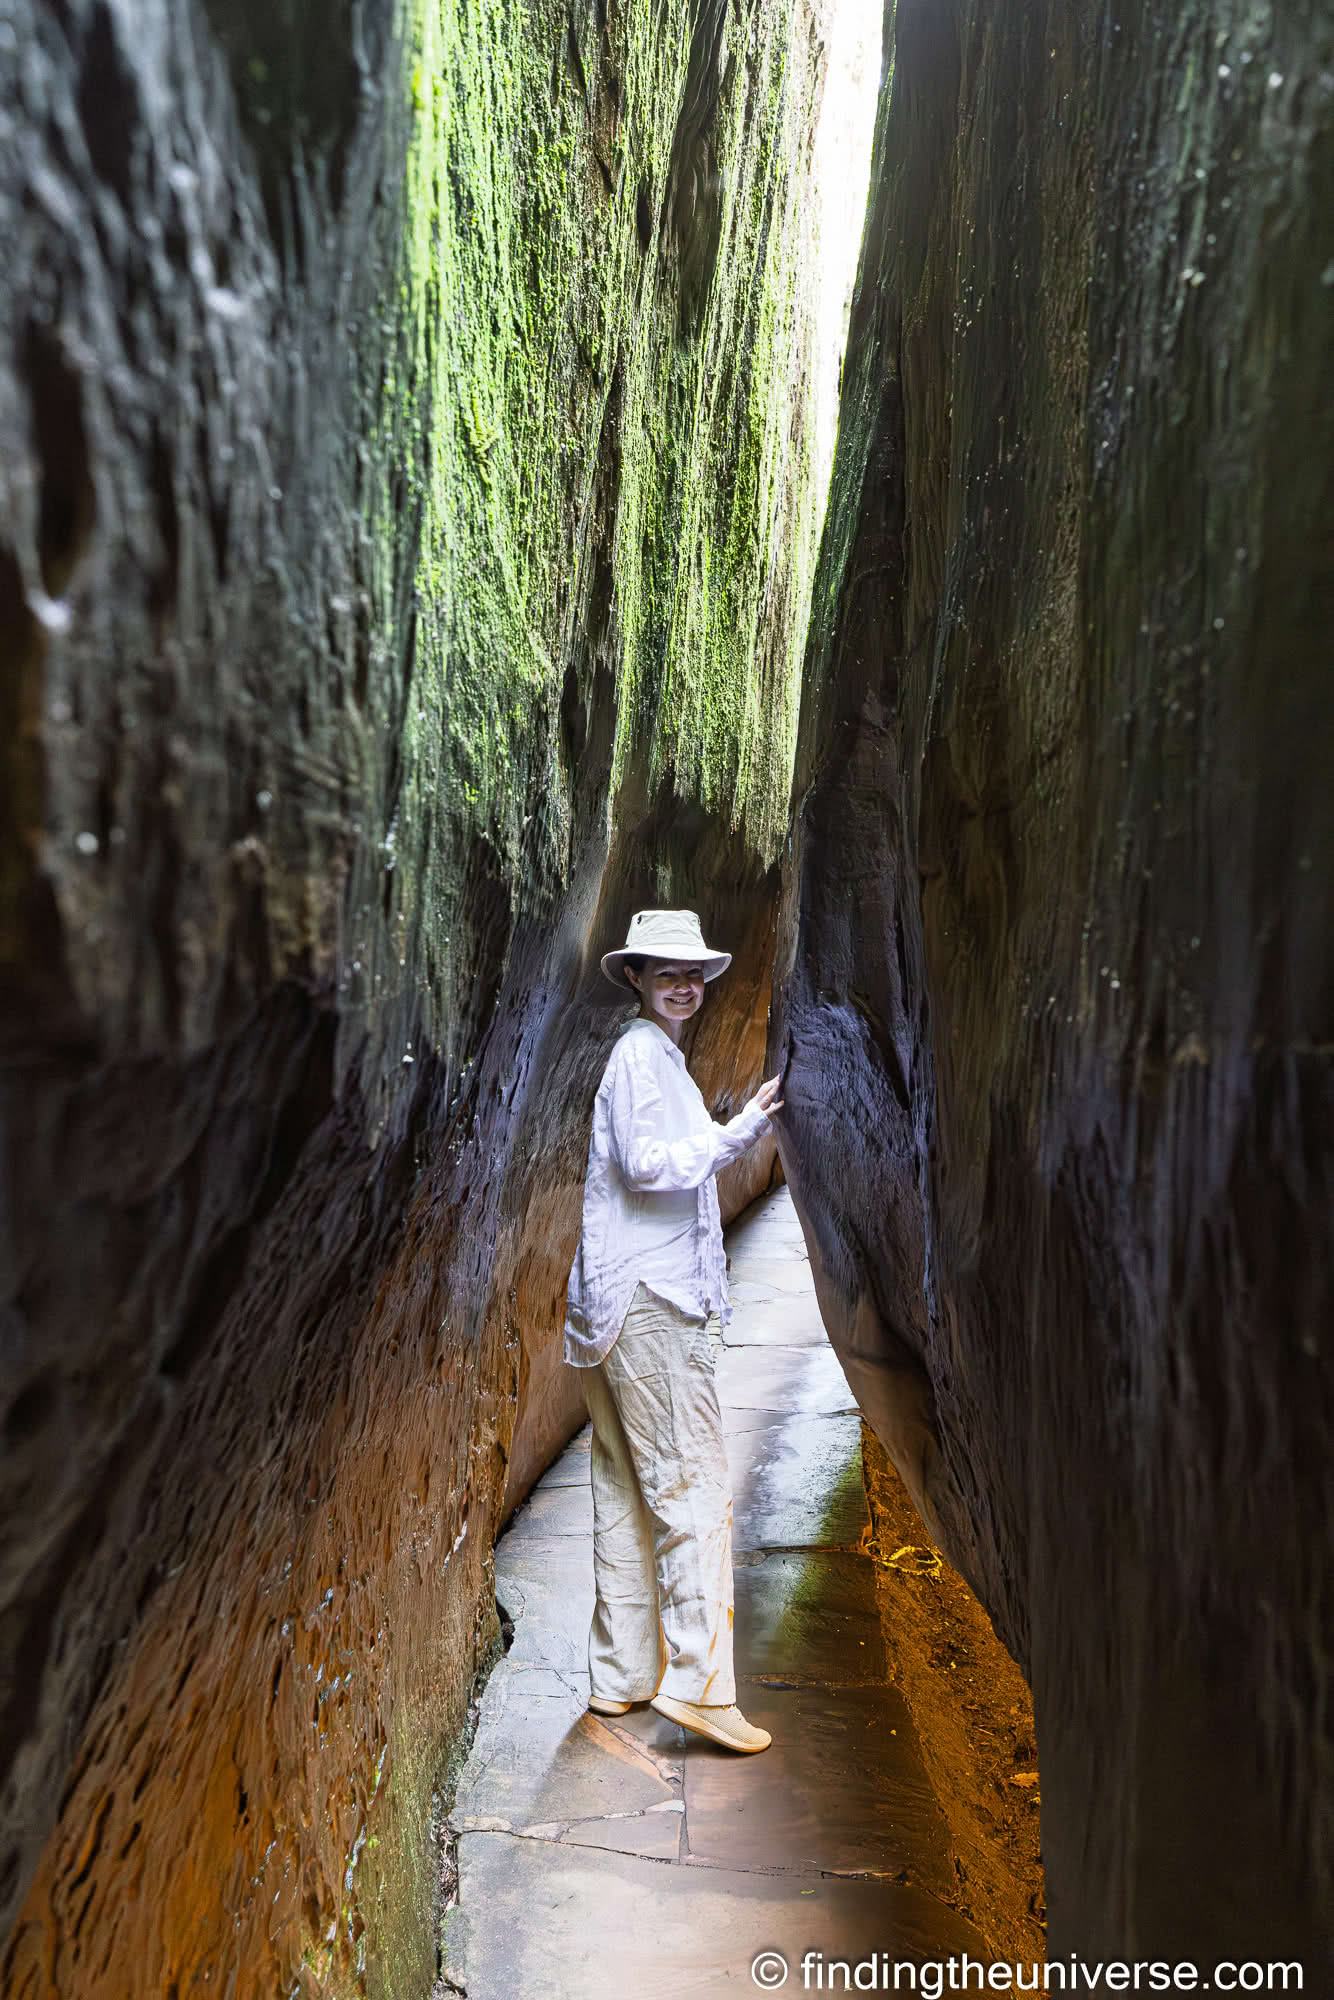
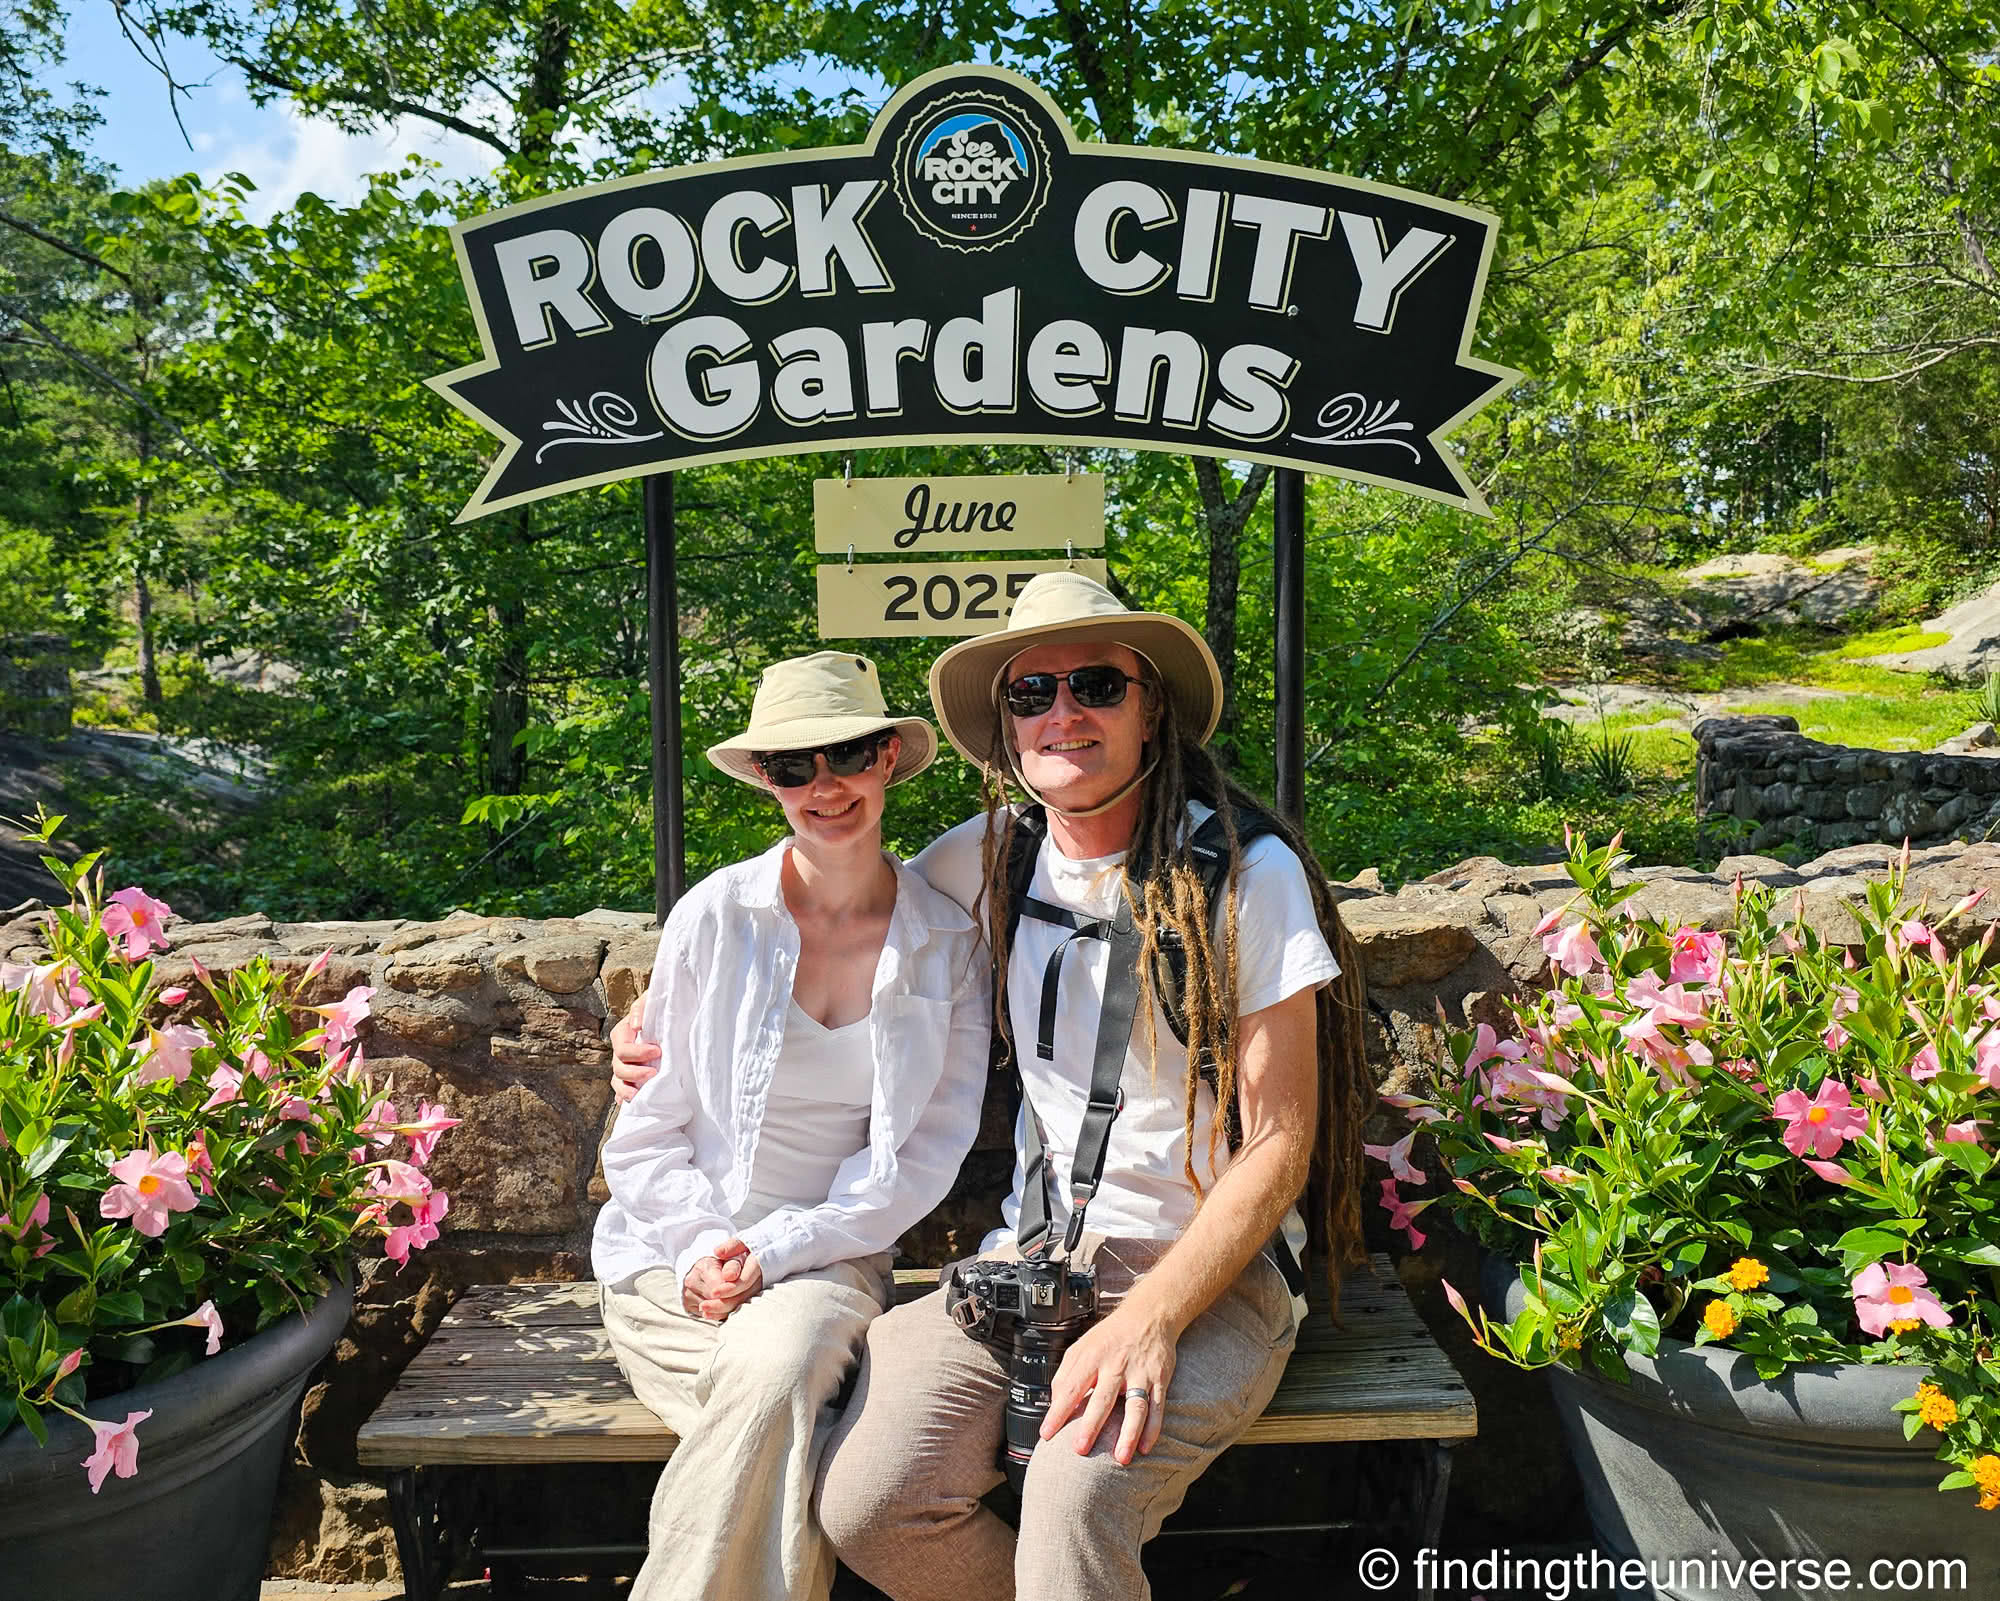
The other popular paid attraction on Lookout Mountain we recommend visiting is Rock City, which is actually just across the state line in Georgia. This has also been a popular attraction in Chattanooga for many years, opening way back in 1932.
It became popular due to a marketing campaign which involve painting the slogan “See Rock City” on the roofs and walls of barns across the US. By 1969, over 900 barns had been decorated across 19 states, and it is safe to say that this got the word out about the attraction fairly comprehensively.
Today, Rock City offers a similar experience to that which visitors would have found back in the day, although it has of course evolved a little over time. The main attraction though are the walking trails, which wend their way around the gorgeous rock formations, leading you to spectacular viewpoints.
From one of these viewpoints it is said that you can see seven states, although you will need a very clear day to achieve that. Still, the view is spectacular, regardless of the number of states you actually see.
We really enjoyed visiting Rock City, it was our favorite attraction on top of Lookout Mountain. It’s really neat to be able to wander around and under all the rocks, and there really is a lot of detail to see, from underground dioramas to a waterfall to swing bridges to those aforementioned views. It really feels like of a lot of love and attention went into creating this attraction, with the same family running it today who originally created it.
We’ve put your visit to Rock City later in the day so it’s a bit cooler, which is especially important if you’re visiting Chattanooga in the summer months. However, it’s a year-round destination, with themes throughout the year, including an Irish festival in March, and lights for Christmas.
For this one we definitely recommend booking online in advance. Prices vary depending on the time slot you choose and the day you visit, and it is usually cheaper to book in advance online rather than buy tickets in person.
See more and book your tickets on the official Rock City website here. We’d suggest around 90 minutes to 2 hours for this attraction. Parking is free.
Dinner: 6pm
After all that exploration, you’re bound to be hungry by now. So it might be time to head for some food!
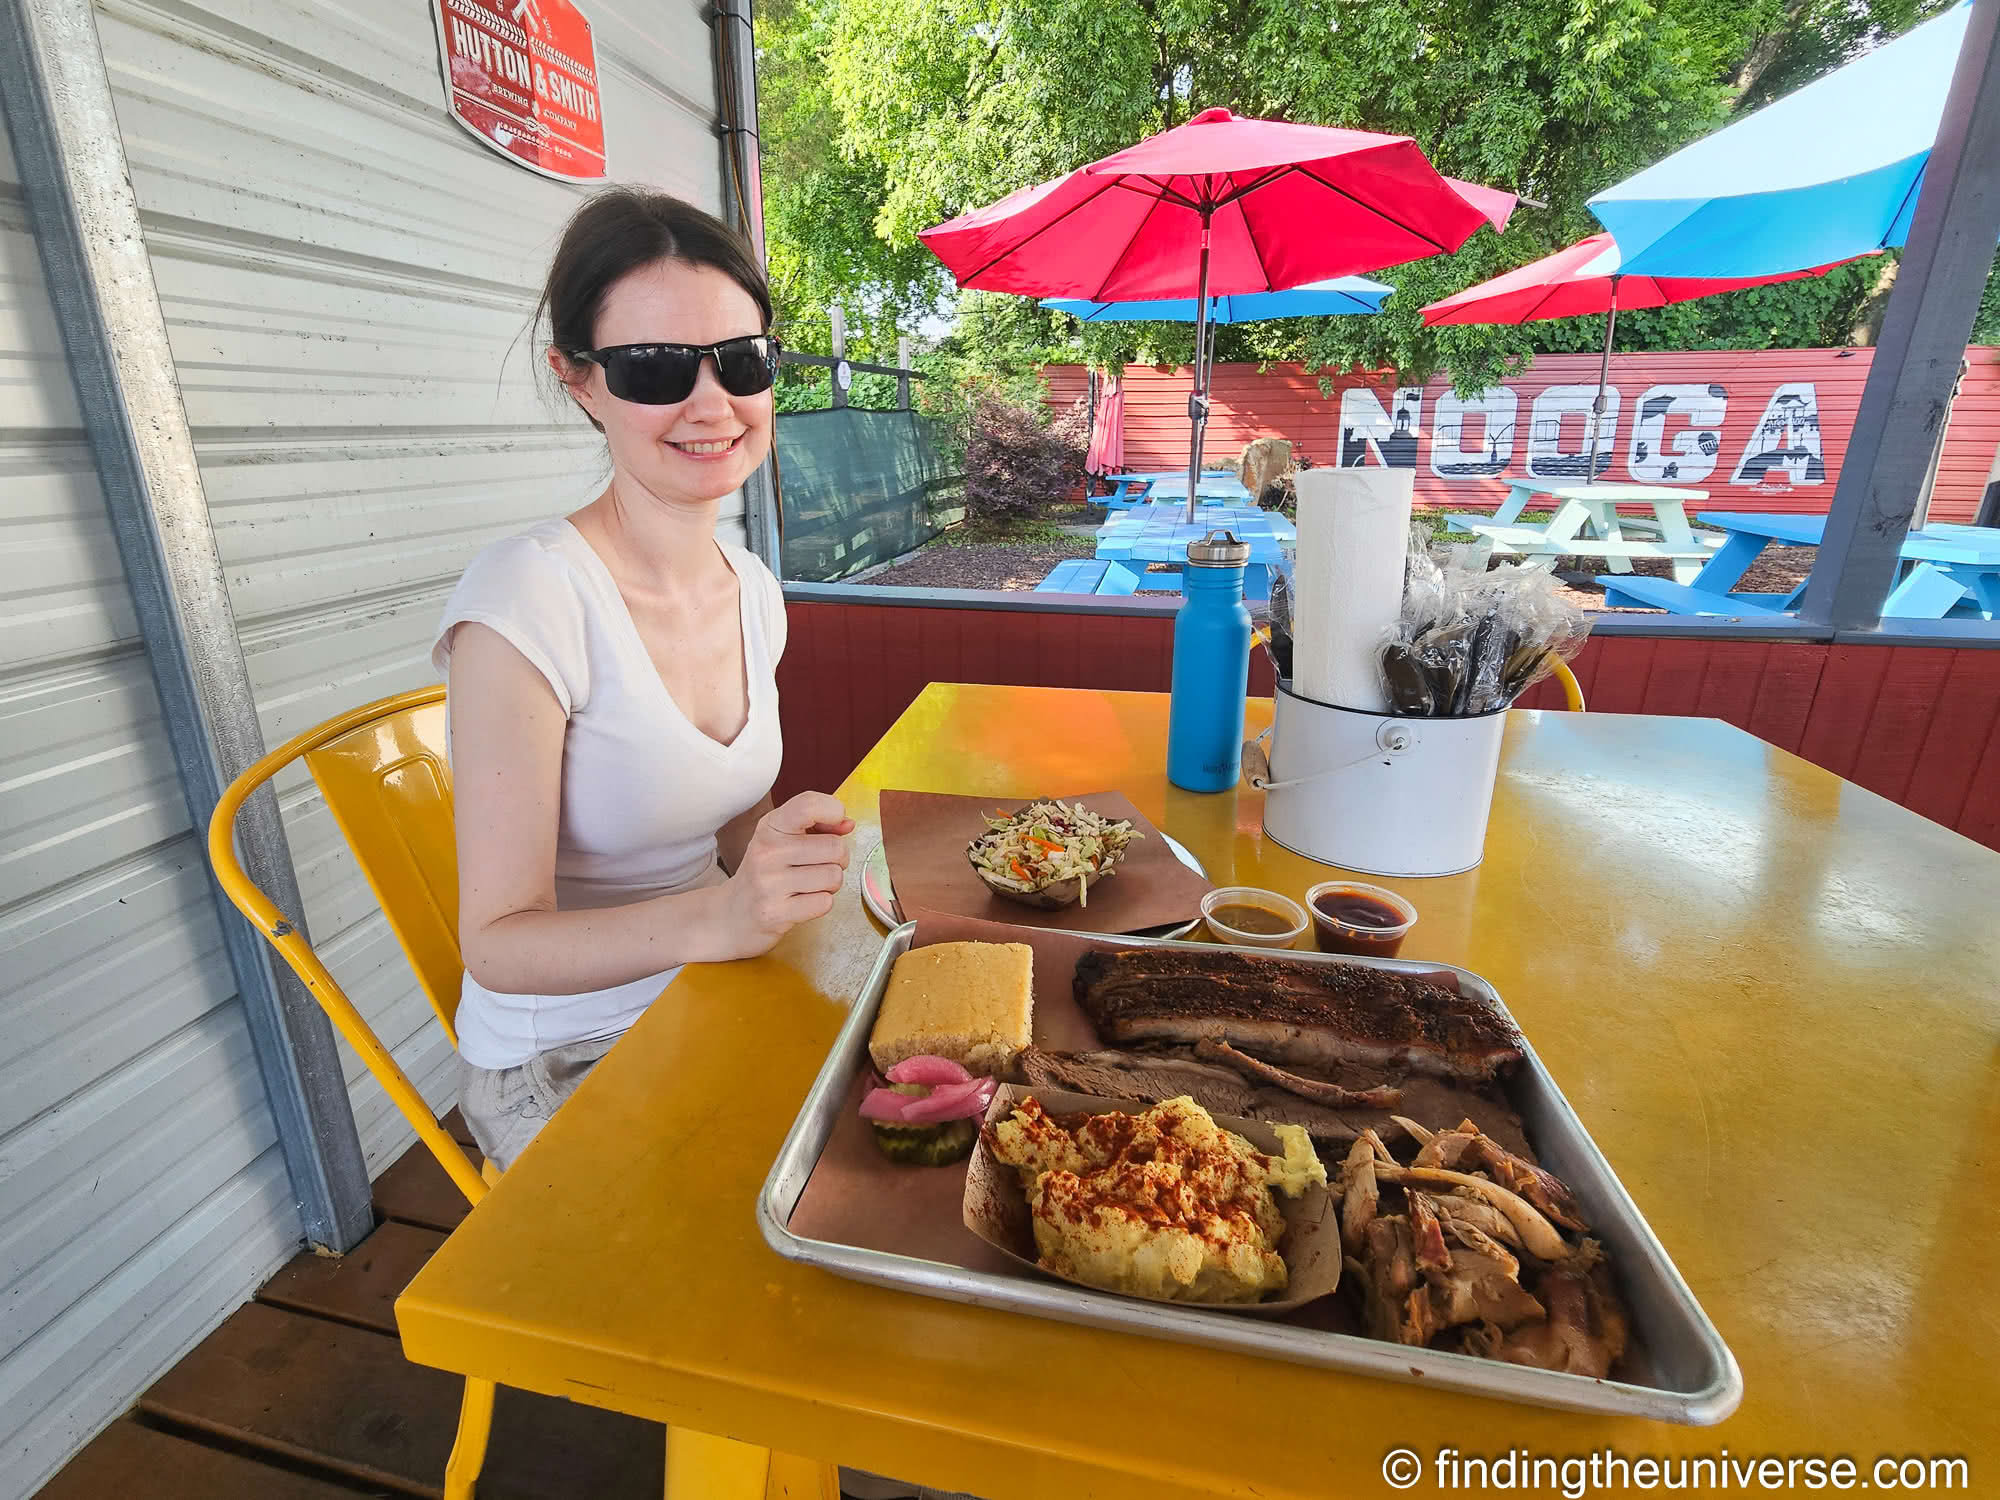
There’s a huge range of dining options to choose from in Chattanooga, from fast casual through to upscale experiences. You’ll also find a range of cuisines to choose from, running the gamut from BBQ, hearty southern fare, through to world flavors.
As well as dining options, Chattanooga has some great spots to drink. Whether you’re planning on watching the sunset with a cocktail (head to the rooftop Whiskey Thief) or want to visit a local brewery like Oddstory or Hutton & Smith, Chattanooga is bound to have something to sate your thirst. For mocktails, check out Sleepyhead Main+Dodds which has a permanent alcohol-free cocktail menu.
Sunset: Lookout Mountain or Walnut Street Bridge
To round off your day in Chattanooga, we think you might want to enjoy watching the sunset. Although if you’d prefer to relax or skip it and head to a bar, that’s totally fine too!
Still, if you do decide to see the sunset, there are some good options.
First, if you’re downtown, then we recommend heading out onto Walnut Street Bridge for a nice view of the sunset over the river. Dating from 1890, this pedestrian only bridge is an iconic landmark in the city and an excellent place from where to enjoy the sunset.
If you’d prefer to watch the sunset from nature, or are still up on Lookout Mountain when the sun is setting, then the other location you might consider is the aptly named Sunset Rock. This is found on the west side of the mountain, and from here you can get a great view across the surrounding landscape from an elevated location.
There is a small free parking lot just near the trailhead, and it’s only about 200 yards from the parking location to the viewpoint. Just be aware that the parking lot only has nine spots and can fill up.
Depending on the time of year you visit, sunset will be at varying times. You can use this website to check when sunset will be during your visit, but it varies from around 5.30pm in mid-winter, through to 9pm in the summer.
So if you want to see the sunset, you might need to plan your dinner time around that depending on when you are visiting.
Of course, there are lots of other places you can watch the sunset from. I saw a lovely sunset from just outside our hotel in the Choo Choo district for example!
That wraps up our guide to what to do in a day in Chattanooga! Let’s now look at some practical tips to help you plan your visit.
How to Get to Chattanooga
You have a few options for getting to Chattanooga.
First, Chattanooga has an airport, code CHA, which is served by a number of American carriers and offers direct flights to many cities, including major airport hubs like Atlanta, Dallas and Charlotte. So whether you are visiting Chattanooga from the USA or overseas, you should be able to fly here relatively easily.
You can also drive to Chattanooga of course, which is how we usually visit. It’s around 2 hours drive northwest of Atlanta, Georgia; 2 hours’ drive southwest of Knoxville, Tennessee; two hours’ drive southeast of Nashville, Tennessee; or 2 hours’ drive northeast of Birmingham, Alabama.
As you can see, there are plenty of other interesting cities within easy driving distance, meaning you could easily include Chattanooga on a road trip of the US south.
In terms of bus and train, Chattanooga is unfortunately not on the passenger rail network in the USA, with the nearest major Amtrak stations being Birmingham and Atlanta.
As of 2023, Chattanooga no longer has a Greyhound stop in the city either. The nearest Greyhound stop is currently in Wildwood, GA, which is about 10 miles southwest of the city center.
How to Get Around Chattanooga
You have a few options for getting around Chattanooga.
First, if you are staying downtown, then many of the downtown attractions will be within easy walking distance. Chattanooga is a nice city to walk around and we can definitely recommend taking a stroll around.
There is also a public transit system managed by the Chattanooga Area Regional Transportation Authority, or CARTA. This includes a bus network which covers most of Chattanooga, including the Incline Railway. However, this doesn’t include other Lookout Mountain locations like Rock City or Ruby Falls.
CARTA also run the free downtown shuttle service, which is a free electric shuttle which runs between the Choo Choo district and downtown. This has been in operation since 1992, and is particularly handy if you’re staying in the Choo Choo district, as we did on one of our visits to Chattanooga. We took the bus right to the Aquarium, which was really convenient.
Ride sharing is also an option in Chattanooga, but do be aware that many ride sharing platforms have restrictions on operating in a different state, especially around picking up people. This would be an issue for somewhere like Rock City, which is in Georgia. So, you might be able to get a ride share to Rock City for example, but then not be able to find one to take you back!
For the sights outside of Chattanooga, particularly those on Lookout Mountain, the easiest way to get around is going to be to drive yourself. This will give you the most flexibility for your visit. There is normally plenty of parking, which is either free or fairly low cost.
Where to Stay in Chattanooga
Chattanooga has lots of options for accommodation, ranging from more budget friendly options through to high-end and boutique hotels.
We’d recommend first deciding where you want to stay. We’d recommend choosing either downtown, the Choo Choo district (which gives you easy access to downtown with the free shuttle), or just outside of town at the chain hotels you usually find around interstate exits.
There are pros and cons to both options. With the downtown hotels, you get the advantage of being in the heart of the action, and you will be able to walk to many attractions. There are also some really nice unique accommodation options. The downside would be that these hotels tend to be more expensive, and parking usually carries a fee, which you’ll have to factor into your budget.
The Choo Choo district can be a good option as well, it’s a historic district with good dining and accommodation options, and you can easily reach the downtown area via the free electric shuttle bus. But hotels will still be on the pricier side with an additional fee for parking in most cases.
Finally, you can opt to stay at one of the many chain hotels near the Interstate exits. These normally come with benefits like free parking and some also include a free breakfast, all at a more wallet friendly price. The downside is that you’ll likely have to drive a bit more, but as many attractions require a car anyway, this likely won’t be a big deal.
If you do decide to stay a little out of town, we’d suggest the hotels off I-24 around exit 174 or exit 175 would be your best option. There are also options around exit 178, which are closer to downtown, but tend to receive more mixed reviews.
We always suggest reading recent reviews prior to booking any hotel as things can change.
Here are some options to consider for your visit. These are ordered approximately by price, but of course price can vary so we always recommend checking and comparing prices for your dates to get the best deal.
Downtown Chattanooga / Choo Choo Hotel Recommendations:
Hotel Bo Days Inn – This is a well-reviewed option offering good value in the downtown area. Rooms have tea/coffee making facilities, and meals are available. Parking is available on-site for a reasonable fee.
Residence Inn Chattanooga Downtown – if you want to be right in the heart of downtown Chattanooga but at a more value-oriented price point, this Residence Inn is a great option. It’s just across from the Aquarium and within an easy walk of the majority of downtown sights. Breakfast is included, on-site parking is available for a fee.
The Read House Hotel – this luxury historic hotel in downtown Chattanooga offers 1920s style with modern day amenities. Expect wood clad walls, checkered floors and dramatic chandeliers, alongside modern day comforts like A/C, on-site parking (for a fee) and two excellent restaurants. One to consider if you’re after a traditional upscale hotel experience.
The Hotel Chalet at The Choo Choo – We stayed here on one of our visits to Chattanooga and really enjoyed it. It’s found in the Choo Choo district, home of the former railway station. The hotel has a pool and on-site parking, an excellent on-site restaurant, and is within walking distance of a number of bars and eateries. Uniquely, you can opt to stay in a converted railway carriage, which is pretty neat, but note that some reviewers noted these can be a little noisy.
The Dwell Hotel – This is a lovely luxury boutique hotel which dates from 1909. It only has 16 rooms and regularly books out, so you’ll want to book well in advance for this one. Each room is individually designed with a retro feel. There’s a full-service bar and a light continental breakfast is available. Parking is available nearby for a fee.
Outside Chattanooga Recommendations
These hotels are found a little outside of town on the major interstate exits. You can sometimes save by being out of town, with the convenience of free parking. Many also have breakfast included.
Days Inn by Wyndham Chattanooga Lookout Mountain West – another good value option near Lookout Mountain, this has an indoor pool as well as free parking and breakfast. Rooms also have a microwave and refrigerator.
Comfort Inn Chattanooga Downtown Southside – the name is a little misleading as this is a couple of miles from downtown. However, it puts you conveniently between downtown and the Lookout Mountain attractions, so might be a good option. Breakfast is included and there’s free parking on site. This hotel tends to get the best reviews of the options on this freeway exit.
You can see many more options for accommodation across a range of price points on booking.com here, including hotels and apartment rentals.
Further Reading
That’s it for our guide to how to spend a day in Chattanooga, Tennessee. Before you head off though, I just wanted to share some more resources we’ve put together to help you plan your trip to the city, and travel in the USA in general.
And if you’re looking for inspiration for the rest of the USA, check out our USA section, which has lots more inspiration
Do you have any questions about visiting Chattanooga? As always, we’re happy to answer any questions you might have, just pop them in the comments below and we’ll get back to you as soon as we can.
From sea to shining sea, the United States is a very diverse country – both when it comes to culture and natural beauty.
I’ve traveled across the continental United States many times over (you never really realize how big Texas is until you drive through it. Damn that state is big!). I think, just on my roadtrips alone, I’ve spent a collective two years exploring the country. That’s a lot of time and doesn’t even take into account that visit to Portland or Nashville or weekend in Savannah. In short, I’ve seen a lot of this country.
And there is a lot worth seeing.
In the past, I’ve talked about my favorite restaurants and lessons learned, so it only seems proper to give you a list of the best places to visit in the USA.
All these places are near and dear to my heart and really showcase just how special this country is and how many wonderful places there are here. (It took me awhile to narrow down this list!)
In no particular order, here’s my detailed list of the best places to visit in the USA:
(Note: This list is based only on where I myself have been. There are a lot more breathtaking places I haven’t explored yet, which is why they may not be on this list. It doesn’t mean they aren’t worth seeing. It just means I haven’t been there.)
1. Memphis
Gritty, industrial, and a bit run down, Memphis appears like its best days are behind it, but don’t let the rough exterior fool you — the city is still home to some killer food and a vibrant blues music scene. Additionally, there’s Graceland (Elvis’s home) for fans of the King, a big waterfront for walking, and the phenomenal, detailed, and moving Museum of Civil Rights (it’s huge, so don’t rush it!). I enjoyed the city more than I expected and was disappointed when I had to leave. To use a cliché, it’s a hidden gem!
WHERE TO STAY IN MEMPHIS: Hostel Memphis – A hip hostel in a century-old building with a fully-equipped kitchen and free Wi-Fi. The hostel is also a non-profit that donates 100% of its profit to social justice causes around the city.
2. Austin
I love Austin (I actually moved there in 2016 and stayed for several years before returning to NYC). The warm weather, the lively honky-tonks and live music, funky house bars on Rainey Street, amazing hiking and biking trails, and tons of outdoor activities…Austin has it all.
Thanks to everything from the growing food truck population to the flagship Whole Foods store with the incredible salad bar (grilled pineapple!), I eat — and eat well — whenever I’m here. The Austin campus of the University of Texas provides a youthful vigor to the city, and its liberal attitude attracts a diverse and eclectic population. In short, you can’t skip Austin, because if you do, I’ll find you and drag you there.
WHERE TO STAY IN AUSTIN: Firehouse Hostel – This centrally-located hostel is located in an old firehall from 1885. They have fast Wi-Fi, plenty of chill common areas, and an amazing on-site bar that serves top-notch craft cocktails.
For more travel tips on Austin, check out these posts:
3. New Orleans
New Orleans is a city with soul. It’s seen some hard times, but it lives on with a zest for life unmatched by most places. It has a rich and long history (don’t miss taking a haunted walking tour while you’re here) and is filled with scrumptious French-inspired Creole and Cajun food, live jazz music, street performers, and an appreciation for all the temptations of life. Life is lived well here in the Big Easy. You don’t come here to relax — you come here to indulge! In my opinion, New Orleans one of the most eclectic and vibrant cities in the United States.
WHERE TO STAY IN NOLA: HI New Orleans – An award-winning hostel with spacious dorms, comfy beds, privacy curtains, and fast Wi-Fi. Everything a budget traveler needs!
Asheville is Portland in the North Carolina mountains: full of tasty craft beer, food, and hipsters. I liked the area a lot, including its proximity to some wonderful and scenic mountain hikes such as the Carolina Mountain Trail. Moreover, the town has a lot of parks for those wanting something closer — and be sure to check out the Asheville Botanical Gardens near the university campus. The beautiful Smoky Mountains are a short drive away, and the gigantic Biltmore estate, the largest privately owned home in the US and once home to George Vanderbilt, is on the outskirts of the city. (If you’ve ever seen Downton Abbey, that’s what the house is like! And, if you haven’t, you should! The show is addicting!)
WHERE TO STAY IN ASHEVILLE: Bon Paul & Sharky’s Hostel – A laid-back hostel with a spacious front and back porch for relaxing. There’s free parking, free Wi-Fi, and plenty of nearby restaurants and cafes.
5. The Pacific Coastal Drive
The drive up the Pacific Coast is considered one of the most scenic in the world. I have to agree. I didn’t travel the whole coast but the portion I drove (San Francisco to Portland) was incredible: sheer cliffs, forests descending to the shoreline, miles of beaches, and giant redwoods. It’s jaw-dropping all the way. Be prepared to make slow progress, as you’ll be pulling over frequently to stop, hike, and admire the view. I especially liked Bandon and Coos Bay, Oregon, and Mendocino, California.
6. Redwood National Park
Along the Pacific Coast is Redwood National Park, a large expanse of giant redwood trees filled with picnic areas, places to camp, and miles upon miles of hiking trails. Trails range from easy to strenuous, and there are many loops that head out to nearby beaches. It’s utterly beautiful, awe-inspiring, and humbling in every way. It’s a must for anyone road-tripping around California.
WHERE TO STAY IN REDWOOD NATIONAL PARK: View Crest Lodge – Located on the coast in Trinidad, this rustic budget-friendly lodge has basic amenities like free Wi-Fi and TV, and some of their rooms also have full kitchens. It’s a clean, comfy no-frills place to crash for a night.
7. Glacier National Park
Even though I visited when most of the park was still closed (it was too early in the year and there was still snow around), I was still stunned by the area: gorgeous snow-capped mountains rising high into the sky; a beautiful, still lake in which to admire those mountains and large glaciers; and hiking trails galore. It was the most mind-blowing place I saw on my trip, and I can understand why everyone raves about it. I can’t recommend a visit there enough.
WHERE TO STAY IN GLACIER NATIONAL PARK: Camping – Pack (or rent) a tent and cozy up for a few nights under the stars. You won’t be disappointed.
8. Denver
Denver has a mix of outdoor ruggedness and big-city living. It has a huge craft beer scene (be sure to take a beer tasting tour), excellent restaurants (including, Sushi Sasa, one of my favorite sushi restaurants in the world), a large international airport with lots of connections, and proximity to the mountains. It’s clean, and the locals are incredibly friendly. There are few cities in the US I want to live in, but I love Denver enough to say that it’s one of them.
WHERE TO STAY IN DENVER: Ember Hostel – This boutique hostel is rated one of the best in the country, offering a swank interior, free jacuzzi, outdoor firepit, comfy beds with blackout curtains, cheap overnight parking, and more.
9. Chicago
When the weather is nice, I don’t think there’s a better city in the United States. Set on the shores of Lake Michigan, Chicago has world-class food (try the deep dish, sushi, and hot dogs), the fun and kitschy Navy Pier, Millennium Park with its famous bean-shaped statue, a kick-ass aquarium, and iconic architecture (be sure to take an architecture tour).
And, once the winter deep freeze is over, Chicagoans burst out of their homes to enjoy the summer weather, so there’s a positive, happy vibe emanating through the city. Take advantage of it.
WHERE TO STAY IN CHICAGO: HI Chicago – A spacious, clean hostel with female-only dorms, free Wi-Fi, and a great location. The beds are comfy and the common area is huge so it’s easy to meet people.
For more travel tips on Chicago, check out these posts:
10. New York City
The city that never sleeps. ‘Nuff said. I mean, there’s a reason I moved here — and then moved back again after living in Texas. You can’t go wrong here. New York sells itself and there’s nothing I can say here. I know you already want to go.
WHERE TO STAY IN NYC: HI NYC – This is one of the biggest and best hostels in the city. It’s super easy to meet people here, they have a chill outdoor patio, and the kitchen is huge so you can cook more meals and save your budget.
For travel tips on New York City, check out these posts:
11. Natchez
I was most surprised by this Mississippi city. I didn’t know anything about it, but Natchez was recommended as a place to see historic 19th-century homes, built by isolated plantation owners wanting to get away in the summer and interact and socialize with each other. As cotton became king, the houses became ever larger and more elaborate.
Now, they are historic monuments, and you can tour them while enjoying a view of the Mississippi River. It’s far off the beaten path — and my favorite discovery from my last road trip.
WHERE TO STAY IN NATCHEZ: The Beaumont House – If you want to splash out, this recently-renovated B&B in a mansion includes free breakfast and spacious historic rooms as well as modern amenities like Wi-Fi, air-conditioning, and flatscreen TVs.
Sitting on Georgia’s coast, Savannah escaped the wrath of the Civil War, allegedly because General Sherman thought it was too pretty to be destroyed. With streets lined with Spanish moss–covered trees, large and inviting parks, and a bustling waterfront, Savannah is a wonderful place to experience the slow pace of the Old South. I had visited this city many, many years ago, but its beauty, Southern comfort food, and tranquility stuck with me over the years.
WHERE TO STAY IN SAVANNAH: Thunderbird Inn – This affordable three-star motel is just a short five-minute walk from downtown. Boasting a retro vibe, there’s free coffee and juice every morning, as well as free popcorn available in the lobby.
13. The Grand Canyon
Words can’t accurately describe how incredible the Grand Canyon is. It’s breathtaking in so many ways — its sheer size, fantastic depth, red hues, and striking vistas. Most people simply stand at the edge of the canyon and look out across it, but its true size and beauty are best appreciated with a hike down to the bottom. Make the time to hike down to the Colorado River, hike the less visited trails, spend the night, and hike back up for sunset.
WHERE TO STAY IN THE GRAND CANYON: Camp – Pack (or rent) a tent and cozy up for a few nights under the stars. You’ll need to reserve a spot early though as they disappear fast!
A little bit country, a little bit tech, Nashville is one of the fastest-growing cities in the US, and rightly so. It’s got a wonderful music scene (including the famous Grand Ole Opry), a growing cocktail bar scene, and some down-home Southern restaurants.
There’s not a lot of “touristy stuff” to do here, but what makes this city one of my favorites are the music, the food, the wildly friendly and happy people, and the positive energy the city seems to exude. When you’re here, plan to spend a few hours at the Tennessee State Museum. It goes into great (though sometimes very one-sided) detail about the state’s history, but it’s more exciting than you might think.
WHERE TO STAY IN NASHVILLE: Red Roof Inn – While it’s not centrally located, this is one of the city’s few affordable two-star options. A quick 13-minute drive from the Grand Ole Opry, this budget-friendly joint boasts an outdoor pool, free Wi-Fi, and free coffee.
For more travel tips on Nashville, check out these posts:
15. San Francisco
Food of every nature, hipsters, high tech, and a diverse population make San Francisco one of my favorite places to visit. Additionally, it’s close to some wonderful national parks, like Muir Woods, where you can escape the city and go hiking amid giant trees (there are lots of half-day guided tours you can take). San Francisco has so much to do that you need at least four days to really appreciate it.
WHERE TO STAY IN SAN FRANCISCO: Green Tortoise – As one of the oldest in town, this hostel is an institution in San Francisco. It offers free breakfast, free dinners multiple times per week, and even a free sauna! It has a huge common room so it’s easy to meet people and has a very fun, social atmosphere.
For more travel tips on San Francisco, read these posts:
16. Miami
White sand beaches, Cuban food, wild nightlife, gorgeous people, and amazing warm weather — what’s not to love about Miami! I don’t think I could ever live here, but for a weekend of fun in the sun, Miami is perfect.
WHERE TO STAY IN MIAMI: Generator Miami – This hostel has a pool, two restaurants, a bar, and is just minutes away from the beach. It’s massive (there are 8 floors), the beds are more comfortable than the cheap ones you’ll find at the party hostels.
For more travel tips on Miami, read these posts:
17. San Diego
Forever warm and sunny, San Diego’s weather creates a permanently happy population that’s friendly and outgoing and that loves the outdoors — from hiking, days at the beach, or running. And they are always happy to show people their city.
The downtown Gaslamp area — as well as the famous Pacific Beach — is full of trendy seafood restaurants, bustling bars, and some seriously life-changing taco stalls. I love San Diego.
WHERE TO STAY IN SAN DIEGO: ITH Adventure Hostel – With a focus on sustainable travel (there’s a vegetable garden and backyard chickens), this chill hostel is very friendly and social. It’s clean, and the water pressure in the showers is decent, and the beds are comfy. (For more hostel suggestions, you can read this post.
19. Lake Tahoe
Though the water level of the lake, as well as the flora and fauna around it, is sadly depleted due to the California drought, Lake Tahoe is still nonetheless impressive and beautiful. Ringed by tiny mountain communities, this is a terrific place for hiking and boating in the summer and skiing in the winter.
WHERE TO STAY IN LAKE TAHOE: Camping – Pack (or rent) a tent and cozy up for a few nights under the stars. You won’t be disappointed.
20. Anywhere in Montana
A lot has been written about how stunning Montana is, but it’s all wrong. It’s even better than words can describe. It’s the most crazy beautiful state I’ve ever been to, filled with wondrous mountains and hills as far as the eye can see. The people are super cool, welcoming, and outdoorsy, too. If I had to pick a favorite state, it would be Montana. I just love it.
WHERE TO STAY IN MONTANA: Treasure State Hostel – Located in downtown Bozeman, this hotel is quiet, clean, and is home to friendly staff. They organize all kinds of events too, like pub crawls and movie nights, so it’s easy to hang out and meet people.
21. Washington D.C.
The capital of the United States is a vibrant, international city, and that’s what I love about it. It’s second only to NYC in diversity of people and food (which is to be expected with so many people from international aid organizations and embassies). You hear a million accents in this town! Throw in the free Smithsonian museums, lots of parks, a riverfront for strolling or running, and some historic government buildings and monuments, and D.C. becomes one phenomenal place to visit, relax, eat, and drink! Be sure to take a tour of Capitol Hill while you’re here!
WHERE TO STAY IN WASHINGTON: Highroad Hostel – Offering pod-style bunks, this cool hostel is located in an old Victorian mansion. The beds have thick mattresses, there’s a fully-equipped kitchen, there’s free coffee and tea each day, and they even host a free happy hour each week!
For more travel tips on Washington D.C., here are some other articles I’ve written:
22. Cape Cod
I spent a lot of summers on the Cape since it’s where New Englanders escape for the summer. You’ll find plenty of small beach towns along the coast (Provincetown and Hyannis being the most famous but I also love Chatham, Falmouth, Wellfleet, and Brewster). If you’re looking for seafood, beaches, boardwalks, and that perfect family vacation, visit the Cape!
WHERE TO STAY IN CAPE COD: Cape Sands Inn – Just a short walk from the beach in West Yarmouth, this three-star property has all the standard amenities (TV, free Wi-Fi), as well as free parking and a relaxing sauna and hot tub.
23. Boston
I may be biased because I grew up here, but I love Boston and cherish my visits home. Boston rocks (Go Red Sox!). It’s historic (founded in 1630), small-ish, easy to get around, and filled with awesome and loyal people. It’s home to a ton of activities, like the Freedom Trail and Faneuil Hall, the JFK Museum, and the Boston Commons and Public Garden, as well as some of the best Italian and seafood restaurants in the country. Be sure to eat at Zaftigs for the best brunch in the city! It’s wicked!
WHERE TO STAY IN BOSTON: HI Boston – This spacious and clean hostel is just a short walk from pretty much everything in the city. They have female-only dorms, free Wi-Fi, and several chill common areas where you can meet other travelers.
For more travel tips on Boston, check out these posts:
24. Las Vegas
Vegas, baby, Vegas! A lot of people are turned off by the bright lights and gambling, but Vegas is much more than the casinos, expensive clubs, and hotels on the famous Strip. There’s incredible hiking nearby at Red Rocks National Park, a growing art scene, a booming tech scene, and lots of concerts and shows.
Get off the Strip, explore the real Vegas (because technically the Strip is located in Paradise, NV, not Las Vegas), and see why people decide to live here.
WHERE TO STAY IN LAS VEGAS: Sin City Hostel – Just a short walk from the (in)famous Fremont Street, this is a social hostel that hosts all kinds of events (such as bar crawls, pasta & wine nights, BBQs, casino nights, and more). It’s a great place to connect with other travelers.
For more travel tips on Las Vegas, these articles can help:
25. Portland
Portland, Oregon is incredible. I would move there if it had a bigger airport with better connections. Here you’ll find an impressive food truck scene, cool bespoke bars and cocktail lounges, a craft beer scene that’s a religion to residents, relaxing parks (including a peaceful Japanese garden), a vibrant art scene, and hiking in the nearby mountains. There’s even an underground donut scene here.
WHERE TO STAY IN PORTLAND: HI Portland – Northwest – Rated one of the best hostels in the world, this centrally-located HI hostel offers free breakfast, in-house made craft beer, an outdoor courtyard with a firepit, regular live music, and much more.
Home to a little business called Starbucks, it also boasts an exciting downtown, fresh fish, authentic Asian food, art museums, and funky nightlife. In historic Pioneer Square, you can go on an underground tour of the city’s ruins (a hella cool experience). Moreover, you’re right on the water and, weather permitting, can head out onto Elliott Bay to explore some little islands. Seattle is just a cool city. There’s always something to do there, it’s techy, and everyone is relaxed. Plus, there’s craft beer and coffee — what’s not to love about that!
WHERE TO STAY IN SEATTLE: Green Tortoise – Located right across from the iconic Pike Place Market, this social hostel organizes all kinds of activities so it’s easy to meet people. They also offer free breakfast and daily events. It’s one of my favorite hostels in the country.
Tucked away in western South Dakota, this town was famous during the Old West days, noteworthy enough to be the focus of an HBO series. Sort of kitschy and re-created, it’s nonetheless a very cool place where you can experience a taste of the old frontier days. It’s also conveniently located near the Black Hills and Mount Rushmore.
WHERE TO STAY IN DEADWOOD: Gold Country Inn – This kitschy hotel is one of the cheapest places in town. Located right downtown, they have a mini gambling hall on-site, free Wi-Fi, and free parking. It’s nothing fancy but it won’t break the bank either.
28. Kansas City
I really loved this city, which features some of the world’s best BBQ and a lively downtown. There’s also a detailed and enlightening jazz museum here, as well as the eye-opening Negro Leagues Baseball Museum (that was the actual name; I’m not being racist). I wish I could have spent more time, but that’s just more reason to come back.
WHERE TO STAY IN KANSAS CITY: Home2 Suites Downtown – With a fitness center, pool, and a decent breakfast spread, this three-star hotel in downtown KC is one of the more affordable places to crash in the city.
29. Louisville
Louisville sits on the Ohio River and is the largest city in Kentucky. I was surprised at how much I liked it and how much there was to do here. There’s an established theatre scene, a handful of museums and galleries, tons of delicious places to eat (it’s a solid foodie city), and all the bourbon you can drink.
Louseiville has a laid-back, artsy vibe to it. It feels much more like an Austin or a Portland than your traditional southern/midwest city. In the past, it was considered a fly-over city and was skipped by most people. It’s definitely not now.
WHERE TO STAY IN LOUISVILLE: Microtel Inn – While it may be 20 minutes from downtown, this budget-friendly inn is affordable, includes free breakfast and free parking, and has free Wi-Fi. It’s a no-frills choice but clean and comfy.
30. Charleston
Charleston is another lively city full of delicious food, fun bars, lots of history, and all the southern charm you’d ever need. It’s beautiful, the people are nice, and there’s a high, high concentration of world-class restaurants for such a small city. (If you love seafood, you’re going to love it here. This is one of the best cities in the country for seafood.)
WHERE TO STAY IN CHARLESTON: Charlestons NotSo Hostel – Located in a historic neighborhood, this laid-back hostel includes free coffee/tea and oatmeal and free Wi-Fi. The rooms are small but the beds are perfectly comfy.
31. Franklin
Located just outside of Nashville, Franklin is bursting with small-town charm. The city is full of history (there was a major Civil War battle here), a historic main street, and some really delicious bars and restaurants. I didn’t expect much and the city really surprised me. It’s the perfect two-night destination.
WHERE TO STAY IN FRANKLIN: The Harpeth Hotel – This upscale property features a restaurant on-site, fitness center, bar, and terrace. If you don’t want to splash out, check Booking.com for other options.
***
The United States is filled with too many “must-sees” places to visit to list in a single blog post. After all, the country is home to over 329 million people and covers 3.8 million square miles.
Just be sure to turn off the highways, head to the small towns, and discover some favorites of your own. The best of the USA is always away from the major highways in the little no-name towns with little diners, quirky shops, and friendly people!
For more travel tips on traveling the USA, read these other blog posts:
Book Your Trip: Logistical Tips and Tricks
Book Your Flight Find a cheap flight by using Skyscanner. It’s my favorite search engine because it searches websites and airlines around the globe so you always know no stone is being left unturned.
Book Your Accommodation You can book your hostel with Hostelworld. If you want to stay somewhere other than a hostel, use Booking.com as it consistently returns the cheapest rates for guesthouses and hotels.
Don’t Forget Travel Insurance Travel insurance will protect you against illness, injury, theft, and cancellations. It’s comprehensive protection in case anything goes wrong. I never go on a trip without it as I’ve had to use it many times in the past. My favorite companies that offer the best service and value are:
Want to Travel for Free? Travel credit cards allow you to earn points that can be redeemed for free flights and accommodation — all without any extra spending. Check out my guide to picking the right card and my current favorites to get started and see the latest best deals.
Need a Rental Car? Discover Cars is a budget-friendly international car rental website. No matter where you’re headed, they’ll be able to find the best — and cheapest — rental for your trip!
Need Help Finding Activities for Your Trip? Get Your Guide is a huge online marketplace where you can find cool walking tours, fun excursions, skip-the-line tickets, private guides, and more.
Ready to Book Your Trip? Check out my resource page for the best companies to use when you travel. I list all the ones I use when I travel. They are the best in class and you can’t go wrong using them on your trip.
Ruin bars are all the rage in Budapest and have been around since the founding of Szimpla Kert, the mecca of all ruin bars, in 2002. These bars are built in Budapest’s old District VII neighborhood (the old Jewish quarter) in the ruins of abandoned buildings, stores, or lots. This neighborhood was left to decay after World War II, so it was a perfect place to develop an underground bar scene. These places were very off the beaten path, rough around the edges, and catered to artists, students, and alternative people.
But they became very popular and well known by 2010 and have nice gone mainstream, though their setting has not changed.
From the outside, these bars look like normal buildings. They don’t have large signs pointing the way, you don’t hear any loud noise, and there’s no line of people waiting to get in. But once you walk in and enter the inner courtyard, you find yourself in the middle of a hip, artsy, and funky bar bustling with crowds talking, dancing, and enjoying the laid-back atmosphere. Large bouncers, along with posted signs, ensure that people are quiet on their way out so as to not disturb the neighbors.
Each of these ruin bars has its own personality, but they all follow a few basic principles: find an old, abandoned place, rent it out, set up a bar, fill it with flea market furniture, have a few artists come in to leave their mark on the walls and ceiling, add in some weird antiques, serve alcohol, and watch people flock in.
When you’re in these bars, you feel like you’re drinking at your local thrift store. None of the furniture matches. It’s all old. It’s eclectic. It feels like they just ransacked your grandmother’s house. The ceilings are all designed differently and the places haven’t been repaired or fixed up, and there are still holes in the walls and visible pipes everywhere.
Though the Ruin Bar movement has become mainstream, many of the bars have done a good job of keeping their character and staying true to their roots — even as they fill up with more tourists.
Here is a list of the best ruin bars of Budapest:
Szimpla Kert
This was the original ruin bar. It opened in 2001, starting this trend. It’s one of the biggest ruin bars and still one of the most popular. Once an abandoned factory, now there’s a large open courtyard, a top floor filled with eclectic furniture, cocktail bars, music, and even an old, stripped-down Trabant (a communist car) to have a drink in. All the rooms have a different theme. They also sell pizza, which, after a few drinks, makes for the perfect walking-home snack. Everyone I take here says it’s one of the coolest bars they’ve ever been to. If you just visit one bar, make it this one.
Grandio
Grandio is a ruin bar and hostel in one. It’s famous for its outdoor, tree-filled courtyard but is mostly filled with travelers and people on bar crawls since it’s also a hostel. This is a good place to start your night and meet other travelers. During the day you can find locals relaxing here with a drink in the garden. It’s not quite as rowdy as the other bars and, since it’s smaller, it has a bit more of a laid-back and intimate vibe.
Dürer Kert
A former university building, this ruin bar and music venue lets you tap into your inner college student as you drink a few beers while playing foosball, Ping-Pong, darts, and a French game called pétanque (it’s fun). The courtyard garden is a good spot to enjoy all the live music that happens in this bar. The space is really big and there’s a lot of activity here. Plus, I love how the art and paintings on the wall.
Instant-Fogas Complex
The Instant-Fogas Complex is located in an entire apartment building and the biggest ruin bar in the city. There are over 20 rooms, 18 different bars, multiple dance floors, and 2 gardens. It’s one of the more club-like ruin bars. In Instant, you can sit in what were once individual apartments and relax on furniture that looks like it was found on the street. They’ve knocked down many of the walls to connect the apartments and make space for the DJs and dancing. Given its popularity and the fact that it’s more “clubby,” drinks here are a little more expensive than in other ruin bars. If you want to dance away the night, this is the bar for you.
Doboz
I’m not entirely sure if this place fits into the ruin bar culture. It was much fancier and trendier than the other bars I visited. It was like being in a “real” bar. However, I was taken there as part of a ruin bar tour, and, regardless, I loved this place. You walk into the courtyard and are greeted by a tree with a red-eyed robot attached to it. It looks like a Transformer is about to attack you. There are two main rooms: one red, the other blue. They play a lot of dance music, and this place fills up toward the end of the night. The only downside is that it has more limited opening hours than other bars.
Mazel Tov
This is one of Budapest’s newest ruin bars. Mazel Tov (located in the old Jewish quarter) is a community center and restaurant serving traditional Jewish cuisine by day. At night, the courtyard is a party with DJs and live entertainment entertaining guests. There’s also a restaurant here. I wouldn’t call this a “ruin bar” in the traditional sense but it’s a nice atmosphere, the decor is nice, and it’s got great drinks. It’s fancier than all the others so don’t expect something so “rough and tumble.”
Csendes Letterem Café & Bar
If you’re looking for a more laid-back vibe to balance out the party atmosphere of some of the other ruin bars but don’t want to sacrifice the cool vintage aesthetic, this is the bar for you. It’s located right in the heart of Budapest and is the perfect place to relax and share drinks with friends or settle in for an evening of conversation. The bar also serves food and has Wi-Fi, so you’ll often find digital nomads mingling here.
***
Budapest may sell itself on history and thermal baths, but the ruin bars are by far the most unique thing about this city. Even if you don’t drink, come spend time at these ruin bars because they are such a funky way to see a popular and totally unique aspect of life in Budapest (you can even take a self-guided tour of a few bars that includes skip-the-line entry). You’ll meet a lot of locals when you visit too! So, don’t miss them.
Get Your In-Depth Budget Guide to Europe!
My detailed 200+ page guidebook is made for budget travelers like you! It cuts out the fluff found in other guides and gets straight to the practical information you need to travel while in Europe. It has suggested itineraries, budgets, ways to save money, on and off the beaten path things to see and do, non-touristy restaurants, markets, bars, safety tips, and much more! Click here to learn more and get your copy today.
Plan your trip to Europe like a pro
Get all my best Europe travel tips as well as free planning guides sent straight to you and see more of the country for less!
Book Your Trip to Budapest: Logistical Tips and Tricks
Book Your Flight Use Skyscanner to find a cheap flight. They are my favorite search engine because they search websites and airlines around the globe so you always know no stone is left unturned.
Book Your Accommodation You can book your hostel with Hostelworld as they have the biggest inventory and best deals. If you want to stay somewhere other than a hostel, use Booking.com as they consistently return the cheapest rates for guesthouses and cheap hotels.
Don’t Forget Travel Insurance Travel insurance will protect you against illness, injury, theft, and cancellations. It’s comprehensive protection in case anything goes wrong. I never go on a trip without it as I’ve had to use it many times in the past. My favorite companies that offer the best service and value are:
Looking for the Best Companies to Save Money With? Check out my resource page for the best companies to use when you travel. I list all the ones I use to save money when I’m on the road. They will save you money when you travel too.
From watching the sun rise over ancient red rock to discovering rich Aboriginal culture, here are the best places to visit in the Northern Territory.
The Northern Territory is Australia’s wild and wonderful outback frontier. It’s a land of timeless landscapes, sacred Indigenous culture, dramatic natural wonders, and adventure.
Spanning the tropical Top End to the vast, sunbaked Red Centre, the Northern Territory offers a travel experience unlike anywhere else in Australia.
Here, cities like Darwin and Alice Springs are gateways to a different pace of life, where crocodiles rule the rivers, ochre-red deserts stretch for miles, and Aboriginal traditions run deep and strong.
Besides marvelling at iconic sights like Uluru, visitors to the Northern Territory often explore the ancient rock art galleries of Kakadu National Park or cruise through the breathtaking gorges of Nitmiluk.
But there’s more to the NT than just its highlights.
In fact, the region is full of surprises, from quirky outback pubs and bush markets to hidden waterholes and star-studded night skies.
While here, you get to meet saltwater crocodiles up close, experience Aboriginal-led tours that open your eyes to the world’s oldest living culture, or visit remote towns where time seems to stand still.
The Northern Territory is a land of awe-inspiring contrasts, with endless desert landscapes, lush tropical wetlands, towering gorges, and deeply rooted Indigenous culture.
There’s no shortage of incredible things to see and do here.
If you’re planning a trip, use this guide to discover the best places to visit in the Northern Territory.
The best way to get around is to rent a car and explore on your own! We recommend Rental Cars, which has the largest range of vehicles for the best value on the market.
1. Darwin City
As the gateway to the Northern Territory, Darwin is a vibrant destination in its own right, brimming with tropical charm, thrilling adventures, and a laid-back multicultural vibe. Perched on a stunning harbour, the city offers countless ways to bask in the warm, relaxed vibe.
Thrill-seekers can jump on jet skis for an exhilarating ride around Darwin Harbour, take to the skies on a unique heli-pub-crawl that lands at outback-style bars, or cool off at the sprawling Aqua Park at the Darwin Waterfront, the largest inflatable water park of its kind in Australia.
But there’s more to Darwin than just adrenaline. Discover the city’s blossoming food scene by wandering through its famous outdoor sunset markets, where sizzling street stalls serve everything from fresh seafood to bush-tucker-inspired dishes.
For another classic Top End experience, head down to Stokes Hill Wharf, a favourite spot to indulge in local fare, watch fishing boats come and go, and admire the breathtaking harbour sunsets.
Most journeys through the heart of the Northern Territory begin in Alice Springs, a true icon of the Outback.
Just a few hours by air from Australia’s major cities, Alice Springs serves as the perfect launchpad for exploring this vast, rugged region.
Nestled between the majestic East and West MacDonnell Ranges, Alice Springs is renowned for its stunning desert landscapes.
The town itself is brimming with personality, famous for its colourful outback characters and a warm, welcoming community that captures the essence of life in the Red Centre.
Alice Springs is also a hub of culture. You can visit local art galleries showcasing vibrant desert works or join cultural tours that share Dreamtime stories and ancient bush skills. Tour Alice Springs Desert Park or the Museum of Central Australia for insights into local nature and art.
Those travelling to Alice Springs shouldn’t miss a visit to Simpsons Gap, a dramatic gorge just outside town where sheer rock walls rise above a serene waterhole.
The iconic Alice Springs
3. Kings Canyon
Many travellers drive from Alice Springs to Kings Canyon, making it an epic road trip through the heart of the Red Centre.
Situated within Watarrka National Park, Kings Canyon is a must-visit for anyone wanting to witness the Australian Outback in all its breathtaking glory. This remarkable protected area is renowned for its spectacular landscapes, diverse wildlife, and strong ties to Aboriginal culture.
The iconic Rim Walk is a highlight. It leads you along the edge of the canyon from where you can enjoy sweeping views of the rugged gorge below and beyond.
But it’s not just the vistas that make Kings Canyon so special. The area is also rich in rare flora, tranquil rock pools, and hidden pockets of cultural significance that speak to thousands of years of ancient Aboriginal culture.
There’s no shortage of ways to explore this incredible place. Join ranger-guided activities to delve deeper into the area’s unique Aboriginal history or head off on a bushwalk to connect deeply with the land.
If you want to see Kings Canyon from a jaw-dropping perspective, don’t miss the chance to embark on a King’s Canyon: 15-minute Scenic Helicopter Tour, a thrilling way to take in the vast scale and raw beauty of the Northern Territory’s Outback region.
4. Uluru
The majestic Uluru stands as the crown jewel of Northern Territory attractions and is truly the heart of Australia’s famed ‘Red Centre.’
Rising dramatically from the surrounding desert plains, this immense sandstone is a living cultural landscape with over 30,000 years of deep cultural significance.
Uluru is sacred to the Anangu people, who have cared for these lands for countless generations and continue to share their stories, traditions, and wisdom with visitors today.
Thus, a visit to this remarkable place is also an opportunity to deepen your understanding of the world’s oldest living culture.
Join guided walking tours led by Aboriginal guides to learn about the area’s geology, rare plant life, native wildlife, and rich Aboriginal Dreamtime stories that breathe life into every cave and waterhole.
For a different perspective, you can hop on an Uluru Base Segway Tour at Sunrise, ride a camel across the red sands, try some self guided Uluru walks, or take to the skies on a scenic helicopter flight for breathtaking aerial views of this iconic landmark.
Uluru at sunset is almost mystical.
5. Berry Springs Nature Park
The Berry Springs Nature Park is one of Northern Australia’s most incredible places to unwind, surrounded by nature.
Just a short 30- to 40-minute drive from Darwin, this beautiful reserve is a favorite among locals, thanks to its crystal-clear swimming holes and lush tropical scenery. It also offers a fascinating glimpse into the region’s wartime past.
Berry Springs is best known for its inviting natural pools, where you can swim and snorkel among small fish and aquatic plants. Those eager to explore the underwater marine life should aim to visit during the dry season, from May to October, when the water is at its clearest and the weather is simply ideal.
However, during the wet season (October to April), the swimming holes may be closed due to flooding.
Berry Springs is one of those national parks where you can enjoy scenic walks. Wander along easy trails shaded by tall trees, keep an eye out for colourful birdlife, and soak up the serene atmosphere that makes this part of Northern Australia so special.
Berry Springs Nature Park also holds echoes of the past, once serving as a World War II rest and recreation area for thousands of troops.
No list of the best places to visit in the Northern Territory would be complete without mentioning Litchfield National Park, one of the region’s most accessible national parks.
Just a short drive from Darwin, Litchfield is a true gem among Northern Territory attractions, drawing visitors with its lush landscapes, thundering waterfalls, and inviting natural swimming holes.
While exploring Litchfield National Park, you’ll find some of the most spectacular scenery in the Top End, such as the rugged sandstone escarpments, monsoon forests alive with birdsong, and clear, spring-fed pools perfect for a refreshing swim.
Litchfield National Park is also known for its fascinating fields of magnetic termite mounds, standing like silent sentinels across the landscape, and offering a glimpse into one of the Outback’s more curious natural wonders.
With its spectacular landscapes and easy access from Darwin, it’s no wonder Litchfield National Park is considered one of the most-visited places in the Northern Territory.
Litchfield National Park has some incredible waterfalls.
Spanning an impressive 400 hectares, this immersive park showcases the variety of flora and fauna native to Central Australia, from colourful bowerbirds to unique wildlife, such as the intriguing orange-footed scrub-fowl.
Wander through a series of carefully recreated habitats that mirror the real ecosystems found across the Top End.
Meander along the Monsoon Forest Walk, step into the vast walk-through aviary where vibrant birds flutter around you, or dive into the fascinating underwater world at the park’s aquarium.
A visit to the Territory Wildlife Park is also a chance to deepen your understanding of how unique creatures thrive in the Northern Territory’s varied environments.
Join one of the daily wildlife presentations or book a special encounter for an up-close look at the park’s resident reptiles, birds, and mammals.
Kakadu National Park is one of the Northern Territory’s crown jewels. It’s a place of spectacular scenery and rich ancient culture in a landscape unlike anywhere else on earth.
Spanning nearly 20,000 square kilometres (roughly the size of a small country), Kakadu is Australia’s largest national park, proudly holding a dual UNESCO World Heritage listing for its outstanding natural wonders and immense cultural significance.
This world heritage site is also a paradise for walkers, with trails like the short yet rewarding Winds Walk near Nourlangie Rock leading to a viewpoint over the Arnhem Land escarpment.
There are also trails leading to thundering waterfalls, including Jim Jim and Twin Falls, where towering sandstone cliffs and crystal-clear plunge pools showcase the area’s scenery.
Take a cruise on the stunning Yellow Water Billabong to witness crocodiles basking on the banks, watch graceful jacanas tiptoe across lily pads, and marvel at sunsets that paint the sky in unforgettable hues.
As one of the richest regions of living Aboriginal culture on the planet, Kakadu is home to thousands of rock art sites, some dating back over 20,000 years, which share timeless stories of creation, hunting, and daily life.
The dry season, from May to October, is the best time to visit Kakadu National Park, when tracks open to spectacular spots like Jim Jim and Twin Falls.
For anyone exploring the Northern Territory, the West MacDonnell National Park is an absolute must.
Stretching west from Alice Springs, this remarkable expanse (often called the West MacDonnell Ranges) or simply “the West Macs”, showcases some of the most dramatic and diverse landscapes in the Northern Territory.
The West MacDonnell Ranges are a wonderland of towering ochre cliffs, hidden gorges, and tranquil waterholes. Popular activities include bushwalking, swimming, and simply soaking up the grandeur of the Outback.
As you wander around the park, you’ll encounter iconic sites like Ellery Creek Big Hole, a stunning natural waterhole framed by steep red cliffs. It’s one of the best spots in the West Macs to take a refreshing dip, have a picnic, or snap photos that capture the stark beauty of the region.
Other highlights include Ormiston Gorge, a favourite for spotting rock wallabies and enjoying sweeping views, and Simpsons Gap, just a short drive from Alice Springs, where towering cliffs create a dramatic backdrop at sunrise or sunset.
There are lots of beautiful watering holes in the Macdonnell Ranges!
10. Tiwi Islands
The Tiwi Islands are among the most unique cultural destinations in the Northern Territory. Located just 80 kilometres north of Darwin, this remote location feels like an entirely different world, where ancient Aboriginal traditions and artistic heritage flourish.
Often called the “Islands of Smiles,” the Tiwi Islands are renowned for their welcoming communities, intricate textiles, striking wood carvings, and colourful Pukumani burial poles that reflect deep spiritual connections to the land.
Join art workshops, watch traditional dance and smoking ceremonies, or explore local museums that reveal fascinating stories of Tiwi life and customs.
Beyond its cultural richness, the Tiwi Islands also showcase some of the Northern Territory’s most striking natural scenery. Think pristine beaches fringed by whispering palms, crystal-clear waters perfect for fishing adventures, and lush tropical bushland teeming with birdlife.
With limited visitor numbers and a deep sense of local pride, exploring the Tiwi Islands feels like stepping into a hidden world where ancient traditions continue to shape daily life.
11. Nitmiluk (Katherine Gorge) National Park
Also known as Katherine Gorge, Nitmiluk Gorge is one of the Northern Territory’s most spectacular natural attractions and a true highlight among the region’s many national parks.
This majestic system of 13 deep sandstone gorges carved by the Katherine River is a place of rugged landscapes, ancient culture, and endless outdoor adventure.
Nearby, the mighty Roper River winds its way through the eastern reaches of the Katherine region, adding even more opportunities for remote fishing, boating, and exploring the vast savanna country that defines this part of Australia.
While many come to navigate the breathtaking sandstone gorges of Nitmiluk National Park by boat, don’t miss Edith Falls (Leliyn) at the northern end of the park, where cascading waterfalls feed into tranquil swimming pools that are perfect for cooling off during the dry season.
Nitmiluk National Park is also one of those special places in the Northern Territory with deep Aboriginal significance. The Jawoyn people have called this land home for thousands of years, and you’ll find remarkable rock formations throughout the park that tell stories of creation and connection.
To round out your visit, don’t miss the chance to unwind once more in the region’s beautiful hot springs. The thermal pools around Katherine are a relaxing spot to visit year-round, and pair perfectly with a side trip to explore stretches of the nearby river.
12. Karlu Karlu (Devils Marbles)
Devils Marbles, known by their Aboriginal name Karlu Karlu, stand as one of the most striking and internationally recognised symbols of the Australian Outback, and undoubtedly one of the top places to visit in the Northern Territory.
Situated within the Tennant Creek & Barkly Region, these massive, gravity-defying granite boulders are scattered across a wide valley and glow a brilliant red at sunrise and sunset.
Karlu Karlu translates to “round boulders,” and this sacred site holds deep spiritual significance for the Kaytetye, Warumungu, Warlpiri, and Alyawarr people, who remain joint custodians of the area.
Their ongoing stewardship ensures that the cultural stories and traditions tied to this remarkable landscape are preserved.
As you explore Karlu Karlu, keep an eye out for small zebra finches and painted finches flitting among the rocks.
For the best experience at this iconic Northern Territory landmark, plan your visit between April and September when the temperatures are cooler and more comfortable for wandering through the reserve.
Devil’s Marbles
13. Arnhem Land
Arnhem Land is one of the most remarkable and truly untouched regions in all of Australia.
Offering a unique window into the ancient heart of the Northern Territory, this vast wilderness is famed for its rugged coastlines, soaring escarpments, serene billabongs, and strong, living Aboriginal culture.
The top attractions at Arnhem Land are not limited to natural wonders. There are also profound cultural experiences.
Guided tours led by Traditional Owners allow you to explore sacred rock art galleries that date back tens of thousands of years, witness intricate bark paintings in renowned art centres like those in Yirrkala, and learn about hunting, bush foods, and the deep spiritual connections the Yolŋu people have with their land.
Adventure lovers will also find Arnhem Land to be a paradise for four-wheel driving, with rugged tracks leading to remote beaches, natural swimming pools, and some of the most beautiful spots in Northern Australia.
DISCLAIMER: Some of the links in this article are affiliate links, which means if you book accommodation, tours or buy a product, we will receive a small commission at no extra cost to you. These commissions help us keep creating more free travel content to help people plan their holidays and adventures. We only recommend the best accommodations, tours and products that ourselves or our fantastic editorial team have personally experienced, and regularly review these. Thanks for your support, kind friend!