نویسنده: post bot

  • 1 Day in Kampala Itinerary

    1 Day in Kampala Itinerary


    If you are visiting Uganda, we highly recommend spending some time in its capital city Kampala. We’ve already covered in depth all our favourite things to do in Kampala, but we appreciate that if you don’t have time to do everything, you may be wondering how best to spend a day in Kampala.

    Well, with that question in mind, we have put together this one day Kampala itinerary. It covers the main highlights that we recommend seeing, which would be perfect for a first time visitor. It covers the major attractions that most visitors are likely to want to see, and is doable in a busy day of sightseeing with some careful planning.

    Of course, as with any of our itineraries, we recommend adjusting this to suit your own personal pace and interests. If you like to go a bit slower and spend longer at attractions, then of course you can change it up.

    This itinerary though should give you a great starting point for how to spend a day in Uganda’s capital city. Let’s get started.


    A 1 Day Kampala Itinerary

    We have visited Kampala a number of times and have visited the majority of the attractions across the city. When we visit Uganda we normally try to have at least a day to explore Kampala, but we have also spent longer in the city at the end of a trip before heading on to our next destination.

    Based on our experiences, we put together this itinerary which encompasses some of our favourite activities in Kampala that we think cover the main highlights that visitors will enjoy seeing.

    After this detailed 1-day itinerary, we’ll also share some other suggested itineraries based around different themes, to give you even more ideas for your day in Kampala. So those are each focused specifically on those with a specific area of interest such as history, culture, food, art, wildlife, etc.

    But first, let’s look at our recommended way to spend a day in Kampala.

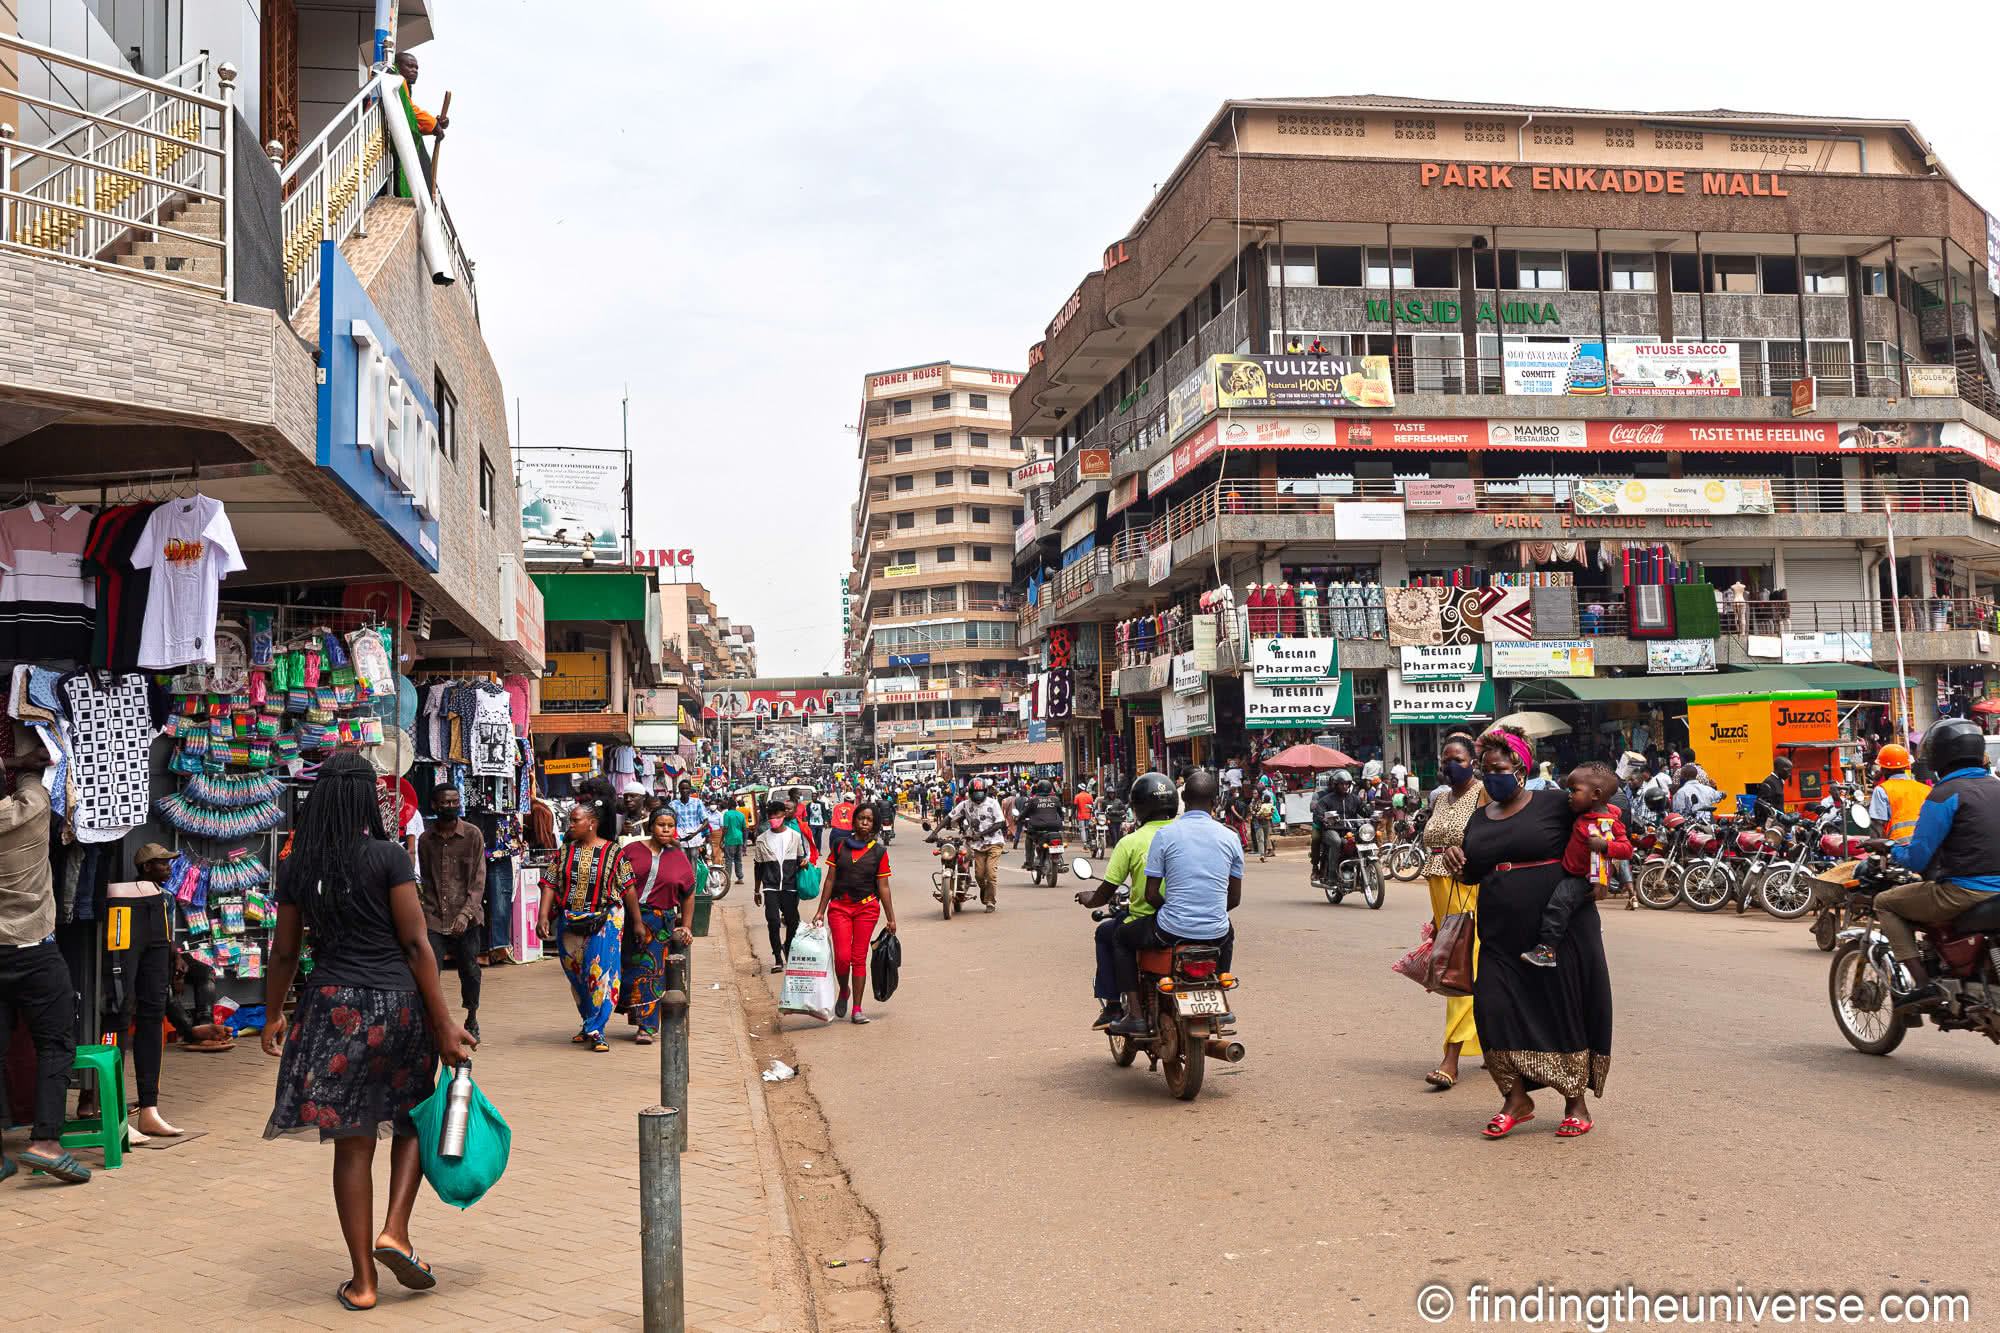
    Stop 1: Take 3-hour walking tour of central Kampala @ 9am

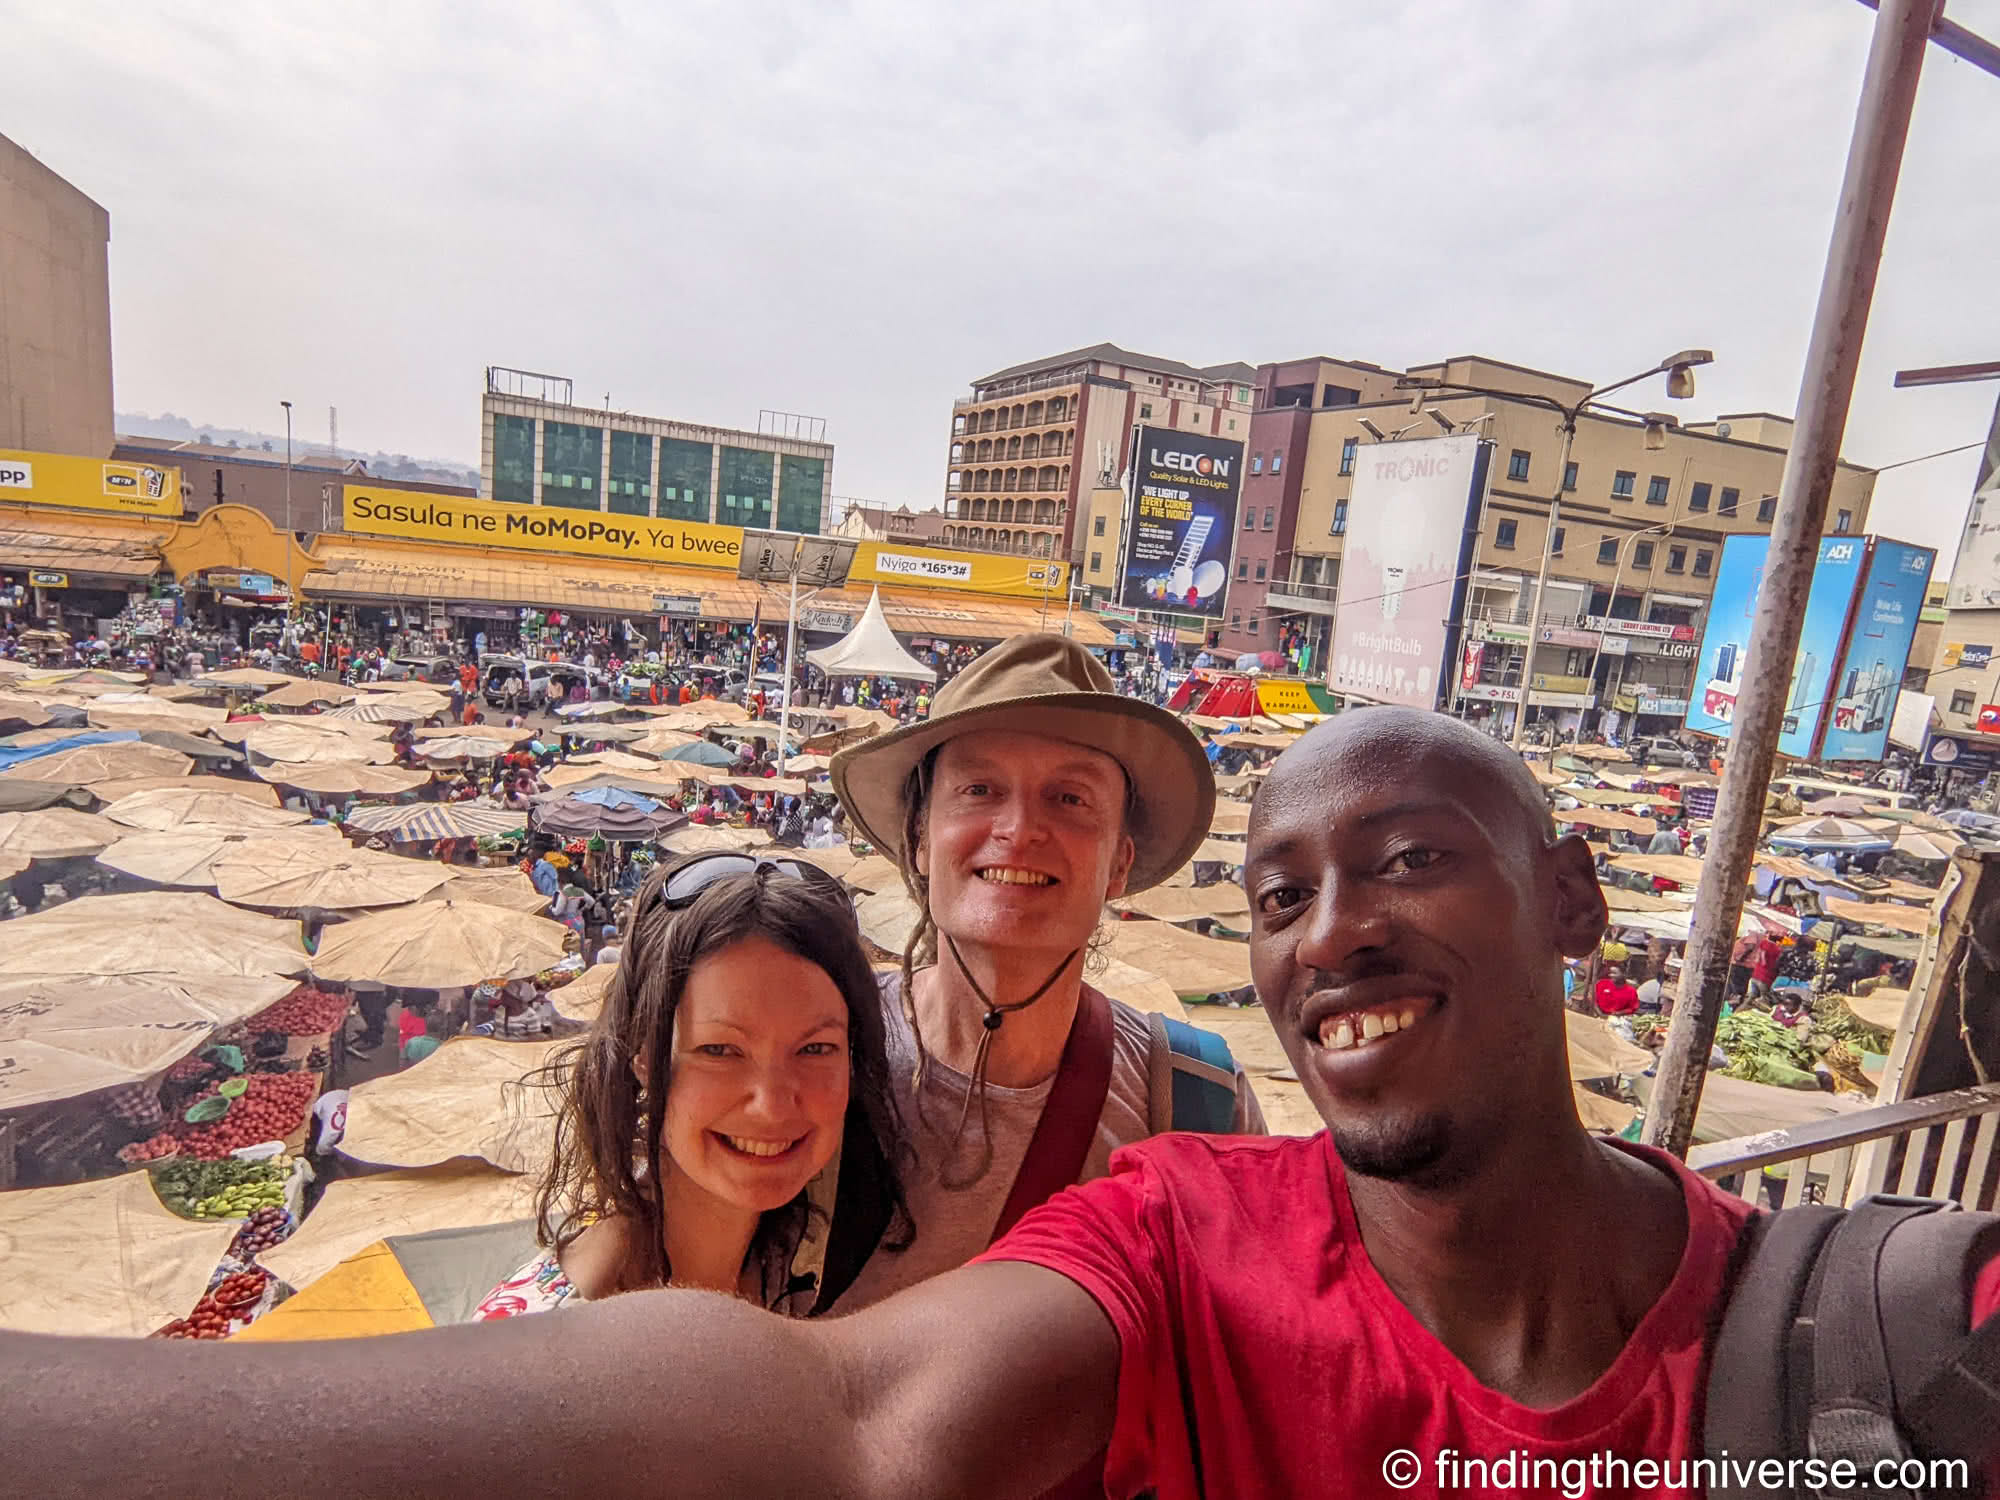
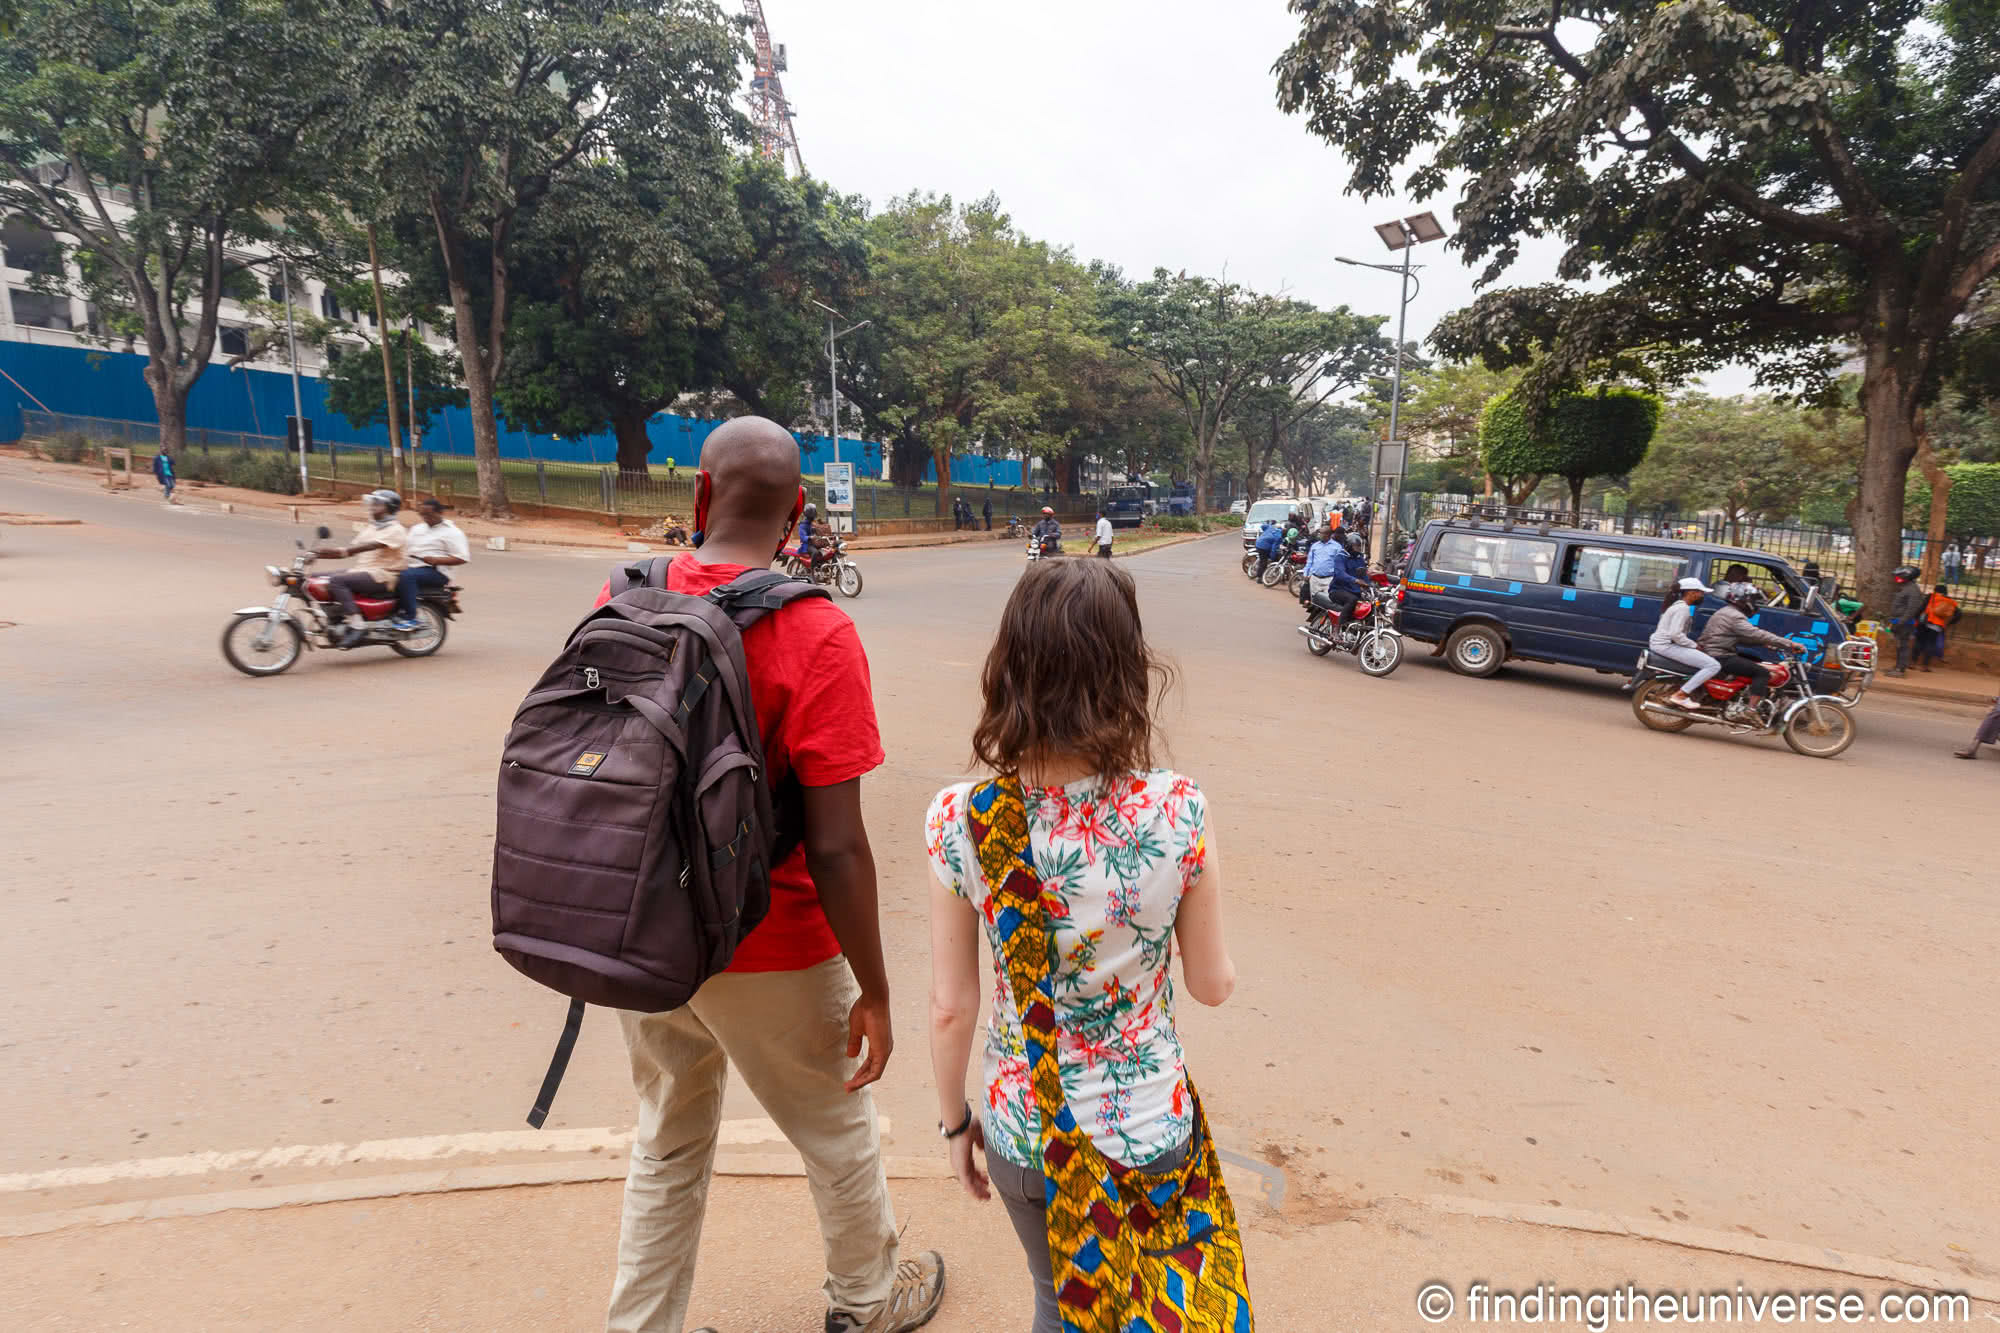
    Our recommendation for your first activity of the day would be to take a walking tour with a knowledgeable local guide. This will help give you a good idea of the history of Kampala, learn about cultural practices, and be able to ask questions to help guide the rest of your time in the city.

    Central Kampala can be a bit overwhelming, especially to the first-time visitor, so having a guide with you who handles the logistics of where you are going and keeping you safe can be a good idea.

    There are a number of different walking tours available of Kampala which generally last 3 to 4 hours. Sights visited will vary, but the majority of tours will include the main highlights of central Kampala. So that might include visiting a market or two, seeing central historical sites and buildings, sampling local foods, and visiting monuments in Kampala including the Independence Monument.

    We took this excellent walking tour of the highlights of central Kampala with guide Arthur who is a part of the ImmersionUG tour company. It is the top company we can personally recommend for walking tours as we have taken several walking and food tours from them during our visits to Uganda. You can see all their tours here.

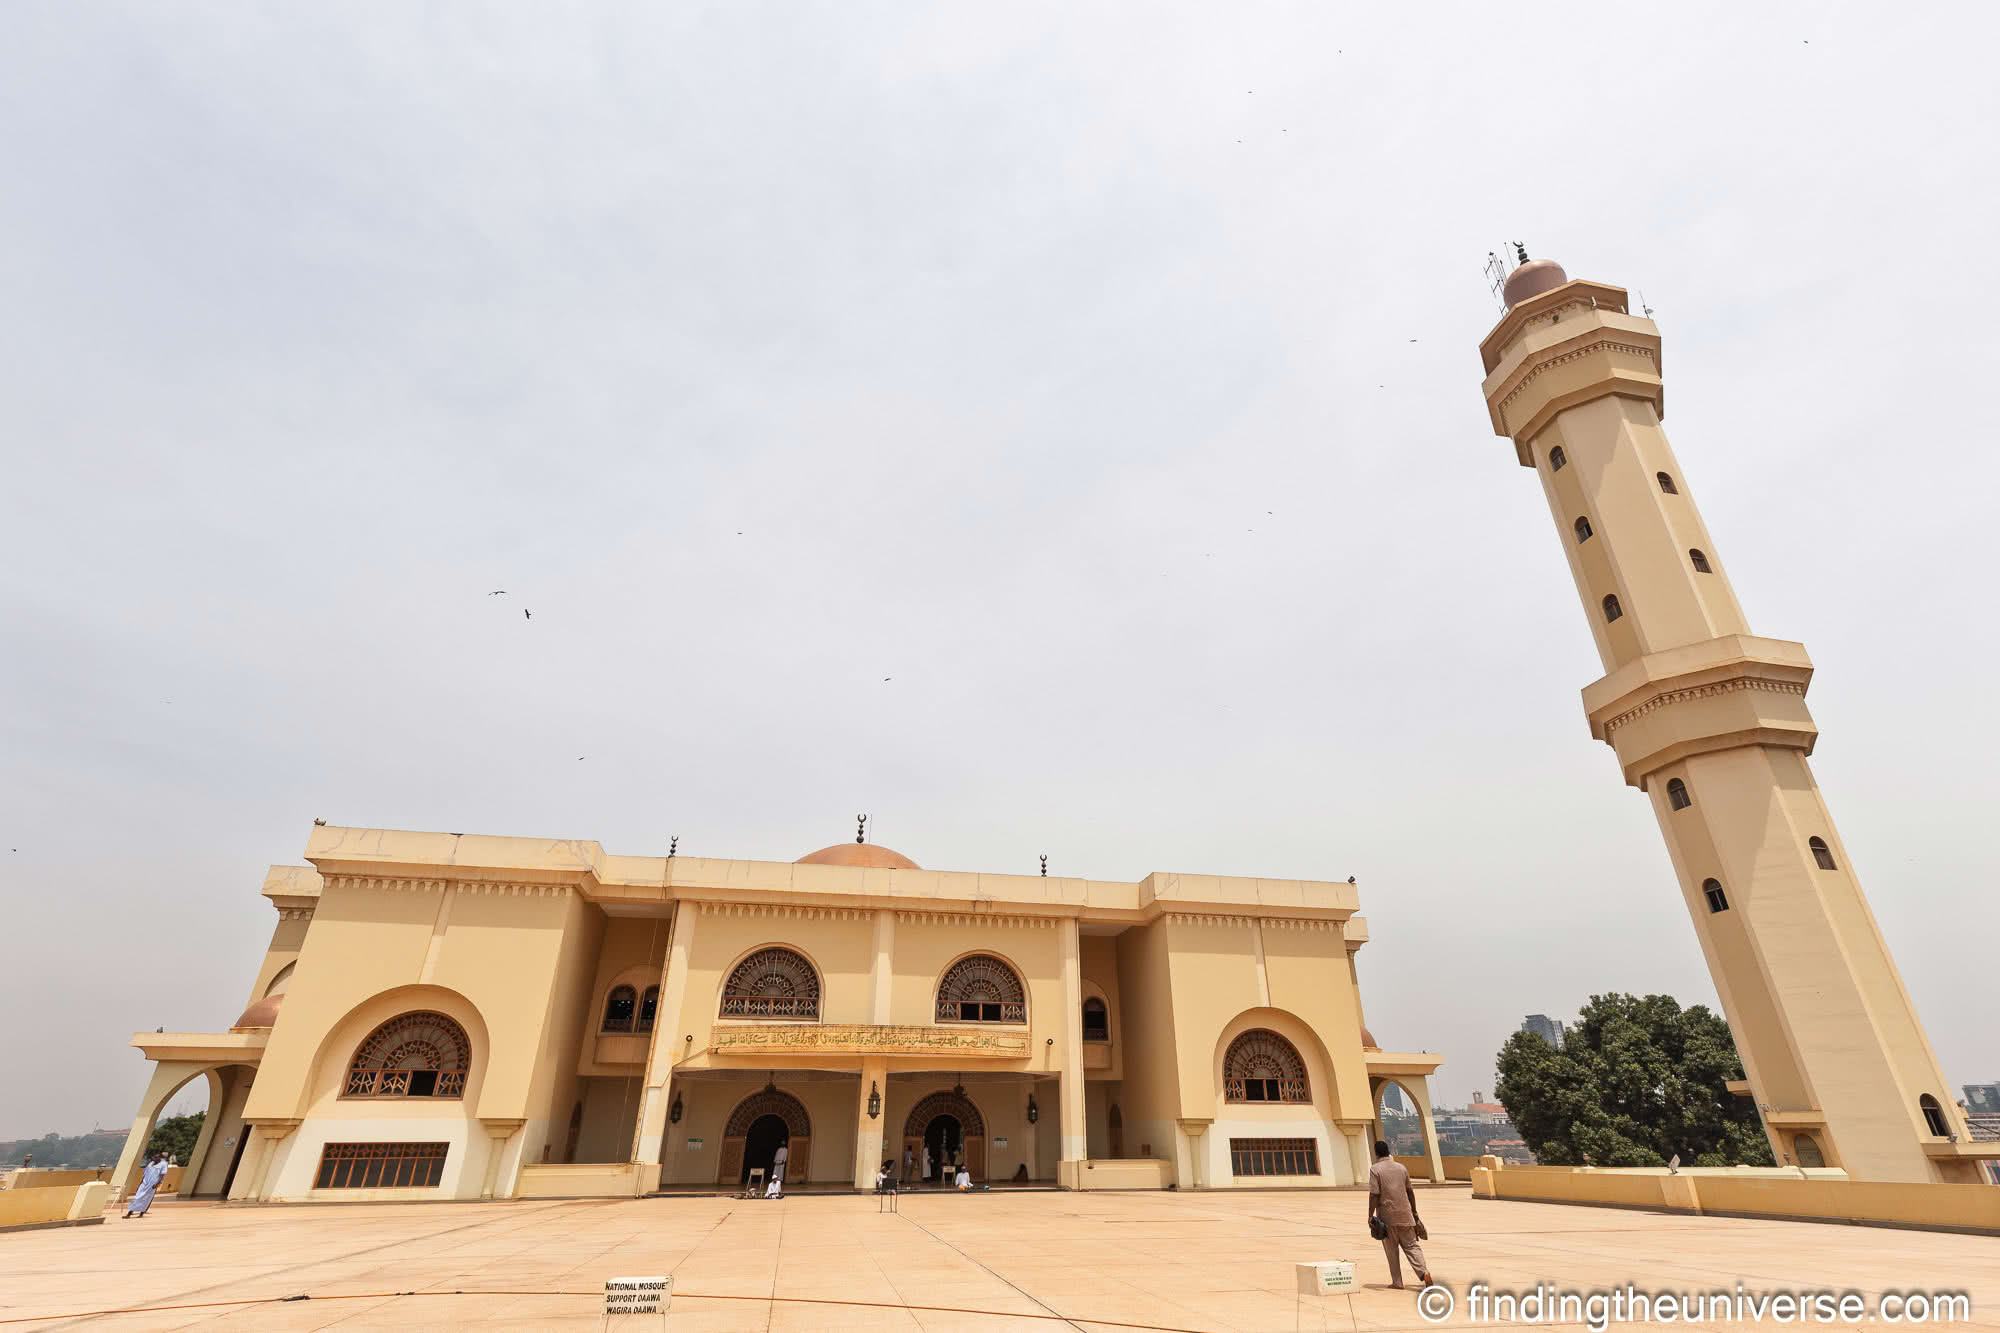
    Many tours of Kampala also give you the option to visit the Uganda National Mosque as part of your tour. Depending on the tour, this will normally extend the tour time by around an hour. It’s also in a different part of the city to that which most foot tours focus on, so normally requires either a boda-boda or taxi ride to another area of the city.

    If you do this then you might be a bit pressed to do everything else in this itinerary and also have lunch, but obviously it’s up to you what your priorities are.

    If you decide to visit the mosque and still want to visit the rest of the recommend places in the afternoon, I’d recommend asking your guide about grabbing a quick sandwich or snack for lunch at the end of the walking tour or consider picking up a couple of things at the market during the tour. You can also come prepared with some snacks and fruit in your day bag to eat during your day.

    Another option would be to book a walking tour which has an earlier start time, such as this private tour which lets you start at 8am.

    Some other popular walking tours to consider in Kampala include:

    Kampala street scenes by Laurence Norah Kampala walking tour ImmersionUG by Laurence Norah

    Uganda National Mosque by Laurence Norah-3
    National Mosque is an optional stop on some walking tours


    Stop 2: Lunch @ 12pm

    At midday, after your walking tour is finished, we recommend stopping for lunch. You’ve just spent around 3-4 hours walking around, so a pause for lunch before continuing your sightseeing is probably a good idea.

    If you are taking a full day tour, your tour will likely include a stop for lunch and the price is often included as part of the tour.

    If you are not taking a full-day tour, we recommend asking your walking tour guide for a good lunch recommendation. One of the benefits of taking a guided tour is that you can ask your guide for recommendations for other sights as well as where to eat lunch. That’s why when we take a walking tour in a city we are visiting for a few days, we always try to do it near the start of our stay so we can take advantage of the guides recommendations for our remaining days.

    There are lots of quick street food stalls and carts that cater to locals if you just want a rolex (omelette wrapped in flatbread), plate of kikomando (chapati and fried beans), meat skewer, or a hot sandwich/wrap (often a chapati wrap with filling). These are quick, cheap, and filling.

    There are also buffet style lunch spots where you can sit down and try several dishes at once. These tend to be a very good value. If you are looking for some popular local foods to try other than a rolex, we would suggest kikomando (fried beans and chapati), matoke or matooke (boiled and mashed green bananas), luwombo (a stew cooked in banana leaves that can include meat, fish, and/or peanuts), local fish (e.g., Nile perch, tilapia), posho or ugali (cornmeal porridge that is a staple across East Africa), and grilled meats.

    Your guide can help suggest a spot for you based on what you are looking for, and you just want to make sure the place looks sanitary and the food is served hot. Avoid fresh veggies and salad, cold dishes, unbottled water, undercooked items, etc.

    If you prefer a nicer sit down place and have a bit more time, we recommend heading to a local hotel restaurant. Most hotels have restaurants that serve both hotel guests and visitors.

    Of course you can also save time by just bringing along some food with you (e.g., fruit, nuts, granola bars, jerky, etc.) and having it as you go during the day if you prefer. Even if you are not ready for lunch, breaking at least for a coffee, tea, or soda though can be nice after a long walking tour.


    Kabaka’s Palace @ 1pm

    The focus of the remainder of the day is on a number of cultural sights that will help you understand the history of Uganda, from pre-colonial times through to the more modern age.

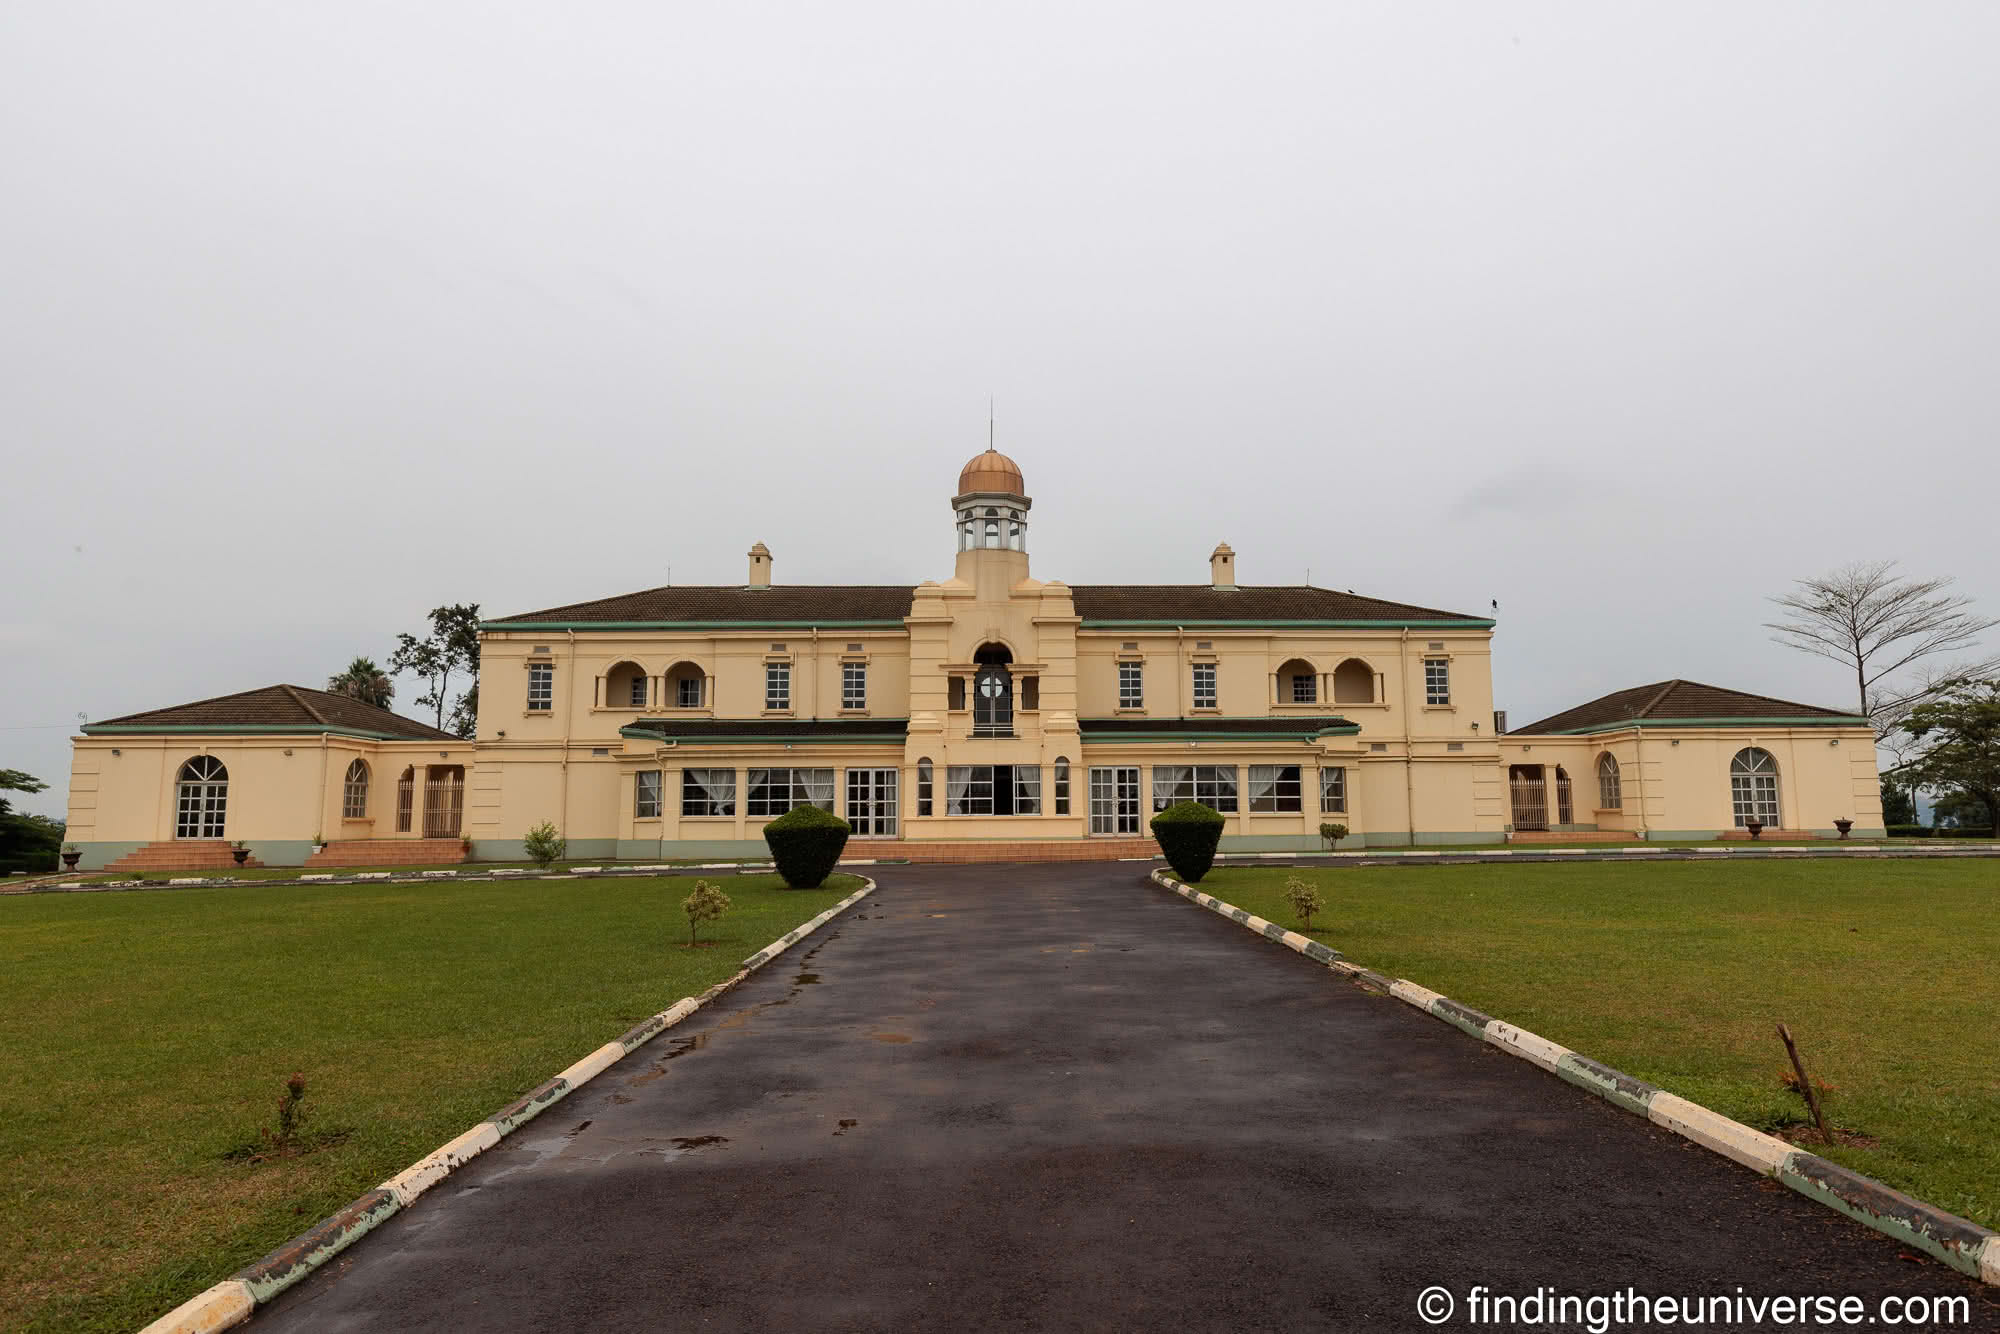
    The first stop we recommend for your afternoon is the Kabaka’s Palace. The Kabaka is the King of the Kingdom of Buganda, which is one of the five kingdoms which makes up modern day Uganda. Buganda is the largest Kingdom, and its capital was also Kampala. The Buganda monarchy dates back over 800 years and is still alive and well today.

    Traditionally, the Kabaka has had his palace on top of one of the many hills of Kampala. Today’s palace, known as Lubiri or Mengo palace, is no different. It is found on top of Mengo Hill, where the palace has been situated since the mid 19th century. However, the building was extensively damaged during the 1966 civil war, following which it was used by Idi Amin during his oppressive regime. The palace is no longer occupied by the Kabaka, who only visits for ceremonial reasons.

    Without a Royal person to keep safe from prying eyes, the palace grounds are now open to visitors. The palace itself is closed, but you get good views of its exterior. The palace grounds can only be visited by tour, which is simple to arrange, just go to the main gate, pay an entry fee, and a guide will show you around.

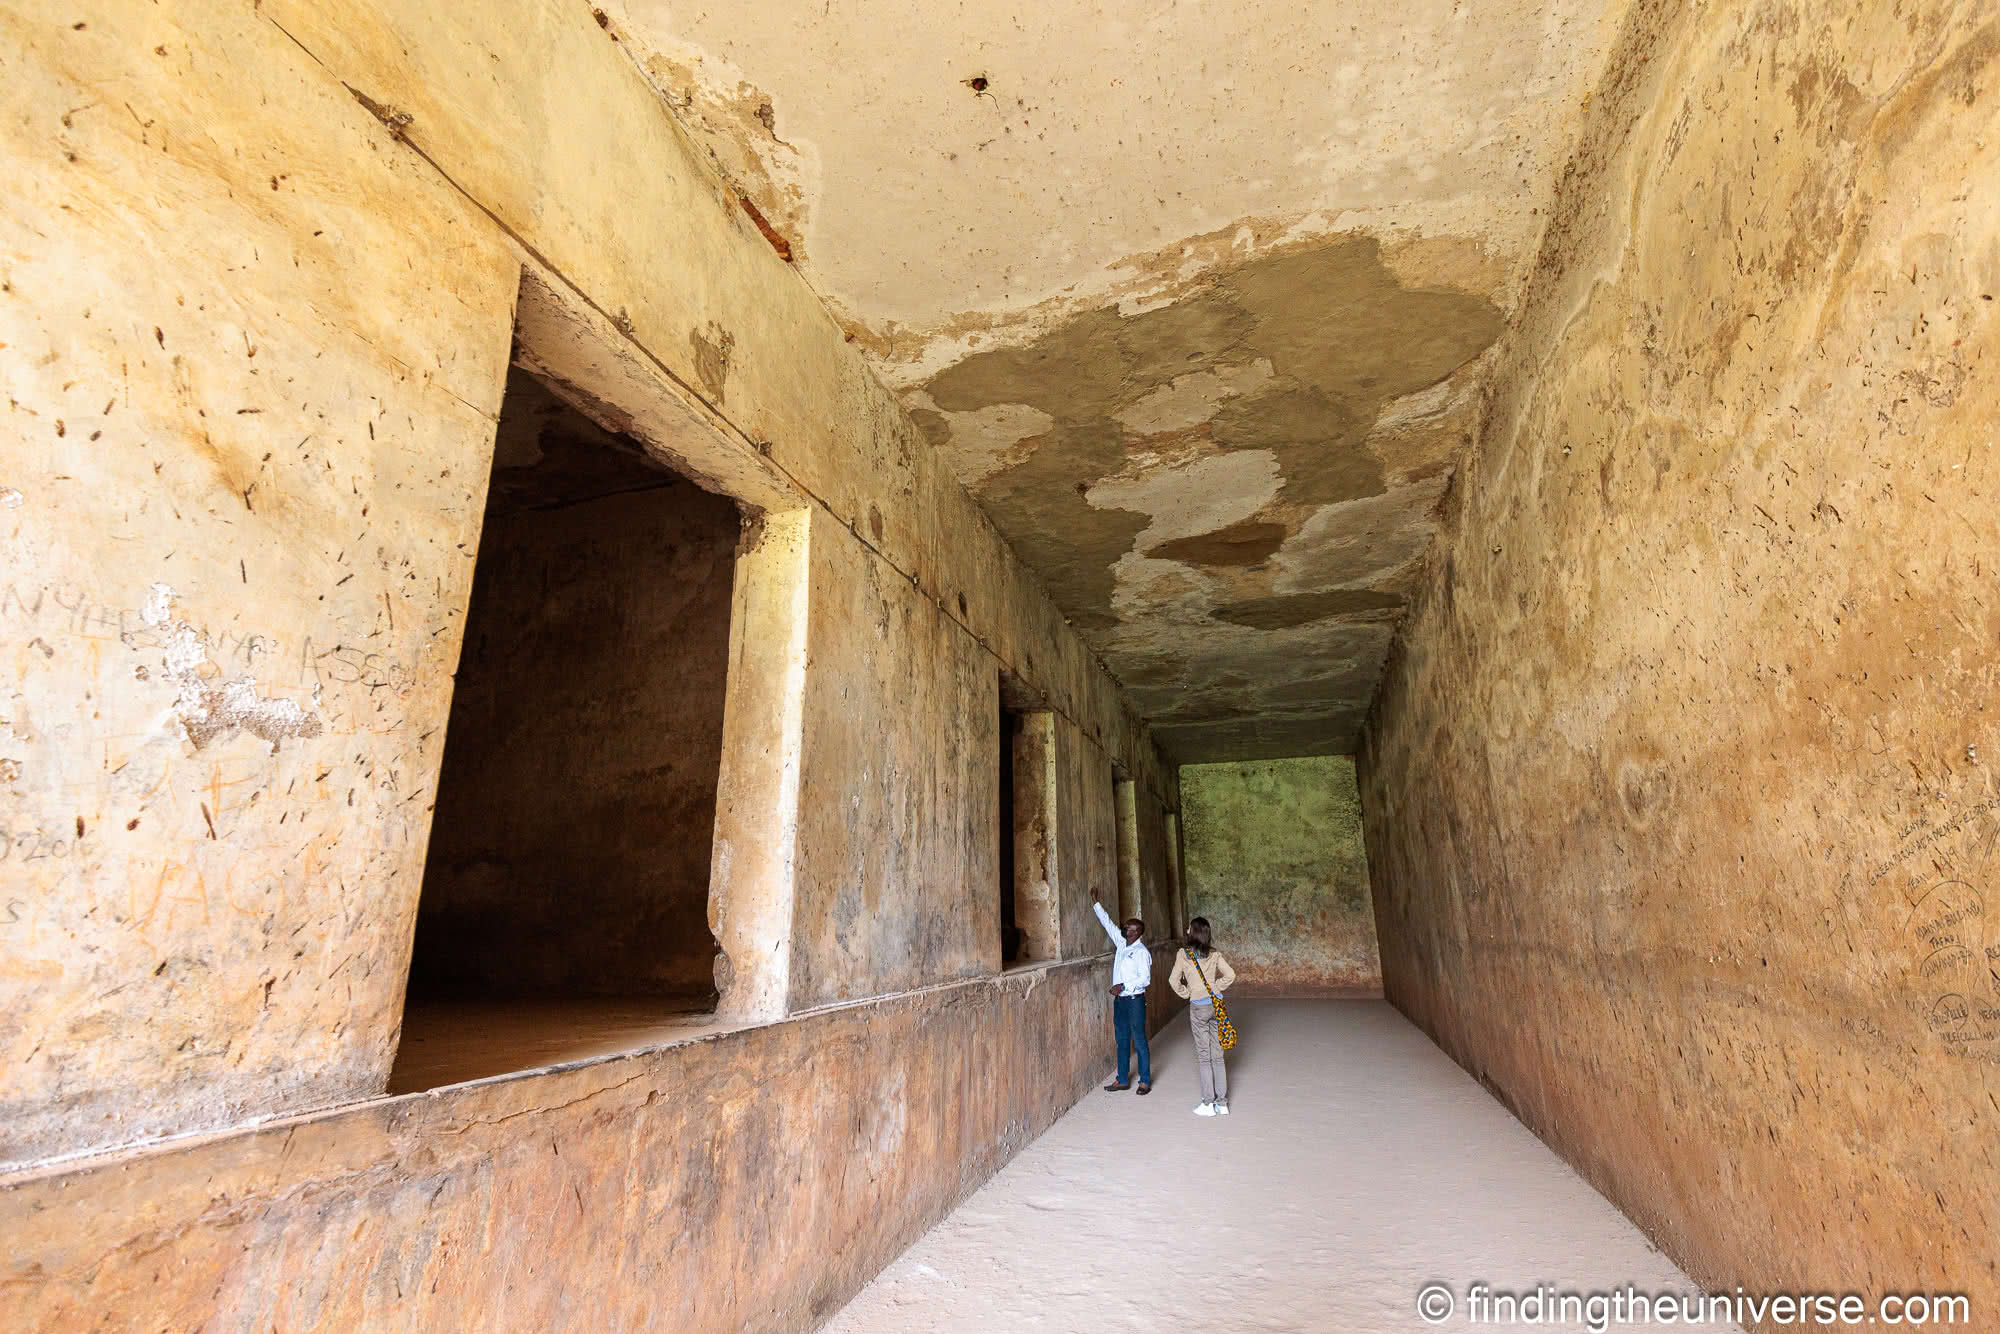
    Your tour will normally include a good oral history of the palace and its grounds, as well as the main events that shaped what you see today. You will also tour the infamous torture chambers of Idi Amin, who had up to 200,000 people imprisoned and murdered here during his regime. This dark period of history and the negative association is the main reason that the palace and its grounds are no longer occupied by the Kabaka.

    We really enjoyed our tour of Kabaka’s Palace and grounds. The tour guide was excellent, and we learnt a lot about Uganda’s history, including recent and more distant history. We also enjoyed learning about traditional bark cloth making and some of the local games that locals like to play.

    A tour will generally last around an hour and we think is an excellent way to learn more about the history of Uganda. You also get a good view of Kampala from Mengo Hill.

    Kabakas Palace Kampala by Laurence Norah Kabakas Palace Kampala by Laurence Norah


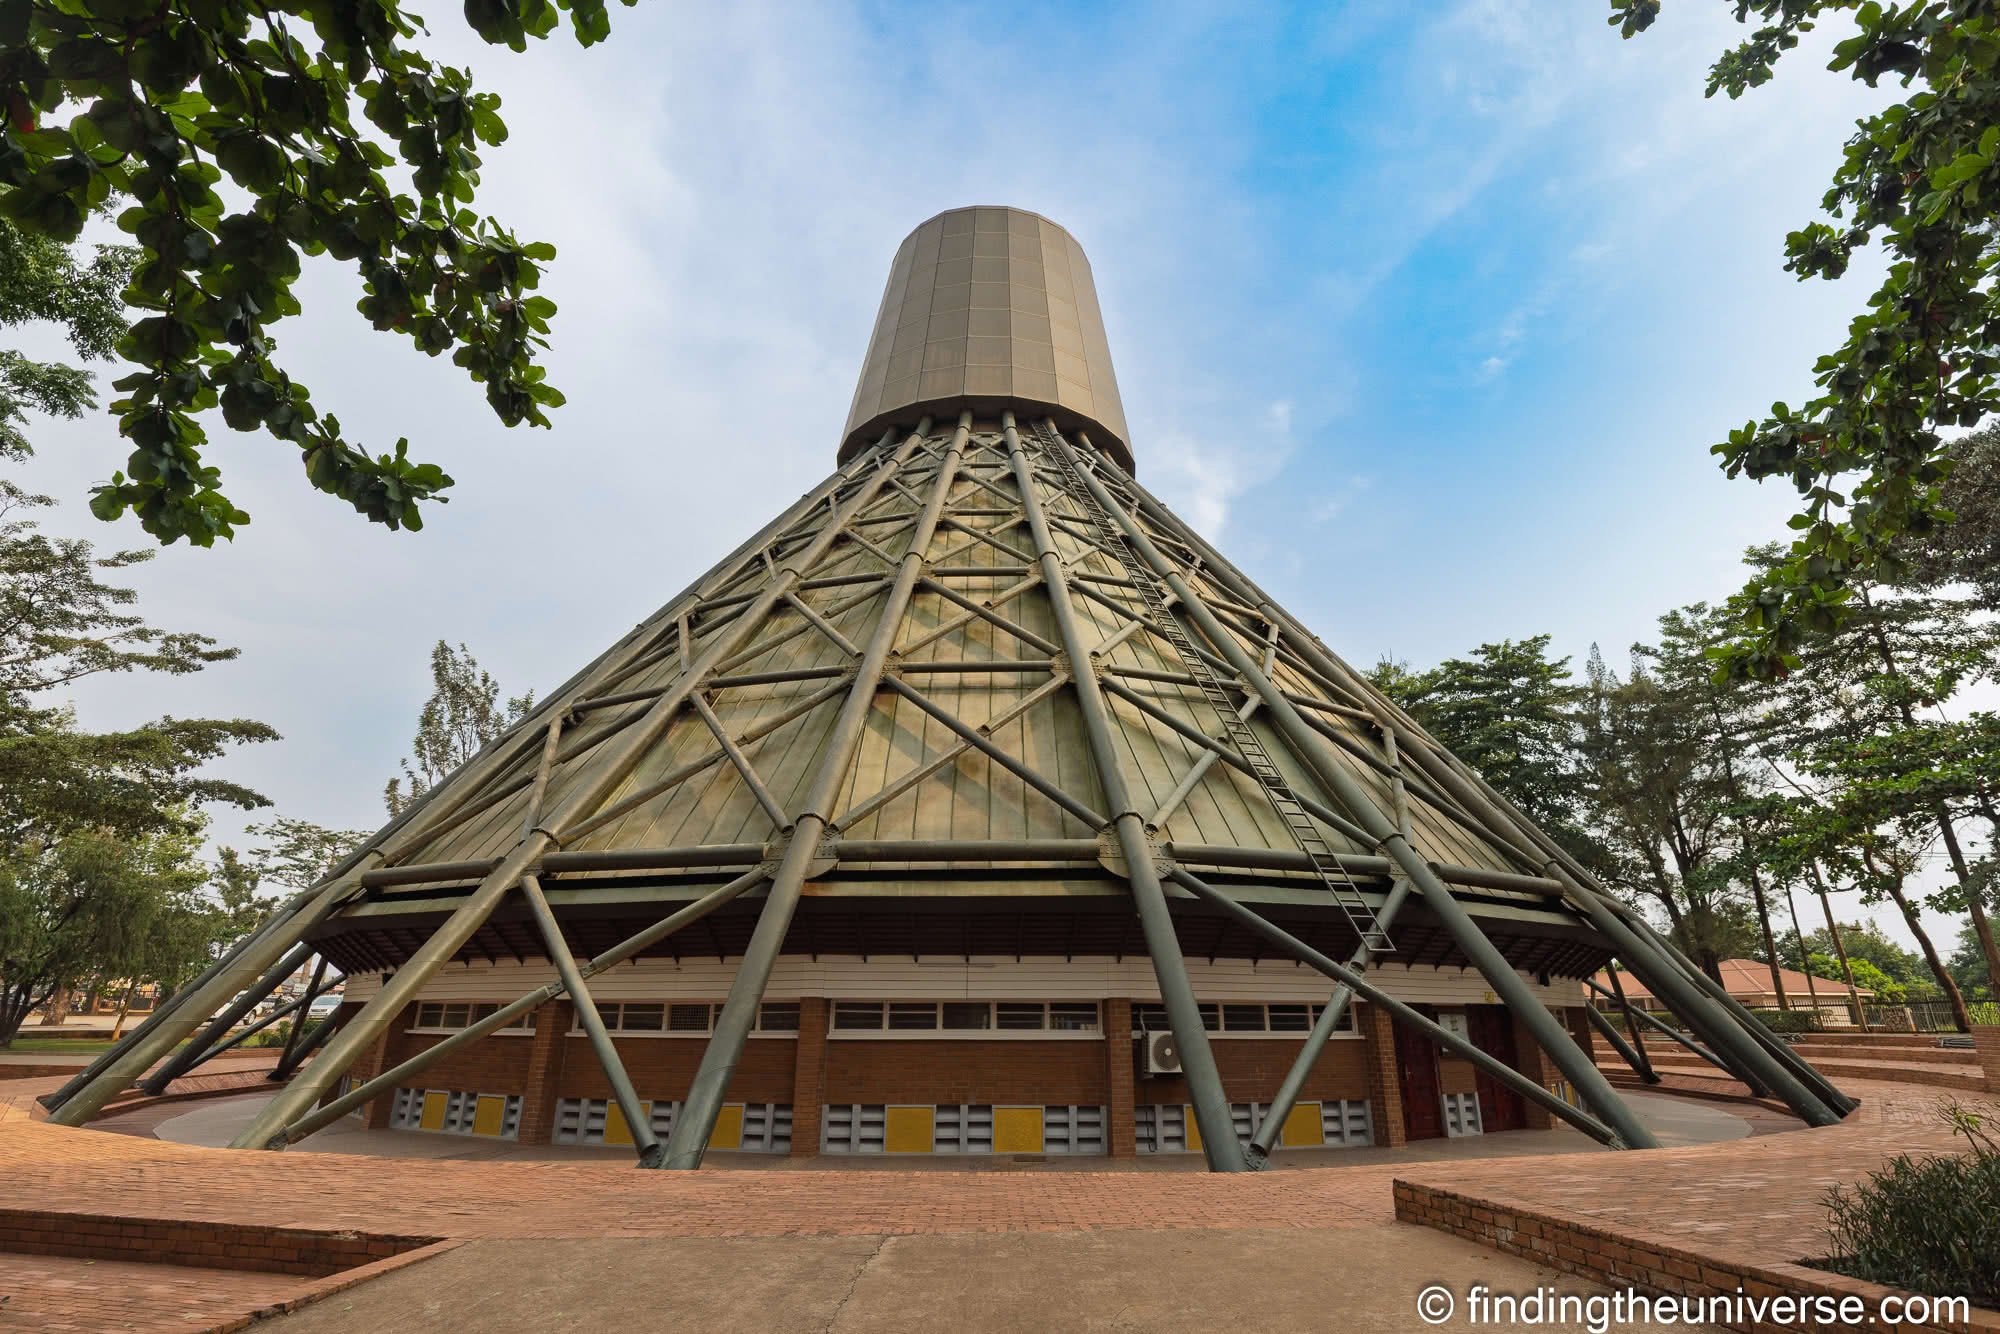
    Kasubi Tombs @ 2:45pm

    Just 10 minutes drive (depending on traffic!) from Kabaka’s Palace are the Kasubi Tombs. These are also related to the Royal family, being the final resting place of a number of the Buganda Kings.

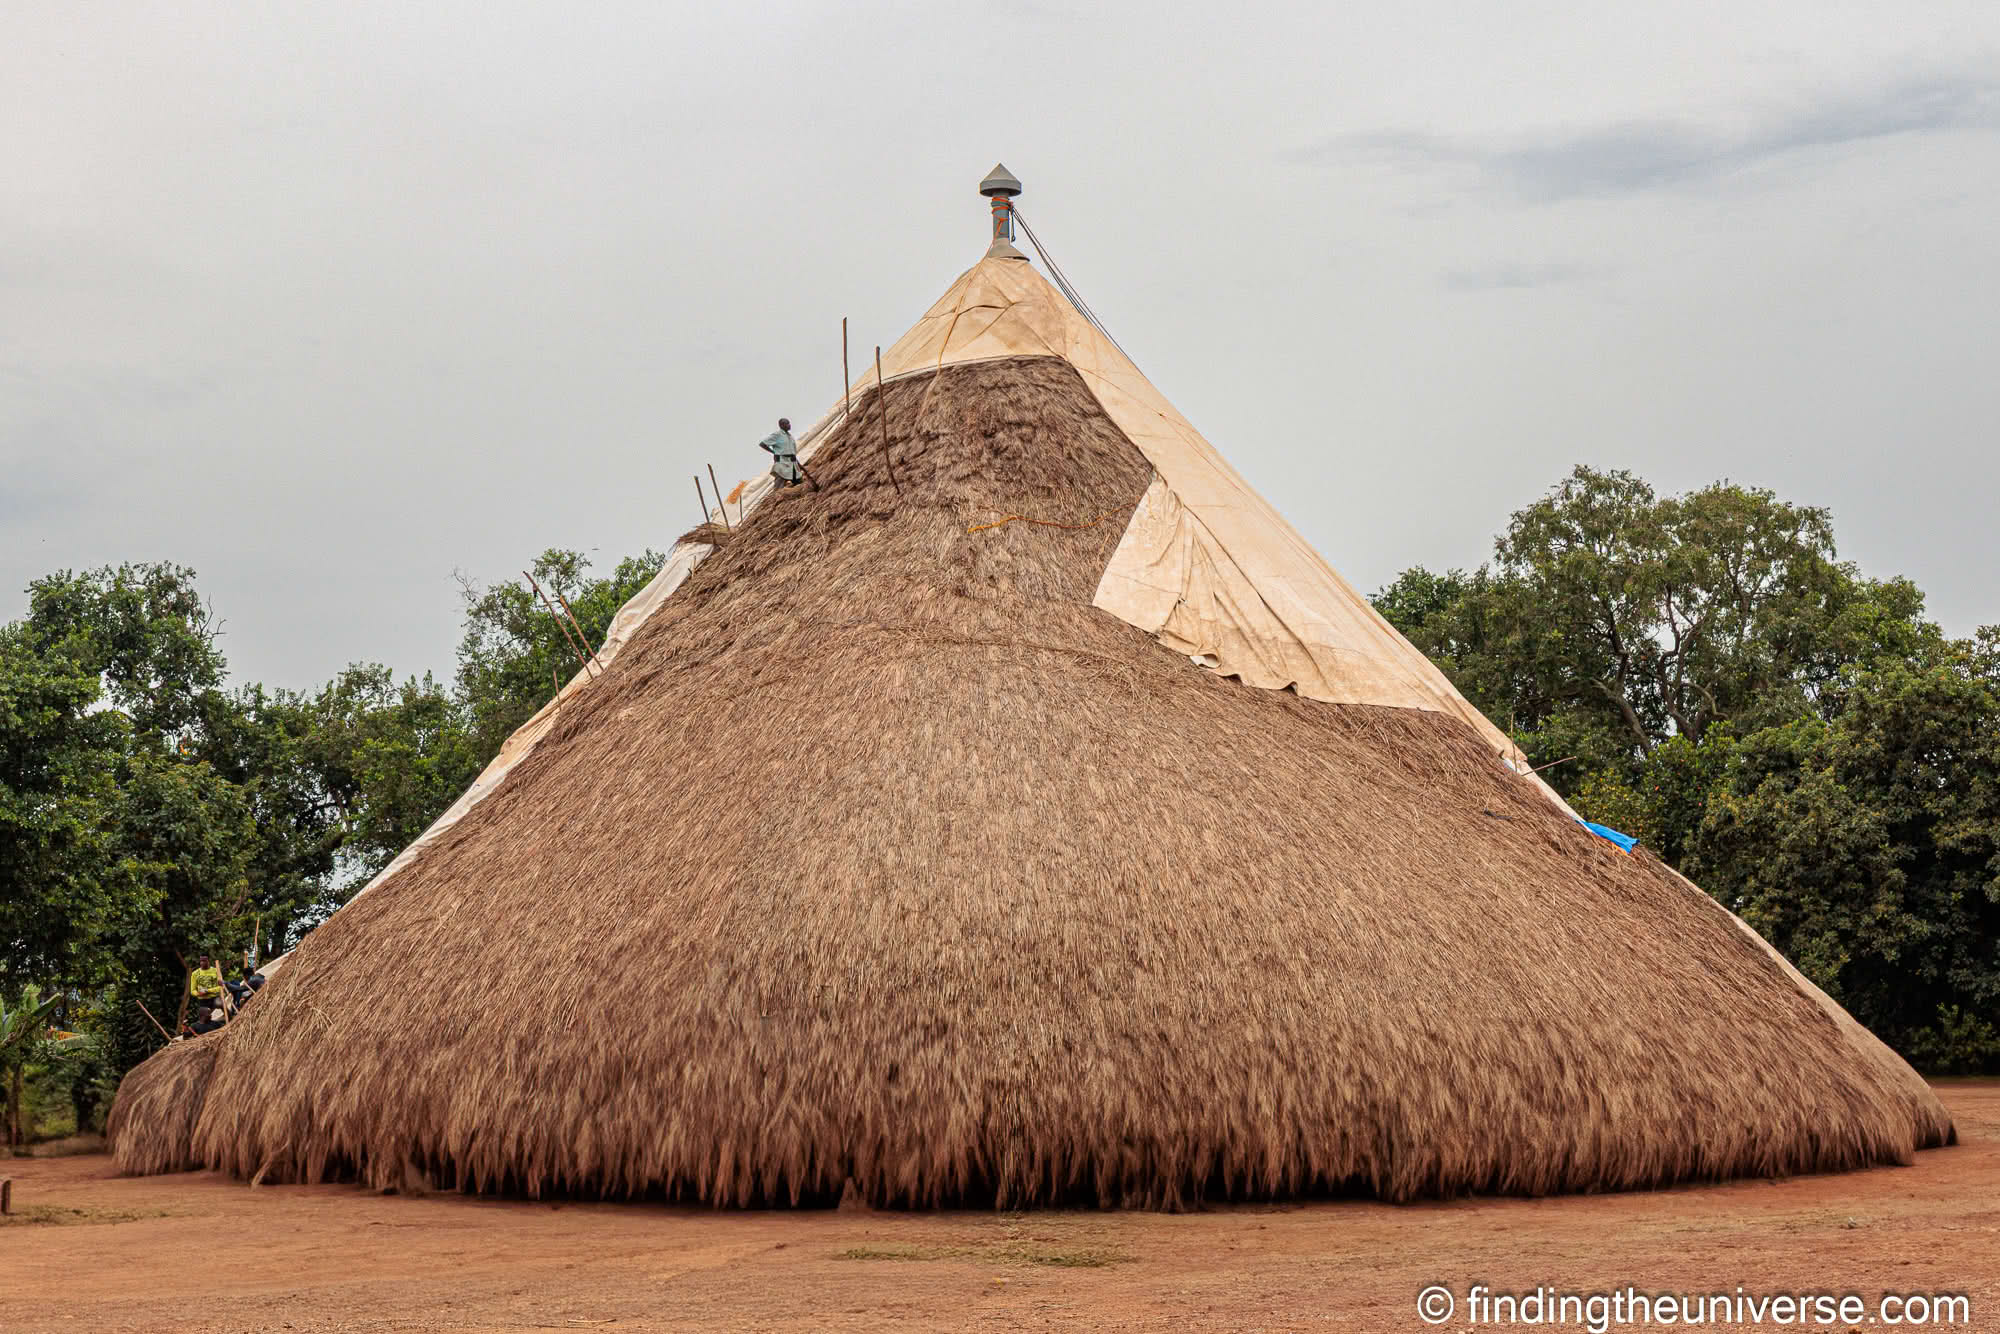
    Traditionally, the Kabaka, or King of Buganda, would choose a unique location for their burial. So the Kasubi tombs are unusual because they are home to four Kabaka’s, as well as a number of their descendants. The tombs date from 1882, with the first burial in 1884, and the most recent in 1971.

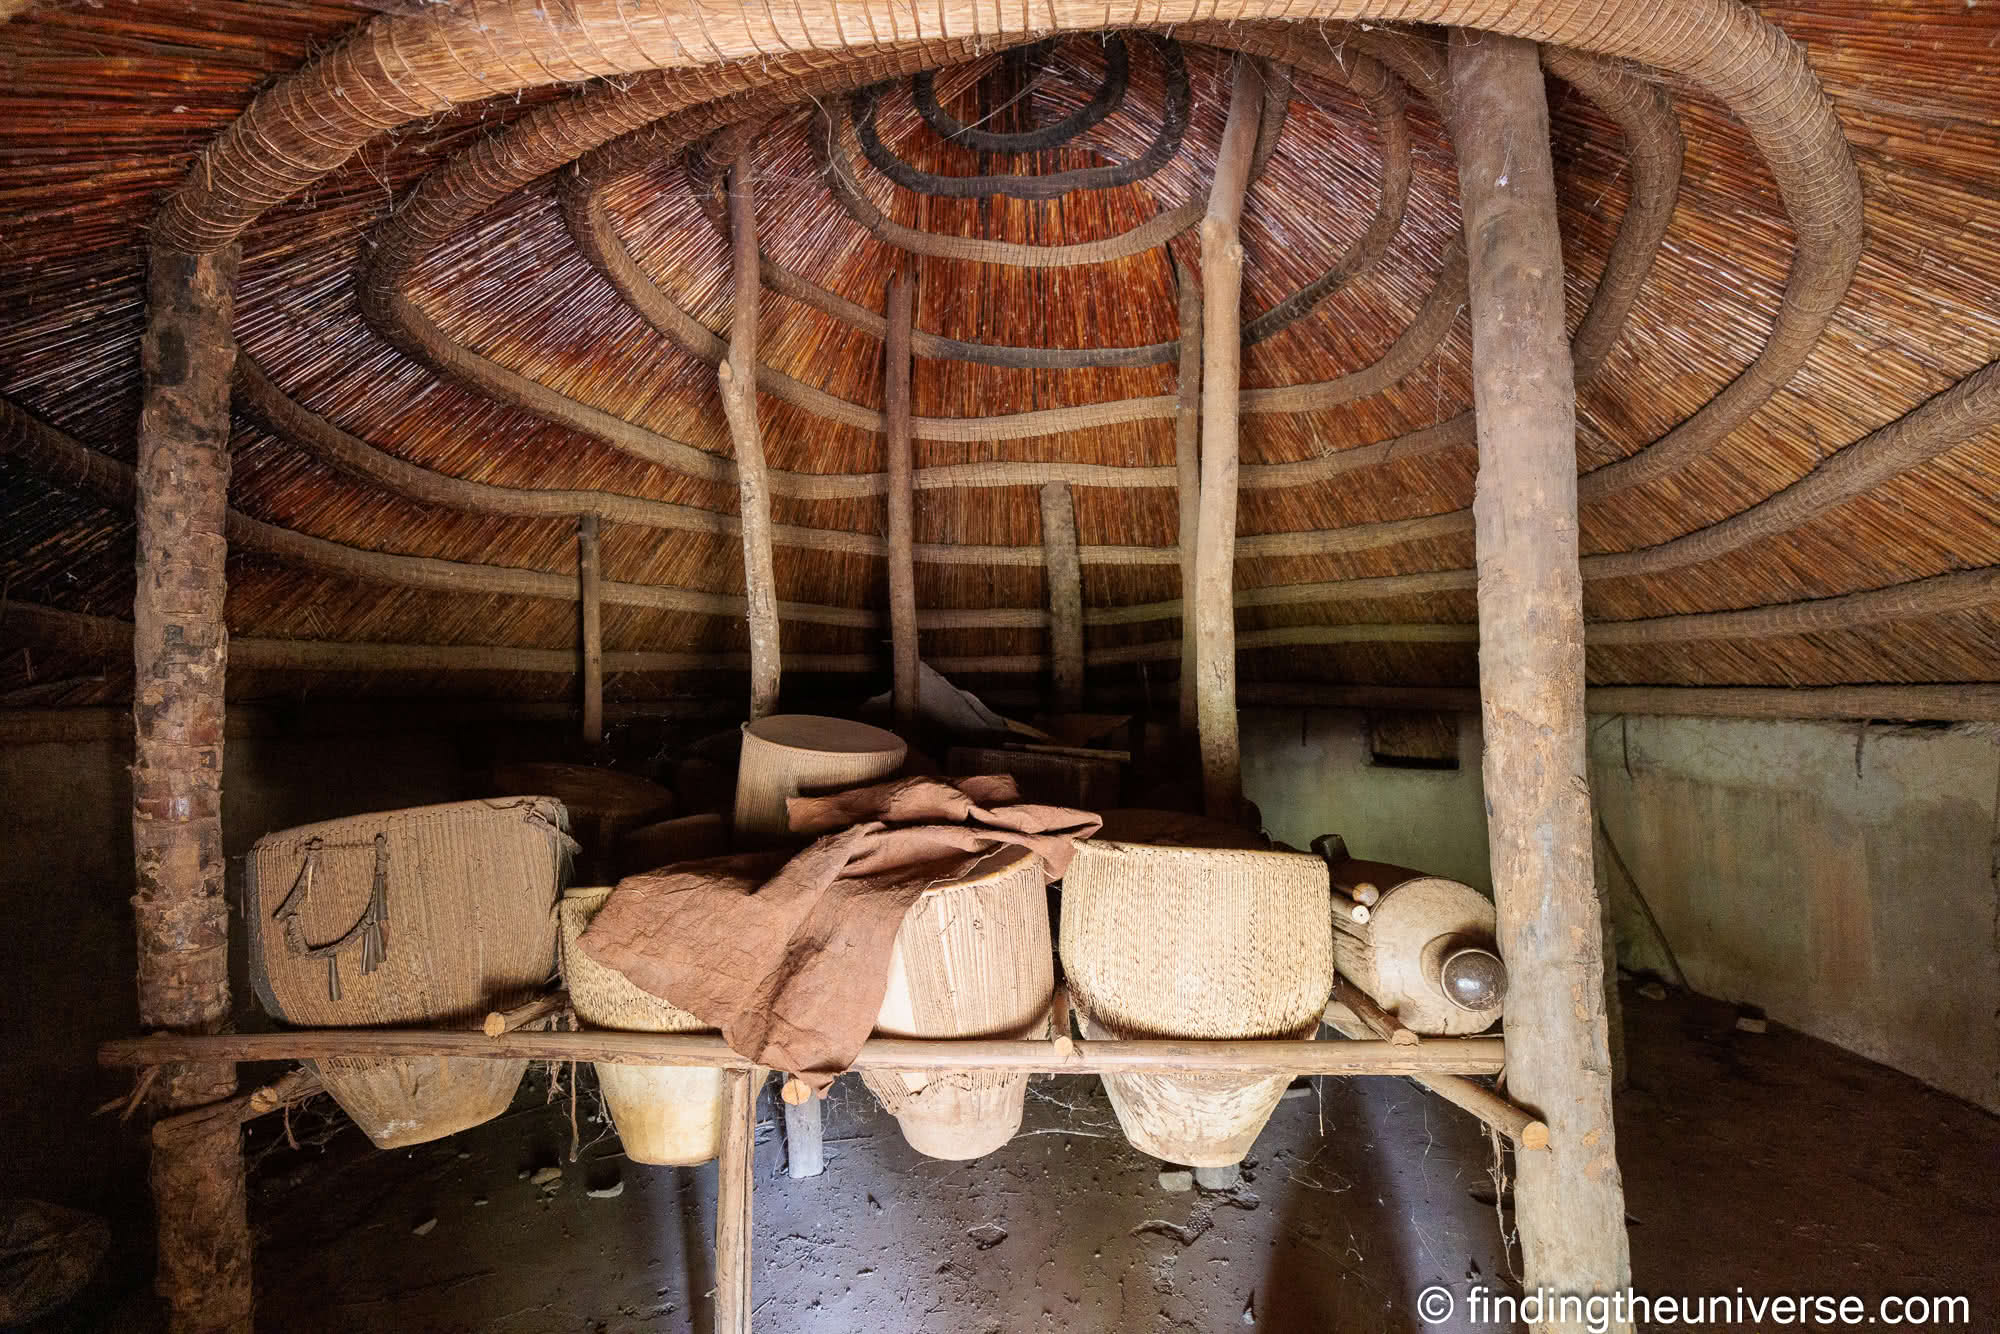
    There are a number of structures on the site, with the huge main circular building being the main attraction. This 102ft wide, 25ft high building is where the tombs of the four kings are actually found. The huge building is primarily constructed from natural materials in the traditional style. It’s unique size and traditional construction methods led to it being listed as a UNESCO world heritage site in 2001.

    As well as the main central building, there are a number of other buildings on the site which can be seen when you visit. These include the Royal drum house, as well as the homes for the Kabaka’s widows and family members. Traditionally these family members would live on site to tend the graves.

    Tragedy befell the site in 2010 when a huge fire caused a great deal of destruction, but following intensive reconstruction efforts using traditional materials, the site is once again open for visitors. There’s a fee to visit, which includes an excellent tour of the grounds. Expect to spend around an hour to 90 minutes here.

    We enjoyed our visit to the Kasubi tombs, although they were still undergoing renovations when we last visited. Those have now been completed. Our tour included all the main sights, and our guide was also very good, really bringing to life everything that we saw.

    Kasubi Tombs Kampala Uganda by Laurence Norah-3 Kasubi Tombs Kampala Uganda by Laurence Norah Kasubi Tombs interior by Laurence Norah


    Uganda National Museum @ 4pm

    After visiting the Kasubi Tombs, if you still wish to continue sightseeing and learning about Uganda, then we highly recommend taking the ten-minute drive to the Uganda National Museum.

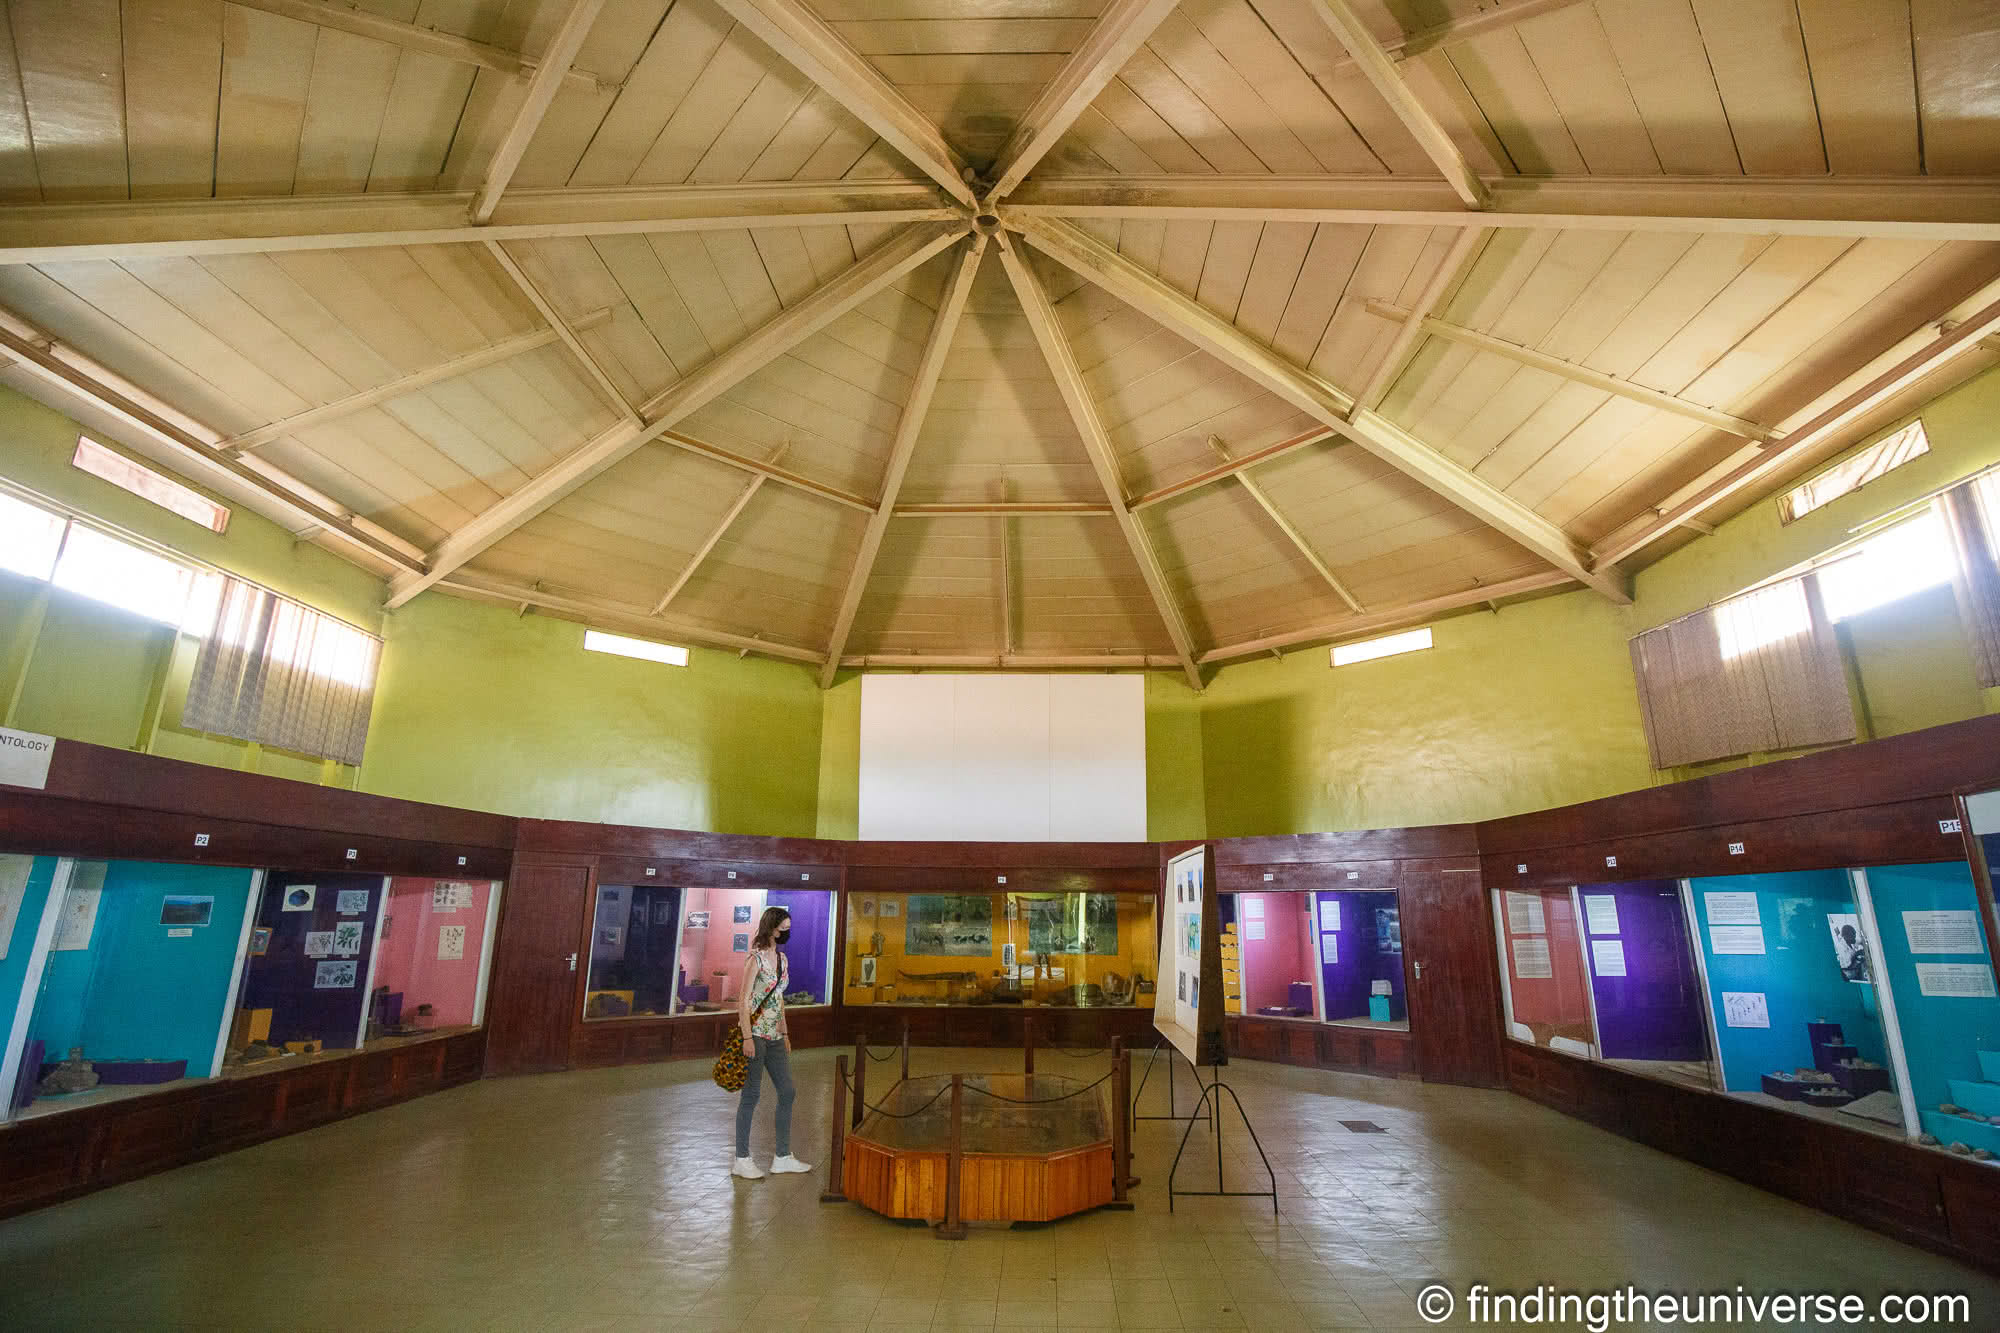
    This dates from 1908, making it the oldest museum in East Africa, and it is the place to come to learn all about Uganda’s cultural heritage and history.

    There are a number of exhibits on display, which cover everything from traditional musical instruments to art, medicine, clothing, fossils and much much more. You can basically learn all about the history of the region from pre-history to the present day.

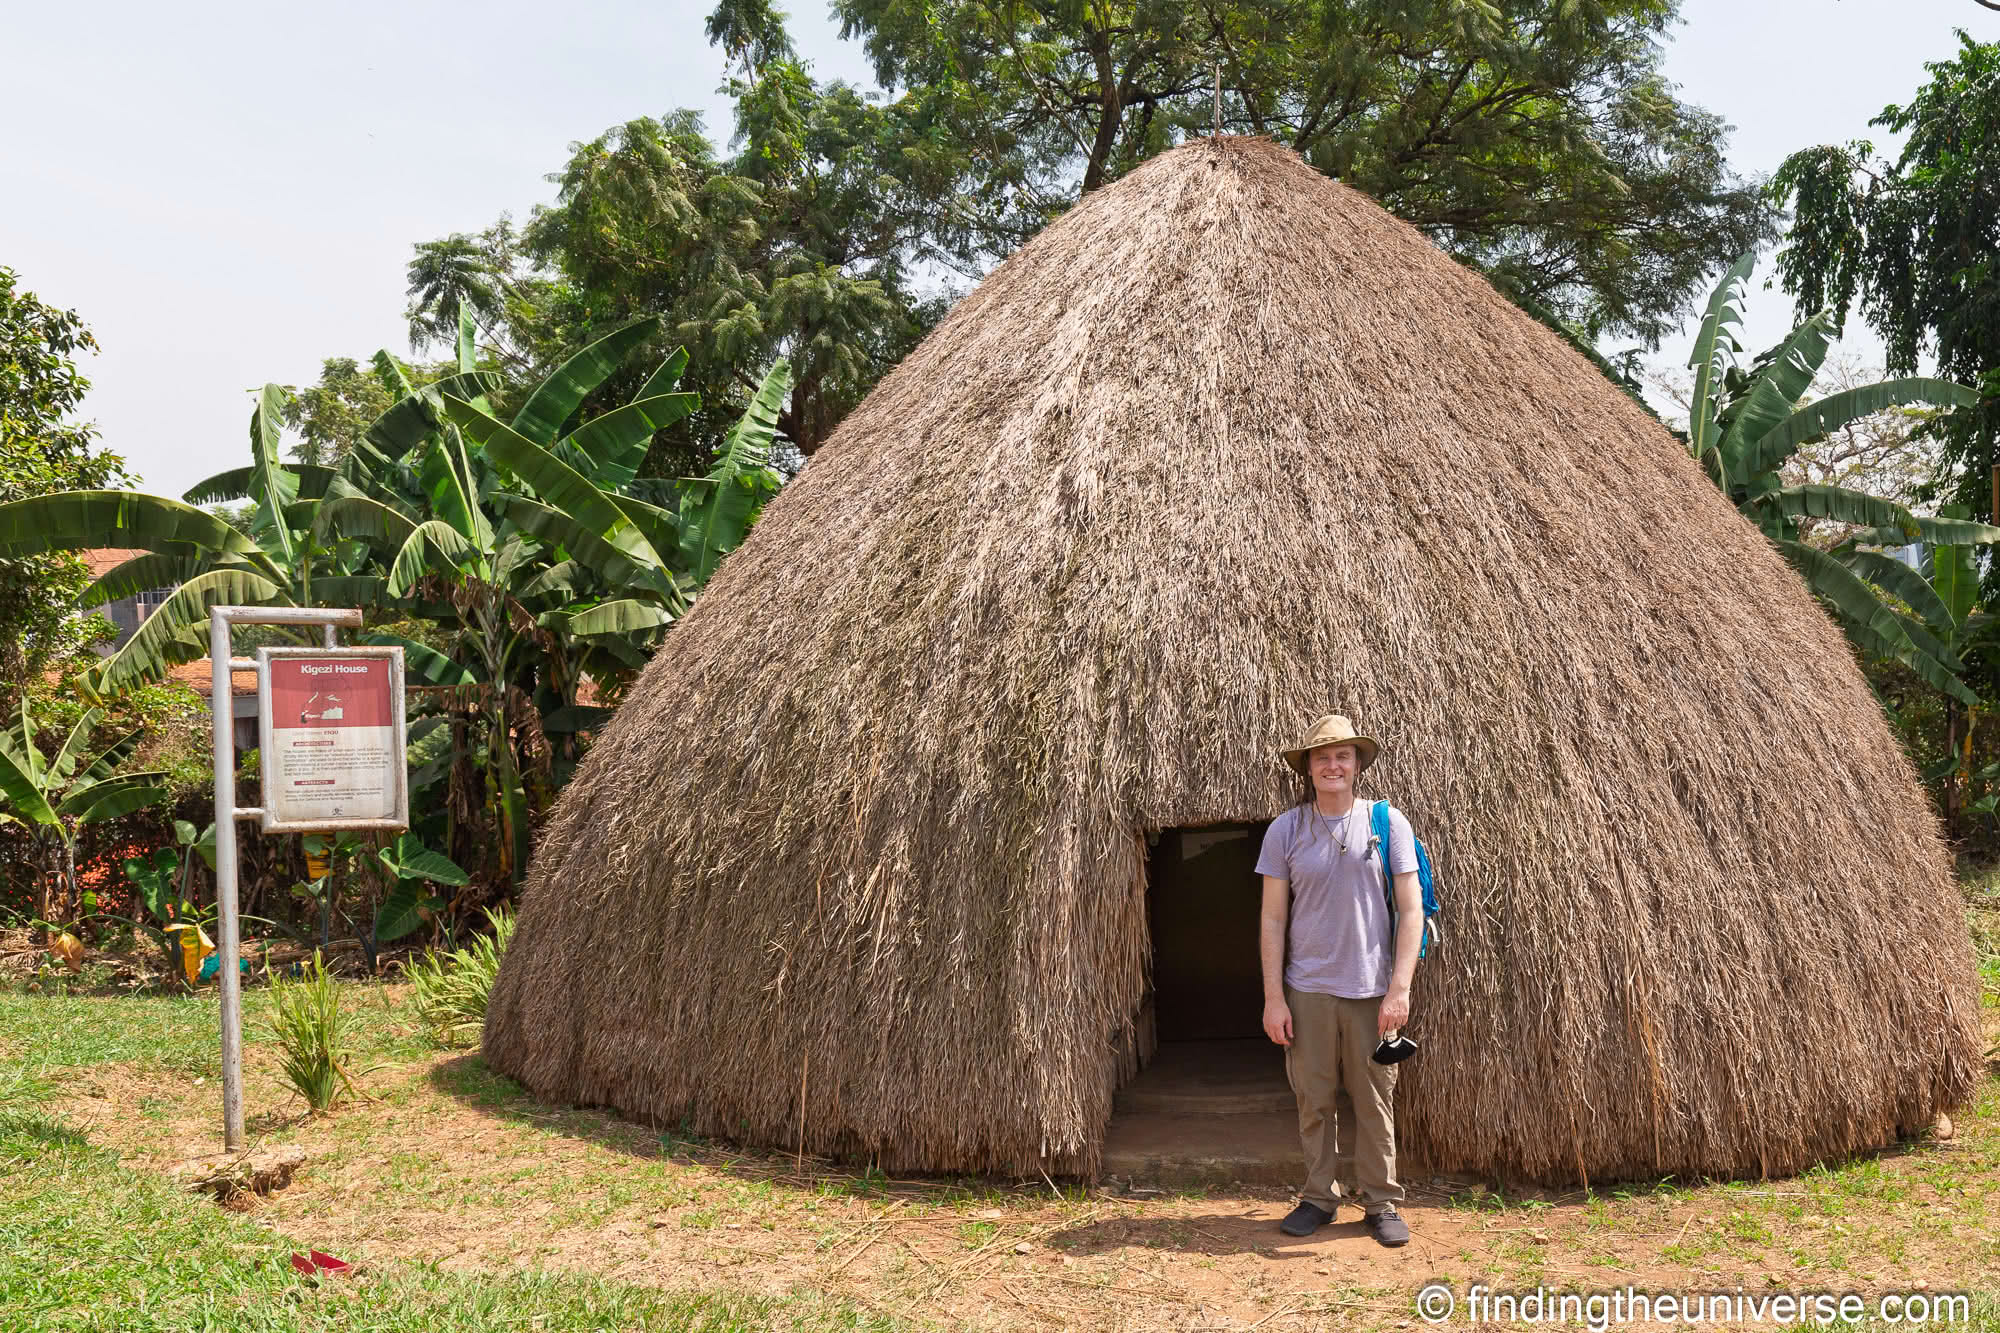
    One of our favorite parts of the museum is the outside area, where you’ll find a number of different traditional buildings. These represent some of the different tribes and time periods of Uganda across the years, and each building also contains a number of historically accurate exhibits.

    This isn’t a massive museum, so even if you don’t have a lot of time left on your schedule we think you’ll still enjoy a visit. There’s a fee to visit and it’s definitely somewhere you can visit on a self-guided basis as there’s plenty of information available in English.

    Uganda Museum by Laurence Norah Uganda Museum Kampala by Laurence Norah


    Break @ 5:30pm

    At this point in the day, you’ve done a lot and we’re going to recommend taking a break, likely heading back to your hotel if you are staying in Kampala, before your evening activity. Perhaps a drink, a nap, or a quick dip in the pool before getting ready for dinner.

    If you are not staying in the city, I’d head to a cafe or bar for a coffee, soda, juice, or beer and a nice break.


    Ndere Cultural Center @ 7pm

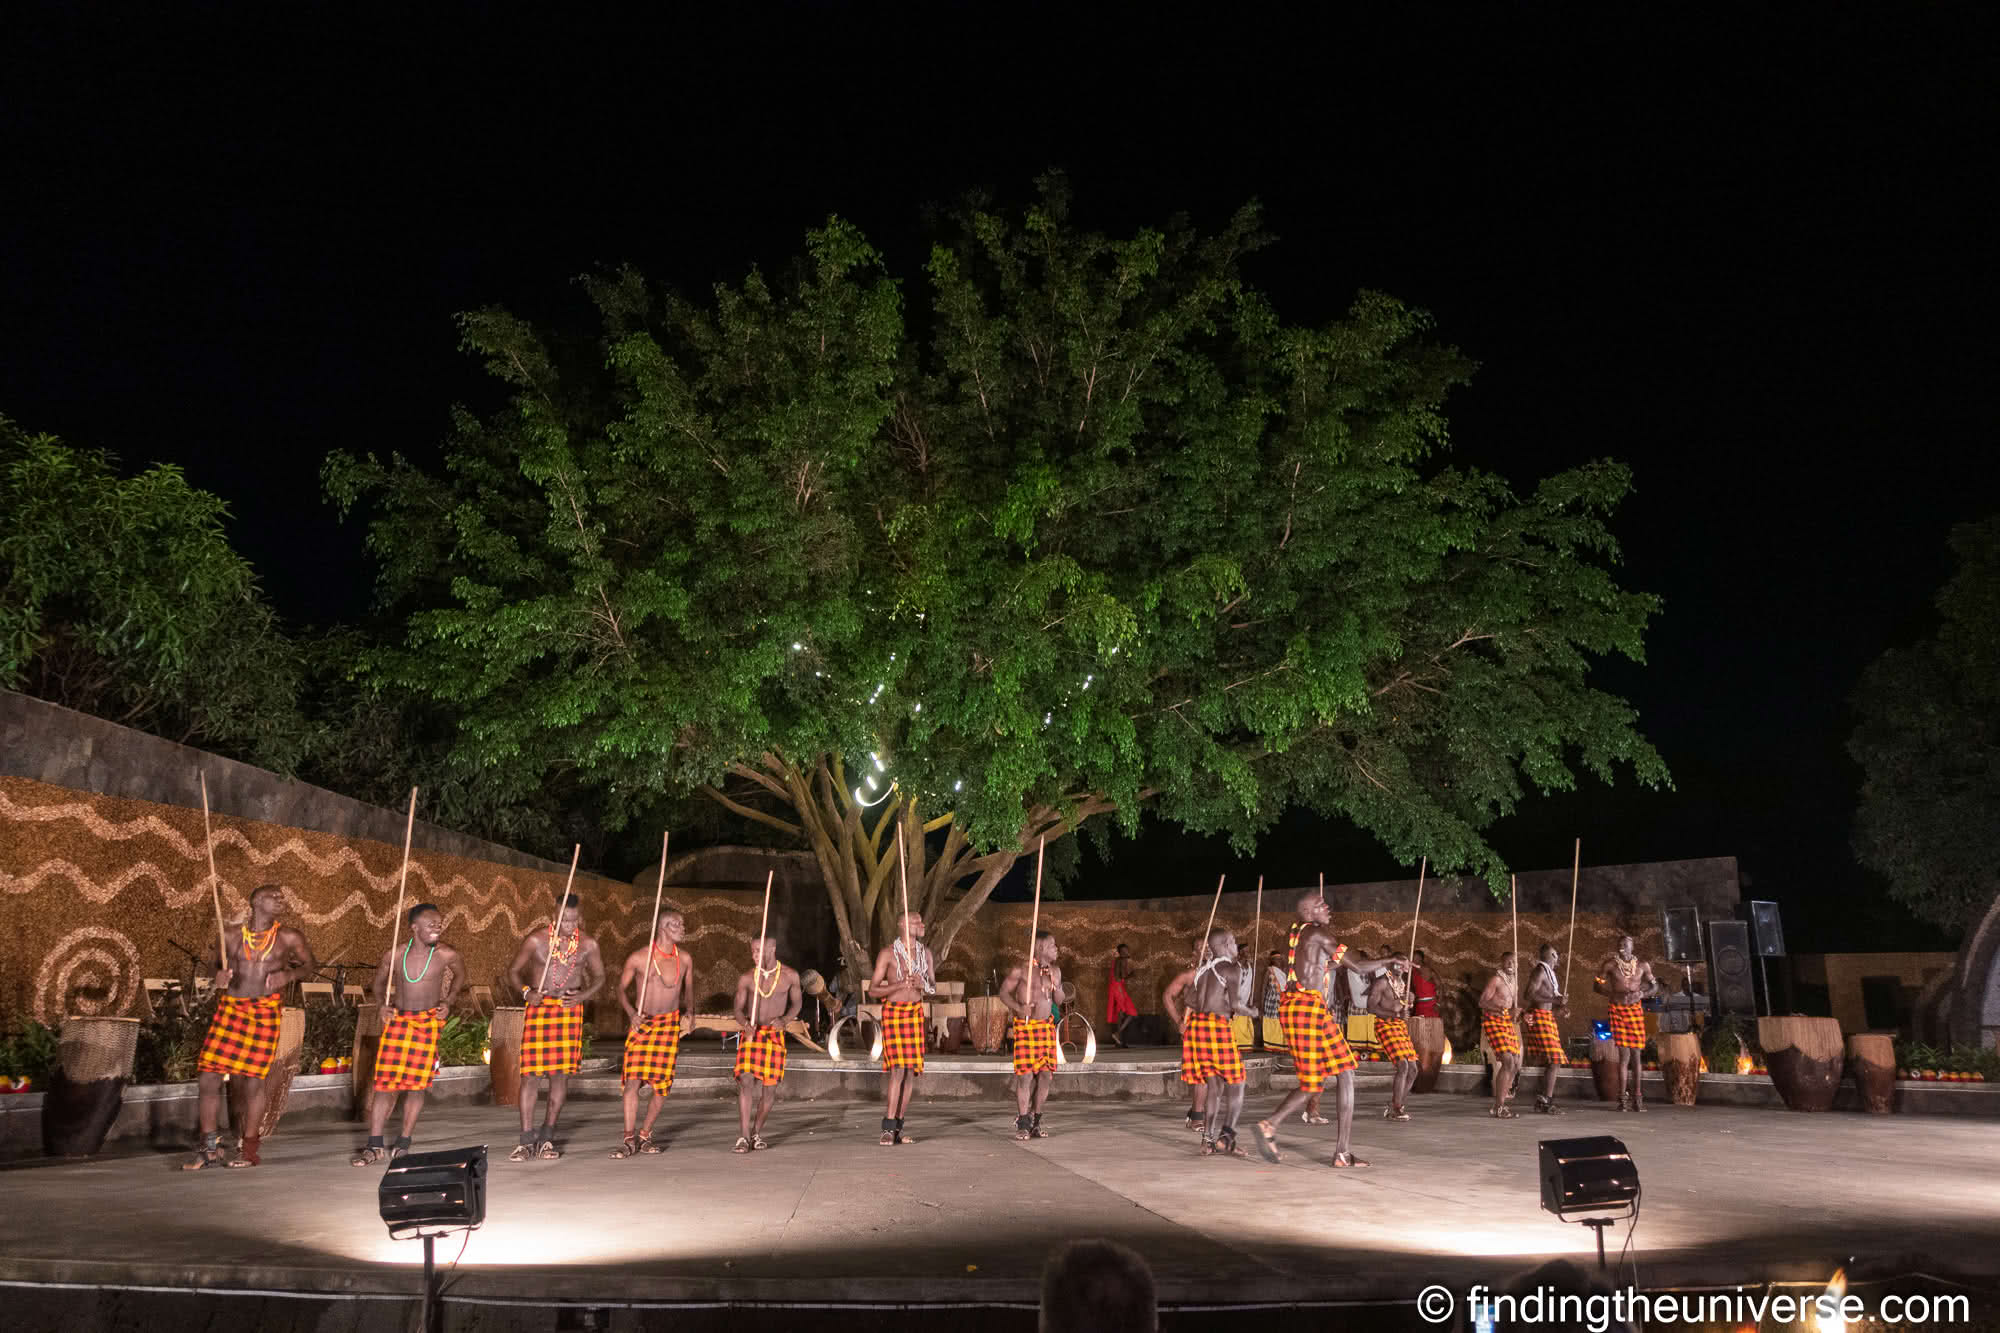
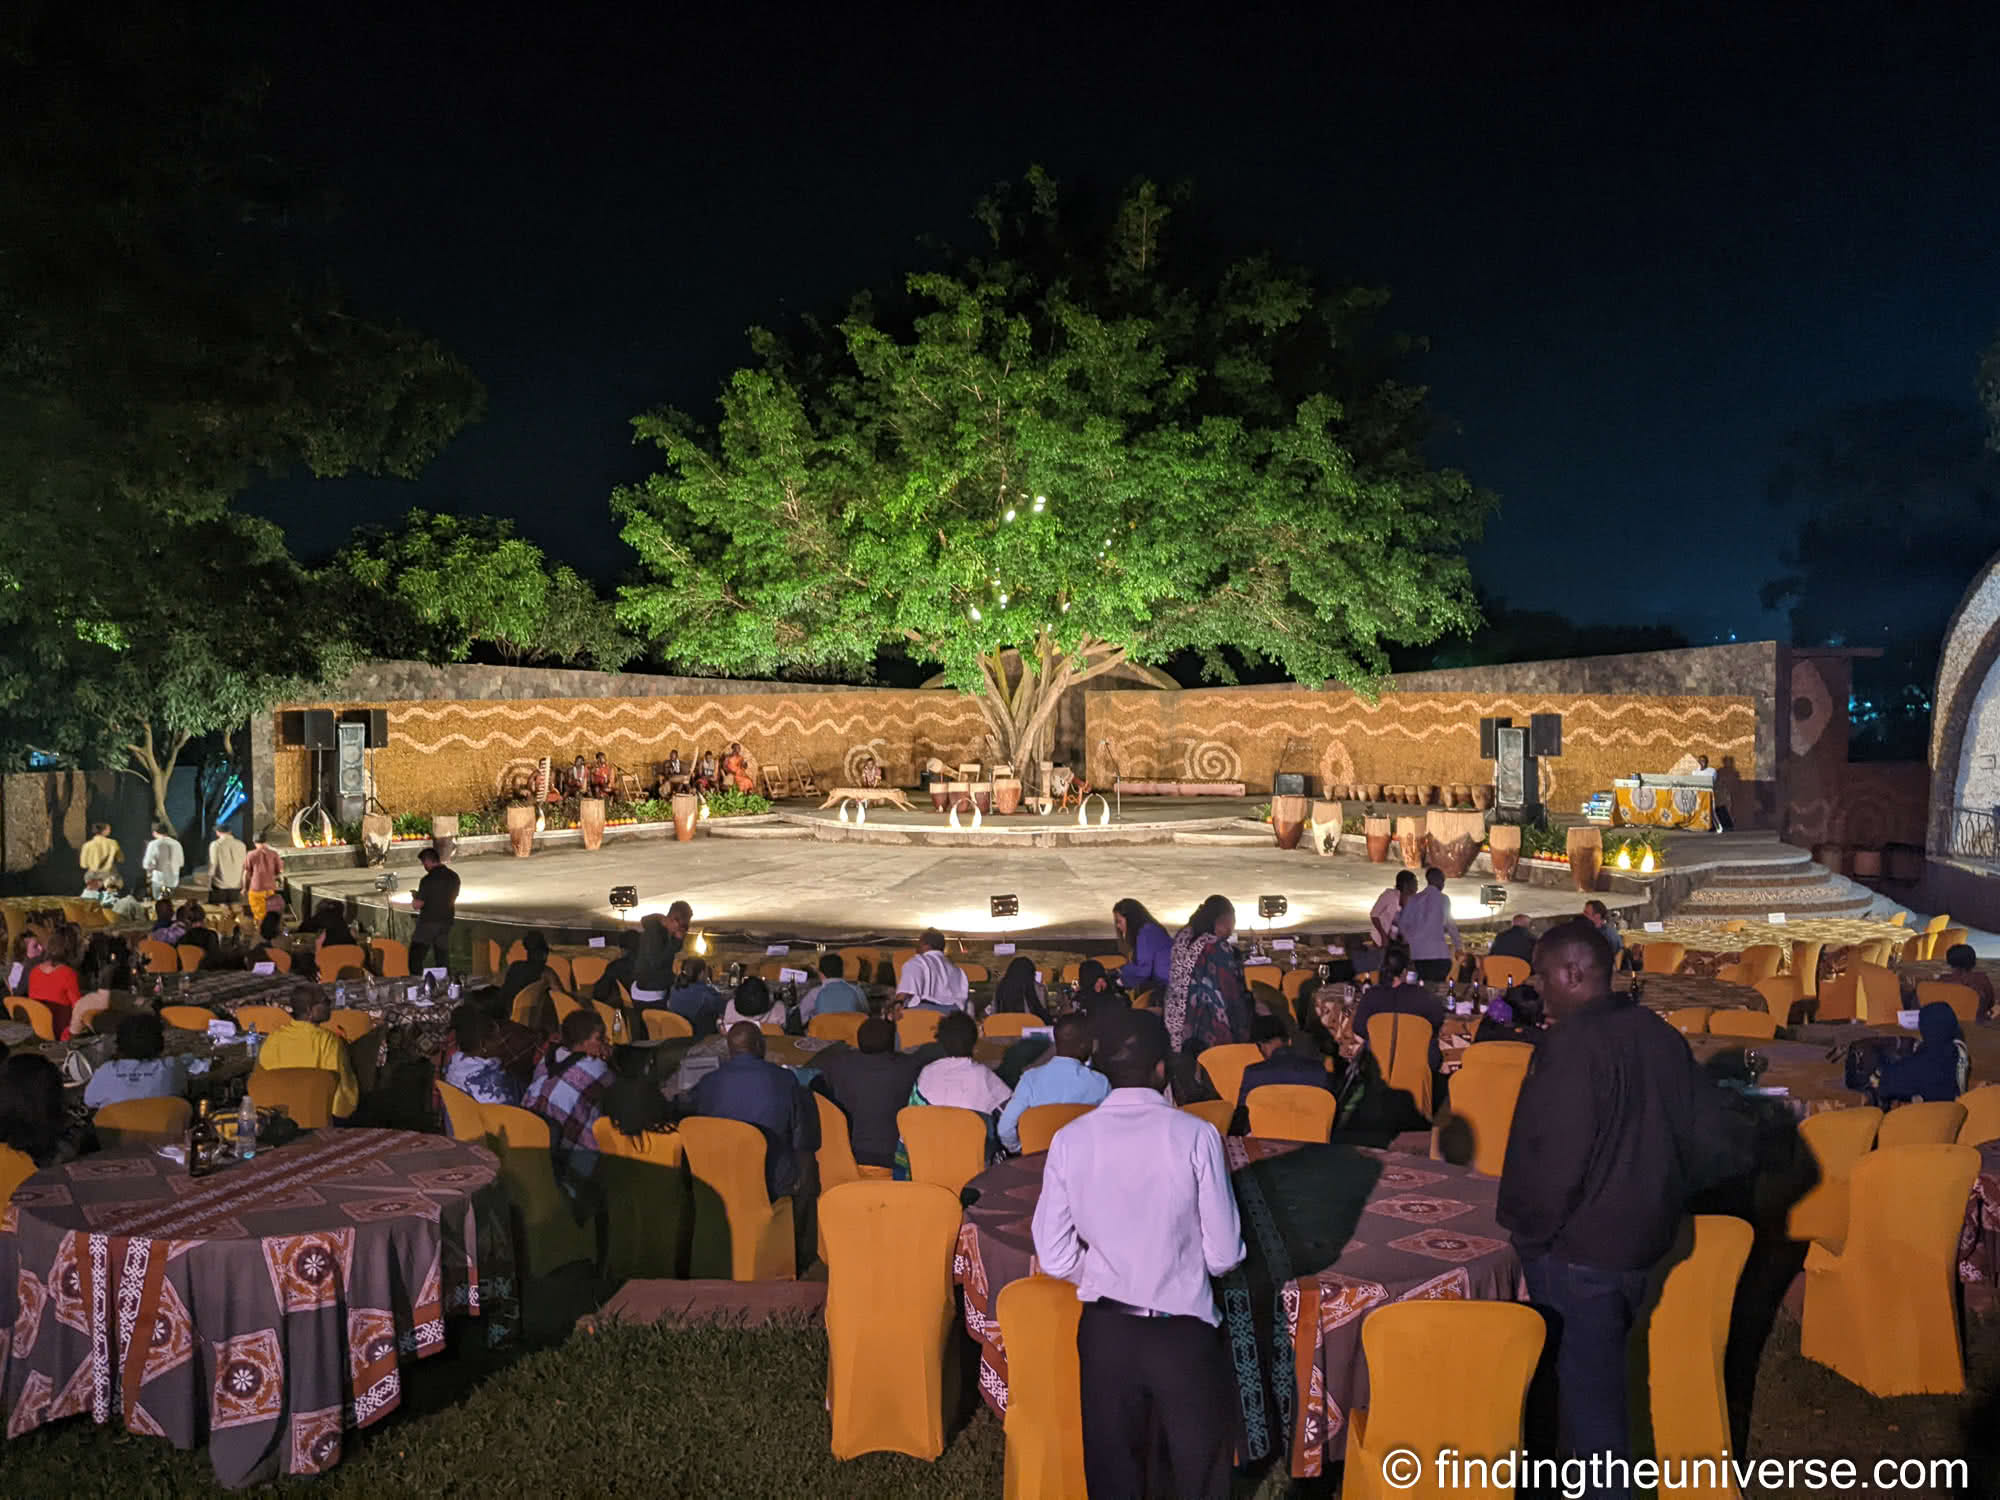
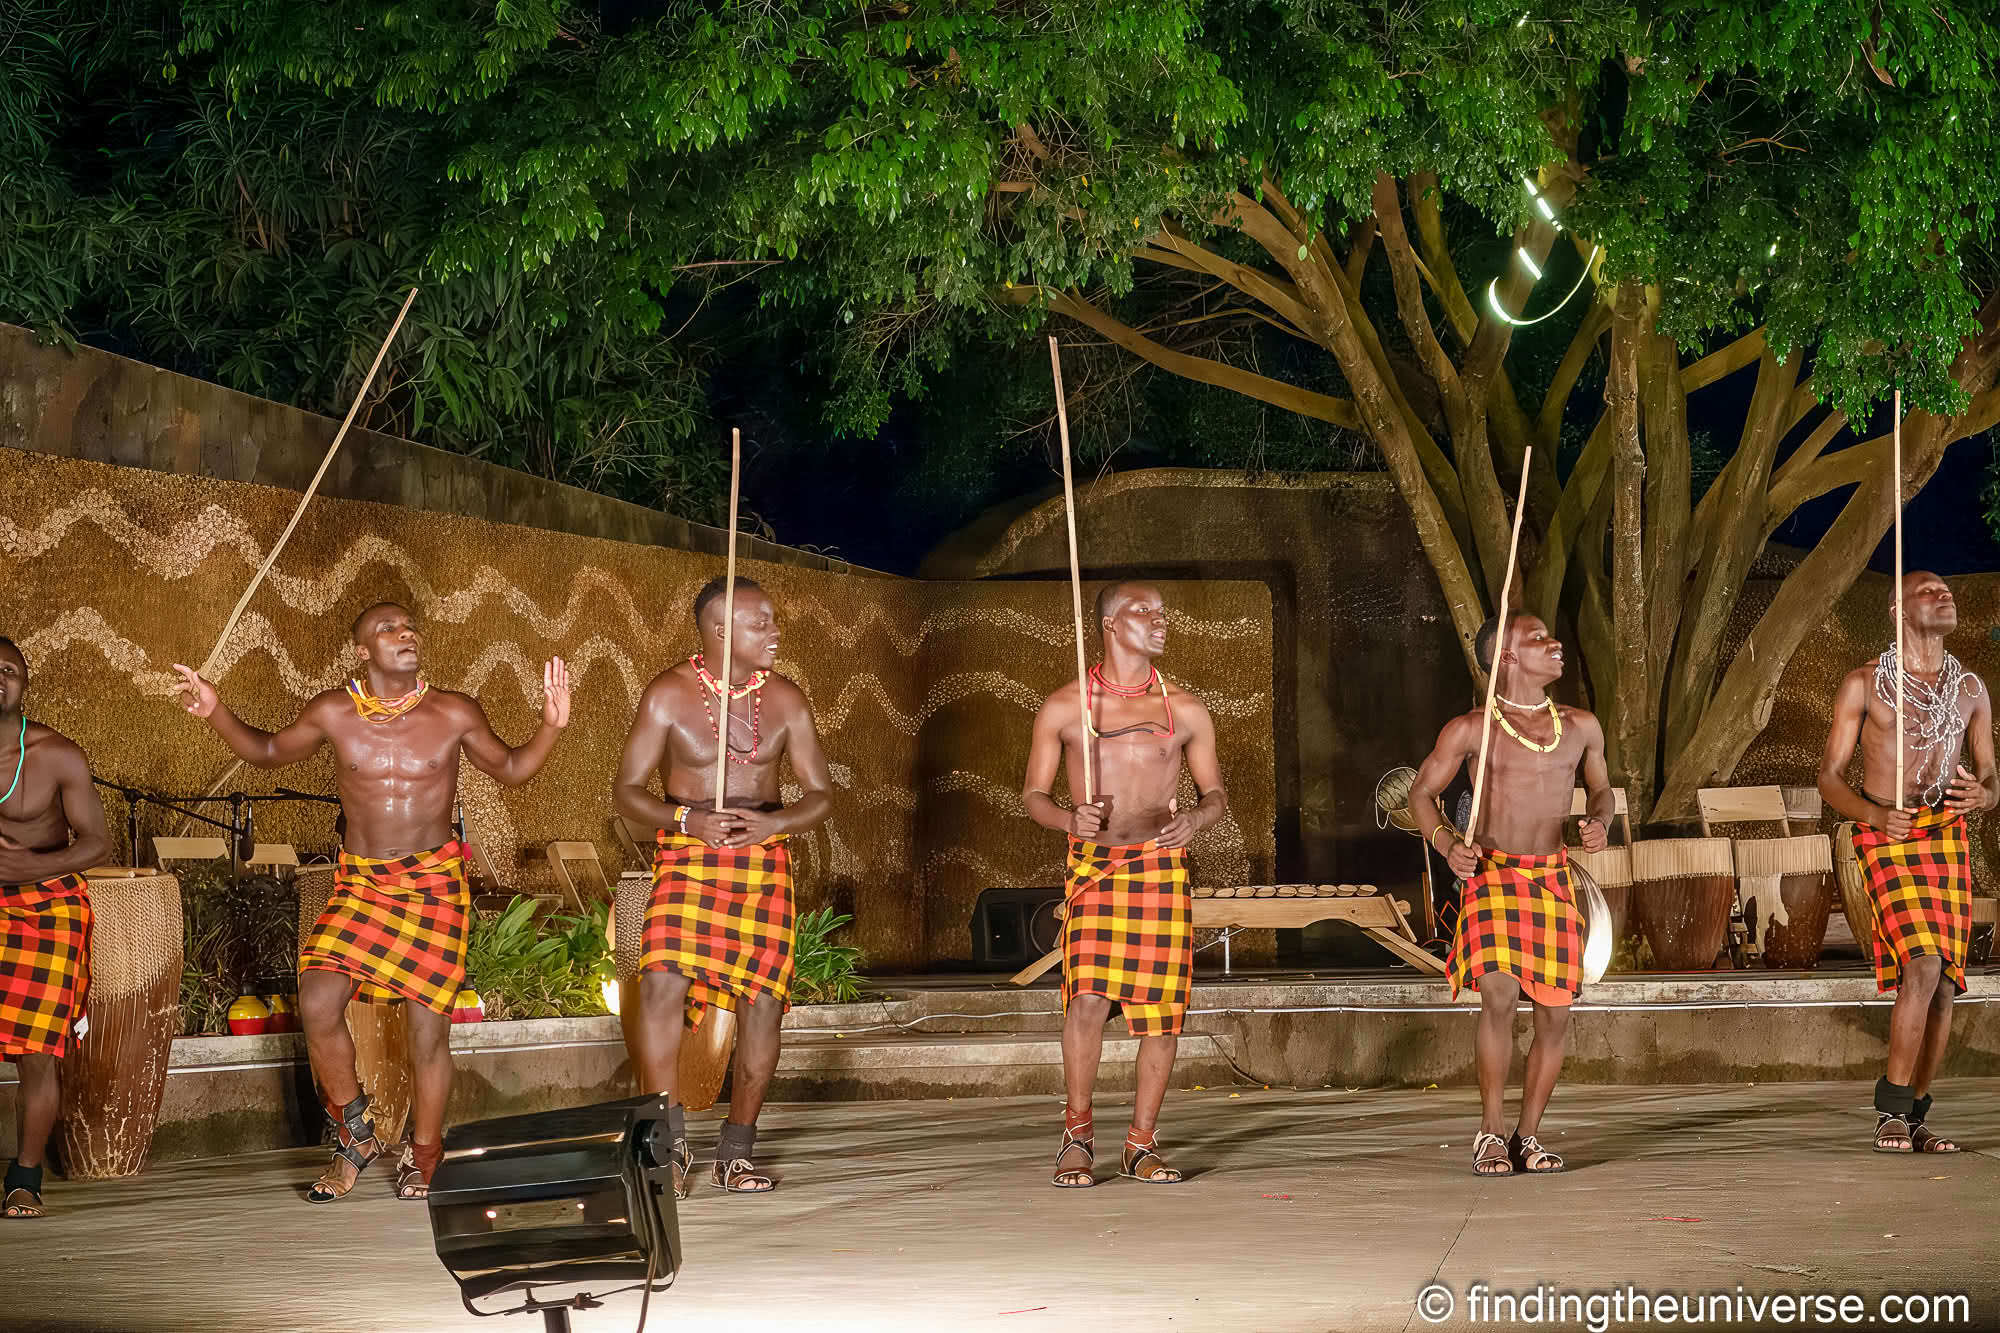
    We would recommend, if possible, planning your visit to Kampala so the evening co-incides with one of the cultural performances at the Ndere Cultural Center. These performances run a few times a week and were one of our highlights of our last visit to Kampala.

    The performance takes place outside under a huge mango tree, and showcases the best of Uganda culture across the various tribes who make up the land. An excellent compere introduces each performance to give you context and understanding of what you are seeing, and really helps bring the experience to the next level.

    It’s also possible to have dinner as part of the show for an extra fee, with a number of traditional dishes included. We can recommend doing this as it will give you a good opportunity to try some local food and not have to worry about finding dinner.

    We arrived a little early for our show so we could explore the grounds a little bit and look at the art on display. We then sat down to watch the show as the daylight faded into night, and really enjoyed the energy and enthusiasm of the performers.

    This was a really fun experience and one of our favourite things to do in Kampala. We can highly recommend it!

    Ndere Cultural Center by_ Ndere Cultural Center by_-2 Ndere Cultural Center performance by_


    Alternative 1 Day Kampala Itinerary Options

    If you’d like some more inspiration for spending a day in Kampala, we have some suggestions for you. We’ve put together some additional options themed around some specific categories like history, food, culture and so on.

    Feel free to mix and match across the attractions to come up with your own perfect 1-day itinerary. We’d suggest that planning to visit 3 or 4 attractions in a day would make sense for most visitors, although do note that activities located outside the city like the Mabamba Swamp tour or Entebbe Zoo are going to take up more time. You can also read our guide to things to do in Kampala for more ideas and information on all the sites we recommend.

    In terms of planning a day like this, you can either do everything yourself, or you can reach out to a tour operator who can put together a private custom tour based on your interests, such as this one. They should handle all your transportation and also ensure that your sightseeing goals are achievable in the time you have.

    History Itinerary

    Kampala has plenty to offer those who are interested in learning about the history of the city and Uganda in general. We’d suggest an itinerary that looks something like the following:

    • Morning: City tour such as this one
    • Afternoon: Uganda Museum, Kabaka’s Palace, and Kasubi Tombs

    It’s also possible to book a tour which includes these sights as well as a number of others, such as this full day tour.


    Food Focused Itinerary

    If you’d like to learn more about the food of Kampala, then you can put together a day which focuses on exploring local markets, learning about local foods and dishes, and eating some of the many traditional dishes of the city. A day might look as follows:


    Arts and Culture Itinerary

    There’s no shortage of art and cultural attractions to enjoy in Kampala. Here’s an idea for a day focused on exploring the artistic and cultural attractions in the city.


    Religious / Spiritual Itinerary

    Uganda has a rich spiritual life, with a number of religions being practiced in the country. These include Christianity and Islam, as well as Judaism, Hinduism, Baha’i, and traditional beliefs and practices.

    Over the years, and particularly with the arrival of colonists, religious practices shifted dramatically in Uganda. As is often the way, this was not a frictionless process, with a number of lives lost in the process. As a result, there are a great many sights of religious significance as well as places of worship across Kampala and the surrounding region. It might be challenging to fit everything into one day given how much there is to see, but an idea would be:

    • Morning: Uganda Martyrs Catholic Shrine Basilica, Baha’i House of Worship
    • Afternoon: Uganda National Mosque, Saint Paul’s Cathedral Namirembe, St. Mary’s Cathedral Rubaga

    The majority of these sights are visited as part of this religious tour of Kampala. This is a similar tour.

    If you are visiting Uganda as a Catholic pilgrim, the Uganda Martyrs Catholic Shrine and Basilica is probably a must-see. It is located a 30 minute drive outside of the city in Namugongo, but you can can take a taxi or join a tour to reach it.

    Also worth mentioning is the very interesting Shree Sanatan Dharma Mandal Hindi temple. It is located in central Kampala and is sometimes visited in city walking tours.

    And for those of you who are particularly interested in the story of how Christianity came to Uganda, a visit to the Kasingi landing site near Entebbe may also be of interest. Just note that it’s quite an effort to get here and is best if you have a driver and you may need to go through a security check as it is located near the airport.

    Uganda Martyrs Catholic Shrine Basilica by Laurence Norah


    Markets/ Shopping focused itinerary:

    Kampala has lots of good markets to explore, from markets which focus on arts and crafts through to more traditional food markets serving the needs of the local population. You could easily spend a day visiting the markets in Kampala, which might look as follows:

    • Morning: Owino Market, Nakasero Market
    • Afternoon: Bagala Craft Market / Exposure Africa / Nommo Gallery

    This full day walking tour of Kampala includes the majority of these markets, as well as a number of other attractions in the city. There is also a half-day tour which also covers the main markets in the city.

    If you are also heading to Entebbe, we would also recommend the Entebbe Juakali Centre (Entebbe Craft Market) and the little craft store within the Victoria Mall across the street for local crafts and souvenirs. There is also the Kitooro Market in Entebbe, a covered market that focuses more on produce, meat, and everyday items.


    Wildlife based itinerary

    Many people visiting Uganda are here for the incredible wildlife opportunities, with chimpanzee trekking and gorilla trekking being high on the list of things to do.

    Whilst those activities primarily take place as part of a longer multi-day safari, there are a number of other wildlife experiences that you can have in and around Kampala. Some of these experiences are a bit longer, so will take up most of the day.

    Here’s a suggested day, followed by some more ideas for wildlife focused activities around Kampala. Note that while you can do urban birding in Kampala, most other wildlife activities and attractions are located in or around Entebbe. But these are still easy to do as a day trip from Kampala.

    • Morning:  Mabamba Swamp tour like this or urban birding around Kampala
    • Afternoon: Entebbe Zoo, Botanical gardens in Entebbe

    Another option would be to visit the Ngamba Island chimpanzee sanctuary (tour like this). If you don’t have the time to do a trip out to the areas of Uganda where chimpanzee trekking is possible, then you can visit Ngamba island instead. This is on Lake Victoria and is home to a number of rescued chimpanzees.

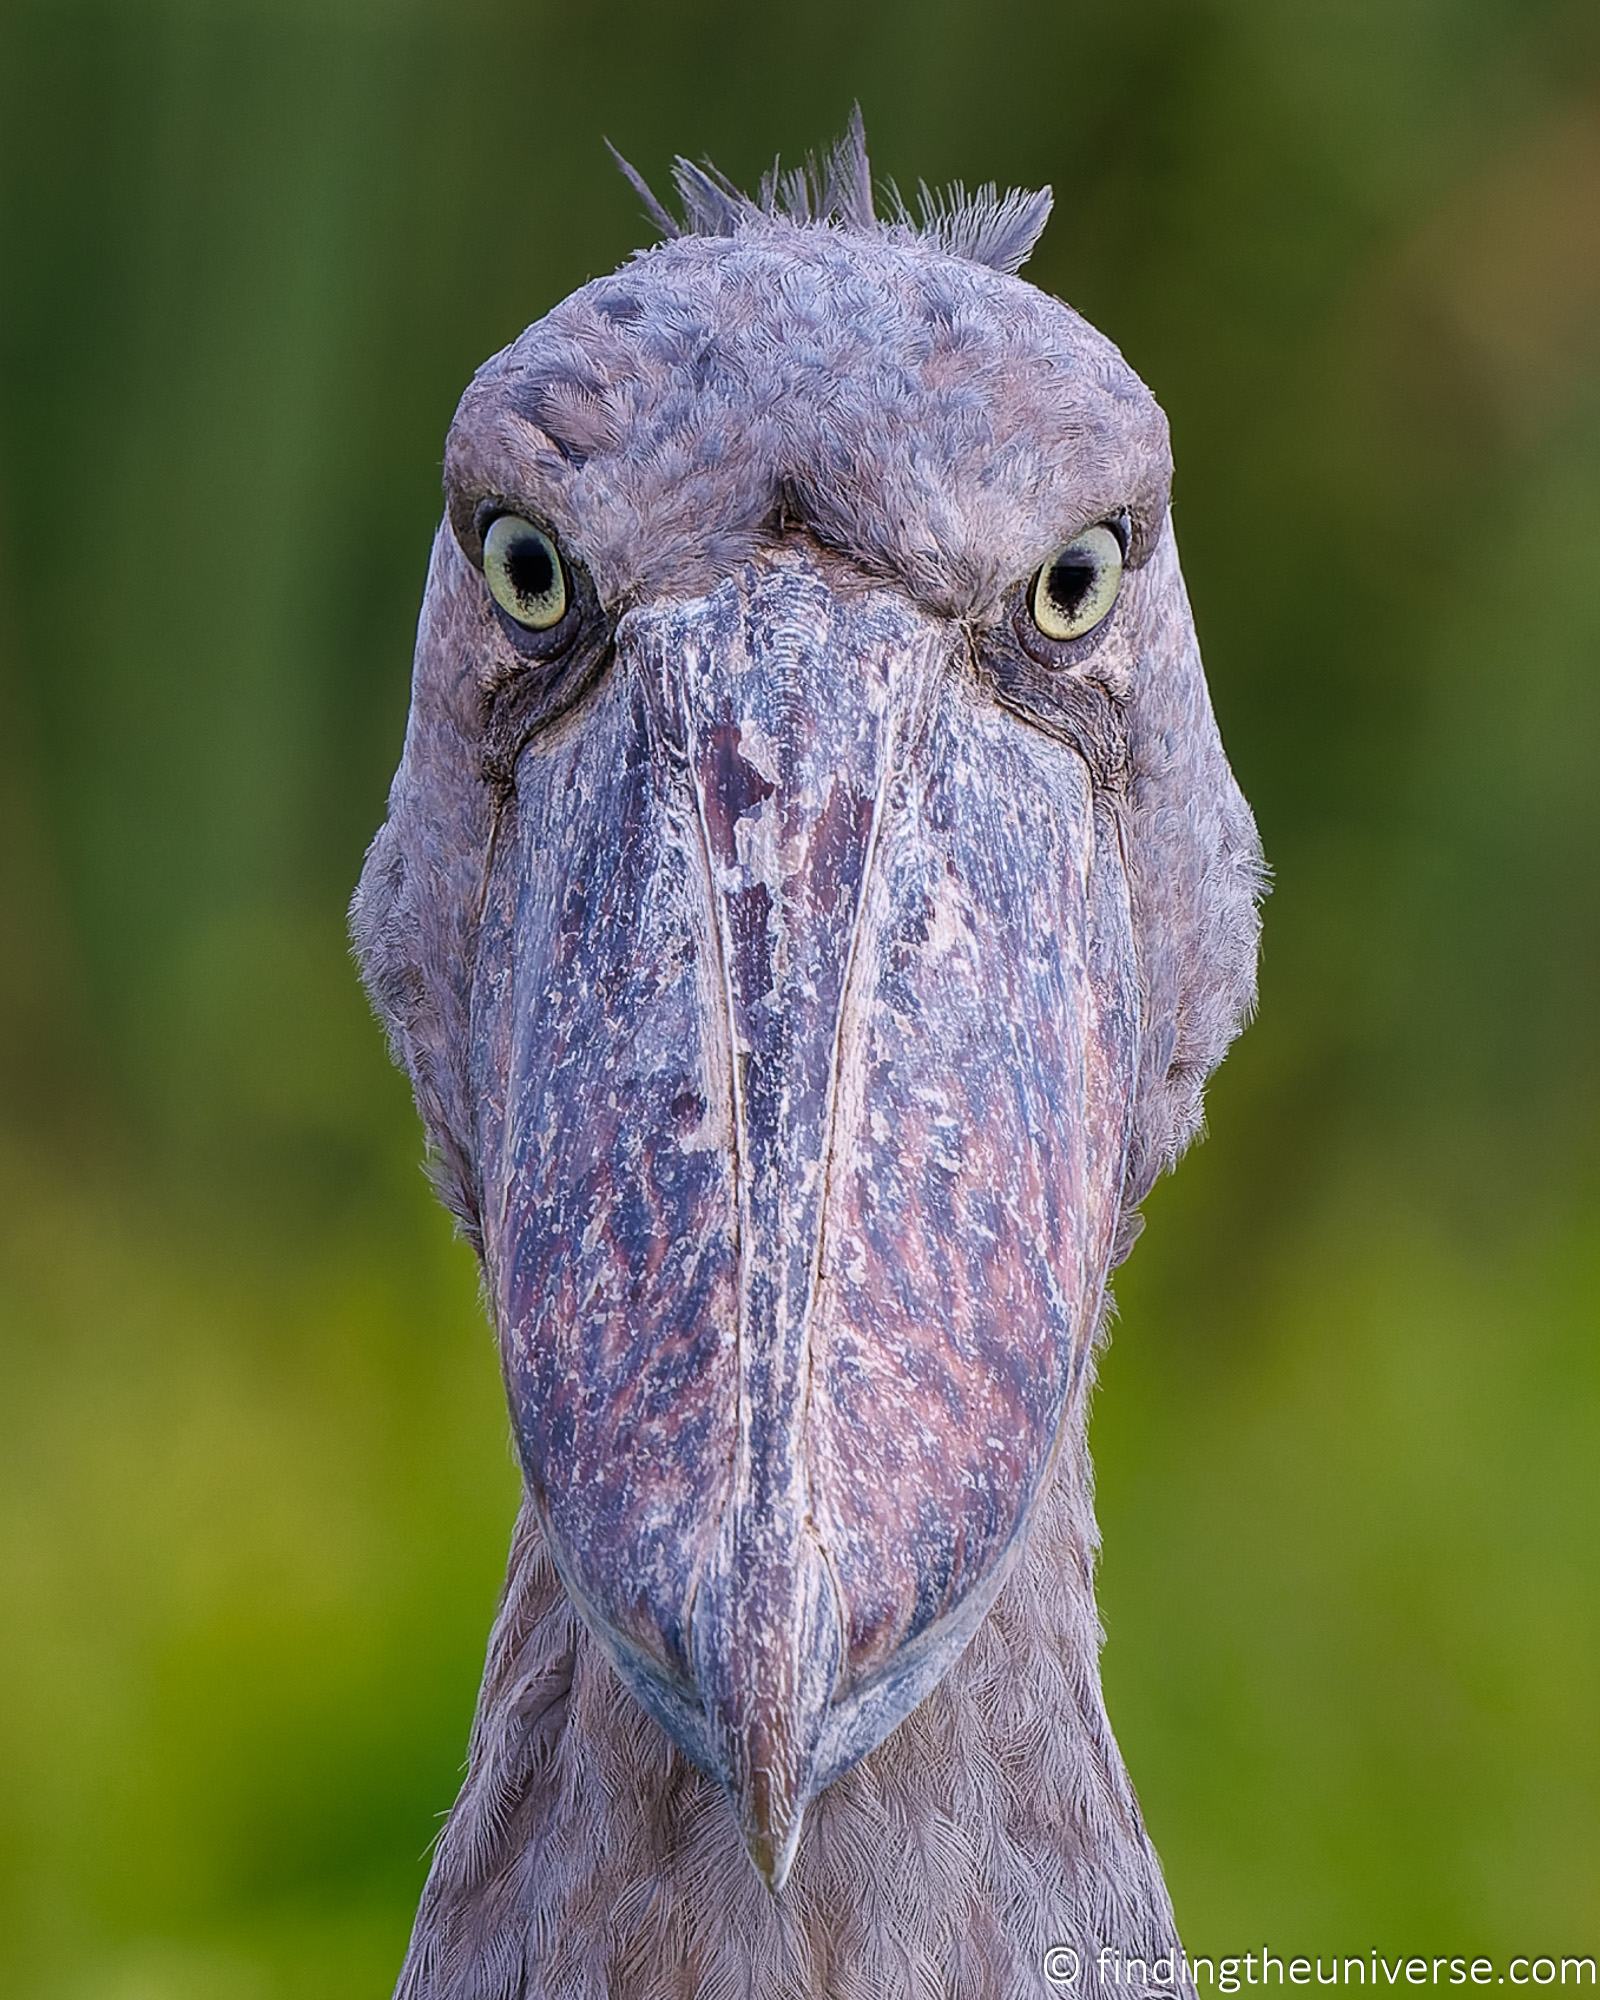
    If you enjoy birds, you can see lots of birds in Kampala without leaving the city, especially in the mornings. In fact there are over 300 species you could see in Kampala! We spotted a number on electric wires and poles, in our hotels’ gardens, at popular attractions (Kabaka’s Palace, Kasubi Tombs, Uganda Martyrs Shrine, Baha’i Temple) and around golf courses.

    So you will likely spot several bird species by just going to popular places if you keep your eyes open. But it can be tricky to do birdwatching in a large and congested city, so just be careful.

    Shoebill Stork


    Kampala Local Life Itinerary

    If you’d like to learn more about life in Kampala, then we’d recommend taking a tour or two with a Kampala local. They’ll be able to take you to places you probably wouldn’t have thought to go on your own, as well as share their insights on life in the city. You can choose a tour (or tours) that meet your interests. An example itinerary might look as follows:

    As you can see, there are myriad ways to fill a day (or more!) in Kampala.


    Booking your Day Tour in Kampala

    You have a few different options for getting around Kampala, including doing everything yourself using ride shares, taxis or buses. However, for a more seamless experience, we think most visitors are going to find it easier to arrange some sort of transport.

    We have done both, and having a driver for the day was definitely easier. If you are visiting Uganda as part of a longer trip where you have a tour company, then they will likely be able to include some time in Kampala as part of your trip. Just let them know where you want to go and what you want to see.

    Another option is just to hire a private driver for the day. They can worry about the traffic, parking, and the route, and you can enjoy yourself with sightseeing.

    Finally, you can book a tour that covers the sights you want to see. There are both private and group tours available. When comparing tours, always check what is and isn’t included. For example, some tours include entry fees, transport, food and water, whilst others may not. It’s also important to check any refund or cancellation policies before booking.

    When we travel, we nearly always book our tours in advance with either GetYourGuide or Viator which both offer a 24-hour cancellation policy for most tickets and tours. This means you can cancel a tour up to 24 hours before it starts and receive a full refund. This allows for flexibility if our travel plans unexpectedly change.

    Here are a number of tour options we suggest which will offer a good experience for your day in Kampala. Note that if a private tour doesn’t visit all the sights you want to see, you may be able to reach out to the operator for a custom itinerary.

    • This private custom tour guide service will allow you to specify exactly what you want to do and see with your day in Kampala.
    • This full day private tour with transport includes Kabaka’s Palace, National Mosque, a sit-down lunch, the Kasubi Tombs, Bagala Craft Market and Bahá’i Temple. Admission fees and lunch are included.
    • This full day private tour includes Bagala Craft Market, Baha’i temple, National Mosque, Kasubi tombs, Kabala’s Palace, Basilica of the Uganda Martrys and a sit-down meal. Lunch and admission fees are included.
    • This full day private tour includes a visit to Kabaka’s Palace, the Kasubi Tombs, Uganda National Mosque, the Baha’i Temple, and the Namugongo Martyr’s Museum. It includes admission fees and lunch.
    • This full day group tour includes Kabaka’s Palace, the Uganda National Mosque, Nakasero market, the Uganda Museum, and an arts and crafts market. Admission fees are included but not food.
    • We’ve found two full day tours, this one and this one, which focus more on the religious sites in and around Kampala, including the Uganda Martyrs Catholic Shrine, the major cathedrals in the city, the Uganda National Mosque and the Baha’i temple.
    • There are also shorter tours of Kampala, including this half day food tour, and this half-day walking tour. We have done both these tours, and they would be a good option for the first half of your day if you are following our itinerary.

    As you can see there are lots of tour options for your time in Kampala!

    Kampala Walking Tour by Laurence Norah


    Further Reading

    That sums up our guide to spending a day in Kampala. We hope you found it useful! Before you head off, we wanted to share some links to other content we think you might find useful in planning your trip to Uganda and the wider region.

    And that’s it! As always, we hope you found this guide useful. If you have any questions or comments, just pop them in the comments section below and we’ll get back to you as soon as we can.

    Guide to spending a day in Kampala


    Source link

  • Beyond Fukuoka: Sample 5-Day Itinerary using JR Kyushu Rail Pass

    Beyond Fukuoka: Sample 5-Day Itinerary using JR Kyushu Rail Pass


    Fukuoka might be the face of Kyushu for many travelers, but here’s the thing: it’s just one city in a region that spans over 36,000 square kilometers and includes seven distinct prefectures. That’s a lot of ground—and a lot of culture, cuisine, and jaw-dropping scenery—to pack into a single island. To treat Kyushu as “just Fukuoka” is like watching the trailer and skipping the movie or ordering just the appetizer when there is an entire feast for the taking.

    Fukuoka City is a fantastic starting point, no doubt. It’s lively, accessible, and loaded with good food. I mean, it’s hard to disagree when you have your face full of tonkotsu ramen. But zoom out on the map, and you’ll see how small a dot it is compared to everything else around it.

    Kyushu is one of Japan’s four main islands, yet it often flies under the radar. It doesn’t boast the constant buzz of Tokyo or the flashy charm of Kyoto. But that’s exactly where its appeal lies. Here, diversity comes naturally. The geography alone is wild in the best way: active volcanoes, steaming hot springs, subtropical coastlines, and lush mountain ranges that shift dramatically as you move from one prefecture to the next. This underrated region has all the right ingredients to be a tourism powerhouse, so plan a visit as soon as you can because it’s only a matter of time before it becomes crazy popular.

    The best part: you can visit all seven prefectures conveniently, thanks to its impressive railway system and a cost-efficient pass: the JR Kyushu Rail Pass.


    WHAT’S COVERED IN THIS GUIDE?

    BEFORE THE TRIP

    If you plan on traveling to multiple destinations throughout Kyushu, make sure to purchase a JR Kyushu Rail Pass before flying to Japan. This pass comes in 3 main types:

    • Northern Kyushu: 3 days, 5 days
    • Southern Kyushu: 3 days only
    • All Kyushu: 3 days, 5 days, 7 days

    If you want to go as far as Miyazaki and Kagoshima, then the All Kyushu variant is for you. This pass will grant you access to local trains, limited express trains, Kyushu Shinkansen (Hakata – Kagoshima-chuo) and Nishi Kyushu Shinkansen (Takeo-onsen – Nagasaki). For more information about these passes, check out this page!

    Upon arrival, exchange your online voucher with the actual pass. The most convenient place to do this is the JR Kyushu Rail Pass Exchange Counter at Fukuoka Airport. It’s easy to find. Upon emerging in the Arrival Hall from the baggage carousel area, turn left. You’ll see a lane of counters, but the one you need is at the very end.

    The counter is open from 9:00 AM to 5:00 PM. If your arrival time is outside these operating hours, you can claim your pass at Hakata Station instead.

    JR Kyushu Rail Pass

    But is it really possible to visit all seven Kyushu prefectures in five days using this pass? Yes, of course. How do we know? We’ve just done it very recently. And in this article, we’re going to show you exactly how.


    DAY 0: ARRIVAL IN FUKUOKA

    If you’re coming from the Philippines, the most budget-friendly flights are offered by Cebu Pacific, which flies directly from Manila to Fukuoka daily. CEB uses a brand new A321neo for their Manila-Fukuoka flights, and our most recent journey with them has been delightful.

    Cebu Pacific Fukuoka

    When booking with Cebu Pacific, you’ll be presented with three options: GoBasic, GoEasy, and GoFlexi. Both GoEasy and GoFlexi come with seat selection and check-in baggage allowance. But if you think there’s a chance your plans could still change, go with GoFlexi so you could easily cancel your flight, convert it to Travel Fund, and book another flight in the future.

    We’ve been flying with Cebu Pacific to Fukuoka for years now, and it’s always a great experience. But it’s only on our most recent trip that we got to try their new in-flight meals. But their beef adobo and chicken char siu really impressed us and are perfect for the Pinoy palate. Book with Cebu Pacific here!

    The flight arrives in Fukuoka at 7:00 PM. You can take the bus or the cab to your hotel and check in. Then spend the night enjoying exactly what this city is known for: FOOD! Fukuoka is where Japan’s obsession with tonkotsu ramen began. This is the home of rich pork-bone broth, served steaming hot and slurp-worthy. But what really sets the city apart is its rare street food culture. While most of Japan leans toward sit-down dining, Fukuoka keeps things casual and lively with its iconic yatai —- open-air food stalls that pop up after sundown. Locals flock to them for after-work bites, cold drinks, and easy banter.

    Fukuoka Yatai Stall

    Fukuoka Mentaiko Omelette and Shin Shin Ramen

    Or if you want something less cozy, you can try other ramen spots in the city like Shin Shin, Hakata Issou Honten, and Canal City’s Ramen Stadium.

    Call it a night because you’re gonna be starting your day early tomorrow.

    Where to Stay: THE BLOSSOM HAKATA Premier is a stylish hotel situated between the JR Hakata Station (just a 7-minute walk from the station!) and Nakasu River, which makes it a good base to explore the city. It features 238 rooms designed with traditional Hakata textiles and modern comforts.

    THE BLOSSOM HAKATA Premier Hotel Fukuoka

    The attention to detail here is very thoughtful. We particularly liked its Japanese-style bathtub using Towada stone (*only on selected floors), a rare volcanic ash rock found exclusively in Mount Yakushi-mori in Akita Prefecture. It gave us a feeling that we are in an onsen, even though we’re just in our hotel room! And since we stayed in a HAKATA Premium King Room, we also enjoyed the mist shower which had a relaxing effect.

    THE BLOSSOM HAKATA Premier Hotel

    THE BLOSSOM HAKATA Premier Hotel Onsen
    Images courtesy of JR Kyushu Hotels & Resorts

    Guests can also indulge at its restaurant serving Kyushu-inspired dishes made from local ingredients and complimentary men’s and women’s baths including sauna with Fukuoka cultural themes and a fitness room, too.


    DAY 1: OITA

    Today, our first destination is Yufuin Onsen in neighboring Oita Prefecture. But before you get too excited about where you’re going, you should also consider how you’re getting there. In style, preferably.

    Yufuin No Mori

    Yufuin no Mori Train from Fukuoka

    You see, JR Kyushu has some of the most beautiful trains in Japan, and one of them is Yufuin No Mori, a special forest-themed nostalgia-filled train that can take you to Yufuin. It connects Hakata Station to Yufuin and Beppu in Oita. Since its debut in 1989, this train has attracted countless travelers with its elegant design and immersive travel experience. Even I gets fascinated by it because it makes me feel like I’m in a steampunk anime when I’m on it.

    Yufuin no Mori Train

    Inside, it has a warm wooden motif, creating a natural and inviting atmosphere. It is also equipped with window-facing seats for optimal sightseeing. We also got to try the snacks sold in the buffet car, which sells regional specialties, including bento boxes crafted by local chefs, Yufuin’s renowned sweets, and desserts like kabosu ice cream. Kabosu is a type of citrus fruit (similar to calamansi but less sour). We totally became obsessed with their kabosu sorbet!

    Yufuin Onsen

    Yufuin Onsen

    From Yufuin Station, travel on foot to Yu No Tsubo, Yufuin’s main street, lined with cozy cafés, playful attractions, and boutique shops selling everything from handmade sweets to whimsical souvenirs. It’s the kind of place where you can wander without a plan—and still end up with a full camera roll and a bag of local treats. Some standout stops include Yufuin Floral Village, a themed attraction inspired by European countryside charm. There’s even a corner styled after Heidi in the Alps.

    Yufuin Floral Village

    Another worthy stop is the Yufuin Showa Museum is a retro-themed attraction that recreates life in Japan during the Showa era (1926–1989), especially the 1950s and ’60s. It features over 20 evocative exhibits, including old-school classrooms, candy shops, and vintage electronics, that visitors can interact with, making it a fun, immersive throwback experience.

    Follow the signs and eventually, you’ll reach Lake Kinrin, a small, tranquil pond often veiled in mist, formed where hot and cold springs meet. Its still, glassy surface reflects the surrounding landscape like a painting, occasionally rippling as golden-hued fish glide just beneath. It’s this glowing illusion at sunset that earned the lake its name: Kinrin, meaning “golden scale.”

    Yufuin Lake Kinrin

    This was our second time visiting. The first time was in autumn, and it was magical. Trees are clad in shades of crimson and amber. Be sure to pause on one of the charming pedestrian bridges nearby—it’s the perfect spot to take in the view (and snap a few photos you’ll definitely want to post).

    After this, walk back to Yufuin Station and catch another train (Yufu Limited Express, in our case) to one of Japan’s most iconic hot spring destinations – Beppu.

    Beppu

    Beppu is famous for offering just about every kind of onsen experience you can imagine. But its most unique attraction? The Hells of Beppu, a collection of hot springs that are meant for viewing, not bathing.

    Beppu Hells

    In Japan, these dramatic geothermal spots are called jigoku, or “hells,” not because they’re scary, but because of the boiling waters, rising steam, and otherworldly colors that give them an intense, almost supernatural vibe. There are several of these “hells” scattered mainly across the Kannawa and Shibaseki districts. You can visit them on a self-guided tour or join a sightseeing group to hit all the highlights in one go.

    And while you’re exploring, don’t miss out on the local specialty: jigokumushi, or “hell-steamed” dishes! The pudding is a fan favorite—soft, sweet, and cooked by the natural steam from the hot springs.

    Hell Steamed Pudding

    But if you’d rather relax, go to Takegawara Onsen instead. Established in 1879, it is renowned for its distinctive karahafu (curved gable) roof, added during a 1938 renovation.

    Takegawara Onsen Beppu

    But more than the architecture, people come here to experience unique bathing experiences. You can choose between a traditional hot spring bath and the rare sand bath (sunayu). In the sand bath, guests don a yukata and are gently buried up to the neck in naturally heated sand, promoting relaxation and detoxification.

    You can spend the night here in Beppu if you so wish, but you can also proceed to Oita City so it’ll be easier for you the next morning.

    Where to Stay: JR Kyushu Hotel Blossom Oita offers an excellent stay right next to JR Oita Station, which is just a minute walk from the ticket gates. All rooms are on the 9th floor or higher, enabling a view not just of Oita City but also the mountains and Beppu Bay on the horizon! It’s especially gorgeous at sunset!

    JR Kyushu Hotel Blossom Oita

    Design-wise, it blends modern comfort with Japanese styles using wood, fostering a warm, homey ambiance. But one of the highlights is the rooftop hot spring, City Spa Tenku, where guests can enjoy even more stellar panoramic views of the city. You’ll also find an open-air onsen, a full-fledged sauna, and a healing spa (bedrock bath), which you can experience for an additional fee. All these will give you luxurious rejuvenating and healing time, especially after a full day of sightseeing.

    Image courtesy of JR Kyushu Hotels & Resorts

    Image courtesy of JR Kyushu Hotels & Resorts

    Dining at the on-site restaurant features seasonal Japanese cuisine with a tranquil vista of a peaceful garden. Its convenient location makes it an excellent base for exploring Oita and the surrounding areas.

    JR Kyushu Hotel Blossom Oita Amenities

    Guests holding a JR Kyushu Rail Pass can enjoy special preferred rates at the hotel. To avail of this benefit, reservations must be made by phone, and the pass must be presented at check-in. Please note that these special rates are subject to availability and may vary depending on the date.


    DAY 2: MIYAZAKI

    At Oita Station, we boarded the Limited Express Sonic 3 train to Nobeoka Station in Miyazaki Prefecture. Travel time was roughly two hours. Then we took the bus to Takachiho Bus Center, where we caught another bus to Iwato Bus Stop, which is just beside our first destination for the day.

    Amano Iwato Shrine & Amano Yasukawara

    Miyazaki Prefecture is one of Kyushu’s underrated gems — a place where dramatic coastlines, lush mountains, and deep-rooted mythology all come together. And it is most evident at Amano Iwato Shrine, dedicated to that very cave where Amaterasu is said to have hidden called Amano Yasukawara.

    Amano Yasukawara Miyazaki

    The shrine complex is tucked away in a serene forest by the river, maintaining a mysterious and sacred atmosphere. To get here, you’ll be climbing down a gorge and crossing the river on a short but incredibly picturesque arch bridge.

    The shrine is often visited during the early morning or late afternoon when the light filters through the trees, creating an almost otherworldly ambiance. It also hosts seasonal festivals celebrating the myths and legends tied to Amaterasu.

    Keep an eye on your watch while you’re here as you’ll need to catch the next bus back to Takachiho Bus Stop. From here, you can walk or take a cab to our lunch stop.

    Chiho no Ie

    Chiho no Ie
    Image courtesy of Chiho no Ie

    Chiho no Ie is a historic restaurant located at the entrance to Takachiho Gorge. Established in 1955, it is renowned as the birthplace of nagashi somen, a unique dining experience where diners catch thin somen noodles as they flow down a bamboo chute filled with cold spring water. This method was inspired by the traditional practice of cooling boiled noodles in the fresh waters of nearby Tamatare Falls. You then dip the noodles in a flavorful shiitake mushroom-based broth.

    Chiho no Ie Somen Noodles
    Image courtesy of Chiho no Ie

    It’s a fun way to eat delicious noodles. But don’t worry, anything you fail to catch is collected in a strainer bowl at the end of the bamboo. You can still eat that so nothing really goes to waste.

    Once you’re full and happy, it’s time for the main event.

    Takachiho Gorge

    Takachiho Gorge

    A visit to Takachiho Gorge is like stepping into a living painting. This narrow, 7-kilometer volcanic canyon was carved out by the Gokase River cutting through layers of basalt rock, creating dramatic cliffs that soar 80 meters high on either side. The gorge’s signature feature is the stunning Manai Falls, a 17-meter cascade that spills down into emerald-green waters below.

    You can take in the vista from various lookout points along the cliffside or on the bridge straddling the gorge. But you can also go closer by is by renting a rowboat and paddling along the calm river, letting you get up close to the basalt cliffs and waterfalls. It’s an experience both peaceful and awe-inspiring.

    Takachiho Gorge Miyazaki

    It is recommended that you reserve online prior to your visit to guarantee a slot. While there are same-day tickets available, according to the staff that we talked to, often these tickets sell out as early as 10 or 11AM.

    Once done, make your way back to Takachiho Bus Center. If you still have the energy, you can travel on foot, but be aware that it’ll be mostly uphill. You can also hail a taxi, as an alternative.

    At Takachiho Bus Center, you can catch a bus to Takamori Station, where you’ll transfer to Minami Aso Railway to Tateno Station. Then, you’ll be switching trains again to Aso Station. Spend the night at a hotel in this area. And oh, by the way, you’re now in Kumamoto Prefecture.

    Tateno Station

    Where to Stay: Fairfield by Marriott Kumamoto Aso offers modern accommodations just right in front of Aso Station, a convenient base for exploring the natural beauty of the region including Mount Aso, Daikanbo, and Kusasenri.

    Fairfield by Marriott Kumamoto Aso

    Fairfield by Marriott Kumamoto Aso Hotel

    The hotel features 93 well-appointed rooms, each equipped with Simmons beds, rain showers, free Wi-Fi, and essential amenities such as mini-fridges and electric kettles. While there is no on-site restaurant, guests can enjoy complimentary coffee and tea in the 24-hour lobby lounge, which also offers a microwave, toaster oven, and vending machines. A reservation-only breakfast box featuring local ingredients is available. And it’s also within walking distance to several izakaya and convenience stores.

    With its blend of comfort, convenience, and access to local attractions, Fairfield by Marriott Kumamoto Aso is an excellent choice for visitors to the area.


    DAY 3: KUMAMOTO & KAGOSHIMA

    Rise and shine early because we’ll be taking on two main destinations today, starting with Kusasenri in Kumamoto Prefecture.

    Kusasenri

    Kusasenri

    Kusasenri is a sweeping grassland plateau located on the slopes of Mount Aso in Kumamoto Prefecture. It’s part of the larger Aso Kuju National Park, which surrounds one of the world’s largest active volcanic calderas – the Aso Caldera. The plateau sits right near Mount Nakadake, an active volcano. From Kusasenri, you get a perfect view of the smoking crater (when access isn’t restricted due to volcanic activity), creating a striking contrast between lush nature and raw geological power. There’s also a museum, café, and observatory nearby.

    Mt Aso Caldera Kumamoto

    Mt Aso Volcano

    The Aso Caldera looks vibrantly verdant in spring and summer as grass covers the ground, providing sustenance to the prized akaushi (literally meaning “red cow” in Japanese), a specific breed of Japanese Brown cattle, sought-after for its high-quality beef with balanced marbling. It’s one of the four main Wagyu breeds in Japan, alongside the more famous Kuroge Washu (Japanese Black).

    Akaushi Red Cow Mt Aso

    In autumn, the area turns golden-brown. I’ve seen them both now, and both sights are breathtaking for me. Last time, we were at Daikanbo on the opposite side of the ridge.

    Aso Boy!

    Aso Boy Limited Express Train

    The Limited Express Aso Boy! is a quirky and fun sightseeing train connecting Kumamoto and Miyaji via the scenic landscapes of Mount Aso. Designed with families in mind, it offers a unique travel experience that combines comfort, entertainment, and breathtaking views. It’s very child-friendly.

    Car 3 has parent-child seating arrangement (next to each other). There’s also a play area for kiddos and a mini-library. The café on board was named after its mascot, which is a black dog named Kuro.

    Aso Boy Train Interior

    Both ends of the train feature large windows, providing passengers with expansive views of the surrounding landscapes. This was our second time taking this train, but this time we were lucky we got to have the front row seats. And oh, good food, too, especially the akaushi beef bento.

    Aso Boy Akaushi Bento Box Lunch

    After terminating at Kumamoto Station, switch to a shinkansen (bullet train) bound for Kagoshima Chuo Station. Yes, bullet trains are also operated by JR Kyushu. And yes, we’re now heading to Kagoshima Prefecture.

    Sengan-en

    At Kagoshima Chuo Station, transfer to a local train on the JR Nippo Main Line going to the newly inaugurated Sengan-en Station, opened only in March 2025. As soon as we hopped off, our attention was stolen by its magnificent, towering neighbor – Mt. Sakurajima. Yes, right on the platform, we could already gawk in awe at the view of one of Japan’s most active volcanoes, as well as Kinko Bay. In fact, it had just erupted on the day before we arrived and on the day of our visit, the volcano was still spewing ashes, demonstrating the grandeur and power of nature.

    Sengan-en Sakurajima View
    Image courtesy of Sengan-en

    Across the street, just a short walk away, lies Sengan-en, a celebrated and historic seaside garden and villa complex built in 1658 by Shimadzu Mitsuhisa, a powerful daimyo and the 19th head of the Shimadzu family, who reigned over part of Kyushu for around 700 years. Covering some 50,000 square meters, it features ponds, bamboo groves, shrines, and pathways that artfully incorporate the majestic Sakurajima as natural backdrop.

    At the heart of the garden lies the House(Iso Residence), originally constructed in 1658 blending Japanese and Chinese culture. Inside, visitors can explore preserved rooms that once hosted dignitaries, including royalty and diplomats, reflecting the clan’s wealth and cultural connections. We particularly liked sitting by the mansion’s tsubo-niwa, the traditional courtyard, just admiring its little pond. And from many of its porches, we also got a good look at the Sakurajima dominating the view.

    Sengan-en Iso Residence

    The residence isn’t the only building worthy of a visit here. Within the complex is the Kagoshima World Cultural Heritage Orientation Centre narrating the history of the site including that of the nearby ruins of cannon factory. It played such a big role in Japan’s shipbuilding, iron casting and the Meiji industrial revolution as a whole, that it was inscribed as a UNESCO World Heritage Site. A faithful model of one of the factories at its peak is showcased inside, and from here, you can also see the actual site outside.

    Sengan-en House and Museum

    If you want to learn more about the history here, we recommend you visit the History Museum Shoko Shuseikan, which is located next to Sengan-en.

    But the highlight of our visit was our first attempt at kyūdō (traditional archery)! Yes, here at Sengan-en, you can learn the basics at a guided session. For every session, you will be handed five arrows, and your goal is to hit the target at the other end of the room. It’s similar to the archery we are more familiar with, but a bit more challenging. The key difference is the stance. Instead of standing, you’re on your knees with your body slightly twisted to face the target. It took some getting used to, but we were able to hit the target with our first few arrows, so yay!!!

    Sengan-en Archery

    After stretching our arm and shoulder muscles Legolas-style, head back to Kagoshima Chuo Station. Here, make a decision on where to spend the rest of the day and night. Here are some of our recommendations:

    • Kagoshima City is worth exploring. Since you’re already here, might as well get to know the city better. The bustling Tenmonkan district comes alive after dark, featuring a variety of izakayas, themed bars, and karaoke lounges. For a more relaxed evening, you can enjoy panoramic views of the city and the active Sakurajima volcano from the Shiroyama Observatory, or take a ride on the illuminated Amuran Ferris Wheel atop Amu Plaza Kagoshima, offering a romantic perspective of the city lights.
    • Kumamoto City is also along the way to your next destination, which makes it an ideal stop. Explore the vibrant Shimotori and Kamitori arcades, where lively izakayas, karaoke bars, and jazz lounges create a bustling atmosphere. For a more relaxed evening, enjoy riverside strolls along Shirakawa River, attend seasonal events like the Shirakawa Night Market, or savor local delicacies like the garlic-loaded Kumamoto ramen.

    You can even turn around and head back all the way to Fukuoka City, if you so please.


    DAY 4: NAGASAKI

    Our Day 4 is all about Nagasaki, one of my favorite cities in Kyushu (and Japan as a whole). It’s unique, certainly different from any other Japanese city mainly because of its complicated history. It’s the only city that remained open to foreigners when the country was in isolation. Western and Chinese influences seeped deep into its heritage in the most unexpected and poignant ways. We’ve also learned about it in Grade School as a city devastated by an unimaginable wartime tragedy.

    But today, Nagasaki is a place of quiet beauty and cultural depth, with charming European-style architecture, peaceful churches, and a reflective spirit that lingers in its museums and memorials. For Filipinos, especially Catholics, you’ll find a stronger connection here than any other city in Japan. Here, the life of St. Lorenzo Ruiz, the first Filipino saint, is showcased in many of its corners.

    Limited Express Kamome Hakata Station

    If you’re coming from Fukuoka City (Hakata Station) or Takeo Onsen (Takeo Onsen Station), you can hop onto a Limited Express KAMOME train to Nagasaki Station and start walking around.

    Nagasaki City Attractions

    This morning itinerary offers a profound exploration of Nagasaki’s historical and cultural tapestry, reflecting its unique blend of Eastern and Western influences. Here are some of the sites you can easily visit on foot in the city center of Nagasaki:

    • Nakamachi Catholic Church, just a six-minute walk from Nagasaki Station. Built in 1897 on the site of a former prison where Christians were once held, the church stands as a testament to resilience. Inside, admire the beautiful stained glass windows crafted by Milano Grassi. Outside, in its garden, stand the statues of the 16 martyrs including San Lorenzo Ruiz.
    • Twenty-Six Martyrs Museum and Monument on Nishizaka Hill, also a short walk away. This poignant site commemorates the 1597 execution of 26 Christians. (The 26 martyrs is a different group from the 16 martyrs. Over 400 martyrs in Japan have been beatified but only these two groups, 42 in total, have been canonized as saints by the Vatican.) This museum houses many historical documents and artifacts like the “Maria Kannon” statue and original letters from St. Francis Xavier, offering deep insights into the history of Christianity in Japan.
    • Twenty-Six Martyrs Museum and Monument and San Lorenzo Ruiz

    • St. Philip’s Church (Nishizaka Church), adjacent to the monument, often referred to as Japan’s mini-Sagrada Familia. Designed by architect Kenji Imai, the church features twin towers and colorful mosaics inspired by Gaudí. Inside, in a niche to the right, you’ll find bone relics of St. Paul Miki, St. James Kisai and St. John de Goto.
    • St Philip's Church Nishizaka Church

    • Oura Cathedral, Japan’s oldest existing wooden Gothic-style church, built in 1864 by French missionaries. Designated as a National Treasure, the church is renowned for the “Discovery of the Flock,” where hidden Christians revealed their faith to Father Petitjean after centuries of persecution. The Christian Museum next to it is also worth a stop if you have more time.
    • Oura Cathedral Nagasaki

    • Glover Garden, just next to the Cathedral. This hillside park offering panoramic views of Nagasaki Harbor. Explore the former residence of Thomas B. Glover, the oldest existing Western-style wooden house in Japan, and stroll through gardens adorned with seasonal flowers. The site also features other Meiji-era Western residences, providing a glimpse into the lives of foreign settlers who contributed to Japan’s modernization.
    • Glover Park Nagasaki

    If you get hungry before or after your stop in Oura Cathedral, you can sample Nagasaki’s local dishes at any of the dining establishments at its base. For budget travelers, you’ll find street food and small eateries lining Glover Street. But if you want a proper lunch at a full-service restaurant, one of the favorites among tourists is ANA Crowne Plaza Nagasaki Gloverhill’s in-house Restaurant Pave, which specializes in a blend of Western-style cuisine and local Nagasaki dishes, including champon, Turkish rice (Toruko rice), and sara udon, crafted with locally sourced ingredients.

    Sara Udon and Turkey Rice Nagasaki

    Two Stars 4047

    To get to our next stop, since we’re carrying a JR Kyushu Rail Pass, how about we level up our train game? Meet the Two Stars 4047, a luxurious sightseeing train operated by JR Kyushu. This handsome train can take you on a scenic journey between Nagasaki Station and Takeo-Onsen Station in Saga Prefecture.

    Two Stars 4047

    Launched in September 2022, it provides travelers with a leisurely alternative to the high-speed Nishi Kyushu Shinkansen, showcasing the coastal beauty of western Kyushu . The train’s name, “Two Stars 4047,” symbolizes the connection between the two prefectures (Saga and Nagasaki) and references the train models used: KiHa 40 and KiHa 47 series cars. Renowned industrial designer Eiji Mitooka, known for his work on other JR Kyushu trains, crafted the train’s elegant white and gold exterior and its warm, wood-accented interior.

    The train operates two distinct routes daily:

    • Morning Route: From Takeo-Onsen to Nagasaki via the Ariake Sea coastline, offering expansive sea views.
    • Afternoon Route: From Nagasaki to Takeo-Onsen along Omura Bay, renowned for its tranquil waters.

    Comprising three cars, the train features:

    • Cars 1 and 3: Reserved seating with various configurations, including booth and sofa seats, some facing large panoramic windows.
    • Car 2 (Lounge 40): A communal space with comfortable seating, a bar offering local snacks, drinks, and sweets, and opportunities to purchase souvenirs. You can also indulge in regional delicacies, such as bento boxes featuring Saga beef (available on the morning route) and freshly baked Nagasaki soufflés (available on the afternoon route). Additionally, the train offers cultural experiences. On our ride, we got to sample the various types of green tea produced in nearby Ureshino in Saga.

    Two Stars 4047 Train Amenities

    But we won’t go all the way to Takeo Onsen. We’ll be alighting at Huis Ten Bosch Station for a much-needed and much-deserved theme park stop!

    Huis Ten Bosch

    Meet one of Japan’s three largest theme parks by land area!

    Huis Ten Bosch

    Located in Sasebo, Nagasaki Prefecture, this sprawling European-style wonderland is designed to look like a little piece of the Netherlands, complete with windmills, tulip fields, canals, and full-scale replicas of Dutch buildings. The name itself means “House in the Forest,” and it’s modeled after a royal palace in The Hague.

    Huis Ten Bosch Nagasaki Dutch Style Buildings

    Huis Ten Bosch Nagasaki

    But this isn’t just some small replica village. It’s a vast 152-hectare park that feels like stepping into a European fairytale, all without leaving Japan. You can see the extent of its boundaries by climbing to the top of the Domtoren, its tallest building.

    Beyond the picturesque scenery, you’ll find digital art museums, projection mapping shows, theme park staples like a giant Ferris wheel and multi-tier carousel, and seasonal events like massive illumination displays in winter and flower festivals in spring. When we visited, a 1-Million Roses exhibit takes the centerstage.

    Huis Ten Bosch Nagasaki Canal Cruiser

    Huis Ten Bosch Carousel
    Image courtesy of Huis Ten Bosch

    You can explore by bike, canal cruiser, or just wander on foot — and many visitors dress up in period costumes to match the ambiance. It’s especially popular for families, couples, and even solo travelers looking for something unexpected and photogenic.

    Your time here will reach a crescendo at the Shower of Lights, a nightly show featuring fireworks display exploding in sync with a musical fountain and illuminations. On our visit, there was even a live musical performance of Katy Perry’s Firework.

    It is entirely possible to visit Huis Ten Bosch on a day trip, but to save yourself from the hassle of last trip schedules and travel times, we recommend spending a night on-site.

    Okura Hotel Huis Ten Bosch

    Where to Stay: Hotel Okura JR Huis Ten Bosch is a luxurious resort hotel just next to the theme park. It’s impossible to miss because its architecture, inspired by Amsterdam Central Station, is eye-catching and is probably the first structure you’ll see on your way to the park. Yes, it’s just a 5-minute walk from JR Huis Ten Bosch Station and a 2-minute walk to the park entrance, making it highly convenient for visitors.

    Hotel Okura JR Huis Ten Bosch
    Image courtesy of JR Kyushu Hotels and Resorts

    Hotel Okura Huis Ten Bosch Nagasaki

    The hotel features 320 rooms, including both Japanese and Western-style options. It also has a “Kotonoyu” bathhouse with natural hot spring baths, a convenience store, bakery, and free Wi-Fi throughout the property.

    Hotel Okura JR Huis Ten Bosch Onsen
    Image courtesy of JR Kyushu Hotels and Resorts

    Don’t miss their breakfast buffet, which is a feast! Their signature French toast and omelette are immaculate! For their omelette, you can choose the ingredients and it was superb especially with the mentaiko.

    Hotel Okura Huis Ten Bosch Breakfast


    DAY 5: SAGA

    Saga is perhaps the most underrated prefecture in Northern Kyushu, which is a shame because it has lots to offer curious tourists. Here are some of the sites you might want to consider adding to your itinerary.

    • Arita Será, a prominent open-air shopping complex in Arita, best-known for its exclusive focus on Arita-yaki—Japan’s first porcelain, which has been produced in the region for over 400 years. Spanning approximately 66,000 square meters, it houses 22 specialty shops offering a diverse range of porcelain items, from everyday tableware to high-end art pieces. Don’t miss a chance to dine at Gallery Arita, a unique café and restaurant offering a distinctive experience where patrons can select from over 2,500 Arita-yaki porcelain cups and saucers to enjoy their coffee or tea. The menu features a variety of local specialties which include Saga beef, Arita chicken, and godofu, a traditional bean curd.
    • Arita Sera

      Gallery Arita Saga

      Gallery Arita Lunch Menu Tofu and Beef

    • Takeo Onsen also offers memorable experiences. You can soak in traditional bathhouses like Motoyu or admire the beautiful Romon Gate and historic Shinkan bathhouse. You can also unwind with a book and coffee at the stylish Takeo City Library, open until late. You can also explore nearby Mifuneyama Rakuen, a historic Japanese garden established in 1845 by Lord Nabeshima Shigeyoshi as part of his villa. It showcases a harmonious blend of natural landscapes and traditional design, featuring elements like the Haginoo Tea House and the Five Hundred Arhats statues. We didn’t stop here on our most recent Kyushu trip, but we got to see it in full autumn a few years ago, and it was absolutely picturesque!
    • Ureshino is also worth a visit. Several cities in Japan proudly claim to be the birthplace of Japanese green tea, but Ureshino has a strong case. The story traces back to Eisai, a Buddhist monk who brought tea seeds from China, believed to have first planted them on Mt. Sefuri in Kanzaki, Saga. From there, tea cultivation spread to nearby Ureshino, which embraced the tradition and elevated it to new heights. Today, this region boasts a vibrant tea culture, with its rolling terraced fields perfectly suited for growing high-quality tea. Green tea is a staple in local cafes and restaurants, offering samplers so you can savor three distinct types of local brews. Ureshino is also famous for its hot springs. Ureshino Onsen’s alkaline waters are reputed for their skin-beautifying properties, making it a favorite destination for relaxation and rejuvenation. Scattered throughout the town are around 60 ryokan and other accommodations, each inviting visitors to soak, unwind, and enjoy the soothing atmosphere.

    Back to Fukuoka

    After exploring Saga, make your way back to Hakata Station in Fukuoka to catch your flight. Or if you still have more time, try to squeeze in a stop at teamLab Forest, an immersive digital art museum located on the 5th floor of BOSS E・ZO Fukuoka, adjacent to the MIZUHO PayPay Dome FUKUOKA.

    Created by the renowned art collective teamLab, this permanent exhibition offers a dynamic blend of interactive art, technology, and nature. But what sets it apart from other teamLab sites is its “catching and collecting forest” zone, where you can “capture” virtual animals for “research”. They are added to your digital collection, and you can “release” them back into the environment. The exhibit evolves with the seasons, showcasing different flora and fauna throughout the year.

    teamLab Forest Fukuoka

    Some teamLab staples are here too, like the room where you can see your animal or plant drawings come to life.

    Better yet, we highly encourage you to stay longer and explore Fukuoka City as well, if you haven’t yet. We’ll be creating a separate article about the places you can visit in Fukuoka so watch out for that.


    Is JR Kyushu Rail Pass Worth It?

    YES! The more destinations you visit, the more the JR Kyushu Rail Pass becomes valuable. Take a look at our breakdown of costs below for this sample 5-day itinerary:

    JR Kyushu Rail Pass Savings

    The JR Kyushu Rail Pass – All Kyushu 5-Day variant costs only JPY 24,000!

    Most of these journeys are on a non-reserved seat, with the exception of Yufuin No Mori, Two Stars 4047, and Aso Boy! These sightseeing limited-express trains only have reserved seats on board. They are also very in demand, so we encourage you to secure a seat beforehand. You may reserve online or at the JR Kyushu counter. For only JPY 1500 reservation fee per ride, you can make sure you get the seat you prefer. (On Yufuin no Mori, when traveling from Fukuoka to Yufuin, choose a window seat on the right side to catch the Jion-no-Taki Falls after Amagase Station. On Two Stars 4047, from Nagasaki to Huis Ten Bosch, sit on the left side of the aisle for a great view of the Omura Bay!)

    For this sample budget, we’ve included the reservation fees in the computation. Even so, the total cost will be JPY 28,500, which is still just above half of what you would spend on train fares and express fees without a pass. That’s a JPY 20,420 (around PHP 8000) difference! Clearly, the JR Kyushu Rail Pass can give you a lot of savings!

    Not only that, with this pass, adventure across all seven prefectures of Kyushu becomes effortless and convenient. Over the course of five days, you can hop on and off trains that connect vibrant cities, tranquil countryside, hot spring towns, and coastal gems—giving you a rich and varied experience of this incredible region. Whether you want to soak in natural beauty, dive into local culture, or savor authentic cuisine, this pass unlocks seamless travel and maximum flexibility. It’s truly the best way to discover everything Kyushu has to offer without worrying about transportation logistics, letting you focus fully on the journey ahead.


    Source link

  • 24 Best Things To Do In Western Australia (2025 Guide)

    24 Best Things To Do In Western Australia (2025 Guide)


    From visiting Perth to touring the beautiful beaches along the coast, here is our list of the best things to do in Western Australia!

    Western Australia is an incredible state full of intriguing bucket list experiences.

    Compared to the East Coast, the West Coast of Australia is far less touristy. Attractions are more spread out and the terrain is much more remote, but this is part of the magic.

    Western Australia has some truly mindblowing natural landscapes where you can escape the crowds and see a side of Australia that you never knew existed.

    From the rich red Earth and crazy rock formations of the Dampier Peninsula and Purnululu National Park in the Kimberley, to the powdery, white sand beaches of the south west region, Western Australia has so much natural beauty to explore.

    You can hike through dense karri forest, swim in a turquoise bay, or gaze out at the landscapes through a natural bridge. You can swim with whale sharks in crystal clear waters, take a selfie with a quokka, or fly over remote waterfalls on a helicopter flight.

    Western Australia is packed with cool experiences. Here is our list of the best things to do!

    Explore more with our ultimate Western Australia road trip itinerary!

    24 Top Things To Do In Western Australia

    Here are the top things to add to your Western Australia bucket list.

    Whether you want to explore by car, book guided tours, hotel-hop or camp under a vast starry sky, any of these activities can be catered to your travel style.

    The best way to get around is to rent a car and explore on your own! We recommend Rental Cars, which has the largest range of vehicles for the best value on the market.

    1. Go wine tasting in the Margaret River Region

    Just 3 hours south of Perth lies Margaret River, a destination celebrated for its world class wineries, pristine beaches, and lush forests.

    This charming town and its surrounding region offer a perfect blend of natural beauty and gourmet experiences, with wine tastings and cellar door visits being the #1 attraction.

    With over 200 vineyards, the Margaret River region has gained international recognition for its premium wines, particularly Cabernet Sauvignon and Chardonnay.

    Few visitors come to Margaret River and skip out on a wine tasting! A guided wine adventure in Margaret River is the best way to learn about the wines and sample delicious products with the help of a local.

    Margaret River also has breweries and amazing food, so there is plenty to do if you’re not a wine lover. Join a wine and brewery tour or visit beloved local establishments like the Margaret River Dairy Company or the Margaret River Chocolate Company.

    2. Check out the Bungle Bungles in Purnululu National Park

    Purnululu National Park, located in Western Australia’s remote East Kimberley region, is a UNESCO World Heritage site with crazy geological formations and rich cultural heritage.

    The park’s centerpiece is the Bungle Bungle Range, a series of giant, rounded sandstone domes formed over 20 million years through natural erosion.

    Beyond the Bungle Bungles, Purnululu National Park is home to diverse ecosystems, including deep gorges, palm-filled oases, and open plains.

    Purnululu National Park also holds significant Aboriginal cultural sites and has some amazing hikes to places like Cathedral Gorge and Echidna Chasm.

    3. Ride a camel at sunset on Cable Beach

    Cable Beach is a highlight of Broome. This sleepy little beach town in north of Western Australia is the Gateway to the Kimberley region.

    But before you set off on any adventures, make sure you visit Cable Beach!

    Set along the turquoise waters of the Indian Ocean, this stunning beach has 22 kilometers of soft white sand and is amazing for strolling, swimming, sunbathing, and relaxing.

    The best way to experience Cable Beach is with a sunset camel ride, where you can witness a mesmerising Western Australia sunset in style.

    Sunset Camel Ride On Cable Beach
    Imagine a sunset experience like this!

    4. Go stargazing in the Pinnacles Desert

    Another one of the coolest natural attractions to see in Western Australia is the Pinnacles Desert.

    The Pinnacles, located within Nambung National Park approximately 200 kilometers north of Perth, are a fascinating sight.

    These thousands of limestone pillars, some reaching up to 5 meters in height, rise dramatically from the golden sands, creating a surreal and otherworldly landscape.

    Formed over 25,000 to 30,000 years ago, the Pinnacles originated from seashell deposits left behind when the sea receded; over time, coastal winds eroded the surrounding sand, revealing the striking formations.

    The Pinnacles Desert is an easy day trip from Perth! Join a sunset and stargazing tour to make the most of your visit.

    5. Explore Karijini National Park

    Karijini National Park, situated in the heart of Western Australia’s Pilbara region, is a breathtaking expanse of natural beauty.

    It is the state’s second-largest national park, so you could easily spend multiple days uncovering all the beauty of Karijini National Park. The area is filled with dramatic gorges, cascading waterfalls, and tranquil swimming holes nestled within red rock canyons that plunge up to 100 meters deep.

    The park’s diverse landscapes are best explored on foot, with hiking trails leading to iconic sites like Dales Gorge, Fortescue Falls, and Fern Pool.

    Karijini National Park is also rich in Aboriginal heritage, being the traditional land of the Banyjima, Kurrama, and Innawonga peoples, whose connection to the land spans over 20,000 years.

    Don’t miss swimming, hiking, camping, and exploring in Karijini National Park, as this is one of the best things to do in Western Australia!

    Karijini National Park
    Serenity in Karijini National Park

    6. Road trip along the South West Coast to Esperance

    The south west corner of Australia is truly spectacular.

    Head south of Perth along the coast and stop in beautiful places like Busselton, Margaret River, Dunsborough, and Augusta. In these spots you can surf, explore magnificent caves, go wine tasting, or stroll along the coastline.

    As you continue on your scenic drive of the south west coast, you’ll get to see some of the best beaches Western Australia.

    Meelup Beach, Hamelin Bay, Greens Pool, Elephant Rocks, Little Beach, Twilight Beach, Lucky Bay, and Hellfire Bay are all beautiful beaches with powdery white sand and crystal clear waters.

    As you road trip along the south west coast towards Esperance, you can stop at any of these gorgeous spots and bask in the unbelievable coastal beauty.

    Organise your trip with our Perth to Esperance road trip itinerary!

    7. Swim with whale sharks

    Hands down, one of the best things to do in Western Australia is swim with whale sharks in Ningaloo Reef.

    Ningaloo Reef Marine Park is a UNESCO World Heritage Site that spans the coastline around Exmouth and Coral Bay. This section of the Coral Coast has a magnificent display of marine life, including whale sharks between March and July.

    At this time of year, guided tours let snorkellers have respectful, close encounters with whale sharks. You can observe these majestic creatures in their natural habitat while also spotting manta rays, turtles, and vibrant coral reef life.

    Swimming with whale sharks at Ningaloo Reef is one of Australia’s most awe-inspiring wildlife experiences.

    8. See kangaroos on the beach in Lucky Bay

    Lucky Bay is a stunning location in Cape Le Grand National Park near Esperance, Western Australia.

    The beach itself is a marvel, with pristine white sands and turquoise waters. But the best thing to do at this gem of Australia’s south west? See kangaroos on the beach!

    These wild marsupials are often seen lounging on the beach, especially during the cooler parts of the day when they emerge from the surrounding bushland to graze and bask in the sun.

    The combination of stunning coastal scenery and the chance to observe kangaroos in their natural habitat makes Lucky Bay a must-visit destination.

    But just remember, kangaroos are wild animals! Sightings are not guaranteed, and you should only admire the animals from a distance.

    Kangaroos On The Beach In Lucky Bay
    Seeing kangaroos in Lucky Bay is definitely a bucket list experience.

    9. Take a quokka selfie on Rottnest Island

    Another item to add to your Western Australia bucket list? A quokka selfie!

    Quokkas are small marsupials affectionately known as the “world’s happiest animals” due to their characteristic smiles.

    These friendly creatures are native to Rottnest Island and can often be seen around the main settlement areas, such as Thomson Bay, as well as in more secluded spots like Geordie Bay and the Wadjemup Lighthouse vicinity.

    While quokkas are used to tourists, it’s important to be respectful and maintain a safe distance. Capturing a ‘quokka selfie’ has become a popular activity among visitors, but let the interactions happen naturally.

    Other than seeing quokkas, you can also enjoy the scenic hiking and biking trails or go snorkelling in Little Salmon Bay on Rottnest Island. It’s one of the most popular day trips from Perth or Fremantle.

    The easiest way to get to Rottnest Island is to book a tour from Perth that includes your short ferry ride and bike hire!

    Read our guide to the best day trips from Perth for more fun ideas.

    10. Fly over the Kimberley Coast

    If you want to see the beautiful and remote Kimberley Coast in a short time frame, consider a scenic flight.

    For those who don’t have a 4WD or heaps of time to plan a road trip, the best way to admire the Kimberley is from the sky!

    You can book a scenic flight from Broome that takes you over some of the Kimberley’s coolest locations in just a couple of hours.

    Scenic flights normally include views of the unique Horizontal Falls and the Buccaneer Archipelago, where rugged islands meet dramatic waterfalls.

    Scenic flights also provide the best vantage point of the area’s rich natural colours, from the vibrant red Earth to the secluded beaches and sapphire waters.

    11. See the world’s oldest living fossils

    If you’re a history lover, add this one to your bucket list!

    Seeing the stromatolites in Western Australia offers a rare glimpse into the Earth’s earliest life forms, making it a must-visit experience for both science lovers and curious travelers.

    Found at places like Hamelin Pool in Shark Bay, a UNESCO World Heritage Site, the stromatolites are among the oldest living fossils on Earth, dating back over 3.5 billion years.

    These rocky, reef-like formations grow extremely slowly in salty waters, which protect them from predators and disturbance.

    Interpretive boardwalks allow visitors to observe the stromatolites up close without disturbing their fragile ecosystem. A visit here is a journey back in time to the very origins of life on our planet!

    12. Go whale watching in winter

    Whale watching in Western Australia is a breathtaking experience, offering the chance to witness the annual migration of majestic humpback, southern right, and even blue whales along the coast.

    From June to December, thousands of whales travel north from Antarctica to breed in the warm waters off the Kimberley and Ningaloo Reef, then return south with their calves, passing close to shorelines and bays.

    Top viewing spots include Busselton, Augusta, and Dunsborough in the south, and Exmouth and Broome further north—where boat tours and coastal lookouts provide unforgettable encounters.

    Seeing a whale breach or tail-slap against a backdrop of rugged cliffs or turquoise sea is a highlight of any trip to Western Australia!

    13. Camp in Cape Range National Park

    Camping in Cape Range National Park is one of the best things to do in Western Australia for nature lovers.

    The park has over 100 camping bays along its western shore, many of which are accessible via conventional 2WD vehicles.

    Campgrounds such as Osprey Bay, Mesa, Tulki, and Kurrajong have unpowered sites nestled between sand dunes, offering partial protection from prevailing winds and proximity to the beach.

    From the campsites, you can easily go swimming, snorkeling, and kayaking in the nearby Ningaloo Marine Park. Also be sure to check out some nearby landmarks like Yardie Creek Gorge, Charles Knife Canyon, and Mandu Mandu Gorge, which showcase the park’s rugged terrain.

    Read next: The Perfect 5 Day Perth Itinerary

    14. Explore Perth City

    No visit to Western Australia is complete without a stop in Perth! The state’s sunny capital city is full of fun things to do for any type of traveller.

    Set along the banks of the Swan River and fringed by white-sand beaches like Cottesloe and Scarborough, Perth invites visitors to enjoy outdoor living at its best.

    Wander through the lush expanses of Kings Park and the Botanical Gardens, one of the world’s largest inner-city parks, for panoramic views and native flora.

    Dive into the lively neighborhoods of Northbridge and Fremantle for buzzing markets, street art, and a thriving food and coffee scene.

    Tour Perth Cultural Centre for museums, theatre, entertainment, or family-friendly attractions. Perth city has it all, so spend at least a day here exploring before you set off on any other Western Australia adventures!

    Perth City Lights
    Don’t miss the incredible city of Perth.

    15. Visit the National Anzac Centre

    Anyone interested in history will love to check out the National Anzac Centre!

    Located in the south west of Australia near Albany, this museum is dedicated to honouring the Australian and New Zealand soldiers who served during World War I.

    The centre is situated in the historic Princess Royal Fortress on Mount Adelaide, offering panoramic views of King George Sound (the departure point for over 41,000 troops bound for the Great War).

    Visitors engage with the Anzac story through interactive exhibits, assuming the identity of one of 32 service men or women to follow their personal journey from recruitment to post-war life.

    With multimedia displays, artefacts, and personal narratives, the National Anzac Centre creates an immersive experience.

    16. See the unique rock formations in Torndirrup National Park

    Torndirrup National Park, located on the rugged southern coast of Western Australia near Albany, is renowned for its dramatic coastal scenery and unique geological formations.

    The park has iconic natural rock formations that are a must-see if you’re in the area.

    First check out The Gap, where waves crash powerfully against a granite chasm. Also take a look at the Natural Bridge, a rock formation shaped by centuries of wind and ocean erosion.

    Home to a variety of native flora and fauna, Torndirrup also offers breathtaking views of the Southern Ocean, scenic walking trails, and excellent whale-watching opportunities during migration season.

    Read next: The Best Time to Visit Perth, Australia

    17. Hike the Cape to Cape Track

    The Cape to Cape Track is a stunning long-distance coastal hike stretching approximately 135 kilometers through Western Australia’s Margaret River region, from Cape Naturaliste in the north to Cape Leeuwin in the south.

    Winding along the rugged Indian Ocean coastline, the trail offers hikers breathtaking views of towering sea cliffs, white sandy beaches, wildflower-filled heathlands, and ancient karri forests.

    Along the way, walkers can discover hidden caves, spot dolphins and migrating whales, and enjoy peaceful moments in remote, unspoiled nature.

    Whether completed as a full multi-day trek or explored in shorter sections, the Cape to Cape Track is one of the best things to do in Western Australia for hikers!

    Margaret River Coastline
    Soak in that stunning Margaret River coastline!

    18. Experience the Kimberley’s coastal beauty in Cape Leveque

    If you want to explore the remote Kimberley region of Western Australia, Cape Leveque is a great place to go.

    Located at the northernmost tip of Western Australia’s Dampier Peninsula, Cape Leveque has striking red sandstone cliffs, pristine white sand beaches, and clear turquoise waters.

    This remote destination, approximately 240 kilometers north of Broome, offers visitors a unique blend of natural beauty and rich Aboriginal heritage.

    The area is traditionally owned by the Bardi people, who manage the Kooljaman eco-resort, providing an opportunity to experience Indigenous culture and hospitality firsthand.

    Accessible via a fully sealed road, Cape Leveque invites travellers to explore its vibrant marine life, including nesting turtles and migrating humpback whales, and to witness breathtaking sunsets over the Indian Ocean.

    The Cape Leveque Lighthouse is a magnificent historic landmark that guides ships through the western entrance of King Sound.

    19. Beach hop in William Bay National Park

    William Bay National Park, located along Western Australia’s Rainbow Coast near Denmark, is celebrated for its stunning coastal scenery and rich biodiversity.

    The park’s crown jewels are Greens Pool and Elephant Rocks, where massive granite boulders create sheltered turquoise pools ideal for swimming and snorkeling.

    Beyond these iconic spots, visitors can explore serene beaches like Madfish Bay and Waterfall Beach, as well as inland features such as Tower Hill and Parry Inlet.

    There are so many tranquil beaches here with crystal clear waters where visitors of all ages can enjoy the sand, sun, and sea of Australia’s south west.

    20. Cruise along the Swan River

    While visiting the Perth area, treat yourself to a Swan River cruise. This is one of the best ways to sightsee around the city and relax during an action-packed trip.

    Swan River cruises usually glide past notable sites such as the Bell Tower, Kings Park, the historic Swan Brewery, and the Royal Perth Yacht Club, all while providing captivating views of the city’s skyline and luxurious waterfront homes.

    Many cruises feature live commentary, enriching the journey with insights into Perth’s history and the significance of the Swan River.

    Cruise options range from scenic round-trip voyages to Fremantle to indulgent lunch or dinner cruises that showcase Western Australia’s local produce.

    21. Admire the wildflowers in Kalbarri National Park

    Kalbarri National Park is a stunning nature reserve on the mid west coast of the state. It’s a popular place to stop on road trips north from Perth up to Broome or Exmouth.

    Kalbarri National Park has some incredible wildflower displays, with over 800 species blooming between late winter and early summer.

    Go hiking, camping, or birdwatching to get the best views of the colourful blooms!

    Other cool things to do in the national park include the Kalbarri Skywalk, hiking through Murchison River Gorge, and admiring geological sites such as Nature’s Window and Z Bend.

    Kalbarri Skywalk
    Views from the Kalbarri Skywalk

    22. See the Wave Rock

    Wave Rock is another popular bucket list location for travellers in Western Australia.

    Located near Hyden in the south west of Australia, Wave Rock is a 15-meter-high, 110-meter-long granite cliff that resembles a massive ocean wave.

    The landmark is known as Katter Kich to the Ballardong people of the Noongar nation, and has a deep cultural significance.

    The Ballardong people consider it a sacred site, and it is part of a broader Dreaming trail. Visitors can explore nearby attractions such as Hippo’s Yawn and Mulka’s Cave, as well as enjoy seasonal wildflower displays and interpretive walking trails.

    Join a Wave Rock Cultural Tour from Perth to make the most of your visit!

    Try a cross country road trip with a drive from Sydney to Perth!

    23. Go 4WDing in Francois Peron National Park

    Western Australia has lots of amazing tracks for 4WD enthusiasts.

    One of the coolest places to drive your 4WD is Francois Peron National Park, located on the Peron Peninsula within Western Australia’s Shark Bay World Heritage Area.

    This is where you will find the iconic scenery of rich red desert cliffs sitting next to turquoise waters and white sand beaches.

    Traversing the park’s sandy tracks requires a high-clearance 4WD, leading explorers to remote coastal lookouts like Skipjack Point and Cape Peron, where sightings of dolphins, dugongs, turtles, and rays are common.

    Guided tours, such as those offered by Wula Gura Nyinda Eco Adventures combine 4WD adventures with Aboriginal cultural insights, including bush tucker and traditional medicine knowledge.

    Many tours include opportunities for snorkeling in sheltered bays like Bottle Bay and conclude with a relaxing soak in the artesian hot tub at the historic Peron Homestead.

    Whether you have your own 4WD or you’re joining a guided excursion, this is definitely a bucket list experience!

    Francois Peron National Park
    Check out the wild natural colours of Francois Peron National Park!

    24. Tour Fremantle Prison

    Fremantle Prison is one of the top landmarks to visit in Fremantle, a bustling suburb of Perth.

    The prison is a World Heritage-listed site that stands as one of the most well-preserved convict-era prisons in the world.

    Built by British convicts in the 1850s, Fremantle Prison is an amazing glimpsi into Australia’s colonial past and penal history.

    With its limestone walls, solitary confinement cells, and execution chambers, it provides a sobering insight into life behind bars through guided tours that explore themes of punishment, reform, and escape.

    Today, Fremantle Prison serves as a major cultural attraction, blending history, architecture, and storytelling to engage visitors with a dark but significant chapter of Australia’s heritage.

    DISCLAIMER: Some of the links in this article are affiliate links, which means if you book accommodation, tours or buy a product, we will receive a small commission at no extra cost to you. These commissions help us keep creating more free travel content to help people plan their holidays and adventures. We only recommend the best accommodations, tours and products that ourselves or our fantastic editorial team have personally experienced, and regularly review these. Thanks for your support, kind friend!


    Source link

  • How to Get Married in AUSTRALIA • Straight & Gay/LGBTQIA+ Wedding Step-by-Step Process

    How to Get Married in AUSTRALIA • Straight & Gay/LGBTQIA+ Wedding Step-by-Step Process


    Planning to get married in Australia? Well, we’ve recently just had our wedding there, and in this article, we’ll share with you the full process and requirements, and all the steps that we’ve taken for a stress-free wedding down under!

    TPTKLOOK5
    BlogDisclaimer

    Planning a wedding can be a difficult experience. There’s so much to think about, from the guest list and the attire to the venue and the food. But throw in the added challenge of a destination wedding, and the pressure ramps up even more. It’s like planning a wedding and a group trip at the same time. It’s especially true if you don’t have a hired wedding planner, like us. We took on the entire challenge on our own.

    But it doesn’t have to too stressful. Not gonna lie, there will be some amount or some form of stress in the process, but it doesn’t need to be overwhelming. With the right preparation and the right guidance, you’ll be able to tackle these hurdles and create the wedding of your dreams, even if it’s going to be on the other side of the world.

    By the way, I am NOT a wedding planner or an immigration adviser. But my blogging partner (now husband) Vins and I recently got married in Australia, and I’m simply sharing our experience.

    WHAT’S COVERED IN THIS GUIDE?

    Why Australia?

    First, let’s talk about why NOT Australia. I could think of a number of reasons why you SHOULDN’T choose Australia for your destination wedding. It’s far (8-10 hours away by plane in our case), it’s expensive (the flight alone can be too much), and the visa requirement can severely affect your guest list. While an Australian visa is not as hard-to-get as a Schengen Visa, it is not an easy one to obtain either. There’s always a chance that you or your loved ones will be denied a visa. So take that into consideration.

    But for me, the pros totally outweigh the cons. And I have three major reasons.

    • It’s easy to get married in Australia. There’s no residency requirement. You can just fly into the country as a tourist and get married immediately. There’s not much paperwork involved.
    • It is a beautiful, diverse country. And out of the 65 countries we have visited so far, it’s definitely one of our favorites. We first set foot here in 2015 when we backpacked across the continent from Darwin to Brisbane. And even to this day, 10 years later, it remains our most memorable trip ever. So it does hold a special place in our hearts.
    • Lastly and most importantly, same-sex marriage is legal in Australia since 2017, when the Marriage Act was officially amended to define marriage as the union of two people. And that’s a biggest, most important thing for us, since we are an LGBT couple.

    There’s no difference in the legal process for straight and LGBTQ+ marriages in Australia. The process is exactly the same for all couples, regardless of gender or sexual orientation, including for foreign citizens getting married in Australia. So if you’re straight and you’re planning to get married in Australia, this article applies to you, too. So yes, Same-sex couples can legally marry anywhere in Australia.

    Melbourne Gay Wedding
    Photo by King Abbott Films

    And this is one of the closest countries where we could get married. Taiwan is much closer and it has marriage equality too. But we found out that LGBT couples can only get married in Taiwan if both parties are from countries that legally recognize marriage equality. So even, say, a Filipino-Taiwanese couple can’t get married in Taiwan because one of them is a citizen of the Philippines, which does not recognize it.

    But don’t get me wrong, we didn’t settle for Australia. It was really one of our first choices. The other one was Denmark because I dreamt of a winter wedding, but getting a Schengen visa for our relatives could prove much more challenging than an Australian visa.

    OK, so how did we plan it?


    Step 1: Decide on the wedding type and size.

    What kind of wedding do you want? Is it gonna be a traditional wedding with at at least 50 guests? Or a micro wedding with fewer than 40 guests? Or do you prefer an elopement wedding with just a couple of witnesses?

    This is the first thing that you need to figure out and decide on because it will dictate many aspects of your wedding including the venue, logistics, and the budget.

    Most destination weddings tend to be smaller primarily because there are a lot of factors that your guests need to overcome or take into consideration including the cost, time, and visa.

    Initially, we wanted an elopement type of wedding with just one or two family members. In Australia, you’ll find a lot of elopement packages. Basically, you’ll hire an officiant to wed you and they will be taking care of all the legal paperwork. And that’s it. No big reception needed.

    Some also choose to get married at the City Hall or Courthouse. For example, in Melbourne, the Victorian Marriage Registry offer two main marriage packages:

    • Classic Ceremony Package: AUD 480 on weekdays, AUD 580 on weekends. This includes the service of a celebrant or officiant, traditional wedding script, and a reservation at one of their ceremony rooms at the Old Treasury Building. You can invite guests. One room can accommodate 8 guests, the other up to 55 guests.
    • Legal-only Package: Weekdays only, AUD 380. They’ll take care of the paperwork and provide a celebrant, but nothing else.

    For more information about this, you can visit the official website of the Victorian Marriage Registry.

    I’ve also heard of super private weddings. You can even do it in a hotel room or in a private room at a restaurant, if you’re OK with that. Just make sure you have an authorized celebrant and two witnesses, and that you complete all the paperwork.

    Like I said, it was something we seriously considered: a very simple wedding without any bells and whistles at all.
    But since we got engaged a few years ago, some of our friends and relatives expressed that they would love to be there even if it meant flying to Australia and spending on tickets and hotels. So as the days passed, we started entertaining the thought of more guests. We ended up with a guest list of 20, which was quite intimate and manageable. I think it was the perfect size for us.


    Step 2: Pick a wedding date.

    The next two steps in this guide are actually interchangeable. Step 2 is about the date. Step 3 is about the venue. So prioritize what matters to you more.

    For us, the date was non-negotiable because it was the same date that we became a couple officially. We have been together for 16 years and we always celebrated in February, and we don’t wish to change that. The venue can change, but our wedding had to happen on a specific day in February.

    Earlier, I mentioned that we wanted a winter wedding, with snow and all, which would’ve been perfect. But since we moved it to the southern hemisphere, where seasons are flipped, everything else had to adjust. February is summer in Australia, so the overall look and feel of the wedding would be very different.

    The date is also very important to nail first when it comes to Australia because some of its places can have pretty extreme weather. In some cities, summer can be a sweltering hell of a season. Likewise, in some cities like Melbourne, the weather is notorious for being incredibly fickle. It can be sunny in the morning but then drench you in the afternoon.

    Knowing your date early helps you plan around local conditions, take advantage of off-peak deals, and avoid holiday crowds or monsoon rains.

    The season and weather can also affect not just what you and your guests could wear on your wedding but also the type of venue that is more appropriate. So let’s talk about venue.


    Step 3: Find an appropriate venue.

    Choosing the right venue for a destination wedding is massive—it sets the tone, vibe, and even the logistics of your big day. Do you want a beach wedding? Do you prefer a farm or a vineyard? Or are you OK with getting married in a public park or city hall?

    There are countless of wedding venues in Australia. I simply googled “best small wedding venues in Melbourne” and it bombarded me with a gazillion options.

    Montsalvat Artist Community
    Montsalvat Artist Community. Photo by King Abbott Films

    Some venues are for ceremonies only. This applies to town hall rooms like the Margaret Craig and Thomas Hyde Room at the Old Treasury Building in Melbourne.

    We also encountered bars and restaurants that allow reception only, not the ceremony. One of the venues we seriously considered was this rooftop bar in the city center, but unfortunately they don’t allow ceremonies anymore.

    But there are those that can accommodate both. Here are three venues that we shortlisted because they are great for both the ceremony and reception and they were available on our chosen date.

    • Sandbar Beach Café, which is great for beach weddings. Although we did not prefer it, we weren’t particularly opposed to the idea. Ceremony at the beach. Reception inside.
    • Prince Deck St. Kilda, which is a function hall that would be great for reception and has an outdoor timber deck, overlooking the beach, which would be ideal for the ceremony. But we decided against them because they’re too big. Given that we were expecting only 20 guests and we didn’t really plan on decorating it too much, either would feel virtually empty.
    • Montsalvat Artist Community, which is located not in Melbourne proper but in Eltham. And although it’s 30-40 minutes from the city center, when I first saw it, I had a really good feeling about it. In the end, we chose this! We have a winner!

    Montsalvat’s ceremony and reception areas were inside a heritage building, which meant the weather won’t be an issue. And it was just the right size.

    Montsalvat Wedding Ceremony Venue
    Montsalvat Wedding Ceremony Venue. Photo by King Abbott.
    Montsalvat's Great Hall.
    Montsalvat’s Great Hall Reception. Photo by King Abbott Films.

    And there are plenty of scenic spots for wedding photography. There’s even a chapel, but we did not use it as this is a secular ceremony. And bonus point: It had the European aesthetic that we initially wanted. Remember, we originally wanted to do the wedding in Europe. Best of both worlds!

    Montsalvat Wedding Photography
    Photo by King Abbott Films

    Each booking comes with the services of a venue coordinator, too!

    The prices were not bad, either. For the food, there were high tea, cocktails and proper plated meal options. This includes free-flowing drinks including white wine, rose, red wine, beer, apple cider, and non-alcoholic drinks.
    If we availed of the proper plated dining package, the ceremony fee would be waived. But there was a catch: they had a 40-guest minimum policy. We were only 20 pax, but we still went ahead, even if it meant paying for food good for twice our expected crowd size. We just had it carvery or buffet-style.

    However, the management decided to not enforce the minimum 40-guest policy. In the end, we only paid for 23 pax. So thank you to the Montsalvat management. (Note that none of these are sponsored. We intentionally avoided having any aspect of our trip sponsored by any brand. We paid for every single thing at our wedding.)

    • Montsalvat Artist Community
      Carvery Dining: AUD 218/pax

    Because the venue is in Australia and we’re Manila-based, we never had a chance to do an ocular inspection of the venue. And we didn’t have anyone in Melbourne to check it. We only relied on online reviews and their photos, and we took a virtual tour on Google Maps. Thankfully, the place was well-documented on Streetview.

    But we still finalized our booking, thinking we’d just fly to Melbourne a few days ahead of the wedding and adjust accordingly.


    Step 4: Book a Celebrant.

    Any wedding in Australia must be officiated by someone legally recognized by the Australian government. They may be civil celebrants, ministers of religion, or registered officiants. Fortunately, it’s not hard to find an authorized celebrant or officiant in Australia, even for LGBTQIA+ couples.

    Most venues have preferred celebrants, someone that they usually work with in the past. You could do that, too. But our first choice was Bronte Price because:

    • He’s the first celebrant in Australia to have completed the Certificate in Gay and Lesbian Weddings.
    • Most of his clients are LGBT couples from the Philippines.

    And thankfully, he was available on our wedding date and could marry us.

    Bronte offers a few packages, depending on the scope of work that you expect him to take on and the size of the wedding. But even for the most basic option, he’ll take care of all the necessary paperwork from start to finish.
    And he did that for us. He also checked in on us every now and then to make sure that everything was alright, especially regarding the legal papers.

    The most important document that you need to file is the Notice of Intended Marriage (NOIM).


    Step 5: Lodge a Notice of Intended Marriage (NOIM).

    Regardless of the state, you must accomplish and submit a Notice of Intended Marriage at least 1 month before the wedding. You can do it as early as 18 months before. It looks like this:

    Notice of Intended Marriage NOIM Australia

    You and your partner must be at least 18 years old to sign this, and you must sign it in front of an authorized witness.

    If you’re signing this outside Australia, an authorized witness can be: an Australian Consular Officer, an Australian Diplomatic Officer, or a notary public, among others. For us, we signed it in front of a Notary Public here in Manila. Then, we emailed it together with a scanned copy of our passports to our Celebrant, who then lodged the application in Australia on our behalf.

    Notice of Intended Marriage NOIM Authorized Witness Australia

    The passport is needed as proof of date of birth. If you’re divorced or a widow/widower, you should also submit the corresponding certificates of divorce or death of spouse.

    Make sure that all details are correct, and write in block letters. And let me repeat because it’s of utmost important: Submit the NOIM at least 1 month before your wedding date. Otherwise, if you do later, you cannot be married on your target date.


    Step 6: Secure your wedding suppliers.

    Once you have finalized the venue, chosen a celebrant, and lodged a marriage notice, it is time to scout vendors for your big day. Depending on how grand you want your wedding to be, you might want to look for a florist for your flowers and decors, a photographer and/or videographer for documentation, wedding cake baker, and, if your venue doesn’t have it in-house, a caterer for the reception.

    Usually, your venue also has a list of their recommended suppliers, so you might want to check ask them first. But most will allow you to source outside if you prefer.

    Flowers/Florist

    One of the reasons we like Montsalvat is: It’s the type of venue that doesn’t need to be glammed up to look special. It has a rustic, almost medieval character to it that you can totally get away with having no to little adornments. So we only ordered for a few flower arrangements, and that was it. The name of the flower shop is Indigo Flower House, recommended by the venue coordinator. These are the costs of the arrangements we ordered:

    Indigo Flower House Melbourne
    Flowers by Indigo Flower House Melbourne. Photos by King Abbott Films
    • Button holes (2x): AUD 36
    • Floor piece (2-meter): AUD 600
    • Table vase arrangements: AUD 200
    • Big ceremony vase arrangements (2x): AUD 200
    • Fresh rose petals for tossing (18x): AUD 81
    • Delivery/set up: AUD 200
    • Total (inc. tax): AUD 1558.70

    Wedding Cake

    Our cake was baked and designed by Froggy by What Froggy Bakes. He just asked us what we wanted, and we described that we just wanted a travel-themed cake, preferably with a world map done pallete-knife style and with white flowers. And he was able to make it a reality. It was 3-tier, which was pretty excessive for 20 guests.

    World Map Wedding Cake
    Cake by What Froggy Bakes. Photo by King Abbott Films
    • Wedding Cake
      3-tier: AUD 846.20

    But this was a gift from one of our best friends, and she insisted on making it 3-tier regardless. It looked stunning! Every layer was a different flavor: carrot cake on top, chocolate in the middle, and caramel at the bottom.

    Photographer & Videographer

    And for our photos and videos, we hired a talented Pinoy who is based in Melbourne. His name is King Abbott. We found him on Instagram and immediately fell in love with his work.

    At the time, he was still offering a Basic Package (AUD 3300 for 6 hours), which was what we picked. But I’m not sure if this is still available.

    Transportation for Guests

    And oh, one more thing, since our venue was situated round 30 minutes from Melbourne City Center, we also had to think about transportation. While it is accessible by Uber and public transportation, Vins and I wanted to make it a lot more convenient for everyone, so we just hired a mini-bus good for 23 pax with driver.

    We paid AUD 750 for the roundtrip transfer (with driver) with BusCharter.com.au. Note that the bus won’t be waiting on site. It picked us up in Melbourne, dropped us off at the venue in the afternoon, and then left. It came back 7 hours later to take us back to the city center after the reception.

    Most suppliers would require that you pay a deposit first and then settle the balance later, usually a week or two before the wedding date, in our experience.

    Hotel Accommodations

    If you’re getting married in Melbourne like we did, best to book your hotel way in advance because accommodation rates can go crazy expensive especially in peak season. We and most of our guests ended up staying at an AirBnB, but if you prefer a proper full-service hotel, here are some that our party tried that you can suggest to your guests:

    Search for more Australia Hotels:

    Hotel Codes

    Once you’ve locked in the venue, date, and NOIM, it’s time for Step 7.


    Step 7: Send out invitations promptly.

    Yes, as early as you can provided that everything’s been finalized. You need to do it sooner than later because remember, this is a destination wedding. There is travel involved. Most of them will need or want to:

  • File a leave of absence from work way in advance. They would probably want to stay longer in Australia to maximize the cost of flights. Most of our guests stayed for a week or two. Some even toured other parts of Australia and New Zealand.
  • Book flights and hotels. And usually, you’ll get them cheaper if you book way ahead of time. Informing your guests early will also allow them more time to save money. Australia is not cheap.
  • Apply for a visa. And visa application entails gathering a number of requirements. We have a separate video about it here: Australian visa application requirements and process!
  • To be honest, this is something that we failed to follow. Our wedding was in February, and up until November of last year, we were still traveling a lot. We only started preparing for the wedding in December. Thankfully, (almost) everyone was able to secure a visa in time.


    Step 8: Do an ocular visit/rehearsal before the big day.

    If you didn’t get a chance to check the venue before, make sure to fly at least a couple of days early to check it and identify possible problems. We inspected the place, mapped out how the guests would move from one area to another, tested the sound system, learned the ropes at the venue.

    By the way, Vins and I did not have the traditional wedding party. We didn’t have sponsors, bridesmaids, groomsmen. We only had a ring bearer and a flower girl. Vins and I planned and took care of everything up until the big day. And at this meeting, we turned it over to some of our friends, who volunteered to do certain tasks. They took charge of certain aspects. And it was perfect. Everything went without a hitch.

    OK, let’s talk about the big day itself.


    Step 9: Follow the wedding mandatories/legalities.

    Before the ceremony, there are still a lot of things to take care of. The Celebrant will be meeting you to do 2 things:

    • To double-check your identity documents again (usually your passports) and verify your two witnesses are over 18.
    • To confirm consent. And this will be done separately. Your celebrant must speak with each of you individually to confirm you’re entering the marriage freely and willingly. This is to ensure there’s no coercion or pressure involved. I was asked to step out of the wedding suite so Vins could confirm, and Vins had to do the same when it was my turn. It’s a legal requirement, not just a formality.

    At one point during the ceremony, you must read the Monitum, a formal paragraph that explains the nature of marriage under Australian law. It goes something like:

    “Before you are joined in marriage… I am required to remind you that under Australian law, marriage is the union of two people to the exclusion of all others, voluntarily entered into for life.”

    If this isn’t said, the marriage might not be legally valid.

    Aside from any personal vows you write, you each have to say a very specific line in front of the celebrant and your witnesses:

    “I call upon the persons here present to witness that I, [Name], take you, [Name], to be my lawful wedded [husband/wife/spouse].”

    You can personalize your vows around this, but the legal sentence must be said in full.

    Don’t worry, your Celebrant should be able to provide the correct wording.

    And before the ceremony ends, you should also sign the marriage certificates, as overseen by the Celebrant and your chosen witnesses. You’ll sign three copies of the certificate:

    • One goes to the Registry of Births, Deaths & Marriages
    • One the celebrant keeps
    • One you get as a keepsake

    The Celebrant will make sure it’s done correctly and witnessed properly.

    After signing, the Celebrant will officially pronounce you MARRIED.

    Outside these mandatories, you can get creative, especially at the reception. Just make sure to follow the local laws especially regarding alcohol consumption.

    But it’s not over yet.


    Step 10: Submit the Paperwork.

    This step is more for your Celebrant, who should lodge your marriage registration with the appropriate state registry — usually within 14 days.

    After the marriage is registered, you can request an official marriage certificate from the state registry. This certificate is the legal document you’ll need to change your name, update your marital status, apply for joint visas, and handle any legal or financial matters.

    It can take a few weeks to a few months to receive, depending on the state. But don’t worry, if you don’t need to stay in Australia for this. You can ask your Celebrant to do this for you, usually as an add-on or for extra fee.
    The Celebrant can then send it to you by mail. We got ours roughly a month after our wedding.

    That’s it! You’re officially and legally married!


Source link

  • 12 NEW ZEALAND Travel Mistakes You Shouldn’t Make

    12 NEW ZEALAND Travel Mistakes You Shouldn’t Make


    Vins and I recently traveled to New Zealand. And yes, New Zealand was a dream. Like, ridiculously beautiful. One of those places where you start questioning if it’s even real. But as stunning as it is, traveling around came with a few surprises, missteps, and “Wait, WHAT?” moments we didn’t exactly see coming. Now that we’re back (a little sunburned, slightly broke, but very much in love with the country), we thought we’d round up the travel mistakes we personally made or almost made, so you don’t have to.

    TPTKLOOK5
    BlogDisclaimer

    From underestimating drive times to forgetting just how intense that Kiwi sun really is, consider this our humble little PSA from one set of travelers to another. Because as magical as New Zealand is and how friendly Kiwis are, New Zealand can also humble a traveler real quick, especially if it’s your first time.

    So before you pack your bags and say “Kia ora!” to the adventure of a lifetime, continue watching this video featuring our list of travel mistakes to avoid.


    WHAT’S COVERED IN THIS GUIDE?

    1. Booking too late.

    We almost didn’t make it to Hobbiton. And it would’ve been such a shame because it’s one of the biggest attractions that we were looking forward to before the trip, and we almost failed to grab tickets.

    One thing you should know about Hobbiton is that these days, you can only explore it with a guide, so you must book a Hobbiton Movie Set Tour. There are many ways to do it:

    • If you prefer to drive or take a public bus on your own, you can just purchase a ticket.
    • You can join a day tour from Auckland or Rotorua, which already includes transfers. Most tours depart from the Shire’s Rest, a café that serves as the gateway to Hobbiton.

    When we tried to book, tickets were sold out! This was one month before our target date. We knew it was popular, but we were waiting for everyone in the group to be granted a visa before we book.

    Thankfully, there are a few tours departing from Matamata iSite. We were a group of five, and by sheer luck, we were able to get the LAST 5 TICKETS! Talk about meant to be. Everything went well in the end.

    But yes, whether you’re joining a tour or buying a ticket only, best to secure it in advance.

    RESERVE A HOBBITON SLOT HERE!


    2. Winging the visa application.

    If you’re required to secure a visa prior to arrival in New Zealand, like us, I have good news and bad news. The good news is, it’s actually pretty easy to apply for a visitor visa. The list of requirements isn’t too long and the whole process (100% of it) is done online.

    The bad news is, just because it’s easy to apply doesn’t mean it’s easy to be granted a visa. This is not just a formality or simple e-Visas given by other less strict countries; they really do evaluate applications meticulously, so you can’t just wing it.

    For example, when you look at the list of supporting documents, only three are tagged as REQUIRED: passport, photo, and itinerary. You can technically submit an application with just those three attachments. But that doesn’t mean you’ll get approved. Of course, it is recommended that you upload other documents that visa officers can use to assess your application especially evidence of genuine intent or rootedness, and evidence of funds if you declare you’re shouldering the cost of the trip yourself.

    It is important that you paint a full picture of your background and your plans in New Zealand, and prove that you intend to leave the country and not overstay.

    We have a separate article about it. READ: NEW ZEALAND VISA APPLICATION GUIDE!

    I know people who have been denied a visa, so take your application seriously.

    Speaking of denied…


    3. Not reapplying when rejected.

    Let’s say your application is declined and you are refused a visa. What now? Can you appeal or ask for reconsideration?

    NO, if you applied outside New Zealand and I’m assuming most of you reading this are not based in NZ. Here’s an excerpt from a refusal letter that my friend received.

    New Zealand Visa Refusal Letter Reconsideration
    Here’s an excerpt from the Refusal Letter that a friend received when she was denied a New Zealand visa.

    But that doesn’t mean there’s nothing else you can do. What you can do is reapply. This means you’ll need to start a new application and pay another visa fee.

    But before you reapply, make sure you have new supporting documents to add that could address the reasons for refusal. If you’ll be submitting the exact same pile of documents, you might just be wasting another NZD 100.

    If you’re currently in New Zealand, YES, you can appeal as long as you make the request within 14 days.

    New Zealand Visa Reapply
    This screenshot is from the official New Zealand Immigration website

    But please note that what I share should NOT be taken as official Immigration advice. Think of me as just a friend sharing my experience. Check out the official New Zealand website or consult an immigration advisor for official advice or assistance.


    4. Failing to Declare Risk Items Upon Entry

    Agriculture and tourism are two of New Zealand’s biggest industries, and the government does everything they can to protect the environment and ensure biosecurity. That’s why they are very strict when it comes to what enters their border.

    New Zealand BIOSECURITY

    It is important that you’re familiar with items that are allowed, restricted, and downright prohibited, and follow their policies so you won’t run into any problem at the airport. You must also be aware of the items that you must declare.

    Before your trip to New Zealand, you will be required to accomplish the New Zealand Traveller Declaration Form, which has two sections specifically about what you’re bringing into the country. The first is BIOSECURITY, and you have to declare if you carry in your hand luggage or check-in luggage items like:

    Risk Items

    New Zealand RISK ITEMS
    Screenshot of a page on the official website
    • Any food: cooked, uncooked, fresh, preserved, packaged or dried, including chocolate, candies, potato chips, crackers, biscuits, cookies, instant noodles, coffee, tea bags, soft drinks and even snacks served inside the plane.
    • Animals or animal products: including meat, dairy products, fish, honey, bee products, eggs, feathers, shells, raw wool, skins, bones or insects
    • Plants or plant products: fruit, flowers, seeds, bulbs, wood, bark, leaves, nuts, vegetables, parts of plants, fungi, cane, bamboo or straw, including for religious offerings or medicinal use
    • Biological products: Animal medicines, biological cultures, organisms, soil or water
    • Equipment: Equipment/clothing used with animals, plants or water, including for gardening, beekeeping, fishing, water sport or diving activities?
    • Outdoor gear: Items that have been used for outdoor activities, including any footwear, tents, camping, hunting, hiking, golf or sports equipment

    I was carrying chocolates and other food products, so I just declared them.

    Restricted Items

    You’ll also be asked if you’re carrying more than the allowed amount of restricted items like medicine and alcohol.

    New Zealand Airport RESTRICTED ITEMS

    At the airport, the border officers just asked what items I declared and directed me to the right lane. It was pretty smooth. I’m guessing because it’s just chocolates and snacks.

    So if it’s meant to be declared, declare them. You can get fined if you fail to do so.


    5. Underestimating New Zealand’s size and distances.

    When you’re looking at a map, it’s easy to see New Zealand as a group of small islands in the far corner of the Pacific, especially when the ginormous Australia is in the same frame. It just looks snack-size compared to its neighbor, which is a full continent, but don’t assume New Zealand is small. New Zealand’s land area is bigger than the UK and just a bit smaller than the Philippines. If you superimpose it on Europe, you’ll find that it stretches from Denmark all the way to the South of France.

    New Zealand Size Comparizon
    © “New Zealand Superimposed over Europe” by Hazhk, Wikimedia Commons, CC BY-SA 3.0

    So no, it will be impractical to assume it only takes a few days to explore or that you can see it all in a week.
    Same goes for distances. Just because Milford Sound appears to be sitting pretty next to Queenstown doesn’t mean it only takes a quick drive. To get there from Queenstown, the route goes around the mountains and takes almost four hours, excluding stops and trust me, you will make some stops because the route is just so scenic.

    Waitomo Caves, which is often a favorite destination from Rotorua or Auckland, is actually 2 to 2 and a half hours away. Even Hobbiton is not “just outside Auckland”. It’s 2 hours from the city center, too.

    This is why it’s important to build a strategic and solid itinerary, especially if you’re driving.


    6. Driving on the Wrong Side of the Road

    Driving in a foreign country is often unnerving. But while in theory, driving in New Zealand should be easy because most roads are paved and there are plenty of signs everywhere, there are a few things you need to remember before you decide to take the wheel.

    First, New Zealand drives on the left side of the road. And if you’re used to driving on the right like where I’m from, it’s pretty disorienting. It takes some getting used to. It’s not just the position of the wheel inside the vehicle or your position on the road. You’ll have to unlearn certain things especially when taking a turn at intersections.

    I also noticed that New Zealand’s roads deeper into the countryside are usually two-lane and narrow, but vehicles move fast here. And instead of stoplights, there are a lot of roundabouts, which is great in minimizing traffic jams.

    New Zealand Roundabouts

    But know that when you’re using Waze or Google Maps, you’ll be counting exits a lot. It’s not difficult, but it just takes some getting used to.

    It’s best to have a navigator or a co-pilot riding shotgun so you can focus on the driving and there is someone to remind you in case you get confused.

    Also, gas stations or petrol stations are few and far between especially when driving between cities, so when you see one, grab the chance and fill up because the next one might be many, many miles away.


    7. Thinking It’s Difficult to Explore for Non-Drivers

    When we started posting about our New Zealand trip on Instagram, we received a lot of questions about whether it is possible to explore the country even if you don’t know how to drive. And the answer is YES.

    They say that the best way to explore New Zealand is to rent a vehicle and drive. And I agree. It’s also cost-efficient if you’re a group. But not everyone is able or willing to drive. For that, you can take public transportation like Intercity Buses. But make sure you sync your itinerary with the available bus journeys because for some routes, the options are limited.

    Some non-drivers would take the bus to another city and then take a day tour of another attraction. Example, a common practice is to stay in Auckland then go on a day trip of Hobbiton and then return to Auckland. Then the next day, take the bus to Rotorua.

    But there are one-way tours available. For instance, there is an Auckland-Hobbiton-Rotorua one-way tour. This way, once you’re done with Auckland, this tour can pick you up in the city, make a stop in Hobbiton so you could explore and then after, drop you off at your next hotel in Rotorua. It’s like a tour and transfer in one. And yes, you can bring your luggage with you.

    Auckland Hobbiton Rotorua One Way Tour

    RESERVE A SLOT HERE!

    We got to try the Christchurch-Queenstown one-way tour. The shuttle picked us up at our hotel in Christchurch along with our bags. And along the way, we stopped at various tourist spots like Lake Tekapo and Hooker Valley in the shadows of Mt. Cook before terminating in Queenstown.

    It’s a good option for non-drivers and will end up less costly than taking a roundtrip tour one day and then boarding an intercity bus separately.

    Klook Christchurch Queenstown One Way Tour

    RESERVE A SLOT HERE!

    Whether you’re booking tours or hotels, redeem our exclusive discount voucher by visiting www.thepoortraveler.net/klook or use our promo codes TPTKLOOK5 for up to P500 OFF or THEPOORTRAVELERKLOOK for up to P300 OFF. These codes may change in the future, so check the description or pinned comment for the updated codes and links.


    8. Skipping sunscreen.

    New Zealand’s climate is pretty mild, and it can still get cool even in summer months, so you might think “Sunscreen? Nah, I’m good.” And by lunchtime? Boom—your face is redder than a blushing teenager. This happened to me. Well, sort of. I apply sunscreen before leaving the hotel but I usually forget to reapply.

    The chilly atmosphere can lull you into a false sense of safety. But the thing is: New Zealand has one of the highest UV levels on the planet especially under the crisp, clear summer skies.

    So don’t forget to bring sunscreen with plenty of SPF and actually use it. And pack a hat, while you’re at it.


    9. Missing the operating hours.

    If you’re used to staying out until late night, know that in many destinations in New Zealand, some establishments close much earlier, especially in smaller towns. For example, in Rotorua and even in Queenstown, most cafes tend to close at around 3 or 4pm. Some as early as 2pm. Starbucks in Rotorua closes at 5pm most days, and Starbucks Queenstown at 6pm. That’s not to say that ALL cafes are like that. You can still find some that remain open at night, but it will be harder. But don’t worry, bars and malls tend to be open much later than cafes.

    This isn’t unique to New Zealand, though. We also noticed this in some cities in Australia. Could be something to do with wages and work-life balance.

    Some attractions also close early. Te Puia in Rotorua is only open until 4pm and Wai-o-Tapu until 4:30pm, understandably. Christchurch Gondola only operates until 5pm and the last ride down is at 5:30PM.

    We also noticed that car rental companies close early, with the exception of airport branches. Europcar in Auckland city center closes at 4pm on weekdays, and 12 noon on weekends. Some branches are closed on Sundays too.
    So make sure to check operating hours when building your itinerary.


    10. Paying for water.

    Tap water in most places in New Zealand is safe to drink. At least in all the destinations we visited. So you don’t really need to spend money on bottled water at the convenience store or supermarket. It’s not cheap.
    If you have a refillable water bottle, you can just fill it up at your hotel or when you can. It’s just a matter of taste, sometimes.

    If you’re joining full day tours like Milford Sound or Lake Tekapo and Hookers Valley, there’s a big chance they will be providing a bottle of water too.


    11. Underestimating Prices.

    New Zealand is expensive. My local friends always tell me that the cost of living here is pretty high. And so is the cost of travel.

    The accommodation rates alone could eat up a big chunk of your budget. There’s a reason Auckland is the only stop where we stayed at a proper full-service hotel. In Rotorua, Christchurch and Queenstown, we spent our nights at a hostel primarily because of the cost.

    This is how much we paid for a private room for 2 per night.

    • Auckland: SkyCity (Hotel)
      NZD 170 (USD 102, PHP 5740)
    • Rotorua: Rock Solid Backpackers (Hostel)
      NZD 147 (USD 87, PHP 4950)
    • Christchurch: Haka House
      NZD 183 (USD 109, PHP 6145)
    • Queenstown: Black Sheep Backpackers (Hostel)
      NZD 215 (USD 128, PHP 7240)

    Just look at how much we paid per night for our Queenstown room. This was already the cheapest centrally-located properties we found at the time — the cheapest – and this room does not have its own toilet and bath. We still had a great stay, though. We actually loved all these hostels.

    We’re probably gonna create a separate review of all these lodging options, so if you don’t want to miss that, make sure to subscribe to this channel, ring the bell beside it and select ALL so you’re always updated.

    For a meal, prepare to shell out:

    • Fast food: NZD 15-20 (USD9-12, PHP506-675)
    • Full-service restaurant: NZD 25-40 (USD 15-24, PHP 845-1350) for a main course, but higher for more premium dishes like steak or ribs

    But one thing I noticed is that a serving is usually huge, even when they say it’s good for just one person. Even their burgers here are ginormous. Since we were a group, we usually just share the food and split the bill, although some restaurants have a one meal per person policy.

    One of the reasons we like staying at hostels is they usually have kitchens where you can prepare your own food. It’s especially useful for long-term travelers. Eating out every day may not be sustainable. If budgeting gets a little tight, just buy something at a supermarket or convenience store and eat at the hostel.


    12. Not staying long enough.

    This is one thing we’re guilty of. One of the first things we said when we got home from our New Zealand trip was, “That was quick.” We spent 10 days thinking it was long enough, but we really felt like we should have extended our trip. And we would have if we had more moolah to spend.

    New Zealand isn’t really a stopover kind of destination. It’s the main event. The headliner. The Beyonce of your itinerary. And much like Beyonce, she deserves your time and money. Hahaha.

    The best destinations in New Zealand are spread out, so the drives are long. They’re worth it, but they’re long. And there’s a lot to do in every destination. Queenstown alone can oh-so-easily fill a week-long itinerary.

    We also regretted not spending more days in Christchurch. We just didn’t expect it to be so full of charm. And because we wanted to see a lot, we tumbled into the pitfall of treating our trip as a list of sights to tick. But when we were there, we found New Zealand to be a place to slow down, linger, and absorb the surroundings.

    So give yourself at least two weeks if you want to explore both islands without spiraling into an Amazing Race episode. More if you can swing it.

    If you have questions, sound off in the comments section below or tag us on your Instagram stories and X (Twitter) posts. You can also follow us there and on Tiktok.

    That’s all for now, remember, plan smart, travel safe, and make every trip WORTH IT!


    Where to Stay in New Zealand

    SkyCity Hotel Auckland
    SkyCity Hotel Auckland

    Search for more Auckland Hotels!

    Hotel Codes


    Source link

  • NEW ZEALAND Travel Guide • How to Plan a Multi-City Trip (Itinerary, Visa & Hotel Tips)

    NEW ZEALAND Travel Guide • How to Plan a Multi-City Trip (Itinerary, Visa & Hotel Tips)


    New Zealand. Aotearoa. Middle-Earth. Whatever you wanna call it, one thing is the same: it is a spectacular destination. And for many of us, it is a place we have been dreaming of visiting. But how do you start planning a trip to this real-life fantasyland? In this video, we’ll walk you through the essentials —from timing and transportation to must-visit spots. Because yes, it may be an epic destination, but it also takes a bit of strategy.

    TPTKLOOK5
    BlogDisclaimer

    WHAT’S COVERED IN THIS GUIDE?

    Step 1: Decide how long your trip will be.

    Size-wise, New Zealand is a bit tricky when seen on the map. It does look like just a couple of droplets in the ocean, especially when the gigantic Australia is in the same frame. But it is not that small. And even if it were, there’s just a lot to see and do. It’s got glaciers, glowworm caves, snow-capped peaks, iconic filming locations, and charming cities. And chances are, you’d want to see them all.

    Our first advice is to stay longer. We stayed for 10 days, and it felt really short. Getting to New Zealand is not easy or cheap, so make the most out of it by staying longer and seeing more, especially if you plan on making a stop at multiple cities.

    But if you can really allocate a few days, that’s fine, but it’s going to be more challenging unless you’ll be focusing on just one or two destinations.


    Step 2: Build your itinerary.

    Once you figure out how many days you will be spending in New Zealand, it’s time to start building your itinerary. The first step is to identify what destinations are non-negotiable for you. For example, if you’re a Lord of the Rings fan, I’m sure you will not forgive yourself if you don’t set foot in Hobbiton. Right?

    So list them out. In our case, we only had a few: Hobbiton, Christchurch, and Queenstown.

    And just by looking at the map, I realized early on that they’re pretty far apart. So from here, we tried to come up with a route that would connect all of these and can realistically be enjoyed in 10 days.

    From the get-go, we knew our entry point would be Auckland. As New Zealand’s largest city, it has the country’s biggest airport and is the most usual jumpoff point to Hobbiton. But instead of going back to Auckland, we decided to stay for a couple of days to Rotorua, since it is also a popular tourist destination.

    Rotorua has an airport, which serves direct flights to Christchurch, so we opted to fly for this leg. But from Christchurch to Queenstown, we wanted to travel by land so we could admire the landscapes along the way. So we’ll only be booking four hotels, one each in Auckland, Rotorua, Christchurch, and Queenstown.

    But as we continued researching, we realized that we could also visit other attractions. For example, from Christchurch to Queenstown, instead of booking a direct bus, we discovered that there are one-way tours on Klook. One-way because it will pick you up in Christchurch, make several extended stops at tourist spots along the way including Lake Tekapo and the areas close to Mt. Cook, and then drop you off in Queenstown. It’s like a bus transfer and group tour in one!

    On Klook, they have Christchurch to Queenstown and Queenstown to Christchurch via Lake Tekapo and Mt. Cook, and Auckland to Rotorua via Hobbiton.

    Auckland Hobbiton Rotorua One Way Tour

    Auckland to Rotorua via Hobbiton

    Christchurch to Queenstown via Mt. Cook & Lake Tekapo

    Queenstown to Christchurch via Mt. Cook & Lake Tekapo


    Step 3: Figure out transportation.

    One thing that became apparent early on while researching for this trip was that public transportation options between cities in New Zealand were quite limited. This is why, many online publications will tell you that the best way to get around is by renting a car or a campervan.

    I agree. By driving, not only do you have total control of your time, you also don’t get restricted by rigid bus or tour schedules. But before you lock it in, make sure you have a valid driver’s license and that you’re confident driving on the left side of the road.

    But if you’re traveling alone or a couple, you might end up spending more. It’s more ideal if you’re part of a group so you have companions to split the cost with.

    If driving is out of the picture for whatever reason, you can take InterCity Buses. But again, know that departures are few and far between. For example, from Auckland to Rotorua, there are only a handful of journeys available. But you can totally make it work if you plan your trip well.

    Another option is by joining the one-way tours that I mentioned in the previous section of this video.
    You can also fly. Domestic flights in New Zealand are delightfully inexpensive, so don’t count them out just yet. For example, when we flew from Auckland to Christchurch, we only paid around 108 NZD (P3640) per person.

    AUCKLAND-CHRISTCHURCH Flights

    Originally we wanted to fly straight from Rotorua Airport to Christchurch, but this route was twice or thrice more expensive so we decided to travel back to Auckland Airport instead.

    ROTORUA-CHRISTCHURCH Flights

    Speaking of flights…


    Step 4: Compare flight prices.

    New Zealand is pretty remote, so it’s no surprise that flights going there are expensive. Its national flag carrier is Air New Zealand, which has direct flights to and from Taipei, Singapore, Hong Kong, Tokyo, Shanghai, Vancouver and various cities across Australia, the United States, and the Pacific. Other airlines like Qantas, Jetstar, China Airlines, Cathay Pacific, Singapore Air, Qatar Airways and Emirates fly to New Zealand too. So do a number of American and Chinese carriers.

    Auckland Airport Destinations
    Via Wikipedia

    We’re based in the Philippines and there are no direct flights available. Philippine Airlines used to offer direct Manila to Auckland flights, but that route has been discontinued. So we had to connect elsewhere. But this trip is part of our greater Australia-New Zealand trip so we flew from Melbourne.

    COMPARE FLIGHTS HERE TOO!

    If you book in advance, a roundtrip flight from Manila usually costs PHP 40,000 to 50,000 in off-peak season and around PHP 60,000 in peak season.

    New Zealand Flights Off Peak
    Manila-Auckland Flights in OFF-PEAK season
    New Zealand Flights Peak Season
    Manila-Auckland Flights in PEAK season

    As much as possible, try to book both legs of the journey with the same airline or at least airlines with code-share agreements, so you won’t need to clear immigration at your layover airport and pick up and check in your bags again. Especially if you’re connecting in Australia, which will require you to obtain a Transit Visa first.

    Manila to Auckland Different Airline Transit Visa
    In this sample booking, you will need an Australian Transit Visa.

    Anyway, if you see fares and arrangements that you like, don’t book just yet. Just compare and canvas. Don’t finalize anything.


    Step 5: Check accommodation options.

    Another thing you need to consider is accommodations. The good news is, most New Zealand city or town centers are not that big. Even Auckland, which is the country’s largest city, isn’t as bustling and is actually quite chill compared to other big cities in other countries. So in theory, as long as you’re within the city center or town center, you should be fine.

    But one thing you need to be prepared for is the cost. While planning our trip, we quickly realized that accommodation rates in New Zealand are quite steep especially in the summer months.

    SkyCity Hotel Auckland
    SkyCity Hotel Auckland
    • In Auckland, we booked a room at SkyCity, which is just next to the Sky Tower, Auckland’s most iconic landmark. We paid around NZD 170 (P5740) per night. Great location, and the Sky Drive, which is the airport bus terminates just around the corner. Check Rates & Availability!
    • In Rotorua, we stayed at Rock Solid Backpackers, a hostel right in the city center within walking distance of major attractions. It was just a fan room, but New Zealand summers are pretty mild so we didn’t mind. It’s equipped with all the basic amenities, a TV, a table, toiletries, and all. And yes, it has an ensuite toilet and bath. We paid USD 87 (NZD 147, PHP 4950) per night. Yes, for a fan room. That’s how expensive rooms are here. Check Rates & Availability!
    • In Christchurch, we booked a private room at Haka House, which I think is also classified as a hostel, but it didn’t feel like it at all. It was newly renovated and our room had ensuite toilet and bath and everything was squeaky clean, so it felt like we were staying at a boutique hotel. Awesome location, too, close to most points of interest including the Botanical Garden and Riverside Market. They had no elevator though, so it can be challenging if you have heavy luggage. This room set us back NZD 183 (USD 109, PHP 6145) per night. Check Rates & Availability!
    • But Queenstown was the priciest of them all. We stayed at another hostel called BLACK SHEEP Backpackers Hostel, in a fan room without its own toilet and shower. The place was neat and nice, and it’s not too far from the center of the action, but we shelled out NZD 215 (USD 128, PHP 7240) per night for this. And this was the cheapest that we found even if we booked this way in advance. Check Rates & Availability!

    By the way, you don’t need to memorize all these details. We compiled all the NEW ZEALAND TRAVEL ESSENTIALS including a list of all the hotels and hostels we tried in the TPT Masterlist. Just visit and scroll until you see the section about New Zealand. We also have a compilation for other destinations around the world. Check Rates & Availability!

    So yeah, New Zealand lodging is super expensive. Just keep it in mind when budgeting for your trip. That’s probably why some travelers choose to just rent a campervan.

    Anyway, just like with flights and transpo, don’t commit to your hotel booking yet. Instead, choose properties that offer FREE CANCELLATION. Both Klook and Agoda have these options.

    • If you book with Klook, please use our promo code THEPOORTRAVELERKLOOK for up to P300 OFF or TPTKLOOK5 for up to P500 OFF. These codes might change in the future so best to just visit thepoortraveler.net/klook to redeem updated discount codes!
    • If you prefer AGODA, use our promo code AGODATPT for 10% discount.

    Whatever you choose, make sure it’s FREE CANCELLATION because there’s one crucial thing that you need to take care of first before you make any booking final…


    Step 6: Apply for a New Zealand visa.

    New Zealand Visa Sample

    You might be wondering why I’m bringing up the visa just now. Well, 2 reasons:

    First, a New Zealand visa isn’t cheap. It costs NZD 100 (PHP 3300), as of this writing. And it’s usually valid for just 1 year. It’s not like the US or Canada visas which can give you up to 10 years. No, just 1 year. So if you’re not yet 100% certain that you’re New Zealand-bound, don’t apply. You’ll just be wasting money if you end up not using it.

    Also, before you start the visa application process, it’s best that you have a strong grasp of your travel plans. When applying for a New Zealand visa, you’ll be asked for your travel dates and hotel addresses, and you can even submit a detailed day-to-day itinerary to bolster your case. Having a solid travel plan will greatly increase your chances of approval. You can also upload your hotel bookings as supporting documents, although it’s optional.

    I’m not going to delve deeper into the process because we have discussed it in detail in our comprehensive NEW ZEALAND VISA GUIDE!

    If you prefer it in Tagalog or Filipino, just watch this video.

    According to the official New Zealand Immigration website, visa processing usually takes 4 weeks or 1 month. I got mine after only 2 days but don’t count on it. It’s always best to apply at least 2 months before your target departure date.


    Step 7: Finalize all your bookings.

    Once you’re granted a visa, finalize all your bookings! Book those flights, tours, transfers, and other stuff that you were eyeing. Or if things change, adjust accordingly.

    Again these are all the promo codes that you can use. We have discounts for hotels, tours, and eSIM for internet connection. We even have special rates for travel insurance, exclusive for TPT subscribers.

    The Poor Traveler Codes

    Make sure to also accomplish and submit the New Zealand Traveller Declaration Form within 24 hours before your departure flight. It has to be in their system by the time you arrive in New Zealand.

    That’s all for now. Remember, plan smart, travel safe, and make every trip WORTH IT!


    Source link

  • The Best Time To Visit Australia (2025 Guide)

    The Best Time To Visit Australia (2025 Guide)


    The best time to visit Australia depends on what kind of holiday you want, from skiing in the Snowy Mountains to snorkelling the Great Barrier Reef. 

    With a country as massive as Australia (three different time zones and two climates), timing your trip can make all the difference.

    If you’re outdoorsy, you might want to visit Australia when it has the best weather, meaning comfortable temperatures, sunny days, and blue skies. It could be tricky, considering the climates vary depending on where you are in the country.

    The northern regions experience a tropical climate, while the southern half has temperate weather.

    In other words, Northern Australia only has two seasons: dry and wet. In contrast, the southern states typically undergo all four seasons.

    In addition, Australia’s diverse landscapes, from luxuriant rainforests and arid deserts to sun-kissed capital cities and snow-covered mountains, create varied weather patterns.

    And Australia, being in the Southern Hemisphere, has utterly opposite seasons to most countries in the Northern Hemisphere. Don’t expect hot weather in June or August (at least in New South Wales and other southern states), as it’s the Australian winter.

    Visiting in December or January? You’re most likely going to deal with heat waves instead of snow storms. After all, it’s the peak of the Southern Hemisphere’s summer.

    So, when’s the best time to visit Australia? There’s no one-size-fits-all answer to that. 

    But if you’re looking to travel when the crowds are smaller and the prices cheaper or planning your trip around the weather, here’s a roundup of what to expect every season.

    Sydney Opera House
    There is no bad time to visit Australia!

    When is the Best Time to Visit Australia?

    The best time to visit the southern parts of Australia is generally during the shoulder seasons, spring (September-November) and autumn (March-May). 

    You’ll enjoy perfect weather, fewer tourists, and potentially lower prices. Plus, nature’s putting on a bit of a show. Think wildflowers in spring and golden foliage in autumn.

    If you’re exploring areas in the north (i.e., Northern Territory, Kimberley Region of Western Australia, or Tropical North Queensland like Cairns), the best time to visit is during the dry season from May to October.

    That said, every season has its perks. We’ll go as far as to say there’s never really a bad time to visit Australia. It’s a year-round destination, especially if you fancy a break in one of the big cities or a scenic road trip.

    Read our Sydney to Perth Road Trip Itinerary for a cross country adventure!

    Summer brings beachy buzz and fun festivals. But it’s also the high season, which translates to big crowds and higher rates. 

    Winter is great for exploring the Outback or hitting the ski slopes of the Australian Alps. Also, it has smaller crowds and cheaper rates. The drawback is that the winter months can be super rainy in some parts of the country.

    While the shoulder seasons are, for the most part, the best time to visit Australia, certain activities like whale-watching, swimming in the Great Barrier Reef, or hiking in the Red Centre, are best experienced during specific times of the year.

    The best way to get around is to rent a car and explore on your own! We recommend Rental Cars, which has the largest range of vehicles for the best value on the market.

    Summer in Australia (December-February)

    Summer in Australia is the peak season. In the southern regions, the weather is warm and sunny, with average temperatures between 25°C and 30°C.

    However, in the northern parts, like Queensland and the Top End, it’s the wet season (November-April). Expect afternoon storms, occasional cyclones, and high humidity (often exceeding 80%). Average temperatures range between 25°C and 37°C.

    Many flock to the south during the summer months. Brace yourself for larger crowds and pricey accommodations. Late December to late January is usually the busiest because of the school holidays.

    Read our guide to Transportation In Australia for tips on getting around!

    Top things to do during summer in Australia

    Many flock to the south during the summer months. Brace yourself for larger crowds and pricey accommodations. Late December to late January is usually the busiest because of the school holidays.

    The summer months are perfect for those who love the iconic Aussie beach lifestyle. Go beach-hopping along the East Coast. New South Wales and Victoria have incredibly stunning beaches, with some staying almost empty even at the height of summer.

    Love road trips? Drive the Great Ocean Road or join a full-day tour for hassle-free sightseeing. Or, ride an open carriage steam train through the Dandenong Ranges, spotting wildlife.

    For avid hikers, Tasmania’s Overland Track and Cradle Mountain are best trekked in summer when the weather is the warmest and most stable. And with the surrounding seas the calmest in summer, it’s the best time to go on a wilderness cruise along the Tasmanian coastline.

    Summer often brings mild but consistent waves, suitable for beginner surfers. Take a surf lesson at Byron Bay or hone your wave-riding skills at Sydney’s Bondi Beach.

    In terms of festivals, summer has a full calendar of events showcasing Australia’s love of food, music, and the outdoors.

    Notable events include Sydney’s New Year’s Eve fireworks, the Australian Open in Melbourne, and the Adelaide Fringe Festival. Also, enjoy Australia Day with fireworks, BBQs, live music, and cultural festivities.

    Tasmania Summertime
    Tasmania is gorgeous in summer.

    Autumn in Australia (March-May)

    Autumn is hands down one of the best times to visit Australia. It’s the shoulder season, so you get the best of both worlds: comfortable weather, fewer visitors, and often slightly lower prices on flights and accommodation.

    The intense heat mellows in the south as temperatures drop to 25°C highs and 17°C lows. You may experience occasional rains, but they are mostly light and brief.

    In the northern Australian states, the rainy season starts to wane, leaving behind lush landscapes and lower humidity levels.

    Though it’s usually uncrowded, Easter weekends (around March or April) are almost always busy as families enjoy the school break. If you plan a trip during the holiday, be sure to book your accommodations early.

    Read next: The Best Australia Travel Tips

    Top things to do during autumn in Australia

    Autumn is like Australia’s sweet spot. Beaches are still warm enough for a swim. The hiking trails are alive with crisp air and golden leaves, making the season perfect for exploring a national park or two.

    Plan a road trip through Tasmania to see the turning of the Fagus, when native beech trees transform from verdant green to deep reds and golds, bathing the land in warm colours.

    While in Tasmania, visit the Freycinet National Park and Wineglass Bay on a scenic walk tour of the East Coast before the next season brings the chill.

    Late February to April is wine harvest season, so a trip to regions like the Barossa Valley, Hunter Valley, or Yarra Valley is a nice touch to your itinerary.

    Looking for killer whales? Head to Western Australia in March or April, the peak of the orca season. You’ll see these playful creatures on a killer whale expedition to Bremer Canyon, a well-known feeding ground. 

    As for events, autumn has no shortage of them. Check out the Melbourne Comedy Festival (March-April), Adelaide’s Tasting Australia (May), and Vivid Sydney (May-June).

    Then, there’s Canberra’s Enlighten Festival (February-March), two weeks of light installations, outdoor art, and night markets. And if you’re a fan of surfing, don’t miss Rip Curl Pro at Bells Beach in Melbourne.

    Bells Beach Victoria
    The iconic Bells Beach in Victoria

    Winter in Australia (June-August)

    While the Northern Hemisphere embraces the Great Outdoors, the Land Down Under abandons the beaches for the toasty comforts of the cozy indoors. Well, almost.

    The winter months are off-season for most of the country, especially the southern parts. That means fewer crowds and cheaper accommodations, flights, and tours.

    Coastal cities like Adelaide and Perth enjoy sunny days with temperatures around 10°C to 18°C. Sydney also has milder temps, but rainfall is frequent, especially in June.

    Melbourne is colder and moodier, with temperatures hovering around 8°C to 15°C. Days are mostly cloudy, but heavy rains are rare.

    Tasmania is even colder, with temperatures at 5°C, which usually drop to as low as 3°C overnight. The highlands often receive snowfall. August is also the rainiest month in the state,

    Meanwhile, the tropical north is in its dry season. In fact, winter is one of the best times to visit Queensland, Darwin, and the rest of the Northern Territory as the sun shines and humidity disappears.

    Uluru Australia
    Winter is the best time to visit Uluru and the Red Centre.

    Top things to do during winter in Australia

    Winter in Australia might make you think twice about visiting, but it offers a range of eclectic activities, from cozying up in a bar in Melbourne to sunbaking on a beach near Cairns before touring the Daintree Rainforest.

    The cooler months are perfect for exploring the iconic Uluṟu-Kata Tjuṯa National Park when the lower temperatures make desert adventures more comfortable. Go for a day trip to Uluru with a BBQ dinner or a multi-day tour of the Australian Outback.

    The Kimberley region in Western Australia is another swathe of ancient landscape you might want to explore in this season. Book a full-day tour of the Kimberley wilderness and Broome between late May and June while the waterfalls are still flowing fully after the heavy rains.

    In the Top End, head to the Kakadu National Park. Discover impressive biodiversity with a Kakadu wilderness getaway tour. Or, if you’re more into the historical aspect of the oldest living culture on earth, check out this Kakadu Park cultural day trip.

    Winter is outside the stinger season (November-May), making it ideal for exploring the Great Barrier Reef on a snorkelling or diving safari.

    The whale-watching season peaks between June and August, especially along the East Coast. Hervey Bay is a prime spot to see these gentle giants in the wild.

    While summer is best for learning to surf, wintry offshore winds bring huge and consistent swells suitable for experienced surfers. 

    Seeking to swap sand for snow? Head to the Snowy Mountains, Mount Buller, Perisher, or Thredbo for skiing, snowboarding, and fireside wine.

    And oh, the Southern Lights? You can see them during during May to August from various spots in Tasmania, like Mount Wellington, Bruny Island, Cockle Creek, and the South Arm Peninsula.

    Australia Winter Whale Watch
    Don’t miss the chance to go whale watching in Australia in winter!

    Spring in Australia (September-November)

    Spring is an absolute treat. It’s a shoulder season, so you’re in a lovely spot between the calm of winter and the chaos of summer.

    The weather starts warming up across the country, but not yet too hot for walks. The bonus? Prices and crowds are still relatively low, especially compared to peak times.

    Average temperatures in spring range from 17°C to 25°C in most southern parts. Northern Australia is a bit warmer, with 31°C, though evenings are usually cooler.

    Spring is when Mother Nature goes on a roll. Wildflowers blanket almost every national park, whales migrate along the West Coast towards the Antarctic, and young koalas and kangaroos emerge from their mothers’ pouches.

    Kangaroos Australia
    No trip to Australia is complete without seeing some adorable kangaroos.

    Top things to do during spring in Australia

    In New South Wales, beaches begin buzzing again, particularly in Sydney. Picture the coastal walk from Bondi to Tamarama turned into an open-air gallery with Sculpture by the Sea (October-November).

    The main draw of spring, however, is the vibrant flowers. And no, we don’t just mean the jacaranda blooms that adorn the parks of Brisbane or the streets of Grafton (its Jacaranda Festival is worth checking out).

    We mean the bloom-fest in Western Australia, where you can see more than 12,000 wildflower species, more than half of which are native to the area.

    The wildflower season can start as early as June and last until late November, depending on the region. But the peak is typically between September and October.

    You can see an extensive array of wildflowers at Kings Park in Perth. But if you fancy seeing the blooms in the wild, head to Kalbarri in Western Australia or the Grampians National Park in Victoria.

    Spring falls on the tail end of the whale-watching season. So, if you haven’t already, go on a last-minute whale spotting cruise from Perth from September to November.

    To see newborn koalas and kangaroos, tour Kangaroo Island in South Australia.

    For spring events, Floridae, Canberra’s biggest flower and entertainment festival happening from September to October, will amaze you. There’s also the Melbourne Cup horse race, which takes place early November.

    Wet Season in Australia (November-April)

    The wet season mainly affects the tropical north, including northern Queensland, the Top End of the Northern Territory (like Darwin and Kakadu), and northern parts of Western Australia.

    It’s considered the off-season for these regions due to the hot weather (around 30°C to 35°C), heavy rainfall, high humidity, and intense afternoon storms. The rains can start as early as October, with January as the wettest month.

    While it’s not everyone’s first pick, the wet season has its perks—lush scenery, thundering waterfalls, fewer crowds, and lower prices. Come prepared for some travel flexibility, as flooding can affect access to remote areas.

    Daintree Rainforest Rainy Season
    Places like the Daintree Rainforest can still be visited in wet season – but be prepared for some storms.

    Top things to do during the wet season

    Visit museums and markets, then jump on a croc-spotting river cruise in Darwin.

    Go barramundi fishing in Kimberley or the Top End.

    Take a scenic flight over the flooded canyons in Katherine Gorge and the tumbling waterfalls of Kakadu.

    Dry Season in Australia (May-October)

    The dry season is the peak season in the tropical north. The weather is warm but not humid, with clear skies, low rainfall, and temperatures usually not going over 30°C.

    It’s the perfect escape from colder southern winters, so expect larger crowds and higher prices in accommodations, flights, and tour packages.

    Top things to do during the dry season

    Travellers flock north during the dry season to explore rainforests, reefs, and remote national parks. Roads are open, waterfalls are still flowing, and outdoor activities are in full swing.

    Swim in Cairn’s Northern beaches, try river-drifting at Mossman Gorge, island hop in the Great Barrier Reef (dry season equals non-stinger season), and paddle across the Noosa Everglades.

    For foodies, the Mindil Beach Sunset Markets, open Thursdays and Sundays from late April to late October, boasts over 60 food stalls from around the world.

    Great Barrier Reef
    The Great Barrier Reef is best in dry season.

    What is the best month to go to Australia?

    The best time to visit Australia is spring (September–November) or autumn (March-May) for great weather, fewer crowds, lower prices, and stunning scenery.

    In the northern regions, the dry season, which coincides with autumn and winter, is the most popular time to visit.

    But every season offers something unique. So, the best time really depends on what kind of adventure you’re after.

    DISCLAIMER: Some of the links in this article are affiliate links, which means if you book accommodation, tours or buy a product, we will receive a small commission at no extra cost to you. These commissions help us keep creating more free travel content to help people plan their holidays and adventures. We only recommend the best accommodations, tours and products that ourselves or our fantastic editorial team have personally experienced, and regularly review these. Thanks for your support, kind friend!


    Source link

  • TAIPEI Sample Itinerary for First-Timers • The Best Attractions in 4 Days

    TAIPEI Sample Itinerary for First-Timers • The Best Attractions in 4 Days


    Taiwan is one of the most iconic travel destinations in Asia. When you see a photo of Taipei 101, you’ll immediately know it’s Taiwan. But aside from this building that was once the tallest in the world, Taiwan has a lot to offer to tourists. From rich cultural heritage, to modern cityscape, to stunning natural landscapes, it attracts travelers who are interested in different kinds of adventure. Whether you’re looking to hike through scenic trails, visit temples, or eat your heart out at night markets, this island will surely give you a trip to remember.

    TPTKLOOK5
    BlogDisclaimer

    Taiwan was our last destination before the pandemic spread around the world and before countries closed their borders. In fact, we even got stranded here because of it! So when we felt that travel is going back to normal, it just felt right to make Taiwan our first out of the country destination.

    And now, we’re sharing with you a sample itinerary that you can follow especially if it’s your first time in Taiwan.

    Note: This isn’t the actual itinerary we had for our trip. But if it’s your first time and you want to experience a lot in Taipei, this itinerary is what we highly recommend.


    WHAT’S COVERED IN THIS GUIDE?

    DAY 1: TAIPEI CITY CENTER

    Arrival

    • Touchdown Airport. When you land at the airport, you can exchange money or withdraw Taiwan dollars from the ATM so you have local currency right away. You can also buy a SIM card or pick one up if you pre-ordered online, so you’re connected as soon as you arrive. Here are two options from Klook!

      GET YOUR DATA SIM CARD HERE!

      GET YOUR DATA eSIM HERE!

    • Make your way to the city center. If you’re on a DIY trip, you can take the train or ride a bus to reach your hotel. But if you’re with a bigger group, traveling with seniors, or just want a smoother trip, you can book a tour package with a reputable agency in Taiwan like Edison Tours, or even from the Philippines.
    • Check in at hotel. If you arrive too early to check in, drop off your bags at the hotel and start exploring.

    Since it’s your first time, it’s best to see Taipei city center’s must-visit attractions.


    Chiang Kai Shek Memorial Hall

    Chiang Kai Shek Memorial Hall Changing of the Guards

    Built in 1976 to honor one of Taiwan’s most important figures, the Chiang Kai Shek Memorial Hall houses a giant statue of him in the main chamber, with a museum and library on the lower level.

    Address: No.21, Zhongshan S. Road, Zhongzheng District, Taipei City, Taiwan (R.O.C)
    Nearest MRT Station: Chiang Kai-shek (CKS) Memorial Hall Station (Red Line 2 or Green Line 3)
    Open: Daily, 9:00 AM – 6:00 PM
    Entrance Fee: FREE


    Sun Yat-sen Memorial Hall

    Another landmark built to honor one of Taiwan’s founding figures is the Sun Yat-sen Memorial Hall. Sun Yat-sen is widely regarded as the Father of the Nation, and this site celebrates his legacy with a grand statue, exhibits, and spacious grounds perfect for a leisurely stroll.

    Address: No. 505, Section 4, Ren’ai Road, Xinyi District, Taipei City, Taiwan (R.O.C)
    Nearest MRT Station: Sun Yat-sen (SYS) Memorial Hall Station (Blue Line 5)
    Open: Daily, 9:00 AM – 6:00 PM
    Entrance Fee: FREE

    Note: Since February 2024, the hall is temporarily closed for maintenance. It is expected to reopen in 2026.


    Taipei 101

    Taipei 101 at Night

    Taipei 101 is the most iconic attraction in Taipei. From 2004 to 2012, it held the title of the world’s tallest building until it was surpassed by the Burj Khalifa in Dubai. At the top, there’s an observatory where you can enjoy breathtaking panoramic views of the capital.

    You can secure your ticket in advance online through accredited booking sites like Klook!

    GET YOUR TAIPEI 101 TICKET HERE!

    Address: No. 7, Section 5, Xinyi Road, Xinyi District, Taipei City, Taiwan (R.O.C.)
    Nearest MRT Station: Taipei 101 Station (Red Line 2)
    Hours open: Daily, 9:00 AM – 10:00 PM
    Entrance Fee: NT$600


    Elephant Mountain

    While the Taipei 101 Observatory offers an incredible view of the city, the best vantage point is actually from Elephant Mountain. Many of the city’s iconic postcard shots were likely taken here. The ideal time to visit is late afternoon so you can enjoy the skyline by day, catch the sunset, and see the city light up at night. Just keep in mind, it does require a bit of a climb, so it might not be suitable for those with mobility concerns.

    Trail Head: Lane 150, Xinyi Road, Section 5, Xinyi District, Taipei City, Taiwan (R.O.C.)
    Nearest MRT Station: Xiàngshān Station (Red Line 2)
    Entrance Fee: FREE


    Ximending

    Ximending is Taipei’s youth district, known for its vibrant entertainment, dining, and shopping scene. It really comes alive at night — bright, bustling, and full of energy. Think of it as Taipei’s version of Tokyo’s Harajuku. You’ll find global brand stores, bars, cafes, and clubs here.

    Taipei Rainbow Road

    Ximending Taipei Japanese Graffiti

    The most popular area is Ximen Walker Street, always packed with both tourists and locals. There are also tons of food options around, making it a great place to grab dinner and wrap up your day.

    Location: Ximending, Wanhua District, Taipei City, Taiwan (R.O.C.)
    Nearest Station: Ximen Station (Blue Line 5 or Green Line 3)
    Entrance Fee: FREE


    DAY 2: NEW TAIPEI CITY

    After exploring Taipei City, it’s time to head to New Taipei City. Though it’s a separate municipality, it’s often grouped with Taipei City as part of the Greater Taipei Metropolitan Area. Thanks to an efficient transportation system and both cities being progressive, you might not even notice that they’re different cities.

    For your second day, let’s switch things up and escape the skyscrapers and shopping malls. Travel to the countryside, visiting the charming districts of Ruifang, Pingxi, and Wanli.

    Yehliu Geopark

    Yehliu Geopark Rock Formations

    Located at the northernmost tip of Taiwan, the Yehliu Geopark is famous for its striking rock formations, set against the backdrop of powerful waves. It’s no surprise that this spot is a favorite for photographers and tourists alike.

    Yehliu Geopark Queen's Head Rock
    Queen’s Head Rock

    However, it’s a bit out of the way compared to other attractions. If you’re doing it DIY-style, be mindful that the journey to the next stop could take around two hours. To save time, we recommend joining a tour, which minimizes transfer and waiting times. Without stops, it’s only about a 45-minute to one-hour drive to the next destination.

    Klook offers a day tour that includes Yehliu Geopark, Jiufen, and Shifen, among others. This covers transportation, insurance, and an English-speaking guide.

    BOOK NEW TAIPEI DAY TOUR HERE!

    For can also purchase your entrance ticket ahead of time online here:

    GET YOUR YEHLIU GEOPARK TICKET HERE!

    Address: No. 167-1, Gangdong Road, Wanli District, New Taipei City, Taiwan (R.O.C.)
    Entrance Fee: Adult, NT$120; Child (6-12 y/o), NT$60


    Jiufen Old Street

    This is like stepping into a scene from Spirited Away. While it wasn’t the actual inspiration for Hayao Miyazaki’s film, many say the town’s ambiance strongly evokes the enchanting atmosphere of the animated world.

    Jiufen Teahouses
    Jiufen Teahouses

    Once a gold mining town, Jiufen Old Street is now famous for its teahouse culture and charming streets. It’s a delightful place to explore. You can browse for souvenirs, enjoy tea or coffee in cozy cafés, or savor a meal in one of its quaint restaurants. Popular spots include Jiufen Old Street, Shengping Theater, the Gold Mine Museum, Mount Keelung Trail, and various scenic viewpoints.

    Location: Ruifang District, New Taipei City, Taiwan (R.O.C.)

    How to Get to Jiufen: From Taipei Main Station, take a train going to Ruifang Station. Along Mingdeng Road is a bus station (Local Residents Plaza) with routes heading toward Jiufen. Take bus Route 827 or 788. Going back to Taipei city, take bus Route 1062.


    Houtong Cat Village

    If you’re a cat lover, the Houtong Cat Village is a must-visit! Located just a 15- to 20-minute drive from Jiufen, this former coal-mining town has transformed into a cat haven. In 2008, a local photographer captured the heartwarming sight of residents caring for abandoned cats. Since then, the village has attracted cat enthusiasts from all over the globe.

    Houtong Cat Village 1

    Aside from the adorable cats, you’ll find statues and cat-themed souvenir shops. The village itself is beautifully scenic, nestled between a stream and a railway. And if you’re feeling hungry, there are plenty of snack stalls to enjoy some local treats.

    Houtong Cat Village 2

    Location: Ruifang District, New Taipei City, Taiwan (R.O.C.)

    How to Get to Houtong Cat Village: If coming from Jiufen, take the train to from Ruifang Station to Houtong Station. From Taipei Main Station, take a train going to Ruifang Station. Then, transfer to Pingxi Line to Houtong Station. Another way is to take a direct local train from Taipei Main Station to Houtong Station.


    Shifen Waterfall

    This area can also be a great lunch stop since there are plenty of restaurants and food stalls around. But if you’re doing a DIY trip, be ready for some walking. The nearest train stop is Shifen Station, which is about a 25-minute walk from the start of the trail. From there, it’s another 15 to 20 minutes to reach the main viewing deck.

    Shifen Waterfalls Trail

    That’s why joining a tour is a smart option, especially if you’re traveling with seniors or kids. Tour buses can park closer to the walking trail, making the journey much shorter and more comfortable. Along the way, you’ll pass by stalls selling snacks, drinks, and souvenirs. Some of the refreshments and bites you’ll find are milk tea, lemon tea, fresh fruits, and eye-catching atis (sugar apples) that are surprisingly huge!

    Shifen Waterfalls

    Once you resist all the food temptations, you’ll reach the first viewpoint near the cascade, which is perfect for photos. But for the best angle, continue along the trail until you reach the main viewing platform for Shifen Falls. Just keep in mind there are stairs, so it may not be suitable for those with mobility concerns.

    Location: Pingxi District, New Taipei City, Taiwan (R.O.C.)

    How to Get to Shifen Waterfalls: From Taipei Main Station, take a train going to Ruifang Station. Then, transfer to Pingxi Line to Shifen Station. From there, you’ll reach the waterfalls in about 25 minutes on foot.


    Shifen Old Street

    Shifen Old Street is where you’ll find the iconic railway track that serves as the site for releasing sky lanterns. If you decide to try the activity, you’ll start by writing your wishes or messages on the lantern. Once you’re done, a staff member will help light it up, and you can watch it slowly rise and drift away with the wind.

    Shifen Old Street

    The Pingxi District is famous for its Sky Lantern Festival, held during the first lunar month — usually in February. But you don’t have to wait for the festival to experience this! Visitors can release sky lanterns year-round for a fee. Of course, it’s not for everyone. If you tend to wonder where these lanterns end up after they fall, you might want to skip it. But there are still plenty of other things to enjoy, like shopping for souvenirs or sampling snacks from the stalls that line the tracks.

    Location: Pingxi District, New Taipei City, Taiwan (R.O.C.)

    How to Get to Shifen Old Street: From Taipei Main Station, take a train going to Ruifang Station. Then, transfer to Pingxi Line to Shifen Station. The railway tracks run along the Shifen Old Street.


    Raohe Night Market

    Raohe Night Market Taipei

    After the tour, it’s time to head back to the city. For dinner, head to Raohe Night Market, one of the oldest and most iconic night markets in Taipei. As of writing, four food stalls here have Michelin Bib Gourmand recognition — an award given to eateries that serve great food at a good value.

    Fuzhou Black Pepper Buns
    Fuzhou Black Pepper Buns

    We were able to try two of them. The most famous is the Fuzhou Black Pepper Buns, known for their crispy, charcoal-baked pork buns cooked in a traditional brick oven. Another must-try is the Chen Dong Pork Ribs Medical Herbs Soup. It may look like mostly bones, but the meat is incredibly tender and falls right off. It’s warm, comforting, and flavorful. And while you’re here, be brave and try the notorious stinky tofu, or snack on skewers from the many vendors. Then cap off your night with a classic Taiwanese milk tea!

    Chen Dong Pork Ribs Medical Herbs Soup
    Chen Dong Pork Ribs Medical Herbs Soup

    Address: Raohe Street, Songshan District, Taipei City, Taiwan (R.O.C.)
    Nearest Station: Songshan Station (Green Line 3)
    Open: Daily, 5:00 PM – 11:00 PM
    Entrance Fee: FREE


    DAY 3: NORTH TAIPEI TOUR

    On the third day, let’s head north! This area is still within Taipei City, but it’s more on the countryside, away from the busy city center. Here are the possible stops.

    Yangmingshan National Park

    Yangmingshan Natl Park 1

    Straddling Taipei and New Taipei City, Yangmingshan is one of Taiwan’s nine national parks. It’s a great destination for nature lovers and outdoor enthusiasts. The park’s most iconic feature is Qixing Mountain, the tallest dormant volcano in Taiwan, surrounded by scenic hiking trails.

    Yangmingshan Natl Park 2

    Most visitors explore the western side of the park, which is the most accessible and tourist-friendly. One of its famous landmarks is the flower clock, a favorite photo spot. If you’re hoping to see cherry blossoms, this is one of the best places in Taiwan. Just make sure to visit during the right season. The rest of the year, the park still bursts with color — thanks to peach blossoms, plum blossoms, azalea, and thorn apples.

    Jump-off Point: Yangmingshan National Park Visitor Center, No. 1-20, Zhuzihu Road, Beitou District, Taipei City, Taiwan (R.O.C.)

    How to Get to Yangmingshan National Park: From Taipei Main Station, take Bus 260 to Yangmingshan National Park Bus Station. It’s just a short walk to the visitor center, which also serves as the main entrance to the park.


    Beitou Hot Spring Park

    Beitou District is a known hot springs hotspot. Tucked between its peaks are valleys where nutrient-rich, steamy waters bubble up from underground. It’s a scenic area, especially around Beitou Hot Spring Park, which often looks mystical when blanketed in steam.

    Beitou Thermal Valley Taipei

    If you choose to visit one of the many public hot springs or spas, you can take a relaxing stroll through the park and soak in the surroundings — literally. If you’re short on time, at least try the local tea eggs, a popular snack often sold around the area. It’s a unique mix of nature, wellness, and local flavor all in one spot.

    Beitou Taipei Tea Eggs

    Location: Beitou District, Taipei City, Taiwan (R.O.C.)

    How to Get to Beitou Hot Spring Park: Depending on your itinerary, you can alight at any of these train stations in Beitou from Taipei Main Station: Beitou Station, Xinbeitou Station, Zhongyi Station, Qiyan Station, Fuxinggang Station, Guandu Station, Qilian Station, Mingde Station, and Shipai Station


    National Palace Museum

    The National Palace Museum holds a collection of around 700,000 artifacts, some dating back thousands of years! But here’s the kicker — only about 1% of that is actually on display. The rest? Safely tucked away in vaults under tight security.

    National Palace Museum Taipei

    The collection is so massive that it’s hard to wrap your head around. We’re talking about 6,000 bronze pieces, 3,000 calligraphy works, and countless gems, carvings, and textiles, among others. All of them showcase the depth and richness of Chinese culture and history. If you’re planning to dive deep, get ready to spend hours inside exploring.

    National Palace Museum Taipei

    Address: No. 221, Sec 2, Zhi Shan Rd, Shilin District, Taipei City, Taiwan
    Nearest MRT Station: Shilin Station (Red Line – 2), then take Bus R30 (NT$15)
    Hours Open: Daily 8:30 AM – 6:30 PM
    Entrance Fee: NT$350


    Shilin Night Market

    Spread across two levels, Shilin Night Market is the largest night market in Taipei. On the ground floor and nearby alleys, you’ll mostly find souvenir shops and apparel stores.

    Shilin Night Market Dry Goods Taipei

    But head down to the basement, and get ready to feel hungry, even if you just ate. The mouthwatering aroma hits instantly. It’s a maze of about 540 food stalls and eateries offering local favorites like fried squid, grilled chicken tails, breaded chicken, Taiwanese sausages, fried buns, and oyster omelette. Best of all, it’s conveniently located right next to the MRT station.

    Good Friend Cold Noodles Shilin Night Market Taipei

    Address: No. 101, Jihe Road, Shilin District, Taipei City, Taiwan (R.O.C.)
    Nearest MRT Station: Jiantan Station (Red Line – 2)
    Best Time to Visit: 5:00 PM – 1:00 AM
    Entrance Fee: FREE


    DAY 4: CHILLIN’ AND SHOPPIN’

    Don’t skip Taipei’s café culture on your last day! While Taiwan is traditionally known for its tea, coffee has now taken the lead as the locals’ drink of choice. In fact, Taiwan boasts one of the highest concentrations of cafés in the world. You’ll definitely notice this in lively areas like Ximending, where cafés — both global chains and quirky specialty shops — seem to pop up on every corner.

    Fong Da Coffee

    Fong Da Coffee

    One café you shouldn’t miss is Fong Da Coffee, said to be the first to serve iced coffee in Taiwan way back in 1956. While most cafés today aim for a trendy, Instagrammable vibe, it stands out by embracing its vintage charm and sticking to its old-school roots with pride.

    Address: No. 42, Chengdu Road, Wanhua District, Taipei City, Taiwan (R.O.C.)
    Opening Hours: Daily, 8:00 AM – 10:00 PM


    Modern Toilet

    Of course, milk tea isn’t taking a backseat! Taiwan is the undisputed bubble tea capital of the world. Many of the most recognizable milk tea brands, like CoCo and ShareTea, were either born here or have their headquarters in the country. But if you’re looking for a milk tea experience that’s truly unforgettable (and a little weird), head to Modern Toilet.

    Modern Toilet Cafe Taipei

    This quirky café-restaurant has been dishing out hilariously “crappy” meals and drinks for years, and tourists can’t get enough! Everything is toilet-themed — from the chairs and tables to the decor and even the dishes. You can sip tea from a mini urinal and enjoy ice cream served in a toilet bowl. Yep, it’s weird…but it’s also a lot of fun!

    ⚠️ Don’t keep your hopes up taste-wise. This is good only for the novelty of its theme. There are much better-tasting milk tea places in Taipei like 50 Lan! We’ll be creating a separate article for our food recommendations.

    Branches: Ximending and Shilin
    Opening Hours: Ximending – Daily, 11:30 AM – 10:00 PM; Shilin – Daily, 11:30 AM – 9:30 PM


    Vigor Kobo Pineapple Cake Factory

    One of the most popular pasalubong items from Taiwan is the iconic pineapple cake. At the Vigor Kobo Pineapple Cake Factory, you can do more than just buy a box. You can actually make your own! They offer a fun workshop where you can try your hand at crafting these sweet treats from scratch. No baking experience? No problem! It’s simple, easy, and a great way to take home a more personal souvenir.

    Vigor Kobo Pineapple Cake Factory

    While waiting for your cakes to bake, you can explore the interactive museum to learn more about the history of pineapple cakes and how they’re made. One of the fun features here is the disappearing dandelion wall — give it a touch, and the flowers magically vanish! After shopping for pasalubong, don’t forget to enjoy the highlight of the visit: tasting the pineapple cake you made, fresh and warm from the oven.

    Address: No. 87, Section 1, Chengtai Road, Wugu District, New Taipei City, Taiwan (R.O.C.)
    Opening Hours: Daily, 8:30 AM – 5:30 PM


    Ever Rich Duty Free

    Ever Rich Duty Free

    If you’re ready for some serious shopping, Ever Rich Duty Free is the place to be. They have numerous stores all over Taipei, even in the airports, but we headed to their massive flagship store in Neihu District. Spread across five floors, it’s packed with all kinds of treasures. Plus, you’ll find some pop-up stalls outside adding to the shopping fun!

    And of course, don’t forget to keep an eye on your flight time! Make sure you catch your plane!

    Address: No. 129, Jinzhuang Road, Neihu District, Taipei City, Taiwan (R.O.C.)
    Opening Hours: Daily, 10:00 AM – 9:00 PM


    D-I-Y vs Booking a Tour

    You can definitely do this itinerary DIY-style. However, Days 2 and 3 can be challenging if you rely solely on public transportation, as the schedule of buses and trains needs careful timing. If you’re traveling with a group, seniors, people with mobility concerns, or if you just want a more relaxed, hassle-free trip, booking a tour is a much more convenient option.

    You can check out Edison Tours, which is one of the most popular tour operators in Taiwan. They have been operating for decades. To see their offers, you can visit their website.

    If you prefer to talk to Pinoys, here are some of the travel agencies in the Philippines that you can ask about Taipei tour packages.

    • Constellation Travels Inc.
      Website: www.constellationtravels.com.ph
      Mobile: +63 956 660 0693
    • Travel Warehouse Inc.
      Website: www.twi.com.ph
    • VIA
      Website: https://ph.via.com
      Landline: (+63 2) 8555-9444
      E-mail: sales.ph@via.com
    • Ark Travel Express Inc.
      Website: www.arktravelexpress.com
      Landline: (+63 2) 8810-4520 / (+63 2) 8528-0933
    • North Star International Travel Inc.
      Website: www.northstar-travel.com.ph
      Landline: (+63 2) 3485-7272
      E-mail: inquiry@northstar-travel.com.ph
    • Ricson Crown Travel & Tours
      Landline: (+63 2) 8352-0797
      E-mail: ricsontrvl@yahoo.com
    • Iloilo Skyways Travel & Tours 
      Website: www.iloiloskywaystravel.com
      Landline: (+63 33) 508-0909
      E-mail: skyways1995@gmail.com
    • Levy Travel and Tours
      Landline: (+63 2) 8775-7436 / (+63 2) 8518-8801 / (+63 2) 8579-7215
      Mobile: +63 917 879 7525
      E-mail: levytravelandtours@gmail.com

    Where to Stay in Taipei

    Here’s a list of the hotels and hostels we tried in Taipei:

    Search for more Taipei Hotels!

    Hotel Codes

    Have Peace of Mind While Traveling!

    Getting a travel insurance is optional, but we highly recommend this, especially when traveling abroad. Travel can be unpredictable, and though we hope we’ll never use it, having it gives us peace of mind in case of unexpected delays, cancellations, or emergencies.

    For international destinations, consider PGA Sompo’s TravelJOY Plus insurance. You can GET IT HERE. Don’t forget to use WORTHIT for a special affordable rate.

    TravelJoy PGA Sompo Code 2025


    Updates Log

    2025 6 18 – First uploaded


    Source link

  • The 6 Best Uluru Walks, Red Centre (2025 Guide)

    The 6 Best Uluru Walks, Red Centre (2025 Guide)


    Explore the Red Centre, learn from the Traditional Owners, and stretch your legs with these incredible Uluru Walks!

    There’s something truly spellbinding about Uluru. Towering above the glorious red sands of the Outback, this ancient rock is mesmerising at any time of day.

    Whether it’s your first time seeing Uluru or back for more, its sheer presence is always jaw-dropping. The best way to connect with it? Hit the trails and walk!

    Uluru is more than just a rock. For the Anangu people, the Traditional Owners of the land, it holds profound significance that you can feel as soon as you arrive.

    The majestic domes of Uluṟu Kata Tjuṯa rise like a mythical desert fortress, with trails that lead deep into its rugged heart.

    Whether you’re here for a day or a week, walking is one of the most rewarding ways to connect with this extraordinary part of Australia.

    Explore more of the Outback on a Adelaide To Darwin Road Trip!

    6 Best Uluru Walks

    Uluṟu and Kata Tjuṯa offer some of the most unforgettable walks in Australia. Each walk features incredible views, cultural significance, and that raw Red Centre magic!

    Ready to hit the trails? Grab your hat, sunscreen, and a pair of sturdy walking shoes. Here are the 6 best walks to truly experience the spirit of this special place on foot.

    Find more info about each of these walks on the National Park website!

    The best way to get around is to rent a car and explore on your own! We recommend Rental Cars, which has the largest range of vehicles for the best value on the market.

    1. Uluṟu Base Walk

    • Distance: 10km
    • Difficulty: Easy/Moderate

    The Uluṟu Base Walk highlights the grandeur of Uluṟu within the Uluṟu-Kata Tjuṯa National Park. This 10.6 km loop takes you around the base of the iconic monolith, where you can marvel at the breathtaking views of its changing colors, ancient rock art, and sacred sites.

    The walk is mostly flat, making it accessible to most fitness levels and even wheelchair accessible in some parts. Therefore, everyone can enjoy the stunning natural wonder of Uluru (Ayers Rock).

    Along the route, you can learn about the area’s rich cultural significance to the Anangu people and the national park’s unique desert ecosystem.

    It doesn’t matter if you’re a beginner or a seasoned hiker – the Uluṟu Base Walk is an incredible way to connect with the natural and spiritual beauty of Uluru.

    Uluru Walking Trail
    Walking the base of Uluru is the best way to absorb the area’s natural beauty.

    2. Mala Walk

    • Distance: 2km
    • Difficulty: Easy

    The Mala Walk is one of the most popular and accessible walks in Uluṟu-Kata Tjuṯa National Park, and for good reason.

    This easy, 2 km return trail takes you along the base of Uluru, past towering rock faces, ancient caves, and Aboriginal rock art that tells powerful Tjukurpa (Anangu creation stories).

    The Mala Walk is especially popular because it’s one of the tracks that is wheelchair accessible, making it suitable for almost everyone.

    As you hike along the Mala Walk trail, interpretive signs reveal stories of the Mala people and their connection to the land.

    Whether joining a ranger-led walk or exploring solo, the Mala Walk is a fascinating way to experience the true spirit of Uluṟu and Kata Tjuṯa.

    3. Kuniya Walk

    • Distance: 1km
    • Difficulty: Easy

    The Kuniya Walk is a short but powerful trail in Uluṟu-Kata Tjuṯa National Park that takes you deep into the heart of the landscape and the culture of Uluṟu-Kata Tjuṯa.

    It’s a gentle 1 km return walk that leads to the peaceful Mutitjulu Waterhole, one of the few permanent water sources around Uluru.

    Along the way, you’ll pass ancient rock art sites and learn about the Kuniya Tjukurpa – a key creation story of the Anangu people.

    The walk takes visitors close to some culturally sensitive sites within Uluru, so walking respectfully is important.

    4. North-east Face Walk

    • Distance: 5km
    • Difficulty: Easy/Moderate

    The North-East Face Walk is a peaceful and scenic section of the Uluṟu Base Walk, and takes you on a close-up look at the mind-blowing rock formations and textured surface of Uluṟu (Ayers Rock).

    Located within the breathtaking Uluṟu-Kata Tjuṯa National Park, this stretch is ideal for those wanting to appreciate the quiet majesty of Uluru without tackling the full circuit.

    The trail is wheelchair accessible, making it a great option for all visitors. You might even come across park rangers who can offer insights into the land’s significance and ecology.

    While not as well-known as the Valley of the Winds at Kata Tjuṯa, the North-East Face Walk is a hidden gem that lets you connect with Uluṟu and Kata Tjuṯa at your own pace.

    Uluru Walking Trail
    There are lots of amazing walks at Uluru!

    5. Lungkaṯa Walk

    • Distance: 4km
    • Difficulty: Easy/Moderate

    The Lungkaṯa Walk is a fantastic part of the Uluṟu Base Walk, perfect for those wanting to dive deeper into the stories and landscapes around Uluru.

    The 4 km return trail takes you along the southern side of Uluṟu, leading to l pa gorge, a peaceful spot framed by dramatic rock formations.

    The walk shares the Tjukurpa (creation story) of Lungkaṯa, the blue-tongue lizard, adding cultural meaning to your adventure.

    While not as rugged as the Valley of the Winds Walk at Kata Tjuṯa, the Lungkaṯa Walk boasts a unique charm, with quiet paths, stunning views, and a strong sense of place that makes it a memorable part of exploring the base of Uluṟu.

    6. Liru Walk

    • Distance: 4.4km
    • Difficulty: Easy/Moderate

    The Liru Walk is a peaceful and culturally rich trail that connects the Uluṟu-Kata Tjuṯa Cultural Centre to the Mala Carpark and the base of Uluru, near l pa gorge.

    Stretching around 4 km return, this walk is a great way to ease into the landscape, surrounded by desert oaks, red sands, and occasional wildlife sightings.

    Along the way, interpretive signs share the Tjukurpa (creation story) of Liru, the poisonous snake, providing insights into Anangu law and tradition.

    While it’s a more relaxed trail than the rugged Valley of the Winds Walk at Kata Tjuṯa, the Liru Walk still holds deep meaning and stunning scenery. You can stop at the Cultural Centre to learn more about the local area before you hike!

    It’s perfect for those looking to pair cultural understanding with a quiet nature stroll before or after the Valley of the Winds Walk or other adventures in the park.

    Lizard Uluru
    Explore the flora and fauna of the Red Centre on these amazing Uluru walks!

    Where to Stay for Your Trip to Uluru

    Deciding where to stay is a big part of making the most of your Uluru adventure. With the hot weather, early starts, and so much natural beauty and rich culture to experience, you’ll want somewhere comfy to rest between exploring the national park.

    Whether you’re traveling on a budget or ready to splurge on something more luxurious, here are our top picks for places to stay near Uluru.

    Best Hostel – YHA Alice Springs

    YHA Alice Springs is a top pick for budget-conscious travellers heading to Uluru. Located in the heart of Alice Springs, it’s approximately a 5.5-hour drive to Uluṟu Kata Tjuṯa National Park, making it a convenient base for exploring the region.

    With a pool to cool off in, a shared kitchen, and cozy common areas, it’s a great base for meeting fellow travellers and planning your adventure at the national park.

    Best Mid-Range Hotel – Desert Gardens Hotel

    For a mid-range option, check out Desert Gardens Hotel. Some rooms in this hotel overlook the incredible views of the iconic rock, with its soaring domes.

    Surrounded by lush gardens, it provides a peaceful escape for your Uluru adventure, with amenities like onsite dining and a swimming pool.

    Best Luxury Hotel – Sails in the Desert

    If you want to stay in a luxurious Uluru (Ayers Rock) Resort, choose Sails in the Desert.

    This elegant resort has well-appointed rooms featuring Indigenous artwork, superb dining options like Ilkari Restaurant, and amenities including a serene pool, spa, and complimentary airport transfers.

    It’s also deeply connected to Anangu culture, with an on-site gallery and décor reflecting local traditions.

    Uluru Sunset
    A trip to Uluru is a must in the Red Centre.

    Guided Uluru Walking Tours

    Sure, you can explore Uluru yourself – it’s adventurous and fun! However, joining a guided walking tour takes the experience to a new level.

    With a guided tour, you’ll hear creation stories, learn about the Anangu people’s deep connection to the land, and spot things you could miss if you do it yourself.

    Not sure where to start? Here are some of the best guided walking tours to check out:

    1. Guided Walking Tour at Sunrise with Light Breakfast

    This 10.5 km Guided Walking Tour at Sunrise takes you around the entire base of Uluru, where you can admire the endless vistas from soaring domes as the sun rises.

    Your guide will share fascinating creation stories and insights into the rich culture of Uluṟu.

    The tour includes a light breakfast and comfortable transport in an air-conditioned coach, and at the end, you’ll even receive a certificate to celebrate your achievement.

    2. Guided Trek of Uluru’s Base in a Small Group

    If you’d rather explore Uluru in a more intimate setting, this Guided Trek of Uluru’s Base in a Small Group is a great option.

    You’ll walk the full base of Uluru with plenty of time to admire the spectacular scenery, from breathtaking rock formations to endless vistas. Enjoy breakfast along the way and stop at key sites like Mutitjulu Waterhole, Kantju Gorge, and ancient rock art sites.

    3. Sacred Sites & Sunset Tour with Wine & Cheeseboard

    Prefer to explore in the golden glow of sunset? The Sacred Sites & Sunset Tour with Wine & Cheeseboard is the perfect pick.

    Visit highlights like Mutitjulu Waterhole and ancient Aboriginal rock art before watching the sun dip behind Uluru’s silhouette. As the colors shift across the landscape, you’ll toast the moment with a glass of sparkling wine and a delicious cheeseboard.

    DISCLAIMER: Some of the links in this article are affiliate links, which means if you book accommodation, tours or buy a product, we will receive a small commission at no extra cost to you. These commissions help us keep creating more free travel content to help people plan their holidays and adventures. We only recommend the best accommodations, tours and products that ourselves or our fantastic editorial team have personally experienced, and regularly review these. Thanks for your support, kind friend!


    Source link

  • Why You Can’t Appreciate One Without the Other

    Why You Can’t Appreciate One Without the Other


    Nomadic Matt standing on a hill looking out over the landscapes of Madagascar

    I used to think “home” was a dirty word. Out there — on the road — was where life happened, full of exciting adventures, fascinating people, and endless possibilities. No dreary commutes, 30-minute lunch breaks, mind-numbing meetings, or endless lists of to-dos squeezed into a rushed weekend.

    Why would anyone want to be home, the place where routine seemed to sap your will to exist? It baffled me.

    My first trip overseas — a vacation to Costa Rica — made me fall in love with travel. For all the reasons mentioned above, I realized why “vacations” were so romanticized in work culture. There was a freedom to them that stood in stark contrast to the daily corporate grind.

    So, when I finally quit my job, I set off on an adventure to experience all the world had to offer for as long as I could make my money last.

    I mean, who could possibly tire of life on the road?

    Well, me.

    Eventually, I did tire of being a full-time nomad. I craved a stable group of friends, regular workouts, a bar that knew my name, a kitchen to cook in, and my own bed.

    Suddenly, I realized that “home” wasn’t a dirty word. It just felt that way to a young, restless soul for whom adulthood felt eons away.

    I had come to understand what someone who is just setting out with romantic notions about travel couldn’t: You can burn out. On my first trip abroad, after 18 months, I hit the wall and decided to cut my trip short. Then, years later, in 2013, I decided that being a nomad was no longer the life for me and decided to stop traveling full-time.

    It was time to grow up, I said. Time to stay put and move on from nomad to… whatever came next.

    But the allure of the road — and the business of working in travel — pulled me back constantly.

    As the years went by, I lived between two worlds: one in which I am traveling, longing for home, and another in which I am home, longing to head out again.

    There were moments where I longed for a clone so I could live in both and satisfy my dual desires.

    After all, you can’t — and shouldn’t — live solely in one forever.

    Because travel and home are complementary forces, yin and yang. Without one, you can’t appreciate the other.

    All travelers hit a wall, that moment when they look around and go, “I’m ready to stay in one place.” When and why that happens is a product of many factors, but I have yet to meet a traveler who doesn’t have that experience. When I started traveling in my twenties, it took me years to feel that. But now, a couple of decades older, it happens after just a month.

    To handle life, the brain creates mental shortcuts to help it process information. It’s why we tend to drive the same route to work every day — it’s just easier, and it’s why you feel like “you can do it in your sleep.” Because if your brain had to figure out a new route to work every day, it would tire itself out. These routines let us put a lot of life on autopilot, so we have energy for work, people, emotions, thoughts, etc.

    But when you travel, you are relearning life skills every day. You have no mental shortcuts. It takes a lot of mental energy to figure out your way in the world anew each day, to repack your bag, say good-bye to the person you met yesterday, and head out and try again to navigate unfamiliar lands, languages, and people as if you had never done so before.

    It tires you out.

    Whereas a vacation is a temporary break from life, long-term travel is different. When you travel long-term (or are on the move frequently), there is no break. You’re constantly trying to figure things out and also constantly breaking your routine. Your travel battery drains.

    Yet in the same way the travel battery needs to be recharged, our “home” battery does too.

    While some people can follow the same routine their entire lives, most of us can’t. We find it boring. We need a break. After a while in one place, we yearn to break up the monotony of our daily routine. Work, commutes, errands… day in, day out, like ants marching on and on.

    So we go travel again. We have an adventure, meet new people, try new food, and have new experiences. Maybe be learn, grow, and expand who we are as a person. Maybe we’re away for a week or two or we take a month off. Or we start working remotely and spend months away. But eventually our battery drains: we get tired, and then we head home again.

    And the cycle repeats.

    Growing older has made me believe that we can never fully appreciate home or travel without the other. My first years on the road would never have been so amazing if I weren’t trying to break free from a quarter-century of routine. Likewise, my bed never would have felt so good had I not spent so many years on the move, changing rooms, and having erratic sleep. Nor would I have enjoyed the relief that routine brings had I not spent so many days trying to navigate the stresses of the world for so long.

    The joy of one is amplified by the other.

    Travel and home are two sides to the same coin. I appreciate each more now than when I was younger, because I get to experience both on my own terms. I’m not trying to run away from either or go to an extreme anymore. I simply follow their ebb and flow and let the battery of life dictate when one or the other happens.

    And I think that is a wisdom that only comes with age — and experience.
     

    How to Travel the World on $75 a Day

    How to Travel the World on $75 a Day

    My New York Times best-selling book to travel will teach you how to master the art of travel so that you’ll get off save money, always find deals, and have a deeper travel experience. It’s your A to Z planning guide that the BBC called the “bible for budget travelers.”

    Click here to learn more and start reading it today!

    Book Your Trip: Logistical Tips and Tricks

    Book Your Flight
    Find a cheap flight by using Skyscanner. It’s my favorite search engine because it searches websites and airlines around the globe so you always know no stone is being left unturned.

    Book Your Accommodation
    You can book your hostel with Hostelworld. If you want to stay somewhere other than a hostel, use Booking.com as it consistently returns the cheapest rates for guesthouses and hotels.

    Don’t Forget Travel Insurance
    Travel insurance will protect you against illness, injury, theft, and cancellations. It’s comprehensive protection in case anything goes wrong. I never go on a trip without it as I’ve had to use it many times in the past. My favorite companies that offer the best service and value are:

    Want to Travel for Free?
    Travel credit cards allow you to earn points that can be redeemed for free flights and accommodation — all without any extra spending. Check out my guide to picking the right card and my current favorites to get started and see the latest best deals.

    Need a Rental Car?
    Discover Cars is a budget-friendly international car rental website. No matter where you’re headed, they’ll be able to find the best — and cheapest — rental for your trip!

    Need Help Finding Activities for Your Trip?
    Get Your Guide is a huge online marketplace where you can find cool walking tours, fun excursions, skip-the-line tickets, private guides, and more.

    Ready to Book Your Trip?
    Check out my resource page for the best companies to use when you travel. I list all the ones I use when I travel. They are the best in class and you can’t go wrong using them on your trip.


    Source link