From the highlights of the Antarctic Peninsula to the nearby islands and passages to visit on the way, here are our top places to visit in Antarctica!
Antarctica, the southernmost continent, is easily one of our favorite destinations on Earth.
This vast expanse of ice and snow, surrounded by the churning waters of the Southern Ocean, beckons the intrepid traveler to explore its untouched frontiers.
From the rugged coastlines of the Antarctic Peninsula to the remote islands scattered across the Southern Ocean, the Antarctic continent is home to an array of places to visit.
Each location has its own unique allure, from unique wildlife to dramatic landscapes.
Whether you’re drawn by the promise of pristine wilderness, unparalleled wildlife encounters, or the thrill of adventure in one of the planet’s most extreme environments, a visit to one or more of these destinations will surely leave its mark.
Here are our top places to visit in Antarctica!

24 Top Places to Visit in Antarctica
From visiting one of the world’s largest king penguin colonies on South Georgia Island, to cruising through a natural harbour and photographing glaciers, to battling across the Drake Passage, these are some of the top places in Antarctica for unforgettable adventures.
Most of these places to visit in Antarctica will be on or around the Antarctic Peninsula. As most expeditions to Antarctica depart from South America, these are the most accessible places to explore.
Other departure points besides South America include New Zealand, Australia, and South Africa. Itineraries around the Antarctic Circle may vary, so contact your tour operator if you have any questions or concerns!
But here are some of the top places to visit in Antarctica in terms of wildlife, scenery, and more!
Important Note! Before you book any international trip, we honestly recommend getting travel insurance. You never know when things will go wrong, and medical bills can add up quickly if you get sick or injure yourself overseas.
Our personal recommendation based on our own experience is World Nomads.
Deception Island
Deception Island, one of the most intriguing destinations in the Antarctic, is a horseshoe-shaped island that forms the caldera of an active volcano. It is one of the South Shetland Islands, located in the Drake Passage just north of the Antarctic Peninsula.
Known for its unique geothermal activity, Deception Island offers visitors the rare experience of warm waters along certain shorelines, where the heat from the volcano warms the sea.
Visitors can also see large colonies of chinstrap penguins or check out relics of the island’s whaling history and scientific research stations.
Deception Island’s dramatic scenery, black volcanic beaches, and massive glaciers provide a stark and haunting beauty that is absolutely breathtaking.
Check out our article on Deception Island for more fun facts!
Lemaire Channel
The Lemaire Channel, often hailed as one of Antarctica’s most stunning natural wonders, is a narrow strait flanked by towering cliffs and spectacular glaciers.
It is a strait off the Antarctic Peninsula, nestled between the mainland and Booth Island.
Known affectionately as “Kodak Gap” due to its photogenic landscapes, this channel offers a dramatic passage through the Antarctic Peninsula.
The serene beauty of the Lemaire Channel is enhanced by the occasional sighting of wildlife, including seals basking on ice floes and seabirds gliding overhead.
Navigating through this narrow channel, visitors are enveloped in an overwhelming sense of tranquillity and awe, making it a highlight for any Antarctic voyage.
Port Lockroy
Port Lockroy is one of the best places in Antarctica to visit for history lovers! It is situated on Goudier Island, a tiny landmass off the larger Wiencke Island.
Originally established as a British research station in 1944, Port Lockroy now serves as a museum and the world’s southernmost post office, known as the Penguin Post Office.
The post office is managed by the United Kingdom Antarctic Heritage Trust, and visitors can send their own postcards from here.
The surrounding area of Port Lockroy and Wiencke Island are also a wildlife haven, particularly for Gentoo penguins. The waters are calm and peaceful, perfect for a penguin-spotting zodiac cruise!
Neko Harbor
Another one of the best places to go when you visit Antarctica is Neko Harbor, an intimate cove on the edge of the Antarctic Peninsula.
This small bay, set against a backdrop of towering glaciers and rugged mountains, provides visitors with the rare opportunity to set foot on the continent itself.
Neko harbor is also a hotspot for marine animals and seabirds, including a bustling Gentoo penguin colony.
The combination of dramatic ice formations, abundant wildlife, and the pristine, untouched environment makes Neko Harbor a quintessential Antarctic experience.
Learn more with our complete guide to Neko Harbor!
Paradise Bay
Not far from Neko Harbor, Paradise Bay is a tranquil place of natural beauty on the Antarctic Peninsula. It offers some of the most picturesque landscapes in Antarctica, so it’s a top spot for photographers.
Surrounded by steep mountains and ice cliffs, the bay’s calm, crystal-clear waters reflect the ethereal beauty of its surroundings.
Home to an abundance of Antarctic wildlife, including seals, whales, and various seabirds, Paradise Bay provides visitors with a unique opportunity to connect with nature in one of the world’s most remote locations.

Marguerite Bay
Marguerite Bay is located on the western coast of the Antarctic Peninsula. It’s one of the larger bays near the continent, with the western edge of the bay opening up to the magnificent Southern Ocean. It’s also one of the most beautiful places to see when you explore Antarctica.
The bay is encased by the rugged glaciers and is a haven for wildlife including Adélie penguins, leopard seals, and humpback and minke whales.
The Dion Islands in the northern part of Marguerite Bay have one of the only penguin colonies on the western side of the Antarctic Peninsula!
Marguerite Bay also has a significant history, having been a key area for early 20th-century explorations.
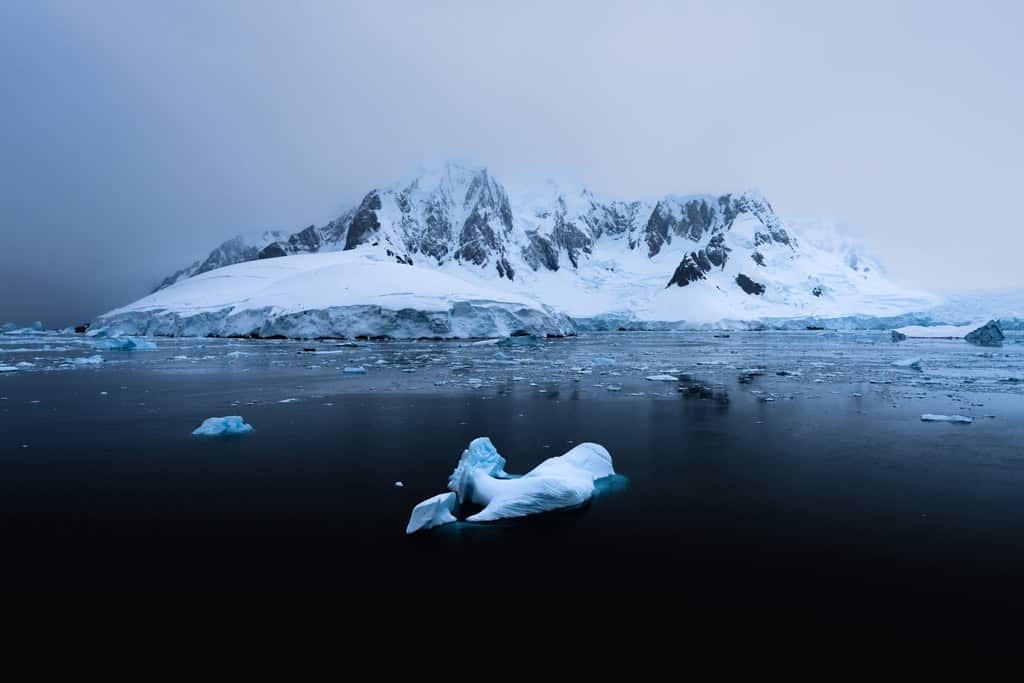
Danco Island
Danco Island is another one of the most iconic places in Antarctica. Nestled amongst the sea ice of the Errera Channel, it’s a small yet breathtaking island with dramatic peaks and glaciers.
Danco Island is also home to one of Antarctica’s most adorable Gentoo penguin colonies, so it’s a hotspot for wildlife lovers.
The island has played an important role in the history of the Southern Continent as well. It was the site of the British Antarctic Survey‘s Station O, a vital location for scientific research and surveying in the 1950s.
Check out our article on Danco Island to learn more!

Cuverville Island
Cuverville Island is another highlight of the Errera Channel that has a thriving Gentoo penguin colony.
Beyond penguins, the island supports various bird species, including kelp gulls, snowy sheathbills, Antarctic terns, and Antarctic shags, making it a haven for birdwatchers near the South Pole.
The island is situated between larger landmasses of the peninsula, giving it calm waters that are ideal for Zodiac cruises. It’s one of the best places in Antarctica to enjoy close-up views of the wildlife and scenery.
Read more about Cuverville Island!
Paulet Island
A volcanic island in the Weddell Sea, Paulet Island is an Antarctic oasis teeming with life and history.
It has one of the largest penguin colonies in its area, with over 100,000 pairs of Adélie penguins nesting among its rocky shores.
The remnants of a stone hut, built by the stranded crew of the 1903 Swedish Antarctic Expedition, add an interesting touch of human history to the stark, natural beauty of the landscape.
Fournier Bay
Fournier Bay is a secluded inlet along the north western shore of Anvers Island in the Palmer Archipelago. Many consider it a hidden gem within the icy wilderness of Antarctica.
Its icy waters are home to a diverse array of marine life, including seals and killer whales, which can often be spotted against the backdrop of the bay’s dramatic ice formations.
Fournier Bay is specifically famous for close encounters with humpback whales. Visitors have reported these majestic creatures surfacing near boats!

Orne Harbour
Another highlight of the Antarctic Peninsula’s western coast is Orne Harbour, a captivating cove known for its incredible beauty and wildlife.
It is particularly famed for its Chinstrap penguin colonies, which reside on the slopes surrounding the harbour.
The harbour’s calm waters make it ideal for Zodiac cruises, allowing close-up views of ice formations and wildlife
A top activity here is the hike to the top of Spigot Peak. This epic viewpoint rewards adventurers with panoramic views of the Danco Coast and the stunning Antarctic landscape.
King George Island
King George Island, the largest of the South Shetland Islands, serves as a major gateway to Antarctica, boasting a relatively mild climate and diverse ecosystems.
This island is notable for its international research stations, where scientists from around the globe study everything from microbiology to geology.
The landscape is a striking mix of barren volcanic rock, mosses, lichens, and the occasional flowering plant, against a backdrop of glaciers and ice-covered peaks.
King George Island also offers a unique wildlife experience, with colonies of seals, penguins, and a variety of seabirds.
The island’s accessibility, combined with its scientific significance and natural beauty, makes it a focal point for Antarctic expeditions.
Read next: How to Travel to Antarctica Responsibly (Must Read)
Half Moon Island
Half Moon Island, a crescent-shaped sliver of land in the South Shetland Islands, is a picturesque Antarctic haven with rocky beaches and cliffs.
It’s one of the best places in Antarctica for wildlife spotting! There is a Chinstrap penguin colony and a thriving population of seals, whales, and seabirds.
With its stunning panoramic views of the surrounding glaciers and mountains, Half Moon Island is an amazing place to visit on any Antarctica trip.

Livingston Island
Livingston Island, part of the South Shetland Islands archipelago near Antarctica, is another hotspot for the Antarctic traveler.
The island’s diverse landscapes range from snow-capped mountains to moss-draped cliffs, providing unique photo opportunities.
The remnants of early 19th-century sealing camps and huts add a layer of historical intrigue, telling tales of human endurance in one of the planet’s most extreme environments.
Elephant Island
A remote outpost in the Southern Ocean, Elephant Island is famously linked to Sir Ernest Shackleton’s 1916 Endurance expedition.
Elephant Island served as a refuge for his crew after their ship was crushed by sea ice in the Weddell Sea. Shackleton and a small group rowed to South Georgia Island before being rescued.
History buffs flock here to visit Point Wild, the memorial that commemorates the Endurance expedition.
Despite its harsh conditions, Elephant Island supports a surprising array of wildlife, including elephant seals, fur seals, and various seabird species.
Penguin Island
Penguin Island is another gem of the South Shetland Islands. This volcanic island is characterized by a central volcanic crater, Deacon Peak, surrounded by beaches that serve as breeding grounds for chinstrap and Adélie penguins.
The relatively easy access to the island’s peak makes it easy for visitors to get stunning panoramic views of the rising mountains, mammoth glaciers, and neighboring islands.

Greenwich Island
Also a top spot to visit in the South Shetland Islands archipelago, Greenwich Island is known for its historical sites and wildlife.
The island features incredible scenery that houses lots of Antarctic creatures such as gentoo penguins, elephant seals, fur seals, and more.
It also includes the remains of 19th-century sealers’ huts, which echo the area’s past human activities.
The island’s relatively mild Antarctic climate and accessible terrain make it a popular stop for expedition cruise ship passengers in Antarctica.
Read next: Top 10 Antarctic Animals To See On Your Travels
Snow Hill Island
Snow Hill Island in the Weddell Sea is best known as the remote breeding site of Emperor penguins. It’s actually the only colony of Emperor penguins that is accessible by tourist expeditions on an Antarctic Cruise!
These majestic birds, the largest of all penguin species, have made Snow Hill a key destination for wildlife enthusiasts and researchers.
Visitors to Snow Hill Island are captivated by the sight of thousands of Emperor penguins, with their distinctive black and white plumage and regal bearing, as they navigate the harsh Antarctic environment.
The island’s landscape, blanketed in snow and surrounded by towering icebergs, provides a dramatic backdrop for observing the Emperor penguins.
Antarctic Sound
One of the absolute best places to spotting polar wildlife is the Antarctic Sound in the Weddell Sea.
The channel is sometimes called “The Gateway to the Weddell Sea” or “Iceberg Alley”, and is famous for its floating fortress-like icebergs.
This area is a prime spot for wildlife, with abundant sightings of Adélie and gentoo penguins, leopard seals, and sometimes orcas patrolling the icy waters.
Rich in exploration history, the Sound was named after the ship Antarctic used during Otto Nordenskjöld’s 1902 Swedish expedition.
Today, the Antarctic Sound is a highlight for expedition cruises, offering breathtaking vistas, towering ice formations, and a gateway into the remote and icy wonders of the Weddell Sea.

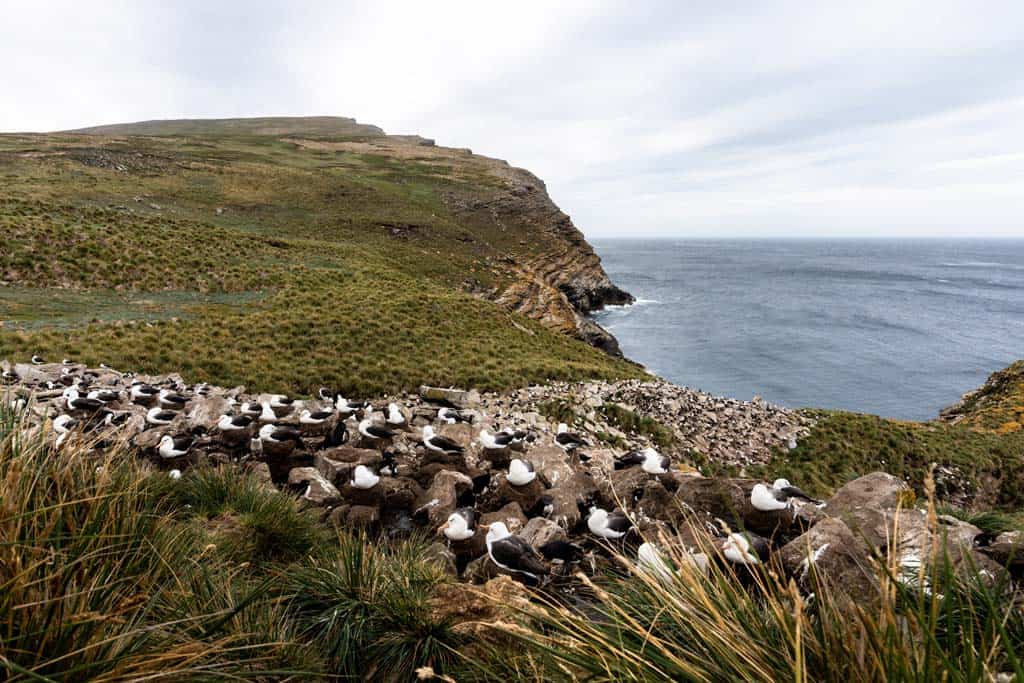
South Georgia Island
Though South Georgia Island is in the midst of the Southern Ocean and isn’t part of the Antarctica Peninsula, it’s easily one of the best places to visit for polar travelers.
Access to South Georgia Island is typically by sea, with visitors arriving via expedition cruises that embark from Ushuaia, Argentina, or the Falkland Islands.
The dramatic landscape of South Georgia provides a stunning backdrop to some of the world’s greatest wildlife spectacles, including vast colonies of king penguins, seals, and an abundance of seabirds.
South Georgia Island has some of the most important wildlife breeding areas in the world. It’s home to the largest macaroni penguin population and over 100,000 breeding pairs of king penguins. Over 100 million seabirds also call the island home, including albatross, petrels, and gulls.
The history of South Georgia Island is also deeply intertwined with the age of exploration and the whaling era, most notably serving as the final stage in Sir Ernest Shackleton’s legendary Endurance expedition.
Read our complete guide to South Georgia Island!
Falkland Islands
The Falkland Islands, an archipelago located in the South Atlantic Ocean, are another hotspot for cruises around the Antarctic.
Comprising over 700 islands, the Falkland Islands are a haven for nature enthusiasts, with their vast open spaces, pristine beaches, and the remarkable biodiversity.
This is one of the best places in Antarctica for bird watching. Notable species in the Falkland Islands include the iconic Falkland penguins, sea lions, and elephant seals.
Stanley, the capital, is a quaint town that exudes a British charm, with colorful houses, well-kept gardens, and a welcoming community. The islands’ history is palpable, with museums and memorials detailing its storied past.
South Sandwich Islands
Another unique destination in the Sub Antarctic Islands is this fascinating and wild collection of uninhabited islands.
The South Sandwich Islands are an extremely remote, highly protected, and rarely visited chain of volcanic islands. They are located southeast of South Georgia and are governed by the UK as part of the British Overseas Territory of South Georgia & the South Sandwich Islands.
Due to harsh weather, treacherous seas, and conservation restrictions, access is only possible via special expedition cruises.
But if you do have the chance to cruise past one of these 11 islands (landings are not always common due to ocean conditions), you are in for a treat.
Here you have one of the most wild places on Earth, where active volcanoes, lava lakes, and extraordinary wildlife colonies thrive. It has no human influence and truly showcases the raw beauty and power of Antarctica.
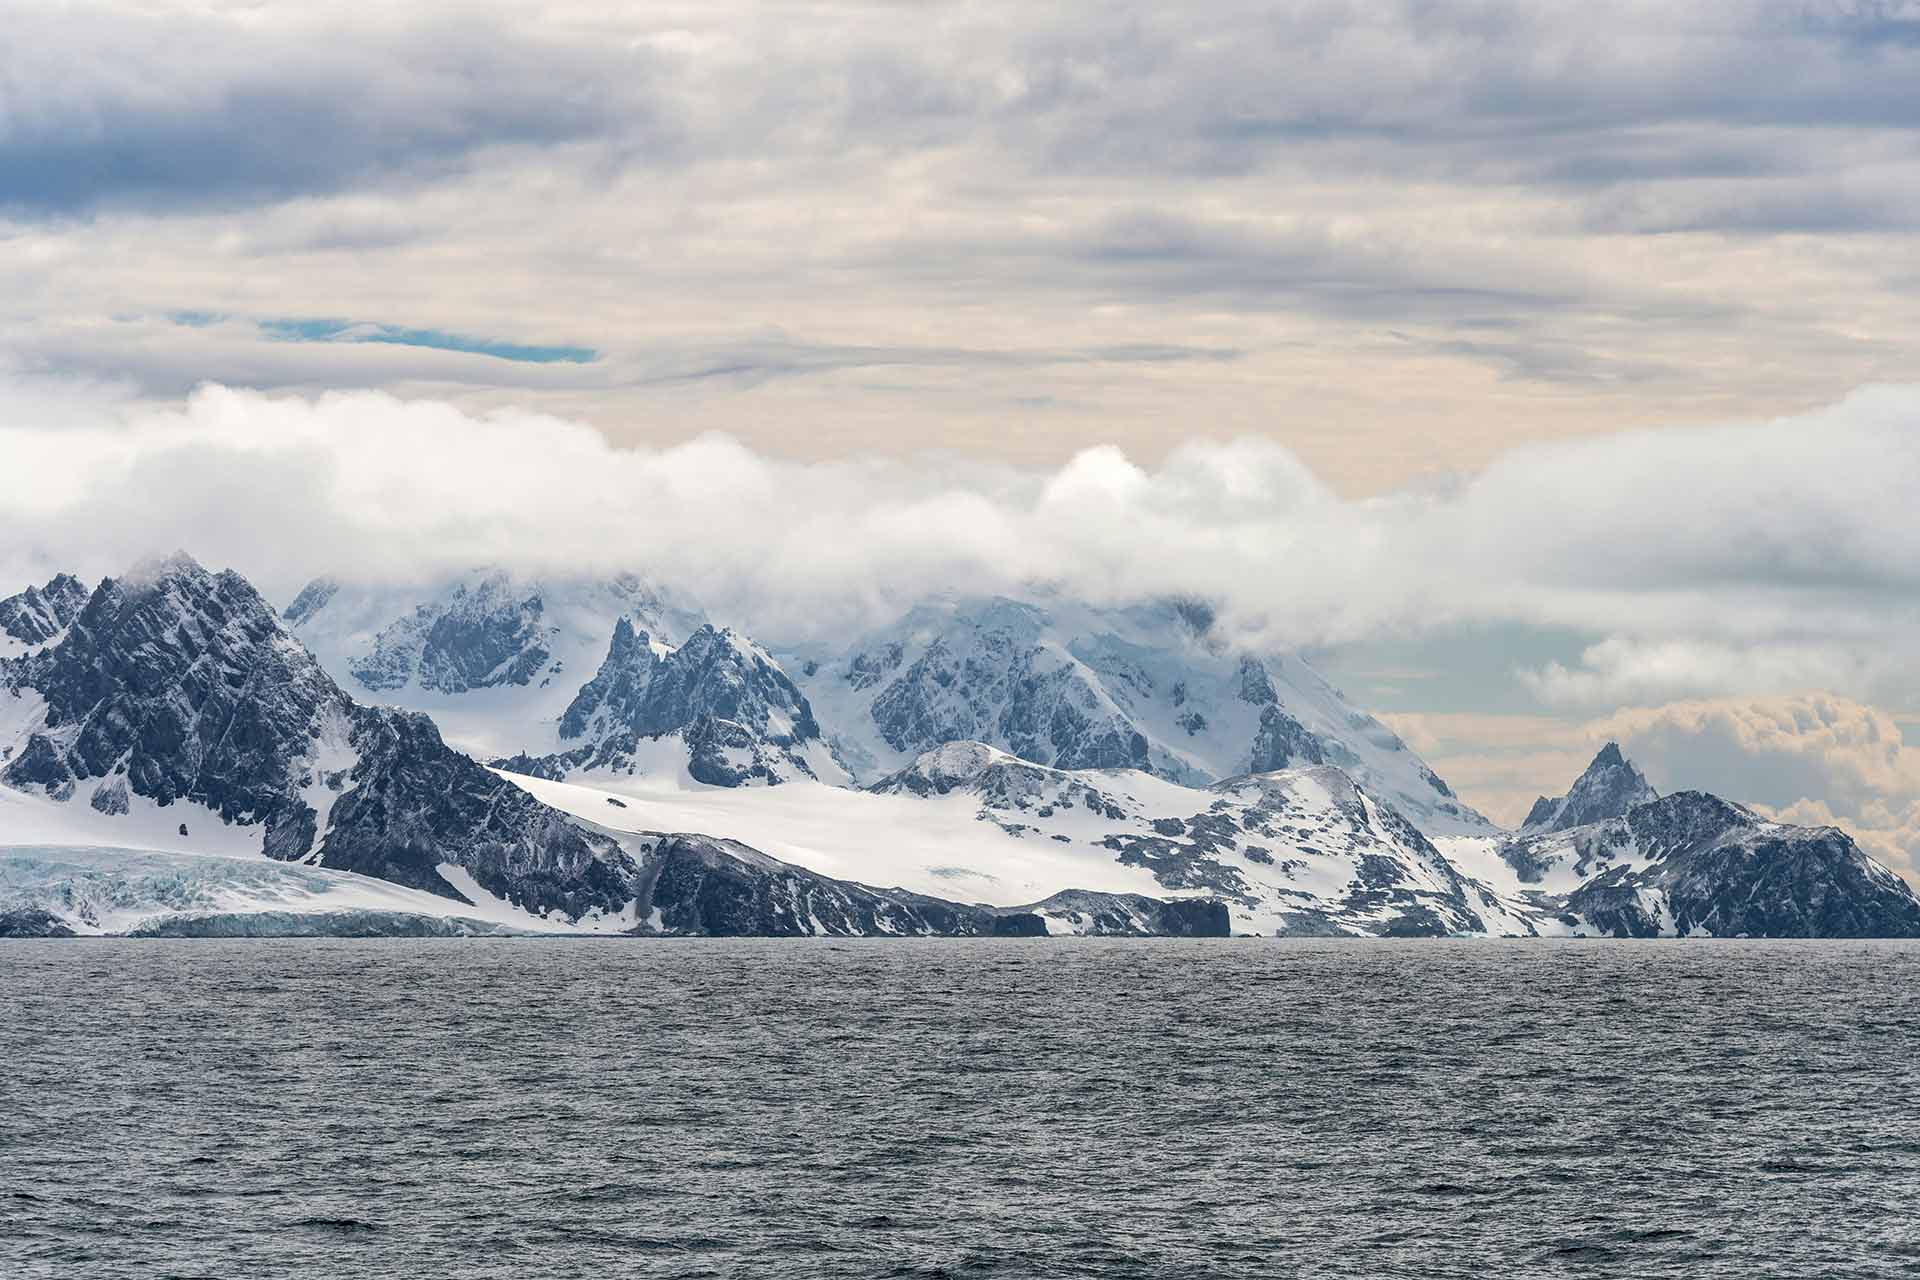
The Drake Passage
Though the Drake Passage is technically a place that you pass on the way to Antarctica, it’s still an iconic part of any sea voyage to the southern end of the Earth.
The Drake Passage sits between the southern tip of South America (Cape Horn) and the northern edge of the Antarctic Peninsula, where the Atlantic, Pacific, and Southern Oceans converge.
It is known as one of the most challenging sea crossings in the world, with massive swells, fierce winds, and powerful currents.
Despite its reputation, the Drake Passage is a rite of passage for Antarctic travelers, and it’s actually one of the most famous tourist attractions on an Antarctic cruise!
Many Drake Passage crossings aren’t nearly as bad as you might think, but you can always opt for a flight if you are actually really nervous about the sea crossing.

Ross Island
This is one of the few locations on our list of Antarctica’s best places that is actually on the other side of the continent.
The spectacular Ross Sea is often called the “Last Ocean,” and it is one of the most pristine marine ecosystems on Earth. It’s nutrient-rich waters support incredible ecosystems, from tiny phytoplankton to emperor penguins, Weddell seals, orcas, and minke whales.
Within the Ross Sea, Ross Island is dominated by Mount Erebus, the southernmost active volcano. It was also the site of historic expedition bases from the early 20th century, including those of Scott and Shackleton.
Today, the island hosts the U.S. McMurdo Research Station and New Zealand’s Scott Base, making it an important spot for science and discovery.
To reach the Ross Sea, you’ll have to book a specialised expedition cruise from New Zealand or Tasmania, Australia.
Learn more about visiting the Ross Sea with our guide to reaching Antarctica from Australia!
DISCLAIMER: Some of the links in this article are affiliate links, which means if you book accommodation, tours or buy a product, we will receive a small commission at no extra cost to you. These commissions help us keep creating more free travel content to help people plan their holidays and adventures. We only recommend the best accommodations, tours and products that ourselves or our fantastic editorial team have personally experienced, and regularly review these. Thanks for your support, kind friend!