بلاگ

  • The Best Travel Suit for Men

    The Best Travel Suit for Men


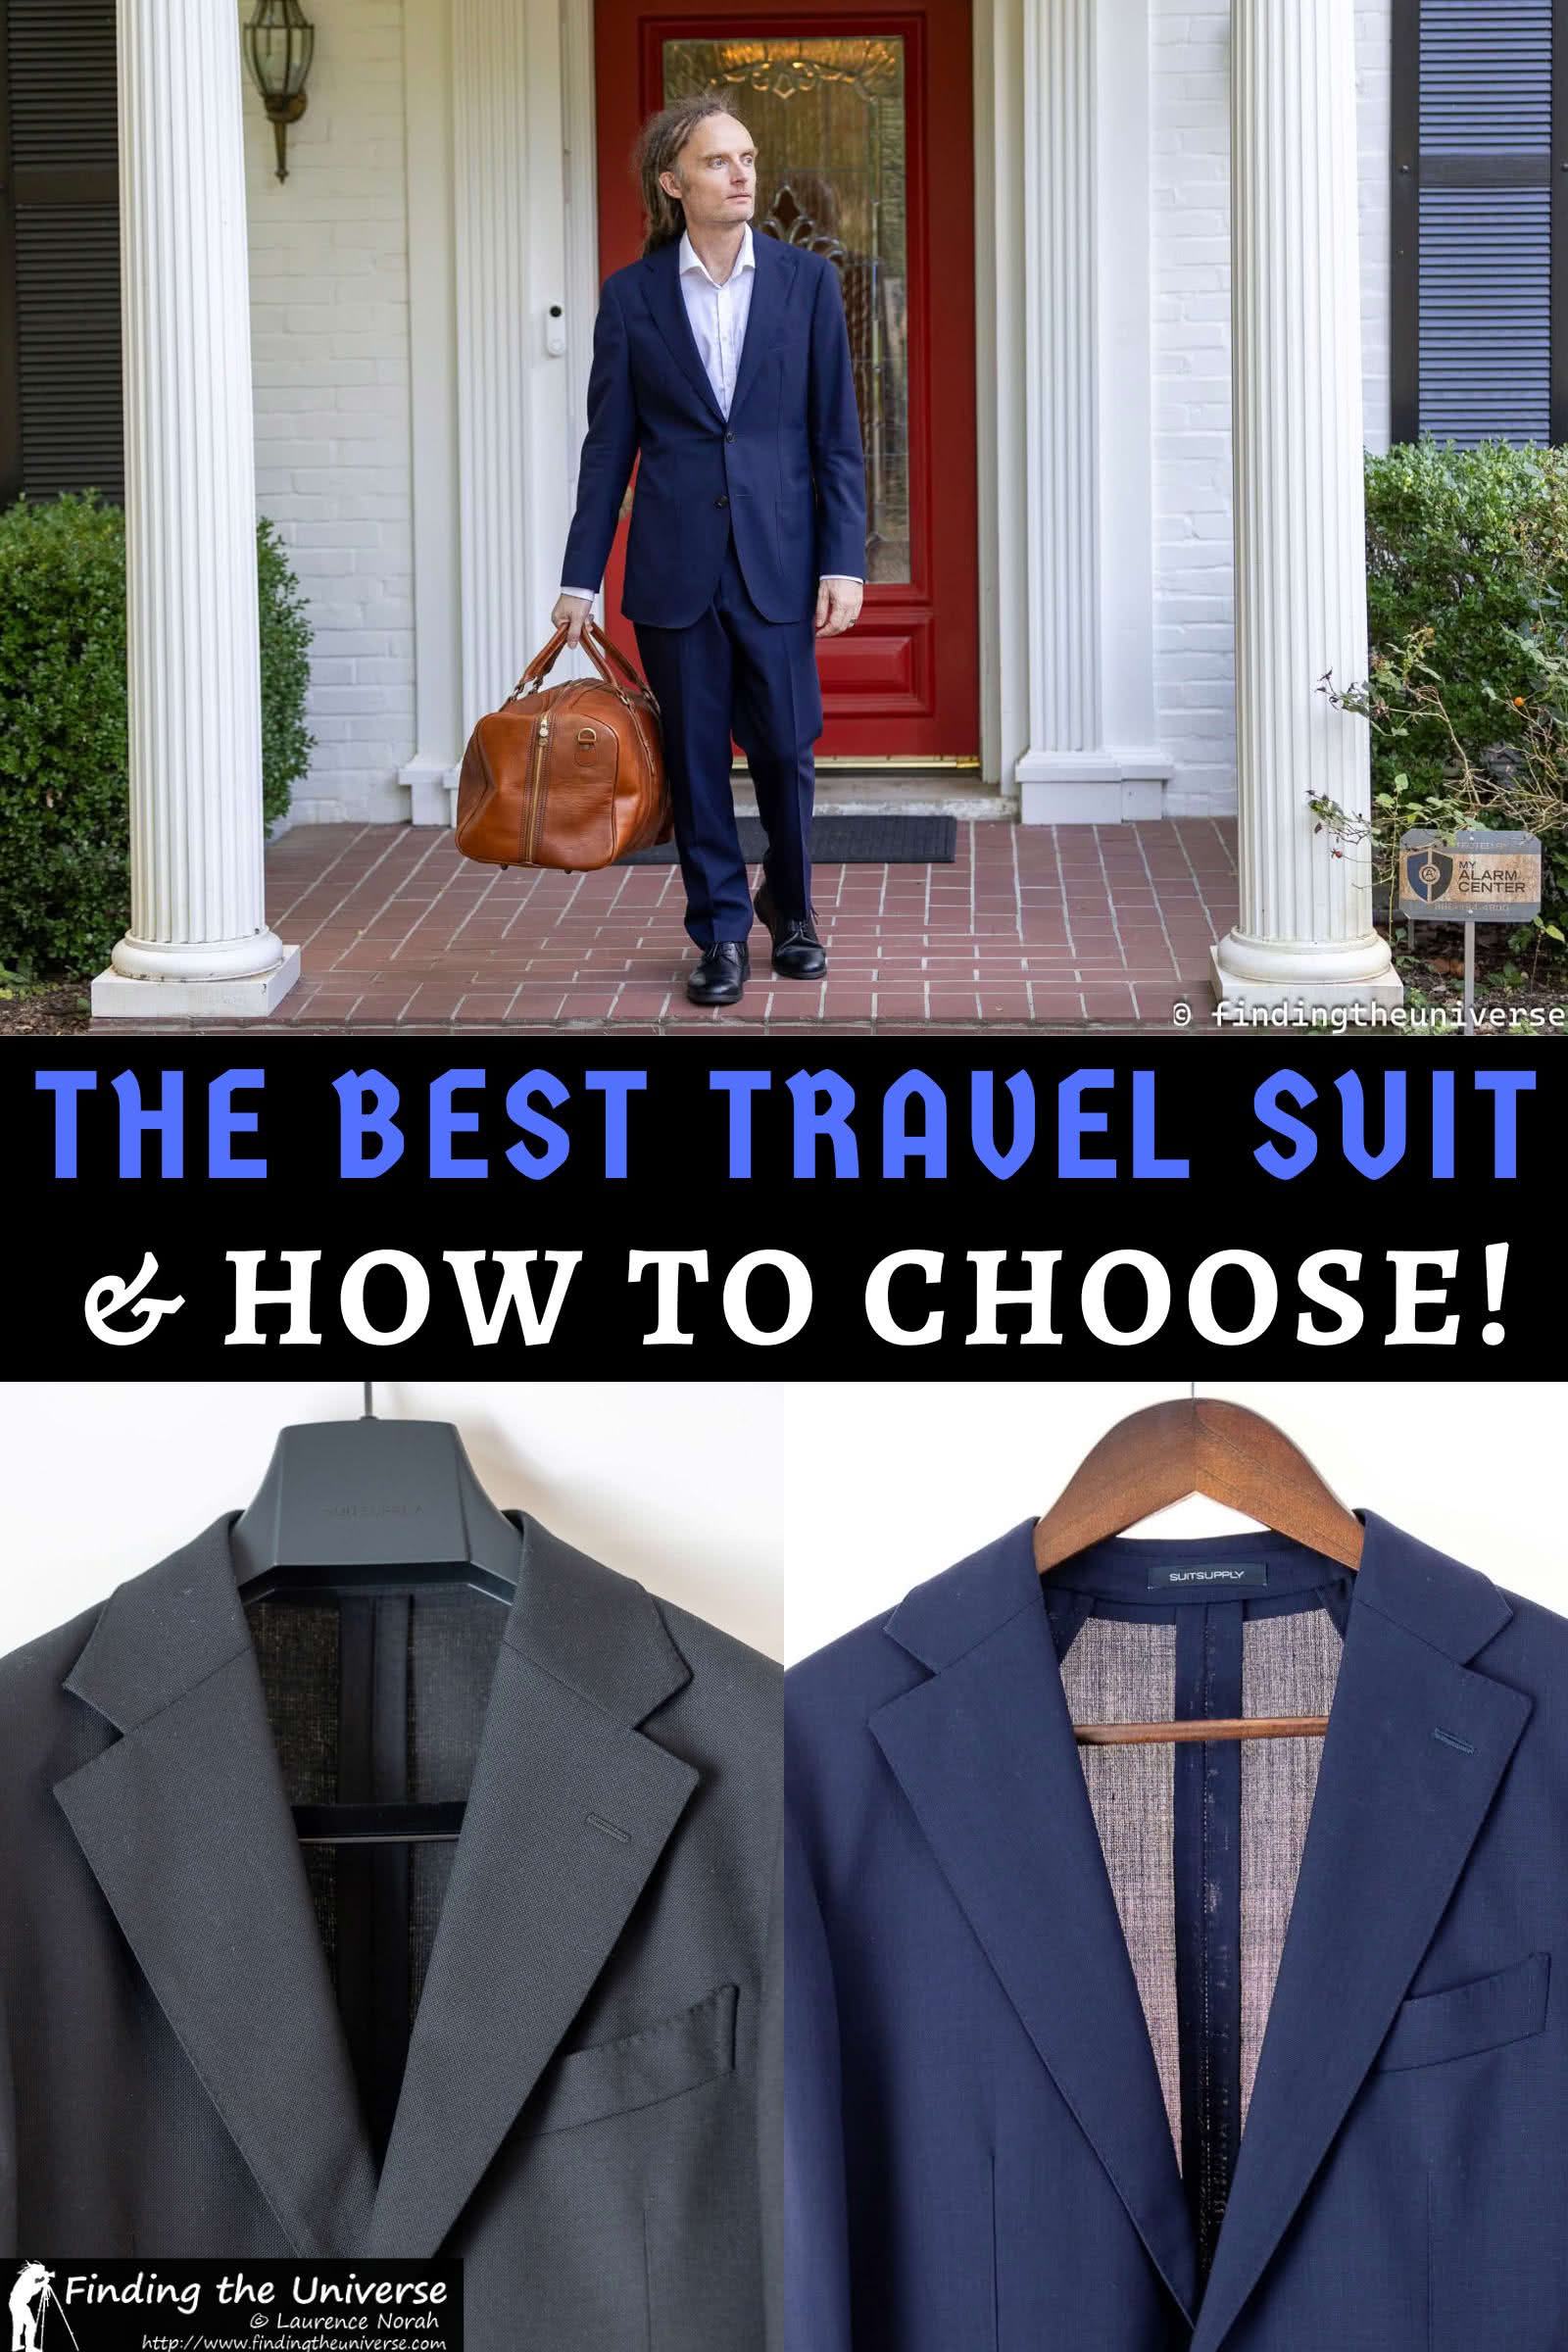
    Jess and I are lucky enough to travel a lot, with our travels taking us to all sorts of locations and venues around the world. Whilst most of our travels don’t require us to wear formal clothing, there are sometimes occasions where we do need to dress up a bit. So I have been on the hunt for a travel-friendly suit.

    I wanted a travel suit for visiting venues with a dress code, such as a fancy restaurant, opera night, or a formal cruise night. Also for those times when we just want to dress up for a special occasion such as for a birthday dinner, Christmas party, or perhaps for a formal afternoon tea experience in Paris.

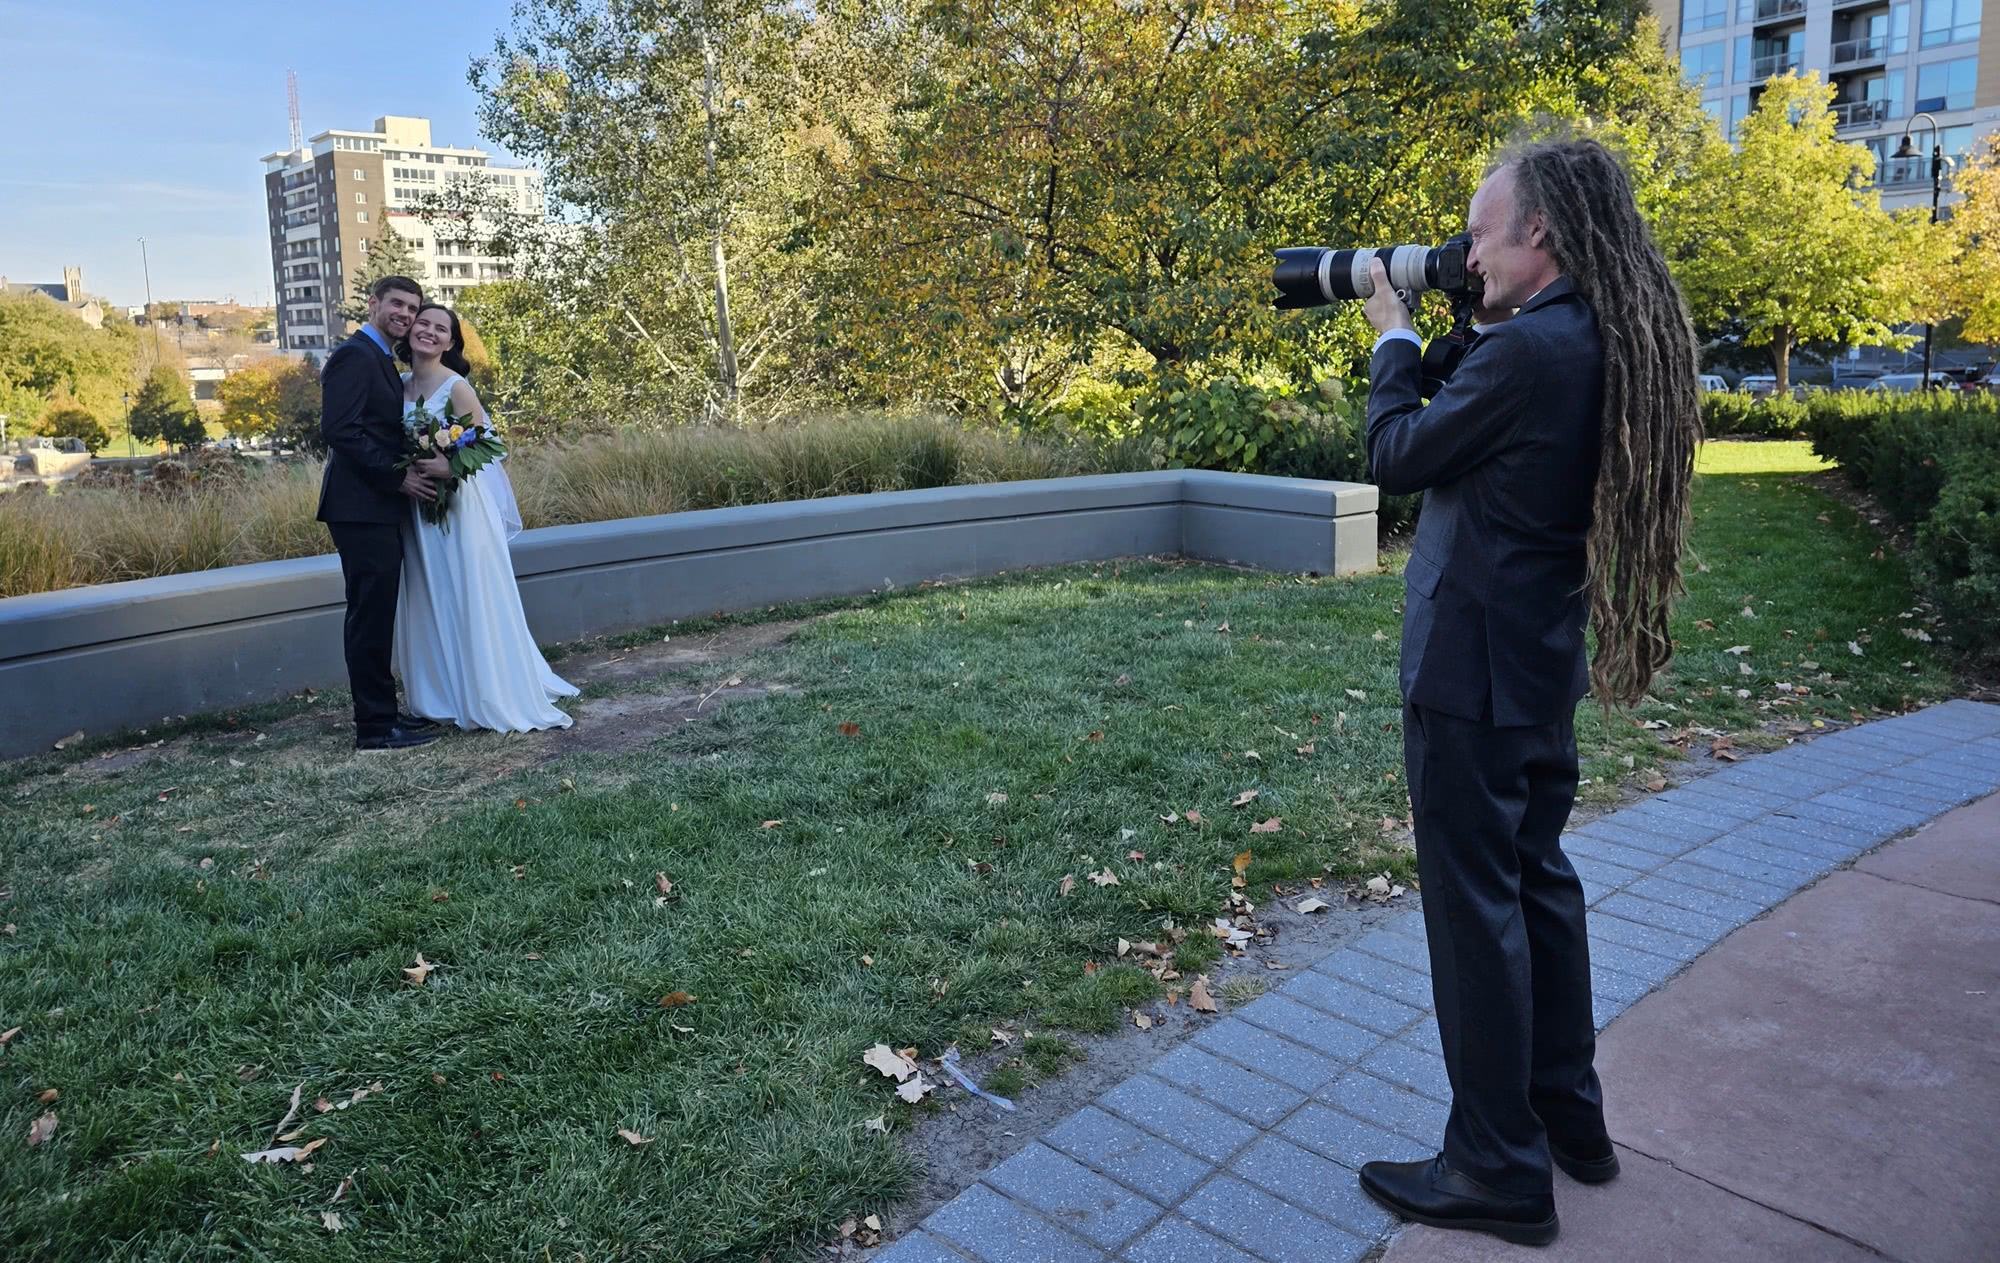
    I also give talks and workshops at travel and photography conferences and often wear either a sports jacket or full suit for some of those events.

    We also have other events we attend, such as weddings, holiday parties, charity fundraisers, and funerals, where a suit is often required or expected. Sometimes these events are at home, but sometimes they require travel so having a suit that can travel well to a destination wedding or out-of-state funeral is nice.

    What all that means is that from time to time I find myself needing a suit. Of course, when I had a job in the corporate world I had a number of suits. However, most of these weren’t suits designed for travel and required some maintenance to keep them looking sharp and wrinkle-free.

    For me, a travel suit has to be something that is going to stand up well to the rigors of travel. We often travel for weeks at a time and the suit needs to survive being packed away for lengthy periods as I don’t tend to wear it all that often. I don’t want to have to worry about wrinkles in the fabric when I unpack it, it just needs to come out of the bag and go on me looking smart.

    I’d also prefer it doesn’t take up too much room in my bag if possible, given that I’m not likely to be wearing it that often.

    I also want a travel suit that works for most occasions, including those outside of travel, such as events and event photography. And one that will work across most types of destinations and climates. For instance an events or wedding photographer is generally expected to wear a suit to look professional and blend in with the guests.

    My initial search for a travel suit started back in 2020. Over the last several years, I’ve actually spent quite a bit of time trying to find the perfect travel suit. Today I have three travel suits in different colors and have tested several others along the way.

    So, without further ado, let me help you find the perfect travel suit for you, based on my experiences to date! Whether you’re looking for a good suit for business travel, preparing for a destination wedding, or you just find yourself needing to look more formal when you travel, I hope this guide helps you!

    What to Look for in a Travel Suit

    Before I recommend specific suits, I want to share some ideas of what to actually look for in a travel suit. This will help explain why I chose the suits I did, but will also help you pick the right suit for you, even if it’s not one I recommend.

    Perhaps the two most important aspects of how a suit is going to look and wear are the type of material it is made of and the cut/fit of the suit.

    For a travel suit wrinkle resistance, weight, and ease of care are also often very important. But there are a lot of other things to consider as well when choosing a travel-friendly suit, including price, color, pockets, and other features.

    Let’s look at each of these.

    Material

    The choice of material the suit is made from is going to make a big difference when it comes to how well a suit works for travel. It’s also going to make a big difference when it comes to the price of the suit. Some materials travel a lot better than others. The main options you have are as follows.

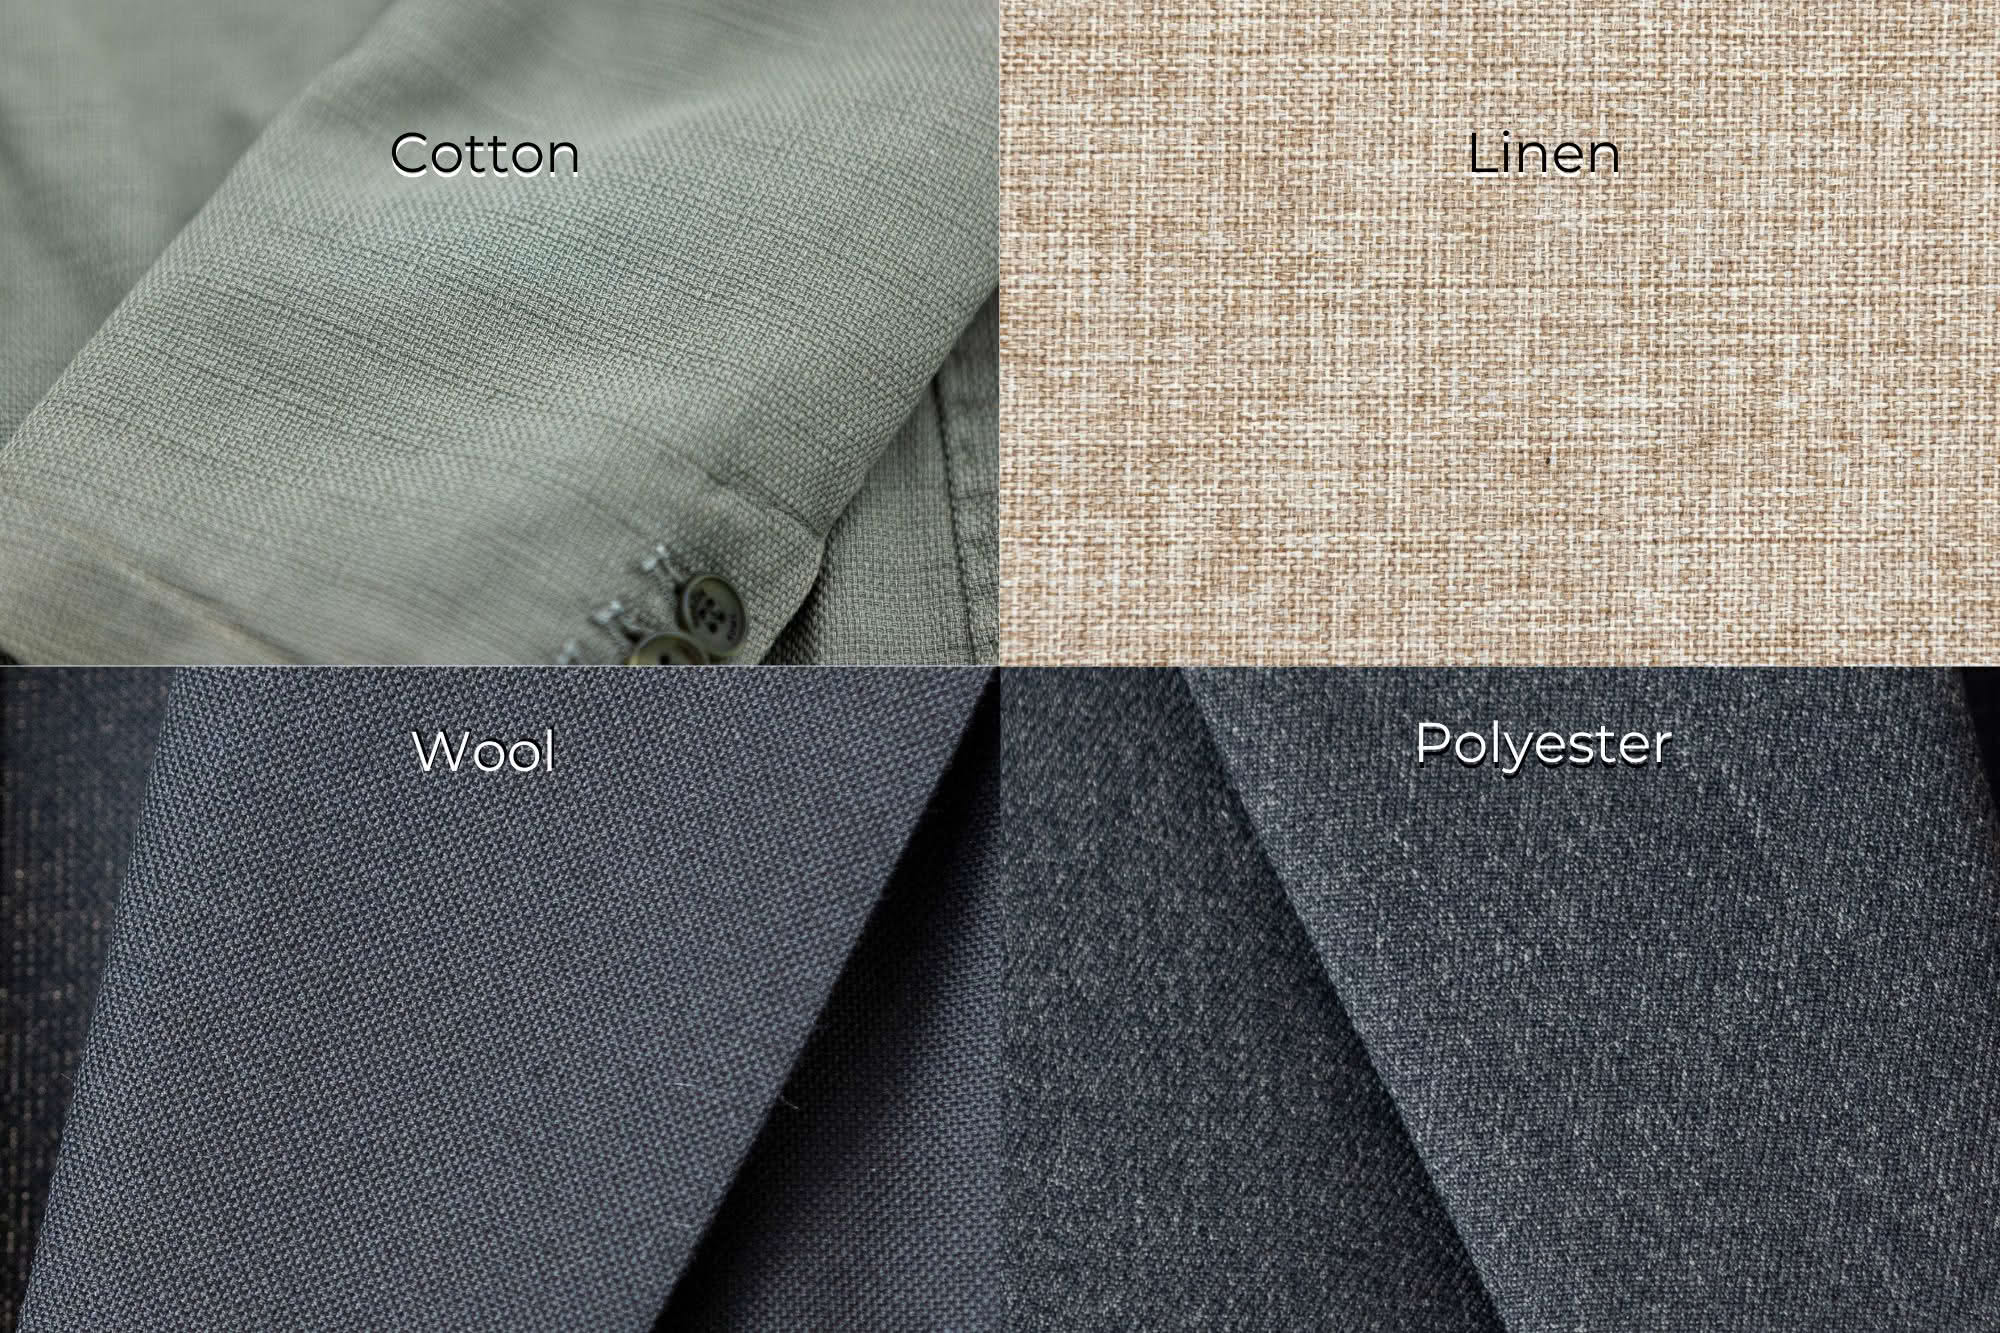
    • Wool – Wool is a great natural fabric and generally considered to be the best fabric overall for a suit. It is breathable, good for various weathers, and looks refined. There are even specific wools which are woven to be more wrinkle resistant. There are a lot of wool types and names used for wool fabrics used in suits including twill,  merino wool, cashmere, tweed, worsted, and flannel.
    • Polyester and Polyester Blends – Polyester suits are generally going to be your most budget-friendly option and most polyester suit fabrics tend to be very wrinkle resistant. Polyester also tends to be an easier care option, and some polyester options are even machine washable. The main downside to polyester is that is not a natural material and might not be as breathable as a natural fibre. It also typically doesn’t look or feel as high-end as a wool suit from up close.
    • Linen – Linen suits have a timeless elegance and can be an option for warm and hot weather destinations. It’s a lightweight and breathable fabric but one that wrinkles easily and is generally harder to care for and it can stain more easily. So linen suits can be a good option for some people but you have to be OK with wrinkles and a more casual look.
    • Cotton – Cotton is another natural and breathable fabric, like linen, that is often used in suits. Cotton can be a comfortable and affordable options, but its downsides are that it tends to have a more casual look, doesn’t drape as well, and some cotton fabrics can wrinkle easily. However, you can normally iron cotton very easily to get rid of wrinkles. Summer suits will often be made of a seersucker fabric.

    Other fabric options like silks, velvet, nylon, etc. are not that common as suit materials. They are generally best avoided as a good travel suit fabric in our opinion.

    Of course, you’ll also see a lot of blended fabrics out there being used for suits as well such as wool/polyester blends, linen/cotton blends, wool/silk blends etc. I would check to see which fabric is making up what percentage of the fabric and consider the pros/cons of each.

    For example, some suits might use a majority of wool for the breathability, but also include a small amount of polyester blend to add stretch.

    Overall, we believe the overall best material option for most people is wool, and specifically a high twist wool weave which will naturally resist wrinkles. This wool weaving process is done at the mill where the suit fabric is produced, and results in a fabric that is naturally wrinkle resistant. A good example of suits that use this type of specialty wool are the Traveller suits by Suitsupply.

    For those on a small budget, polyester is probably your best bet. You can also consider polyester/wool blends which can give you a wool suit at a smaller price point with the benefits of both wool and polyester.

    A great budget pick that I’ve tested is the Haggar Men’s Travel Performance suit which you can often find on sale for under $200 for both the blazer and matching suit pants!

    For those wanting a machine washable suit, you’ll want to consider a harder wearing polyester suit. Most suits, even most polyester ones, are not designed to be machine washed so you specifically need to look for a brand that makes suits that are designed to be machine washed.

    One brand I can personally recommend is the Gramercy suit collection by Bluffworks as these suits can be machine washed and even tumble dried on low heat!

    Those looking for a more casual summer look who don’t mind wrinkles, we think linen is a great option. For instance in destinations like Italy and Greece, you see a lot of linen in the summers and it’s a great option for those types of settings.

    Cotton is probably my least favorite of the above as a travel suit material. However, I do have  a green blazer I got in Italy that is 100% cotton that I love. I wear it when I want to look put together but not too formal.

    Suit Fabric Comparison

    Color

    Color is obviously a personal choice when it comes to a travel suit. We’d suggest picking a color that you like and one that will work in a number of situations. You also want to consider your skin tone/complexion and types of climates you will be wearing it in.

    You may also want to pick a suit that will coordinate with any accessories you already have that you want to wear, such as shoes, shirts, and ties.

    Navy, closely followed by medium grey and charcoal grey, are generally regarded as the most versatile suit colors. You can see this image matrix for a brief guide. These colors are suitable for a range of events and match well with most shoe, belt, and shirt colors.

    A royal blue suit can also be a good option if you want something a bit more modern than a classic navy color. Brown and tan suits can also work and are versatile but are generally less popular than navy or grey suits.

    If you are planning to use your suit strictly for more formal occasions (e.g., formal weddings, funerals, charity balls), then you might consider a black suit. However, these can look too formal for some settings and are less versatile.

    Also, it should be noted that if you attend a lot of black-tie events (where a tuxedo/dinner jacket and bow tie are expected), it probably makes more sense to get a black tuxedo instead to work for those events and a dark suit in another color (such as navy or charcoal gray) for less formal events.

    Other colors, such as tans, medium shades of blue, greens, creams, khaki, burgundy, etc. are also widely available but are going to be less versatile and may not work with all skin tones.

    However, they may still be a good choice depending on where you want to wear it and your complexion. For instance, khaki, cream, and pastel suits tend to look better on those with darker skin.

    If you are looking at linen suits, these often come in natural shades of creams and tan as well as pastel colors which are well-suited for warmer climates and that type of material. Cotton suits also tend to come in a wider variation of colors and patterns than wool ones.

    While a solid color is the most versatile choice and is going to be the most timeless, you can also go with a suit with a pattern for a bolder look and to better fit your personal style.

    Classic men’s suit patterns include pinstripes, checks, gingham, plaids, herringbone, and houndstooth. If you opt for a patterned suit, choosing a classic color like navy or gray can help keep it being more versatile.

    If you are only purchasing one suit and don’t currently own a suit, I would generally recommend choosing a solid navy or grey suit. Generally, I travel with either a navy or gray suit. These will generally work for a pretty wide range of events from interviews and conferences to weddings and formal nights out. They also generally look good on most people.

    Of course, the final decision is up to your needs and your own personal sense of style.

    Suit color comparison


    Cut/Fit

    There are a lot of suit styles, cuts, and variations out there and looking at all the options can be a bit overwhelming, especially if this is your first suit. You’ll find lots of options regarding how the jacket buttons, linings, lapel sizes, various types of cuts, pocket shapes, button types, linings, venting, paddings, and much more.

    If you are purchasing a travel suit, then you are likely buying a suit that you want to last for a long time and which you might not be wearing too often. So, you will want a suit style that is going to last for a long time and isn’t going to become dated in a few years.

    For instance, imagine the 1920’s pinstripe double-breasted suits we often now associate with American gangsters and bootleggers from that era, or the disco inspired 1970s leisure suits. These are not exactly timeless designs.

    As such, we’d recommend choosing a more timeless and conservative style that will likely stay in fashion, rather than anything that might be popular now but fall out of vogue in the coming years.

    The key decisions you will have to make will include whether or not you want a single- or double-breasted suit, the number of buttons on the suit jacket, the size and style of the suit lapels, whether or not the pants are pleated, and whether the suit is slim, classic, or looser fitting.

    Again, these are all personal decisions. However, for a timeless look we’d recommend:

    • single breasted jacket (although double breasted is also popular if you prefer that look)
    • a 2-button jacket (or three roll two, just don’t button the top button!)
    • a jacket lapel width that matches your body width (generally, thinner people look better with a thinner lapel, and heavier people with a wider lapel)
    • lapels with a notch in
    • choose matching pants in a classic suit trousers style such as one with a mid rise, straight or tapered legs, flat front or single pleat, plain hem, belt loops, and 2 back pockets.
    • a tailored/slim or classic/regular fit (a tailored or slim fit is more fitted to body whereas a classic fit is looser and more relaxed)

    Whether or not you opt for slim/tailored or regular/classic fit will depend on your body shape and personal style. It’s really important that you feel comfortable and confident in your suit, so choose the style that works best for you.

    Just be sure to read details of each suit’s fit as different suit brands don’t always mean the same thing when using fit terms (slim/tailored/classic/regular/relaxed/loose) to describe their suit fits.

    For the suit pants, if you are buy the suit as a set you often don’t have too many choices unless you choose to customize them. But generally you just want to get a classic pair of dress pants that matches your jacket in the exact same fabric that doesn’t have any features that could really date it quickly (e.g., skinny leg, really wide legs, flared bottoms, wide cuffs/turn-ups).

    When you are wearing the suit and the jacket is buttoned, it should not be creasing or pulling anywhere. Areas to check include the shoulder, chest, waist and upper back area. It should also fit well to your body shape and not have excess fabric.

    If you are trying a suit on in store, then make sure to look at it in a mirror from all angles. Bring along a friend/partner or ask a store associate for advice about how well it fits.

    If you purchase online or by catalog, then be sure to do the same at home and ask someone else to give you advice. Minor alterations in length and fit can be made by a tailor and are generally not too expensive, but you want the overall shape, fit, and features to be there. For more information, this is an excellent guide to how a suit should fit.

    SuitSupply Traveller Suit in Navy by Laurence Norah-5
    Wearing my Navy Suitsupply Traveller suit, carrying my Floto leather bag


    Weight

    There are a few factors that affect how heavy a suit is, and these also affect how the suit performs in different climates.

    First, and perhaps most importantly, the actual fabric a suit is made from will dictate how heavy the suit is.

    Fabric weight is measured in grams per square metre (gsm), with lower numbers reflecting a lighter suit and heavier numbers reflecting a heavier suit.

    A lightweight suit will generally be made of fabric which varies from around 150gsm to 290gsm. A midweight suit will fall between 290gsm and 360gsm. A heavyweight suit will be anything over 360gsm. These numbers aren’t fixed of course, but can be helpful as a general rule of thumb.

    The fabric weight directly affects the warmth of the suit. The lighter the suit fabric, the more suitable it will be for warm weather. Conversely, a heavier fabric will provide more warmth, good for cold climates.

    Naturally, the fabric weight also directly affects how heavy the suit actually is. A heavier fabric will result in a heavier suit, giving you more to carry around. If you pack light, this is definitely something to consider.

    Other factors also affect the overall weight of the suit. The suit’s canvassing, lining, and padding, if it has any, can also increase the weight of the suit. A suit jacket often has both canvasing and lining. and it may also have padding in the shoulders.

    If you have a choice in the amount of canvasing (a layer of material attached to inside of jacket that gives it shape) and/or lining (thinner layer of cloth that touches your body and can be used in both jackets and/or pants) for your suit, your choice will depend on how much structure you want, the climate where you plan to wear it, and how formal or casual you want your suit to be.

    More canvassing and lining is best for more formal jackets, jackets worn in cooler climates, and when you want more structure. Unlined jackets are best for those wanting a lighter jacket, more casual jacket, and warmer climates. The amount of canvasing and lining can vary a lot from completely unlined to full lined. If you are not sure, there are also partial and half lined options.

    For a travel suit, we’d recommend something on the lighter end of the spectrum, which will be both easier to pack and carry, and also offer versatility in a number of climates. If it is cooler, you can always wear an undershirt if necessary or opt for a more medium-weight suit. My personal preference is definitely towards less lining and padding.

    Suit lining comparison
    Suit lining comparison


    Size Inclusivity

    While most suit brands do offer a wide range of suit sizes, these won’t work for everyone. While travel suits can pretty easily be sized down or made shorter by a tailor, those who need larger or longer suits may have more difficulty finding well-fitting suit options.

    However, there are still a lot of options. For example, brands like Suitsupply offer sizes from XXS to XXXXL and offer regular, long, and short sizing.

    You also have the option to customize the size and fit of their suits and you can give them your exact measurements. Even budget-friendly brands like Haggar offer big and tall sizes in many of their suits.


    Versatility

    When choosing a suit for travel, you will want to consider how versatile it is going to be. The versatility is going to come from many of the factors we’ve already discussed including style, color, and fabric weight, as well as how well it pairs with other clothing and accessories in your wardrobe.

    Things to think about include:

    • Can you wear the suit pieces individually as well as together? Would you wear the blazer jacket with different pants for a more casual look for example? Would the pants also work well with a dress shirt to wear for work or business functions or church events?
    • Will the suit work for you in different situations and events? Would you wear it to a wedding, conference, holiday party, funeral, cruise, business meeting, fancy dinner, baptism, etc. Think about events you’ve been to over the past few years or have coming up, how many of them could it work for?
    • Does the travel suit work in multiple destinations and climates? Does it work in both cold and hot climates? Would you wear it humid as well as dry destinations? Would it fit in equally well in the places you tend to travel in the USA, Europe, Asia, etc?
    • Does the suit work well with other wardrobe pieces you already have? You are likely to wear a suit more often if it goes with different colored shoes, belts, bags, shirts, ties, etc.

    Generally, the more versatile the suit you choose, the more useful it will be and the more opportunities you will have to wear it.

    For instance, consider that you are planning a trip to southern Italy, and you choose a nice cream linen suit for your summer travels there. It can be a great option for an Italian summer trip. However, that same suit isn’t likely going to be as well suited for a business meeting in London, a fjords cruise formal night, or a New York City formal wedding.

    Now if you have very different circumstances where you plan to wear a suit, you might consider budgeting for two suits that will cover all scenarios. For instance, one darker and more formal suit and one lighter and more casual suit.

    Overall, pick the most versatile suit you can. I feel it is worth spending a bit more on a more versatile suit option that you can wear more often compared to a lower cost suit that is less versatile and you don’t wear so much

    SuitSupply suit at Photography Show by Laurence Norah travel suit London Eye Laurence Norah Jessica Norah


    Wrinkle Resistance

    We’d argue that one of the key criteria to look for when choosing a travel suit is how resistant it is to wrinkles and creases. Travel is going create a lot more potential for wrinkles in a suit compared to having it hanging in a closet at home. This is the case even if the suit is in a suit carrier.

    Ideally you want a suit which is going to be resistant to wrinkles and creases, and this all comes down to the material the suit is made from.

    Good materials which include wrinkle resistance include high twist open weave wool, as well as some synthetic materials such as a polyester blend.

    Most travel-oriented suits should make it clear that they are wrinkle resistant in the suit description but do dig into the claims to see what exactly it is about the suit that validates these claims. Check reviews from customers and see if they report issues with creases or wrinkles.  If your suit arrives in the mail wrinkled, that is a bad sign.

    Now if you are going for a suit made of linen or cotton, then you’ll likely have to live with some wrinkles and creases. Just be sure to know if it can be ironed as needed.


    Care

    Travel can be tough on a suit, and you are likely going to need to get it cleaned from time to time. So, when purchasing a suit, you will want to check to see how easy it is to clean.

    Can it be machine washed? Tumble dried? Ironed? Hand washed? Does it have a stain repellant? Is it dry clean only?

    If these features are important features for you, then be sure to carefully check care instructions prior to any purchase.

    In our experience the majority of suits are going to be dry-clean only. This is an additional expense to consider in your budget when purchasing a suit. While you’ll likely get a number of wears out of a suit and be able to just spot clean, eventually it will need a full clean.

    That said, there are quite a few travel suits on the market which can be machine washed, hand-washed, machine dried, and even ironed. For lots of travelers, an easy care option is a great plus. If you are looking for this, we recommend checking out suits by Bluffworks, Ministry of Supply, and this suit by Haggar.

    Even a lot of “dry clean only suits” can be hand washed and air dried if done gently and with care. My wife, Jess, is pretty good at successfully hand washing and air drying all kinds of “dry clean” only materials to save money on dry cleaning (and to avoid the chemical treatments). But do take into account it is always a risk to ignore the suit’s care recommendations.

    Based on our experience, even if you have an easy care travel suit that can be machine washed and everything, you still want to treat it gently to keep it looking it best and extending its life. I would only machine wash when needed, use gentle and delicate cycles, and use low heat or air dry.


    Pockets

    Most suits will have a number of pockets in both the suit jacket and suit pants, and there is normally a choice in pocket style.

    Honestly, this is a personal preference. The main thing is ensuring there are sufficient pockets for your needs. If you are planning on wearing a travel suit to the airport for example, a suit with pockets that zip or that can comfortably handle things like a passport might be useful when going through check in and security.

    However, if you usually only wear a suit once you are in destination at an event, then the number and style of pockets may not be as important to you. Just think about what you normally like to carry with you when wearing a suit.

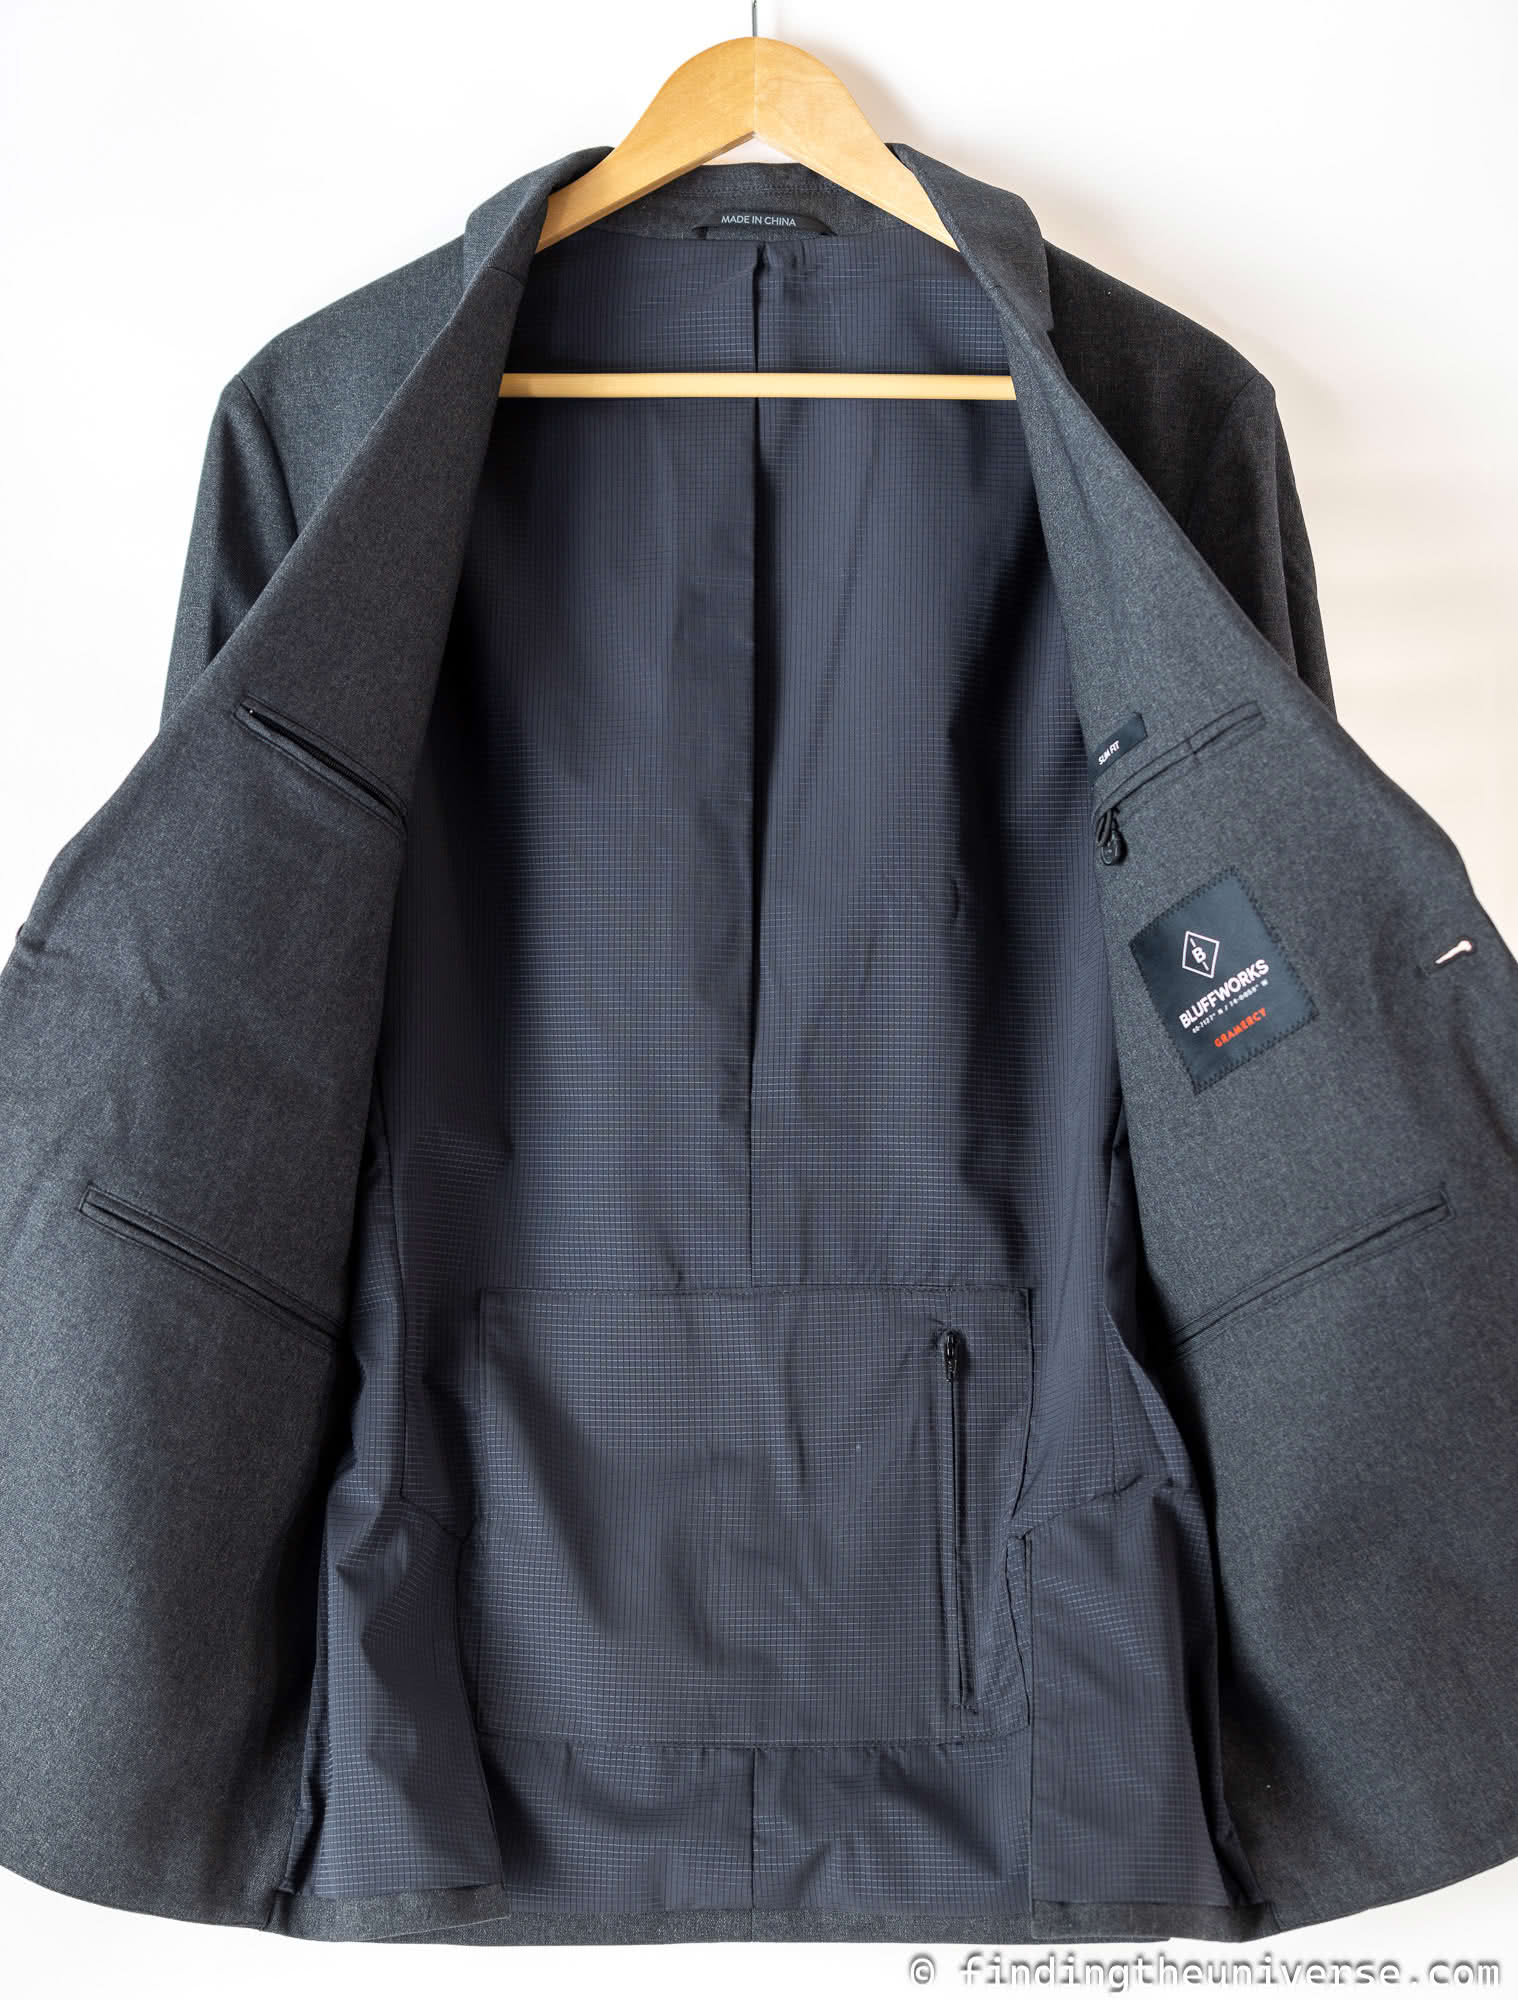
    If you like a suit with lots of pockets, then I’d recommend checking out the Bluffworks Gramercy suit, which has 18 pockets between the jacket and pants.

    Bluffworks Gramercy jacket pockets by Laurence Norah-2
    The Bluffworks Gramercy suit jacket has 10 pockets, including a number of zippered and hidden pockets


    Budget

    Price is going to be a key deciding factor when it comes to choosing a travel suit. I would say that a good travel suit that should last the test of time will probably run you between $500 and $850 (approximately £400 to £650).

    However, you can definitely pick up a more budget oriented travel suit for about $200. It might not have all the features or look quite as nice, but it will serve it’s purpose. A well fitting and tailored inexpensive suit can still look really good.

    Another option if you are on a really small budget is to check out secondhand and vintage suits. If you can can score a suit of your size, or slightly larger, you can get it tailored as needed for a better fit or to update it a bit.

    You can also, of course, spend much more on a suit with custom tailored wool suits often running in the $1,500 to $6,000 range.

    However, I’d say most people would probably find the sweet spot of $500 to $850 will get them a good quality suit that will fulfill all their needs and last a good long time.

    SuitSupply Traveller Suit in Black unlined by Laurence Norah-3


    Recommended Travel Suits

    We’re now going to go through our recommended suits for travel. First, I’ll cover the suits I personally own and travel with, which I decided upon after doing a lot of research and trying on a lot of suits.

    I’ll share my picks for overall best wool travel suit, my favorite easy care travel suit, and my favorite suit for those with a small budget.

    I’ll share my experiences of those suits first. Then, I’ll cover some other popular options that you might want to consider as well.


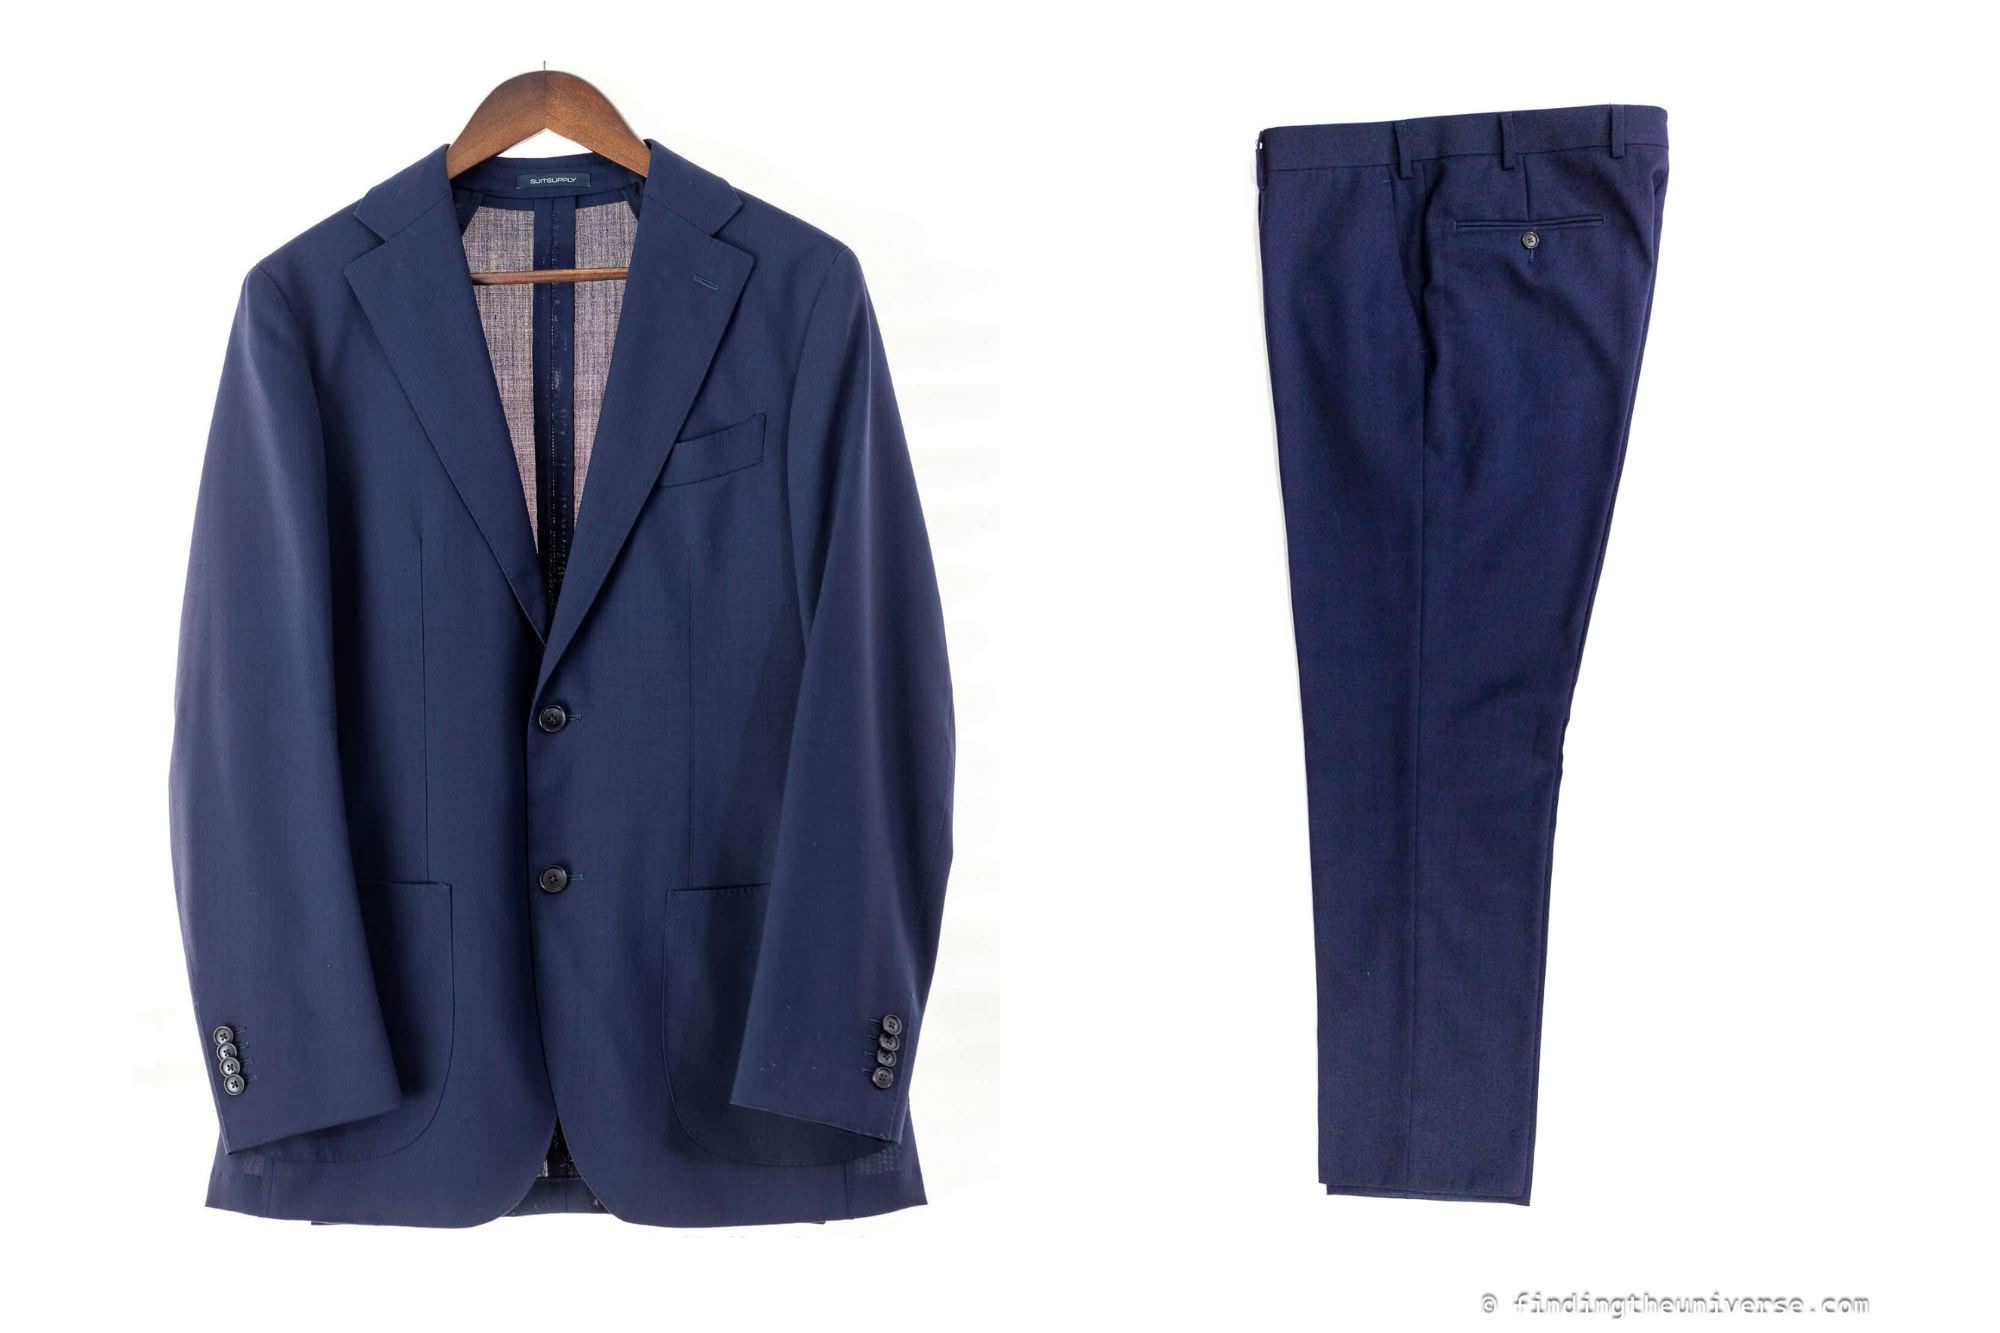
    Suitsupply Traveller Suit (Best Wool Suit Option)

    My recommendation for a wool travel suit is to choose one from the Suitsupply Traveller Suit collection. Suitsupply is a Dutch menswear fashion brand founded in 2000. The brand is best known for its use of high quality Italian fabric suits sold at a much lower price that those of designer brands using similar fabrics.

    The Traveller suits are all made of 4-ply Italian wool midweight fabric and come in both tailored and classic/relaxed fits with both single and double breasted jacket options. The suits can be purchase as a suit set, or you can purchase the jacket and trousers separately. It is available in several colors.

    The secret ingredient to the Suitsupply Traveller suit is the material it’s made from. Their suits are made from a specialty 4-ply Italian wool which they call “Traveller Wool”. This is a high twist wool, which is a specific way of weaving wool yarn that results in it being naturally crease resistant as well as light and breathable. They are designed for all season wear in all types of climates.

    SuitSupply Traveller Suit
    Suitsupply Traveller Suit in Navy

    You can actually customize most of the suits on the Suitsupply website to use this wool if you prefer a different suit style. However, for this review I’m focusing on the standard Suitsupply Traveller suit style.

    It is worth noting that Suitsupply have changed their wool yarn supplier over time. The suit I purchased in 2021 has wool made by the Lanificio F. Lli Cerruti mill, and which was branded as iTravel wool. The suit I purchased in 2024 has wool made by the Lanificio Rogna wool mill.

    Both of these wool mills are long established and reputable Italian wool mills, and the fabric produced by both mills for the suits is a high twist open weave wool which is specifically designed to stand up well to the rigors of travel.The look and feel of the wool between the two suits is very similar to my eye.

    Let’s look at the other details of this suit. Beyond the wool used, there are a couple of other key standard features of this suit that make it more travel friendly.

    First, the main body of the jacket is unlined, which means, as the name suggests, that there is no lining on the inside part of the jacket between the wool and you. The exception is the sleeves which are lined.

    If you are used to a fully lined suit this may look and feel a bit odd at first, but by leaving the majority of the suit unlined you cut down on some of the weight and it’s also easier to fold. An unlined suit is also cooler, making it more suitable for warmer climates, giving the suit more versatility.

    That said, if you prefer a fully lined or half lined suit, that is available as a custom option.

    The jacket suit also has a half-canvas construction, rather than a full canvas construction. This ensures the jacket keeps its form around your chest, whilst being lighter than a full canvas construction. Note that this is the default, and you can customize the suit to be either a full canvas or even no canvas (unconstructed) if you prefer.

    In terms of the trousers, by default they come half lined (although this changed between my first suit and my second suit, with my first purchase being fully unlined). Again, you can choose to customize the pants to be fully lined, half lined or unlined if you prefer.

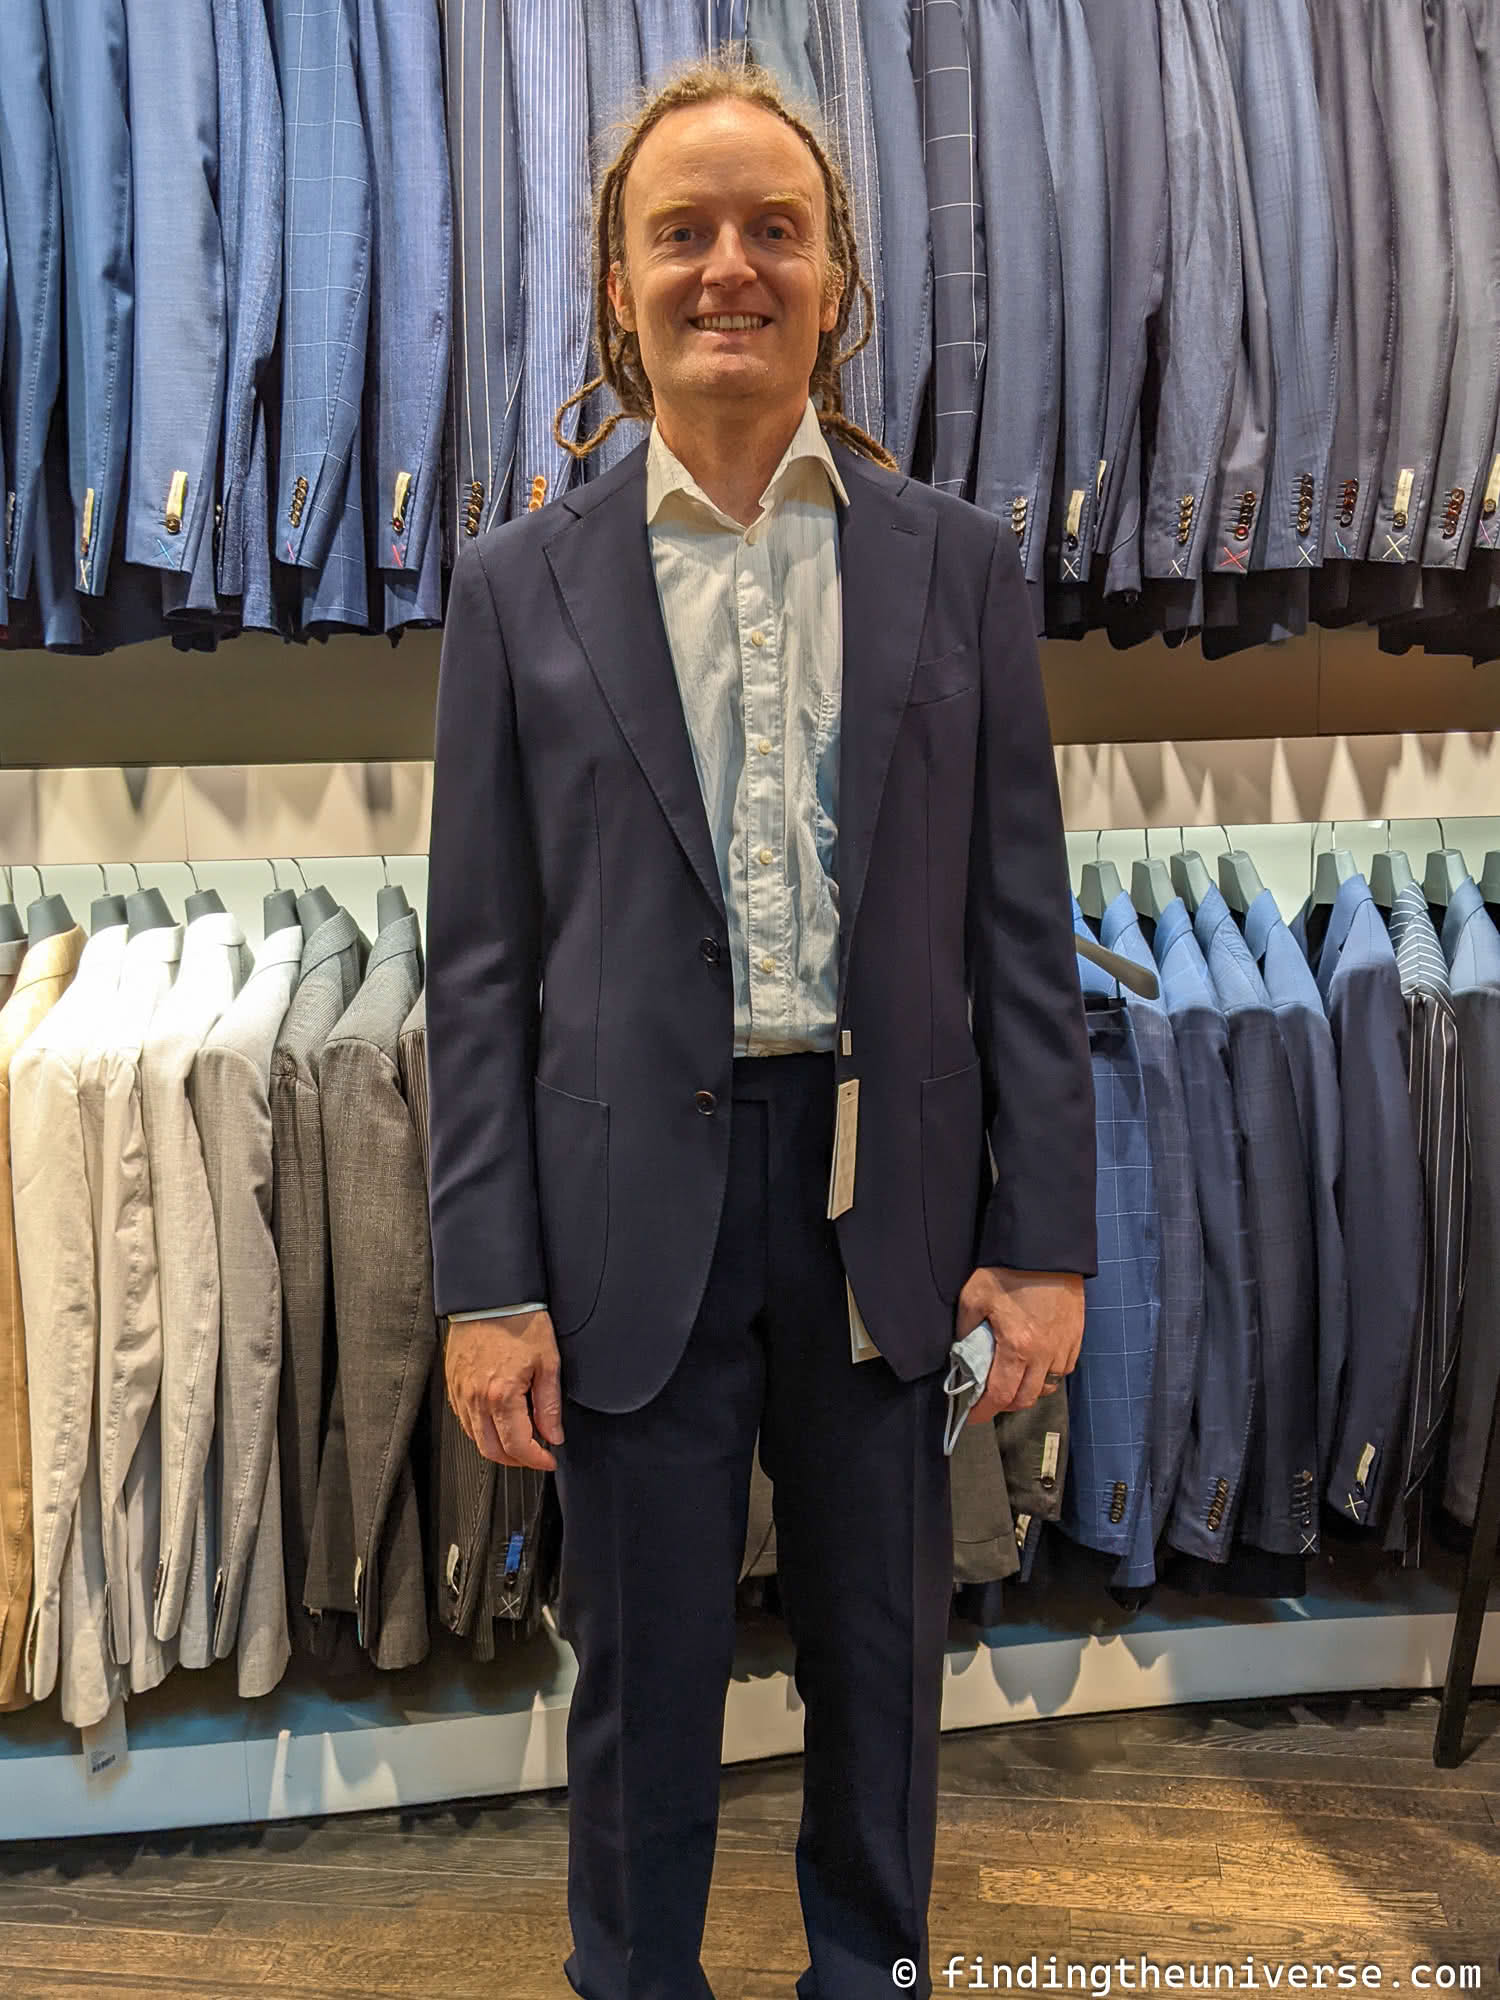
    I actually own two Suitsupply Traveller suits, and they are my go-to travel suits. I purchased my first one in 2021 in navy blue, and my second one in 2024 in black. Specifically, I chose the Navy Havana suit in 2021, and the Black Havana Tailored Fit Suit in 2024.

    The navy suit I actually purchased in store in their London store when I was living in the UK. I was able to try it on, buy it off the rack, and have the pants trimmed all in that same afternoon at the store. I didn’t get any customization done other than hemming the pants which were a little too long.

    I have really loved that navy suit, and when I decided I needed a more formal black suit, I decided I wanted to get the same Havana suit in black. I decided to just order these online as I knew my sizes and the fit, and would just take it to a local tailor to get the pants hemmed as it is a simple and cheap alteration.

    The design and material of the Suitsupply Traveller suit has changed slightly over the period between my purchases, and like everything in life, the cost has also gone up a bit.

    For my second Suitsupply suit I purchased the jacket as the standard option without making any changes. Compared to my navy jacket, there are some slight differences in lapel width and the blazer came with a a 3 roll 2 button design, rather than the two button design in the original. However, these are pretty minor changes and I like both jackets pretty equally.

    For the black suit pants, I did customize these. I chose to change the closure type, do a flat front, and just do a plain hem on these. The Traveller pants came as half lined in the upper part as standard and I kept that which I think is nice for more formal black pants.

    Both suits have been wonderful travel suits. They are very comfortable and have stood up to weeks of being packed away at the bottom of my suitcase (or carried in the free included suit carrier bag), coming out wrinkle free and ready to go every time. I have worn them to nice dinners, conferences, business talks, afternoon teas, cruise formal nights, weddings, and more.

    Overall, I have very much enjoyed my Suitsupply Traveller suits which I plan to keep wearing for years to come. I also appreciate how much they can be customized if you choose. Just note that you’ll save money if you stick to the standard features.

    There are a lot of pros of the Suitsupply Traveller suit including the pure Italian wool fabric, breathability, high quality construction, four season weight, modern style, included suit carrier bag, ability to customize, and a decent price point for a pure wool suit. Some cons are that it is dry clean only and that if you want to customize it, it can really increase the price.

    If you are interested and this is your first suit, I would recommend that you visit a Suitsupply store to try the suits on and get the fit and look right. You can of course still order online and customize the suits if you prefer (I did this for my second Suitsupply purchase with good results), but I think for a first time purchase an in-store visit is well worth it if there is a store near you.

    Suitsupply have physical stores in Europe, Asia and the Americas, with around 150 locations to choose from. You can also purchase and customize all their suits online. You can see the full Suitsupply Traveller range here. They can also ship to most locations worldwide.

    Presenting at the UK Photography Show Laurence photographing from inside London Eye by Laurence Norah SuitSupply suit at dinner by Laurence Norah SuitSupply Traveller Suit in Navy by Laurence Norah-3 SuitSupply Traveller Suit in Black unlined by Laurence Norah-4


    Bluffworks Gramercy Suit (Best Easy Care Suit Option)

    The Bluffworks Gramercy Suit is another travel suit I own and is my top recommendation if you want an easy care suit option (machine washable) and/or you want a suit with a lot of pockets. It’s also a good option if you don’t want a wool suit for any reason such as allergies.

    Bluffworks has been around since 2012 and the main factor that sets it apart from almost all the other companies out there selling travel suits is that their brand is focused on travel-friendly clothing.

    Bluffworks Gramercy Suit
    Bluffworks Gramercy Suit in Gotham Grey

    I have found their Bluffwork Gramercy suit to be an excellent travel suit and the suit has a number of features that make it stand out from the crowd.

    First, Bluffworks makes these suits out of a polyester material they call Gramercy. This is a material that they spent a long time developing to ensure it looks as close to wool as possible. I have to say that they have done a great job—the suit doesn’t have any of the shine you might associate with a polyester suit, and I think most people wouldn’t be able to tell it wasn’t wool.

    However, you do still get the benefits of polyester, meaning its lightweight, quick-drying, and breathable.

    Even more impressive though is that the suit is fully machine washable. You can even tumble dry it on low heat, and if you really need to, iron it. However, Bluffworks say that the suit shouldn’t need ironing as the material is wrinkle and crease resistant. This has certainly been my experience with it and I haven’t needed to iron it yet.

    The other feature that sets it apart is the amount of pockets and storage in this suit. The jacket and trousers between them have 18 pockets (!), which is far more than a regular suit.

    Some of these pockets are cleverly hidden, others are zippered, and there’s even one designed for your travel documents. One downside of a suit is often a lack of pockets, but the Bluffworks Gramercy has you covered on that front. This definitely makes it much more travel-friendly and the zipped and hidden pockets add some extra security.

    The suit jacket is partially lined (the sleeves are unlined), so it isn’t quite a light and breathable as an unlined suit jacket (all those pockets have to go somewhere after all). So for the hottest climates this is something to think about, although it wears easily and certainly doesn’t feel heavy in the way that a more traditional lined wool suit does.

    While there aren’t many colors available, they have the most poplar and recommended ones, including navy, grey, and black. I have the Bluffworks Gramercy suit in Gotham Grey, and I think it looks great. It is honestly pretty hard to tell it’s not wool, and the feel is amazing. I love all the pockets it has, and I have found it’s still comfortable in warmer climates.

    Bluffworks also make a range of other travel-friendly clothes (including women’s clothing), all of which are designed to be packable, wrinkle resistant, odor resistant, and easy to care for. The Gramercy suit is their original travel suit but they also have the Presidio travel suit which has a slightly more modern and simpler look with a fully lined jacket.

    I also have a Bluffworks Lenox dress shirt. A dress shirt is pretty much an essential item to wear under a suit (unless you’re a tech CEO or something), and I have found that the Bluffworks Lenox also performs really well, standing up to the rigors of travel and looking good as it does.

    I think it’s a great looking dress shirt. It offers full stretch, a soft feel, is fully machine washable, and is really comfortable to wear. It has quickly become my favorite dress shirt.

    I can highly recommend the Bluffworks range of clothes, they look good, are easy to care for, and won’t break the bank.

    Bluffworks is based in the U.S. but ships internationally. Currently, their clothing is only sold online from their website, and you can explore their full range online here.

    Bluffworks Gramercy suit by Laurence Norah-2 Bluffworks Gramercy suit by Laurence Norah-2 Laurence presenting Bluffworks Gramercy by Laurence Norah Travel suit by Laurence Norah Bluffworks Gramercy suit by Laurence Norah-2 wedding photography 1 Wearing Bluffworks suit at wedding


    Haggar Men’s Travel Performance Suit (Best Small Budget Option)

    If you are on a small budget and the Suitsupply and Bluffworks suits above are a bit out of your price range right now, I recommend checking out the Haggar Men’s Travel Performance suit. This is a polyester travel suit that offers a very good value for those with not a lot of money to spend. You can normally get the full suit for less than $200!

    I purchased the Haggar Men’s Travel Performance suit in the color Dark Heather Grey to compare it to the more expensive suits I owned, to see how it stood up. I already owned a few pairs of Haggar’s regular travel pants which I’ve always found to be very comfortable.

    If you live in the USA, you are probably familiar with the brand as its been around since 1926 and continues to be a popular brand, particularly for men’s pants and suits.

    Haggar Travel Performance Suit
    Haggar Travel Performance suit in Dark Heather Grey

    Overall, I found this travel-friendly suit to be very comfortable and easy to wear. I really liked how light it was, thanks to the moisture wicking polyester construction. It is lined, but it is still lightweight.

    The flexible fit waistband and stretch fabric in the suit itself also made it very comfortable to wear. It is also very resistant to wrinkles and wasn’t wrinkled from shipping or when thrown in my luggage or car.

    It comes in a wide variety of colors and sizes, including some short and tall size options. The jacket is fully lined and has some padding around shoulders for a more structured look. It is 100% polyester and it is dry clean only.

    This suit has a lot of pros, including its low cost, fast delivery options, range of colors and sizes, and light and comfortable fit. The main downsides are that it doesn’t have the more refined look and detailing as my other suits and isn’t designed to be machine washable. However, I feel it is a very good value at the price point and I think if I got this slightly altered, it would make it look a bit more polished.

    Note that Haggar makes a wide range of suits, including an easy care machine washable suit, which you might also consider as another travel suit option. This one might be a particularly good option for those who want to be able to throw it in the washing machine.

    You can buy it online (including from Amazon), the brand’s website, or buy from U.S. department stores selling the Haggar brand. You can find their clothing in stores such as Kohl’s, Macy’s, and JCPenney although I purchased mine on Amazon as I couldn’t find them available in the stores we visited.

    Note that Haggar doesn’t sell their clothing directly outside the U.S. as far as we are aware. If you live outside the USA and are looking for a similar option in your own country, I’d head to your local department store and see what suits they sell off the rack at the lower price points.

    Haggar travel suit by Laurence Norah-4 Haggar travel suit by Laurence Norah-2


    More Travel Suit Options

    There are a great many suit manufacturers on the market, and many of them make a suit which is either specifically designed for travel, or happens to have qualities which make it good for travel.

    Here are some options that we recommend you look into if our recommendations above don’t quite fit what you are looking for, or you’d just rather have some more options!

    Suits are available at a wide range of budgets and in various styles and materials, so you should be able to find something that works for you.


    Ministry of Supply Velocity Suit

    Another travel suit to consider is the Velocity Suit from Ministry of Supply. This is constructed from their Velocity material, which is a blend of 61% polyester, 33% viscose, and 6% elastane. It’s designed to look and feel as much like wool as possible, while offering the benefits of the blended material.

    The blend means the suit offers both stretch and wrinkle resistance, and it’s also machine washable and you can put it in the drier.

    You can even cool iron it if you want, although Ministry of Supply says that if the suit does have any wrinkles your body temperature will be enough to even them out. Which is pretty neat. The suit jacket is partially lined.

    It’s worth noting that Ministry of Supply also makes a suit called Kinetic, which is unlined and even lighter. However it doesn’t look quite as formal, with a three button design and higher lapel. If that works for you, then it is definitely worth considering as well.


    Sene Studio FlexTech Suit

    If you don’t like wearing suits because you feel they are too restrictive, then the Sene Studio FlexTech suit might be for you. This suit is made with Sene Studio’s FlexTech material, which is a four-way stretch polyester which is designed to be super flexible. That means that you can move freely in the suit and not feel restricted.

    There’s lot more to like about the suit. First, it’s going to be tailor made for you, which is quite a benefit especially at this price point.

    The way this works is that when you go through the purchase process you will answer a series of questions about your body shape, size and weight, and FlexTech will create the suit specifically for you. If after all that it doesn’t fit, they will remake it or let you return it anyway, which isn’t always the case with a custom suit.

    Now this isn’t quite as detailed as the customization on something like the Suitsupply suits, where you can specify detailed measurements for all sorts of the suit parts, but it is a step above your average suit, and is definitely appreciated at this price point.

    In terms of other features, this suit can be machine washed in cold weater, but isn’t suitable for a tumble dryer as it needs to be air dried. It also can’t be dry cleaned or ironed. As it’s polyester it will dry pretty quickly, but obviously not as quickly as something that can be machine dried.

    Overall, this is definitely a good option for a travel suit to consider if you want the flexibility of stretch fabric.


    StudioSupply Lanificio Zegna Traveller

    Stepping up a little in price now, to the StudioSuits Lanificio Zegna Traveller wool suit.

    This suit is made from wool woven by the notable Italian weavers Ermenegildo Zegna and is notable for its crease and wrinkle resistance. It’s dry-clean only, as is to be expected with a wool suit.

    The suit is lined, but you can customize it to be half lined or unlined if you prefer. You can also customize a great many more aspects of the suit, from pocket style to lapel size, although of course many customizations do add extra cost.

    It’s worth noting that as well as making material for other suit manufacturers to use, Ermenegildo Zegna also make their own suits. So you can purchase a suit directly from Zegna, but just be aware the prices are significantly higher.


    Brooks Brothers Explorer Collection

    Brooks Brothers are a well known suit retailer with a wide range of suits to choose from. They also have a travel-oriented range of suits, known as the Explorer Collection.

    These are made from a 98% wool 2% polyester blend. The wool is a lightweight wool made by the Vitale Barberis Canonico mill, which is blended with polyester. This material gives you the best of both worlds—the quality feel and performance of wool, with the benefit of a comfortable stretch fit with wrinkle resistance from the polyester.

    The suits have a half canvas construction, meaning they are more lightweight than Brooks Brothers’ traditional full construction suits, allowing for a lighter suit that is easier to pack.

    As they are a majority wool construction, these suits are dry-clean only. There’s also not a lot of customization available, but the price is reasonable for a wool suit.


    Charles Tyrwhitt Ultimate Performance Suit

    Charles Tyrwhitt is based in the UK and was my go-to brand for shirts when I lived and worked in London. They also make a range of suits, including their Ultimate Performance Suit.

    This is made from a superfine 100% 4-ply merino wool with natural stretch. It’s also crease resistant. The jacket is half canvas and lined while the pants are half lined. There aren’t any customizations available but it’s a reasonable price for a wool suit.


    Armani and other Designer Brands

    If you have a bigger budget, then you can dive into the world of designer and bespoke suits. Armani is probably one of the best known suit designer brands and you can’t really go wrong with a well-tailored Georgio Armani Italian-made suit.

    Other well known designer brands, many of which offer custom options, include Tom Ford, Zegna, Brunello Cucinelli, Brooks Brothers, and Brioni. Just note you’ll need to do your own research on which ones are going to be best for travel as most brands don’t specifically label any of their suits as travel friendly.

    For a bespoke suit, you can head to NYC, Saville Row in London, or Milan where there are lots of tailor shops offering bespoke suits made to order. Here you can design the perfect travel suit of your dreams with almost unlimited options.

    However, if you are looking for a travel suit, you may find that paying a lot more for a suit doesn’t necessarily deliver a lot of added benefits other than the name brand. For instance, in a 2011 blind test conducted by the Wall Street Journal, the reviewers found “little difference in quality” between a $614 Suitsupply suit and a $3,600 Armani option.

    Suit store by Laurence Norah


    Additional Items for a Travel Suit

    The suit is going to be the main thing you wear, but you are going to need a few more things to complete the look. Depending on your style and level of formality, these might include a dress shirt, tie, tie bar, belt, dress socks, cuff links, and shoes.

    There are also a few other accessories you might consider to make your travel packing easier.


    Wrinkle-resistant Dress Shirt

    You need to wear something under your suit, and the majority of the time for a more formal occasion that is likely to be a dress shirt.

    Ideally you are going to want a dress shirt that travels as well as the suit. After all, having a beautiful wrinkle free suit isn’t any good if you pair it with a crinkled shirt!

    The Best Travel Suit for Men

    Of course, most shirts are a lot easier to iron than most suits, but since an iron isn’t always available then a shirt which features wrinkle resistance is a good option.

    I have a number of no iron cotton dress shirts which I purchased from a major UK retailer (John Lewis Non Iron Twill Slim Fit Single Cuff Shirt), which work well. You can buy these kinds of shirts at about any department store.

    But my favorite dress shirt at the moment is the Bluffworks Lenox dress shirt which I think looks great and performs really well. In terms of color, white is generally an easy color that pairs well with most suits, but this is a personal preference thing of course.


    Comfortable Dress Shoes

    Obviously, you are going to need to wear something on your feet, and the standard choice for many occasions is going to be a pair of dress shoes. However, dress shoes can be somewhat impractical to travel with as they take up a fair bit of space for something you might not plan to wear that much.

    So what you want are a pair of dress shoes that look the part, but are comfortable and versatile enough to wear all day. This is especially the case if you are hoping to only travel with one pair of shoes.

    My current personal favorite dress shoes for travel which look formal are my pair of Amberjack Originals. I also have a pair of Timberland shoes which look a bit less formal but work as dress shoes in a pinch.

    Amberjack make a range of leather dress shoes which are designed to look just like a formal dress shoe, but with all the comfort and performance of a sneaker. They are incredibly comfortable, and I highly recommend them. Timberland are also obviously a well known brand, and I appreciate how comfortable their shoes are for all day wear.

    In terms of style and color, there are a great many dress shoe styles to choose from. The main colors for dress shoes are black, brown and burgundy. It’s important to choose a shoe color which matches your suit. As a general rule, the following applies:

    • Black shoes match black, grey/charcoal and navy suits
    • Brown shoes match grey/charcoal, navy, brown and white suits
    • Burgundy shoes match grey/charcoal, navy and brown suits

    As I recommend navy or grey as a suit color, with black as a backup, then I’d say black shoes are going to be the most versatile, followed by brown. Both are a solid choice though.

    Amberjack Travel shoes by Laurence Norah-2


    Garment Bag

    Many travel suits, especially those made with man-made materials, are specifically designed so you can essentially stuff them into your regular luggage and by the miracle of technology they’ll come out the other end looking like they were just pressed.

    The Best Travel Suit for Men

    That said, you may prefer to treat them with a bit more care, in which case a good garment bag might be a good idea. This is also a good option if luggage space is less of an issue, such as when you are traveling by road.

    Personally I quite like the basic lightweight garment bag that came with my Suitsupply travel suit, although its only really capable of holding my suit and a dress shirt. I also have a larger more padded garment bag like this that works well for road trips.


    Packing Cubes

    We highly recommend traveling with packing cubes to help you improve how well organized your luggage is. Rather than a bundle of clothes that you have to dig through to find the item you want, packing cubes allow you to sort and organize your packed items for easy retrieval.

    The Best Travel Suit for Men

    If you don’t have a garment bag, a packing cube can also be a good place to put your travel suit and shirt. This can stay in your bag until you need it.

    There are a great many packing cubes on the market, which offer different features. We’d recommend getting packing cubes with a compression feature to improve space, but basic packing cubes like these will work too. It’s also a good idea to get a set of different sizes.

    One thing to note with packing cubes is that whilst they help a lot with organization, they do take up more space as the cube itself takes up a bit of room. So you might want to practice packing with them prior to a trip to ensure everything fits nicely.


    Tips for Buying a Travel Suit

    I’m going to cover a few tips to help you buy a travel suit, to helpfully make the process smoother for you.


    Measure Properly

    If you are able to visit a physical suit store location or tailor, then this is going to be the easiest way to get properly measured.

    If you do go to a physical store, make sure to bring along your dress shirt and dress shoes that you plan to wear with the suit so you can get the fit just right. In my experience, a good suit store will be able to provide you with these items if you don’t have them, but if you do have them I recommend bringing them.

    If you can’t visit a physical store, then check the website of the suit you are purchasing. They should have detailed instructions on how to measure yourself for their suit. Take your time and get this right to avoid having to make a return.

    It’s also important to note that different manufacturers might use different sizing systems, so don’t take measurements you made on one site and apply them to another site, always measure again following each suit manufacturers specific instructions.

    Also be sure to take international differences in measurements and systems in mind if ordering a suit from a country based outside of your own. For example you don’t want to mix up inches with centimeters in providing your measurements!

    SuitSupply store by Laurence Norah
    Trying suits in a Suitsupply store


    Check the Returns Policy

    If you are buying a suit in person or online, you will want to check what their returns policy is. When buying in person this should be less of an issue as you should be able to get the fit right in store. However, even so, you might change your mind after the fact or decide you want a different color.

    If you are purchasing online, you absolutely want to be sure there is a robust and easy returns policy in place so you can return your suit if the fit isn’t quite right, or if it’s not what you expected.

    If the suit has any customization, you will want to check if this changes the return policy. Sometimes a custom-made item might not be returnable, which would definitely be an issue if it didn’t fit!


    Opt for Something Timeless

    If you’re like me, you might not wear a suit that often, or need a travel specific suit that often. So you want to buy a suit that is going to last a long time. In this case you will want to pick a style that is going to last the test of time.

    Generally, a solid color like navy, grey or black is going to stay fashionable. Patterns and other color options can come and go in fashion, and what may be popular now might look dated in a couple of years.

    Similarly, a classic single-breasted jacket, 2 button jacket with a regular lapel is unlikely to go out of style. Sticking to tailored and classic fits and the most timeless features will help keep your suit from looking dated in the future.


    Understand the Power and Limitations of Alterations

    Unless you get your suit custom made to your measurements, there is a decent chance your suit could fit a bit better with some small alterations. Getting your suit tailored to you will really make a suit look nicer, more modern, and more expensive.

    Even a cheap suit is going to look much better if it fits your body properly and the great thing is that most alterations are fairly inexpensive.

    It is good to know what kind of alteration are fairly easy for a tailor or seamstress to make and those that are difficult or not recommended. Generally you want to make sure the overall fit and style, particularly of the jacket, is good as you typically don’t want to be adjusting front jacket buttons, shoulder width, padding, pockets, or overall shape or structure.

    But things that are typically easy to change are adjusting the length of jacket sleeve and pant legs, changing the hem of your pants, taking in or letting out the waist of your pants, tapering pant legs, adding/removing cuffs to your pants, and adding/changing buttons to the jacket sleeves. Other changes may also be possible depending on the structure of your suit.

    If you are buying a suit off the rack or online and are between the standard sizes, you always want to size up a size. For example if you are a 31 in pants and the only options are a 30 or a 32, always go for the 32 length. You can always make the pant legs shorter but there is a limit to how much you can make them longer depending on amount of excess fabric at the hem.

    Just note that while sizing up is always a better option than buying a suit that is too small, I would not recommend buying a suit that is more than 2 sizes too big. Once you get too big, the suit is just not likely to fit you well overall without some major adjustments. You would be better off paying more for a suit in the correct size even if it costs a bit more (the adjustments to a really ill fitting suit can be costly and results may not be great).

    Budget for Alterations

    You should add a small amount of your suit budget to tailoring as chances are you will need at least a minor alteration unless you are lucky to fit a standard size or get it made to measure.

    For example, my Suitsupply suit pants came in a fixed length and I needed to get the adjusted to be a bit shorter. With the first pair I bought, I did that in store and they did it for me for a modest fee. With the second pair, I took them to a local alternations store. I think in both cases this alteration cost between $15 to $20.

    Depending on the alteration, you should expect each change to cost between $10 and $30 (£8 – £25). So if you want to for instance taper the legs of your suit pants and also take in the waist, I’d budget about $40 (£30).

    But you can also call your local tailor or seamstress to get your local prices before you bring in your suit, and this can also help you shop around for the best price. Just be sure to read reviews first so you don’t end up with shoddy work!

    Tailoring a suit isn’t always necessary, but it can often help get the fit just right, especially with an off the rack suit. So just bear in mind that this might be an additional cost on top of your suit budget to take into account.


    Further Reading

    That summarizes our guide to the best travel suit for men! Hopefully you found it useful.

    We also have a number of other relevant posts that we think you will find useful for travel planning.

    And that’s it. We hope you found a travel suit you like, or at least some ideas for what to look for when buying a travel suit.

    Do you have a favorite travel suit you’d like to share, or a question about any of the above? As always, just let us know in the comments below!

    A detailed guide to travel suits for men. What to look for, how to choose a travel suit, and recommended options across a range of budgets


    Source link

  • Heidelberg Christmas Market 2023 – Experience the magic

    Heidelberg Christmas Market 2023 – Experience the magic


    When it’s that time of year, Heidelberg Christmas Market should be on your list for an enchanting holiday experience like no other. Nestled in the heart of a historic city, this market weaves a festive tapestry with Christmas trees against the backdrop of a stunning castle and charming old town. The Christmas market season in Germany is one that should not be missed. 

    Heidelberg Christmas Market in front of the Catherdal. Image of a Gluhwein Stall.
    Heidelberg Christmas Market | In front of

    Its collection of unique markets, each with its own charm during the holiday season, offers a delightful array of handcrafted treasures and culinary delights, from intricate ornaments to mouthwatering Bratwurst and heartwarming Glühwein. Skating on the ice rink at Karlsplatz adds an extra layer of fun and a festive atmosphere, and the warm hospitality of Heidelberg’s locals makes you feel like part of the holiday celebrations. 

    With twinkling lights, carolers, food stalls, and the scent of roasting chestnuts, Heidelberg Christmas Market envelops you in the holiday spirit and Christmas season, creating magical memories that will stay with you long after the season has passed.

    This site contains affiliate links to products. We may receive a commission for purchases made through these links. Support my blog here

    Heidelberg Christmas Market

    Wooden Life Size Advent Calendar
    Wooden Advent Calendar

    Heidelberg is located in southwest Germany not too far from Frankfurt. It boasts a rich and storied history that stretches back over 800 years. Its roots can be traced to Roman times, but it truly rose to prominence in the 14th century when Heidelberg University, one of Europe’s oldest, was founded.

    The city’s majestic castle, perched on a hill overlooking the town, has witnessed centuries of political intrigue and cultural evolution. Heidelberg also played a pivotal role in the development of the printing press, thanks to Johannes Gutenberg’s association with the city. Today, Heidelberg retains its medieval charm, with cobblestone streets, historic architecture, and a vibrant cultural scene that invites visitors to step back in time and explore its fascinating history

    One of the German Christmas traditions is to visit these festive market stalls or winter markets. Visiting Christmas markets in Germany is an experience that will warm your heart and create lasting memories. These markets are a delightful blend of tradition, festive spirit, and pure enchantment.

    Every corner is filled with holiday magic, from the twinkling lights and charming stalls to the delicious aroma of Bratwurst and Glühwein. It’s a chance to immerse yourself in centuries-old traditions, discover unique handcrafted gifts, and savor mouthwatering seasonal treats. 

    Heidelberg is a small Christmas market compared to Cologne Christmas Markets. Heidelberg’s Christmas Market is one of my favorites to visit because there are so many areas to see and of course, it’s a special city to my heart – one of the first German towns I experienced when I moved to Germany.

    From the Christmas Markets in Heidelberg, you’ll get to experience the romantic castle backdrop in the distance. You’ll get to experience the beautiful Christmas decorations, local holiday cuisine, hanging star lights you can easily send back home, gifts, and so much more. 

    German Christmas markets, the warm and welcoming atmosphere invites you to share in the joy of the season with locals and fellow travelers alike. Whether you’re strolling through a historic town square or enjoying the backdrop of a medieval castle, Germany’s Christmas markets are a celebration of togetherness, nostalgia, and the true spirit of the holidays. 

    So, if you’re seeking a winter adventure that’s both heartwarming and unforgettable, visiting Christmas markets in Germany is an absolute must.

    Heidelberg Christmas Market Dates, hours, Location, and parking (2023)

    Before embarking on your festive journey, it’s essential to know when and where the magic happens.

    Date Information:  The Christmas markets of Heidelberg in 2023 are set to open their doors from November 27th to December 22nd to follow the advent season. The markets will no longer be open after 22th. The ice-skating rink is open until the 7th of January. 

    Hours: Daily from 11am – 9pm. 

    Locations: You’ll find these delightful markets scattered across the city, creating a winter wonderland that’s impossible to resist. Universitätsplatz, Marktplatz, Kornmarkt, Karlsplatz, Anatomiegarten, and Bismarckplatz are where you will find the many Christmas Markets in Heidelberg. 

    Where to Park:

    What to Expect at Heidelberg Christmas Markets

    Wooden advent calendar booth with a giant fan with advent candles surrounging the structure all made of wood with people standing outside of it.

    The Heidelberg Christmas Markets aren’t just one market; they are a collection of enchanting spots throughout the city. Here’s a quick rundown of the main ones:

    • Universitätsplatz: This market exudes a fairytale-like atmosphere. The twinkling lights and charming stalls make it perfect for strolling and enjoying a warm mug of Glühwein (mulled wine).
    • Marktplatz: The heart of the city transforms into a festive paradise. You’ll find artisan crafts, delicious treats, and the magnificent Christmas tree here.
    • Kornmarkt Winterwäldchen (Winter Forest): Venture into a magical winter forest where you can explore unique gifts and immerse yourself in the holiday spirit.
    • Karlsplatz (+ Ice Rink): Lace up your skates and glide on the ice rink at Karlsplatz. It’s a fun activity for all ages and adds to the festive charm.
    • Other Christmas Markets in Heidelberg: While these are the main markets, keep an eye out for smaller, hidden gems scattered throughout the city.

    Why Visit the Heidelberg Christmas Markets?

    The Heidelberg Christmas Markets are not just about shopping and indulging in delicious food (though that’s a big part of it). It’s an experience that warms your heart and soul. The twinkling lights, the aroma of roasting chestnuts, and the joyous atmosphere will leave you enchanted.

    In comparison to Christmas Markets in Strasbourg, Cologne, Bamburg, Nuremberg, Berlin or any of the other largest markets in Europe, Christmas markets in Heidelberg are quite small. However, what I dislike about those Christmas markets is how large they are. It can almost be too crowded to really enjoy yourself.

    What makes the small town of Heidelberg and their Christmas markets the perfect place in my opinion are their local town feel and being able to truly walk around and enjoy yourself. This gives more of an authentic christmas market feel because you’ll see families, friends, and neighbors all chatting with each other. Even in our small town in Germany – much smaller than Heidelberg, at our small markets we see people connecting like what the holiday season does. 

    Most Christmas Markets in Germany can be quiet during the day and much more busy during the evenings or night when people are off of work. 

    What to Eat at a German Christmas Market

    Now, onto the delightful part – food! Don’t leave without trying these German Christmas market treats:

    • Bratwurst: Savor the deliciousness of a traditional German sausage.
    • Flammkuchen: Think of it as a German-style pizza, thin and delicious.
    • Stollen: A traditional Christmas fruitcake.
    • Feuerzangenbowle: A flaming mulled wine spectacle.
    • Gluwein – Hot wine that helps keep you warm and is filled with spices
    • Cinnamon Stars
    • ​Chocolates and Fruit Covered in Chocolate

    Be sure to read this guide on German Christmas Market Food to get the full breakdown of everything to try at a local German Christmas Market. 

    What to buy at Heidelberg Christmas Market

    Moravian Stars lite up in a booth at Heidelberg Christmas Market
    Moravian Stars at Heidelberg Christmas Market

    There are a few things you can buy at the Christmas markets in Heidelberg, these are the most popular items you can find at a traditional Germany Christmas Market. 

    • Hand-blown glass ornaments
    • Moravian Stars
    • Nutcrackers
    • Wooden toys

    I highly suggest you check out my guide on the best things to do in Heidelberg to get more detailed information on how to spend a day in Heidelberg

    • Visit Heidelberg Castle – The main attraction to Heidelberg. You can easily take the funicular railway up to the top of the hill to get a lovely view of Heidelberg.
    • World’s largest wine barrel – At the castle, you can check out the world’s largest wine barrel.
    • Tour the oldest university – Heidelberg University is the oldest university in Germany dating back to 1386.

    Tips for Visiting the Heidelberg Christmas Markets

    Heidelberg Castle in the background of the market

    To make the most of your visit, here are some handy tips:

    • Dress Warm: It can get chilly, so bundle up. I suggest a puffy winter jacket with thick sweaters and long sleeves. Lots of layers. 
    • Bring Cash: Bring cash as not all stalls accept cards. Germany is a cash-heavy country and you’ll also need coins for the bathrooms as well. 
    • Plan Ahead: Take a look at the market map to make the most of your visit.
    • Visit in the evenings: To truly get the Christmas market feel with lights – you’ll want to visit at night. 

    FAQs About the Christmas Markets in Heidelberg

    We’ve got you covered with answers to your burning questions for visiting Heidelberg Christmas Market:

    Will the Heidelberg Christmas markets be open in 2023?

    Yes, they’ll be open from November 27th to December 22nd.

    How much time is needed at the markets?

    Plan for at least a few hours to fully enjoy the festive spirit. Although, you can easily visit the Christmas Markets in Heidelberg in one day, however, some markets have certain events for certain days. After living here for 2 years, you’ll realize most Christmas markets in Germany start to sell similar or the same things – however the atmosphere and decorations are all different. 

    What’s the best way to get around Heidelberg?

    Walking or cycling is the best way to explore the city and its markets. You can easily take public transportation as well especially if you are traveling from other cities. However, Heidelberg is a pretty walkable city. 

    What else is there to do in Heidelberg?

    There are many things to do in Heidelberg beyond just the Christmas markets like Heidelberg castle. 

    Is there a Christmas market at Heidelberg Castle?

    While there isn’t a market at the castle, the castle itself is a must-visit attraction during the holidays.

    What other Christmas markets are near Heidelberg?

    Check out the Mannheim Christmas Market or the Speyer Christmas Market for more festive fun. If you want to take further trips, I suggest Cochem and Rudesheim Christmas Markets as well, they are smaller towns but are quite beautiful and easy to do as a day trip via car. 

    Liked this post? Pin it!

    Heidelberg Christmas Market Pinterest Image - Image of the Wooden Advent Booth with a fan and several fake red candles surrounding it.


    Source link

  • We Finished the Victorian! Final House Tour of Our Queen Anne Renovation

    We Finished the Victorian! Final House Tour of Our Queen Anne Renovation


    When we left California in 2011, it was primarily due to wanting more space, wanting to own property. Plus, we longed for a more comfortable—not to mention, cheaper—way of life. The following year, we found our dream home: an 1800s beauty, built along a railroad in Tennessee in 1899. For a San Francisco native and his new bride, it was the perfect home with which to get their Chip and Joanna on, though I had no idea then just what a Queen Anne renovation entailed.

    Queen Anne Victorian house

    Here is the Victorian in Manchester, Tennessee when we first saw her in 2012.

    When we bought the house, it had sat vacant for three years, yet the bones were good, and it needed no electrical or plumbing upgrades, which was clutch for us. I don’t think we would have considered buying it were that not the case. It did, however, need just about everything else done to it—and plenty of cosmetic improvements we opted to do along the way. Let’s just say, I know my way around a tool or two now.

    Digging a Fence

    Home renovation DIY: A Queen Anne Victorian
    Home renovation DIY: A Queen Anne Victorian

    Home renovation DIY: A Queen Anne Victorian

    We thought we’d be here forever, but the concept of “forever” changes from your 20s to your 30s to your 40s; one day, we were both just ready for a change. We were done living in a house that would forever be a fixer-upper so long as we inhabited it because it would never actually be “complete” in our mind; ready to be in a space that was not conducive to modern living (closets—what are those?). We both wanted a house that was more well-suited for both living and working in the way that a pair of entrepreneurs who work out of their home need.

    Home renovation DIY: A Queen Anne Victorian
    Home renovation DIY: A Queen Anne Victorian

    And we found it: The Cedar House, a single-level midcentury modern beauty that could be both our home and office at once (and is also a fixer, for what it’s worth). Since we never want to part with the Vic, we got to work readying the Queen Anne to be a commercial rental; the result, let’s just say, is a more comfortable house than we ever lived in!

    Completed Queen Anne Victorian renovation

    Freshly-painted Victorian, after we moved out in 2019.

    And since so many of you followed our Victorian renovation on social media and the blog over the years, I felt I owed it to you to show the before and afters, as well as detail everything we did since we bought her in 2012.

    Designing Our Master Bedroom

    About the Victorian

    First of all, let’s lay her out, shall we? Her square footage is right around 2,700 with an unfinished attic on the third floor that spans nearly the full footprint of the house and a quarter basement; Thank God for these storage options, as we had no garage or carport and closet space was extremely limited.

    Victorian house tour before renovation

    Victorian house tour before renovation
    Victorian house tour before renovation

    She sits on a sloped corner lot of about 0.4 acres. She was built in 1899 in Manchester, Tennessee and, for years, was owned by the Reynolds family. So many people over the years have stopped by while we were working to tell us all about how their grandmother or aunt or best friend’s mom once lived here when she was a boarding house. I have no idea when the last time this home was inhabited prior to us moving in fall 2012, but it had been years, if not a decade.

    Victorian house tour before renovation

    Victorian house tour before renovation
    Victorian house tour before renovation

    And her state reflected that transient nature she was accustomed to prior to being occupied by my restless husband. Each room had a keyed lock on the door for private rental, and the interior—while fairly untouched from a restoration standpoint—was just that … untouched. And, therefore, neglected. For perspective, these are all photos from our home inspection back in 2012 when each room was a different color of a Fruit Loop.

    Victorian house tour before renovation
    Victorian house tour before renovation

    Victorian house tour before renovation

    The house was listed as a six bedroom, two bathroom, but we only used three rooms as bedrooms. Downstairs, we had a large living room connected to the dining room that doubled as an office; a small mud room that led down to a quarter basement; a guest room that connected to the Florida room; a kitchen and a small bathroom with shower. Upstairs was the master bedroom, the guest room we dubbed the “Lemon Room,”  the largest of the bedrooms, which was SVV’s office, and the larger of the two bathrooms that was, oddly, not connected to any of the bedrooms.

    Victorian house tour before renovation

    And here are a few inside peeks at what she looked like after we moved out in 2019. Pretty dramatic difference, no? It’s crazy what a little paint and some TLC can do to a house that’s over 120 years old.

    Renovating a Victorian home

    The Victorian also has a wraparound porch on the front and a concrete area out back that had an awning we ripped out and planned to eventually put a pergola over. Who knows, maybe we still will in the future?

    Designing Our Queen Anne Victorian Home
    Designing Our Queen Anne Victorian Home

    The Exterior

    Before we even moved in, we had Satisfaction Windows come out and measure to replace all 66 of the original windows in a custom Queen Anne style. We kept the old ones—still have them in the basement we’re saving for a rain day (or, uh, craft project)—but they were old, flimsy and leaking, and the new ones still channeled the original style while being much more energy-efficient. In fact, even in the coldest months, this house was less than $250 to heat. It was surprisingly warm in the winter and cool in the summer. Replacing these windows was one of our bigger line items for the house, especially upfront, but we had taken out a construction loan and it was so, so worth it.


    Renovating Our Queen Anne Victorian Home
    Renovating Our Queen Anne Victorian Home
    Exterior Progress + After: 2014 vs. 2019

    It wasn’t long after we moved in that our roof started leaking. The worst part? It was nearly impossible to get someone to call us back due to the slope of our house. A friend finally found us a crew to replace it quickly, and while the flashing installation required the demolition of entire sections of the original wood, the roof itself has lasted and will for a very long time.

    How to Get Rid of Squirrels in the Attic

    After we’d been in the house a year or two, we started tearing the siding off to replace it back with new wood. Since we lived next door to a builder supply company, we were able to get all the siding material there and keep it stored in their warehouse as long as we needed.

    Replacing siding in a Queen Anne Victorian
    Replacing siding in a Queen Anne Victorian

    Little did we know “as long as we needed” would be three years. No exaggeration, that’s how long the house sat just half-covered by the old siding, with plastic wrap keeping water out of the uncovered spots. This was not intentional, but we had two sets of “carpenters” completely ghost halfway through the job—lesson learned, don’t pay until the job is completed and vet every single person that comes to work for you—and try as we might, we couldn’t find any legit construction company in the area to tackle wood siding; they all only do vinyl or brick. With a mix of cedar shake shingles and cypress siding, it was more than all of the contractors we begged to do the work wanted to tackle.

    Queen Anne Victorian house

    Finally, when we were getting desperate, we found a company out of Murfreesboro who charged us just under $10,000 to finish the job. More than we wanted to pay, but it was worth it—and they wound up going out of business the next month, so I’m glad they finished it before that happened!

    Cedar and cypress siding installation image on an 1800s Queen Anne Victorian house in Tennessee
    Cedar and cypress siding installation image on an 1800s Queen Anne Victorian house in Tennessee
    Exterior Progress + After: 2014 vs. 2019

    During that same timeframe, some friends came out to help us paint the front porch, and before they did, we replaced a lot of the rotting wood and spires. We also painted a haint blue on the porch ceiling and floor to ward off the evil spirits and mosquitoes (and OK, because it looks cool). We used Ohio Haint Blue, which any paint store should be able to mix up for you. We started out using all Benjamin Moore paint, then quickly switched over to Sherwin-Williams because it was more convenient and they have great customer service—plus, SVV has a contractor account there, which if you’re in the business of renovating houses, you should definitely ask for—but it’s all personal preference.

    Everything You Need to Know About Painting Your House

    Painting Haint Blue on a Porch
    Painting Haint Blue on a Porch

    Plus, you know my plant-loving husband did some landscaping ninjary on this corner lot! He planted wisteria, kiwi, blueberries, lavender, sage, lemongrass, hops, blackberries and assorted herbs, which are for the most part still growing strong and slowly enveloping the house in draped greenery and edible goodness.

    DIY: How to Fix Up a Queen Anne Victorian Home

    Home Renovation: Rehabbing an 1800s Victorian Home
    Home Renovation: Rehabbing an 1800s Victorian Home

    We also enclosed the lot with a picket fence that we built ourselves after a few years of funeral home goers traipsing right through our land and demolishing SVV’s careful landscaping efforts. That was another saga in itself; after the former ill-informed codes director tried to stop us with a variance, then realized there was nothing in the codes book that could prevent a fence, he set us back an entire year before we could complete the project. Ohhhh, small-town politics.

    Building a Picket Fence

    And after the fence was painted, we went ahead and painted the entire exterior of the house, which we’d do all over again three years later after the primer failed. Fun!

    Buying and Renovating a Queen Anne Victorian Home

    Exterior expenditures:

    • Windows: $16,000
    • Roof: $8,000
    • Siding: $18,000
    • Paint: $2,500
    • Landscaping: $2,000
    • Lift rental: $2,000
    • Fence: $3,500
    • Custom finial: $800
    • Miscellaneous: $1,000

    Everything You Need to Know About Painting Your House

    Throughout the Home

    In addition to the windows, we also installed light-filtering cellular shades from JustBlinds throughout the house—with blackout cellular shades for my bedroom—something we’ve also done in Myrtle and now the Cedar House. They’re affordable, aesthetically-pleasing and ran us around $2,000 for the entire house (pro tip: wait until they have a sale, which is often). SVV hates window treatments, and we’ll agree to disagree on that, but with the house being on the town square and surrounded by a building supply company with workers always coming and going, we needed some form of privacy.

    Renovation
    Blinds in a Queen Anne Victorian
    Lemon Room Before + After: 2012 vs. 2019

    We scraped the majority of ceilings throughout the house to remove the ugly, orange peel-style popcorn texture that was likely a bad decision made in the 80’s. If you’re ever thinking of doing popcorn, STOP RIGHT THERE. But if you inherit a popcorn mess as we did, definitely consider sanding, patching and painting the ceilings white—our go-to color for ceilings is Sherwin-Williams contractor grade flat white straight out of the can— as it can make the most dramatic impact in any room. You can see what the ceiling throughout the house looked like here via our living room, which was one of the few rooms we never did get to.

    Popcorn Ceiling in a Victorian House
    Popcorn Ceiling in a Victorian House
    Living Room Before + After: 2012 vs. 2019

    Many of the doors had original hardware and transoms. We removed the unnecessary doors and stored them in the basement, then put them all back on before our tenants moved in, so each office could have its own privacy. SVV stained them all to remove pollen, mold and dirt, and they look as new as a 121-year-old door can look! We also had to replace a few of the knobs so they had locks on them, but kept all original details when possible.

    Victorian house | Camels & Chocolate

    And while Fruit Loops is, indeed, an attractive palette of wall colors, we took a fresh coat of white paint to every surface. We used Benjamin Moore’s Swiss Coffee color formula for every single room except the mudroom and upstairs bathroom, both of which we painted Grey Owl by Benjamin Moore. Swiss Coffee is the most widely-used formulation for #basic and clean neutral colors. It gives you an opportunity to add pops of color, which is a requirement for where I reside.

    Painting a stairwell yellow
    Renovating a Queen Anne Victorian
    Stairwell Before + After: 2012 vs. 2019

    The Upstairs Bedrooms

    The day we closed on the Vic and got the keys in August 2012, the first thing we did right before the sun set was go upstairs and rip out the ugly carpet covering the floors in both bedrooms. Then, we had Gary Parnham, a local flooring professional, come and refinish the floor in the Lemon Room as it had been painted red. The master bedroom had no flooring beneath, so we asked Gary to lay tulip poplar that will age over time to match the rest of the house, since that’s the original species of wood used for the upstairs.

    Replacing flooring in a Queen Anne Victorian
    Replacing flooring in a Queen Anne Victorian

    Replacing flooring in a Queen Anne Victorian

    Renovating a Guest Bedroom
    Renovating a Guest Bedroom

    Improving Our House to Refinance

    Both bedrooms had fireplaces that were crumbling, so we demo’d them both and added subway tile from a tile company out of Nashville.

    DIY Tiling your Fireplace
    DIY Tiling your Fireplace

    The Upstairs Bathroom

    This bathroom got a full-on gut job, and come to think of it, I never blogged about the final renovation. Here’s the skinny: We ripped out the linoleum floor. SVV relocated the plumbing. We busted up the porcelain that held the tub into place. And we reconfigured the whole thing by moving the clawfoot tub to the other side of the room.

    How we gutted, sanded and tiled our way to the master bathroom of our dreams

    Mission Stone + Tile's Hex Appeal | Camels & Chocolate

    We saved the tub and painted it safety yellow, then installed a dreamy hex tile from Stone Source throughout the floor. With slanted walls that mirrored the roof line, it was really tricky finding furniture that would fit in here; however, we finally found some vintage pieces of Broyhill Brasilia off of Craigslist, then modified a mirror to make it work. We also replaced the toilet, as we did in the downstairs bathroom.

    Tiling a Bathroom

    Designing a Bathroom for a Queen Anne Victorian

    Bathroom Remodel in a Queen Anne Victorian
    Bathroom Remodel in a Queen Anne Victorian
    Master Bathroom Before + After: 2012 vs. 2017

    The Kitchen

    Sadly, we never really touched this beast as we cook far too much and never saved up the $40,000 or so it would take to completely gut the kitchen. Instead, we added a bright color of paint on the walls, installed LED countertop lights, custom-designed a center island a local woodworker then built for us and later removed all the cabinet doors to open it up a bit. I disliked the kitchen so much, I don’t even have any updated photos of it. You can see that the only downstairs bathroom is positioned behind the kitchen, which apparently is how they did things back in ye olden days, but I’m definitely happy to be back in a normal house with an en-suite master bath these days!

    Designing the Kitchen in Our Queen Anne Victorian Home

    Everything You Need to Know About Painting Your House

    The Florida Room

    Toward the end of our time at the Victorian, we started taking sledgehammers to things. One of the first sections SVV yanked out and sealed up was the unnecessary door between the downstairs bedroom and the Florida room. He then built a wall atop it, and you couldn’t even tell there had ever been a door frame there. This wound up giving our renters far more flexibility with how they use the space (last we saw, they installed a second fridge and are using it as more kitchen space).

    Florida room in Queen Anne Victorian
    Florida room in Queen Anne Victorian

    We also never replaced the windows in the Florida room because we had always planned on creating a breakfast nook and possibly sealing them up. As such, one of the window sills was completely rotted. After we moved out, we busted out that entire window and wall and SVV covered it with siding that matches the rest of the house.

    Replacing wood siding in a Queen Anne Victorian
    Replacing wood siding in a Queen Anne Victorian

    Several people asked why we didn’t put the window back, but there was no need. This window looked out onto the chimney, and it’s actually brighter than it was before now that it’s covered with a fresh coat of white paint to reflect all the other light back into the space.

    Replacing wood siding in a Queen Anne Victorian
    Replacing wood siding in a Queen Anne Victorian

    The Downstairs Bedroom

    This is the room SVV slept in for the past few years (don’t judge, he snores loudly), and it was outfitted with twin beds for when our cousins’ kids came to stay or we had large groups of friends that weren’t coupled up but were OK with sharing a room.

    Victorian house tour before renovation
    Victorian house tour before renovation
    Downstairs Bedroom Before + After: 2012 vs. 2019

    We didn’t do much to it other than sealing up the aforementioned doorway, as well as sealing the top of a closet entrance that had once been covered by stained glass. This room was always in pretty good shape and has the best mantle in the entire house; also, the only one of our six fireplaces that still has the original tile.

    Designing Your Guest Bedroom

    Victorian house tour before renovation
    Victorian house tour before renovation

    A house tour of our 1800s Queen Anne Victorian | CamelsAndChocolate.com

    So what does it cost to renovate an 1800s Victorian house?

    I’ve been asked before what it costs to renovate an old house like this, and that’s so subjective. Plus, we didn’t exactly tally every trip to Home Depot or Lowe’s over the past decade. Not to mention, we didn’t have to do some of the bigger items—like plumbing and electrical—and much of the labor was the two of us, meaning we saved a lot there, so what we spent isn’t realistic unless you’re a skilled DIYer who can tackle almost anything, as my talented husband is.

    How to Renovate an 1800s Victorian home

    I’d confidently say the total cost of these renovations exceeded six figures, but this was done over the course of seven years, and the original price we paid for the home was only $139,000 to begin with. We initially took out a $50,000 construction loan, which we paid off when we refinanced our house a couple years later, and then used cash and credit cards for the remaining renovations.

    And, of course, there are ongoing costs associated with being a landlord. We’re constantly dropping by to fix something here, patch something there, and we also are getting ready to paint her again this year, as well as hopefully install gutters so the paint doesn’t fail once more.

    Renovating an 1800s Victorian home

    That said, property value in Manchester is low, so we definitely spent more than we could get from selling this house, which is why we always intended to turn it into a rental. In a rural area, it doesn’t make sense to renovate a Queen Anne like this so extensively unless you plan on it being your forever home (or your business), but I’m happy with the way it all worked out: We got seven glorious years in this beauty, and now she has lovely inhabitants who appreciate her as much as we do.

    Victorian stairwell

    Any questions about renovating a Queen Anne Victorian? Feel free to ask below!

    For more DIY tips and home renovation guides, check out these posts:


    PIN IT! SAVE THIS POST FOR LATER


    Source link

  • How to Eat Cheap When You Travel the World (Updated 2025)

    How to Eat Cheap When You Travel the World (Updated 2025)


    Nomadic Matt holding up a piece of pizza at a pizza shop in NYC

    I love to eat.

    In fact, eating is one of my favorite activities, and also one of my favorite aspects of traveling.

    Food is such an integral part of so many cultures that to skip out on meals when you travel is to miss out on a part of the travel experience.

    I’m always disappointed when I meet travelers who cook all their meals in a hostel kitchen or spend so much of their time just getting food at grocery stores.

    I mean, don’t get me wrong, grocery stores and markets teach you a lot about a place. And you don’t need to eat out for every meal.

    But why come to Italy to cook pasta in your hostel? Or skip a sushi dinner in Japan or paella in Spain?

    Of course, eating out all the time is expensive. Imagine if you ate out every day while at home — your food budget would be astronomical! And, when you are traveling long term (or just on a tight budget), you have to think about making your money last.

    Additionally, many people have dietary concerns that prevent them from fully embracing new foods. And many travelers are vegan or vegetarian, as well, which might impact their options.

    To make sure I can eat out without breaking the bank, I have had to learn how to balance eating 99% of my meals out while still finding a way to save money. Here’s how to eat out on a budget while you travel the world:

    1. Follow the Five Block Rule

    I live by what I call The Five Block Rule. I don’t eat within five blocks of a major tourist attraction or area. I simply walk in any direction and search for a place to eat when I hit five blocks. There’s an invisible line at this area: tourists don’t go past it. All of a sudden you notice that the crowds are gone, and that’s when you want to start looking.

    Sure, you might find a good meal in a tourist area, but you’ll find a better, cheaper meal outside it. Go where the menus aren’t in multiple languages. Go to those little tiny hole in the wall places that you are unsure about. The meal might not knock your socks off each time but it will be a memorable and more local experience.

    2. Use Local Knowledge

    If you are unsure of where to eat (and don’t like the idea of randomly wandering into restaurants), try apps where locals post reviews. I use them often to find recommendations for food in the cities and towns I visit. You can also ask the tourist office or the staff at your hostel/hotel or taxi drivers, who tend to eat at cheaper food stalls. They will have good recommendations. After all, local workers aren’t going to eat in the tourist area!

    My two favorite apps are Yelp and The Fork. For vegan and vegetarian recommendations, check out Happy Cow.

    3. Ask The Right Question

    Be sure to ask locals the question, “Where do you eat?” not “Where should I eat?” If you ask people the second question, most people will think to send you to the popular restaurants tourists visit because that will be what comes to mind. They’ll think, “Hmmm where do visitors go eat? What’s popular in town?”

    However, by asking where they eat, you will get recommendations for more local restaurants because they will tell you all the hole in the wall spots they eat at on a day-to-day basis. Small word change, much better results.

    4. Eat Street Food

    A meat skewer on a paper plate from an outdoor street vendor


    In most places around the world (and especially in Asia), the streets are lined with little food stalls and areas where food is cooked openly on the street. You grab a plate, sit down in a little plastic chair, and enjoy a delicious meal. Street food is some of the best food in the world. Meals at street stalls and vendors cost just a few dollars (if that) most of the time and are a great way to really experience the local cuisine.

    While in Sweden, I lived off these types of vendors. In Amsterdam, FEBO and their croquettes kept my stomach full. In Costa Rica, the empanada seller filled me up for a dollar and I bought local food from vendors at markets for mere pennies in Madagascar.

    Many places, like Thailand and Vietnam, for example, wouldn’t be the same if the street food disappeared. (And yes, it’s safe. The locals wouldn’t eat it otherwise.)

    5. Eat Fast Food (Sometimes)

    Fast food isn’t the best food, but it is another option if you want a cheap meal in inexpensive parts of the world. For as little as $5 USD (more in expensive countries like Norway, home of the $13 Whopper), you can get a filling (and hugely caloric) meal.

    Sure, it’s not the greatest food, and I am going to skip the philosophical debate about traveling around the world only to eat McDonald’s to say that it’s cheap and just another way to help you rein in your spending.

    6. Stick to Local Ingredients

    Local restaurant in Thailand


    When you’ve been traveling for a while, it’s only normal to crave a taste of home every now and then. That means that sure, sometimes I get sick of Greek food when I’ve been traveling there for a bit. Other times, I can’t eat any more Thai food and just want a burger. And that’s OK.

    However, non-local food is almost always more expensive than local cuisine. For example, in Vietnam, a bowl of pho is less than a dollar, but a burger is about three times as much (or more!). Try to stick to the local cuisine as much as possible and also try to avoid any food that is imported as that will increase the price of your meal too!

    7. Find the Lunch Specials

    Many restaurants, especially in Europe, offer lunch specials, where items on the dinner menu are offered at a huge discount. You can get an amazing afternoon meal for a fraction of the cost you’d pay for the same meal in the evening.

    I usually tend to eat my “nice” meal during lunch, because lunch specials and plates of the day are about 30–40% off what I might pay at dinner. The options will usually be more limited, but the savings more than justify it.

    Sadly, there is no one website where you can find all the restaurants in the world that offer lunch specials. They vary from city to city and region to region. What you can do other than wander aimlessly around the city in hopes of finding a place (though I have done that) is to ask the tourist office or the staff at your hostel/hotel if they know where to find lunch specials. They are usually very aware of what places have specials.

    8. Bring a Refillable Water Bottle

    As you walk around and sightsee, you need to stay hydrated. But buying a bottle of water every day is not only environmentally wasteful, it also makes foolish budget travel sense. Carry a refillable bottle of water (with a filter) with you instead and just use the tap water. I suggest a Lifestraw bottle. It ensures your water is always clean and safe — even if the tap water isn’t.

    9. Cook 50% of Your Meals

    I don’t cook a lot on the road as I don’t like hostel kitchens. They never have everything I need, and I hate traveling with a portable kitchen so I can have all the ingredients I want. Yet when I am in one place for a while (or if I’m Couchsurfing), I cook a few meals.

    Cooking is one of the best ways to keep your travel costs down, and supermarkets are also great places to go see what the local people eat. The only place where cooking your own meals isn’t the most economical option is Asia, where street food is usually cheaper.

    As I mentioned, I’ll often go out for a nicer meal at lunch when I can find a good deal. That will usually mean for dinner I’ll be cooking my own food. That way, I’ll still get to try the local cuisine but I’ll also get to keep my budget intact. Double win!

    10. Have a Picnic

    Picnic spread with cheese, baguette, and wine, in a park in Paris, France


    Another good option is to picnic. This is something I do a lot for lunch if I’m somewhere where the weather is nice. I usually head to a local food market, pick up a bunch of food, and go picnic in the park. Not only am I saving money (sandwiches aren’t expensive), but it affords me a good chance to watch the locals scurry about their daily lives.

    If you’re staying at a hostel, this is a great ice-breaker for meeting new people. Just invite everyone along to join you and you’ll be making new friends in no time!

    11. Use Tourism Cards

    Most people think of tourist cards like the iAmsterdam card or the Oslo Pass as just a way to save money on transportation and attractions. But these cards also offer discounts at many restaurants. Typically, discounts are around 15–25%, but sometimes lunch specials can be up to 50% off.

    Visit the local tourism office when you arrive and ask what food discounts are included. Chances are you’ll be able to save even more money if you just take the time to learn about the tourism pass. It’s a worthwhile investment!

    12. Get Free Breakfast

    A breakfast plate of sausages, potatoes, and various dips


    If you can find hostels or hotels that include breakfast, you’ve already eliminated the cost of one meal. Plus, if you have a huge breakfast that fills you up for most of the day then you don’t need to eat as many meals out. Moreover, many hostels around the world also offer free dinners, free coffee and tea, and other food-related perks. Search them out to save money and lower your food costs.

    13. Eat Where the Students Do

    Where there are universities, there are students, and since students are usually broke, that means there are likely cheap places to eat nearby. Check Google Maps for local post-secondary institutions and see what you can find in the nearby area. Many bars in the area will likely have cheap drinks and happy hours too, so you can save even more.

    Additionally, use Google to search for places. Type in “Student friendly restaurants in [X]” to get lots of suggestions on where to eat. You can also ask your hotel/hostel for information too.

    14. Use Supermarket Deals

    In many countries, supermarkets offer lunchtime specials for workers in the surrounding areas. These usually entail fresh sandwiches or some soup or salads. Additionally, many supermarkets also discount food that expires soon, including bread, baked goods, meat, and produce. For example, pre-made meals in Japan are often 50% off right before the grocery store closes because they can’t keep it overnight. Tight food laws in Scandinavia also mean that food that has “expired” is discounted too. (And, since food, especially imported meats, are so expensive in those countries, most locals buy the “expired” food).

    Buy groceries in the evening and you can likely find yourself some discounted (but still totally safe and edible) food.

    ***
    I love a nice restaurant. I don’t mind paying money for a good meal with a nice glass of wine. But doing that EVERY meal is simply too expensive.

    But, by using the tips above, I can afford to keep my costs down while still being able to afford a quality meal every so often.

    And that’s what is really important — finding the right balance.

    Because if you can manage to balance eating great food with saving money, both your wallet and your stomach will thank you.
     

    How to Travel the World on $75 a Day

    How to Travel the World on $75 a Day

    My New York Times best-selling book to travel will teach you how to master the art of travel so that you’ll get off save money, always find deals, and have a deeper travel experience. It’s your A to Z planning guide that the BBC called the “bible for budget travelers.”

    Click here to learn more and start reading it today!

    Book Your Trip: Logistical Tips and Tricks

    Book Your Flight
    Find a cheap flight by using Skyscanner. It’s my favorite search engine because it searches websites and airlines around the globe so you always know no stone is being left unturned.

    Book Your Accommodation
    You can book your hostel with Hostelworld. If you want to stay somewhere other than a hostel, use Booking.com as it consistently returns the cheapest rates for guesthouses and hotels.

    Don’t Forget Travel Insurance
    Travel insurance will protect you against illness, injury, theft, and cancellations. It’s comprehensive protection in case anything goes wrong. I never go on a trip without it as I’ve had to use it many times in the past. My favorite companies that offer the best service and value are:

    Want to Travel for Free?
    Travel credit cards allow you to earn points that can be redeemed for free flights and accommodation — all without any extra spending. Check out my guide to picking the right card and my current favorites to get started and see the latest best deals.

    Need a Rental Car?
    Discover Cars is a budget-friendly international car rental website. No matter where you’re headed, they’ll be able to find the best — and cheapest — rental for your trip!

    Need Help Finding Activities for Your Trip?
    Get Your Guide is a huge online marketplace where you can find cool walking tours, fun excursions, skip-the-line tickets, private guides, and more.

    Ready to Book Your Trip?
    Check out my resource page for the best companies to use when you travel. I list all the ones I use when I travel. They are the best in class and you can’t go wrong using them on your trip.


    Source link

  • In 2024: A Year of Joy

    In 2024: A Year of Joy


    If there’s anything as 2024 as this, it’s taken me a full month after the year concluded to finish this post. But I didn’t want to skip it for the first time in 17 years, as the past year was remarkable in so many ways.

    Bangkok Rooftop Bar | copyright: Kristin Luna of Odinn Media

    2024 was wild and weird and wonderful. I was not overly present on this blog for many reasons, mainly because life has thrown so many work changes into our life that have catapulted us to next level of busy. (Don’t you hate people complaining they’re busy?)(So do I.)(But here’s the truth.)

    Highlights of 2024 | copyright: Kristin Luna of Odinn Media

    2024 in travel

    We still traveled a whole lot in 2024 even if my airline accounts didn’t show it. Just days after ushering in a new year, we flew to Charleston, S.C. for a military ceremony celebrating SVV’s former roommate taking command of a NOAA ship. Since my brother-in-law’s family lives there, we also got to spend some quality time with them.

    Navy roommates

    When we got home, I caught a terrible case of pneumonia and recovered just in time to leave on our annual winter sabbatical, this time to Thailand with four days in Qatar on the front end. Due to our increasing focus on tourism marketing, we try to plan all of our trips in the winter when tourism is in a lull. That typically means, we vacation in January or February, then come back refreshed for a busy and full work year.

    Thailand Trip | copyright: Kristin Luna of Odinn Media

    I have so many tips for planning a trip to Thailand, and hopefully one day soon I’ll have time to sit down and bang them all out. We were lucky to have government friends based in Bangkok, so we headquartered our trip from their apartment, then did some island-hopping, too.

    Related Post: How to travel for free on credit card points

    After returning from Asia, our work travel ramped up. We’ve been on contract with the state for the past two years, and we’ve gotten to see a lot of Tennessee as a result. Much of our travel in 2024 was by car, and I’m definitely glad I upgraded my vehicle a couple years back!

    Tennessee Tourism | copyright: Kristin Luna of Odinn Media

    Tennessee tourism work aside, Mom and I took the kids to Blue Ridge, Georgia for a long weekend over their Spring Break, then I flew to Bismarck to keynote a marketing meeting.

    Dance recital with Charlotte

    We went to Memphis a few times, in March, April and July, to visit my cousins and also found ourselves in Sweetwater for a mural project. And we can’t forget one of the biggest events of the year: We flew to Austin for the eclipse and to see our besties!

    My other international trip for the year was with my mom to Paris in May to attend Roland-Garros, our second of the four tennis Grand Slam events and first overseas tourney. It rained on us nonstop for 10 days, but we had a blast—and bonus: We got to see Taylor while there (my fourth Eras show, but I digress!).

    Paris, France | copyright: Kristin Luna of Odinn Media

    For SVV’s 50th birthday—and just because we like to spend time together—my family met up with my cousins in Fort Morgan, Alabama for a full week of beach fun. We’re usually 30A people, but the crowds and the fact that SVV and I fell in love with Dauphin Island a few years back drove us west along the coast, and it was a blast.

    Highlights of 2024 | copyright: Kristin Luna of Odinn Media

    Tell me he looks 50!? No flippin’ way.

    Tennessee Portrait Photographer: Kristin Luna

    When we got back, we went to Murray, Kentucky for a weekend, the first of three trips we’d make in succession to our northern neighbor. We finished the summer with a week in South Carolina at my friend Kelly’s family’s home in Lake Keowee and the Smoky Mountains only days before the area was devastated by Hurricane Helene.

    In the fall, I spoke at a pair of Tennessee conferences, TNHTA’s Governor’s Conference on Hospitality & Tourism in Chattanooga and Rural Tourism Conference in Union City, and we took my niece Charlotte and nephew Mac on their first trip to Dollywood—and to their first UT game on the same weekend. A good Florida beating is best experienced in person at Neyland Stadium in Knoxville if I do say so myself!

    UT game at Neyland Stadium

    I was back up in Kentucky for a night in Louisville with my cousin’s daughter McKayla in November to see Taylor Swift (yes, again) up in Indy, then SVV and I returned a few weeks later for me to speak at the Kentucky Travel Industry Association’s annual conference in Covington.

    Eras Tour in Indianapolis | copyright: Kristin Luna of Odinn Media

    In November, my sister and I also celebrated my mom’s 75th birthday with a mid-week getaway to Cloudland in Georgia. We spent the entire holiday season at home, a nice respite after a year spent on the road, but hardly a restful one as we were in full holiday mode with Christmas shoots and school picture day and Breakfast with Santa and so much more.

    Breakfast with Santa | copyright: Kristin Luna of Odinn Media

    2024 in work

    We are more embedded in the tourism world than ever, and I’m truly grateful to every editor, every tourism board and every government official who hires us for gigs. It’s some of the most fulfilling work we’ve ever done (not to mention, a whole lot of fun!).

    Tennessee Governor's Conference on Tourism & Hospitality

    Though in 2024, I wrote several stories for Washington Post, Southern Living, Marriott Bonvoy, Preferred Travel and various other outlets, I have scaled back on my freelance writing because, to be frank, the pay for traditional media these days is peanuts compared to when I started over 20 years ago. And as an almost 42-year-old businesswoman, the one thing I’m not going to do is backpedal—though that said, I still have editors I adore who I am willing to do almost anything for if they ask. You know who you are!

    Tennessee tourism speaker Kristin Luna

    We’ve found a whole lot of joy doing photography contracts and content marketing for tourism boards. Several of those who we have worked with regularly include cities in our own region like Bell Buckle, and being able to help tell their story on a continuous basis has been priceless.

    Tennessee photographer and tourism marketer Kristin Luna

    In continuing with Work I Never Thought I’d Do—I legit hated a stage and an audience just 15 years ago—I keynoted a couple meetings, spoke at three conferences and hosted two marketing workshops. What an honor to get to speak a session at the Tennessee’s and Kentucky’s governors conferences, as well as the rural tourism conference which was in my home state this year.

    Tennessee tourism speaker Kristin Luna

    In 2025, I already have four conferences booked as a speaker (including one keynote)—two in February, one in June and one in July—and I hope that’s just the beginning.

    Tennessee tourism speaker Kristin Luna

    2024 in photography

    Well I’ve studied photography since college, I could have never predicted what the last five years have brought, and that’s more than 100 standalone shoots a year that have absolutely nothing to do with tourism. Family shoots, children portraits, heritage photography, volume photography, corporate headshots, Breakfast with Santa—I’ve learned and done it all.

    Holiday Photo Kids Shoot | copyright: Kristin Luna of Odinn Media
    Holiday Photo Kids Shoot | copyright: Kristin Luna of Odinn Media

    This year, I also did the school photos for four different preschools, which was a whole other skill set we have learned (and are still mastering), but what a fun new challenge—and it added another 125 kids to my 2024 photo subjects.

    Halloween Photo Shoot | copyright: Kristin Luna of Odinn Media

    Holiday Photo Kids Shoot | copyright: Kristin Luna of Odinn Media
    Holiday Photo Kids Shoot | copyright: Kristin Luna of Odinn Media

    2024 in blogging

    Blogging has changed dramatically since I started this blog in 2007. In 2024, I favored updating some of my most popular posts regularly over new content. Whereas in the pioneering day of blogging, we would get a wild hair, bang out a post and push it live without a second thought, publishing a new blog post in 2024 (or now, 2025) takes days from the research and the writing to the photo editing and the coding.

    And secondly, Google’s ever-changing algorithm has decimated the careers of bloggers and creators across the board. If you don’t understand how search engines are prioritizing AI content over actual fact-checked content that has been thoughtfully researched, written and compiled by an individual, my friend Amanda has a great primer on the topic of Google and AI killing blogs here.

    Tennessee bloggers, Kristin Luna and Scott van Velsor

    That means the post your favorite bloggers are spending days fact checking and producing may be pushed to the second or third page or even further back if they are never seen. That doesn’t exactly incentivize a lot of us to compete anymore. That said, if you want to be a good steward of original content and support your favorite creators, hopscotch right over the Google AI results and click through to an actual post the next time you’re searching, will you?

    The good news is that, affiliate links aside, we have always been ad-free, so we have never relied on Google to pay our bills. On the same token, since this site is free content and not necessarily monetized, it is not always prioritized as it may be were the tables turned.

    This time last year, I stopped publishing my monthly highlights posts due to time constraints, but also because after dropping MailChimp when they made it unattainable for small businesses to keep up, I have yet to find a newsletter service that sends out my posts in full. That means when I do write a new post, I also have to write a newsletter, format it and push it out to the thousands of people who subscribe. All of that is just a lot when blogging is not my main revenue stream, but more something I love and can’t always prioritize.

    Related post: How I Plan a Trip: Tools, Tricks & Websites I Use for Traveling

    As always, I love posting my travels here and I will continue to as time allows. I have so many trips like Australia, Thailand, Iceland, and Hawaii I spent months planning and perfecting the itinerary that I truly want to share. When that will happen? Your guess is as good as mine.

    2024 in entrepreneurship

    Two years ago, we bought our latest commercial investment. We initially tried out a co-working space, but in Tullahoma, it simply wasn’t financially feasible for us to continue operating it as such.

    CoWorking space in Tullahoma, Tennessee

    So last summer, we regrouped and rebranded, and at the beginning of September, opened our CoSalon which were full in a matter of weeks. After owning the building for 18 months, it was so nice seeing the space brim with stylists and entrepreneurs. An added bonus is I now have a place to go for my hair, facials and Botox all under one roof!

    CoSalon Tullahoma

    2024 in public art

    As the economy continues to waffle, several federal agencies have taken hits in the past years when it comes to funding, and the arts is no different. For our public art nonprofit, many of our projects exist entirely due to grant funding, and there were simply not as much funding available last year. As such, we declined several opportunities and only completed two mural projects: in Sweetwater and Palmer, the first funded by the city and the second by the state arts commission.

    Allegory of Hope by Britt Flood, Mural in Palmer, Tennessee

    “Allegory of Hope” by Britt Flood Palmer, Tennessee

    We also had one of our favorite artists, Whitney Herrington, come down and paint a mural inside CoSalon, which was a treat!

    We’ve got some fun projects up our sleeves for 2025 though, so stay tuned! Many grants we were awarded for this fiscal year will be implemented this spring, plus we applied for operational funding for the first time, which would give us many opportunities to gift art to rural communities that need some love and color.

    2024 at home

    I still love the Cedar House as much as the day we bought it six years ago, even more so now. While we didn’t complete any major projects this year, we’ve slowly been tweaking away and making this house a home, including hanging more original art, some of which is our own.

    The Cedar House at Christmas

    I love adding to the framework of this beautiful piece of property, and I hope SVV lets me stay here many, many years! The Victorian is the only home I lived in for longer than 18 months as an adult, but I have absolutely no itch to change our situation or to build out a new space as I have in the past, just to continue to improve the one in which we live.

    Our animals are doing great: Ella (our pup) is 14.5, the first of our Cat Distribution System rewards Whiskey and Rye are 5, and our baby girl Molly is 2.5. They keep us busy and constantly cleaning up fluids in our home (ha), but we wouldn’t have it any other way.

    Holiday Animal Shoot | copyright: Kristin Luna of Odinn Media
    Animals | copyright: Kristin Luna of Odinn Media

    2024: The Greatest Hits

    • Days traveled: 115
    • Countries visited: 5, including 2 new ones
    • States visited: 11
    • Miles put on my Expedition: 30,000
    • Tennessee counties covered: 63
    • Business class flights taken: 4
    • Taylor Swift shows attended: 2, making that 4 total for the Eras tour
    • Books read/listened to: 52
    • Photos snapped: 30,000+

    Highlights of 2024 | copyright: Kristin Luna of Odinn Media

    As always, thanks so much for being here! If you’re looking for travel inspiration, I’ve got 17 years’ worth of posts you can sift through by location here.

    For past year-end reviews, see my recaps here: 2023, 20222021202020192018201720162015201420132012201120102009 and 2008.


    Source link

  • The 19 Best Beaches In Victoria Australia (2025 Guide)

    The 19 Best Beaches In Victoria Australia (2025 Guide)


    The best beaches in Victoria Australia promise boundless sunshine, sand, swells, and spectacular views for travellers.

    Victoria’s coastline sprawls over 2,000 kilometres. Beautiful beaches dot this long sandy stretch, as do seaside towns, national parks, and walking trails.

    Listing down all the best beaches in Victoria is a tall order because there are just too many! But we’ve rounded up the top must-visit spots that will keep you returning for more.

    Here are the most spectacular beaches in Victoria, Australia.

    Plan your trip Down Under with our complete Australia Travel Guide!

    19 Best Beaches In Victoria Australia

    The best way to get to all these incredible beaches is with your own car. We highly recommend renting a car if you don’t already have one! This gives you the most flexibility for exploring the stunning coastline.

    The best way to get around is to rent a car and explore on your own! We recommend Rental Cars, which has the largest range of vehicles for the best value on the market.

    Torquay Beach, Great Ocean Road

    The seaside town of Torquay is the gateway to the Surf Coast and the birthplace of the surfing sportswear Rip Curl. It’s also home to Torquay Beach!

    Though often overshadowed by its more popular neighbour, Bells Beach, Torquay Beach is one of the best beaches in Victoria Australia for the whole family. Dogs included (yes, it’s pet-friendly).

    On its beautiful stretches of sand, you can have a picnic, sunbake, build sandcastles, or walk your furry friend. 

    The milder breaks are tailor-made for those who want to learn to surf or hone their skills. During low tide, the shallow waters near the shore are great for little kids to waddle and paddle in.

    Nearby are cafes and eateries if you want to grab some snacks. The beach has shower facilities, toilets, and a spacious parking lot.

    Lifeguards patrol Torquay Beach in the summer months, particularly on weekends and school holidays.

    Bells Beach, Great Ocean Road

    Victoria’s most popular beach destination, Bells Beach, is the crown jewel of Torquay, Australia’s surfing capital.

    Bells is globally known for its legendary swells. It hosts the oldest surfing competition in the world, the Rip Curl Pro, every Easter weekend.

    Because of its powerful waves, Bells is fitting for experienced surfers. It’s unpatrolled and the strong currents make it unsuitable for swimming.

    But you don’t need to be a surfer to enjoy Bells Beach. The incredible scenery makes up for its rough waters!

    Dramatic cliffs fringe the coast, creating a natural amphitheatre from where you can gaze at the ocean or watch surfers barrel through giant waves. 

    Make your way to the shore through the wooden stairs that snake down the bluff. On the beach, you can set up a picnic, sunbathe, or soak your toes in the waters at low tide.

    Bells Beach Surfers Best Beaches In Victoria Australia
    Surfers at the famous Bells Beach

    Johanna Beach, Glenaire

    A hub for surfing, fishing, and camping, Johanna Beach is another stunning stop along the Great Ocean Road. It has an off-grid campsite frequented by road trippers, bushwalkers, and surfers.

    Surprisingly serene despite its popularity, Johanna is surreal at sunset.

    The waves here best fit seasoned surfers. Don’t swim unless you’re a strong swimmer, as the beach is unpatrolled and the waters are rough.

    Between August and February, it is a nesting ground for the threatened Hooded Plover.

    You can bring your dogs, but keep them on a lead to help protect the wildlife in the area.

    Loch Ard Gorge Beach, Great Ocean Road

    Named after a wrecked ship, Loch Ard Gorge Beach is one of the most memorable stops along the Great Ocean Road.

    Due to its strong currents, Loch Ard Gorge is unsuitable for swimming. But its otherworldly views make it one of the best beaches in Victoria for sightseeing. 

    If the scenery doesn’t move you, perhaps its haunting history will. The gorge forms part of the infamous Shipwreck Coast, where roughly 638 ships sank.

    In June 1878, the ship Loch Ard, travelling from England to Melbourne, struck a reef and sank near the shallow inlet.

    Of the several surrounding walking trails, the most popular is the track down to the beach where the survivors were safely washed ashore. Unfortunately, the access to the beach from the lookout has been closed after a rockfall in May 2023.

    You can still see Loch Ard Gorge Beach from the decked-out platform overlooking the coastline.

    There are many other points of interest in the area, including various viewpoints, rock formations, a blowhole, and a small cemetery where those who lost their lives in the Loch Ard shipwreck were laid to rest.

    A short drive from the gorge is another iconic natural landmark, the Twelve Apostles, a collection of towering limestone columns rising from the Southern Ocean.

    You can see both attractions on a Great Ocean Road trip. For a hassle-free adventure, consider booking a day tour of the area.

    Apollo Bay, Great Ocean Road

    A scenic seaside town nestled at the foothills of the Otways, Apollo Bay is a haven for outdoor adventures and relaxing getaways.

    One of its highlights is the three-kilometre sandy beach that follows the curve of the crescent-shaped bay. 

    The sheltered waters make it an excellent swimming beach, especially among casual bathers and families with small kids. Lifesavers patrol the area in the summer and public holidays.

    Apollo Bay doesn’t have the huge waves that pro surfers chase, but it’s a popular spot for watersports like kayaking and boating.

    Seafood lover? Consider lunch settled. Once a fishing village, Apollo Bay has fantastic eateries serving the catch of the day. After lunch head to the Great Ocean Road Brewhouse, famous for its 100 craft beers.

    Apollo Bay Victoria Beaches
    Beaches surrounded by rolling green hills in Apollo Bay

    Kitty Miller Bay, Ventnor

    Kitty Miller Bay is not the best beach for sunbathing, but the rock pools, surrounding cliffs, and SS Speke Shipwreck create a postcard-worthy scenery.

    The bay is more of a walking beach than a swimming beach. When the tides are low, you can go to the beach and scramble over the rocks to the shipwreck site.

    For confident swimmers, there are lovely spots for snorkelling at high tide. You might even catch some waves to surf.

    Gibson Steps, Great Ocean Road

    The name Gibson Steps technically refers to the 86-step staircase carved intro a rocky bluff, leading to a quiet beach below. Over the years, the name has come to refer to the entire area.

    Like many spots on the Southern Ocean coast, the beach has choppy waves, making it unsafe for swimming. The view, however, is not to be missed. 

    The beach’s most famous landmarks are the two gigantic sea stacks jutting from the ocean. Nicknamed Gog and Magog, these rock formations are simply out of this world, but even more so at sunrise and sunset.

    You can see the rocks from the lookout at the top of the Gibson Steps. But if you want to get a feel of how massive they are, climb down the stairs and hike to the end of the beach.

    The beach access may be closed due to rough weather or high tides. Be sure to check the weather and tide table before visiting.

    Explore more of Southern Australia’s coastline with a Melbourne To Adelaide Drive Itinerary!

    Ninety Mile Beach, Gippsland

    Unspoilt, untamed, and unforgettable, Ninety Mile Beach is Victoria’s longest uninterrupted beach. 

    This pristine strip of honey-coloured sand lies between the Gippsland Lakes district and Bass Strait. It sprawls as far as the eye can see without any headlands or sudden bends blocking the view.

    It’s a favourite among hikers, kayakers, campers, and surf fishers. You can also swim in some areas. Touristy seaside towns, like Lakes Entrance and Woodside, have lifeguards that patrol the beach during summer. 

    Ninety Mile Beach is within the Gippsland Lakes Coastal Park, the country’s most extensive inland waterways, famous for boating and fishing.

    Brighton Beach, Melbourne

    Brighton Beach is another highlight. The Melbourne beach is most famous for its row of brightly painted beach boxes lining the shoreline.

    In the Victorian era, women used the bathing sheds to change into their swimming attire. Over a century later, most of these multi-hued wooden huts remain largely unaltered, except for a dab or two of paint. 

    As iconic as these bathing boxes are, there is more to Brighton Beach!

    Thanks to its calm waters, Brighton Beach is a popular swimming spot. It’s also patrolled by lifeguards year-round.

    Beyond the shallow sand bar, you can windsurf, kite surf, or water ski.

    For something more relaxing, take a leisurely walk on the Middle Brighton Pier or picnic at Green Point, a small park near the beach.

    The Iconic Colourful Beach Boxes At Brighton Beach, Melbourne
    The iconic colourful beach boxes at Brighton Beach, Melbourne

    Half Moon Bay, Melbourne

    The 350-metre-long Half Moon Bay beach has two distinct sides that offer different experiences.

    As the southern bay is partially protected, it has been considered one of the best beaches in Victoria Australia for swimming and boating. 

    Apart from the calm waters, the southern part is known for the Black Rock Jetty. From the jetty, you can see the remains of a sunken warship, HMVS Cerberus. Grounded in 1926, it serves as a breakwater.

    Half Moon Bay Surf Life Saving Club, the oldest in Victoria, and the Black Rock Yacht Club are also in the south.

    The northern end, backed by the Red Bluff Cliffs, is wilder and more raw. The water is deep, with high waves that create strong currents.

    For leisure bathers, the patrolled and protected south is the best and safest spot for a swim. Still, the northern section is worth exploring for its breathtaking beauty. 

    The beach is dog-friendly, but take note of the schedule, as access hours are capped during peak season.

    Read next: How to Spend 3 Days in Melbourne

    St Kilda Beach, Melbourne

    You don’t have to travel far from the city to experience one of the best beaches in Victoria! St Kilda Beach is just six kilometres south of the Melbourne CBD.

    Summer or not, St Kilda is a hive of beach activities. Beyond swimming and sunbathing, holiday goers can engage in windsurfing, kitesurfing, jet skiing, stand-up paddle boarding, and sailing. 

    The Esplanade draws rollerbladers, joggers, walkers, and foodies on the hunt for good food.

    Walk down the pier to see the colony of Australian penguins. If you’re feeling a little adventurous, try the rides at Luna Park, the oldest amusement park in Australia.

    Fairhaven Beach, Fairhaven

    Undoubtedly one of the most spectacular beaches in Victoria, Fairhaven Beach is fantastic for serene strolls. This 6-kilometre stretch of golden sands is the longest beach along the Great Ocean Road. 

    Its main draw, however, is the cinematic views. On a clear day, you can see eye-popping panoramas sprawling from the eastern headland, where the surf club is, to Devil’s Elbow, a hairpin bend atop a sheer cliff face.

    The beach’s eastern end has great swells and numerous breaks for surfing, particularly around Moggs Creek, Spouts Creek, and The Spot.

    You can also swim in Fairhaven, but make sure you stay within the red and yellow flags for safety.

    Sorrento Ocean Beach, Mornington Peninsula

    Sorrento Ocean Beach (also known as Back Beach) is stunning from all angles, from its golden sand dunes to its deep blue waters and the grassy bushland in the background.

    It’s easily one of the most beautiful beaches in the Mornington Peninsula. That’s saying something, considering the slew of lovely ocean beaches in the area.

    Partly protected from waves and patrolled at peak times, the beach is moderately safe for swimming. But be cautious of the rips and swim only between the flags.

    As the waters recede at low tide, several rock pools appear on the coast. They come in various sizes, with some deep enough to swim in. 

    Many visit the beach just for the rock pools. It’s important to check the tide chart to be sure you visit during low tide when the area is safest!

    Sorrento Ocean Beach, Mornington Peninsula
    The beautiful Sorrento Ocean Beach, Mornington Peninsula

    Refuge Cove, Wilsons Promontory 

    If isolated beaches are your thing, nothing is more secluded than Refuge Cove. It lies on the eastern tip of the Wilsons Promontory National Park and is only accessible by boat or a multi-day hike.

    For over 200 years, sailors and boaters have used Refuge Cove to shelter from the turbulent Bass Strait. It’s popular not just with boaters but also with birders and bushwalkers.

    Refuge Cove has two sandy beaches backed by lush vegetation. The northern end is larger and more exposed, while the southern section is smaller and even more sheltered. 

    There’s a campsite with basic toilets and unfiltered creek water on the south beach.

    Both beaches are safe for swimming, but be careful as they’re unpatrolled and the water is deep near the shore.

    Explore more of Victoria on these fun day trips from Melbourne.

    Little Waterloo Bay

    Nestled in the southern end of Wilsons Prom, Little Waterloo Bay is a lovely strip of white sand lapped by crystal blue waters. A steep slope of granite boulders and lilly pilly trees borders the bay from behind.

    You can reach the bay by foot via the Telegraph Saddle Track in an overnight hike or a day walk. It’s a popular stop along the multi-day Wilsons Prom Southern Circuit. 

    On the beach is a campsite with picnic tables, toilets, and untreated water from a creek.

    When the waves are low, the beach is safe to swim in. Be sure to stay close to the shore, as rip currents may suddenly intensify at any time.

    Squeaky Beach, Wilsons Promontory

    If you haven’t figured out where the name comes from, here’s a clue: powdery white sand that is so clean it doesn’t only glisten under the sun, it also squeaks underfoot. 

    Squeaky Beach is not just one of the best beaches in Victoria. In 2024, Tourism Australia declared it the best beach in the country. And in 2025, Lonely Planet awarded it the second-best beach in the world.

    We wholeheartedly agree. Squeaky’s natural beauty is hard to beat. The sugary sand contrasts dramatically with the turquoise waters, while the greyish granite boulders bring out the vibrancy of the surrounding foliage.

    One snag is that Squeaky is unsuitable for casual swimming due to the rips and strong currents. But if you’re an experienced surfer, you’ll have fun catching the waves.

    Wilsons Promontory Coastline And Beaches
    Wilsons Promontory is lined with incredible beaches!

    Portarlington Beach, Portarlington

    With its calm waters, sandy expanse, and views of the Melbourne cityscape, Portarlington is one of the best beaches in Victoria Australia for those seeking a relaxing seaside escape.

    The area near the jetty is the busiest, with people picnicking, barbecuing, swimming, sunbathing, or just soaking up the warm summer’s day.

    Portarlington boasts clear, shallow waters with almost no waves, making it ideal for families with small children. Though there are no strong currents, be cautious of the boat traffic near the jetty.

    YCW Beach, Phillip Island

    The beach’s gentle waves are tailor-made for novice surfers. But when the conditions are right, the ocean can produce excellent waves for more experienced ones.

    The sandy strip between the headlands at each end of the beach is safe for young and casual bathers to paddle in. But be cautious, as the beach is unpatrolled and has sections with rocks beneath.

    YCW has a campsite, change rooms, toilets, and gravel car parking. If you need to grab some snacks, there’s a local store nearby.

    Cape Paterson Beach, Cape Paterson

    The cape has two beaches: bay and surf. 

    The curved 400-metre bay beach is a favourite among families and fishers. The area near the shallow bar, away from the rocks at each end, is a safe spot for casual bathers and young kids, while the marine-rich waters offshore draw snorkelers and divers. 

    The highlight is an artificial rock pool atop a craggy platform. Built in the 1960s, it’s a great place for cooling off on a hot summer day.

    The surf beach is 500 metres long and receives waves averaging 1.3 metres high. The life-saving club, parking lot, toilets, and food stalls are here.

    Both sides have lifeguards during summer and holidays. Dogs are allowed but must be on a lead at all times.

    Read next: 11 Awesome Free Things To Do In Melbourne

    Port Phillip Bay Beaches

    Port Phillip Bay has some of the best beaches in Victoria Australia. Many of these are shallow and flat, with golden sand and calm turquoise waters that are safe for swimming.

    The swells are seldom huge enough for surfing, but the beaches offer watersports like bodyboarding and kayaking. Several lifesaving clubs operate along the bay, so most beaches are patrolled. 

    St Kilda and Brighton are part of Port Phillip’s beaches. But there are several other beautiful beaches lining the bay, including: 

    • Williamstown Beach
    • Safety Beach
    • West Beach
    • Dromana Beach
    • Elwood Beach
    • Hampton Beach

    DISCLAIMER: Some of the links in this article are affiliate links, which means if you book accommodation, tours or buy a product, we will receive a small commission at no extra cost to you. These commissions help us keep creating more free travel content to help people plan their holidays and adventures. We only recommend the best accommodations, tours and products that ourselves or our fantastic editorial team have personally experienced, and regularly review these. Thanks for your support, kind friend!


    Source link

  • Attending the French Open in Paris

    Attending the French Open in Paris


    Last year, I had the pleasure of attending Roland-Garros with my mom, and I chronicled every moment of the experience. I’m back to update this post for tennis fans and newbies alike as the ticketing process has changed for 2025. So if you’re planning to get tickets for Roland-Garros this year two-week, you may want to listen up about what to know when going to the French Open.

    What to expect at Roland-Garros: attending the French Open

    This post was last updated in February 2025.

    What is Roland-Garros?

    First, if you’re a newcomer to tennis, you need to know this much: Roland-Garros is Paris’ largest tennis facility and the site of one of four Grand Slam tennis events—the others being the Australian Open in January, Wimbledon in June and the U.S. Open in August. Taking place for two weeks each May and June, Roland-Garros (also known as the French Open) is the only Grand Slam that is played on clay. This generally means the courts can take a bit more light rain than other events, but the rain during last year’s French Open was downright relentless, and matches were canceled more often than not.

    What does that mean for you going to Roland-Garros in the future? Be sure you plan to attend several days in a row—and also make sure you buy access to Philippe-Chatrier or Suzanne Lenglen at least half of the sessions because on heavy rain days, these courts with their retractable roofs are the only ones where play will remain uninterrupted.


    Roland-Garros is located in the heart of Paris in the 16th arrondissement, and due to its convenient locale, it’s absolutely mobbed with tennis fans who train and plane it from all over the continent—as well as plenty of Americans like us on their quest to hit all the Grand Slam tennis tournaments. It’s incredibly easy to reach, which means it’s also incredibly hard to get tickets.

    But before we get any further: Is Roland-Garros worth attending? Absolutely. Was navigating the ticketing system an absolute nightmare? Also yes.

    Which brings me to why I’m writing this post. I spent months reading firsthand accounts and Reddit threads of how to get tickets for Roland-Garros so you don’t have to.

    How to get tickets for Roland-Garros

    The traditional ticket process for Roland-Garros has been modified for 2025, likely because the process was such a headache in the past. Seriously, I equate our 2024 experience with trying to get tickets for Taylor Swift’s Eras tour, it was that bad!

    For this year, there is a priority booking period for all premium offers from February 27 to March 3. These offers include gourmet catering and access to private areas.

    For regular tickets, you’ll need to register for the draw by Feb. 9. This is meant to reduce waiting times and guarantee fair access on the opening day of sales. If you are selected in the draw, you will be given a two-day slot to book your tickets. ​According to the Roland-Garros website:

    Sales will open at 10am, and a queue will be set up to regulate access to the website in case of heavy traffic. Whether you arrived at the ticketing site at 6pm the day before or at 9.58am on the D-day, your position in the queue will be allocated randomly at 10am. Once on the website, you will have a certain amount of time to finalize your order.​

    In full transparency, here is what Roland-Garros tickets cost us in 2024 and how much we paid per session going through the main sale:

    Buying tickets for Roland Garros: how to get them and what they cost

    The lowest we paid was €370 for a premium / VIP day pass with €520 being the most. For a single night session that was not VIP, we spent €169.

    Sales limits have been adjusted this year, so each buyer can purchase:

    • 4 tickets maximum for the Main courts​
    • 4 tickets maximum for the Outside courts from 25 May to 1 June​
    • 15 tickets maximum for Opening Week (Qualifying)
    • 15 tickets maximum on the Outside courts from 2 to 8 June

    What to expect at Roland-Garros: attending the French Open

    Buying hospitality packages or after-market tickets for Roland-Garros

    If you want to guarantee tickets to Roland-Garros, it’s probably smart to consider going through a tennis broker like Steve Furgal who organizes packages to all the tournaments. Though I’ve never personally gone this route, this is obviously a more surefire way to guarantee admission to Roland-Garros, particularly if you’ve booked your flights and hotels a year out like we did. We spoke to several Americans who went through such brokers to bundle their lodging and session passes and ensure they got tickets, and they recommended this route if you have the money to do so. (I’ve priced it out, and it’s VERY expensive.)

    Roland-Garros does open up tickets for resale in late-April, so you could get lucky there, too. Roland-Garros has gone to an all-mobile ticketing system, which means the only way in the tournament is by having the ticket loaded into your app before you’re on the grounds. Your name and birthdate are also tied to this ticket. You can, however, buy tickets for others, then transfer them to them, but the ID’ing process makes buying after-market tickets for Roland-Garros extremely sketchy.

    Thanks to a pilot friend who attended Roland-Garros in a previous year, I knew of at least one reputable after-market seller, GoalTickets.com, which seems to mainly deal professional sporting events in Europe like the Olympics. So when we found a day session pass that included a seat at Philippe-Chatrier for €400 a person the night before, we jumped on them. You have to enter the name, birthdate and email address of each ticket holder when you go through the purchasing process, so the tickets can be transferred to your Roland-Garros account, which they were almost immediately.

    Which tickets should I get at Roland-Garros?

    What tickets access what courts at Roland-Garros is by far the most confusing part of the process. There are so many different ticket options—then VIP packages on top of that—that I didn’t even understand until after four full days on the grounds.

    Are VIP passes at Roland-Garros worth the price?

    Grounds pass

    The grounds pass gets you access to all the outside courts (courts 2 through 14), as well as the unreserved upper section at Suzanne-Lenglen, the second biggest court, and the unreserved section of Simonne-Mathieu. It does not allow you access to the main court, Philippe-Chatrier, which in the early rounds only has three day session matches and one night session match to begin with.

    Grounds pass at Roland-Garros: which ticket is best?

    So if you’re a casual tennis fan—and it’s not a rainy year—the grounds pass likely makes the most sense for you. When the grounds pass would suck is a week like this week when everything is rained out. That said, you get a refund for the pass if less than two hours of play time commenced.

    Court Philippe-Chatrier

    Every one of the five sessions we purchased were a Philippe-Chatrier ticket, which allows access to all outside courts and the unreserved section at Simonne-Mathieu, as well as an assigned seat within the main stadium, which does have a retractable roof. It does not include admission to Suzanne-Lenglen; that is a separate ticket. Originally built in 1928, Philippe-Chatrier was renovated a few years back with lighting and a retractable roof; the stadium can hold 15,225 spectators, and the seats are quite comfortable with padded backs.

    What to expect at Roland-Garros: attending the French Open

    After attending Indian Wells, the U.S. Open and the Cincy Open, we bought the Philippe Chatrier tickets thinking it was our best shot at seeing so many of our favorite top-10 ranked players. What we didn’t know before arriving at Roland-Garros is that the French do not put the biggest matches on the main court; rather, they put the French men (and occasionally women).

    So on the first night we were there, Rafa Nadal was playing his last ever match against Sascha Zverev, who has a great shot at winning the whole thing, which you would think would be the featured night match. It wasn’t. Instead, we got to hear the cheers for Nadal from the outside of the afternoon match, and Gael Monfils got the prime spot on Philippe-Chatrier instead (which was a fun match, but c’mon … give Rafa, the most winning Roland-Garros champion of all time, his respect!).

    Grounds pass at Roland-Garros: which ticket is best?

    Still, I’m very glad we had this option on the day all outside matches were rained out, as we had a warm and cozy seat and got to see eight hours of tennis across three matches—Caroline Garcia versus Sofia Kenin, Jesper de Jong versus Carlos Alcaraz, Naomi Osaki versus Iga Swiatek—only moving for snack and bathroom breaks.

    Court Suzanne-Lenglen

    Suzanne-Lenglen is the second largest court at Roland-Garros with a capacity of 10,056 seats. Thankfully, as of last year, there’s now a retractable roof. After seven straight days of rain delays, this was a great year for Roland-Garros to introduce its second indoor-outdoor court.

    Suzanne-Lenglen Court at Roland-Garros in Paris, France

    Court Simonne-Mathieu

    Court Simonne-Mathieu is a bit of a stroll from the rest of the grounds, so we only caught one match there: a heated three-setter between Olga Danilovic and Donna Vekic. This court has a capacity of 5,000 seats and is absolutely stunning in that it is situated smack in the middle of a botanical garden with a greenhouse you walk through to access your seat. If you have a grounds pass or a ticket to Philippe-Chatrier or Suzanne-Lenglen, you can get into the upper unreserved seats at any Simonne-Mathieu match.

    Court Simmone-Mathieu at Roland-Garros in Paris, France

    Premium / VIP passes

    Three of the five sessions we had tickets for, we had premium passes (or VIP tickets) not for any reason other than that was all that was available during the tense ticket-buying process. For our two day premium passes, we had  Premium Découverte, which gave us access to the complimentary bar in La Divine at Suzanne-Lenglen throughout the session in La Divine and drinks (champagne, beer, spritzes, coffee, soda) at any time during the day.

    VIP packages at Roland-Garros: what to expect

    The food at La Divine was great, but it was the same every time, and it was definitely more passed apps and canapes than an actual filling meal. Still, we ate enough to hold us over between sessions and prevent us from having to buy the subpar food in the Roland-Garros convenience stores. I also liked the VIP passes for going to use the private bathrooms when hurrying between matches and not having to wait in line.

    VIP packages at Roland-Garros: what to expect

    For the first night session we attended, we had Premium Immersion, which gave us early entry at 6pm through a private gate (Gate 49, at Boulevard d’Auteuil), access to La Brasserie des Mousquetaires all evening where we could enjoy drinks throughout the session and a cocktail dinner served between 6:45pm and 8pm. This did not give us any direct access to the stadium (or view of the matches other than the TVs), nor could we take drinks out of the lounge and into the stadium.

    The difference between day sessions and night sessions

    I much prefer the day session at Roland-Garros (or any tennis event really) because you get to see so much tennis, particularly in the early rounds.

    What to expect at Roland-Garros, the French Open in Paris

    Day sessions: what to know

    For day sessions, you can get into the ground starting at 10am. The matches on outside courts and Suzanne Lenglen start at 11am, while the first match of the day on Philippe Chatrier is at 12pm. Your ticket will get you into the rest of the day until the night session starts, and if the outside matches go well into the night, you can stay on those courts as long as you want—they don’t kick you out! Most of the outside courts don’t have lights, so they can only go until 10pm (when it gets dark here in Paris), but a few do.

    Night sessions: what to know

    For night sessions, you can get into the grounds from 6:30pm on (or 6pm with VIP). There’s only technically one night session match per night on each Philippe-Chatrier and Suzanne-Lenglen courts, so unless it’s a big name you want to see, you’re far better off getting a day session pass to Roland-Garros. That said, you can also access any outside matches still going on—and this week with all the rain delays, there have been plenty—so if there are some going late, I’d recommend getting there the moment you can get through the gates and see as many of the outside matches as possible before the main event on Philippe-Chatrier or Suzanne-Lenglen.

    What to expect at Roland-Garros: attending the French Open

    Reselling your Roland-Garros tickets

    The mobile app does make it extremely easy to resell your Roland-Garros tickets, but even though you’re doing so directly through the tournament’s portal, they take a commission. We put ours up the day of Sinner’s night match, and for a night session ticket we bought through Roland-Garros for €169 that sold within seconds, we got €63 back each, despite them reselling for retail price or higher. I could have sold my ticket via GoalTickets.com or another third-party, but honestly, I didn’t want to deal with it.

    Roland Garros: reselling tickets

    Getting to Roland-Garros

    There is a metro stop, Boulogne Jean Jaurès, directly by Roland-Garros that you can take if you’re staying by a metro. We had planned to do this, but our Airbnb in the 15th arr. on Rue Alain Chartier wound up being just 10 to 15 minutes from Roland-Garros by car, so we took a Bolt each way and paid 10 euro on average (and €25 once during surge pricing). This was not much more than it would have cost us for two metro tickets at €2.10 a person. Plus, we left the grounds well after 10pm most nights, so it also just felt safer.

    How to get to Roland-Garros: What to expect at the French Open

    Bolt is like European Uber, and we used it more than a dozen times in Paris and had only good experiences. I recommend downloading the app before you go and looking for Bolt promo codes on Reddit that give you discounted rides. I found one that got us 20% off our first 10 rides.

    There are also taxis lined up outside of the Roland-Garros stadium at the security entrances, but they were charging a flat fee of €50 to get back “into the city,” which in reality is a hop, skip and jump away.

    What can you bring into Roland-Garros?

    The bag policy states no backpacks and no bags more than 15 liters in capacity, but I found that people abused this policy and that security didn’t really care so long as it wasn’t a suitcase. This is Europe, so you don’t have to bring clear bags. Out of respect for the others sitting near you in the stands, please make sure you’re carrying a bag that is small enough that you’re not knocking over those around you (this happened to me many times!).

    What to Bring to Roland-Garros

    With a small slingback bag, I was able to fit an extra layer, a poncho, a visor, back-up chargers, my wallet, sunscreen, my emergency meds, granola bars and a small camera. I did not take my DSLR or mirrorless camera, but I saw several non-media spectators with them. Instead, I rented this compact camera (promo code LUNATIC15 if you want 15% off) to save myself the trouble.

    If you’re doing a general admission ticket, your bag will be checked once when you’re crossing the street into the Roland-Garros barriers and once when you go through the ticket scan line. If you have a VIP ticket, your bag will be checked when crossing the street and then at special Gate, likely 49, which is basically the fast-track line into the Roland-Garros grounds. This was the one thing I missed the sole session we didn’t have VIP access: the quick pass-through versus gen-pop queuing. But I don’t think that aspect alone warrants the hefty prices of VIP (again, which we only did because it was the only tickets we could get on the site!).

    You can also bring in water bottles that are 1.5 liters or less in size, and there are refill stations throughout the grounds so bring an empty canteen. You can also bring in snacks, so if you don’t want to drop a mint on food at Roland-Garros, I recommend doing this. We didn’t eat a lot from the food vendors at Roland-Garros other than a caprese sandwich, which was delicious, but I saw a lot of people online complaining about how expensive the food was for the price.

    Water refill stations at Roland-Garros in Paris, France

    I did have a couple Lavazza cappuccinos which at €7.50 a pop were steep for being basic drinks, but it was freezing out and I didn’t buy any cocktails like I typically do at tournaments due to the weather and the lack of bathrooms, so girl math and whatnot. Though the last night there, I felt like I needed to try the beer, so I had a €12 Leffe, which is self-serve at the beer stand and also requires a €2 deposit for the cup that you’ll get back once you return it.

    Food and drink at Roland-Garros: What to expect at the French Open

    Where to stay for Roland-Garros

    Roland-Garros is on the other side of the Seine in the 16th Arrondissement. If you’re going to Roland-Garros this year, I’m assuming you already have a place to stay. I’ll update this post before next year’s Roland-Garros with a more thorough list of hotel recommendations that aren’t far from the tournament site.

    We originally booked at the Radisson Blu Paris Boulogne eleven months out, then a few months ago, they canceled our booking without reasoning or so much as a message. Emails and calls went unreturned, and I got a bit panicked knowing it was an Olympic year, so I booked an Airbnb in the 15th Arrondissement off of Rue de Vaugirard. We arrived and it was not as described and also quite cluttered and dirty. The host had a refund policy where we could get a full refund for all unused nights within 24 hours (guess she’d had this issue before…), so we stayed a night then canceled the following six and booked this gem owned by an architect named Sylvie for the remaining time.

    I would absolutely book Sylvie’s apartment again, but I’m not sure I’d go through the general Airbnb route in Paris again if I didn’t know the host (or have a direct recommendation or referral to one) as so many people reached out to tell me their similar horror stories, and Airbnb is worthless in guest resolution when the host is at fault. I loved the 15th for its proximity to the Eiffel Tour, the Seine, Montmartre and all of the iconic Paris museums.

    Other things to know about Roland-Garros

    A few more key questions about Roland-Garros, answered:

    Getting between stadiums at Roland-Garros

    The bottleneck between Suzanne-Lenglen and the outer courts (Court 11 and up) is real! I almost had a panic attack when I tried to move from Philippe-Chatrier to Court 11 when the two main courts were letting out at the same time. This is my biggest criticism of Roland-Garros; the layout isn’t conducive to moving around when big matches are letting out simultaneously, not like more thoughtfully designed grounds like Indian Wells. I assume this is because Roland-Garros is in the middle of a city and space is a premium, but I wish they’d do something to help with the crowd control as it felt like someone could easily get crushed.

    Buying merch at Roland-Garros

    A friend who had been before said a lot of the branded Roland-Garros merch sells out by week two so to go to the store when you first get there. We did, to buy our ponchos (€15) and then again the next night to buy Mom a pair of tennis shoes since she only brought sandals. There’s a huge store right by the main entrance and a few smaller boutiques and T-shirt stands throughout the grounds. Most of the T-shirts ran from €20 to €37 and the sweatshirts and hoodies were in the €70 range.

    You can also buy the clothing on the Roland-Garros website and have it shipped for free to your house, which we did so we didn’t have to haul our new fits home with us. Since LaCoste is the official Roland-Garros sponsor, you’ll find a whole lot of LaCoste clothing and shoes, as well as Wilson and Babolat.

    Queuing to get into outside courts

    The stadiums of Court 6, 7, 8 and 9 are in a four-square pattern between Suzanne-Lenglen and Philippe-Chatrier. We watched a four-hour Frances Tiafoe match here during which we had to wait 45 minutes to get in. So if there’s someone you really want to see on one of these four courts, I suggest you arrive early as you’ll likely have to queue first.

    Wi-Fi and charging your phone

    The Roland-Garros WiFi was quite good. There were only a few times I couldn’t get on WiFi in the early rounds. Still, you’ll need to have data enabled when you arrive on the grounds, as the tickets in the mobile app only show when you’re connected (and screenshots of your tickets will not fly). So if you’re coming from overseas, make sure your phone will work in France, then you can turn it right back on airplane mode when you’re inside the grounds to save money and preserve your battery.

    I recommend taking a fully charged phone and at least two external batteries if you’re going for the full day session. I used two of these USB-C chargers for my iPhone 15 Pro while my mom used one of these compact chargers for her iPhone 14; though there was only one day I needed the second back-up charger, it was good insurance for us since we needed to scan our tickets every time we went into Phillipe Chatrier, as well as use my phone for Bolt after we left.

    Charging lockers at Roland-Garros, the French Open

    When we weren’t using data to scan our tickets or check the schedule, I kept my phone in airplane mode at all times (and got on WiFi if I wanted to check the schedule). The app also prompts you to enter dark mode, which I kept enabled to further preserve battery. There are charging lockers on site at key spots around the grounds if you’re desperate. You may just have to wait to use them.

    The bathroom situation at Roland-Garros

    If you get on the Roland-Garros app, you can zoom into the site map and find all the bathroom points around the grounds. Compared to other tennis tournaments I’ve attended, the bathrooms at Roland-Garros felt scarce. There were only two bathrooms at Philippe Chatrier total, and they are outside the court, so you have to go out of the stadium if you need to go to the toilet between matches and lines could be very long. So if you’re someone with an active bladder, I recommend going easy on the champagne and beer to limit the number of bathroom stops you need to make.

    OK, that was a lot of information on what to expect at Roland-Garros, so let me know if I missed anything. Despite the weather, which can’t be helped, I really love this tournament and would recommend it to all tennis fans. I’d also do it very differently next time and buy after-market tickets on GoalTickets.com a few days before each session rather than spending so much on VIP packages we didn’t really get to use fully thanks to the weather. But you live, you learn, you know?


    SAVE THIS POST FOR LATER

    How to Plan a Trip to Roland-Garros, the French Open in Paris, France
    How to Plan a Trip to Roland-Garros, the French Open in Paris, France


    Source link

  • Best 19 Anti Theft Bag for Travel for 2024

    Best 19 Anti Theft Bag for Travel for 2024


    Traveling can be quite stressful when planning and the worst thing that can happen is dealing with theft during your travels. One way to ensure the safety of your belongings is by getting one of the best anti-theft travel bags out there. There are a few companies out there and I’ll lay out which ones to look out for. Whether you are looking for the best anti-theft travel purse, best travel anti theft backpack, or a travel anti theft crossbody bag, I got you covered. 

    This site contains affiliate links to products. We may receive a commission for purchases made through these links. Support my blog here

    Man stealing a purple wallet from woman's backpack purse from behind.

    Best Anti Theft Bag for Travel for 2023

    There are a few things to consider when picking out the best anti theft travel bag from the type of fabric, types of zippers, a chain, and protective lining. While it’s not necessary to have an anti theft travel bag, it provides a sense of security and prevent thieves from getting you personal information. A theft proof bag will be one of the best investments you can make for your trip. 

    If you are just want to get quick and to the point for an anti theft bag for travel, here is the list of the best anti-theft bags listed in this review guide. You can also go by my true and trusted favorite here.

    Arden Cove Crossbody Bag in Black

    Arden Cove Crossbody

    • 2 lined pockets
    • Stylish
    • Detachable chain strap
    • Waterproof exterior and zippers
    • Regular clips to lock zippers
    • RFID-blocking pocket
    • Slots for bank cards

    PacSafe Go 15L Anti-Theft

    • Laptop Pocket for up to 12” Laptop or 13” Macbook
    • Side pocket for a water bottle or small umbrella
    • Water-Resistant
    • Luggage Slip
    • Zip Clip
    • TurnNLock Security Hooks
    • RFID Blocking Materials

    Best Anti Theft Cross Body Bags | Best Anti Theft Purses

    Best Anti Theft Backpacks

    Best Anti Theft Slings

    Best Anti Theft Handbag Totes

    Best Anti Theft Travel Bag Comparison Chart 

    What is an Anti Theft Bag?

    An anti theft bag for travel is pretty much a bag with all the modern conveniences and prevents pickpocketers from getting your important documents and finances. These bags often include a variety of different materials, locking clasps, a chain, and more. Honestly, my best travel tip is to get an anti theft bag for travel. There are many reasons why these bags are worth it. 

    These bags help prevent thieves from getting to everything that matters to you on your trip. It stops them from slashing your bag open, unzipping them in crowded and public spaces, prevents them from scanning your RFID cards, is easy to clean, and can be used in different circumstances. Most bags are not necessarily equipped with these kinds of materials which is why it’s crucial to consider the following items below. 

    What to look for in an Anti Theft Bag – Anti Theft Bag Best features

    I’ve listed the major features to look for when trying to find the best anti theft bag for travel. Unfortunately, when it comes to many of these bags, a lot of them are not always necessarily beautiful or stylish although they have improved and many are. The purpose of an anti theft bag for travel is primarily for function, however, designs are constantly changing and I think eventually, it will be easier to find fashionable yet functional bags. 

    How do I choose the best Purse for travel?

    Well there are a lot of things to consider in which is the best purse or bag for travel. I’ve listed some of the most common things you need to look out for below and see which suits you best for your future anti theft travel bag, backpack, purse, or tote. It’s important to have a pickpocket proof bag.

    Slash-proof Fabric

    The first and foremost thing you need to look for in anti theft travel bags is slash-proof materials to make your bag theft proof. This is crucial because a lot of pickpocketers will quickly slash your bag from underneath or the strap around your body in order to get your important belongings. A slash-proof bag should be something you should definitely look for in an anti theft bag

    Zippers with Locking Latches or Clips

    This to me be is a very important feature for an anti theft bag for travel. There are some anti theft bags out there that don’t have the locking latches which is a little worrisome for me. The locking latches provide more security to your bag when you lock it up or have it around your body. 

    These locking clips prevent thieves from accessing your pockets right away. It clips your zippers and keeps them locked and safe. Additionally, some have it on the strap and it prevents thieves from unclasping the lock and dropping the strap of your bag. 

    There are anti theft travel bags that only have clips and are not locking clips and those are subjectable to what you are looking for. A locking clasp provides more security but a regular clip does a fairly decent job as well. It may or may not be a deal-breaker for you and that is ultimately your decision. I have listed a few that do not have that feature on some of the zippers, however, they are stylish and do not typically look like anti theft bags. 

    Attachable chain or Shoulder strap to table while dining

    When I talk about the clasps above, I highly recommend them for an anti theft bag for travel because these clips are also helpful if you want to take your bag off and attach it to the chair or table at a restaurant when eating. It will prevent someone from taking it easy. You can even add a lock between the 2 for extra security if necessary. 

    RFID Lining

    RFID

    This is super important to protect you from identity theft from credit cards, debit cards, and passports, it’s crucial that your bag has these features to save you from the headaches of worrying about theft. The worst thing that can happen other than physical theft, is having a canceled credit card and being unable to have the fund to pay for things abroad. These are why RFID travel bags are so important to have. 

    Easy to Clean Material

    An easy-to-clean material is important because well-travel can get stinky, messy, and often requires long and enduring trips. You want an anti theft bag for travel you can easily wash, take care of, and make sure it lasts a lifetime. 

    Versatility

    Finally, I think it’s important to have a bag that is very versatile. A bag that has a lot of pockets so I can store money and cards in different areas of the bag, can be accessible in many areas, areas for a water bottle, or just the necessities. 

    Brands with the Best Anti Theft Bags

    There are 2 major brands with the best anti theft bags. These 2 brands are typically PacSafe Anti Theft Bags and Travelon Anti Theft Bags. Another brand I am introducing is Arden Cove which is more for a stylish and simplistic design. 

    What is the best-rated anti-theft messenger bag for travel?

    I would say that PacSafe and Travelon are the best and more well-known for a reason. Although I do love Arden Cove’s design and aesthetic, I find that PacSafe and Travelon to be more durable and well known. However, that does not discredit Arden Cove. They are still a great brand and their main goal is to provide stylish anti theft bags. 

    Best Travel Anti Theft Purses and Anti Theft Cross Body Bags

    Anti Theft Purses and Anti Theft Cross Body Bags are probably some of the most popular items people search for and are in need of. Many women are worried when they travel about losing items, being a victim of theft, and assault. These items help many of us women who travel solo have a little bit more of a sense of security. Travel secure purses are becoming more common even for everyday use. These are some of my favorite purses for travel security.

    Arden Cove Cross Body Bag

    Arden Cove Crossbody Anti Theft Bag for Travel in Black

    The Arden Cove Crossbody is probably one of my favorite anti theft bag for travel as it’s a designed cross body purse that doesn’t look too much like an anti-theft purse. I would say it’s one of the best bag travel anti theft for women. It’s got a modern design, it’s simple, and it seems to go from day to night fairly easily while still being a secure travel purse. It doesn’t look so sporty which is what we love about this product. This anti theft crossbody purse comes in black, cream, grey, navy, maroon, chocolate, and red. This is an anti theft travel bag for women fashion lovers.

    Don’t let the size of this anti theft purse fool you. This purse is pretty jam packed with features. 

    Here are some of its popular anti theft features:

    • 2 lined pockets and a zip lined pocket 
    • Detachable chain strap
    • Waterproof exterior and zippers
    • Regular clips to lock zippers
    • RFID-blocking pocket
    • Slots for bank cards

    Shop Arden Cove Cross Body Bag

    Pack Safe Metrosafe LS250 Anti-Theft Shoulder Bag

    This was honestly my first and favorite cross body bag. It’s an anti theft classic bag. I used this when I traveled all over Italy and I’m so thankful I had this bag. During our trip to Italy, someone had managed to get into my Aunt’s backpack, but thankfully, she had safety pinned it. So all they managed to do was get the safety pin off. This bag is my ultimate favorite because of its size and features. 

    I was able to carry my Fujifilm Mirrorless Camera, passport, money in different pockets, wallet, a water bottle, and so much more. I love the locking features for this bag as well, it provides locking clasps with a safety clip feature which makes it harder to get into. 

    Features of this anti theft crossbody bag include: 

    • Waterbottle/Umbrella Compartment
    • Turn N Lock Security Clips
    • Slashguard Strap
    • ExoMesh Slashguard Material
    • Hidden Zip Clip
    • RFID Blocking Card Materials
    • Adjustable shoulder strap
    • Water bottle pockets

    Shop Pack Safe Metrosafe

    Travelon Anti-Theft Heritage Tour Bag

    The Travelon bag is a pretty stylish anti-theft bag that is modern-looking. This is a unisex bag that is perfect for anyone out there. It’s a bit of a city-style which is one of Travelon’s popular designs. This one also has a pocket for a water bottle or small compact umbrella and I would say is pretty comparable to the PacSafe Metrosafe LS250 above. I would say this is a anti theft classic messenger bag. It is a perfect anti theft crossbody travel bag for men.

    Features of this anti theft crossbody bag include: 

    • Waterbottle/Umbrella Compartment
    • Security Clips
    • Slashguard Strap
    • Slash resistant materials
    • RFID Blocking Materials

    Shop Travelon Hertiage Tour Bag

    PacSafe Citysafe CX Anti-Theft Square Crossbody

    PacSafe created this bag for fashion and function. It’s a minimalist style bag perfect for small things. If you like to pack light and not carry too much on the go, this is the perfect bag for you. This bag is perfect for city touring and just a great little bag for everyday use. 

    Features for this anti-theft crossbody bag:

    • Turn N Lock Security Clips
    • Anti slash material
    • RFID Blocking Materials
    • Roobar Locking Style System

    Shop Anti-Theft Square Crossbody

    Travelon Anti-Theft Signature 3 Compartment Crossbody

    The Travelon anti-theft bag is probably their most common anti theft purses. You can easily find this purse at the container store and my friends have purchased this bag when I recommended they get an anti theft bag for Europe. What we loved about these bags is its sheer amount of space for a crossbody. There was seriously so much space in this bag and lots of pockets, a zipper lock, slash-resistant strap, and versatile design. It was perfect for holding makeup, extra souvenirs, water bottles, and so much more. This is the travelon anti-theft classic messenger bag that is one of the best sellers and best options on the market.

    If I didn’t already love my PacSafe bag, this would be an option I would buy for sure. 

    Features of this anti-theft purse:

    • Deep large main compartment
    • Slash resistant materials
    • Turn N Lock Security Clips
    • RFID Blocking
    • Slash Resistant Straps

    Shop Signature 3 Compartment Crossbody

    Best Travel Anti Theft Backpack

    The best anti-theft backpacks are ones where you feel secure having them on your back and protecting your items. There are so many backpack options out there for travel but to narrow it down to anti theft backpacks is quite difficult. It depends on what type of backpack you are in need of and looking for. These are some of the best anti theft backpack designs out there. 

    Arden Cove Convertible Backpack and Crossbody 

    Arden Cove anti theft travel bag for women

    What I love about this backpack is that you can change the straps into a shoulder bag. This is an anti theft travel bag for women. I love a bag that is versatile, a anti theft convertible bag, and can change based on what your needs are. Sometimes you want a backpack and sometimes you want a different bag. There is 1 main compartment with a front pocket perfect for story money and cards. It also has space for things like a tablet, camera, and more. This is the best travel purse backpack combo. 

    Features of this anti-theft backpack:

    • Cut Resistant Straps
    • RFID Blocking Pockets
    • Waterproof Zippers
    • Slash Resistant Materials
    • Locking hardware and clasps
    • Waterproof Fabric

    Shop Arden Cove Convertible Backpack and Crossbody

    Pacsafe Go 15L Anti-Theft Backpack

    This backpack reminds me of a classic high school backpack. It looks like an everyday backpack which makes it a perfect design. This backpack has a laptop pocket that holds up to a 13” Macbook or 12” laptop. It also has a strap that slides over your luggage handle which makes it perfect for travel. You can easily slip this bag onto your roller carry-on suitcase. It also has a side pocket perfect for holding a water bottle or small umbrella which makes it a perfect anti theft bag for travel.

    Features of this anti-theft backpack:

    • Laptop Pocket for up to 12” Laptop or 13” Macbook
    • Side pocket for a water bottle or small umbrella
    • Water-Resistant
    • Made of Recyclable Materials
    • Luggage Slip
    • Zip Clip
    • Slashguard Materials
    • TurnNLock Security Hooks
    • RFID Blocking Materials

    Shop Pacsafe Go 15L Anti-Theft Backpack

    Introducing the Bagsmart Camera Backpack, a true companion for the intrepid photographers traversing the globe! This backpack is more than just a carrier; it’s a fortress for your precious camera gear, meticulously crafted to safeguard your equipment while providing unmatched convenience. Designed with the modern photographer in mind, the Bagsmart Backpack boasts a cleverly organized interior.

    With specialized compartments for your camera and space for up to two lenses, it ensures easy access and ample protection. Its thoughtful design doesn’t stop there; it extends to accommodating your laptop, memory cards, and even a rain cover for those unpredictable weather moments, making it an indispensable travel companion for every shutterbug.

    Features of the Bagsmart Camera Backpack include:

    • Dedicated compartments and pockets for camera and lenses
    • Padded sleeve for a laptop
    • Ample storage for memory cards and accessories
    • Integrated rain cover for weather protection
    • Adjustable and padded shoulder straps for comfort
    • Side pockets for a water bottle or compact umbrella
    • Anti-theft design elements like lockable zippers and RFID protection
    • Durable, water-resistant materials for added security
    • Ergonomic design for prolonged wear and ease of use
    • Stylish yet functional, the Bagsmart Camera Backpack is a testament to innovation meeting practicality, catering to the needs of photographers who seek both security and convenience in their gear-carrying solutions.

    Travelon heritage Backpack

    This is a backpack has a vintage style that makes it modern yet classic. It’s fairly stylish, fashionable, and perfect for everyday use. I would say that this is a bag that meets function and fashion. You can use this to carry your laptop, tablet, accessories, and would also make for the perfect diaper bag as well. 

    Features of this anti-theft backpack:

    • Pocket for up to a 14” laptop
    • Slash Resistant
    • Locking Clasps
    • RFID Blocking Pockets
    • Slash Resistant Straps

    Travelon Signature Anti-Theft Slim Backpack

    The Travelon Signature Anti-Theft Slim Backpack is the ultimate blend of style and function. It’s vintage but modern, perfect for your daily hustle or travel escapades.

    Key features? It’s got a pocket for a 14” laptop and is built with safety in mind. Slash-resistant fabric and straps, locking clasps, and RFID-blocking pockets protect you and your valuables. This bag’s not just smart; it’s a fortress. It’s perfect for work, travel, or even as a diaper bag. Functional, fashionable, and secure. What more could you want?

    Features of this anti-theft backpack:

    • 14″ Laptop Pocket: Designed with a pocket to fit up to a 14″ laptop. Perfect for work or travel.
    • Slash Resistant: The material and straps are built to resist slashing. Walk confidently through any crowd.
    • Locking Clasps: Keeps your valuables secure so you can explore without constant worry.
    • RFID Blocking Pockets: Safeguard your personal information from tech-savvy thieves.

    Best Anti Theft Slings or waist packs

    Sling bags are another option for an anti theft bag for travel. These are very popular in Asian countries and can be seen as fanny packs in some situations. Most people enjoy wearing these like a crossbody backpack. These provide some space for small important must-haves during your travel and they are light and leave you hands-free. These are 2 of my favorite options of the anti theft slings.

    PacSafe Vibe 325 Anti-Theft Sling Pack

    This is the perfect bag for everyday city life. It’s designed to be more like a crossbody backpack. It has a long narrow main pocket and a variety of different pockets to keep your belongings safe. This bag has been well designed and provides a variety of different safety features including locking clips, RFID and splashguard materials.

    Features of this anti-theft slingbag:

    • Slash Resistant
    • RFID Blocking Pockets
    • Slash Resistant Straps
    • PopNLock Security Clips
    • Roobar Locking System

    Shop PacSafe Vibe 325 Anti-Theft Sling Pack

    Travelon Anti-Theft Active Waist Pack

    This is the typical fanny pack-style anti-theft bag for travel. It’s perfect for people who like to wear these packs on their hips. It can also be worn around the back like most sling bags and is interchangeable. This one has a lot of pockets to hold your cards, passport, and more. This one even has a pocket to hold a waterbottle or small umbrella! It makes for the perfect anti theft travel bag for a water bottle.

    Features of this anti-theft fanny pack:

    • Slash Resistant
    • RFID Blocking Pockets
    • Slash Resistant Straps
    • Waterbottle/Umbrella Compartment

    Shop Travelon Anti-Theft Active Waist Pack

    Pacsafe Go Anti-Theft Sling Pack

    The Pacsafe Go Anti-Theft Sling Pack is more than just a trendy bag—it’s your security detail wrapped in a sleek design. Ideal for urban adventurers and casual day-trippers alike, this pack offers a perfect blend of style and function. With its versatile design, you can sling it any way you like, all while knowing your essentials are safe and sound.

    Key Features of this Anti Theft Sling

    • Versatile Design: Wear it on the front or back to match your style and situation.
    • Lockable Zippers: No more constant bag-checks. Lock it and forget it.
    • RFID Safe Pockets: Protects your cards and passport from unauthorized scans.
    • Cut-Resistant Straps: Feel secure even in crowded places, thanks to straps that are tough to slice through.

    Monos Metro Sling

    The Monos Metro Sling is for those who love simplicity but won’t compromise on functionality. This pack is the epitome of minimalist design, offering a sleek and clean look while maintaining space for your essentials. It’s perfect for those quick trips out where you just need the basics, but want them to be easily accessible and secure.

    Key Features

    • Compact Yet Roomy: Don’t let its size fool you. It’s designed to hold more than you think, from a tablet to your daily essentials.
    • Water-Resistant Material: Because nobody likes water damage, right? Your belongings stay dry, come rain or shine.
    • Multiple Pockets: Organize with ease, thanks to well-placed pockets for everything you need to carry.
    • Adjustable Strap: Customize the fit to make it as comfortable as it is functional.

    Best Anti Theft Handbag Totes

    These totes are perfect for someone who just wants a useful messenger workbag and other things. It’s perfect to hold important documents and protect your tech from thieves. These are great substitutions for bulky hard briefcases.

    PacSafe Citysafe CX Anti-Theft Satchel Handbag

    Best 19 Anti Theft Bag for Travel for 2024 19

    This bag has more of a feminine look to it which provides a lot of security but is also stylish. It’s elegant and timeless which means it won’t go out of style. This is a satchel handbag which is the perfect large-size anti theft travel purse. It’s perfect for fitting in your makeup, tablet, phone, and more. 

    Features of this anti-theft bag for travel:

    • Slash Resistant
    • TurnNLock Clips
    • RFID Blocking Pockets
    • Slash Resistant Straps
    • Roobar Locking System

    Shop PacSafe Citysafe CX Anti-Theft Satchel Handbag

    Travelon Anti-Theft Addison Tote

    Use this everyday tote for travel, work, life, and daily errands. It’s a modern tote with everything you need. It has several pockets, an interior wallet, and a spacious pocket for a 10” tablet to keep on hand. This bag is meant to be durable and long-lasting with all the anti theft features. 

    Features of this anti-theft bag for travel:

    • Slash Resistant
    • Locking clasps
    • RFID Blocking Pockets
    • Slash Resistant Straps

    Shop Travelon Anti-Theft Addison Tote

    Pacsafe Go Anti-Theft Tote Bag

    Best 19 Anti Theft Bag for Travel for 2024 20

    This is probably my favorite tote bag out of all of the ones I listed above. This tote bag is large and perfect for the beach, grocery shopping, day trips, and as a diaper bag. It’s spacious and has a pocket for a 15” laptop. It’s made from recyclable materials with all of the perfect anti-theft security features as well. 

    Features of this anti-theft bag for travel:

    • Slash Resistant
    • Locking clasps
    • RFID Blocking Pockets
    • Slash Resistant Straps
    • Zip Clips
    • Dock Locks
    • TurnNLock Security Clips

    Shop Pacsafe Go Anti-Theft Tote Bag

    Unbox Therapy X Pacsafe Anti-Theft Briefcase

    Best 19 Anti Theft Bag for Travel for 2024 21Best 19 Anti Theft Bag for Travel for 2024 22

    This is a great option for those looking for a briefcase and a secure messenger bag. This is a unisex anti theft bag that holds up to a 15” laptop and a 10” tablet. This has a wide zipper area that allows you to get to your things quickly and easily. It has locking zippers, slash-resistant material and straps, RFID blocking materials, and more. It also includes a strap that allows you to easily slide these over carry-on roller suitcases to allow you to be hands-free at the airport. This is probably a popular anti-theft travel bag for men.

    Features of this anti-theft bag for travel:

    • Slash Resistant
    • Locking clasps
    • RFID Blocking Pockets
    • Slash Resistant Straps
    • Zip Clips
    • Roobar Locking 
    • Luggage strap

    Shop Unbox Therapy X Pacsafe Anti-Theft Briefcase

    The Peak Design Everyday Tote

    The Peak Design Everyday Tote is the ideal blend of fashion and utility. Its elegant design fits in just as well at a fancy dinner as it does on a casual day out. But don’t let its good looks fool you—this tote is built to handle your daily grind and then some.

    Key Features for the Peak Design Everyday Tote

    • Convertible Straps: Switch between tote and backpack modes for ultimate carrying flexibility.
    • Weatherproof Exterior: A durable, water-resistant shell ensures your valuables stay dry, no matter what the day throws at you.
    • Customizable Compartments: The inside is like a personalized locker, with dividers you can adjust to fit all your essentials neatly.
    • Quick-Access Pockets: No more digging through your bag. Pockets designed for fast access to your most-used items.

    Anti Theft Bag for Travel FAQs

    Where can I buy an Anti Theft Purse or Travel Bag?

    Most of these bags an be found online by clicking on the links above. However, PacSafe and Travelon I have found at the Container Store and at REI. These have been great places to grab some of these popular bags. However, their selections are very limited. I suggest using the links above to grab some bags you may not be able to find in the store. 

    The Benefits of Anti theft Travel Purses

    Honestly, this is completely up to you and your budget. It provides a great sense of security when walking around especially in busy and crowded areas. These anti theft travel purses provide a great deal of protection for your belongings when you are out and about. It doesn’t necessarily have to be used for travel, it can definitely be used every day as well. These bags prevent thieves from getting all of your important information. 

    I have listed all the materials above that make for a great anti theft bag for travel and those would be the benefits for getting one. 

    What Is An Anti-Theft Pocket?

    An Anti theft pocket can be a variety of things. It can be the hidden pocket within your back that is more secure with RFID pockets that help keep things hidden from view and difficult for thieves or pickpocketers to access.

    Why Do You Need An Anti-Theft Bag?

    You don’t need an anti-theft bag, but they do make for a great investment and protect your belongings while traveling. Thieves are getting more creative in getting into your belongings and you don’t want to fall victim to theft during your international travel.

    There are a lot of benefits from having an anti-theft bag from lockable zippers to anti slash materials, it can’t be beat when it comes to normal purses and bags. I do have to say it is one of my travel essentials and the slash-proof material provides me withextra protection.

    What Is The Best Anti-Theft Travel Purse?

    This ultimately comes down to your decision. There are a lot of anti-theft bags on the market right now. I highly recommend the Arden Cove Crossbody bag or the PacSafe Metrosafe Bag. These are bags I’ve had in my rotation for a while and have done really well for my trips to Italy where my aunt almost got robbed!

    The Arden Cove Crossbody is one of the best anti-theft purses and my favorite right now because it doesn’t look anything like an anti-theft bag with its elegant and stylish design with shoulder straps that you can easily take out to dinner in a nice dress. It can easily be dressed up and dressed down without lacking anti-theft features.

    What Is The Best Anti-Theft Bag For Travel?

    Well, I would suggest an anti theft backpack ultimately when it comes to am anti theft bag that is best for travel. My suggestion is the PacSafe Go 15L. It looks like a normal backpack with all of the features you need to travel like RFID protection, Slashproof Materials, and locking zippers. You won’t look like a tourist wearing this backpack around town.

    Which Anti-Theft Bag Are You Getting?

    Buy Me a Coffee at ko-fi.com

    Posts related to best anti theft travel bags

    Liked this post? Pin it for later!

    Best Anti Theft Bags for Travel Pinterest Cover


    Source link

  • Tools, Tricks & Websites I Use for Traveling

    Tools, Tricks & Websites I Use for Traveling


    For me, the most exciting part of any vacation often is the trip planning aspect. The second my husband or I dream up a potential destination, I’m compiling Airbnb recommendations, flight alerts flagged and a rough itinerary outlined within hours. If trip planning is something that overwhelms you, however, pull up a chair and I’ll give you a peek behind the curtain as to my process—here are the travel tools and websites I use as a jumping off point for any vacation.

    This post was last updated in February 2025.

    And if you’re just here for a greatest hits list of travel tools, here’s a round-up of sites and tools I swear by:

    How I start trip planning

    For me, every trip starts with finding the best flight deal, which helps me figure out when I want to travel. Generally, I have a good idea of the time of year, but my dates are fairly flexible, which is why I love that many airlines now have flexible search calendars.

    Southwest low-fare calendar

    Note: When using credit card points for flight redemptions, particularly overseas, it’s imperative you have flexibility within a certain date range. We’ve started targeting a month we want to travel about a year out, then planning our actual dates around the best rewards flights availability (lowest cost and best route). This is how we’ve traveled for extremely cheap to Thailand, Qatar, Australia and Hawaii the past three winters!

    Related post: How We Went to Hawaii on Credit Card Points

    Tracking flights

    I typically prefer traveling in the off-season or shoulder season because that means less crowds and cheaper prices, but sometimes—like our summer trip to Europe with our niece—timing just isn’t that flexible, which is why flight alerts and tracking are my jam. I start tracking flights anywhere up to a year before a trip I’m considering.

    How I Plan a Trip: Tools and Websites to Use

    Any frequent traveler will tell you that Google Flights is king, and I’m not going to steer you any differently. This is always where I begin my flight search: first by entering the route I want, entering approximately how long I’d like to travel, then using the flexible calendar feature to decide on the cheapest days for my trip.

    How I Plan a Trip: Tools and Websites to Use

    Then, I set up a flight alert so I get an email if that flight route goes up or down in price before I book it. Google Flights will also tell you if the price is high for that time or typical, which I find helpful as it gives me a good guideline to know if I should wait for the price to go down or book when I find it’s normal or cheaper than average.

    How I Plan a Trip: Tools and Websites to Use

    Important to note: Once you find the best flight for your trip, go to the airline’s website and book directly. Google Flights sometimes will show rates for OTAs (online travel agencies) like Expedia, and it’s never smart to book a flight via a third party, at least if you’re flying overseas and doling out thousands of dollars. (If it’s a $100 flight for a one-hour route from you, then by all means, tempt fate!

    I’m of the mindset that you should book flights as far out as possible, especially if flying at peak times like holidays, but often the rule of thumb is to book six months before an international flight and one to four months before a domestic. That said, there’s no hard-and-fast “when is the best time to book flights?” answer anymore, so if you find a good deal that matches your budget, jump on that.

    I’ve also been subscribed to the Going newsletter (formerly Scott’s Cheap Flights) since the very beginning of this flight alert email, and I love this free version for finding great air deals. It’s why we wound up going to Holland a few years back and why we were in Iceland on another cheap flight the following winter when $400 airfare landed in my inbox. I’ve never booked a flight so quickly!

    How I Plan a Trip: Tools and Websites to Use

    Related Article: 13 Tips to Help You Survive Travel This Summer

    Finding lodging

    Before I pull the trigger on my flights, I then cross-reference my dates with lodging availability; usually finding something isn’t an issue unless you’re going to, say, Africa (which we’re doing in the spring!) where lodges are scarce and you truly need to book your accommodation 10 to 12 months out.

    How I Plan a Trip: Tools and Websites to Use

    How cute was our chalet in Switzerland?

    I’m an Airbnb girl despite my recent frustrations with them, but not everywhere in the world has a large selection of Airbnbs available; I find this particularly true for coastal and rural regions of the South. Booking.com has become my other go-to resource for lodging, especially overseas, as it consolidates hotels and vacation rentals. I’ve used it several times on U.S. vacations in the past couples years, too, as I’ve found the same listings on there as on Airbnb, only Booking charges a much lower service fee.

    Booking rental cars

    When traveling domestically, I’m typically loyal to Enterprise as I have a business account with them that gives me certain perks and cash back, but overseas where rental cars vary dramatically is another story. On recent trips, I’ve been using DiscoverCars.com to find the best deals on rental cars. Most recently, we rented a car in Switzerland for $966 for one week, whereas it was $1800 or more directly through the rental car companies. I pre-pay with this option and always put it on one of my travel cards that also includes insurance coverage so I can decline that at the car rental window.

    How I Plan a Trip: Tools and Websites to Use

    Figuring out things to do

    I use Google Images, friends’ travel blogs and social media to figure out what I want to do in whatever destinations I’m visiting. I typically have a list of several free or low-cost options that make the final itinerary, then budget for one big-ticket item like the helicopter ride in Iceland or a train ride to the top of Jungfrau in Switzerland.

    Train Ride to the Top of Jungfrau in Switzerland

    My go-to booking sources for tours has been Get Your Guide for years (especially ever since Viator did me dirty). I find that, in many cases, the price is lower than if I were to book the attraction outright, and I’m always all about saving a dollar or 10.

    Buying insurance

    The only time I take out a separate insurance policy is when I’m doing a big trip like our safari next spring, for which I took out a trip insurance plan for SVV and me through World Nomads. Otherwise, I book all my trips on my AmEx Platinum and Chase cards (more on that later), each of which carries specific insurance and coverage for trip delays, trip interruptions, delayed baggage and more.

    Other resources to help my trip plan

    How I use credit card points to travel is an entire series of posts of its own. I’m a big proponent of the Chase Sapphire cards and the American Express suite of cards (I have the Plat, Biz Plat, Gold, Biz Gold and Blue) for anyone who wants to accrue points quickly and use them for flights and hotels. Not only do I get the points for purchases I’d already make, but all of my cards have so many add-on benefits that they quickly even out with the cost of the annual fee.

    AmEx card benefits

    In the past year I’ve been getting serious about making my miles go even further; it turns out the more I study, the less I know, so I frequently refer to a host of points blogs and Facebook groups that have helped me learn the churn and burn of travel credit cards. Some of my favorites are 10x Travel, One Mile at a Time and The Points Guy. I also use Credit Karma and Mint, both free, to monitor my expenses and various credit cards, as well as the Rakuten plugin for cash back on pretty much every purchase I make online.

    It’s definitely a lot of work, making charts and budget spreadsheets and referencing various sources before booking a trip, but I like to think it saves me a lot of money in the long run, so it’s completely worth the hours spent learning these various platforms! If you have any specific questions about my trip planning process, drop them in the comments.


    PIN IT! SAVE THIS POST FOR LATER


    Source link

  • 10 Tips for Starting and Running a Successful Photography Business

    10 Tips for Starting and Running a Successful Photography Business


    As a professional photographer who runs a photography business, including an online photography course, I am often asked if I have any tips on how to run a successful photography business.

    I also get e-mails from time to time from readers asking me why their photos aren’t selling. Possibly they’ve set up an online photo sales store using a site like SmugMug, but they are struggling to find an audience. They are wondering where they might be going wrong. If that’s you, this guide should help.

    I have already written a guide to how to make money as a photographer, which covers the various income streams available to you when you are starting out as an amateur photographer. This guide isn’t going to focus on that. Instead, it’s going to look more at what you need to do to actually succeed with your photography business.

    So, whether your photography business is about selling your photos, working as a wedding photographer, running photography tours and workshops or selling stock photos, this guide should help ensure you focus on the right things to get your business running successfully. This is based on my years of actually running a successful photography business and what has worked for me.

    10 Tips for Running a Successful Photography Business

    I’m now going to go through my tips for running a successful photography business. These are not in any specific order, I’d say they are all equally important to your success!

    Craft your Skill

    One common mistake I see with aspiring professional photographers, and one which is easy to fall into, is basically trying to run before you can walk.

    What I mean by this is that it is really important to ensure that you are actually creating a good enough service or product that people will want to buy from you before trying to make a living from it.

    This can be tricky to establish, especially as the initial feedback we get on our photos is likely to be from friends and family. They will tend to offer very positive feedback, which is of course very nice, but unfortunately might not provide the sort of constructive feedback we really need.

    Buoyed by all the positive feedback, it can be easy to jump straight into building an online portfolio, uploading a pile of photos, and then sitting back and waiting for the money to roll in. If it does, great! If it doesn’t, it can be a disheartening experience.

    It can also be a costly experience, as many online portfolio sites charge a fee, which you need to be able to cover from your income. If you aren’t making an income, you’re going to be operating at a loss, which is not a good place to be.

    Even worse would be to set up as a wedding photographer, book your first gig, and then not be able to deliver to your client’s expectations. This can result in anything from disappointed clients to negative reviews to, in a worst-case scenario, being sued for not delivering a quality service.

    So, what to do? Well, first you need to spend time actually developing your photography skill. That might mean reading online photography guides, watching photography focused videos, signing up to a photography course, or taking a local photography class. There’s a huge amount of content available for free, and of course there are also paid resources.

    You also need to get out there and practice your photography as much as possible. Photography is a skill, and it is one that can be continuously improved. If you are planning on becoming a wedding photographer for example, you might be able to find an existing photographer who needs a second shooter, and this can be a good way to develop your skills in a real-world environment.

    When you are starting out I highly recommend volunteering to assist in doing actual gigs such as being a back-up wedding photographer, interning at a photo studio, shooting at an event as a volunteer, or shadowing a working photographer. Doing a bit of work for free can allow you to get some experience and stretch your wings without the pressure of being the one responsible for the final product.

    If you plan to make an income from your photography then I would argue that it’s best to invest up front in your skillset first and foremost. As I said, it can be easy to put the cart before the horse, whether that’s paying for an online e-commerce store or spending thousands on gear. You need to know to use the gear so you can create content good enough to sell in your store, and that should definitely be the priority.

    Now, to circle back to my previous point, which is how to know if you are at the point where you are actually creating content that is going to be good enough to sell. Of course, there’s no fixed goal, and a lot will come down to the market you are selling into and the products you are selling. If you’re the only wedding photographer in town for example, then it will likely be easier to find clients even if you are a bit less experienced. However, if you’re competing in an established market, you might have to level up your skills more to be able to compete.

    Still, there are ways to know if your work is at the level where it can sell. First is feedback with buyer intent. That means, if people start to contact you, perhaps having seen your work on your social media feed, and ask if they can either buy your work or hire you to do a shoot. Ideally these will be total strangers who have nothing vested in your success. This is a strong indicator that your work really is good enough to start making an income from.

    I’d also highly recommend seeking out ways to get constructive feedback on your work. In-person photography clubs, online groups and forums, and photography classes with a homework element can be a good way to get this feedback.

    You basically want total strangers to be looking at your work, who aren’t worried about your feelings, to provide input as to what is good about it and what could be improved. A word of warning, this kind of feedback can sometimes be challenging to hear, especially if you have primarily only gotten glowing feedback from friends and family. But it is definitely important to a) help you improve and b) get you the point where you can feel confident in putting your product up for sale.

    Finally, another way to get validation of your work is to enter photography competitions which are judged by real people (not social media popularity contests!). There are a lot of these, some paid, some not.

    I’d suggest focusing on the free competitions to start with. If you start to place your work in these competitions, this can also be positive validation. It can also be a useful accolade to add to your photography resume.

    Travel Photography Course-topaz-upscale-2000w
    My photography course, which is one of the ways I make an income as a photographer, offers learning opportunities to those starting out in photography

    by Laurence Norah-2


    Do your Research on the Type of Photography Business

    Before launching a photography business, you will want to do some research into the type of business you plan to run to make sure it’s a feasible business idea.

    There are multiple ways to make money as a photographer including:

    • Selling photos – this can be selling physical prints, digital images, licenses to use an image, canvases, etc.
    • Selling photo art products – using your photos to create unique products. Photos can be printed on all sorts of things, such as greeting cards, pillowcases, phone cases, fabric, ornaments, clothing, coffee mugs, postcards, wallpaper, tote bags, etc.
    • Taking portrait studio photos  – family photos, student yearbook photos, pet photos, graduation photos, cruise photos, portfolio photos, catalog and fashion photography
    • Wedding / event photography – engagements, weddings, parties, business conferences, music festivals
    • Business / product photography – taking photos for business websites, doing product photography, food photography, taking photos of cars, hotel rooms, houses/apartments etc.
    • Stock photography – taking photos to be sold on stock photo websites. A lot of the most popular are fairly generic photos with wide appeal (e.g., man holding coffee cup while looking surprised at computer, family on sunny beach in California, elderly woman crossing street), but stock photography can also include fine art photos or photos of famous people which can command much greater prices.
    • Photojournalists – photographers who take photos to be featured in newspapers, online news articles, magazines, TV programs, etc. to go along with news stories.
    • Education – this can mean running photo workshops, writing about photography, teaching online or in person classes, giving talks etc.
    • Leading photography tours – taking guests on photography specific tours, either locally or in popular photography destinations

    There are of course other ways to make money from photography but those should give you a lot of ideas and most photographers will fit into one of those general areas. Many working photographers make money in a number of different ways and I myself have done work in at least half of those types of photography at one time or another.

    I would recommend choosing one or two specific areas you want to start with, and then later you can always expand once you are established and making money in those initial areas.

    Once you have chosen how you want to make an income from your photography, you will want to try to figure out what you want to focus on and do the research on what is already out there. You want to understand what kinds of products/services are being offered, and does it match with your skills and interests etc.

    So, for example, let’s say you know you want to sell photos. Specifically, you decide you want to take photos and sell them online as either prints or digital images.

    Now you have to decide what kind of photos you want to sell as it’s much easier if you are known for a certain type of subject or style. Whether that is fantasy fine art photography, bird photography, NYC street photography, abstract photos, or seascapes, it’s generally important to have a niche you are going to be known for.

    Then you have to figure out the best place to sell and market your type of photos. Where and how do other photographers sell the type of photos you like to take?

    Another example may be someone who wants to do studio photography focusing on babies and families. Lots of people like to get professional photos when they have babies and young kids.

    But studio photography is something that is geographically bound so you want to make sure there is a strong market for this service in your area as renting studio space can be costly. So if you live in an area where most people are older and retired, focusing on baby photography is probably not a great business for your area and you may want to consider either another kind of photography or setting up in another area with a younger demographic.

    You will also want to research your competition in the area. Whilst no competition might seem like a good thing, this can also be a warning sign that there is no market for the services you are offering.

    Of course, this isn’t always the case, but it is worth bearing in mind. If there are existing businesses offering similar services, you will want to be sure that there is enough market to go around, and that you will be able to effectively compete.

    QM2252520Wedding252520Cunard252520Transatlantic25252025252844252520of2525204925252925255B425255D
    Wedding photography
    Event photography
    Event photography


    Figure out your Audience and Market

    Before you start off, it is best to figure out who is your typical customer. How old are they, where are they from, what are they looking for, what is their budget etc.

    If you can get your products and services in front of people who are more likely to want to buy them, it’s going to make your life a lot easier.

    For example, if you want to sell photos and mainly take beach landscapes in Florida, your best market is probably people living in coastal Florida and tourists visiting those areas of Florida. A combination of online, gift shops, and local art shops might serve you well as ways to target this audience. There will be an established market, and it should be easier to start selling your work.

    In this example you may also want to diversify your offerings to appeal to your target audience across price points. Perhaps you offer larger original framed photos at the local art shops and cheaper smaller prints, greeting cards, and postcards at the local tourist souvenir shops.

    If you are a wedding photographer, you’ll want to narrow down your geographical range (unless you plan to travel as a destination wedding photographer). And you’ll want to decide on type of weddings you want focus on and a style of photography so you can build a portfolio.  You’ll also want to carefully decide on a pricing model.

    If you are someone offering photo tours in Iceland for example, you’ll want to find ways to reach people planning travels there. An online presence is likely going to be very important, as well as perhaps connecting with travel agents, travel bloggers who write about Iceland, local tour companies in Iceland, etc.

    If you are doing tours, you’ll also want to do a lot of ground research and practice, so you are knowledgeable and set up to handle such a tour in the destination.

    As you can see, there’s a lot to think about. Ultimately, you want to make sure that an audience exists for the product you want to sell in the place you want to sell it, and that you will be able to reach that audience.

    Income levels

    Puffins Grimsey Iceland
    Photographing puffins in Iceland, a popular destination for photography workshops


    Run your Numbers

    If you are planning on making money as a photographer, you need to treat the business like, well, a business. This might not be the most exciting part of being a professional photographer, but it’s certainly important if you want to run a profitable business.

    So what does it mean? Well, you need to sit down with a tool like a spreadsheet and figure out how you’re going to make a profit. That means writing down all the costs associated with running your business, which is called your cost of business.

    These costs will vary depending on your business model, but could include anything from the cost of gas getting to and from a shoot, to studio rent, equipment costs, insurance, taxes, marketing, photo editing software subscriptions, any professional fees (accounting etc.), shipping cost of products, printing costs, website costs etc. Some costs will be ongoing, others will be upfront one-off costs. You also want to consider how much you want to pay yourself.

    Once you know the costs of doing business in your area, you can then start to put together a pricing model that will allow you to cover all your costs and, hopefully, turn a profit. At its simplest, you want to make more money selling your products and services than it costs you to produce them.

    Put together a simple business plan and consider showing it to some trusted family members or friends for advice to see if it makes sense. There are lots of free online templates for business plans you can download for examples to get you started.

    You will need to make various estimates when you put your pricing model together. For example, you might need to forecast how many weddings you might shoot in a year, or how many photos you plan to sell. It’s best to be conservative with your estimates when you start out. As you develop your business and build a reputation, you’ll be able to revise your numbers and likely increase your prices.

    Whatever model you choose, be it an hourly billing rate as a wedding photographer, or a per product rate for sales, the goal is to put together a plan which makes financial sense and doesn’t have you running at a loss.

    Numbers chart


    Price your Work/Services Accordingly

    Speaking of pricing, this is a key consideration. Photography can be a tricky service to price, depending on what type of photography business you are setting up.

    If you are offering a service like wedding photography, portrait photography, or a similar service, then you can fairly easily figure out pricing by simply researching other businesses in your general area (or areas with a similar demographic and income level) who might offer similar services.

    Fees for these sorts of service tend to fall inside a certain range, and can be priced hourly or on a package basis. As an example, some wedding photographers charge a package price, whilst others might charge an hourly rate and then a fee per photo. A package rate tends to be commonly accepted (and can be easier in terms of knowing your income) but it’s up to you.

    When you start off you will likely need to be at the lower end of the range in order to win clients and develop a reputation. As you build your reputation and get positive reviews and feedback, you can start to look at increasing your prices if you feel the market will support it.

    If you plan to sell your photos, then you fall more into the world of art. Art is much more subjective, and so pricing can be highly variable. Mostly it comes down to how well established you are as an artist, the specific product you are selling (limited edition vs regular print for example), and the demand for the product you are selling in the location you are selling it.

    Again though, I’d advise starting out on the low end of the pricing spectrum. Just make sure to cover your costs. As you develop a name for yourself and build an audience, you can start to think about increasing prices and things like limited edition or one-off prints that command more of a premium.

    Your target market will also directly affect your prices. There’s no point setting high prices for prints you are selling locally if this makes your products unaffordable to most of the people in your area. However, if this is the case, you might consider selling online to reach a wider and more affluent market.

    Now, while I do recommend starting out low, you want to be sure to increase your prices as you grow more confident in your skills and you become more known in your field. At the end of the day, you need to make sure you are making money once you get yourself established and you don’t want to undersell yourself.

    Camera on money by Laurence Norah


    Invest in yourself and your product

    As previously mentioned, photography is a skill which we develop over time. There’s always something new to learn, and there’s always new gear to buy.

    I am a strong believer in the concept of continuous education. I always feel there’s something new about photography to learn, be that a new style of photography, a new way to edit photos, or a new bit of equipment to learn how to use.

    Now, you do want to invest in high quality equipment, especially as you begin to make some money. This doesn’t mean the most expensive equipment but you certainly need to make sure your gear is up to the task. For example, a wedding or portrait photographer is definitely going to get better results with a wide aperture lens and a decent flash. A studio photographer doing things like portraits or animal photography will likely benefit from a good studio lighting setup and backdrop.

    As you grow, you will want to make additional investments as needed and as you have the money. Start with the camera and gear you have and save up the money for the gear you think you need to make your photos better or your job easier. Don’t go into debt trying to buy gear you can’t afford!

    You also don’t want to fall into the gear acquisition trap. It can be easy to believe that simply upgrading your camera and your camera gear will make you a better photographer.

    In some cases, better gear will absolutely yield better results. However, good gear can’t replace skills. So don’t forget to keep investing in yourself. Whether that’s taking trips to new destinations to broaden your portfolio, enrolling in a class to learn new editing techniques, or going on a photography workshop to get new inspiration, investing in yourself is always a good idea.

    You will also want to invest in your product to make it the best it can be. If you’re offering prints of your work for example, a high quality photo printer might be a sensible long-term investment. If you are going to spend hours editing photos, then a high-end photo editing computer and monitor for photo editing is going to be an excellent investment.

    Photo editing monitor by Laurence Norah
    A good monitor and computer make all the difference to photo editing!


    Camera equipment
    Having the right equipment to cover your photography needs is also important


    Be Professional

    Your clients’ (and potential clients) impressions of you are very important, and it is key to be as professional as possible in all aspects of your business.

    For example, if you have a photography studio or office, this should be clean and professional looking. If you meet clients in person, you should be dressed appropriately and professionally for that situation (especially if doing wedding or corporate photography). If you are selling at an art show booth you should act professionally and have business cards to give out to those interested etc.

    If you want to have a successful photography business, you also need a professional online presence. This should take the form of a website at the very least but can also extend to social media channels. If you choose to run a social media channel, you need to commit to regular updates of content, and to interact with any comments you receive. Otherwise, it can seem like the business is inactive. If you can’t do that, it might be better not to do social media.

    I would say that a website is the most important online presence to have. This is where clients can find you, see how to contact you, and see what services you offer.

    It’s also an opportunity to showcase your work to potential clients, share testimonials from existing clients, and it can be a place to sell photos from directly if that’s something you do.

    These days, people are used to professional looking websites that are easy to navigate and look good on mobile. An outdated website can very quickly put clients off. The good news is that once you have set your website up, it will need minimal ongoing work other than refreshing your prices, updating photos and other minor tasks.

    I would personally recommend using a service that specializes in creating a nice looking website that matches the service you plan to provide. Whilst you might be able to save a little bit of money by building a website from scratch yourself, the end result is likely not going to look as professional unless you happen to be a professional web designer as well.

    As examples of recommended services to check out, SquareSpace is an excellent system that lets anyone build good looking websites with minimal experience required. SmugMug is a fantastic tool for building an online site for selling your photos (You can get 15% off the plan cost and a 14-day free trial if you use this link).

    There are other options of course, see my guide to selling photos online for many more options at various price points.

    SmugMug portfolio screenshot
    My SmugMug portfolio and image sale site


    Laurence in suit with camera by Laurence Norah
    Dressed in business attire for a shoot


    Invest in Marketing

    You might be the greatest wedding photographer in the world, or at least, in your part of the world, but if no-one knows you exist, you aren’t going to get any work.

    Whatever type of photography service you are offering, marketing is going to be key. There are multiple types of marketing, available at various price points. The key thing is to invest in marketing that is going to reach your audience. There’s no point paying for a marketing campaign that reaches an audience that isn’t relevant to you and your product.

    Marketing is also something you want to do after you have set up your website and any social media channels, defined your prices and so on. There’s little point advertising your services if your target audience then has no way to find you and see what you offer.

    Some marketing options to consider are as follows:

    • social media, such as Facebook, Instagram and TikTok. Your marketing efforts can be both paid advertising as well as organic content
    • offering your services or products for free as a way to grow your portfolio and get word of mouth recommendations as well as testimonials
    • locally targeted marketing, good for a local service such as a portrait studio which focuses on providing photography services in a local community. This can be anything from advertising in a local newspaper to sponsoring local events, to local bulletin boards and even ads on your local Facebook Marketplace or Craigslist
    • paid digital search ads such as Google Ads or Facebook Ads. Just note that these can be expensive and difficult to get right if you don’t know what you are doing, and it can be very easy to spend a lot of money with little return
    • e-mail, which is to say, try to collect e-mail addresses whenever you can from both potential and existing clients. An e-mail list can be a powerful way to reach out to potential clients about what you are offering, promotions and so on

    The main takeaway here is that you want to get word about your business out to people who are likely to want to buy your products and services, and a good marketing strategy is how to do that.

    marketing
    Examples of marketing channels


    Be a Timely Communicator with Potential Clients

    Ok, so you have setup your photography business, you know what you are selling, and you have potential clients. Hurrah!

    Now you just need to be sure you convert your potential clients to paid clients. It is really important at this phase of your business that you respond very quickly to any outreach, be that phone call, e-mail, text message, or via social media.

    When in the research phase for purchasing a photography product or service, many people will reach out to multiple providers at the same time. You want to always try to respond quickly, as this will give your potential client confidence in your ability to deliver.

    If you think about any company you’ve ever contacted, how has it felt if you’ve not had a response in days? These days, with the speed of available communication tools, everyone wants a speedy response to their enquiry.

    The worst thing is no response at all. I’ve seen this happen many times, particularly on social media. If someone asks a question on a social media post, you want to be sure to respond.

    This is good for that potential lead, but also looks good to anyone else checking out your social media, as they will see you are proactive and responsive. If someone see a question with no response, it makes them wonder if you are still active, or if you care about your customers. Not a good look.

    Bluffworks Gramercy suit by Laurence Norah-2 wedding photography 2


    Believe in Yourself

    My last tip is a bit more personal in nature. The reality is that photography can be a hard business. It can be a bit lonely as most photographers work alone. So it can be hard to get started and find your footing and your niche, and you might start to feel defeated.

    My advice is to believe in yourself and your product, and to keep at it. Many photographers, especially when starting out, do a number of different types of photo gigs to make ends meet. Or they might do it in addition to a regular 9-5 job.

    The main this is to know what you want and to go after it in a smart way. Be patient, be realistic, be persistent, believe in yourself.

    Finally, don’t let the business of photography get in the way of also just enjoying and loving photography. Turning a hobby into a business can be a challenge, and you don’t want that challenge to overshadow your passion for photography.

    Laurence Norah photographer


    Further Reading

    That’s it for my guide to running a successful photography business! If you found this useful, you might enjoy some of my other photography related content. Here are some articles to get you started.


    Looking to Improve Your Photography?

    If you found this post helpful, and you want to improve your photography overall, you might want to check out my online travel photography course.

    Since launching the course in 2016, I’ve already helped over 2,000 students learn how to take better photos. The course covers pretty much everything you need to know, from the basics of how a camera works, through to composition, light, and photo editing.

    It also covers more advanced topics, including astrophotography, long exposure photography, flash photography, and HDR photography.

    You get feedback from me as you progress, access to webinars, interviews and videos, as well as exclusive membership of a Facebook group where you can get feedback on your work and take part in regular challenges.

    It’s available for an amazing one-off price for lifetime access, and I think you should check it out. Which you can do by clicking here.

    And that’s it! I’d love to hear about your thoughts and tips on running a successful photography business and as always am happy to answer any questions you have. Just pop them in the comments below and I’ll get back to you as soon as I can.

    Tips and advice on how to set up and run a successful photography business from a professional photographer


    Source link