We’ve been travel blogging for the past 15 years, and yes, we adore theme parks, especially Disney parks! And in this article, we’re sharing with you the Top 15 rides in Hong Kong Disneyland that we were able to try.


Note: We ranked these rides based on our personal experience and preference, so this list is purely subjective. Our choices and opinions might differ from yours, and that’s totally fine! We’d love to know which rides make your top three. Sound off in the comment section!
Get Your HK Disneyland Ticket Here!
You can purchase your tickets at the Hong Kong Disneyland Park’s Main Entrance Ticket Booths and Guest Relations, but it is highly recommended and more convenient to get your tickets in advance online. You can follow the link below for the ticket packages on Klook.
✅ CHECK HK DISNEYLAND TICKET OPTIONS HERE!
You can use our promo code THEPOORTRAVELERKLOOK for up to P300 OFF or TPTKLOOK5 for up to P500 OFF. These codes might change in the future, so best to just visit thepoortraveler.net/klook to redeem updated discount codes!
Top 15 HK Disneyland Rides & Attractions
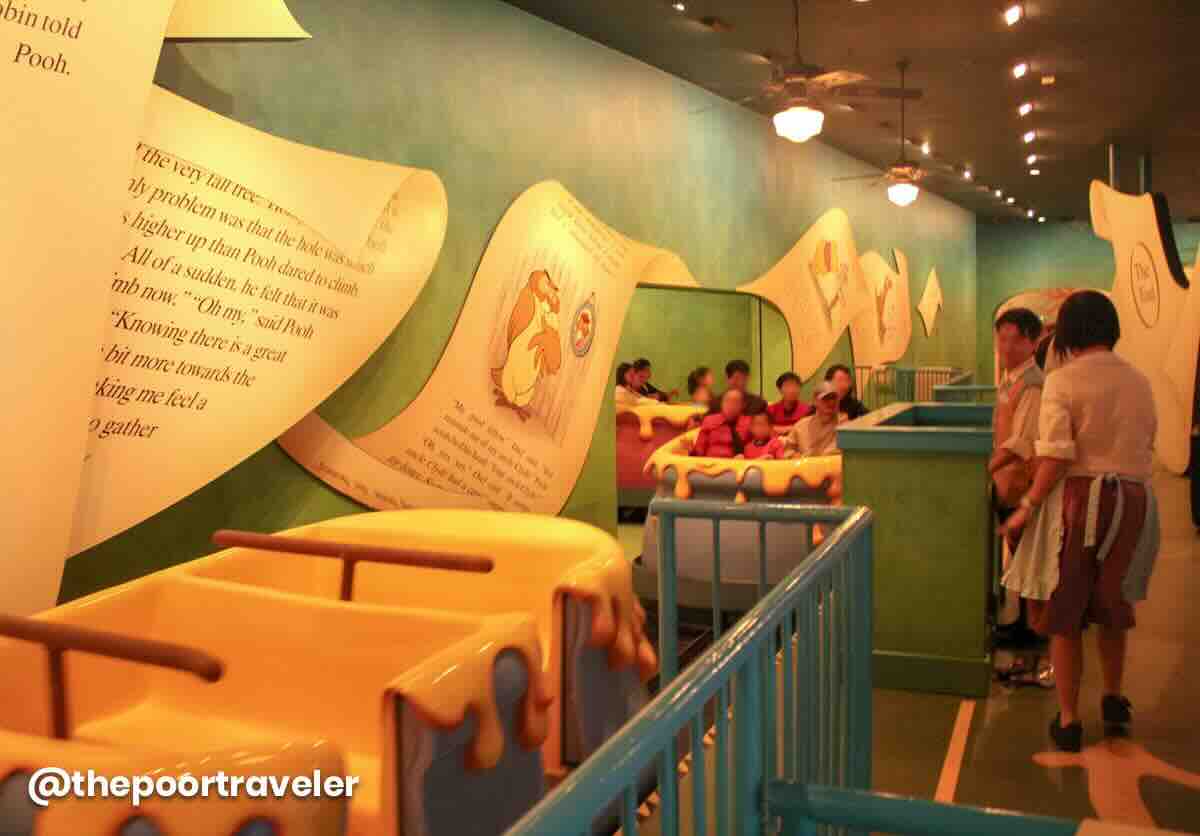
#15: The Many Adventures of Winnie the Pooh
Location: Fantasyland
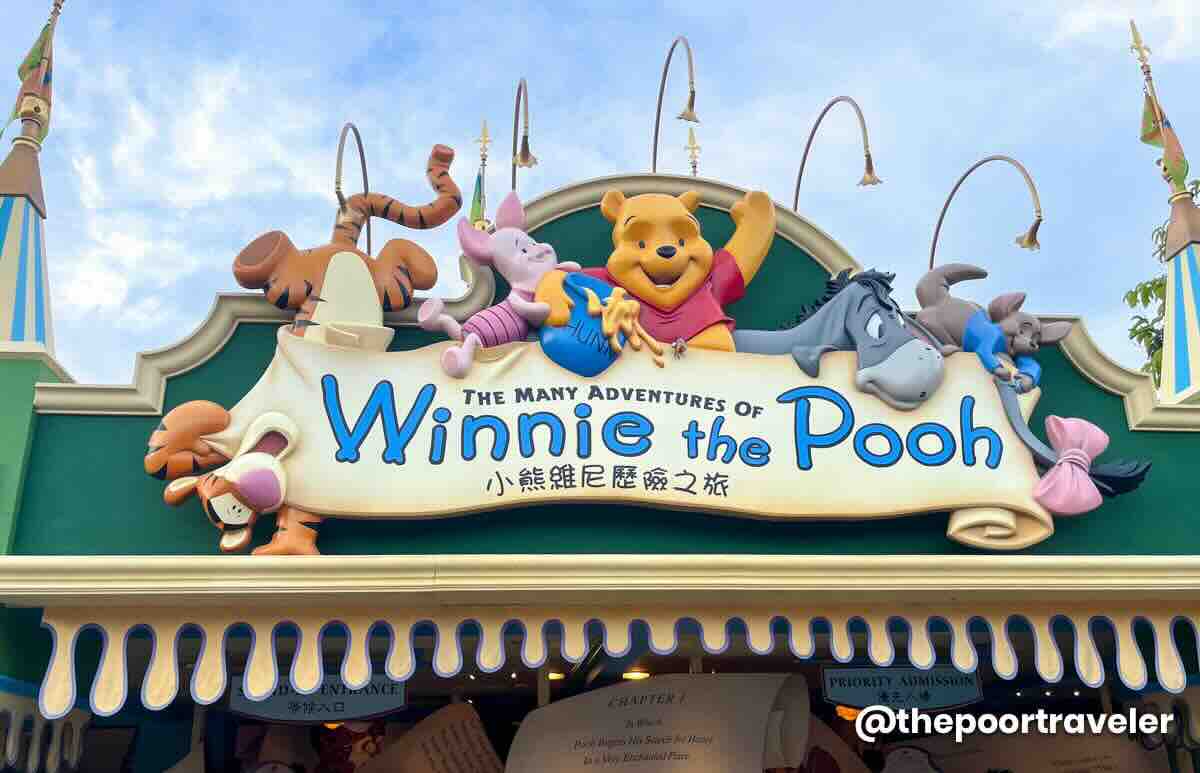
The Many Adventures of Winnie the Pooh is a charming dark ride located in Fantasyland. Here, you can board one of the whimsical “Hunny Pot” vehicles and journey through the beloved tales of A.A. Milne, the author who created Winnie the Pooh. This family-friendly attraction brings the Hundred Acre Wood to life with colorful scenes and motion-enhanced effects — from bouncing along with Tigger to getting caught in a dream full of Heffalumps and Woozles. It doesn’t have drops or sudden movements. The ride is gentle and steady, great for all ages, especially little kids and seniors.
This ride is not exclusive to Hong Kong Disneyland. We have also tried it at Magic Kingdom in Orlando. Shanghai Disneyland also has a version of it. There are subtle differences, but the overall experience is very similar. It’s not the flashiest ride in the park, but it’s pure, comforting Disney magic—soft, sweet, and straight from the heart.
Personal Take: But as much as I adore the nostalgia and whimsy of Winnie the Pooh, this ride ranks lower on my personal list of favorites at Hong Kong Disneyland because it doesn’t quite deliver the thrill or wow factor that other attractions in the park serve up. It’s not very memorable. You remember I mentioned earlier that I made sure to ride this again? It’s because I barely remember it. Even today, before recording, I had to rewatch my videos again to remind myself.
The storytelling is cute and the visuals are warm and fuzzy, but if you’re the type who craves heart-racing excitement or cutting-edge effects, this one might feel a bit too mellow. It’s nice, but not necessarily what you’ll rave about after leaving the park.
Safety and Accessibility
- Indoor Ride
- Good for all ages.
- No height restrictions.
- Wheelchair-accessible.
Guest Policy: Children below 7 years old must be accompanied by a guardian age 16 years or older.
#14: Dumbo the Flying Elephant
Location: Fantasyland
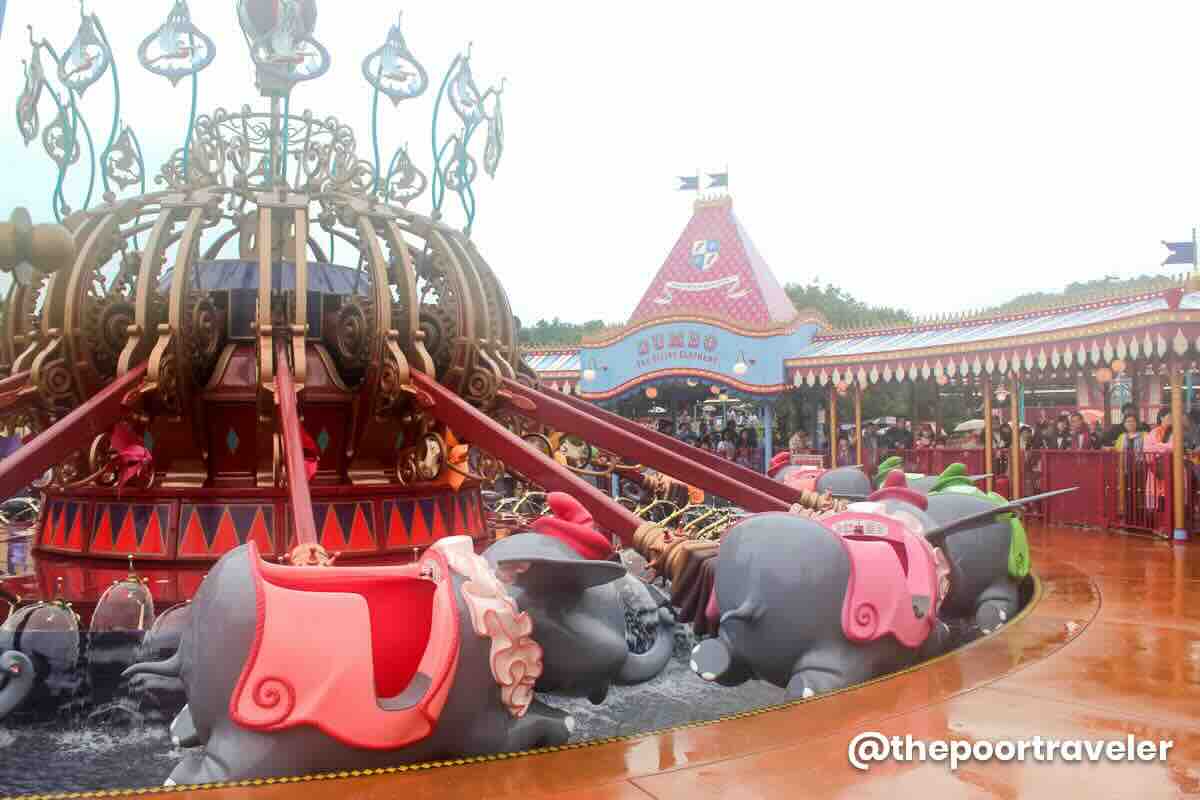
Dumbo the Flying Elephant is a Disney classic through and through. It’s basically like a carousel but in the air and lets you pilot your very own Dumbo as you glide in circles over Fantasyland. With a simple lever, you can control your flying elephant’s altitude, adding a playful sense of control that younger riders absolutely love. The views are surprisingly lovely too, especially on a sunny day when you can spot the Cinderella Carousel, the castle, and the bustling park below.
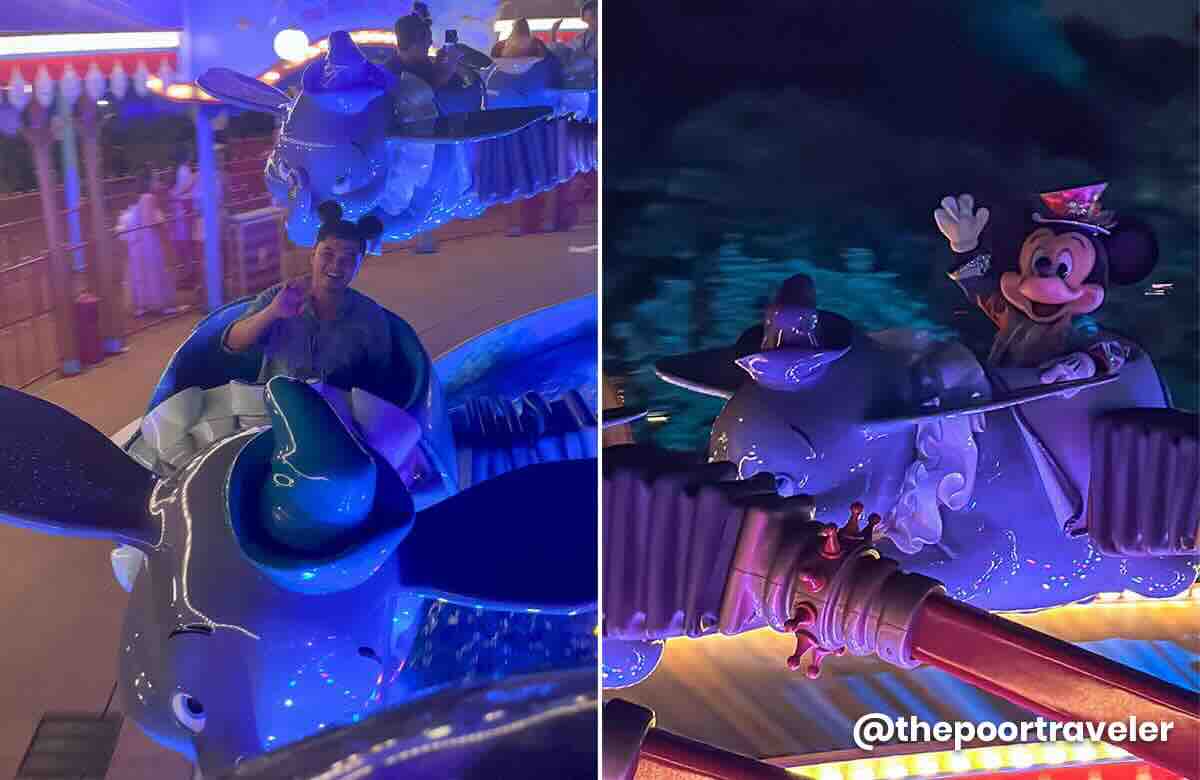
Personal Take: Still, as charming as it is, Dumbo is more of a quick, feel-good moment than a showstopper. It’s just a simple ride, without an immersive storyline, cutting-edge effects, or much variations. Its short duration and relatively slow pace mean it’s not going to wow thrill-seekers, and in peak hours, the wait time can feel a bit long for what you actually get.
But still, I enjoyed it every time, especially on our last visit when we got to share the ride with Mickey and Minnie!
Safety and Accessibility
- Outdoor Ride
- Good for all ages.
- No height restrictions.
- Need to transfer from wheelchair to ride.
Guest Policy: Children below 7 years old must be accompanied by a guardian age 16 years or older.
#13: Jungle River Cruise
Location: Adventureland
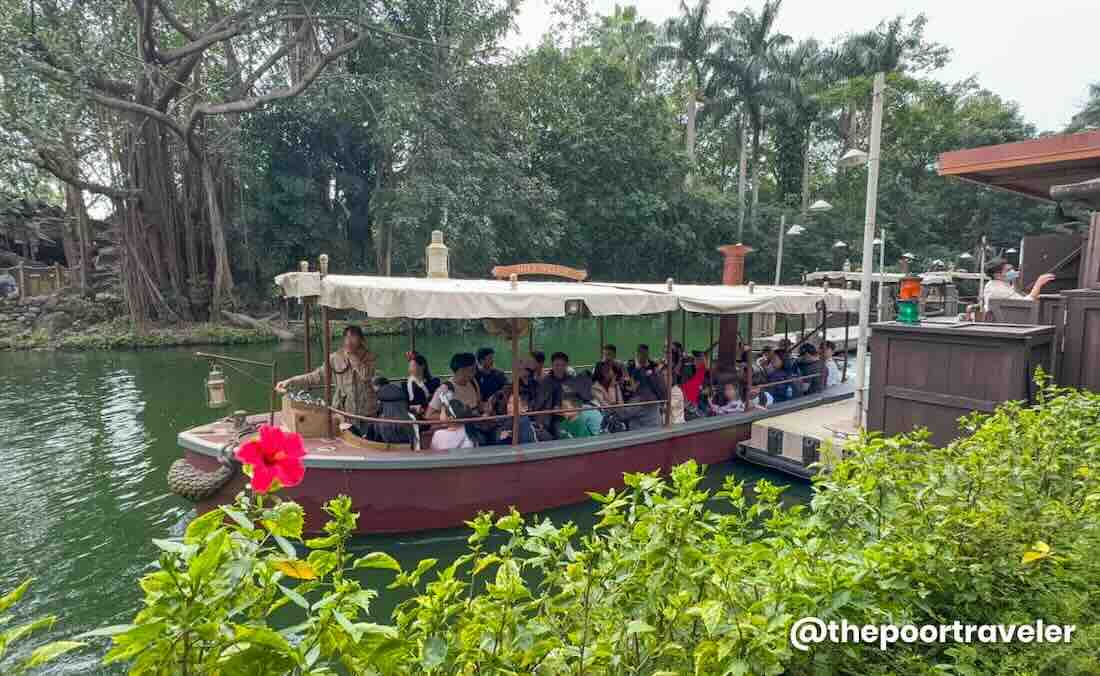
Jungle River Cruise delivers a vivid, immersive safari-style adventure right in the heart of Adventureland. You board a charming tramp-steamer-style boat and drift past Tarzan’s Treehouse, through dense, tropical scenery teeming with animatronic wildlife — elephants, gorillas, hippos, crocodiles, and headhunters using blow-darts — against the lush forest backdrop.
The ride stands out for its dramatic finale, where the mythical fire and water gods engage in an impressive spectacle of steam, flame, and water effects. I usually do this ride in the afternoon to escape the heat of the sun. Nothing’s more refreshing than being surrounded by cold water!

Personal Take: The boat driver/tour guide is integral in the ride. And what they’re doing is not easy, delivering both information and humor at the right time, sometimes in multiple languages. The guides sometimes rush through the script, which can affect how much you’ll enjoy this attraction. And while the theming is rich, some thrill-seekers might find the pace a touch too tame compared to more immersive attractions.
Safety and Accessibility
- Outdoor Ride
- Good for all ages.
- No height restrictions.
- Wheelchair-accessible.
- Sign Language service is available.
Guest Policy
- Children below 7 years old must be accompanied by a guardian age 16 years or older.
- This ride has the surprise factor.
#12: It’s a Small World
Location: Fantasyland
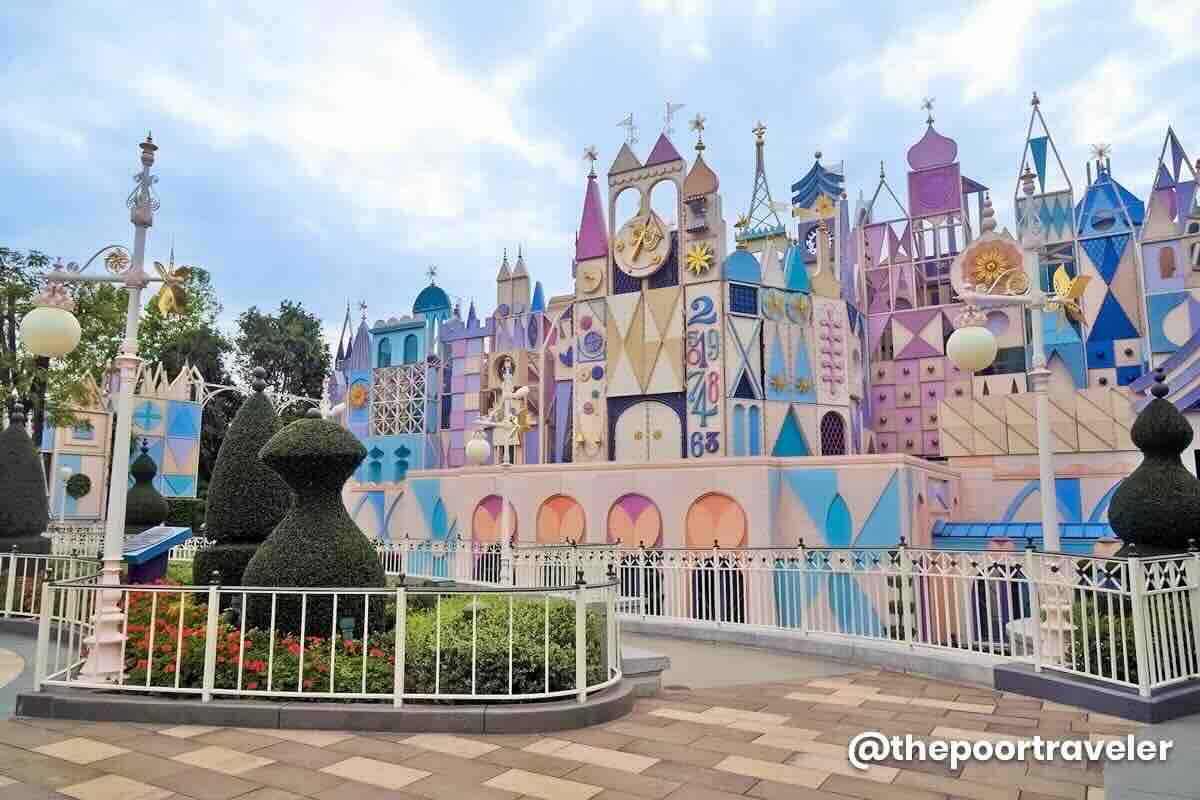
It’s a Small World is one of Hong Kong Disneyland’s largest indoor attractions, offering a peaceful 9-minute boat cruise through vibrant, stylized scenes that celebrate global cultures and unity. It’s heartfelt, timeless, and visually enchanting.
It’s a dark ride. And in the theme park world, the term “dark ride” refers to attractions where guests travel in a guided vehicle through a series of scenes, usually with special lighting, sound effects, animatronics, and projections to tell a story. The “dark” part doesn’t mean it’s scary (though it can be, sometimes). But it just refers to the ride being enclosed and using controlled lighting to set the mood. And Small World is like that.
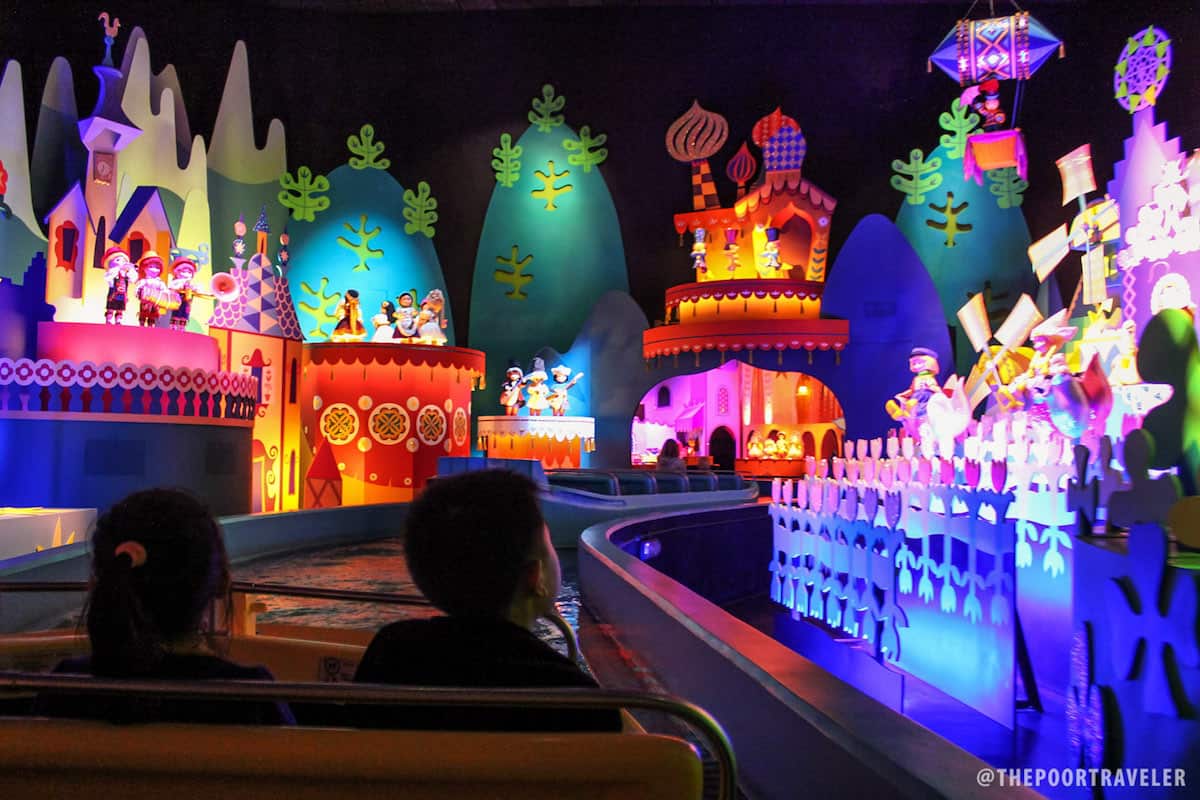
Inspired by the original Disneyland version, this edition uses a canal-style ride system and showcases the artistic vision of Mary Blair, with iconic, colorful figures crafted from papier-mâché, glitter, textiles, and authentic costumes.
Personal Take: We have also seen the Magic Kingdom version of it in Orlando, and we very much prefer Hong Kong’s take on it, perhaps because of its expanded Asian segment, including a brief feature on the Philippines! A bahay kubo sets the stage, with dolls dressed in traditional Filipino attire. But compared to other rides, it still remains very low-key.
Safety and Accessibility
- Indoor Ride
- Good for all ages.
- No height restrictions.
- Wheelchair-accessible.
Guest Policy: Children below 7 years old must be accompanied by a guardian age 16 years or older.
#11: Antman and the Wasp: Nano Battle!
Location: Tomorrowland
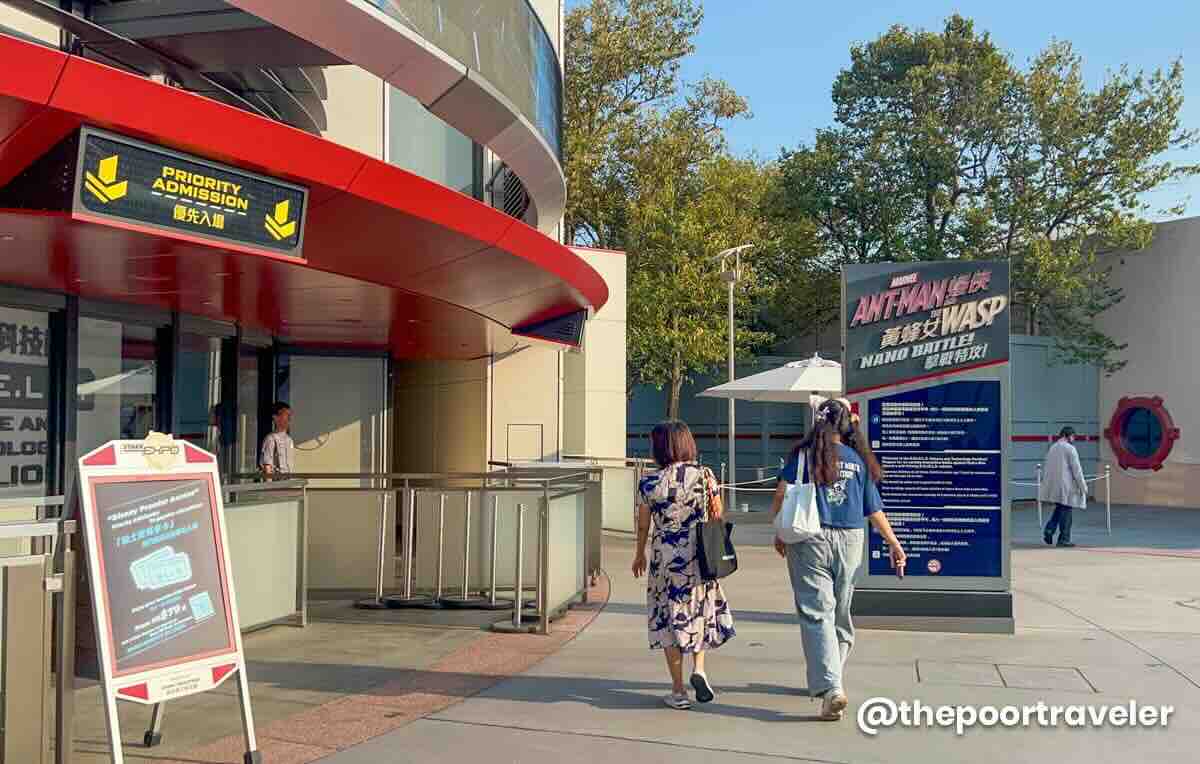
Now we’re talking! Ant-Man and The Wasp: Nano Battle! is a shooting dark ride launched in March 2019, nestled within Tomorrowland, a Marvel-themed expansion of the park. Yes, I said “shooting dark ride.” Emphasis on shooting.
Guests board an Omnimover-style vehicle with laser-based blasters. Riders are tasked with helping Ant-Man and The Wasp fend off Hydra’s swarmbots by shooting at animated targets while immersed in stunning visuals and score. As early as the start of the queue, you’ll be sucked into the story featuring the cast of the movie. Yes, you’ll be surrounded by images of Paul Rudd, which is a treat in itself.
Inside the ride, you’re “shrunk” to ant-size to fight swarmbots from a micro-perspective. You shoot targets as you coast along, and the more targets you hit the higher your score. You can even have a mini-contest with your companion to see who’s the better shot, making it high-energy and interactive.
Personal Take: While the competitive shooting feature adds gaming flair, those seeking more immersive scenes or edge-of-your-seat thrills might find the gameplay focus a touch repetitive or dated. I like it. But not enough to make it to our Top 10.
Safety and Accessibility
- Indoor Ride
- Good for all ages.
- No height restrictions.
- Wheelchair-accessible. Note: This service is temporarily suspended from August 15, 2025 until further notice. Check the official website for updates.
Guest Policy: Children below 7 years old must be accompanied by a guardian age 16 years or older.
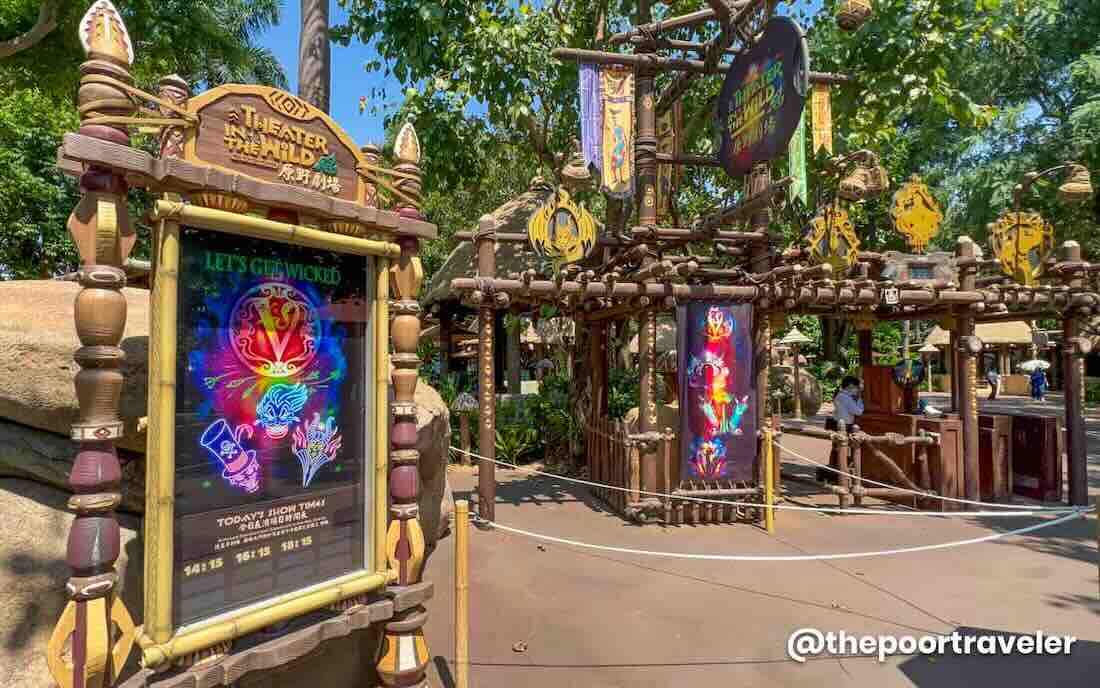
#10: Theater in the Wild
Location: Adventureland
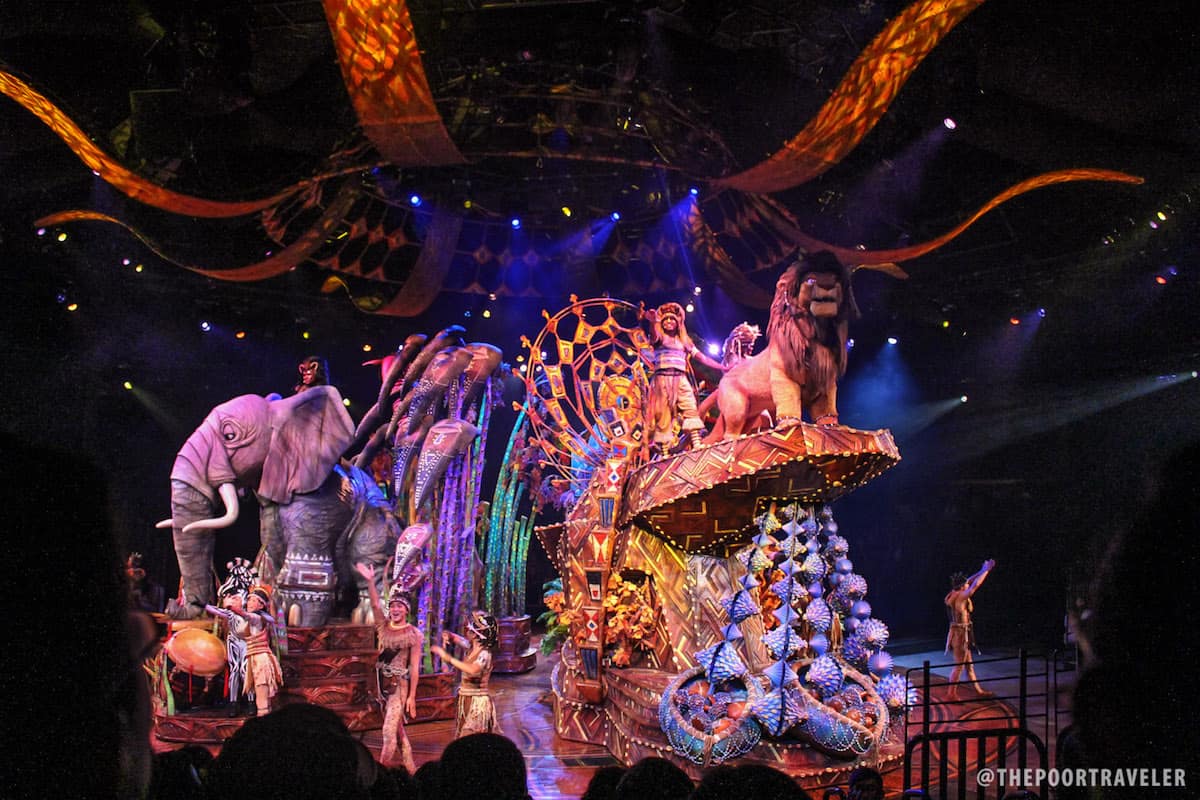
At the heart of Adventureland stands the Theater in the Wild. And more often than not, the main feature is the Festival of the Lion King, a spectacular, 30-minute Broadway-style stage show, retelling Simba’s story through Elton John and Tim Rice’s iconic songs, acrobats, fire dancers, dynamic choreography, and striking production design. Love the giant characters that look like parade floats. The Hong Kong version shines with its central turntable stage, which allows dramatic presentations.
But it’s not always The Lion King. A couple of years ago, we chanced upon a completely different show called Let’s Get Wicked, featuring Disney’s devilish but beloved villains like Ursula, Cruella deVille, Dr. Facilier, Mother Gothel, Gaston, and of course, Maleficent. If Lion King dazzles with its heartfelt storytelling, the villains amp up the comedy and choreography.
Personal Take: I always try to catch the Festival of the Lion King show whenever I’m in Disneyland because I really, really enjoy it. Usually, I choose the showtimes around lunch time so I can escape the scorching sun. Or the rain, on a couple of occasions.
Safety and Accessibility
- Indoor Attraction
- Good for all ages.
- No height restrictions.
- Wheelchair-accessible.
- Assistive Listening, Sign Language, and Video Captioning services are available.
Attention! The Festival of the Lion King is temporarily suspended from September 3, 2025 onwards. Check the official website for updates.
Guest Policy: Some scenes may be a little intense and may feel frightening for young viewers.
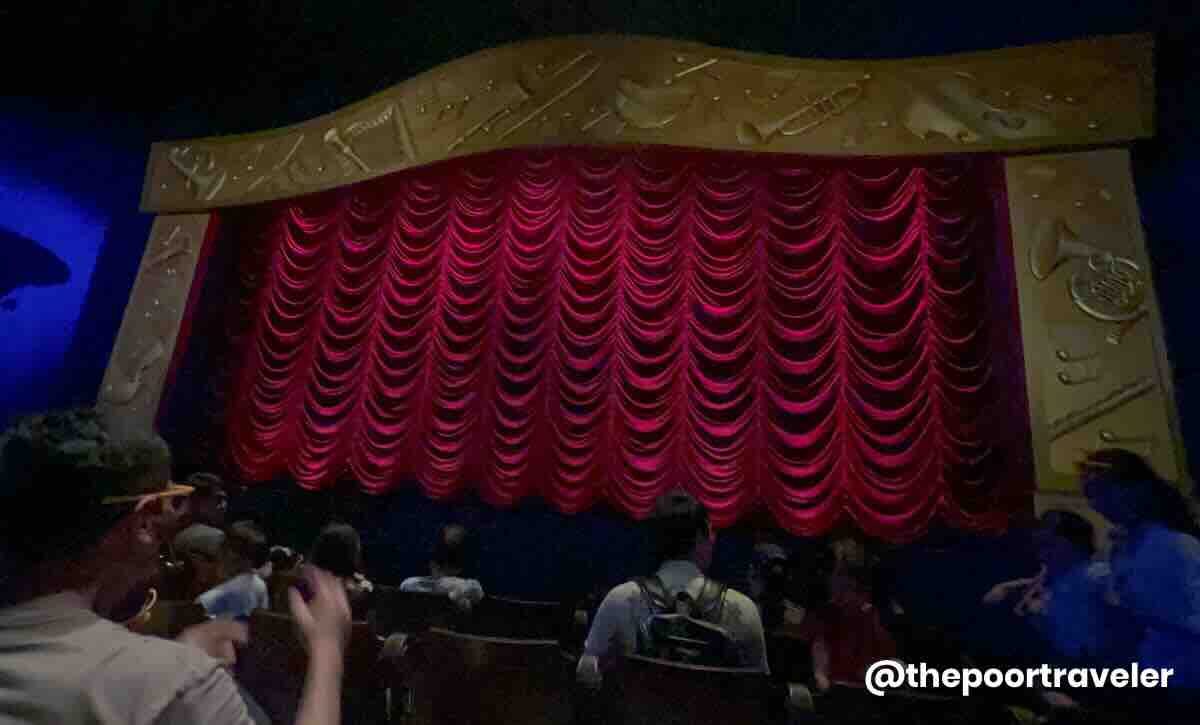
#9: Mickey’s PhilharMagic
Location: Fantasyland
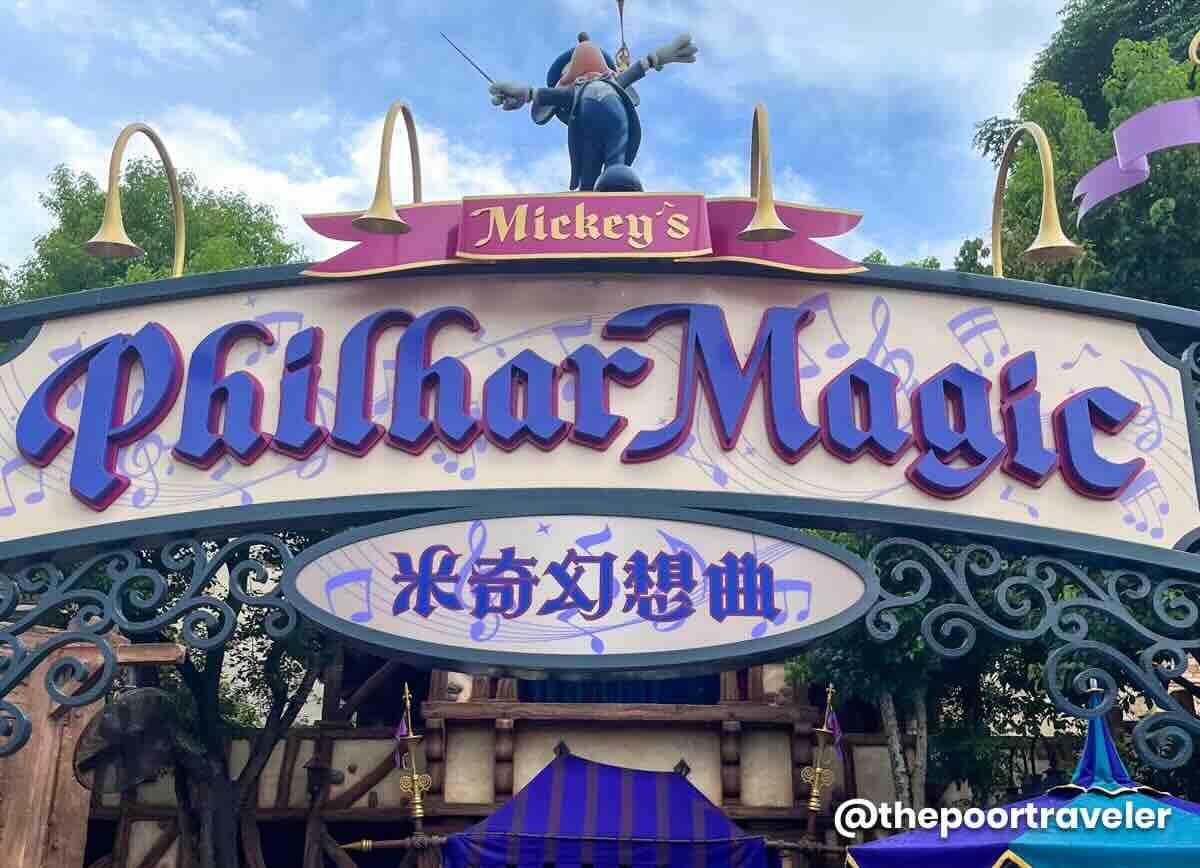
Located in Fantasyland, this 12-minute 4D film spectacular is one of my favorites! It’s pure nostalgia. It makes me feel like a kid again.
Although it’s called Mickey’s PhilharMagic, the mischievous Donald Duck steals the show, quite literally. By stealing Mickey’s hat and then losing it, he embarks on an adventure through many of Disney’s most loved classics like The Little Mermaid, The Lion King, Peter Pan, and Aladdin. It has been enchanting guests since the park’s opening, and I don’t think it’s going anywhere. In fact, they recently updated and upgraded it, adding a number featuring Coco’s El Poco Loco and extending some parts.
Personal Take: The 4D effects and larger-than-life projection make it especially appealing on hot days or for families needing a restful, air-conditioned moment. It also flips fast because they fill the theater every run.
Safety and Accessibility
- Indoor Ride
- Good for all ages.
- No height restrictions.
- Wheelchair-accessible.
- Assistive Listening service is available.
Guest Policy: Children below 7 years old must be accompanied by a guardian age 16 years or older.
If this 4D ride is too mild for you, the next item on our list might scratch that nastier virtual reality itch!
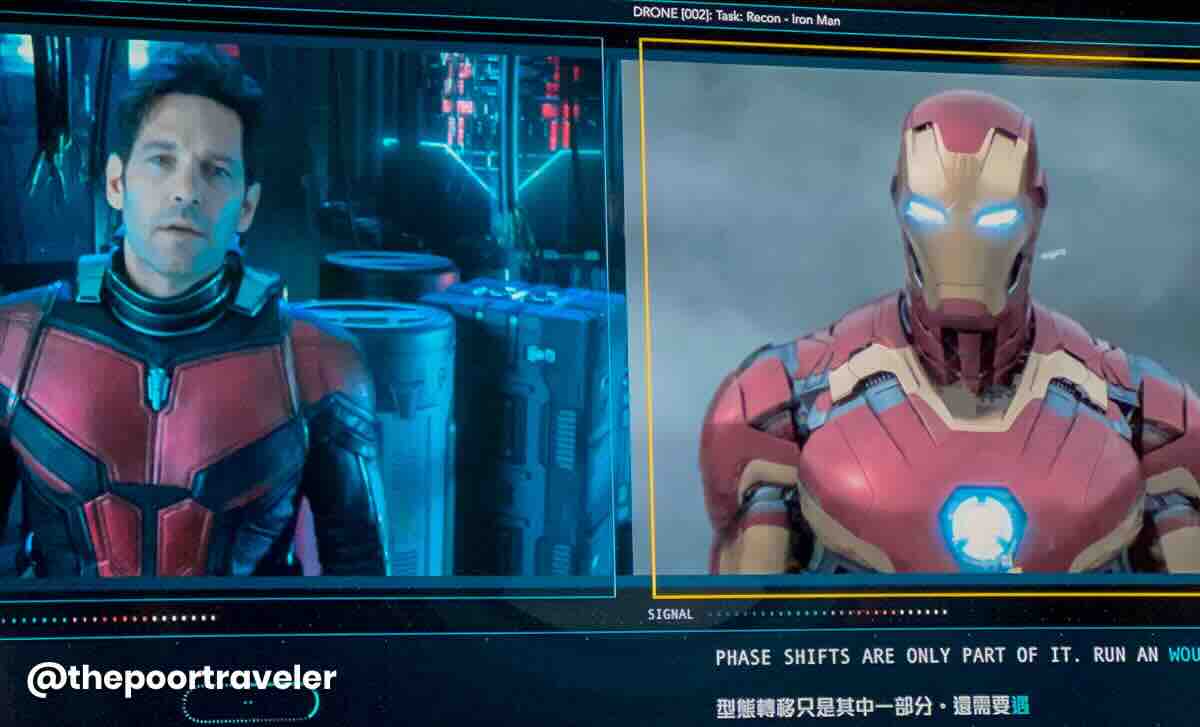
#8: Iron Man Experience
Location: Tomorrowland
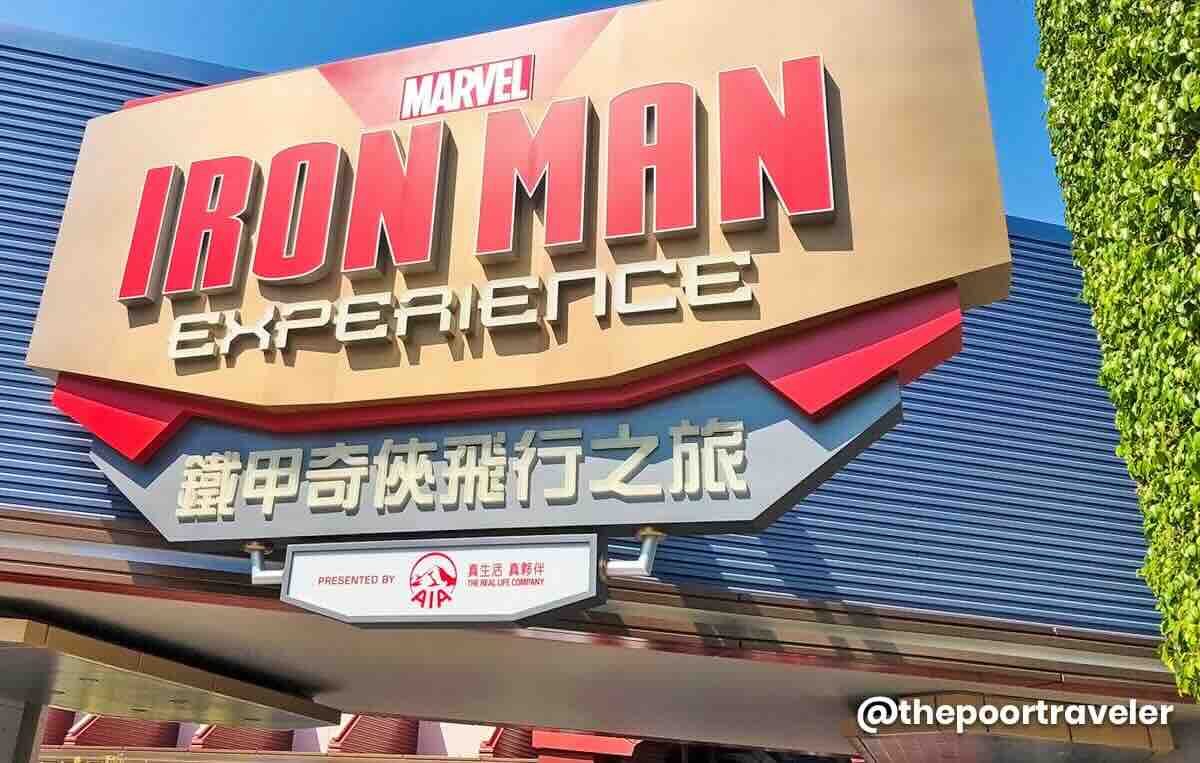
The Iron Man Experience is a 3D motion-simulator ride located in Tomorrowland’s “Stark Expo” area. It’s the first-ever Marvel-themed ride in any Disney park, offering guests an immersive flight alongside Iron Man. Riders don StarkVision glasses and board the Expo Edition Iron Wing, a motion vehicle, for a thrilling journey over Hong Kong. Yes, the ride will take you above and through Hong Kong’s cityscape, making the suspension of disbelief stronger.
Tony Stark battles Hydra, and you’re right there with him, navigating the skies and battling robotic invaders across iconic landmarks. The queue itself is part of the show, but to be honest, I never got to pay attention to it because every time I’m here (usually in the late afternoon), there’s almost always NO LINE at all, which is surprising, given how popular Ironman is. I usually walk right into the ride.
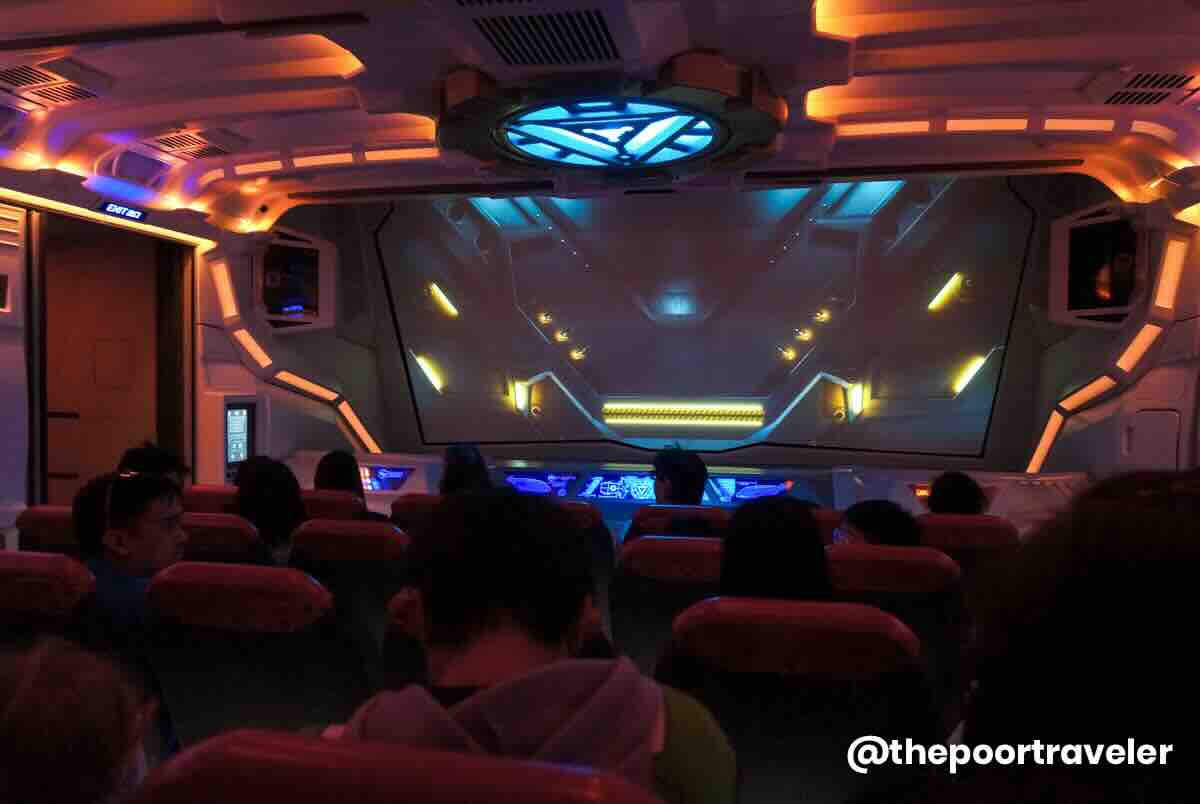
Personal Take: Despite its blockbuster appeal, it’s still a simulator — not a physical roller coaster — so thrill-seekers craving high-speed drops might find it tamer than expected. But the reason it’s only #8: I always get dizzy on this ride. I don’t know why. It doesn’t happen at most other simulator rides.
Safety and Accessibility
- Indoor Ride
- Rider must be at least 102 cm (40in) or taller.
- Need to transfer from wheelchair to ride.
Guest Policy
- Children below 7 years old must be accompanied by a guardian age 16 years or older.
- Rider should be in good health and without conditions such as high blood pressure, heart, back or neck problems, motion sickness, or other conditions that could be affected by this ride.
- Pregnant women are strongly advised not to ride.
- Service animals are not permitted.
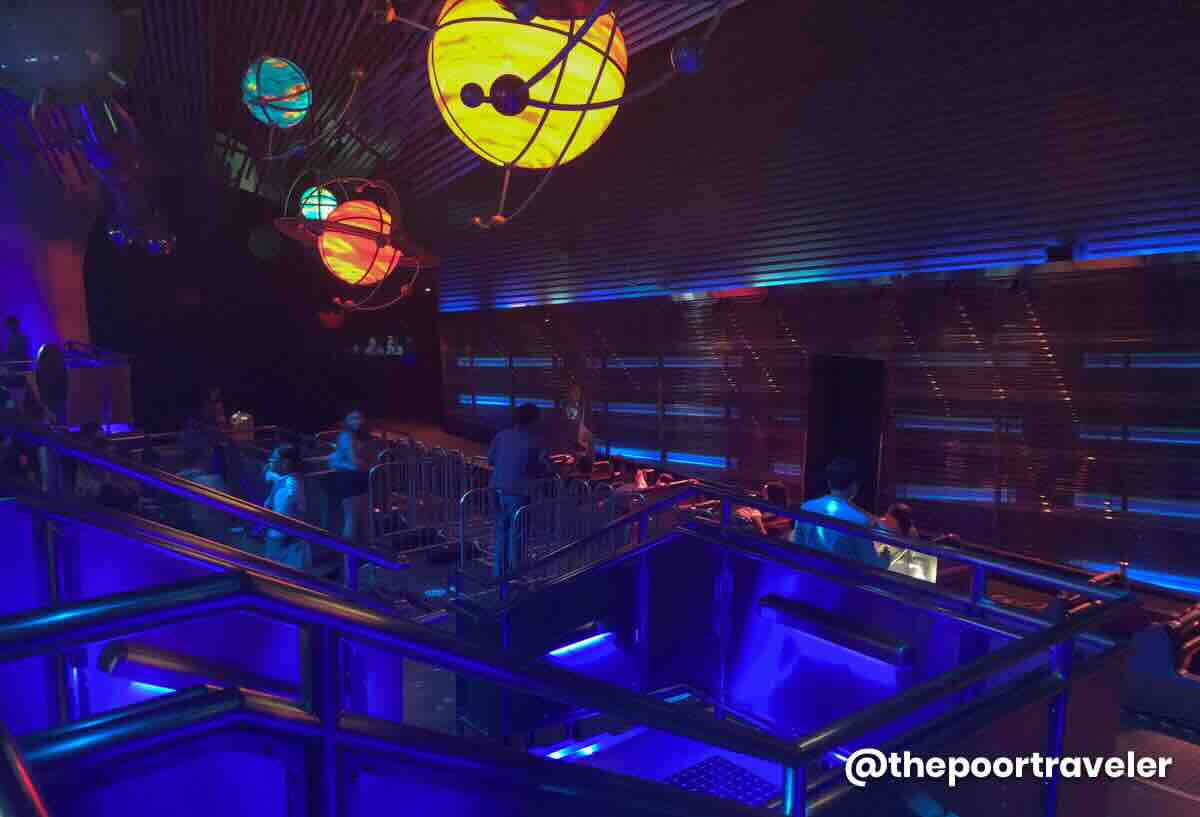
#7: Hyperspace Mountain
Location: Tomorrowland
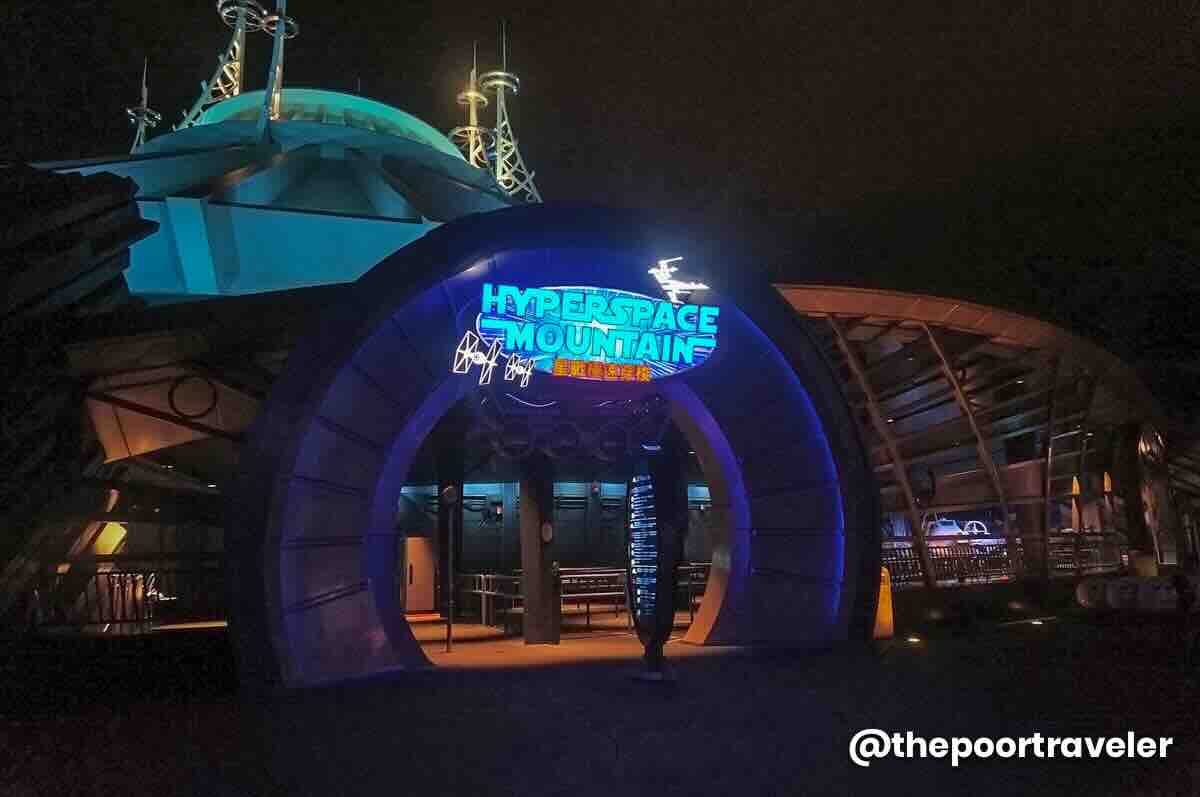
Also located in Tomorrowland, Hyperspace Mountain is Hong Kong Disneyland’s thrilling indoor roller coaster. It used to be known as Space Mountain before being permanently reimagined with a Star Wars overlay.
The ride propels guests through a pitch-dark, space-themed course with amplified visuals. The Star Wars twist places riders in the midst of a Rebel versus Imperial dogfight, launching into an adrenaline-pumping hyperspace battle. That blend of speed, surprise, and cinematic tension makes it one of the park’s most exhilarating attractions, especially if you’re a big Star Wars fan.
Personal Take: That said, the ride can feel rattly and less smooth. It’s hard to explain, but if you’ve tried similar but newer rides like the Guardians of the Galaxy ride at EPCOT or Tron Lightcycle Power Run at Magic Kingdom, you’ll know what I mean. It also lacks a big drop that gives that fluttering feeling in the tummy. And if that feeling of weightlessness is what you’re after, you should pay a visit to Toy Story Land.
Safety and Accessibility
- Indoor Ride
- Rider must be at least 102 cm (40in) or taller.
- Need to transfer from wheelchair to ride.
Guest Policy
- Children below 7 years old must be accompanied by a guardian age 16 years or older.
- Rider should be in good health and without conditions such as high blood pressure, heart, back or neck problems, motion sickness, or other conditions that could be affected by this ride.
- Pregnant women are strongly advised not to ride.
- Service animals are not permitted.
#6: Toy Soldiers Parachute Drop
Location: Toy Story Land
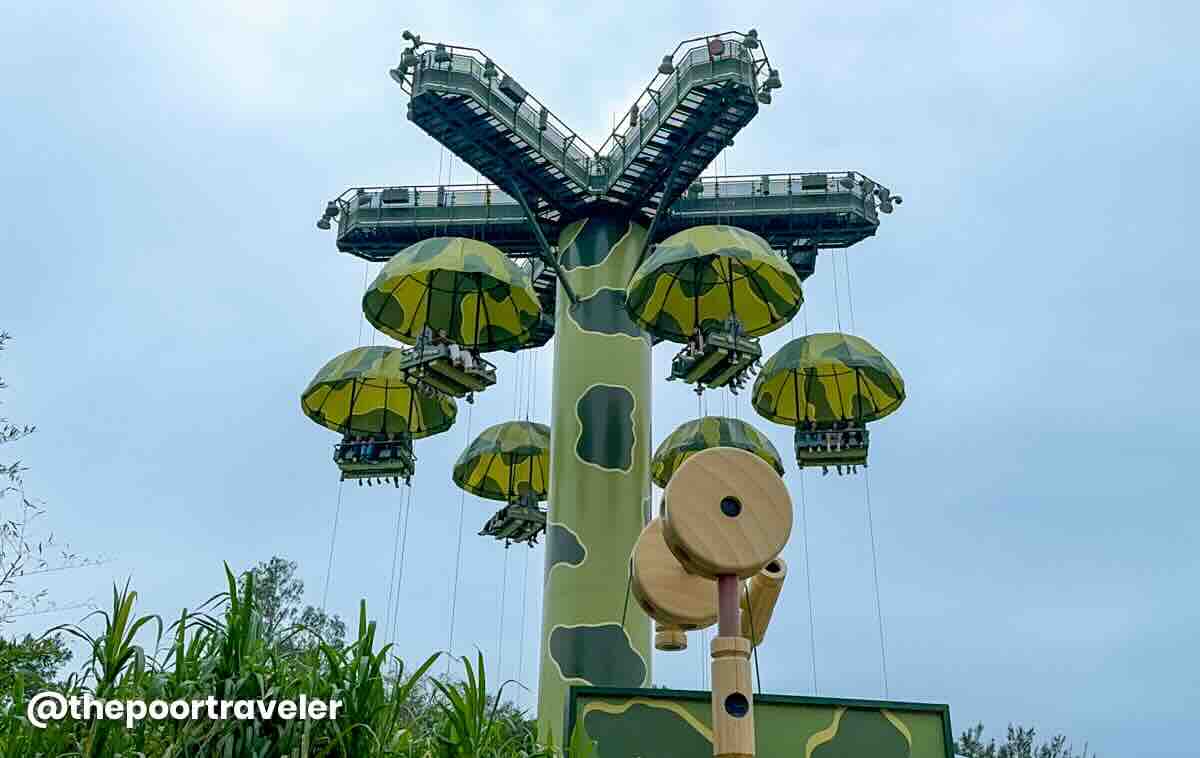
Toy Soldiers Parachute Drop is a parachute jump–style attraction that drops riders down an 80-foot (roughly 25-meter) tower. Guests board six-person parachute-shaped gondolas. From the top, you could have an expansive view of the surrounding areas, but I doubt you’ll be focusing on the view while you’re here. The ride then gently ascends then descends multiple times, creating those much-chased butterflies in the stomach.
Personal Take: This ride gives a nice rush with its ascending and plunging motion, but stays light enough for many ages, even kids. It’s also great for thrill-seekers who prefer something a bit extreme but not too much. But be warned that wait times can run long, especially in peak seasons.
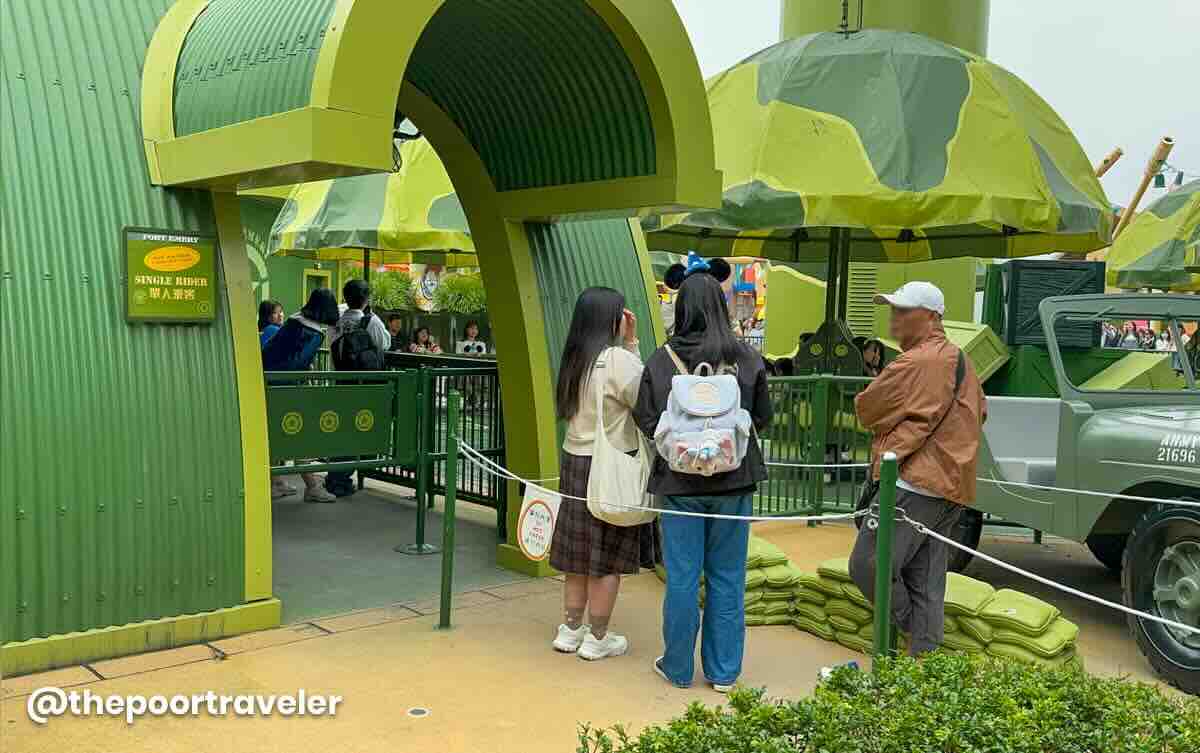
This ride tends to draw big crowds, sometimes hitting 120 minutes. We found a workaround, though. This is one of those rides with a separate single-rider line, so take advantage of it. You’ll be separated from your group, but you’ll be breezing through it, and you can even ride multiple times as a single rider.
Safety and Accessibility
- Outdoor Ride
- Rider must be at least 81 cm (32in) or taller.
- Need to transfer from wheelchair to ride.
Guest Policy
- Children below 7 years old must be accompanied by a guardian age 16 years or older.
- Rider should be in good health and without conditions such as high blood pressure, heart, back or neck problems, motion sickness, or other conditions that could be affected by this ride.
- Pregnant women are strongly advised not to ride.
- Service animals are not permitted.
Just next to the Parachute Drop stands the next attraction on our list…
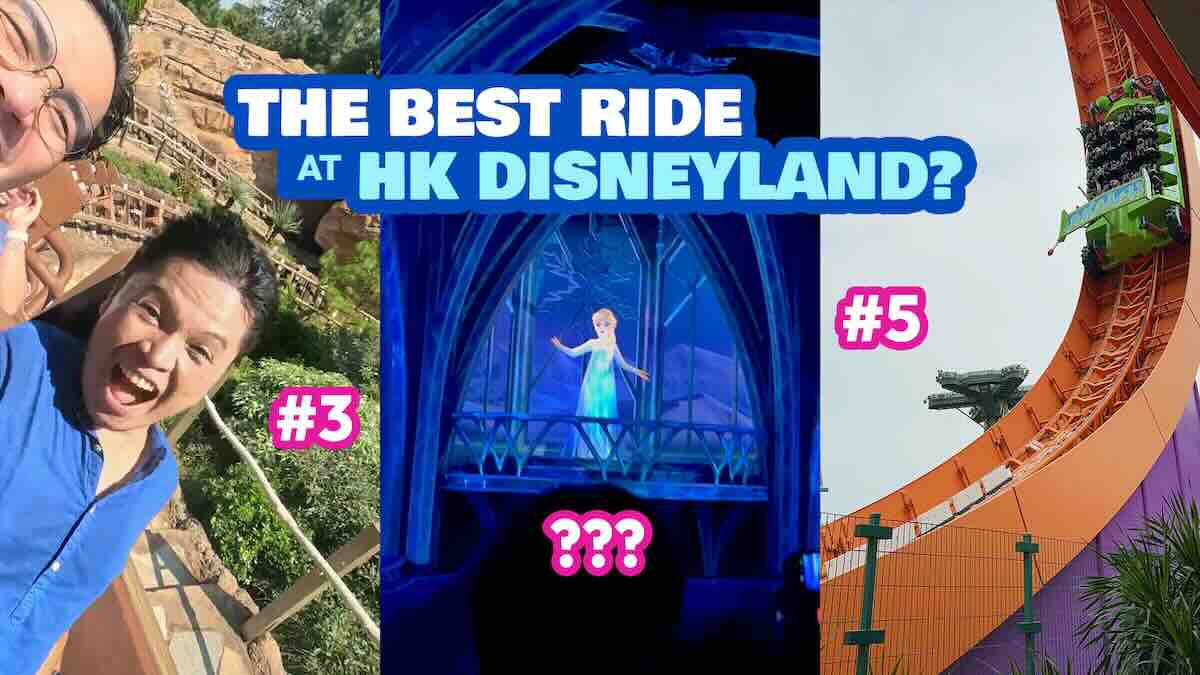
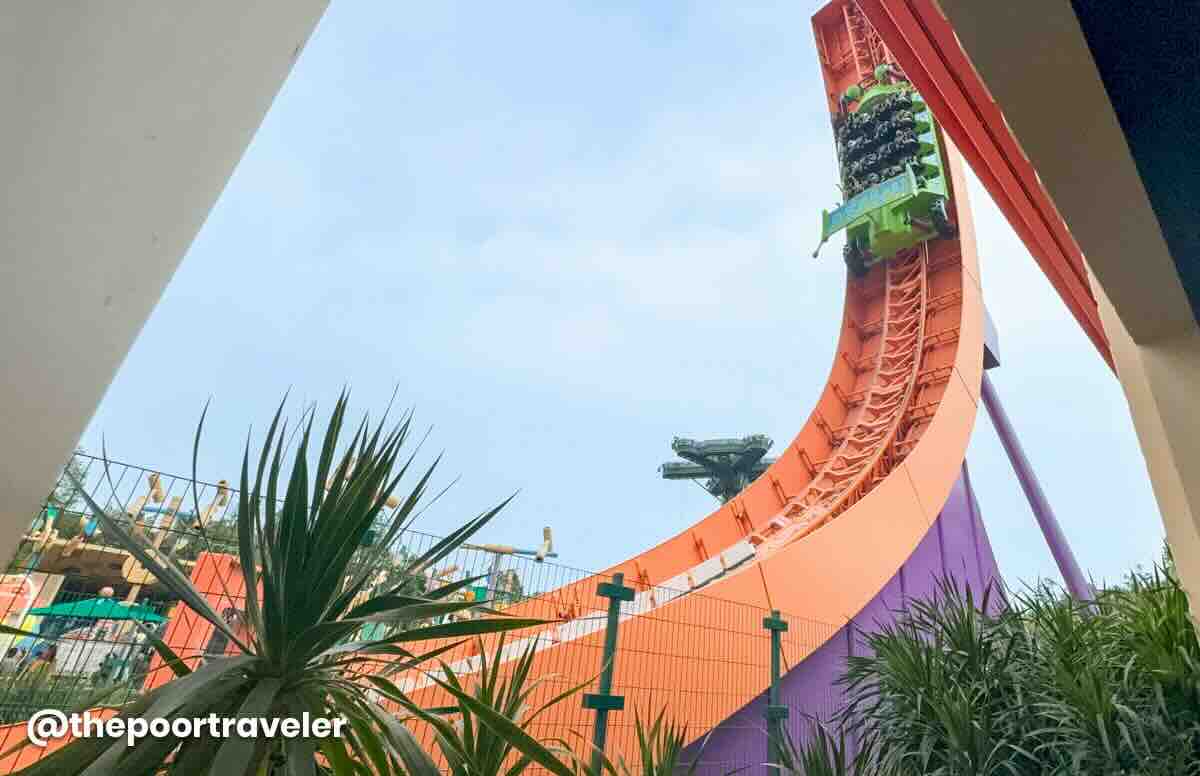
#5: RC Racer
Location: Toy Story Land
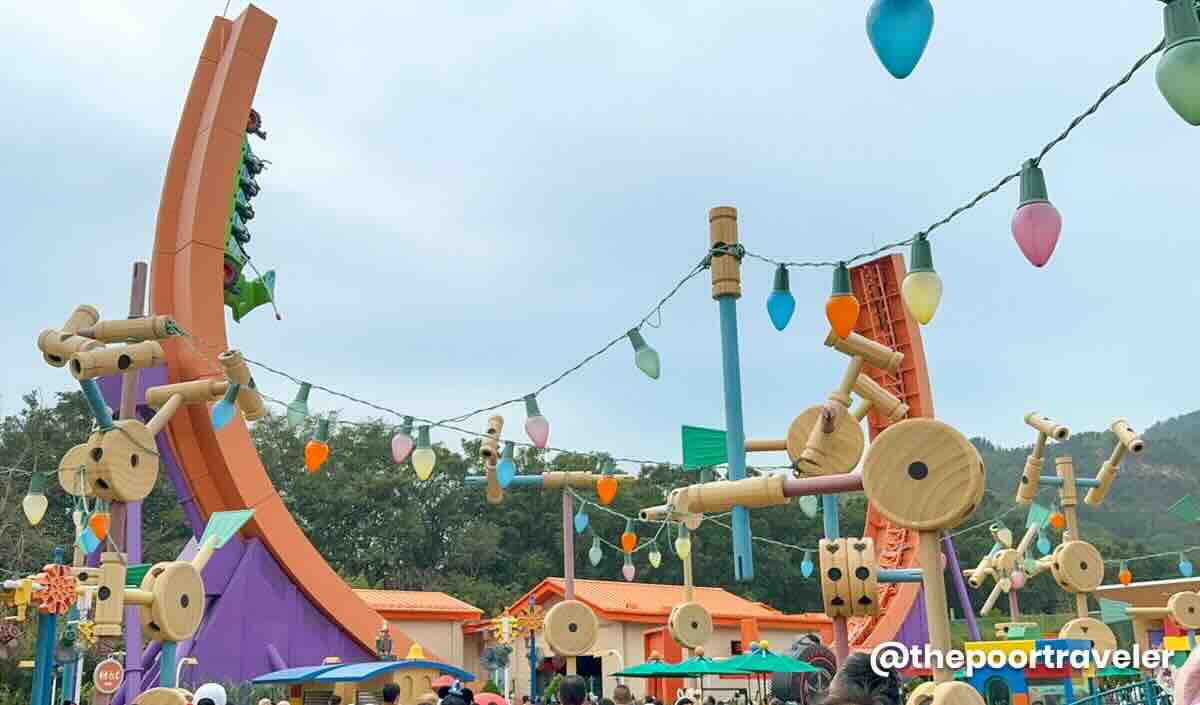
RC Racer is a thrilling steel shuttle ride themed after the iconic RC car from Toy Story. This totally exhilarating ride launches guests back and forth along a giant U-shaped “half-pipe” track, reaching heights of about 25 meters (82 feet). Think Enchanted Kingdom’s Anchor’s Away, but crazier. Much crazier.
Drawing inspiration from Hot Wheels tracks, the ride offers a fun, dynamic experience, building speed in each pass to create that gravity-defying sensation or “hang time”, holding you at steep angles, which is especially thrilling if you’re seated in the back. And yes, I was seated at the back! At one point, I thought the ride malfunctioned and catapulted us into the air, only to be pulled back to earth, then get swung up again. I loved, loved, loved it! If you don’t want to be too overwhelmed, sit in the middle part.
Personal Take: The Toy Story theming is impeccable. The station mimics a toy garage, and the queue resembles a toy racetrack. However, it has a limited throughput — only one car runs at a time. Hence, wait times can be too long at times. Just be prepared for potentially long lines and an intense ride that’s more adrenaline than storytelling.
Safety and Accessibility
- Outdoor Ride
- Rider must be at least 120 cm (48in) or taller.
- Need to transfer from wheelchair to ride.
Guest Policy
- Children below 7 years old must be accompanied by a guardian age 16 years or older.
- Rider should be in good health and without conditions such as high blood pressure, heart, back or neck problems, motion sickness, or other conditions that could be affected by this ride.
- Pregnant women are strongly advised not to ride.
- Service animals are not permitted.
OK, we’re down to the final four. And to be honest with you, we had a hard time ranking numbers 2 to 4 because we kept changing our minds. These 3 attractions are very different. Virtually, it’s a triple tie. But as of writing, here’s how things stand.
#4: Momentous Nighttime Spectacular
Location: Main Street, U.S.A.

Ah, the ever-so-famous fireworks display at the end of every day — Momentous Nighttime Spectacular. Actually, fireworks display may not be the right term for it because compared to its previous version years ago, there are fewer fireworks now. But that doesn’t mean it’s less spectacular. If anything, they really dialed it up!
Projected right onto the Castle of Magical Dreams and the fountain in front of it, this spectacular blends breathtaking visuals, powerful music, lasers, and fireworks into one seamless, emotional show. It takes you on a journey through beloved Disney and Pixar stories — one minute you’re feeling the warm fuzzies with heartfelt scenes, the next you’re gripping your chest during epic, action-packed sequences. It’s like the ultimate Disney highlight reel, only bigger, brighter, and paired with a soundtrack that could make a grown man tear up (don’t ask me how I know).
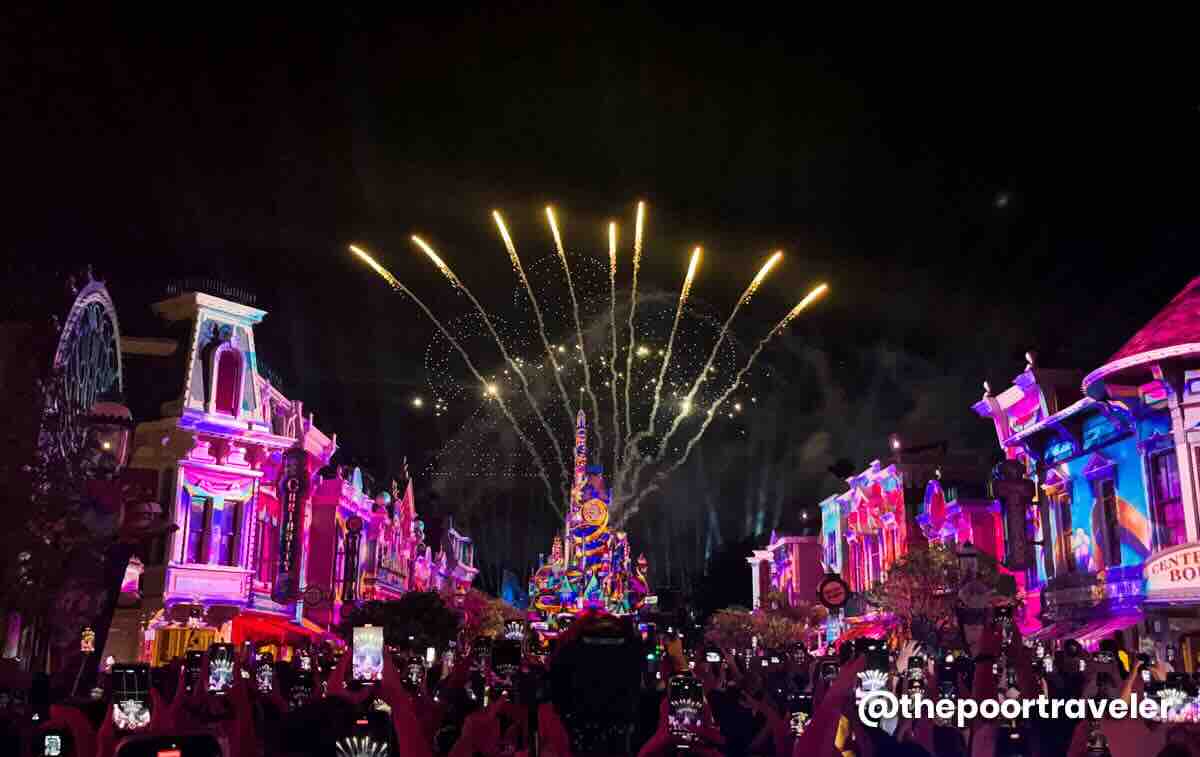
As if that wasn’t enough, for the park’s 20th anniversary, they’ve added an extra layer of magic — drones. Hundreds of them light up the sky in stunning formations, creating massive shapes, icons, and symbols that complement the castle projections below and push the wow factor through the roof.
Personal Take: We decided to put it at number 4 because, of course, a show this epic comes with a few realities. First, you’ll want to stake out your spot early if you want the best view. And by early, we mean HOURS early. If the show starts at 8PM, you should already secure a spot at around 5 or 6PM because it gets crowded pretty quickly. And other guests can easily block your sightline or ruin your experience.
Weather can also play the villain. Heavy rain or strong winds may force changes or cancellations. But on a perfect night, when everything aligns, Momentous, especially with its dazzling drone addition, is one of those rare theme park experiences that sticks with you long after the lights fade.
Safety and Accessibility
- Outdoor Attraction
- Good for all ages.
- No height restrictions.
- Wheelchair-accessible.
Guest Policy: Some parts may have the surprise factor or may be a little intense for those with photophobia or sensitive to flashing or blinding lights.
#3: Big Grizzly Mountain Runaway Mine Cars
Location: Grizzly Gulch
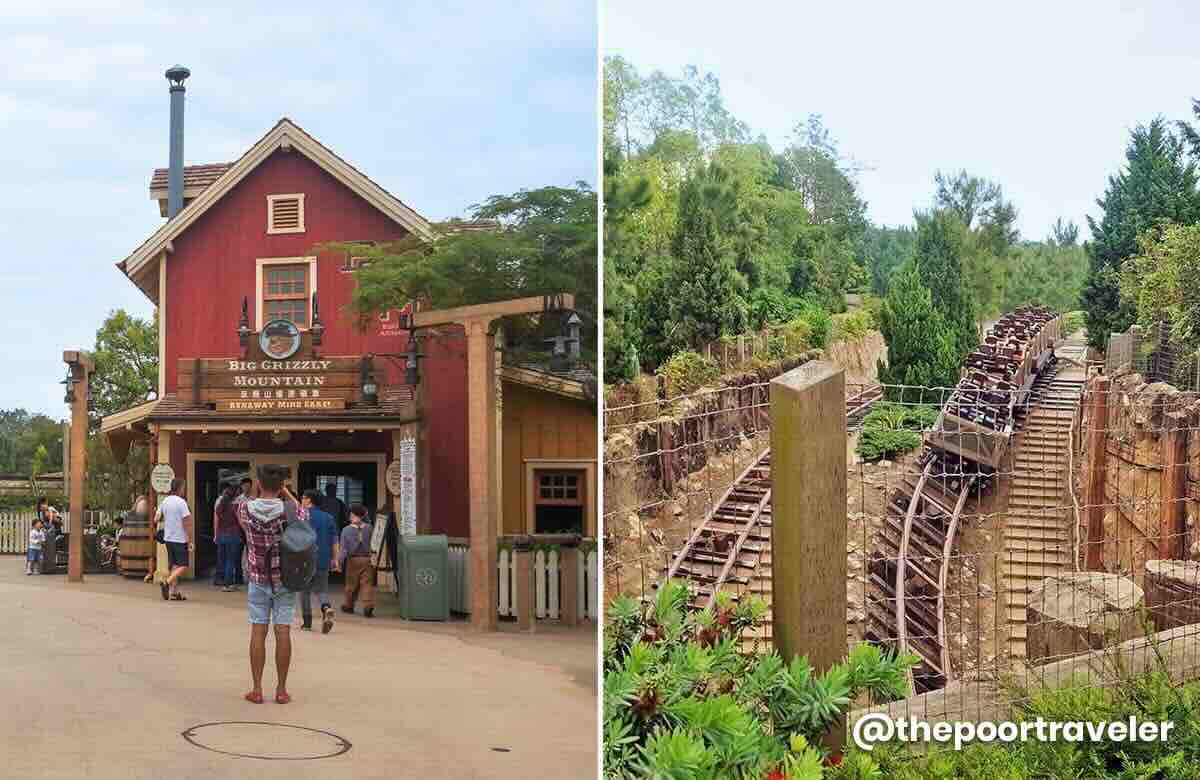
The best roller coaster in Hong Kong Disneyland! Located in the Wild West–themed Grizzly Gulch and unveiled in July 2012, Big Grizzly Mountain Runaway Mine Cars takes riders on a gold rush, following animatronic bears. But it’s not really the narrative that makes it special. It’s the unexpected twists: a lift hill and a surprise launch that sends you rolling backward!
Personal Take: Just like Hyperspace Mountain, it also feels rough, but I didn’t really mind because its bumpiness matches the mine theme of the ride. But prepare to wait a long time for your turn, as it is also very popular, but the line moves slowly.
Safety and Accessibility
- Outdoor Ride
- Rider must be at least 112 cm (44in) or taller.
- Need to transfer from wheelchair to ride.
Guest Policy
- Children below 7 years old must be accompanied by a guardian age 16 years or older.
- Rider should be in good health and without conditions such as high blood pressure, heart, back or neck problems, motion sickness, or other conditions that could be affected by this ride.
- Pregnant women are strongly advised not to ride.
- Service animals are not permitted.
#2: Mystic Manor
Location: Mystic Point
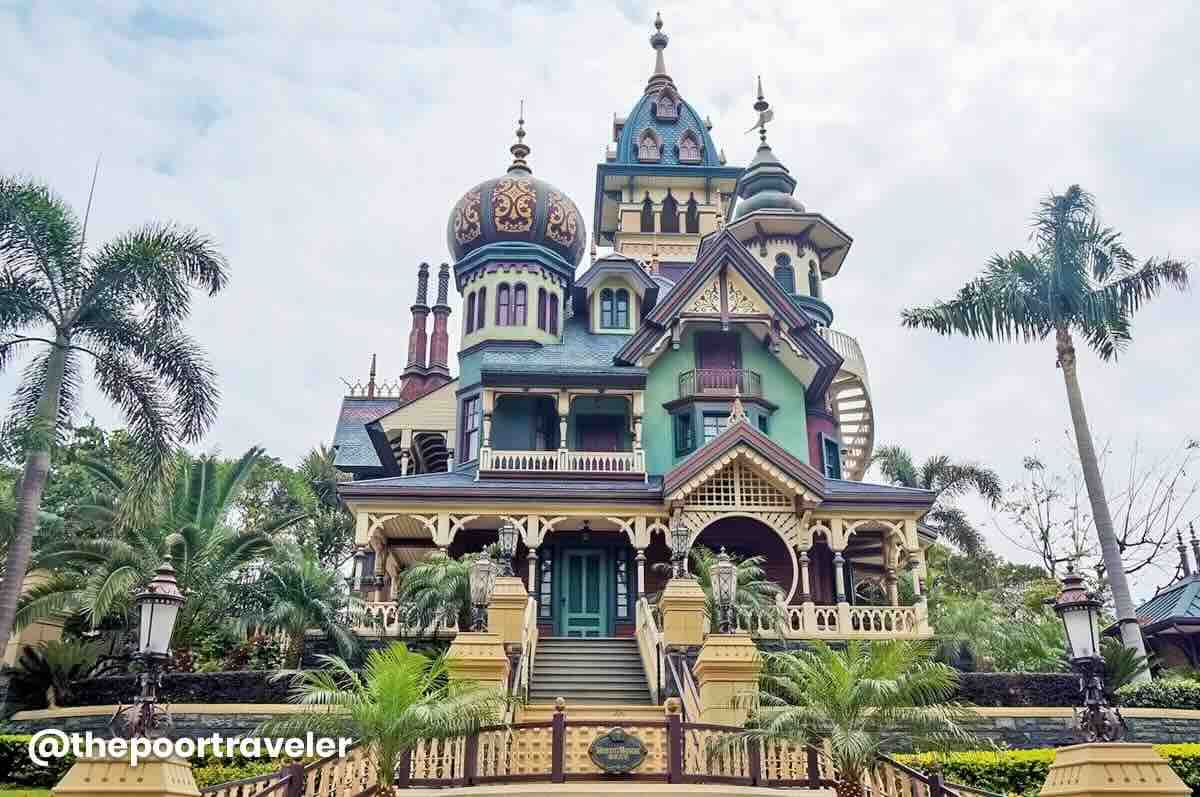
Mystic Manor is Hong Kong Disneyland’s crown jewel. For the longest time, I firmly believed it was the most imaginative ride here.
It is a ride that is unique to Hong Kong Disneyland because it’s an original story and not based on any existing Disney film. And yet, even though none of the characters are familiar, it’s very easy to be invested in its narrative. The story is centered around Lord Henry Mystic and his very naughty pet monkey named Albert. It is set in a lavish Victorian-style mansion, and using a trackless ride system, you glide from room to room, each brought to life by realistic animatronics, jaw-dropping special effects, elaborate set pieces, and a beautiful score. The mix of physical props and high-tech projections creates an unforgettable experience. This is STORYTELLING at its finest.
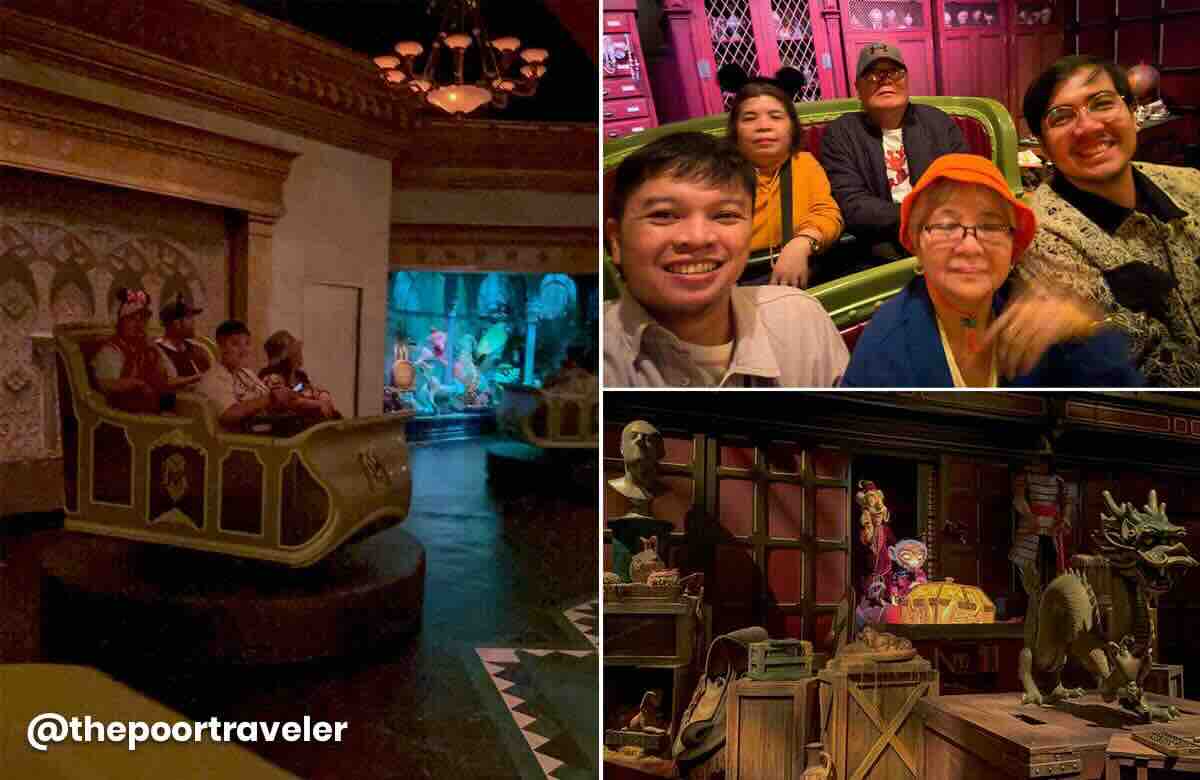
Personal Take: Aside from its overall creativity and originality, what makes us put it so high on the list is its inclusivity. It’s not a scary ride. Not at all. Despite its name, it’s not a horror train, unlike the Haunted Mansion in other Disney parks. Instead, it’s a whimsical, mysterious, and hilarious adventure that both kids and adults will surely enjoy. Even my mom has this as her favorite Disney ride.
I hope they adapt this into a proper movie someday!
Safety and Accessibility
- Indoor Ride
- Good for all ages.
- No height restrictions.
- Wheelchair-accessible.
Guest Policy: Children below 7 years old must be accompanied by a guardian age 16 years or older.
And for our #1…
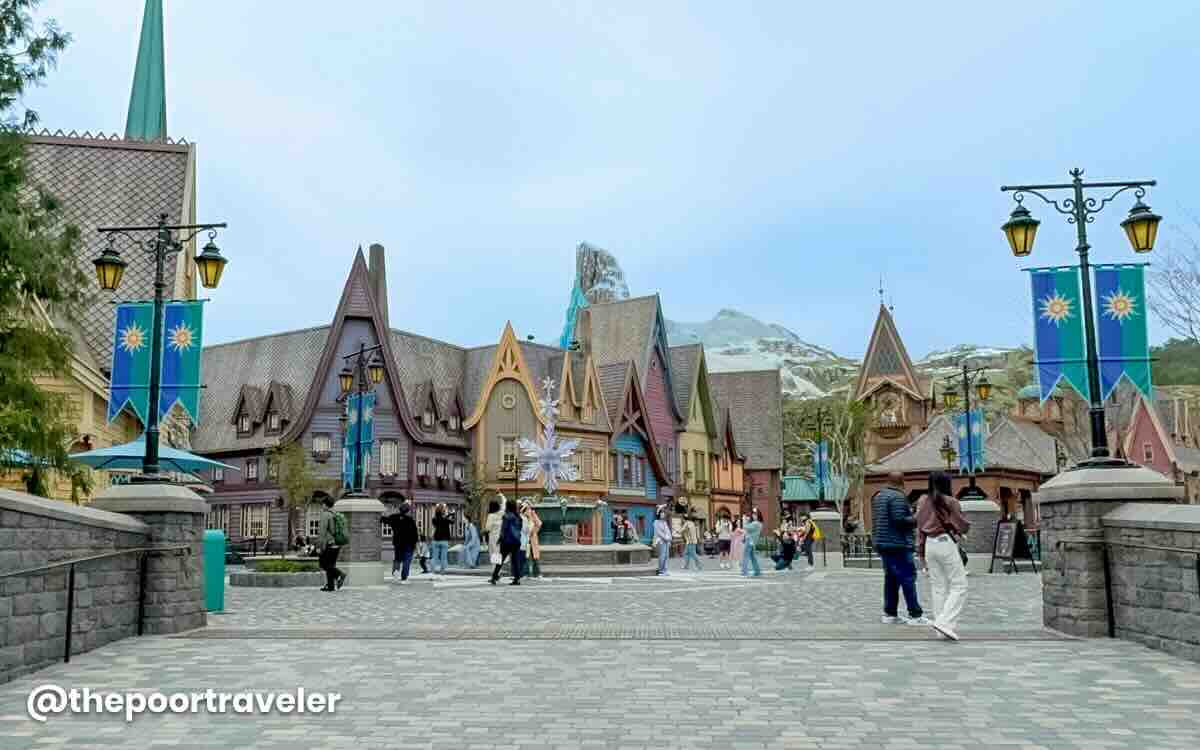
#1: Frozen Ever After
Location: World of Frozen
This may be a controversial take. Most publications put Mystic Manor or Big Grizzly Mountain or even Hyperspace Mountain at the very top. But hear me out.
As a ride, Frozen Ever After feels like a relaxing boat ride across a charming village in the beginning. But just when you’re caught up in the sparkly snow and “aaaw” feelings, it catches you off-guard with a couple of delightful thrills and surprises. Nothing wild, but just enough to make you cling to your seat. It’s a perfect blend of family-friendly storytelling and just the right amount of excitement.
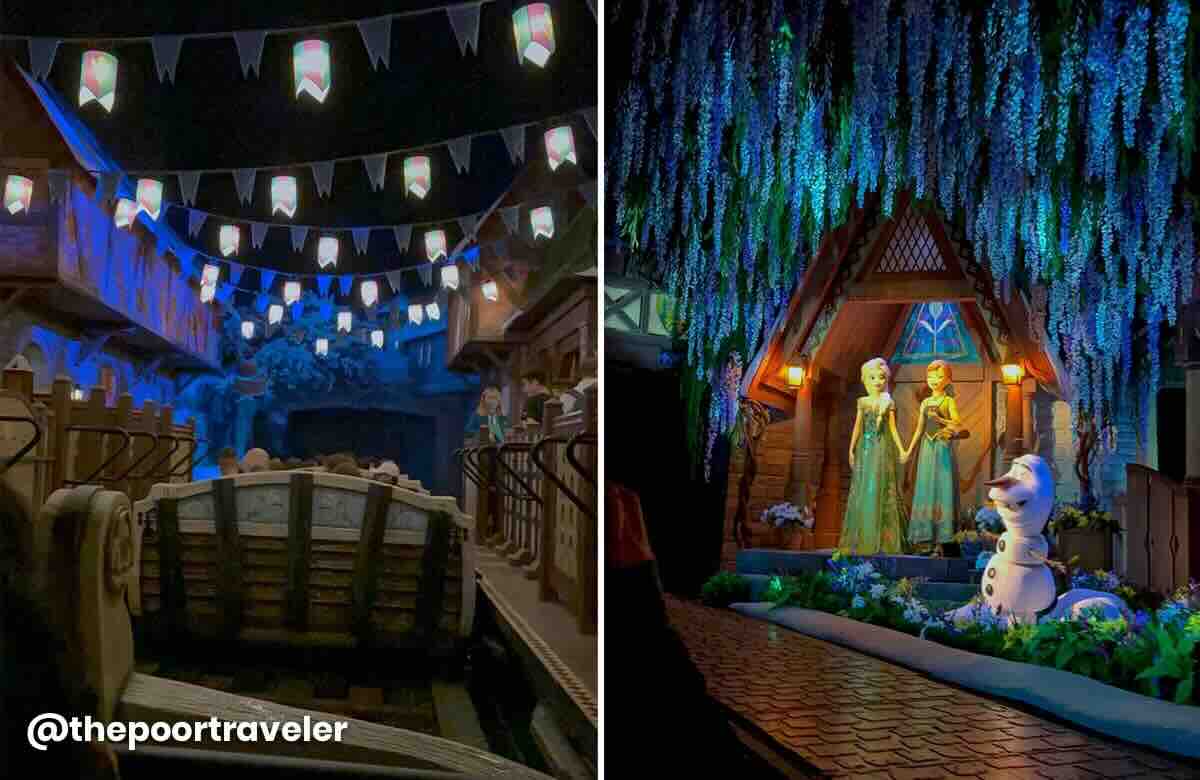
Personal Take: I know, it’s not unique to Hong Kong Disneyland. Tokyo Disney Sea has its own Frozen attraction. We’ve also experienced this exact same ride at EPCOT in Walt Disney World in Florida. But Hong Kong’s version made a few little improvements that made all the difference. The ride was much smoother and more thrilling overall. And most of all, it has all the elements that I’m looking for in anything Disney, be it a ride or a film: a compelling narrative, a strong sense of nostalgia, grand set design, fantastic effects, and a wonderful soundtrack.
Sure, the line can get long too especially that the novelty has not worn off yet, but it is absolutely worth the wait.
Safety and Accessibility
- Indoor Ride
- Good for all ages.
- No height restrictions.
- Wheelchair-accessible.
Attention! The Frozen Ever After ride is temporarily closed from August 31 to September 19, 2025. Check the official website for updates.
Guest Policy
- Children below 7 years old must be accompanied by a guardian age 16 years or older.
- This ride has the surprise factor.
- Pregnant women are strongly advised not to ride.
Beyond the Top 15
Here are the other rides that didn’t make it to our Top 15:
- Wandering Oaken’s Sliding Sleighs (World of Frozen). For some reason, despite multiple visits since it opened, we still never got to try it. Our first time, it was closed. Second time, the line was too long and we got too lazy to return to it.
- Cinderalla Carousel (Fantasyland). It’s fun, but it is just that. A carousel.
- Slinky Dog (Toy Story Land). Both Vins and I found it meh. It was more dizzying than thrilling.
- House de Villains. This is a fashion-themed show featuring Disney’s most iconic villains led by Cruella deVille. We only got to see it once, but it’s no longer available now.
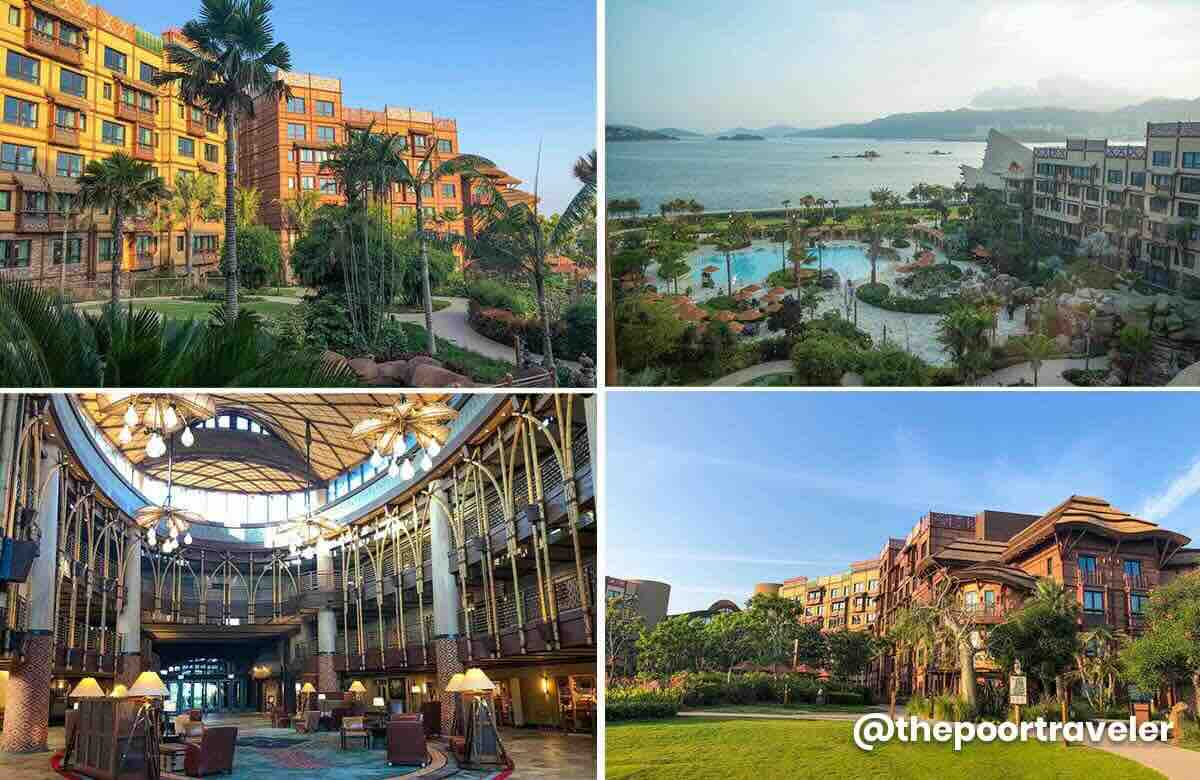
Where to Stay Near Hong Kong Disneyland
For an even more magical Disney experience, book your stay at one of the Disney hotels at Hong Kong Disneyland Resort. Below are the three hotels to choose from.
Where to Stay in Hong Kong
Outside of Disneyland, the closest area to Disneyland is Tung Chung and Hong Kong SkyCity. These areas are also near the airport. However, if you’re also exploring other parts of Hong Kong during your trip, you may also consider other areas like Tsim Sha Tsui or Central.
For more details about different areas to stay in Hong Kong, you can check out our Where to Stay in Hong Kong article. But you may also check out these top accommodations in Hong Kong based on online user reviews for recommendations.
- iClub Sheung Wan Hotel, Hong Kong Island. Check Rates & Availability! ✅
- Ibis Hong Kong Central & Sheung Wan Hotel, Hong Kong Island. Check Rates & Availability! ✅
- Mini Central, Hong Kong Island. Check Rates & Availability! ✅
- B P International, Kowloon. Check Rates & Availability! ✅
- Stanford Hillview Hotel, Kowloon. Check Rates & Availability! ✅
- Metropark Hotel Mongkok, Kowloon. Check Rates & Availability! ✅
- Dorsett Mongkok Hong Kong, Kowloon. Check Rates & Availability! ✅
- Novotel Citygate Hong Kong Hotel, Tung Chung. Check Rates & Availability! ✅
- Four Points By Sheraton Hong Kong, Tung Chung. Check Rates & Availability! ✅
- Regal Airport Hotel, Hong Kong SkyCity. Check Rates & Availability! ✅
Search for more Hong Kong Hotels!

Have Peace of Mind While Traveling!
Getting a travel insurance is optional, but we highly recommend this, especially when traveling abroad. Travel can be unpredictable, and though we hope we’ll never use it, having it gives us peace of mind in case of unexpected delays, cancellations, or emergencies.
For international destinations, consider PGA Sompo’s TravelJOY Plus insurance. You can GET IT HERE. Don’t forget to use WORTHIT for a special affordable rate.

Updates Log
2025 9 2 – First uploaded
Photos by: Mariah Cruz, Yosh Dimen, and Asta Alvarez


![Aurora Expeditions Svalbard Cruise Review [2025 Guide]](https://farasar.ir/wp-content/uploads/2025/09/Aurora-Expeditions-Svalbard-Cruise-Review-Feature-Image.jpg)


![Aurora Expeditions’ Greg Mortimer Ship Review [2025]](https://farasar.ir/wp-content/uploads/2025/08/Greg-Mortimer-Ship-Review-Tour-Aurora-Expeditions-Hero-Image.jpg)