Not many people have heard about the Republic of San Marino, but believe me, this tiny state of only 61 km2 (23.5 square miles) is truly worth visiting! Being surrounded by Italy on all sides, San Marino is often confused with just another Italian city. Nonetheless, this small country has stubbornly clung to its independence for over 1700 years. San Marino may be small and often disregarded by tourists, but it has quite a few interesting things to see and do, so be sure you make it part of your European itinerary.
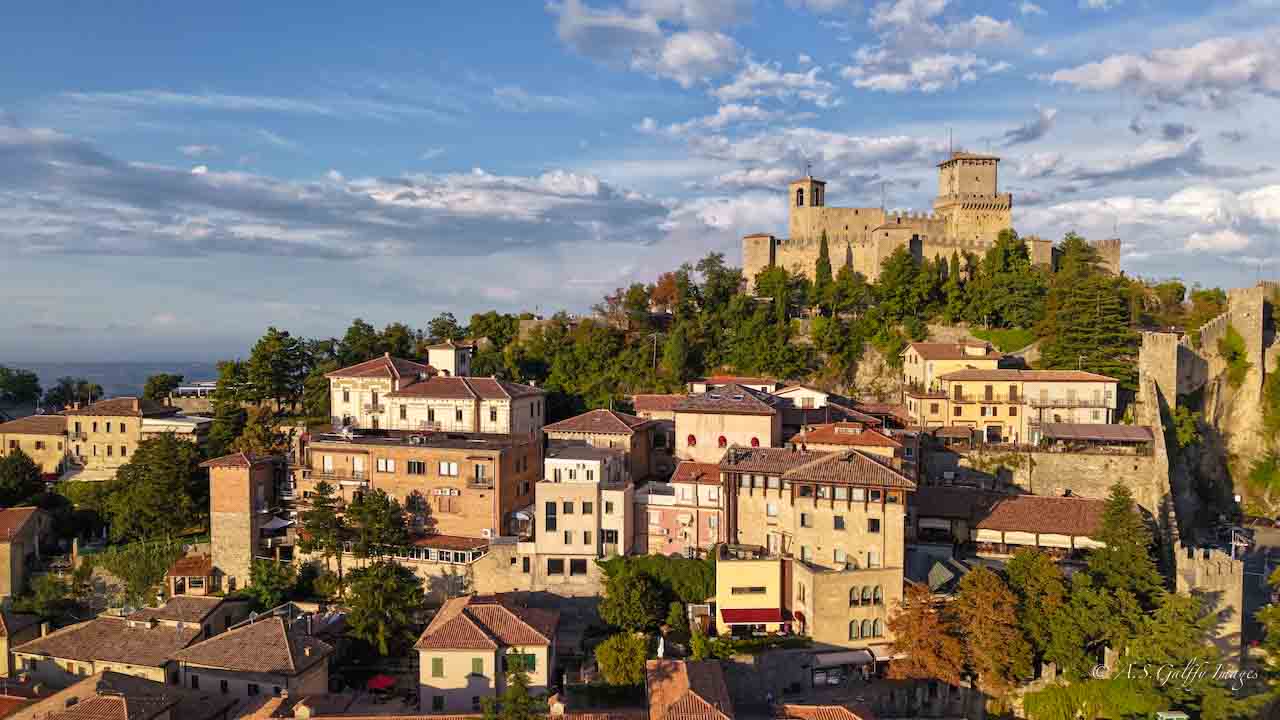
Guaita Fortress seen from above
A Brief History of San Marino
The Republic of San Marino claims to have been founded back in 301 A.D., when a stonemason named Marinus fled religious persecution to establish a community on Mount Titano. This makes it the world’s oldest continuous republic and a living testament to ancient republican ideals and democratic self-rule. A legacy that has endured for over 1,700 years!
The factors that contributed to it’s long-enduring independence are however multiple. On one hand, the country’s geographic location atop Monte Titano in Italy’s Apennine Mountains made it difficult to conquer.
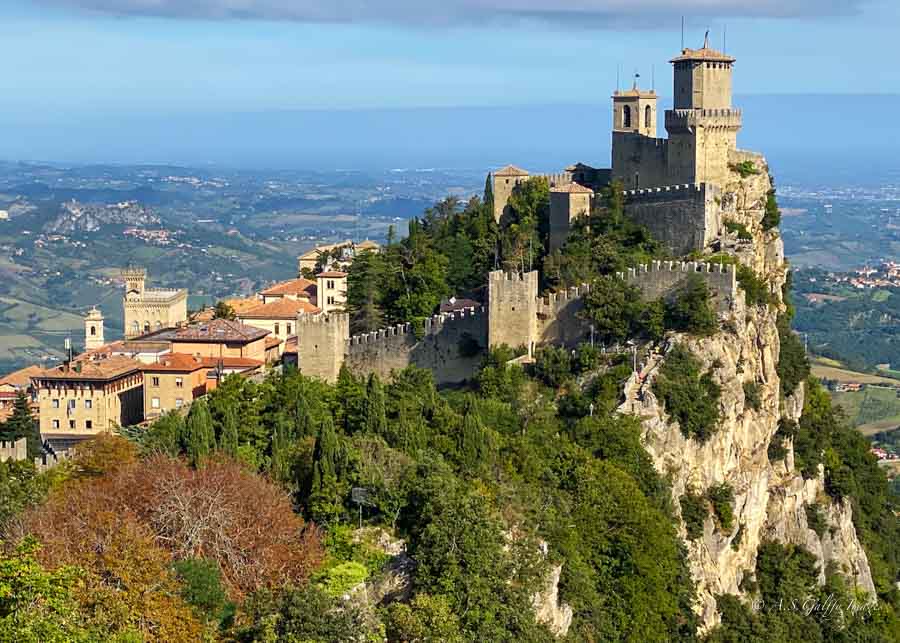
View of Guaita Fortress in San Marino historic center
Over the centuries, the republic maintained a policy of neutrality, especially during major conflicts and unification movements, in order to avoid becoming a target.
In 1797, Napoleon protected San Marino’s independence and even offered to expand its territory, a gesture rooted in a friendship cultivated by one of its regents.
But the one that saved San Marino from being incorporated into the new Italian state was Giuseppe Garibaldi. During the 19th-century Italian unification, Garibaldi and his revolutionaries found refuge here, so in gratitude he helped ensure San Marino’s independence.
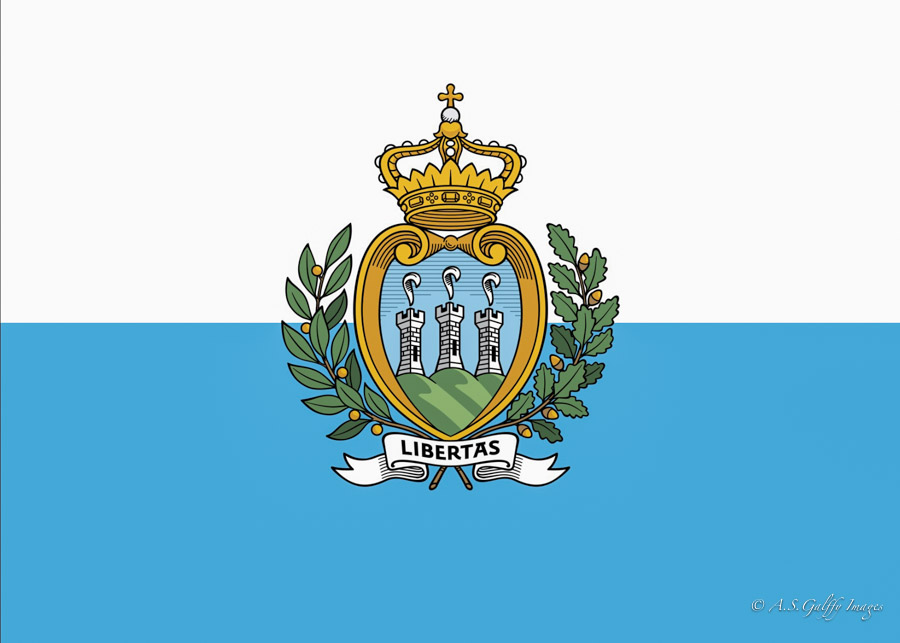
San Marino Flag
Top Things to Do in San Marino
San Marino is a small place, so you don’t need a lot of time to explore its attractions. However, if you have the time to visit it you’ll discover there are quite a few unique things to visit here.
Climb the Three Towers
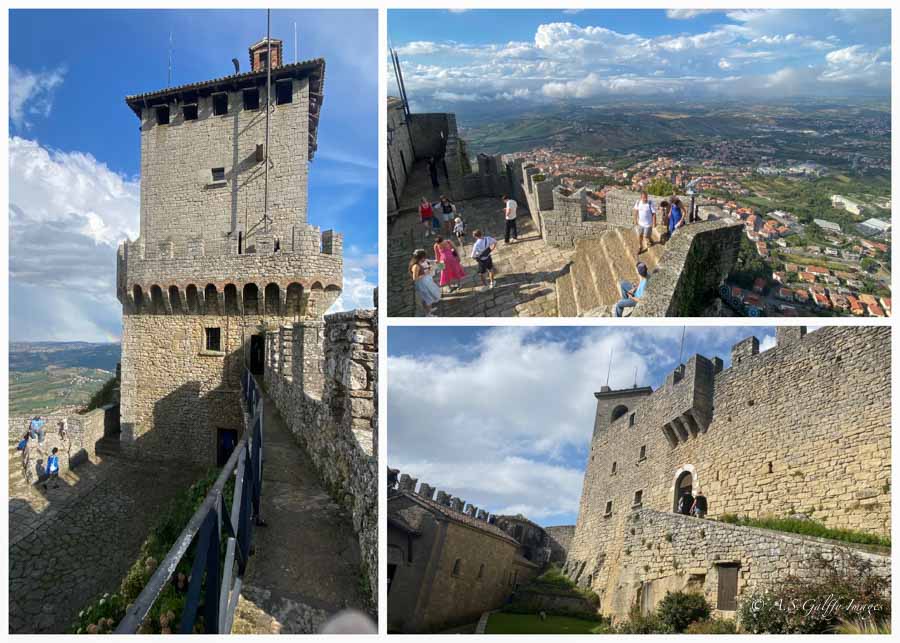
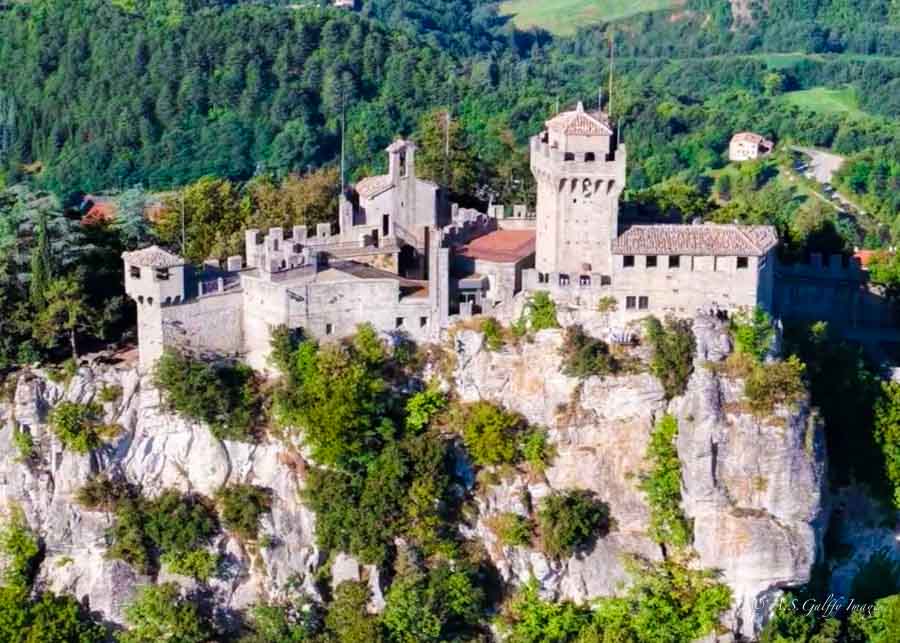
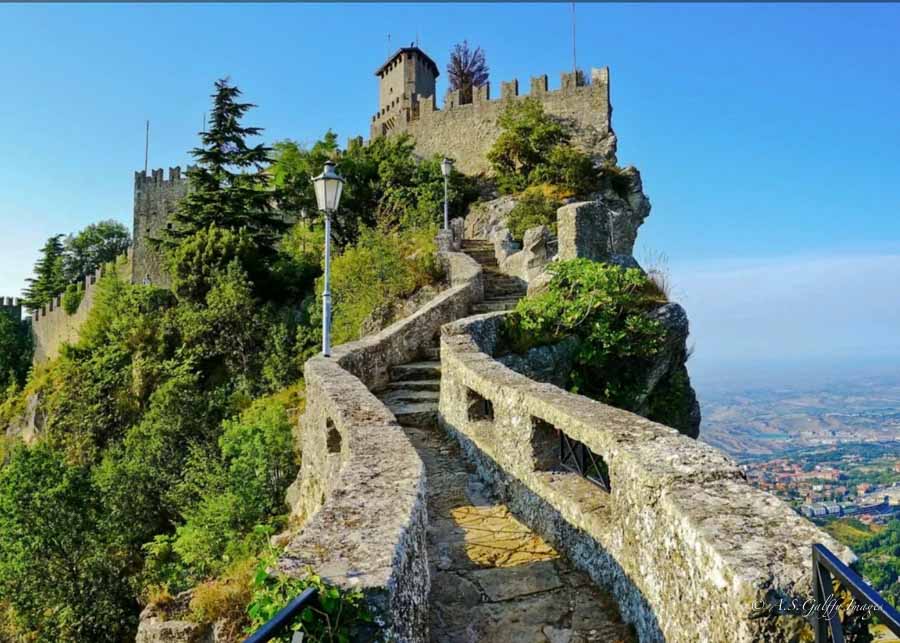
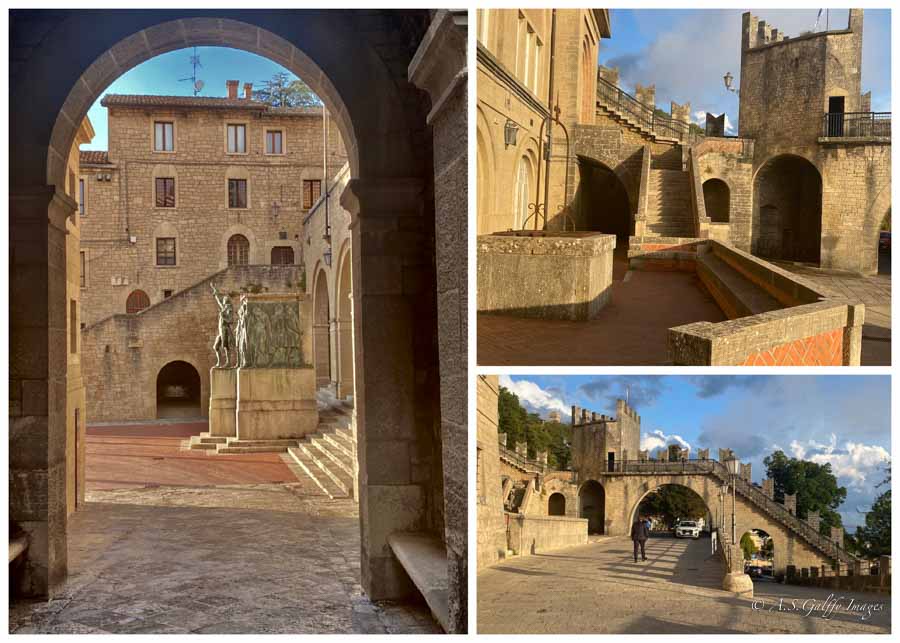
Definitely the most important attraction in San Marino are the Three Towers – Guaita, Cesta and Montale – which are located at the very top of Monte Titano. The towers are a symbol of San Marino and thus also appear on the country’s flag as well as the Coat of Arms.
Guaita Tower seen from above
Guaita Tower
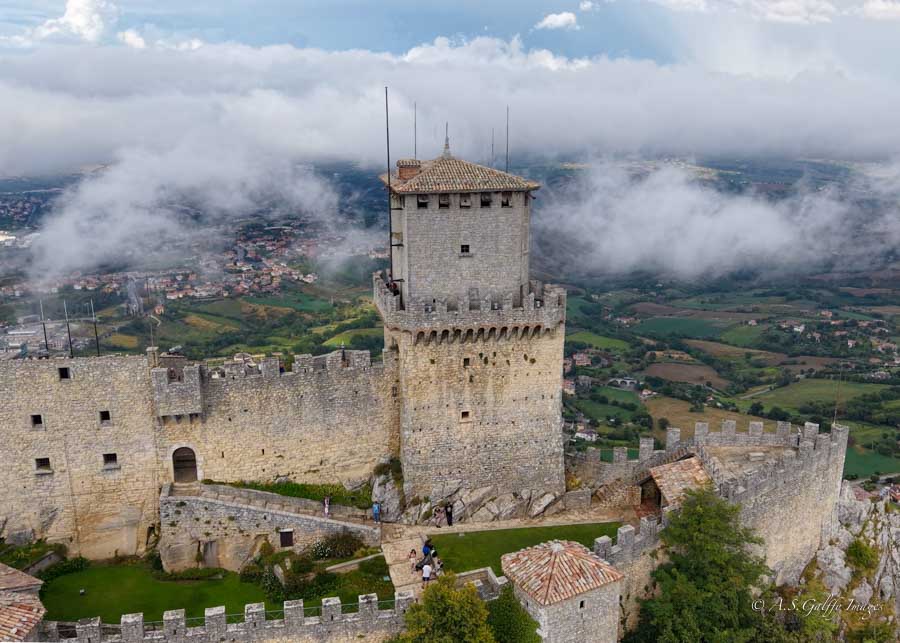
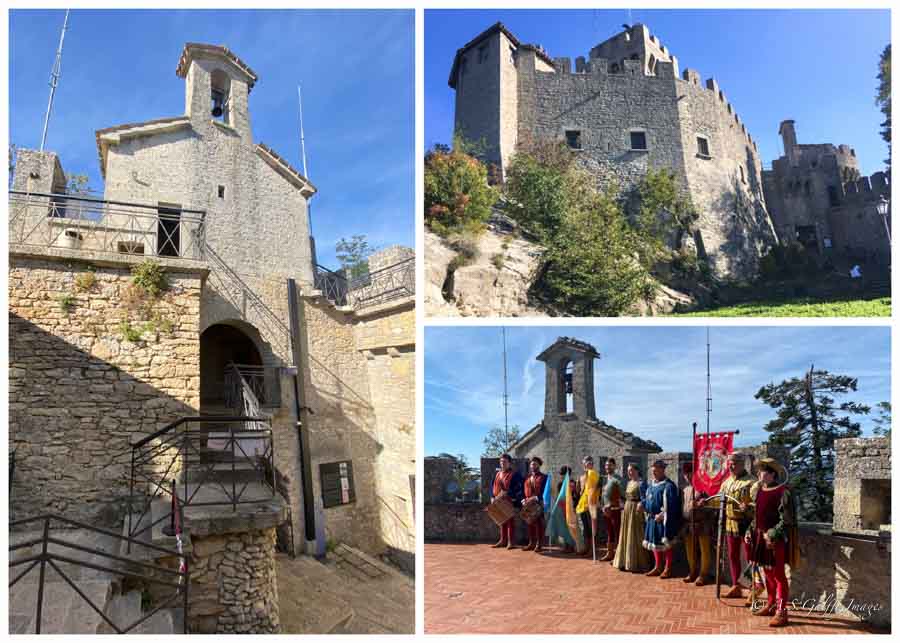
The oldest of the three towers Is Guaita (or Rocca) which is built directly on the stone of the mountain without any foundations. This tower dates back to the XI century and is among the oldest fortresses in Italy. There are two rings of walls where people were sheltering during sieges.
Images from inside the Guaita Tower
You can reach the tower by climbing a very narrow and steep staircase, but the effort is worth it. From the top you’ll get a beautiful view of the entire valley.
Cesta Tower
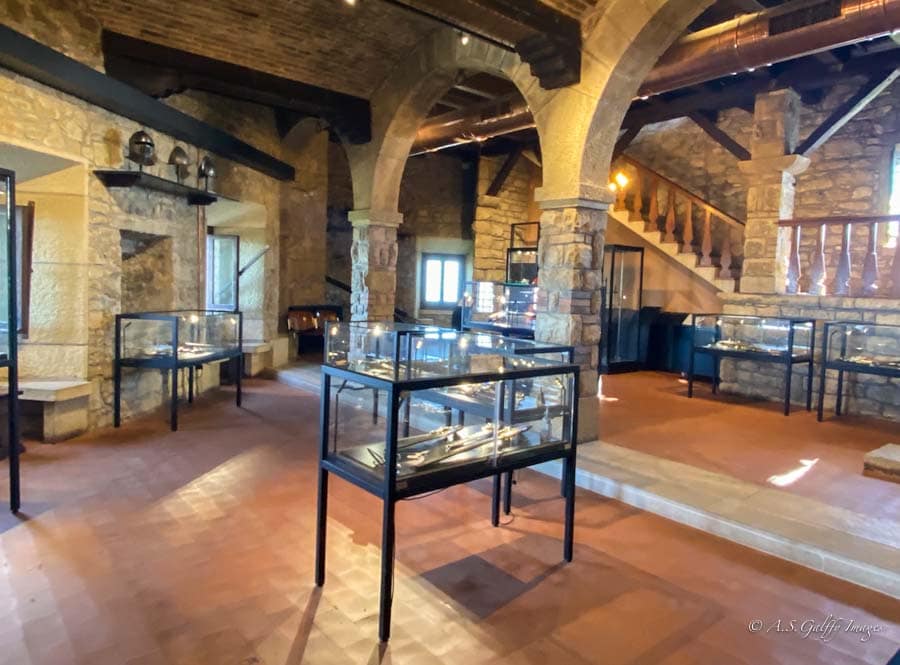
The second tower known as Cesta (or Fratta) sits a little farther away, on another peak of Mount Titan. This is the highest one, rising at 756 meters above sea level. Built at the end of the 11th century, the Second Tower was the seat of the guardhouse and also housed some prison cells.
Cesta Tower seen from above
Inside Cesta Tower
Today the tower houses the Museum of Ancient Arms, which includes firearms, bows, crossbows, and armor all dating from various periods between the Middle Ages and the end of the 19th century.
Museum of Ancient Arms, one of the best things to do in San Marino
From the top you can look back toward the Guaita and see the third tower as well.
Montale Tower
The third tower called Montale is not open to the public because it is difficult to access. However, you can still walk all the way to it. The walk takes about 10 minutes from the second tower along a scenic path on the mountain ridge.
Montale Tower in San Marino
This tower dates back to the late 13th century and is the smallest in size. Nonetheless, it played a strategic role in the country’s defense because it sits in the best position for lookout. It also functioned as a prison during the 14th century.
Walk the Passo delle Steghe (Witches’ Path)
One of the nicest things to do in San Marino is walk along the Witches’ Path (Passo delle Steghe), which connects the first and the second tower. This shaded paved pass carved in stone on the ridge of Mount Titano has earned its name from a local legend. The story says that the path was a gathering place for witches to performe mysterious rituals around large fires.
Passo delle Steghe (Witches’ Path) in San Marino
This is definitely one of the most photogenic spots in San Marino that offers stunning views of Castello della Cesta and the Adriatic Sea.
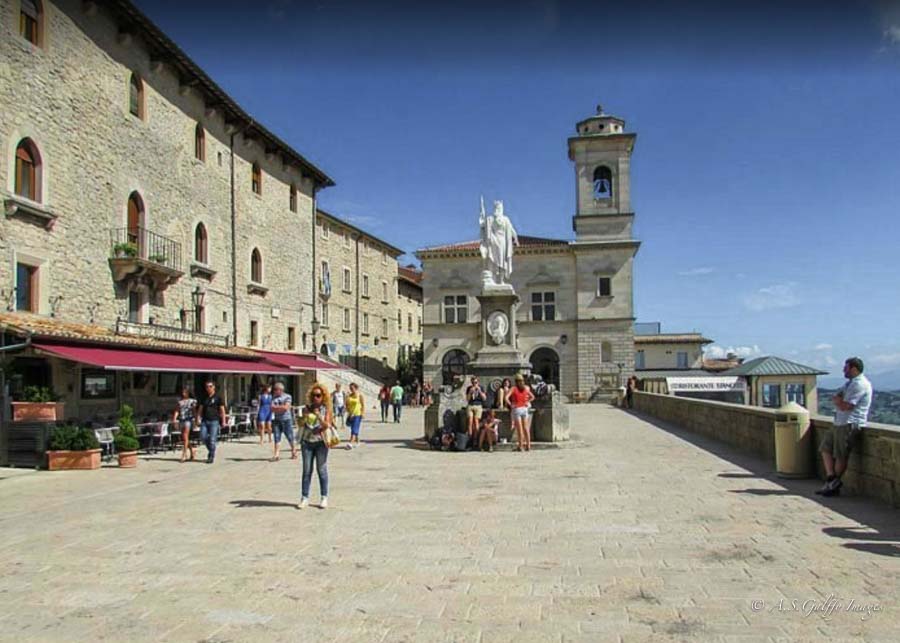
Visit Piazza della Liberta
Piazza della Liberta is the most popular public square in San Marino. This historic place serves as the center of government and a symbol of the Republic’s independence. Here you’ll find the Palazzo Pubblico – the government seat– and the Statue of Liberty, a marble sculpture that symbolizes the country’s freedom.
Piazza della Liberta
The piazza is a hub for local events and offers panoramic views of the surrounding area. There are a number of shops in the square and places to eat. You can even see the changing of the guard here.
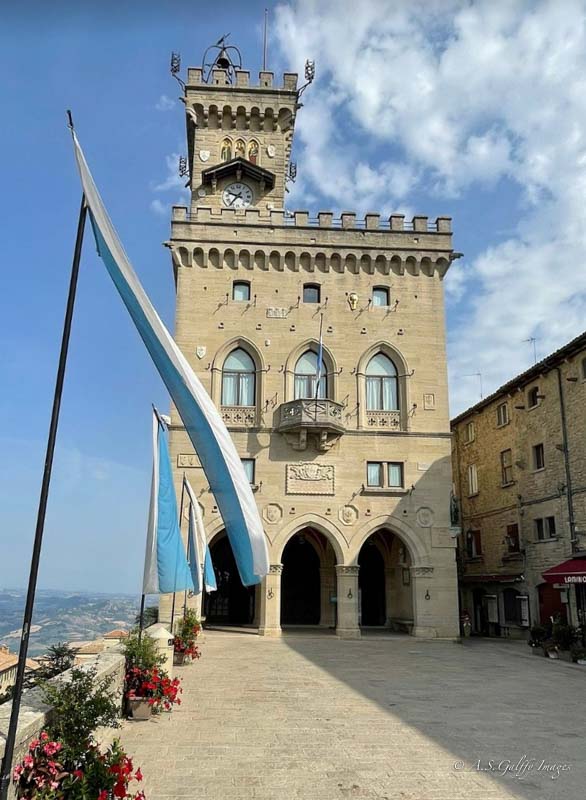
Take a Tour of the Palazzo Pubblico
Palazzo Pubblico (the Public Palace) is actually the town hall of the City of San Marino as well as its official Government Building. This is the seat of the Republic’s main administrative bodies: the Captains Regent, the Grand and General Council and the Congress of State. Here is also where official State ceremonies take place.
Palazzo Pubblico
The palace is open to the public at specific times throughout the year, but it’s closed on certain holidays and during official ceremonies. To visit Palazzo Pubblico you’ll need to purchase a ticket, but if you buy San Marino Pass the entrance is included.
Palazzo Pubblico
Step Inside the Basilica of San Marino
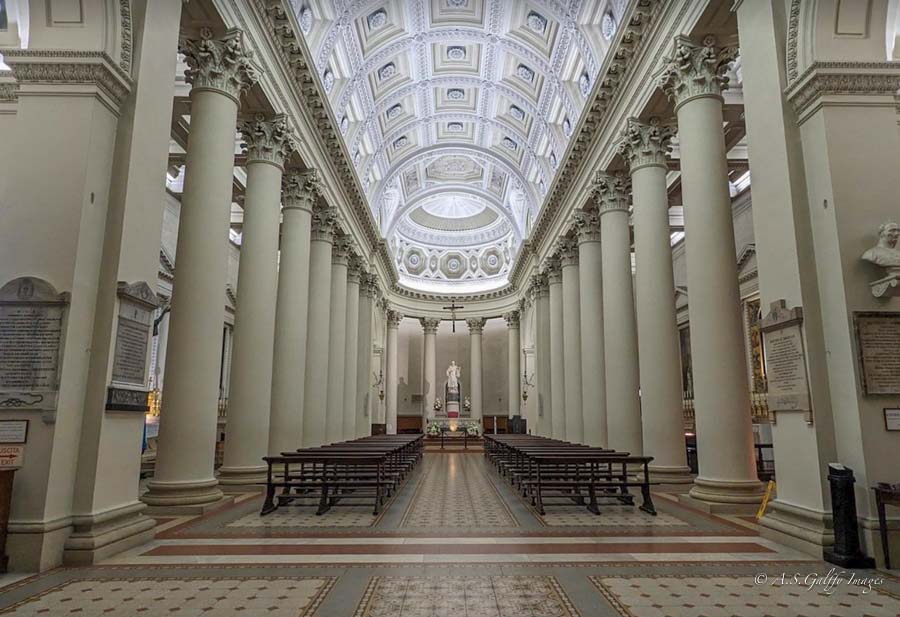
The large cathedral in the center of the City of San Marino is the country’s main church and a significant landmark. Located in Piazza Domus Plebis, the cathedral is a site of deep spiritual significance as it houses the relics of Saint Marinus, the founder and patron saint of San Marino.
Basilica of San Marino
The interior features three naves and two side aisles which create a spacious and traditional basilica layout. Besides the main altar adorned with a statue of the saint, there are also several marble altars, as well as beautiful paintings, stain glass and frescos.
The main nave of Basilica di San Marino
Wander the Streets of the Historic Center
Walking is the best way to experience the historic center of San Marino. Most of the Old Town is exclusively for pedestrians, allowing you to explore freely. You can wander the narrow alleyways and cobblestone streets, climb the staircases and check out the souvenir shops. Walking around is a great way to find unexpected viewpoints and interesting corners. And don’t worry about getting lost because this is a very compact area.
Contrada de la Porta Nova
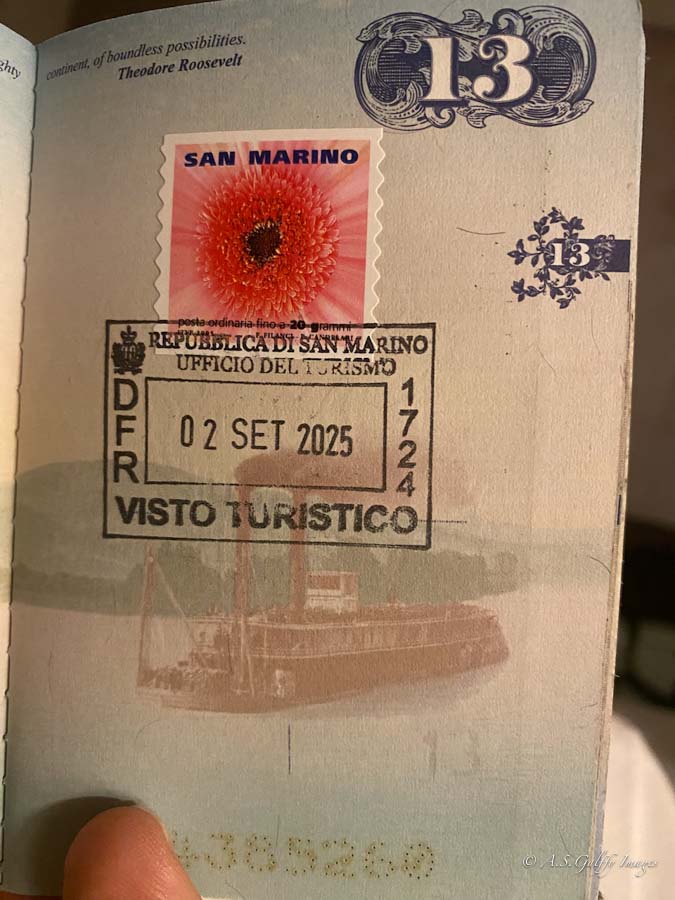
Get a San Marino Stamp in Your Passport
One of the nicest things to do in San Marino is visit the San Marino Tourism Office and have them stamp your passport for you. While you don’t need a visa to get into San Marino, many tourists love having their passports stamped when visiting this tiny country.
The stamps costs only €5 and that money goes towards promoting the tourism of San Marino.
How to Get to San Marino
San Marino is only accessible by bus or by car, as there is no train station or airport nearby. The closest city is Rimini, which is around 20 km away. In Rimini there is a bus connection which takes around 1 hour to San Marino and vice versa. There are frequent connections by a Bonelli Shuttle and Bus Benedettini every 1 hour and 30 minutes and costs €6. You can check the Bonelli Bus schedule here.
We came by car as we were on a bigger tour of Italy and didn’t have any issues reaching it. We could also find parking, which is generally a problem in Europe.
Parking in San Marino is available throughout the city and is relatively inexpensive. You may choose to leave your car down the hill in Borgo Maggiore and use the funicular (Funivia din San Marino) to reach the historic center. Or you can drive to it, if you don’t mind driving the uphill winding roads of Mount Titano. There are some parking places in the historic center, but they fill up very quickly during the summer months.
Other Interesting Things to Know Before Visiting San Marino
Culture and Traditions
While San Marino is heavily influenced by its Italian surroundings, it maintains a strong national identity and is very proud of its history. The country has a rich and unique culture, with distinct traditions. Such is the Feast of San Marino on September 3rd when the Sammarinese commemorate the founding of their republic. If you are lucky to be here for that feast, you’ll witness parades, concerts, military displays, and medieval reenactments.
The Feast of San Marino Celebration
There is also the Anniversary of the Arengo on March 25th, when they commemorate the 1906 meeting that restored direct democratic elections and ended over three centuries of oligarchic rule by the Grand and General Council.
Medieval Days Festival
Other traditions include the Feast of Saint Agatha and Medieval Days (Jouat Medioeva) a festival that transforms the city into a medieval setting with armored guards and traditional costumes.
Language
Although the official language is Italian, the Sammarinese also use a dialect of Emiliano-Romagnolo which incorporates local phrases into their everyday conversation.
One interesting thing to notice is that although it uses Euro as its official currency, San Marino is not part of the European Union.
San Marino Government
The Republic of San Marino does not have a presidential system per se. Instead, it has two heads of state known as the Captains Regent. This system dates back to the 13th century.
Captains Regent of San Marino
The two Captains Regent serve as heads of state and government for a six-month term. This tradition dating back to the 13th century ensures a balance of power. The two heads of state are typically elected from opposing parties. And not only that. San Marino has a long history of female leadership. Over the centuries, at least 20 women served as Captains Regent.
How to Explore San Marino
The historic center of San Marino is a very tiny place which can easily be explored on foot and without any guidance. Don’t be afraid of getting lost on its narrow alleyways because eventually you’ll end up where you started. There is no way to completely loose your way.
In terms of time necessary to visit San Marino, we only had one full day and a night and thought that was enough. That’s not to say that you would run out of things to do if you had more time, but if you only want to visit the main attractions, 1-2 days should be enough.
From the Great Barrier Reef to the lush rainforests to the sunburnt Outback, here are the best places to visit in Queensland.
Queensland is Australia’s sun-soaked playground, brimming with natural wonders, lively cities, and fun adventures. There’s no shortage of exciting things to see and do here.
Its lively capital, Brisbane, enjoys an incredible average of 283 sunny days a year, making it an ideal year-round getaway.
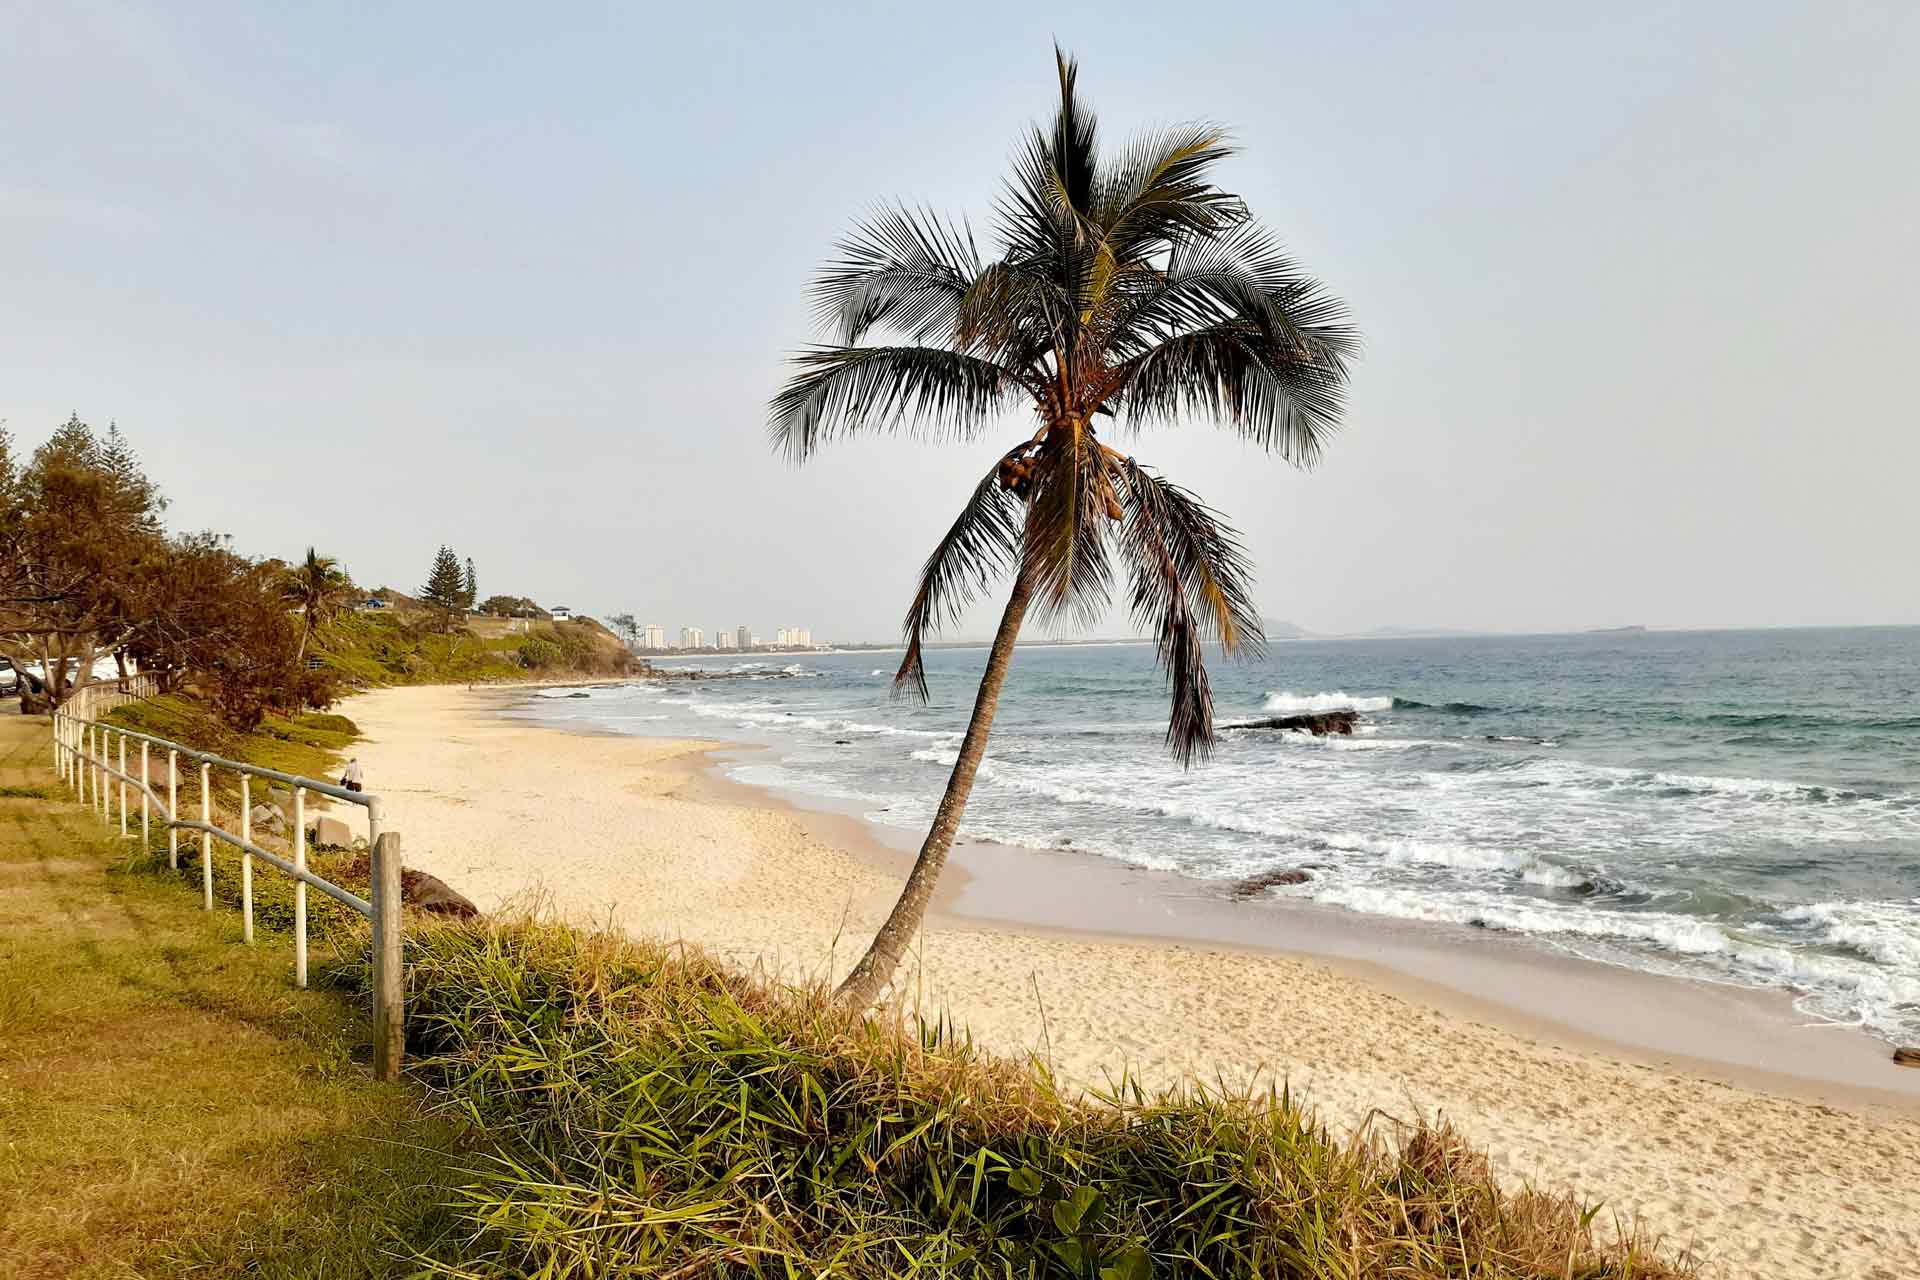
Queensland’s coastline is sprinkled with sun kissed beaches, from the bustling shores of the Gold Coast to the relaxed, sun-soaked sands of Noosa.
Besides iconic places like the Great Barrier Reef and Whitsunday Islands, Queensland reveals countless hidden gems.
There are secluded waterfalls, colorful local markets, quirky art galleries, and spectacular wildlife encounters, from cuddling koalas to spotting crocodiles in the wild!
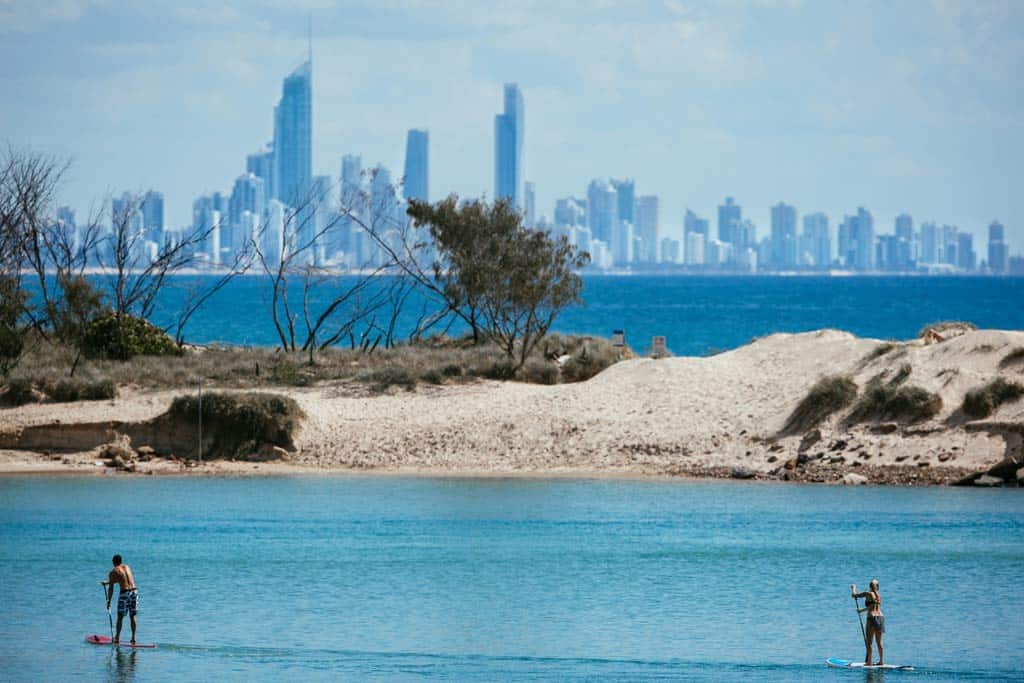
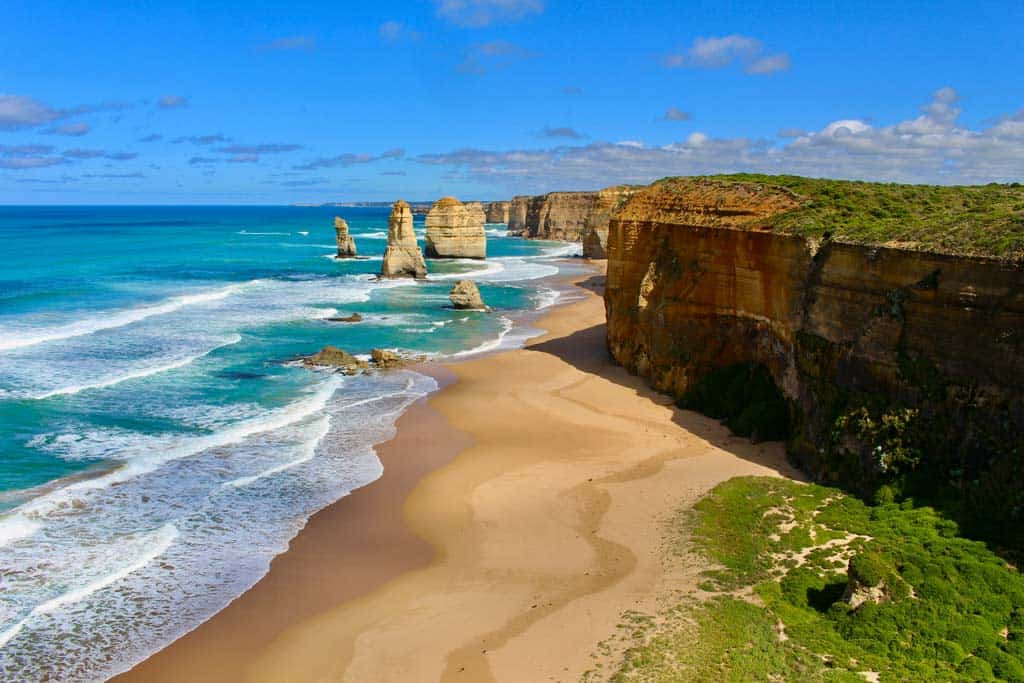
The famous swirling sands of Whitehaven Beach, Queensland
17 Best Places To Visit in Queensland
Be it chasing waves, delving into timeless Aboriginal stories, or venturing into the rugged heart of the outback, Queensland offers countless ways to explore, relax, and soak up the simple pleasures of its sunlit paradise.
To help you plan your adventure, here’s a guide to the best spots to see in Queensland. There are of course many more destinations that didn’t make the list, but this is just a brief overview.
The best way to explore Queensland, Australia, is with your own car! But if you don’t have a vehicle or want to rent one, you can still get to the most popular places via flights and public transport.
The best way to get around is to rent a car and explore on your own! We recommend Rental Cars, which has the largest range of vehicles for the best value on the market.
1. Brisbane
Brisbane, Queensland’s lively capital, is well worth a stop on your visit to the state.
Here, you’ll experience vibrant city life at its fullest, from buzzing laneways lined with street art and quirky cafes to rooftop bars that serve up stunning sunset views over the skyline.
The city’s bustling markets and thriving dining scene spill out onto sunny streets, inviting you to linger over local produce, artisan goods, or a lazy brunch.
Take time to wander along the Brisbane River, which winds gracefully through the heart of the city. It’s the perfect place to embark on riverside walks, bike rides, or a scenic cruise aboard a CityCat ferry.
If you’re into history, stop by the grand City Hall in King George Square, a beautiful heritage building that still hosts concerts and exhibitions.
Besides the city hall, there are many other historic sites in Brisbane, such as the Old Windmill, Queensland’s oldest surviving building, and the striking Story Bridge, which you can even climb for incredible views.
Meanwhile, art enthusiasts will find world-class collections at the nearby galleries in South Bank, including the impressive QAGOMA, which showcases contemporary works and thought-provoking installations.
No trip to Queensland is complete without spending some time on the Gold Coast, Australia’s glittering playground where laid-back beach culture meets big-city energy.
Just an hour south of Brisbane, this sun-soaked region is famous for its endless sandy beaches, world-class surf breaks, and vibrant nightlife.
The heart of the Gold Coast is Surfers Paradise, a bustling hub where high-rise towers overlook golden shores, and the streets buzz with shops, restaurants, bars, and entertainment. Here, you can catch a wave, relax on the beach, or wander through beachfront markets by day and dive into lively nightspots after dark.
Beyond the beautiful beaches, there’s plenty to enjoy on the Gold Coast. Head to the city centre for stylish dining and boutique shopping, or venture into the lush hinterland where you’ll find waterfalls, rainforest walks, and charming mountain villages.
Families visiting the Gold Coast can spend the day at famous theme parks like Dreamworld and Movie World, while animal lovers should stop by the Currumbin Wildlife Sanctuary to meet kangaroos, koalas, and other native animals.
Gold Coast has the perfect blend of nature and city life!
Tucked along the stunning Sunshine Coast, this coastal gem is celebrated for its natural beauty and laid-back atmosphere, making it one of the most popular attractions outside of Tropical North Queensland and the Great Barrier Reef.
Start your exploration in Noosa National Park, famous for its scenic walking trails that weave through lush forests and open up to breathtaking ocean vistas.
One of the best ways to experience Noosa National Park is by hiking the coastal track, where you’ll wander along rugged cliffs with the sea sparkling below. Keep your eyes peeled for dolphins riding the waves and turtles popping up in the crystal-clear water, a classic Sunshine Coast moment!
Along the way, you’ll discover idyllic spots like Tea Tree Bay, a peaceful cove perfect for a swim, a lazy afternoon on the sand, or simply watching surfers glide across the gentle breaks.
After your walk, you can easily pop back into Noosa’s lively town centre for boutique shopping, a local coffee, or a fresh seafood lunch overlooking the water.
4. Great Barrier Reef
The Great Barrier Reef is hands down one of the most visited attractions in Queensland, and it’s easy to see why.
Stretching over 2,300 km along the Coral Sea, this dazzling underwater ecosystem is not only the world’s largest reef system but also one of Australia’s most treasured UNESCO World Heritage sites.
It’s a bucket-list destination that draws avid divers and snorkelers from all over the globe.
Most people picture the reef as part of Tropical North Queensland, and they’re right. Places like Cairns and Port Douglas are classic jumping-off points to explore the Great Barrier Reef.
You’ll also find plenty of reef tours departing from Port Douglas and Airlie Beach. Besides snorkeling, you can try scuba diving, cruising over vibrant coral gardens on a glass-bottom boat, or relaxing for a day on a floating reef pontoon right in the middle of the ocean.
Don’t overlook the Southern Great Barrier Reef. This part of the Great Barrier Reef has a more laid-back vibe and often fewer crowds, perfect for couples and those who prefer a tranquil vacation.
The Southern Great Barrier Reef is home to some of Queensland’s hidden gems, like Heron Island and Lady Elliot Island, where you can quite literally step off the beach and be snorkeling in crystal-clear waters teeming with marine life.
The Southern Great Barrier Reef also boasts fantastic dive sites, offering unforgettable encounters with vibrant marine life.
5. Cairns
Cairns is often the first stop for those exploring Tropical North Queensland, and it’s easy to see why.
This laid-back city serves as the primary gateway to the Great Barrier Reef, making it one of the top attractions in all of Queensland.
From here, you can hop on countless reef tours and enjoy snorkeling, scuba diving, or sailing over dazzling coral gardens on a glass-bottom boat.
But there’s more to enjoy in Cairns beyond the Great Barrier Reef. Stroll along its lively Esplanade, take a dip in the waterfront lagoon, and soak up the sunshine that Queensland is famous for.
For those craving even more adventure, head north to Port Douglas, a stylish coastal town that also serves up easy access to the reef and the ancient Daintree Rainforest. Or take the ferry to an offshore island paradise like Fitzroy Island or Green Island.
And if you’re after something uniquely enchanting, don’t miss a visit to Paronella Park. It’s an extraordinary heritage-listed site where a Spanish-style castle stands hidden in the rainforest near Mena Creek.
There are also lots of waterfalls, beaches, and cultural attractions around the Cairns area.
Fitzroy Island near Cairns
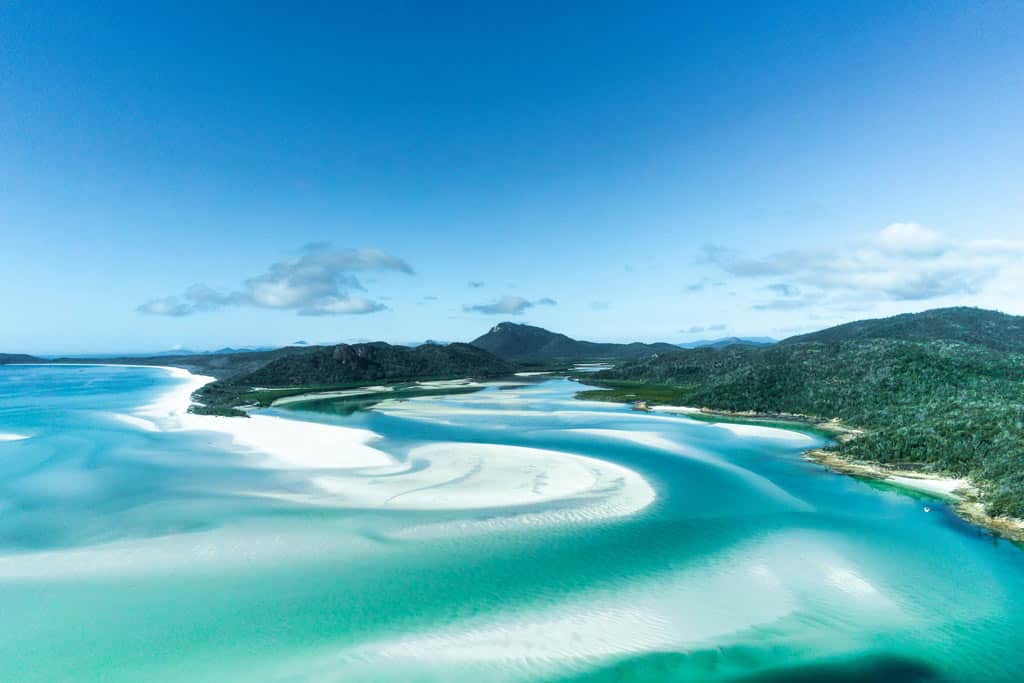
6. Whitsunday Islands
The Whitsunday Islands are one of Queensland’s true showstoppers, a collection of idyllic islands scattered across the turquoise Coral Sea, just off the coast from Airlie Beach.
Known for their breathtaking natural beauty, the Whitsundays offer a dreamy contrast to the bustling Gold Coast and the relaxed charm of the Sunshine Coast.
Most visitors kick things off in Airlie Beach, a lively resort town that serves as the perfect gateway to the islands.
From here, you can join sailing tours, snorkel or dive the vibrant fringing reefs, or take a scenic flight for an unforgettable view of the swirling sands of Whitehaven Beach.
If you’re keen to see one of the region’s most iconic sights from above, consider booking an Airlie Beach: Whitsunday Islands & Heart Reef Scenic Flight, a fantastic way to admire the breathtaking patterns of the coral and turquoise lagoons.
Don’t miss Whitehaven Beach, famous for its dazzling white silica sand and crystal-clear waters. It’s a breathtaking scene that looks like it was lifted straight from a postcard.
Another top attraction is Hamilton Island, the most developed of the Whitsundays, where you’ll find upscale resorts, marina-front dining, and even opportunities to meet Aussie wildlife up close.
7. Sunshine Coast
The Sunshine Coast is one of Queensland’s most beloved regions. It is more laid-back than the bustling Gold Coast and a perfect complement to adventures in Tropical North Queensland and the Great Barrier Reef.
Just a short drive north of Brisbane, the Sunshine Coast greets you with breathtaking natural scenery, friendly coastal towns, and a laid-back vibe that makes it easy to unwind.
Stretching along a beautiful coastline, the Sunshine Coast is famous for its golden beaches, from the family-friendly shores of Mooloolaba to the legendary surf breaks at Noosa. Spend your days soaking up the sun, trying your hand at surfing, or simply strolling along the sand with an ice cream in hand.
But there’s more to the Sunshine Coast than just its beaches. Head inland and you’ll discover the lush hinterland, dotted with charming villages like Montville and Maleny, where you can browse local art galleries, sip on fresh coffee, and enjoy sweeping views.
Nature lovers can hike through Sunshine Coast’s rainforest trails or chase waterfalls in nearby national parks.
Noosa, a highlight of the Sunshine Coast
8. K’gari (Fraser Island)
K’gari is one of Queensland’s true natural wonders and an absolute must for anyone exploring the state.
Recognised as one of Australia’s remarkable UNESCO World Heritage Sites, K’gari (Fraser Island) is the largest sand island in the world, stretching over 120 kilometres along the beautiful Fraser Coast.
Most visitors kick off their adventure from Hervey Bay, a charming town on the Fraser Coast that’s famous as the main jumping-off point for tours and ferry rides to K’gari (Fraser Island).
Between July and November, Hervey Bay also becomes one of the best places in the world for whale watching, with humpback whales using the sheltered waters of the Fraser Coast to rest and play.
Once you arrive on K’gari (Fraser Island), you’ll quickly see why this unique spot draws visitors from all over. Drive along the iconic 75 Mile Beach, a stretch of sand along the Fraser Coast that doubles as both a highway and a landing strip.
As you drive along 75 Mile Beach, stop to explore the rusting hull of the Maheno Shipwreck, take a dip in the naturally bubbling Champagne Pools, or cool off in the crystal-clear freshwater of Eli Creek.
There’s more to K’gari (Fraser Island) beyond the 75 Mile Beach. Venture inland to discover towering rainforests growing straight out of the sand and pay a visit to Lake McKenzie, famous for its dazzling turquoise water and pure white silica shores.
Wildlife lovers will also be in for a treat, spotting everything from dingos trotting along the shore to colourful birds flitting through the forest canopy.
9. Lamington National Park
Just a short drive from the buzz of the Gold Coast, you’ll find yourself in the tranquil Gold Coast Hinterland, home to Lamington National Park.
This stunning national park is one of Queensland’s best natural attractions, famous for its lush scenery, ancient trees, and incredible biodiversity.
Wander under a spectacular rainforest canopy that feels a world away from the sandy beaches below. Here, towering Antarctic beech trees and tangled vines shelter everything from brilliant king parrots to shy pademelons.
The park is crisscrossed with walking tracks, ranging from easy strolls to longer hikes that lead you past cascading waterfalls, mossy creeks, and dramatic lookouts over endless green valleys.
If you’re up for a real adventure, try the treetop walk at O’Reilly’s, where you can literally stroll through the canopy on a series of suspension bridges, a highlight for adventurous visitors!
Lamington’s natural surroundings make it an incredible place to reconnect with nature. Plus, it’s so close to the Gold Coast that you can easily combine a rainforest day trip with a visit to the coast’s golden beaches.
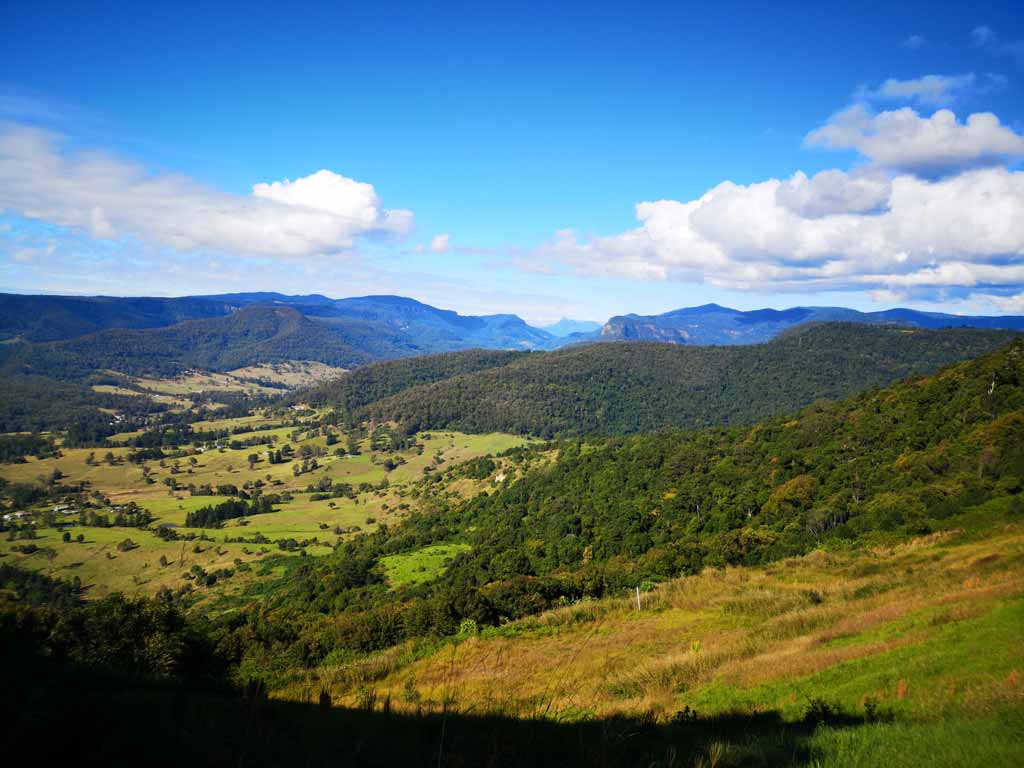
Explore the incredible hinterland scenery!
10. Townsville
Townsville is one of Queensland’s most underrated attractions. Set along the stunning coastline of North Queensland, it’s a lively hub that serves as a jumping-off point to explore the Great Barrier Reef, without the bigger crowds of Cairns.
One of the standout features of Townsville is Castle Hill, a giant pink-granite monolith that towers over the city. Hike or drive to the top to witness panoramic views stretching from the city streets to the sparkling sea.
Back in town, you’ll find plenty of attractions to fill your days, from the bustling Strand waterfront promenade lined with cafes and palm trees to the fascinating Reef HQ Aquarium, which showcases the wonders of the nearby reef.
And if you’re road-tripping further down the coast, don’t miss a stop in Mackay to cool off at the Bluewater Lagoon, a unique swimming spot that’s perfect for a break under the tropical sun.
Visiting Daintree National Park is like stepping into another world, where time stands still and ancient secrets whisper through the trees.
Tucked away in North Queensland, the Daintree Rainforest is part of the Wet Tropics, a spectacular region recognized as one of the world’s UNESCO World Heritage sites for its incredible biodiversity and cultural significance.
The Daintree Rainforest is over 180 million years old, making it one of the oldest continually surviving ancient rainforests on Earth. Walking beneath its emerald canopy, you’ll pass giant ferns, twisting vines, and crystal-clear streams teeming with unique marine life.
Top attractions at the Daintree Rainforest include exploring the magical Mossman Gorge, where you can stroll along elevated boardwalks or take a refreshing dip in pristine waters surrounded by towering trees.
For an unforgettable way to see the highlights of the Daintree Rainforest, consider booking this Daintree Rainforest and Mossman Gorge Tour, which takes you deeper into the forest’s heart with local guides who share the area’s rich Indigenous stories and natural wonders.
12. Mission Beach
If you’re dreaming of a laid-back destination where tropical rainforest spills right down to beautiful beaches, look no further than Mission Beach.
Tucked between Cairns and Townsville in Tropical North Queensland, this relaxed coastal village is a true gem, offering a perfect blend of lush jungle and golden sand.
Mission Beach is made up of four small beach communities stretched along 14 kilometres of palm-fringed coastline, giving you plenty of space to find your own slice of paradise.
One of the top things to do here is simply relaxing on the sand. It’s also a fantastic place to spot cassowaries, the colourful (and slightly prehistoric) giant birds that love to wander through the rainforest.
Located off the coast of Townsville in North Queensland, Magnetic Island is a tropical gem with a laid-back island life and rugged Aussie charm.
It’s famous for its golden beaches, with more than 20 of them scattered throughout the island.
Magnetic Island is home to a large population of wild koalas, and one of the best attractions here is hiking the Forts Walk, where you’re almost guaranteed to spot them dozing in eucalyptus trees.
The walk also rewards you with panoramic views over turquoise bays and rocky headlands.
Spend your days exploring secluded coves, kayaking alongside turtles, or enjoying a sunset sail.
Radical Bay – Just one of the gorgeous spots you can visit on Magnetic Island.
14. Longreach
If you’re looking to experience the rugged heart of the Sunshine State, head west to Longreach, one of the must-see destinations in Outback Queensland.
This legendary outback town is home to incredible attractions that celebrate Australia’s pioneering spirit and wide-open spaces.
Step into the stories of stockmen and bush life at the Australian Stockman’s Hall of Fame, or discover the remarkable history of aviation at the Qantas Founders Museum, where you can even tour inside a jumbo jet.
In the evenings, enjoy a sunset cruise along the Thomson River or tuck into a hearty camp oven dinner under a canopy of stars.
15. Carnarvon Gorge
Tucked away in Outback Queensland, Carnarvon Gorge is one of those magical destinations where you can witness the beauty of nature.
This lush oasis is hidden among rugged sandstone cliffs and dry plains, with an unexpected burst of greenery in the heart of Queensland’s outback.
There are so many exciting things to do here. Wander along shady trails beneath towering fan palms and fig trees, splash through cool creek crossings, and discover ancient Aboriginal rock art sites that tell stories thousands of years old.
You’ll also come across plenty of fascinating wildlife here. Watch for wallabies hopping through the undergrowth, bright parrots flitting overhead, and if you’re lucky, you might even spot a shy platypus gliding through the crystal-clear pools!
Springbrook National Park, located in Queensland’s Gold Coast hinterland, is a UNESCO World Heritage-listed site celebrated for its lush rainforests, cascading waterfalls, and ancient geological formations.
As part of the Gondwana Rainforests of Australia, the park offers a glimpse into Earth’s prehistoric past with its ancient Antarctic beech trees and diverse ecosystems.
Visitors can explore several sections, including the Springbrook Plateau, known for its panoramic views and waterfalls like Purling Brook Falls; the Natural Bridge, a unique rock formation housing a glowworm colony; and Mount Cougal, featuring twin peaks and historical sites.
The park’s rich biodiversity and scenic trails make it a haven for nature enthusiasts and hikers alike. Join a guided tour to make the most of your trip and let an expert guide show you around!
17. Maryborough
Nestled on the Fraser Coast, Maryborough is one of Queensland’s most charming heritage destinations. Once one of Queensland’s busiest ports, today Maryborough draws visitors with its beautifully preserved colonial streetscapes, riverside parks, and warm country-town vibe.
Maryborough is also famously linked to one of the world’s most beloved stories, as the birthplace of P.L. Travers, author of Mary Poppins. The town proudly celebrates its connection with a whimsical Mary Poppins Statue right in the heart of town.
You’ll also find gracious old buildings in Maryborough that whisper tales of the past, vibrant local markets, and cozy cafés.
DISCLAIMER: Some of the links in this article are affiliate links, which means if you book accommodation, tours or buy a product, we will receive a small commission at no extra cost to you. These commissions help us keep creating more free travel content to help people plan their holidays and adventures. We only recommend the best accommodations, tours and products that ourselves or our fantastic editorial team have personally experienced, and regularly review these. Thanks for your support, kind friend!
The best way to explore the beaches of New South Wales is with your own car. Check out our list of the best NSW road trips for some fun exploration ideas, or browse our favourite things to do in NSW.
However you choose to get around, New South Wales is a stunning state that is sure to impress.
The best way to get around is to rent a car and explore on your own! We recommend Rental Cars, which has the largest range of vehicles for the best value on the market.
Hyams Beach, Jervis Bay
What better way to start the list than with the beach that boasts the whitest sand in the world? That’s not a matter of personal opinion. That’s according to the Guinness World Records.
It’s not just the sand that people visit Hyams Beach for. The calm, clear waters are perfect for swimming, snorkelling, and stand-up paddleboarding. Plus, the scenery is divine.
Hyams Beach gets quite busy during summer and long weekends, but there’s plenty of room to spread out across the 2.8 km stretch, so you don’t have to worry about elbowing fellow beachgoers for space.
The main issue will be finding parking, especially between midday and mid-afternoon. As a quick fix, you can park at Greenfield Beach and then hike the White Sands Walking Track to Hyams Beach.
The idyllic white sands and blue waters of Hyams Beach
Murrays Beach, Jervis Bay
Murrays Beach, located in Booderee National Park, is almost the spitting image of Hyams Beach.
It has the same blue waters and sugar-white sand backed by lush bushland. The difference is that it has fewer people.
If you’re looking for a family-friendly beach in Jervis Bay, Murrays Beach is your best bet. Protected by Bowen Island, the waters are calm and suitable for casual swimmers and young children. It also abounds with rich marine life, making it great for snorkelling.
For hikers, the beach offers self-guided walks, like the low-tide trail, where you can explore the shoreline and its marine life.
You can access Murrays via the Jervis Bay Road. Please note that there’s a fee to enter the national park.
Sydney is iconic for its cosmopolitan charm, but it also has some of the best beaches in NSW. Among these is Palm Beach, roughly 41 km from the city centre.
Palm Beach is the northernmost of Sydney’s beaches. It’s mostly quiet and uncrowded, thanks to its remote location.
Because Palm Beach faces the ocean, it often has big waves. This makes it popular among surfers but not so much with swimmers.
If you want to swim, head to the southeastern end of the beach, where you’ll find a 50-metre-long rock pool with relatively calm waters.
Nearby is the Bible Garden, a set of well-manicured terraces overlooking the ocean and the shore.
Don’t skip a hike to the Barrenjoey Lighthouse, known for its spectacular scenery and whale sightings in winter.
Shelly Beach, Sydney
Just a 20-minute walk from Manly Beach, you’ll reach Shelly Beach. This small swath of sand is a quieter alternative to Manly, one of the busiest beaches in NSW.
Shelly Beach is part of Cabbage Tree Bay, a protected marine reserve. It’s popular among scuba divers and snorkellers mainly because of its rich sea life, which is visible in shallow water.
If you’d rather stay on land, hike the bush trail around the headland for incredible views. You can also sunbathe or have a picnic on the sand.
Shelly Beach has free electric barbecues, showers, and toilets. There’s also a café called The Boathouse.
Tamarama Beach, Sydney
Tamarama is the perfect beach for people-watching. This 80-metre narrow strip is a favourite hangout among the trendy and attractive, often A-listers, earning it the nickname Glamarama.
Celebrity sightings or not, we think Tamarama is one of the best beaches in NSW because of its scenery. Nestled between two headlands, it offers gorgeous ocean views.
The beach is a well-known stop on the Bondi Beach to Coogee Coastal Walk. Backing the beach is a grassy parkland with a playground, barbecue facilities, picnic areas, toilets, and changing rooms.
Tamarama Beach is an iconic stop on the Bondi to Coogee Coastal Walk.
Bondi Beach, Sydney
Of course, a list of the best New South Wales beaches is incomplete without mentioning Bondi!
Possibly Australia’s most famous beach, Bondi Beach is a dazzling strip of sand with lots of nearby attractions.
Walk along the Esplanade and stop at the skate park, admire the colourful murals, or hit the outdoor gym.
Just a short walk south of Bondi, Bronte is perhaps the most family-friendly among the Sydney beaches.
At the southern end, you’ll find a kid-friendly rock pool and an ocean-fed lap pool, both free to use.
Confident surfers can chase waves near the rocky headland. Everyone else can relax in the grassy park behind the sand for picnics, frisbee, or a barbecue.
Bronte Beach also has a kiosk, changing rooms, toilets, and even the world’s oldest surf lifesaving club.
Avoca Beach is a 1.7 km stretch of golden sand tucked between two giant sandstone headlands and fringed by Norfolk Island Pines.
It’s mainly a surfing beach. The more sheltered northern end is ideal for beginners, while the southern part, with its point break, is suitable for expert surfers.
The waters can be rough, so always seek the advice of the lifesavers if you want to swim.
There’s also an ocean rock pool at the southern end of the beach, near the Surf Life Saving Club, where recreational swimmers and young kids can splash safely.
Umina Beach, Central Coast
Perched on the Central Coast’s southern coastline, Umina is another popular family beach in New South Wales.
Not only is the beach patrolled, but the waters are also calm and shallow, with waves that never get too big for swimmers and novice surfers.
If you want to take a break from splashing in the water, head to the playground near the Surf Life Saving Club. It’s the biggest one on the Central Coast and features a skate park, bike track, climbing rocks, and more.
For adults, there’s an outdoor café beside the playground that serves brunch, coffee, and ice cream.
Added perk? Umina is dog-friendly, with designated off-leash areas, including the northern end leading up to Ocean Beach.
Try to catch the sunrise at Umina Beach!
Mollymook Beach, South Coast
Mollymook Beach boasts a 2.3 km sweep of golden sand and swells that can get as high as 1.5 metres along its southern reef.
On the southern end of the beach, you’ll find a natural rock pool that’s great for swimming and snorkelling. The rocky headland on the opposite side is ideal for fishing and diving.
Mollymook is mostly quiet, but in summer, it turns into one of the liveliest NSW beaches as it hosts markets and surfing events.
From September to October, you can spot humpback and southern right whales passing by the beach. Dolphins are also a common sight, no matter the season.
Surfing kangaroos? Pebbly Beach, one of the jewels of Murramarang National Park, is the place to go to see these intriguing critters on the shore.
No, they won’t be swimming, let alone surfing (that was a myth). But they’ll be close enough to the water to appear like it.
If you’re looking for a spot to sunbake, swim, or surf, Pebbly Beach is not the best option. It’s unpatrolled, and the waters often get choppy. Plus, the pebbles make it uncomfortable to sunbathe.
Still, Pebbly Beach is one of our favourite beaches in NSW. The views are stunning, the ambience serene, and it’s great for camping.
Zenith Beach, Port Stephens
Flanked by two colossal headlands, Zenith Beach in Tomaree National Park is one of the best beaches in NSW, purely for its sheer beauty.
It’s small, just 400 metres long, but it plays a huge role in wildlife conservation as a sanctuary for birds and dolphins.
The waters look inviting, but Zenith is unpatrolled, and high tide often brings strong rips. So, take extra caution if you swim or surf.
Zenith is the perfect strolling beach. Walk to the summit of Tomaree Head to enjoy jaw-dropping vistas of the shore, the ocean, and the offshore islands around Port Stephens.
Zenith Beach is one of the best places in Port Stephens.
Anna Bay, Port Stephens
Anna Bay is not one beach but two: One Mile Beach and Birubi Beach. The bay, however, is best known as the gateway to the massive sand dunes in the Worimi Conservation Lands.
Here, you can surf and spot dolphins one minute, then sandboard down a sandy slope the next. At sunset, you can go on a camel or horse ride along the shore.
Anna Bay also has dozens of rock pools you can explore. For more marine life encounters, visit the Irukandji Shark and Ray Encounters to pet and feed sharks and rays.
Caves Beach, Lake Macquarie
Love caves? Then Caves Beach should be on your list of the top places to visit in New South Wales.
This 300-metre beach got its name from the network of sea caves at its southern end. The northern part is more sandy and quieter.
You can access the caves only at low tide. When the water is out, you’ll also find rock pools along the shore.
The beach is patrolled on weekends and in summer, so it’s safe for swimming.
There are barbecue facilities, toilets, picnic areas, and a surf life saving club on the beach.
Treachery Beach, Seal Rocks
Secluded, spectacular, and “secret”, Treachery Beach is hands down one of the most beautiful beaches in New South Wales. But barely anyone knows where it is.
Treachery Beach is on the southern end of Seal Rocks, a small coastal settlement three hours from Sydney. You can access the beach in two ways: via the Treachery Camp or through the Treachery Headland walking trail.
The coast is serene, pristine, and made for long beach walks. It boasts consistent swells and big waves. Despite this, you’ll rarely see anybody else on the shore except for a few spirited surfers.
Bongil Beach, Bundagen
Set in Bongil Bongil National Park near Coffs Harbour, this 7 km, nearly empty stretch is a haven for nature lovers.
Bongil Beach is a tranquil escape from the busier beaches on the NSW north coast. It’s also popular among seasoned surfers and anglers.
But what we love most about this quiet beach is the wildlife. It’s one of the best beaches on the north coast for birdwatching and dolphin spotting from the shore.
And if you venture off the beach into the national park’s eucalyptus forest, you might find koalas perched in the trees.
Wategos Beach, Byron Bay
A long, crescent-shaped strip of white sand, Wategos is one of the prettiest beaches in Byron Bay.
It’s the ultimate family beach, with calm waters, barbecues, picnic tables, and plenty of space to sprawl on.
Sheltered by a headland, Wategos Beach has gentle waves. It’s an excellent spot for longboarding and learning to surf.
Lounge on the sand and keep an eye out for bottlenose dolphins, which are known to play in the rolling waves. You can also take the 3.7 km Cape Byron Walking Track to the Cape Byron Lighthouse.
Ride the waves at Wategos Beach, Byron Bay!
Main Beach, Byron Bay
Right smack in the heart of Byron Bay, Main Beach is arguably the most popular beach on the NSW north coast.
Patrolled every day year-round, Main Beach has calm waters and mild waves that are good not only for swimming but also for learning to surf.
The beach itself has barbecues, showers, a playground, and a grassy area with picnic tables. Across the street are shops, cafés, a swimming pool, and the iconic Beach Hotel.
Main Beach, being the centre of Byron Bay, is often a jump-off point for many tours, including kayak tours.
In summer, the beach can get crowded. For somewhere quieter, head to the nearby Wategos Beach, only a short walk away.
Tallow Beach, Byron Bay
This 2.5 km beach spans between Cape Byron and Broken Head Beach. While it has its share of bustle during summer, it’s nearly deserted outside the peak season.
Tallow is a lovely beach for birdwatching. White-bellied sea eagles and ospreys are the most popular residents here. In spring and winter, you can watch humpback whales from the shore.
As Tallow is an exposed beach, the waves often get rough. It’s also unpatrolled, so recreational swimming is not recommended.
Named after the red rock formations dotting the shore, this 5.2 km cove is one of the most amazing north coast beaches in New South Wales. Red Rock is a short drive from the buzzing Coffs Harbour, but it’s way more tranquil.
Surf lifesavers patrol the beach during summer. There are plenty of sandy spots where you can relax. At low tide, you can hike to the tiny Red Rock Island.
Red Rock is also fantastic for stand-up paddle boarding, kayaking, and fishing. If you want to surf, head to the reef at the northern end of the beach.
Seven Mile Beach, Shoalhaven
This unspoiled sweep of almost white sand is one of those NSW beaches that caters to all kinds of beach lovers, whether they’re looking for adventure or a secluded spot to unwind.
Seven Mile Beach is a long beach, so you’ll find plenty of space to surf. It’s also known for windsurfing and kitesurfing.
If you want to swim or kayak, stay in the area near the mouth of the Crooked River, where the waters are calmer and the waves are gentler.
What makes Austinmer one of the best beaches in NSW? We say it’s the vibe. No, it isn’t your typical secluded beach, but it’s a local favourite with serious charm.
Just over an hour from Sydney via the famous Sea Cliff Bridge, Austinmer is perfect for a chill afternoon or an adventurous day out.
It has golden sand, clear waters, and not one but two ocean rock pools for casual swimming and cooling off. There’s also a playground, picnic areas, and ample parking.
Austinmer is a stunning beach in the Wollongong area.
Bennetts Beach, Hawks Nest
Bennetts Beach in Hawks Nest is big, beautiful, and often surprisingly empty. One of the loveliest NSW beaches, it spans over 14 km and boasts sparkling white sand.
The northern end offers calmer waters, while the southern end, known as the Dolphin’s Playground, is perfect for catching waves. Nearby is the Yacaaba Headland, from where you can bask in sweeping views.
The beach is patrolled during the swimming season and even has a surf club with parking and toilets. Dogs are welcome, with off-leash zones north and south.
Jibbon Beach, Royal National Park
Jibbon Beach is an 800-metre crescent-shaped stretch of sand with calm waters that sparkle like turquoise in the sun.
The beach is the starting point for scenic coastal walks, including the Jibbon Loop Track and the multi-day Coast Track.
Along the way, you’ll find Aboriginal rock engravings, including images of kangaroos, whales, and the sky spirit Baiame.
Tucked inside Bouddi National Park on the NSW Central Coast, Maitland Bay is a secluded beach that rewards those willing to hike for it.
This peaceful 600-meter beach is only accessible by foot via a 1-km trail that winds through lush bushland. Two headlands protect the bay, so the waters are generally calm.
You’ll often have the beach to yourself. There are no lifeguards, and even mobile phone reception can be limited.
At low tide, you can walk to Bouddi Point and see the wreck of the SS Maitland.
DISCLAIMER: Some of the links in this article are affiliate links, which means if you book accommodation, tours or buy a product, we will receive a small commission at no extra cost to you. These commissions help us keep creating more free travel content to help people plan their holidays and adventures. We only recommend the best accommodations, tours and products that ourselves or our fantastic editorial team have personally experienced, and regularly review these. Thanks for your support, kind friend!
From sea to shining sea, the United States is a very diverse country – both when it comes to culture and natural beauty.
I’ve traveled across the continental United States many times over (you never really realize how big Texas is until you drive through it. Damn that state is big!). I think, just on my roadtrips alone, I’ve spent a collective two years exploring the country. That’s a lot of time and doesn’t even take into account that visit to Portland or Nashville or weekend in Savannah. In short, I’ve seen a lot of this country.
And there is a lot worth seeing.
In the past, I’ve talked about my favorite restaurants and lessons learned, so it only seems proper to give you a list of the best places to visit in the USA.
All these places are near and dear to my heart and really showcase just how special this country is and how many wonderful places there are here. (It took me awhile to narrow down this list!)
In no particular order, here’s my detailed list of the best places to visit in the USA:
(Note: This list is based only on where I myself have been. There are a lot more breathtaking places I haven’t explored yet, which is why they may not be on this list. It doesn’t mean they aren’t worth seeing. It just means I haven’t been there.)
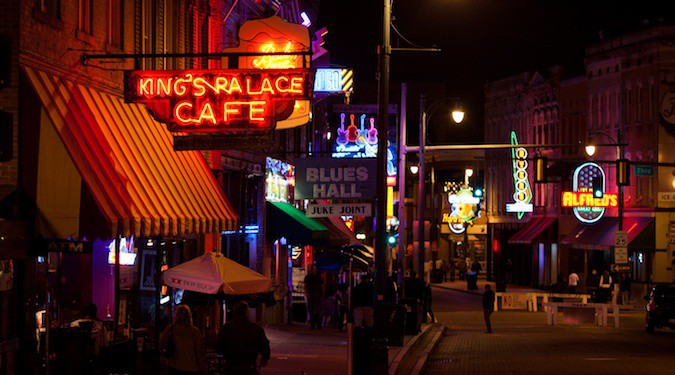
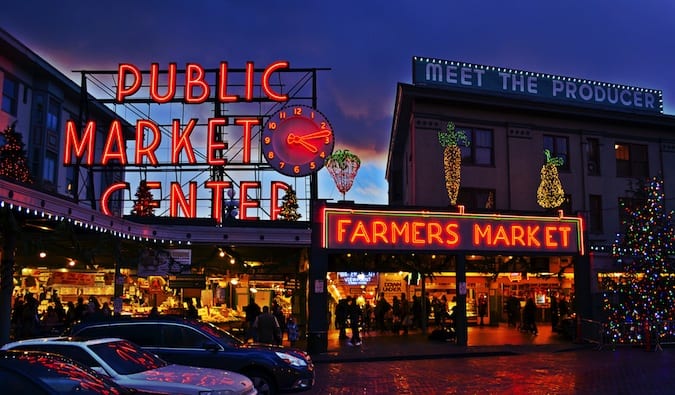
1. Memphis
Gritty, industrial, and a bit run down, Memphis appears like its best days are behind it, but don’t let the rough exterior fool you — the city is still home to some killer food and a vibrant blues music scene. Additionally, there’s Graceland (Elvis’s home) for fans of the King, a big waterfront for walking, and the phenomenal, detailed, and moving Museum of Civil Rights (it’s huge, so don’t rush it!). I enjoyed the city more than I expected and was disappointed when I had to leave. To use a cliché, it’s a hidden gem!
WHERE TO STAY IN MEMPHIS: Hostel Memphis – A hip hostel in a century-old building with a fully-equipped kitchen and free Wi-Fi. The hostel is also a non-profit that donates 100% of its profit to social justice causes around the city.
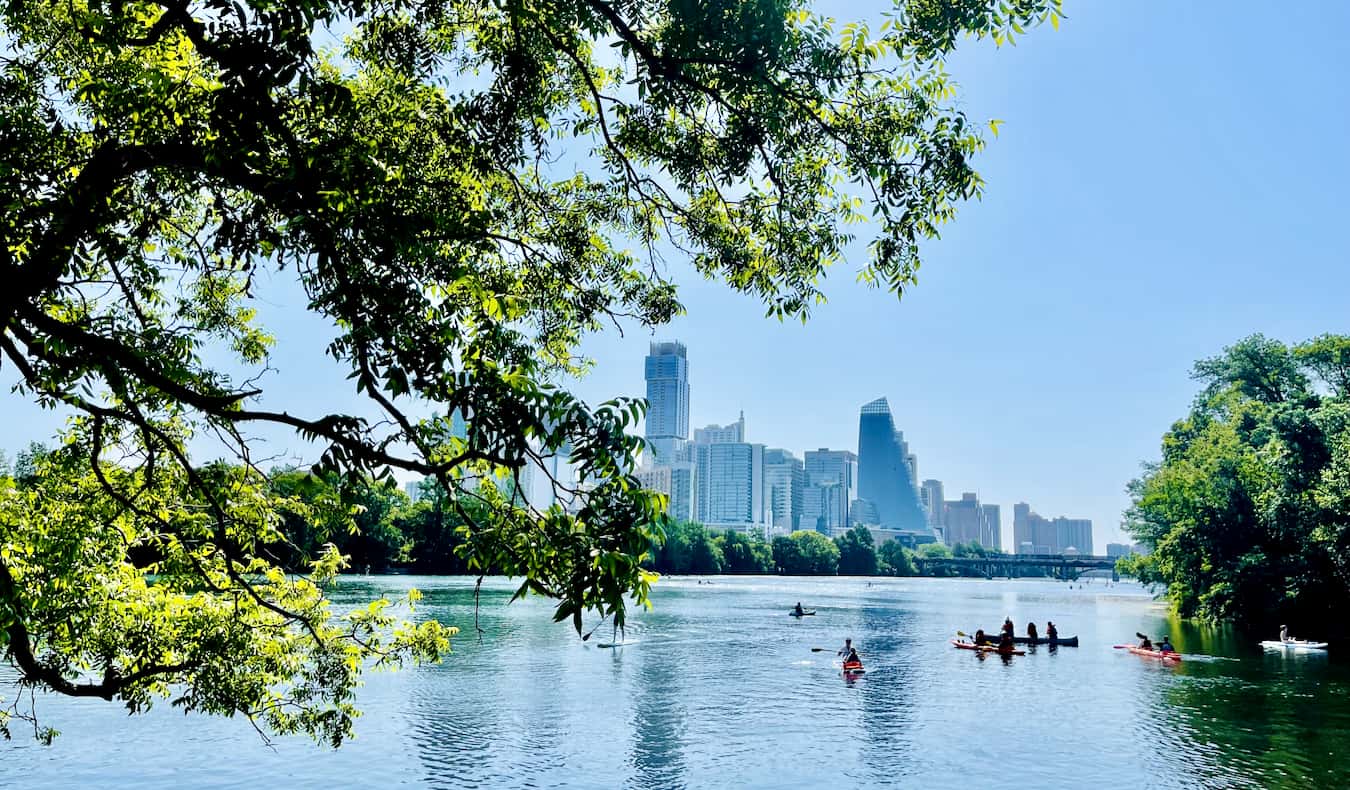
2. Austin
I love Austin (I actually moved there in 2016 and stayed for several years before returning to NYC). The warm weather, the lively honky-tonks and live music, funky house bars on Rainey Street, amazing hiking and biking trails, and tons of outdoor activities…Austin has it all.
Thanks to everything from the growing food truck population to the flagship Whole Foods store with the incredible salad bar (grilled pineapple!), I eat — and eat well — whenever I’m here. The Austin campus of the University of Texas provides a youthful vigor to the city, and its liberal attitude attracts a diverse and eclectic population. In short, you can’t skip Austin, because if you do, I’ll find you and drag you there.
WHERE TO STAY IN AUSTIN: Firehouse Hostel – This centrally-located hostel is located in an old firehall from 1885. They have fast Wi-Fi, plenty of chill common areas, and an amazing on-site bar that serves top-notch craft cocktails.
For more travel tips on Austin, check out these posts:
3. New Orleans
New Orleans is a city with soul. It’s seen some hard times, but it lives on with a zest for life unmatched by most places. It has a rich and long history (don’t miss taking a haunted walking tour while you’re here) and is filled with scrumptious French-inspired Creole and Cajun food, live jazz music, street performers, and an appreciation for all the temptations of life. Life is lived well here in the Big Easy. You don’t come here to relax — you come here to indulge! In my opinion, New Orleans one of the most eclectic and vibrant cities in the United States.
WHERE TO STAY IN NOLA: HI New Orleans – An award-winning hostel with spacious dorms, comfy beds, privacy curtains, and fast Wi-Fi. Everything a budget traveler needs!
Asheville is Portland in the North Carolina mountains: full of tasty craft beer, food, and hipsters. I liked the area a lot, including its proximity to some wonderful and scenic mountain hikes such as the Carolina Mountain Trail. Moreover, the town has a lot of parks for those wanting something closer — and be sure to check out the Asheville Botanical Gardens near the university campus. The beautiful Smoky Mountains are a short drive away, and the gigantic Biltmore estate, the largest privately owned home in the US and once home to George Vanderbilt, is on the outskirts of the city. (If you’ve ever seen Downton Abbey, that’s what the house is like! And, if you haven’t, you should! The show is addicting!)
WHERE TO STAY IN ASHEVILLE: Bon Paul & Sharky’s Hostel – A laid-back hostel with a spacious front and back porch for relaxing. There’s free parking, free Wi-Fi, and plenty of nearby restaurants and cafes.
5. The Pacific Coastal Drive
The drive up the Pacific Coast is considered one of the most scenic in the world. I have to agree. I didn’t travel the whole coast but the portion I drove (San Francisco to Portland) was incredible: sheer cliffs, forests descending to the shoreline, miles of beaches, and giant redwoods. It’s jaw-dropping all the way. Be prepared to make slow progress, as you’ll be pulling over frequently to stop, hike, and admire the view. I especially liked Bandon and Coos Bay, Oregon, and Mendocino, California.
6. Redwood National Park
Along the Pacific Coast is Redwood National Park, a large expanse of giant redwood trees filled with picnic areas, places to camp, and miles upon miles of hiking trails. Trails range from easy to strenuous, and there are many loops that head out to nearby beaches. It’s utterly beautiful, awe-inspiring, and humbling in every way. It’s a must for anyone road-tripping around California.
WHERE TO STAY IN REDWOOD NATIONAL PARK: View Crest Lodge – Located on the coast in Trinidad, this rustic budget-friendly lodge has basic amenities like free Wi-Fi and TV, and some of their rooms also have full kitchens. It’s a clean, comfy no-frills place to crash for a night.
7. Glacier National Park
Even though I visited when most of the park was still closed (it was too early in the year and there was still snow around), I was still stunned by the area: gorgeous snow-capped mountains rising high into the sky; a beautiful, still lake in which to admire those mountains and large glaciers; and hiking trails galore. It was the most mind-blowing place I saw on my trip, and I can understand why everyone raves about it. I can’t recommend a visit there enough.
WHERE TO STAY IN GLACIER NATIONAL PARK: Camping – Pack (or rent) a tent and cozy up for a few nights under the stars. You won’t be disappointed.
8. Denver
Denver has a mix of outdoor ruggedness and big-city living. It has a huge craft beer scene (be sure to take a beer tasting tour), excellent restaurants (including, Sushi Sasa, one of my favorite sushi restaurants in the world), a large international airport with lots of connections, and proximity to the mountains. It’s clean, and the locals are incredibly friendly. There are few cities in the US I want to live in, but I love Denver enough to say that it’s one of them.
WHERE TO STAY IN DENVER: Ember Hostel – This boutique hostel is rated one of the best in the country, offering a swank interior, free jacuzzi, outdoor firepit, comfy beds with blackout curtains, cheap overnight parking, and more.
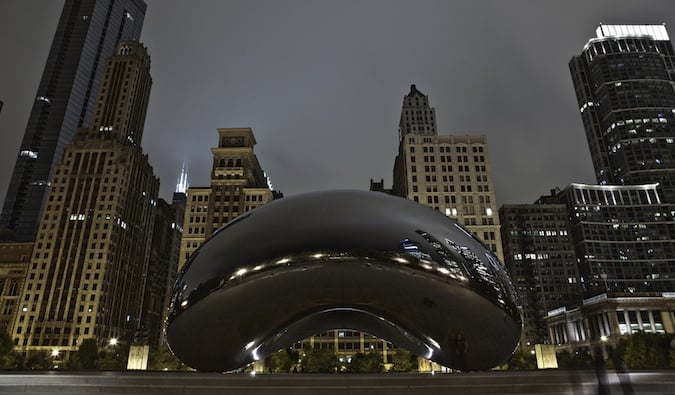
9. Chicago
When the weather is nice, I don’t think there’s a better city in the United States. Set on the shores of Lake Michigan, Chicago has world-class food (try the deep dish, sushi, and hot dogs), the fun and kitschy Navy Pier, Millennium Park with its famous bean-shaped statue, a kick-ass aquarium, and iconic architecture (be sure to take an architecture tour).
And, once the winter deep freeze is over, Chicagoans burst out of their homes to enjoy the summer weather, so there’s a positive, happy vibe emanating through the city. Take advantage of it.
WHERE TO STAY IN CHICAGO: HI Chicago – A spacious, clean hostel with female-only dorms, free Wi-Fi, and a great location. The beds are comfy and the common area is huge so it’s easy to meet people.
For more travel tips on Chicago, check out these posts:
10. New York City
The city that never sleeps. ‘Nuff said. I mean, there’s a reason I moved here — and then moved back again after living in Texas. You can’t go wrong here. New York sells itself and there’s nothing I can say here. I know you already want to go.
WHERE TO STAY IN NYC: HI NYC – This is one of the biggest and best hostels in the city. It’s super easy to meet people here, they have a chill outdoor patio, and the kitchen is huge so you can cook more meals and save your budget.
For travel tips on New York City, check out these posts:
11. Natchez
I was most surprised by this Mississippi city. I didn’t know anything about it, but Natchez was recommended as a place to see historic 19th-century homes, built by isolated plantation owners wanting to get away in the summer and interact and socialize with each other. As cotton became king, the houses became ever larger and more elaborate.
Now, they are historic monuments, and you can tour them while enjoying a view of the Mississippi River. It’s far off the beaten path — and my favorite discovery from my last road trip.
WHERE TO STAY IN NATCHEZ: The Beaumont House – If you want to splash out, this recently-renovated B&B in a mansion includes free breakfast and spacious historic rooms as well as modern amenities like Wi-Fi, air-conditioning, and flatscreen TVs.
Sitting on Georgia’s coast, Savannah escaped the wrath of the Civil War, allegedly because General Sherman thought it was too pretty to be destroyed. With streets lined with Spanish moss–covered trees, large and inviting parks, and a bustling waterfront, Savannah is a wonderful place to experience the slow pace of the Old South. I had visited this city many, many years ago, but its beauty, Southern comfort food, and tranquility stuck with me over the years.
WHERE TO STAY IN SAVANNAH: Thunderbird Inn – This affordable three-star motel is just a short five-minute walk from downtown. Boasting a retro vibe, there’s free coffee and juice every morning, as well as free popcorn available in the lobby.
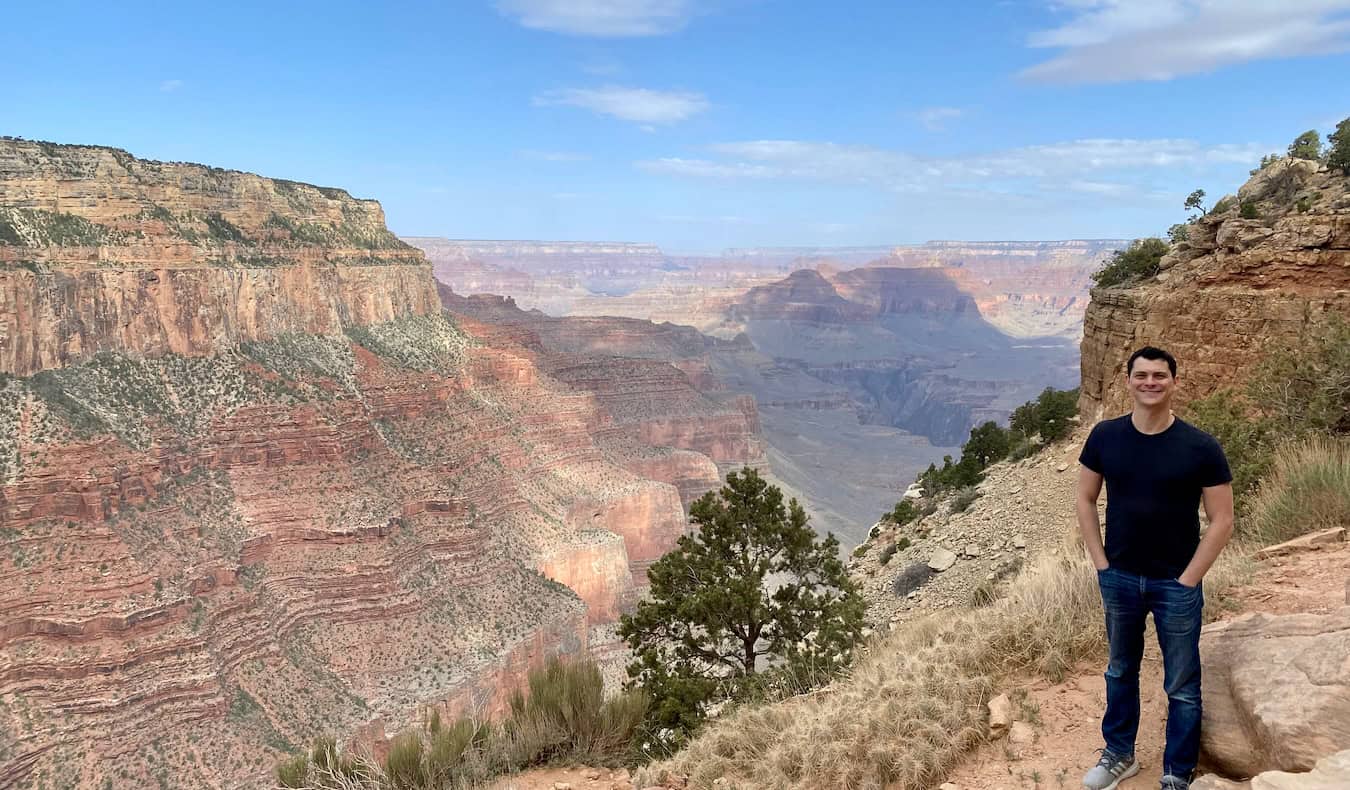
13. The Grand Canyon
Words can’t accurately describe how incredible the Grand Canyon is. It’s breathtaking in so many ways — its sheer size, fantastic depth, red hues, and striking vistas. Most people simply stand at the edge of the canyon and look out across it, but its true size and beauty are best appreciated with a hike down to the bottom. Make the time to hike down to the Colorado River, hike the less visited trails, spend the night, and hike back up for sunset.
WHERE TO STAY IN THE GRAND CANYON: Camp – Pack (or rent) a tent and cozy up for a few nights under the stars. You’ll need to reserve a spot early though as they disappear fast!
A little bit country, a little bit tech, Nashville is one of the fastest-growing cities in the US, and rightly so. It’s got a wonderful music scene (including the famous Grand Ole Opry), a growing cocktail bar scene, and some down-home Southern restaurants.
There’s not a lot of “touristy stuff” to do here, but what makes this city one of my favorites are the music, the food, the wildly friendly and happy people, and the positive energy the city seems to exude. When you’re here, plan to spend a few hours at the Tennessee State Museum. It goes into great (though sometimes very one-sided) detail about the state’s history, but it’s more exciting than you might think.
WHERE TO STAY IN NASHVILLE: Red Roof Inn – While it’s not centrally located, this is one of the city’s few affordable two-star options. A quick 13-minute drive from the Grand Ole Opry, this budget-friendly joint boasts an outdoor pool, free Wi-Fi, and free coffee.
For more travel tips on Nashville, check out these posts:
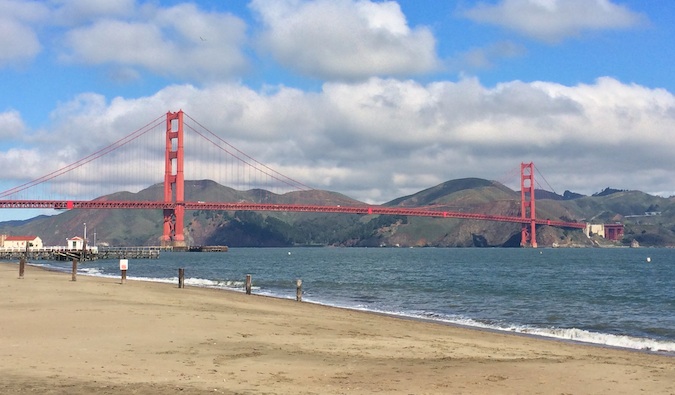
15. San Francisco
Food of every nature, hipsters, high tech, and a diverse population make San Francisco one of my favorite places to visit. Additionally, it’s close to some wonderful national parks, like Muir Woods, where you can escape the city and go hiking amid giant trees (there are lots of half-day guided tours you can take). San Francisco has so much to do that you need at least four days to really appreciate it.
WHERE TO STAY IN SAN FRANCISCO: Green Tortoise – As one of the oldest in town, this hostel is an institution in San Francisco. It offers free breakfast, free dinners multiple times per week, and even a free sauna! It has a huge common room so it’s easy to meet people and has a very fun, social atmosphere.
For more travel tips on San Francisco, read these posts:
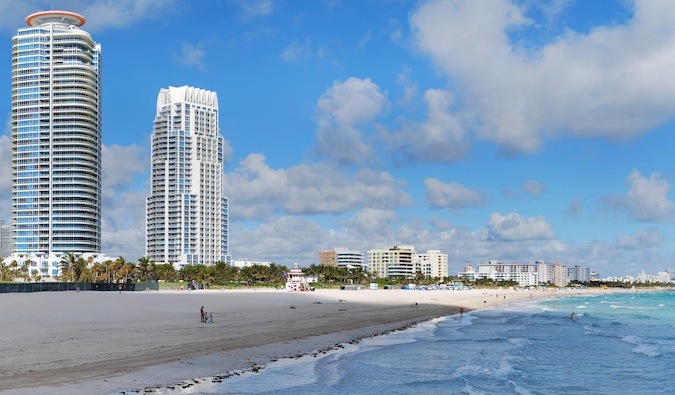
16. Miami
White sand beaches, Cuban food, wild nightlife, gorgeous people, and amazing warm weather — what’s not to love about Miami! I don’t think I could ever live here, but for a weekend of fun in the sun, Miami is perfect.
WHERE TO STAY IN MIAMI: Generator Miami – This hostel has a pool, two restaurants, a bar, and is just minutes away from the beach. It’s massive (there are 8 floors), the beds are more comfortable than the cheap ones you’ll find at the party hostels.
For more travel tips on Miami, read these posts:
17. San Diego
Forever warm and sunny, San Diego’s weather creates a permanently happy population that’s friendly and outgoing and that loves the outdoors — from hiking, days at the beach, or running. And they are always happy to show people their city.
The downtown Gaslamp area — as well as the famous Pacific Beach — is full of trendy seafood restaurants, bustling bars, and some seriously life-changing taco stalls. I love San Diego.
WHERE TO STAY IN SAN DIEGO: ITH Adventure Hostel – With a focus on sustainable travel (there’s a vegetable garden and backyard chickens), this chill hostel is very friendly and social. It’s clean, and the water pressure in the showers is decent, and the beds are comfy. (For more hostel suggestions, you can read this post.
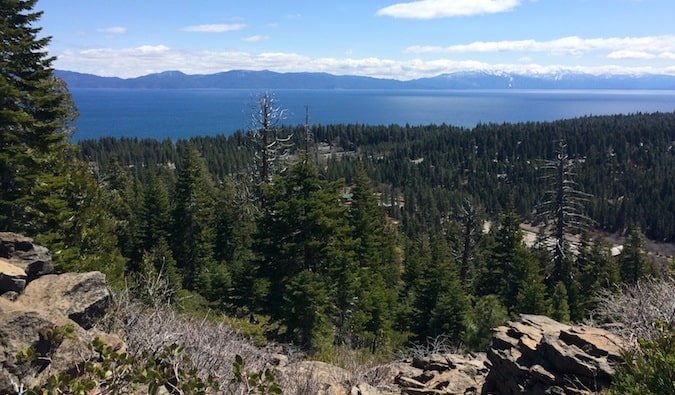
19. Lake Tahoe
Though the water level of the lake, as well as the flora and fauna around it, is sadly depleted due to the California drought, Lake Tahoe is still nonetheless impressive and beautiful. Ringed by tiny mountain communities, this is a terrific place for hiking and boating in the summer and skiing in the winter.
WHERE TO STAY IN LAKE TAHOE: Camping – Pack (or rent) a tent and cozy up for a few nights under the stars. You won’t be disappointed.
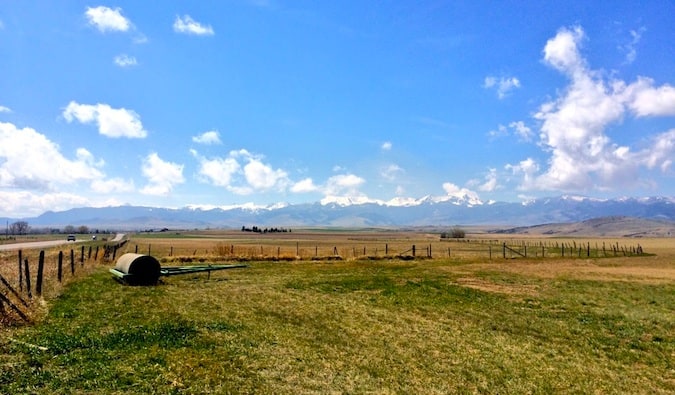
20. Anywhere in Montana
A lot has been written about how stunning Montana is, but it’s all wrong. It’s even better than words can describe. It’s the most crazy beautiful state I’ve ever been to, filled with wondrous mountains and hills as far as the eye can see. The people are super cool, welcoming, and outdoorsy, too. If I had to pick a favorite state, it would be Montana. I just love it.
WHERE TO STAY IN MONTANA: Treasure State Hostel – Located in downtown Bozeman, this hotel is quiet, clean, and is home to friendly staff. They organize all kinds of events too, like pub crawls and movie nights, so it’s easy to hang out and meet people.
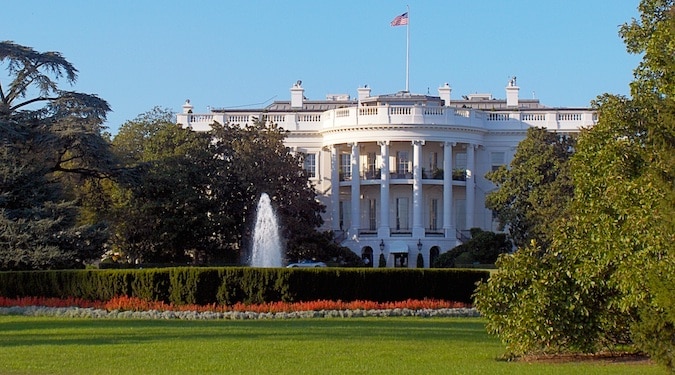
21. Washington D.C.
The capital of the United States is a vibrant, international city, and that’s what I love about it. It’s second only to NYC in diversity of people and food (which is to be expected with so many people from international aid organizations and embassies). You hear a million accents in this town! Throw in the free Smithsonian museums, lots of parks, a riverfront for strolling or running, and some historic government buildings and monuments, and D.C. becomes one phenomenal place to visit, relax, eat, and drink! Be sure to take a tour of Capitol Hill while you’re here!
WHERE TO STAY IN WASHINGTON: Highroad Hostel – Offering pod-style bunks, this cool hostel is located in an old Victorian mansion. The beds have thick mattresses, there’s a fully-equipped kitchen, there’s free coffee and tea each day, and they even host a free happy hour each week!
For more travel tips on Washington D.C., here are some other articles I’ve written:
22. Cape Cod
I spent a lot of summers on the Cape since it’s where New Englanders escape for the summer. You’ll find plenty of small beach towns along the coast (Provincetown and Hyannis being the most famous but I also love Chatham, Falmouth, Wellfleet, and Brewster). If you’re looking for seafood, beaches, boardwalks, and that perfect family vacation, visit the Cape!
WHERE TO STAY IN CAPE COD: Cape Sands Inn – Just a short walk from the beach in West Yarmouth, this three-star property has all the standard amenities (TV, free Wi-Fi), as well as free parking and a relaxing sauna and hot tub.
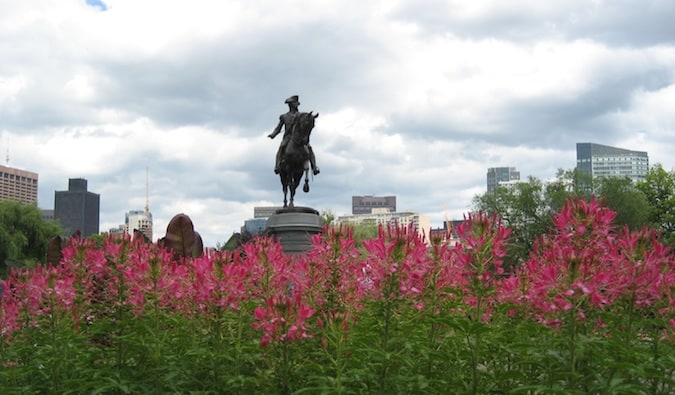
23. Boston
I may be biased because I grew up here, but I love Boston and cherish my visits home. Boston rocks (Go Red Sox!). It’s historic (founded in 1630), small-ish, easy to get around, and filled with awesome and loyal people. It’s home to a ton of activities, like the Freedom Trail and Faneuil Hall, the JFK Museum, and the Boston Commons and Public Garden, as well as some of the best Italian and seafood restaurants in the country. Be sure to eat at Zaftigs for the best brunch in the city! It’s wicked!
WHERE TO STAY IN BOSTON: HI Boston – This spacious and clean hostel is just a short walk from pretty much everything in the city. They have female-only dorms, free Wi-Fi, and several chill common areas where you can meet other travelers.
For more travel tips on Boston, check out these posts:
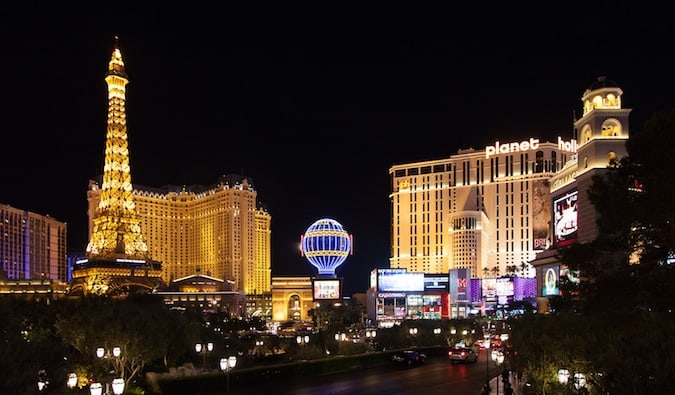
24. Las Vegas
Vegas, baby, Vegas! A lot of people are turned off by the bright lights and gambling, but Vegas is much more than the casinos, expensive clubs, and hotels on the famous Strip. There’s incredible hiking nearby at Red Rocks National Park, a growing art scene, a booming tech scene, and lots of concerts and shows.
Get off the Strip, explore the real Vegas (because technically the Strip is located in Paradise, NV, not Las Vegas), and see why people decide to live here.
WHERE TO STAY IN LAS VEGAS: Sin City Hostel – Just a short walk from the (in)famous Fremont Street, this is a social hostel that hosts all kinds of events (such as bar crawls, pasta & wine nights, BBQs, casino nights, and more). It’s a great place to connect with other travelers.
For more travel tips on Las Vegas, these articles can help:
25. Portland
Portland, Oregon is incredible. I would move there if it had a bigger airport with better connections. Here you’ll find an impressive food truck scene, cool bespoke bars and cocktail lounges, a craft beer scene that’s a religion to residents, relaxing parks (including a peaceful Japanese garden), a vibrant art scene, and hiking in the nearby mountains. There’s even an underground donut scene here.
WHERE TO STAY IN PORTLAND: HI Portland – Northwest – Rated one of the best hostels in the world, this centrally-located HI hostel offers free breakfast, in-house made craft beer, an outdoor courtyard with a firepit, regular live music, and much more.
Home to a little business called Starbucks, it also boasts an exciting downtown, fresh fish, authentic Asian food, art museums, and funky nightlife. In historic Pioneer Square, you can go on an underground tour of the city’s ruins (a hella cool experience). Moreover, you’re right on the water and, weather permitting, can head out onto Elliott Bay to explore some little islands. Seattle is just a cool city. There’s always something to do there, it’s techy, and everyone is relaxed. Plus, there’s craft beer and coffee — what’s not to love about that!
WHERE TO STAY IN SEATTLE: Green Tortoise – Located right across from the iconic Pike Place Market, this social hostel organizes all kinds of activities so it’s easy to meet people. They also offer free breakfast and daily events. It’s one of my favorite hostels in the country.
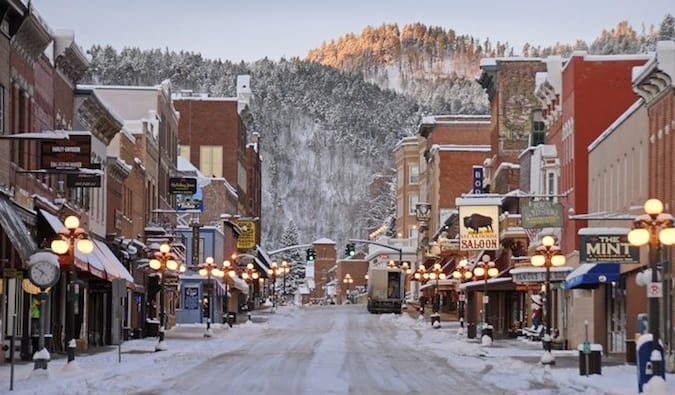
Tucked away in western South Dakota, this town was famous during the Old West days, noteworthy enough to be the focus of an HBO series. Sort of kitschy and re-created, it’s nonetheless a very cool place where you can experience a taste of the old frontier days. It’s also conveniently located near the Black Hills and Mount Rushmore.
WHERE TO STAY IN DEADWOOD: Gold Country Inn – This kitschy hotel is one of the cheapest places in town. Located right downtown, they have a mini gambling hall on-site, free Wi-Fi, and free parking. It’s nothing fancy but it won’t break the bank either.
28. Kansas City
I really loved this city, which features some of the world’s best BBQ and a lively downtown. There’s also a detailed and enlightening jazz museum here, as well as the eye-opening Negro Leagues Baseball Museum (that was the actual name; I’m not being racist). I wish I could have spent more time, but that’s just more reason to come back.
WHERE TO STAY IN KANSAS CITY: Home2 Suites Downtown – With a fitness center, pool, and a decent breakfast spread, this three-star hotel in downtown KC is one of the more affordable places to crash in the city.
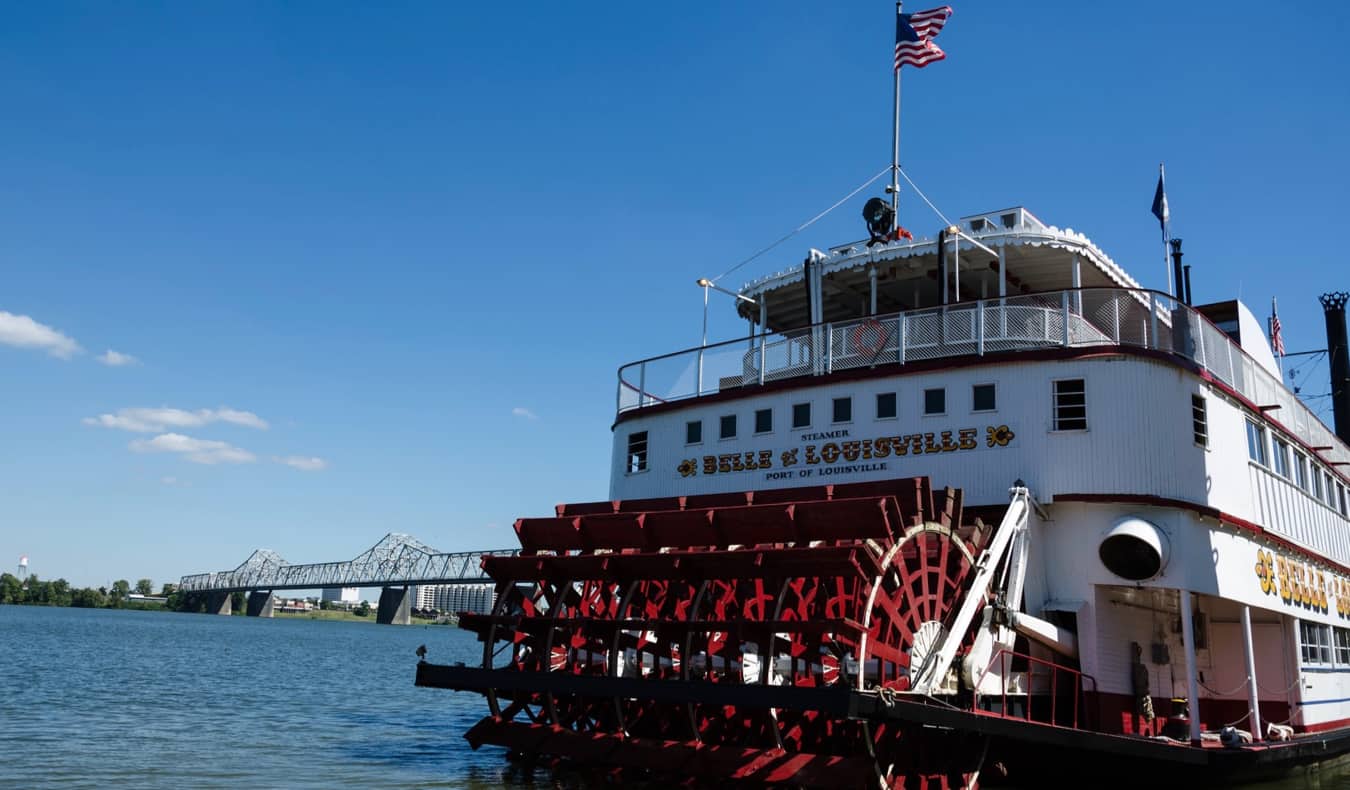
29. Louisville
Louisville sits on the Ohio River and is the largest city in Kentucky. I was surprised at how much I liked it and how much there was to do here. There’s an established theatre scene, a handful of museums and galleries, tons of delicious places to eat (it’s a solid foodie city), and all the bourbon you can drink.
Louseiville has a laid-back, artsy vibe to it. It feels much more like an Austin or a Portland than your traditional southern/midwest city. In the past, it was considered a fly-over city and was skipped by most people. It’s definitely not now.
WHERE TO STAY IN LOUISVILLE: Microtel Inn – While it may be 20 minutes from downtown, this budget-friendly inn is affordable, includes free breakfast and free parking, and has free Wi-Fi. It’s a no-frills choice but clean and comfy.
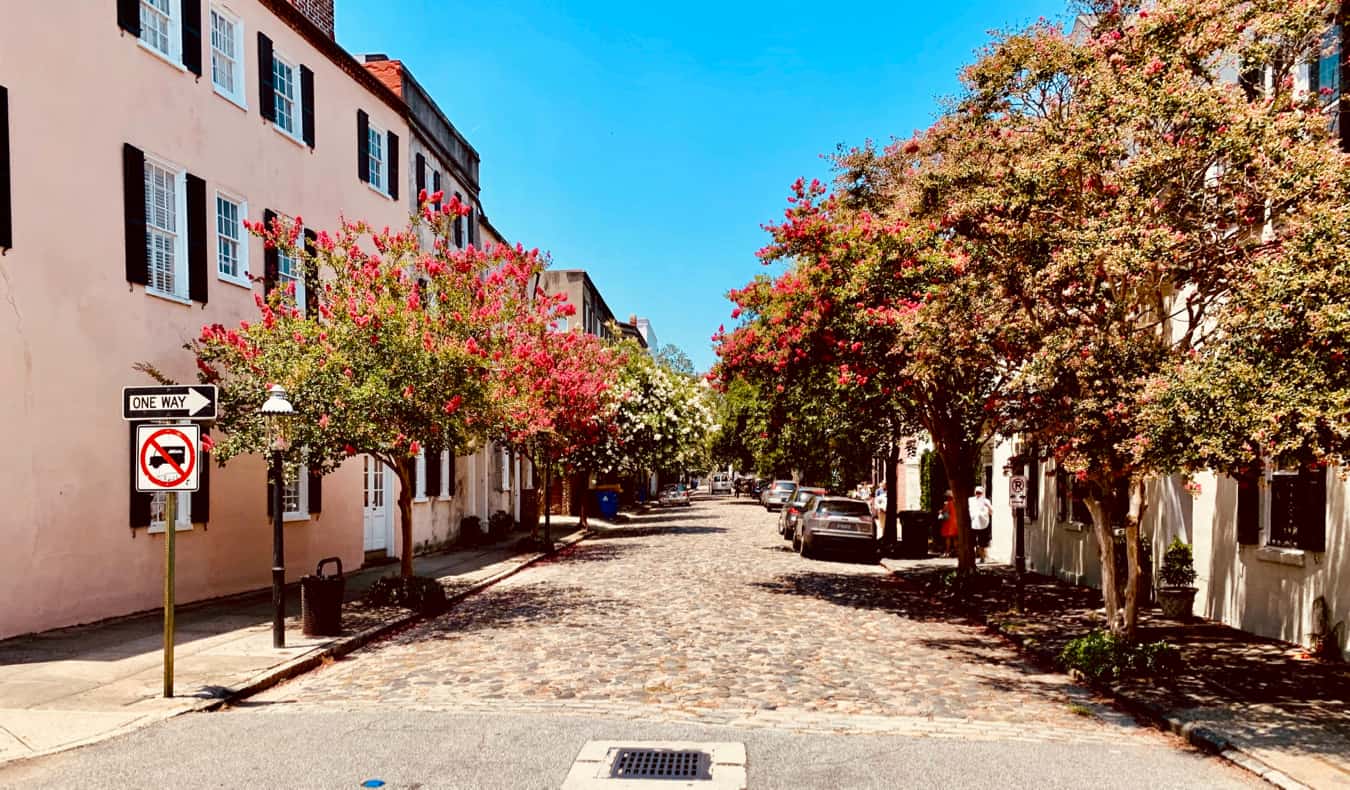
30. Charleston
Charleston is another lively city full of delicious food, fun bars, lots of history, and all the southern charm you’d ever need. It’s beautiful, the people are nice, and there’s a high, high concentration of world-class restaurants for such a small city. (If you love seafood, you’re going to love it here. This is one of the best cities in the country for seafood.)
WHERE TO STAY IN CHARLESTON: Charlestons NotSo Hostel – Located in a historic neighborhood, this laid-back hostel includes free coffee/tea and oatmeal and free Wi-Fi. The rooms are small but the beds are perfectly comfy.
31. Franklin
Located just outside of Nashville, Franklin is bursting with small-town charm. The city is full of history (there was a major Civil War battle here), a historic main street, and some really delicious bars and restaurants. I didn’t expect much and the city really surprised me. It’s the perfect two-night destination.
WHERE TO STAY IN FRANKLIN: The Harpeth Hotel – This upscale property features a restaurant on-site, fitness center, bar, and terrace. If you don’t want to splash out, check Booking.com for other options.
***
The United States is filled with too many “must-sees” places to visit to list in a single blog post. After all, the country is home to over 329 million people and covers 3.8 million square miles.
Just be sure to turn off the highways, head to the small towns, and discover some favorites of your own. The best of the USA is always away from the major highways in the little no-name towns with little diners, quirky shops, and friendly people!
For more travel tips on traveling the USA, read these other blog posts:
Book Your Trip: Logistical Tips and Tricks
Book Your Flight Find a cheap flight by using Skyscanner. It’s my favorite search engine because it searches websites and airlines around the globe so you always know no stone is being left unturned.
Book Your Accommodation You can book your hostel with Hostelworld. If you want to stay somewhere other than a hostel, use Booking.com as it consistently returns the cheapest rates for guesthouses and hotels.
Don’t Forget Travel Insurance Travel insurance will protect you against illness, injury, theft, and cancellations. It’s comprehensive protection in case anything goes wrong. I never go on a trip without it as I’ve had to use it many times in the past. My favorite companies that offer the best service and value are:
Want to Travel for Free? Travel credit cards allow you to earn points that can be redeemed for free flights and accommodation — all without any extra spending. Check out my guide to picking the right card and my current favorites to get started and see the latest best deals.
Need a Rental Car? Discover Cars is a budget-friendly international car rental website. No matter where you’re headed, they’ll be able to find the best — and cheapest — rental for your trip!
Need Help Finding Activities for Your Trip? Get Your Guide is a huge online marketplace where you can find cool walking tours, fun excursions, skip-the-line tickets, private guides, and more.
Ready to Book Your Trip? Check out my resource page for the best companies to use when you travel. I list all the ones I use when I travel. They are the best in class and you can’t go wrong using them on your trip.
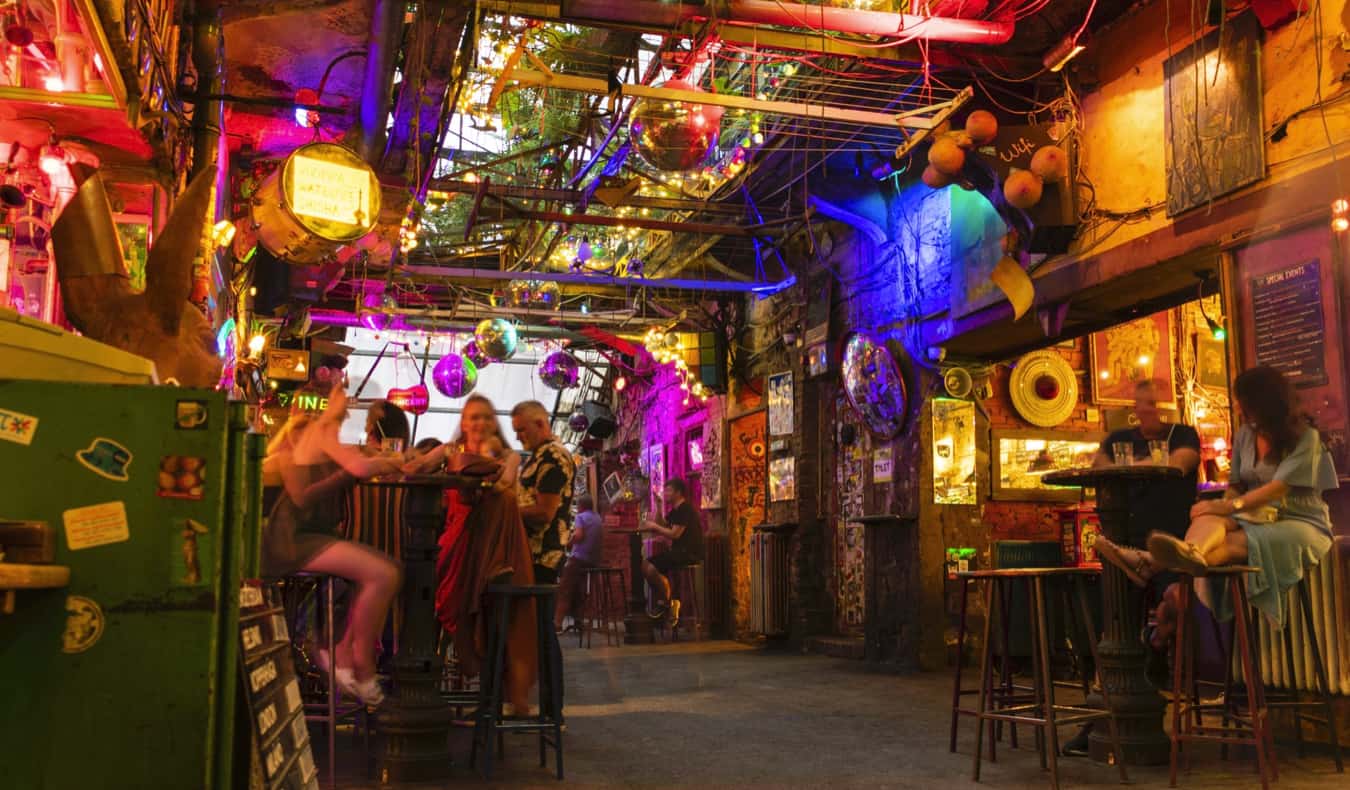
Ruin bars are all the rage in Budapest and have been around since the founding of Szimpla Kert, the mecca of all ruin bars, in 2002. These bars are built in Budapest’s old District VII neighborhood (the old Jewish quarter) in the ruins of abandoned buildings, stores, or lots. This neighborhood was left to decay after World War II, so it was a perfect place to develop an underground bar scene. These places were very off the beaten path, rough around the edges, and catered to artists, students, and alternative people.
But they became very popular and well known by 2010 and have nice gone mainstream, though their setting has not changed.
From the outside, these bars look like normal buildings. They don’t have large signs pointing the way, you don’t hear any loud noise, and there’s no line of people waiting to get in. But once you walk in and enter the inner courtyard, you find yourself in the middle of a hip, artsy, and funky bar bustling with crowds talking, dancing, and enjoying the laid-back atmosphere. Large bouncers, along with posted signs, ensure that people are quiet on their way out so as to not disturb the neighbors.
Each of these ruin bars has its own personality, but they all follow a few basic principles: find an old, abandoned place, rent it out, set up a bar, fill it with flea market furniture, have a few artists come in to leave their mark on the walls and ceiling, add in some weird antiques, serve alcohol, and watch people flock in.
When you’re in these bars, you feel like you’re drinking at your local thrift store. None of the furniture matches. It’s all old. It’s eclectic. It feels like they just ransacked your grandmother’s house. The ceilings are all designed differently and the places haven’t been repaired or fixed up, and there are still holes in the walls and visible pipes everywhere.
Though the Ruin Bar movement has become mainstream, many of the bars have done a good job of keeping their character and staying true to their roots — even as they fill up with more tourists.
Here is a list of the best ruin bars of Budapest:
Szimpla Kert
This was the original ruin bar. It opened in 2001, starting this trend. It’s one of the biggest ruin bars and still one of the most popular. Once an abandoned factory, now there’s a large open courtyard, a top floor filled with eclectic furniture, cocktail bars, music, and even an old, stripped-down Trabant (a communist car) to have a drink in. All the rooms have a different theme. They also sell pizza, which, after a few drinks, makes for the perfect walking-home snack. Everyone I take here says it’s one of the coolest bars they’ve ever been to. If you just visit one bar, make it this one.
Grandio
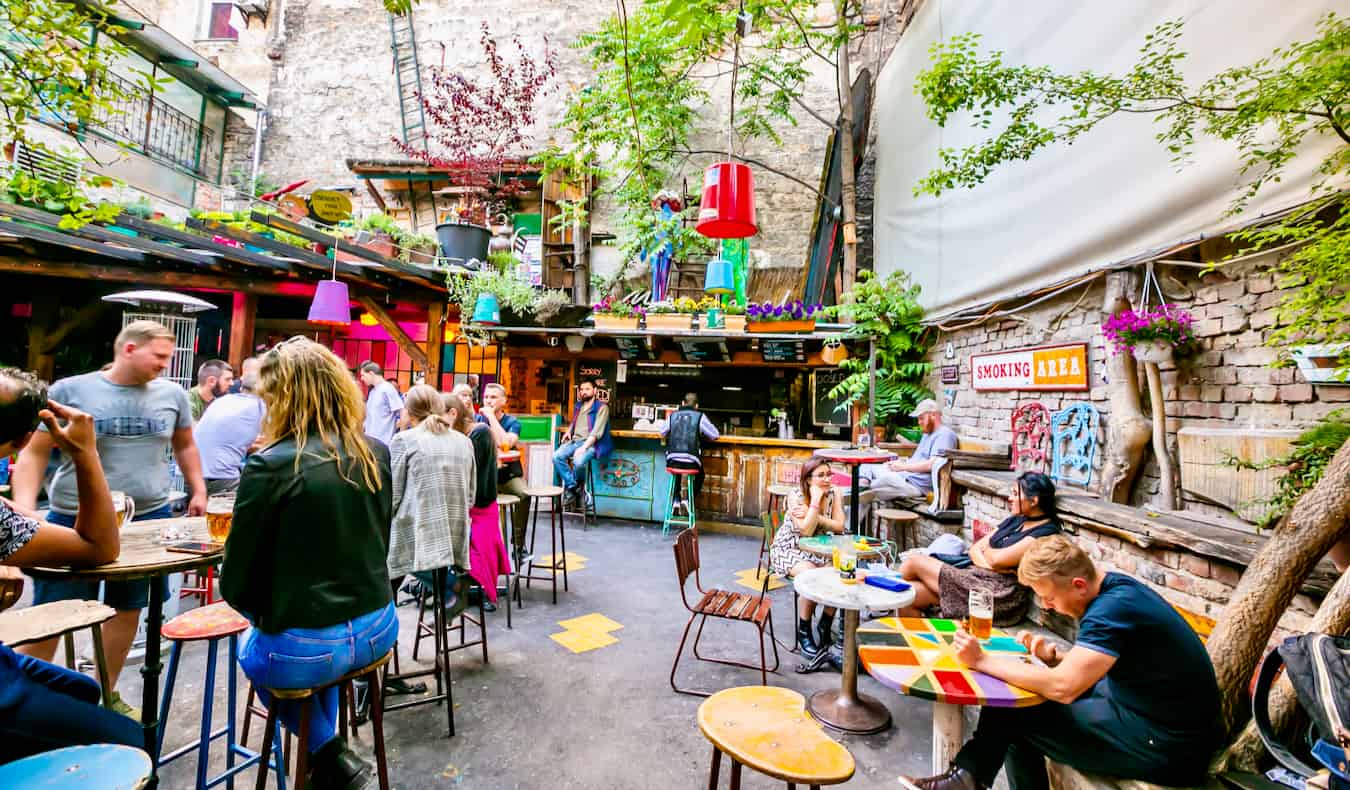
Grandio is a ruin bar and hostel in one. It’s famous for its outdoor, tree-filled courtyard but is mostly filled with travelers and people on bar crawls since it’s also a hostel. This is a good place to start your night and meet other travelers. During the day you can find locals relaxing here with a drink in the garden. It’s not quite as rowdy as the other bars and, since it’s smaller, it has a bit more of a laid-back and intimate vibe.
Dürer Kert
A former university building, this ruin bar and music venue lets you tap into your inner college student as you drink a few beers while playing foosball, Ping-Pong, darts, and a French game called pétanque (it’s fun). The courtyard garden is a good spot to enjoy all the live music that happens in this bar. The space is really big and there’s a lot of activity here. Plus, I love how the art and paintings on the wall.
Instant-Fogas Complex
The Instant-Fogas Complex is located in an entire apartment building and the biggest ruin bar in the city. There are over 20 rooms, 18 different bars, multiple dance floors, and 2 gardens. It’s one of the more club-like ruin bars. In Instant, you can sit in what were once individual apartments and relax on furniture that looks like it was found on the street. They’ve knocked down many of the walls to connect the apartments and make space for the DJs and dancing. Given its popularity and the fact that it’s more “clubby,” drinks here are a little more expensive than in other ruin bars. If you want to dance away the night, this is the bar for you.
Doboz
I’m not entirely sure if this place fits into the ruin bar culture. It was much fancier and trendier than the other bars I visited. It was like being in a “real” bar. However, I was taken there as part of a ruin bar tour, and, regardless, I loved this place. You walk into the courtyard and are greeted by a tree with a red-eyed robot attached to it. It looks like a Transformer is about to attack you. There are two main rooms: one red, the other blue. They play a lot of dance music, and this place fills up toward the end of the night. The only downside is that it has more limited opening hours than other bars.
Mazel Tov
This is one of Budapest’s newest ruin bars. Mazel Tov (located in the old Jewish quarter) is a community center and restaurant serving traditional Jewish cuisine by day. At night, the courtyard is a party with DJs and live entertainment entertaining guests. There’s also a restaurant here. I wouldn’t call this a “ruin bar” in the traditional sense but it’s a nice atmosphere, the decor is nice, and it’s got great drinks. It’s fancier than all the others so don’t expect something so “rough and tumble.”
Csendes Letterem Café & Bar
If you’re looking for a more laid-back vibe to balance out the party atmosphere of some of the other ruin bars but don’t want to sacrifice the cool vintage aesthetic, this is the bar for you. It’s located right in the heart of Budapest and is the perfect place to relax and share drinks with friends or settle in for an evening of conversation. The bar also serves food and has Wi-Fi, so you’ll often find digital nomads mingling here.
***
Budapest may sell itself on history and thermal baths, but the ruin bars are by far the most unique thing about this city. Even if you don’t drink, come spend time at these ruin bars because they are such a funky way to see a popular and totally unique aspect of life in Budapest (you can even take a self-guided tour of a few bars that includes skip-the-line entry). You’ll meet a lot of locals when you visit too! So, don’t miss them.
Get Your In-Depth Budget Guide to Europe!
My detailed 200+ page guidebook is made for budget travelers like you! It cuts out the fluff found in other guides and gets straight to the practical information you need to travel while in Europe. It has suggested itineraries, budgets, ways to save money, on and off the beaten path things to see and do, non-touristy restaurants, markets, bars, safety tips, and much more! Click here to learn more and get your copy today.
Plan your trip to Europe like a pro
Get all my best Europe travel tips as well as free planning guides sent straight to you and see more of the country for less!
Book Your Trip to Budapest: Logistical Tips and Tricks
Book Your Flight Use Skyscanner to find a cheap flight. They are my favorite search engine because they search websites and airlines around the globe so you always know no stone is left unturned.
Book Your Accommodation You can book your hostel with Hostelworld as they have the biggest inventory and best deals. If you want to stay somewhere other than a hostel, use Booking.com as they consistently return the cheapest rates for guesthouses and cheap hotels.
Don’t Forget Travel Insurance Travel insurance will protect you against illness, injury, theft, and cancellations. It’s comprehensive protection in case anything goes wrong. I never go on a trip without it as I’ve had to use it many times in the past. My favorite companies that offer the best service and value are:
Looking for the Best Companies to Save Money With? Check out my resource page for the best companies to use when you travel. I list all the ones I use to save money when I’m on the road. They will save you money when you travel too.
From watching the sun rise over ancient red rock to discovering rich Aboriginal culture, here are the best places to visit in the Northern Territory.
The Northern Territory is Australia’s wild and wonderful outback frontier. It’s a land of timeless landscapes, sacred Indigenous culture, dramatic natural wonders, and adventure.
Spanning the tropical Top End to the vast, sunbaked Red Centre, the Northern Territory offers a travel experience unlike anywhere else in Australia.
Here, cities like Darwin and Alice Springs are gateways to a different pace of life, where crocodiles rule the rivers, ochre-red deserts stretch for miles, and Aboriginal traditions run deep and strong.
Besides marvelling at iconic sights like Uluru, visitors to the Northern Territory often explore the ancient rock art galleries of Kakadu National Park or cruise through the breathtaking gorges of Nitmiluk.
But there’s more to the NT than just its highlights.
In fact, the region is full of surprises, from quirky outback pubs and bush markets to hidden waterholes and star-studded night skies.
While here, you get to meet saltwater crocodiles up close, experience Aboriginal-led tours that open your eyes to the world’s oldest living culture, or visit remote towns where time seems to stand still.
The Northern Territory is a land of awe-inspiring contrasts, with endless desert landscapes, lush tropical wetlands, towering gorges, and deeply rooted Indigenous culture.
There’s no shortage of incredible things to see and do here.
If you’re planning a trip, use this guide to discover the best places to visit in the Northern Territory.
The best way to get around is to rent a car and explore on your own! We recommend Rental Cars, which has the largest range of vehicles for the best value on the market.
1. Darwin City
As the gateway to the Northern Territory, Darwin is a vibrant destination in its own right, brimming with tropical charm, thrilling adventures, and a laid-back multicultural vibe. Perched on a stunning harbour, the city offers countless ways to bask in the warm, relaxed vibe.
Thrill-seekers can jump on jet skis for an exhilarating ride around Darwin Harbour, take to the skies on a unique heli-pub-crawl that lands at outback-style bars, or cool off at the sprawling Aqua Park at the Darwin Waterfront, the largest inflatable water park of its kind in Australia.
But there’s more to Darwin than just adrenaline. Discover the city’s blossoming food scene by wandering through its famous outdoor sunset markets, where sizzling street stalls serve everything from fresh seafood to bush-tucker-inspired dishes.
For another classic Top End experience, head down to Stokes Hill Wharf, a favourite spot to indulge in local fare, watch fishing boats come and go, and admire the breathtaking harbour sunsets.
Most journeys through the heart of the Northern Territory begin in Alice Springs, a true icon of the Outback.
Just a few hours by air from Australia’s major cities, Alice Springs serves as the perfect launchpad for exploring this vast, rugged region.
Nestled between the majestic East and West MacDonnell Ranges, Alice Springs is renowned for its stunning desert landscapes.
The town itself is brimming with personality, famous for its colourful outback characters and a warm, welcoming community that captures the essence of life in the Red Centre.
Alice Springs is also a hub of culture. You can visit local art galleries showcasing vibrant desert works or join cultural tours that share Dreamtime stories and ancient bush skills. Tour Alice Springs Desert Park or the Museum of Central Australia for insights into local nature and art.
Those travelling to Alice Springs shouldn’t miss a visit to Simpsons Gap, a dramatic gorge just outside town where sheer rock walls rise above a serene waterhole.
The iconic Alice Springs
3. Kings Canyon
Many travellers drive from Alice Springs to Kings Canyon, making it an epic road trip through the heart of the Red Centre.
Situated within Watarrka National Park, Kings Canyon is a must-visit for anyone wanting to witness the Australian Outback in all its breathtaking glory. This remarkable protected area is renowned for its spectacular landscapes, diverse wildlife, and strong ties to Aboriginal culture.
The iconic Rim Walk is a highlight. It leads you along the edge of the canyon from where you can enjoy sweeping views of the rugged gorge below and beyond.
But it’s not just the vistas that make Kings Canyon so special. The area is also rich in rare flora, tranquil rock pools, and hidden pockets of cultural significance that speak to thousands of years of ancient Aboriginal culture.
There’s no shortage of ways to explore this incredible place. Join ranger-guided activities to delve deeper into the area’s unique Aboriginal history or head off on a bushwalk to connect deeply with the land.
If you want to see Kings Canyon from a jaw-dropping perspective, don’t miss the chance to embark on a King’s Canyon: 15-minute Scenic Helicopter Tour, a thrilling way to take in the vast scale and raw beauty of the Northern Territory’s Outback region.
4. Uluru
The majestic Uluru stands as the crown jewel of Northern Territory attractions and is truly the heart of Australia’s famed ‘Red Centre.’
Rising dramatically from the surrounding desert plains, this immense sandstone is a living cultural landscape with over 30,000 years of deep cultural significance.
Uluru is sacred to the Anangu people, who have cared for these lands for countless generations and continue to share their stories, traditions, and wisdom with visitors today.
Thus, a visit to this remarkable place is also an opportunity to deepen your understanding of the world’s oldest living culture.
Join guided walking tours led by Aboriginal guides to learn about the area’s geology, rare plant life, native wildlife, and rich Aboriginal Dreamtime stories that breathe life into every cave and waterhole.
For a different perspective, you can hop on an Uluru Base Segway Tour at Sunrise, ride a camel across the red sands, try some self guided Uluru walks, or take to the skies on a scenic helicopter flight for breathtaking aerial views of this iconic landmark.
Uluru at sunset is almost mystical.
5. Berry Springs Nature Park
The Berry Springs Nature Park is one of Northern Australia’s most incredible places to unwind, surrounded by nature.
Just a short 30- to 40-minute drive from Darwin, this beautiful reserve is a favorite among locals, thanks to its crystal-clear swimming holes and lush tropical scenery. It also offers a fascinating glimpse into the region’s wartime past.
Berry Springs is best known for its inviting natural pools, where you can swim and snorkel among small fish and aquatic plants. Those eager to explore the underwater marine life should aim to visit during the dry season, from May to October, when the water is at its clearest and the weather is simply ideal.
However, during the wet season (October to April), the swimming holes may be closed due to flooding.
Berry Springs is one of those national parks where you can enjoy scenic walks. Wander along easy trails shaded by tall trees, keep an eye out for colourful birdlife, and soak up the serene atmosphere that makes this part of Northern Australia so special.
Berry Springs Nature Park also holds echoes of the past, once serving as a World War II rest and recreation area for thousands of troops.
No list of the best places to visit in the Northern Territory would be complete without mentioning Litchfield National Park, one of the region’s most accessible national parks.
Just a short drive from Darwin, Litchfield is a true gem among Northern Territory attractions, drawing visitors with its lush landscapes, thundering waterfalls, and inviting natural swimming holes.
While exploring Litchfield National Park, you’ll find some of the most spectacular scenery in the Top End, such as the rugged sandstone escarpments, monsoon forests alive with birdsong, and clear, spring-fed pools perfect for a refreshing swim.
Litchfield National Park is also known for its fascinating fields of magnetic termite mounds, standing like silent sentinels across the landscape, and offering a glimpse into one of the Outback’s more curious natural wonders.
With its spectacular landscapes and easy access from Darwin, it’s no wonder Litchfield National Park is considered one of the most-visited places in the Northern Territory.
Litchfield National Park has some incredible waterfalls.
Spanning an impressive 400 hectares, this immersive park showcases the variety of flora and fauna native to Central Australia, from colourful bowerbirds to unique wildlife, such as the intriguing orange-footed scrub-fowl.
Wander through a series of carefully recreated habitats that mirror the real ecosystems found across the Top End.
Meander along the Monsoon Forest Walk, step into the vast walk-through aviary where vibrant birds flutter around you, or dive into the fascinating underwater world at the park’s aquarium.
A visit to the Territory Wildlife Park is also a chance to deepen your understanding of how unique creatures thrive in the Northern Territory’s varied environments.
Join one of the daily wildlife presentations or book a special encounter for an up-close look at the park’s resident reptiles, birds, and mammals.
Kakadu National Park is one of the Northern Territory’s crown jewels. It’s a place of spectacular scenery and rich ancient culture in a landscape unlike anywhere else on earth.
Spanning nearly 20,000 square kilometres (roughly the size of a small country), Kakadu is Australia’s largest national park, proudly holding a dual UNESCO World Heritage listing for its outstanding natural wonders and immense cultural significance.
This world heritage site is also a paradise for walkers, with trails like the short yet rewarding Winds Walk near Nourlangie Rock leading to a viewpoint over the Arnhem Land escarpment.
There are also trails leading to thundering waterfalls, including Jim Jim and Twin Falls, where towering sandstone cliffs and crystal-clear plunge pools showcase the area’s scenery.
Take a cruise on the stunning Yellow Water Billabong to witness crocodiles basking on the banks, watch graceful jacanas tiptoe across lily pads, and marvel at sunsets that paint the sky in unforgettable hues.
As one of the richest regions of living Aboriginal culture on the planet, Kakadu is home to thousands of rock art sites, some dating back over 20,000 years, which share timeless stories of creation, hunting, and daily life.
The dry season, from May to October, is the best time to visit Kakadu National Park, when tracks open to spectacular spots like Jim Jim and Twin Falls.
For anyone exploring the Northern Territory, the West MacDonnell National Park is an absolute must.
Stretching west from Alice Springs, this remarkable expanse (often called the West MacDonnell Ranges) or simply “the West Macs”, showcases some of the most dramatic and diverse landscapes in the Northern Territory.
The West MacDonnell Ranges are a wonderland of towering ochre cliffs, hidden gorges, and tranquil waterholes. Popular activities include bushwalking, swimming, and simply soaking up the grandeur of the Outback.
As you wander around the park, you’ll encounter iconic sites like Ellery Creek Big Hole, a stunning natural waterhole framed by steep red cliffs. It’s one of the best spots in the West Macs to take a refreshing dip, have a picnic, or snap photos that capture the stark beauty of the region.
Other highlights include Ormiston Gorge, a favourite for spotting rock wallabies and enjoying sweeping views, and Simpsons Gap, just a short drive from Alice Springs, where towering cliffs create a dramatic backdrop at sunrise or sunset.
There are lots of beautiful watering holes in the Macdonnell Ranges!
10. Tiwi Islands
The Tiwi Islands are among the most unique cultural destinations in the Northern Territory. Located just 80 kilometres north of Darwin, this remote location feels like an entirely different world, where ancient Aboriginal traditions and artistic heritage flourish.
Often called the “Islands of Smiles,” the Tiwi Islands are renowned for their welcoming communities, intricate textiles, striking wood carvings, and colourful Pukumani burial poles that reflect deep spiritual connections to the land.
Join art workshops, watch traditional dance and smoking ceremonies, or explore local museums that reveal fascinating stories of Tiwi life and customs.
Beyond its cultural richness, the Tiwi Islands also showcase some of the Northern Territory’s most striking natural scenery. Think pristine beaches fringed by whispering palms, crystal-clear waters perfect for fishing adventures, and lush tropical bushland teeming with birdlife.
With limited visitor numbers and a deep sense of local pride, exploring the Tiwi Islands feels like stepping into a hidden world where ancient traditions continue to shape daily life.
11. Nitmiluk (Katherine Gorge) National Park
Also known as Katherine Gorge, Nitmiluk Gorge is one of the Northern Territory’s most spectacular natural attractions and a true highlight among the region’s many national parks.
This majestic system of 13 deep sandstone gorges carved by the Katherine River is a place of rugged landscapes, ancient culture, and endless outdoor adventure.
Nearby, the mighty Roper River winds its way through the eastern reaches of the Katherine region, adding even more opportunities for remote fishing, boating, and exploring the vast savanna country that defines this part of Australia.
While many come to navigate the breathtaking sandstone gorges of Nitmiluk National Park by boat, don’t miss Edith Falls (Leliyn) at the northern end of the park, where cascading waterfalls feed into tranquil swimming pools that are perfect for cooling off during the dry season.
Nitmiluk National Park is also one of those special places in the Northern Territory with deep Aboriginal significance. The Jawoyn people have called this land home for thousands of years, and you’ll find remarkable rock formations throughout the park that tell stories of creation and connection.
To round out your visit, don’t miss the chance to unwind once more in the region’s beautiful hot springs. The thermal pools around Katherine are a relaxing spot to visit year-round, and pair perfectly with a side trip to explore stretches of the nearby river.
12. Karlu Karlu (Devils Marbles)
Devils Marbles, known by their Aboriginal name Karlu Karlu, stand as one of the most striking and internationally recognised symbols of the Australian Outback, and undoubtedly one of the top places to visit in the Northern Territory.
Situated within the Tennant Creek & Barkly Region, these massive, gravity-defying granite boulders are scattered across a wide valley and glow a brilliant red at sunrise and sunset.
Karlu Karlu translates to “round boulders,” and this sacred site holds deep spiritual significance for the Kaytetye, Warumungu, Warlpiri, and Alyawarr people, who remain joint custodians of the area.
Their ongoing stewardship ensures that the cultural stories and traditions tied to this remarkable landscape are preserved.
As you explore Karlu Karlu, keep an eye out for small zebra finches and painted finches flitting among the rocks.
For the best experience at this iconic Northern Territory landmark, plan your visit between April and September when the temperatures are cooler and more comfortable for wandering through the reserve.
Devil’s Marbles
13. Arnhem Land
Arnhem Land is one of the most remarkable and truly untouched regions in all of Australia.
Offering a unique window into the ancient heart of the Northern Territory, this vast wilderness is famed for its rugged coastlines, soaring escarpments, serene billabongs, and strong, living Aboriginal culture.
The top attractions at Arnhem Land are not limited to natural wonders. There are also profound cultural experiences.
Guided tours led by Traditional Owners allow you to explore sacred rock art galleries that date back tens of thousands of years, witness intricate bark paintings in renowned art centres like those in Yirrkala, and learn about hunting, bush foods, and the deep spiritual connections the Yolŋu people have with their land.
Adventure lovers will also find Arnhem Land to be a paradise for four-wheel driving, with rugged tracks leading to remote beaches, natural swimming pools, and some of the most beautiful spots in Northern Australia.
DISCLAIMER: Some of the links in this article are affiliate links, which means if you book accommodation, tours or buy a product, we will receive a small commission at no extra cost to you. These commissions help us keep creating more free travel content to help people plan their holidays and adventures. We only recommend the best accommodations, tours and products that ourselves or our fantastic editorial team have personally experienced, and regularly review these. Thanks for your support, kind friend!
Wondering when to visit Antarctica? Having personally visited the White Continent 15 times at different parts of the year, here is a month by month breakdown of what to expect and what it’s like to travel to Antarctica during the summer season of the Southern Hemisphere: November – March.
Antarctica is without a doubt, the wildest and most remote place on Earth.
We’ve been all over the world, spending 17 years travelling to 100+ countries, and we can honestly say that there is nowhere quite like here.
Only the most intrepid people make the trek down to this frozen continent at the globe’s Polar Circle. And it’s not necessarily an easy journey to make!
You shouldn’t just book a trip to Antarctica on a whim. A successful Antarctic expedition requires months and months of careful planning and preparation.
Not to mention, visiting Antarctica is expensive because it is such a rare and unique travel experience.
So if you’re going to spend your hard-earned money on this once-in-a-lifetime journey, knowing when to go is essential to your preparation as well!
Regardless of how rugged and remote the Antarctic Peninsula is, many travellers who make this trip south claim it’s the best trip of their lives.
Landscape photographers, wildlife enthusiasts, and adventure seekers flock to Antarctica for many reasons.
There are vast, untouched landscapes filled with colossal icebergs, fields of pack ice, dramatic displays of light, and icy Antarctic waters.
Penguins, whales, seals, and seabirds thrive in the Southern Ocean and down to the Antarctic Circle.
READ MORE: Discover everything else there is to know about the white continent in our detailed travel to Antarctica guide!
This continent is one of the best places in the world to see whales breaching, fluffy penguin chicks hatching, and seal pups frolicking.
If you’re ready to start planning a trip to the pristine snowy landscapes of Antarctica, it’s important to consider which month you’ll be visiting.
We’ve been at all the usual times – early season, peak season and late season – and know what to expect.
We also get hundreds of emails every year from people wanting to know the best time to go, so we’ve finally put this article together.
This article will serve as an ultimate guide to the best time to visit Antarctica! So read on for a month by month breakdown of the wildlife happenings and weather conditions of Antarctica!
Month
Why Travel to Antarctica at that Time?
November
Pristine landscapes, sea ice
December
Stable weather, penguins building nests
January
Stable weather, penguin chicks, better accessibility for many landing sites
February
Great accessibility for most landings, good weather, whales
March
Peak whale watching season, beautiful sunrises and sunsets, potential for fresh snow
Want to know the best time to see epic sunsets like this in the Antarctic Peninsula? Read on!
When is the Best Time to Visit Antarctica?
It’s super important to research the best time to visit Antarctica before you book a trip down to the Polar Circle, so well done for finding your way to this article!
Tourists can only visit during the summer months, and it is recommended to start planning your trip at least 12 months in advance so you can figure out the best time and itinerary to go.
From November to March, Antarctica expedition cruises run frequently. But each month offers something a bit different!
After our very successful tour to Antarctica this season, we are going to be running another exclusive adventure down to the Peninsula in 2025, this time crossing the Antarctic Circle! Check out the Crossing the Antarctic Circle photography tour page if you’d like to learn more.
The best months for whale watching may not be the best months for seeing baby penguins for example.
Cooler temperatures mean massive icebergs, but warmer temperatures mean less sea ice and therefore further exploration into the Antarctic Circle.
We will give a detailed explanation of each month in Antarctica and what that means for wildlife movements, trip costs, and landscapes!
Some Antarctica trips also include visits to nearby islands like South Georgia and the Falkland Islands, so we’ll mention some of the important happenings there as well.
An Adelie penguin stands on the sea ice as we approach the Antarctic Peninsula at the end of November.
Antarctic Summer Season – Month by Month Breakdown
This guide to the best time to visit Antarctica will only cover the ‘summer months’: November to March.
Some Antarctic cruises may begin in late October, but it’s pretty rare. And the ones that do are usually on a mission into the Weddell Sea to visit the emperor penguin colony at Snow Hill, which is a very different and costly expedition.
We would recommend visiting Antarctica no earlier than November.
Many people also wonder about crossing the Drake Passage, and whether this notoriously rough patch of ocean is calmer at certain times of the year.
Unfortunately, the infamous Drake Passage can be turbulent at any time of year, so you’ll just have to conquer that obstacle regardless.
Trust us though, it’s part of the experience and despite potentially being seasick for a few days, it’s a badge of honour you can always wear proudly.
With today’s modern ships (unlike Shackleton’s Endurance) and sophisticated safety measures, crossing the Drake Passage isn’t necessarily dangerous, it’s just a bit rocky.
Just pop some motion sickness pills, relax, and enjoy the ride! You’ll be in Antarctica in no time!
Here is what you can expect when you arrive, depending on which month you visit.
Why would you visit Antarctica in the summer? For views like this!
November
November marks the start of the tourist season in Antarctica. That means relatively low prices and fewer tourists on the continent.
Cruise ships are just starting to arrive, and the wildlife is only just starting to become more active after a harsh winter.
Temperatures are still below freezing, snow levels are high, and icebergs are huge.
The plus side of these cold temperatures?
In November Antarctica’s landscape remains very much pure and untouched, with blankets of snow everywhere.
In a usual year, this is the only time to see significant blocks of sea ice before they start to melt over the summer.
The November sun is still quite low in the sky, which makes for spectacular sunsets.
Because of all these facts, our personal thoughts are, and many would agree that, November is the best time to visit Antarctica for landscape photographers!
In terms of wildlife, mating season is beginning for many species. Penguins begin mating and laying eggs.
You may even see some females waddling around with their eggs balanced on their feet.
In South Georgia, you’ll get to see elephant seals courting, which is a special, dramatic and confronting scene.
READ MORE: Want to see the huge king penguin colonies in South Georgia? Check out our expert guide on the best time to visit South Georgia!
And in the Falkland Islands, November is a great time to see wildflowers and active seabirds.
In late November, prices rise and tourism ramps up as the weather starts to get warmer!
Huge icebergs and ice floe await if you travel to Antarctica in November.
December
If you had to pick the absolute best month for visiting Antarctica, December might be it.
Temperatures warm up to around 0 degrees Celsius! Yet because the summer has only just begun, you can still see some large icebergs lingering from winter.
By late December, the summer sun is in full swing. The sun rises and barely sets, leaving around 20-22 hours of daylight the further south you get.
Warmer weather and longer days mean ample time for exploring Antarctica. It also means that wildlife becomes extremely active, so get your cameras ready!
Migrating whales begin to pass through the Antarctic waters, ready to feed on nutrient-rich organisms in the cold ocean.
Humpback whales are starting to become more common, having finished their migration south from the tropics.
Penguin chicks are also starting to hatch! You can see baby penguins in early December on the Falkland Islands, though the chicks are more frequent towards the end of the month on the Antarctic Peninsula.
In South Georgia, elephant seal pups are born and courtship rituals for seabirds are common.
There is also an airstrip on King George Island that opens up in December if you’d rather fly to Antarctica than sail through the tumultuous Drake Passage.
A fair warning though – weather is unpredictable and flights aren’t 100% guaranteed, so you do run a risk that your trip may be shortened if the planes can’t land.
So in our personal opinion, December is arguably the best time to visit Antarctica, due to the warm weather, long days, and active wildlife. Keep in mind, this is also one of the most expensive times to visit Antarctica!
We came across this beautiful Adelie penguin colony on Paulet Island in December. A real treat!
January
January is also considered peak season for travelling to Antarctica.
With almost 24 hours of daylight and temperatures around 10 degrees Celsius, many would consider January to be the best time to visit Antarctica.
This is the best time for land expeditions, as the snow and ice have receded, opening up more landing opportunities, and warm temperatures make hiking, Antarctica camping, and exploring more comfortable.
January means that sea ice breaks around the Antarctic Peninsula as well. So cruise ships can venture further into the continent, and the Ross Sea opens up for access.
Cruises into the Ross Sea are very exclusive. They are rare and expensive, but those who make the journey into the elusive Ross Sea can see the historic huts of previous explorers like Scott.
January is also the best time to see newborn penguin chicks on the Peninsula! These adorable critters are at their fluffiest in January, and the adult penguins are introducing their babies to the world.
You can also see penguin chicks in South Georgia. King penguins, gentoo penguins, macaroni penguins, and chinstrap penguins are common species to see on the island.
Seals and seal pups are also very active in both Antarctica and South Georgia. Fur seals are in the breeding season in South Georgia and therefore can be quite aggressive, so many operators struggle to make landings to ensure visitors keep their distance.
Whale sightings are also likely in January. Fin whales, minke whales, and orca whales make frequent appearances, though humpback whales are the most common ocean giants at this time.
Absolutely perfect conditions in peak season in Antarctica. Doesn’t get much more stunning than this, right?
February
As February approaches in Antarctica, summer is nearing its end. But temperatures are still quite high and sea ice and snow continues to shrink.
Sea ice is actually at its lowest in February. That means cruise ships can cross the Antarctic Circle with relative ease, and the Ross Sea is still open for access.
Penguin chicks are a bit older, meaning they’re more active and more inquisitive! You’ll often see parent penguins diving in and out of the water to find food for their growing chicks.
Active penguins also mean active predators. Orcas and leopard seals are easier to spot in February, as are fur seals and elephant seals.
February also offers amazing whale watching. Minke, sperm, southern right, and humpback whales are frolicking through the Antarctic waters, and blue whales might even make an appearance.
Seabirds are also playful in the late Antarctic summer. In South Georgia, you can even visit exclusive albatross nesting sites.
February offers great conditions for sailing and water activities like kayaking, though temperatures begin to drop later in the month.
One thing to consider though is that as there has been warmer temperatures and very little snow over the summer, many of the main landing sites will now be quite rocky and muddy.
They’ve also had thousands of people walk there before you, so the pristine feel is starting to fade and from a photographer’s perspective it’s not quite so unspoilt.
That’s not to say February is a bad time to go. The extra wildlife activity more than makes up for it.
Penguins are still very active in February!
March
March marks the end of the tourist season in the Antarctic Peninsula.
Temperatures start to get colder, daylight hours shrink creating epic sunrises and sunsets, and the weather starts to shift.
That also means there are fewer ships in Antarctica, and tour prices drop significantly.
By March, penguin chicks are a bit older and more curious. They’re often not afraid to walk right up to humans, so wildlife photographers will have a blast.
Baby penguins are molting as well, meaning they shed their grey fluff. Because snow cover is at its lowest since November, the landscapes aren’t as pristine in March as they were earlier in the season.
But March is by far the best time for whale watching in Antarctica!
Whales will have been feeding heavily for a couple of months now, so by March they become more playful and less focused on food.
It’s common to see whales breaching, and sometimes whales will even come right up to boats and kayaks to investigate what’s happening on the surface.
Fur seals and leopard seals are also still visible in March.
Sunrises and sunsets are more colourful as well because the sun is dropping lower in the sky again.
Don’t let the late season deter you – March is still a great time to visit Antarctica.
Want the absolute best opportunities to see humpback whales in Antarctica? Visit in March!
Can Tourists Visit the Antarctic Peninsula in Winter?
Though it’s not actually prohibited, tourists can’t really visit Antarctica in the winter.
During winter in the Southern Ocean, conditions are just not suitable for tourists to visit. The hours of daylight decrease rapidly.
By the peak of winter, the sun doesn’t rise at all, leaving the continent in complete darkness.
Temperatures are often -50 degrees Celsius, and snow and ice storms are common. Sea ice covers all the normal points of entry for ships as well.
You won’t find any Antarctica cruises running until late October, and this isn’t really a place where normal public transport exists! So tourists don’t have any reason to visit Antarctica in winter.
Many would consider late December or early January to be the best months to visit Antarctica.
Weather conditions are at their most favorable, with warm temperatures, low levels of pack ice, and long daylight hours. Wildlife is also very active, both in Antarctica and on neighbouring islands like South Georgia.
However, the early season and late season both have much to offer as well.
November is the best season for landscape photographers. The icebergs are still mighty, the snowy landscapes are still preserved, and the low sun makes glorious colors at sunrise and sunset.
February and March are the best months for whale watching! If you visit in the cooler months, just make sure you pack appropriately so you can stay warm.
So no matter which month you visit, you will find something special in Antarctica.
What is the best month to go to Antarctica?
The best month to go to Antarctica depends on what you are looking for. November is great for pristine landscapes, December and January is perfect for stable weather and penguin chicks, and February and March are the best time for whale watching.
When should I visit Antarctica?
In our opinion based on multiple trips at all times of the summer, you should visit Antarctica based on what you want to see – Unspoiled landscapes in November, abundant wildlife in December and January, and whales in February and March.
Whether relaxing by the beach, savouring world-class wine, or venturing into the outback, here are the best places to visit in South Australia.
South Australia is a wildly diverse and underrated gem in the southern heart of the country. It has a stunning coastline, world-class wine regions, rich Aboriginal heritage, incredible wildlife experiences, and dramatic outback landscapes.
If your idea of travel involves salty air, vineyard views, or red dirt underfoot, South Australia has the perfect adventure for you.
You can explore the rolling vineyards of the Barossa Valley or spot sea lions and kangaroos on Kangaroo Island. Wander through Adelaide’s bustling Central Market or marvel at the ancient landscapes of the Flinders Ranges.
As you explore quiet country towns, you might uncover hidden coves, sparkling lakes, and unexpected gems tucked away from the usual tourist trails.
These amazing places to visit in South Australia will surely impress!
Granite Island on the Fleurieu Peninsula
14 Best Places To Visit In South Australia
South Australia is home to rolling vineyards, rugged seaside escapes, remote desert adventures, and delightful country villages, giving you plenty to explore.
If you’re planning a trip, use this list to discover the best that this region has to offer. We recommend hiring a car and road-tripping your way around South Australia for the most freedom and flexibility.
The best way to get around is to rent a car and explore on your own! We recommend Rental Cars, which has the largest range of vehicles for the best value on the market.
1. Adelaide
You’ll likely begin your adventure in Adelaide, the vibrant capital of South Australia.
Known for its laid-back vibe and buzzing arts scene, Adelaide, South Australia has much to offer.
No visit to Adelaide is complete without wandering through the South Australia Adelaide Central Market, a food lover’s paradise filled with fresh produce, culinary delights, and multicultural flavors that reflect the city’s diverse community.
Sports enthusiasts will appreciate the iconic Adelaide Oval, not just for its cricket and AFL matches, but also for its historic architecture and sweeping views of the city from the rooftop climb.
Just a short drive from Adelaide, you’ll find the Adelaide Hills, one of the most charming tourist attractions in South Australia.
Start your day with a warm cup of coffee from one of the many cosy cafes in Stirling or Aldgate. These quaint villages are just as inviting as their coffee aromas.
Then, head over to Hahndorf, Australia’s oldest surviving German settlement, where you can wander along tree-lined streets, browse local shops, and dig into hearty Bavarian-style platters paired with a cold German beer.
If you’re visiting in spring or autumn, don’t miss the Mount Lofty Botanic Gardens, where the hills transform into a wonderland of vibrant colors and scenic walking trails.
For a real taste of the region, head to the famous Beerenberg Farm to sample world-renowned jams and sauces, or pick strawberries if you’re visiting between November and April.
3. Kangaroo Island
Kangaroo Island is just a short flight or ferry ride from the mainland, yet it feels like a world away. It’s worth considering if planning a weekend escape or even a spontaneous day trip in South Australia.
As one of the jewels in the tourism Australia crown, Kangaroo Island is full of rugged beauty and laid-back charm that makes you want to slow down and soak it all in.
One of the top things to do on the island is visit Seal Bay, where you can walk right onto the beach and watch wild sea lions bask, play, and snooze in their natural habitat.
If your idea of a holiday is doing absolutely nothing, you’re also in the right place. Kangaroo Island has some stunning isolated lodges that offer total tranquillity, where you can switch off and relax in style.
As a popular day trip destination, Kangaroo Island is often included in guided tours departing from Adelaide.
One of the top-rated options is the Kangaroo Island Full-Day Experience by Ferry, which comes highly recommended for those looking to see the island’s highlights in a single, hassle-free trip.
Kangaroo Island has so much natural beauty.
4. Flinders Chase National Park
For even more spectacular scenery, head to Flinders Chase National Park, a wild and rugged corner of Kangaroo Island that showcases nature at its most dramatic.
Spanning thousands of hectares on the island’s western tip, this protected area is a wonderland of coastal cliffs, dense bushland, and iconic rock formations.
Two of the park’s most famous attractions, the Remarkable Rocks and Admirals Arch, are absolute must-sees. The Remarkable Rocks live up to their name: these giant granite boulders have been carved into surreal shapes by the Southern Ocean.
Just a short drive away, Admirals Arch is another geological marvel, with a natural rock bridge framing crashing waves and the chance to spot New Zealand fur seals basking on the rocks below.
Flinders Chase is also rich in biodiversity. Keep your eyes peeled for kangaroos, wallabies, echidnas, and even the elusive platypus as you wander through its walking trails.
5. Naracoorte Caves National Park
Naracoorte Caves National Park is one of South Australia’s most fascinating and underrated gems.
Visiting Naracoorte is like stepping into a prehistoric time capsule, where you can see the remains of long-extinct creatures like giant kangaroos, marsupial lions, and enormous wombat-like creatures called Diprotodons.
During your visit, you’ll have the chance to explore caves on guided tours, including the spectacular Alexandra Cave and the eerie Victoria Fossil Cave, where paleontologists are still uncovering secrets from the past.
Some tours even include opportunities to crawl through narrow passages and experience real caving.
Above ground, the Wonambi Fossil Centre brings the story to life with lifelike recreations of these ancient beasts in their natural habitats.
6. Barossa Valley
Just a short drive from Adelaide, the Barossa Valley is a popular wine region home to world-class wineries, charming small towns, and rolling vineyards that stretch as far as the eye can see.
The picturesque valley is the perfect place to slow down, sip great wine, and soak up the good life.
One of the best ways to experience the Barossa is by joining a guided wine tour with lunch and tastings, which lets you sample award-winning drops without worrying about being the designated driver.
Sip your way through iconic cellar doors while gazing out over sun-drenched rows of vines.
For a taste of local life in Barossa Valley, head to the main street of Tanunda, where you’ll find quirky boutiques, antique stores, and gourmet eateries that showcase the region’s fresh produce and culinary talent.
7. Murray River & Riverland Region
In the southeast corner of South Australia, near the border with New South Wales, you’ll find the stunning Murray River & Riverland Region, a haven for riverfront relaxation, water sports, and wine country experiences.
Flowing through a landscape of dramatic cliffs, wetlands, and red gum forests, the Murray River winds its way past charming riverside towns and scenic viewpoints, making it a perfect destination for those craving beautiful scenery and a slower pace of travel.
One of the best ways to soak it all in is on a houseboat. As your boat cruises along the Murray River, you’ll see pelicans gliding across the water and kangaroos grazing along the bank.
If you’re into outdoor adventures, the Riverland is full of them: kayaking through quiet backwaters, hiking the trails of Murray River National Park, or birdwatching in one of the many conservation reserves.
The Riverland Region is renowned for its vibrant local produce and warm country hospitality. It’s home to award-winning wineries, citrus orchards, and plenty of riverside cafés where you can enjoy a delicious meal with a view.
The Flinders Ranges, South Australia’s largest mountain range, is another must-visit destination in the region. With its rugged peaks, deep gorges, and ancient geological formations, this region and national park delivers that true “big sky country” feel you won’t find anywhere else.
For an unforgettable experience, take to the skies on a scenic flight over the majestic Wilpena Pound, a massive natural amphitheatre carved into the range.
Back on the ground, base yourself in style with a stay at a luxury safari tent, where you’ll wake up to golden sunrises and the sounds of the outback all around you.
The Flinders Ranges are also a haven for outdoor lovers, with a network of 4WD tracks and walking trails that let you explore the rugged terrain at your own pace.
To truly understand the spirit of the Flinders Ranges, join a guided cultural tour and delve into Indigenous Adnyamathanha culture, stories, and sacred sites. The connection to Country here runs deep, and learning from Traditional Owners brings deeper insight into your journey.
Explore the Outback in the Flinders Ranges!
9. Fleurieu Peninsula
The Fleurieu Peninsula is bursting with things to do, from whale watching at Victor Harbor and Encounter Bay during winter to swimming with Southern Bluefin Tuna near Granite Island.
Just a short drive south of Adelaide, this South Australian gem is the perfect addition to your adventure in the region.
For those who love to browse and sample, the local markets of the Fleurieu Peninsula are a real treat. You’ll find stalls packed with fresh regional produce, homemade goods, and one-of-a-kind crafts, perfect for picking up picnic supplies or souvenirs.
Wine lovers will want to spend a day in McLaren Vale, one of Australia’s most celebrated wine regions, where cellar doors are nestled among rolling vineyards.
After a day of exploring, kick back in a cosy cottage or lakeside retreat, and admire the peaceful surroundings. If you’re into golf, the region is also home to a scenic golf course, where you can enjoy a round with sea views.
10. Clare Valley
Clare Valley is another one of South Australia’s best wine regions. It’s perfect if you’re into good food, great wine, and peaceful countryside views. Located just a couple of hours north of Adelaide, it’s an easy escape for a weekend getaway.
Clare Valley is best known for its world-class Riesling, and the best way to enjoy it is by cycling the Riesling Trail.
It’s an easy ride that links cellar doors, country pubs, and farm shops. Along the way, expect to find rolling vineyards, stone cottages, and several picnic spots.
You’ll also want to stop in the historic towns of Auburn and Sevenhill. Pop into art galleries, grab a bite at a cosy café, or check out the old churches.
Clare Valley is about slowing down, soaking up the scenery, and sipping wine in good company.
The Eyre Peninsula is another exciting destination in South Australia. With its stunning natural beauty, pristine beaches, and laid-back vibe, this is perfect for those who love being close to the ocean and far from the crowds.
Start your journey in Port Lincoln, the seafood capital of Australia. Enjoy a meal with a view at one of the seaside restaurants of Port Lincoln, which specialises in locally sourced fresh seafood and regional wines.
For thrill-seekers, Port Lincoln is the only place in Australia where you can cage dive with Great White Sharks. Just off the coast of the Eyre Peninsula, this heart-pounding experience puts you eye-to-eye with one of the ocean’s most formidable predators.
If you prefer your ocean encounters a little more relaxed, head to Coffin Bay and tour an oyster farm, where you can learn about the growing process and then slurp up the freshest oysters imaginable, straight from the water.
And don’t miss the chance to pack a picnic and unwind on one of the gorgeous beaches of the Eyre Peninsula, where you might have the whole stretch of coastline to yourself!
Port Lincoln has lots of pristine beaches.
12. Yorke Peninsula
If you’re after a laid-back escape by the sea, the Yorke Peninsula is the place to be. Located just a few hours from Adelaide, this relaxed spot has pristine beaches, charming fishing towns, and loads of outdoor fun.
A must-see is Innes National Park, located at the southern tip of the Yorke Peninsula.
It’s known for its rugged cliffs, secluded beaches, and picturesque hiking paths. Besides hiking, you can also go surfing, birdwatching, or whale-spotting during the cooler months.
Innes National Park is also a great place to camp or enjoy a picnic surrounded by ocean views. Be sure to explore the shipwreck sites and old lighthouses to get a glimpse of the region’s maritime history
The Limestone Coast is full of natural wonders and great places to eat and drink. This is the perfect spot if you’re after a getaway with beautiful beaches and countryside charm.
A must-see is the Blue Lake in Mount Gambier. The Blue Lake is a huge volcanic crater lake that turns a brilliant cobalt blue in summer. While you’re there, don’t miss the Umpherston Sinkhole. It’s a sunken garden that’s perfect for a relaxing stroll.
The Limestone Coast is also known for its incredible caves. Head to Naracoorte Caves National Park, a UNESCO World Heritage Site, to explore underground chambers and learn about ancient fossils.
You’ll also find great beaches, wineries, and coastal towns like Robe, where you can grab fish and chips and watch the waves roll in.
It’s a relaxed region that is definitely worth stopping by on your South Australian adventure.
The beautiful town of Robe on the Limestone Coast.
14. Coorong National Park
For nature lovers, be sure to check out Coorong National Park.
Stretching along the southeastern coast of South Australia, this long, narrow lagoon system is separated from the Southern Ocean by sweeping dunes, creating a landscape unlike anywhere else in the state.
Birdwatchers will surely have a great time here, as it’s home to hundreds of native and migratory species, including pelicans and black swans.
The park is also steeped in Aboriginal culture and was a shelter for the Ngarrindjeri people for thousands of years. You can take a guided cultural tour or enjoy kayaking, bushwalking, or fishing in the still waters of the lagoons.
Coorong’s serene beauty and remote vibe make it a perfect escape from the hustle and bustle. You can come here for a day trip or a quiet overnight stay under the stars.
It’s one of those places where time slows down, and the landscapes do all the talking!
DISCLAIMER: Some of the links in this article are affiliate links, which means if you book accommodation, tours or buy a product, we will receive a small commission at no extra cost to you. These commissions help us keep creating more free travel content to help people plan their holidays and adventures. We only recommend the best accommodations, tours and products that ourselves or our fantastic editorial team have personally experienced, and regularly review these. Thanks for your support, kind friend!
Whether you want diverse landscapes, rich history, or vibrant culture, here are the best places to visit in Victoria, Australia.
Victoria is a vast, diverse state in southeastern Australia, known for its scenic coastal drives, charming towns, buzzing city life, lush wine regions, and incredible natural landscapes.
Whether you’re craving a beach escape, a mountain retreat, or a taste of Australia’s thriving arts and food scene, Victoria delivers!
Many visitors flock to Victoria to drive through the iconic Great Ocean Road, spot little penguins on Phillip Island, wander through Ballarat’s living gold rush museum, sip wine in the Yarra Valley, and more.
But there are plenty of unexpected things to discover in Victoria, too.
Historic steam trains chugging through mountain ranges, quirky art-filled laneways, regional food and wine festivals, and off-the-beaten-path beaches make exploring this Australian state full of surprises.
The iconic Great Ocean Road in Victoria
19 Best Places To Visit In Victoria, Australia
From road-tripping along the iconic Great Ocean Road to sipping delicious wine in the Yarra Valley, spotting penguins on Phillip Island, or soaking in the hot springs of the Mornington Peninsula, here’s our list of the best places to visit in Victoria, Australia.
If you’re planning a trip soon, use this list to make the most of your adventure in Victoria!
The best way to get around is to rent a car and explore on your own! We recommend Rental Cars, which has the largest range of vehicles for the best value on the market.
1. Melbourne
No trip to Victoria is complete without experiencing the dynamic charm of Melbourne, the state’s buzzing capital. It’s known for its quirky art-filled laneways, world-class coffee shops, and a thriving creative scene.
Wander through its charming streets to uncover hidden street art, indie boutiques, and tucked-away cafés that locals swear by. Queen Victoria Market, Federation Square, and the Shrine of Remembrance are a few iconic landmarks to check out.
The city has plenty of fun adventures for all ages, from interactive museums to zoo experiences and even the chance to catch a live AFL game.
And when you’re ready for a breather, the coast isn’t far: St Kilda, Elwood, and the iconic Brighton Beach huts offer a sunny escape just minutes from the city.
Melbourne is the ideal gateway to exploring Victoria, thanks to the well-connected Melbourne airport, which welcomes travellers from various countries around the world.
Once you pick up your rental car from Melbourne Airport, you can hit the road and kick off your adventure with a scenic drive along the iconic Great Ocean Road.
Melbourne is an iconic city in Australia.
2. Great Ocean Road
If you’re a fan of road trips, the Great Ocean Road is one journey you simply can’t miss. Stretching over 240 kilometres along Victoria’s rugged southern coast, this leisurely drive boasts some of Australia’s most spectacular coastal scenery. Book a guided tour if you don’t want to drive yourself!
Whether setting off for a weekend escape or taking your time over several days, the route promises dramatic ocean views, windswept beaches, and charming seaside towns.
The iconic 12 Apostles (towering limestone stacks rising from the sea) are a must-see highlight, but the magic of the Great Ocean Road doesn’t stop there.
Take a detour inland to explore Lake Elizabeth, where early risers might catch a glimpse of elusive platypuses paddling through the mist. Or enjoy the charming coastal town of Apollo Bay.
Don’t miss a stop at the Great Otway National Park near the Great Ocean Road, where you can hike through lush rainforest, stand beneath towering waterfalls, or even go ziplining through the treetops.
Tucked away on the far eastern edge of Victoria, Mallacoota is a hidden gem surrounded by the breathtaking Croajingolong National Park.
While it may not sit directly along the Great Ocean Road, this off-the-beaten-path destination offers just as much natural beauty without the crowds.
Blessed with some of the warmest winter temperatures in Victoria, Mallacoota is a fantastic year-round escape for beach lovers, hikers, and water enthusiasts.
Spend your days kayaking along the Mallacoota Inlet, hiking scenic coastal trails, or boating through serene waterways.
History buffs should stop by historic sites, including the WWII Bunker Museum and the nearby Gabo Island Lighthouse, which offers a glimpse into the region’s maritime past.
Just a two-hour road trip from Melbourne, Phillip Island is one of Victoria’s most beloved coastal escapes.
The island’s biggest claim to fame is the enchanting Penguin Parade, where each evening, hundreds of little penguins waddle ashore at Summerland Beach. The Penguin Parade is a magical, must-see experience for all ages.
Animal lovers will also enjoy a visit to the Koala Conservation Centre, where you can stroll along tree-top boardwalks and spot koalas lounging in their natural habitat.
Marine life thrives around Phillip Island. Join a Wildlife Coast Cruise to see fur seals, dolphins, and even whales during migration season.
If you’re keen on surfing, head to Cape Woolamai, part of Victoria’s first National Surfing Reserve, with world-class waves and stunning ocean views.
History buffs can dive into the island’s past at the Phillip Island Historical Society Museum. And for motorsport fans, Phillip Island is also famous for its adrenaline-filled racing events, including motorcycle Grand Prix and car championships.
5. Wilson’s Promontory National Park
If you’re craving an escape into nature, Wilsons Promontory National Park delivers some of the most unforgettable outdoor adventures in Victoria.
Just under a three-hour drive from Melbourne, this stunning national park in the Gippsland region is the perfect day trip for those looking to explore and reconnect with the wild.
Often called “The Prom” by locals, the park is home to dramatic mountain ranges, powdery beaches, and trails that showcase the beauty of Victoria’s coastline.
Whether hiking to the top of Mt. Oberon for sweeping ocean views or swimming in the clear waters of Picnic Bay, every turn offers something breathtaking.
From granite peaks to lush rainforests and remote beaches, the landscapes here are as diverse as they are pristine.
Explore the beautiful coastline of Wilson’s Promontory.
6. Yarra Valley
Just an hour from Melbourne, the Yarra Valley is a dream destination for lovers of food and wine.
While the Great Ocean Road is full of coastal beauty, the Yarra Valley has rolling vineyards, award-winning cellar doors, and peaceful countryside charm.
This region is famous for its cool-climate wines, especially Chardonnay, Pinot Noir, and Shiraz.
Nature lovers can stroll through the towering trees of the Redwood Forest. Meanwhile, animal enthusiasts should not miss Healesville Sanctuary, one of the best places in Victoria to see Australian animals up close.
7. Mornington Peninsula
The Mornington Peninsula is a great idea if you’re looking for a destination that perfectly balances adventure and relaxation.
Just a short drive from Melbourne, this coastal gem hugs the shores of Port Phillip Bay and is known for its rolling vineyards, clifftop walks, and charming seaside towns.
One of the standout experiences here is soaking in the Peninsula Hot Springs, a natural thermal oasis where you can unwind in steaming pools surrounded by native bushland.
For wine lovers, the region is a dream. The Peninsula is home to some of Victoria’s top wineries, especially known for producing cool-climate Pinot Noir. Pair your tastings with a long, lazy lunch at one of the area’s award-winning restaurants, many of which overlook the vines.
If you prefer the outdoors, explore the stunning Mornington Peninsula National Park, hike scenic walking trails, or join a dolphin and seal snorkelling tour in Port Phillip Bay for a thrilling wildlife encounter.
8. Ballarat
Nestled in regional Victoria, Ballarat is a charming small town with a big personality, perfect for anyone looking to explore beyond the usual Great Ocean Road stops.
As one of the most historically rich destinations in the state, Ballarat is where you can learn more about Australia’s gold rush era.
Step back in time at Sovereign Hill, an open-air museum where costumed characters, gold panning, and candle-making demonstrations bring the 1850s to life.
History should check out the Arch of Victory and wander through one of the country’s oldest regional galleries, the Art Gallery of Ballarat.
Families shouldn’t miss the Ballarat Wildlife Park, home to local wildlife like kangaroos, koalas, wombats, and even crocodiles.
For a relaxing afternoon, stroll through the beautifully maintained Ballarat Botanical Gardens, or hop aboard a vintage tram at the Ballarat Tramway Museum.
Find some small-town charm in Ballarat.
9. Bendigo
Once a booming town during the gold rush, Bendigo has now become one of Victoria’s most vibrant cultural destinations.
While many visitors are drawn to the coastal wonders of the Great Ocean Road, those who venture inland to Bendigo are rewarded with fascinating history, stunning art, and cultural richness.
Start your journey underground at the Central Deborah Gold Mine, where you can experience life as a gold miner and learn about the town’s glittering past.
Art lovers shouldn’t miss the Bendigo Art Gallery, one of Australia’s oldest and most prestigious regional galleries, which houses an impressive collection of local and international art pieces.
Bendigo also proudly celebrates its Chinese heritage. A visit to the Golden Dragon Museum offers a captivating insight into the lives and traditions of the Chinese community that helped shape the city.
You can also stop by Bendigo Pottery, Australia’s oldest working pottery, for a hands-on experience and a glimpse into historic ceramic craftsmanship.
Tucked just east of Melbourne, the Dandenong Ranges are a peaceful escape, perfect for a scenic road trip.
This lush, mountainous region is best known for its towering forests, cool climate gardens, and quaint small towns that feel worlds away from city life.
Charming villages like Olinda, Sassafras, Belgrave, and Emerald are brimming with cozy cafés, boutique shops, and friendly locals.
One of the most iconic attractions in the region is the Puffing Billy Steam Train. Departing from Belgrave, this century-old train ride winds through lush fern gullies and across historic timber bridges.
It’s especially popular for families and train enthusiasts, but anyone will enjoy the novelty and charm of this classic experience.
For outdoor enthusiasts, the Dandenong Ranges deliver plenty of natural beauty to explore. The 1,000 Steps Kokoda Track Memorial Walk offers a moderate hiking challenge with historical significance and is surrounded by dense rainforest teeming with native birdlife.
Other highlights include Olinda Falls and Sherbrooke Forest, where you can spot lyrebirds or wallabies if you’re lucky.
11. Mildura
Located in the northwestern corner of Victoria, Mildura is a vibrant regional city rich in heritage and brimming with outdoor activities. Set on the banks of the Murray River, it’s a haven for those who love relaxed riverfront living.
Hop on a paddle steamer cruise, kayak along calm waters, or enjoy a sumptuous lunch at a riverside winery.
The Murray River also shapes the region’s laid-back lifestyle and provides a stunning backdrop for everything from fishing to sunset walks.
Beyond its river charm, Mildura also serves as a gateway to one of the most extraordinary landscapes in Victoria, Mungo National Park.
Just a couple of hours’ drive away in New South Wales, the Mungo National Park is a UNESCO World Heritage-listed site home to otherworldly sand formations, ancient Aboriginal culture, and the famous Walls of China dunes.
Exploring this park feels like stepping into another era, with guided tours offering insight into some of the oldest human remains found in Australia.
Don’t miss the crazy natural landscapes in Mungo National Park.
12. Grampians
The Grampians are among Victoria’s most rewarding regions to explore, especially suited for nature lovers, foodies, and culture seekers.
An easy day trip from Melbourne, this picturesque region is best known for the towering sandstone peaks of Grampians National Park, with some of the most scenic hiking trails, cascading waterfalls, and panoramic lookouts.
The park is also home to some of Australia’s most significant Aboriginal rock art sites, providing a deeper cultural connection to the land through ancient stories etched into stone.
Stop by Brambuk, the National Park & Cultural Centre, to learn more about the area’s rich Indigenous heritage.
Families will love quirky spots like Grampians Adventure Golf, where you can play a round surrounded by gardens and local sculptures.
You can also enjoy a relaxing bike ride around the Grampians or spend the day sampling bold reds, especially the region’s signature Shiraz, at one of the renowned wineries.
13. Daylesford
A place of indulgence and serenity, Daylesford is one of Victoria’s most enchanting destinations and a popular choice for a relaxing weekend day trip from Melbourne.
Known as the spa capital of the state, this charming town is a haven for those who love good food, fine wine, and serene surroundings.
Start your getaway by soaking in the region’s natural mineral waters at one of Daylesford’s luxurious bathhouses or spas. Then stroll through the Wombat Hill Botanic Gardens, perched on an extinct volcano, looking out at panoramic views.
The region is also a paradise for food and wine lovers. You’ll find local restaurants and renowned wineries showcasing fresh, seasonal produce and award-winning cool-climate wines.
For a more immersive experience, join a private wine tour and sample the best of the Macedon Ranges.
Nature lovers should venture a little further to Trentham Falls, one of the longest single-drop waterfalls in Victoria.
It’s an easy walk through scenic walking tracks with views that are especially striking after rainfall. You’ll also find boutique art galleries, antique stores, and artisanal markets scattered throughout Daylesford and nearby Hepburn Springs.
Just under an hour from Melbourne, Geelong is a vibrant port city that’s often overlooked, but absolutely worth a stop, especially on a road trip through the Great Ocean Road.
With its sparkling waterfront, laid-back vibe, and a growing arts and food scene, Geelong is certainly one of the best places to see in Victoria.
Start by exploring the lively city centre, where you’ll find beautifully preserved heritage buildings, trendy cafés, and a buzzing atmosphere. For a dose of history, step into the National Wool Museum, housed in a former wool store, and learn about Geelong’s important role in Australia’s wool industry.
Nearby, the Geelong Gaol Museum and Geelong Gallery also offer fascinating insights into the city’s past.
Surf lovers can hit the waves at Thirteenth Beach, while foodies will find no shortage of award-winning eateries, breweries, and wineries to satisfy every craving.
For something truly unforgettable, try hot air ballooning at sunrise or even sign up for a rally car experience if you’re after an adrenaline rush.
15. Warrnambool
Located at the western end of the Great Ocean Road, Warrnambool is a vibrant coastal city where you can enjoy fascinating wildlife encounters and discover a rich maritime history.
Whether you’re up for outdoor adventures or simply want to relax by the sea, this charming destination is a great place to include in your itinerary.
Warrnambool’s city centre is full of character, home to cozy cafés, heritage buildings, and cultural attractions, but it’s the coastline that truly steals the show.
If you’re into local wildlife, swing by Tower Hill Wildlife Reserve, a serene volcanic crater where you might spot koalas, emus, and kangaroos in the wild.
Home to some of Victoria’s most pristine beaches, Warrnambool is a haven for beachgoers and surfers. Head to Leevy’s Beach or Killarney Beach to catch a wave, or simply enjoy the peaceful surroundings and salty air.
From July to October, Logan’s Beach becomes one of the best places in Australia to spot Southern Right whales as they migrate and calve close to shore.
For more breathtaking coastal views, take a walk through Thunder Point Coastal Reserve, where rugged cliffs, ocean spray, and native wildlife create a dramatic landscape.
The beautiful Tower Hill Wildlife Reserve
16. Alpine National Park
Covering over 646,000 hectares, Alpine National Park is the largest national park in the state and offers a diverse range of outdoor activities across all seasons.
From hiking along rugged alpine ridgelines to mountain biking through dense forest trails, this park is a playground for thrill seekers!
In the warmer months, the park comes alive with activities like camping, fishing, and horseback riding along lush valleys and rivers. Winter transforms the region into a snowy wonderland, making it a top spot for skiing and snowboarding.
While many associate Victoria with the coastal beauty of the Great Ocean Road, Alpine National Park proves that the state’s high country is just as captivating.
The best places to go for skiing, snowboarding, or hiking and mountain biking in summer include Mount Hotham or Mount Buller.
17. Lakes Entrance
Lakes Entrance is one of Victoria’s most amazing places for a coastal escape, luring visitors with its sandy beaches, water-based adventures, and unique attractions.
Just over four hours’ drive from Melbourne, this laid-back town is a great destination for a road trip or a scenic day trip along the coastline.
A highlight of any visit here is the Gippsland Lakes, Australia’s largest inland water system. It’s where you can go boating, kayaking, fishing, or simply watching pelicans glide across the water.
Those looking to unwind can swim in calm waters or enjoy a peaceful picnic by the lake. Just nearby, you’ll find Ninety Mile Beach, one of the longest uninterrupted beaches in the world, where stunning coastline and crashing waves create the ultimate backdrop.
Stop by the Griffiths Sea Shell Museum, a quirky and fascinating place showcasing marine oddities, coral, and thousands of shells.
For a memorable way to explore the area, hop on a cruise through the lake system and feel the sea breeze as you take in the beauty of the water and surrounding bushland.
Embark on coastal adventures in Lakes Entrance!
18. Milawa and King Valley
Tucked away in Victoria’s picturesque High Country, Milawa and King Valley are an ideal stop for a food and wine-focused road trip.
These charming rural regions are known for their scenic beauty and gourmet offerings, perfect for a weekend getaway or a relaxing stop on a longer road trip adventure through Victoria.
King Valley is best known for its strong Italian heritage, with historic winemaking families crafting exceptional varietals like Prosecco, Sangiovese, and Nebbiolo.
The cellar doors here are warm and inviting, often paired with hearty local fare and stories passed down through generations.
Meanwhile, Milawa is famous for the iconic Brown Brothers Winery, where you can savour wine tastings alongside artisan cheeses, fresh bread, and gourmet produce sourced from the region.
Beyond food and wine, there’s plenty to explore in the region. The King River provides a refreshing alternative to sandy beaches, where you can swim and try canoeing or white water rafting. You can even book a hot air balloon ride to take in sweeping views of the vineyards and valleys from above!
Nestled in the heart of the Goulburn Valley, Shepparton is a vibrant regional city with many exciting attractions – definitely worth a stop on a road trip through northern Victoria.
One standout attraction is the Shepparton Motor Museum. It showcases an impressive classic, vintage, and muscle car collection. There are also interesting motoring memorabilia that tell the story of Australia’s rich automotive history.
The town is also great for avid walkers, with walking tracks around Victoria Park Lake.
Shepparton also boasts a strong local art scene at the Shepparton Art Museum, and the fun and quirky Moooving Art Trail, which features over 90 brightly painted cow sculptures scattered throughout the region.
DISCLAIMER: Some of the links in this article are affiliate links, which means if you book accommodation, tours or buy a product, we will receive a small commission at no extra cost to you. These commissions help us keep creating more free travel content to help people plan their holidays and adventures. We only recommend the best accommodations, tours and products that ourselves or our fantastic editorial team have personally experienced, and regularly review these. Thanks for your support, kind friend!
Here are the best beaches in Western Australia, from the remote Kimberley, to the Perth area, to the white sands around Esperance.
Western Australia beaches are some of the most famous Down Under.
With soft white sand, the turquoise waters of the Indian Ocean, and far fewer crowds than Australia’s East Coast, many would argue that the West is best when it comes to beaches in Australia!
Western Australia is also such a massive state, so there is incredible diversity in the coastline.
Up north, you have rich red cliffs, remote Indigenous communities, and wild 4WD tracks. Picture camel rides on the beach and vibrant sunsets with no one else around.
A bit further south, you have the marine life-filled waters of Ningaloo Reef.
Then you have the busy and accessible coastline around Perth. South of that, you can find epic surf breaks around Margaret River and more gleaming white sand beaches around Esperance.
Western Australia honestly has some of the best beaches in the world!
Cottesloe Beach in Perth
Best Beaches In Western Australia
From the remote coves and bays of the Kimberley to the powdery white sands of Esperance, Western Australia has some truly spectacular beaches.
Here is our list of the best Western Australia beaches to add to your bucket list. The best way to get around is with a rental car, or even a 4WD if you plan to explore Cape Leveque and the Kimberley.
The best way to get around is to rent a car and explore on your own! We recommend Rental Cars, which has the largest range of vehicles for the best value on the market.
Best Beaches In The Northwest
These beaches are situated in the northern corner of Western Australia, from Ningaloo Reef up to the Kimberley.
The incredible Cable Beach near Broome
Cable Beach
The iconic Cable Beach is one of Australia’s most well-known destinations.
Located in Broome, Western Australia, Cable Beach has 22 kilometres of pristine white sand framed by striking red cliffs and the turquoise waters of the Indian Ocean.
With calm, warm waters perfect for swimming during the dry season, Cable Beach is a fabulous place to spend the day. Camel rides on the beach are also popular, particularly at sunset.
A sunset camel ride across the stunning sands of Cable Beach while the sun sets over the ocean is a must-do in Western Australia!
Roebuck Bay
Roebuck Bay, nestled along the eastern shores of Broome, is a vibrant marine sanctuary celebrated for its ecology and culture.
Designated as a Ramsar wetland and part of the Yawuru Nagulagun Roebuck Bay Marine Park, the bay’s expansive tidal mudflats serve as vital feeding grounds for hundreds of thousands of migratory shorebirds.
The bay’s diverse habitats include mangroves, seagrass beds, and cliffs, all of which support lots of different wildlife.
Culturally, Roebuck Bay holds deep importance for the Yawuru people, the area’s Traditional Owners, who continue to engage with the land and sea through traditional practices.
Pender Bay
Pender Bay is a National Heritage-listed coastal wilderness on the remote Dampier Peninsula of the Kimberley region.
Accessible only by four-wheel drive, the bay is one of the most secluded and gorgeous beaches in Western Australia.
From June to September, the bay serves as a calving ground for one of the world’s largest populations of humpback whales, making it a prime location for land-based whale watching.
The area is also rich in cultural heritage, traditionally recognised as a shared space among the Bardi, Nyul Nyul, and Nimanburr peoples.
Visitors can explore Aboriginal rock art sites, join cultural tours, or enjoy the beach by swimming, snorkelling, or fishing.
Perched at the northernmost tip of Western Australia’s Dampier Peninsula, Cape Leveque is an isolated coastal gem with much to offer.
The area is traditionally owned by the Bardi Jawi people, who have inhabited the region for thousands of years and continue to share their deep connection to the land and sea through cultural tours and storytelling.
Access to Cape Leveque has improved with the sealing of the Cape Leveque Road, though a four-wheel-drive vehicle is recommended for the final stretch.
The beaches of Cape Leveque have rich red sandstone cliffs, white sand beaches, and crystal-clear turquoise waters.
Insane views around Cape Leveque on the Dampier Peninsula
Ardyaloon (One Arm Point)
Ardyaloon, also known as One Arm Point, is a remote Aboriginal community situated at the northern tip of the Dampier Peninsula in Western Australia.
Home to the Bardi Jawi people, the community is renowned for its strong cultural traditions and deep connection to the sea.
Visitors can explore the Ardyaloon Hatchery, an Indigenous-run aquaculture center that cultivates trochus shells and other marine species.
The area also has stunning coastal vistas and beaches, including views of the Buccaneer Archipelago and the dramatic tidal movements of King Sound.
While there is no accommodation within Ardyaloon itself, nearby communities such as Lombadina and Cape Leveque provide lodging options.
Access to Ardyaloon requires a visitor permit, so make sure you get this in advance.
Best Beaches In The West
Here are the best beaches along the west coast of the state. This coastline stretches from Perth up to Ningaloo Reef!
Osprey Bay is a highlight of Cape Range National Park on Western Australia’s Coral Coast.
The bay has crystal-clear waters for snorkelling, where you can see sea turtles, diverse fish species, and vibrant coral formations just meters from the shore.
Osprey Bay Campground is also one of the best camping spots on the Coral Coast. There are 44 unpowered sites where you can camp right next to the beach and fall asleep to the sounds of the sea.
Accessible via Yardie Creek Road, the campground is a short drive from Exmouth and serves as a perfect base for exploring the surrounding natural wonders.
Turquoise Bay
Consistently ranked among Australia’s top beaches, Turquoise Bay is another highlight of Cape Range National Park near Exmouth.
Renowned for its pristine white sands and crystal-clear waters, Turquoise Bay has some incredible snorkelling spots that you can access right from the shore.
As part of the UNESCO World Heritage-listed Ningaloo Coast, here you can observe vibrant coral gardens that rival that of the Great Barrier Reef on the East Coast.
Turquoise Bay has a “drift snorkel” where you can cruise with the current, and there are also calmer waters for families and beginner snorkellers.
The Ningaloo Coast – where stunning coral reefs lie right offshore!
Coral Bay
Coral Bay is a must-visit for any avid divers or nature lovers. If you want to explore the UNESCO World Heritage-listed Ningaloo Reef, Coral Bay is the perfect gateway!
You can snorkel in the exquisite coral gardens right from the shore. The bay’s crystal-clear waters are home to over 500 species of fish, manta rays, turtles, and, seasonally, whale sharks and humpback whales.
Coral Bay is a popular place for guided swimming or snorkelling tours, where you can swim right alongside marine life such as manta rays or whale sharks.
For those preferring to stay dry, glass bottom boat tours provide a window into the underwater wonders.
When you visit Shell Beach, you’ll realise it’s accurately named as the entire shore is composed of tiny white cockle shells! These shell fragments blanket the coast for over 60 kilometers. It’s an incredible natural phenomenon to see.
Visitors to Shell Beach can enjoy the serene, clear waters ideal for swimming and snorkeling, with the high salinity providing extra buoyancy.
Easily accessible via Shark Bay Road, about 45 kilometers southeast of Denham, Shell Beach offers an otherworldly experience unlike any sandy beach.
Jurien Bay Beach
Another one of the best beaches in Western Australia is Jurien Bay Beach.
Situated approximately 220 kilometers north of Perth, the beach offers a serene setting for swimming, fishing, and kayaking in the calm waters.
The beach is also home to the Jurien Bay Jetty, a popular landmark that extends into the ocean. It’s the perfect place for a scenic stroll or a day of fishing.
Nearby, the Jurien Bay Marine Park has amazing coral reefs and a healthy popular of rare Australian sea lions.
Sea lions in Jurien Bay Marine Park
Best Beaches In The Perth Area
If you’re not planning to stray from the Perth area, here are the best beaches around the city and the nearby Rottnest Island.
Cottesloe Beach
Easily one of the most beautiful beaches in Perth, Cottesloe Beach has white sand, sapphire waters, and a vibrant community atmosphere.
Located just 15 minutes west of Perth’s city center, Cottesloe Beach is the perfect escape from the city for a day of swimming, snorkelling, surfing, and sunbathing.
The beach is sheltered by offshore reefs and patrolled by lifeguards, ensuring a safe environment for visitors of all ages.
A highlight of Cottesloe Beach is the annual Sculpture by the Sea exhibition, where local artists display incredible sculptures along the shoreline.
The beach is also home to the historic Indiana Tea House, a landmark building with lovely ocean views.
A few of the best Western Australian beaches are located on Rottnest Island. This is one of the best day trips from Perth!
Rottnest Island has countless beautiful beaches, but Pinky Beach is one of the best.
Located on the island’s northern shore, Pinky Beach is sheltered from prevailing winds and has calm, clear waters ideal for swimming and beginner snorkelling.
A highlight of Pinky Beach is its proximity to the historic Bathurst Lighthouse, which provides a picturesque backdrop and can be reached via a scenic staircase from the beach.
The beach is also a prime spot for sunset viewing, with the setting sun casting a beautiful pink hue over the waters, giving the beach its name.
Parakeet Bay is another one of the best beaches on the northern shore of Rottnest Island.
This serene and secluded beach has gleaming white sands and calm, turquoise waters. It’s also sheltered by rocky outcrops and usually has tranquil conditions for swimming or snorkelling.
The gentle, shallow waters of Parakeet Bay make it a safe spot for families and less experienced swimmers.
Accessible by bike or the Island Explorer bus, Parakeet Bay provides a perfect escape for those looking to unwind amidst Rottnest Island’s stunning coastal scenery.
Rottnest Island has some of the best beaches in Western Australia!
Little Salmon Bay
Another one of the most stunning beaches on Rottnest Island is Little Salmon Bay.
Tucked away on the southern edge of the island, Little Salmon Bay also has the white sand and turquoise water that Western Australia beaches are so famous for.
This sheltered cove is part of a protected marine sanctuary. There is a marked snorkel trail at Little Salmon Bay, where underwater signs guide visitors through vibrant coral gardens.
Flanked by rocky outcrops and grassy dunes, Little Salmon Bay is a gorgeous island destination.
Elevate your experience by combining the ferry ride with skydiving over Rottnest Island! The view of the beaches from the sky is unparalleled.
Bathers Beach
Beach lovers should also consider a visit to Bathers Beach while they visit Perth. This lovely beach in Fremantle provides a historical journey through time.
Also known as Manjaree by the Whadjuk Noongar people, Bathers Beach is rich in cultural and historical significance.
It served as a vital meeting and trading place for the Whadjuk community throughout history. In 1829, Captain Charles Fremantle landed here, marking the beginning of European settlement in the region.
Bathers Beach is located beneath the historic limestone cliffs of Arthur Head Reserve, home to the Round House—the oldest public building in Western Australia.
The beach itself also offers gorgeous sunsets and swimming conditions.
Scarborough Beach
Scarborough Beach is another contender for the most picturesque beach in Perth. It’s actually often considered one of the best Western Australian beaches!
Just 15 minutes northwest of Perth’s city center, Scarborough Beach is a scenic beach but also a dynamic and vibrant coastal destination.
The beachfront has lots of nice amenities, including a heated ocean pool, a skate park, and the family-friendly Whale Playground.
There is some great surf, and the beach is patrolled year-round. The bustling esplanade also has lots of cafes, bars, and restaurants.
These amazing beaches are located south of Perth, along the southwest and south coast of Western Australia. From the iconic Lucky Bay to the beaches around Margaret River, there are lots of beautiful places to explore!
Meelup Beach
As you head south of Perth into the southwest of Western Australia, there are stunning beaches galore.
The Margaret River region has some fabulous beaches, notably Meelup Beach near Dunsborough.
Nestled within Meelup Regional Park, this northeast-facing beach offers calm, sheltered conditions ideal for swimming, snorkeling, and paddleboarding.
There are also some shaded grassy areas, picnic tables, and barbecue facilities nearby, making Meelup Beach the perfect place for a relaxing day by the sea.
Surrounded by native bushland and granite outcrops, Meelup Beach also serves as a starting point for scenic coastal walks, offering visitors breathtaking views of Geographe Bay and opportunities to spot local wildlife.
There is some world-class whale watching in this part of the Margaret River region as well!
Hamelin Bay
Another one of the best Western Australia beaches is Hamelin Bay in the Margaret River region. It’s just 30 minutes south of Margaret River town.
The bay is particularly famous for its friendly stingrays, including smooth stingrays, black stingrays, and eagle rays. These rays often glide gracefully through the shallow waters near the shore, offering visitors an unforgettable wildlife experience.
Beyond the marine life, Hamelin Bay has opportunities for swimming, snorkelling, and exploring nearby shipwrecks.
The surrounding Ngari Capes Marine Park and coastal cliffs provide scenic walks and panoramic views as well. There is lots to do in the beautiful Hamelin Bay!
Hamelin Bay, a gem of the Margaret River region
Shelley Beach
Shelley Beach, nestled within West Cape Howe National Park near Albany, Western Australia, is a secluded coastal gem perfect for outdoor adventures.
Surrounded by ancient granite boulders estimated to be over 1 billion years old, Shelley Beach is a beautiful spot for swimming and relaxing.
It’s also a fantastic fishing spot, with opportunities to catch species like Australian salmon, mulloway, whiting, and herring.
Hikers can explore nearby walking trails, including sections of the renowned Bibbulmun Track.
As the only section of West Cape Howe National Park that is accessible by two-wheel-drive vehicles, Shelley Beach is a highlight of Australia’s southwest.
Top things to do at Misery Beach include fishing, swimming, and taking on the scenic coastal trails.
Lucky Bay
One of the most iconic beaches in all of Australia is Lucky Bay. With fine white sand and pristine waters, Lucky Bay is picture-perfect.
Travellers flock to Lucky Bay to spot the iconic kangaroos that love to hang out on the sand. There is nothing quite as Australian as seeing kangaroos on the beach!
Lucky Bay is located in Cape Le Grand National Park near Esperance. This pristine stretch of coastline is perfect for swimming, fishing, kayaking, snorkelling, and relaxing in an idyllic setting.
Visitors can also explore nearby hiking trails like the Coastal Trail, which provides breathtaking views of the surrounding landscapes.
For those wishing to extend their stay, the Lucky Bay Campground offers facilities such as solar-heated showers and picnic areas.
Kangaroos on Lucky Bay Beach
Greens Pool and Elephant Rocks
Greens Pool and Elephant Rocks in William Bay National Park near Denmark, Western Australia, are two of the region’s most captivating natural attractions.
Greens Pool is known for its gorgeous turquoise waters surrounded by a ring of giant granite boulders.
A short walk from Greens Pool leads to Elephant Rocks, where massive, rounded granite rock formations resemble a herd of elephants wading in the shallow waters.
Visitors can descend a staircase between the rocks to access the secluded Elephant Cove, a picturesque beach perfect for photography.
Greens Pool and Elephant Rocks are both unique geological sites that showcase the natural beauty of Western Australia.
Little Beach is one of the most beautiful beaches near Albany, Western Australia.
This secluded cove offers panoramic views towards Mount Manypeaks and Waychinicup National Park.
A short walk from Little Beach leads to Waterfall Beach, where a seasonal waterfall cascades onto the shore.
Accessible via a well-maintained path from the car park, Little Beach is part of a protected area that supports diverse wildlife, such as the endangered noisy scrub-bird.
Whether you’re seeking relaxation or adventure, Little Beach in Two Peoples Bay Nature Reserve is a fabulous place to visit!
Waterfall Beach
Another one of the most beautiful beaches in Western Australia is Waterfall Beach.
This secluded crescent of white sand and turquoise water is just a 1km walk from Little Beach.
Combine the two into one trip! The walk between the beaches is beautiful as well.
Waterfall Beach is sheltered by rugged granite outcrops and is unpatrolled, so it really feels like a hidden gem.
From the rocks about Waterfall Beach, a waterfall cascades through the vegetation onto the shore. Hence the name!
Hellfire Bay is another highlight of Cape Le Grand National Park near Esperance.
I might be sounding like a broken record, but Hellfire Bay also has captivating white sands and turquoise water. Western Australia is absolutely packed with beaches like this!
The rugged mountains and granite cliffs add a bit of texture to the classic beach vibes.
Explore the best of the area by hiking the Cape Le Grand Coastal Trail, which connects Hellfire Bay with nearby Thistle Cove and Le Grand Beach.
Or join a guided 4×4 tour of Cape Le Grand National Park to see Hellfire and some other beaches and sand dunes with an expert guide!
Twilight Beach
All the beaches around the Esperance area are incredible. But Twilight Beach is often considered one of the best!
This picture‑perfect coastal haven has, of course, stunning natural colours with its brilliant white sand and vibrant blue waters.
Protected on its western end by offshore rock formations, the pristine beach offers calm, shallow waters perfect for young children and beginner surfers. The eastern side of Twilight Beach has bigger waves ideal for more experienced surfers.
Twilight Beach is beautiful even in cloudy weather.
Wharton Beach
Last but not least on our list of the best beaches in Western Australia is Wharton Beach.
Easily accessed via a 4WD beach drive or by parking above at Duke of Orleans Bay Caravan Park, Wharton Beach is popular yet manages to feel wild and secluded.
This seldom‑crowded gem is perfect for swimming, snorkelling, fishing, surfing (particularly near the western end), and even dolphin spotting.
Stretching across a sweeping 4.5 km crescent, Wharton Beach is consistently praised as one of Australia’s most stunning beaches!
DISCLAIMER: Some of the links in this article are affiliate links, which means if you book accommodation, tours or buy a product, we will receive a small commission at no extra cost to you. These commissions help us keep creating more free travel content to help people plan their holidays and adventures. We only recommend the best accommodations, tours and products that ourselves or our fantastic editorial team have personally experienced, and regularly review these. Thanks for your support, kind friend!