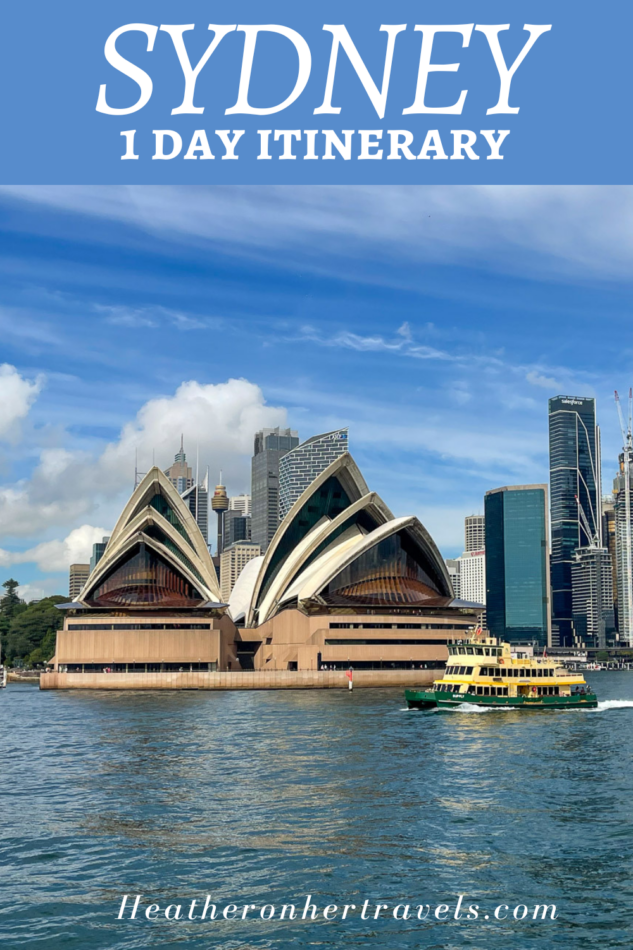
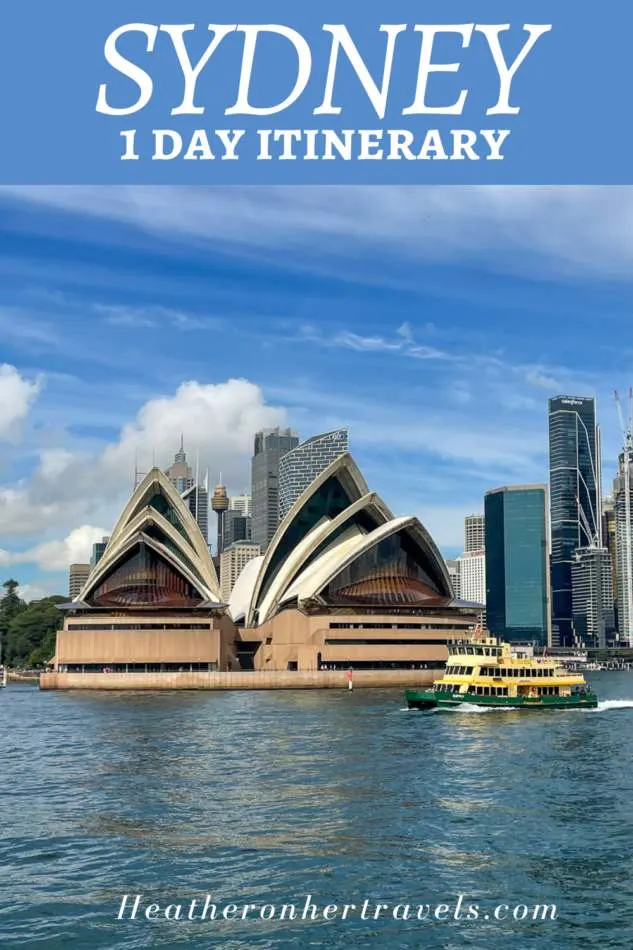
If you only have one day in Sydney Australia, and want to see the highlights, we’ve created this 1 day itinerary to give you a taste of this very walkable city. We’ll explore Sydney’s history, enjoy waterfront views at the Sydney Opera House, dip into some art and culture and enjoy the relaxing green space of the Botanic Garden.
Sydney 1 day itinerary
For those with an additional day or two, or anyone wanting more time at the beach, we also have some day trip ideas. Just a short bus or ferry ride from the city centre, you can dip into Sydney’s beach lifestyle at Bondi Beach, Manly or Watsons Bay.
If you are visiting Sydney for the first time, whether on a cruise or as part of a wider tour of Australia, this 1 day Sydney itinerary offers something for everyone.
Bondi Beach Sydney
This article may contain affiliate links that provide commission on purchases you make at no extra cost to you. As an Amazon Associate I earn from qualifying purchases.
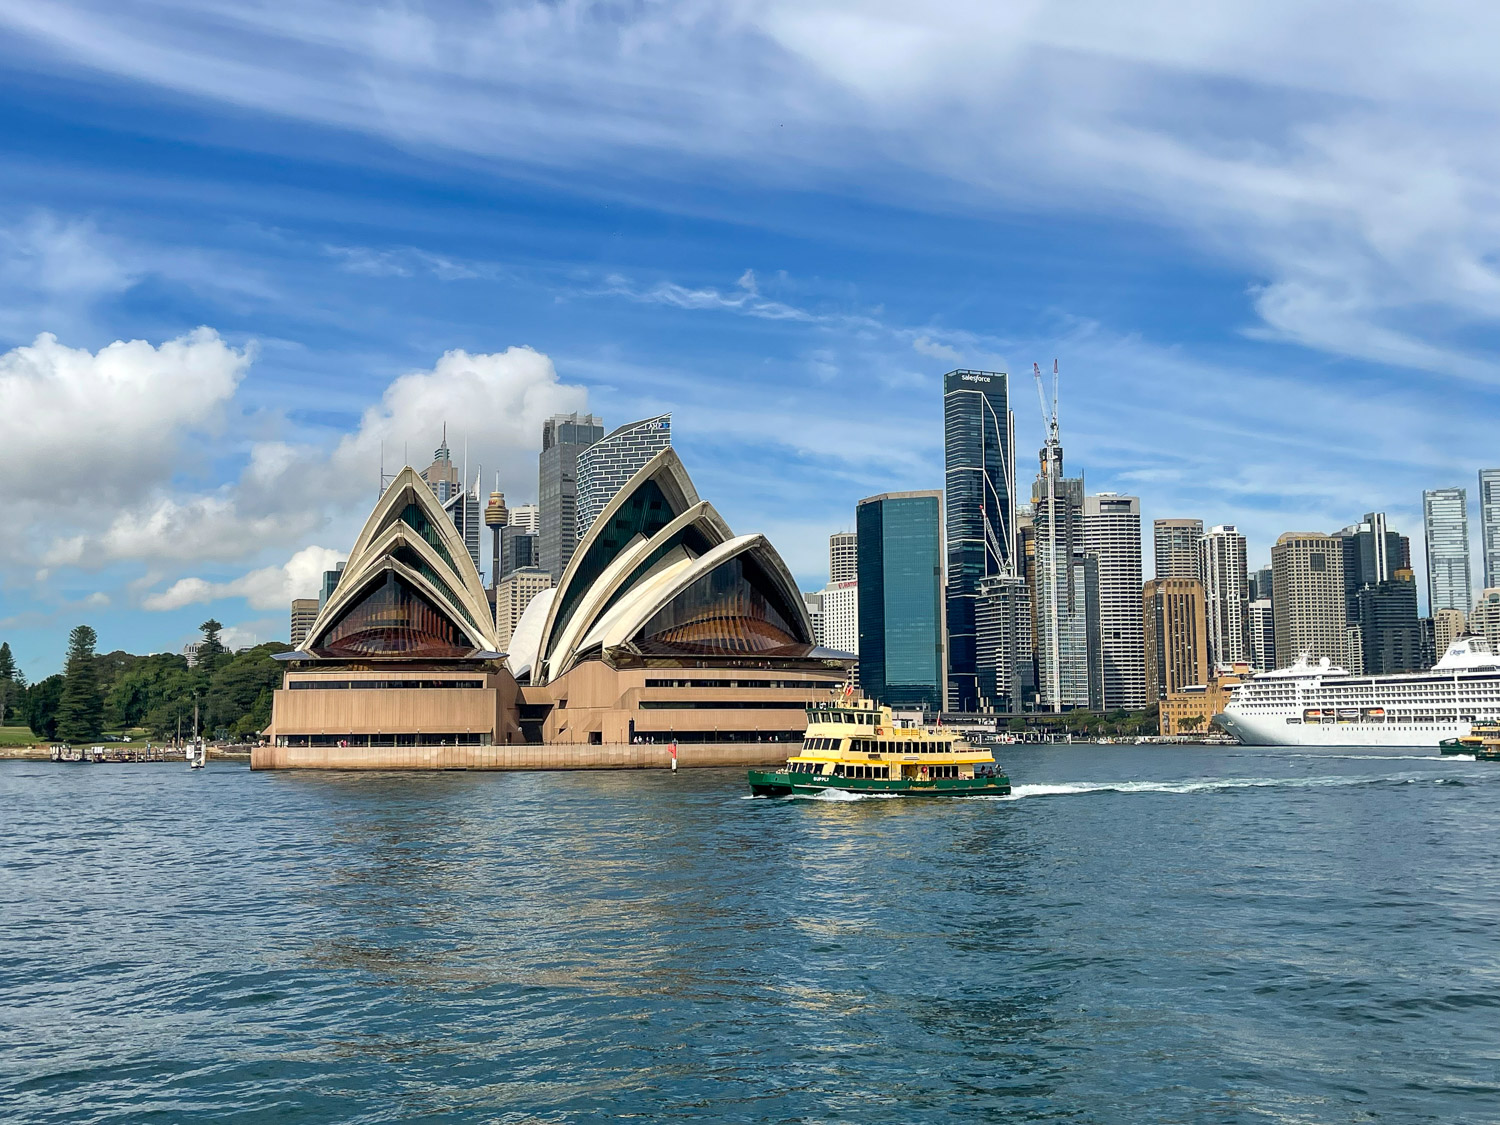
Let’s start our day in Sydney at Circular Quay. Not only is this where the cruise ships dock, but all the harbour ferries come and go from here and it’s centrally located on bus and train routes.
Keen to see Sydney?
Here’s a quick version of the Sydney highlights in one day. All the attractions mentioned are free to visit, although of course you’ll need to budget for refreshments and any booked tours. We also have a short and printable version of this itinerary to download below.
The Rocks – an historic neighbourhood where the colony was founded. (1 Hour)
Coffee break at Museum of Contemporary Art ground floor cafe
Sydney Opera House – Sydney’s most iconic cultural attraction (1 Hour)
Royal Botanic Garden – 30 hectares of lawns, trees and themed gardens (1 hour)
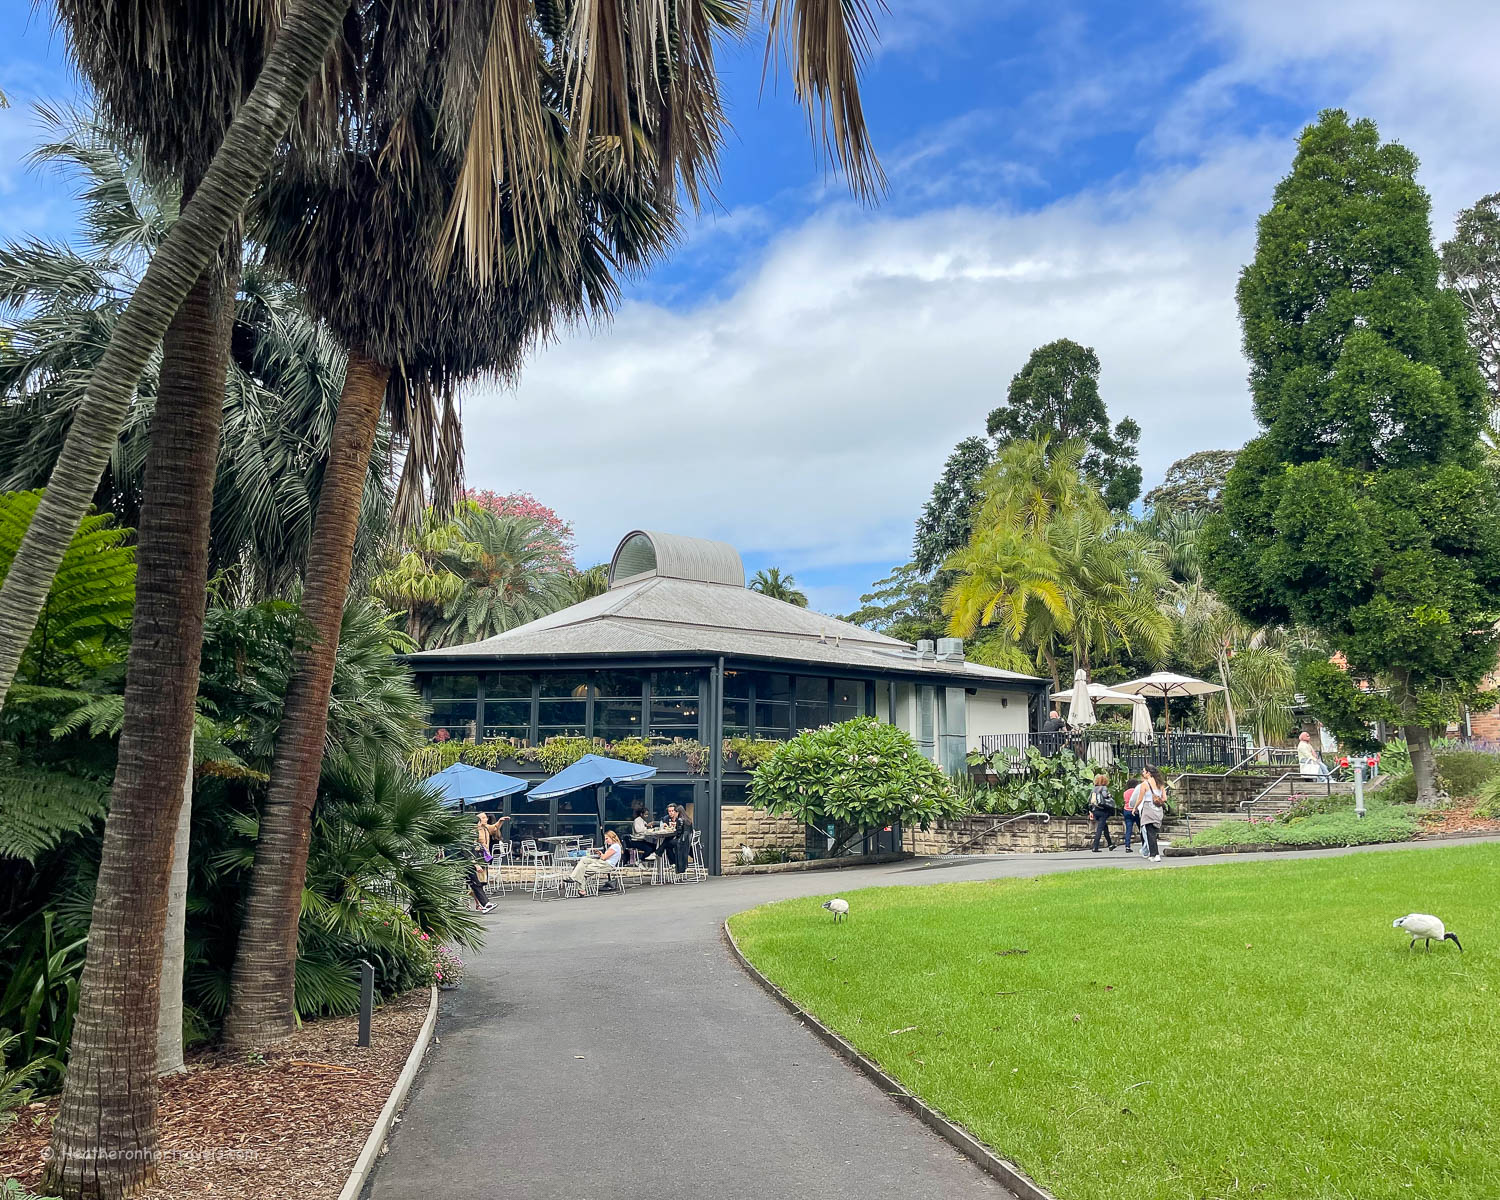
Lunch break at Farm Cove Eatery in the Botanic Garden
Option to head to the beach at Bondi, Manly or Wilson Bay for the afternoon or alternatively stay in central Sydney
Art Gallery of New South Wales ( 1 hour) – a free art gallery of indigenous and other Australian artworks – or alternatively
Hyde Park Barracks (1 hour) – a free museum dedicated to the experiences of the convicts who helped found Sydney
MacQuarie Street – (30 mins) – walk past some of Sydney’s imposing 19th century government buildings
Martin Place (Central Business District) – (30 mins) – soak up the buzz of Sydney’s business district
Ice Cream at Messina Gelato
Walk back to Circular Quay – admiring the varied architecture along George St or Pitt St (30 mins)
Sunset drinks at the Opera Bar, Sydney Opera House
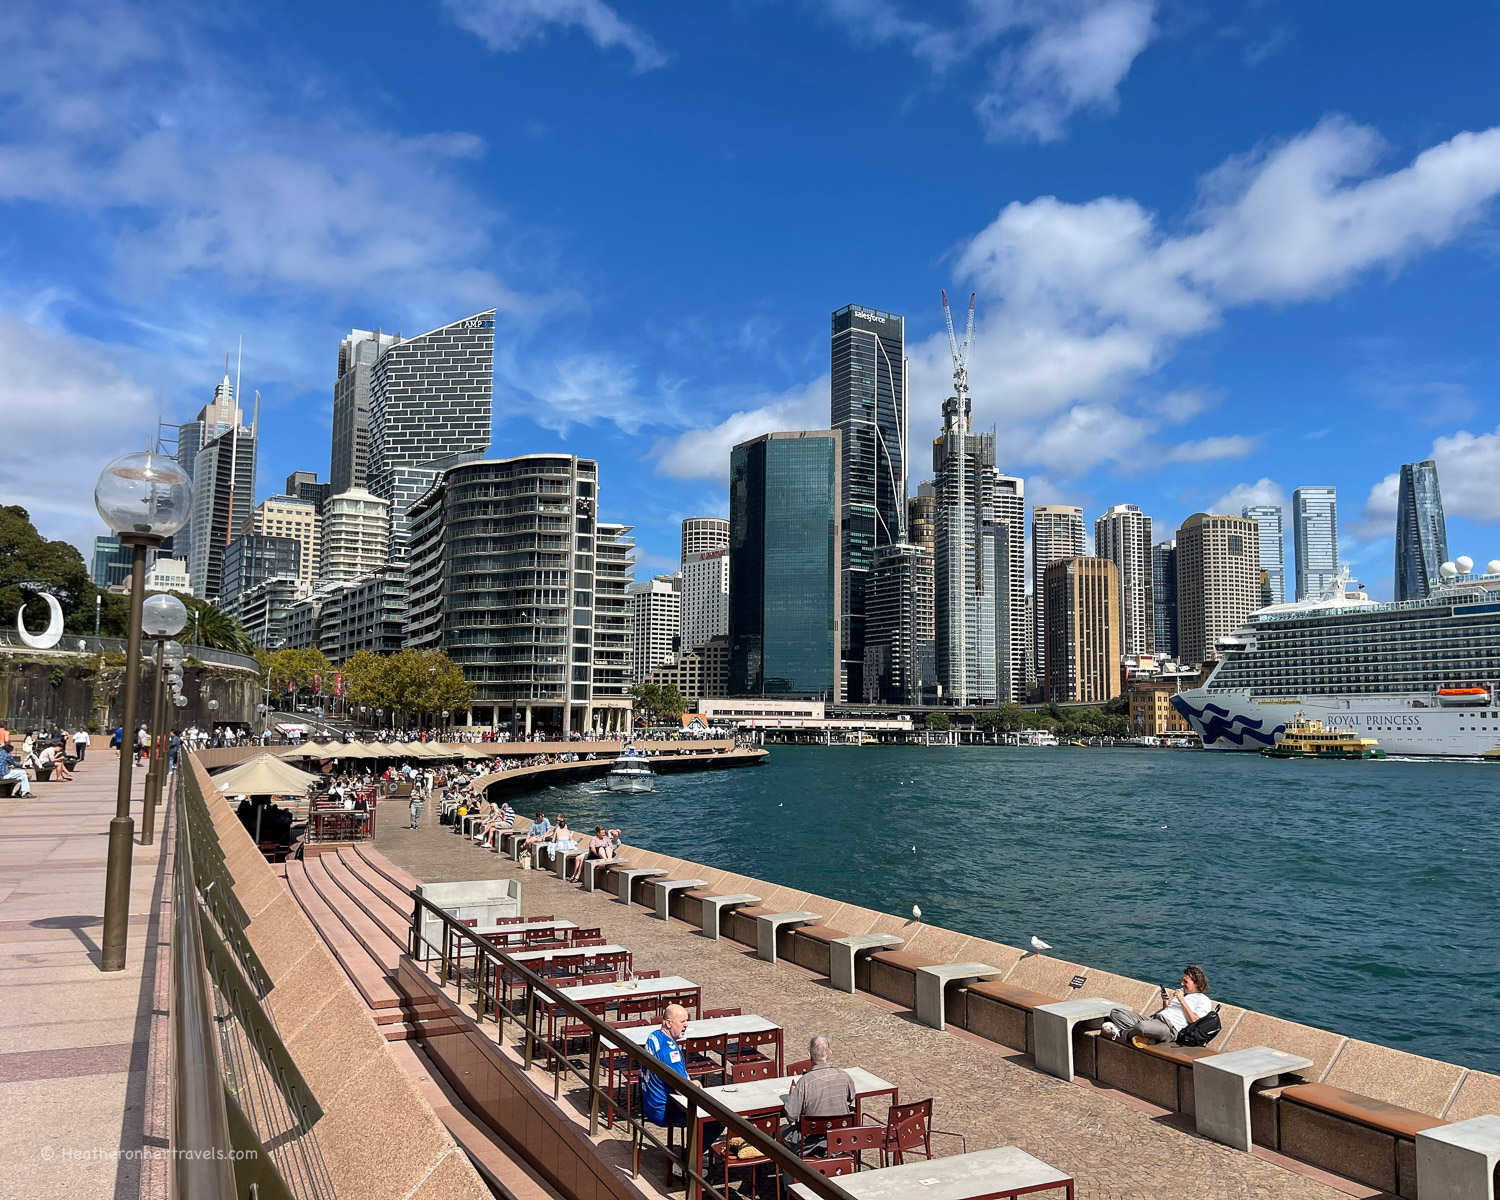
Circular Quay and CBD Sydney
The early history of the Sydney area
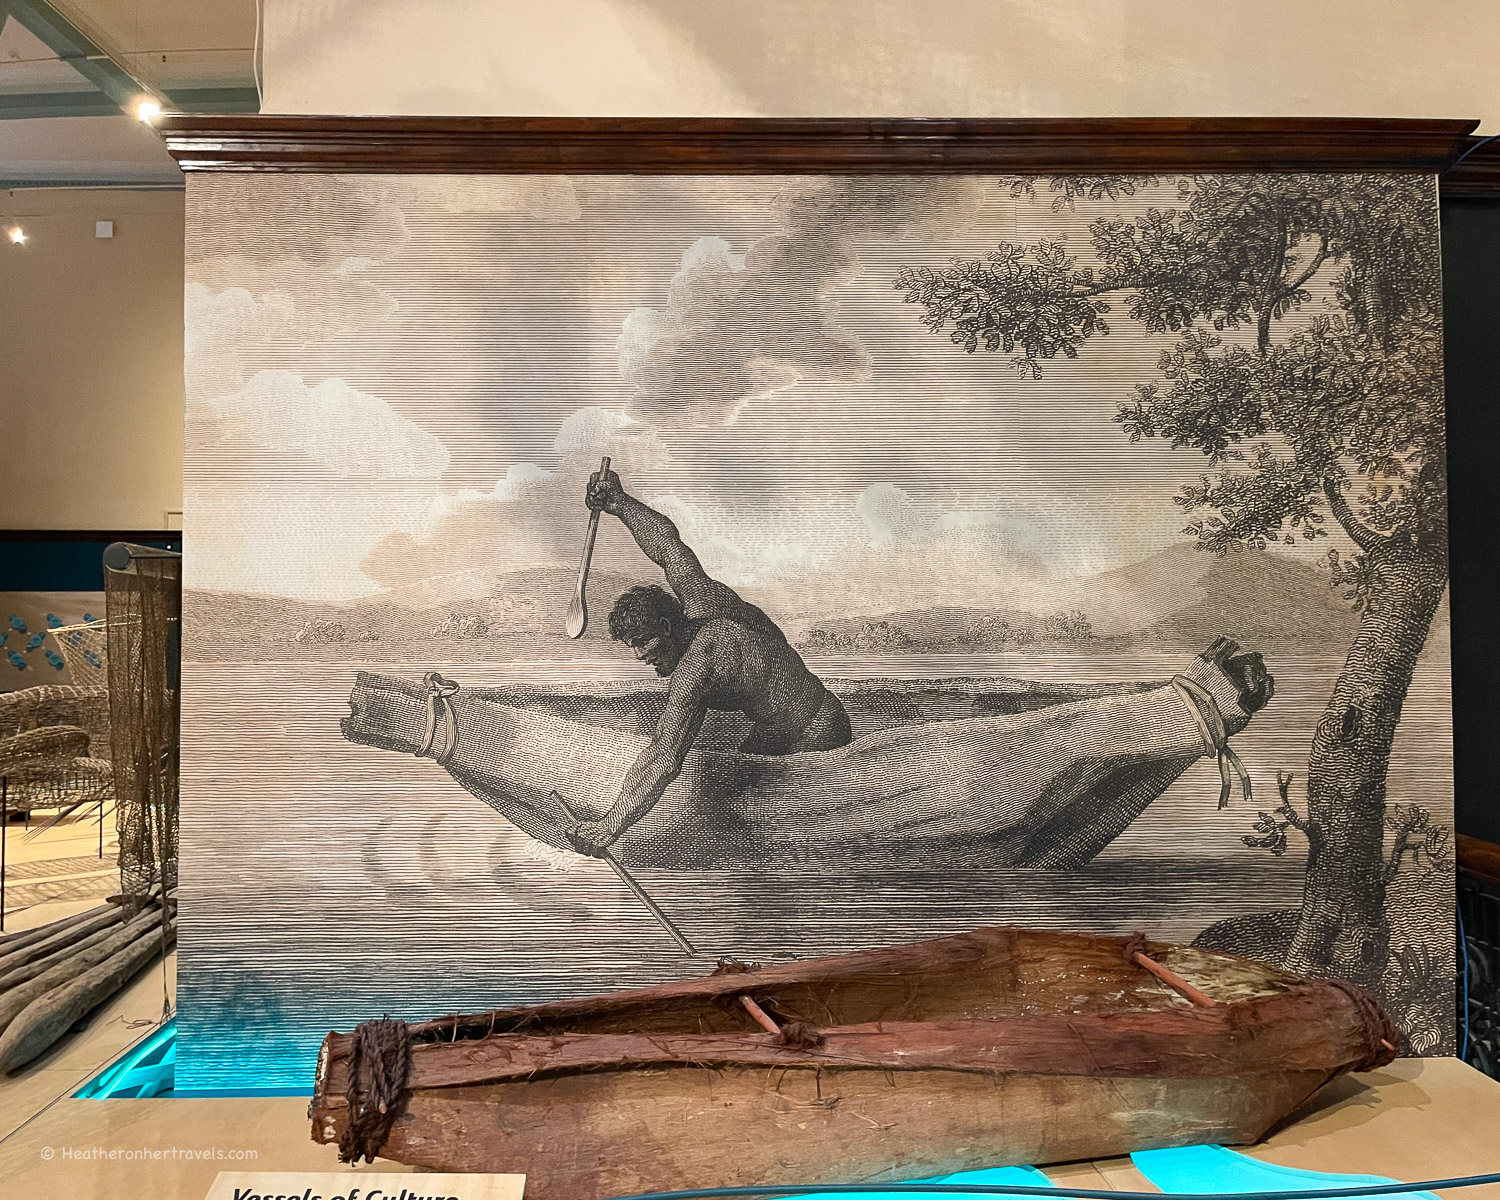
Before we visit the areas that formed the first colony in the early 19th century, we need to acknowledge the Gadigal clans of the Eora Nation who lived here before those English settlers arrived. These aboriginal people lived in family clan groups all around the Sydney Bay area, living from harvested plants, fish and seafood that were plentiful in the area.
Australia Museum, Sydney Australia
Many place names in Sydney originate from aboriginal descriptions, and indigenous rock carvings can be seen around the Sydney Bay area.
A few aboriginal men such Benelong and Bungaree acted as mediators and interpreters between their culture and the early settlers – they are remembered in place names around Sydney. However, over time the Gadigal territory around Sydney was taken over by the new colony, and conflicts often arose between the two cultures.
You can discover some of the stories behind these early contacts in the Cadi Jam Ora Garden of the Royal Botanic Garden and the Yiribana Gallery in the Art Gallery of New South Wales, as well as in other museums around Sydney.
The Rocks
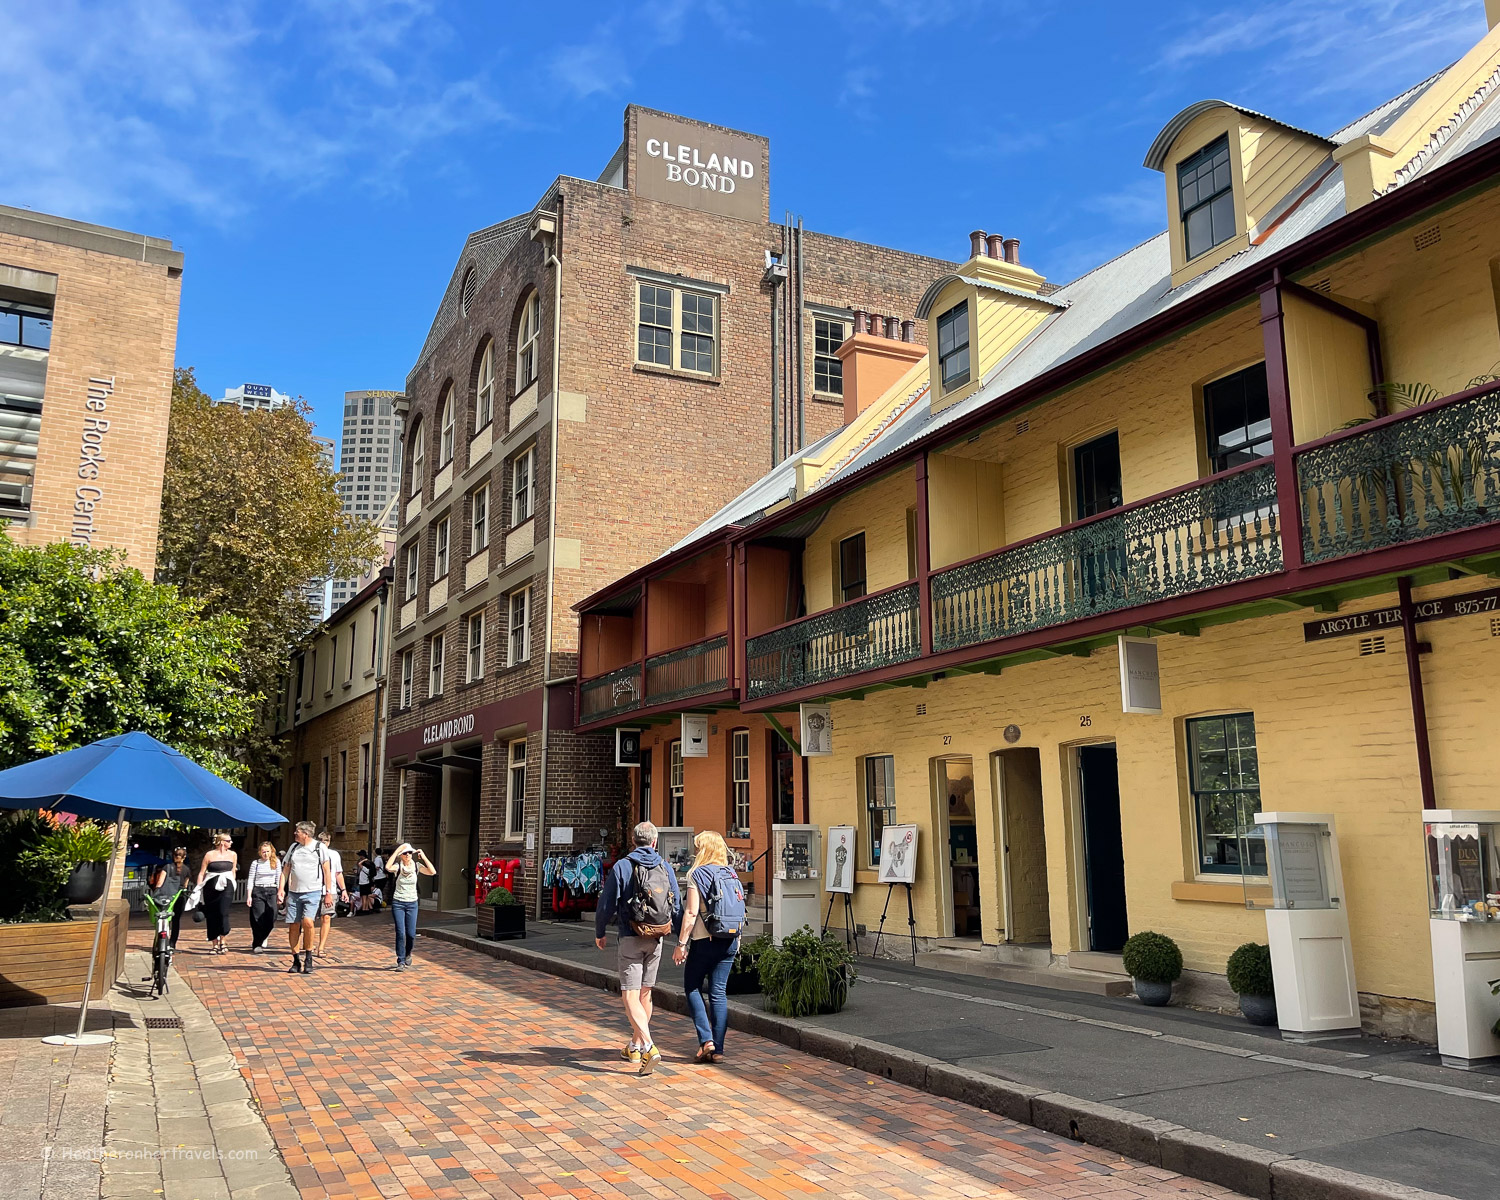
The neighbourhood known as The Rocks is a grid of streets to one side of Circular Quay, named after the rocky cliffs that you’ll see as you walk through the area. This was the commercial centre of the earliest colony, with warehouses for stores and close packed houses.
The Rocks, Sydney Australia
Water was supplied from The Tank stream that ran through the area into Sydney Bay. Later, a road (now Argyle street) was hewn through the sold rock, known as ‘The Cut’, which allowed the colony to expand.
Today the area is less residential and more of a tourist hub, with art galleries and souvenir shops. Since cruise ships dock right alongside this area, it can be crowded in high season. Nevertheless, we found the area charming, and care has been taken to promote high quality Australian souvenirs and crafts in the shops here.
We recommend spending an hour looking around ‘The Rocks’ – here’s what to look out for;
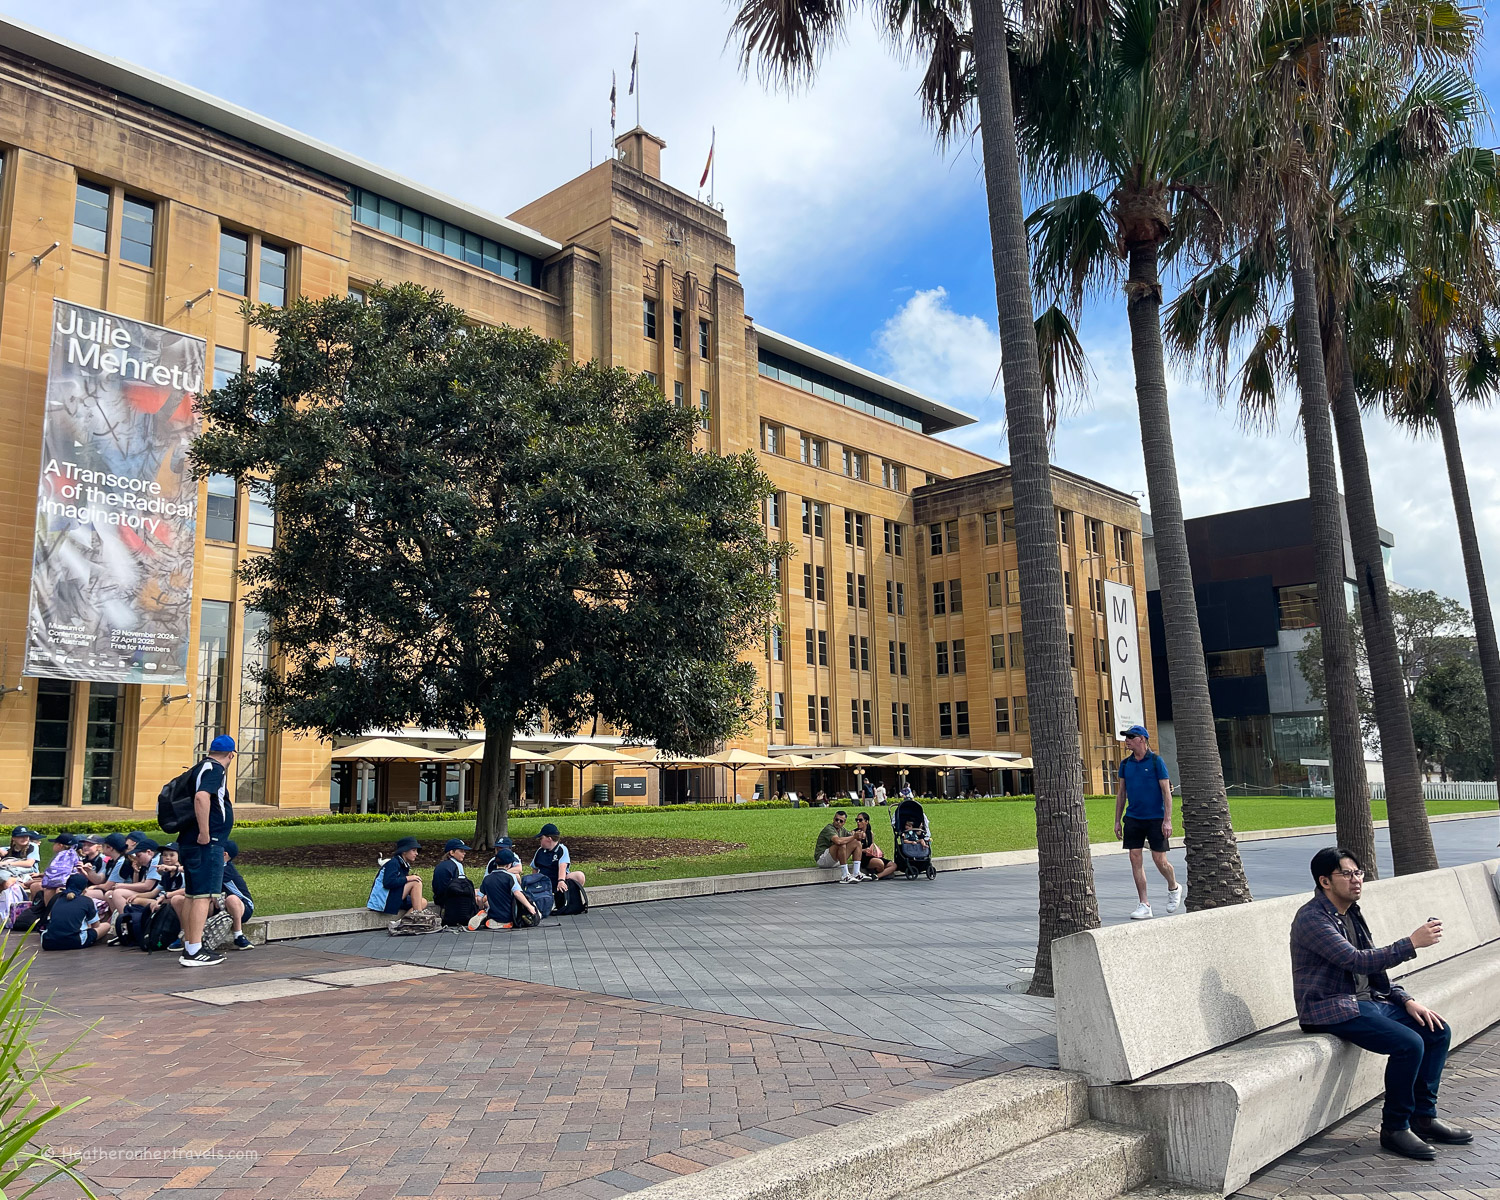
The Museum of Contemporary Art is worth visiting on another day, but for our 1 day in Sydney we recommend a coffee stop in the pleasant terrace cafe.
Museum of Contemporary Art, Sydney Australia
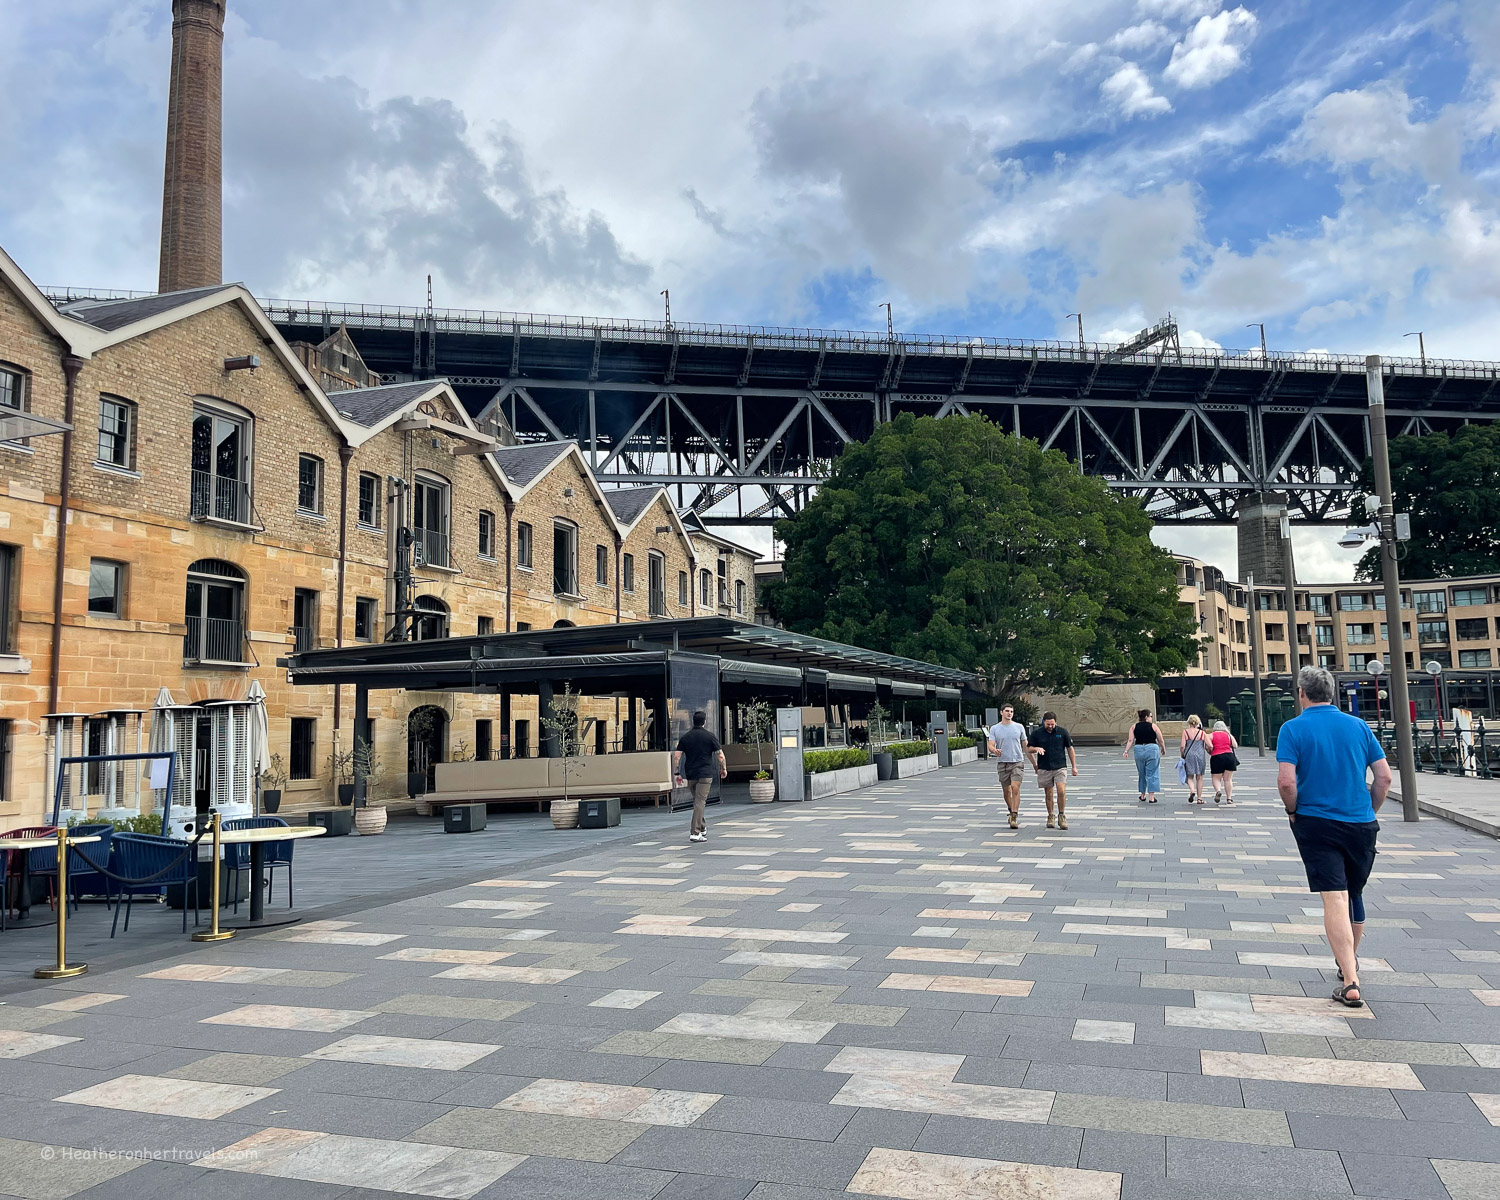
Walk past Cadman’s cottage and the warehouse buildings of Campbell’s Stores, now housing restaurants. In front of you is the Sydney Harbour Bridge, another landmark of the city.
Cadman’s Cottage, Sydney Australia
Skirt back to Playfair Street, a pedestrianised area where there are many 19th century buildings, now housing galleries and craft shops. The Rocks Market with craft stalls is held here at weekends. There’s more shopping and some street food stands in the adjoining Rocks Centre.
Campbell’s Storehouses, The Rocks Sydney Australia
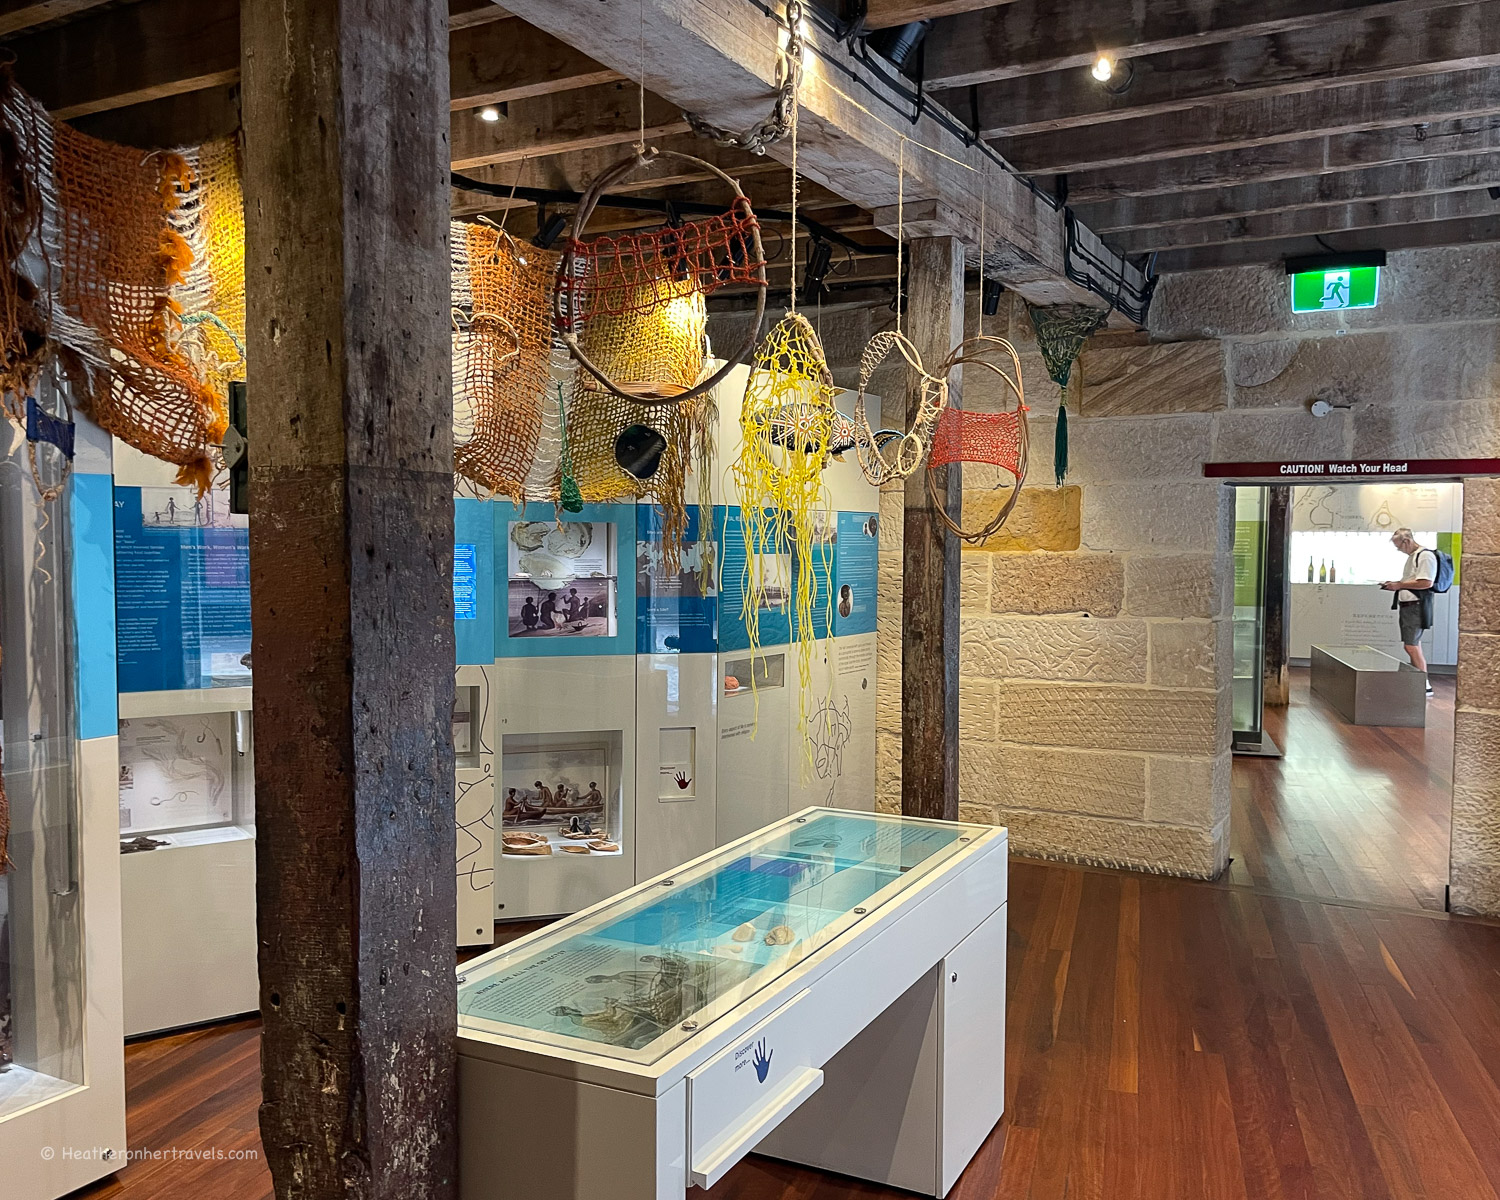
Stop at The Rocks Discovery Museum (free) located in one of the older buildings, to learn about the area’s history.
At The junction of Playfair Street and Argyle Street, look right to see how the road was cut through the rock, now running under the highway leading to the Harbour Bridge.
The Cut, Argyle St, Sydney Australia
Continue your stroll down some of the narrow lanes, such as Nurses’s Walk to soak up the area’s atmosphere.
Coffee Stop: We recommend the ground floor cafe of the Museum of Contemporary Art for a coffee in the shady open air terrace with views of the harbour.
Cafe at Museum of Contemporary Art, Sydney Australia
Now walk past the ferry piers at Circular Quay and along the Eastern Pontoon to the Sydney Opera House.
Sydney Opera House
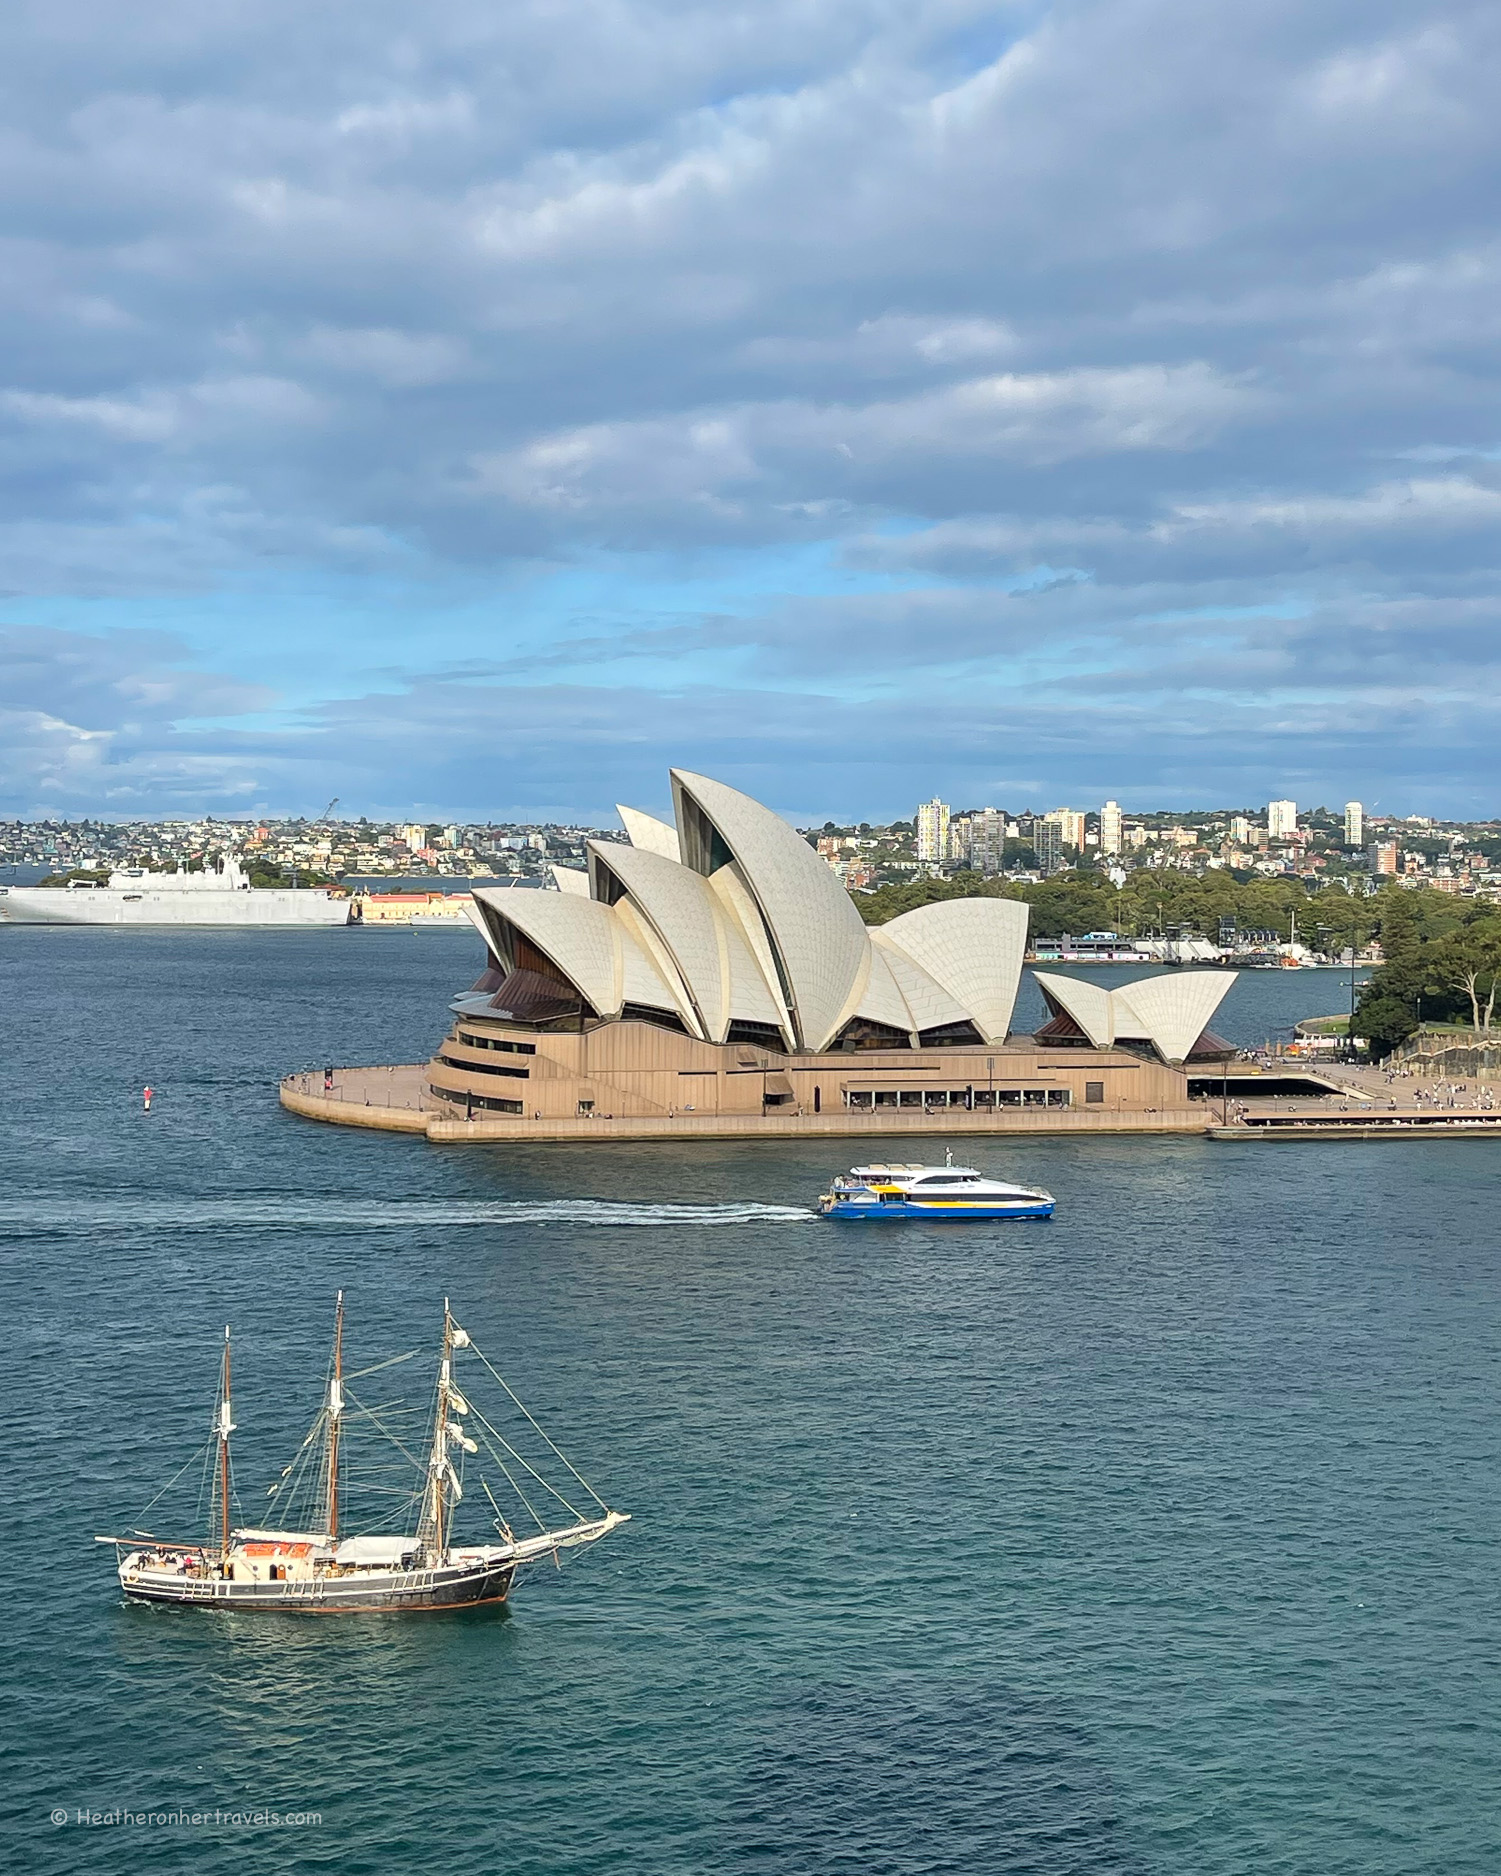
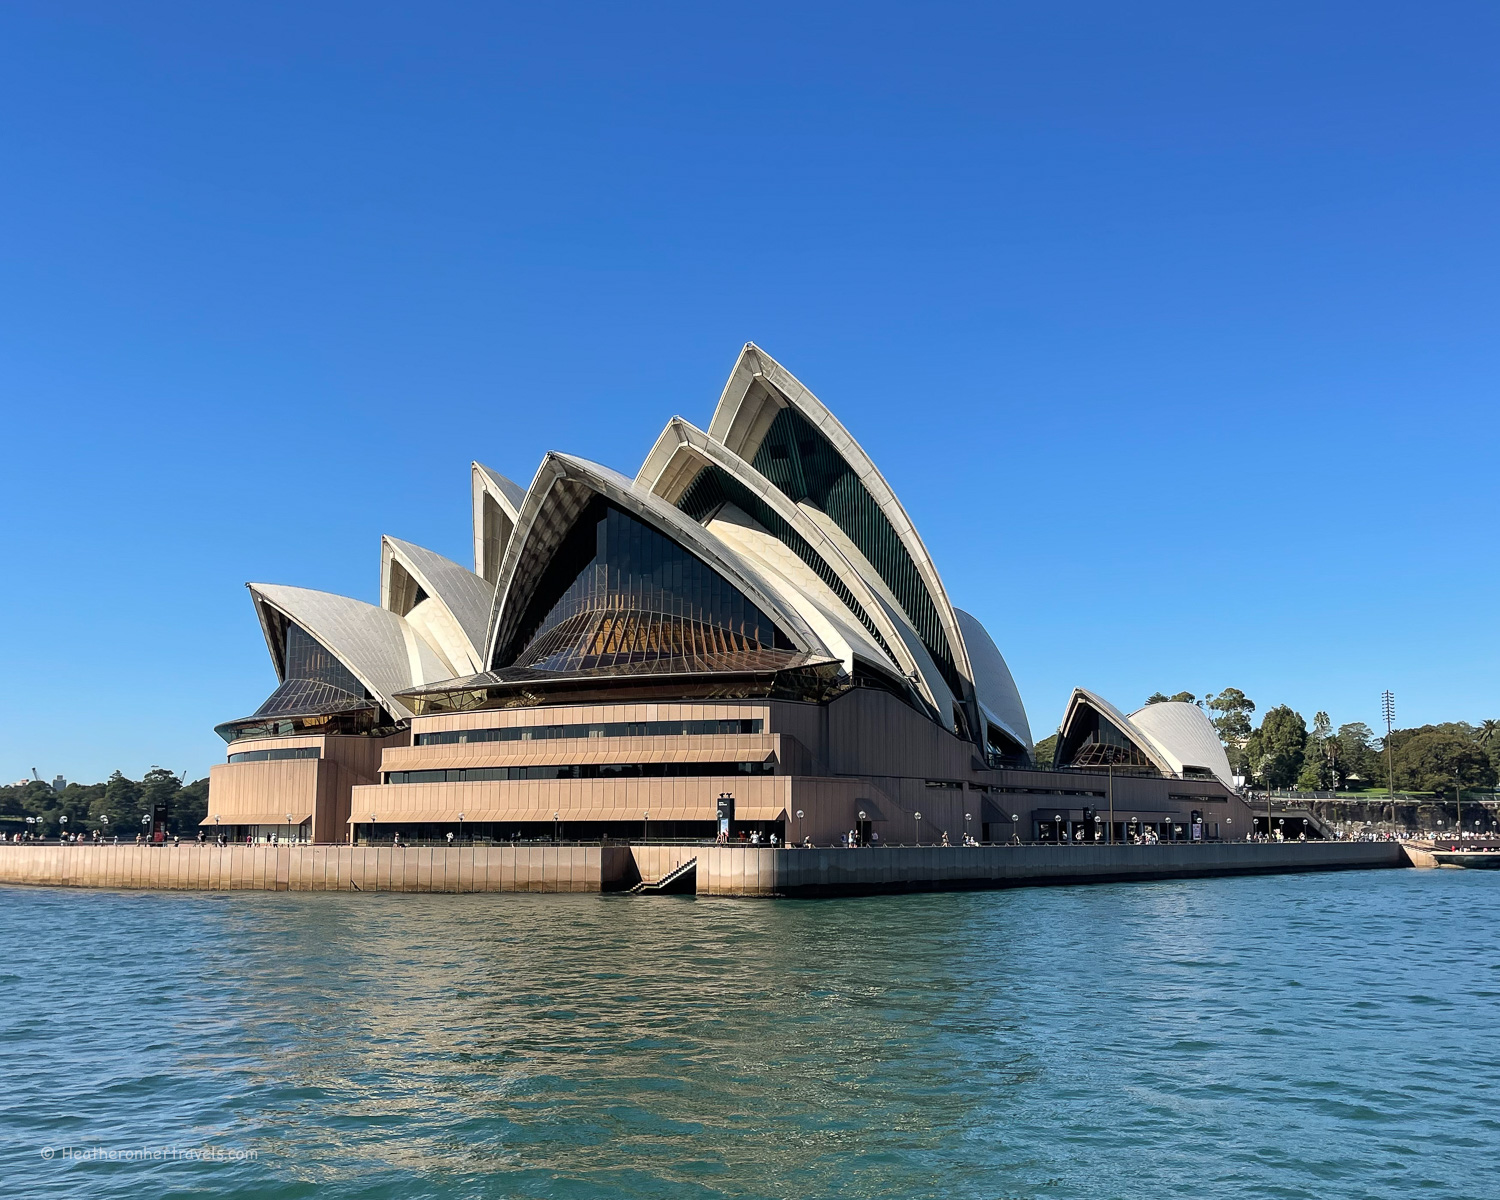
The Opera House is Sydney’s best known landmark, sitting on the prominent Bennelong Point overlooking the harbour. It was intended to build Sydney’s reputation as a world class centre for culture and the performing arts, replacing a tram depot that previously stood on this spot.
Sydney Opera House, Australia
After an international design competition in 1957, the design of Danish architect Jorn Utzon was chosen, with shell-like roof structures housing two large concert halls, a restaurant and smaller performance spaces.
Sydney Opera House, Australia
The actual construction caused an engineering conundrum and Utzon was forced to resign from the project. Eventually the building was completed by an architectural team led by Peter Hall and opened by Queen Elizabeth II in 1973.
Sydney Opera House, Australia
Sydney Opera House is a magnet for visitors, who swirl around the different levels of the building to take their photos. But to see the interiors you’ll need to book a tour, which is worth planning ahead as they are often booked up on the day.
Sydney Opera House, Australia
We recommend spending an hour here on our 1 day Sydney itinerary, so here’s what to look out for;
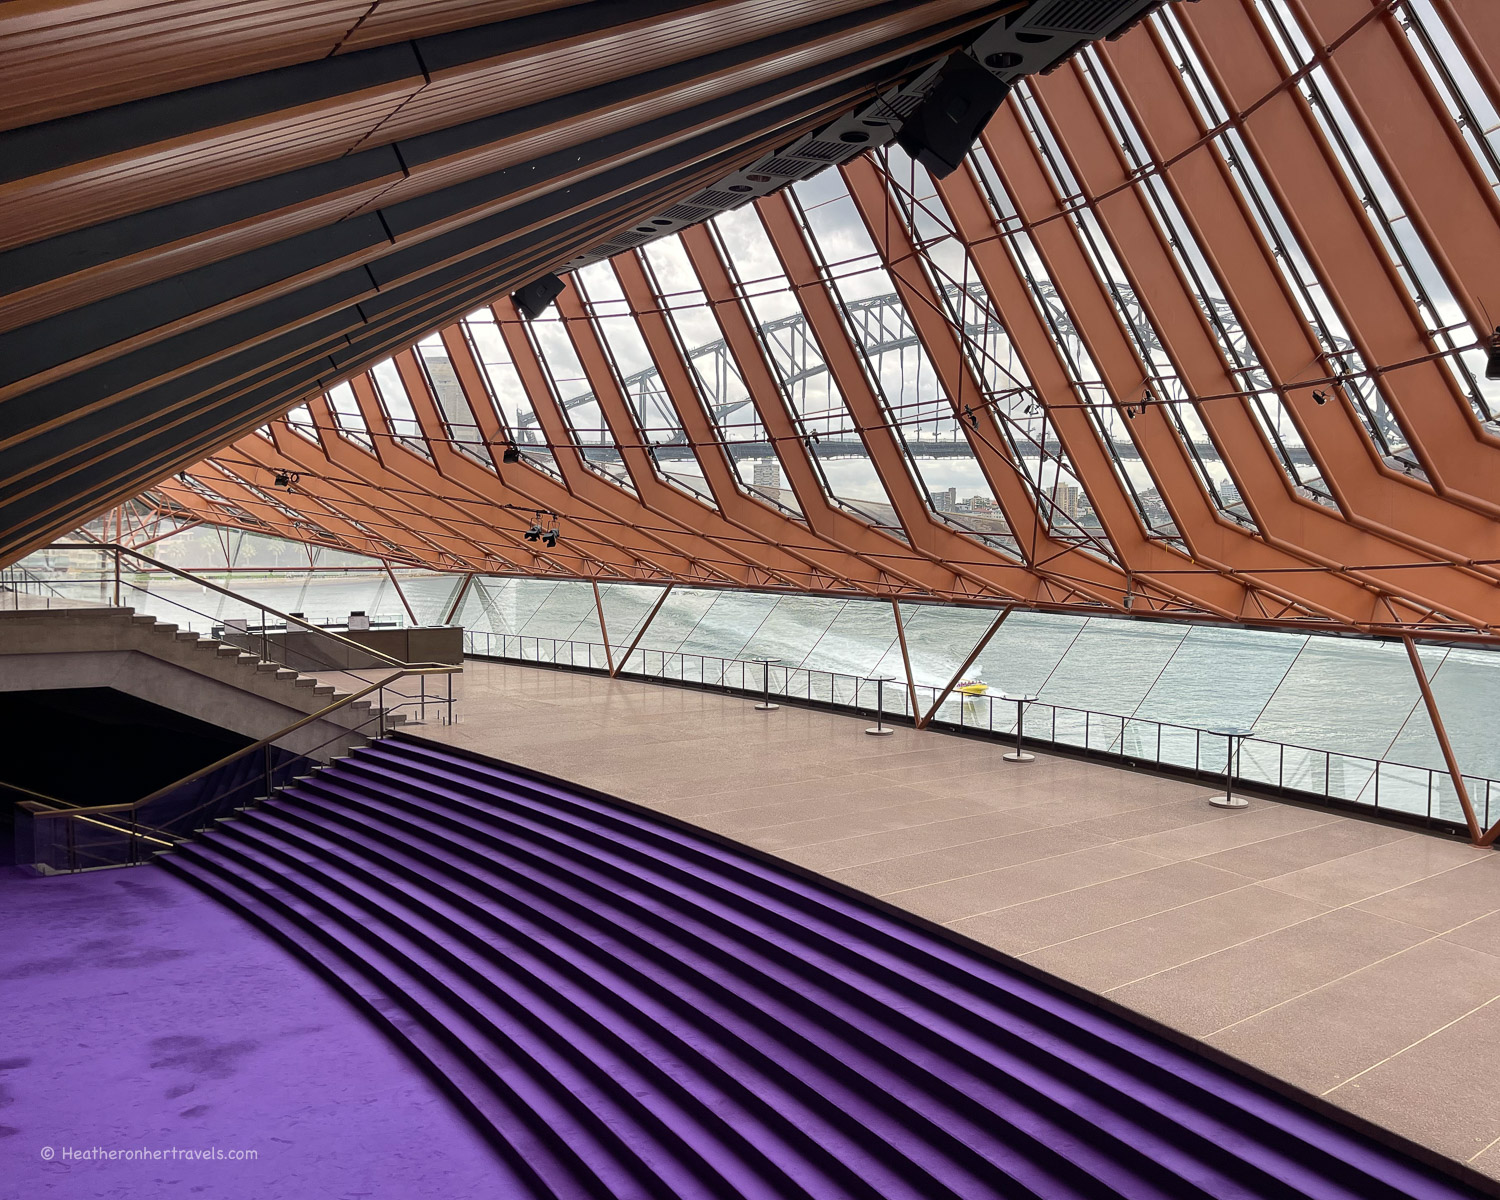
View the building’s exterior from all angles and levels. You can walk up the steps on the land side, walk around on the harbour side and explore the different levels of terraces housing bars and restaurants.
Sydney Opera House, Australia
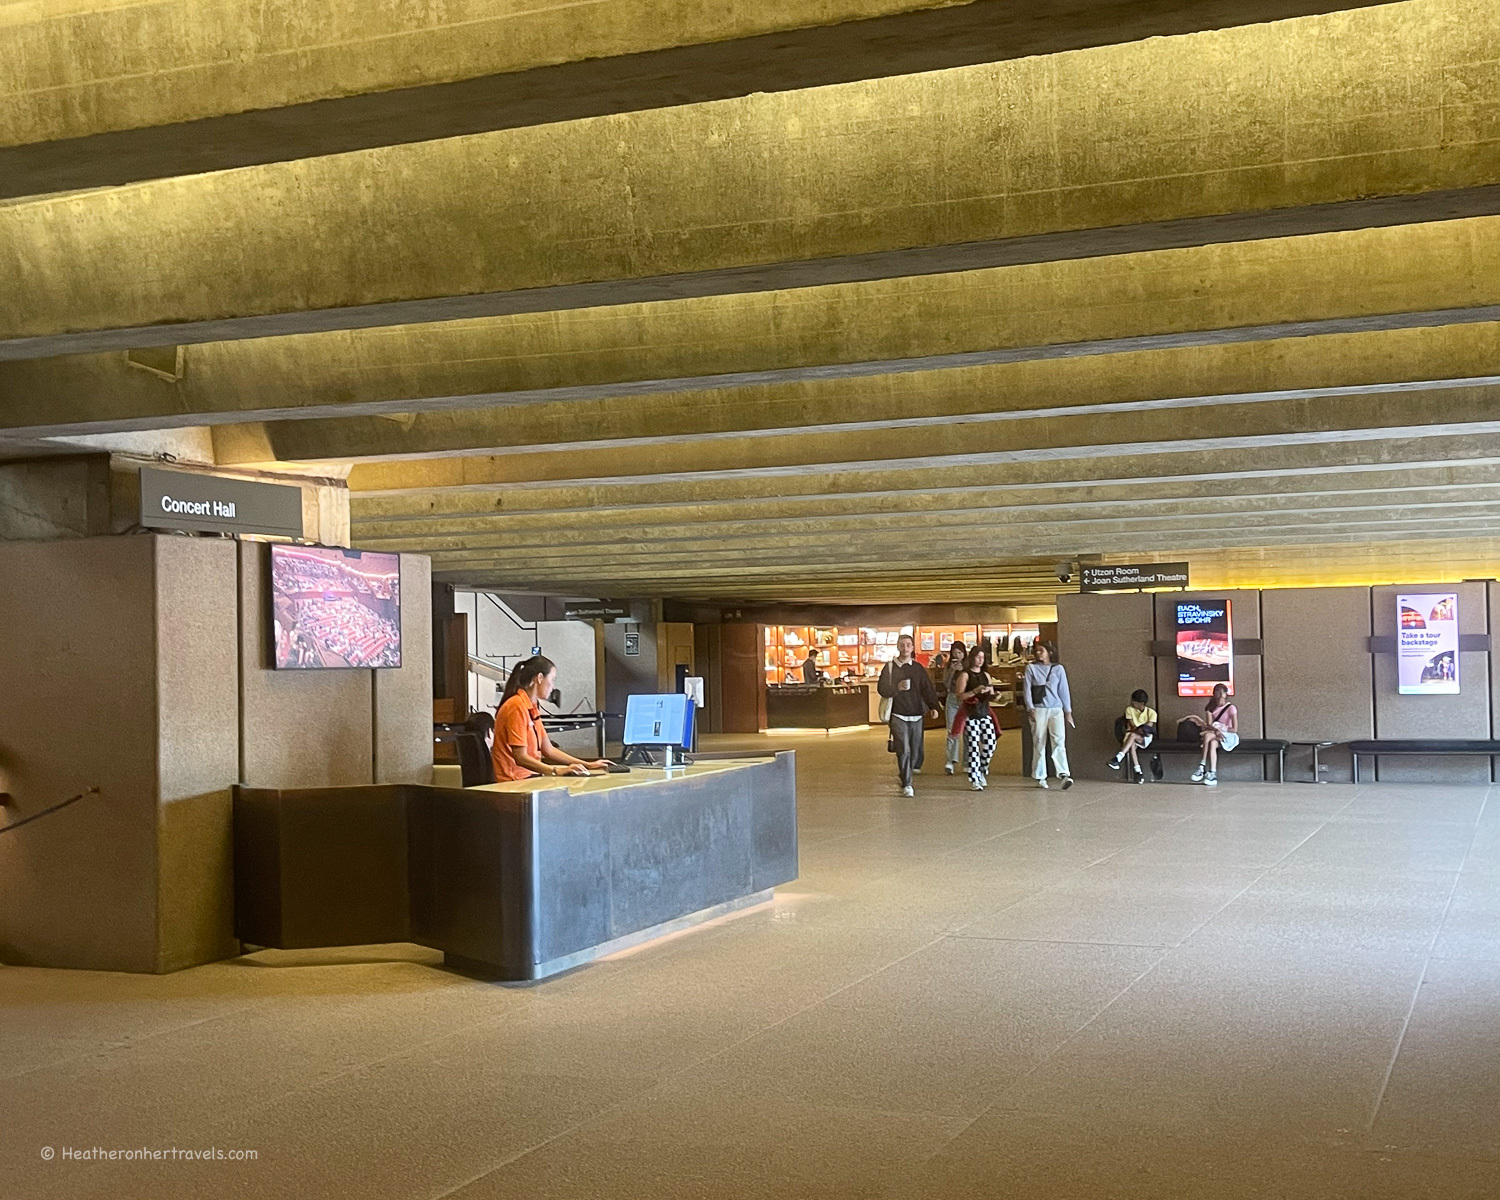
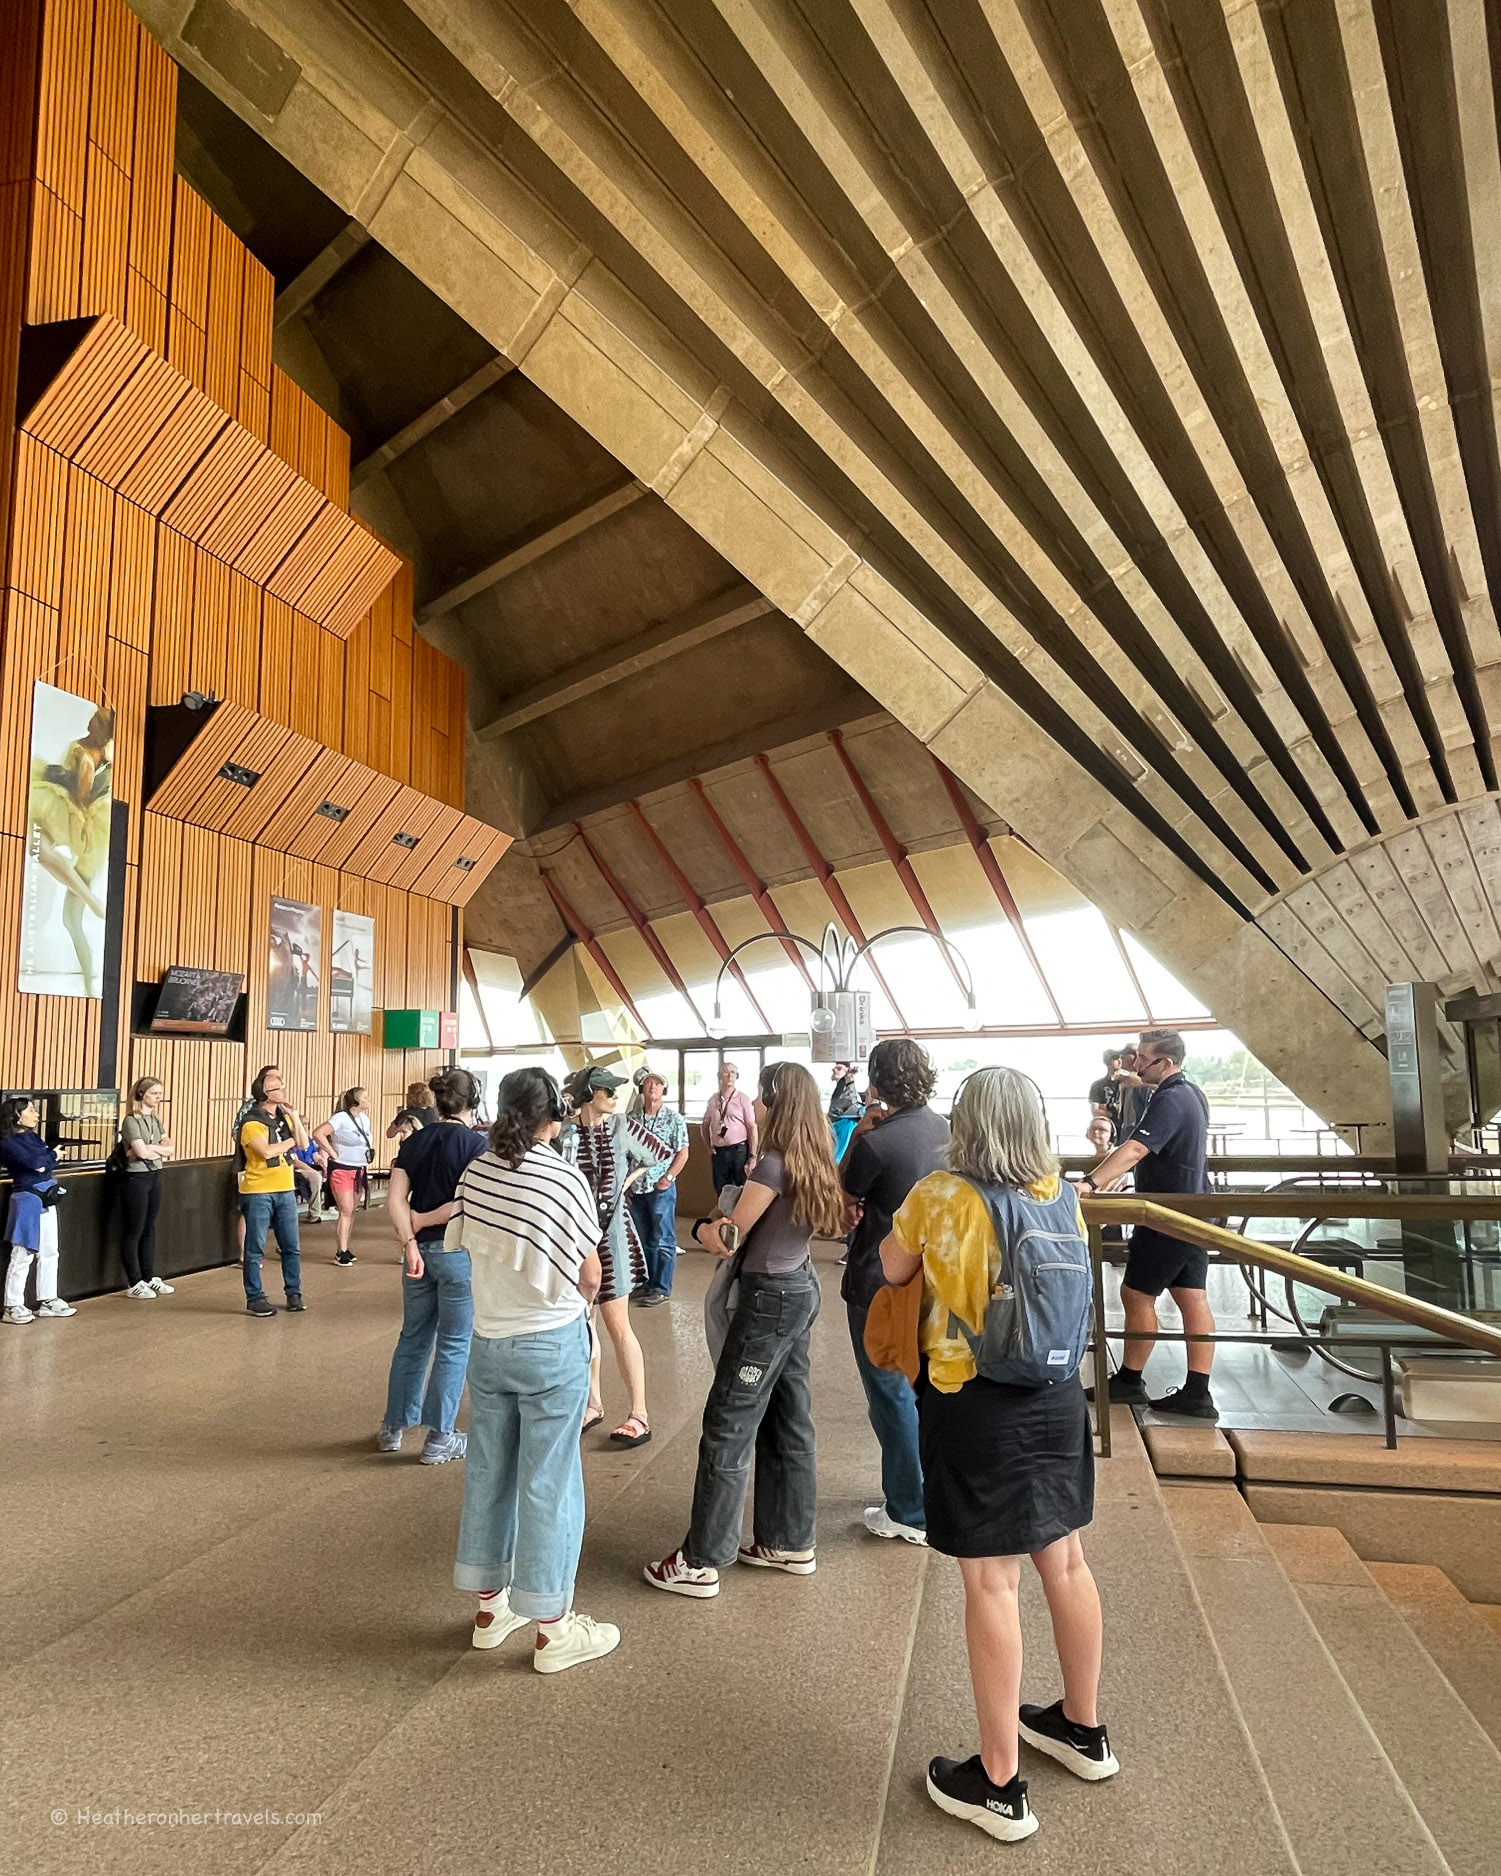
Walk up the steps to enter the foyer and get a sense of the interior, which is as much as you’ll see inside without taking a tour. Here you’ll find the ticket sales counters, a small gift shop and a kiosk cafe, with some seating in the Lounge area.
Foyer at Sydney Opera House, Australia
Back on the ground level, there’s a passage under the steps leading to a bar by the Midden by Mark Olive restaurant, where there are sometimes photographic exhibitions.
Head down the steps or escalator to the lower ground level visitor centre. There’s a small gift shop and some exhibition space about the building of the opera house. Tickets are also sold here for the opera house tours, although these are often sold out on the day so better to book ahead.
Sydney Opera House, Australia
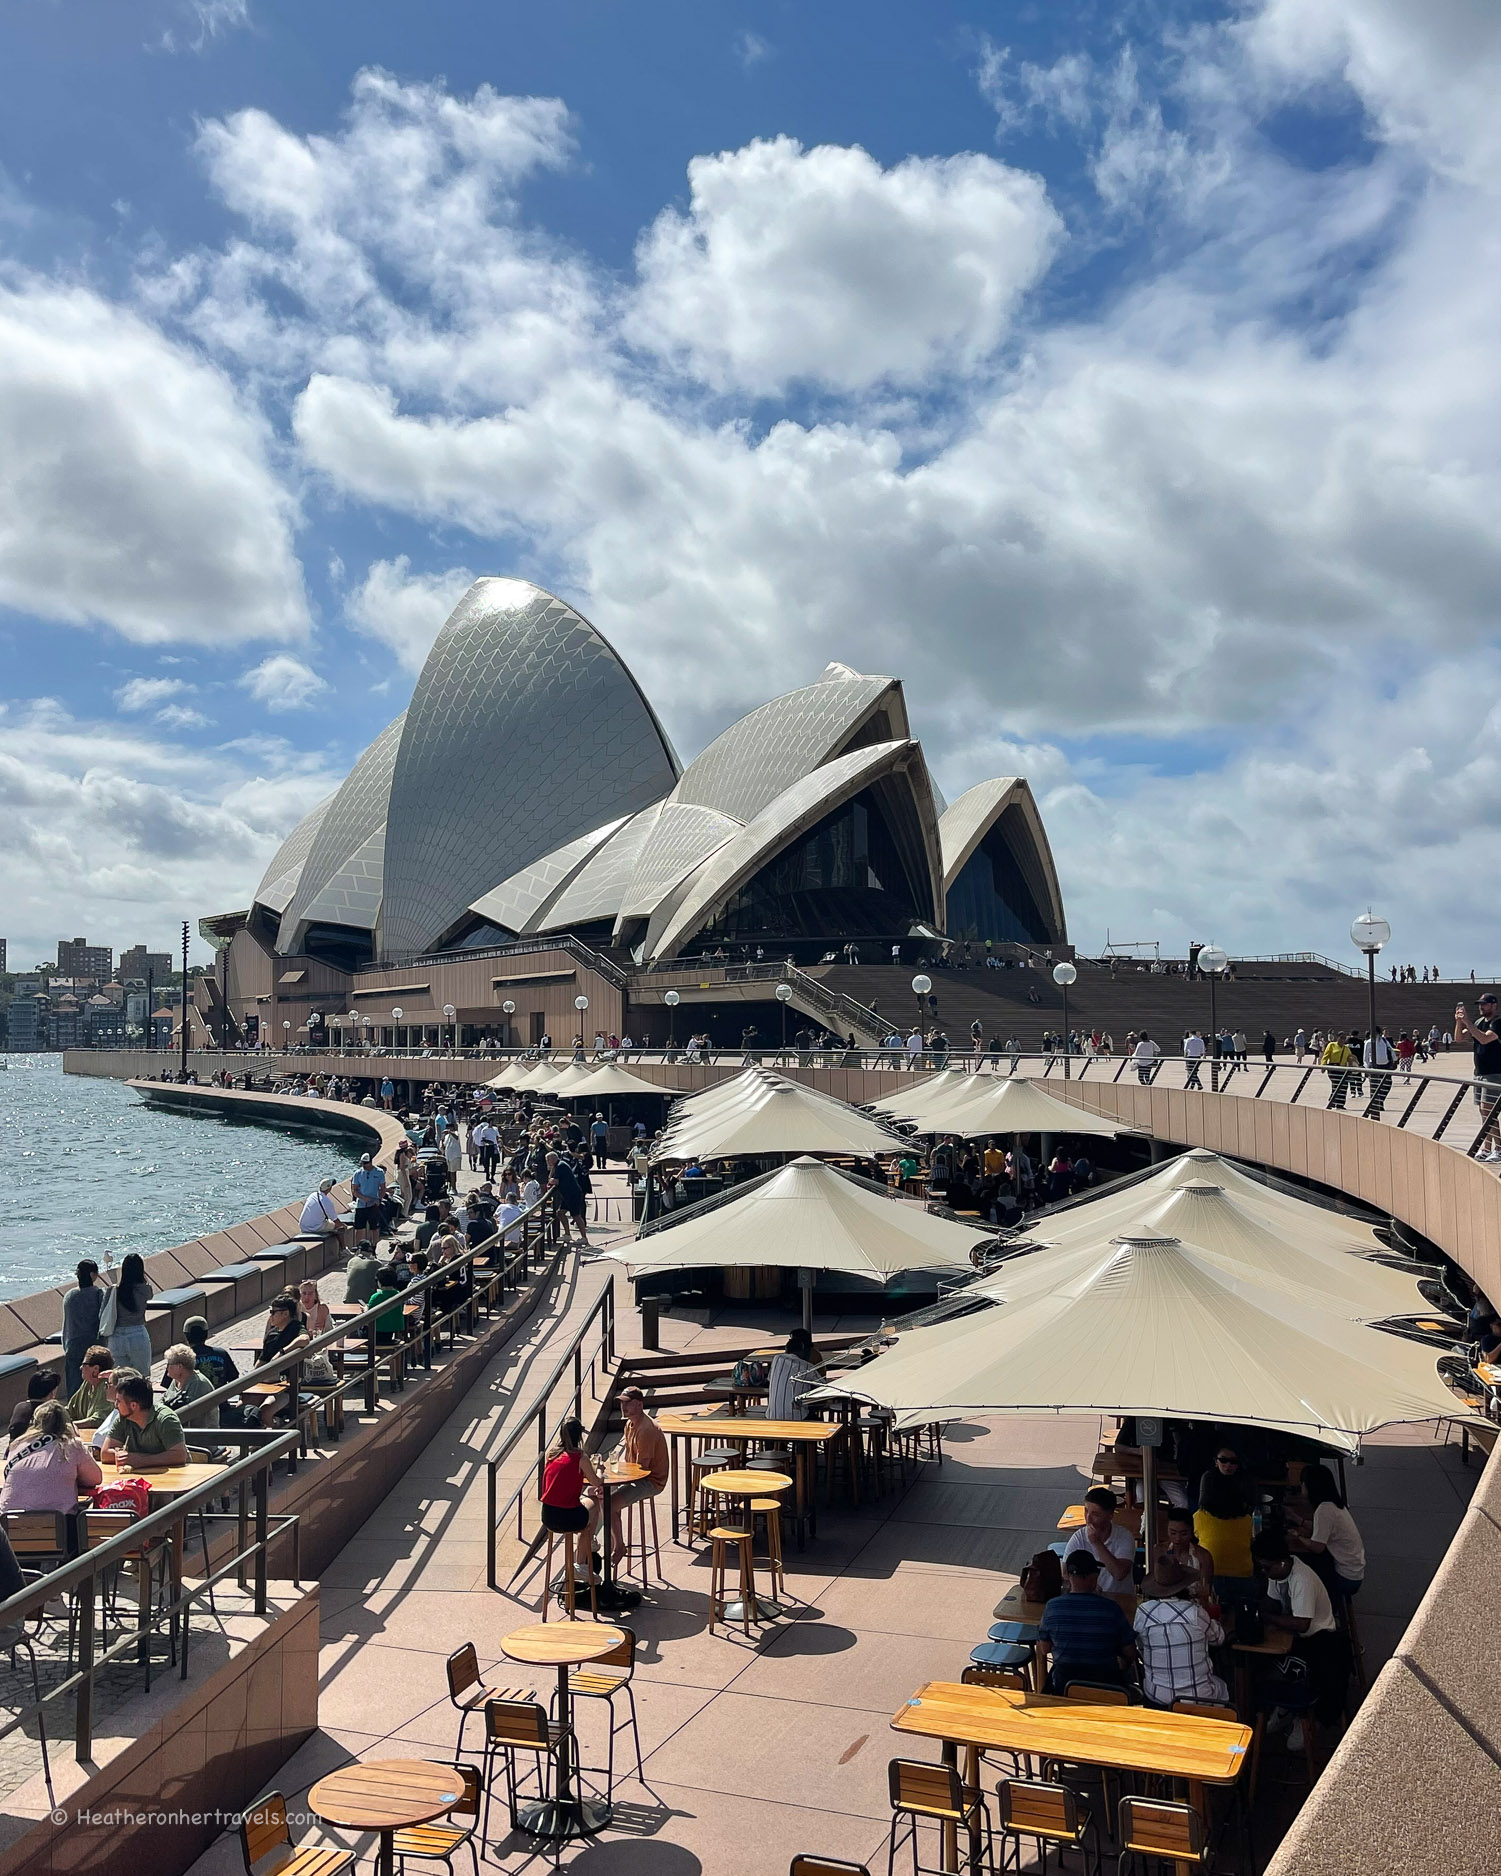
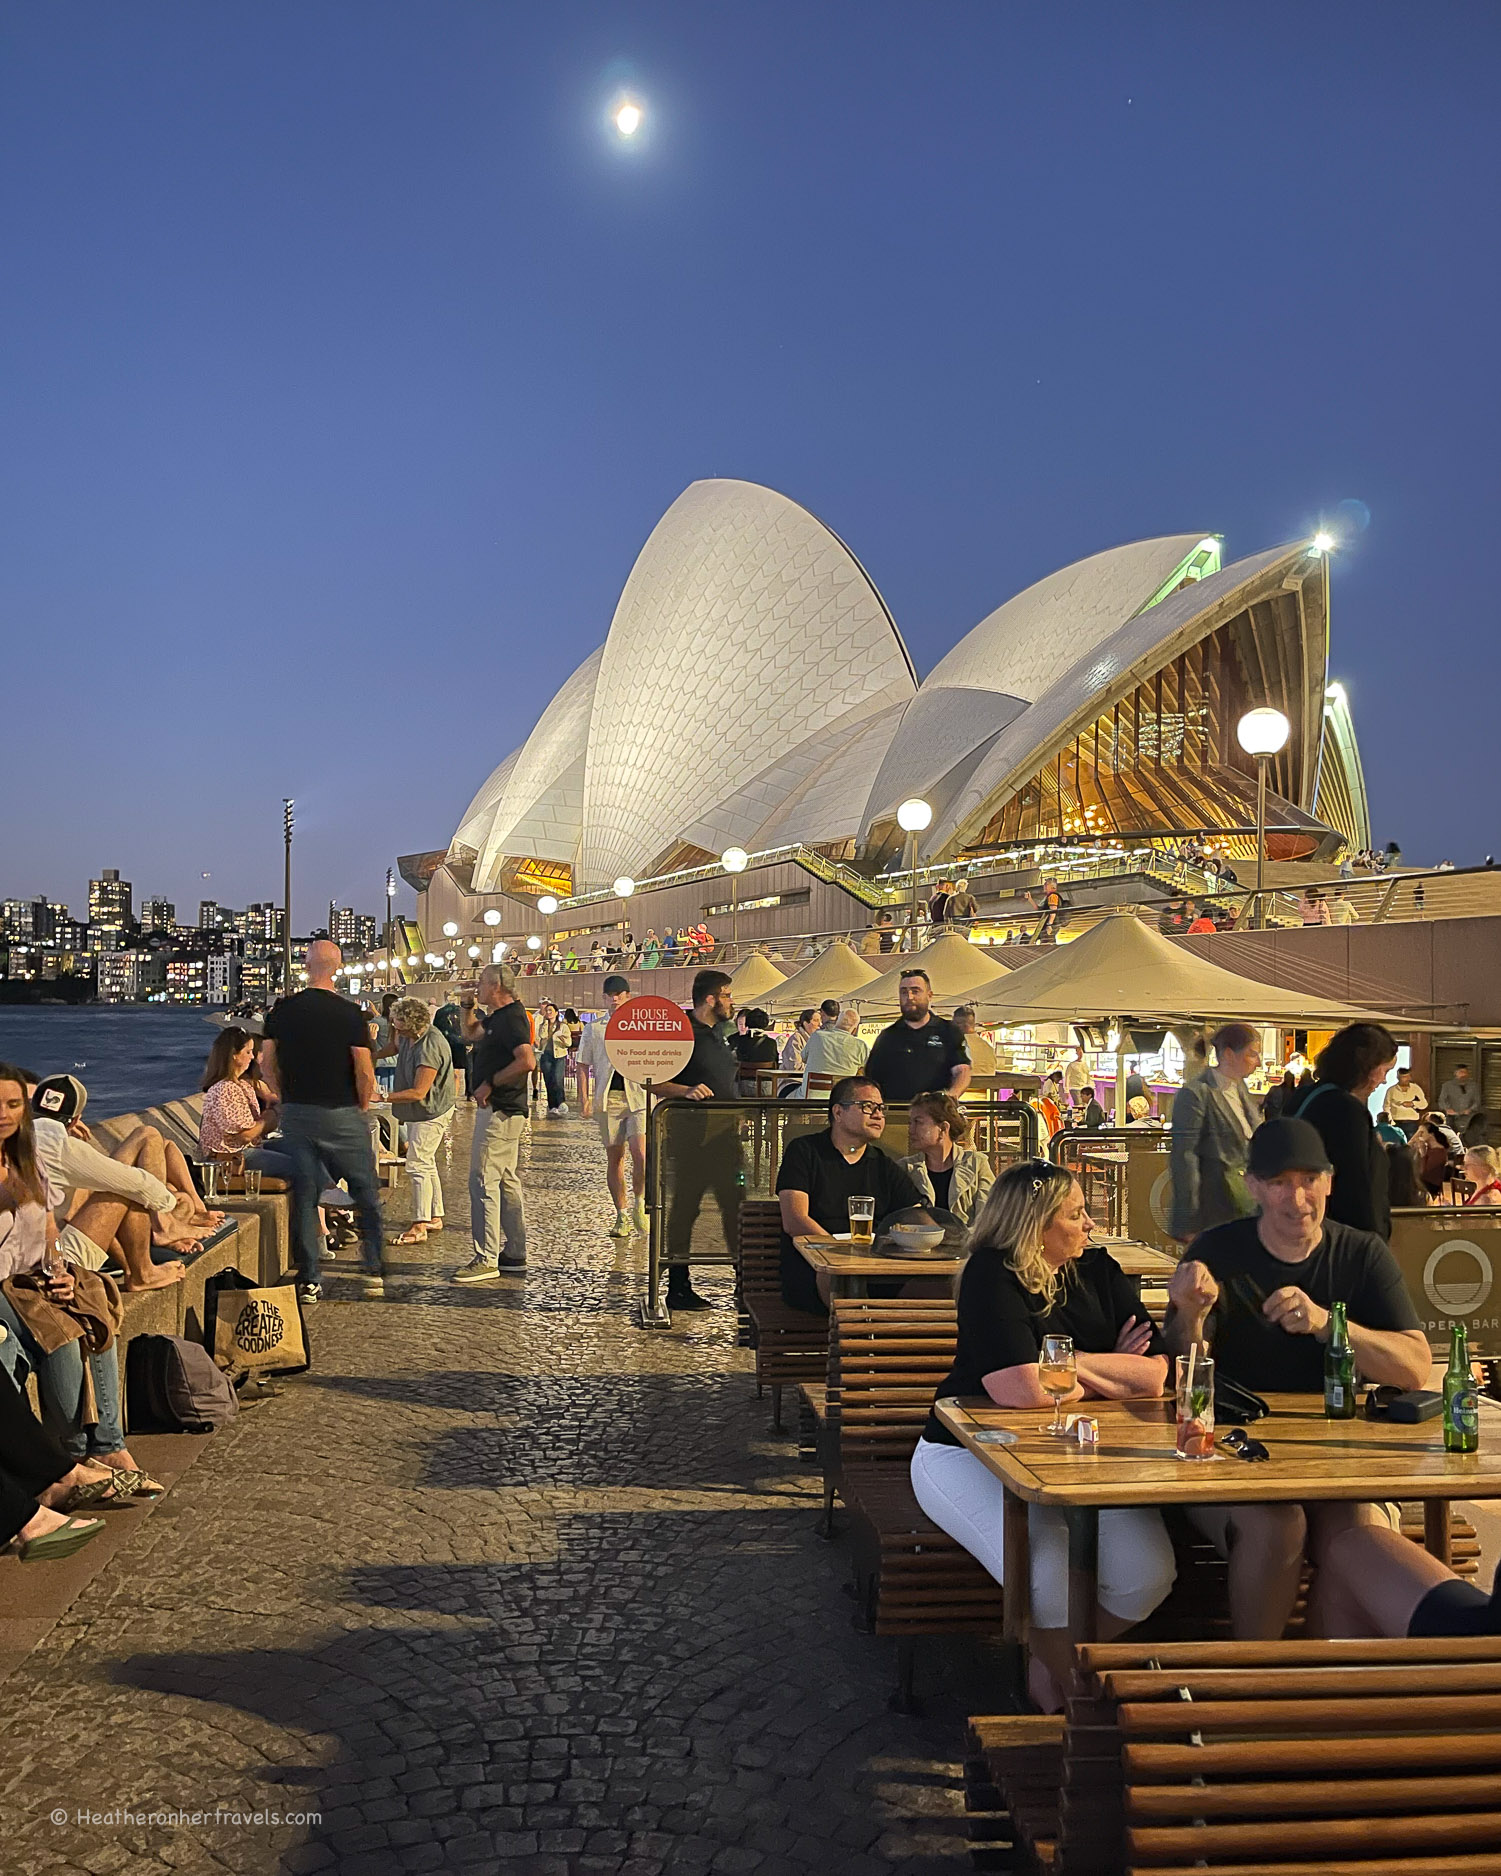
On this lower ground level is the House Canteen, with Asian inspired all day dining and the Opera Bar, which we recommend for a sunset drink.
Opera Bar at Sydney Opera House, Australia
Check back at dusk when there are often colourful light projections onto the sails of the opera house – while we were there there was a daily Baud Gili projection taking place several times after sunset.
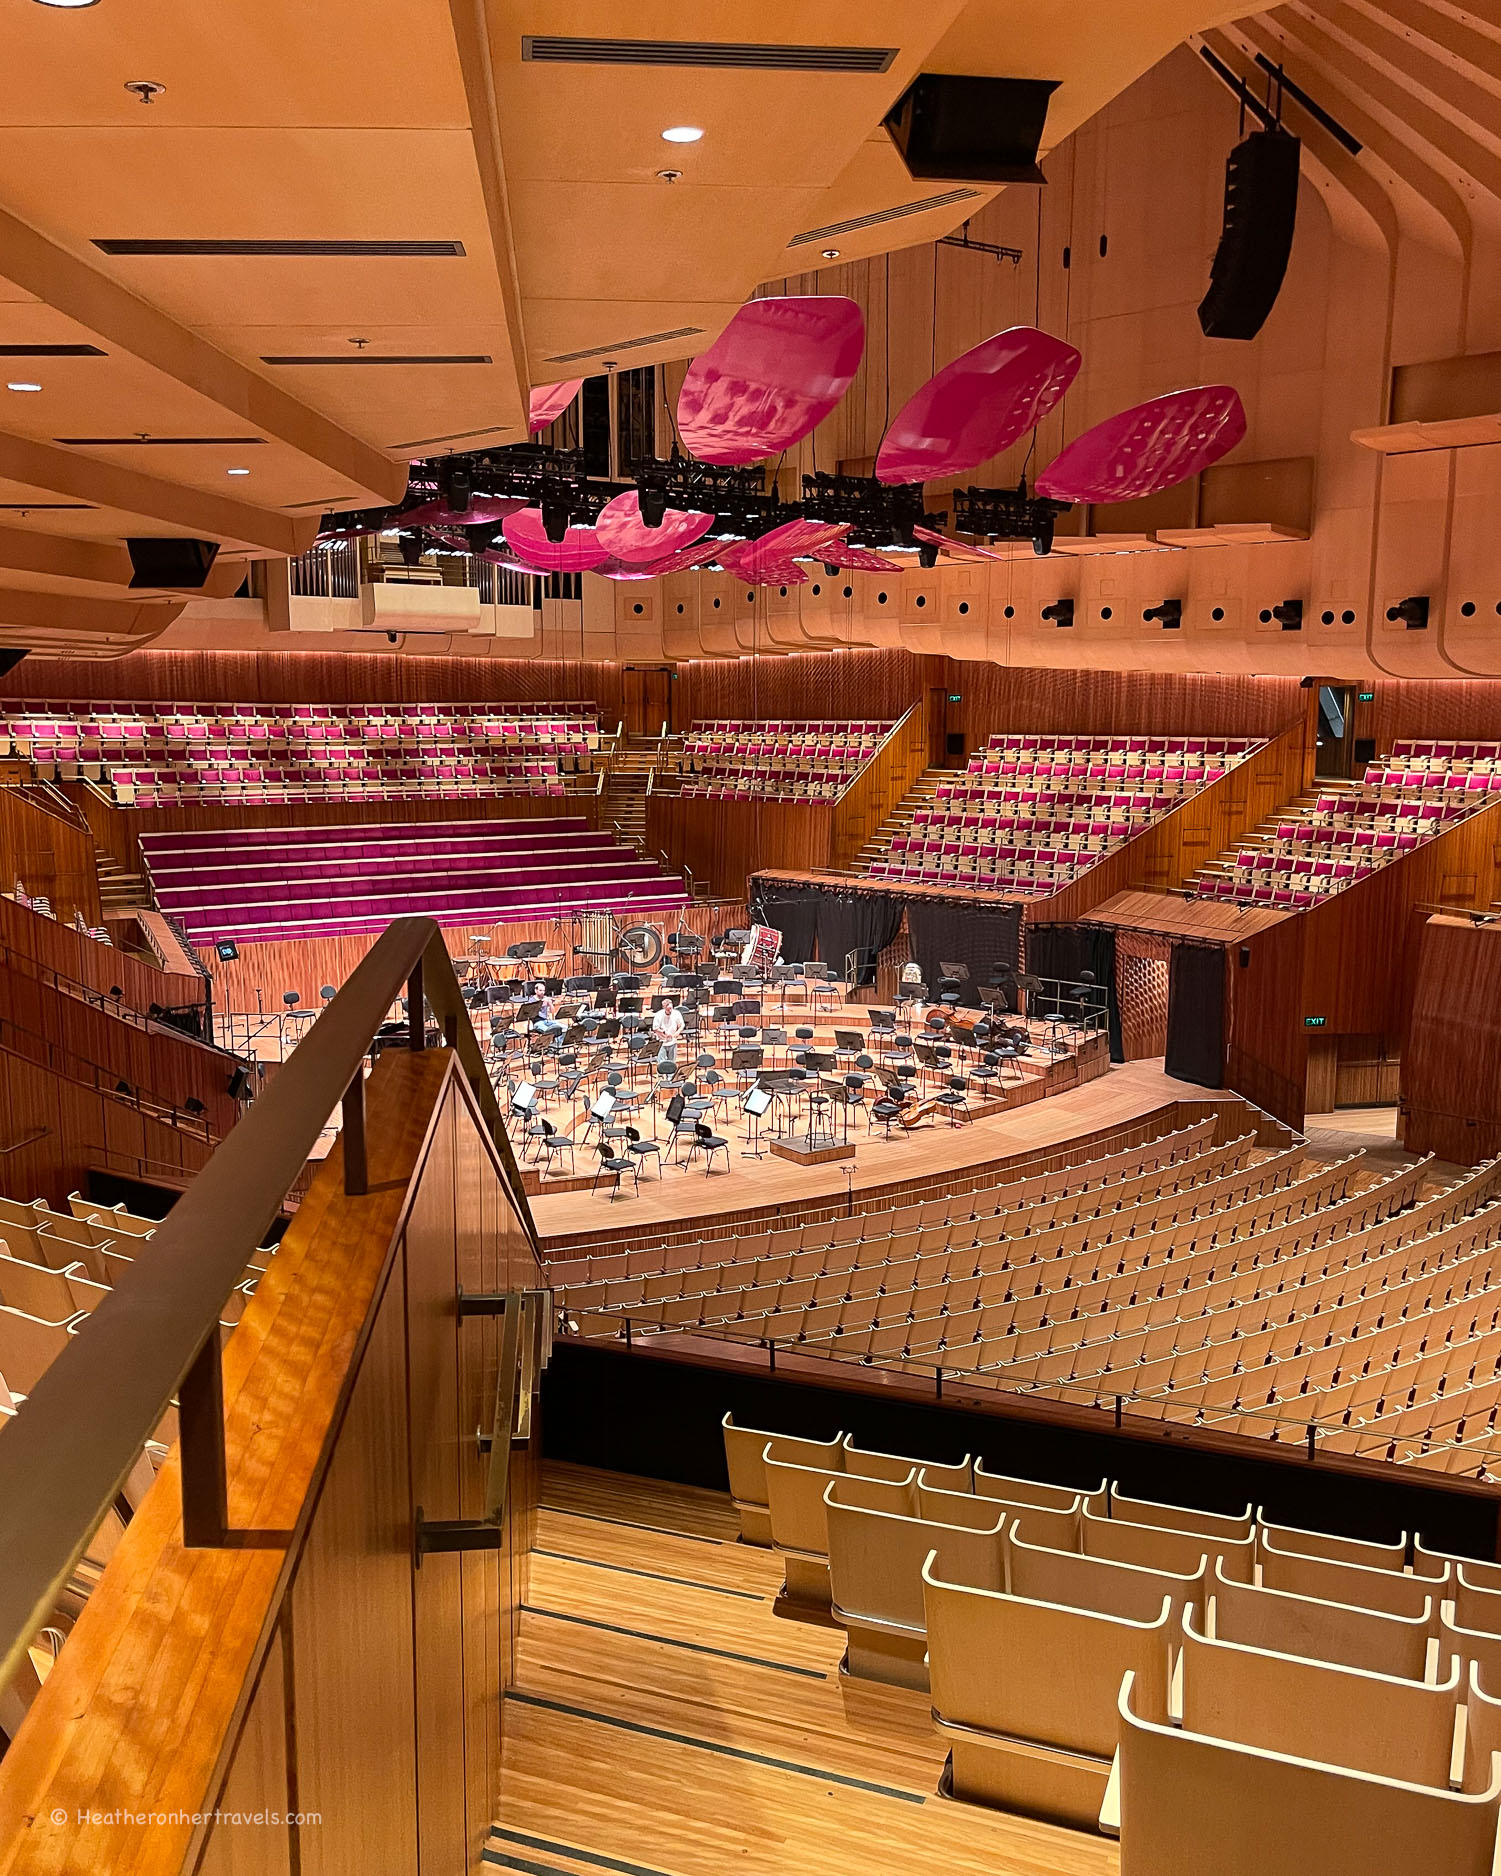
Take a tour of Sydney Opera House, Australia
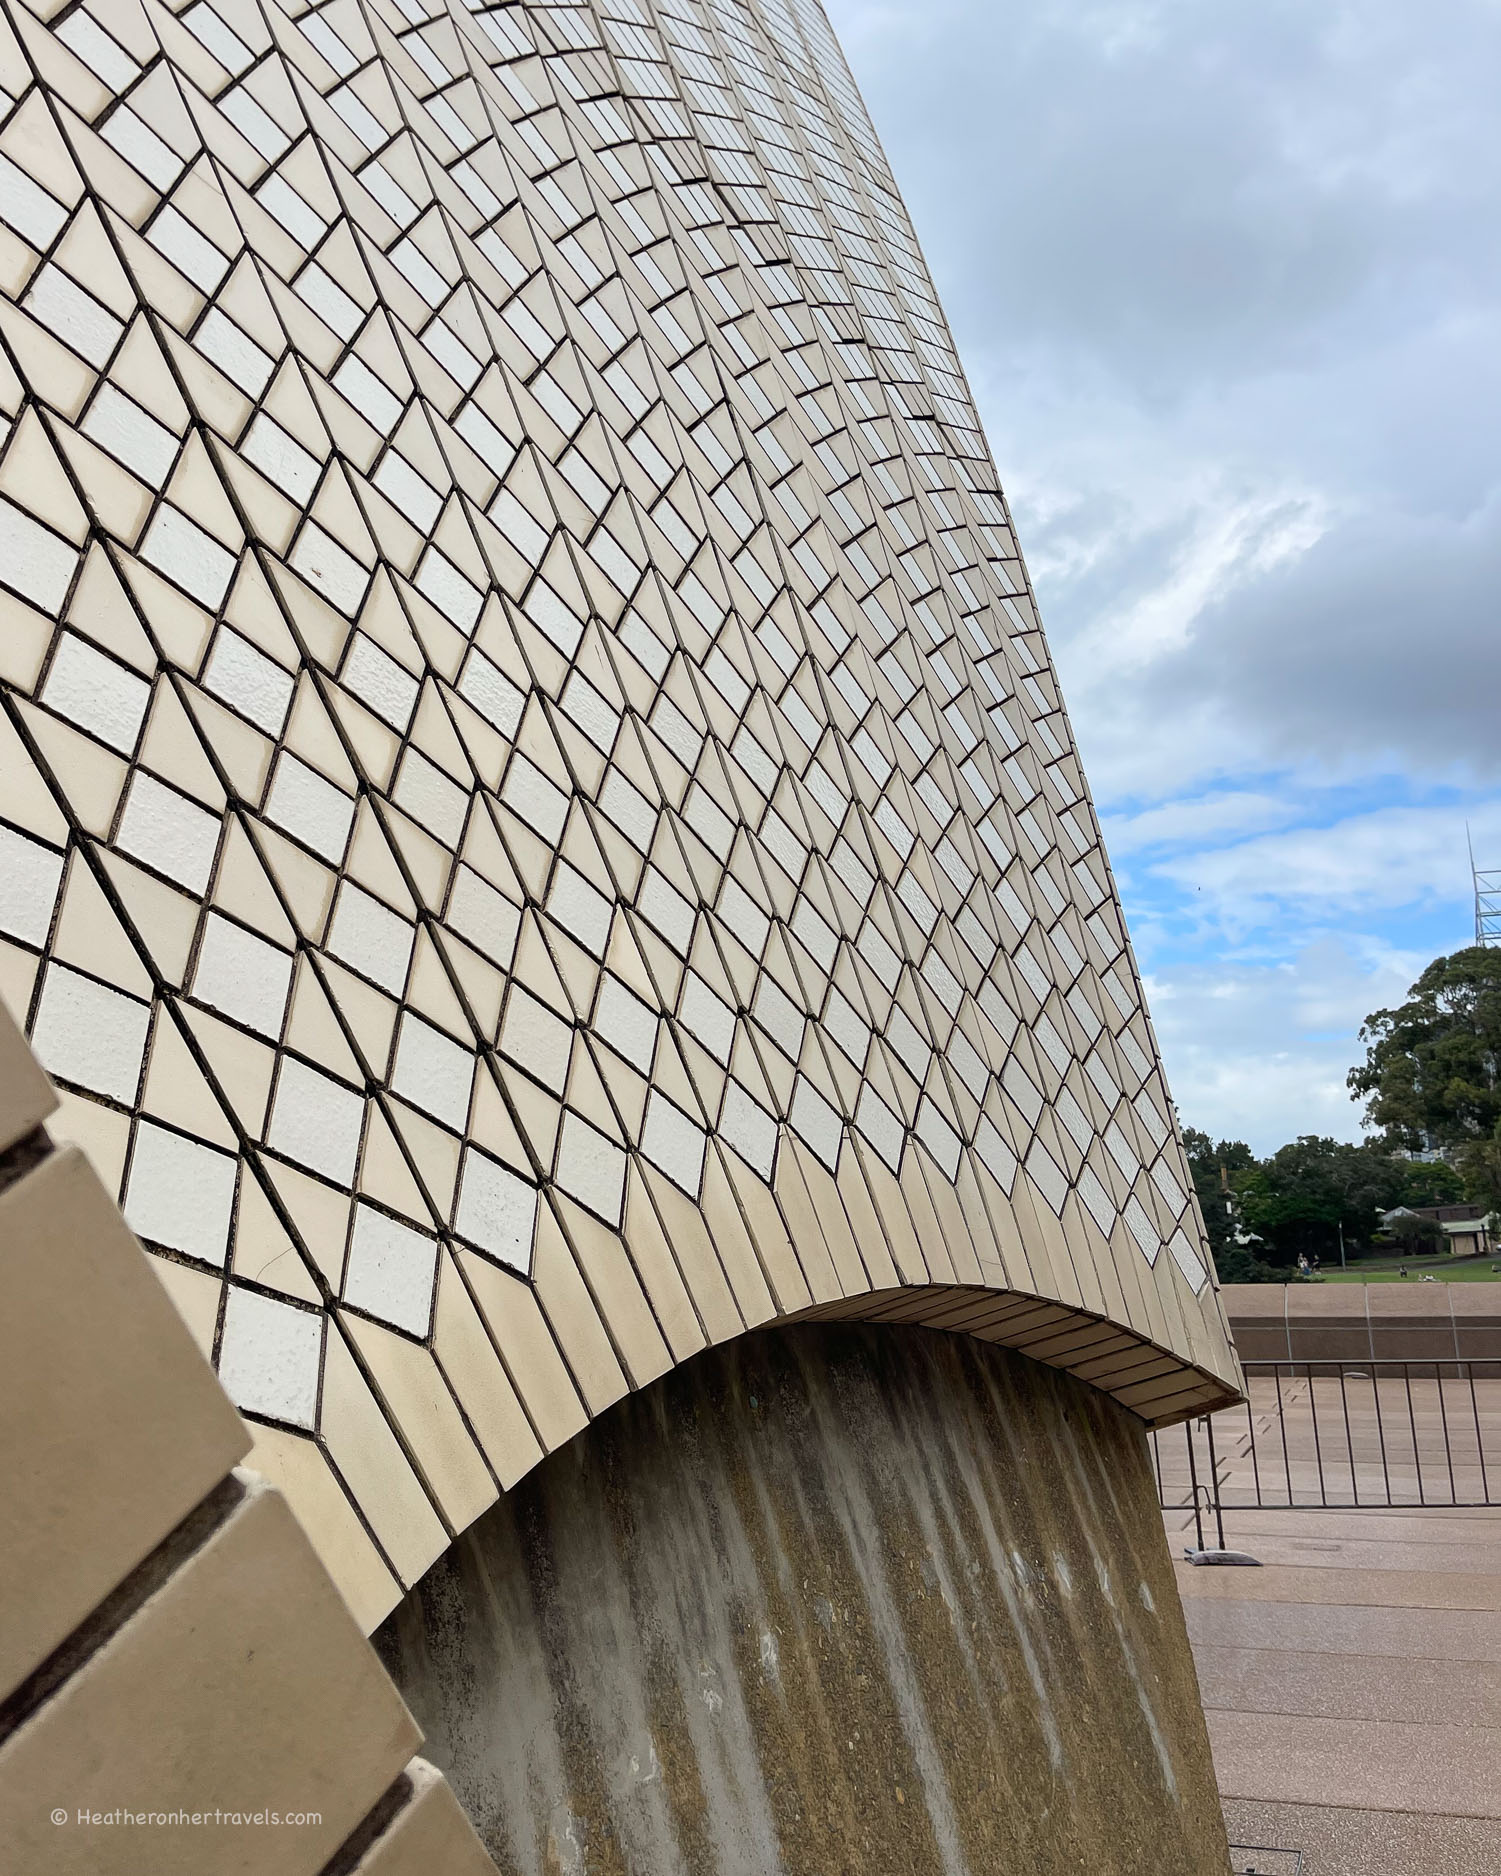
We highly recommend taking a tour of Sydney Opera House if you have more time another day, to see the stunning interiors of the Opera House. On our tour, we really enjoyed the sculptural quality of the building, stories of its construction and close ups of the distinctive roof tiles and structure.
Close ups of the roof tiles at Sydney Opera House, Australia
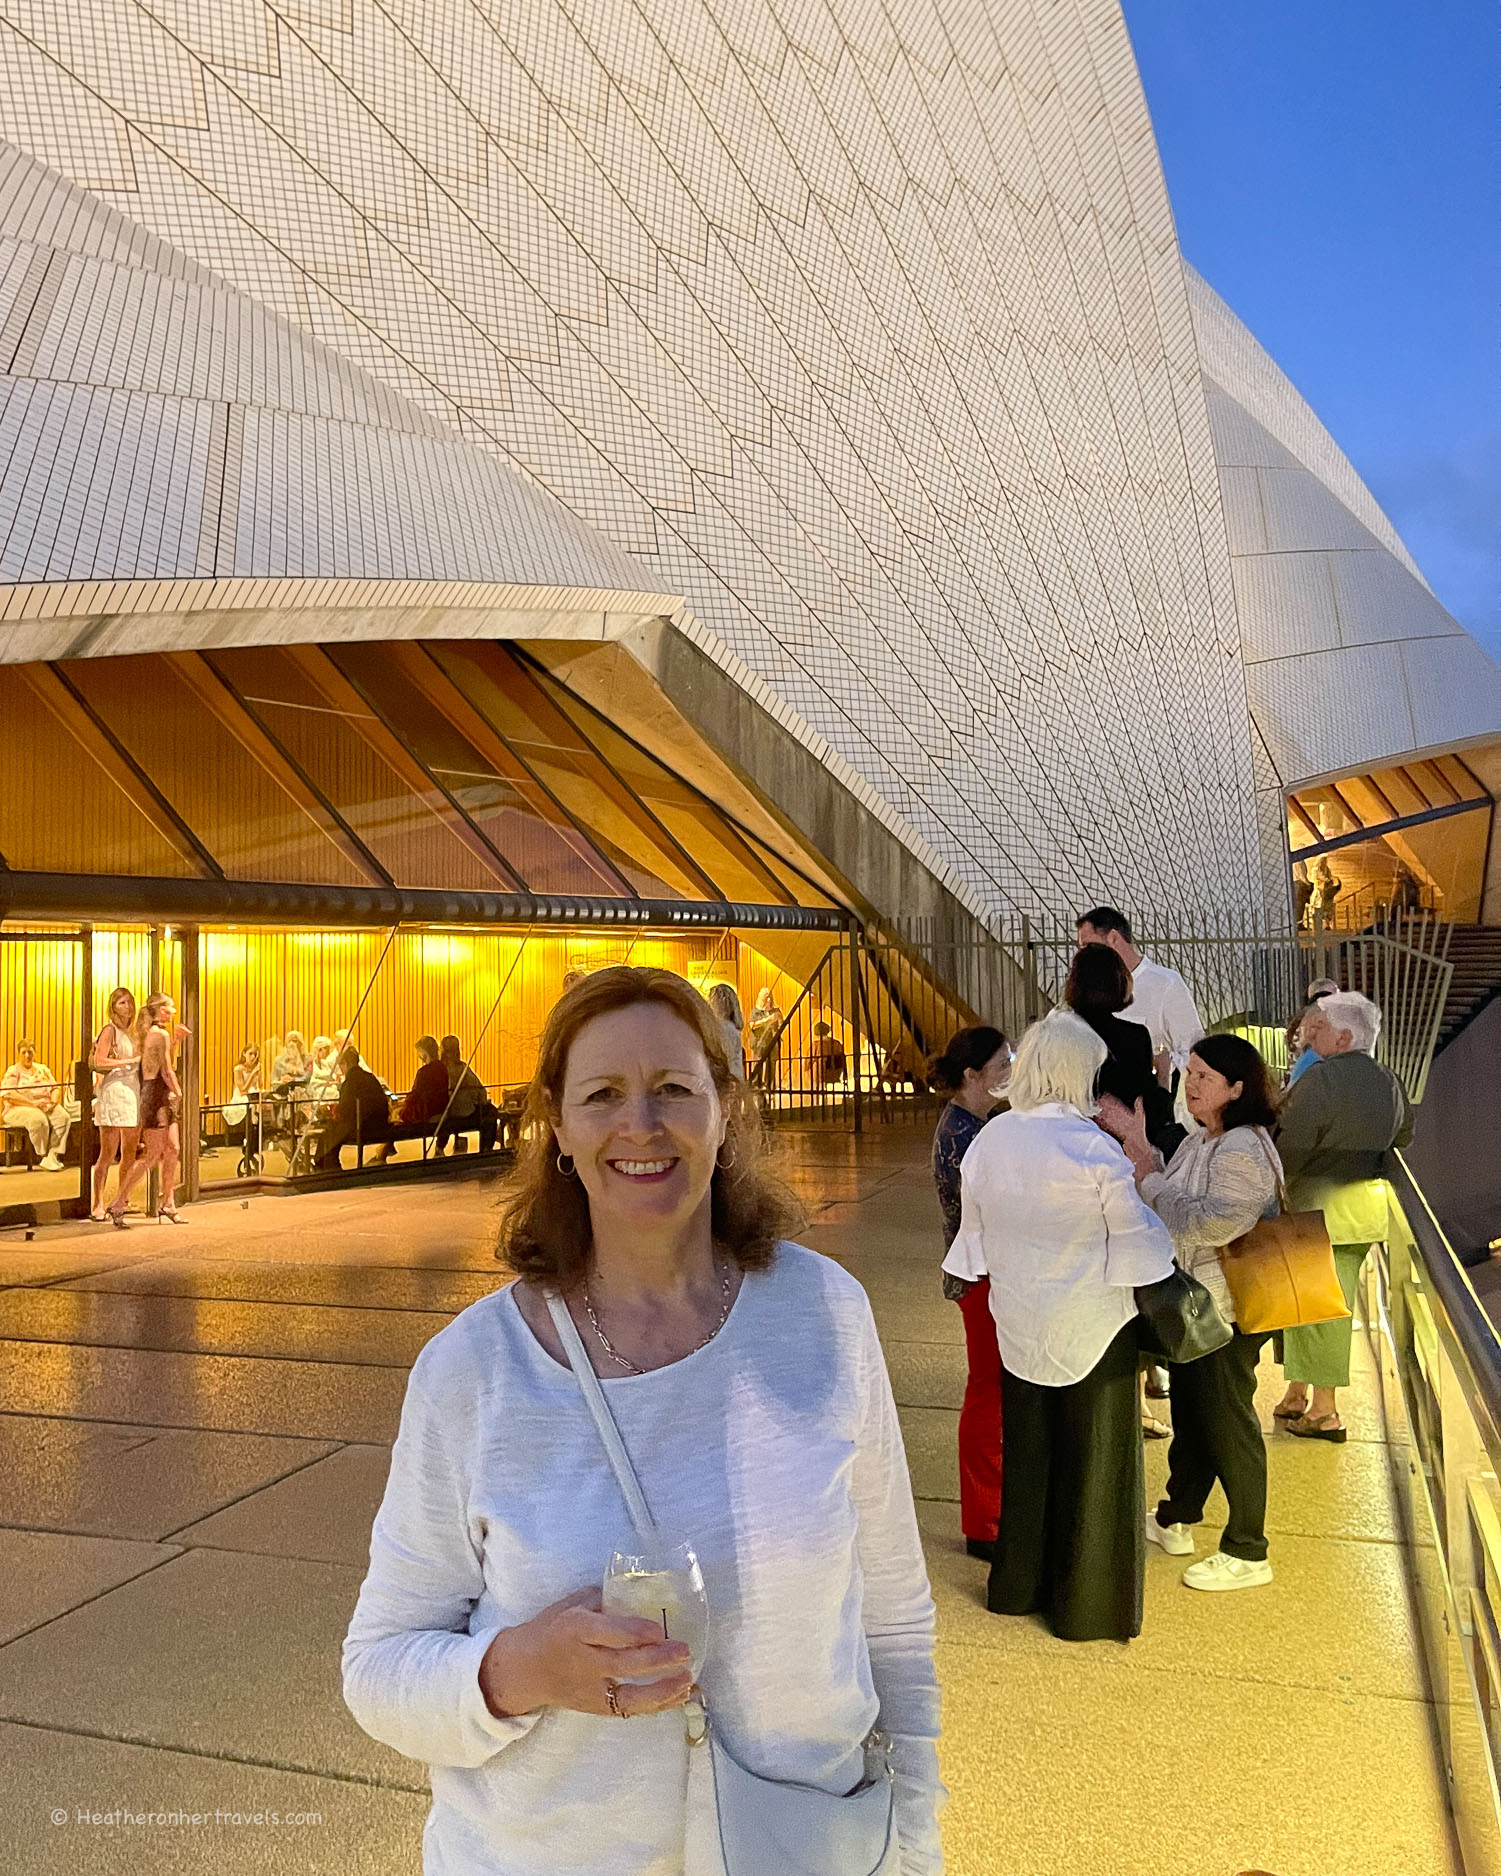
We also booked tickets for a ballet performance of Nijinsky, which was a fun evening, offering another way to experience the Opera House from the inside. If you are Sydney for a while, check what’s on, as it’s a memorable experience.
Heather attending a performance at Sydney Opera House, Australia
Now walk through the Opera House Gate into the Botanical Gardens.
Botanic Gardens of Sydney
We recommend spending up to an hour in the Botanic Gardens and having lunch there – it’s a calming oasis after the crowds around the Sydney Opera House. The 30 hectare garden overlooks Farm Cove and was the site of the first farm planted, to sustain the European colony.
Heather in the Botanic Garden Sydney Australia
After entering from the Opera House Gate, follow the path slightly up hill to get a glimpse of Government House through the railings, which is the office and residence of the Governor of New South Wales.
Botanic Garden Sydney Australia
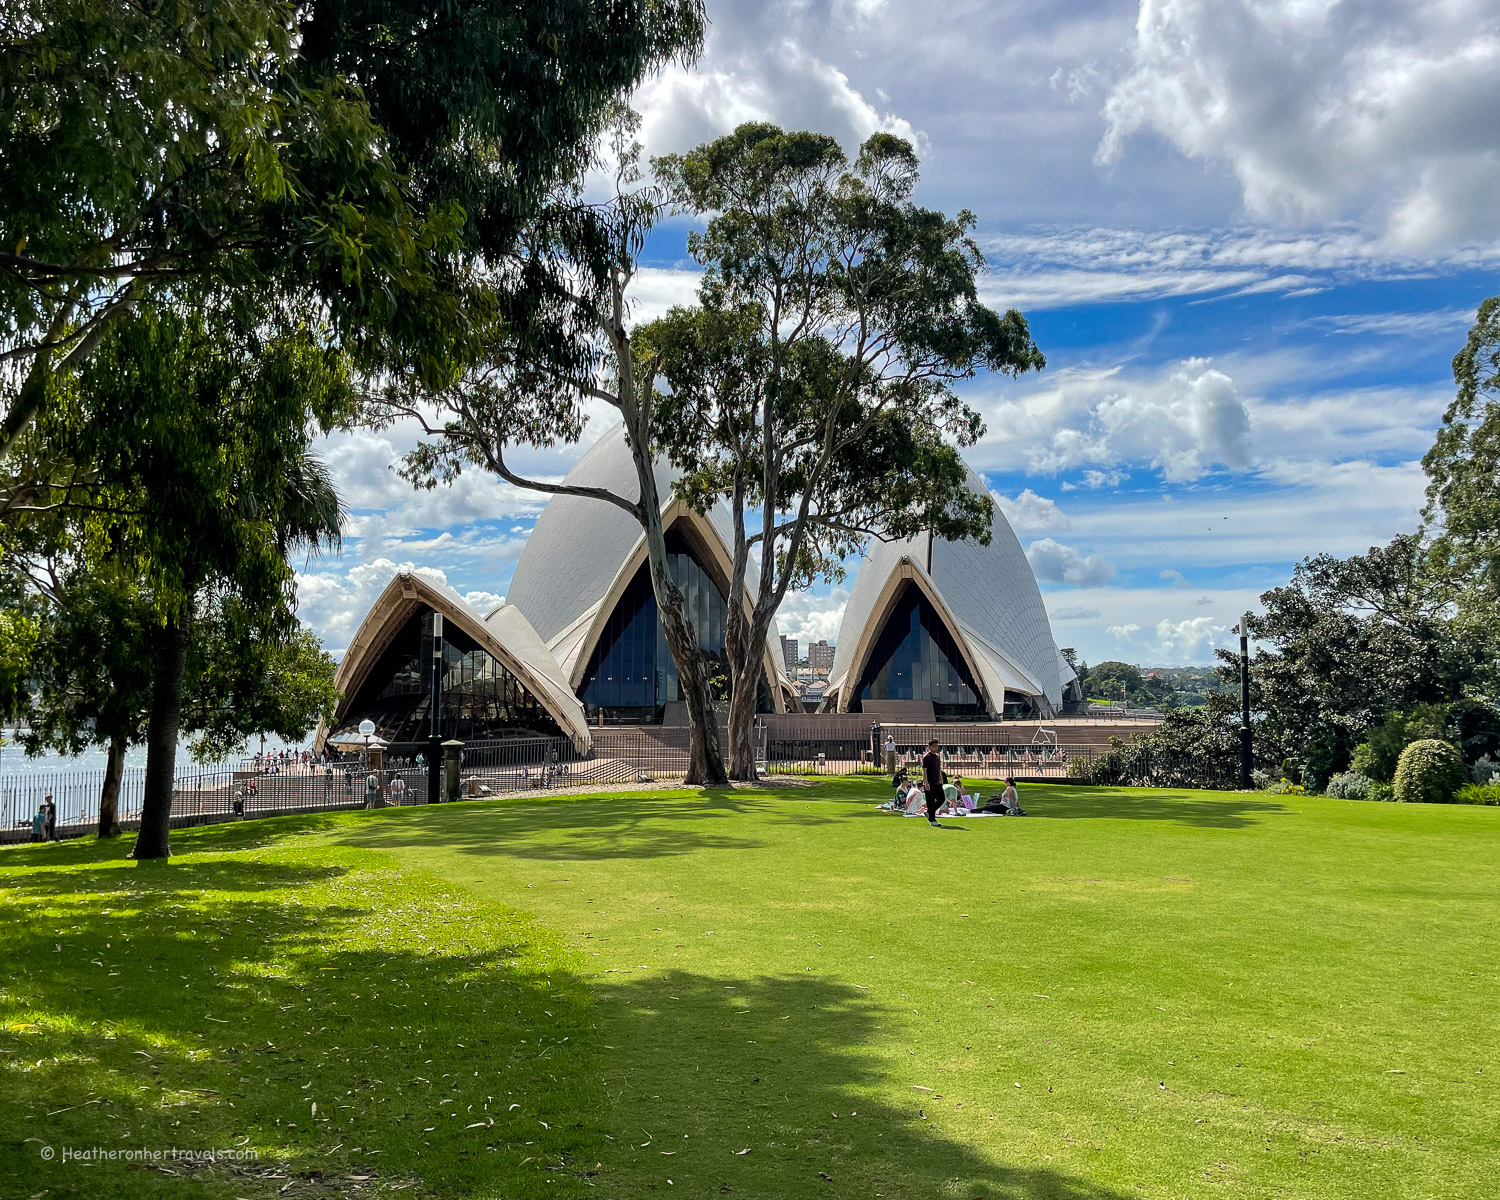
Tip: If you want to have a picnic in the Botanic Garden, a great place is the Bennelong Lawn, tucked between Government House and the Sydney Opera House, where you can sit under a shady tree looking down over the Opera House.
Best place for a picnic – Bennelong Lawn, Botanic Garden Sydney Australia
There are a number of ‘gardens within gardens’ in the Botanic Garden of Sydney, as well as plenty of lawns and shady trees to sit and relax. We recommend wandering around for an hour, making your way up through the garden, in the direction of the exit opposite the Art Gallery of New South Wales.
Our favourite garden spots were:
Succulent Garden, Botanic Garden Sydney Australia
The Succulent Garden – a walled area with cactus and other sculptural succulents
Palace Rose Garden – with a pergola of climbing roses as well as beds of bush and species roses
The Palm Grove – full of colourful kaffir lilies in springtime
The Calyx – a modern glasshouse with a living green wall that hosts exhibitions and events
The Herb Garden – a formal garden with aromatic plants
Cadi Jam Ora – with boards telling the stories of first encounters between the Gadigal people and the European settlers
Cadi Jam Ora Botanic Garden Sydney Australia
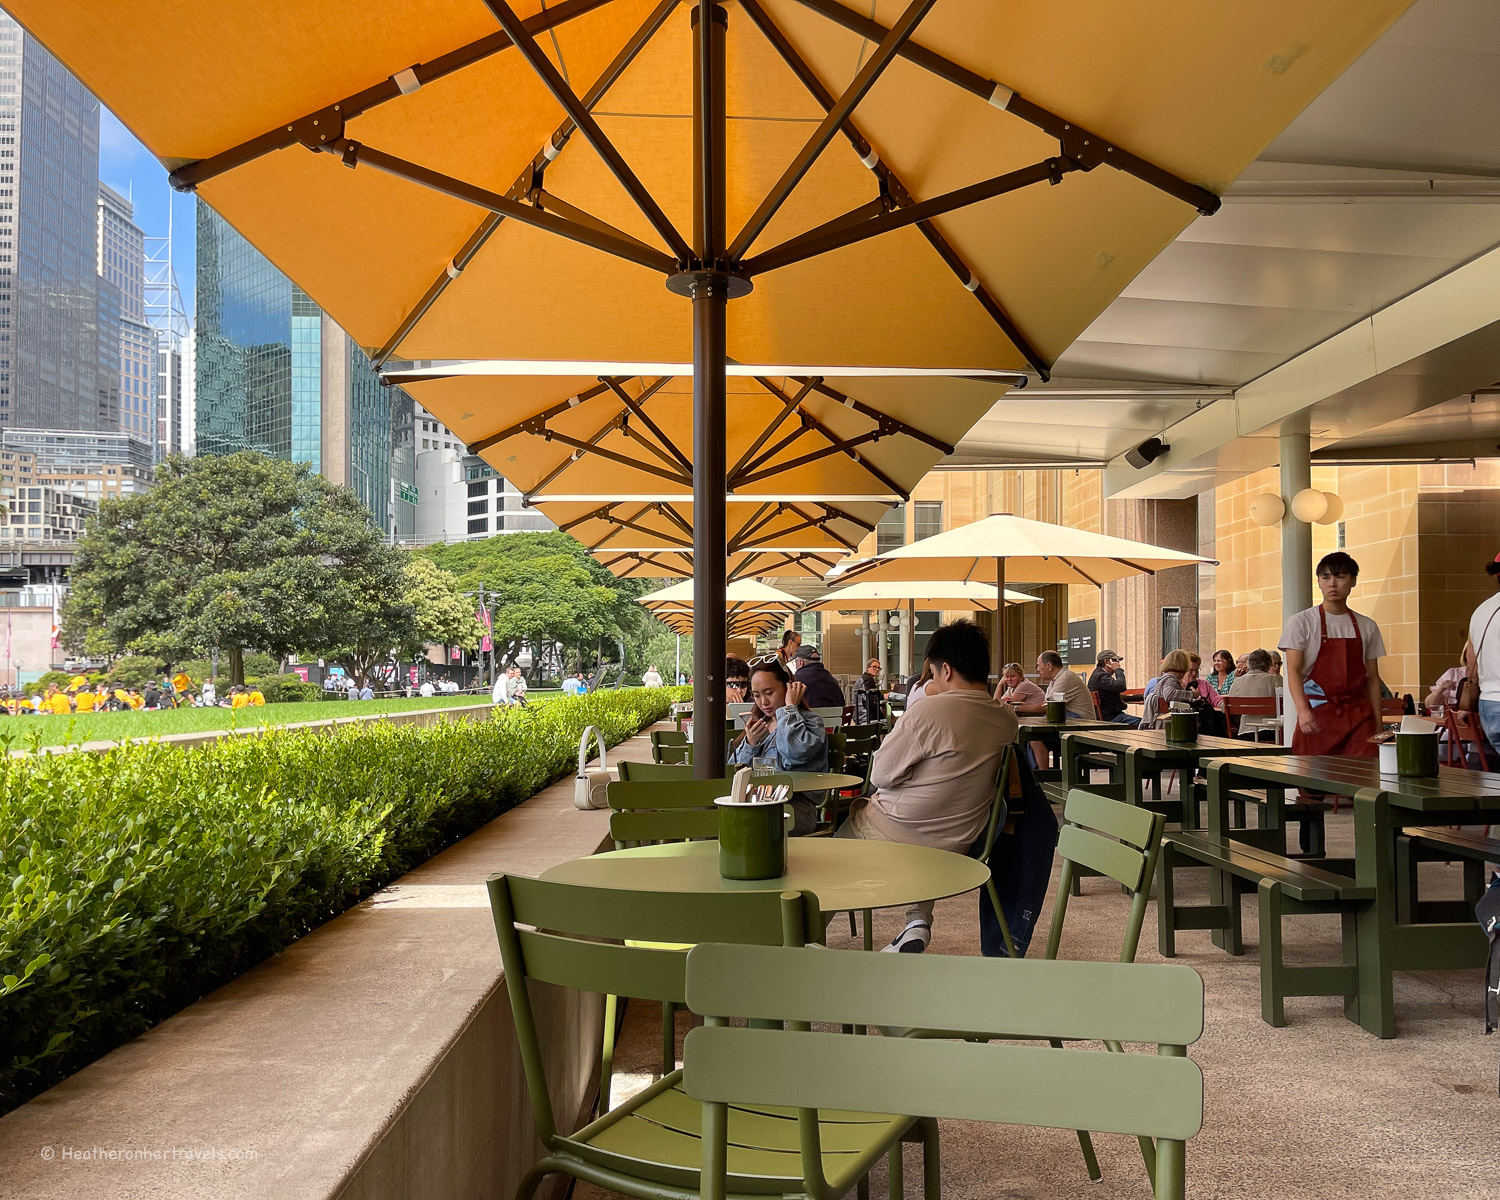
Lunch stop: We recommend a relaxed light lunch in the ground floor Farm Cove Eatery, within the Botanical gardens. If you prefer a more formal table service lunch, try the Botanic House restaurant by Luke Nguyen on the upper floor, offering an upscale Asian fusion menu.
Botanic House restaurant, Botanic Garden Sydney Australia
After lunch it’s time to enjoy one of Sydney’s outstanding museums and galleries. We have two recommendations for you, both of which are free. You should allocate at least an hour to each of them, so it’s better to choose one or the other, as you probably won’t have time for both.
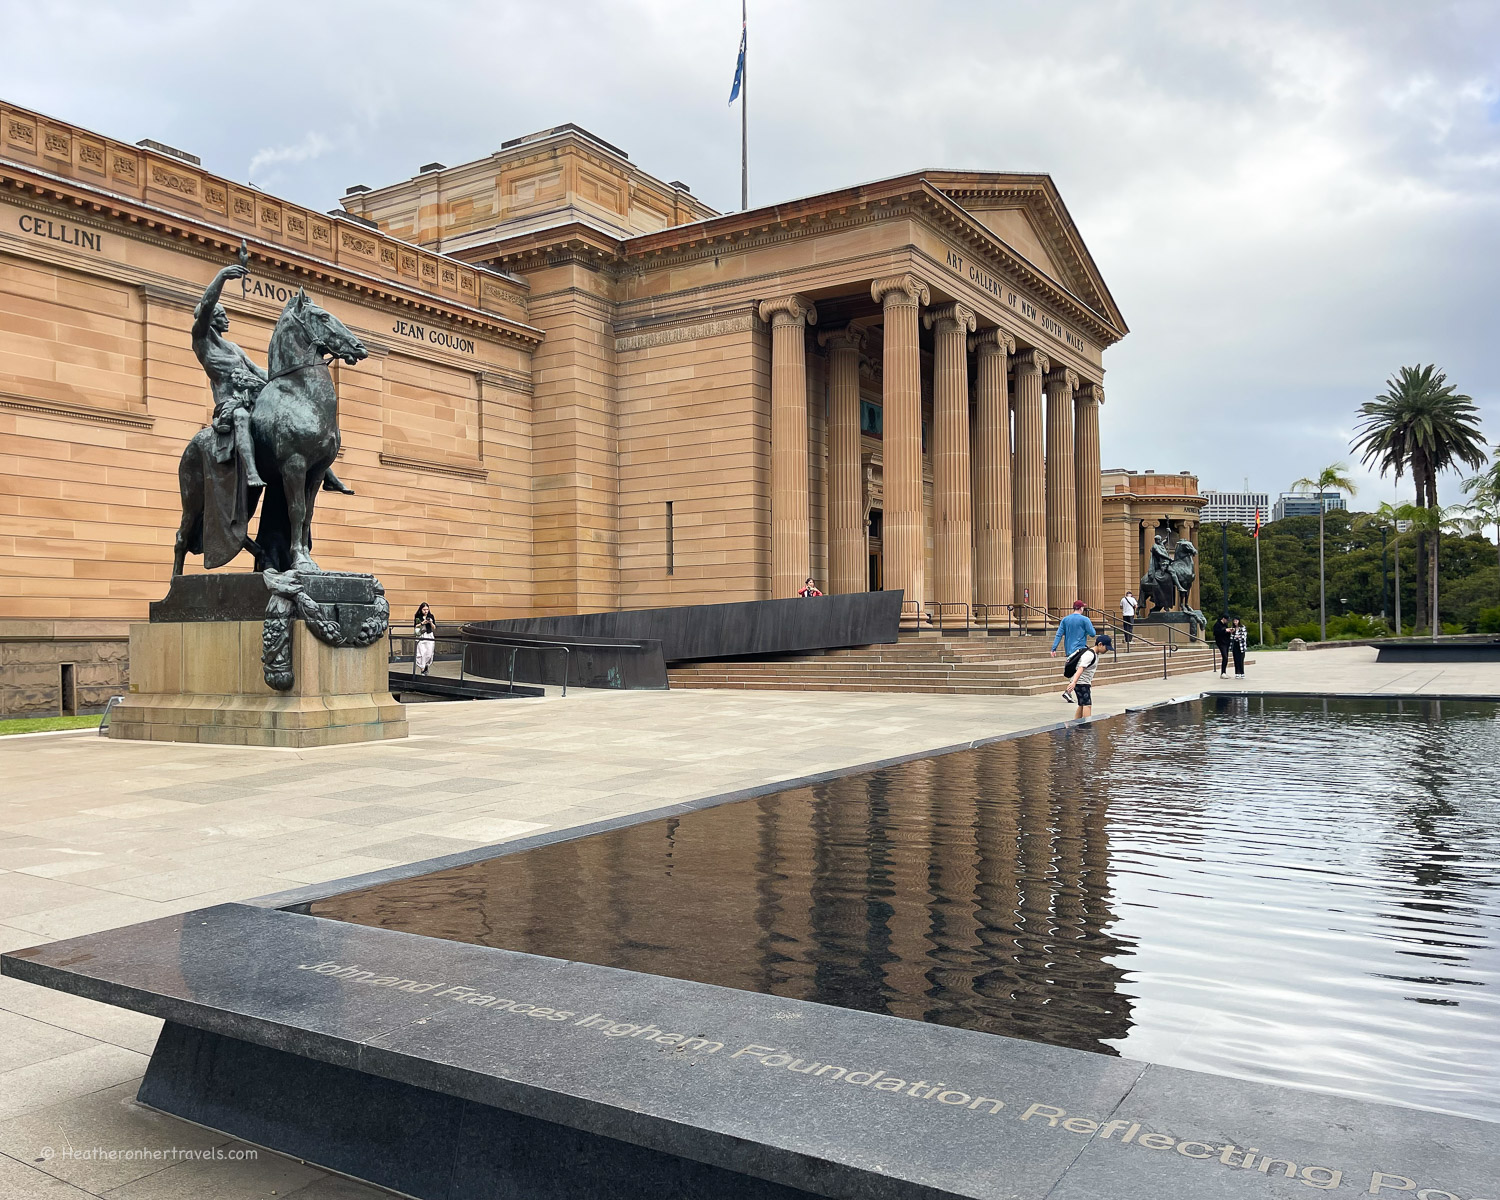
Art Gallery of New South Wales
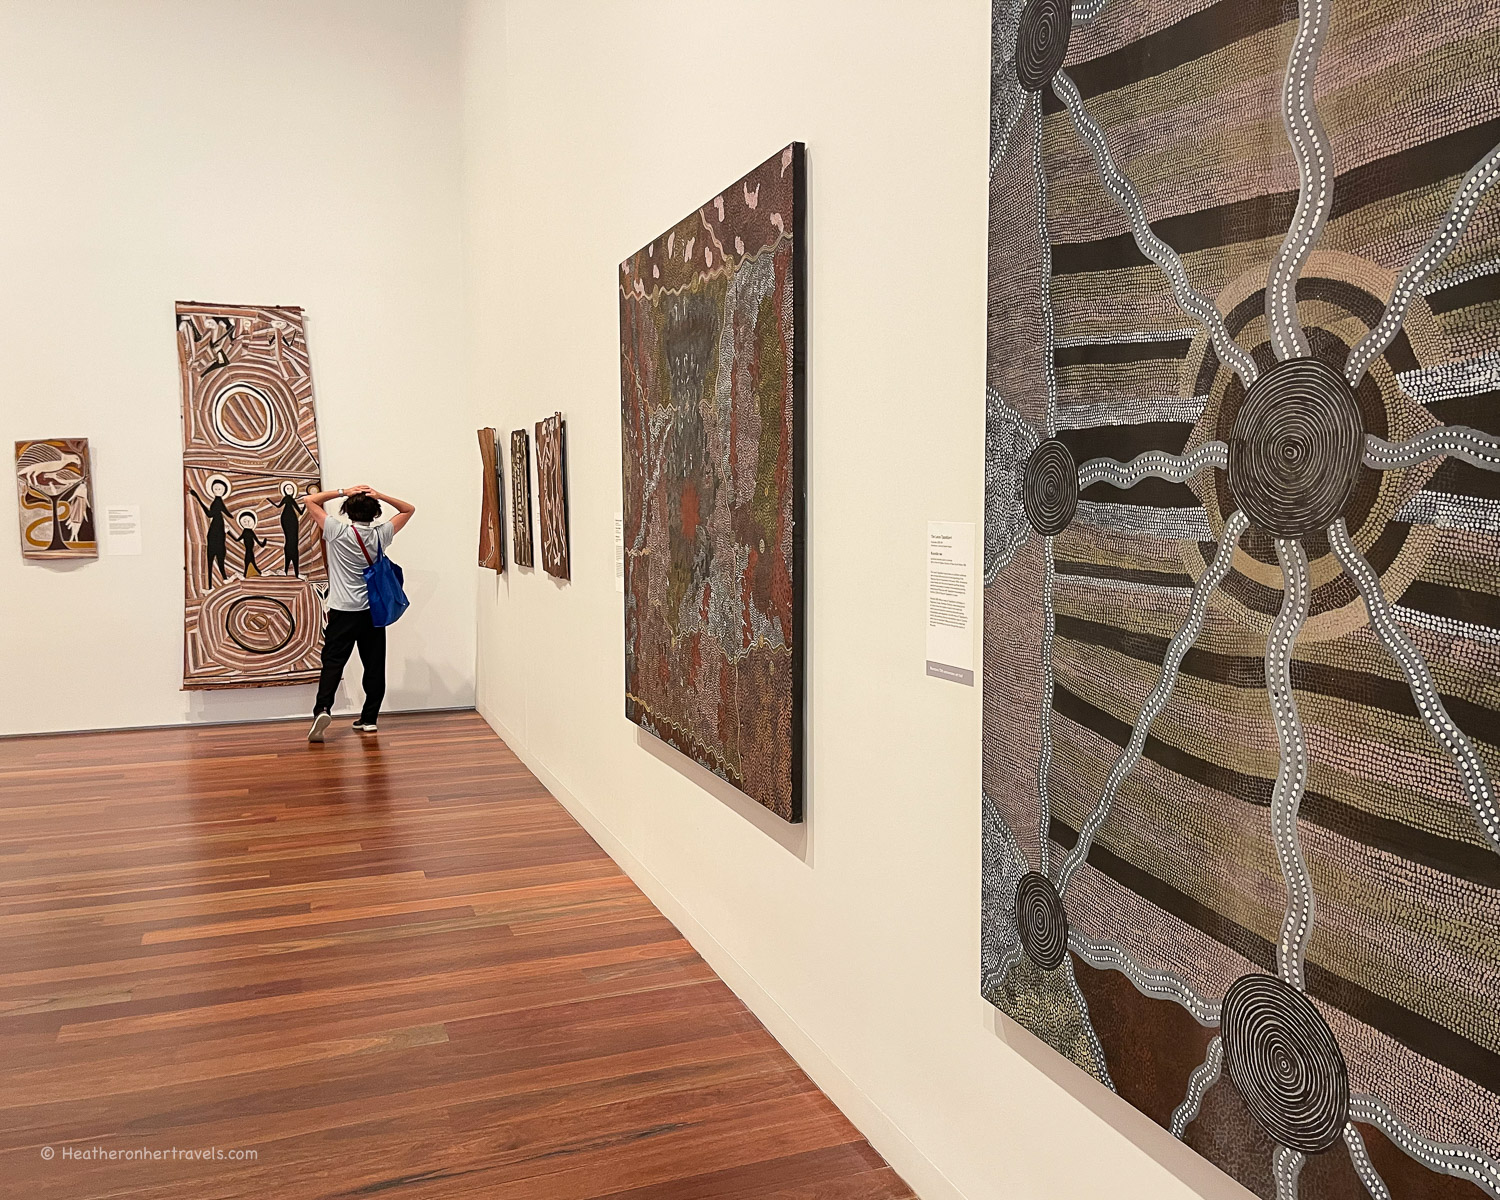
The gallery is a haven for art lovers, with the focus on Australian art and photography and a strong collection of Aboriginal and Torres Strait Islander art. We especially recommend the newer glass wing, where you can see some Aboriginal art in the Yirbana Gallery.
Art Gallery of NSW, Sydney Australia
The Art Gallery campus comprises two connected buildings, the original 19th century sandstone classical facade, and the newer glass pavilions named Naala Badu.
Naala Badu Wing, Art Gallery of NSW, Sydney Australia
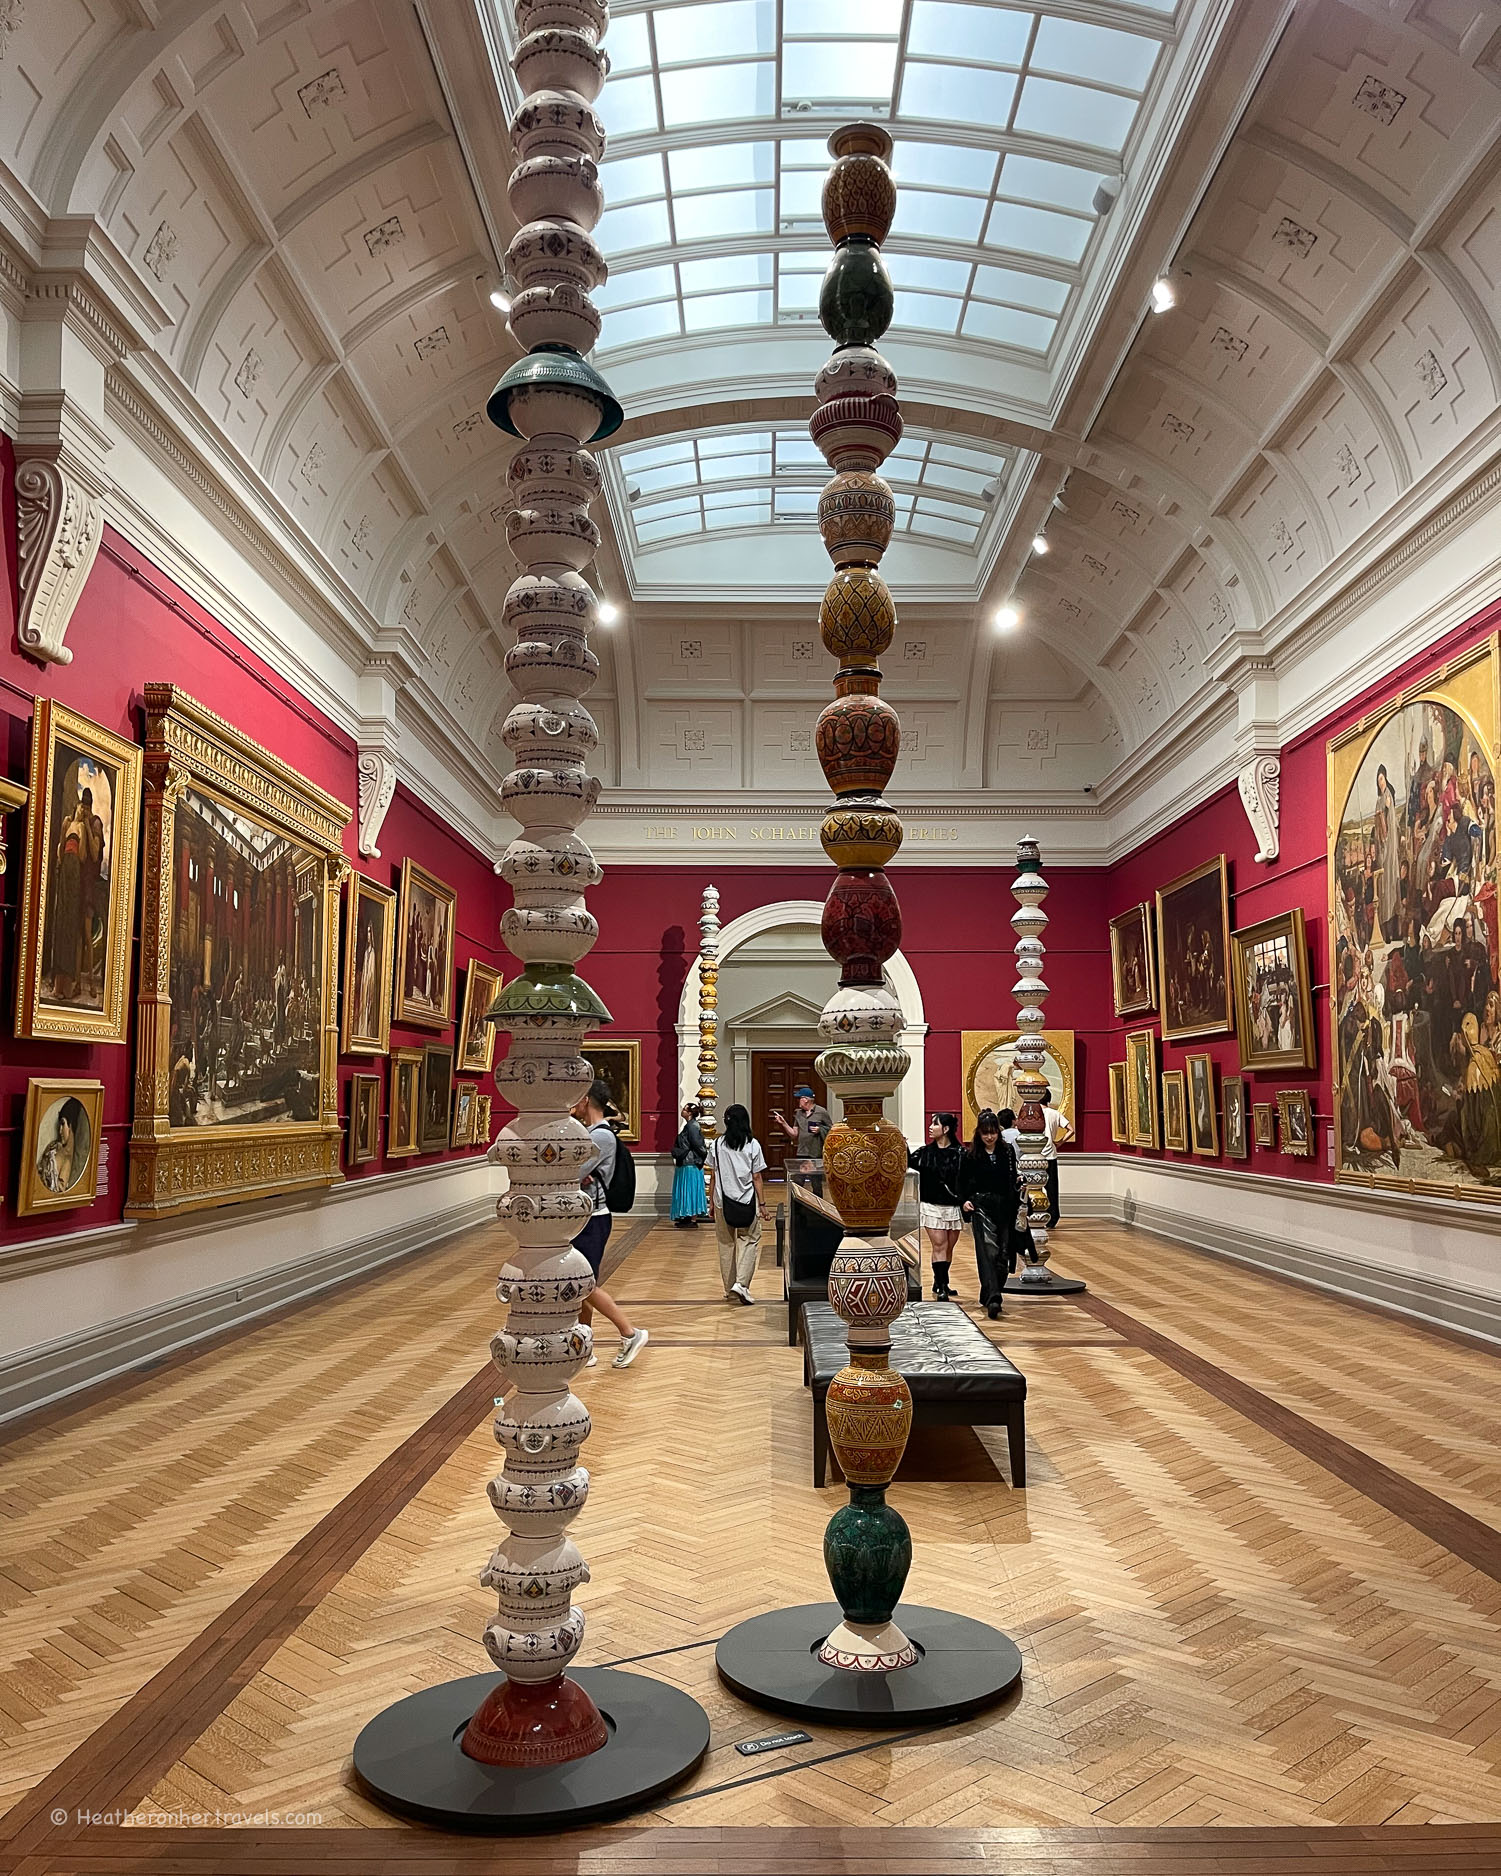
If you are short of time, I’d enter the glass pavilions first, as this is where the Yirbana Gallery is located. The gallery, meaning ‘This way’ in the language of the Eora people, houses the collection of Aborigonal and Torres Strait Islander art, and is one of the highlights of the whole museum.
Indigenous art in the Art Gallery of NSW, Sydney Australia
The galleries of the 19th century building also offer beautifully displayed collections of Australian and European art. I enjoyed the way that art from different eras was mixed together in the galleries, based on themes, rather than centuries, which give the galleries a lively and contemporary feel.
After spending around an hour here, walk across the Domain, an open green space, to Hyde Park Barracks Museum.
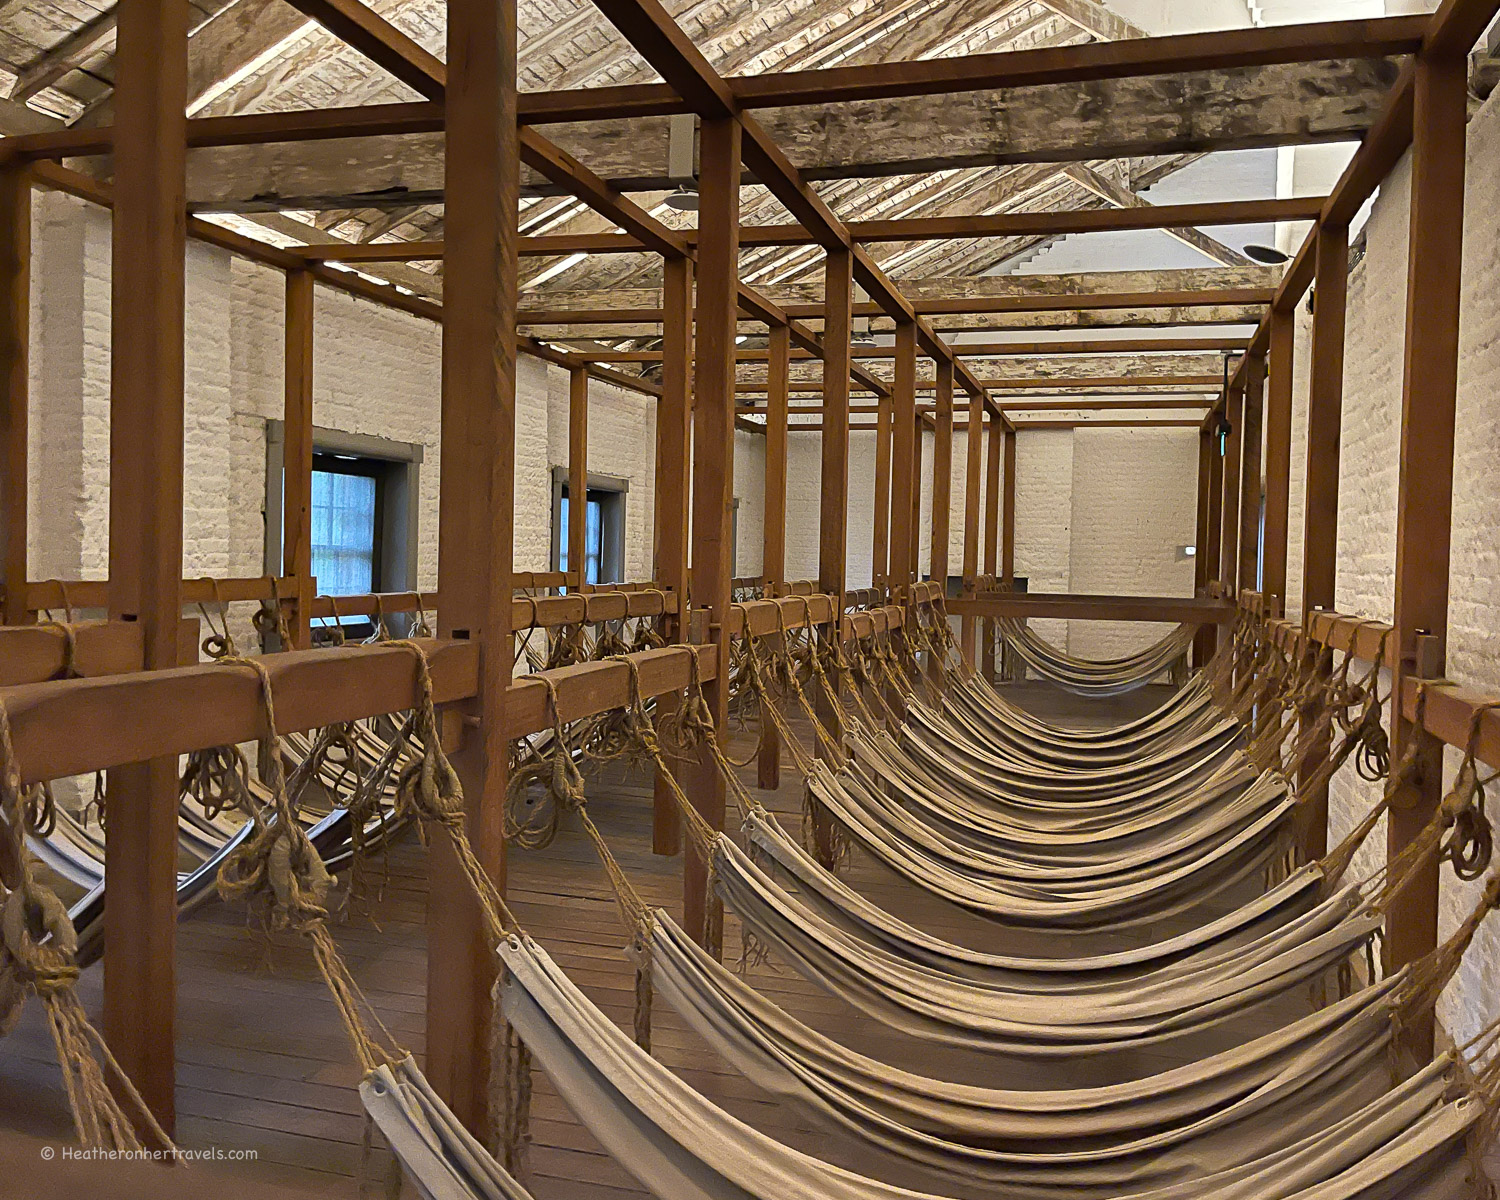
Hyde Park Barracks Museum
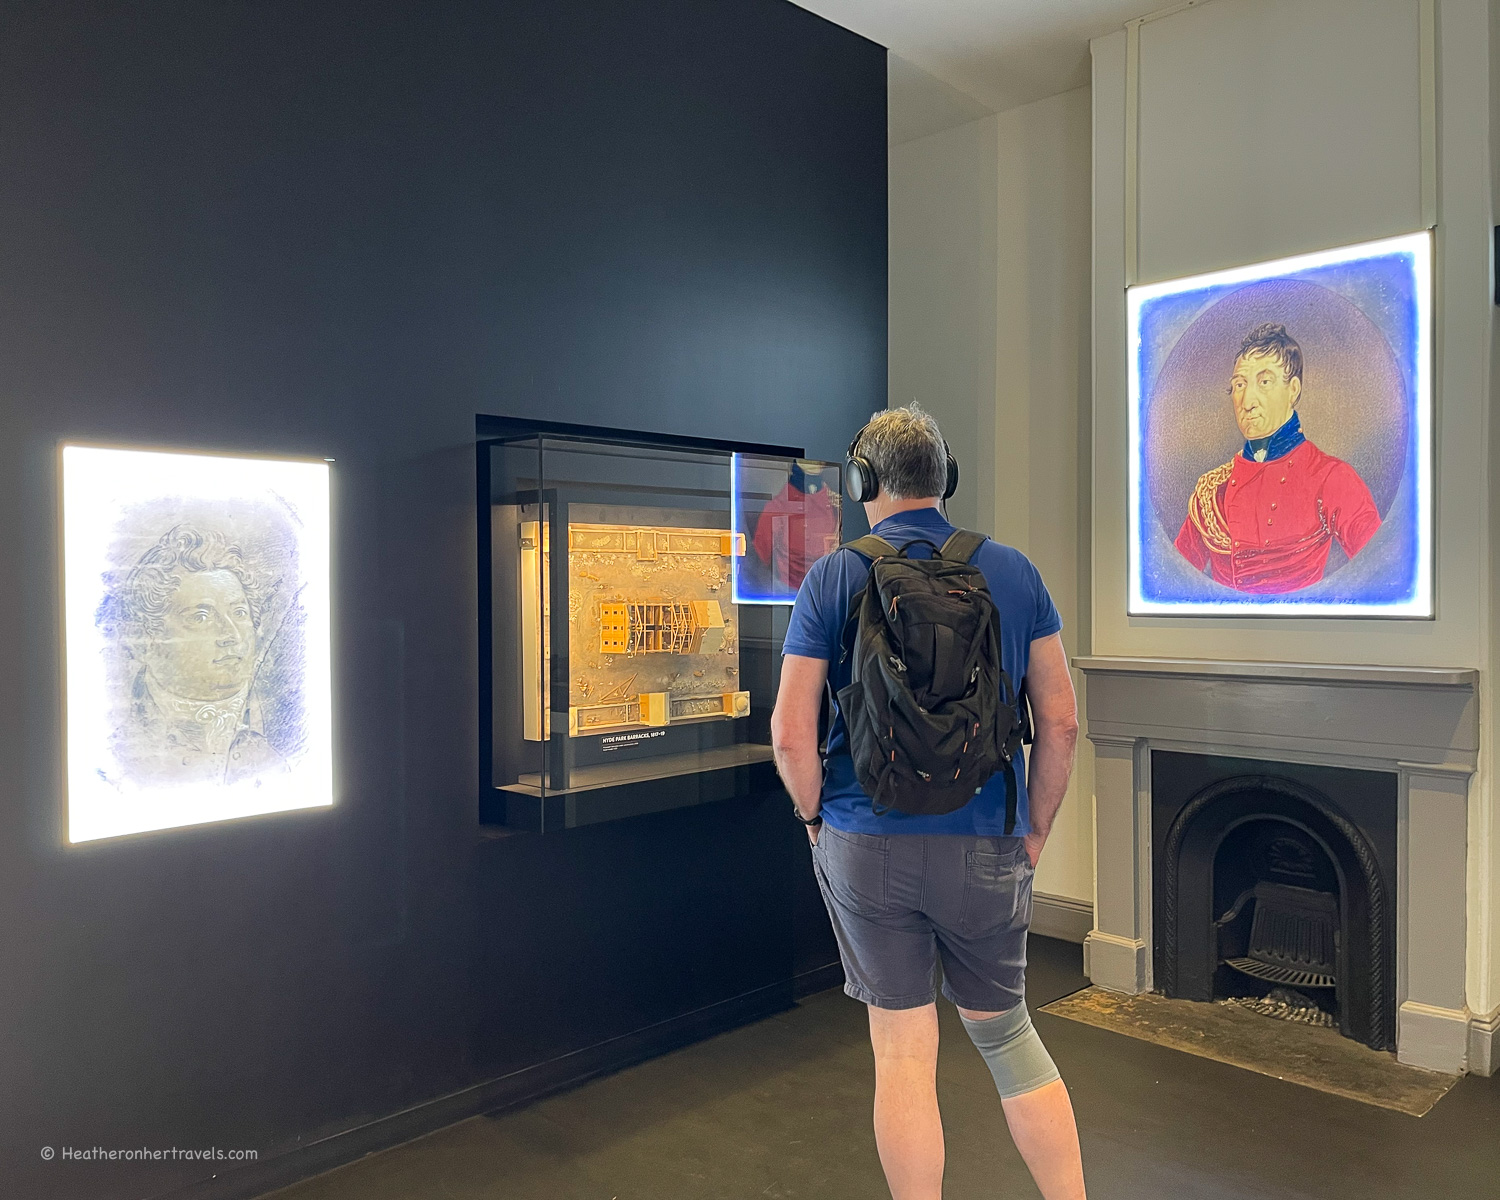
If you are interested in the early beginnings of Sydney as a colony, the Hyde Park Barracks Museum covers the convict history of those who were deported from England to build a new life here.
Hyde Park Barracks, Sydney Australia
The classically proportioned sandstone building, by convict architect Francis Greenway, is beautiful in its own right and was built by convict labour in 1819. It originally housed convicts who slept in cramped rows of hammocks. Later the building provided accommodation for newly arrived female immigrants until they could find work.
Hyde Park Barracks, Sydney Australia
The rooms are based on different themes and take you on a journey from the first arrival of the convicts after a long sea journey, to the work they were set to do and the expansion of the new colony.
It’s a relaxing museum to visit, since you are provided with an audio guide and headphones, that automatically start their commentary as you pass through each room.
Hyde Park Barracks, Sydney Australia
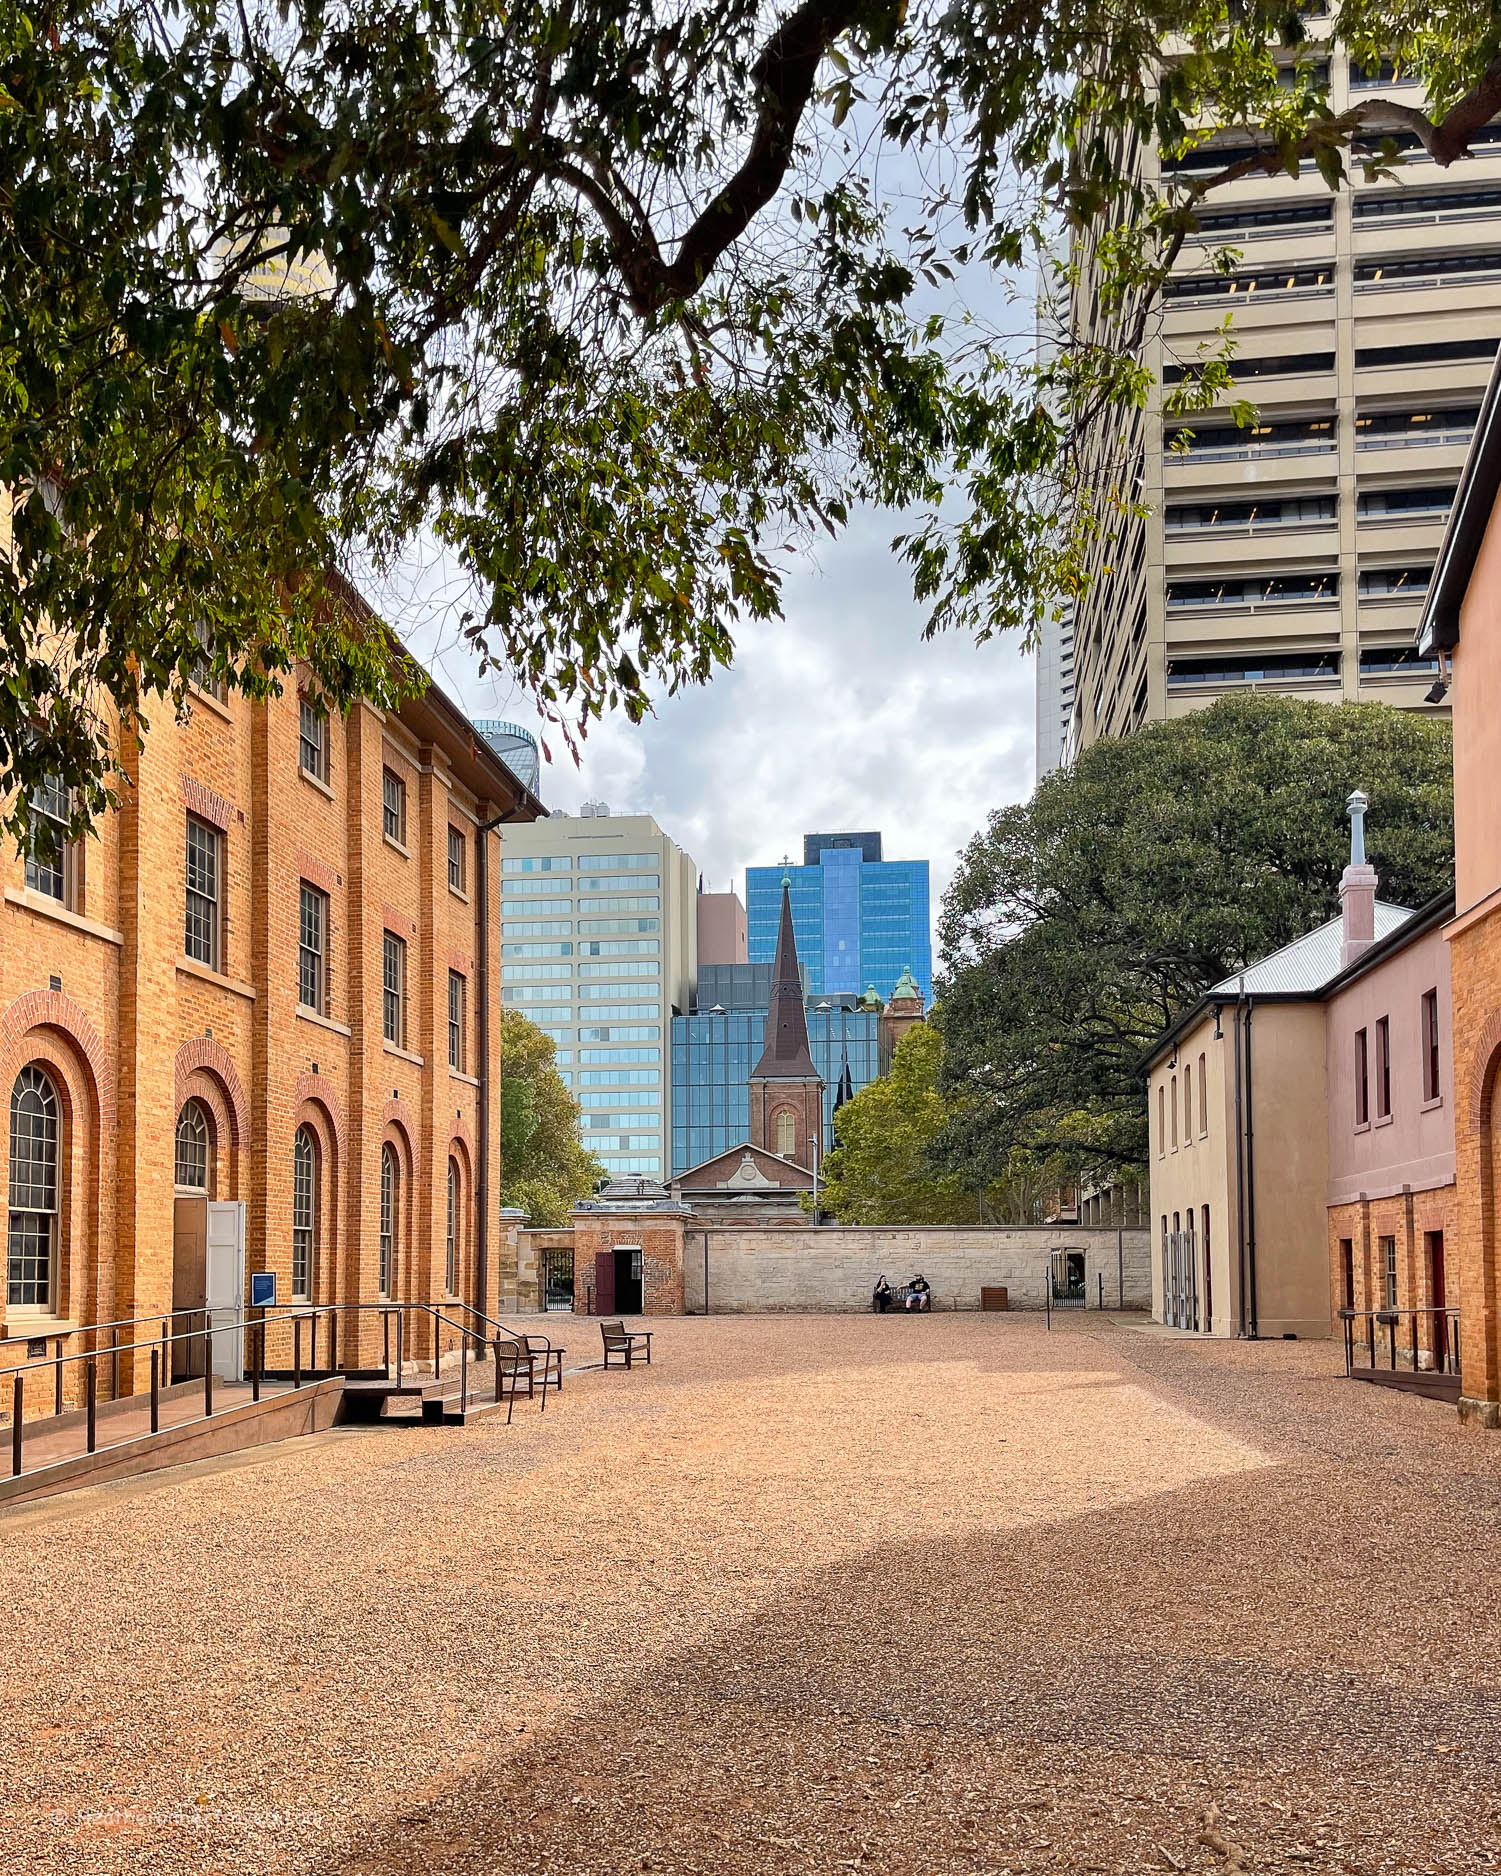
If you’ve spent your time at the Art Gallery of New South Wales (you probably won’t have time to do both museums), you can still admire Hyde Park Barracks from the outside.
Then walk down Macquarie Street to see some of the 19th century historic buildings, from the early days of the colony, as you make your way back to the starting point at Circular Quay.
Macquarie Street
Named after Lachlan Macquarie, one of the early governors of New South Wales, Macquarie Street was set out in the 1800’s. It was intended as a ceremonial route from the harbour, with a number of imposing public buildings. Many were designed by a convict architect, Francis Greenway and are still used today for government or civic purposes.
Hyde Park Barracks, Sydney Australia
Spend half an hour walking along the street, to admire the architecture of these imposing buildings as you head towards Martin Place.
Hyde Park Barracks – Built to house convicts and later accommodation for newly arrived female immigrants, now a museum.
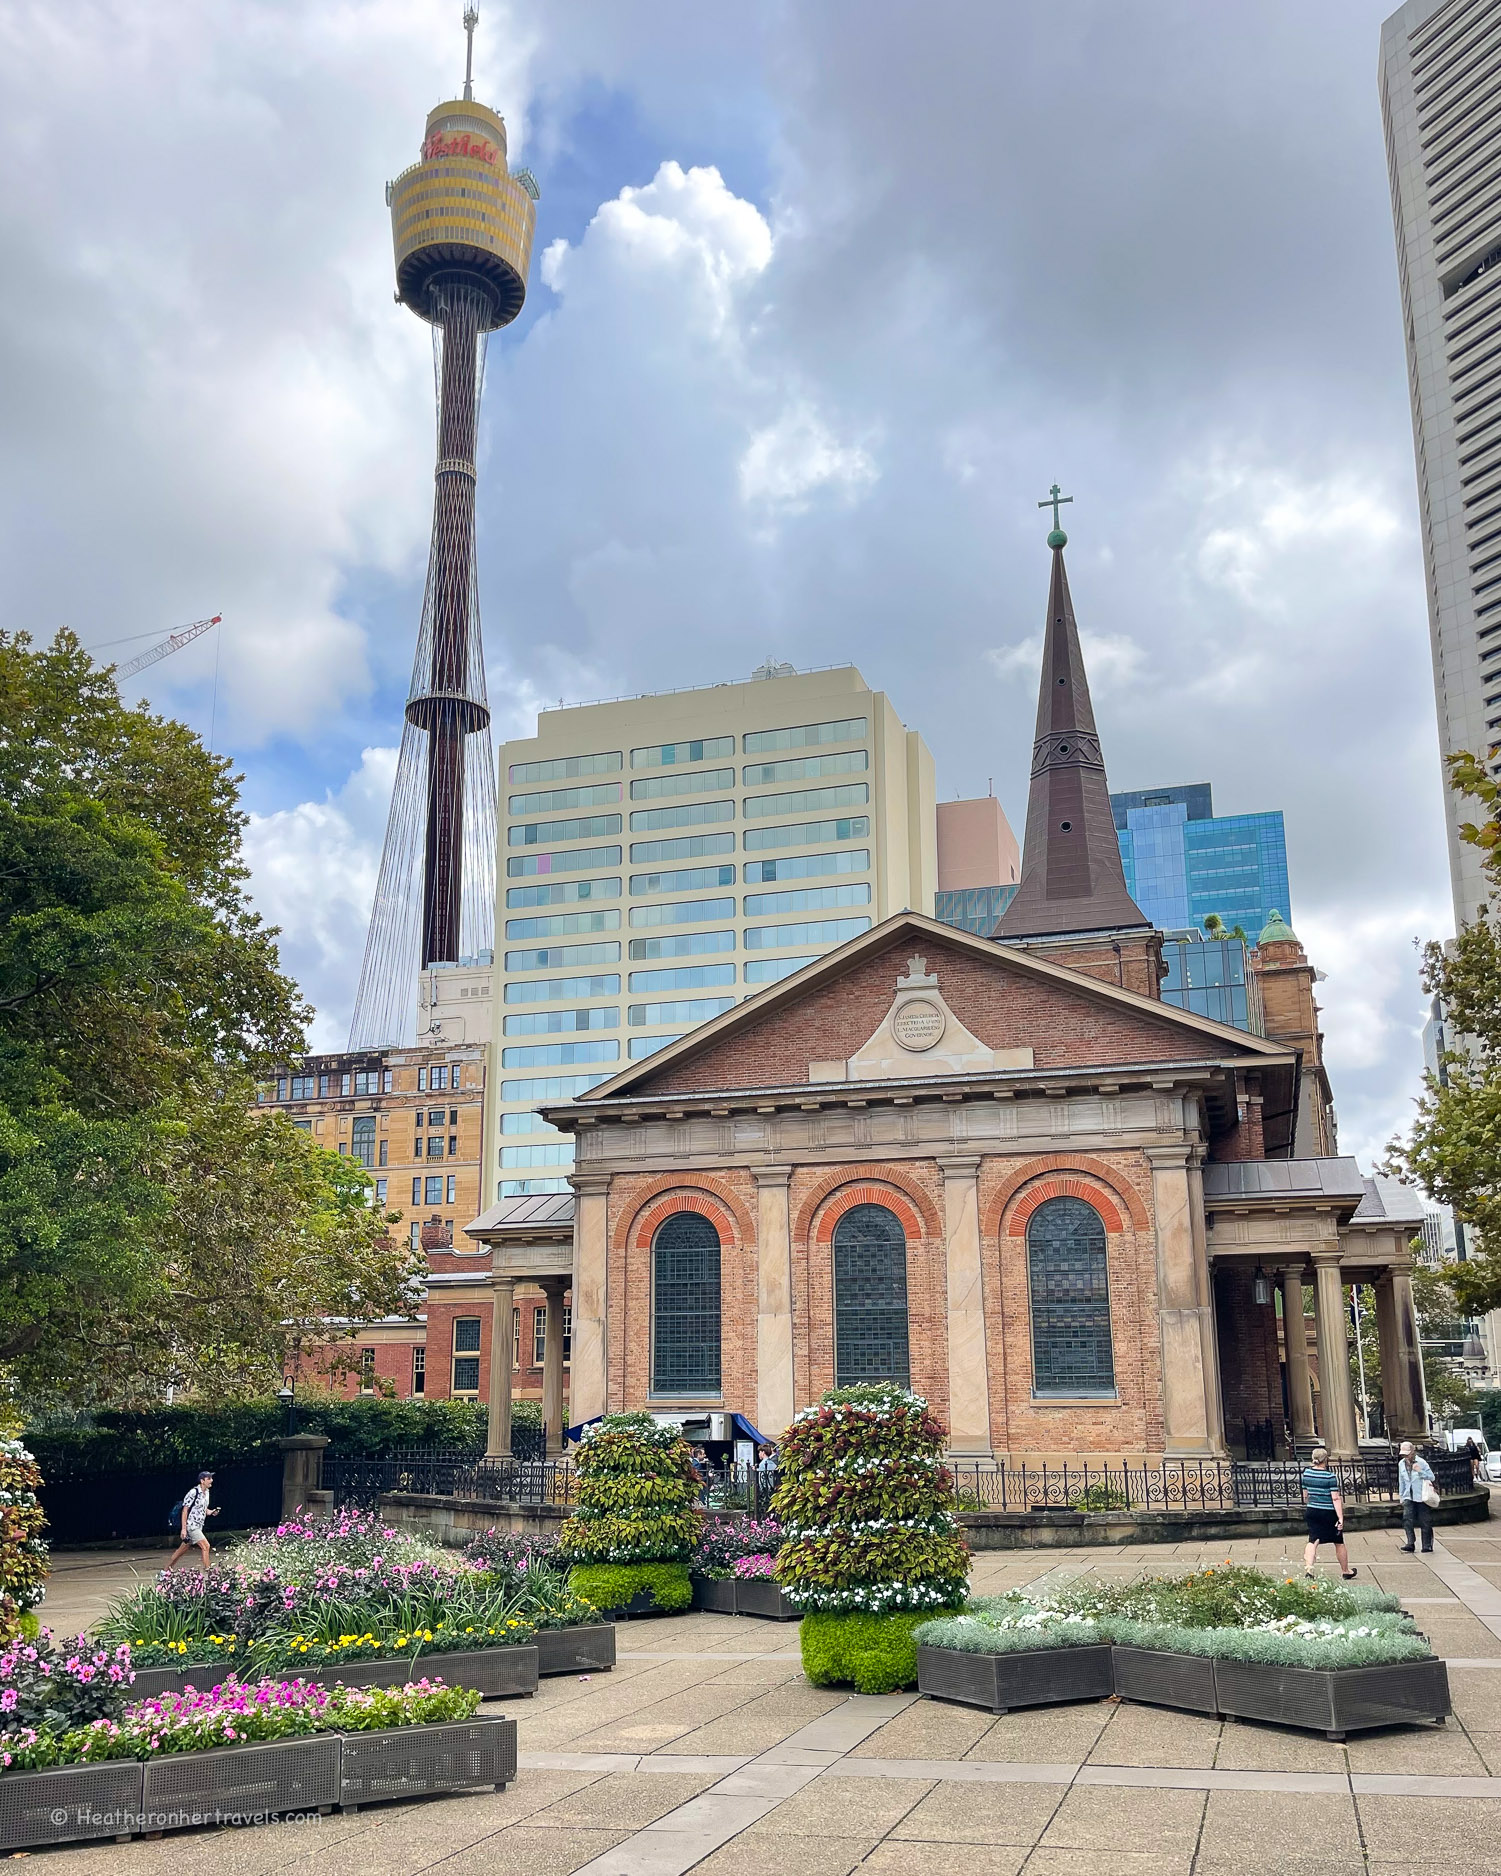
St James’ Church – across the street from Hyde Park Barracks, with an elegant exterior and steeple. The interior is quite simple, but there’s a beautiful modern stained glass window in the side chapel.
St James Church Sydney Australia
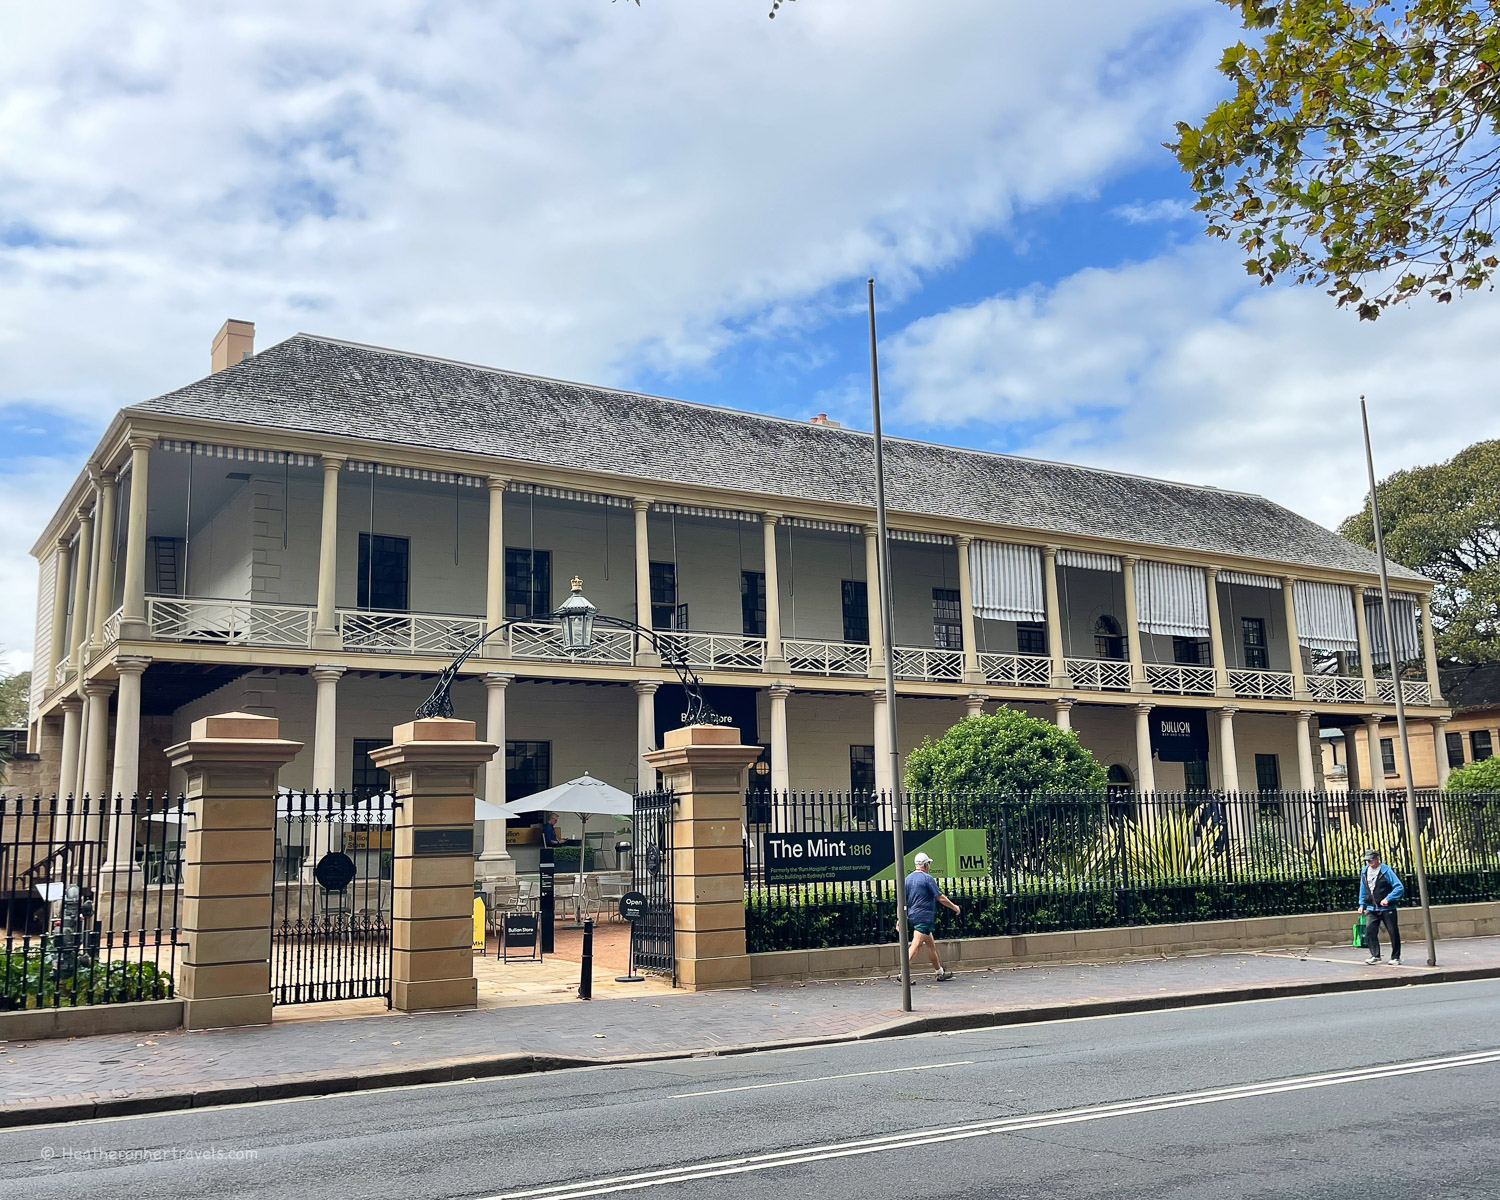
The Mint – formerly a wing of the Sydney Hospital, later used as a mint, to process the gold discovered in Australia. The building has been beautifully restored and houses a small coffee shop and some limited exhibits, with museum offices at the back. You can walk through the portico to see the courtyard space behind.
The Mint Macquarie Street Sydney Australia
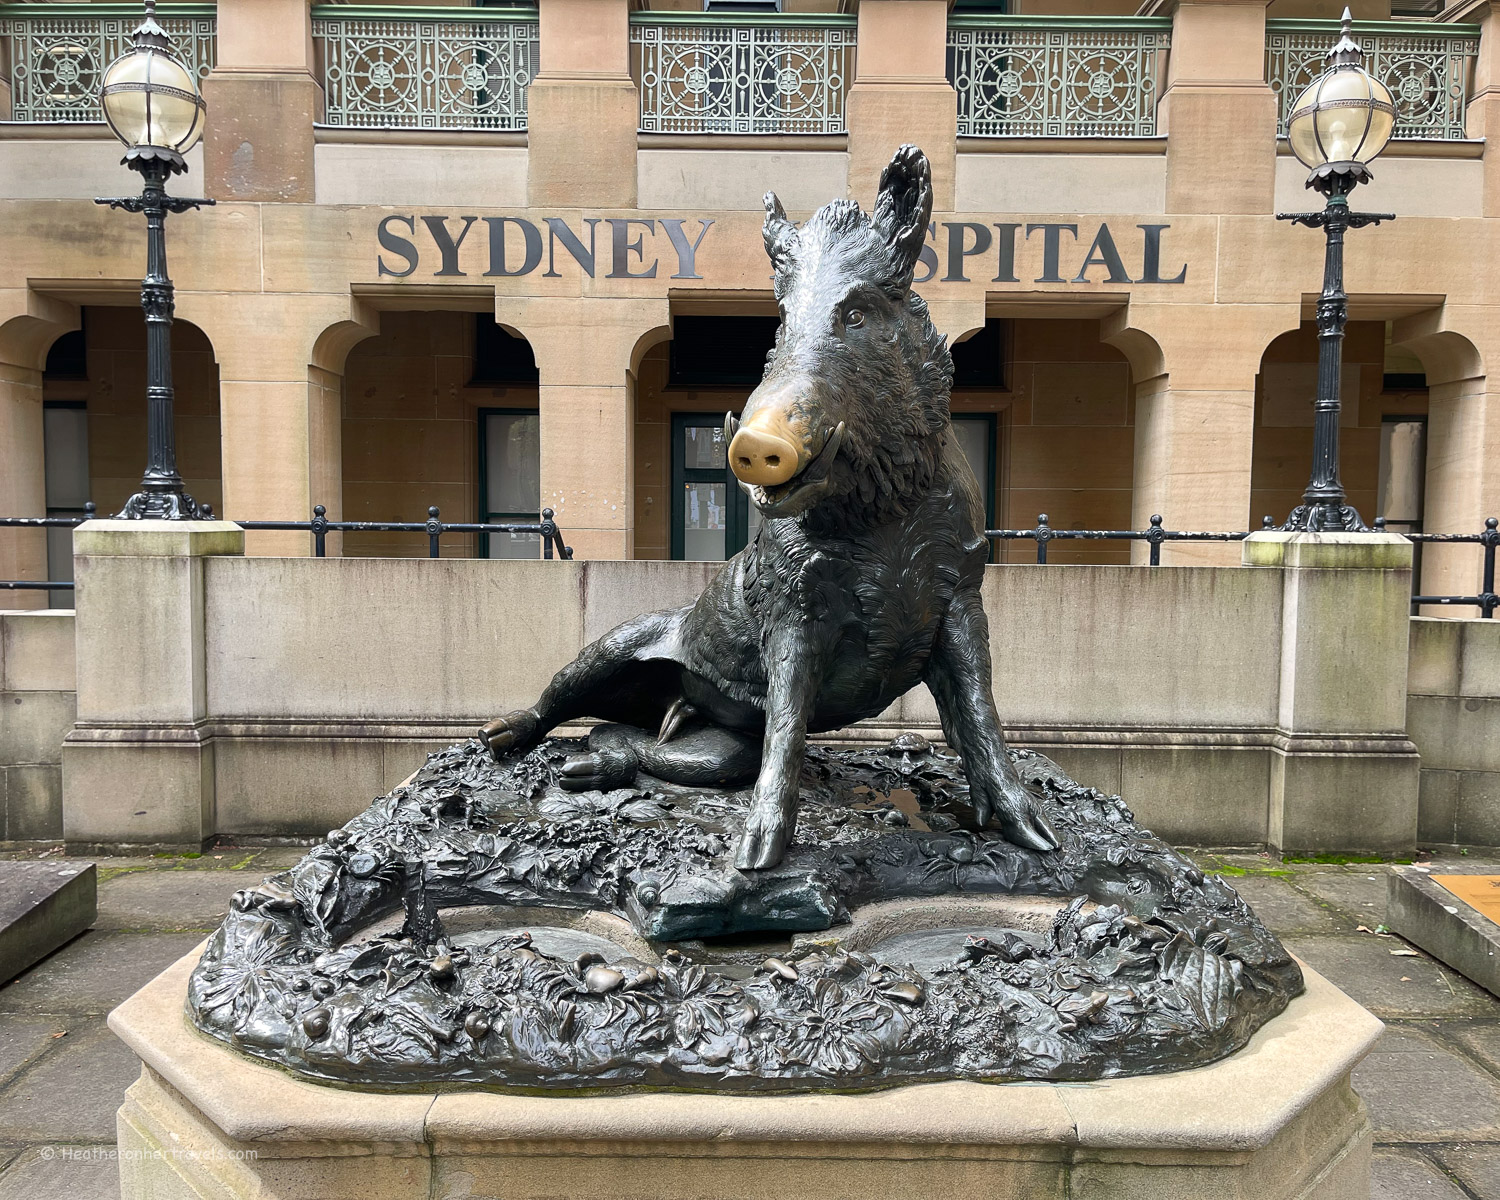
Sydney Hospital – this is a working hospital and the current building stands on the site of the original Sydney Hospital, which was built with two wings, now the Mint and the Parliament Building. At the front is a replica of Il Porcellino, the brass boar statue that stands in Florence, Italy.
Sydney Hospital Sydney Australia
Parliament House – a mirror image of The Mint, this now houses the State Parliament of New South Wales, however tours need to be booked in advance.
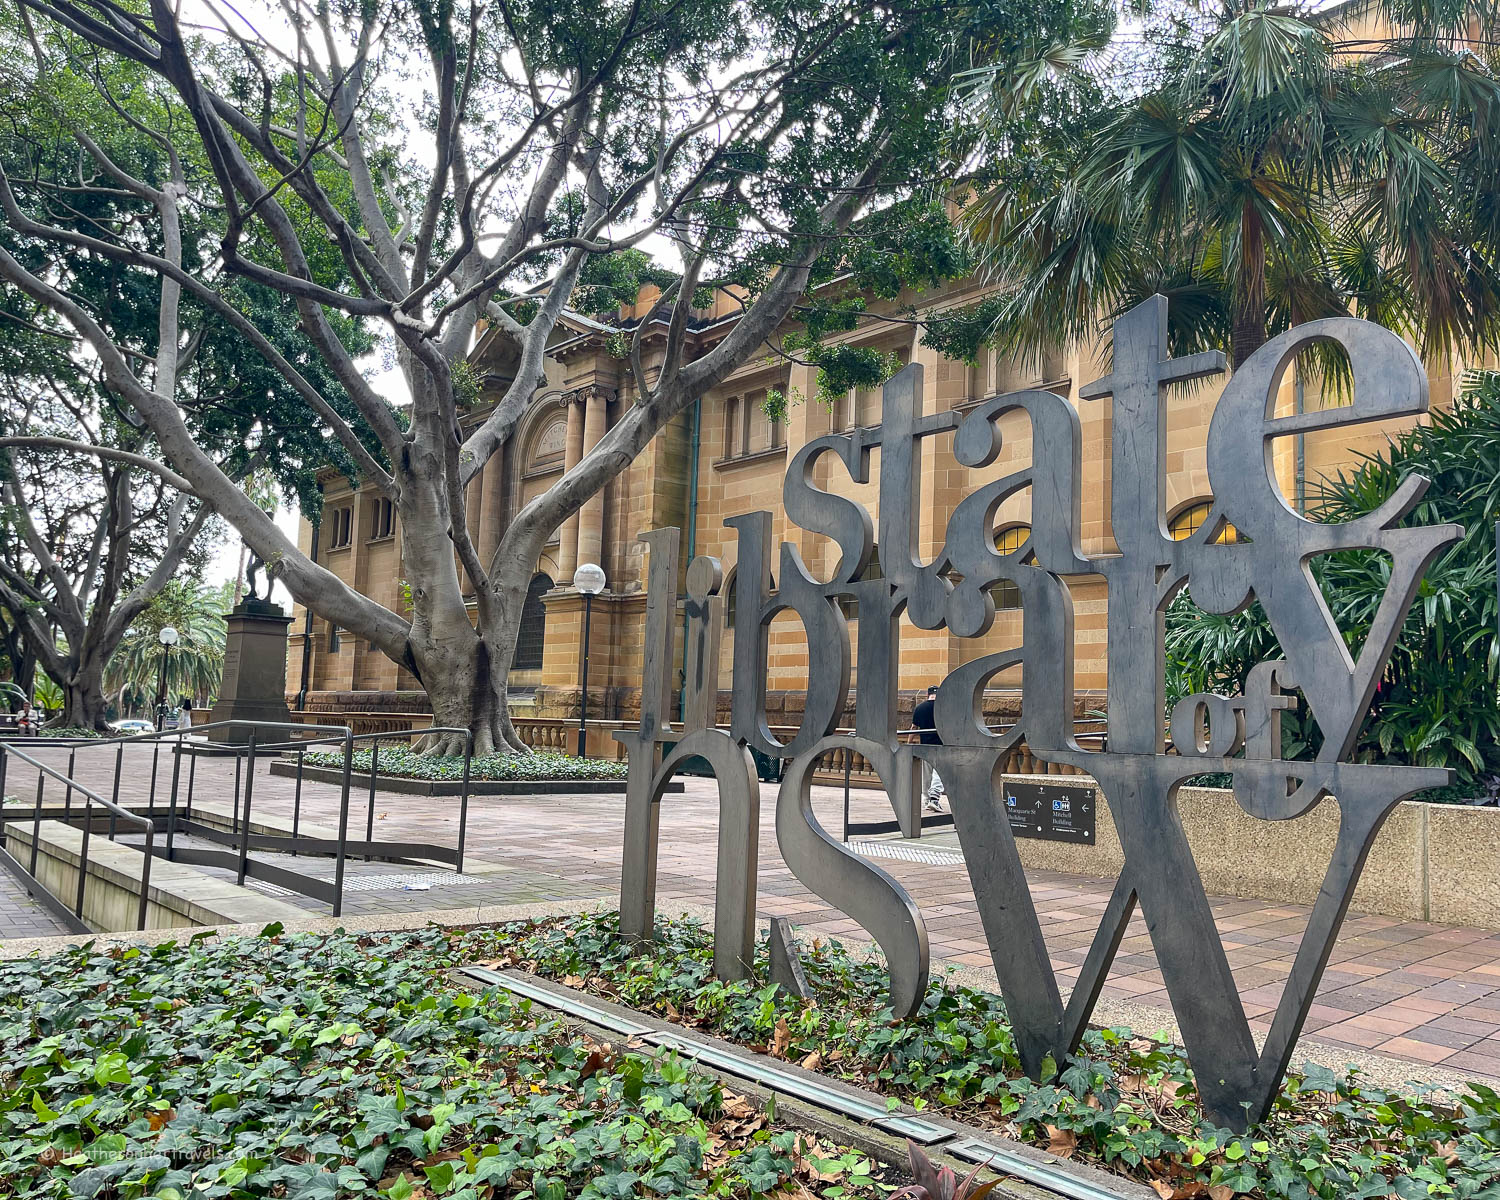
State library of NSW Sydney Australia
A little further is the State Library of New South Wales, but our route now takes us across the road from the Parliament Building, and down the hill to Martin Place in the Central Business District.
Central Business District (CBD)
Cross the road and head down the hill into Martin Place and the Central Business District (CBD). Depending on where you are staying, you may want to catch the train or bus from Martin Place back to your accommodation.
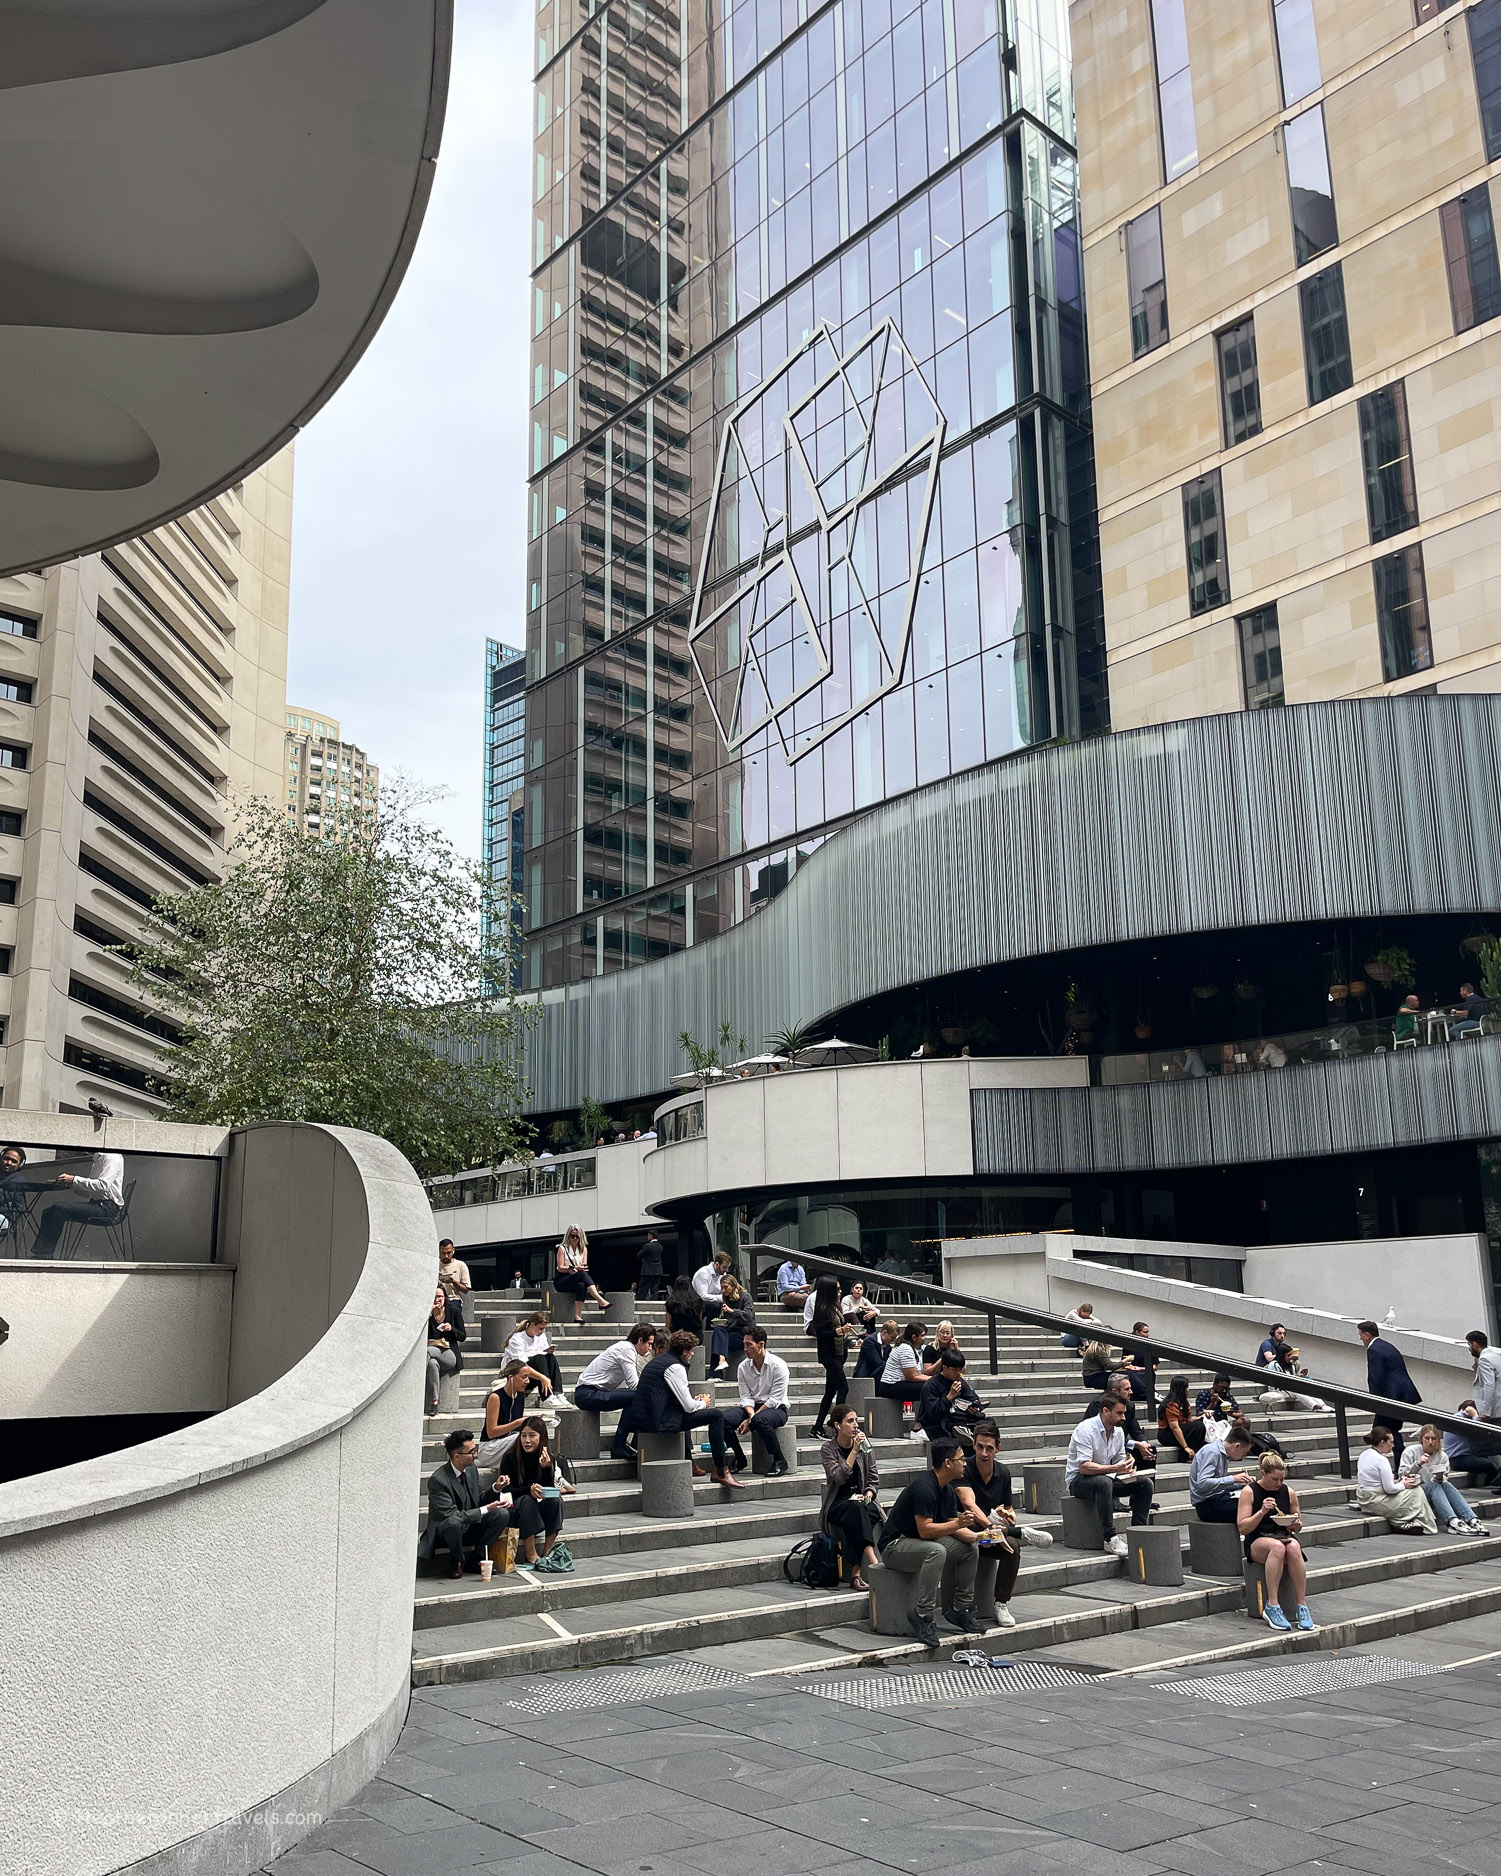
Martin Place, Sydney Australia
It’s a 10-15 minute walk back to Circular Quay from here, but if you prefer, hop on a 333 bus from Martin Place or the light railway (tram) from Wynyard stop, to take you back to Circular Quay.
If returning on foot to Circular Quay, you could now walk back along Pitt Street or George Street through the Central Business District, soaking up the atmosphere of suited office workers catching an after work drink or heading home.
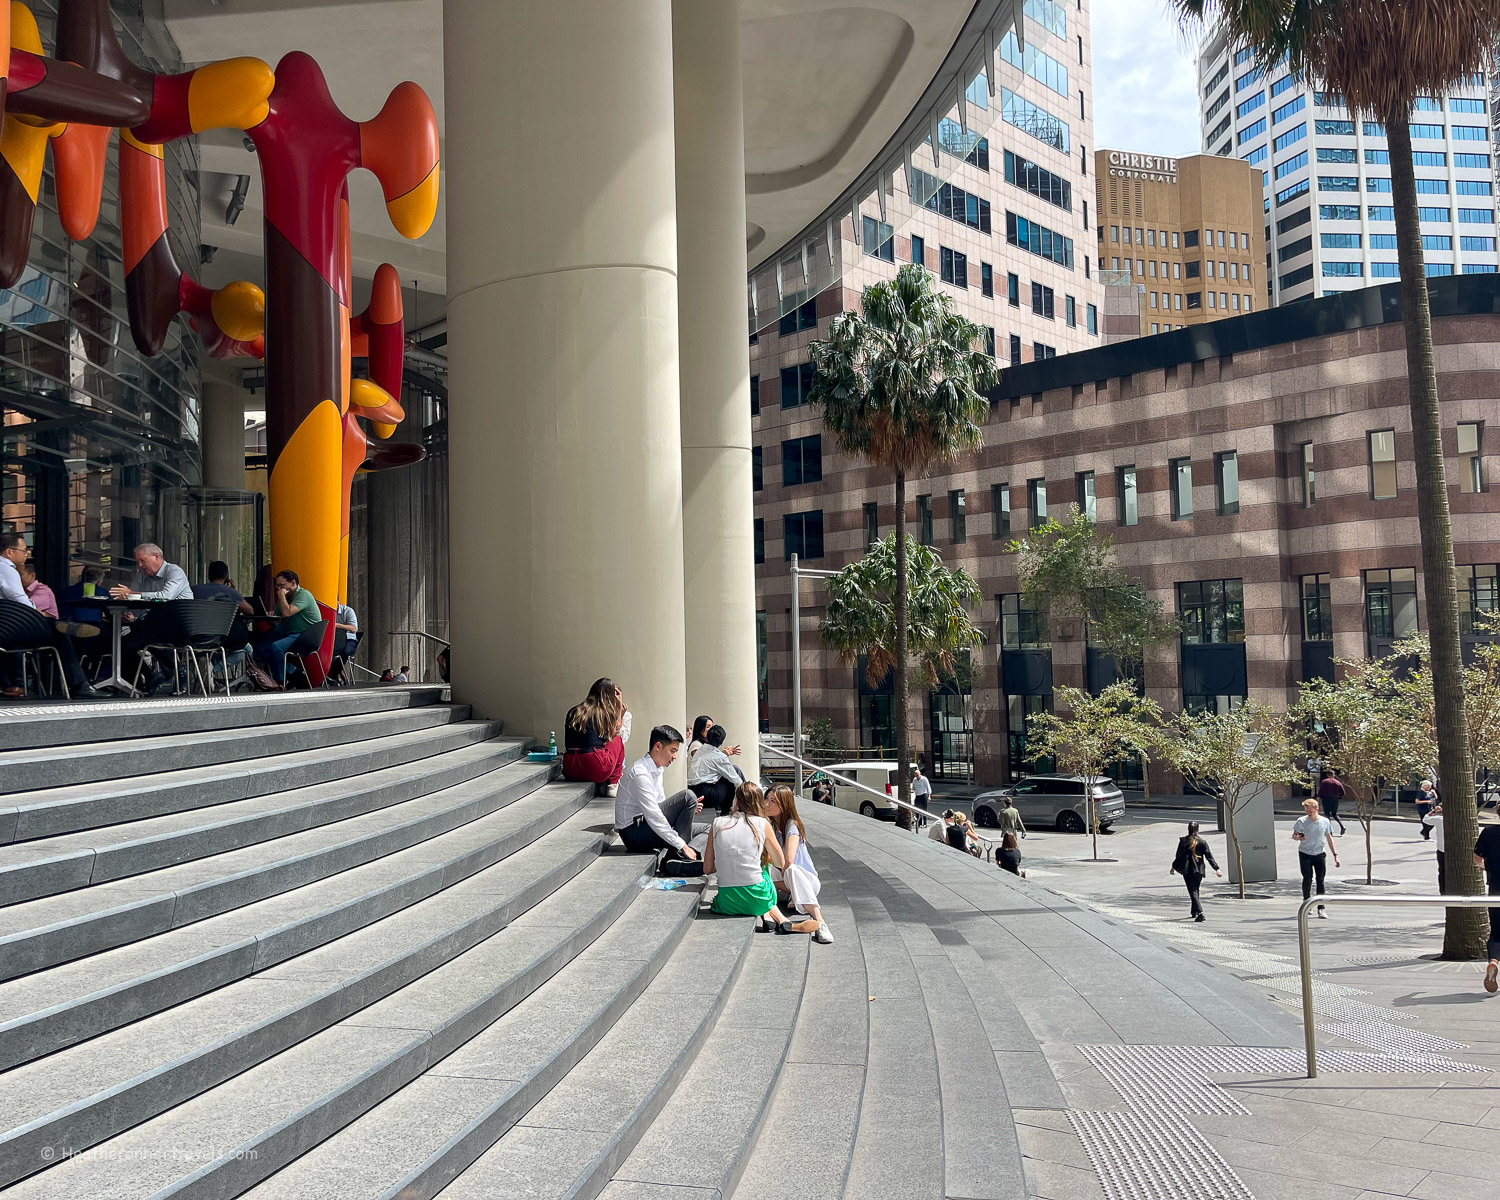
Central Business District, Sydney Australia
It’s fun to observe the different ages and styles of architecture, with a mixture of 19th century buildings and sleek modern office complexes.
Messina Gelato Sydney Australia
Ice Cream Stop: We highly recommend the amazing ice cream at Gelato Messina (25 Martin Place)
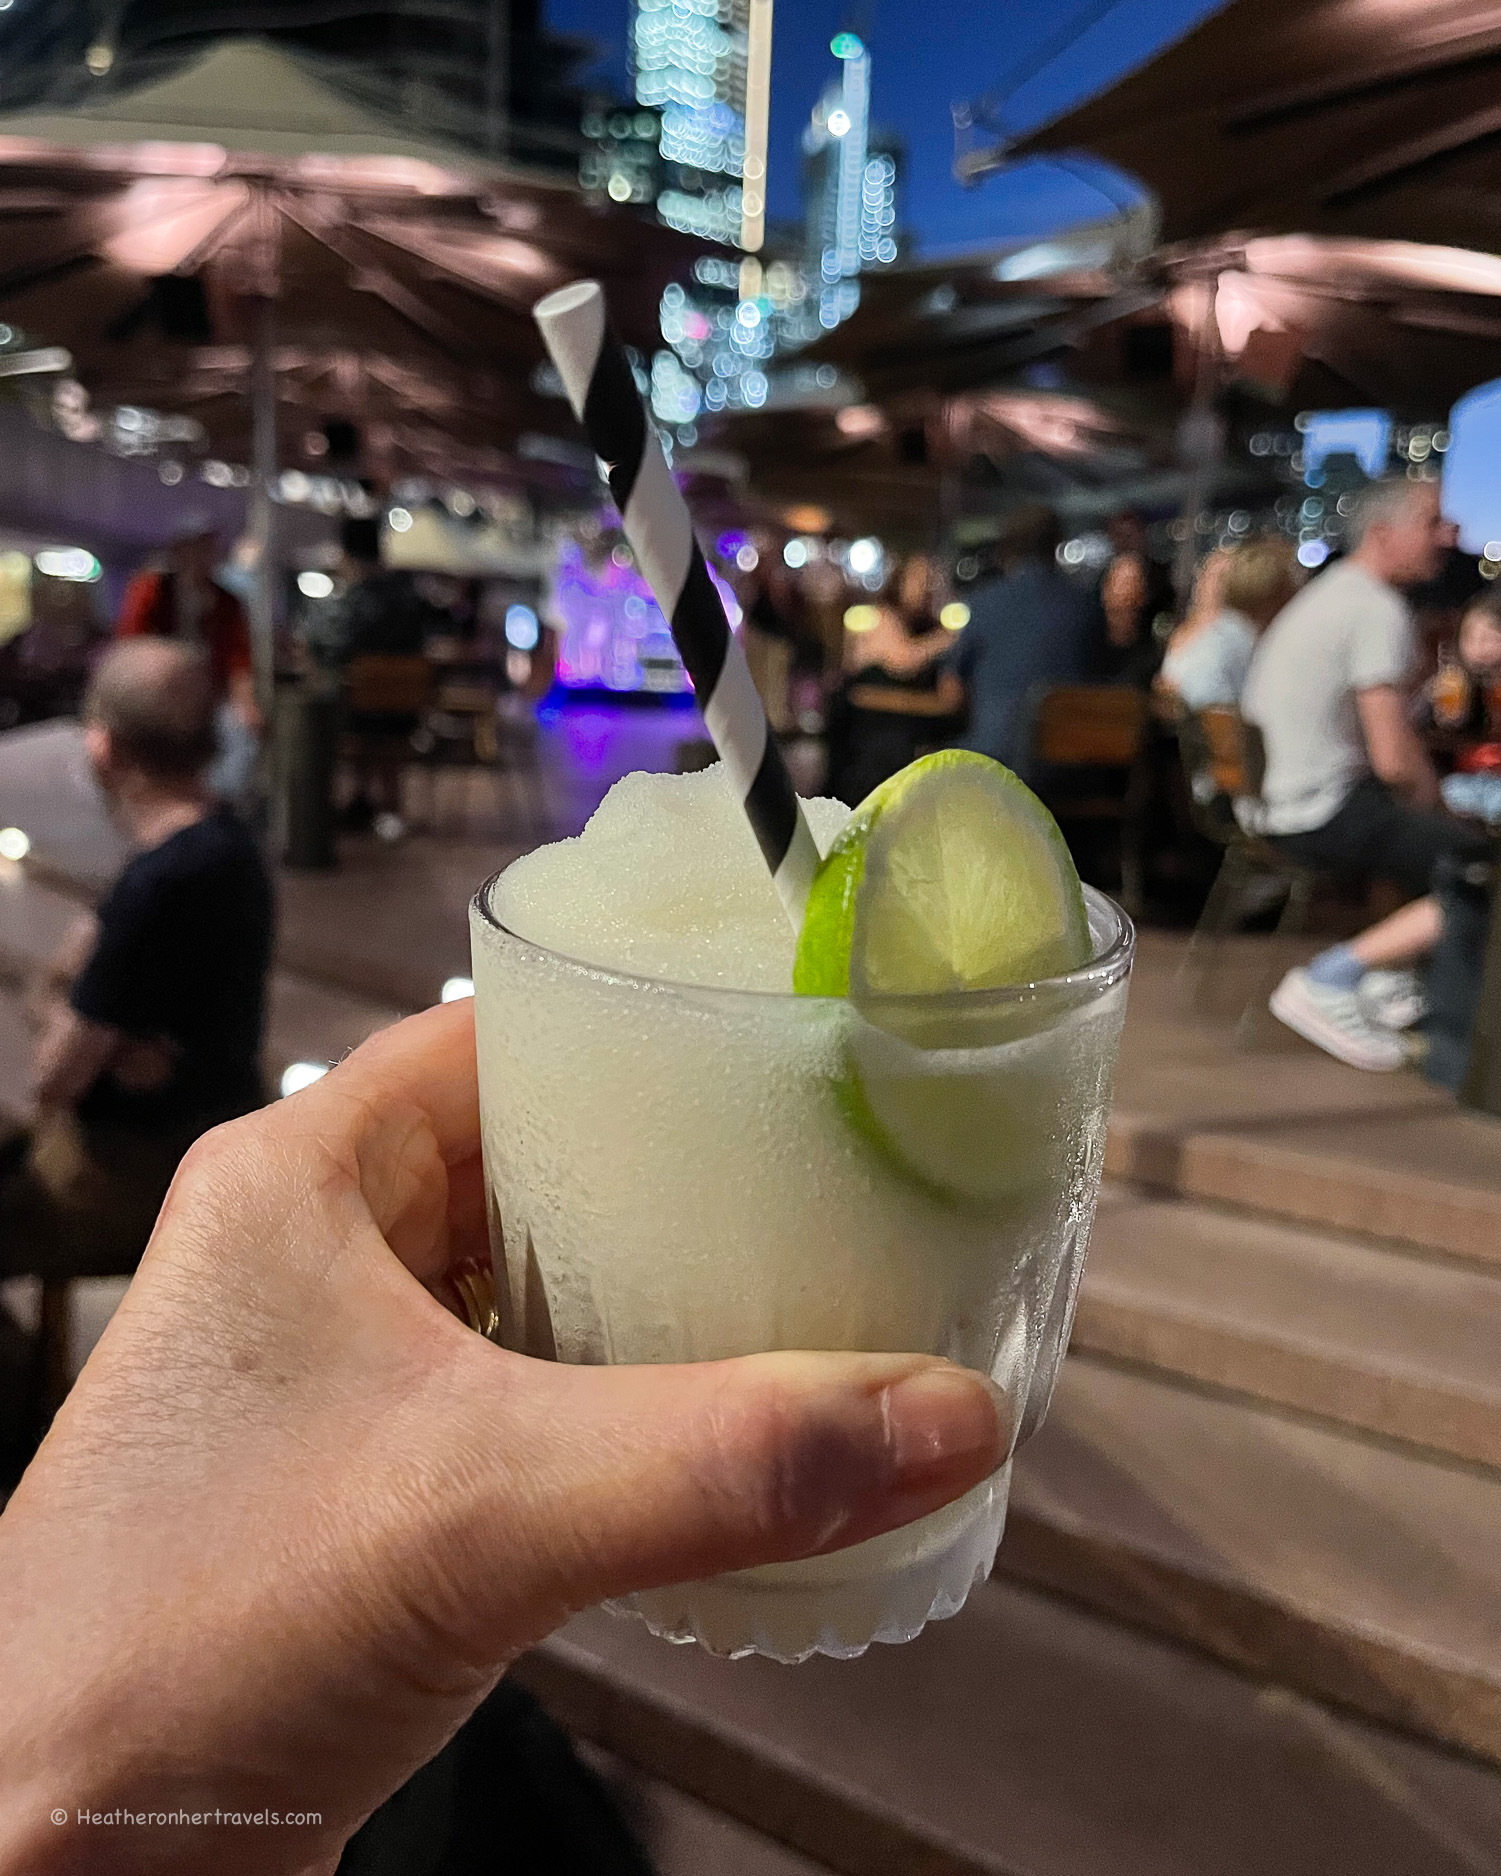
Aperitifs at The Opera Bar, Sydney Opera House
Finish your day with an early evening drink at The Opera Bar, set on the lower concourse of the Sydney Opera House. When the weather is fine, the atmosphere is buzzing and there’s often live music to accompany your sunset drink with a view of the Sydney Harbour Bridge.
Opera Bar at Sydney Opera House, Australia
It’s a fine way to end your day in Sydney.
Opera Bar, Sydney Opera House, Australia
Spend a second day in Sydney?
If you have a second day in Sydney or just want to pack in some beach time, we have three different options, for excursions to Bondi Beach, Watsons Bay or Manly.
Each of these excursions warrant a full day. However if you don’t mind a packed itinerary, you could spend the morning in central Sydney visiting the Rocks, Sydney Opera House and Botanical garden. Then make a shorter excursion to spend the afternoon in Bondi Bay, Watson’s Bay or Manly.
Heather at Pavilion on Bondi Beach, Sydney, Australia
A day at Bondi Beach
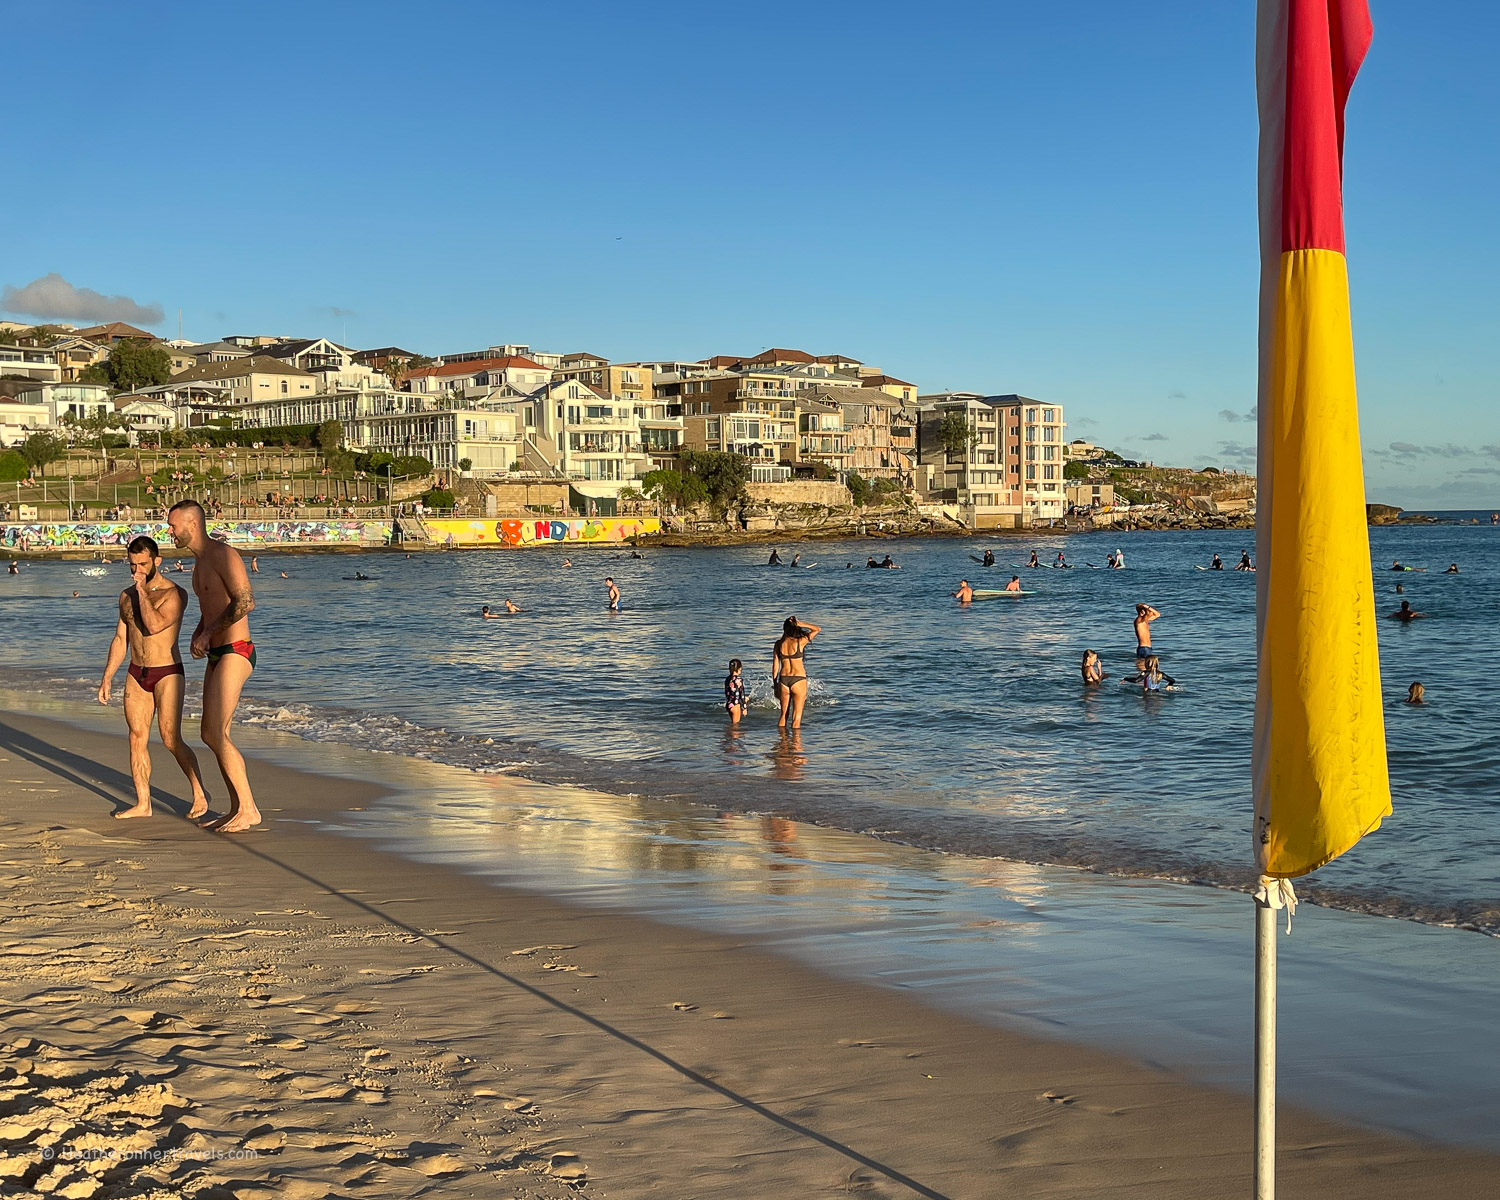
Bondi is Sydney’s best known surf beach and has something for everyone. It’s a huge beach but can get very busy in summer and at weekends.
Things to do in Bondi Beach
Chill out, sunbathe, swim and people watch on the broad expanse of sand at Bondi Beach. This is known as a surfer’s beach and you can book lessons with Lets go surfing or one of the other surf schools that operate here. If you go swimming, check the height and strength of the waves and only swim between the red and yellow flags that are surveyed by lifeguards.
Swim between the flags – Bondi Beach, Sydney, Australia
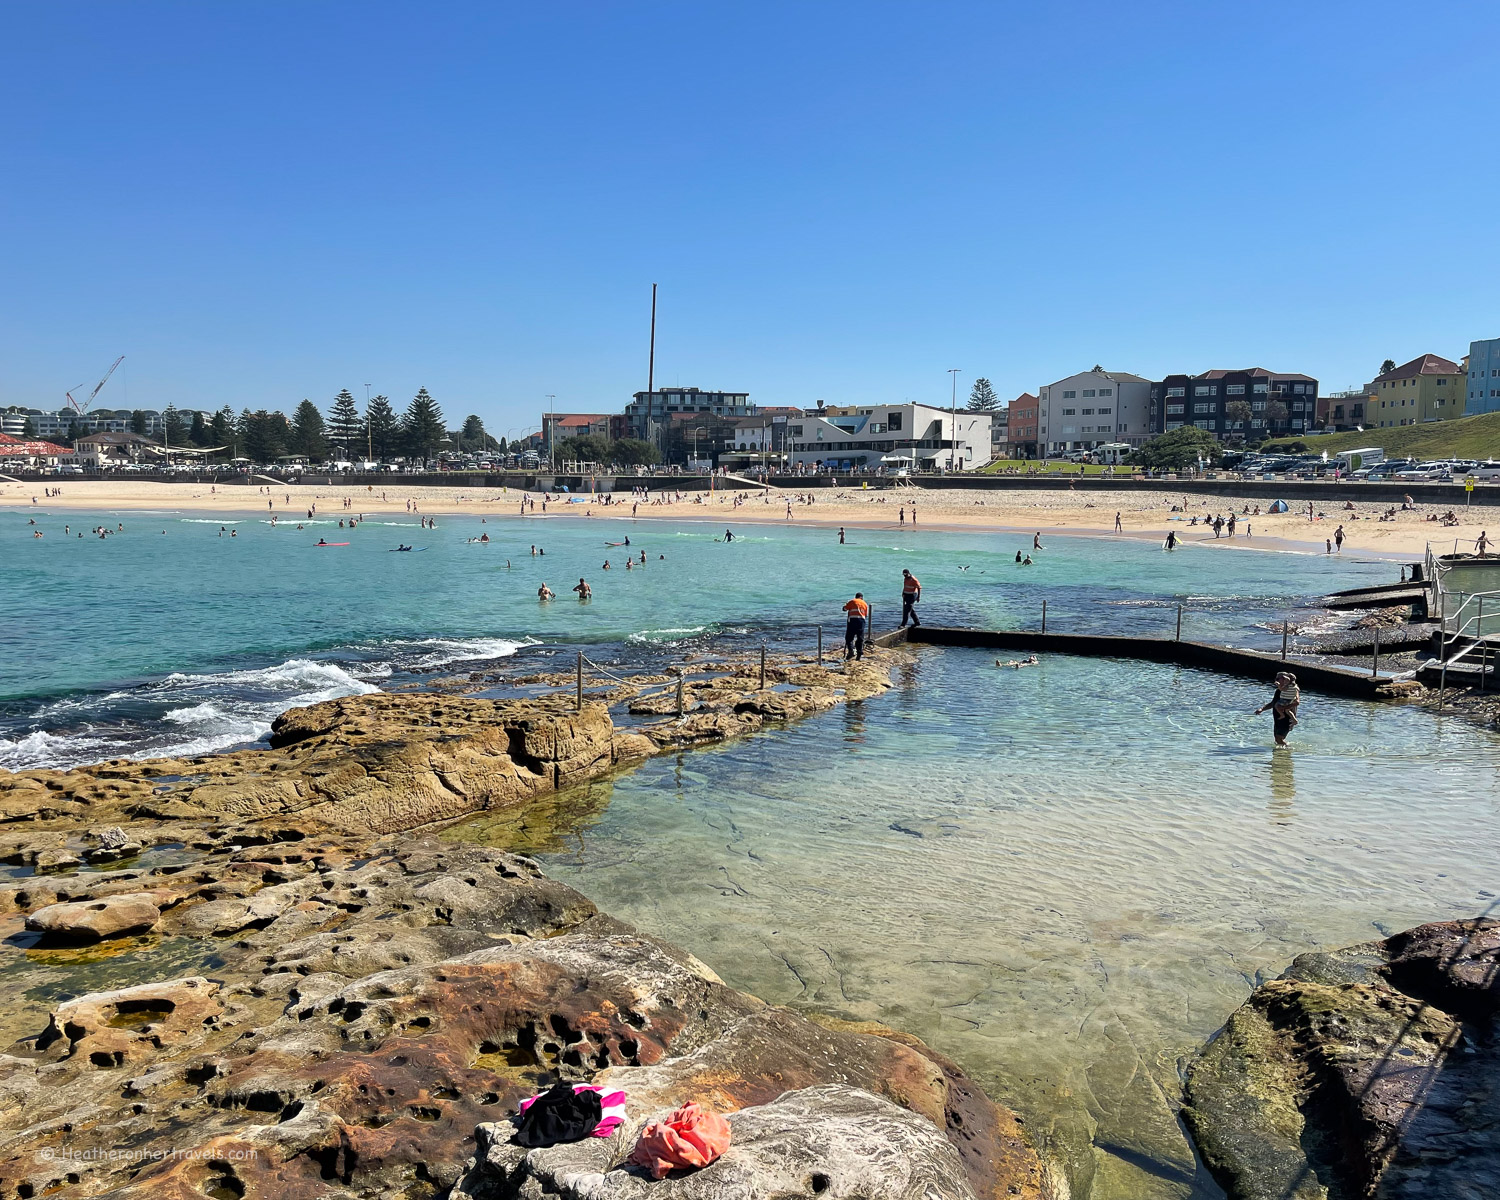
Icebergs – Bondi’s famous ocean pool is located at the south end of the beach and is a good place to swim if you find the crashing surf a little too challenging. There’s an entrance fee (10 AUD when we were there) and a cafe inside. Upstairs is the Bistro, which is technically a member’s club but they welcome all visitors as long as you have an ID and sign in at the entrance.
Icebergs, Bondi Beach, Sydney, Australia
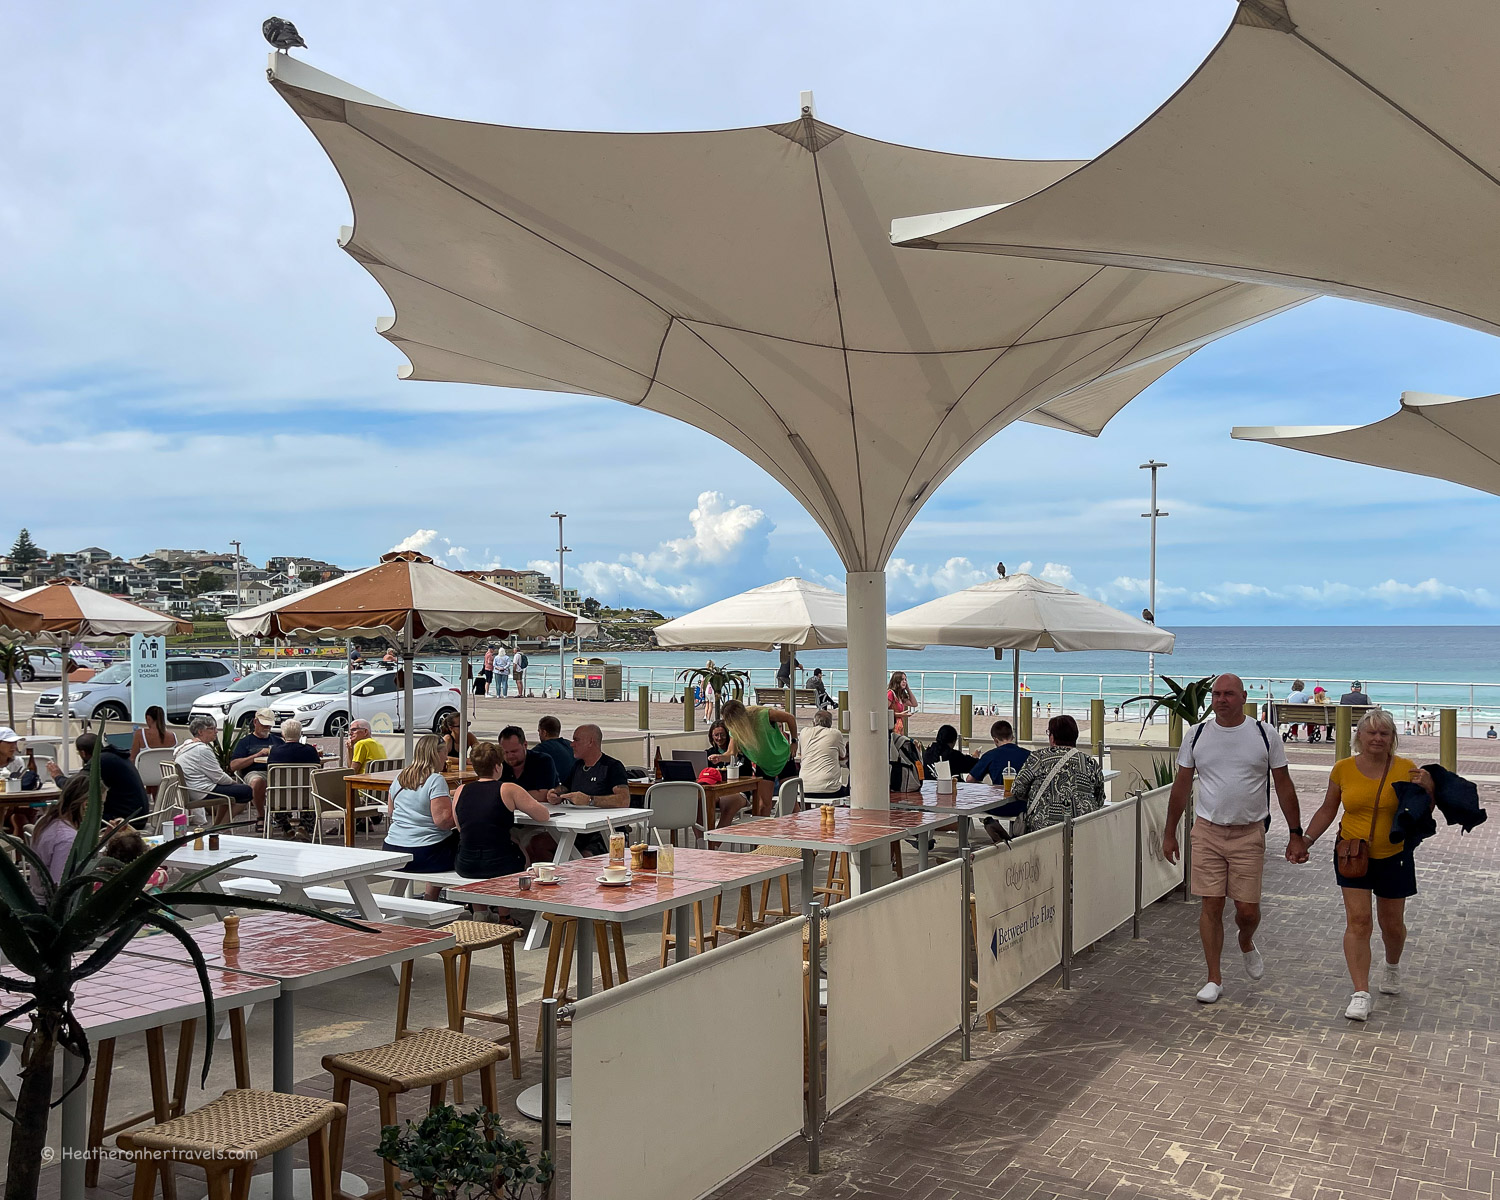
The Pavillion – this seafront pavilion has been fully renovated as a cafe, arts and community hub. Inside, it’s a 1930s beauty with great views from the first floor balcony, which serves drinks in summer. There’s an art exhibition space, information centre and green shady courtyard, with regular music and theatre events. The two cafes Glory Days and Surfish are great to hang out in the day, with Promenade Restaurant for chilled lunches, evening drinks and dining.
Pavilion on Bondi Beach, Sydney, Australia
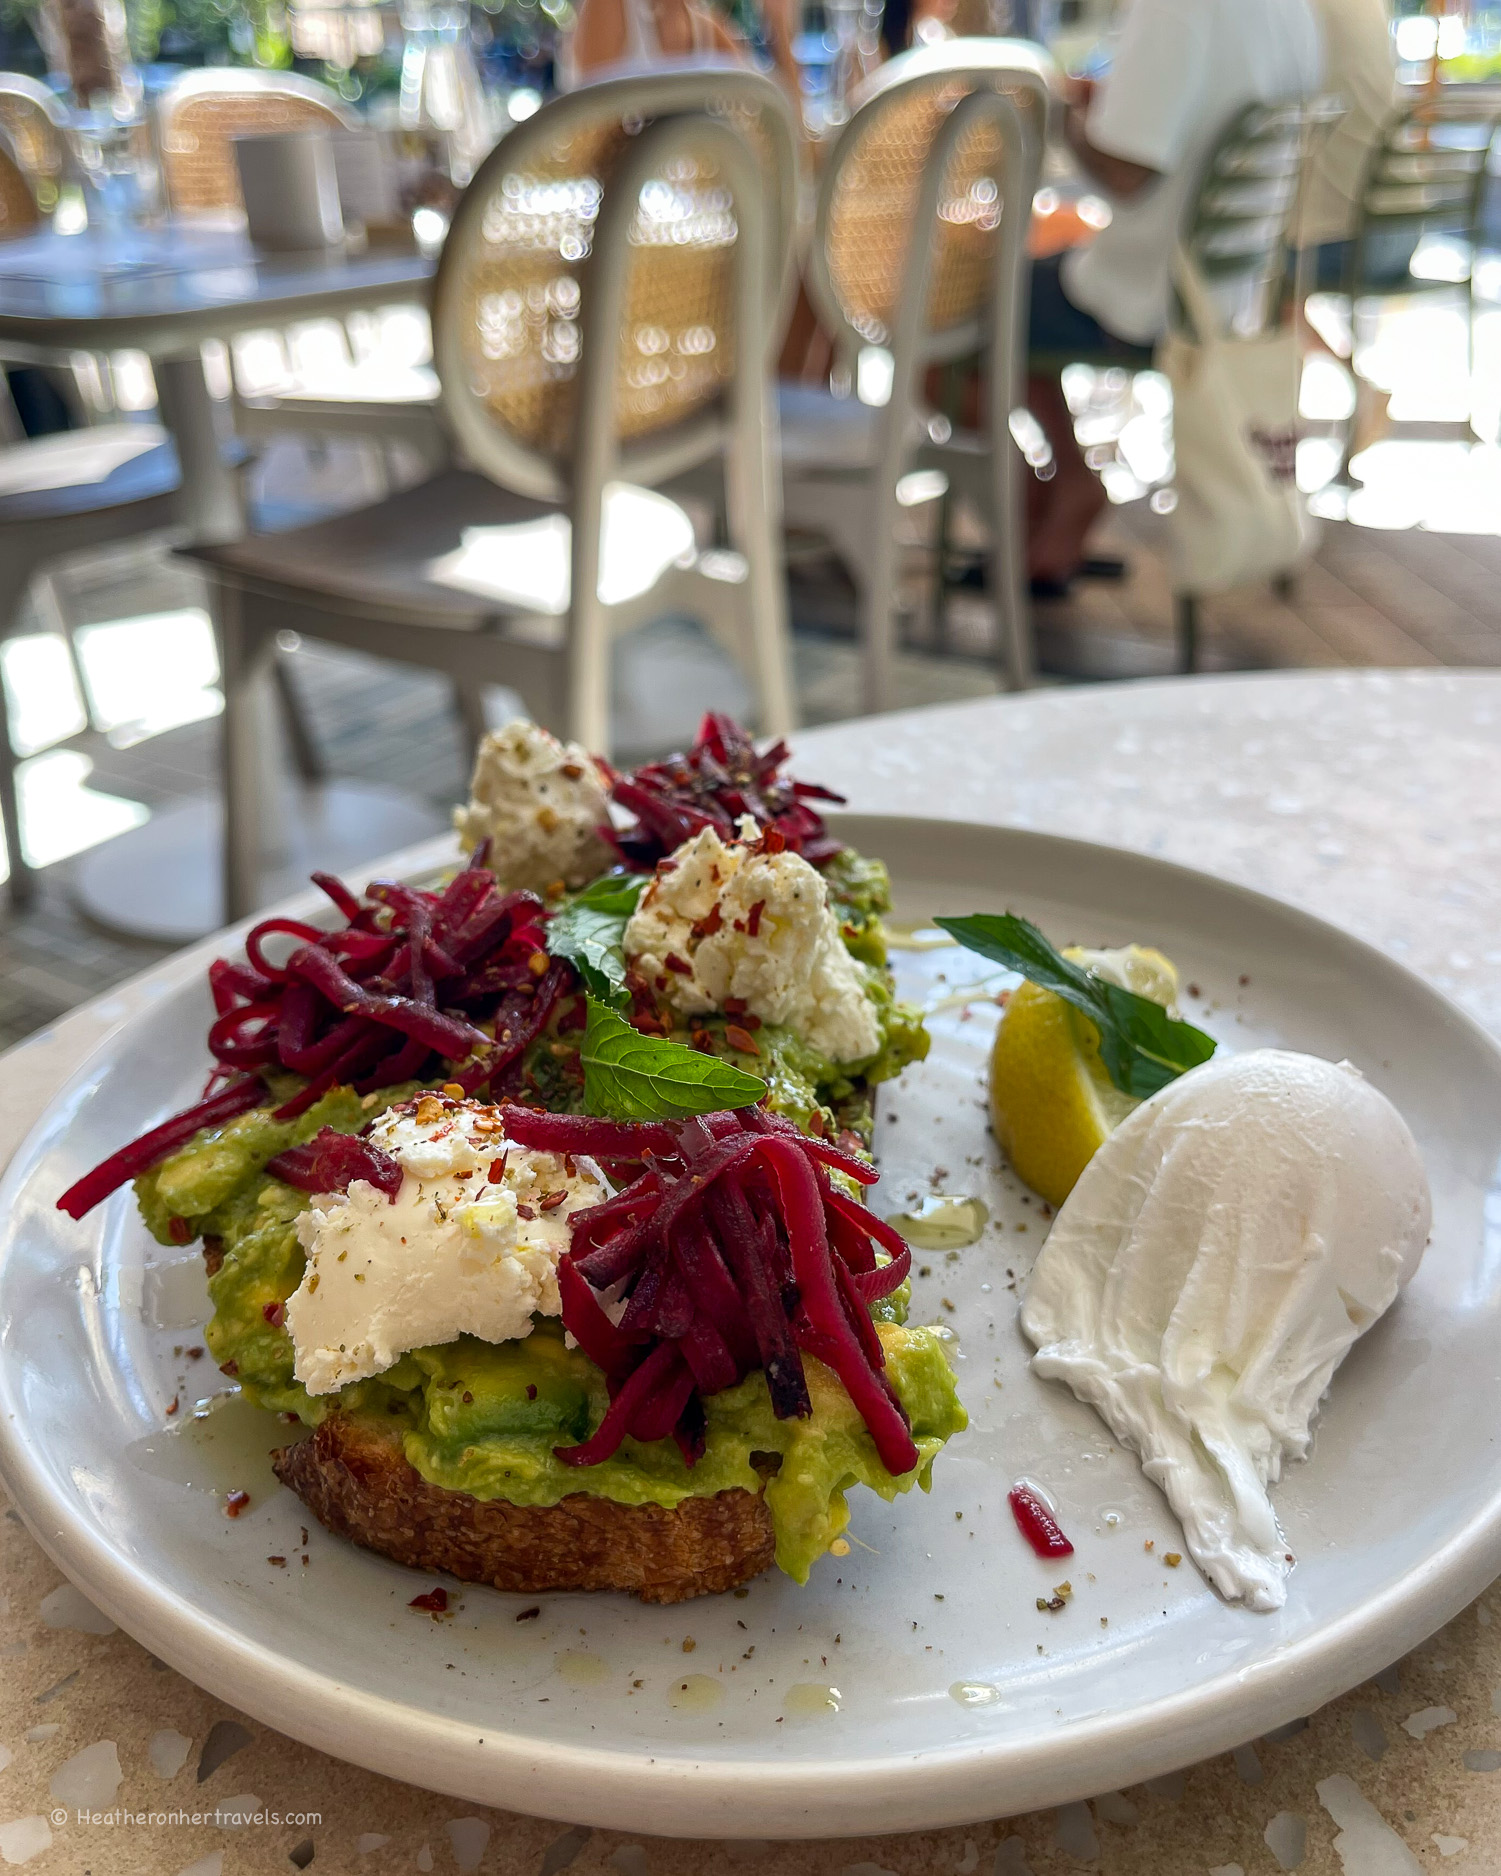
Brunch on Bondi beach – Australians love coffee culture and brunch is an art form, nowhere more than Bondi Beach. The cafes in front of the pavilion (Glory Days and Surfish) are great for daytime coffee and snacks with a sea view. But if you want to brunch like a local, head to Speedo’s or The Depot, both at the north end of the beach. There are numerous other great places that are further from the beach, such as Blackwoods, but they are set in more residential areas.
Brunch at Blackwoods Bondi, Sydney, Australia
Check out the murals along the beach – Between Bondi Pavilion and the Skate Park, the wall backing the beach promenade has a series of murals, many with a beach theme.
Bondi Beach Murals, Sydney, Australia
Shopping around Campbell Parade – Many of the top swimwear and fashion brands have branches at Bondi Beach, and you’ll find them along Campbell Parade, Gould Street and Hall Street.
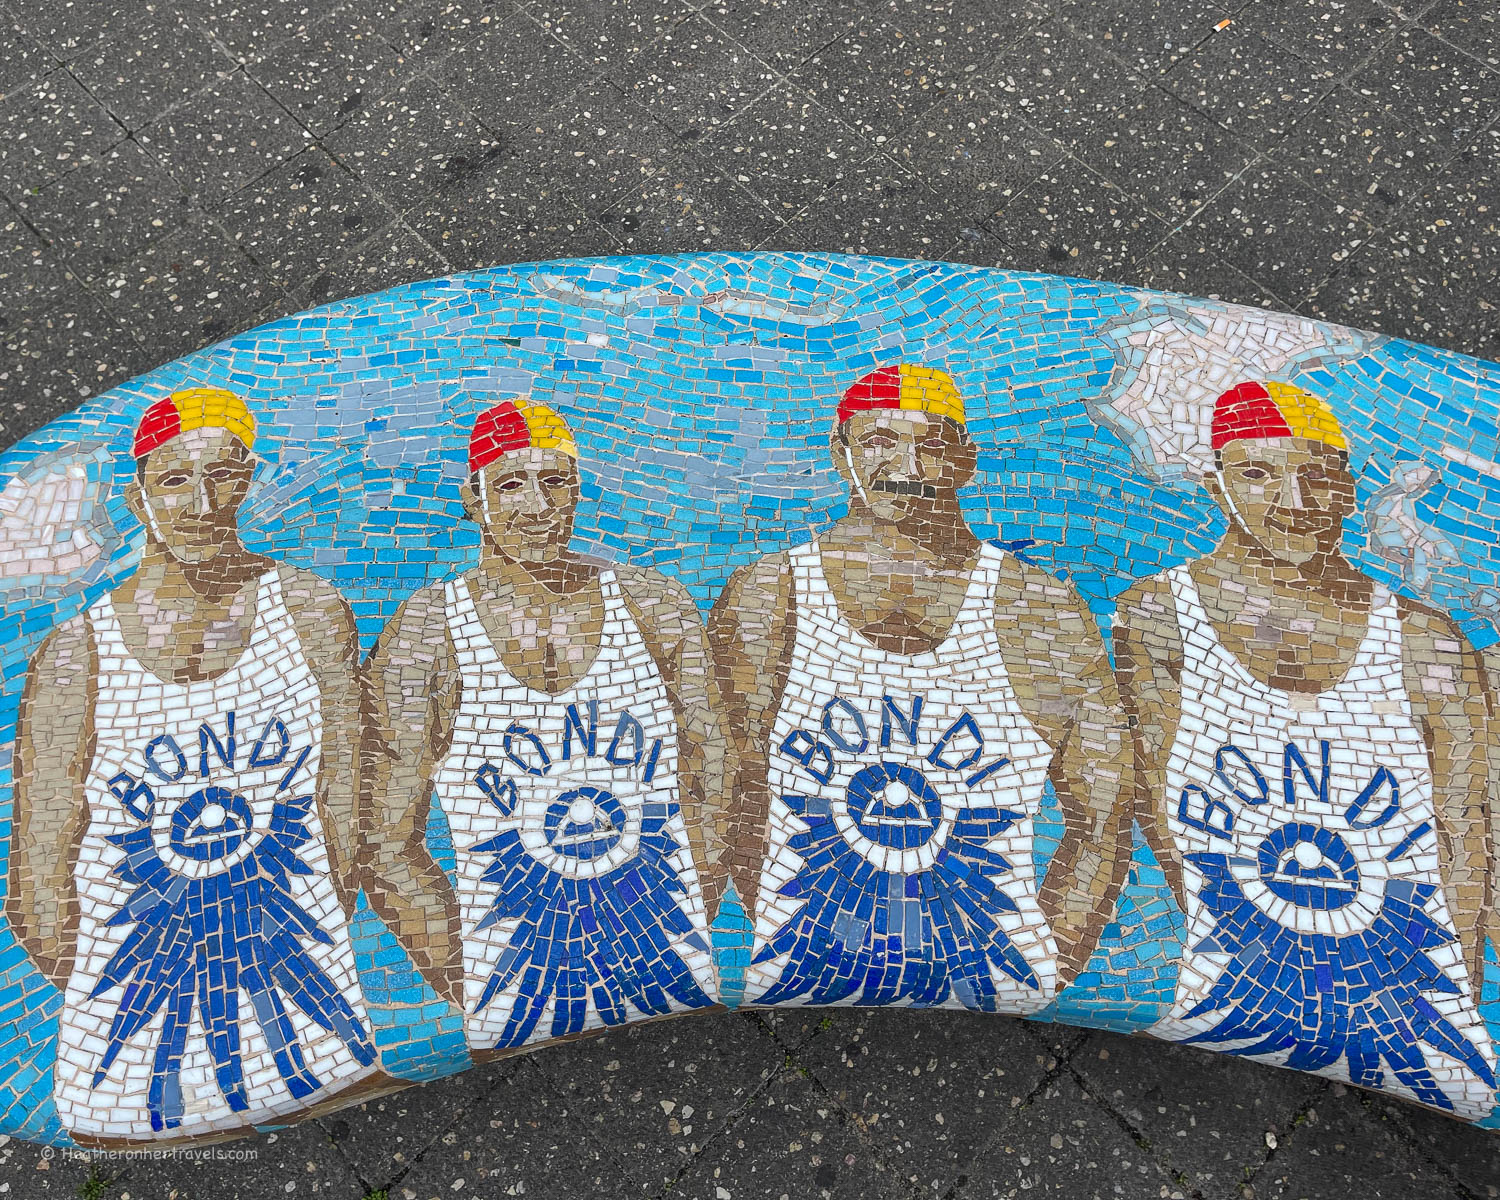
Lifeguard mosaics Campbells Parade, Bondi Beach, Sydney, Australia
Hang out at the Bondi weekend market – it’s held at Bondi Beach Public School on Campbell Parade on Saturday and Sunday. Saturday is for food stalls and farmer’s market, Sunday for crafts and vintage.
Bondi Beach Market, Sydney, Australia
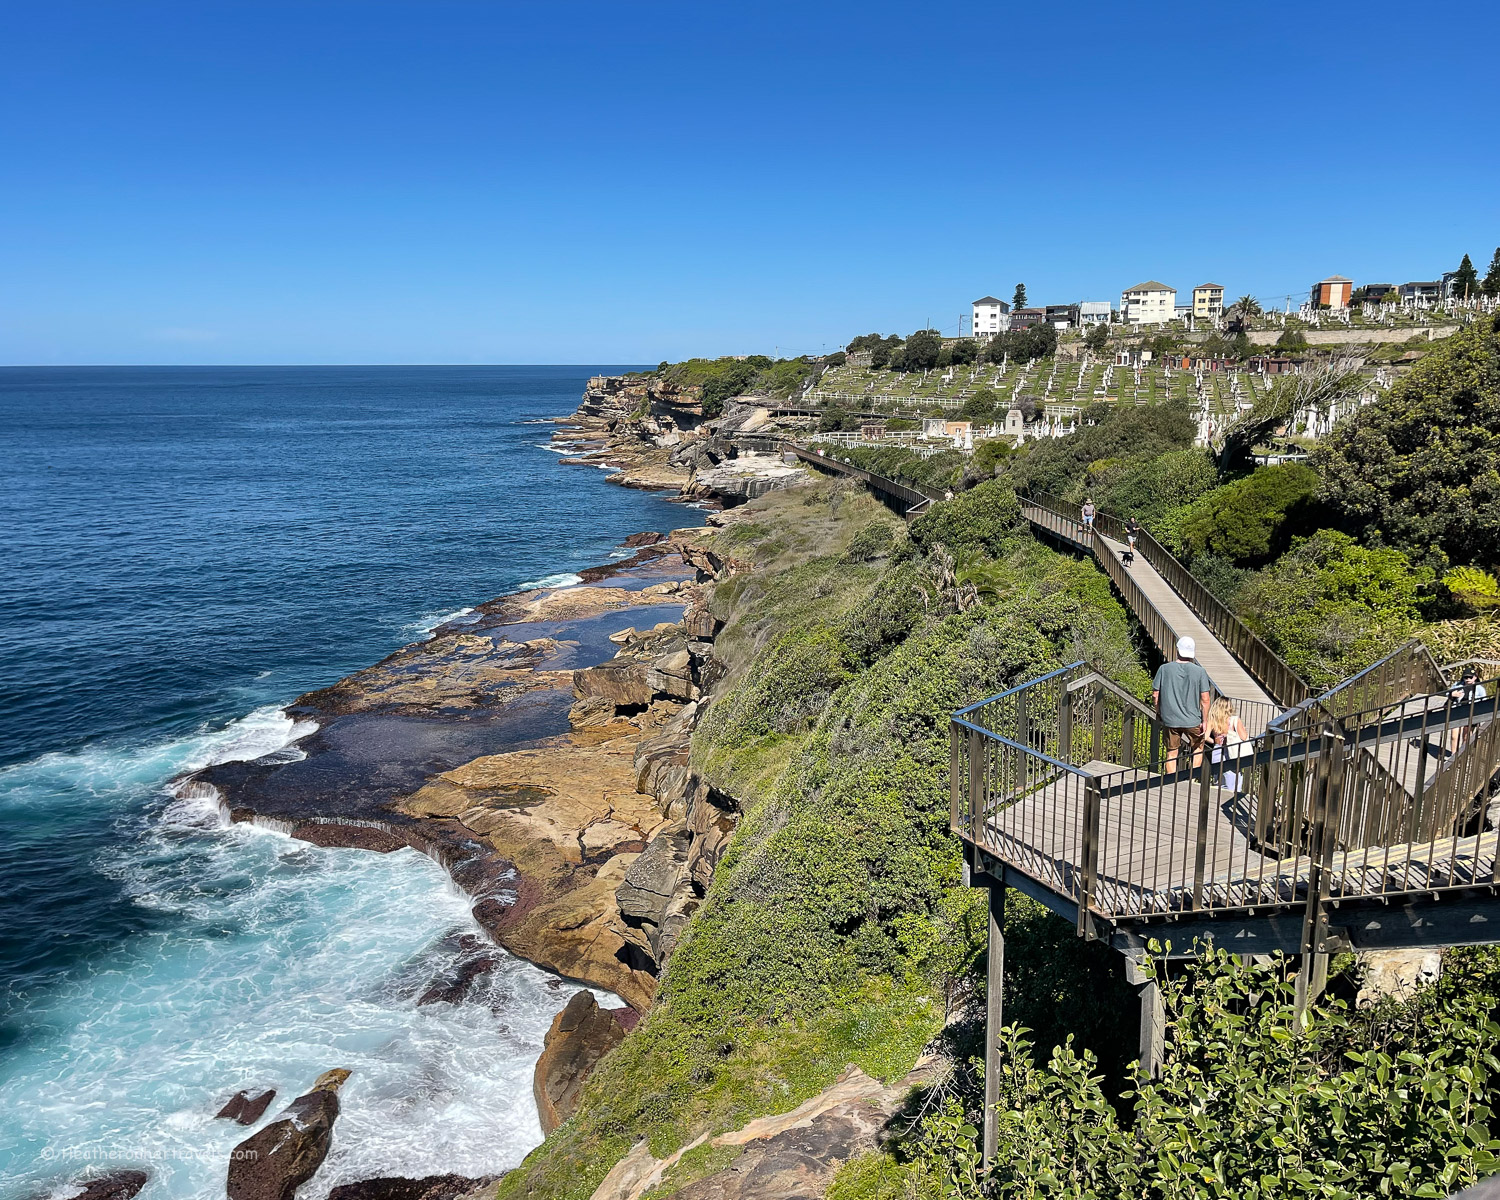
Walk some of the Bondi to Coogee coastal trail – Even if you only have an hour or two to spare, you could make it as far as Tamarama beach or Bronte beach where there’s a lovely ocean pool.
Bondi to Clovelly walk, Sydney, Australia
Getting to Bondi Beach
Bus: From Circular Quay or Martin Place take the 333 bus all the way to Bondi Beach. Journey time around 40 mins.
Train + Bus: From the centre take the train to Bondi Junction. From Bondi Junction bus station (right above the rail station) take the 333 or 380 bus to Bondi Beach. Journey time 45-60 mins.
North Bondi Beach, Sydney, Australia
Refreshment stops in Bondi Beach
There are numerous good options – these were our favourites.
Drinks on the beach – Surfish or Glory Days
Brunch – Speedos or The Depot
Dinner – Promenade, North Bondi Fish or Rocker
Cafes at The Pavilion on Bondi Beach, Sydney, Australia
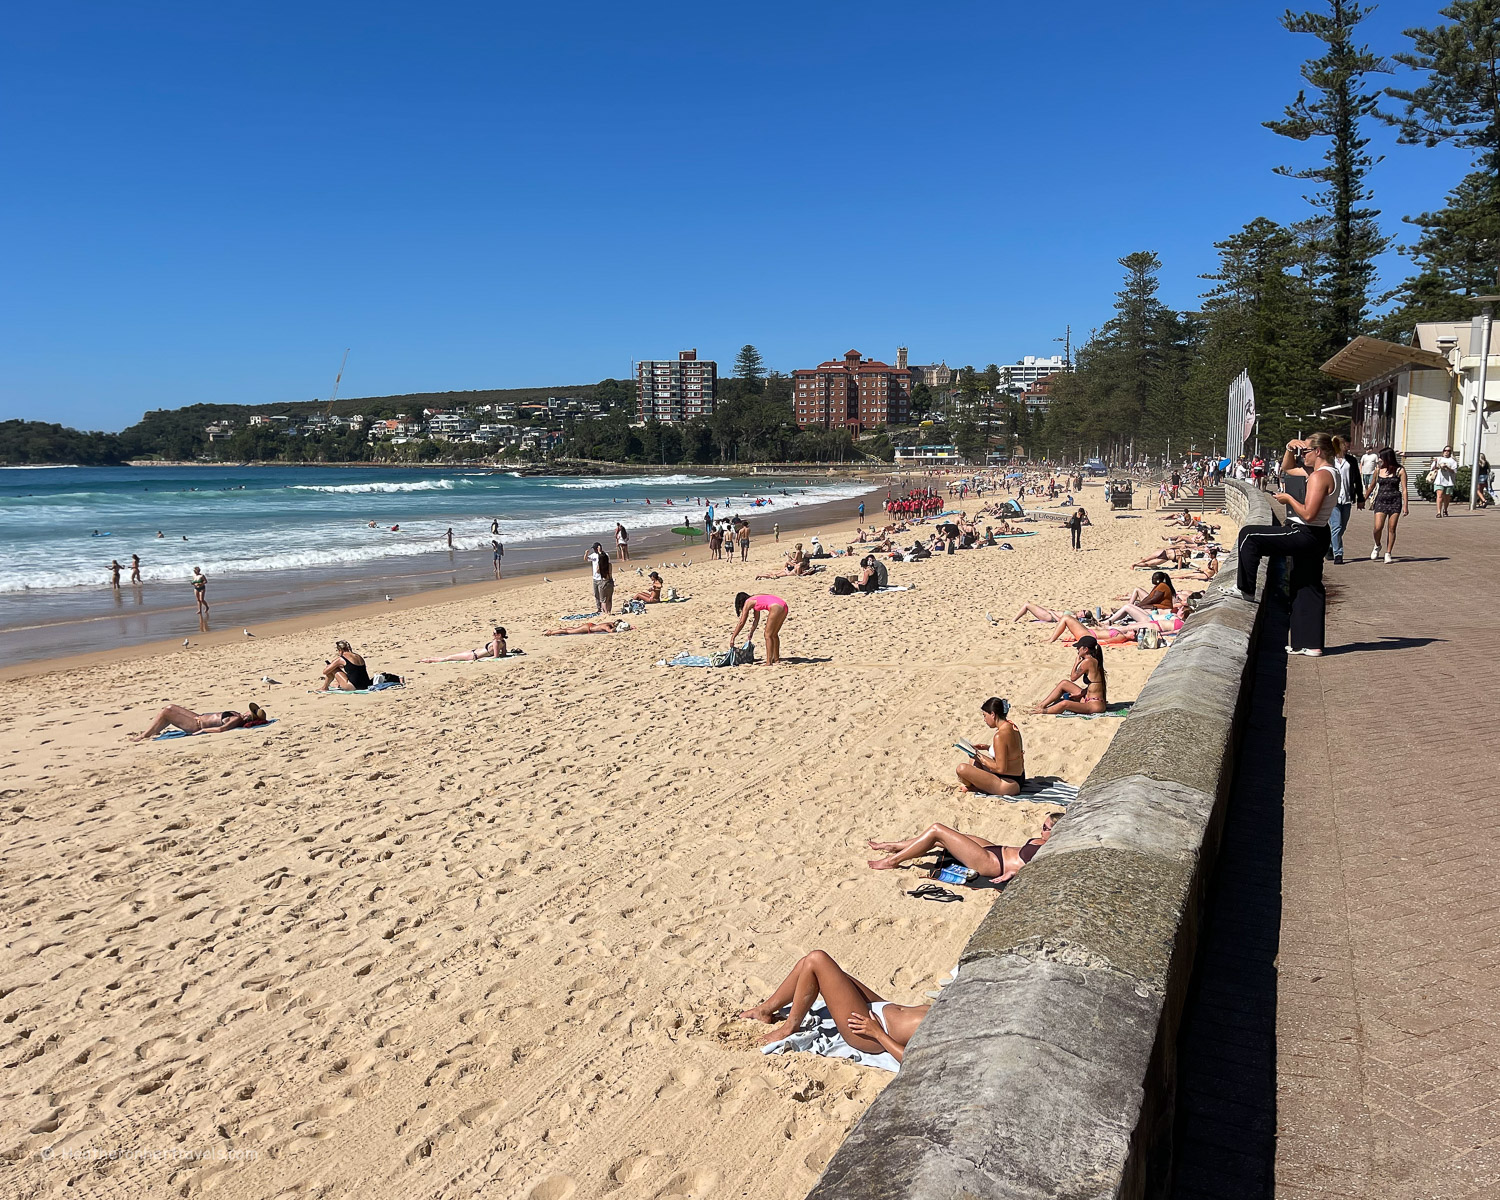
A day in Manly
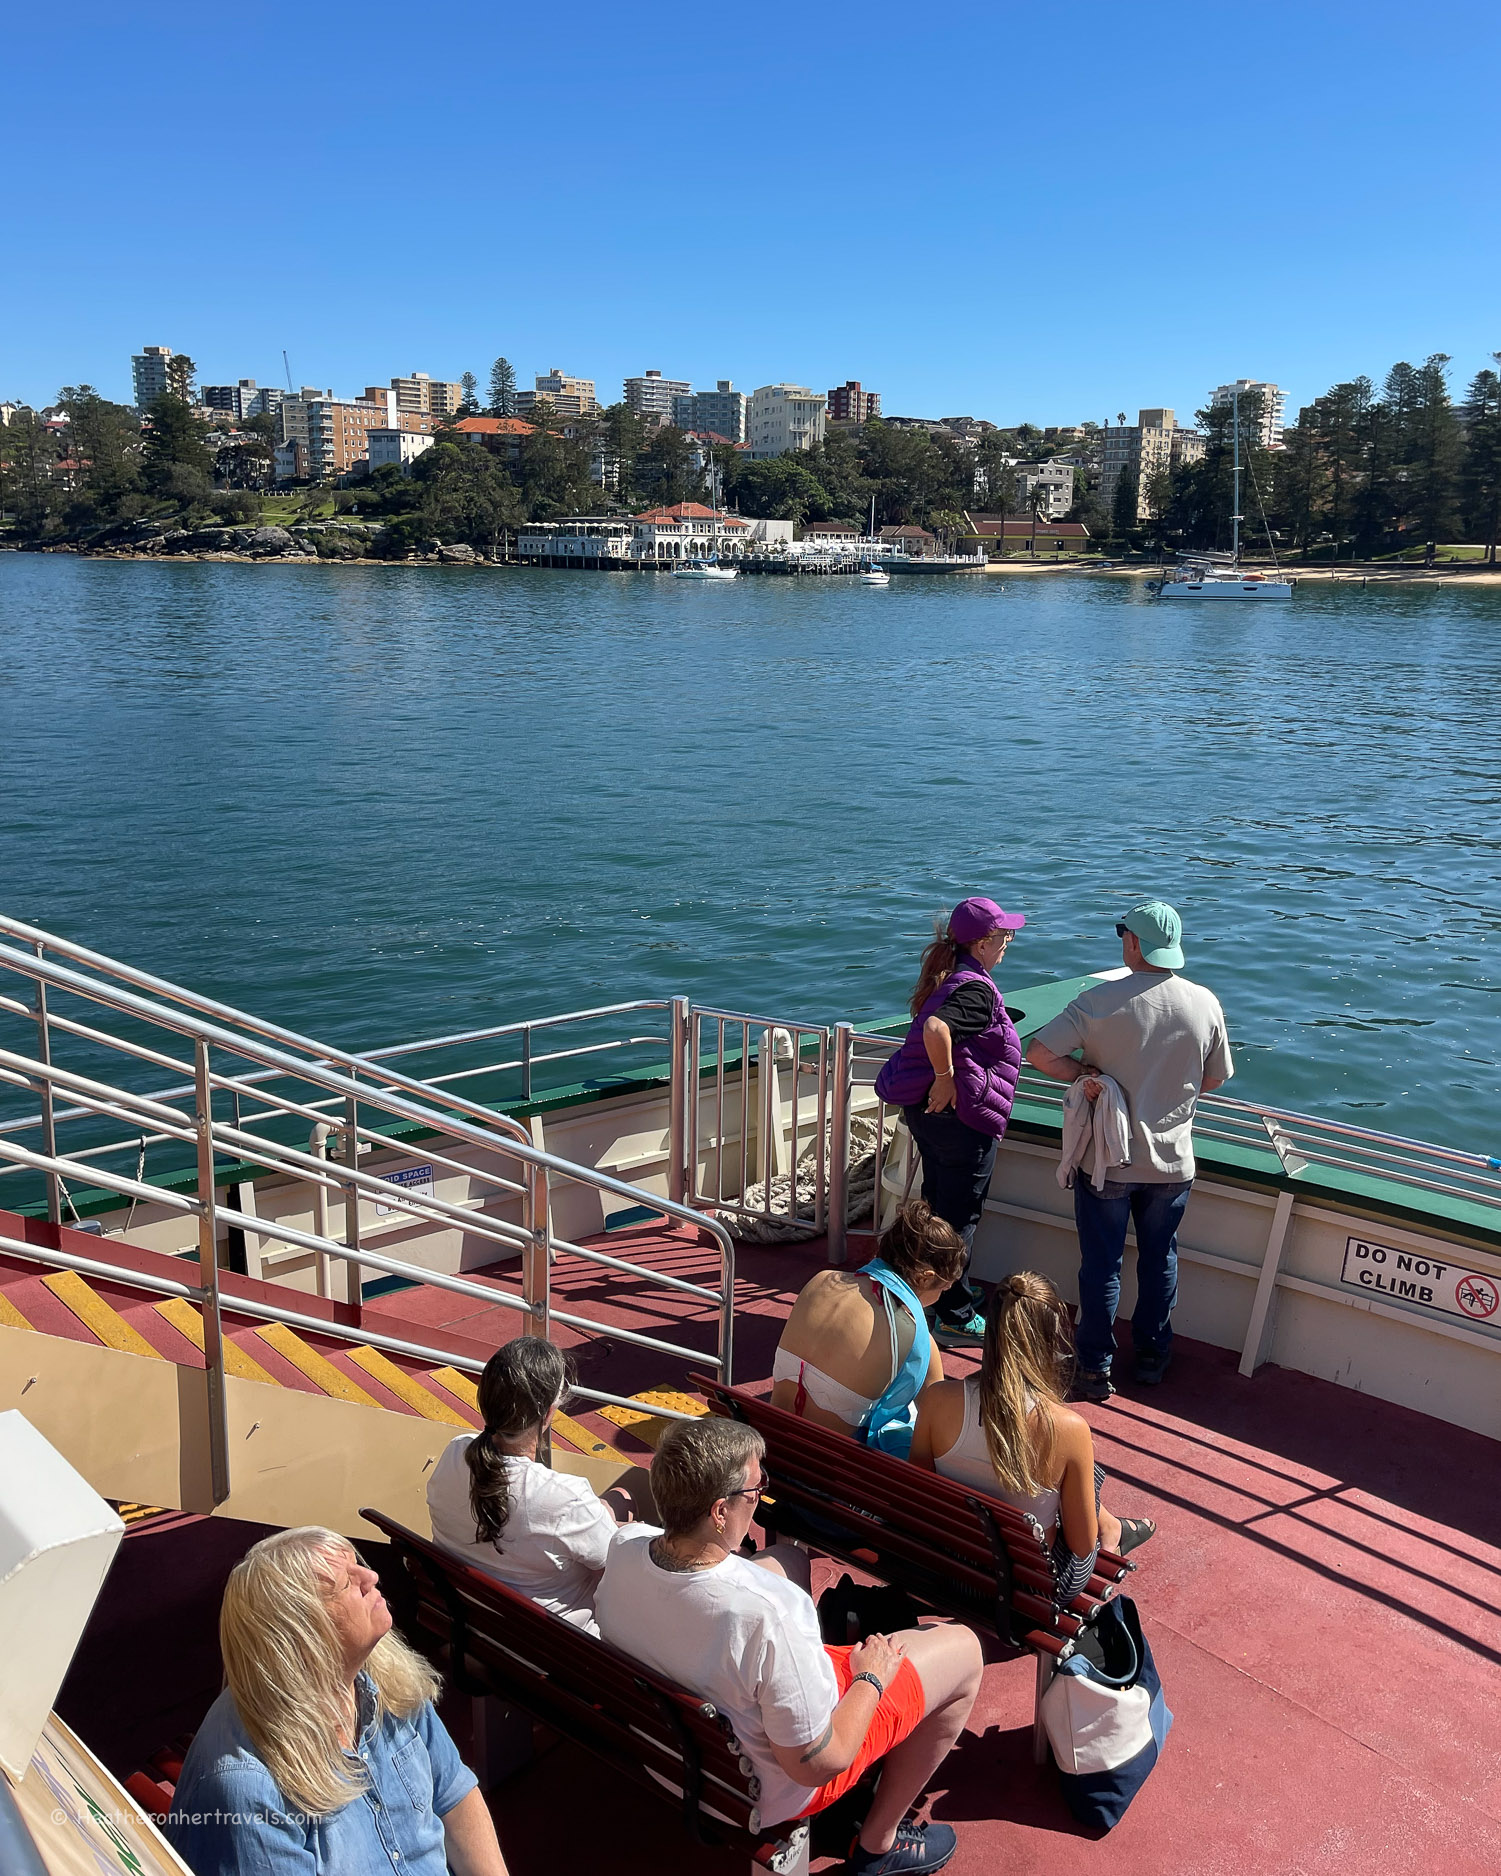
Manly is another popular surf beach and you get the bonus of a ferry ride to get there, seeing Sydney Harbour from the water on the way.
Things to do around Manly
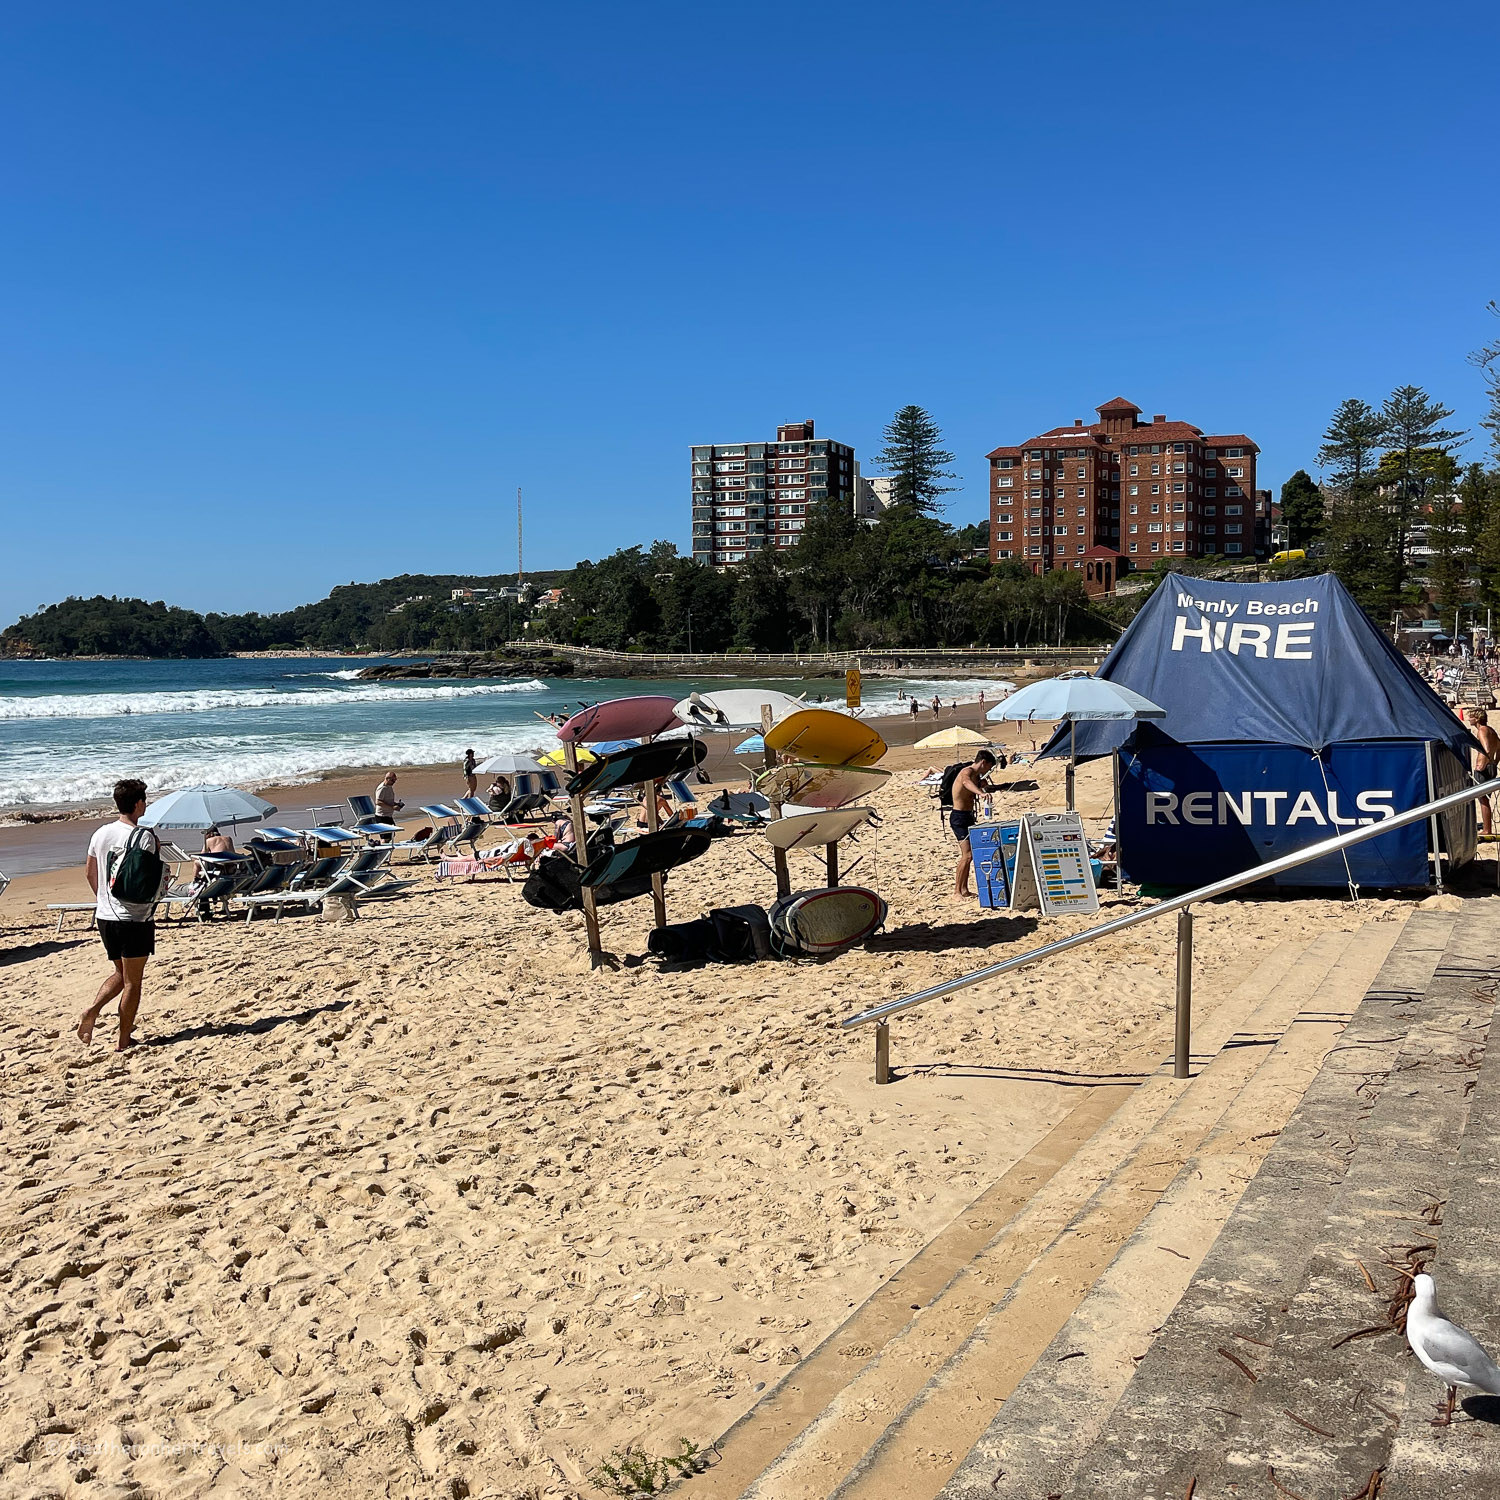
From Manly wharf where the ferry stops, follow the crowds along The Corso, a pedestrianised boulevard, to reach Manly’s main surfing beach.
Manly beach is known for its rolling surf and you can book a lesson with Manly surf school. Due to the strong waves and rip currents, you should only swim between the red and yellow flags which are patrolled by lifeguards.
Manly Beach Sydney Australia
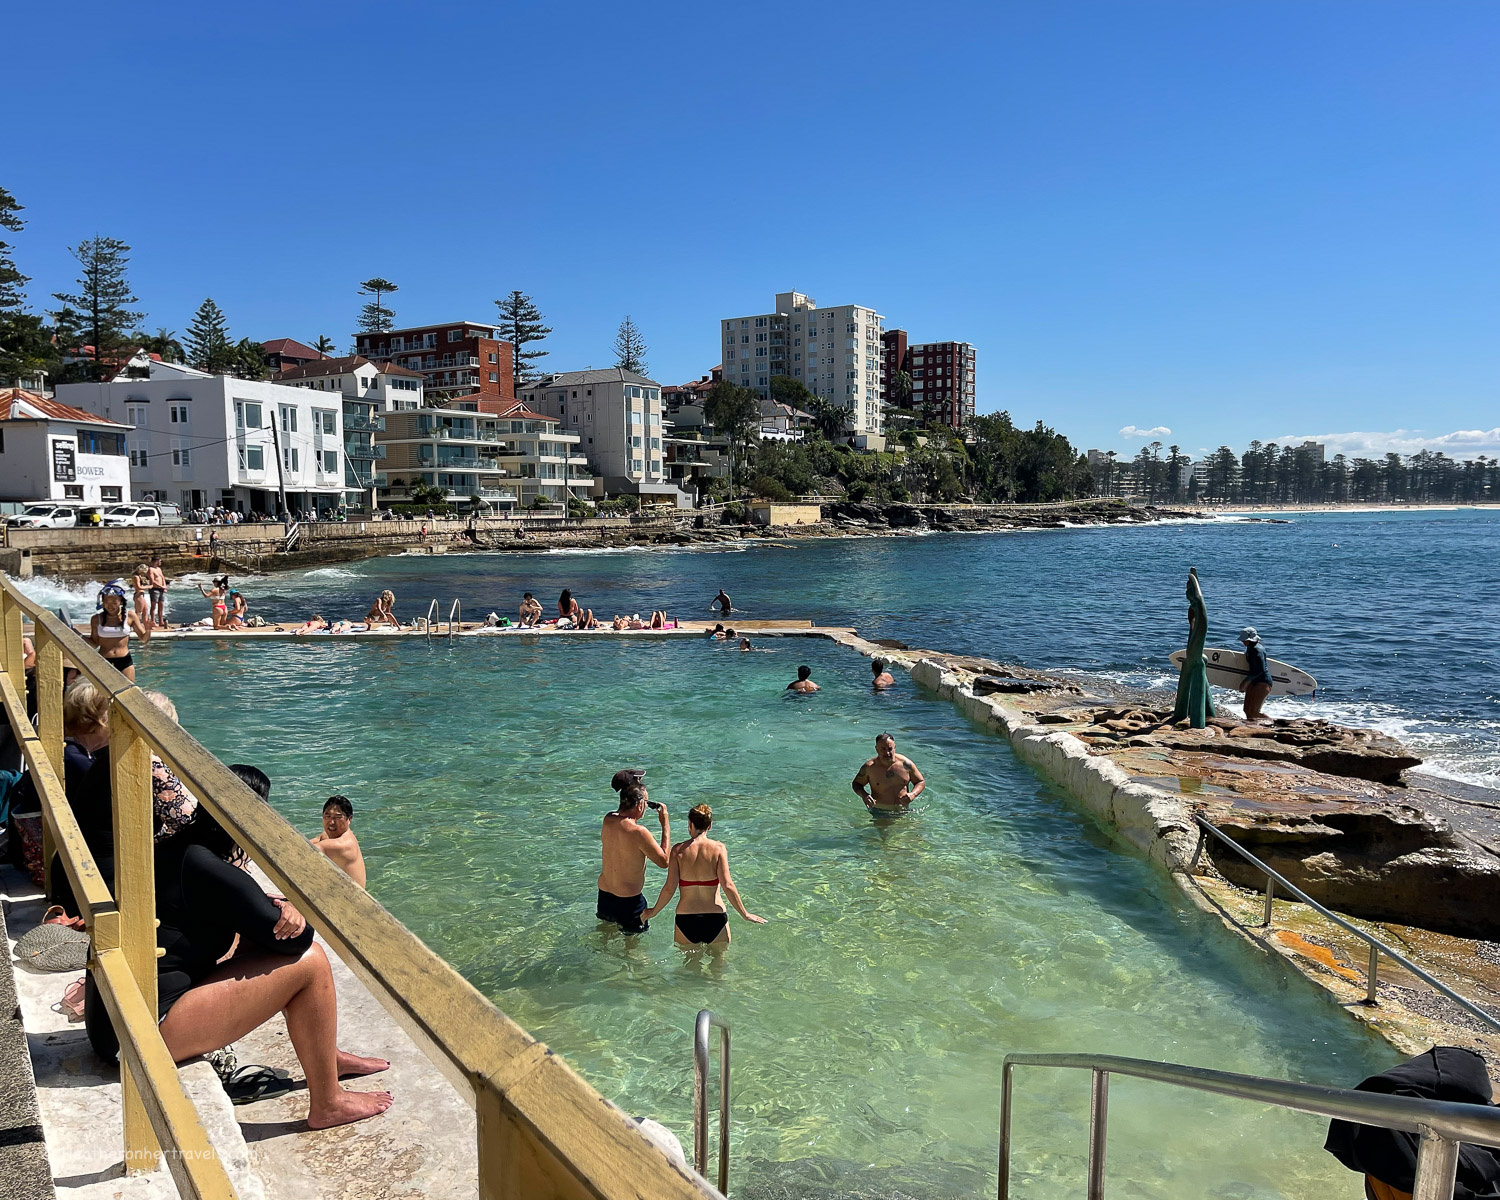
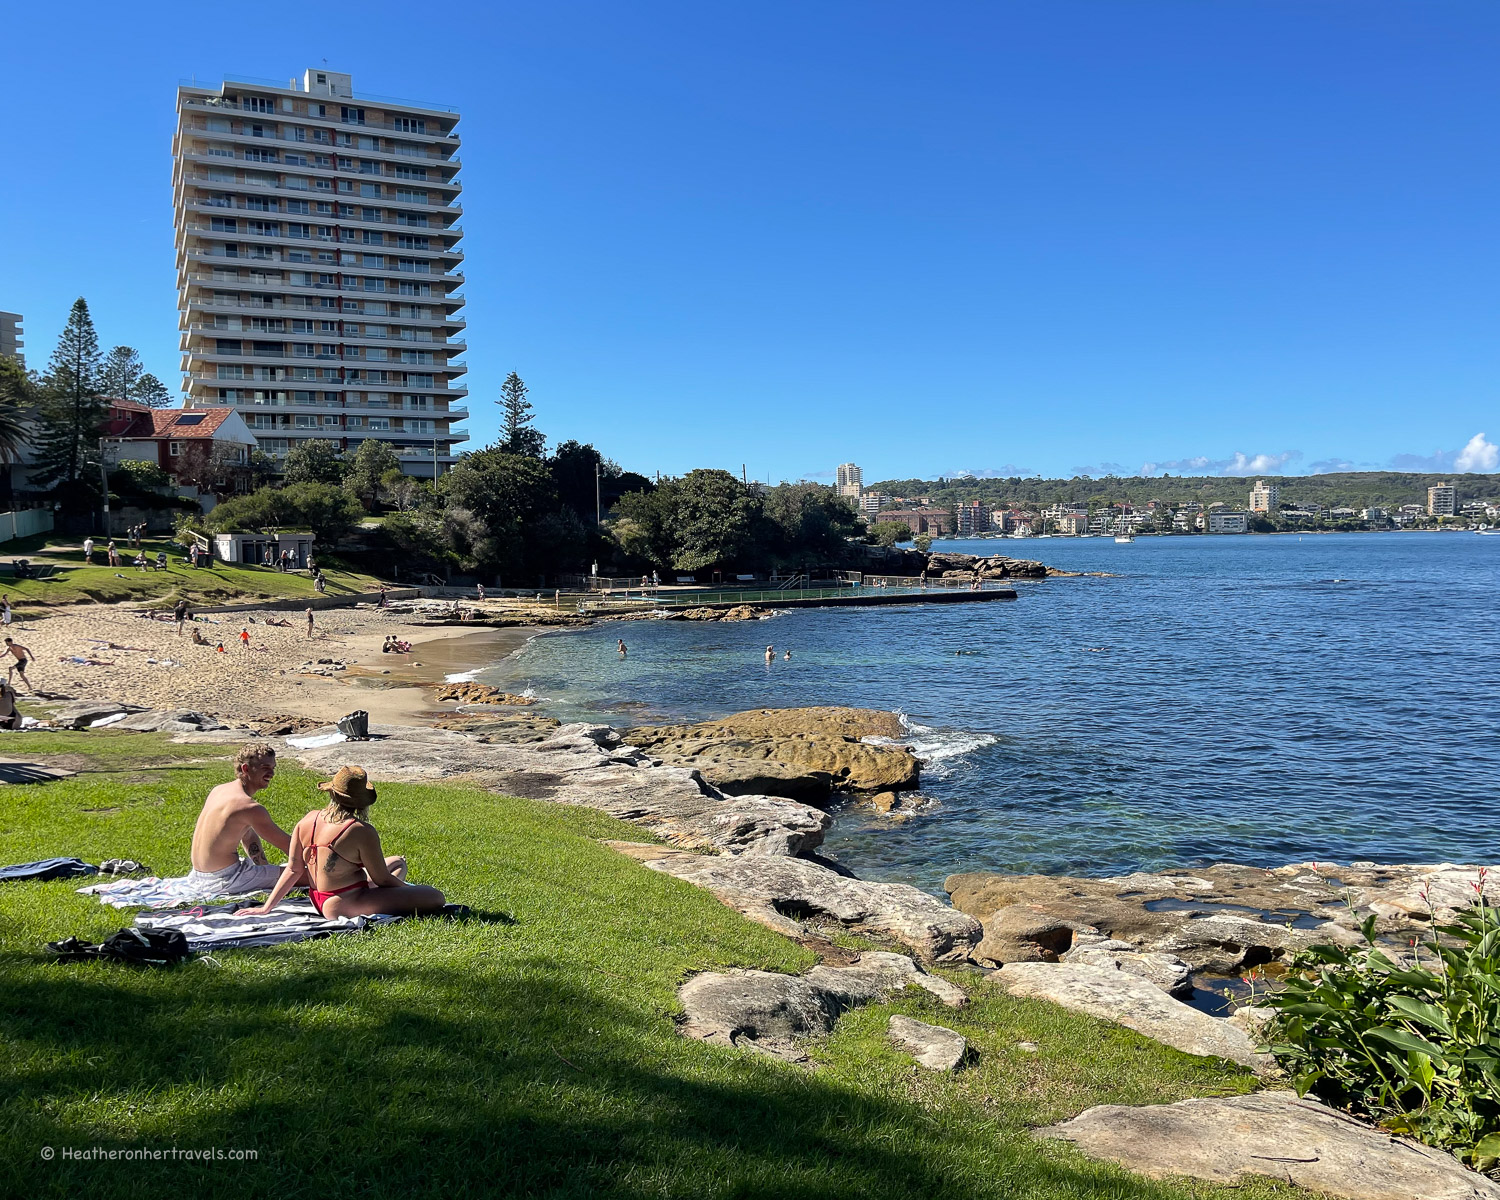
To find calmer waters, walk along Marine Parade at the south of the beach, past the Cabbage Tree Bay Aquatic reserve which is a good spot for snorkelling. A little further is the Fairy Bower sea pool where you could take a dip, then continue to Shelly Beach, which is a more sheltered beach for swimming.
Fairy Bower Pool Manly Sydney Australia
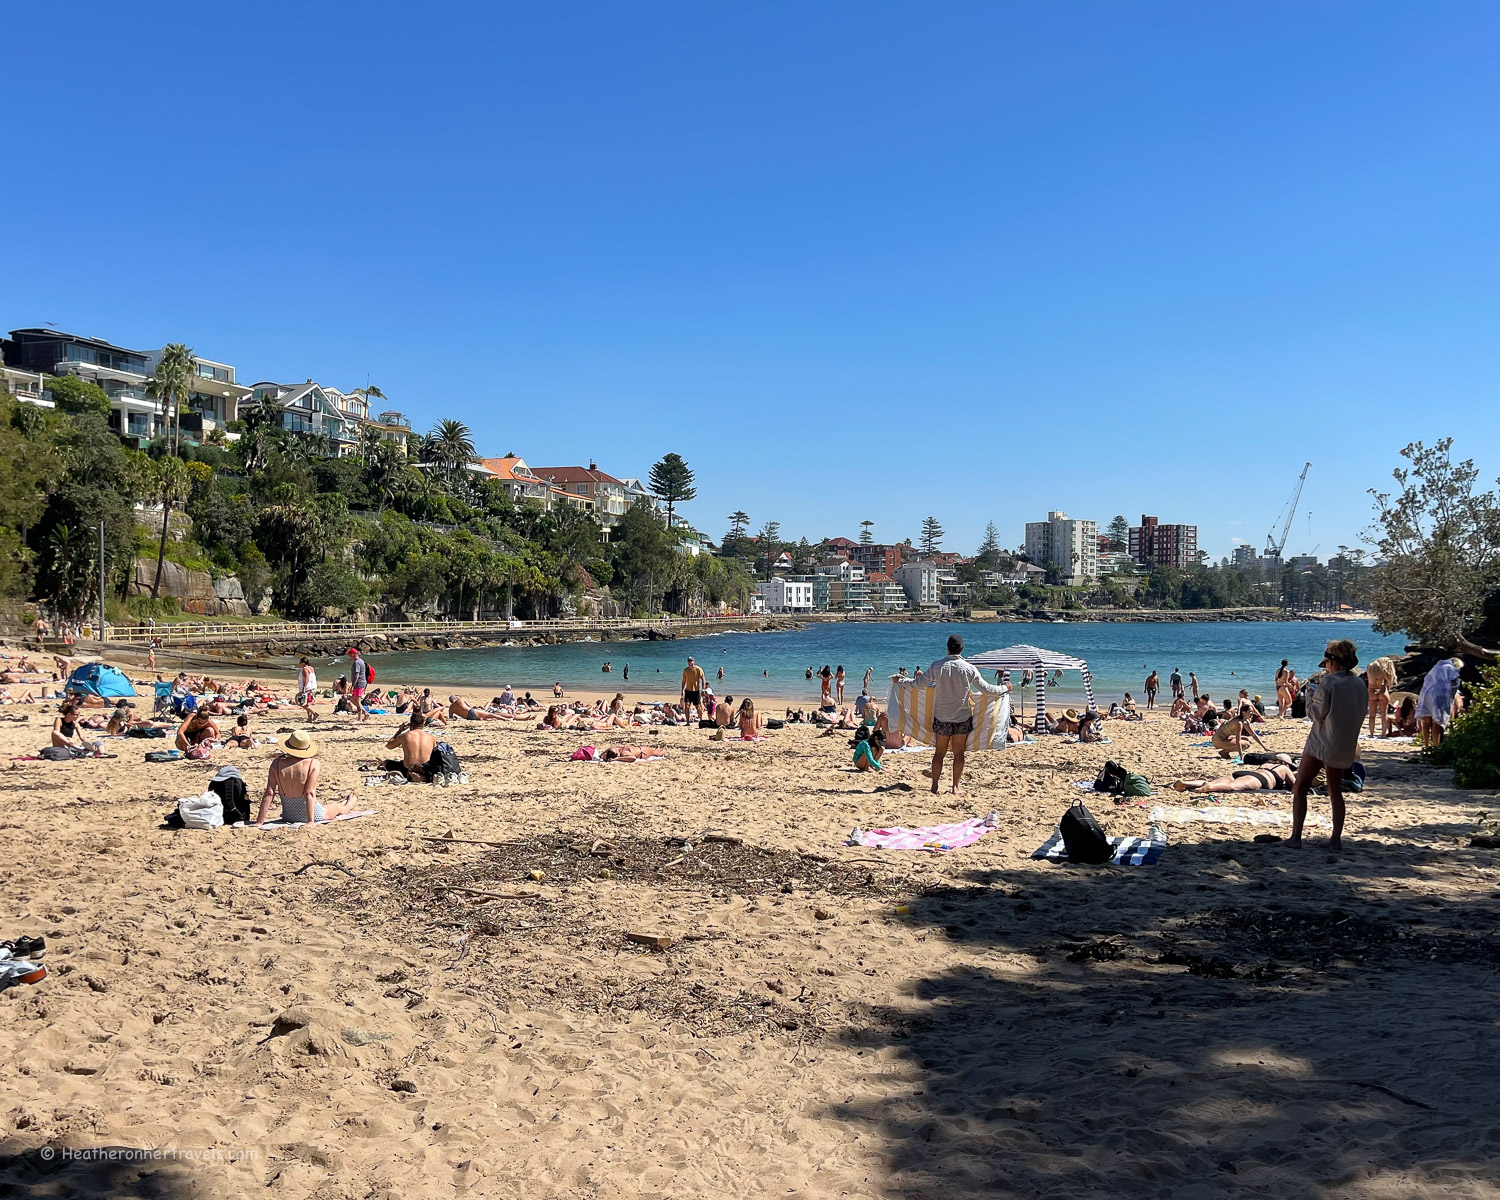
Shelly Beach Sydney Australia
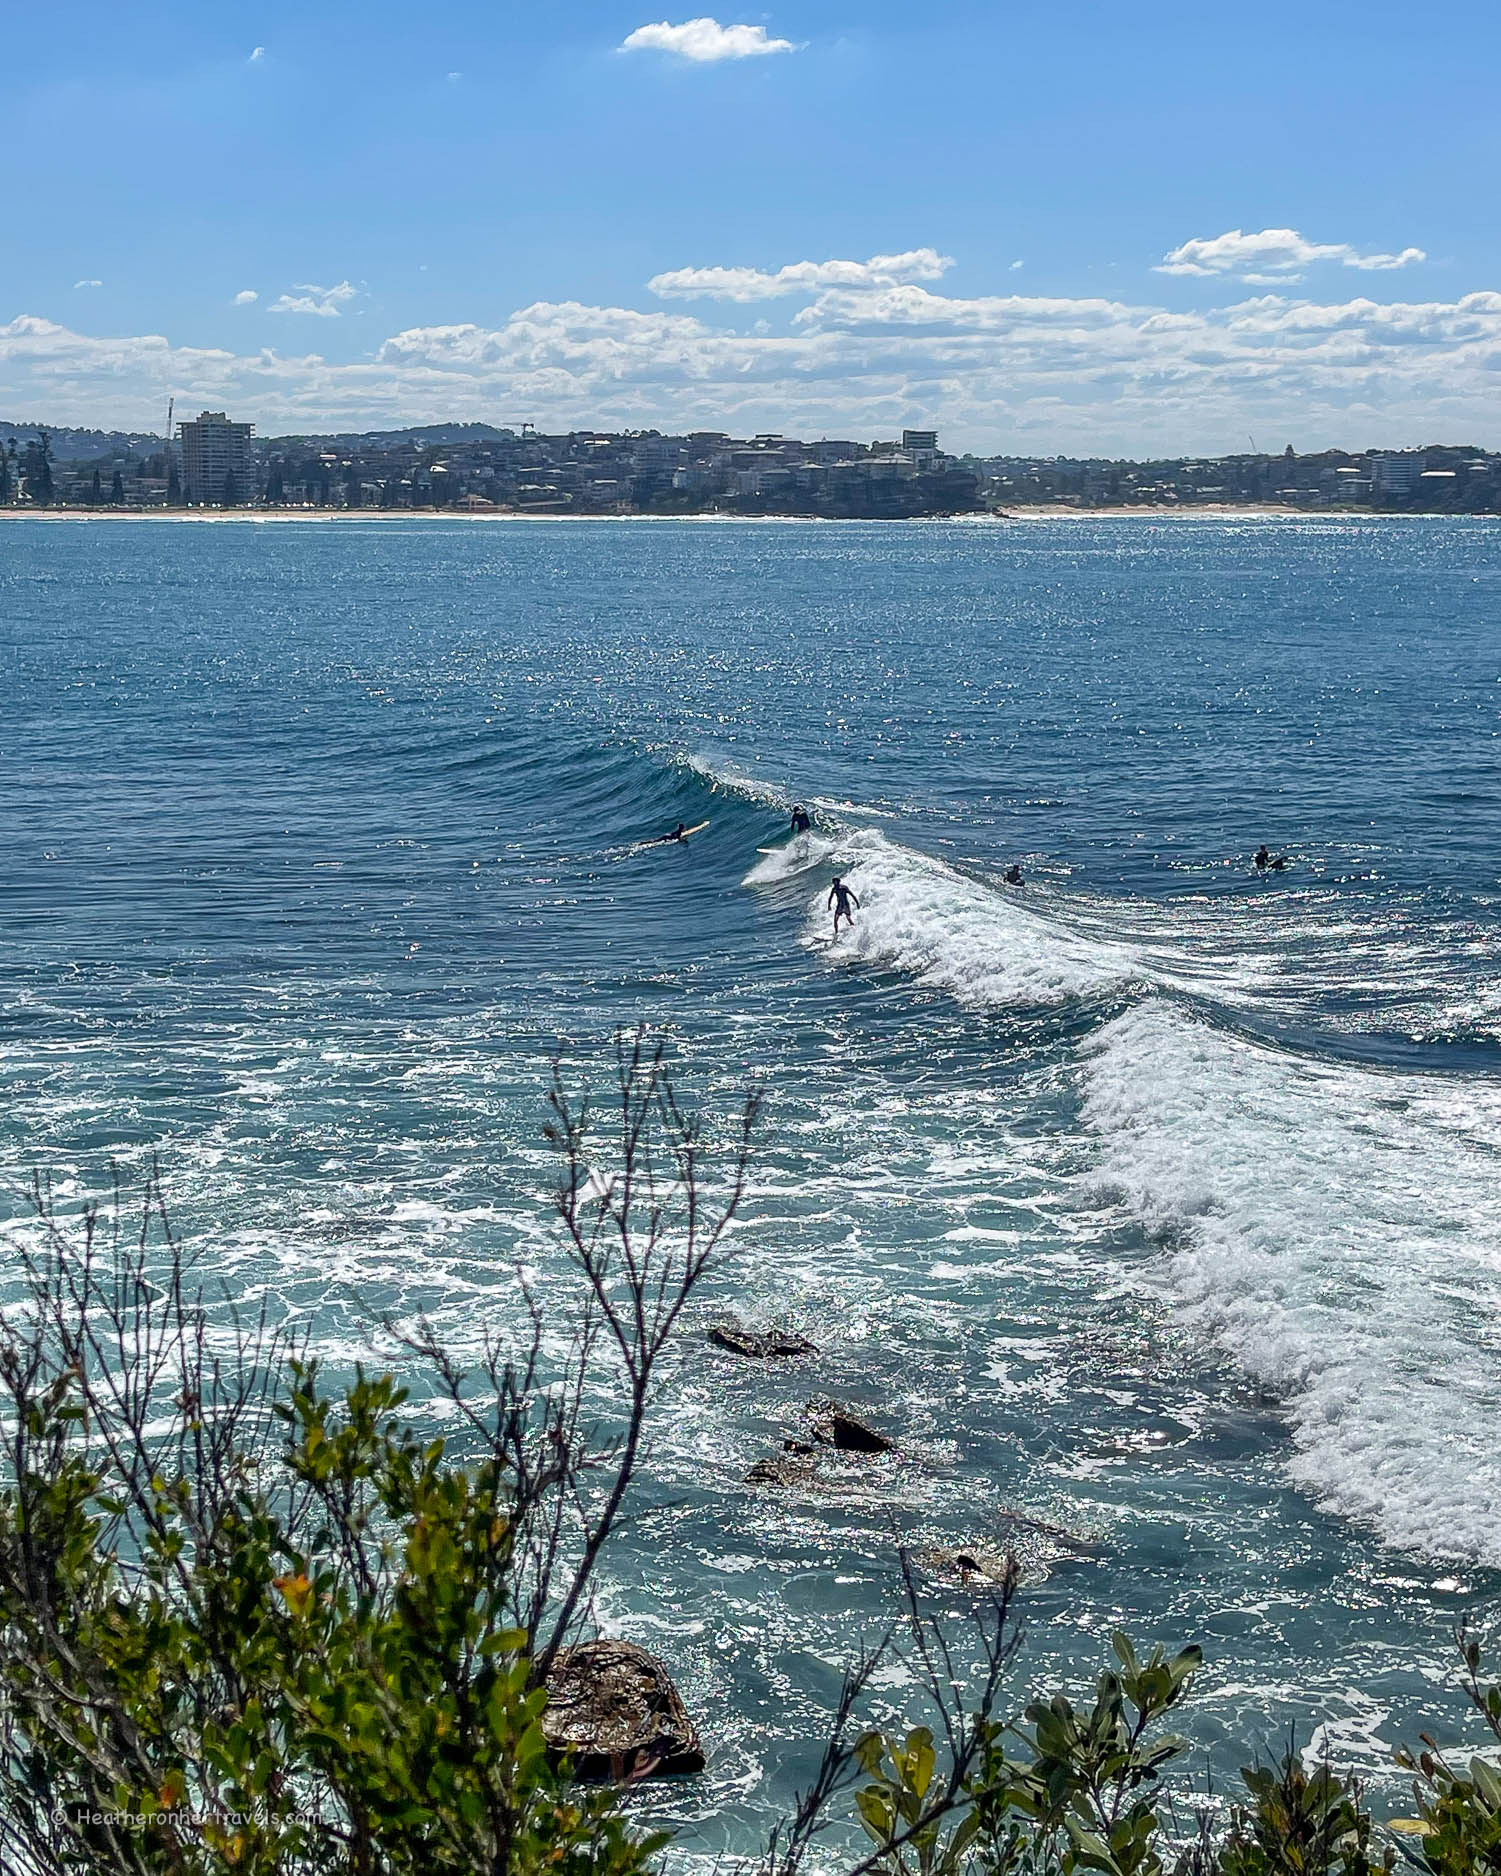
Walk up onto the headland above Shelly beach, for a bird’s eye view of the surfers hanging offshore ready to catch the waves.
Surfers at Manly Sydney Australia
For a longer circular walk continue from the Shelly beach car park on the Shelly Beach to Barrack Precinct walk. The trail takes you over the headland, past Old Quarry Swamp and we ended up at Collin’s beach. From here, follow the coast path around to Little Manly beach and return to the Manly ferry wharf. This walk takes 2-3 hours.
Heather at Old Quarry Swamp above Manly Sydney Australia
With a whole day to spend, you could make the Manly Cove to Spit Bridge coastal walk, passing numerous small beaches and rocky swimming places. From Spit bridge, return by bus to Manly, or catch an Uber back to central Sydney.
Heather on the Manly to Spit Bridge Walk Sydney Australia
If you just have an hour to spare you could walk from Manly ferry wharf and Manly Cove to the next bays of Delwood beach and Fairwood beach for some swimming off the rocks. Being on the Sydney Bay side, you don’t get the crashing surf of the main Manly beach.
Fairlight Beach Manly Sydney Australia
Getting to Manly
From Circular Quay take the ferry to Manly. Ferries normally run at least 3 times an hour. Journey time 25 mins
Ferry to Manly Sydney Australia
Refreshment stops in Manly
Brunch in Manly Sydney
The Bower near Shelly beach – coffee and brunch with a view of the ocean
The Boathouse on Shelly Beach – brunch and lunch on the beach
Manly to Spit Bridge Walk Sydney Australia
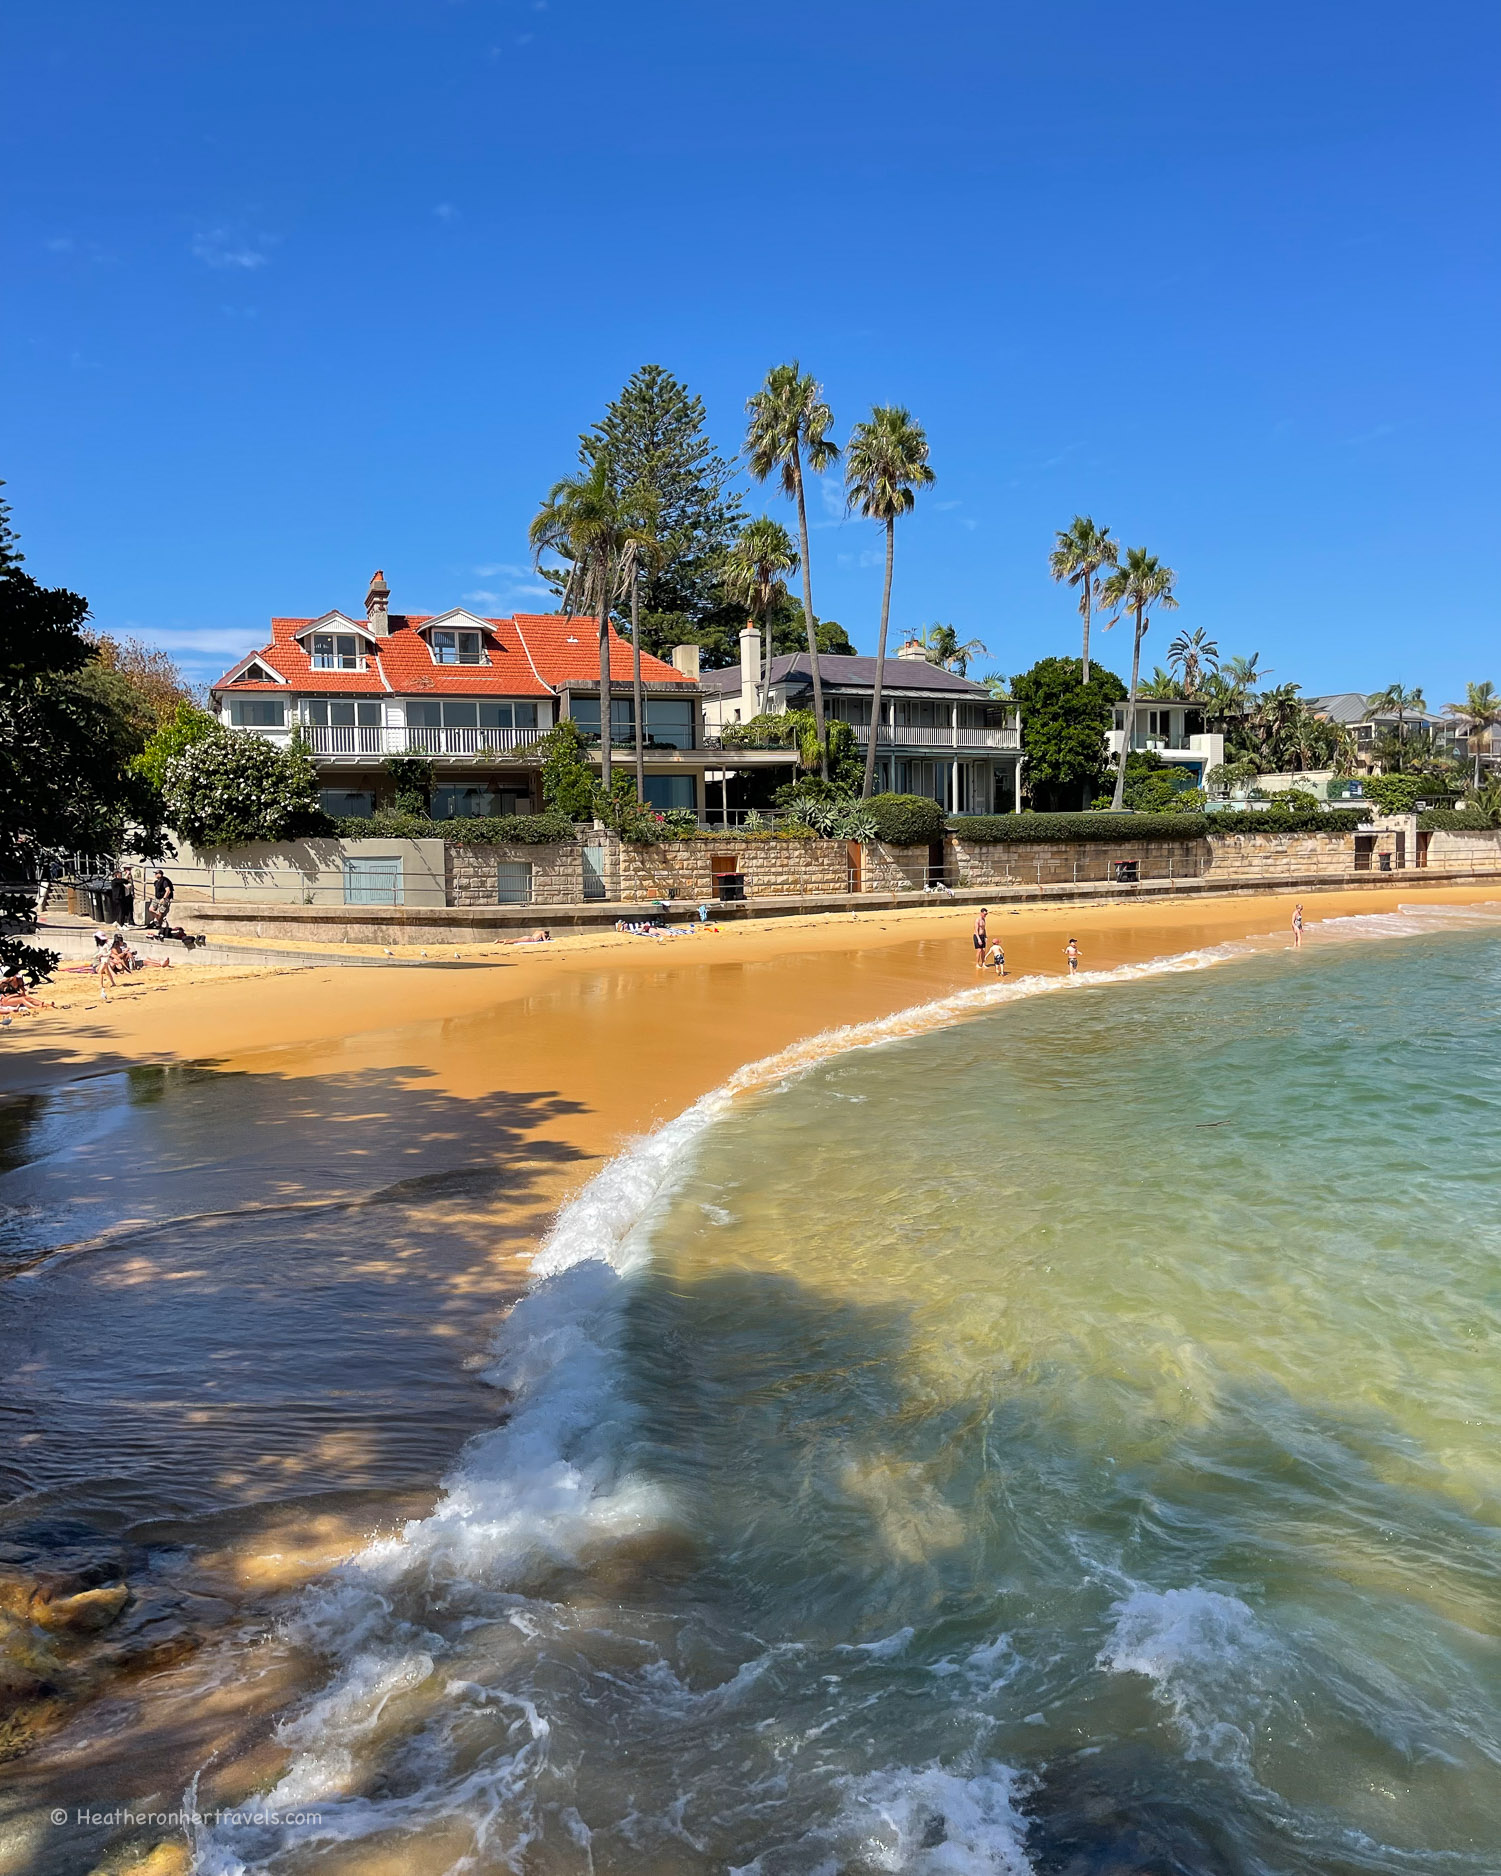
A day at Watsons Bay
Watsons Bay has some nice beach areas, but it’s mainly known as a relaxing place to eat fish and chips and take some short walks up onto the headland at the mouth of Sydney Bay.
Things to do around Watsons Bay
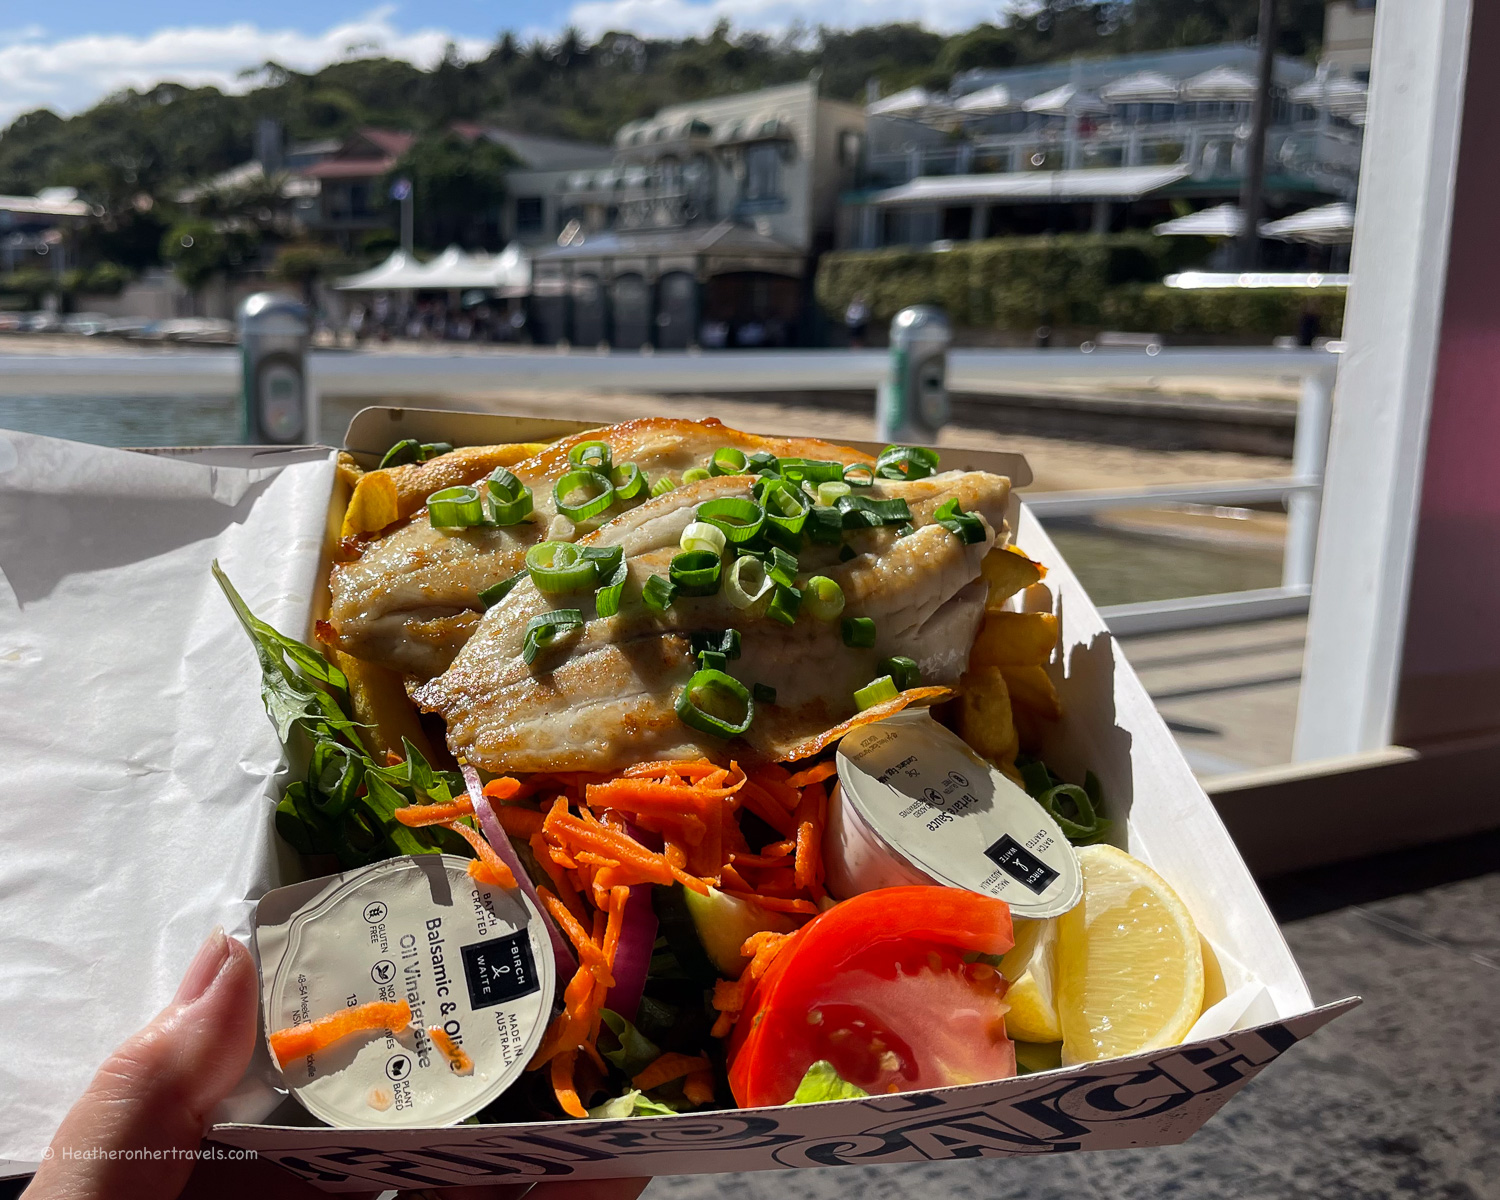
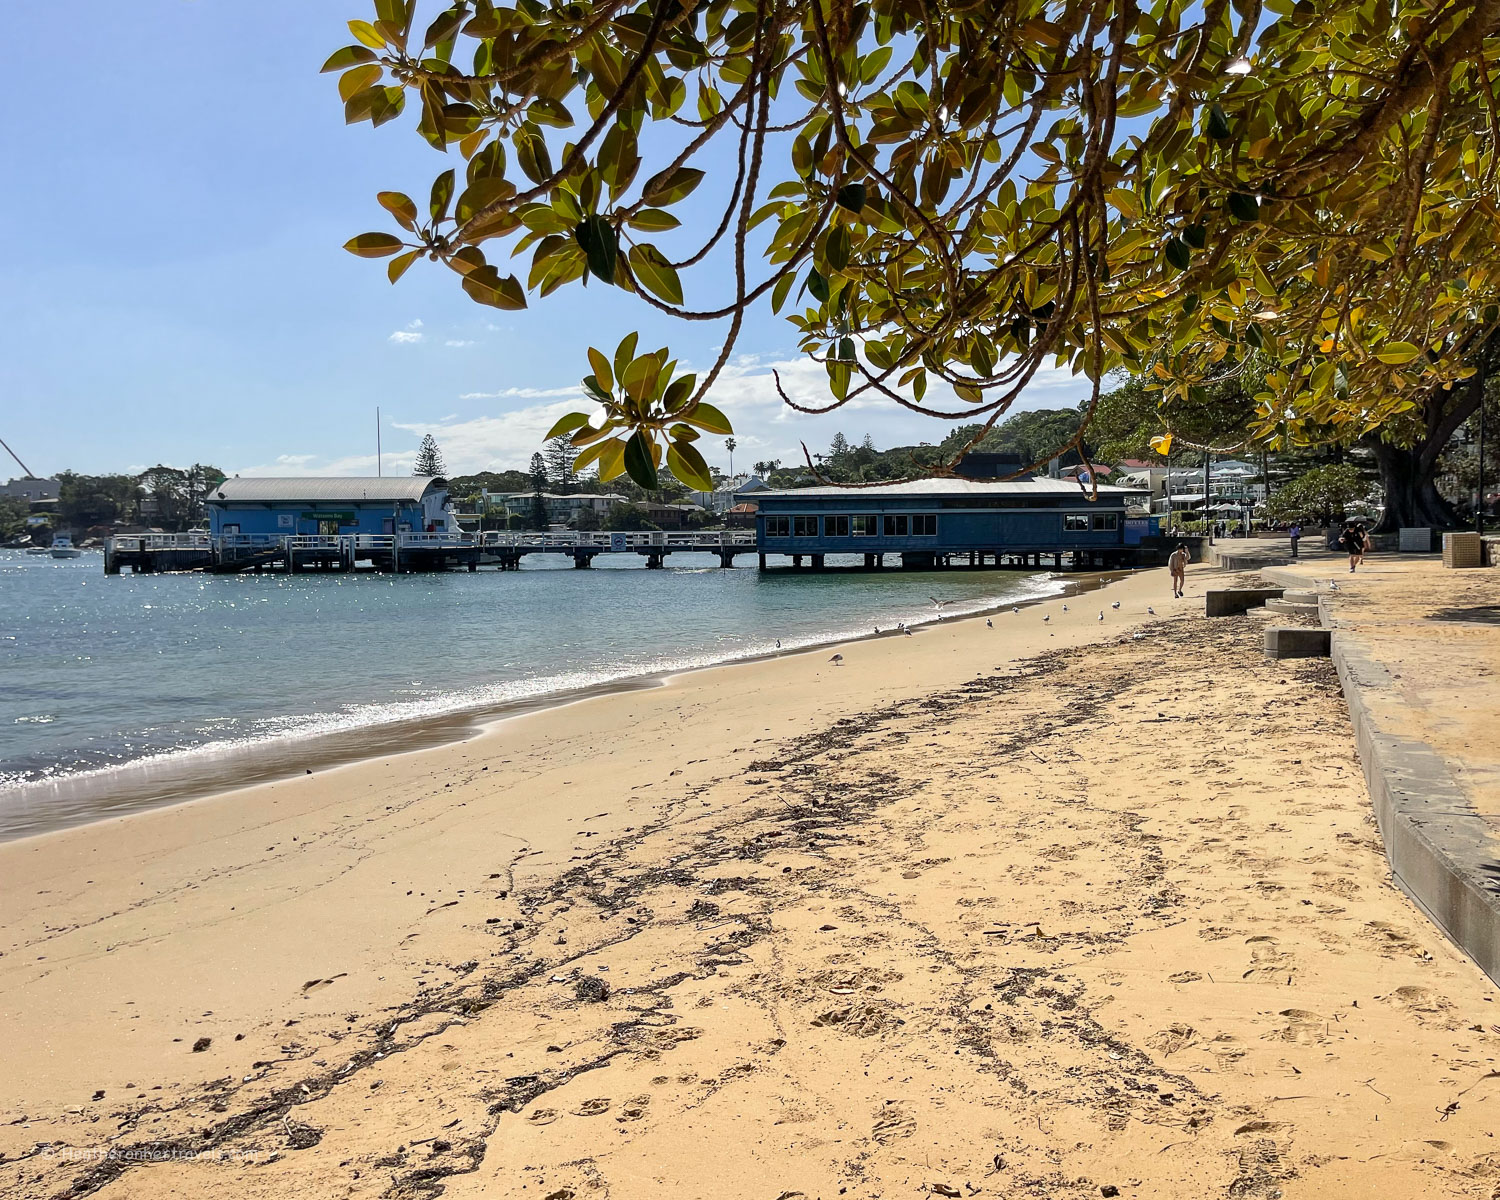
Eat fish & chips at Doyles. They have a busy sit down restaurant, but we preferred to order from the takeaway counter next to the ferry pier and use the seating area behind it, which offers the same view over the water. Tip: If you don’t like too much fried food, they have plenty of healthier seafood options.
Fish & chips at Doyle’s Watson Bay
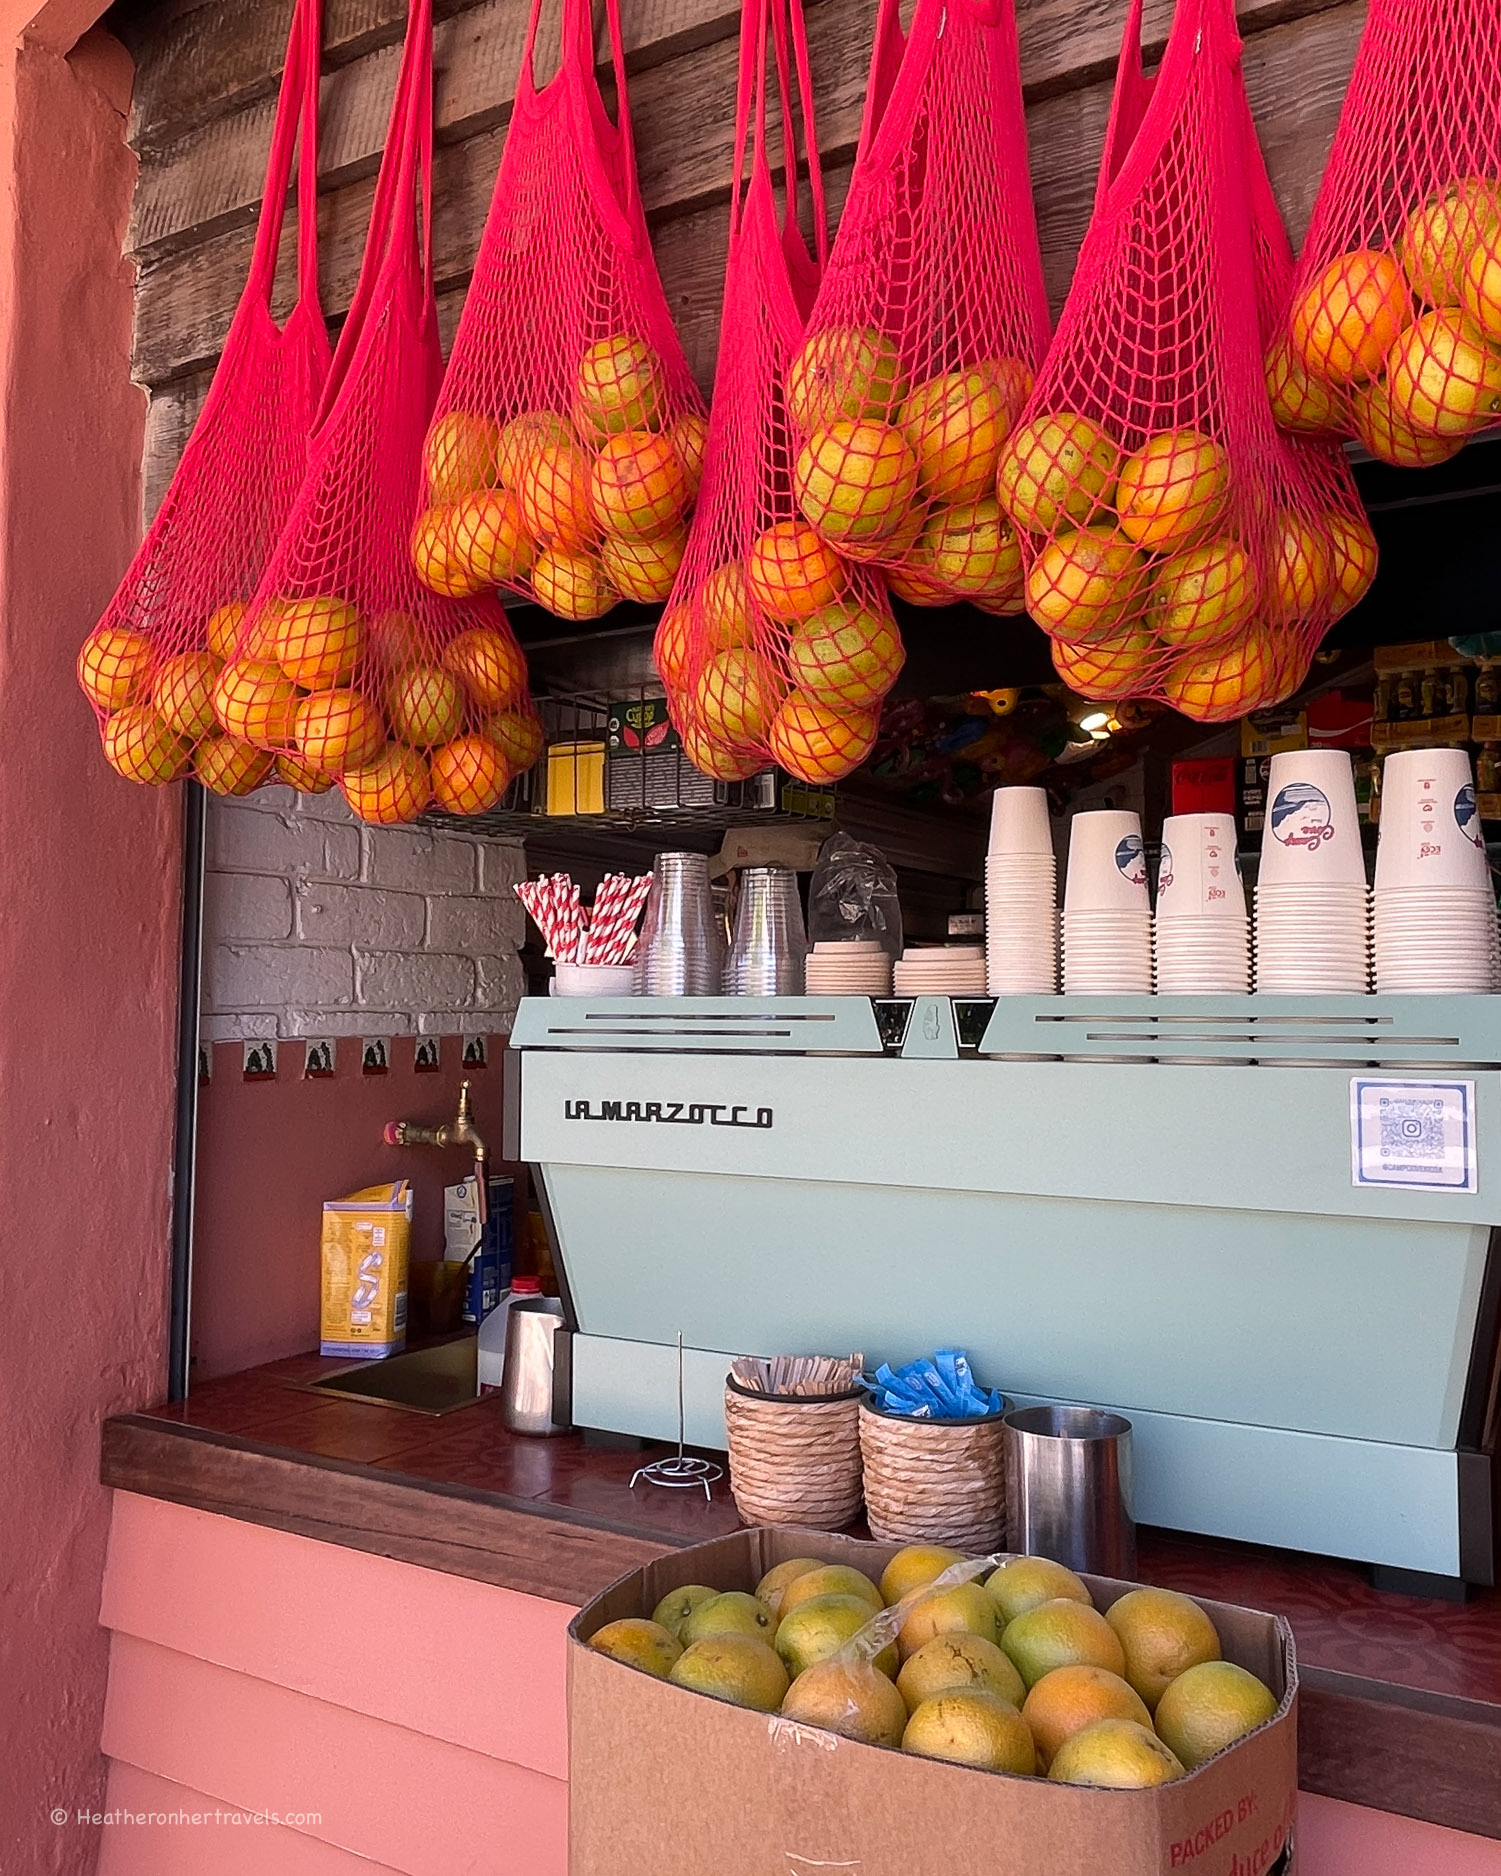
At the end of Marine Parade, walk past all the pretty cottages in Cove Street, to arrive at Camp Cove Beach, with its cute beach kiosk cafe (try their fresh orange juice). The beach is sheltered, with calm water for swimming.
From Camp Cove Beach, walk up onto the headland past the canons, to the Hornby Lighthouse.
Heather at Hornby Lighthouse Watsons Bay Sydney Australia
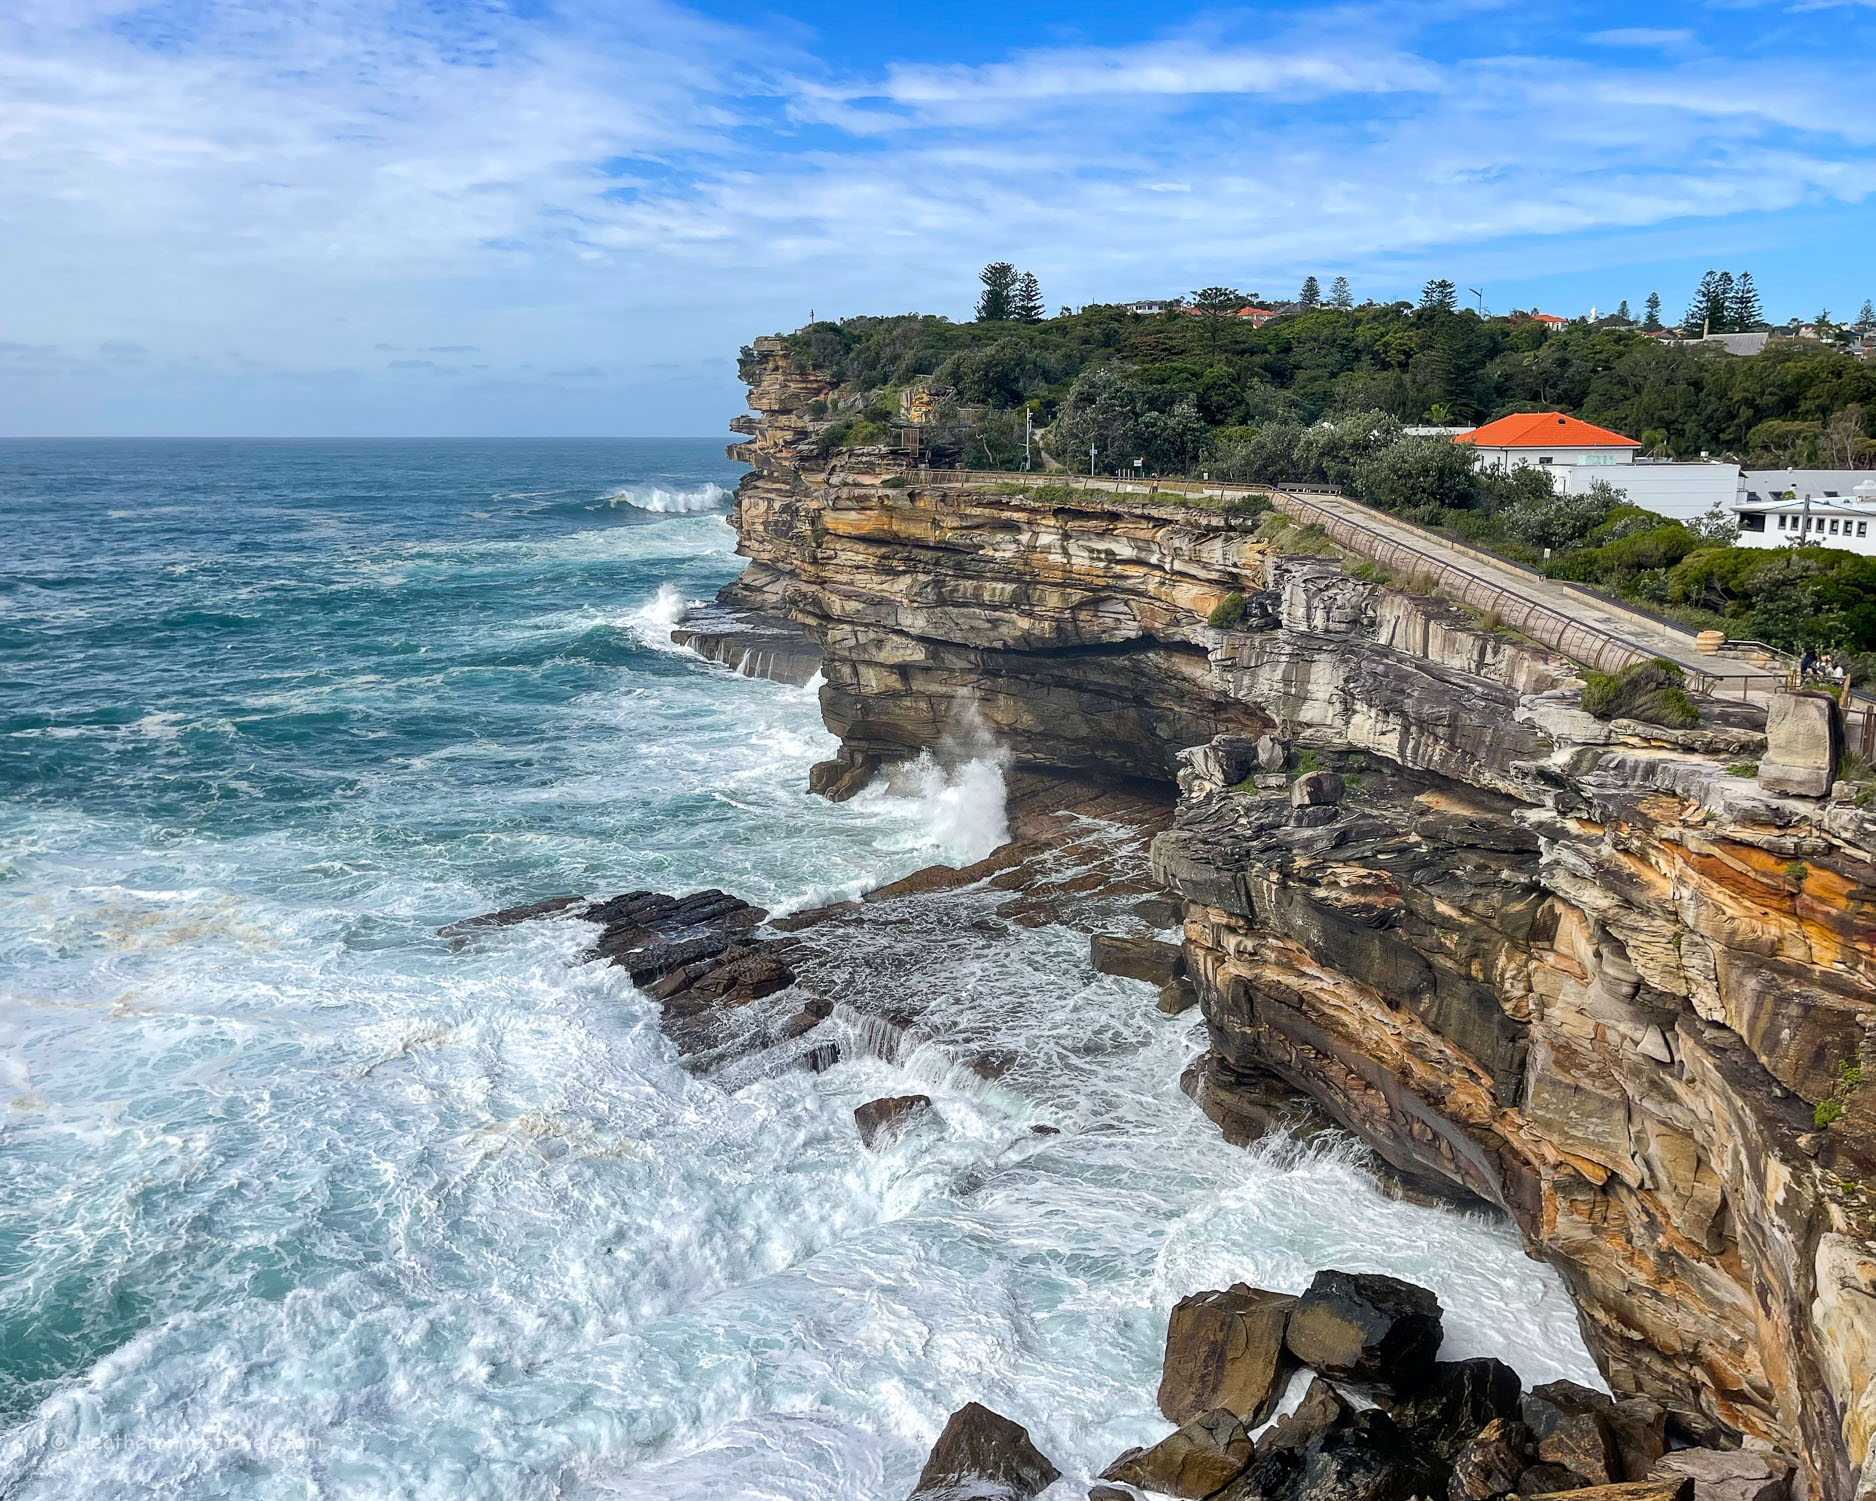
From the Watsons Bay ferry wharf, walk across Robertson Park and up onto the walking trail at Gap Bluff. Here you’ll see the contrast between the calm waters on the harbour side and the crashing waves on the ocean side, where the tragic wreck of the Dunbar in 1857 is marked by its salvaged anchor.
Gap Bluff Watsons Bay Sydney Australia
If you have a whole day to spend, you might like to hike the coastal path in the direction of Rose Bay, past a succession of lovely coves and beaches. Even if you only have half a day, you could fit in swims at Kutti Beach, the Parsley Bay wharf and arrive at Shark Beach, before retracing your steps.
Heather at Shark Beach Sydney Australia
Gettingto Watsons Bay
From Circular Quay take the ferry to Watsons Bay. Normally runs 2 times an hour. Journey time 30 mins. Tip: As the ferries are not as frequent later in the day, be sure to check the afternoon ferry times for your return trip.
Watsons Bay Sydney Australia
Refreshment stops in Watsons Bay
Doyles – restaurant or takeaway for fish & chips or seafood
Watsons Bay Boutique Hotel – for sunset drinks
Camp Cove Kiosk – for coffee, orange juice and snacks
Watsons Bay Tea Rooms – for drinks and light meals
Join a group of like-minded travelers in our next scheduled tour in Russia on:
September 9th to 16th, 2025 (Russian Caucasus) – APPLY NOW
Sept 18th to 24th, 2025 (Arctic Russia) – APPLY NOW
Today, it exists a general misunderstanding with regard to the visa for Russia, which is that since the Ukraine war started in 2022, Russia is not offering tourist visas to international visitors.
This assumption is not only false but, with the recent introduction of an e-visa, getting a visa for Russia is easier than ever.
This short guide will show you the different ways to get your visa for Russia.
As you may know, Against the Compass is offering group expeditions into remote locations within the Russian Federation.
Only in 2025, we’ve had participants from the following countries: USA, UK, Canada, Spain, Netherlands, Denmark, Sweden, Greece, Poland, Argentina, Costa Rica, and Kuwait.
All of them managed to get their Russian visa without issues.
Don’t forget to check our upcoming expeditions to Russia:
September 9th to 16th, 2025 (Russian Caucasus). APPLY NOW
September 18th to 24th, 2025 (Arctic Russia). APPLY NOW
November 16th to 22nd, 2025 (Arctic Russia). APPLY NOW
March 31st to April 6th, 2026 (Arctic Russia). APPLY NOW
April 14th to 21st, 2026 (Russian Caucasus). APPLY NOW
How to apply for an electronic visa for Russia
In 2024, the Russian migration authorities made history by launching a user-friendly e-visa portal, allowing travelers to easily get their visa for Russia easily in a few days.
This e-visa allows you to travel in Russia for up to 16 days.
Which countries are eligible for a Russian e-visa?
All EU and Schengen countries, as well as Bahrain, Cambodia, China, Japan, India, Indonesia, Iran, Korea, Kuwait, Malaysia, Mexico, Myanmar, North Macedonia, Oman, Philippines, Saudi Arabia, Serbia, Singapore, Taiwan, Turkey and Vietnam.
How long does it take to get approval?
Around 4 calendar days.
How much does the Russian e-visa cost?
It costs 52 USD.
Can I use the e-visa at any entry point?
With the e-visa, you can enter Russia via any of its international airports, but land border crossings are limited.
How to apply for a Russian visa at the embassy (the traditional way)
Applying for a Russian e-visa seems pretty convenient, but there are some cases in which you will have to get it at the embassy or consulate in your country of residence:
Your country is not on the list of countries eligible for an e-visa. Unfortunately, this also the USA, Canada, the United Kingdom and Australia
You want to get a multi-entry visa
Don’t worry, getting your Russian visa at the embassy is pretty easy.
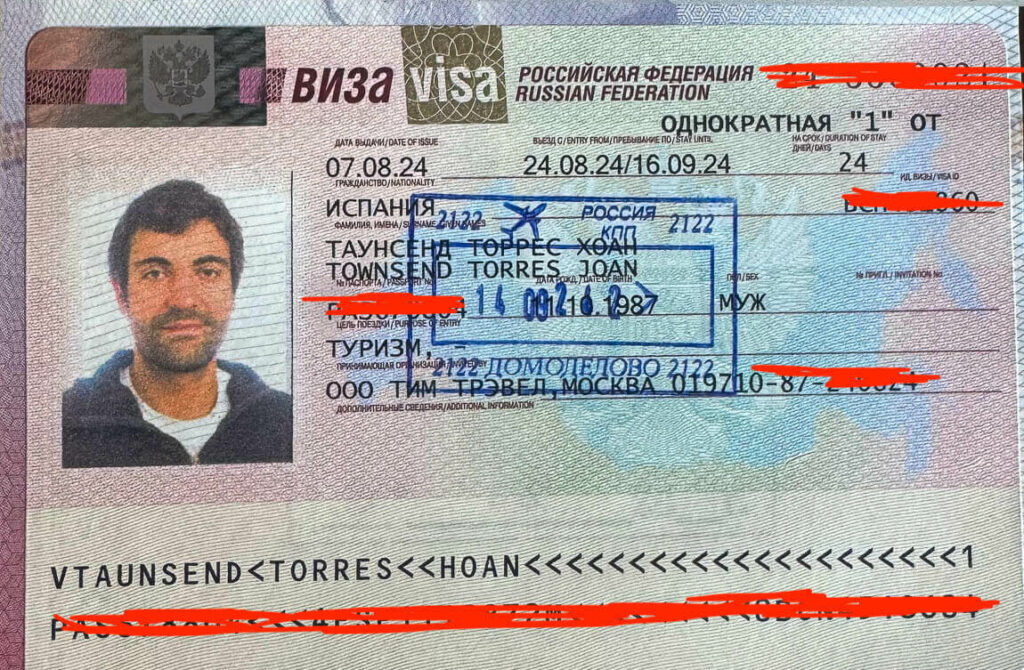
Russian visa embassy requirements
1. Obtain a Letter of Invitation (LOI)
Important: Your visa will be only valid in the period stated in the LOI
The first thing you’ll need to have is an official Letter of Invitation (LOI), which can only be obtained through a valid tour operator in Russia.
You can easily purchase a Russian LOI online via iVisa Center, for example (they might also help you with the visa).
Alternatively, we can also provide a Letter of Invitation if joining any of our tours in Russia:
September 9th to 16th, 2025 (Russian Caucasus). APPLY NOW
September 18th to 24th, 2025 (Arctic Russia). APPLY NOW
November 16th to 22nd, 2025 (Arctic Russia). APPLY NOW
March 31st to April 6th, 2026 (Arctic Russia). APPLY NOW
April 14th to 21st, 2026 (Russian Caucasus). APPLY NOW
2. Fill out the visa application form
After obtaining your LOI, you will be able to complete the following online application form.
Keep in mind that the LOI is a must-requirement for completing this form, since they’ll be asking you for your sponsor details.
After submitting your form, you will have to print it out and bring it to the embassy.
3. Go to your respective consulate, embassy or Russian Visa Center
Fortunately, Russia has embassies in pretty much all countries, all of them being fully operational, including the ones in the USA, Canada, UK and anywhere across Europe.
Some embassies require having an appointment, while others don’t. Moreover, some prefer to delegate all visa services to their respective Russian Visa Center, while others require travelers to go to the actual embassy.
Either way, look for your Russian Embassy website to check their specific requirements.
Ever thought cruising was just buffets and bingo? Think again.
From eco-friendly ships and off-the-beaten-path destinations to high-speed Wi-Fi and coworking spaces (yes, really), cruising in 2026 is getting a serious glow-up.
Whether you’re dreaming of a relaxing family getaway, a remote work setup with ocean views, or just want someone else to plan the meals for once, now’s the perfect time to start planning your adventure at sea.
Cruises are not just for retirees or luxury lovers anymore. These days, they welcome everyone, from families and solo travelers to digital nomads and first timers who just want someone else to do the cooking for a while. And with 2026 Cruises already open for booking, there has never been a better time to dive in and explore.
Why Plan a Cruise Now?
Planning early gives you the best shot at locking in your dream trip. Cruise lines are already rolling out their 2026 itineraries, with more options than ever. Whether you are after a big adventure, a laid back escape, or just curious about cruise life, there is something out there with your name on it.
One trend we are loving is the rise of all inclusive cruise deals. Instead of constantly checking your wallet for extras, you get meals, drinks, entertainment, and even tips bundled into one price. It is simple, clear, and leaves you free to enjoy your vacation without doing math over every coffee or cocktail.
The cruise world has changed a lot, and for the better. Modern cruise ships are like floating resorts, offering everything from fine dining and Broadway style shows to waterparks and zip lines.
In 2026, expect even more personalization with:
Themed voyages like wellness retreats, culinary tours, history adventures, and wildlife safaris
Flexible dining hours so you can eat when you want
Excursion options tailored to your activity level
Entertainment schedules that fit a wide range of travel styles
Families, younger travelers, and anyone craving a bit more freedom will find cruising a lot more welcoming than it used to be.
Greener Ships, Smarter Choices
Eco conscious travelers, take heart. Cruising is working on cleaning up its act.
Ships launching in 2026 will feature greener technologies like LNG powered engines, advanced water filtration, and waste management systems. Plus, cruise lines are putting a bigger focus on responsible tourism by:
Limiting visits to overcrowded ports
Working directly with local communities
Sharing more about how passengers can help reduce their impact
Like all things, the cruise industry is evolving, but it is a step in the right direction for travelers who want to explore the world more responsibly.
Where You Can Go (Hint, It’s Not Just the Caribbean)
The classics, like the Mediterranean, Caribbean, and Norwegian fjords, are still crowd pleasers, but 2026 is opening up some exciting new horizons.
Look out for cruises heading to:
The Azores and Greenland
The South Pacific
West Africa
Less traveled parts of the Baltics and Eastern Mediterranean
These newer routes are perfect if you are craving somewhere a little more off the beaten path, without giving up the comforts of cruise life.
Smart Tech, Smoother Sailing
Cruise ships are getting smarter and more connected than ever.
Think:
Wristbands that unlock your cabin and replace credit cards
App based room service
High speed Wi Fi and coworking spaces
It really is a dream setup for digital nomads or anyone who wants to sneak in a little work between poolside margaritas.
Cruises Make Slow Travel Easy
If you love the idea of slow travel, cruising might be your perfect match.
With longer port stays and more relaxed days at sea, cruises let you soak up each destination at a slower, more meaningful pace. It is a wonderful way to travel if you are more about savoring the experience than ticking off a checklist.
Perfect for Families and Multi Gen Trips
Cruises have always been popular with families, but 2026 is set to be even better.
Ships are rolling out more spaces and activities for every age group, from toddler splash zones to teen lounges and adults only retreats. Plus:
Meals, entertainment, and childcare are all in one place
Everyone can explore their interests during the day
Families can come back together in the evening for dinner, shows or a sunset stroll on deck
It’s an easy, stress free way to keep everyone happy on vacation.
Book Early, Travel Better
The earlier you book, the more choices you have. Early planning means you can:
Grab the best cabins and itineraries
Research visas and shore excursions
Stay ahead of any itinerary tweaks or ship updates
Plus, you will have plenty of time to get excited about your trip, which, let’s be honest, is half the fun.
Cruising in 2026 is shaping up to be an entirely different experience from the cruises of years past. It is more flexible, more sustainable, and more focused on creating truly memorable adventures.
Whether you’re in it for the 2026 Cruises deals, the all inclusive simplicity, or the chance to discover new corners of the world from the comfort of a ship, it’s a great time to start planning. Your future self will thank you when you’re watching the sunset over a brand new horizon, drink in hand, with nothing more pressing on your schedule than deciding what to have for dinner.
How to apply for a New Zealand tourist visa? In this article, we’ll be enumerating all the requirements we submitted and the steps we’ve taken in order to be granted a short-stay New Zealand visa for tourism or visiting family or friends. Please note that this is simply a compilation of everything I know based on my own and my friends’ personal experience. This should NOT be taken as official Immigration advice. If you’re after a Resident visa, student visa, or work visa, know this article will not be able to help you as it is focused only on Visitor Visa.
New Year, new adventure! It does feel like a new start because last year, we have closed our country count at 60. And what better way to kick off a new era than by exploring the breathtaking landscapes of New Zealand! Yes, New Zealand is our Country #61!
Whether you’re dreaming of hiking through Milford Sound, saying hello to the glowworms of Rotorua, or finally living out your Lord of the Rings fantasy, there’s one thing you’ll need before booking that flight: a New Zealand visa.
The good news? The entire application process can be done online! No need for embassy visits or long queues: just a few clicks, some documents, and you’re on your way to Middle Earth. In this guide, we’ll walk you through the step-by-step process of applying for a New Zealand visa for Filipinos, including requirements, fees, and some tips to boost your chances of approval. Let’s get started!
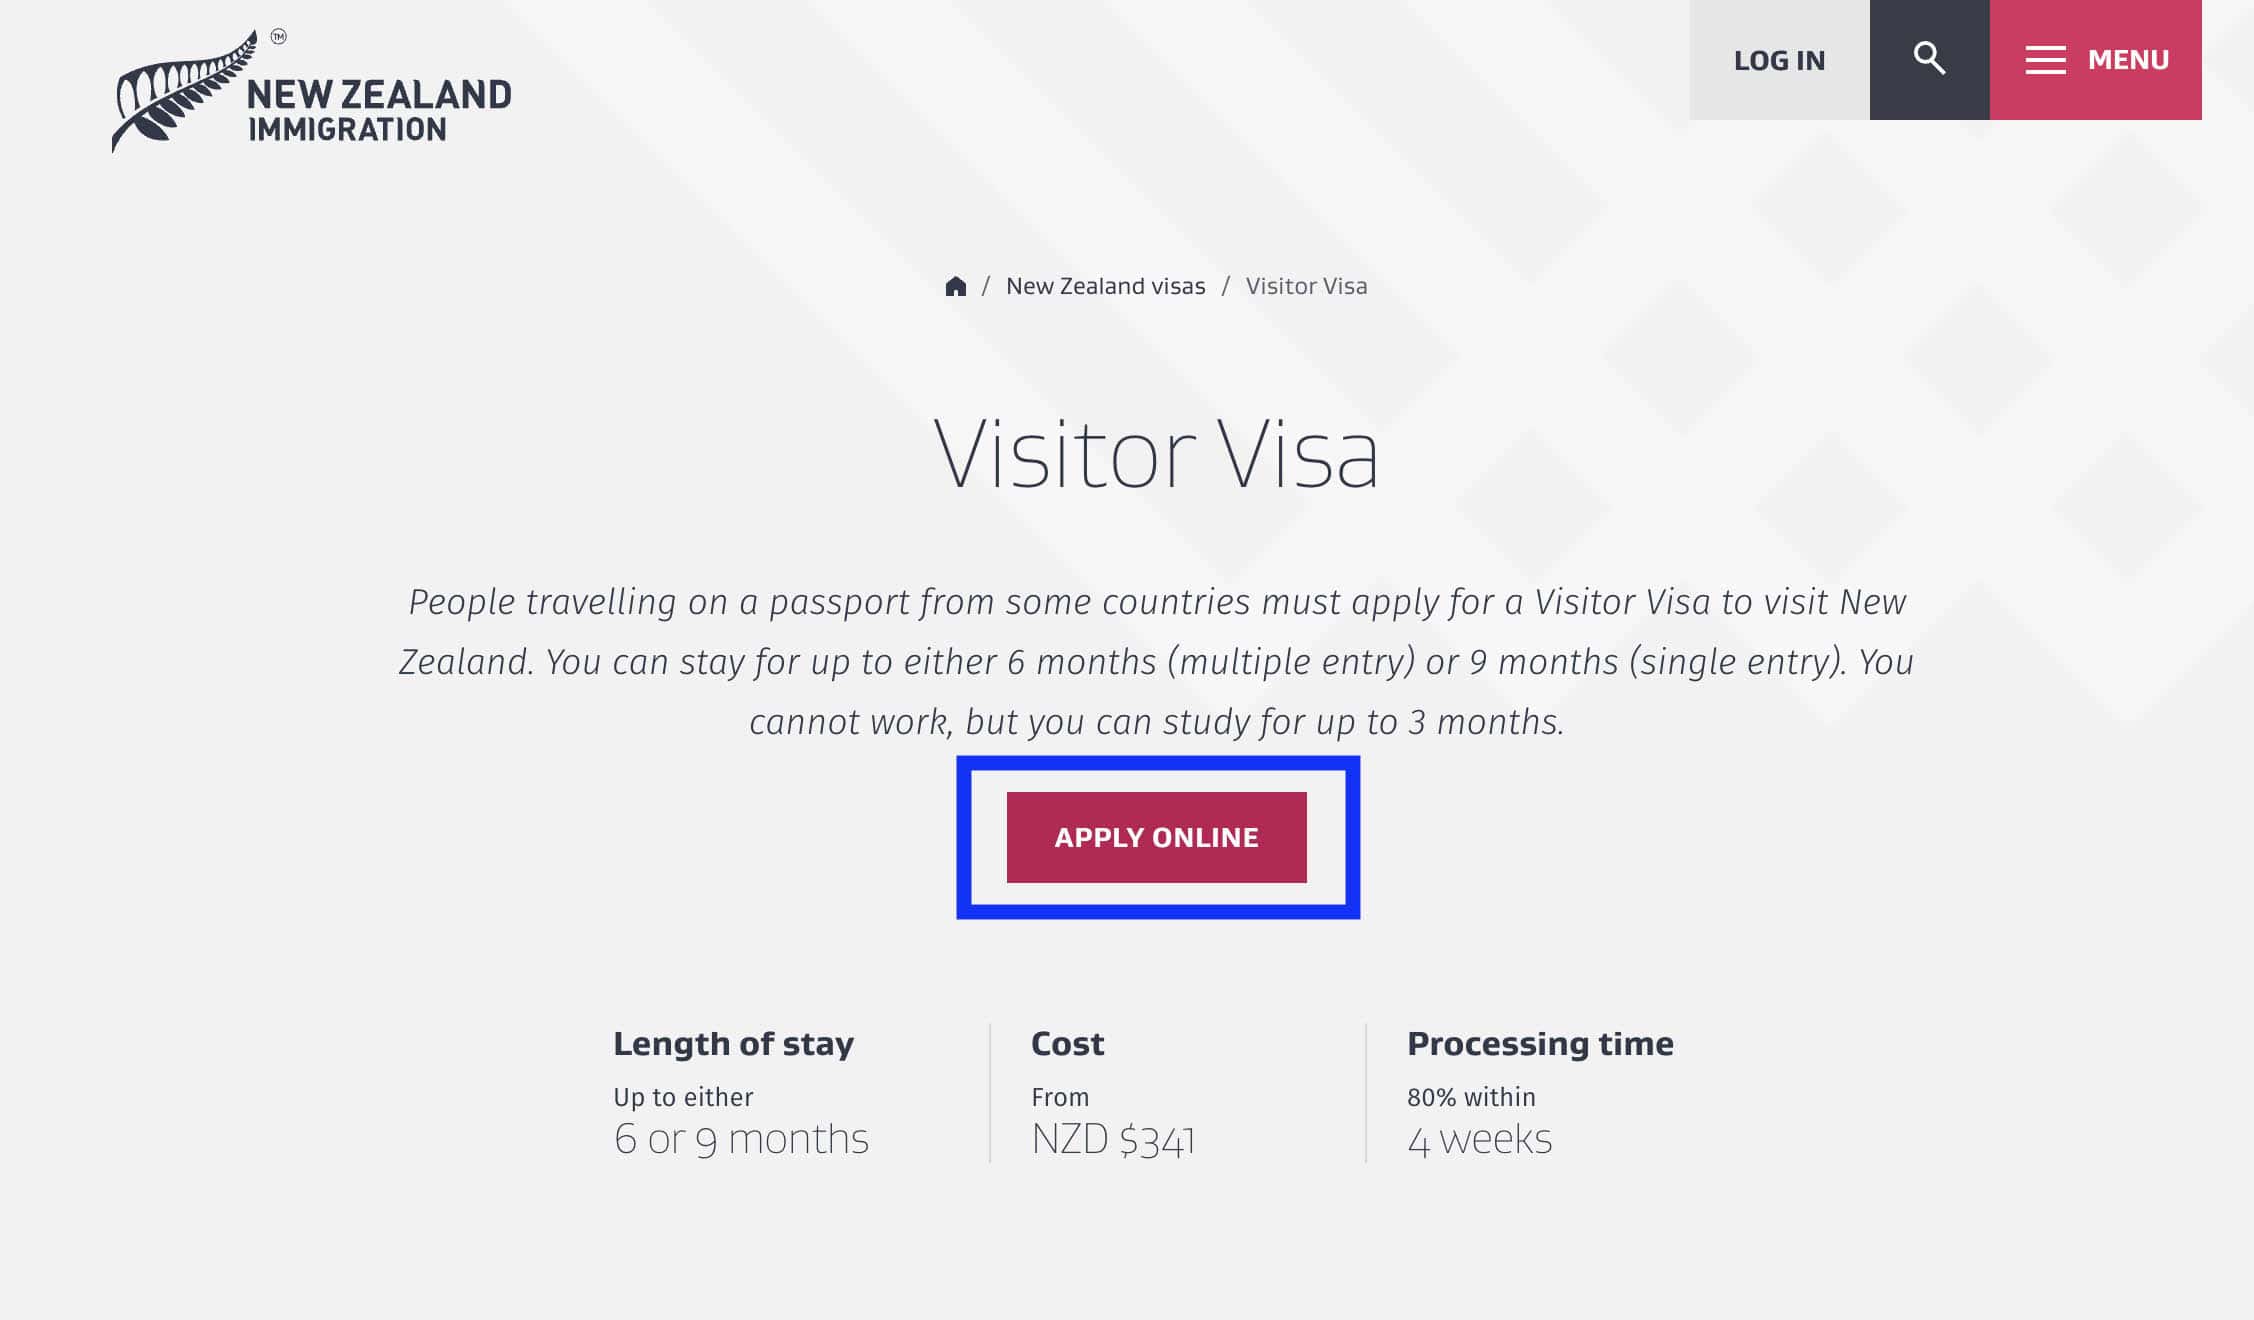
New Zealand offers plenty of visit visa options, with varying lengths of stay allowed and documents required. If your purpose of visit is tourism and you enter it on the official Immigration website, you’ll mainly be presented with three types:
New Zealand Visitor Visa Types
New Zealand Electronic Travel Authority (NZeTA), the e-visa version, but unfortunately, most Filipinos are not eligible for this for now unless they’re arriving by cruise ship. You may check eligibility criteria here.
Visitor Visa, which will allow you to visit on a holiday or for tourism, stay with family and friends, play amateur sport, or get married in New Zealand.
Group Visitor Visa, similar to the regular Visitor visa but a more convenient option for groups traveling together with the same purpose and travel arrangements (same flights, same accommodations).
In this article, we’ll be focusing on the Visitor Visa only because that’s what I applied for.
2. Complete the requirements.
While the entire application can be done online, before you start the process, you must first gather all the requirements. But take note of the following:
Scan all these documents and save them as a PDF file, except the photo which must be JPEG.
You can only upload one file per item. If your document has multiple individual pages, combine them all in one file. For example, if your bank statement has one page per month, make sure to merge all these pages to create just one file.
Submit as many document types as you can for better chances of approval. Only the first three items — passport, photo, and itinerary — are tagged as “required” on the website. The other items on this list are marked “Optional”. Technically, you can submit your application with just the passport, photo, and itinerary. But of course, we highly urge you to also submit the other documents, too, because it is not realistic to expect being granted a visa with only those three.
Anyway, below is the list of the documents to submit for your New Zealand visa application.
a. Passport
Must be valid. Make sure you still have at least 6 months of validity so you won’t run into PH Immigration problems later.
Text must be readable.
b. Photo
Passport-size. Dimensions should NOT be smaller than 900 x 1200 pixels, but not larger than 2250 x 3000 pixels.
Soft copy (JPEG). File size should be between 500 KB and 3 MB.
Non-white background. Gray, ideally.
You can take the photo yourself as long as you follow the specifications listed by the government. You can find the full photo guidelines here.
But I suggest that you just go to a photo studio and let the professionals do it.
c. Evidence of Purpose of Visit
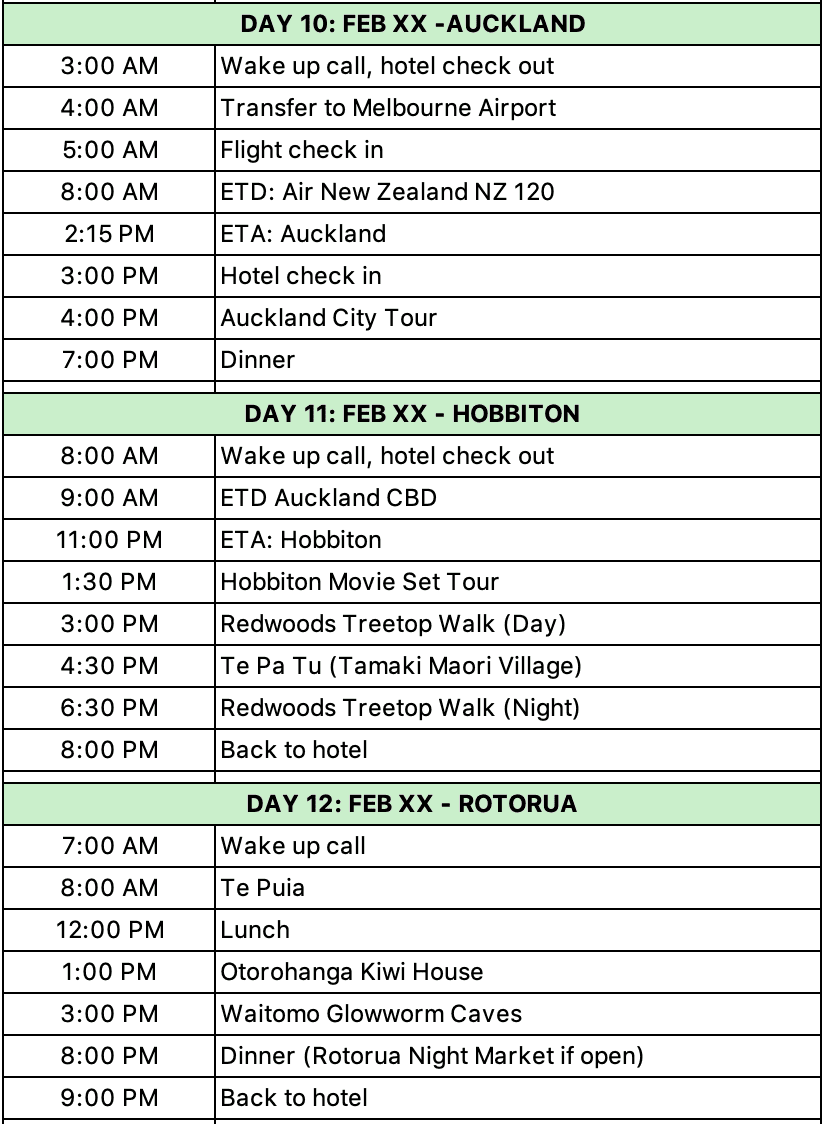
This can be an itinerary detailing your day-by-day stay in New Zealand.
This is the format I submitted:
d. Evidence of Genuine Intent
With this, you must prove that the purpose of travel that you declared is true, and that you will be coming back home after your trip. You can submit any or all of the following:
Proof of leave of absence from work, showing that you have a job to return to after the trip. I submitted a Certificate of Employment that also indicates that my leave of absence has been filed and approved.
Passport stamps and visas, proving you have visited other countries before.
Proof of accommodations, which can be a hotel booking for tourists. This is optional and you may choose to skip this. But if you want to submit to increase your odds, book a hotel that has a FREE CANCELLATION policy so you can easily refund should you be refused a visa. Search for free-cancellation hotels here! Make sure the room you’re booking is marked “Free cancellation.” Use promo code THEPOORTRAVELERKLOOK for extra discount!
Flight booking, to show you plan to exit New Zealand. Again, this is optional only. If you already have this, then go ahead and submit. But if you don’t have it yet, you may opt to not submit. But if you really want to submit this for better chances, don’t submit an actual ticket. Submit a flight reservation instead, which can be cancelled in case you get denied a visa. You can get this from travel agencies. We usually get ours from Gazelle Travel & Tours, a licensed and accredited travel agency here in the Philippines. You can order flight reservations online here!
Australian visa, only if applicable. If you don’t have this, you can ignore this. If you do, submit it. I think this could massively help your application. In our group, those who submitted an Australia visa got approved a lot faster than those who didn’t.
e. Evidence of Funds
This can be bank statements and/or bank certificates.
I submitted two bank accounts: payroll account and savings account. I created one PDF file per bank account. One file, I uploaded under Evidence of Funds, while the other under Other Evidence (which I will discuss below).
f. Evidence you are visiting family or friends
Only if applicable. If you have family or friends in New Zealand that you plan to visit, you must provide your contact’s:
names
addresses
contact numbers
their New Zealand visa or citizenship status
I didn’t provide any of these because I was traveling for tourism.
If you’re visiting a partner or family member working in New Zealand but they cannot support a visa for you, you may also be asked to submit a cover letter stating the details of your trip and the purpose of your visit.
g. Credit card or debit card
You will be paying the NZD 100 visa fee online, so make sure you have a valid credit card of debit card.
Other Optional Documents
You’ll also encounter a section for “Other Evidence.” This refers to other documents that can help prove your character and genuine intent. It can be any of the following:
Cover letter
ITR (tax document)
Certificate of Employment
Additional bank accounts (other financial information)
Birth certificate
Yes, I also uploaded a cover letter because remember, everything’s online. Having a cover letter allowed me to properly explain my purpose of travel and clarify any aspect that needs clarification. You can use the cover letter to explain if you’re just new at your current job or why your bank account is newly opened, or whatever.
I also uploaded a birth certificate only because I had a digital copy of it. If you don’t have one, it’s OK. I don’t think it’s going to make or break your application. But if you have it, feel free to submit it.
3. Create a RealMe Account.
RealMe is the official account management portal of the New Zealand Immigration department. To be able to apply for a New Zealand visa, you must first register for a RealMe account. Here’s how:
Click on the LOG IN button. It will then take you to the REALME page.
Click on CREATE A REALME LOG IN button. If you’re viewing the site on a mobile phone, you first need to tick off “I need to create a log in” in order for the log-in button to appear.
Enter a valid email address. Then click SEND CODE. Check your inbox and enter the confirmation code in the designated field. Click CONFIRM CODE.
Set a username and password. Click CONTINUE.
Enter your mobile number. You’ll also be asked a choose security questions and provide answers. Click the CONTINUE button.
That’s it!
You’ll be redirected to your RealMe dashboard. You may be asked to log in again.
4. Start your online application.
To do this:
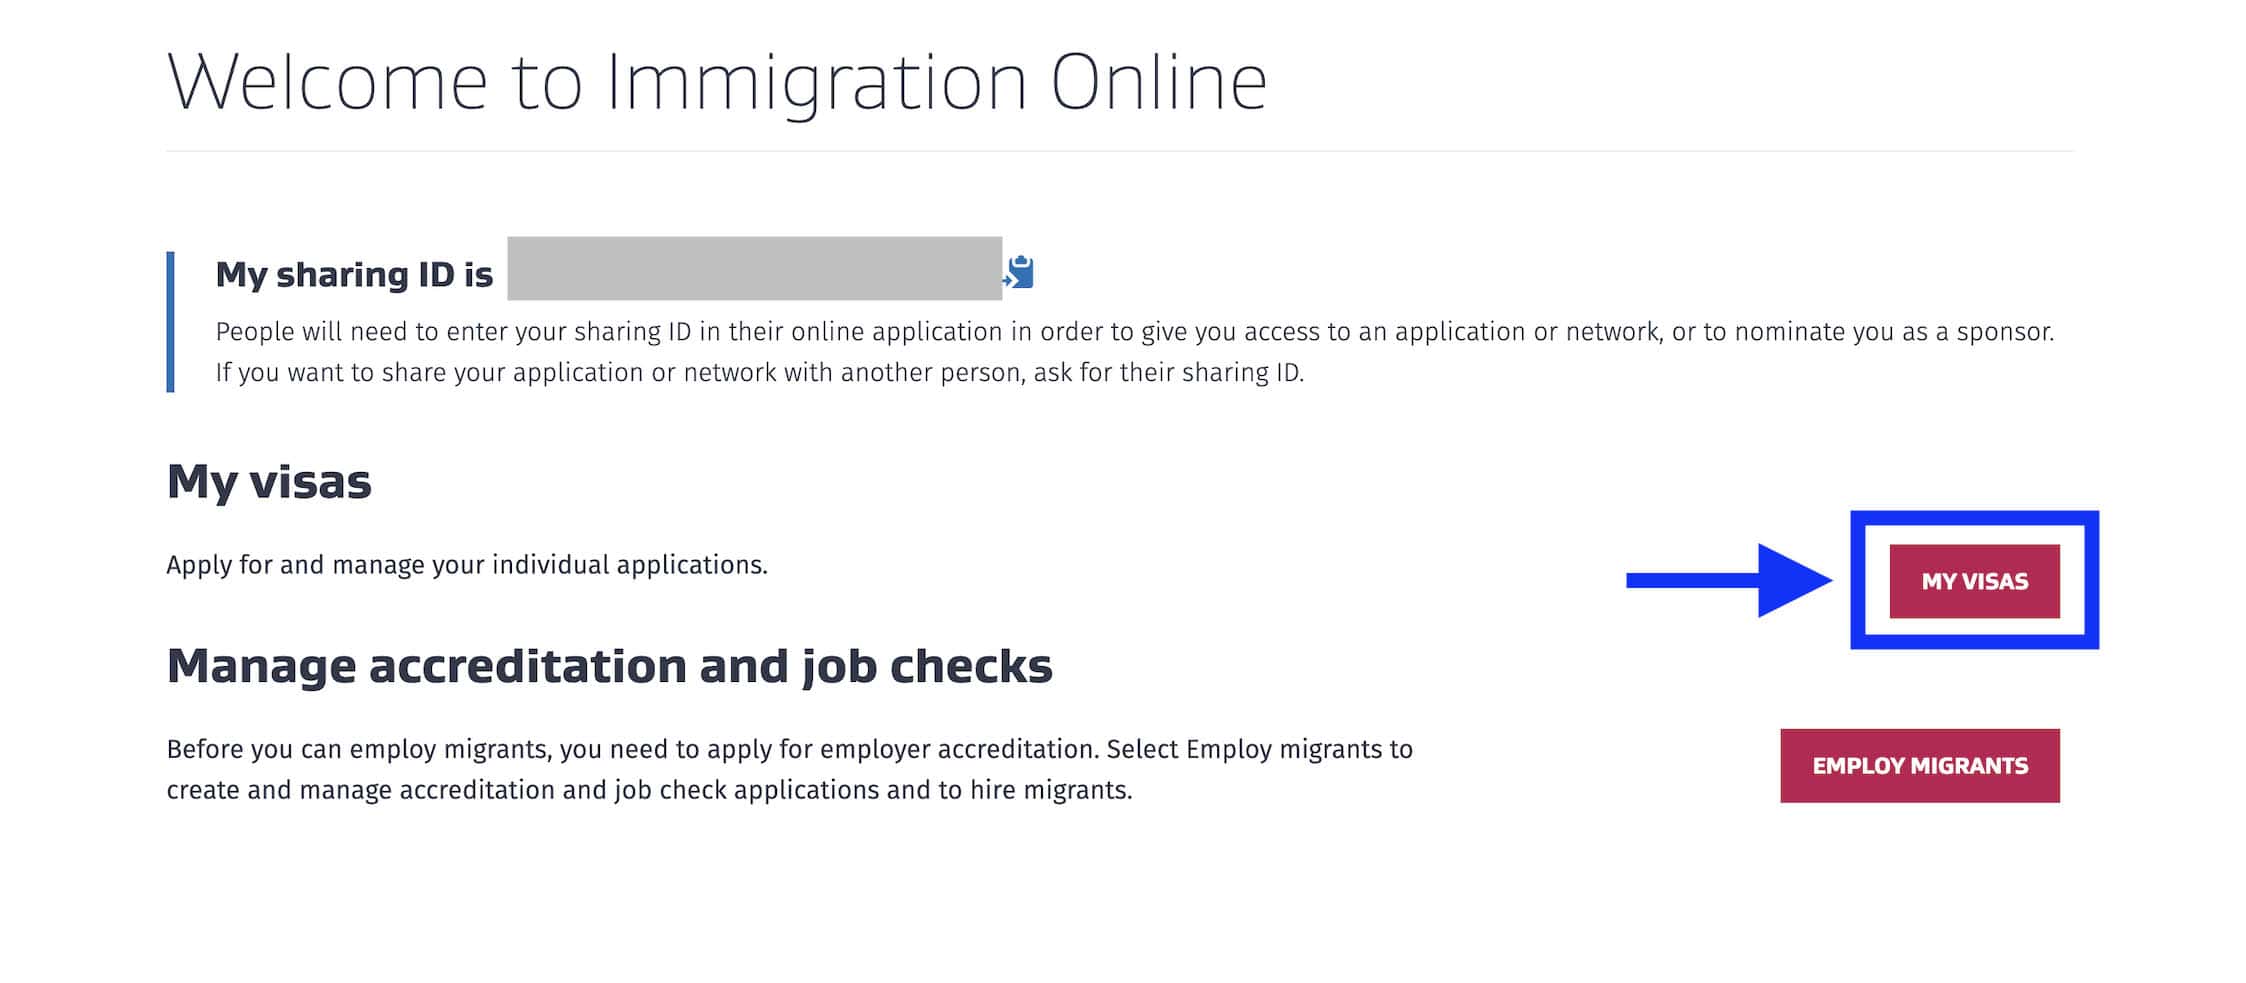
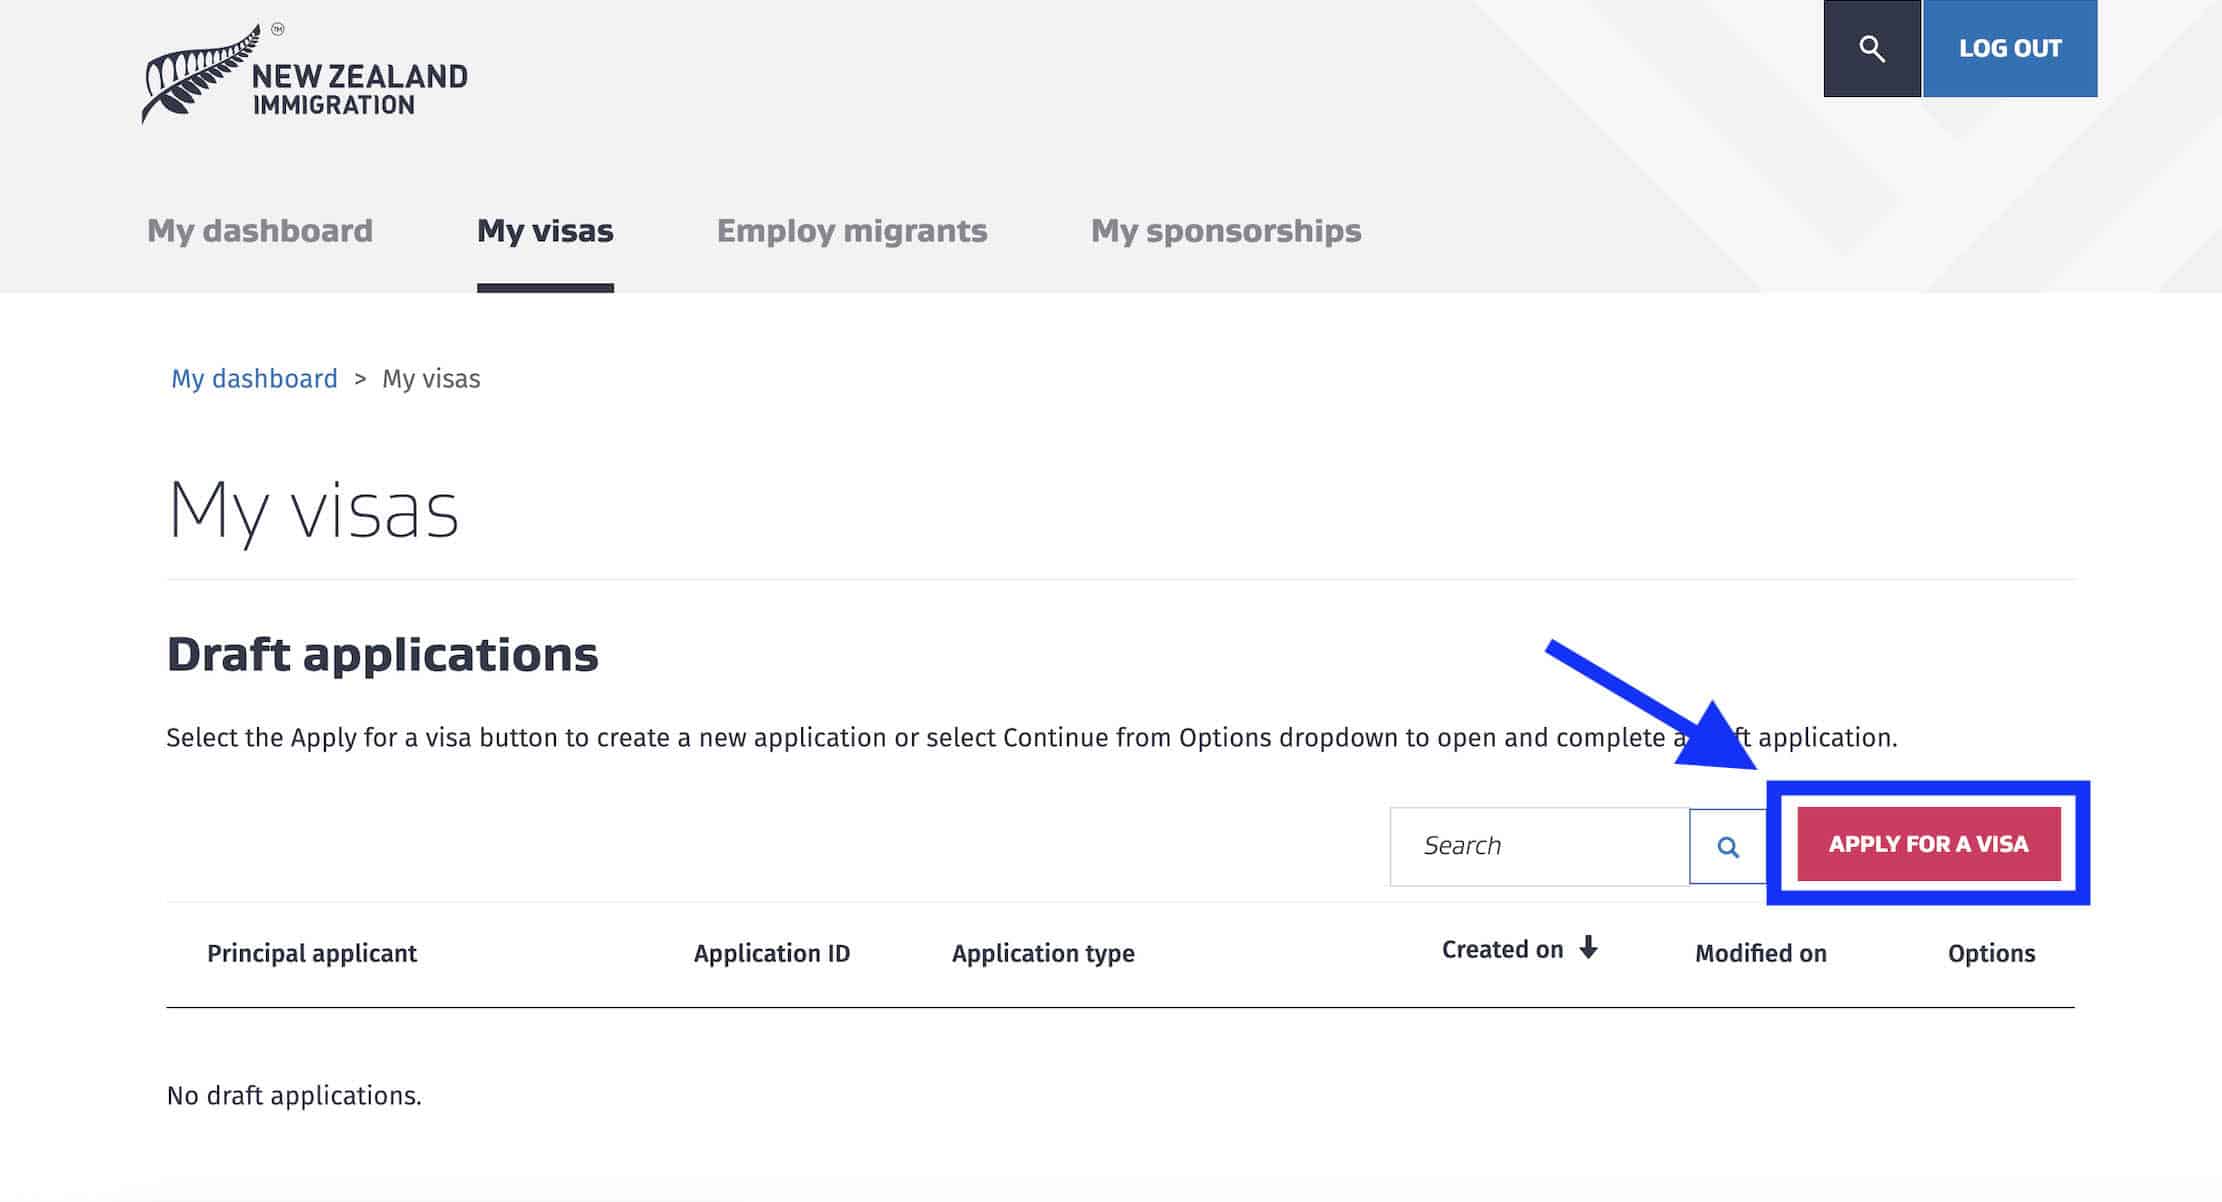
Click on MY VISAS. On the next page, you’ll find a section called DRAFT APPLICATIONS.
Click on APPLY FOR A VISA. On the next page, scroll down.
Under YOUR SITUATION, select TEMPORARY VISA. Since this guide is for those traveling for tourism only, make sure you select answers pertaining to TOURIST or HOLIDAY purpose. Towards the bottom of the page, you should see GENERAL VISITOR VISA.
Click on START MY APPLICATION.
That’s it. Now, it’s time to fill out the application form.
5. Fill out the application form.
If you’re coming from the application dashboard and you’re applying for yourself, look for the row labeled PRINCIPAL APPLICANT under the APPLICANTS section. Then click CONTINUE on the same row. It will then take you to the application form.
The good news is: this form is not too complicated. There are only a few questions. Unlike the US Visa and Australian visa application form which have around 20 pages, the New Zealand visa application form has only seven (7) pages, which are about the following:
Page 1: Identity Details. You’ll be asked to enter your name, passport details, immigration history, photo with gray background, email address, contact numbers, and physical address.
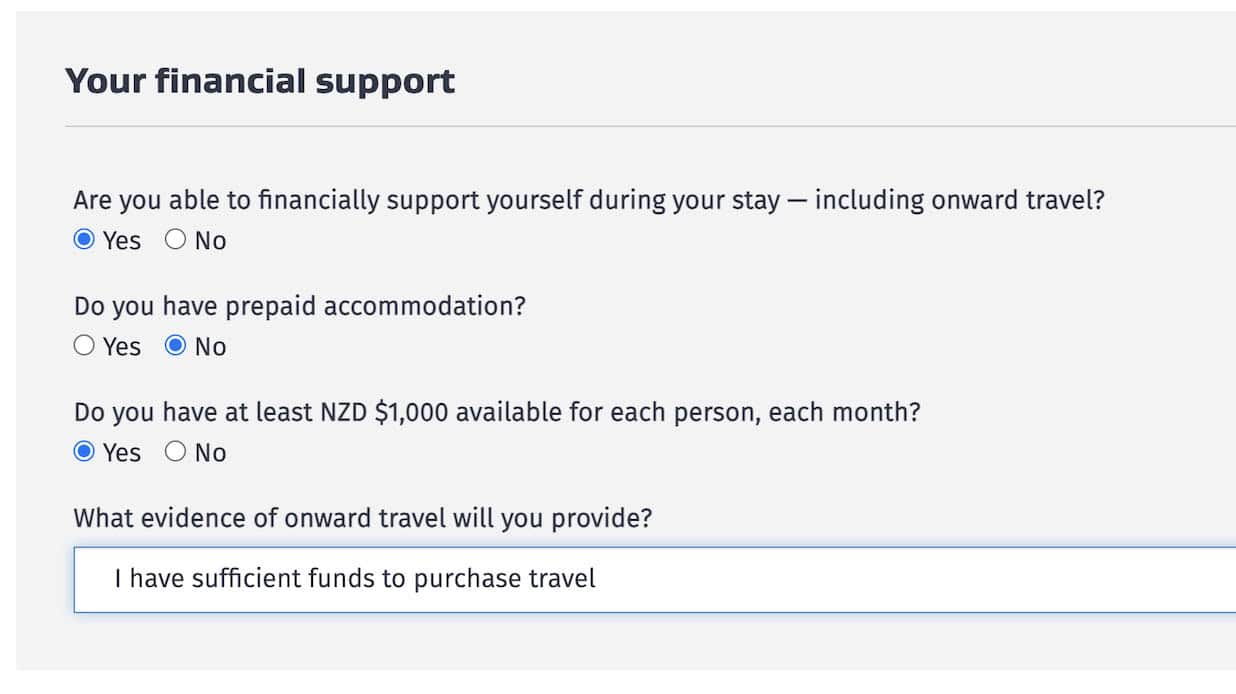
Page 2: Purpose of Visit. You’ll be asked to declare that you can afford to pay for this trip. It will also ask you if you possess NZD 1000 per person per month, if you have already booked your accommodations, and if there is anyone below 16 in this application.
Page 3: Character. Questions are about whether you have been convicted for a crime, deported from another country, or refused a visa before. You must answer truthfully.
Page 4: Health. In particular, you’ll be asked whether you have tuberculosis, whether you’ll be needing medical care during your stay in New Zealand, and whether you have undergone a medical examination for this application. The last bit made me pause for a bit because it made me think a medical test was required. But don’t panic. I answered NO to this but I was not asked for medical test results.
Page 5: Employment History. Input your employer’s details including the name of the company and how long you have been employed. If you’re self-employed, enter your business information. The form only requires your CURRENT employment.
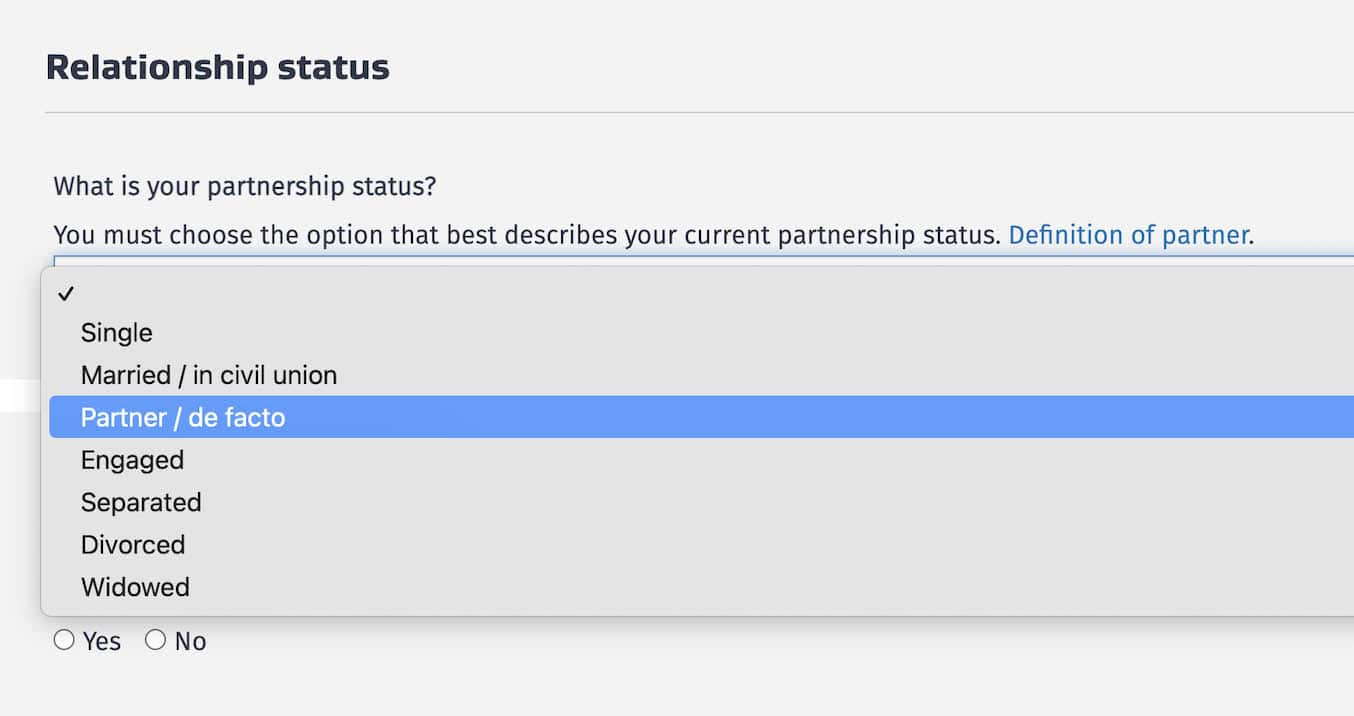
Page 6: Relationships. You’ll be asked for your relationship status: single, married, engaged, widowed, etc. You’ll spot a Partner/De Facto option, which refers to people in a relationship and live together in the same address for a considerable length of time. Straight and LGBTQIA+ relationships are covered here. You’ll also be asked if your partner is included in this visa application. If so, enter their details.
Page 7: Immigration Assistance. You need to declare whether you’re accomplishing the form on behalf of someone else or you have sought the assistance of an Immigration adviser. I answered NO to both questions.
That’s it!
💡 TIP! At any point, you can SAVE your progress. You don’t need to complete the form in one sitting. If there are details that you don’t have yet or are unsure of or you simply cannot finish it, you can click on SAVE & EXIT to save your progress and pick up where you left off another time.
But once you’re through, you’ll be led to the next section, which is….
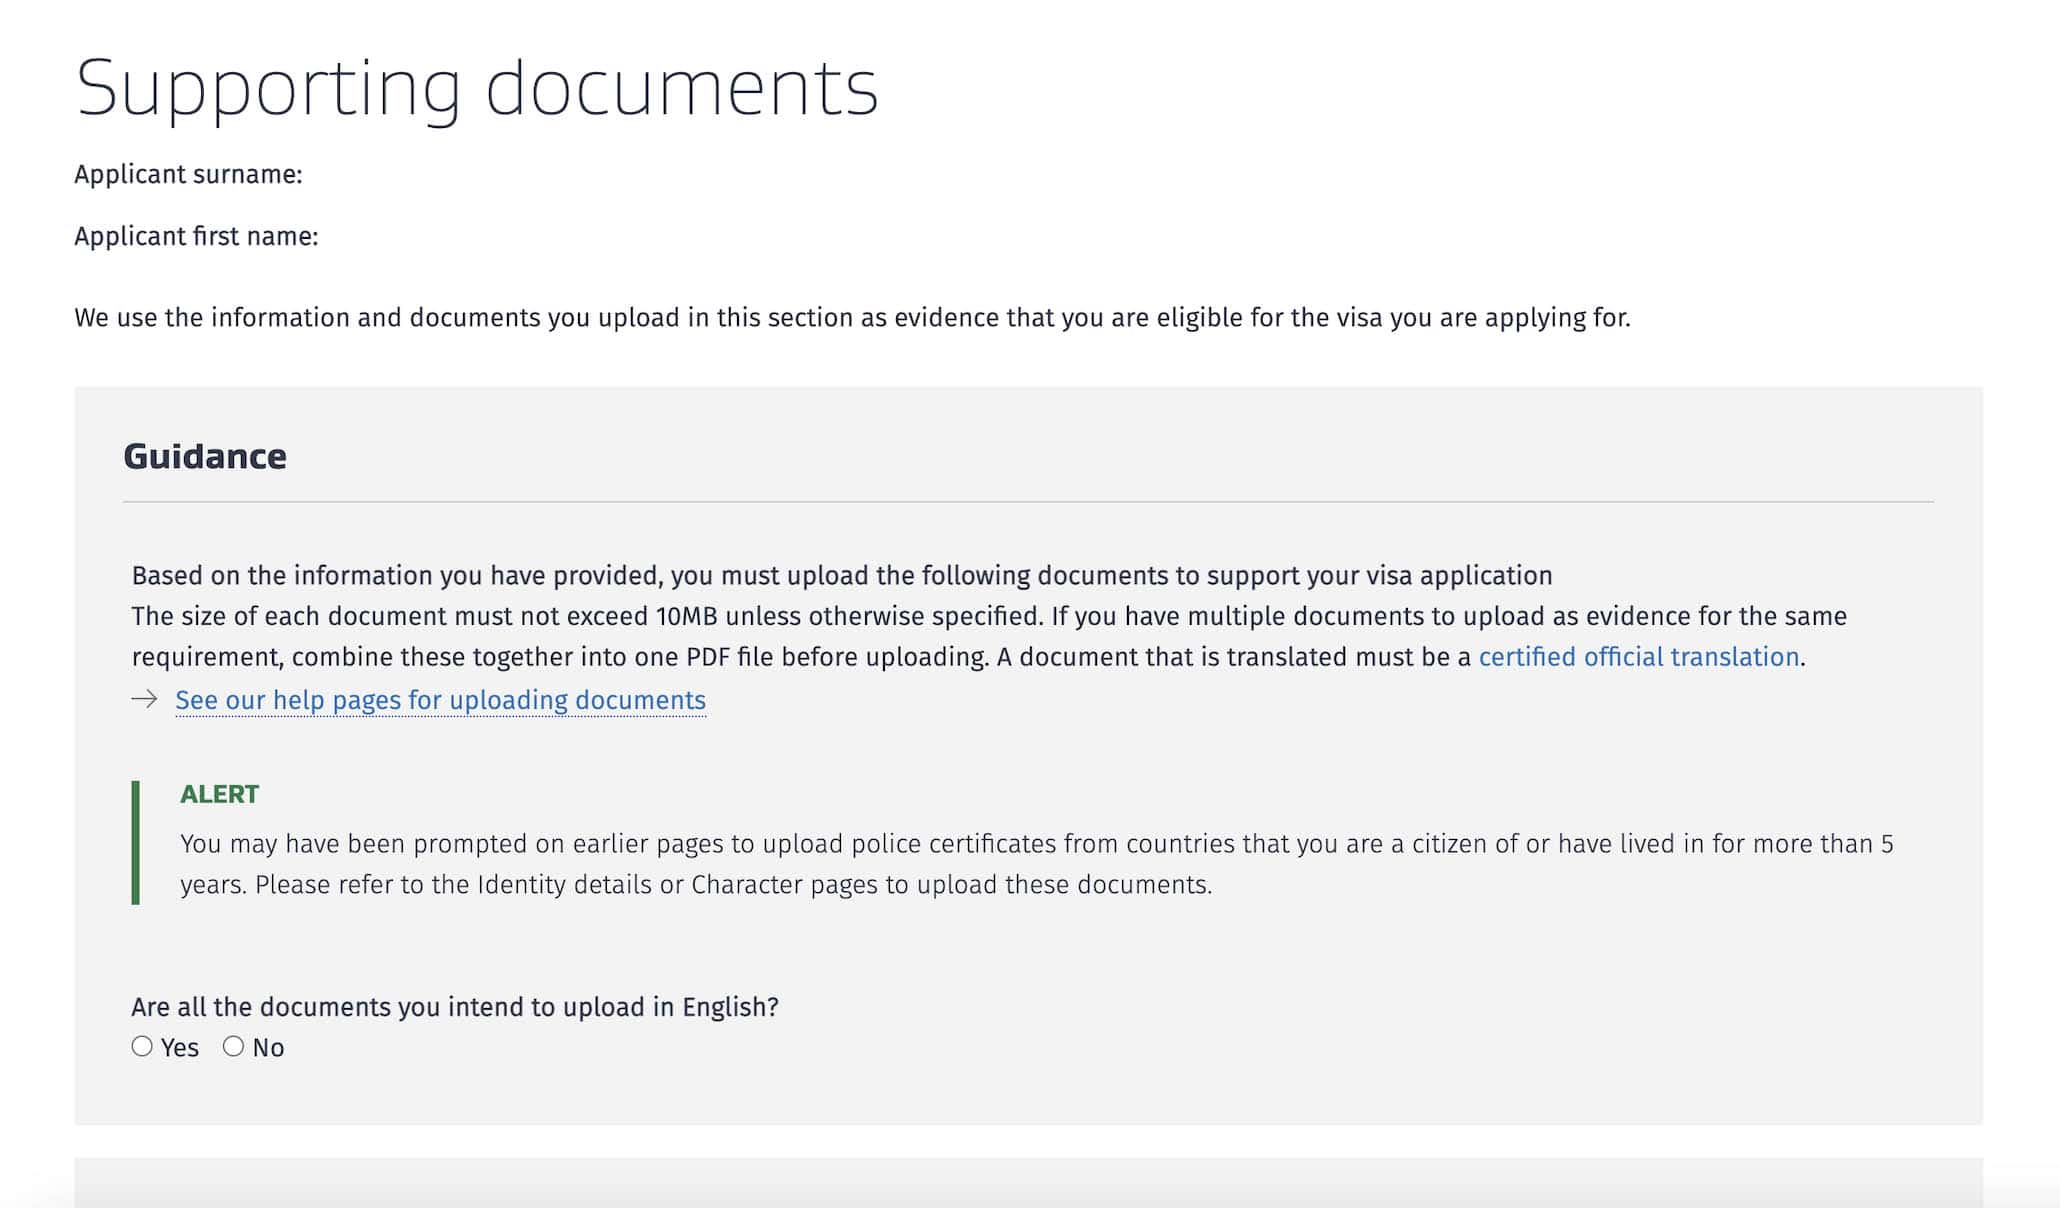
6. Upload supporting documents.
Before you could upload, you’ll be asked if all the documents you’re submitting are in English. If so, select YES. Having your documents in English will make things easier.
Then it’s time to upload your supporting documents. To do that, just click on BROWSE and select the file you intend to upload.
Identity evidence: a copy of your passport. You’ll also find this question: Are you living in a country that is not your country of citizenship? If you’re based in the Philippines, answer NO.
Purpose of visit evidence: detailed itinerary.
Evidence of genuine intent. proof from employer that your leave of absence is approved. There is also a section about Australian visa. An AU visa is NOT required, but if you have one, upload it because it’ll help improve your chances. Otherwise, you can just skip this part. You’ll also be encouraged to upload other documents that can serve as proof of genuine intent. I attached a Certificate of Employment, flight reservation, and hotel booking.
Evidence of funds. Under “Are you providing bank or financial statements…?”, answer YES, upload your bank documents, and enter the details of your bank account.
Other evidence. You can upload your BIR Income Tax Return (ITR) and additional bank accounts under OTHER FINANCIAL INFORMATION. You can also submit a cover letter.
💡 IMPORTANT NOTES!
Your documents must all be in PDF file format. Make sure they are all readable and NOT password-protected. Bank statements, especially those downloaded online, are usually encrypted. If that’s the case, ensure that you remove the password before uploading so the evaluator could access them.
If you upload the wrong file, you can delete and replace it with the right one. It’s not final until you submit the application.
If everything looks good and correct, check the tickboxes under DECLARATION and click SAVE & CONTINUE.
7. Submit and pay for your application.
After uploading, on the next page…
Review all the information you entered. If you spot a mistake, you can go back and correct it.
If everything is in order, click READY FOR SUBMISSION. You’ll be redirected back to the Application dashboard.
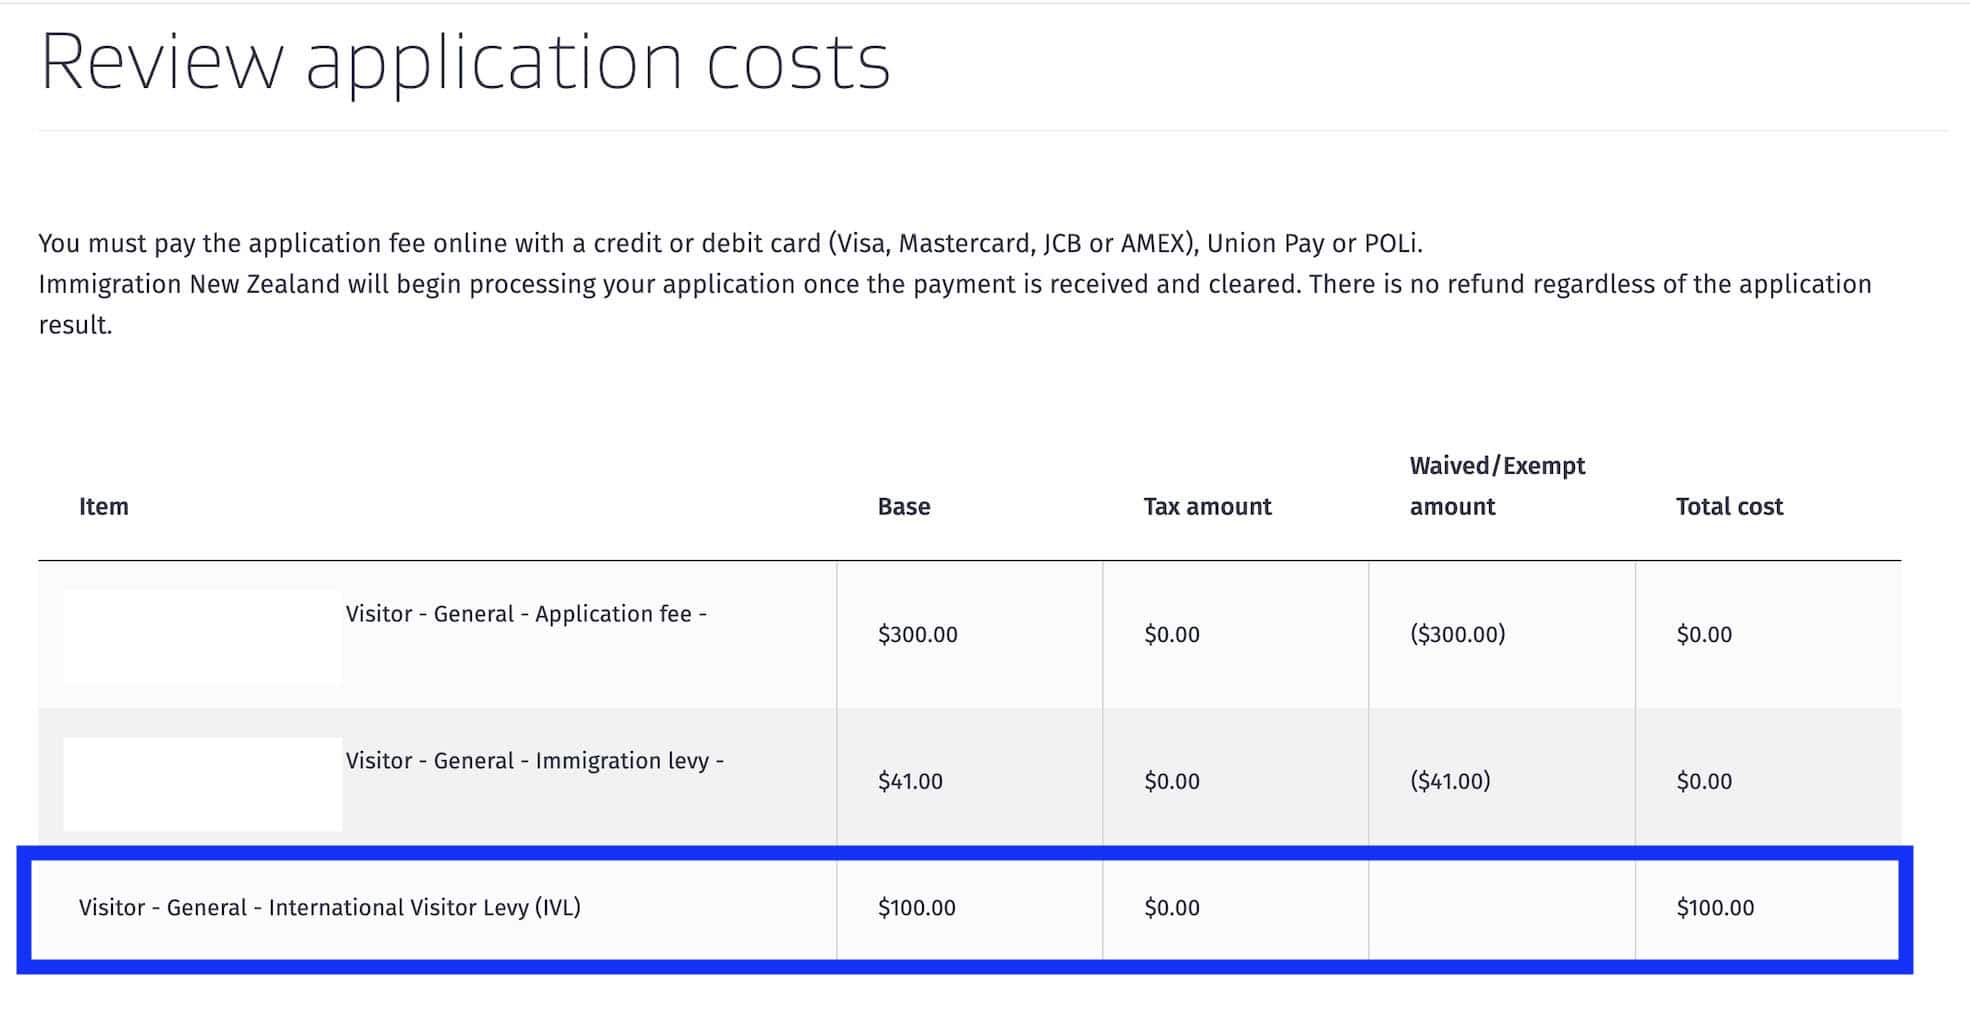
On the right side of the dashboard, find the button labeled PAY & SUBMIT APPLICATION. Hit it and review the application costs.
The total amount for a Visitor Visa is only NZD 100 (roughly PHP 3,300).
You can pay via credit card, debit card, or Union Pay. Once done, you should receive a message stating that the transaction is successful.
After this, there’s nothing else you can do but wait.
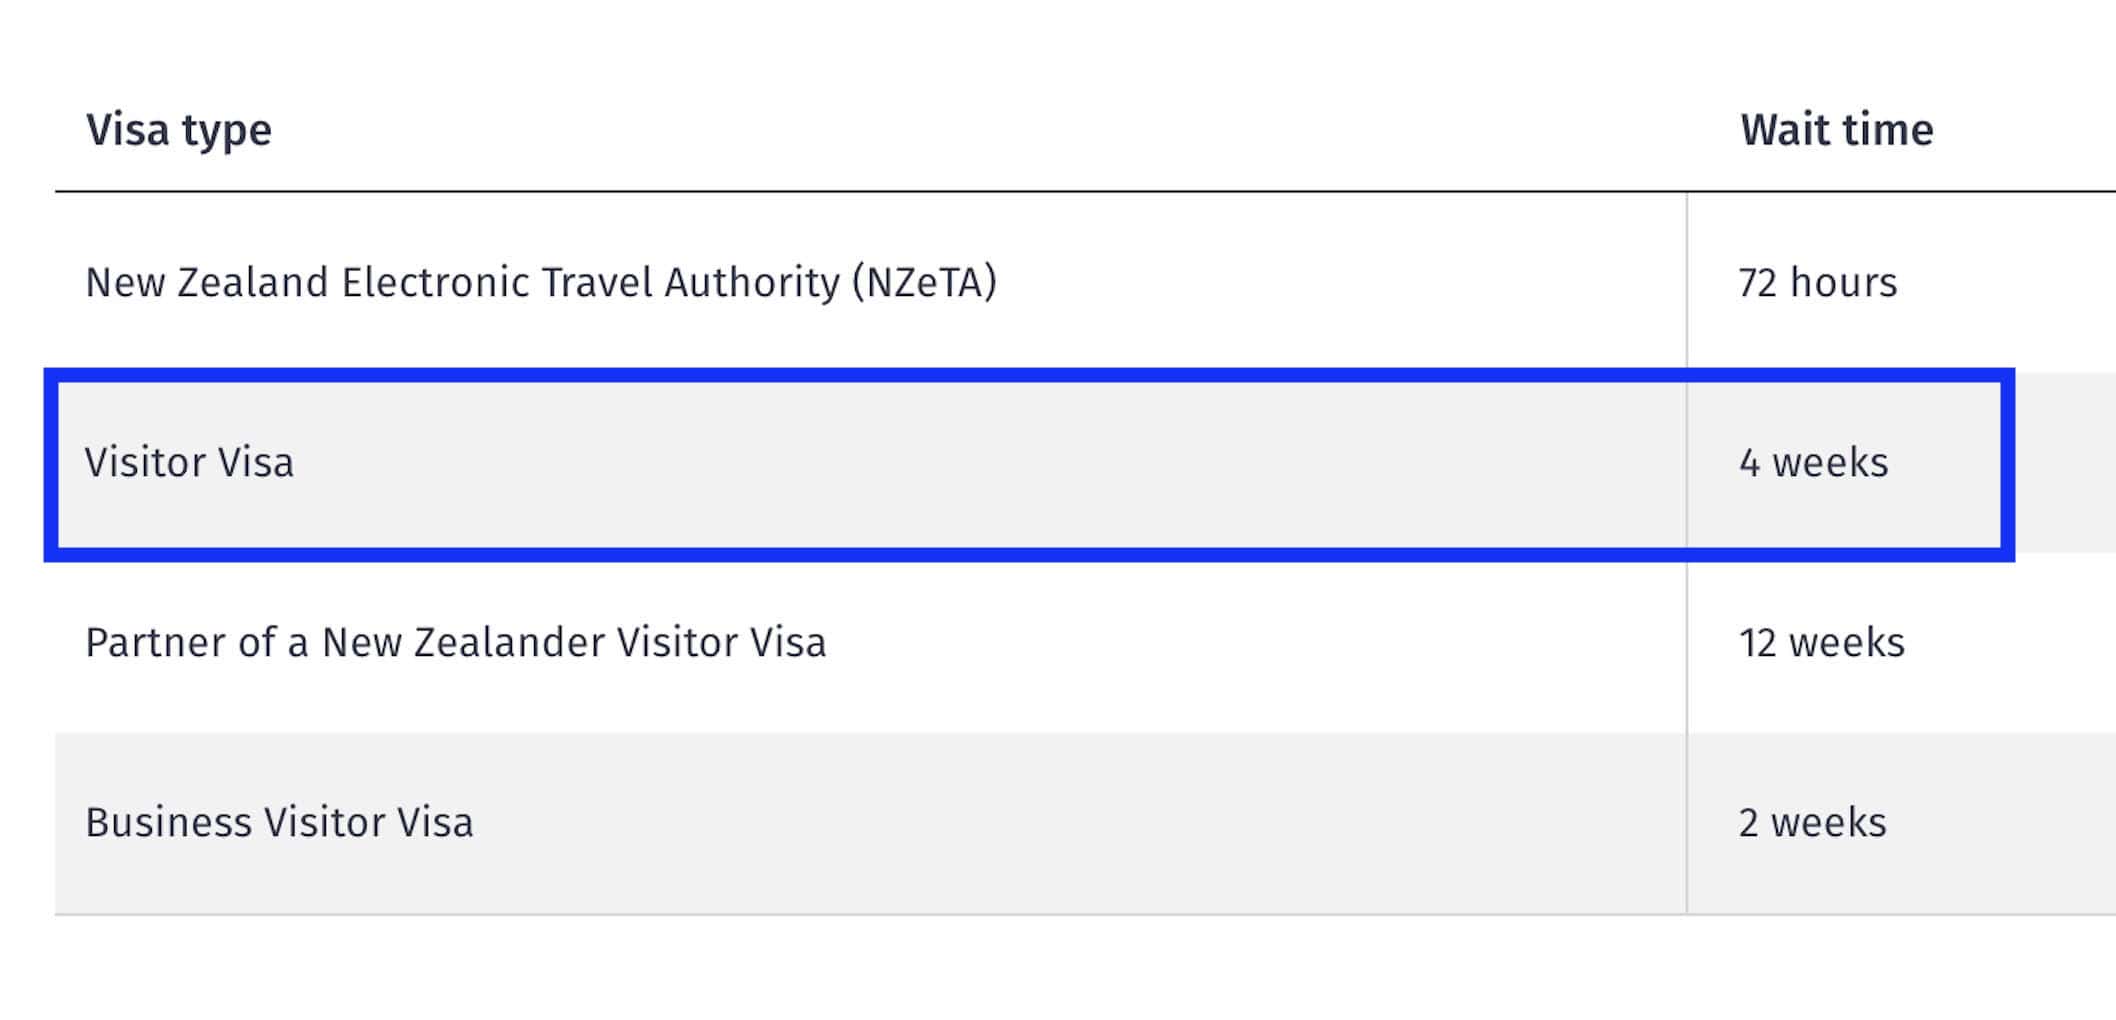
8. Wait for the result.
According to the New Zealand Immigration website, the usual wait time is 4 weeks.
But to be honest, I got my visa after only 2 days, while Vins got his after 6 days. Below are our timelines:
YOSH December 11 – I submitted my application December 13 – I received the visa (approved)
VINS December 21 – Vins submitted his application December 27 – Vins received the visa (approved)
Note that both Vins and I had valid Australian visas, too, and submitted them as supporting docs. One of our companions who didn’t have an AU visa got approved after exactly two (2) weeks or 14 days.
That said, you’re highly encouraged to apply early and have at least four weeks of allowance to be safe. We actually applied two months before our travel date.
FREQUENTLY ASKED QUESTIONS
What is the validity period of the visa?
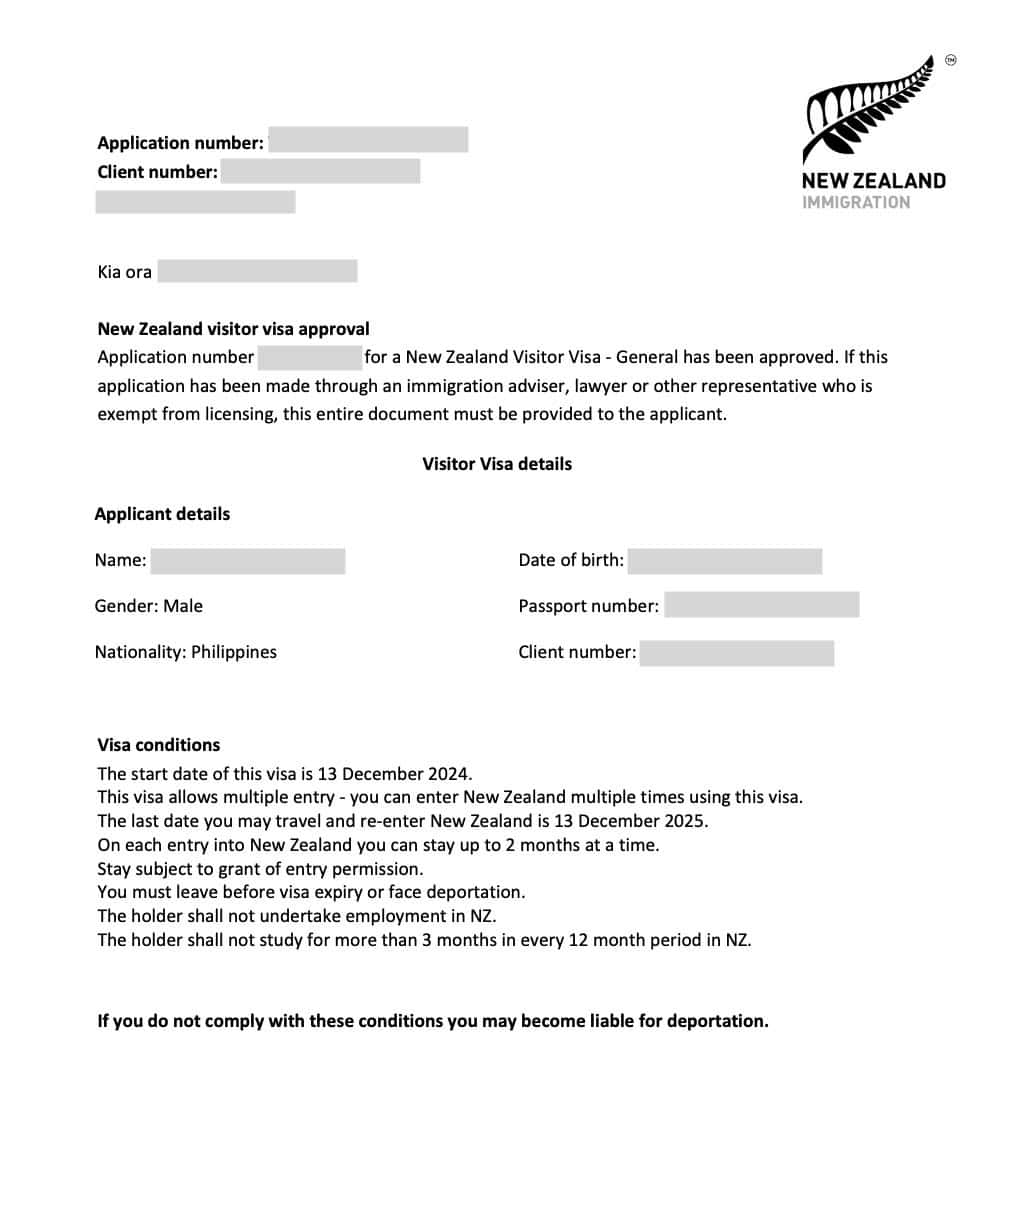
I was granted a multiple-entry visitor visa, valid for one (1) year, starting on the day the visa was issued.
How long can I stay in New Zealand?
Two months per trip, in our case.
How much money should you have to get approved?
No idea. At the very least, you should have NZD 1000 per month because that’s what’s indicated on the application form. But of course, you should have more.
At one point in the uploading process, you will be asked the following questions:
It’s important to remember, however, that it’s not just the funds that are being inspected. More importantly, you should be able to show that you have strong rootedness or ties to the Philippines and that you have no reason to overstay in New Zealand.
Is flight ticket required?
No, flight booking is optional. But if you already have one — say, you got it from a seat sale — go ahead and submit. If you don’t have one yet, you may opt to not submit.
But if you really want to submit this for better chances, don’t upload an actual ticket. Use a flight reservation instead. This is different from an actual flight booking because a flight reservation can be cancelled in case your application is rejected. You can get one from travel agencies.
We usually get our flight reservation from Gazelle Travel & Tours, a licensed and accredited travel agency here in the Philippines. Since we’re always asked about where we get ours, we decided to put up a page where you can easily order one.
No, this is optional and you may choose to skip this. But if you want to submit to increase your odds, book a hotel that has a FREE CANCELLATION policy so you can easily refund should you be refused a visa. Search for free-cancellation hotels here!
Here are some top-rated hotels available online. Make sure the room you’re booking is marked “Free cancellation.” Use promo code THEPOORTRAVELERKLOOK for extra discount!
NO, a cover letter is NOT required. But we recommend submitting one especially if your case is complicated or if you have to explain something.
Remember, there will be NO interview, so a cover letter is your only opportunity to explain away anything that could be confusing or dubious.
What are the common reasons for visa denial?
I don’t know what the most usual reasons for refusal are, but a friend of mine who was denied a visa showed me the refusal letter. In her case, the main reasons cited were “weak ties in home country” and “weak family ties.”
This is why you should submit as many relevant supporting documents that you could, especially those proving genuine intent and rootedness in the Philippines. You must be able to show that you have a good life here in the Philippines and you have a stable job or source of income here.
We think that in particular, the reason for her denial was that she has just transferred to a new company, so the employer details in the application form and the employer in her ITR didn’t match. And she didn’t submit a cover letter to explain this, either.
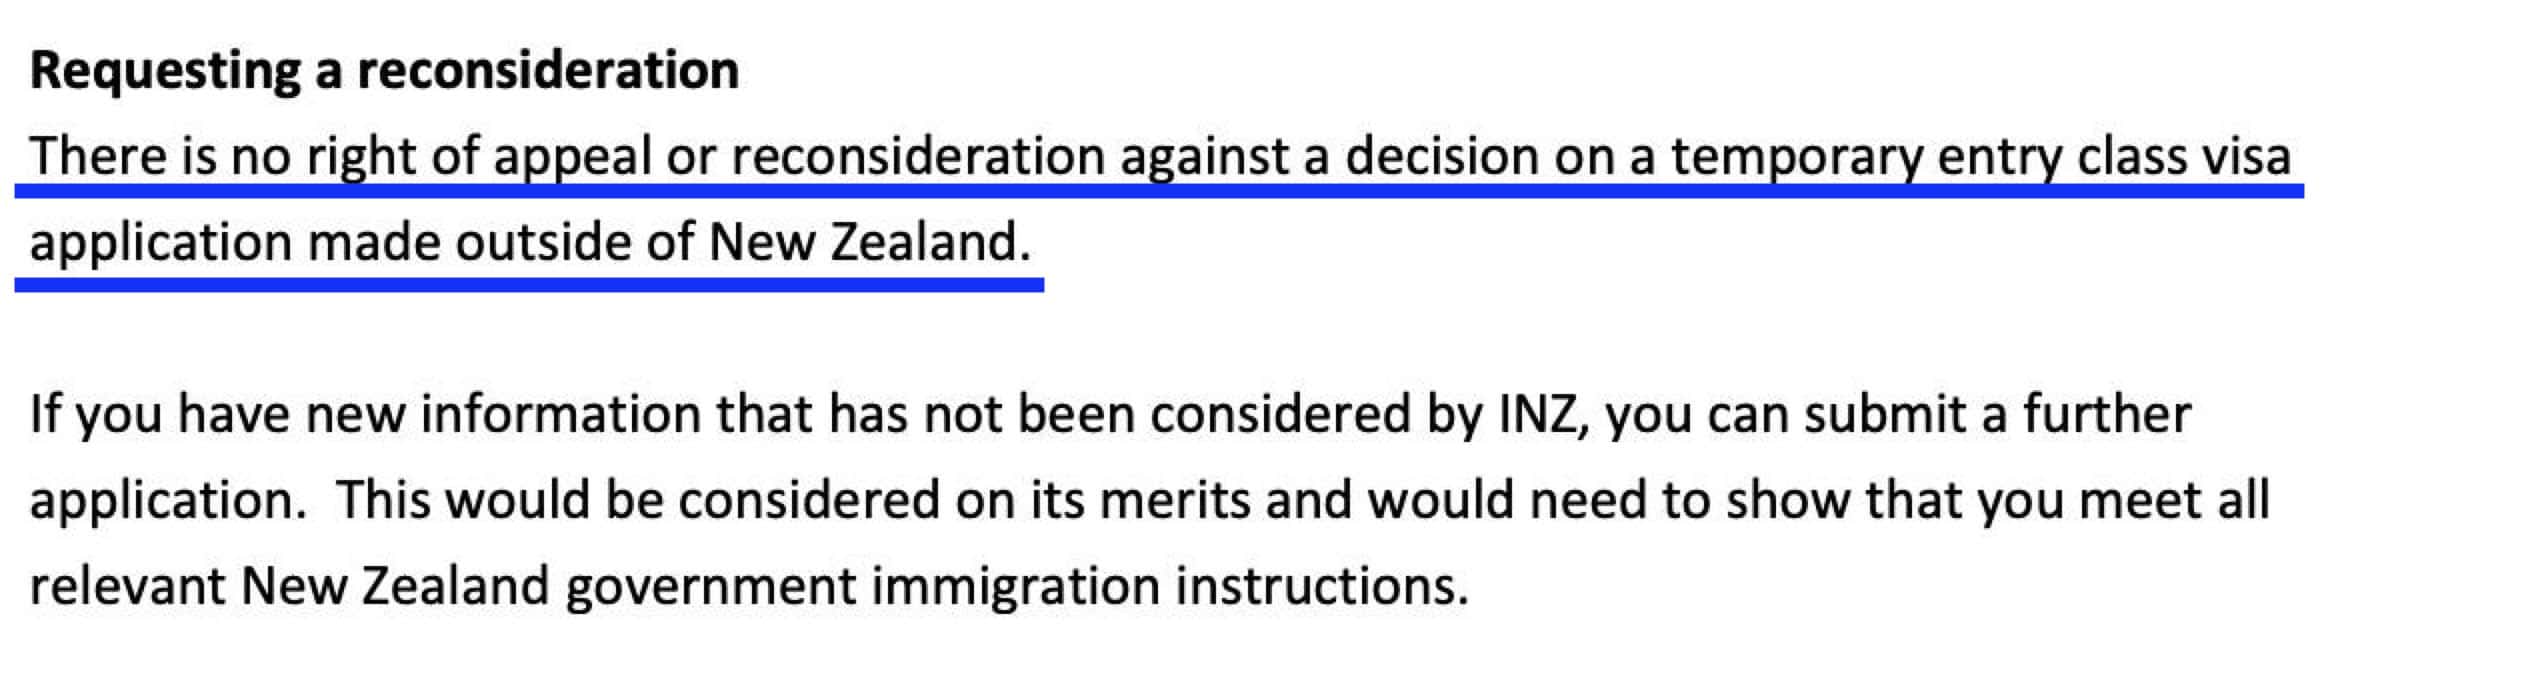
Can you appeal after being rejected a visa?
NO, if you applied outside New Zealand. I’m assuming most of you reading this article are not based in NZ.
Here’s an excerpt from the Refusal Letter that a friend received when she was denied a New Zealand visa.
What you can do is reapply. This means you’ll need to start a new application and pay another visa fee. But before you reapply, make sure you have new supporting documents to add that could address the reasons for refusal. If you’ll be submitting the exact same pile of documents, you might just be wasting another NZD 100.
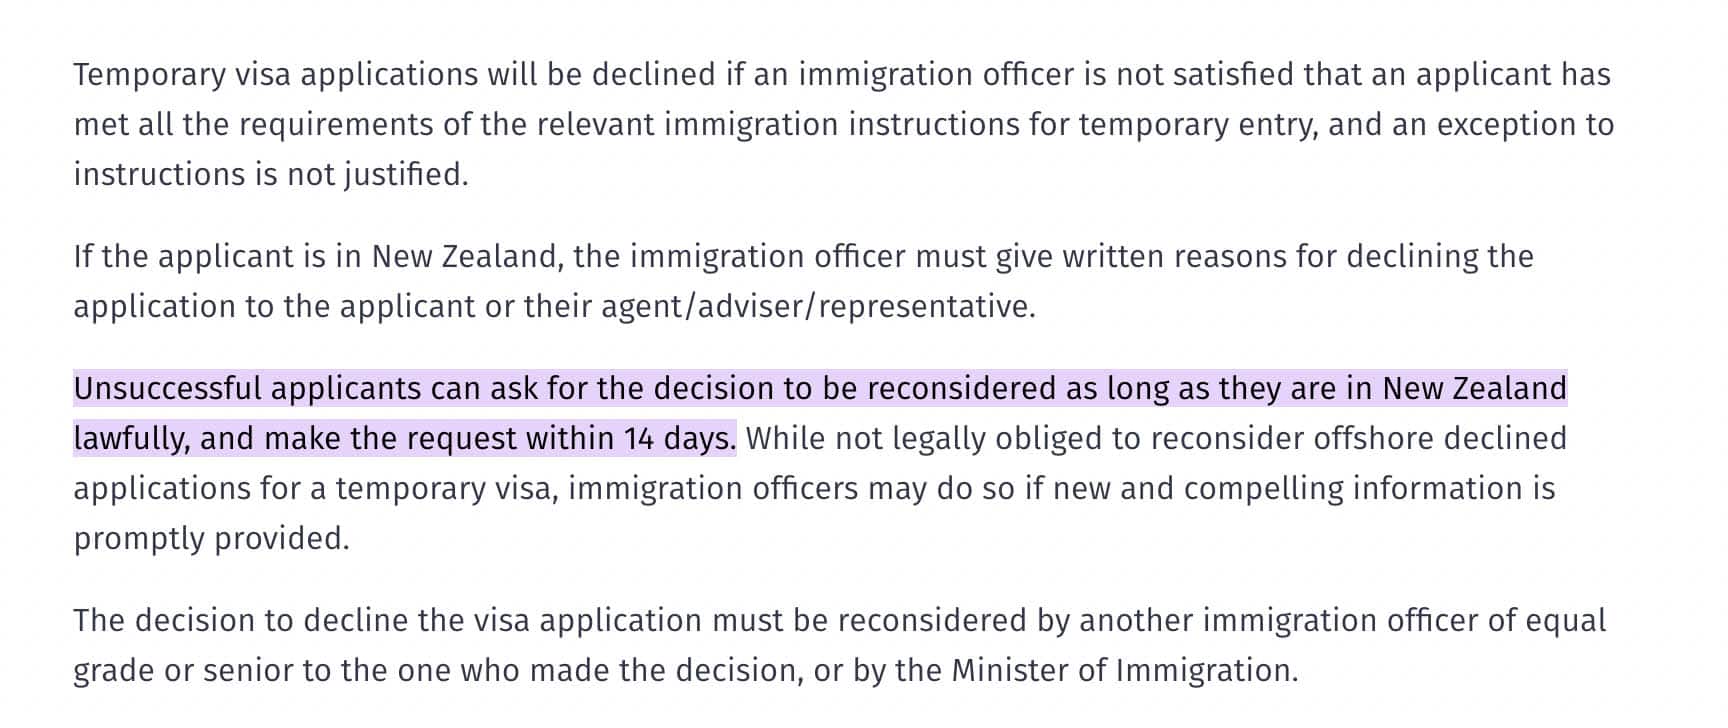
If you’re currently in New Zealand, YES, you can appeal as long as you make the request within 14 days.
This screenshot is from the official New Zealand Immigration website
What does a New Zealand visa look like?
Like this:
It’s a simple PDF file with an NZ Immigration logo and visa conditions. It’s NOT the sticker type that is affixed on the passport.
That’s all for now. Remember, plan smart, travel safe, and make every trip WORTH IT!
Being the second largest country in the world, Canada has a wide variety of attractions that draw tourists. It has natural wonders, rich cultural diversity, and vibrant cities. Its most notable natural wonder, the Niagara Falls, is just one of the several waterfalls you can see in the country. Countless national parks, some of which are recognized as a UNESCO World Heritage Site or UNESCO Biosphere Reserve, also await nature lovers. And in between its towering rockies and extensive coastlines, you can admire its pristine lakes, prairies, and wildlife.
Aside from its stunning geography, Canada has a rich culture and history too. You can get glimpses of that within its cities like Vancouver, Toronto, and Montreal. To top it all off, Canada is also among the places where you can see the elusive Northern Lights. Every corner of Canada really offers something for different types of travelers to enjoy. It’s no wonder why millions of tourists around the world goes to the Maple Leaf Country to explore.
But how do you get to Canada? This would depend on which country you’re from. Some countries enjoy visa-free travel, while others need to secure a visa. For some visa-required countries, their citizens may be eligible to apply for an electronic travel authorization or eTA instead of a visa. In this guide, we’ll explain who is eligible to apply for a Canada eTA and discuss the step-by-step application process on how you can get one.
An eTA or electronic travel authorization is a requirement for visa-exempt foreign nationals who are entering Canada by air. Travelers from select visa-required countries including the Philippines can also apply for an eTA provided that they meet the ALL of these requirements:
You’ve held a Canadian visitor visa (temporary resident visa) in the past 10 years OR you have a valid US non-immigrant visa on the day of your eTA application.
You’re going to Canada for a temporary stay (usually for 6 months or less).
You’re flying to or transiting through an airport in Canada using a valid passport from an eligible visa-required country.
Eligible Visa-Required Countries
As of 2025, here is a list of select visa-required countries that are eligible to apply for an eTA:
Antigua and Barbuda
Argentina
Brazil
Costa Rica
Mexico
Morocco
Panama
Philippines
St. Kitts and Nevis
St. Lucia
St. Vincent and the Grenadines
Seychelles
Thailand
Trinidad and Tobago
Uruguay
eTA-Eligible Visa-Exempt Countries
As of 2025, here is a list of visa-exempt countries that require an eTA if flying to Canada:
Andorra
Australia
Austria
Bahamas
Barbados
Belgium
British Citizen
British National (Overseas)
British Overseas Citizen (re-admissible to the United Kingdom)
British Overseas Territory Citizen with citizenship through birth, descent, naturalization or registration in one of the British overseas territories of: -Anguilla -Bermuda -British Virgin Islands -Cayman Islands -Falkland Islands (Malvinas) -Gibraltar -Montserrat -Pitcairn Island -Saint Helena -Turks and Caicos Islands
British Subject with a right of abode in the United Kingdom
Brunei Darussalam
Bulgaria
Chile
Croatia
Cyprus
Czech Republic
Denmark
Estonia
Finland
France
Germany
Greece
Hong Kong Special Administrative Region of the People’s Republic of China (must have a passport issued by Hong Kong SAR)
Hungary
Iceland
Ireland
Israel (must have a national Israeli passport)
Italy
Japan
Republic of Korea
Latvia
Liechtenstein
Lithuania
Luxembourg
Malta
Monaco
Netherlands
New Zealand
Norway
Papua New Guinea
Poland
Portugal
Romania (electronic passport holders only)
Samoa
San Marino
Singapore
Slovakia
Slovenia
Solomon Islands
Spain
Sweden
Switzerland
Taiwan (must have an ordinary passport issued by the Ministry of Foreign Affairs in Taiwan that includes the personal identification number)
United Arab Emirates
Vatican City State (must have a passport or travel document issued by the Vatican)
How to Apply for a Canada eTA
1. Prepare the necessary information.
Before you start filling out the application form, make sure you have the following with you:
Valid Passport
Valid Email Address
Debit or Credit Card
You will need these to fill out the form and pay for the eTA fee.
2. Find out if you’re eligible for a Canada eTA.
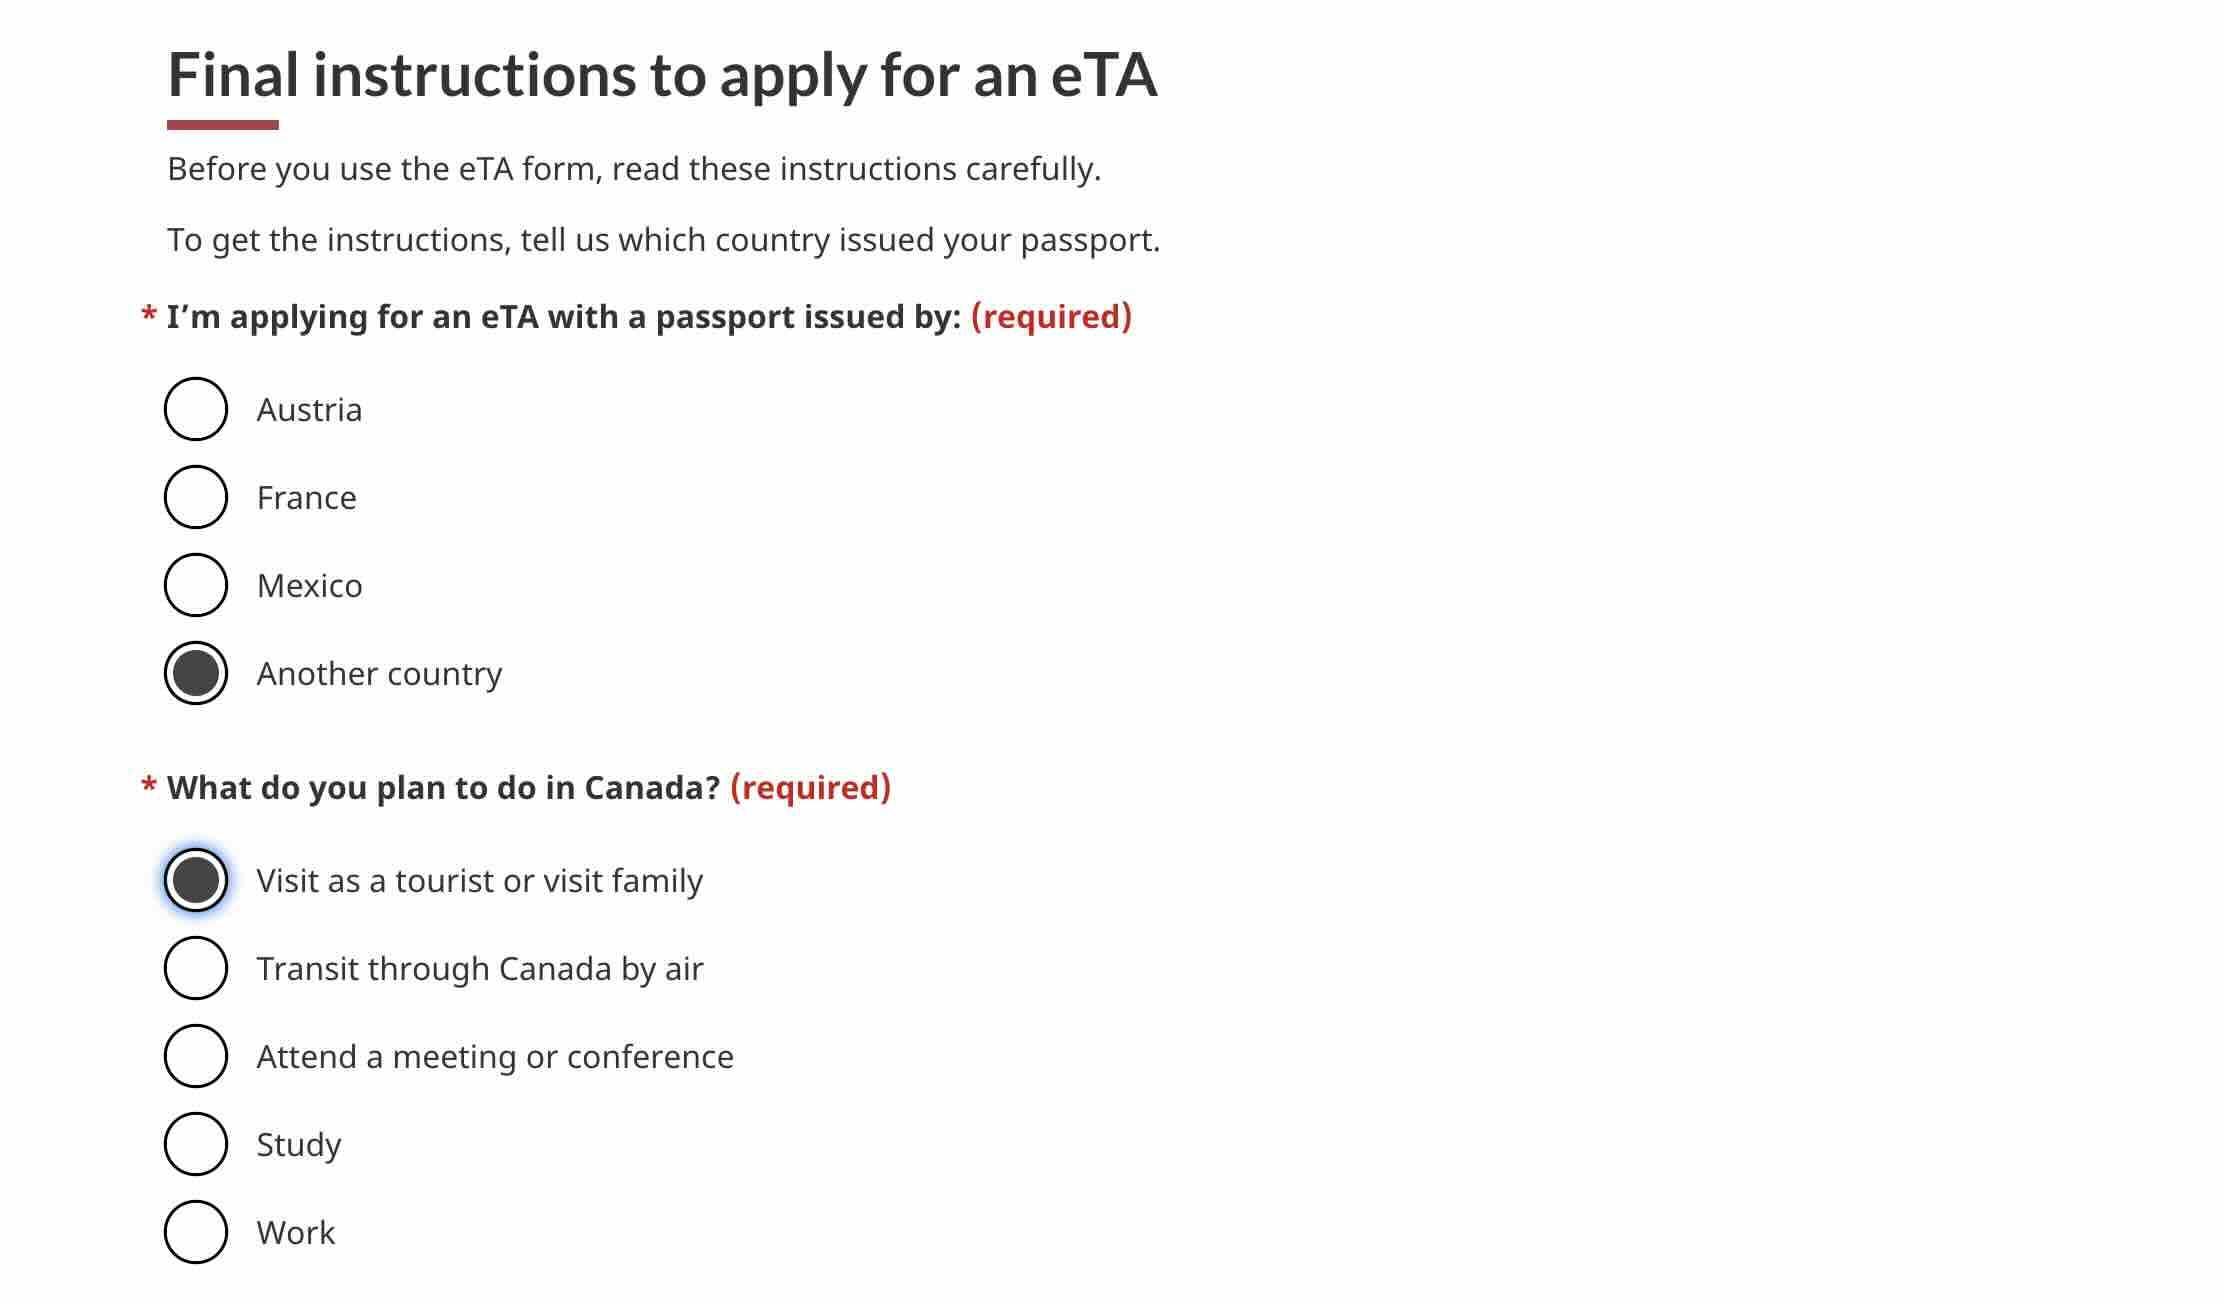
Go to the Canada eTA website. You will be led to a page where you have to answer which country issued your passport and the purpose of your travel to Canada. After that, you will be directed to the actual eTA form.
Then, you will answer a few questions to determine whether you’re eligible to apply for an eTA. If you’re not eligible, you will see a note that will tell you that you cannot apply for an eTA and you may need a visa or other type of document to travel to Canada. If you are eligible, you will see the next part of the application form.
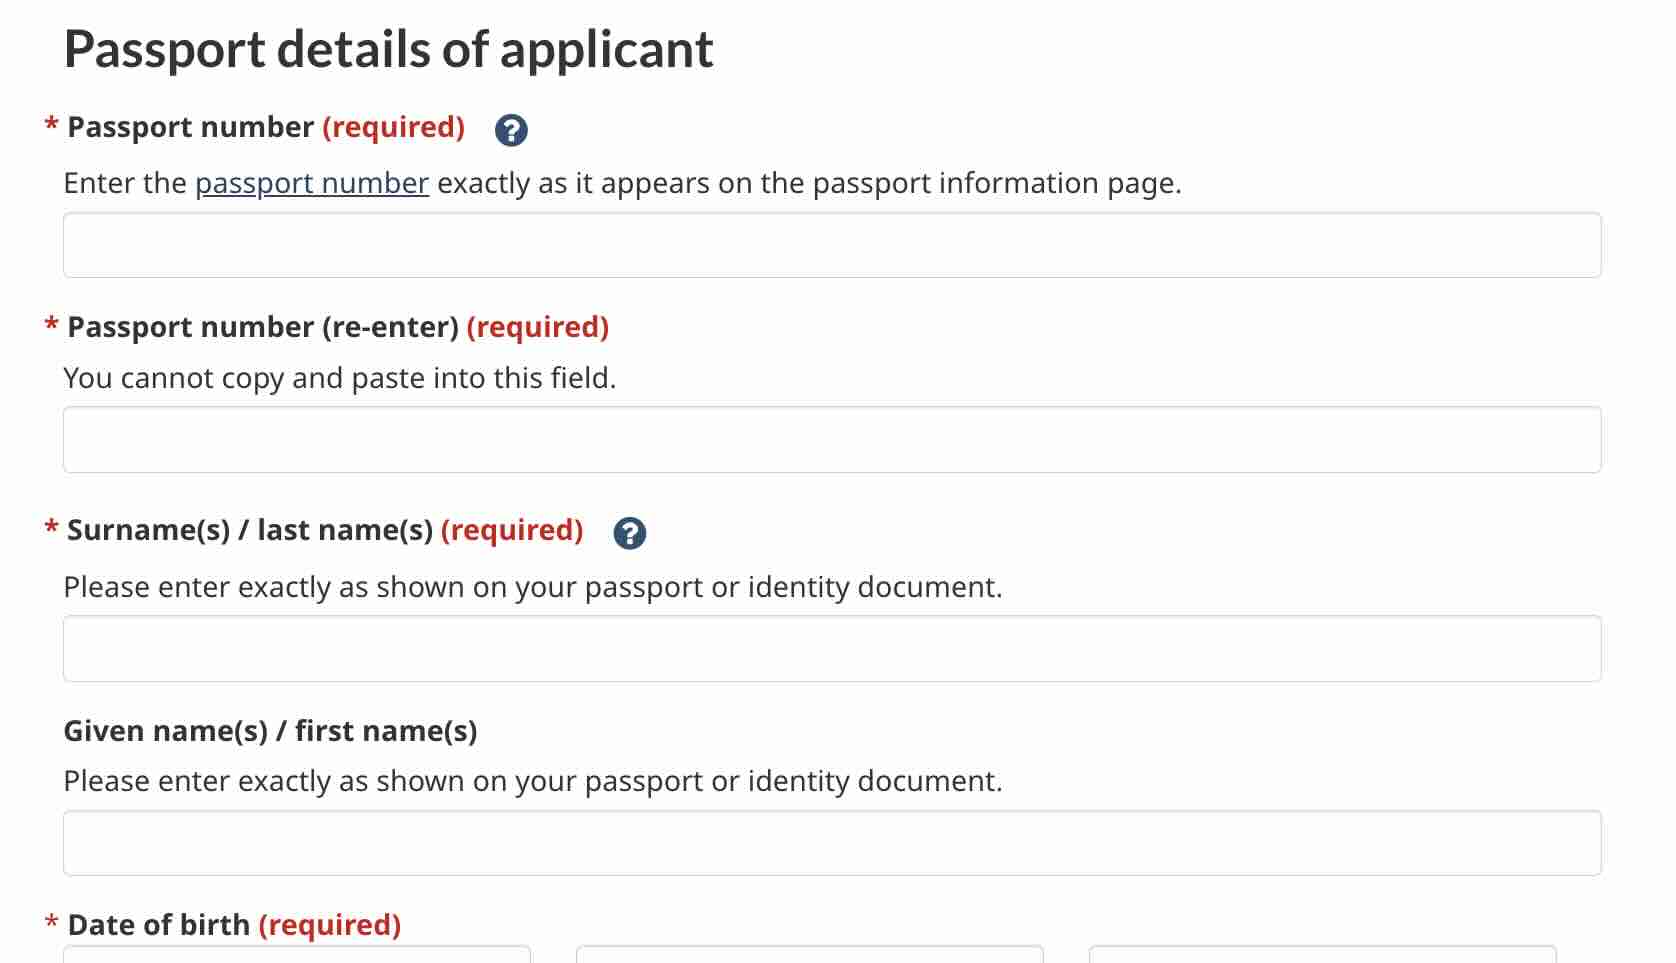
3. Enter your passport details.
You will be asked to enter your passport number, surname, given name, and date of birth among other passport details. Make sure to enter the correct details as indicated on your valid passport.
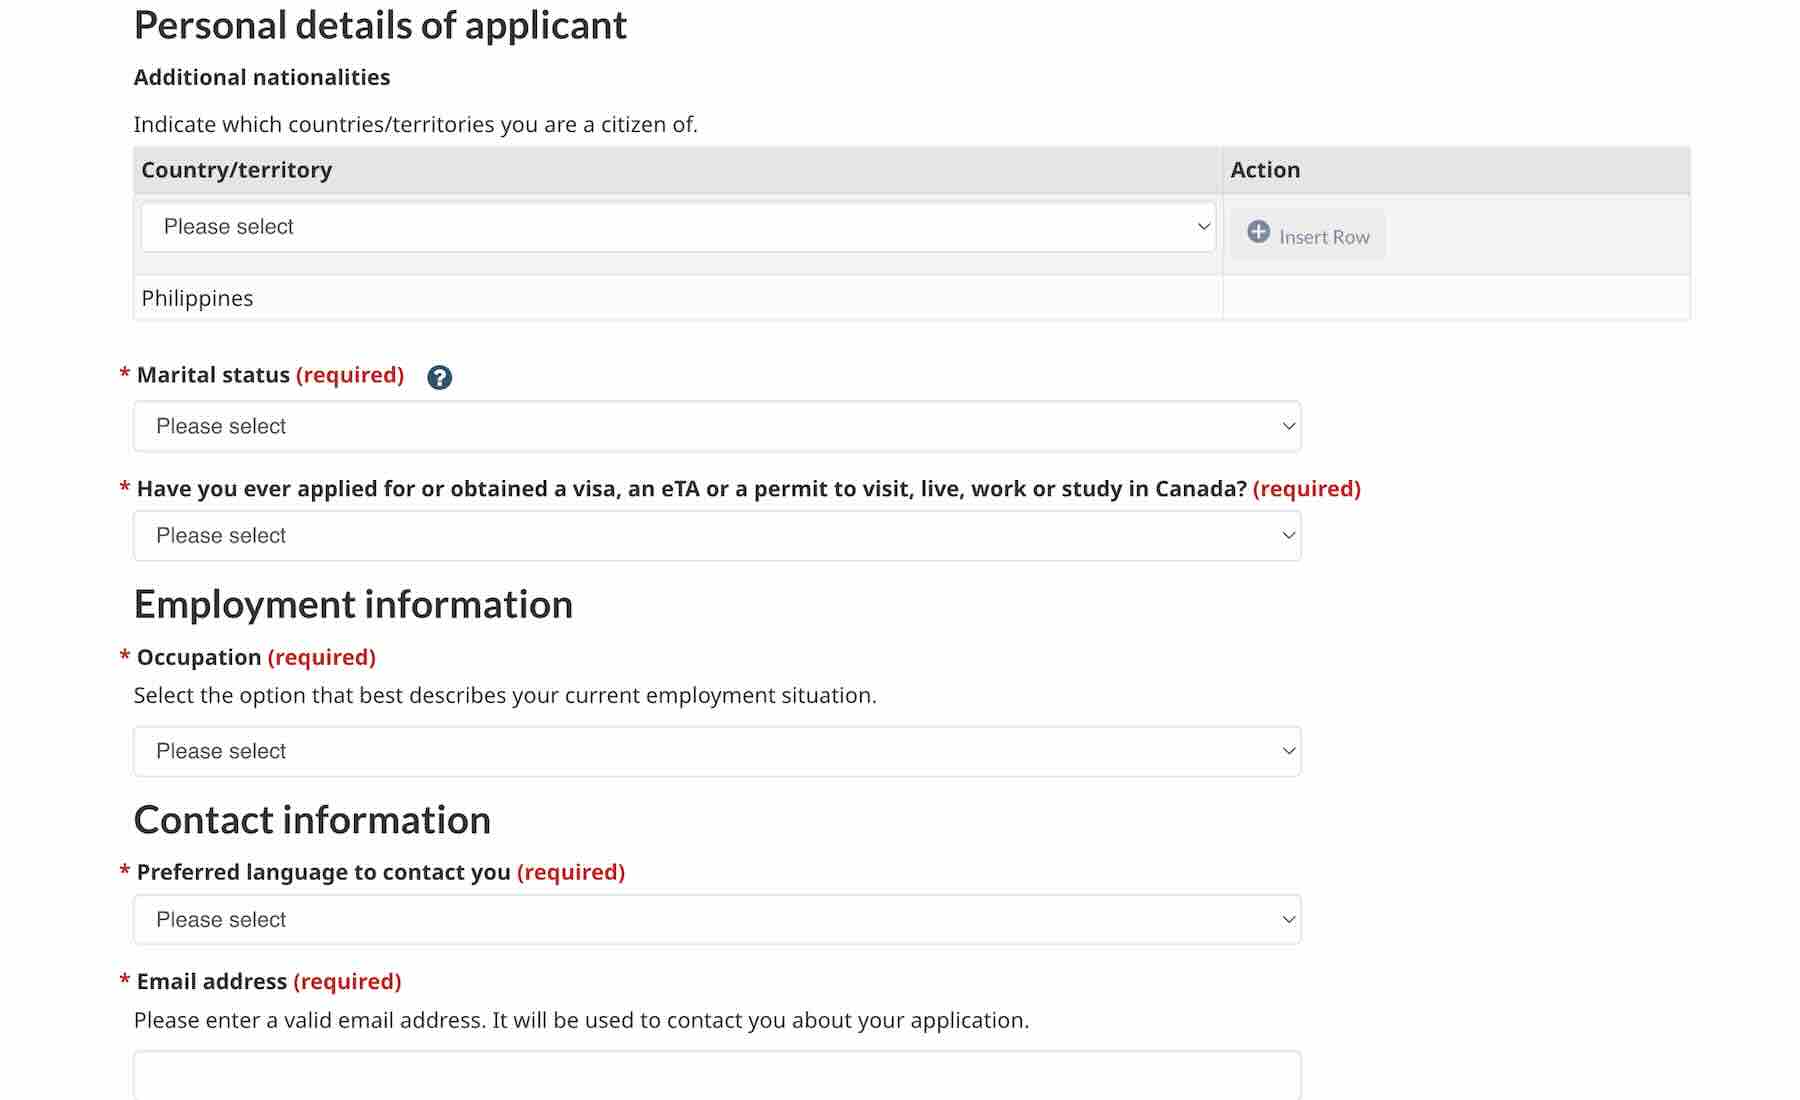
4. Enter your personal details.
In this part of the form, you need to answer whether you’ve previously applied for or held a visa, an eTA, or permit to enter Canada. If you have, you may enter your Unique Client Identifier (UCI) or visa/eTA or permit number.
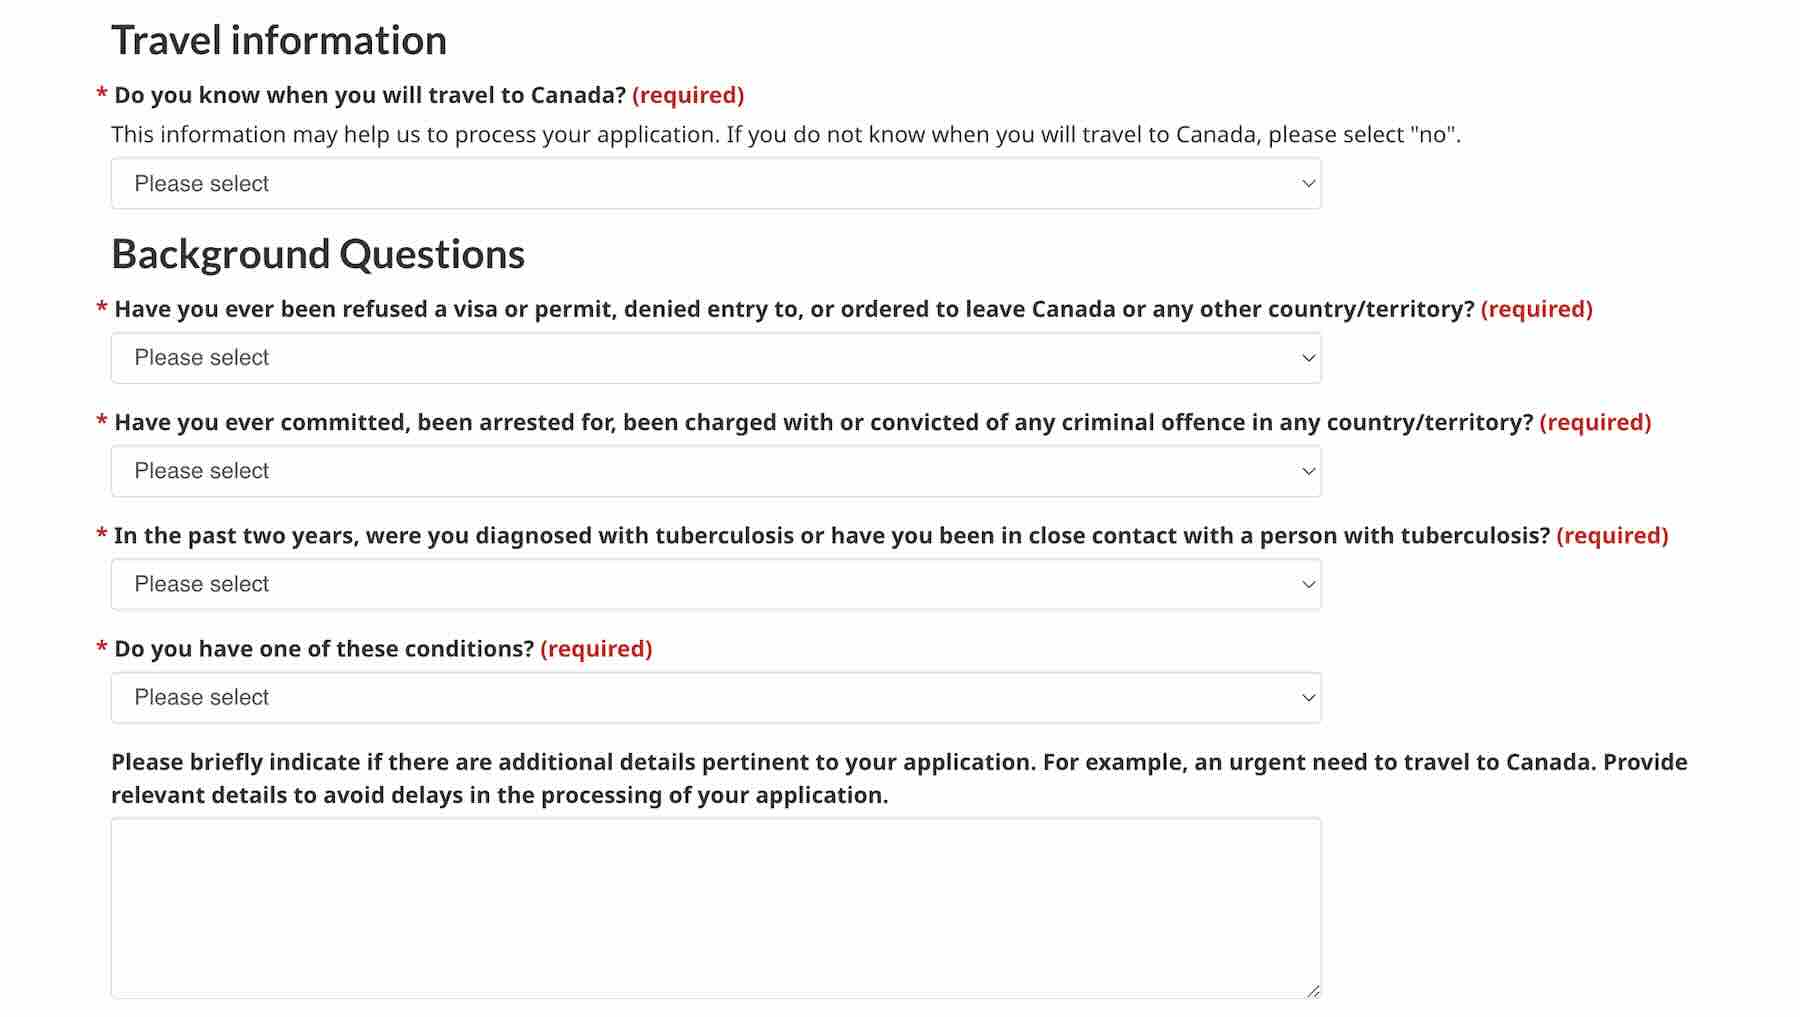
Next, you need to enter your employment information, contact information and residential address. If you already know when you’re traveling to Canada, you will be required to enter your travel information too. If not, just select no and proceed to answering the background questions.
Once you’ve completed all the information, double check if they are correct. Then, read the privacy notice and click ‘I Agree’ and enter your complete name as indicated on your passport to sign.
5. Pay the eTA fee.
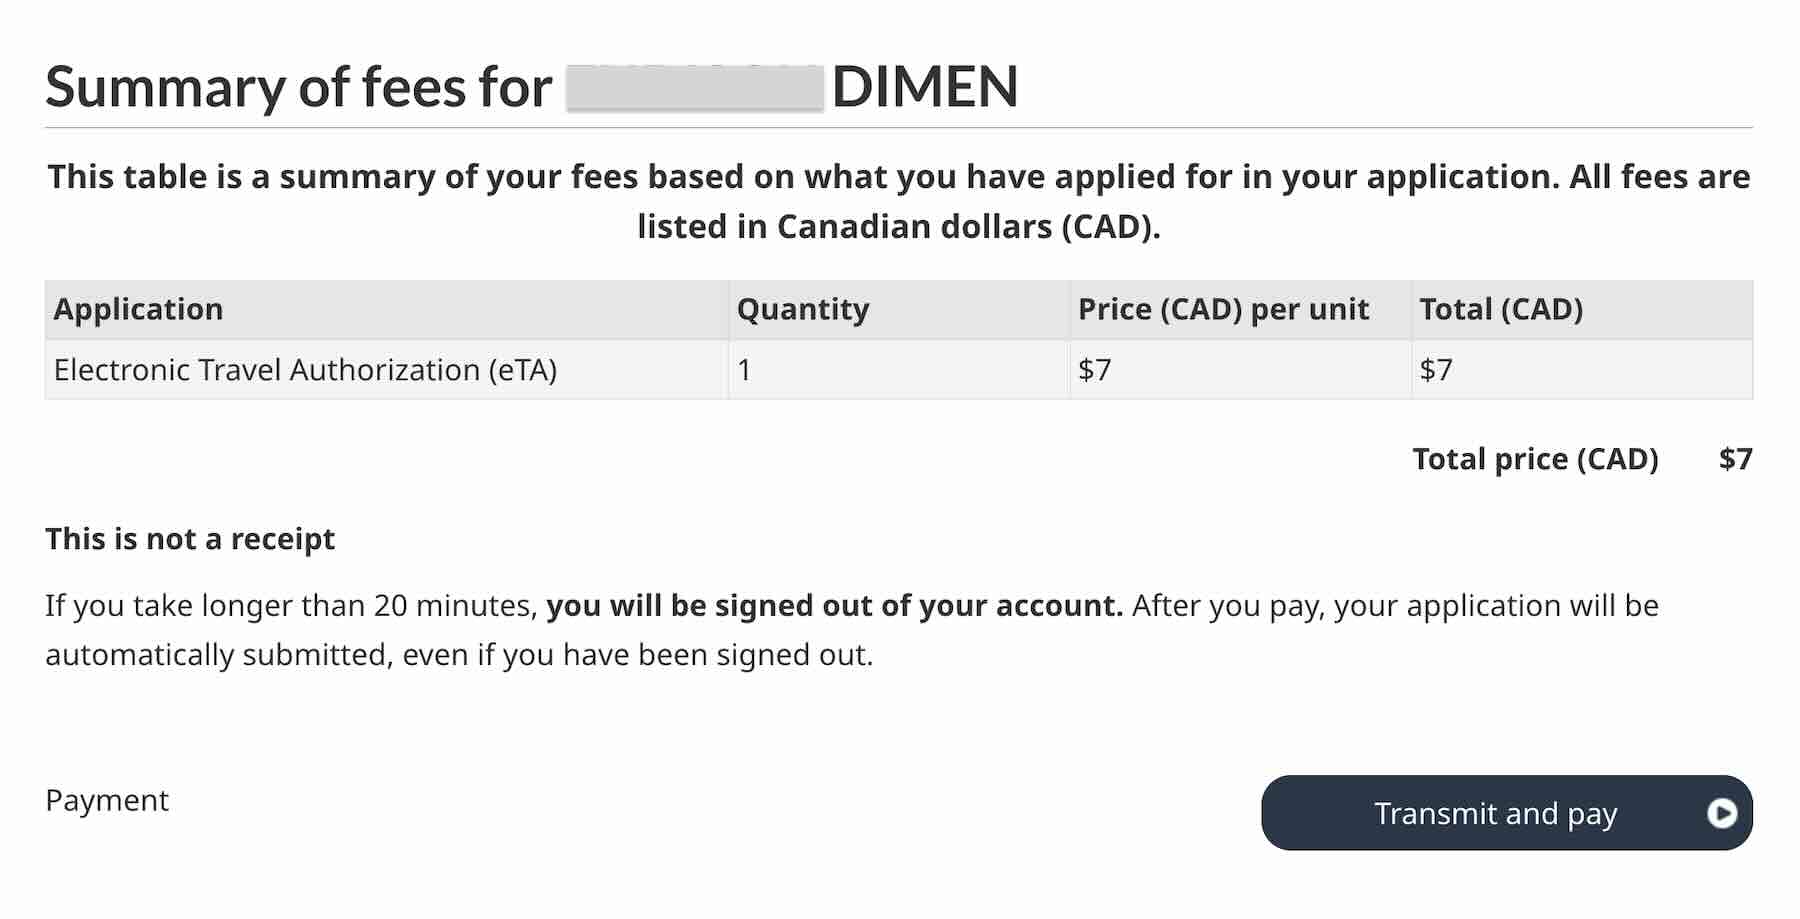
After filling out the application form, click Proceed to Payment. You’ll be directed to a summary of fees, which is a total of CAD 7 for the eTA. Then, click Transmit and Pay.
Enter your debit or credit card information and click checkout. You might need to enter an OTP to verify your transaction.
Once you’ve successfully paid, your application will be automatically submitted.
6. Wait for an email about your eTA.
After submitting your application and paying the fee, expect an email from Immigration, Refugees, and Citizenship Canada. According to the Canada eTA website, most eTAs are approved within minutes. If you don’t see anything in your inbox, make sure to check the junk or spam folder too.
If your eTA is approved, the email you will receive will include your eTA number. Make sure to save this number in case you need to contact the IRCC or check the status of your eTA in the future.
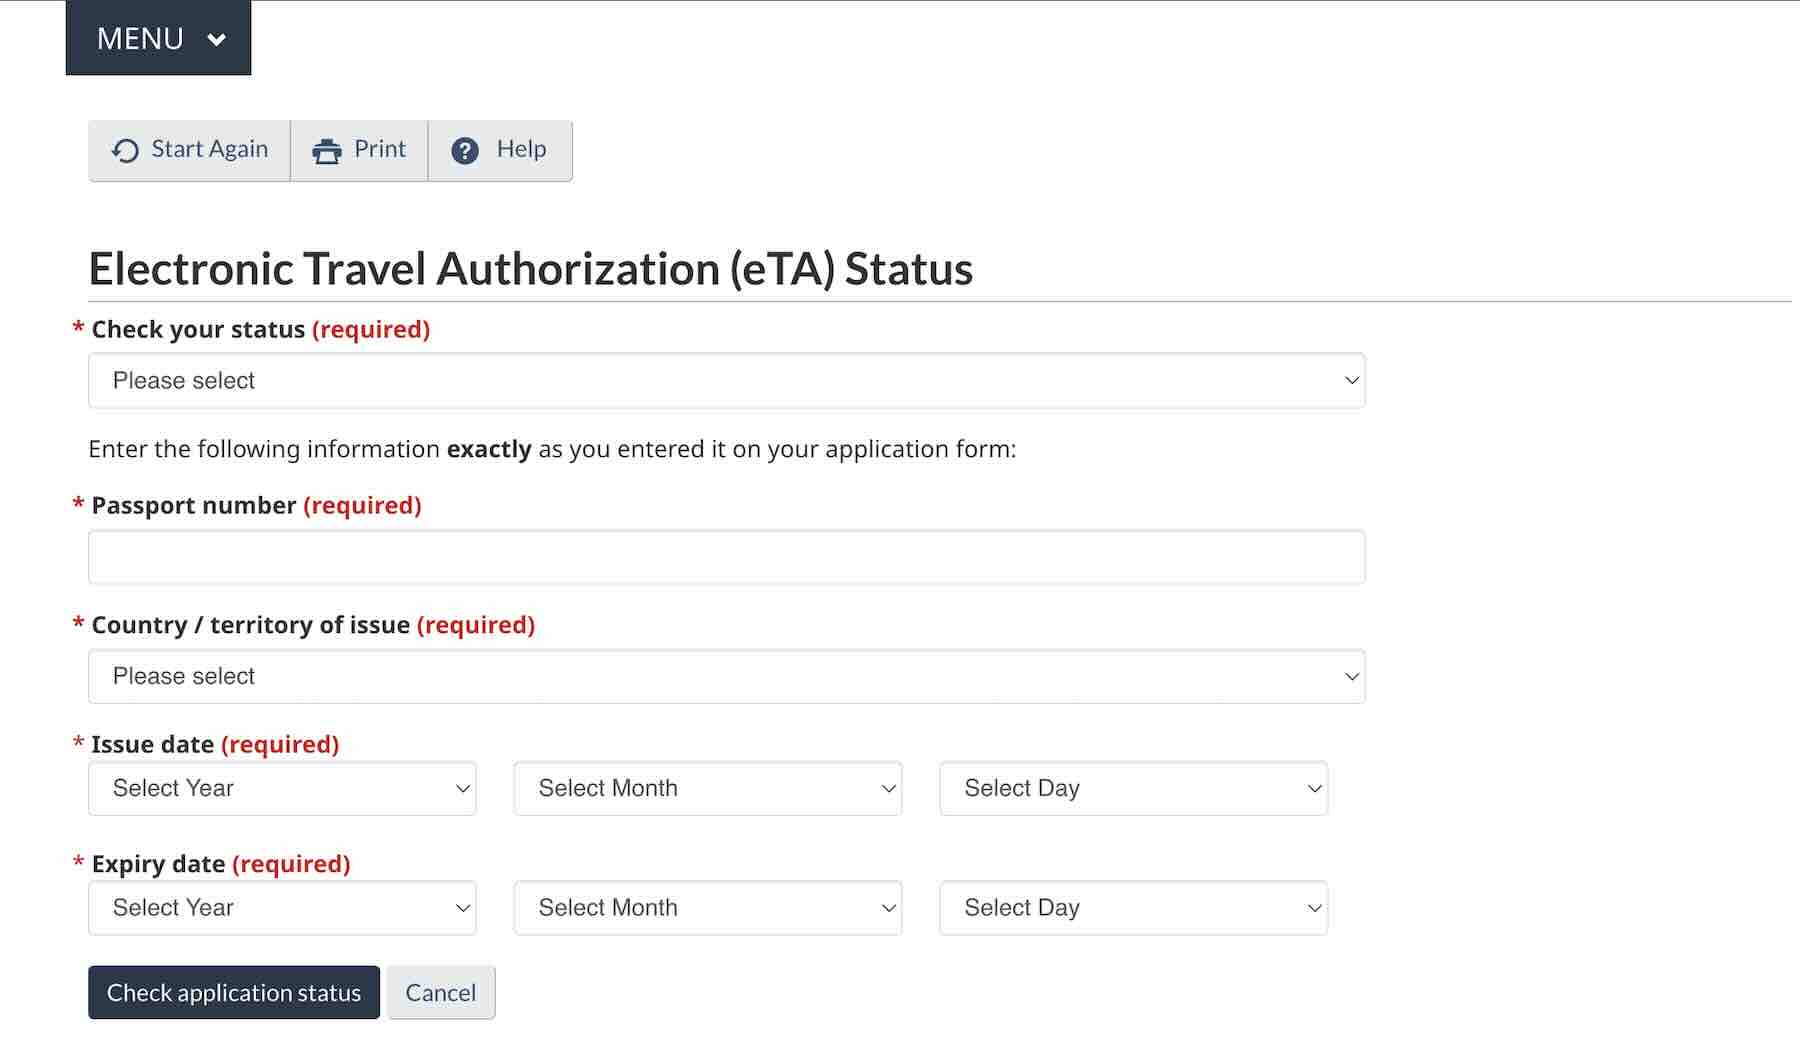
If you don’t receive an email right away, your application may be taking longer to process. In such cases, the IRCC will send you an email within 72 hours with instructions for the next steps. After receiving this email, you may use the eTA Check Status tool to check the progress of your application.
Frequently Asked Questions
How much is the Canada eTA?
The Canada eTA costs CAD 7. You can pay the fee online after filling out the application form. Accepted mode of payments are debit and credit cards.
Am I eligible to apply for a Canada eTA?
You can find out if you are eligible to apply for a Canada eTA by visiting this page and answering the questions provided.
Can I apply for a Canada eTA for my family?
Yes. However, a separate eTA application must be submitted for each person.
If you’re applying for eTA for your dependents/family members, make sure to answer “yes” to “Are you applying on behalf of someone?” You will also need to enter your details on the Parent/guardian or representative details section.
Japan is among the most visited countries for Filipino travelers, and it isn’t difficult to understand why. There’s so much to love about Japan that its proximity to the Philippines is just a bonus. Even our team has visited The Land of the Rising Sun over a dozen times.
The country has a good mixture of ancient tradition and modernity that makes for a memorable travel experience. With a total of 47 prefectures, it is packed with countless stunning landscapes, an excellent culinary scene, a rich history, and hospitality like no other. One thing is for sure: you’ll end your trip wanting for more.
Another thing travelers love about Japan is the convenience it offers. One, its train system connects every major city, making many attractions easily accessible. Two, it is never short of accommodation and food options. Another thing that Japan made more convenient in recent times is their immigration procedures. They now have Visit Japan Web for a smoother arrival clearance at the immigration area.
In this article, we’ll guide you on how to accomplish your Visit Japan Web and how you can use it for your trip to Japan.
What is Visit Japan Web?
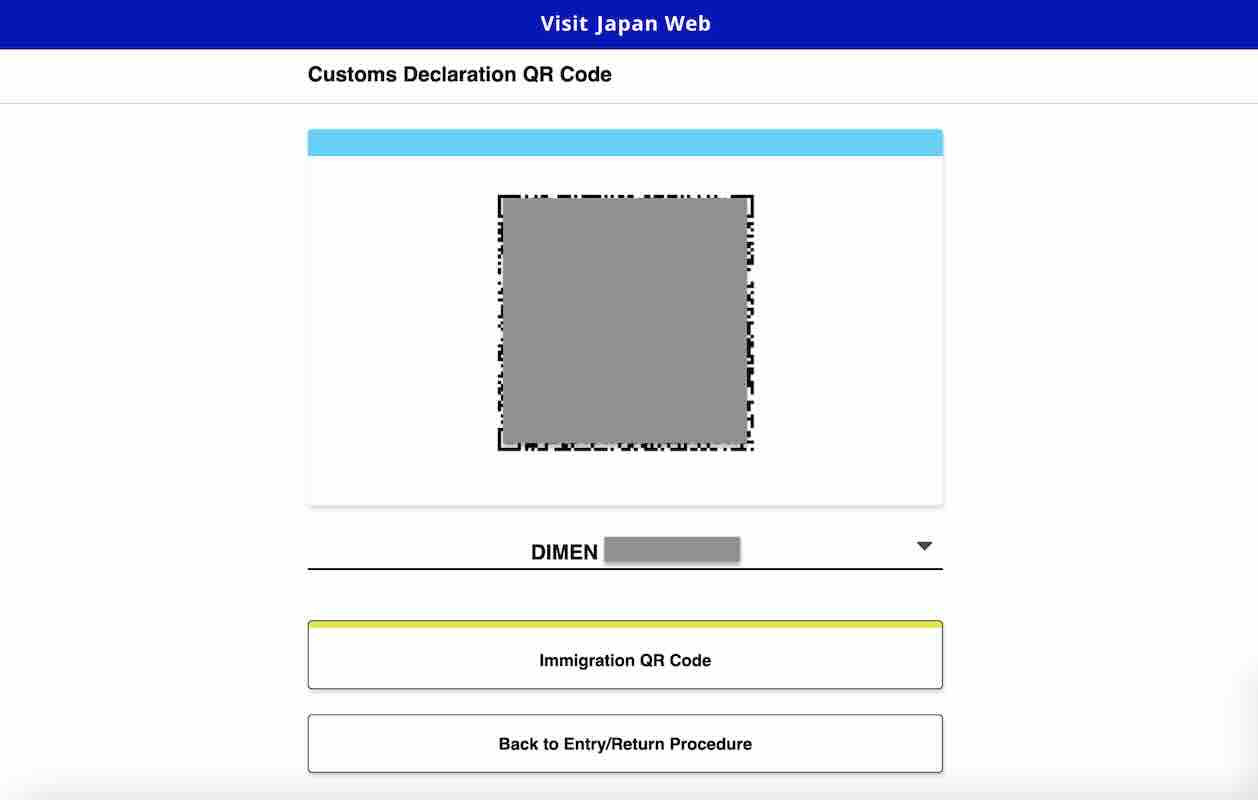
Visit Japan Web is a website that allows travelers going to Japan to pre-register the necessary information for immigration procedures. Once you register, you will get a QR code that you can use for immigration clearance and customs declaration. With this, you can go through the arrival process quicker, saving you a lot of time. Tourists can also use this service to create a tax-free QR code that they can use when making tax-free purchases at eligible stores.
How to Register for Visit Japan Web
1. Create an account.
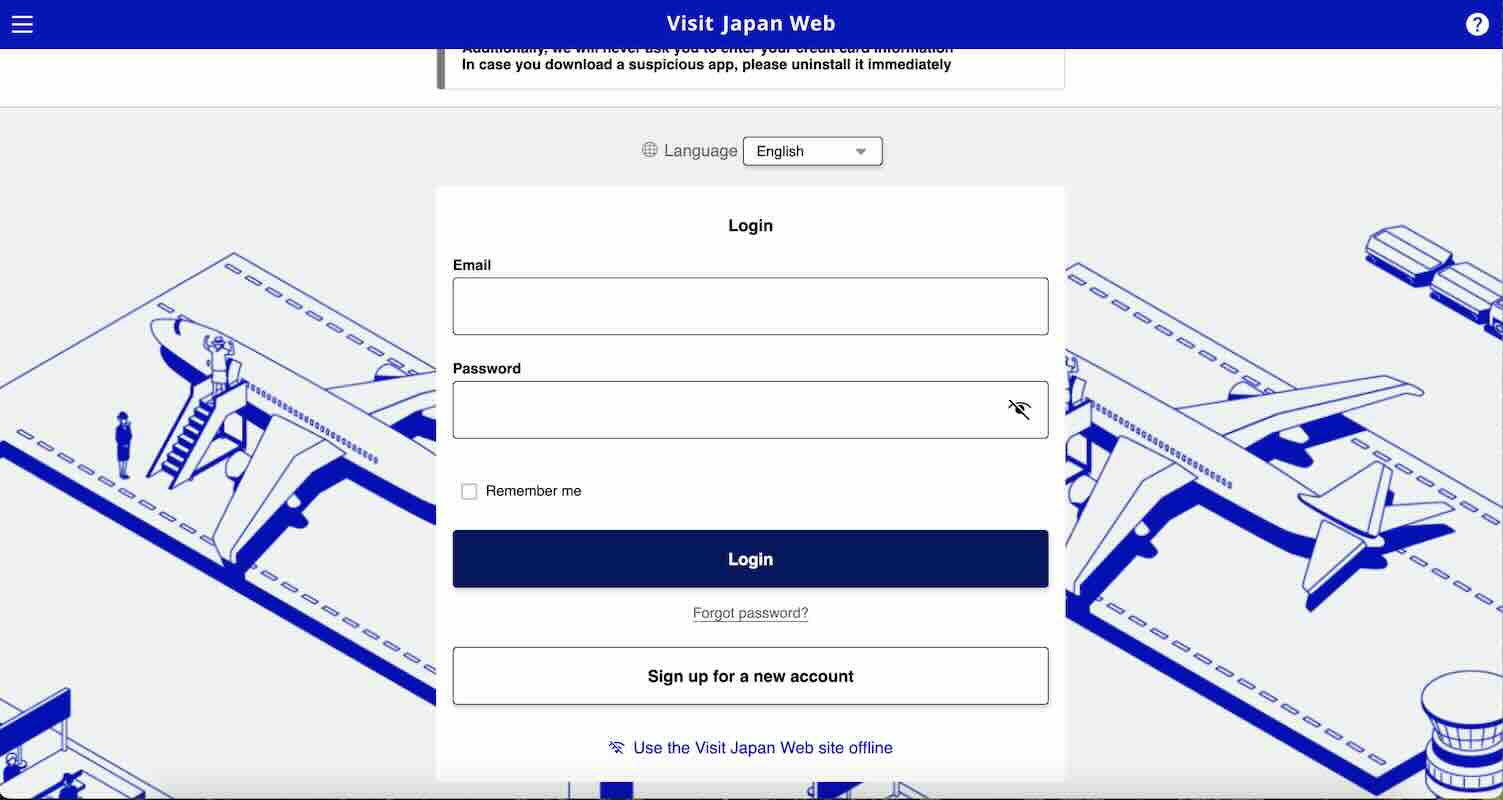
Go to Visit Japan Web site. You can do this on your mobile device or your computer. Click “Sign up” for a new account at the bottom of the page.
Then, read the Terms of Use and Privacy Policy. Tick the boxes to agree and click “Next” to proceed.
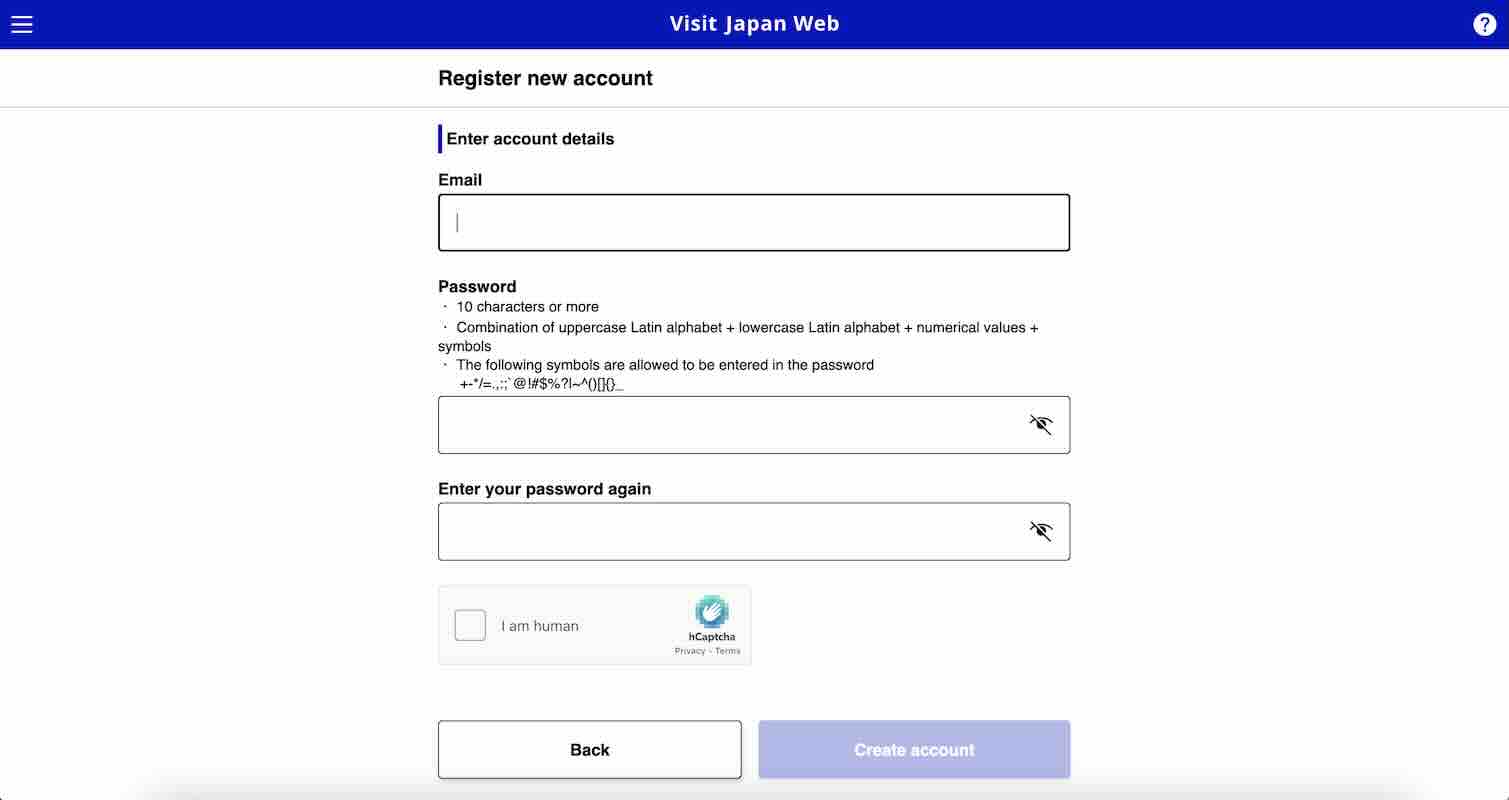
2. Enter account details.
Type in your email address. Make sure that it’s a working email address that you can access since a confirmation will be sent here. Then, create a password and make sure it meets the following criteria:
Has 10 characters or more
Has both uppercase and lowercase letters
Has numerical values
Has one or more of these symbols: +-*/=.,:;`@!#$%?|~^()[]{}_
Re-enter your password and complete the captcha. Then, click “Create account”.
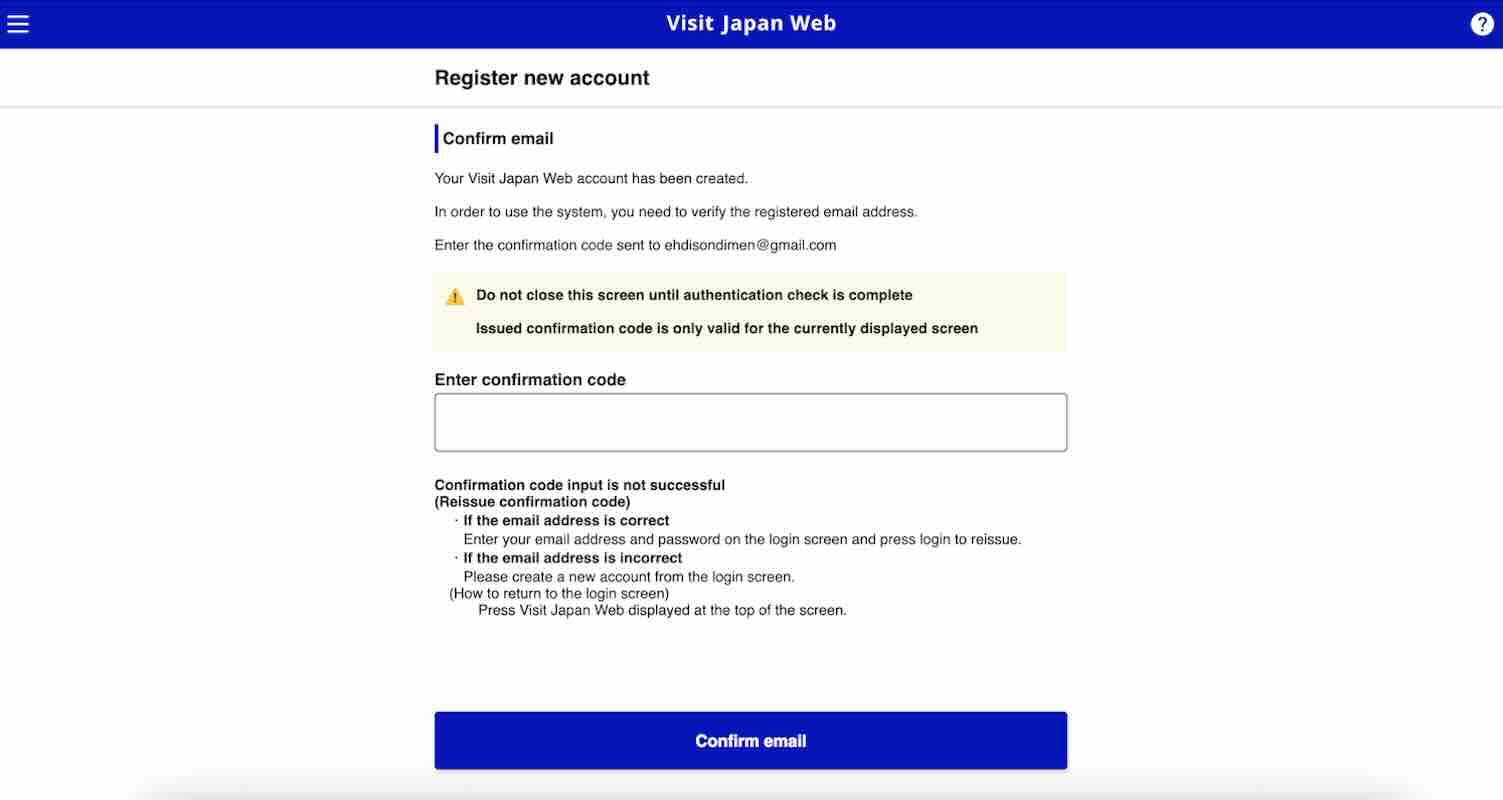
3. Confirm email.
A confirmation code will be sent to the email address you used to register. Check your email and enter the code. Then, click “Confirm email”.
If the confirmation is successful, a pop-up window will appear with that message. Click “Go To Login Screen”.
4. Login to your account.
Enter the email and password you registered and click “Login”.
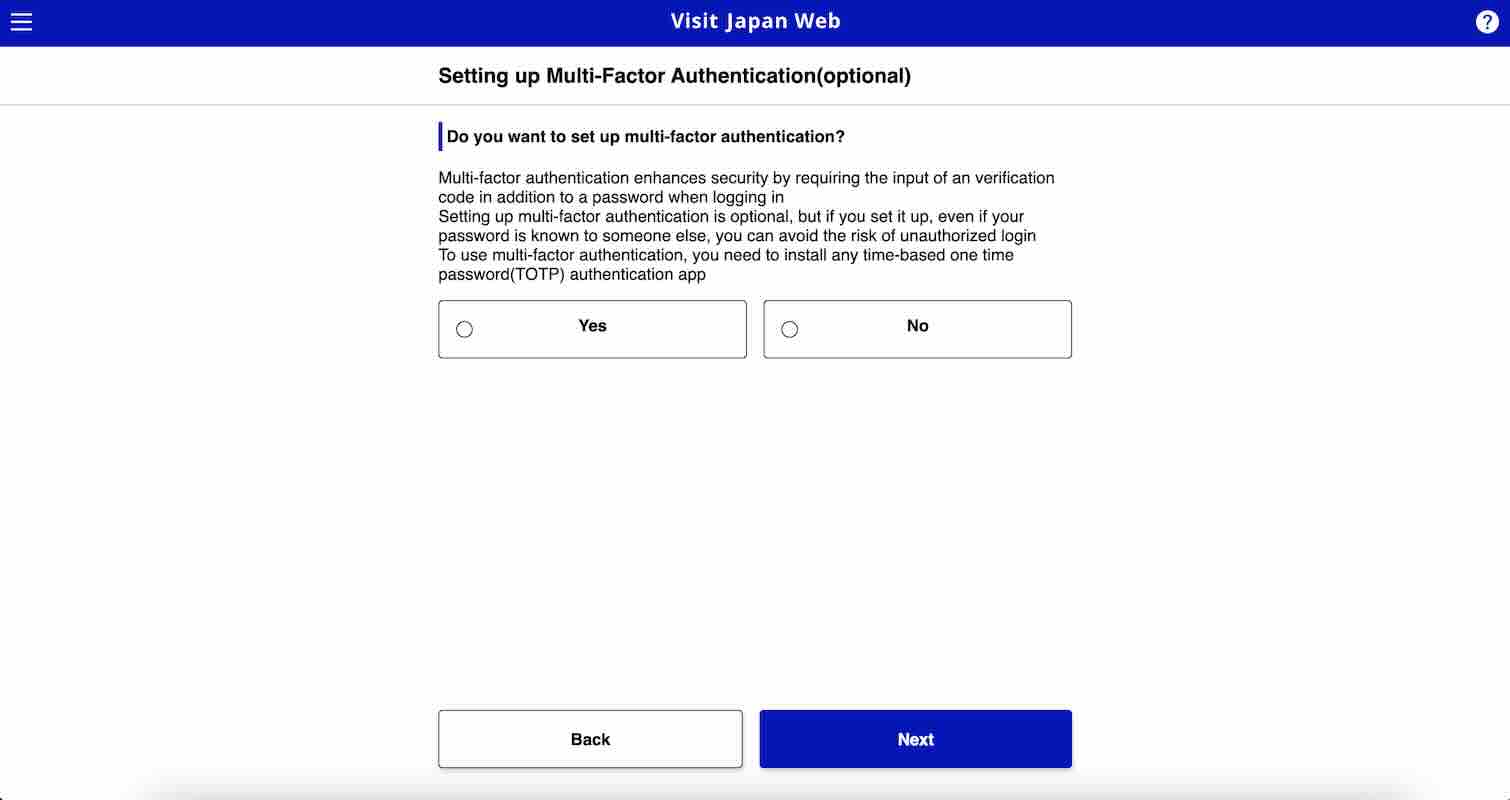
After this, you can opt to set up multi-factor authentication. This will give you extra security to your account. But note that choosing to set up multi-factor authentication will require you to install an authentication app like Google Authenticator or Microsoft Authenticator.
If you don’t want to use multi-factor authentication, click “No”. Then, click “Next”.
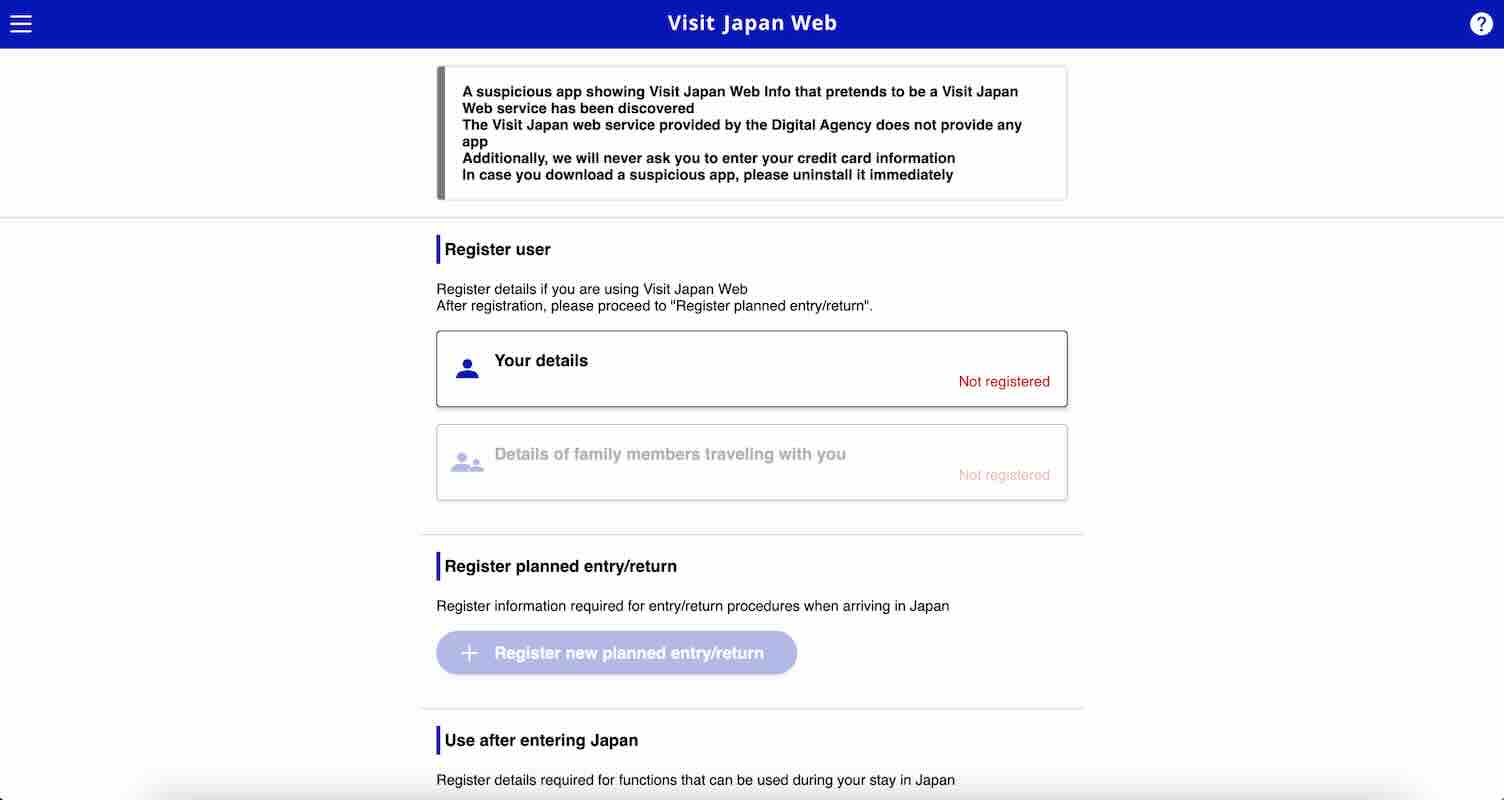
5. Choose your entry/return procedure category.
Click “Your details” to start entering your personal information.
On the first page for this section, you’ll answer the following questions for the entry/return procedure category:
Do you have a passport issued by the Japanese government?
Do you live in Japan and will re-enter Japan with a (special) re-entry permission?
If you’re a tourist, your answer to both these questions will most likely be “No”. Then, proceed to answering whether you’ll use a tax-free QR code or not. After that, click “Next”.
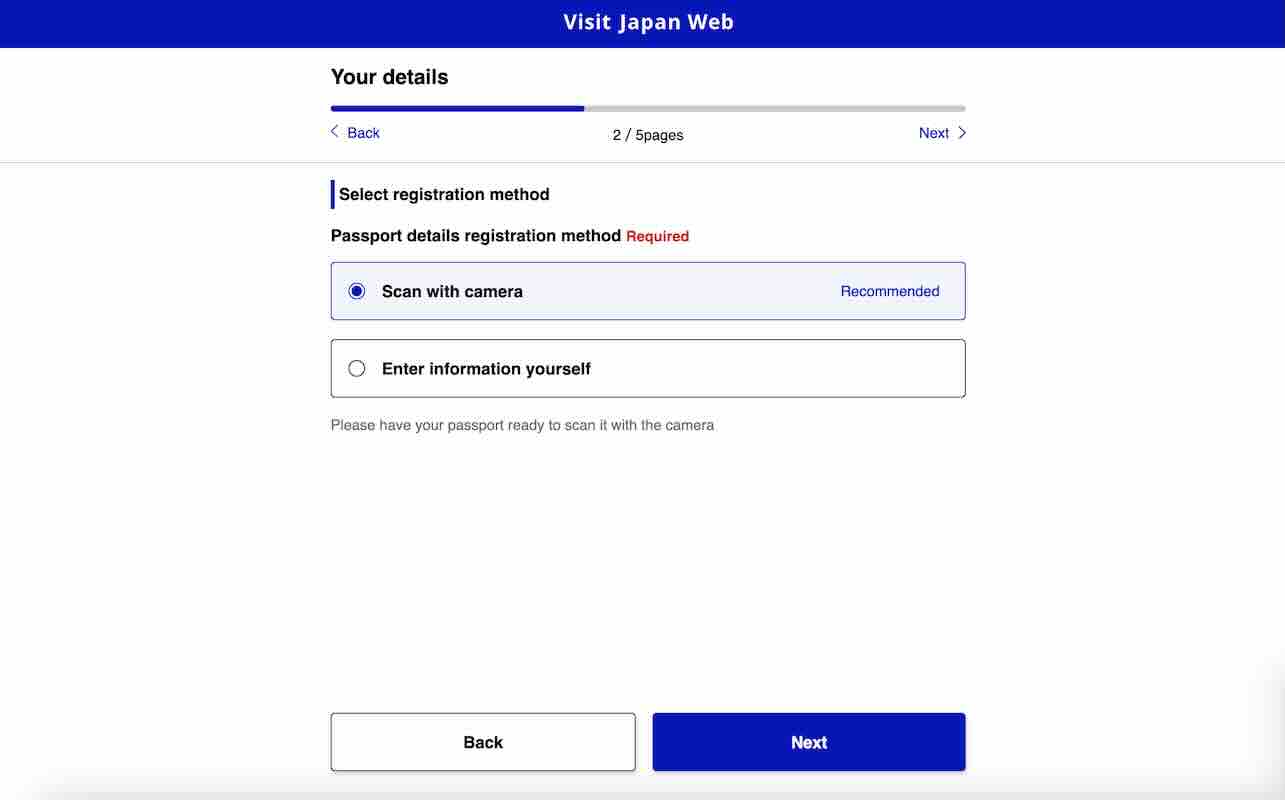
6. Register passport details.
Make sure to have your passport with you when you do this step. You have two options to register your passport details: scan with camera and manually entering the information. Choose which method you prefer, then click “Next”.
If you’re entering the information manually, here are the details you would need to provide:
Passport Number
Surname
Given Name
Nationality
Date of Birth
Date of Passport Expiry
Once you’ve successfully entered all the details, click “Next”.
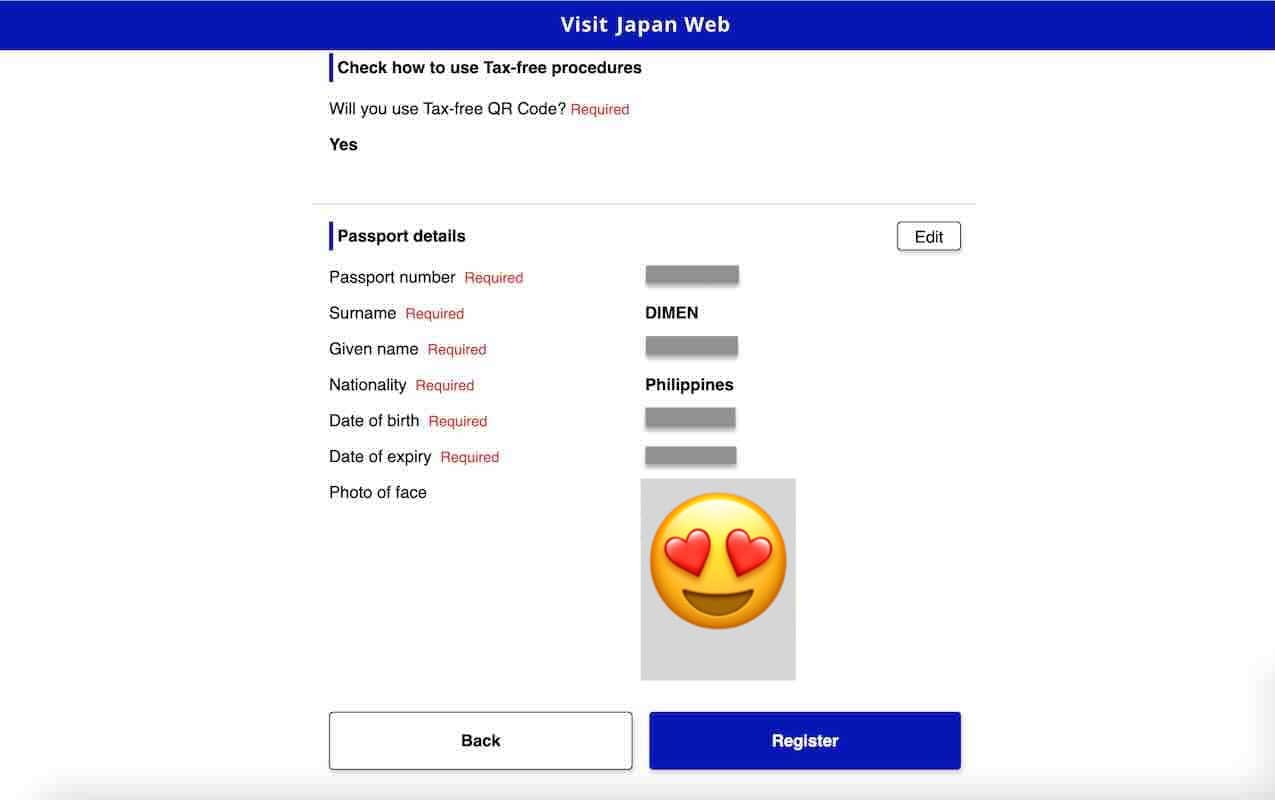
7. Confirm the details you entered.
In this page, you’ll see a summary of all the details you provided. If there’s any mistake, just click the “Edit” button on the right side of the section you need to edit. If everything is correct, click “Register”.
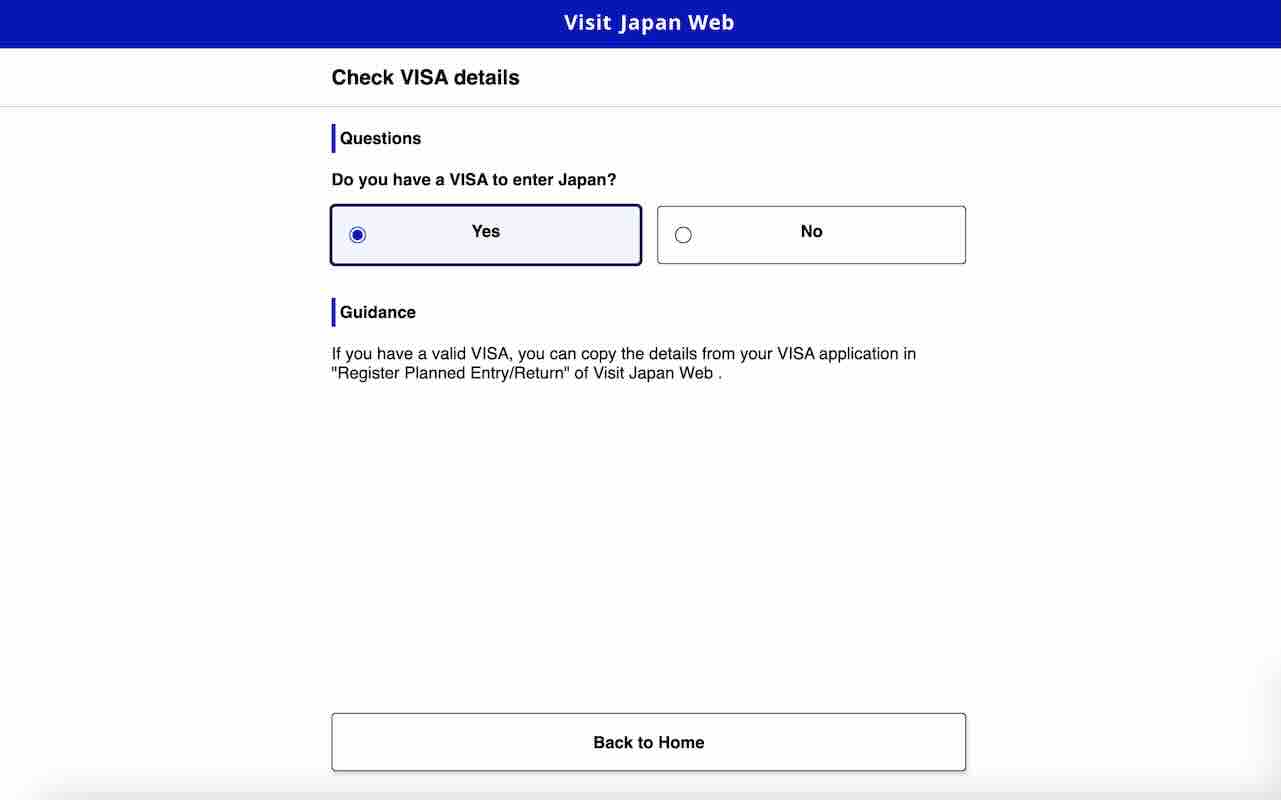
8. Check visa details.
Upon successful registration, you will see a pop-up window telling you so with a prompt to check whether you need to apply for a visa. Click “Check VISA requirement”.
Then, click “Yes” to confirm if you have a VISA to enter Japan. After that, click “Back to Home”.
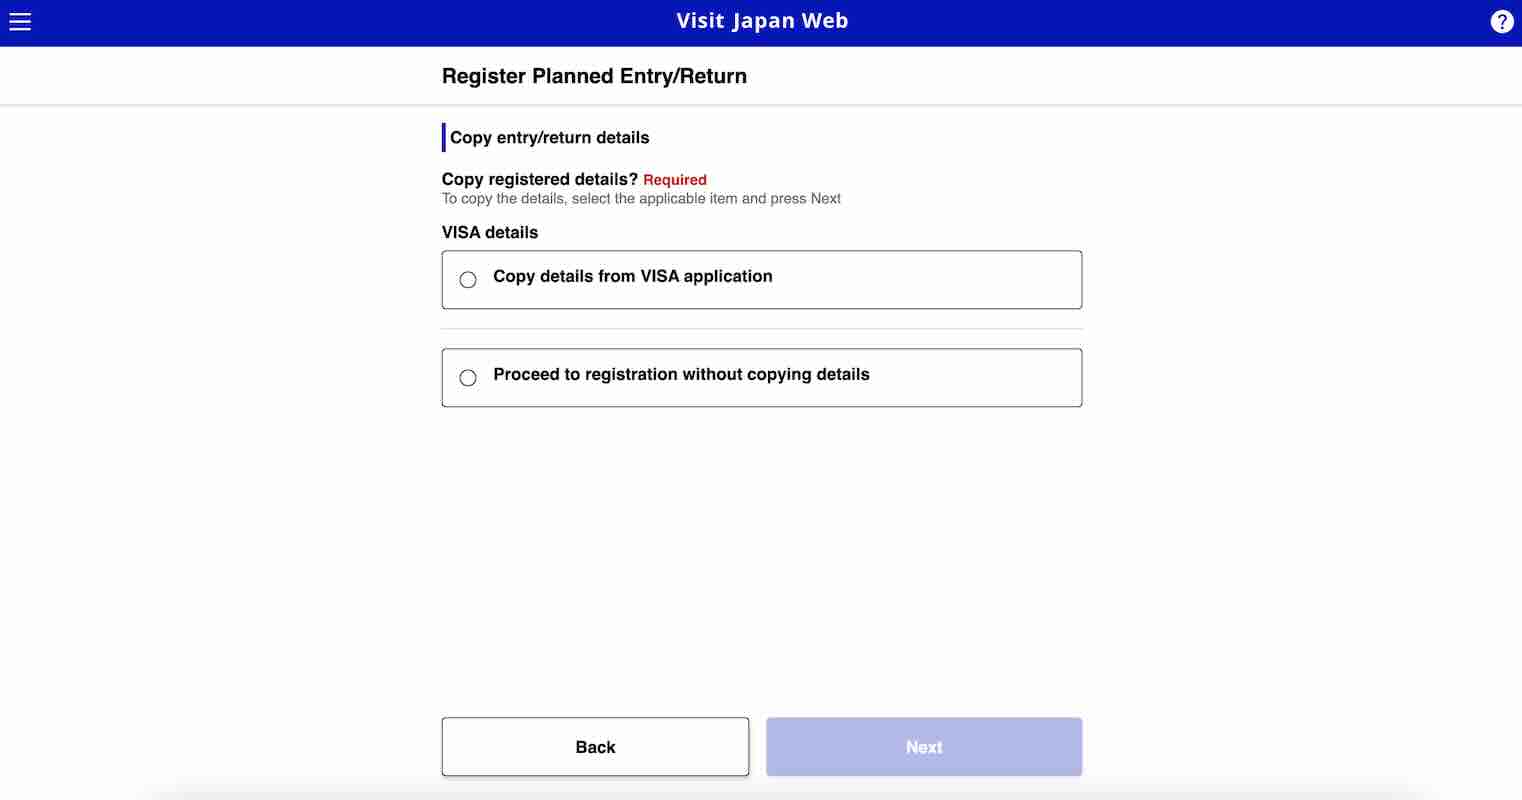
9. Register Planned Entry/Return.
On the homepage, click “Register new planned entry/return”. You can choose to copy the details of your trip from your visa application or enter the details manually.
If you choose to copy the details from your visa application, you’ll need to enter your visa issue number.
Meanwhile, if you opt to enter your details manually, here are the fields you need to accomplish:
Trip Name
Planned Arrival Date in Japan
Airline Name
Flight Number
After completing all these details, click “Next”.
On the next section, you need to enter the address of your accommodation in Japan. Here are the details you’ll need to provide:
Prefecture
City
Address
Hotel Name
Contact number
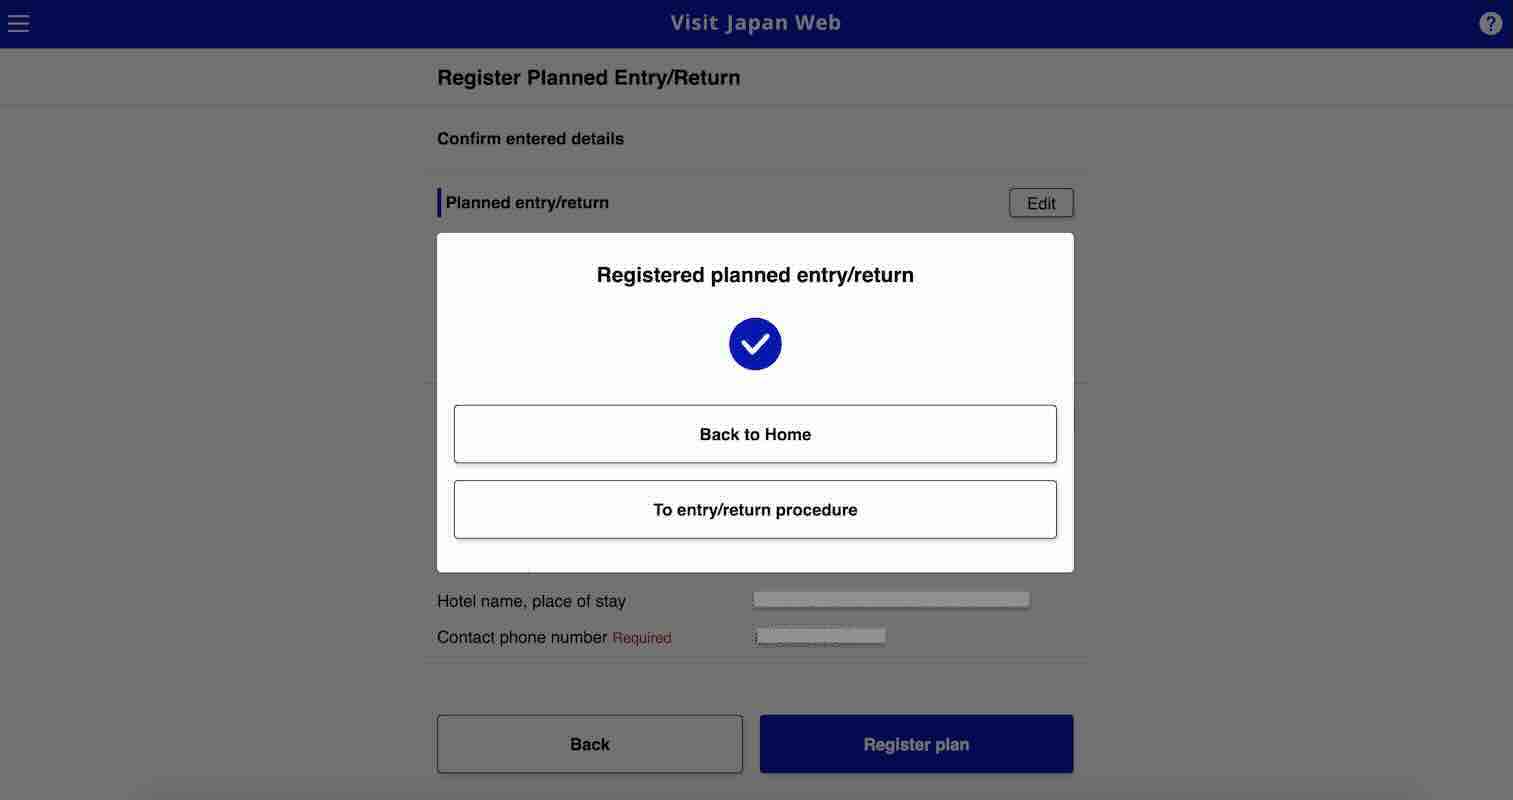
Once you’re done entering all the necessary details, click “Confirm entered details”.
Then, on the pop-up page, click “To entry/return procedure” to proceed to the next step.
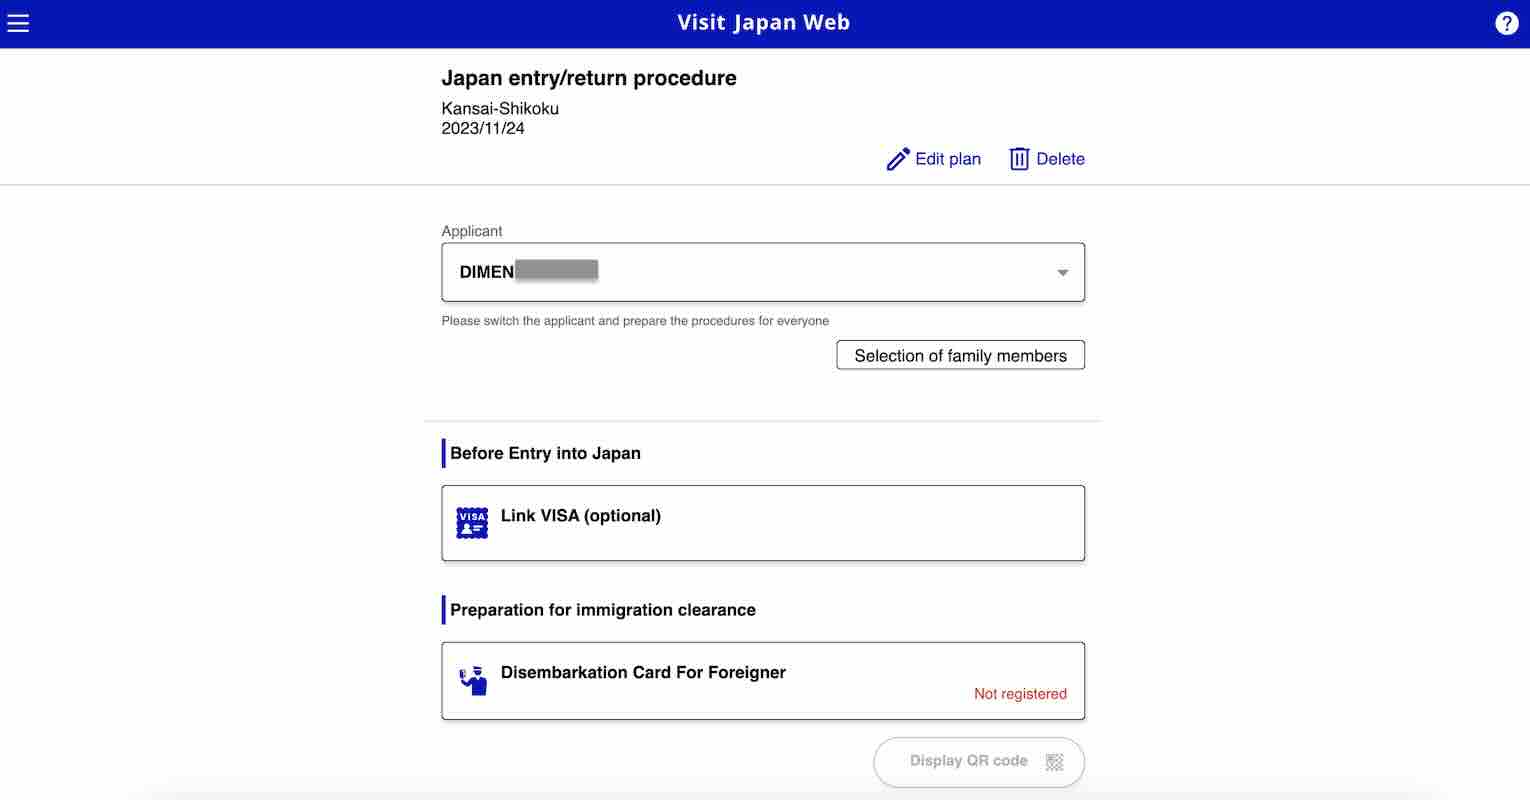
10. Generate QR code for immigration clearance.
On this page, you’ll see that you can also link your visa here, but that’s optional. We’ll skip that process here and proceed to the preparation for immigration clearance.
Click “Disembarkation Card for Foreigner”. This is the form you’d typically fill out manually before landing. On the pop-up window, click “Next” to start your registration process.
Here are the details you need to fill out:
Home Address
Purpose of Visit
Last Flight Number
Duration of Stay
Prefecture
City
Address
Hotel Name
Contact Number
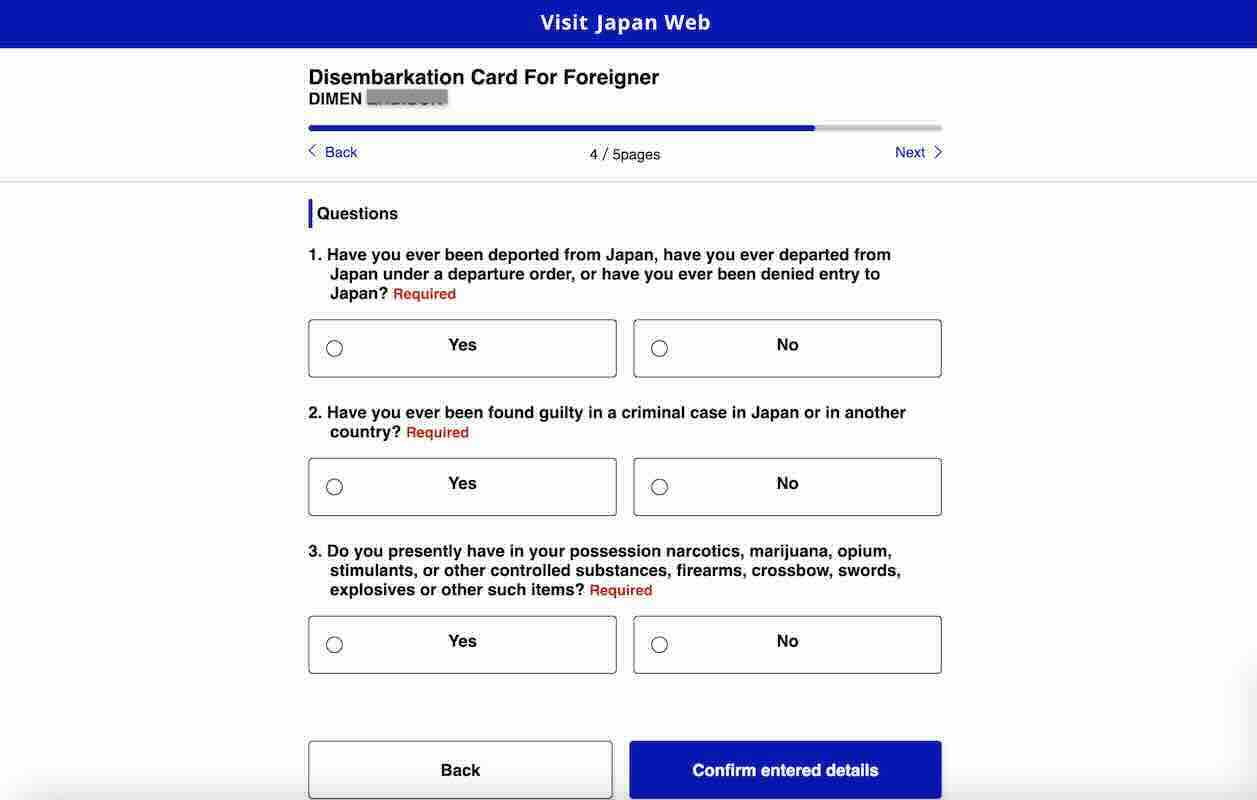
After entering all these information, click “Next”. Then you’ll need to answer a few questions. Once everything is set, click “Confirm entered details”.
On the next page, you’ll be shown a summary of all the details you entered. If everything is correct, click “Register”. Then click “Back to Entry/Return” to proceed to the next step.
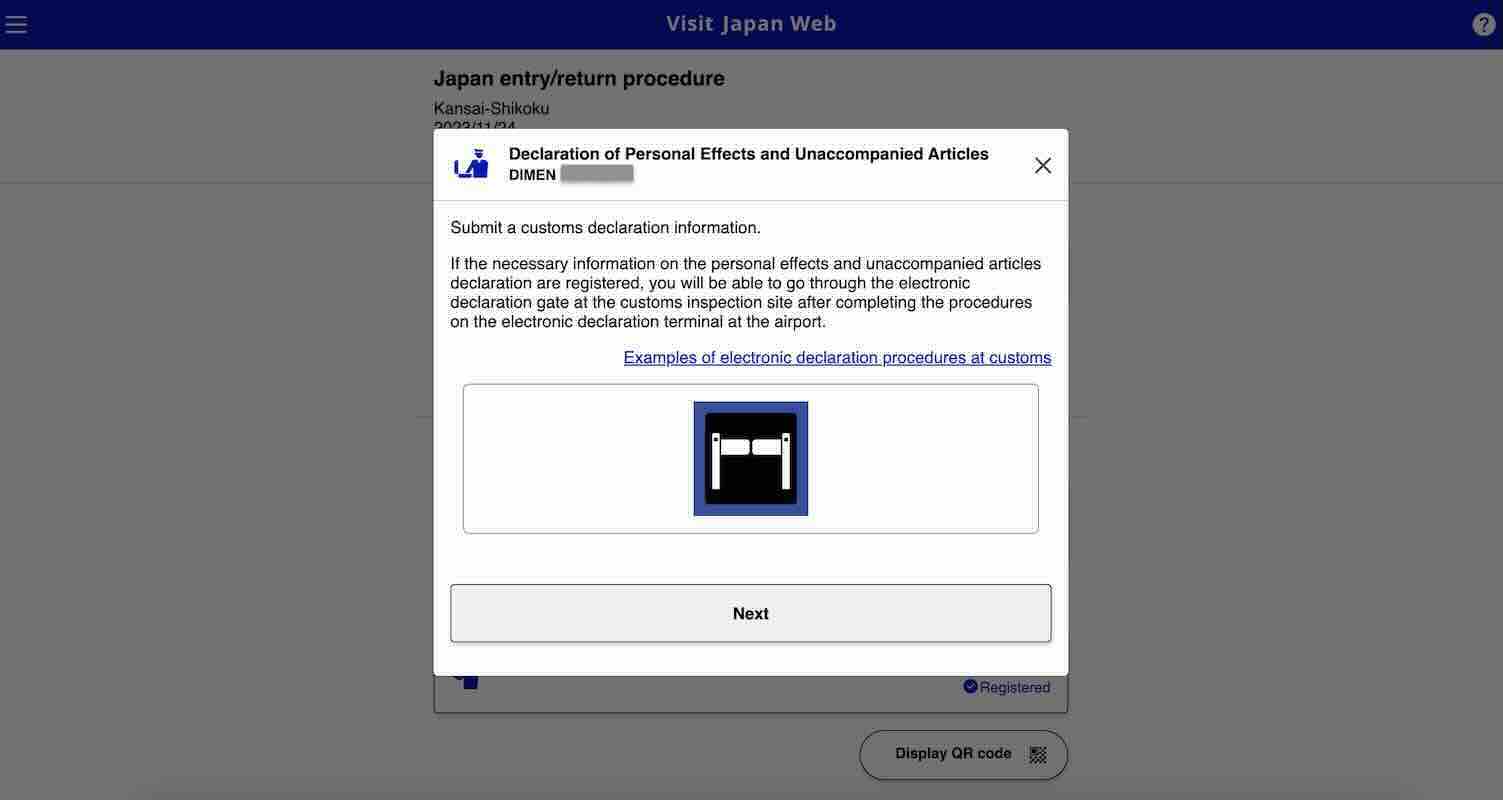
11. Generate QR code for customs declaration.
On a pop-up window, you can read about how the electronic customs declaration works. Once you’ve read the details, click “Next” to start filling out the form.
Below are the details you need to submit:
Occupation
Date of Arrival in Japan
Flight No./Name of Vessel
Point of Embarkation
After typing in all the required details, click “Next”.
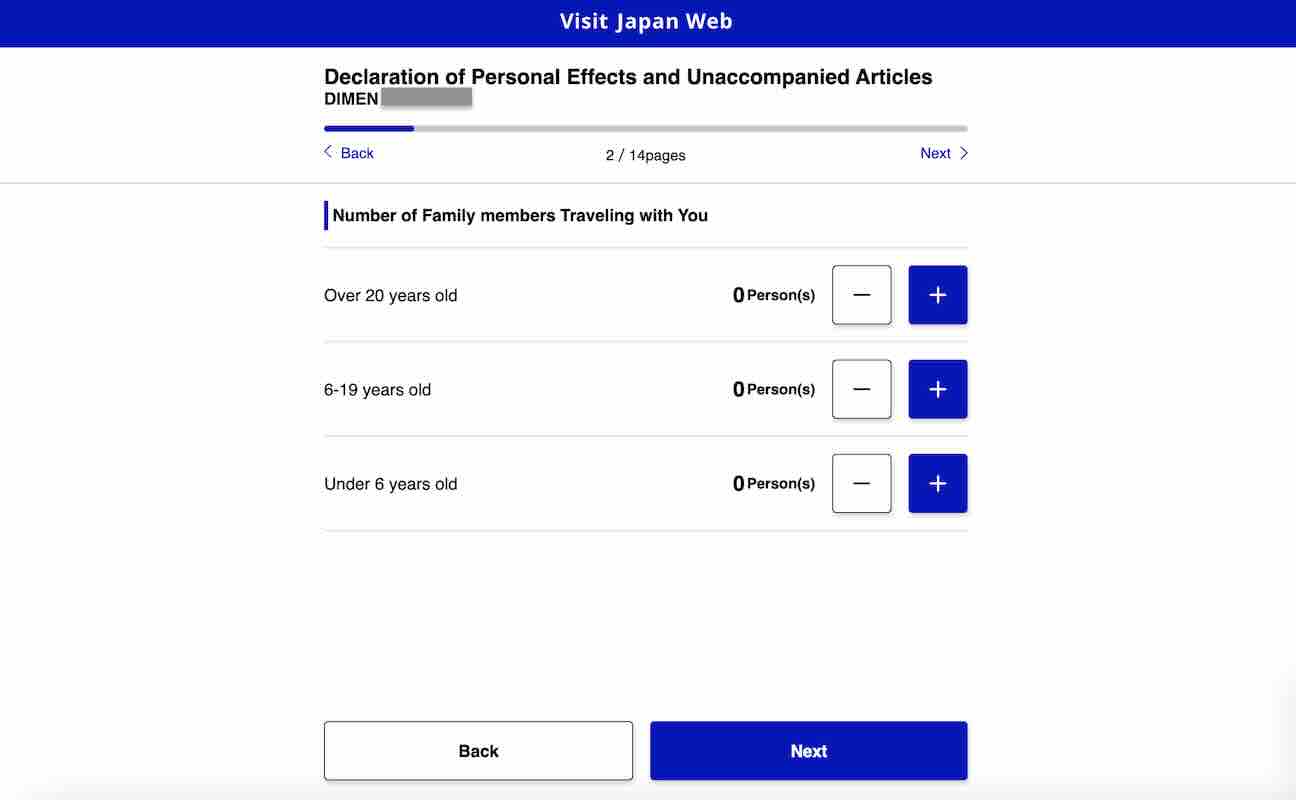
On the next page, you need to enter the number of family members traveling with you. If you’re not traveling with any family, just leave them at zero (0) and click “Next”.
11.1 Declaration Information
In this section, you’ll answer questions about items you’re bringing into Japan. Among the prohibited items are firearms and explosives. There are also restricted items including meat products, fruits, vegetables, and plants. Read every item to be informed about the restrictions and other information you need to know for customs declaration.
Once you’re done, click “Next” to generate your QR code for customs declarations.
Have Peace of Mind While Traveling!
Getting a travel insurance is optional, but we highly recommend this, especially when traveling abroad. Travel can be unpredictable, and though we hope we’ll never use it, having it gives us peace of mind in case of unexpected delays, cancellations, or emergencies.
For international destinations, consider PGA Sompo’s TravelJOY Plus insurance. You can GET IT HERE. Don’t forget to use WORTHIT for a special affordable rate.
I’ve lived in South Korea for over 3 years and I’m half-Korean I’ve been all over Korea and tested out some of the best tours in Seoul so you can figure out which is the best for you! Now, I don’t need to tell you that Seoul is a city that exudes energy, modernity, and centuries-old traditions, all wrapped in one. But what you might not know is how to see the city’s highlights in the most engaging way. So, grab a notepad (or just open your travel planning app), because I’ve got you covered!
This site contains affiliate links to products. We may receive a commission for purchases made through these links. Support my blog here
The Ultimate Guide to the Best Day Tours in Seoul for Every Kind of Traveler
Looking for the best way to maximize your time in Seoul? The city offers a range of day tours designed to suit all kinds of interests. Nature lovers can find solace on trips like the Nami Island and Gangchon Rail Bike tour, which offers a unique blend of scenic beauty and physical activity. History enthusiasts will appreciate the Korean Folk Village and Everland Day Tour, combining a deep dive into Korean culture with modern-day thrills. There is so much to see in this beautiful country.
Are you a history buff or just love dressing up? Then this day tour in Seoul is the dream! You get to visit the iconic Gyeongbokgung Palace – a UNESCO world heritage site, where you can rent a Hanbok—the traditional Korean outfit—and feel like a royal from the Joseon Dynasty. Don’t miss the Changing of the Guard ceremony; it’s like stepping into a time capsule! You’ll also get to experience Bukchon Hanok Village – one of Korean’s preserved traditional villages.
This is pretty much one of the most popular tours you can possibly grab. You can easily do this on your own as well, but it helps when you have a tour guide to give you some of the history of this palace and surrounding areas.
A visit to Seoul is incomplete without indulging in some lip-smacking Korean street food. This tour provides you with local guides and takes you through bustling markets like Myeongdong and Gwangjang, where you’ll get to try local cuisine classics like Tteokbokki, Hotteok, and Kimbap.
To be honest, this is one of my favorite day tours in Seoul. There aren’t a lot of food tours available in other parts of Korea, so this is a great stepping stone to knowing what foods to try and eat in South Korea. Korean food is more than just Korean BBQ! So go out there and try some of my favorite dishes that I grew up with.
EMBARK ON A CAPTIVATING NORYANGJIN FISH MARKET TOUR | In Seoul, where you’ll witness a bustling hub of activity and immerse yourself in the vibrant seafood culture of Korea. Explore rows of stalls brimming with fresh seafood, observe the lively auctions, and indulge in delicious seafood delicacies straight from the market’s numerous restaurants. More details here.
If you’re anything like me and love to start your day with a burst of physical activity, then I suggest the Bukhansan Mountain morning hike. You’ll head to Bukhansan National Park and hike one of Korea’s most popular mountains. Get those boots on and enjoy the panoramic views of Seoul from the top. Just don’t forget your camera!
And finally, if you’re looking to explore the posh neighborhoods of Seoul, head over to Gangnam. Yes, as in ‘Gangnam Style’. It’s a shopper’s paradise and home to some of the best cafés and boutiques Seoul has to offer. Day tours in Seoul like this are perfect for people wanting to learn more about why Gangnam became so famous.
EXPERIENCE TRADITIONAL KOREAN CULTURE: RENT A HANBOK IN SEOUL | Immerse yourself in the rich cultural heritage of Korea by renting a hanbok, the traditional Korean attire, in Seoul. Read more details here.
Ready for the scoop? Seoul is not just a bustling metropolis; it’s also the backdrop for many of your beloved K-Dramas. Picture yourself at the Namsan Tower, where countless love confessions have been made. Or imagine strolling down the stylish streets of Garosu-gil. And let’s not forget the iconic Gyeongbokgung Palace, which has graced the screen in historical dramas. Whether you’re a hopeless romantic or a history geek, these K-Drama spots in Seoul add an extra layer of magic to your Korean adventure.
Experience the city that never sleeps! From the sparkling Han River to the bustling streets of Myeongdong, the Seoul Night Tour gives you a slice of Korean nightlife. It’s the city under the stars, and you won’t want to miss a moment. This tour is a great one to also experience delicious Korean street food as many Koreans love to stay out late with a good drink and good food. We have a tradition that when we drink, we also need to eat.
Ghosts in Seoul? You bet! On this eerie walking tour, you’ll hear legends and stories of Seoul’s haunted past. Wander through dark alleys and learn about the city’s mysteries, myths, and spirits that refuse to rest. This is a great way to get spooked especially during Halloween.
Worried about finding Halal options while exploring day tours in Seoul? Worry no more! The Muslim Friendly Tour offers an itinerary that respects Islamic practices, including Halal dining options and prayer spaces. See the sights without the stress!
To be honest, trying to find food tours strictly for Muslims within Korea can be quite difficult, so to see this amazing guided tour being offered and available is amazing. I often get asked what are the options for Muslims in Korea and unfortunately, it’s quite difficult for me to navigate as someone who isn’t. So rely on the experts living in Seoul to provide that information and join this amazing Muslim Tour in Seoul!
This 5 star cooking experience is one that shouldn’t be missed! Unleash your inner chef in this interactive cooking experience! Learn how to make Korean dishes like Kimchi and Bibimbap under the guidance of local experts. It’s a deliciously fun way to immerse yourself in Korean culture. You’ll be able to experience a tour of Mangwon Market as well.
Korean food is no easy task, but this Korean cooking experience will help you learn how to make some of the best and easiest Korean dishes. You’ll be stuffed at the end of this experience and hopefully learn more about Korean food and culture.
Explore Seoul at your own pace with a biking tour that takes you along the Han River and through some of Seoul’s most scenic parks. You’ll cover more ground and see the city from a unique, up-close perspective. In this tour, you’ll be able to have lunch and experience Korean tea at a traditional tea house. You’ll get to experience iconic sights including Iwha Woman Street, Sinchon, Chungdong Church, Deoksu Palace, Gyeongbokgung Palace, and the famous Insadong markets.
Best Day Tours from Seoul
These are some of the best day trips from Seoul that you can take. The best thing about traveling within Korea is that it’s quite easily accessible.
This is one of the best Seoul day trips that offer you a breath of fresh air—literally! Imagine pedaling down old train tracks with the wind in your hair at Gangchon, surrounded by lush landscapes that look like they’re straight out of a painting. It’s probably one of the most booked tours you can get because of all the popular destinations. The garden of Morning Calm is a beautiful garden, especially during Christmas in Korea. Nami Island is an island where you can literally see all 4 seasons change. One of my favorite things to do in Korea is ride the Gangon Rail Bike, it’s a unique experience that you should try at least once.
And let’s not forget the fairy-tale charm of Nami Island, with its towering tree lanes, romantic walkways, and even ostriches prancing around. It’s as if Mother Nature herself decided to bless this tiny island. Whether you’re traveling with family, your special someone, or just your adventurous self, this combo is a serene yet exciting way to experience the Korean countryside. Nami island is where many K-Drama movies were filmed and is a popular tourist location, especially during autumn in Korea. This should be added to your Seoul itinerary.
One of the most recommended tours on GetYourGuide is the DMZ (Korean Demilitarized Zone) tour. It’s an eye-opener that offers a glimpse into the tension between North and South Korea. The DMZ tour includes stops at the 3rd Tunnel, the Freedom Bridge, and the Dora Observatory. A must for anyone interested in geopolitics or history!
This is one of the best things to do in Paju as it has a lot of history. The DMZ has a lot of interesting information and can provide you with some insight into exactly what has happened. Due to the war, many Koreans had escaped from North Korea and a lot of family members in Korea still have family in North Korea that they haven’t been able to see for decades. You can choose between a full day tour or half-day tour. Some tours include the JSA (joint security area) while others do not – this is one thing to consider as it’s definitely an area that shouldn’t be missed.
Suggested DMZ Tours
Book cheap airline tickets and accommodations with Booking.com to save money when you’re moving abroad!
Boulders and blooms, anyone? The Pocheon Art Valley and Herb Island tour is a feast for the eyes and soul. First, you’ll explore the stunning landscapes of Pocheon Art Valley—an abandoned quarry-turned art space. Then, bask in the aromatic bliss of Herb Island, filled with themed gardens and magical evening lights. Nature and art have never blended so beautifully.
Pocheon Art Valley is a beautiful place to check out and you can easily take the tram up to the location and see these beautiful rocky features. Herb Island not too far from Pocheon Art Valley is a great place to see some lights and take photos. Many K-Dramas were filmed here because of the beautifully designed backdrops. During summer, it’s a great place to see the lavender.
From the past to the present, experience the full spectrum of Korean culture. Begin your day at the Korean Folk Village, where you can immerse yourself in the traditions and crafts of yesteryears. Then hop over to Everland, Korea’s largest theme park, for some high-adrenaline fun.
Everland is great for older kids as there aren’t as many rides available for younger children, however, there are still a few available and an amazing zoo exclosure to see the different exotic animals. You can get some delicious Korean park food, ride some large wooden rollercoasters, drink beer, and take many photos as well.
Unlock the secrets of the Joseon Dynasty with a visit to Suwon Hwaseong Folk Village. As you walk along the well-preserved Suwon Hwaseong fortress walls, you’ll find artisans demonstrating traditional Korean crafts. It’s history brought to life, making you feel like you’ve traveled back in time. You’ll also get to experience Gwangmyong cave as well as a rail bike ride.
Now, don’t get me wrong, I love Seoul – I lived in Seoul for a year, but Incheon is where my heart and home is. I lived in Incheon for 2 years and it’s where most of my family are located and I just find it to be one of my favorite places to be.
Incheon is more than just Incheon airport, there are a lot of things to do in Incheon despite what a lot of people say. You can discover the historical Chinatown, visit the fairytale-like Songwol-dong Fairy Tale Village, and don’t miss out on the breathtaking views at Wolmido Island. There are a lot of areas to shop and see in Songdo as well.
Block off a day, adventurers, because Legoland Korea Resort is a colorful paradise and amusement park where every brick tells a story! Perfect for families, kids-at-heart, or anyone who ever dreamt of stepping into a life-sized Lego world. Located in Chuncheon City in Gangwon-do, a convenient distance from Seoul, this wonderland offers roller coasters, water attractions, and hands-on Lego building experiences. Dive into themed zones like Ninjago World and the magical Lego Castle. It’s more than just a theme park; it’s a creative playground that brings your favorite Lego sets to life.
You’ll want to select the Roundtrip Shuttle Bus option and departure times starts between 8-8:30 from either Hongik University Station or Myeongdong Station.
If you are traveling during Winter in Korea, you’ll definitely want to see the snow and visit this beautiful winter wonderland during this time of year. Grab your mittens and your sense of wonder, because Vivaldi Park SnowyLand and ski resort is a winter wonderland you won’t want to miss! Located just a snowball’s throw away from Seoul, this magical resort transforms into a snowy paradise during the winter months.
Whether you’re a pro on the slopes or just there for the snow angels, there’s something for everyone. Think of sledding hills, snow tunnels, and even an ice climbing wall. Plus, the atmosphere is as warm as hot cocoa with bonfires and evening light shows. So if you’re yearning for that perfect blend of exhilaration and coziness, look no further. Get ready to make your winter fantasies a frosty reality!
If you are traveling during autumn or winter, this is a great Seoul day tour to take especially for nature lovers. It’s also amazing to take outside of those time frames as well, but you’ll really get to see the beauty of Korea during those times of the year.
Your journey starts with Jeonju Hanok Village – one of the best places to visit in Korea, where traditional Korean houses, known as Hanok, line the streets like a scene from a historical drama. But keep those cameras ready, because next up is Jangtaesan—home to luscious forests and eco-friendly attractions. And for the grand finale? Daedunsan, where suspension bridges and cable cars await, offers sweeping views of the mountainous landscape. From history to heights, this tour has it all. You’re not just sightseeing; you’re soul-searching in the heart of Korea.
Thoughts on Best Day Tours in Seoul
And there you have it, my adventure-seeking pals! From historical haunts to culinary quests, from natural wonders to the magic of television brought to life, the best day tours in Seoul offer a tapestry of experiences that are as diverse as they are thrilling. Whether you’ve got a single day or a whole week to explore, these tours are your passport to a deeper understanding of this vibrant city.
The number of calls I’ve gotten from friends and family members lately asking me to help with using credit card points for flights is at an all-time high. You should have a workshop, they say. We’d pay to have you figure this out for us, they tell me.
But look, I’m not going to charge them—or you—but I will share all my secrets here. It’s taken me awhile to figure out the process, and it’s a bit like travel Jenga if we’re being honest. If you do find this content helpful, I’d appreciate you use the embedded links to open credit cards or subscriptions, as it continues to help me provide these resources free of charge to you.
This site is part of an affiliate sales network and receives compensation for sending traffic to partner sites. This compensation may impact how and where links appear on this site. This site does not include all financial companies or all available financial offers.
Quick resources for booking flights
How to find rewards flights
People think that opening a credit card and earning the sign-up bonus is all you have to do, and rewards flights will just materialize. Wrong! Obviously, you need the points first, but each airline varies in how much inventory they have open for awards seats and the amount of points needed to book (which also depends on time of year you’re traveling, class of service and route, among other things). One service I love that makes this process easier is Point.Me, which lets you load in all your credit card points and figures out flights for you based on which points you have (Ultimate Rewards, Membership Rewards, Bilt Reward, etc.). You can then sort by lowest points, quickest flights or your personal credit card/airline loyalty programs.
It’s how I found our flights in a very complicated itinerary to Qatar and onto Thailand—we flew in suites all the way around the world and just paid a total of $200 out of pocket for taxes—and it’s well worth the subscription fee. But if you don’t want the ease of a service to do it for you, here’s what you need to know as you start the process of using credit card points for flights.
You have to put in the research
Once you have your destination in mind, the first things to research are 1) what airlines fly there from your home airport and 2) do your credit card points transfer to those airlines? For example, Chase Ultimate Rewards points transfer to United, KLM and AirFrance, while American Express Membership Rewards transfer to Delta (and no one transfers to American, ha). I find this chart from In Points We Trust a helpful one to reference quickly when I’m doing my flight searches.
When finding reward flight availability, you may have to reposition to a larger airport (i.e. book a separate flight to a larger airport with better airlift). Being based out of Nashville at BNA, I do a lot of this—I often fly for cheap or use my Companion Pass to get to other cities like D.C., Atlanta, Newark or even JFK to begin my journey, then book my round-trip international airfare out of those hubs.
Once you have an idea of what routes go where, then you can start plugging and playing on the airline websites. You’ll usually need a frequent flier account to search rewards availability, so go ahead and sign up for the airline(s) you think you may be flying so you’ll be one step closer. After you have an account, you can plug in your dates or date range, then start looking at availability and pricing. For many airlines, this means checking a box that says “use points” or “rewards flights.” And if the airline (like United, pictured here) offers a calendar by the month, it’s worth checking to see what days have the cheapest rewards availability to your destination.
Sometimes, I find it easier to search awards availability on the airline’s app, so if you’re finding the browser experience clunky, considering downloading the app instead. The 300 level of using credit card points to fly for free is learning what alliances (e.g. Avios, Flying Blue, etc.) you can transfer to—and also what airports to avoid connecting through as they charge an exorbitant amount of taxes (I’m looking at you, Heathrow)—but that is a topic for another day once you’ve got the basics down.
This is important: You’re always going to want to transfer points to that airline’s site versus booking through the credit card portal, which often costs five times the points as transferring directly to the airline, not to mention has fewer routes available.
If you find a flight for, say, Qatar Airways that requires 140,000 points, then—and only then—is it safe to transfer the points over from your credit card to that airline account and book the flight stat. Points transfers often are instantaneous but sometimes can take up to 72 hours, so don’t fret if you don’t see them in your airline account right away. And if an airline allows you to hold the seat—which often is something you’d have to do via calling—absolutely take them up on that.
You have to book early
For our Thailand trip this year, I booked my flights 11 months out, and the same for our Australia trip coming up this winter. Do you always have to be looking that far out? If you want to fly business, the answer is generally yes. Economy availability is usually more plentiful, but business class has limited inventory because the airlines want the cash for those expensive seats.
Airlines typically release flights around 330 before departure. If you’re flying international and want to use points for business class seats, I suggest you book as close to that release date as possible.
You have to be flexible
You can’t have dates set in stone when you need to leave and arrive and expect to find points flights that magically align with that dream. After I have a general idea of where I want to go—like the year and season, for example—and how many days I want to be gone for, I’ll start tracking prices on Google Flights (if I’m paying out of pocket), including setting up price alerts, and watching rewards availability like a hawk (if I’m using points). This is a time-consuming hobby, make no mistake.
If you have the flexibility to travel with a few weeks’ notice, you can definitely make out well using points for flights. For example, I just saw a lot of award availability open up to Europe for next month! The points game is great for Type A travelers like me who plan their travels a year out, as well as fly-by-the-seat-of-their-pants jetsetters who have the flexibility to up and go on a whim.
I also subscribe to many different newsletters like Going and 10xTravel—I recommend the paid subscriptions for both—which give me heads up about short sales, awards flight availability and more.
Also know going into this process that many holidays or high season periods will likely be sold out or blacked out—or, on the flip side, you’ll have to spend a premium of points, meaning it might not be worth it to use your hard-earned points on that specific trip. I typically find I get the best bang for my buck using credit card points for flights when I’m traveling outside of the big travel seasons like summer and November/December.
My favorite credit cards for earning travel points
Each of them has different benefits, but all of them come with lounge access, which I use the heck out of.
Top ways to earn points toward flights
Beyond opening credit cards, getting the sign-up bonuses and using those cards for key categories, there are other things you can do to make sure you’re getting the maximum points.
Link your Rakuten to your AmEx account
The number one—read this: NUMBER ONE—way to rack up additional Membership Rewards points is by signing up for a free Rakuten account, then linking it to your American Express card. I’ve found my points through cash back are way more valuable than a few dollars each cycle.
You can only do this if you have an AmEx account. Sorry, Chase and Cap1 card holders. Explore my favorite AmEx card here.
Check your offers regularly
No matter which card you have, there will be an offers section in your dashboard. I routinely browse them and add any ones—like LuluLemon, Marathon gas, Hilton, etc.—to my offers, that way if I spend money with any of those businesses and meet the criteria, I’ll either earn additional points or cash back. AmEx, in particular, often has points deals for Amazon purchases. You just have to make sure you (obviously) use that card when shopping at the business.
Refer your family and friends
Once you have opened credit cards, using your referral link when friends and family open the same card can be helpful in accruing additional points you can use toward travel. And bonus, you didn’t have to spend a dime to do it either!
Any other questions on using credit card points for flights? This is just the tip of the iceberg, but should get you going as you work toward your master’s degree in rewards travel.
Opinions expressed here are author’s alone, not those of any bank, credit card issuer, hotel, airline, or other entity. This content has not been reviewed, approved or otherwise endorsed by any of the entities included within the post. Terms apply to American Express benefits and offers. Enrollment may be required for select American Express benefits and offers. Visit americanexpress.com to learn more.
Tennessee draws visitors for myriad reasons: music, food, nature, civil rights history and art (yes, art). And if you’re heading this way and love a good free road trip activity, you may be looking for the best mural cities in Tennessee. As a bona-fide mural chaser, traveler and a public art nonprofit president, I’m here to be your guide. After all, I want you to see the very best art my home state has to offer!
“Art of Harmony” mural by Ty Christian; beauty image mural in Tullahoma by Sophi Odling
My husband and I have been seeking out cities with great public art—think: Cincinnati, Austin, Lisbon, Oklahoma City, Portland—for more than two decades. And for seven years now, we’ve also been helping develop the face of public art in rural parts of Tennessee through our nonprofit work. Murals drive tourism, and they have the domino effect of attracting visitors, who then spend money at local businesses. It’s a win-win for everyone.
If you’re traveling to the Volunteer State and want to go on your own public art road trip, I’ve got some ideas for you. Starting from west to east, here are the best mural cities in Tennessee and what to see while you’re there.
Memphis, Tennessee
If you want the true pulse of Tennessee, start in Memphis. This city is the home to blues, jazz, gospel and a whole host of creatives during their thing. From Beale Street to the Mississippi River, Overton Park to Broad Avenue, Memphis has so many nooks and crannies to explore and murals to unearth. I have a full guide to the best murals in Memphis here, as well as other guides to planning a weekend in Memphis.
Memphis murals by Damon Lamarreed and Pugs Atomz, Dustin Spagnola, Qwynto, Alive Paint and Siphne A. Sylve, Sarah Painter and Cosby Hayes
The story of Waverly’s art scene is the result of one local entrepreneur’s love for train graffiti. He wondered, if given legal permission to paint, what these artists could be capable of if they weren’t trespassing or vandalizing. So he started the Walls Art Park in Waverly to allow creatives the space to do just that. The Walls Art Park first opened in 2018 with 14 walls scattered among three wooded acres; a year later, Klein added two acres, which allowed for even more walls once trees were cleared and trails added. Today, the park spans 80+ paintable surfaces, and Klein has plans to expand into the adjoining 10 acres with camping areas and other forms of three-dimensional art like sculptures and wood carving. Waverly is also home to Loretta Lynn’s Ranch and Johnsonville State Historic Park.
When it comes to sheer volume, Nashville’s murals are unmatched. Corporations like the Tennessee Titans have seen the value of public art, and several neighborhoods like the Nations have developed policies where new developments must sponsor art installations as a gift to the community. Some names to watch out for include local muralists Cymone Wilder, Mobe, Folek, Kim Radford and Whitney Herrington, as well as international names like Beau Stanton and Guido van Helton, who designed the famed Silo mural. And yes, there’s even a Kelsey Montague wings mural, much as I hate to even mention it. If you’re coming to Music City, the art scene is very spread out, so I made this mural guide to Nashville, which I update frequently, to make your experience a bit more seamless.
Nashville murals by Sarah Painter and Cymone Wilder, Jason Woodside, Thomas Halloran, Sentrock
Manchester is where we first started our public art nonprofit—much to the chagrin of some of the older folks in town—and we were able to make an immediate impact by transforming the entrance to the downtown Manchester square almost overnight. In the years to come, we added pieces throughout the Manchester greenway, as well as one at exit 110 at Foothills Craft to raise awareness of suicide prevention. This mural happens to be on the way to Old Stone Fort State Archaeological Park for those who are coming down to visit Manchester’s lovely state park and waterfalls.
Manchester murals by Tara Aversa, Matt Willey, Sarah Painter and Cosby Hayes, Ivan Roque
Tullahoma is where I was born and raised and the place I chose to come back to as an adult. It’s also a town that is plagued by a state highway and a rail line running right through its core, disturbing the walkability of the downtown—but one that draws so many visitors thanks to the presence of Arnold Air Force Base, George Dickel (dba as Cascade Hollow Distilling Co.) and Jack Daniel’s Distillery. So we decided to make it our personal project by focusing on driving people to various downtown Tullahoma businesses with the draw of public murals. We have 18 murals in Tullahoma and counting, and for as long as we live here (and there are walls to paint), it will continue to be a passion of ours. If you’re coming to Coffee County, you can use this map to see all the murals in Tullahoma and Manchester.
Tullahoma murals by Kris Kanaly, Ty Christian, Nathan Brown, JUURI, Mobe, Daria Hammond
A decade ago, Chattanooga’s art scene wouldn’t have made my list for best murals in Tennessee—too much art by committee, too little allowance for creative liberties—but the city has seen a serious renaissance in recent years. The addition of local artists like Nathan Brown making a splash with full-blown, block-long murals has made the Scenic City one I love driving through to look for new murals. Chattanooga, in general, is a great town to visit, with neighborhoods like St. Elmo and Northshore some of my favorites.
There aren’t enough powerful adjectives to describe just how much I love the town of Sweetwater. Four years ago, I only knew it by name, then we were awarded a National Endowment for the Arts grant to do an original piece in a town that had ties to the suffrage movement. Sweetwater was the unanimous pick. What we found in the coming months—and later, the years—was a town that supports its small businesses, one that is devoted to the visitor experience, and a city staff who truly cares about its community. Today, Sweetwater is well on its way to 10 murals in town thanks to the visionaries in charge, and we couldn’t be happier to be a part of that. But there’s plenty more to do beyond murals, too: There’s the Lost Sea Adventure, Tsali Notch Vineyard, Sweetwater Valley Farm and the sweetest Smokies-adjacent town Tellico Plains just down the road.
Sweetwater murals by Jenny Ustick, Kim Radford, Megan Lingerfelt, Whitney Herrington
Where to stay in Sweetwater: Remedies Inn right on Main Street
Knoxville, Tennessee
If I had to name the artiest town in Tennessee, I would respond with Knoxville, no contest. Large university towns often pump out some of the most creative endeavors, and UT’s The School of Art has helped pave the careers of many notable alumni like designer/illustrator Paris Woodhull, who has her own downtown storefront. But what I love most about Knoxville’s artistic fabric is the mindful placemaking: the ever-changing murals of Strong Alley, the inspiring sculptures in Krutch Park, the brand-new Knox Walls. If every city approached creativity the way Knoxville does, the world would be in great shape.
Knoxville murals by Megan Lingerfelt and Curtis Glover, Paris Woodhull
We’ve installed many more murals in small towns that could eventually earn a spot on this best mural cities in Tennessee list with the addition of more original pieces in the future (and absolutely no wings). Here’s a map of all of our DMA installations throughout the state.
Jess and I are lucky enough to travel a lot, with our travels taking us to all sorts of locations and venues around the world. Whilst most of our travels don’t require us to wear formal clothing, there are sometimes occasions where we do need to dress up a bit. So I have been on the hunt for a travel-friendly suit.
I wanted a travel suit for visiting venues with a dress code, such as a fancy restaurant, opera night, or a formal cruise night. Also for those times when we just want to dress up for a special occasion such as for a birthday dinner, Christmas party, or perhaps for a formal afternoon tea experience in Paris.
I also give talks and workshops at travel and photography conferences and often wear either a sports jacket or full suit for some of those events.
We also have other events we attend, such as weddings, holiday parties, charity fundraisers, and funerals, where a suit is often required or expected. Sometimes these events are at home, but sometimes they require travel so having a suit that can travel well to a destination wedding or out-of-state funeral is nice.
What all that means is that from time to time I find myself needing a suit. Of course, when I had a job in the corporate world I had a number of suits. However, most of these weren’t suits designed for travel and required some maintenance to keep them looking sharp and wrinkle-free.
For me, a travel suit has to be something that is going to stand up well to the rigors of travel. We often travel for weeks at a time and the suit needs to survive being packed away for lengthy periods as I don’t tend to wear it all that often. I don’t want to have to worry about wrinkles in the fabric when I unpack it, it just needs to come out of the bag and go on me looking smart.
I’d also prefer it doesn’t take up too much room in my bag if possible, given that I’m not likely to be wearing it that often.
I also want a travel suit that works for most occasions, including those outside of travel, such as events and event photography. And one that will work across most types of destinations and climates. For instance an events or wedding photographer is generally expected to wear a suit to look professional and blend in with the guests.
My initial search for a travel suit started back in 2020. Over the last several years, I’ve actually spent quite a bit of time trying to find the perfect travel suit. Today I have three travel suits in different colors and have tested several others along the way.
So, without further ado, let me help you find the perfect travel suit for you, based on my experiences to date! Whether you’re looking for a good suit for business travel, preparing for a destination wedding, or you just find yourself needing to look more formal when you travel, I hope this guide helps you!
What to Look for in a Travel Suit
Before I recommend specific suits, I want to share some ideas of what to actually look for in a travel suit. This will help explain why I chose the suits I did, but will also help you pick the right suit for you, even if it’s not one I recommend.
Perhaps the two most important aspects of how a suit is going to look and wear are the type of material it is made of and the cut/fit of the suit.
For a travel suit wrinkle resistance, weight, and ease of care are also often very important. But there are a lot of other things to consider as well when choosing a travel-friendly suit, including price, color, pockets, and other features.
Let’s look at each of these.
Material
The choice of material the suit is made from is going to make a big difference when it comes to how well a suit works for travel. It’s also going to make a big difference when it comes to the price of the suit. Some materials travel a lot better than others. The main options you have are as follows.
Wool – Wool is a great natural fabric and generally considered to be the best fabric overall for a suit. It is breathable, good for various weathers, and looks refined. There are even specific wools which are woven to be more wrinkle resistant. There are a lot of wool types and names used for wool fabrics used in suits including twill, merino wool, cashmere, tweed, worsted, and flannel.
Polyester and Polyester Blends – Polyester suits are generally going to be your most budget-friendly option and most polyester suit fabrics tend to be very wrinkle resistant. Polyester also tends to be an easier care option, and some polyester options are even machine washable. The main downside to polyester is that is not a natural material and might not be as breathable as a natural fibre. It also typically doesn’t look or feel as high-end as a wool suit from up close.
Linen – Linen suits have a timeless elegance and can be an option for warm and hot weather destinations. It’s a lightweight and breathable fabric but one that wrinkles easily and is generally harder to care for and it can stain more easily. So linen suits can be a good option for some people but you have to be OK with wrinkles and a more casual look.
Cotton – Cotton is another natural and breathable fabric, like linen, that is often used in suits. Cotton can be a comfortable and affordable options, but its downsides are that it tends to have a more casual look, doesn’t drape as well, and some cotton fabrics can wrinkle easily. However, you can normally iron cotton very easily to get rid of wrinkles. Summer suits will often be made of a seersucker fabric.
Other fabric options like silks, velvet, nylon, etc. are not that common as suit materials. They are generally best avoided as a good travel suit fabric in our opinion.
Of course, you’ll also see a lot of blended fabrics out there being used for suits as well such as wool/polyester blends, linen/cotton blends, wool/silk blends etc. I would check to see which fabric is making up what percentage of the fabric and consider the pros/cons of each.
For example, some suits might use a majority of wool for the breathability, but also include a small amount of polyester blend to add stretch.
Overall, we believe the overall best material option for most people is wool, and specifically a high twist wool weave which will naturally resist wrinkles. This wool weaving process is done at the mill where the suit fabric is produced, and results in a fabric that is naturally wrinkle resistant. A good example of suits that use this type of specialty wool are the Traveller suits by Suitsupply.
For those on a small budget, polyester is probably your best bet. You can also consider polyester/wool blends which can give you a wool suit at a smaller price point with the benefits of both wool and polyester.
A great budget pick that I’ve tested is the Haggar Men’s Travel Performance suit which you can often find on sale for under $200 for both the blazer and matching suit pants!
For those wanting a machine washable suit, you’ll want to consider a harder wearing polyester suit. Most suits, even most polyester ones, are not designed to be machine washed so you specifically need to look for a brand that makes suits that are designed to be machine washed.
One brand I can personally recommend is the Gramercy suit collection by Bluffworks as these suits can be machine washed and even tumble dried on low heat!
Those looking for a more casual summer look who don’t mind wrinkles, we think linen is a great option. For instance in destinations like Italy and Greece, you see a lot of linen in the summers and it’s a great option for those types of settings.
Cotton is probably my least favorite of the above as a travel suit material. However, I do have a green blazer I got in Italy that is 100% cotton that I love. I wear it when I want to look put together but not too formal.
Color
Color is obviously a personal choice when it comes to a travel suit. We’d suggest picking a color that you like and one that will work in a number of situations. You also want to consider your skin tone/complexion and types of climates you will be wearing it in.
You may also want to pick a suit that will coordinate with any accessories you already have that you want to wear, such as shoes, shirts, and ties.
Navy, closely followed by medium grey and charcoal grey, are generally regarded as the most versatile suit colors. You can see this image matrix for a brief guide. These colors are suitable for a range of events and match well with most shoe, belt, and shirt colors.
A royal blue suit can also be a good option if you want something a bit more modern than a classic navy color. Brown and tan suits can also work and are versatile but are generally less popular than navy or grey suits.
If you are planning to use your suit strictly for more formal occasions (e.g., formal weddings, funerals, charity balls), then you might consider a black suit. However, these can look too formal for some settings and are less versatile.
Also, it should be noted that if you attend a lot of black-tie events (where a tuxedo/dinner jacket and bow tie are expected), it probably makes more sense to get a black tuxedo instead to work for those events and a dark suit in another color (such as navy or charcoal gray) for less formal events.
Other colors, such as tans, medium shades of blue, greens, creams, khaki, burgundy, etc. are also widely available but are going to be less versatile and may not work with all skin tones.
However, they may still be a good choice depending on where you want to wear it and your complexion. For instance, khaki, cream, and pastel suits tend to look better on those with darker skin.
If you are looking at linen suits, these often come in natural shades of creams and tan as well as pastel colors which are well-suited for warmer climates and that type of material. Cotton suits also tend to come in a wider variation of colors and patterns than wool ones.
While a solid color is the most versatile choice and is going to be the most timeless, you can also go with a suit with a pattern for a bolder look and to better fit your personal style.
Classic men’s suit patterns include pinstripes, checks, gingham, plaids, herringbone, and houndstooth. If you opt for a patterned suit, choosing a classic color like navy or gray can help keep it being more versatile.
If you are only purchasing one suit and don’t currently own a suit, I would generally recommend choosing a solid navy or grey suit. Generally, I travel with either a navy or gray suit. These will generally work for a pretty wide range of events from interviews and conferences to weddings and formal nights out. They also generally look good on most people.
Of course, the final decision is up to your needs and your own personal sense of style.
Cut/Fit
There are a lot of suit styles, cuts, and variations out there and looking at all the options can be a bit overwhelming, especially if this is your first suit. You’ll find lots of options regarding how the jacket buttons, linings, lapel sizes, various types of cuts, pocket shapes, button types, linings, venting, paddings, and much more.
If you are purchasing a travel suit, then you are likely buying a suit that you want to last for a long time and which you might not be wearing too often. So, you will want a suit style that is going to last for a long time and isn’t going to become dated in a few years.
For instance, imagine the 1920’s pinstripe double-breasted suits we often now associate with American gangsters and bootleggers from that era, or the disco inspired 1970s leisure suits. These are not exactly timeless designs.
As such, we’d recommend choosing a more timeless and conservative style that will likely stay in fashion, rather than anything that might be popular now but fall out of vogue in the coming years.
The key decisions you will have to make will include whether or not you want a single- or double-breasted suit, the number of buttons on the suit jacket, the size and style of the suit lapels, whether or not the pants are pleated, and whether the suit is slim, classic, or looser fitting.
Again, these are all personal decisions. However, for a timeless look we’d recommend:
single breasted jacket (although double breasted is also popular if you prefer that look)
a 2-button jacket (or three roll two, just don’t button the top button!)
a jacket lapel width that matches your body width (generally, thinner people look better with a thinner lapel, and heavier people with a wider lapel)
lapels with a notch in
choose matching pants in a classic suit trousers style such as one with a mid rise, straight or tapered legs, flat front or single pleat, plain hem, belt loops, and 2 back pockets.
a tailored/slim or classic/regular fit (a tailored or slim fit is more fitted to body whereas a classic fit is looser and more relaxed)
Whether or not you opt for slim/tailored or regular/classic fit will depend on your body shape and personal style. It’s really important that you feel comfortable and confident in your suit, so choose the style that works best for you.
Just be sure to read details of each suit’s fit as different suit brands don’t always mean the same thing when using fit terms (slim/tailored/classic/regular/relaxed/loose) to describe their suit fits.
For the suit pants, if you are buy the suit as a set you often don’t have too many choices unless you choose to customize them. But generally you just want to get a classic pair of dress pants that matches your jacket in the exact same fabric that doesn’t have any features that could really date it quickly (e.g., skinny leg, really wide legs, flared bottoms, wide cuffs/turn-ups).
When you are wearing the suit and the jacket is buttoned, it should not be creasing or pulling anywhere. Areas to check include the shoulder, chest, waist and upper back area. It should also fit well to your body shape and not have excess fabric.
If you are trying a suit on in store, then make sure to look at it in a mirror from all angles. Bring along a friend/partner or ask a store associate for advice about how well it fits.
If you purchase online or by catalog, then be sure to do the same at home and ask someone else to give you advice. Minor alterations in length and fit can be made by a tailor and are generally not too expensive, but you want the overall shape, fit, and features to be there. For more information, this is an excellent guide to how a suit should fit.
There are a few factors that affect how heavy a suit is, and these also affect how the suit performs in different climates.
First, and perhaps most importantly, the actual fabric a suit is made from will dictate how heavy the suit is.
Fabric weight is measured in grams per square metre (gsm), with lower numbers reflecting a lighter suit and heavier numbers reflecting a heavier suit.
A lightweight suit will generally be made of fabric which varies from around 150gsm to 290gsm. A midweight suit will fall between 290gsm and 360gsm. A heavyweight suit will be anything over 360gsm. These numbers aren’t fixed of course, but can be helpful as a general rule of thumb.
The fabric weight directly affects the warmth of the suit. The lighter the suit fabric, the more suitable it will be for warm weather. Conversely, a heavier fabric will provide more warmth, good for cold climates.
Naturally, the fabric weight also directly affects how heavy the suit actually is. A heavier fabric will result in a heavier suit, giving you more to carry around. If you pack light, this is definitely something to consider.
Other factors also affect the overall weight of the suit. The suit’s canvassing, lining, and padding, if it has any, can also increase the weight of the suit. A suit jacket often has both canvasing and lining. and it may also have padding in the shoulders.
If you have a choice in the amount of canvasing (a layer of material attached to inside of jacket that gives it shape) and/or lining (thinner layer of cloth that touches your body and can be used in both jackets and/or pants) for your suit, your choice will depend on how much structure you want, the climate where you plan to wear it, and how formal or casual you want your suit to be.
More canvassing and lining is best for more formal jackets, jackets worn in cooler climates, and when you want more structure. Unlined jackets are best for those wanting a lighter jacket, more casual jacket, and warmer climates. The amount of canvasing and lining can vary a lot from completely unlined to full lined. If you are not sure, there are also partial and half lined options.
For a travel suit, we’d recommend something on the lighter end of the spectrum, which will be both easier to pack and carry, and also offer versatility in a number of climates. If it is cooler, you can always wear an undershirt if necessary or opt for a more medium-weight suit. My personal preference is definitely towards less lining and padding.
Suit lining comparison
Size Inclusivity
While most suit brands do offer a wide range of suit sizes, these won’t work for everyone. While travel suits can pretty easily be sized down or made shorter by a tailor, those who need larger or longer suits may have more difficulty finding well-fitting suit options.
However, there are still a lot of options. For example, brands like Suitsupply offer sizes from XXS to XXXXL and offer regular, long, and short sizing.
You also have the option to customize the size and fit of their suits and you can give them your exact measurements. Even budget-friendly brands like Haggar offer big and tall sizes in many of their suits.
Versatility
When choosing a suit for travel, you will want to consider how versatile it is going to be. The versatility is going to come from many of the factors we’ve already discussed including style, color, and fabric weight, as well as how well it pairs with other clothing and accessories in your wardrobe.
Things to think about include:
Can you wear the suit pieces individually as well as together? Would you wear the blazer jacket with different pants for a more casual look for example? Would the pants also work well with a dress shirt to wear for work or business functions or church events?
Will the suit work for you in different situations and events? Would you wear it to a wedding, conference, holiday party, funeral, cruise, business meeting, fancy dinner, baptism, etc. Think about events you’ve been to over the past few years or have coming up, how many of them could it work for?
Does the travel suit work in multiple destinations and climates? Does it work in both cold and hot climates? Would you wear it humid as well as dry destinations? Would it fit in equally well in the places you tend to travel in the USA, Europe, Asia, etc?
Does the suit work well with other wardrobe pieces you already have? You are likely to wear a suit more often if it goes with different colored shoes, belts, bags, shirts, ties, etc.
Generally, the more versatile the suit you choose, the more useful it will be and the more opportunities you will have to wear it.
For instance, consider that you are planning a trip to southern Italy, and you choose a nice cream linen suit for your summer travels there. It can be a great option for an Italian summer trip. However, that same suit isn’t likely going to be as well suited for a business meeting in London, a fjords cruise formal night, or a New York City formal wedding.
Now if you have very different circumstances where you plan to wear a suit, you might consider budgeting for two suits that will cover all scenarios. For instance, one darker and more formal suit and one lighter and more casual suit.
Overall, pick the most versatile suit you can. I feel it is worth spending a bit more on a more versatile suit option that you can wear more often compared to a lower cost suit that is less versatile and you don’t wear so much
Wrinkle Resistance
We’d argue that one of the key criteria to look for when choosing a travel suit is how resistant it is to wrinkles and creases. Travel is going create a lot more potential for wrinkles in a suit compared to having it hanging in a closet at home. This is the case even if the suit is in a suit carrier.
Ideally you want a suit which is going to be resistant to wrinkles and creases, and this all comes down to the material the suit is made from.
Good materials which include wrinkle resistance include high twist open weave wool, as well as some synthetic materials such as a polyester blend.
Most travel-oriented suits should make it clear that they are wrinkle resistant in the suit description but do dig into the claims to see what exactly it is about the suit that validates these claims. Check reviews from customers and see if they report issues with creases or wrinkles. If your suit arrives in the mail wrinkled, that is a bad sign.
Now if you are going for a suit made of linen or cotton, then you’ll likely have to live with some wrinkles and creases. Just be sure to know if it can be ironed as needed.
Care
Travel can be tough on a suit, and you are likely going to need to get it cleaned from time to time. So, when purchasing a suit, you will want to check to see how easy it is to clean.
Can it be machine washed? Tumble dried? Ironed? Hand washed? Does it have a stain repellant? Is it dry clean only?
If these features are important features for you, then be sure to carefully check care instructions prior to any purchase.
In our experience the majority of suits are going to be dry-clean only. This is an additional expense to consider in your budget when purchasing a suit. While you’ll likely get a number of wears out of a suit and be able to just spot clean, eventually it will need a full clean.
That said, there are quite a few travel suits on the market which can be machine washed, hand-washed, machine dried, and even ironed. For lots of travelers, an easy care option is a great plus. If you are looking for this, we recommend checking out suits by Bluffworks, Ministry of Supply, and this suit by Haggar.
Even a lot of “dry clean only suits” can be hand washed and air dried if done gently and with care. My wife, Jess, is pretty good at successfully hand washing and air drying all kinds of “dry clean” only materials to save money on dry cleaning (and to avoid the chemical treatments). But do take into account it is always a risk to ignore the suit’s care recommendations.
Based on our experience, even if you have an easy care travel suit that can be machine washed and everything, you still want to treat it gently to keep it looking it best and extending its life. I would only machine wash when needed, use gentle and delicate cycles, and use low heat or air dry.
Pockets
Most suits will have a number of pockets in both the suit jacket and suit pants, and there is normally a choice in pocket style.
Honestly, this is a personal preference. The main thing is ensuring there are sufficient pockets for your needs. If you are planning on wearing a travel suit to the airport for example, a suit with pockets that zip or that can comfortably handle things like a passport might be useful when going through check in and security.
However, if you usually only wear a suit once you are in destination at an event, then the number and style of pockets may not be as important to you. Just think about what you normally like to carry with you when wearing a suit.
If you like a suit with lots of pockets, then I’d recommend checking out the Bluffworks Gramercy suit, which has 18 pockets between the jacket and pants.
Price is going to be a key deciding factor when it comes to choosing a travel suit. I would say that a good travel suit that should last the test of time will probably run you between $500 and $850 (approximately £400 to £650).
However, you can definitely pick up a more budget oriented travel suit for about $200. It might not have all the features or look quite as nice, but it will serve it’s purpose. A well fitting and tailored inexpensive suit can still look really good.
Another option if you are on a really small budget is to check out secondhand and vintage suits. If you can can score a suit of your size, or slightly larger, you can get it tailored as needed for a better fit or to update it a bit.
You can also, of course, spend much more on a suit with custom tailored wool suits often running in the $1,500 to $6,000 range.
However, I’d say most people would probably find the sweet spot of $500 to $850 will get them a good quality suit that will fulfill all their needs and last a good long time.
Recommended Travel Suits
We’re now going to go through our recommended suits for travel. First, I’ll cover the suits I personally own and travel with, which I decided upon after doing a lot of research and trying on a lot of suits.
I’ll share my picks for overall best wool travel suit, my favorite easy care travel suit, and my favorite suit for those with a small budget.
I’ll share my experiences of those suits first. Then, I’ll cover some other popular options that you might want to consider as well.
My recommendation for a wool travel suit is to choose one from the Suitsupply Traveller Suit collection. Suitsupply is a Dutch menswear fashion brand founded in 2000. The brand is best known for its use of high quality Italian fabric suits sold at a much lower price that those of designer brands using similar fabrics.
The Traveller suits are all made of 4-ply Italian wool midweight fabric and come in both tailored and classic/relaxed fits with both single and double breasted jacket options. The suits can be purchase as a suit set, or you can purchase the jacket and trousers separately. It is available in several colors.
The secret ingredient to the Suitsupply Traveller suit is the material it’s made from. Their suits are made from a specialty 4-ply Italian wool which they call “Traveller Wool”. This is a high twist wool, which is a specific way of weaving wool yarn that results in it being naturally crease resistant as well as light and breathable. They are designed for all season wear in all types of climates.
Suitsupply Traveller Suit in Navy
You can actually customize most of the suits on the Suitsupply website to use this wool if you prefer a different suit style. However, for this review I’m focusing on the standard Suitsupply Traveller suit style.
It is worth noting that Suitsupply have changed their wool yarn supplier over time. The suit I purchased in 2021 has wool made by the Lanificio F. Lli Cerruti mill, and which was branded as iTravel wool. The suit I purchased in 2024 has wool made by the Lanificio Rogna wool mill.
Both of these wool mills are long established and reputable Italian wool mills, and the fabric produced by both mills for the suits is a high twist open weave wool which is specifically designed to stand up well to the rigors of travel.The look and feel of the wool between the two suits is very similar to my eye.
Let’s look at the other details of this suit. Beyond the wool used, there are a couple of other key standard features of this suit that make it more travel friendly.
First, the main body of the jacket is unlined, which means, as the name suggests, that there is no lining on the inside part of the jacket between the wool and you. The exception is the sleeves which are lined.
If you are used to a fully lined suit this may look and feel a bit odd at first, but by leaving the majority of the suit unlined you cut down on some of the weight and it’s also easier to fold. An unlined suit is also cooler, making it more suitable for warmer climates, giving the suit more versatility.
That said, if you prefer a fully lined or half lined suit, that is available as a custom option.
The jacket suit also has a half-canvas construction, rather than a full canvas construction. This ensures the jacket keeps its form around your chest, whilst being lighter than a full canvas construction. Note that this is the default, and you can customize the suit to be either a full canvas or even no canvas (unconstructed) if you prefer.
In terms of the trousers, by default they come half lined (although this changed between my first suit and my second suit, with my first purchase being fully unlined). Again, you can choose to customize the pants to be fully lined, half lined or unlined if you prefer.
I actually own two Suitsupply Traveller suits, and they are my go-to travel suits. I purchased my first one in 2021 in navy blue, and my second one in 2024 in black. Specifically, I chose the Navy Havana suit in 2021, and the Black Havana Tailored Fit Suit in 2024.
The navy suit I actually purchased in store in their London store when I was living in the UK. I was able to try it on, buy it off the rack, and have the pants trimmed all in that same afternoon at the store. I didn’t get any customization done other than hemming the pants which were a little too long.
I have really loved that navy suit, and when I decided I needed a more formal black suit, I decided I wanted to get the same Havana suit in black. I decided to just order these online as I knew my sizes and the fit, and would just take it to a local tailor to get the pants hemmed as it is a simple and cheap alteration.
The design and material of the Suitsupply Traveller suit has changed slightly over the period between my purchases, and like everything in life, the cost has also gone up a bit.
For my second Suitsupply suit I purchased the jacket as the standard option without making any changes. Compared to my navy jacket, there are some slight differences in lapel width and the blazer came with a a 3 roll 2 button design, rather than the two button design in the original. However, these are pretty minor changes and I like both jackets pretty equally.
For the black suit pants, I did customize these. I chose to change the closure type, do a flat front, and just do a plain hem on these. The Traveller pants came as half lined in the upper part as standard and I kept that which I think is nice for more formal black pants.
Both suits have been wonderful travel suits. They are very comfortable and have stood up to weeks of being packed away at the bottom of my suitcase (or carried in the free included suit carrier bag), coming out wrinkle free and ready to go every time. I have worn them to nice dinners, conferences, business talks, afternoon teas, cruise formal nights, weddings, and more.
Overall, I have very much enjoyed my Suitsupply Traveller suits which I plan to keep wearing for years to come. I also appreciate how much they can be customized if you choose. Just note that you’ll save money if you stick to the standard features.
There are a lot of pros of the Suitsupply Traveller suit including the pure Italian wool fabric, breathability, high quality construction, four season weight, modern style, included suit carrier bag, ability to customize, and a decent price point for a pure wool suit. Some cons are that it is dry clean only and that if you want to customize it, it can really increase the price.
If you are interested and this is your first suit, I would recommend that you visit a Suitsupply store to try the suits on and get the fit and look right. You can of course still order online and customize the suits if you prefer (I did this for my second Suitsupply purchase with good results), but I think for a first time purchase an in-store visit is well worth it if there is a store near you.
Suitsupply have physical stores in Europe, Asia and the Americas, with around 150 locations to choose from. You can also purchase and customize all their suits online. You can see the full Suitsupply Traveller range here. They can also ship to most locations worldwide.
The Bluffworks Gramercy Suit is another travel suit I own and is my top recommendation if you want an easy care suit option (machine washable) and/or you want a suit with a lot of pockets. It’s also a good option if you don’t want a wool suit for any reason such as allergies.
Bluffworks has been around since 2012 and the main factor that sets it apart from almost all the other companies out there selling travel suits is that their brand is focused on travel-friendly clothing.
Bluffworks Gramercy Suit in Gotham Grey
I have found their Bluffwork Gramercy suit to be an excellent travel suit and the suit has a number of features that make it stand out from the crowd.
First, Bluffworks makes these suits out of a polyester material they call Gramercy. This is a material that they spent a long time developing to ensure it looks as close to wool as possible. I have to say that they have done a great job—the suit doesn’t have any of the shine you might associate with a polyester suit, and I think most people wouldn’t be able to tell it wasn’t wool.
However, you do still get the benefits of polyester, meaning its lightweight, quick-drying, and breathable.
Even more impressive though is that the suit is fully machine washable. You can even tumble dry it on low heat, and if you really need to, iron it. However, Bluffworks say that the suit shouldn’t need ironing as the material is wrinkle and crease resistant. This has certainly been my experience with it and I haven’t needed to iron it yet.
The other feature that sets it apart is the amount of pockets and storage in this suit. The jacket and trousers between them have 18 pockets (!), which is far more than a regular suit.
Some of these pockets are cleverly hidden, others are zippered, and there’s even one designed for your travel documents. One downside of a suit is often a lack of pockets, but the Bluffworks Gramercy has you covered on that front. This definitely makes it much more travel-friendly and the zipped and hidden pockets add some extra security.
The suit jacket is partially lined (the sleeves are unlined), so it isn’t quite a light and breathable as an unlined suit jacket (all those pockets have to go somewhere after all). So for the hottest climates this is something to think about, although it wears easily and certainly doesn’t feel heavy in the way that a more traditional lined wool suit does.
While there aren’t many colors available, they have the most poplar and recommended ones, including navy, grey, and black. I have the Bluffworks Gramercy suit in Gotham Grey, and I think it looks great. It is honestly pretty hard to tell it’s not wool, and the feel is amazing. I love all the pockets it has, and I have found it’s still comfortable in warmer climates.
Bluffworks also make a range of other travel-friendly clothes (including women’s clothing), all of which are designed to be packable, wrinkle resistant, odor resistant, and easy to care for. The Gramercy suit is their original travel suit but they also have the Presidio travel suit which has a slightly more modern and simpler look with a fully lined jacket.
I also have a Bluffworks Lenox dress shirt. A dress shirt is pretty much an essential item to wear under a suit (unless you’re a tech CEO or something), and I have found that the Bluffworks Lenox also performs really well, standing up to the rigors of travel and looking good as it does.
I think it’s a great looking dress shirt. It offers full stretch, a soft feel, is fully machine washable, and is really comfortable to wear. It has quickly become my favorite dress shirt.
I can highly recommend the Bluffworks range of clothes, they look good, are easy to care for, and won’t break the bank.
Bluffworks is based in the U.S. but ships internationally. Currently, their clothing is only sold online from their website, and you can explore their full range online here.
If you are on a small budget and the Suitsupply and Bluffworks suits above are a bit out of your price range right now, I recommend checking out the Haggar Men’s Travel Performance suit. This is a polyester travel suit that offers a very good value for those with not a lot of money to spend. You can normally get the full suit for less than $200!
I purchased the Haggar Men’s Travel Performance suit in the color Dark Heather Grey to compare it to the more expensive suits I owned, to see how it stood up. I already owned a few pairs of Haggar’s regular travel pants which I’ve always found to be very comfortable.
If you live in the USA, you are probably familiar with the brand as its been around since 1926 and continues to be a popular brand, particularly for men’s pants and suits.
Haggar Travel Performance suit in Dark Heather Grey
Overall, I found this travel-friendly suit to be very comfortable and easy to wear. I really liked how light it was, thanks to the moisture wicking polyester construction. It is lined, but it is still lightweight.
The flexible fit waistband and stretch fabric in the suit itself also made it very comfortable to wear. It is also very resistant to wrinkles and wasn’t wrinkled from shipping or when thrown in my luggage or car.
It comes in a wide variety of colors and sizes, including some short and tall size options. The jacket is fully lined and has some padding around shoulders for a more structured look. It is 100% polyester and it is dry clean only.
This suit has a lot of pros, including its low cost, fast delivery options, range of colors and sizes, and light and comfortable fit. The main downsides are that it doesn’t have the more refined look and detailing as my other suits and isn’t designed to be machine washable. However, I feel it is a very good value at the price point and I think if I got this slightly altered, it would make it look a bit more polished.
Note that Haggar makes a wide range of suits, including an easy care machine washable suit, which you might also consider as another travel suit option. This one might be a particularly good option for those who want to be able to throw it in the washing machine.
You can buy it online (including from Amazon), the brand’s website, or buy from U.S. department stores selling the Haggar brand. You can find their clothing in stores such as Kohl’s, Macy’s, and JCPenney although I purchased mine on Amazon as I couldn’t find them available in the stores we visited.
Note that Haggar doesn’t sell their clothing directly outside the U.S. as far as we are aware. If you live outside the USA and are looking for a similar option in your own country, I’d head to your local department store and see what suits they sell off the rack at the lower price points.
More Travel Suit Options
There are a great many suit manufacturers on the market, and many of them make a suit which is either specifically designed for travel, or happens to have qualities which make it good for travel.
Here are some options that we recommend you look into if our recommendations above don’t quite fit what you are looking for, or you’d just rather have some more options!
Suits are available at a wide range of budgets and in various styles and materials, so you should be able to find something that works for you.
Another travel suit to consider is the Velocity Suit from Ministry of Supply. This is constructed from their Velocity material, which is a blend of 61% polyester, 33% viscose, and 6% elastane. It’s designed to look and feel as much like wool as possible, while offering the benefits of the blended material.
The blend means the suit offers both stretch and wrinkle resistance, and it’s also machine washable and you can put it in the drier.
You can even cool iron it if you want, although Ministry of Supply says that if the suit does have any wrinkles your body temperature will be enough to even them out. Which is pretty neat. The suit jacket is partially lined.
It’s worth noting that Ministry of Supply also makes a suit called Kinetic, which is unlined and even lighter. However it doesn’t look quite as formal, with a three button design and higher lapel. If that works for you, then it is definitely worth considering as well.
If you don’t like wearing suits because you feel they are too restrictive, then the Sene Studio FlexTech suit might be for you. This suit is made with Sene Studio’s FlexTech material, which is a four-way stretch polyester which is designed to be super flexible. That means that you can move freely in the suit and not feel restricted.
There’s lot more to like about the suit. First, it’s going to be tailor made for you, which is quite a benefit especially at this price point.
The way this works is that when you go through the purchase process you will answer a series of questions about your body shape, size and weight, and FlexTech will create the suit specifically for you. If after all that it doesn’t fit, they will remake it or let you return it anyway, which isn’t always the case with a custom suit.
Now this isn’t quite as detailed as the customization on something like the Suitsupply suits, where you can specify detailed measurements for all sorts of the suit parts, but it is a step above your average suit, and is definitely appreciated at this price point.
In terms of other features, this suit can be machine washed in cold weater, but isn’t suitable for a tumble dryer as it needs to be air dried. It also can’t be dry cleaned or ironed. As it’s polyester it will dry pretty quickly, but obviously not as quickly as something that can be machine dried.
Overall, this is definitely a good option for a travel suit to consider if you want the flexibility of stretch fabric.
This suit is made from wool woven by the notable Italian weavers Ermenegildo Zegna and is notable for its crease and wrinkle resistance. It’s dry-clean only, as is to be expected with a wool suit.
The suit is lined, but you can customize it to be half lined or unlined if you prefer. You can also customize a great many more aspects of the suit, from pocket style to lapel size, although of course many customizations do add extra cost.
It’s worth noting that as well as making material for other suit manufacturers to use, Ermenegildo Zegna also make their own suits. So you can purchase a suit directly from Zegna, but just be aware the prices are significantly higher.
Brooks Brothers are a well known suit retailer with a wide range of suits to choose from. They also have a travel-oriented range of suits, known as the Explorer Collection.
These are made from a 98% wool 2% polyester blend. The wool is a lightweight wool made by the Vitale Barberis Canonico mill, which is blended with polyester. This material gives you the best of both worlds—the quality feel and performance of wool, with the benefit of a comfortable stretch fit with wrinkle resistance from the polyester.
The suits have a half canvas construction, meaning they are more lightweight than Brooks Brothers’ traditional full construction suits, allowing for a lighter suit that is easier to pack.
As they are a majority wool construction, these suits are dry-clean only. There’s also not a lot of customization available, but the price is reasonable for a wool suit.
Charles Tyrwhitt is based in the UK and was my go-to brand for shirts when I lived and worked in London. They also make a range of suits, including their Ultimate Performance Suit.
This is made from a superfine 100% 4-ply merino wool with natural stretch. It’s also crease resistant. The jacket is half canvas and lined while the pants are half lined. There aren’t any customizations available but it’s a reasonable price for a wool suit.
Armani and other Designer Brands
If you have a bigger budget, then you can dive into the world of designer and bespoke suits. Armani is probably one of the best known suit designer brands and you can’t really go wrong with a well-tailored Georgio Armani Italian-made suit.
Other well known designer brands, many of which offer custom options, include Tom Ford, Zegna, Brunello Cucinelli, Brooks Brothers, and Brioni. Just note you’ll need to do your own research on which ones are going to be best for travel as most brands don’t specifically label any of their suits as travel friendly.
For a bespoke suit, you can head to NYC, Saville Row in London, or Milan where there are lots of tailor shops offering bespoke suits made to order. Here you can design the perfect travel suit of your dreams with almost unlimited options.
However, if you are looking for a travel suit, you may find that paying a lot more for a suit doesn’t necessarily deliver a lot of added benefits other than the name brand. For instance, in a 2011 blind test conducted by the Wall Street Journal, the reviewers found “little difference in quality” between a $614 Suitsupply suit and a $3,600 Armani option.
Additional Items for a Travel Suit
The suit is going to be the main thing you wear, but you are going to need a few more things to complete the look. Depending on your style and level of formality, these might include a dress shirt, tie, tie bar, belt, dress socks, cuff links, and shoes.
There are also a few other accessories you might consider to make your travel packing easier.
Wrinkle-resistant Dress Shirt
You need to wear something under your suit, and the majority of the time for a more formal occasion that is likely to be a dress shirt.
Ideally you are going to want a dress shirt that travels as well as the suit. After all, having a beautiful wrinkle free suit isn’t any good if you pair it with a crinkled shirt!
Of course, most shirts are a lot easier to iron than most suits, but since an iron isn’t always available then a shirt which features wrinkle resistance is a good option.
I have a number of no iron cotton dress shirts which I purchased from a major UK retailer (John Lewis Non Iron Twill Slim Fit Single Cuff Shirt), which work well. You can buy these kinds of shirts at about any department store.
But my favorite dress shirt at the moment is the Bluffworks Lenox dress shirt which I think looks great and performs really well. In terms of color, white is generally an easy color that pairs well with most suits, but this is a personal preference thing of course.
Comfortable Dress Shoes
Obviously, you are going to need to wear something on your feet, and the standard choice for many occasions is going to be a pair of dress shoes. However, dress shoes can be somewhat impractical to travel with as they take up a fair bit of space for something you might not plan to wear that much.
So what you want are a pair of dress shoes that look the part, but are comfortable and versatile enough to wear all day. This is especially the case if you are hoping to only travel with one pair of shoes.
My current personal favorite dress shoes for travel which look formal are my pair of Amberjack Originals. I also have a pair of Timberland shoes which look a bit less formal but work as dress shoes in a pinch.
Amberjack make a range of leather dress shoes which are designed to look just like a formal dress shoe, but with all the comfort and performance of a sneaker. They are incredibly comfortable, and I highly recommend them. Timberland are also obviously a well known brand, and I appreciate how comfortable their shoes are for all day wear.
In terms of style and color, there are a great many dress shoe styles to choose from. The main colors for dress shoes are black, brown and burgundy. It’s important to choose a shoe color which matches your suit. As a general rule, the following applies:
Black shoes match black, grey/charcoal and navy suits
Brown shoes match grey/charcoal, navy, brown and white suits
Burgundy shoes match grey/charcoal, navy and brown suits
As I recommend navy or grey as a suit color, with black as a backup, then I’d say black shoes are going to be the most versatile, followed by brown. Both are a solid choice though.
Many travel suits, especially those made with man-made materials, are specifically designed so you can essentially stuff them into your regular luggage and by the miracle of technology they’ll come out the other end looking like they were just pressed.
That said, you may prefer to treat them with a bit more care, in which case a good garment bag might be a good idea. This is also a good option if luggage space is less of an issue, such as when you are traveling by road.
Personally I quite like the basic lightweight garment bag that came with my Suitsupply travel suit, although its only really capable of holding my suit and a dress shirt. I also have a larger more padded garment bag like this that works well for road trips.
We highly recommend traveling with packing cubes to help you improve how well organized your luggage is. Rather than a bundle of clothes that you have to dig through to find the item you want, packing cubes allow you to sort and organize your packed items for easy retrieval.
If you don’t have a garment bag, a packing cube can also be a good place to put your travel suit and shirt. This can stay in your bag until you need it.
There are a great many packing cubes on the market, which offer different features. We’d recommend getting packing cubes with a compression feature to improve space, but basic packing cubes like these will work too. It’s also a good idea to get a set of different sizes.
One thing to note with packing cubes is that whilst they help a lot with organization, they do take up more space as the cube itself takes up a bit of room. So you might want to practice packing with them prior to a trip to ensure everything fits nicely.
Tips for Buying a Travel Suit
I’m going to cover a few tips to help you buy a travel suit, to helpfully make the process smoother for you.
Measure Properly
If you are able to visit a physical suit store location or tailor, then this is going to be the easiest way to get properly measured.
If you do go to a physical store, make sure to bring along your dress shirt and dress shoes that you plan to wear with the suit so you can get the fit just right. In my experience, a good suit store will be able to provide you with these items if you don’t have them, but if you do have them I recommend bringing them.
If you can’t visit a physical store, then check the website of the suit you are purchasing. They should have detailed instructions on how to measure yourself for their suit. Take your time and get this right to avoid having to make a return.
It’s also important to note that different manufacturers might use different sizing systems, so don’t take measurements you made on one site and apply them to another site, always measure again following each suit manufacturers specific instructions.
Also be sure to take international differences in measurements and systems in mind if ordering a suit from a country based outside of your own. For example you don’t want to mix up inches with centimeters in providing your measurements!
Trying suits in a Suitsupply store
Check the Returns Policy
If you are buying a suit in person or online, you will want to check what their returns policy is. When buying in person this should be less of an issue as you should be able to get the fit right in store. However, even so, you might change your mind after the fact or decide you want a different color.
If you are purchasing online, you absolutely want to be sure there is a robust and easy returns policy in place so you can return your suit if the fit isn’t quite right, or if it’s not what you expected.
If the suit has any customization, you will want to check if this changes the return policy. Sometimes a custom-made item might not be returnable, which would definitely be an issue if it didn’t fit!
Opt for Something Timeless
If you’re like me, you might not wear a suit that often, or need a travel specific suit that often. So you want to buy a suit that is going to last a long time. In this case you will want to pick a style that is going to last the test of time.
Generally, a solid color like navy, grey or black is going to stay fashionable. Patterns and other color options can come and go in fashion, and what may be popular now might look dated in a couple of years.
Similarly, a classic single-breasted jacket, 2 button jacket with a regular lapel is unlikely to go out of style. Sticking to tailored and classic fits and the most timeless features will help keep your suit from looking dated in the future.
Understand the Power and Limitations of Alterations
Unless you get your suit custom made to your measurements, there is a decent chance your suit could fit a bit better with some small alterations. Getting your suit tailored to you will really make a suit look nicer, more modern, and more expensive.
Even a cheap suit is going to look much better if it fits your body properly and the great thing is that most alterations are fairly inexpensive.
It is good to know what kind of alteration are fairly easy for a tailor or seamstress to make and those that are difficult or not recommended. Generally you want to make sure the overall fit and style, particularly of the jacket, is good as you typically don’t want to be adjusting front jacket buttons, shoulder width, padding, pockets, or overall shape or structure.
But things that are typically easy to change are adjusting the length of jacket sleeve and pant legs, changing the hem of your pants, taking in or letting out the waist of your pants, tapering pant legs, adding/removing cuffs to your pants, and adding/changing buttons to the jacket sleeves. Other changes may also be possible depending on the structure of your suit.
If you are buying a suit off the rack or online and are between the standard sizes, you always want to size up a size. For example if you are a 31 in pants and the only options are a 30 or a 32, always go for the 32 length. You can always make the pant legs shorter but there is a limit to how much you can make them longer depending on amount of excess fabric at the hem.
Just note that while sizing up is always a better option than buying a suit that is too small, I would not recommend buying a suit that is more than 2 sizes too big. Once you get too big, the suit is just not likely to fit you well overall without some major adjustments. You would be better off paying more for a suit in the correct size even if it costs a bit more (the adjustments to a really ill fitting suit can be costly and results may not be great).
Budget for Alterations
You should add a small amount of your suit budget to tailoring as chances are you will need at least a minor alteration unless you are lucky to fit a standard size or get it made to measure.
For example, my Suitsupply suit pants came in a fixed length and I needed to get the adjusted to be a bit shorter. With the first pair I bought, I did that in store and they did it for me for a modest fee. With the second pair, I took them to a local alternations store. I think in both cases this alteration cost between $15 to $20.
Depending on the alteration, you should expect each change to cost between $10 and $30 (£8 – £25). So if you want to for instance taper the legs of your suit pants and also take in the waist, I’d budget about $40 (£30).
But you can also call your local tailor or seamstress to get your local prices before you bring in your suit, and this can also help you shop around for the best price. Just be sure to read reviews first so you don’t end up with shoddy work!
Tailoring a suit isn’t always necessary, but it can often help get the fit just right, especially with an off the rack suit. So just bear in mind that this might be an additional cost on top of your suit budget to take into account.
Further Reading
That summarizes our guide to the best travel suit for men! Hopefully you found it useful.
We also have a number of other relevant posts that we think you will find useful for travel planning.