برچسب: For

  • Best 19 Anti Theft Bag for Travel for 2024

    Best 19 Anti Theft Bag for Travel for 2024


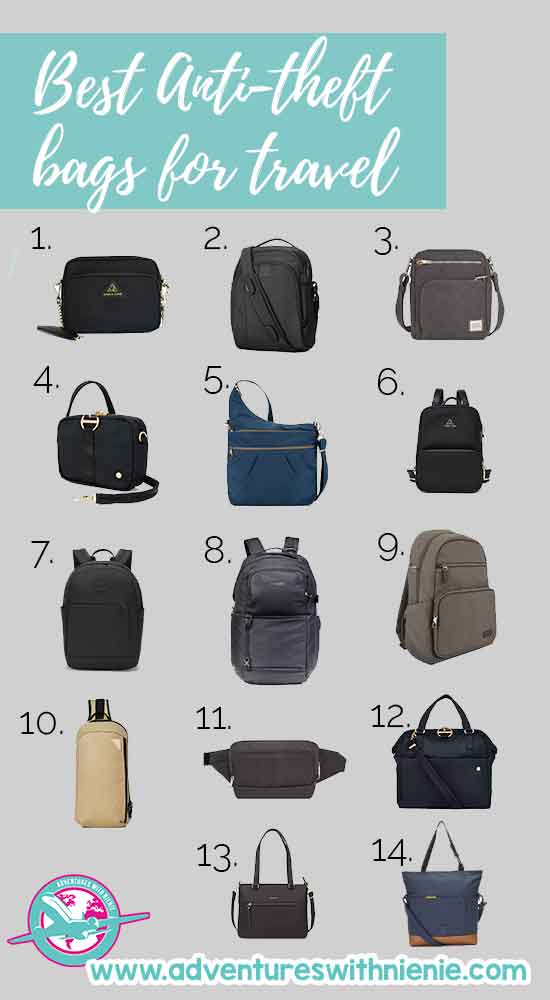
    Traveling can be quite stressful when planning and the worst thing that can happen is dealing with theft during your travels. One way to ensure the safety of your belongings is by getting one of the best anti-theft travel bags out there. There are a few companies out there and I’ll lay out which ones to look out for. Whether you are looking for the best anti-theft travel purse, best travel anti theft backpack, or a travel anti theft crossbody bag, I got you covered. 

    This site contains affiliate links to products. We may receive a commission for purchases made through these links. Support my blog here

    Man stealing a purple wallet from woman's backpack purse from behind.

    Best Anti Theft Bag for Travel for 2023

    There are a few things to consider when picking out the best anti theft travel bag from the type of fabric, types of zippers, a chain, and protective lining. While it’s not necessary to have an anti theft travel bag, it provides a sense of security and prevent thieves from getting you personal information. A theft proof bag will be one of the best investments you can make for your trip. 

    If you are just want to get quick and to the point for an anti theft bag for travel, here is the list of the best anti-theft bags listed in this review guide. You can also go by my true and trusted favorite here.

    Arden Cove Crossbody Bag in Black

    Arden Cove Crossbody

    • 2 lined pockets
    • Stylish
    • Detachable chain strap
    • Waterproof exterior and zippers
    • Regular clips to lock zippers
    • RFID-blocking pocket
    • Slots for bank cards

    PacSafe Go 15L Anti-Theft

    • Laptop Pocket for up to 12” Laptop or 13” Macbook
    • Side pocket for a water bottle or small umbrella
    • Water-Resistant
    • Luggage Slip
    • Zip Clip
    • TurnNLock Security Hooks
    • RFID Blocking Materials

    Best Anti Theft Cross Body Bags | Best Anti Theft Purses

    Best Anti Theft Backpacks

    Best Anti Theft Slings

    Best Anti Theft Handbag Totes

    Best Anti Theft Travel Bag Comparison Chart 

    What is an Anti Theft Bag?

    An anti theft bag for travel is pretty much a bag with all the modern conveniences and prevents pickpocketers from getting your important documents and finances. These bags often include a variety of different materials, locking clasps, a chain, and more. Honestly, my best travel tip is to get an anti theft bag for travel. There are many reasons why these bags are worth it. 

    These bags help prevent thieves from getting to everything that matters to you on your trip. It stops them from slashing your bag open, unzipping them in crowded and public spaces, prevents them from scanning your RFID cards, is easy to clean, and can be used in different circumstances. Most bags are not necessarily equipped with these kinds of materials which is why it’s crucial to consider the following items below. 

    What to look for in an Anti Theft Bag – Anti Theft Bag Best features

    I’ve listed the major features to look for when trying to find the best anti theft bag for travel. Unfortunately, when it comes to many of these bags, a lot of them are not always necessarily beautiful or stylish although they have improved and many are. The purpose of an anti theft bag for travel is primarily for function, however, designs are constantly changing and I think eventually, it will be easier to find fashionable yet functional bags. 

    How do I choose the best Purse for travel?

    Well there are a lot of things to consider in which is the best purse or bag for travel. I’ve listed some of the most common things you need to look out for below and see which suits you best for your future anti theft travel bag, backpack, purse, or tote. It’s important to have a pickpocket proof bag.

    Slash-proof Fabric

    The first and foremost thing you need to look for in anti theft travel bags is slash-proof materials to make your bag theft proof. This is crucial because a lot of pickpocketers will quickly slash your bag from underneath or the strap around your body in order to get your important belongings. A slash-proof bag should be something you should definitely look for in an anti theft bag

    Zippers with Locking Latches or Clips

    This to me be is a very important feature for an anti theft bag for travel. There are some anti theft bags out there that don’t have the locking latches which is a little worrisome for me. The locking latches provide more security to your bag when you lock it up or have it around your body. 

    These locking clips prevent thieves from accessing your pockets right away. It clips your zippers and keeps them locked and safe. Additionally, some have it on the strap and it prevents thieves from unclasping the lock and dropping the strap of your bag. 

    There are anti theft travel bags that only have clips and are not locking clips and those are subjectable to what you are looking for. A locking clasp provides more security but a regular clip does a fairly decent job as well. It may or may not be a deal-breaker for you and that is ultimately your decision. I have listed a few that do not have that feature on some of the zippers, however, they are stylish and do not typically look like anti theft bags. 

    Attachable chain or Shoulder strap to table while dining

    When I talk about the clasps above, I highly recommend them for an anti theft bag for travel because these clips are also helpful if you want to take your bag off and attach it to the chair or table at a restaurant when eating. It will prevent someone from taking it easy. You can even add a lock between the 2 for extra security if necessary. 

    RFID Lining

    RFID

    This is super important to protect you from identity theft from credit cards, debit cards, and passports, it’s crucial that your bag has these features to save you from the headaches of worrying about theft. The worst thing that can happen other than physical theft, is having a canceled credit card and being unable to have the fund to pay for things abroad. These are why RFID travel bags are so important to have. 

    Easy to Clean Material

    An easy-to-clean material is important because well-travel can get stinky, messy, and often requires long and enduring trips. You want an anti theft bag for travel you can easily wash, take care of, and make sure it lasts a lifetime. 

    Versatility

    Finally, I think it’s important to have a bag that is very versatile. A bag that has a lot of pockets so I can store money and cards in different areas of the bag, can be accessible in many areas, areas for a water bottle, or just the necessities. 

    Brands with the Best Anti Theft Bags

    There are 2 major brands with the best anti theft bags. These 2 brands are typically PacSafe Anti Theft Bags and Travelon Anti Theft Bags. Another brand I am introducing is Arden Cove which is more for a stylish and simplistic design. 

    What is the best-rated anti-theft messenger bag for travel?

    I would say that PacSafe and Travelon are the best and more well-known for a reason. Although I do love Arden Cove’s design and aesthetic, I find that PacSafe and Travelon to be more durable and well known. However, that does not discredit Arden Cove. They are still a great brand and their main goal is to provide stylish anti theft bags. 

    Best Travel Anti Theft Purses and Anti Theft Cross Body Bags

    Anti Theft Purses and Anti Theft Cross Body Bags are probably some of the most popular items people search for and are in need of. Many women are worried when they travel about losing items, being a victim of theft, and assault. These items help many of us women who travel solo have a little bit more of a sense of security. Travel secure purses are becoming more common even for everyday use. These are some of my favorite purses for travel security.

    Arden Cove Cross Body Bag

    Arden Cove Crossbody Anti Theft Bag for Travel in Black

    The Arden Cove Crossbody is probably one of my favorite anti theft bag for travel as it’s a designed cross body purse that doesn’t look too much like an anti-theft purse. I would say it’s one of the best bag travel anti theft for women. It’s got a modern design, it’s simple, and it seems to go from day to night fairly easily while still being a secure travel purse. It doesn’t look so sporty which is what we love about this product. This anti theft crossbody purse comes in black, cream, grey, navy, maroon, chocolate, and red. This is an anti theft travel bag for women fashion lovers.

    Don’t let the size of this anti theft purse fool you. This purse is pretty jam packed with features. 

    Here are some of its popular anti theft features:

    • 2 lined pockets and a zip lined pocket 
    • Detachable chain strap
    • Waterproof exterior and zippers
    • Regular clips to lock zippers
    • RFID-blocking pocket
    • Slots for bank cards

    Shop Arden Cove Cross Body Bag

    Pack Safe Metrosafe LS250 Anti-Theft Shoulder Bag

    This was honestly my first and favorite cross body bag. It’s an anti theft classic bag. I used this when I traveled all over Italy and I’m so thankful I had this bag. During our trip to Italy, someone had managed to get into my Aunt’s backpack, but thankfully, she had safety pinned it. So all they managed to do was get the safety pin off. This bag is my ultimate favorite because of its size and features. 

    I was able to carry my Fujifilm Mirrorless Camera, passport, money in different pockets, wallet, a water bottle, and so much more. I love the locking features for this bag as well, it provides locking clasps with a safety clip feature which makes it harder to get into. 

    Features of this anti theft crossbody bag include: 

    • Waterbottle/Umbrella Compartment
    • Turn N Lock Security Clips
    • Slashguard Strap
    • ExoMesh Slashguard Material
    • Hidden Zip Clip
    • RFID Blocking Card Materials
    • Adjustable shoulder strap
    • Water bottle pockets

    Shop Pack Safe Metrosafe

    Travelon Anti-Theft Heritage Tour Bag

    The Travelon bag is a pretty stylish anti-theft bag that is modern-looking. This is a unisex bag that is perfect for anyone out there. It’s a bit of a city-style which is one of Travelon’s popular designs. This one also has a pocket for a water bottle or small compact umbrella and I would say is pretty comparable to the PacSafe Metrosafe LS250 above. I would say this is a anti theft classic messenger bag. It is a perfect anti theft crossbody travel bag for men.

    Features of this anti theft crossbody bag include: 

    • Waterbottle/Umbrella Compartment
    • Security Clips
    • Slashguard Strap
    • Slash resistant materials
    • RFID Blocking Materials

    Shop Travelon Hertiage Tour Bag

    PacSafe Citysafe CX Anti-Theft Square Crossbody

    PacSafe created this bag for fashion and function. It’s a minimalist style bag perfect for small things. If you like to pack light and not carry too much on the go, this is the perfect bag for you. This bag is perfect for city touring and just a great little bag for everyday use. 

    Features for this anti-theft crossbody bag:

    • Turn N Lock Security Clips
    • Anti slash material
    • RFID Blocking Materials
    • Roobar Locking Style System

    Shop Anti-Theft Square Crossbody

    Travelon Anti-Theft Signature 3 Compartment Crossbody

    The Travelon anti-theft bag is probably their most common anti theft purses. You can easily find this purse at the container store and my friends have purchased this bag when I recommended they get an anti theft bag for Europe. What we loved about these bags is its sheer amount of space for a crossbody. There was seriously so much space in this bag and lots of pockets, a zipper lock, slash-resistant strap, and versatile design. It was perfect for holding makeup, extra souvenirs, water bottles, and so much more. This is the travelon anti-theft classic messenger bag that is one of the best sellers and best options on the market.

    If I didn’t already love my PacSafe bag, this would be an option I would buy for sure. 

    Features of this anti-theft purse:

    • Deep large main compartment
    • Slash resistant materials
    • Turn N Lock Security Clips
    • RFID Blocking
    • Slash Resistant Straps

    Shop Signature 3 Compartment Crossbody

    Best Travel Anti Theft Backpack

    The best anti-theft backpacks are ones where you feel secure having them on your back and protecting your items. There are so many backpack options out there for travel but to narrow it down to anti theft backpacks is quite difficult. It depends on what type of backpack you are in need of and looking for. These are some of the best anti theft backpack designs out there. 

    Arden Cove Convertible Backpack and Crossbody 

    Arden Cove anti theft travel bag for women

    What I love about this backpack is that you can change the straps into a shoulder bag. This is an anti theft travel bag for women. I love a bag that is versatile, a anti theft convertible bag, and can change based on what your needs are. Sometimes you want a backpack and sometimes you want a different bag. There is 1 main compartment with a front pocket perfect for story money and cards. It also has space for things like a tablet, camera, and more. This is the best travel purse backpack combo. 

    Features of this anti-theft backpack:

    • Cut Resistant Straps
    • RFID Blocking Pockets
    • Waterproof Zippers
    • Slash Resistant Materials
    • Locking hardware and clasps
    • Waterproof Fabric

    Shop Arden Cove Convertible Backpack and Crossbody

    Pacsafe Go 15L Anti-Theft Backpack

    This backpack reminds me of a classic high school backpack. It looks like an everyday backpack which makes it a perfect design. This backpack has a laptop pocket that holds up to a 13” Macbook or 12” laptop. It also has a strap that slides over your luggage handle which makes it perfect for travel. You can easily slip this bag onto your roller carry-on suitcase. It also has a side pocket perfect for holding a water bottle or small umbrella which makes it a perfect anti theft bag for travel.

    Features of this anti-theft backpack:

    • Laptop Pocket for up to 12” Laptop or 13” Macbook
    • Side pocket for a water bottle or small umbrella
    • Water-Resistant
    • Made of Recyclable Materials
    • Luggage Slip
    • Zip Clip
    • Slashguard Materials
    • TurnNLock Security Hooks
    • RFID Blocking Materials

    Shop Pacsafe Go 15L Anti-Theft Backpack

    Introducing the Bagsmart Camera Backpack, a true companion for the intrepid photographers traversing the globe! This backpack is more than just a carrier; it’s a fortress for your precious camera gear, meticulously crafted to safeguard your equipment while providing unmatched convenience. Designed with the modern photographer in mind, the Bagsmart Backpack boasts a cleverly organized interior.

    With specialized compartments for your camera and space for up to two lenses, it ensures easy access and ample protection. Its thoughtful design doesn’t stop there; it extends to accommodating your laptop, memory cards, and even a rain cover for those unpredictable weather moments, making it an indispensable travel companion for every shutterbug.

    Features of the Bagsmart Camera Backpack include:

    • Dedicated compartments and pockets for camera and lenses
    • Padded sleeve for a laptop
    • Ample storage for memory cards and accessories
    • Integrated rain cover for weather protection
    • Adjustable and padded shoulder straps for comfort
    • Side pockets for a water bottle or compact umbrella
    • Anti-theft design elements like lockable zippers and RFID protection
    • Durable, water-resistant materials for added security
    • Ergonomic design for prolonged wear and ease of use
    • Stylish yet functional, the Bagsmart Camera Backpack is a testament to innovation meeting practicality, catering to the needs of photographers who seek both security and convenience in their gear-carrying solutions.

    Travelon heritage Backpack

    This is a backpack has a vintage style that makes it modern yet classic. It’s fairly stylish, fashionable, and perfect for everyday use. I would say that this is a bag that meets function and fashion. You can use this to carry your laptop, tablet, accessories, and would also make for the perfect diaper bag as well. 

    Features of this anti-theft backpack:

    • Pocket for up to a 14” laptop
    • Slash Resistant
    • Locking Clasps
    • RFID Blocking Pockets
    • Slash Resistant Straps

    Travelon Signature Anti-Theft Slim Backpack

    The Travelon Signature Anti-Theft Slim Backpack is the ultimate blend of style and function. It’s vintage but modern, perfect for your daily hustle or travel escapades.

    Key features? It’s got a pocket for a 14” laptop and is built with safety in mind. Slash-resistant fabric and straps, locking clasps, and RFID-blocking pockets protect you and your valuables. This bag’s not just smart; it’s a fortress. It’s perfect for work, travel, or even as a diaper bag. Functional, fashionable, and secure. What more could you want?

    Features of this anti-theft backpack:

    • 14″ Laptop Pocket: Designed with a pocket to fit up to a 14″ laptop. Perfect for work or travel.
    • Slash Resistant: The material and straps are built to resist slashing. Walk confidently through any crowd.
    • Locking Clasps: Keeps your valuables secure so you can explore without constant worry.
    • RFID Blocking Pockets: Safeguard your personal information from tech-savvy thieves.

    Best Anti Theft Slings or waist packs

    Sling bags are another option for an anti theft bag for travel. These are very popular in Asian countries and can be seen as fanny packs in some situations. Most people enjoy wearing these like a crossbody backpack. These provide some space for small important must-haves during your travel and they are light and leave you hands-free. These are 2 of my favorite options of the anti theft slings.

    PacSafe Vibe 325 Anti-Theft Sling Pack

    This is the perfect bag for everyday city life. It’s designed to be more like a crossbody backpack. It has a long narrow main pocket and a variety of different pockets to keep your belongings safe. This bag has been well designed and provides a variety of different safety features including locking clips, RFID and splashguard materials.

    Features of this anti-theft slingbag:

    • Slash Resistant
    • RFID Blocking Pockets
    • Slash Resistant Straps
    • PopNLock Security Clips
    • Roobar Locking System

    Shop PacSafe Vibe 325 Anti-Theft Sling Pack

    Travelon Anti-Theft Active Waist Pack

    This is the typical fanny pack-style anti-theft bag for travel. It’s perfect for people who like to wear these packs on their hips. It can also be worn around the back like most sling bags and is interchangeable. This one has a lot of pockets to hold your cards, passport, and more. This one even has a pocket to hold a waterbottle or small umbrella! It makes for the perfect anti theft travel bag for a water bottle.

    Features of this anti-theft fanny pack:

    • Slash Resistant
    • RFID Blocking Pockets
    • Slash Resistant Straps
    • Waterbottle/Umbrella Compartment

    Shop Travelon Anti-Theft Active Waist Pack

    Pacsafe Go Anti-Theft Sling Pack

    The Pacsafe Go Anti-Theft Sling Pack is more than just a trendy bag—it’s your security detail wrapped in a sleek design. Ideal for urban adventurers and casual day-trippers alike, this pack offers a perfect blend of style and function. With its versatile design, you can sling it any way you like, all while knowing your essentials are safe and sound.

    Key Features of this Anti Theft Sling

    • Versatile Design: Wear it on the front or back to match your style and situation.
    • Lockable Zippers: No more constant bag-checks. Lock it and forget it.
    • RFID Safe Pockets: Protects your cards and passport from unauthorized scans.
    • Cut-Resistant Straps: Feel secure even in crowded places, thanks to straps that are tough to slice through.

    Monos Metro Sling

    The Monos Metro Sling is for those who love simplicity but won’t compromise on functionality. This pack is the epitome of minimalist design, offering a sleek and clean look while maintaining space for your essentials. It’s perfect for those quick trips out where you just need the basics, but want them to be easily accessible and secure.

    Key Features

    • Compact Yet Roomy: Don’t let its size fool you. It’s designed to hold more than you think, from a tablet to your daily essentials.
    • Water-Resistant Material: Because nobody likes water damage, right? Your belongings stay dry, come rain or shine.
    • Multiple Pockets: Organize with ease, thanks to well-placed pockets for everything you need to carry.
    • Adjustable Strap: Customize the fit to make it as comfortable as it is functional.

    Best Anti Theft Handbag Totes

    These totes are perfect for someone who just wants a useful messenger workbag and other things. It’s perfect to hold important documents and protect your tech from thieves. These are great substitutions for bulky hard briefcases.

    PacSafe Citysafe CX Anti-Theft Satchel Handbag

    Best 19 Anti Theft Bag for Travel for 2024 19

    This bag has more of a feminine look to it which provides a lot of security but is also stylish. It’s elegant and timeless which means it won’t go out of style. This is a satchel handbag which is the perfect large-size anti theft travel purse. It’s perfect for fitting in your makeup, tablet, phone, and more. 

    Features of this anti-theft bag for travel:

    • Slash Resistant
    • TurnNLock Clips
    • RFID Blocking Pockets
    • Slash Resistant Straps
    • Roobar Locking System

    Shop PacSafe Citysafe CX Anti-Theft Satchel Handbag

    Travelon Anti-Theft Addison Tote

    Use this everyday tote for travel, work, life, and daily errands. It’s a modern tote with everything you need. It has several pockets, an interior wallet, and a spacious pocket for a 10” tablet to keep on hand. This bag is meant to be durable and long-lasting with all the anti theft features. 

    Features of this anti-theft bag for travel:

    • Slash Resistant
    • Locking clasps
    • RFID Blocking Pockets
    • Slash Resistant Straps

    Shop Travelon Anti-Theft Addison Tote

    Pacsafe Go Anti-Theft Tote Bag

    Best 19 Anti Theft Bag for Travel for 2024 20

    This is probably my favorite tote bag out of all of the ones I listed above. This tote bag is large and perfect for the beach, grocery shopping, day trips, and as a diaper bag. It’s spacious and has a pocket for a 15” laptop. It’s made from recyclable materials with all of the perfect anti-theft security features as well. 

    Features of this anti-theft bag for travel:

    • Slash Resistant
    • Locking clasps
    • RFID Blocking Pockets
    • Slash Resistant Straps
    • Zip Clips
    • Dock Locks
    • TurnNLock Security Clips

    Shop Pacsafe Go Anti-Theft Tote Bag

    Unbox Therapy X Pacsafe Anti-Theft Briefcase

    Best 19 Anti Theft Bag for Travel for 2024 21Best 19 Anti Theft Bag for Travel for 2024 22

    This is a great option for those looking for a briefcase and a secure messenger bag. This is a unisex anti theft bag that holds up to a 15” laptop and a 10” tablet. This has a wide zipper area that allows you to get to your things quickly and easily. It has locking zippers, slash-resistant material and straps, RFID blocking materials, and more. It also includes a strap that allows you to easily slide these over carry-on roller suitcases to allow you to be hands-free at the airport. This is probably a popular anti-theft travel bag for men.

    Features of this anti-theft bag for travel:

    • Slash Resistant
    • Locking clasps
    • RFID Blocking Pockets
    • Slash Resistant Straps
    • Zip Clips
    • Roobar Locking 
    • Luggage strap

    Shop Unbox Therapy X Pacsafe Anti-Theft Briefcase

    The Peak Design Everyday Tote

    The Peak Design Everyday Tote is the ideal blend of fashion and utility. Its elegant design fits in just as well at a fancy dinner as it does on a casual day out. But don’t let its good looks fool you—this tote is built to handle your daily grind and then some.

    Key Features for the Peak Design Everyday Tote

    • Convertible Straps: Switch between tote and backpack modes for ultimate carrying flexibility.
    • Weatherproof Exterior: A durable, water-resistant shell ensures your valuables stay dry, no matter what the day throws at you.
    • Customizable Compartments: The inside is like a personalized locker, with dividers you can adjust to fit all your essentials neatly.
    • Quick-Access Pockets: No more digging through your bag. Pockets designed for fast access to your most-used items.

    Anti Theft Bag for Travel FAQs

    Where can I buy an Anti Theft Purse or Travel Bag?

    Most of these bags an be found online by clicking on the links above. However, PacSafe and Travelon I have found at the Container Store and at REI. These have been great places to grab some of these popular bags. However, their selections are very limited. I suggest using the links above to grab some bags you may not be able to find in the store. 

    The Benefits of Anti theft Travel Purses

    Honestly, this is completely up to you and your budget. It provides a great sense of security when walking around especially in busy and crowded areas. These anti theft travel purses provide a great deal of protection for your belongings when you are out and about. It doesn’t necessarily have to be used for travel, it can definitely be used every day as well. These bags prevent thieves from getting all of your important information. 

    I have listed all the materials above that make for a great anti theft bag for travel and those would be the benefits for getting one. 

    What Is An Anti-Theft Pocket?

    An Anti theft pocket can be a variety of things. It can be the hidden pocket within your back that is more secure with RFID pockets that help keep things hidden from view and difficult for thieves or pickpocketers to access.

    Why Do You Need An Anti-Theft Bag?

    You don’t need an anti-theft bag, but they do make for a great investment and protect your belongings while traveling. Thieves are getting more creative in getting into your belongings and you don’t want to fall victim to theft during your international travel.

    There are a lot of benefits from having an anti-theft bag from lockable zippers to anti slash materials, it can’t be beat when it comes to normal purses and bags. I do have to say it is one of my travel essentials and the slash-proof material provides me withextra protection.

    What Is The Best Anti-Theft Travel Purse?

    This ultimately comes down to your decision. There are a lot of anti-theft bags on the market right now. I highly recommend the Arden Cove Crossbody bag or the PacSafe Metrosafe Bag. These are bags I’ve had in my rotation for a while and have done really well for my trips to Italy where my aunt almost got robbed!

    The Arden Cove Crossbody is one of the best anti-theft purses and my favorite right now because it doesn’t look anything like an anti-theft bag with its elegant and stylish design with shoulder straps that you can easily take out to dinner in a nice dress. It can easily be dressed up and dressed down without lacking anti-theft features.

    What Is The Best Anti-Theft Bag For Travel?

    Well, I would suggest an anti theft backpack ultimately when it comes to am anti theft bag that is best for travel. My suggestion is the PacSafe Go 15L. It looks like a normal backpack with all of the features you need to travel like RFID protection, Slashproof Materials, and locking zippers. You won’t look like a tourist wearing this backpack around town.

    Which Anti-Theft Bag Are You Getting?

    Buy Me a Coffee at ko-fi.com

    Posts related to best anti theft travel bags

    Liked this post? Pin it for later!

    Best Anti Theft Bags for Travel Pinterest Cover


    Source link

  • Tools, Tricks & Websites I Use for Traveling

    Tools, Tricks & Websites I Use for Traveling


    For me, the most exciting part of any vacation often is the trip planning aspect. The second my husband or I dream up a potential destination, I’m compiling Airbnb recommendations, flight alerts flagged and a rough itinerary outlined within hours. If trip planning is something that overwhelms you, however, pull up a chair and I’ll give you a peek behind the curtain as to my process—here are the travel tools and websites I use as a jumping off point for any vacation.

    This post was last updated in February 2025.

    And if you’re just here for a greatest hits list of travel tools, here’s a round-up of sites and tools I swear by:

    How I start trip planning

    For me, every trip starts with finding the best flight deal, which helps me figure out when I want to travel. Generally, I have a good idea of the time of year, but my dates are fairly flexible, which is why I love that many airlines now have flexible search calendars.

    Southwest low-fare calendar

    Note: When using credit card points for flight redemptions, particularly overseas, it’s imperative you have flexibility within a certain date range. We’ve started targeting a month we want to travel about a year out, then planning our actual dates around the best rewards flights availability (lowest cost and best route). This is how we’ve traveled for extremely cheap to Thailand, Qatar, Australia and Hawaii the past three winters!

    Related post: How We Went to Hawaii on Credit Card Points

    Tracking flights

    I typically prefer traveling in the off-season or shoulder season because that means less crowds and cheaper prices, but sometimes—like our summer trip to Europe with our niece—timing just isn’t that flexible, which is why flight alerts and tracking are my jam. I start tracking flights anywhere up to a year before a trip I’m considering.

    How I Plan a Trip: Tools and Websites to Use

    Any frequent traveler will tell you that Google Flights is king, and I’m not going to steer you any differently. This is always where I begin my flight search: first by entering the route I want, entering approximately how long I’d like to travel, then using the flexible calendar feature to decide on the cheapest days for my trip.

    How I Plan a Trip: Tools and Websites to Use

    Then, I set up a flight alert so I get an email if that flight route goes up or down in price before I book it. Google Flights will also tell you if the price is high for that time or typical, which I find helpful as it gives me a good guideline to know if I should wait for the price to go down or book when I find it’s normal or cheaper than average.

    How I Plan a Trip: Tools and Websites to Use

    Important to note: Once you find the best flight for your trip, go to the airline’s website and book directly. Google Flights sometimes will show rates for OTAs (online travel agencies) like Expedia, and it’s never smart to book a flight via a third party, at least if you’re flying overseas and doling out thousands of dollars. (If it’s a $100 flight for a one-hour route from you, then by all means, tempt fate!

    I’m of the mindset that you should book flights as far out as possible, especially if flying at peak times like holidays, but often the rule of thumb is to book six months before an international flight and one to four months before a domestic. That said, there’s no hard-and-fast “when is the best time to book flights?” answer anymore, so if you find a good deal that matches your budget, jump on that.

    I’ve also been subscribed to the Going newsletter (formerly Scott’s Cheap Flights) since the very beginning of this flight alert email, and I love this free version for finding great air deals. It’s why we wound up going to Holland a few years back and why we were in Iceland on another cheap flight the following winter when $400 airfare landed in my inbox. I’ve never booked a flight so quickly!

    How I Plan a Trip: Tools and Websites to Use

    Related Article: 13 Tips to Help You Survive Travel This Summer

    Finding lodging

    Before I pull the trigger on my flights, I then cross-reference my dates with lodging availability; usually finding something isn’t an issue unless you’re going to, say, Africa (which we’re doing in the spring!) where lodges are scarce and you truly need to book your accommodation 10 to 12 months out.

    How I Plan a Trip: Tools and Websites to Use

    How cute was our chalet in Switzerland?

    I’m an Airbnb girl despite my recent frustrations with them, but not everywhere in the world has a large selection of Airbnbs available; I find this particularly true for coastal and rural regions of the South. Booking.com has become my other go-to resource for lodging, especially overseas, as it consolidates hotels and vacation rentals. I’ve used it several times on U.S. vacations in the past couples years, too, as I’ve found the same listings on there as on Airbnb, only Booking charges a much lower service fee.

    Booking rental cars

    When traveling domestically, I’m typically loyal to Enterprise as I have a business account with them that gives me certain perks and cash back, but overseas where rental cars vary dramatically is another story. On recent trips, I’ve been using DiscoverCars.com to find the best deals on rental cars. Most recently, we rented a car in Switzerland for $966 for one week, whereas it was $1800 or more directly through the rental car companies. I pre-pay with this option and always put it on one of my travel cards that also includes insurance coverage so I can decline that at the car rental window.

    How I Plan a Trip: Tools and Websites to Use

    Figuring out things to do

    I use Google Images, friends’ travel blogs and social media to figure out what I want to do in whatever destinations I’m visiting. I typically have a list of several free or low-cost options that make the final itinerary, then budget for one big-ticket item like the helicopter ride in Iceland or a train ride to the top of Jungfrau in Switzerland.

    Train Ride to the Top of Jungfrau in Switzerland

    My go-to booking sources for tours has been Get Your Guide for years (especially ever since Viator did me dirty). I find that, in many cases, the price is lower than if I were to book the attraction outright, and I’m always all about saving a dollar or 10.

    Buying insurance

    The only time I take out a separate insurance policy is when I’m doing a big trip like our safari next spring, for which I took out a trip insurance plan for SVV and me through World Nomads. Otherwise, I book all my trips on my AmEx Platinum and Chase cards (more on that later), each of which carries specific insurance and coverage for trip delays, trip interruptions, delayed baggage and more.

    Other resources to help my trip plan

    How I use credit card points to travel is an entire series of posts of its own. I’m a big proponent of the Chase Sapphire cards and the American Express suite of cards (I have the Plat, Biz Plat, Gold, Biz Gold and Blue) for anyone who wants to accrue points quickly and use them for flights and hotels. Not only do I get the points for purchases I’d already make, but all of my cards have so many add-on benefits that they quickly even out with the cost of the annual fee.

    AmEx card benefits

    In the past year I’ve been getting serious about making my miles go even further; it turns out the more I study, the less I know, so I frequently refer to a host of points blogs and Facebook groups that have helped me learn the churn and burn of travel credit cards. Some of my favorites are 10x Travel, One Mile at a Time and The Points Guy. I also use Credit Karma and Mint, both free, to monitor my expenses and various credit cards, as well as the Rakuten plugin for cash back on pretty much every purchase I make online.

    It’s definitely a lot of work, making charts and budget spreadsheets and referencing various sources before booking a trip, but I like to think it saves me a lot of money in the long run, so it’s completely worth the hours spent learning these various platforms! If you have any specific questions about my trip planning process, drop them in the comments.


    PIN IT! SAVE THIS POST FOR LATER


    Source link

  • 10 Tips for Starting and Running a Successful Photography Business

    10 Tips for Starting and Running a Successful Photography Business


    As a professional photographer who runs a photography business, including an online photography course, I am often asked if I have any tips on how to run a successful photography business.

    I also get e-mails from time to time from readers asking me why their photos aren’t selling. Possibly they’ve set up an online photo sales store using a site like SmugMug, but they are struggling to find an audience. They are wondering where they might be going wrong. If that’s you, this guide should help.

    I have already written a guide to how to make money as a photographer, which covers the various income streams available to you when you are starting out as an amateur photographer. This guide isn’t going to focus on that. Instead, it’s going to look more at what you need to do to actually succeed with your photography business.

    So, whether your photography business is about selling your photos, working as a wedding photographer, running photography tours and workshops or selling stock photos, this guide should help ensure you focus on the right things to get your business running successfully. This is based on my years of actually running a successful photography business and what has worked for me.

    10 Tips for Running a Successful Photography Business

    I’m now going to go through my tips for running a successful photography business. These are not in any specific order, I’d say they are all equally important to your success!

    Craft your Skill

    One common mistake I see with aspiring professional photographers, and one which is easy to fall into, is basically trying to run before you can walk.

    What I mean by this is that it is really important to ensure that you are actually creating a good enough service or product that people will want to buy from you before trying to make a living from it.

    This can be tricky to establish, especially as the initial feedback we get on our photos is likely to be from friends and family. They will tend to offer very positive feedback, which is of course very nice, but unfortunately might not provide the sort of constructive feedback we really need.

    Buoyed by all the positive feedback, it can be easy to jump straight into building an online portfolio, uploading a pile of photos, and then sitting back and waiting for the money to roll in. If it does, great! If it doesn’t, it can be a disheartening experience.

    It can also be a costly experience, as many online portfolio sites charge a fee, which you need to be able to cover from your income. If you aren’t making an income, you’re going to be operating at a loss, which is not a good place to be.

    Even worse would be to set up as a wedding photographer, book your first gig, and then not be able to deliver to your client’s expectations. This can result in anything from disappointed clients to negative reviews to, in a worst-case scenario, being sued for not delivering a quality service.

    So, what to do? Well, first you need to spend time actually developing your photography skill. That might mean reading online photography guides, watching photography focused videos, signing up to a photography course, or taking a local photography class. There’s a huge amount of content available for free, and of course there are also paid resources.

    You also need to get out there and practice your photography as much as possible. Photography is a skill, and it is one that can be continuously improved. If you are planning on becoming a wedding photographer for example, you might be able to find an existing photographer who needs a second shooter, and this can be a good way to develop your skills in a real-world environment.

    When you are starting out I highly recommend volunteering to assist in doing actual gigs such as being a back-up wedding photographer, interning at a photo studio, shooting at an event as a volunteer, or shadowing a working photographer. Doing a bit of work for free can allow you to get some experience and stretch your wings without the pressure of being the one responsible for the final product.

    If you plan to make an income from your photography then I would argue that it’s best to invest up front in your skillset first and foremost. As I said, it can be easy to put the cart before the horse, whether that’s paying for an online e-commerce store or spending thousands on gear. You need to know to use the gear so you can create content good enough to sell in your store, and that should definitely be the priority.

    Now, to circle back to my previous point, which is how to know if you are at the point where you are actually creating content that is going to be good enough to sell. Of course, there’s no fixed goal, and a lot will come down to the market you are selling into and the products you are selling. If you’re the only wedding photographer in town for example, then it will likely be easier to find clients even if you are a bit less experienced. However, if you’re competing in an established market, you might have to level up your skills more to be able to compete.

    Still, there are ways to know if your work is at the level where it can sell. First is feedback with buyer intent. That means, if people start to contact you, perhaps having seen your work on your social media feed, and ask if they can either buy your work or hire you to do a shoot. Ideally these will be total strangers who have nothing vested in your success. This is a strong indicator that your work really is good enough to start making an income from.

    I’d also highly recommend seeking out ways to get constructive feedback on your work. In-person photography clubs, online groups and forums, and photography classes with a homework element can be a good way to get this feedback.

    You basically want total strangers to be looking at your work, who aren’t worried about your feelings, to provide input as to what is good about it and what could be improved. A word of warning, this kind of feedback can sometimes be challenging to hear, especially if you have primarily only gotten glowing feedback from friends and family. But it is definitely important to a) help you improve and b) get you the point where you can feel confident in putting your product up for sale.

    Finally, another way to get validation of your work is to enter photography competitions which are judged by real people (not social media popularity contests!). There are a lot of these, some paid, some not.

    I’d suggest focusing on the free competitions to start with. If you start to place your work in these competitions, this can also be positive validation. It can also be a useful accolade to add to your photography resume.

    Travel Photography Course-topaz-upscale-2000w
    My photography course, which is one of the ways I make an income as a photographer, offers learning opportunities to those starting out in photography

    by Laurence Norah-2


    Do your Research on the Type of Photography Business

    Before launching a photography business, you will want to do some research into the type of business you plan to run to make sure it’s a feasible business idea.

    There are multiple ways to make money as a photographer including:

    • Selling photos – this can be selling physical prints, digital images, licenses to use an image, canvases, etc.
    • Selling photo art products – using your photos to create unique products. Photos can be printed on all sorts of things, such as greeting cards, pillowcases, phone cases, fabric, ornaments, clothing, coffee mugs, postcards, wallpaper, tote bags, etc.
    • Taking portrait studio photos  – family photos, student yearbook photos, pet photos, graduation photos, cruise photos, portfolio photos, catalog and fashion photography
    • Wedding / event photography – engagements, weddings, parties, business conferences, music festivals
    • Business / product photography – taking photos for business websites, doing product photography, food photography, taking photos of cars, hotel rooms, houses/apartments etc.
    • Stock photography – taking photos to be sold on stock photo websites. A lot of the most popular are fairly generic photos with wide appeal (e.g., man holding coffee cup while looking surprised at computer, family on sunny beach in California, elderly woman crossing street), but stock photography can also include fine art photos or photos of famous people which can command much greater prices.
    • Photojournalists – photographers who take photos to be featured in newspapers, online news articles, magazines, TV programs, etc. to go along with news stories.
    • Education – this can mean running photo workshops, writing about photography, teaching online or in person classes, giving talks etc.
    • Leading photography tours – taking guests on photography specific tours, either locally or in popular photography destinations

    There are of course other ways to make money from photography but those should give you a lot of ideas and most photographers will fit into one of those general areas. Many working photographers make money in a number of different ways and I myself have done work in at least half of those types of photography at one time or another.

    I would recommend choosing one or two specific areas you want to start with, and then later you can always expand once you are established and making money in those initial areas.

    Once you have chosen how you want to make an income from your photography, you will want to try to figure out what you want to focus on and do the research on what is already out there. You want to understand what kinds of products/services are being offered, and does it match with your skills and interests etc.

    So, for example, let’s say you know you want to sell photos. Specifically, you decide you want to take photos and sell them online as either prints or digital images.

    Now you have to decide what kind of photos you want to sell as it’s much easier if you are known for a certain type of subject or style. Whether that is fantasy fine art photography, bird photography, NYC street photography, abstract photos, or seascapes, it’s generally important to have a niche you are going to be known for.

    Then you have to figure out the best place to sell and market your type of photos. Where and how do other photographers sell the type of photos you like to take?

    Another example may be someone who wants to do studio photography focusing on babies and families. Lots of people like to get professional photos when they have babies and young kids.

    But studio photography is something that is geographically bound so you want to make sure there is a strong market for this service in your area as renting studio space can be costly. So if you live in an area where most people are older and retired, focusing on baby photography is probably not a great business for your area and you may want to consider either another kind of photography or setting up in another area with a younger demographic.

    You will also want to research your competition in the area. Whilst no competition might seem like a good thing, this can also be a warning sign that there is no market for the services you are offering.

    Of course, this isn’t always the case, but it is worth bearing in mind. If there are existing businesses offering similar services, you will want to be sure that there is enough market to go around, and that you will be able to effectively compete.

    QM2252520Wedding252520Cunard252520Transatlantic25252025252844252520of2525204925252925255B425255D
    Wedding photography
    Event photography
    Event photography


    Figure out your Audience and Market

    Before you start off, it is best to figure out who is your typical customer. How old are they, where are they from, what are they looking for, what is their budget etc.

    If you can get your products and services in front of people who are more likely to want to buy them, it’s going to make your life a lot easier.

    For example, if you want to sell photos and mainly take beach landscapes in Florida, your best market is probably people living in coastal Florida and tourists visiting those areas of Florida. A combination of online, gift shops, and local art shops might serve you well as ways to target this audience. There will be an established market, and it should be easier to start selling your work.

    In this example you may also want to diversify your offerings to appeal to your target audience across price points. Perhaps you offer larger original framed photos at the local art shops and cheaper smaller prints, greeting cards, and postcards at the local tourist souvenir shops.

    If you are a wedding photographer, you’ll want to narrow down your geographical range (unless you plan to travel as a destination wedding photographer). And you’ll want to decide on type of weddings you want focus on and a style of photography so you can build a portfolio.  You’ll also want to carefully decide on a pricing model.

    If you are someone offering photo tours in Iceland for example, you’ll want to find ways to reach people planning travels there. An online presence is likely going to be very important, as well as perhaps connecting with travel agents, travel bloggers who write about Iceland, local tour companies in Iceland, etc.

    If you are doing tours, you’ll also want to do a lot of ground research and practice, so you are knowledgeable and set up to handle such a tour in the destination.

    As you can see, there’s a lot to think about. Ultimately, you want to make sure that an audience exists for the product you want to sell in the place you want to sell it, and that you will be able to reach that audience.

    Income levels

    Puffins Grimsey Iceland
    Photographing puffins in Iceland, a popular destination for photography workshops


    Run your Numbers

    If you are planning on making money as a photographer, you need to treat the business like, well, a business. This might not be the most exciting part of being a professional photographer, but it’s certainly important if you want to run a profitable business.

    So what does it mean? Well, you need to sit down with a tool like a spreadsheet and figure out how you’re going to make a profit. That means writing down all the costs associated with running your business, which is called your cost of business.

    These costs will vary depending on your business model, but could include anything from the cost of gas getting to and from a shoot, to studio rent, equipment costs, insurance, taxes, marketing, photo editing software subscriptions, any professional fees (accounting etc.), shipping cost of products, printing costs, website costs etc. Some costs will be ongoing, others will be upfront one-off costs. You also want to consider how much you want to pay yourself.

    Once you know the costs of doing business in your area, you can then start to put together a pricing model that will allow you to cover all your costs and, hopefully, turn a profit. At its simplest, you want to make more money selling your products and services than it costs you to produce them.

    Put together a simple business plan and consider showing it to some trusted family members or friends for advice to see if it makes sense. There are lots of free online templates for business plans you can download for examples to get you started.

    You will need to make various estimates when you put your pricing model together. For example, you might need to forecast how many weddings you might shoot in a year, or how many photos you plan to sell. It’s best to be conservative with your estimates when you start out. As you develop your business and build a reputation, you’ll be able to revise your numbers and likely increase your prices.

    Whatever model you choose, be it an hourly billing rate as a wedding photographer, or a per product rate for sales, the goal is to put together a plan which makes financial sense and doesn’t have you running at a loss.

    Numbers chart


    Price your Work/Services Accordingly

    Speaking of pricing, this is a key consideration. Photography can be a tricky service to price, depending on what type of photography business you are setting up.

    If you are offering a service like wedding photography, portrait photography, or a similar service, then you can fairly easily figure out pricing by simply researching other businesses in your general area (or areas with a similar demographic and income level) who might offer similar services.

    Fees for these sorts of service tend to fall inside a certain range, and can be priced hourly or on a package basis. As an example, some wedding photographers charge a package price, whilst others might charge an hourly rate and then a fee per photo. A package rate tends to be commonly accepted (and can be easier in terms of knowing your income) but it’s up to you.

    When you start off you will likely need to be at the lower end of the range in order to win clients and develop a reputation. As you build your reputation and get positive reviews and feedback, you can start to look at increasing your prices if you feel the market will support it.

    If you plan to sell your photos, then you fall more into the world of art. Art is much more subjective, and so pricing can be highly variable. Mostly it comes down to how well established you are as an artist, the specific product you are selling (limited edition vs regular print for example), and the demand for the product you are selling in the location you are selling it.

    Again though, I’d advise starting out on the low end of the pricing spectrum. Just make sure to cover your costs. As you develop a name for yourself and build an audience, you can start to think about increasing prices and things like limited edition or one-off prints that command more of a premium.

    Your target market will also directly affect your prices. There’s no point setting high prices for prints you are selling locally if this makes your products unaffordable to most of the people in your area. However, if this is the case, you might consider selling online to reach a wider and more affluent market.

    Now, while I do recommend starting out low, you want to be sure to increase your prices as you grow more confident in your skills and you become more known in your field. At the end of the day, you need to make sure you are making money once you get yourself established and you don’t want to undersell yourself.

    Camera on money by Laurence Norah


    Invest in yourself and your product

    As previously mentioned, photography is a skill which we develop over time. There’s always something new to learn, and there’s always new gear to buy.

    I am a strong believer in the concept of continuous education. I always feel there’s something new about photography to learn, be that a new style of photography, a new way to edit photos, or a new bit of equipment to learn how to use.

    Now, you do want to invest in high quality equipment, especially as you begin to make some money. This doesn’t mean the most expensive equipment but you certainly need to make sure your gear is up to the task. For example, a wedding or portrait photographer is definitely going to get better results with a wide aperture lens and a decent flash. A studio photographer doing things like portraits or animal photography will likely benefit from a good studio lighting setup and backdrop.

    As you grow, you will want to make additional investments as needed and as you have the money. Start with the camera and gear you have and save up the money for the gear you think you need to make your photos better or your job easier. Don’t go into debt trying to buy gear you can’t afford!

    You also don’t want to fall into the gear acquisition trap. It can be easy to believe that simply upgrading your camera and your camera gear will make you a better photographer.

    In some cases, better gear will absolutely yield better results. However, good gear can’t replace skills. So don’t forget to keep investing in yourself. Whether that’s taking trips to new destinations to broaden your portfolio, enrolling in a class to learn new editing techniques, or going on a photography workshop to get new inspiration, investing in yourself is always a good idea.

    You will also want to invest in your product to make it the best it can be. If you’re offering prints of your work for example, a high quality photo printer might be a sensible long-term investment. If you are going to spend hours editing photos, then a high-end photo editing computer and monitor for photo editing is going to be an excellent investment.

    Photo editing monitor by Laurence Norah
    A good monitor and computer make all the difference to photo editing!


    Camera equipment
    Having the right equipment to cover your photography needs is also important


    Be Professional

    Your clients’ (and potential clients) impressions of you are very important, and it is key to be as professional as possible in all aspects of your business.

    For example, if you have a photography studio or office, this should be clean and professional looking. If you meet clients in person, you should be dressed appropriately and professionally for that situation (especially if doing wedding or corporate photography). If you are selling at an art show booth you should act professionally and have business cards to give out to those interested etc.

    If you want to have a successful photography business, you also need a professional online presence. This should take the form of a website at the very least but can also extend to social media channels. If you choose to run a social media channel, you need to commit to regular updates of content, and to interact with any comments you receive. Otherwise, it can seem like the business is inactive. If you can’t do that, it might be better not to do social media.

    I would say that a website is the most important online presence to have. This is where clients can find you, see how to contact you, and see what services you offer.

    It’s also an opportunity to showcase your work to potential clients, share testimonials from existing clients, and it can be a place to sell photos from directly if that’s something you do.

    These days, people are used to professional looking websites that are easy to navigate and look good on mobile. An outdated website can very quickly put clients off. The good news is that once you have set your website up, it will need minimal ongoing work other than refreshing your prices, updating photos and other minor tasks.

    I would personally recommend using a service that specializes in creating a nice looking website that matches the service you plan to provide. Whilst you might be able to save a little bit of money by building a website from scratch yourself, the end result is likely not going to look as professional unless you happen to be a professional web designer as well.

    As examples of recommended services to check out, SquareSpace is an excellent system that lets anyone build good looking websites with minimal experience required. SmugMug is a fantastic tool for building an online site for selling your photos (You can get 15% off the plan cost and a 14-day free trial if you use this link).

    There are other options of course, see my guide to selling photos online for many more options at various price points.

    SmugMug portfolio screenshot
    My SmugMug portfolio and image sale site


    Laurence in suit with camera by Laurence Norah
    Dressed in business attire for a shoot


    Invest in Marketing

    You might be the greatest wedding photographer in the world, or at least, in your part of the world, but if no-one knows you exist, you aren’t going to get any work.

    Whatever type of photography service you are offering, marketing is going to be key. There are multiple types of marketing, available at various price points. The key thing is to invest in marketing that is going to reach your audience. There’s no point paying for a marketing campaign that reaches an audience that isn’t relevant to you and your product.

    Marketing is also something you want to do after you have set up your website and any social media channels, defined your prices and so on. There’s little point advertising your services if your target audience then has no way to find you and see what you offer.

    Some marketing options to consider are as follows:

    • social media, such as Facebook, Instagram and TikTok. Your marketing efforts can be both paid advertising as well as organic content
    • offering your services or products for free as a way to grow your portfolio and get word of mouth recommendations as well as testimonials
    • locally targeted marketing, good for a local service such as a portrait studio which focuses on providing photography services in a local community. This can be anything from advertising in a local newspaper to sponsoring local events, to local bulletin boards and even ads on your local Facebook Marketplace or Craigslist
    • paid digital search ads such as Google Ads or Facebook Ads. Just note that these can be expensive and difficult to get right if you don’t know what you are doing, and it can be very easy to spend a lot of money with little return
    • e-mail, which is to say, try to collect e-mail addresses whenever you can from both potential and existing clients. An e-mail list can be a powerful way to reach out to potential clients about what you are offering, promotions and so on

    The main takeaway here is that you want to get word about your business out to people who are likely to want to buy your products and services, and a good marketing strategy is how to do that.

    marketing
    Examples of marketing channels


    Be a Timely Communicator with Potential Clients

    Ok, so you have setup your photography business, you know what you are selling, and you have potential clients. Hurrah!

    Now you just need to be sure you convert your potential clients to paid clients. It is really important at this phase of your business that you respond very quickly to any outreach, be that phone call, e-mail, text message, or via social media.

    When in the research phase for purchasing a photography product or service, many people will reach out to multiple providers at the same time. You want to always try to respond quickly, as this will give your potential client confidence in your ability to deliver.

    If you think about any company you’ve ever contacted, how has it felt if you’ve not had a response in days? These days, with the speed of available communication tools, everyone wants a speedy response to their enquiry.

    The worst thing is no response at all. I’ve seen this happen many times, particularly on social media. If someone asks a question on a social media post, you want to be sure to respond.

    This is good for that potential lead, but also looks good to anyone else checking out your social media, as they will see you are proactive and responsive. If someone see a question with no response, it makes them wonder if you are still active, or if you care about your customers. Not a good look.

    Bluffworks Gramercy suit by Laurence Norah-2 wedding photography 2


    Believe in Yourself

    My last tip is a bit more personal in nature. The reality is that photography can be a hard business. It can be a bit lonely as most photographers work alone. So it can be hard to get started and find your footing and your niche, and you might start to feel defeated.

    My advice is to believe in yourself and your product, and to keep at it. Many photographers, especially when starting out, do a number of different types of photo gigs to make ends meet. Or they might do it in addition to a regular 9-5 job.

    The main this is to know what you want and to go after it in a smart way. Be patient, be realistic, be persistent, believe in yourself.

    Finally, don’t let the business of photography get in the way of also just enjoying and loving photography. Turning a hobby into a business can be a challenge, and you don’t want that challenge to overshadow your passion for photography.

    Laurence Norah photographer


    Further Reading

    That’s it for my guide to running a successful photography business! If you found this useful, you might enjoy some of my other photography related content. Here are some articles to get you started.


    Looking to Improve Your Photography?

    If you found this post helpful, and you want to improve your photography overall, you might want to check out my online travel photography course.

    Since launching the course in 2016, I’ve already helped over 2,000 students learn how to take better photos. The course covers pretty much everything you need to know, from the basics of how a camera works, through to composition, light, and photo editing.

    It also covers more advanced topics, including astrophotography, long exposure photography, flash photography, and HDR photography.

    You get feedback from me as you progress, access to webinars, interviews and videos, as well as exclusive membership of a Facebook group where you can get feedback on your work and take part in regular challenges.

    It’s available for an amazing one-off price for lifetime access, and I think you should check it out. Which you can do by clicking here.

    And that’s it! I’d love to hear about your thoughts and tips on running a successful photography business and as always am happy to answer any questions you have. Just pop them in the comments below and I’ll get back to you as soon as I can.

    Tips and advice on how to set up and run a successful photography business from a professional photographer


    Source link

  • Level8 Creator Carry-on – the Best Luggage for Modern Travel

    Level8 Creator Carry-on – the Best Luggage for Modern Travel


    Every traveler should have a good carry-on. Even if you only fly occasionally, having a reliable one on hand allows you to bypass the check-in and worry less about your baggage getting lost. But what makes a high-quality carry-on?

    As someone who hasn’t checked a bag in the past ten years of travel across the U.S. and abroad, I’ve thought a lot about what makes a good piece of carry-on luggage. And if you ask me, it’s about capacity, maneuverability, durability, and design. After testing quite a few carry-ons over the years, I came across one that beats all the ones I had before: the Level8 Creator Carry-on.

    many carrying a Level8 Creator carry-on
    Level8 Creator Carry-on

    Why the Level8 Creator Carry-on Stands Out

    The best carry-ons should be both spacious and easy to keep organized, with handy pockets and compartments. I prefer a carry-on that also looks good and the Level8 Creator Carry-on meets all these requirements.

    In terms of features, the Creator has some that sets it apart from the rest of the suitcases:

    suitcase with Built-in USB-A&C ports
    Built-in USB-A&C ports
    • Wide-handle: this suitcase offers an adjustable telescopic wide trolley handle. This revolutionary design is ultra-sturdy and provides enhanced stability. It also has the advantage of creating more interior space for packing.
    • Quick-Access Laptop Pocket: Front sleeve with an independent laptop compartment for easy access.
    • Built-in USB-A&C ports: this feature keeps you powered up on the go. (Power bank not included)
    • Durable Design: premium German Makrolon® polycarbonate, which is lightweight and built to last.
    • YKK dual-layer zipper: provide better protection against water and dust.
    • TSA-approved lock: this not only ensures the security of your belongings, but also saves you from the inconvenience of having your lock permanently damaged during a routine security inspection.
    • 360° smooth spinner wheels: this system with precision ball bearings ensures smooth handling and lasting durability, no matter the terrain. The wheels are not only smooth, but also very quiet.
    • Eco-Friendly Interior: Fully lined with 100% RPET recycled polyester features a divider and dual zippered compartments for smart packing.
    • Dual zippered compartments and a divider for better packing. The front sleeve includes a mesh pocket and an independent laptop compartment, making organization effortless and your essentials easily accessible.
    • Lifetime Guarantee: Lifetime warranty that covers functional aspects including shell, wheels, handles, and zippers.
    front pocket for the computer
    Quick access laptop pocket

    My Personal Opinion About the Level 8 Creator Carry-on

    Pros

    • The LEVEL8 Creator carry-on, as well as the Level8 Adventurer, both have the wide handle which is a grea feature.
    • I also like the robust construction and organization features, particularly the zipless openings and compression straps. 
    • The spacious interior and smooth wheels are also a big plus.
    suitcase with smooth wheels
    Smooth wheels
    • I love the sleek design and modern look of the Creator Carry-on.
    • The suitcase comes with a sturdy computer sleeve which allows you to carry your computer in your hand if you choose to.
    computer sleeve
    Computer sleeve

    Cons

    • Price wise, the Level8 Creator carry-on is on the expensive side. Nonetheless, it’s a good value for the money and a good investment. Besides, these days Level8 offers a big 15% discount for many of its suitcases, including the Creator.
    • Due to its sturdy construction it is also a little heavier (10.1 lb) than other Level8 carry on, like the Pro Carry-on spinner or the Adventurer, which are only 9.1. This may be an issue with some airlines carry-on allowance.

    While it might not be ideal for all airlines’ carry-on size restrictions, its robust construction, spacious interior, and organized features make it a worthwhile investment for many travelers. 

    Level8 Creator Carry-on
    Level8 Creator Carry-on

    Don’t Miss the Packing Cube Travel Set!

    If you want to pack even smarter, you can complete your Level8 Creator carry on with the 4-piece Packing Cube Travel Set. These are good for garments, gadgets, or grooming essentials and will make your packing way more efficient. A great way to keep your belongings dry and organized.

    The packing cubes are made of a two-tone polyester that fights mildew and repels water and have detachable rubber patches for quick identification. The cubes dimensions are as follows:

    Level8 packing cubes set
    Level8 packing cubes set

    Dimensions:
    Garment Cube: 18″L x 12″W x 4″D (46 x 31 x 10 cm)
    Journey Cube for Worn Attire or Footwear: 12″L x 9″W x 4″D (31 x 23 x 10 cm)
    Electronics Cube: 9″L x 5.9″W x 3.9″D (23 x 15 x 10 cm)
    Grooming & Beauty Essentials Pouch: 9″L x 5.9″W x 3.9″D (23 x 15 x 10 cm)

    Note: Level8 Group provided me with this suitcase for a review. However, the opinions expressed in this article are based on my own experiences with this piece of luggage.


    Source link

  • Costa Rica Unplugged: A Quest for Family-Friendly Thrills and Tranquility

    Costa Rica Unplugged: A Quest for Family-Friendly Thrills and Tranquility


    Ziplining

    The Costa Rican countryside offers the ideal backdrop for a wide range of exhilarating activities both adults and children will find fun and exciting. The chance to glide above a rainforest’s canopy while taking in breathtaking panoramic views is one of the primary reasons why ziplining is a must-try tourist attraction in the country. The Arenal volcano area is a breathtaking location to partake in this thrilling activity, with several tour companies offering family-friendly zipline excursions to this destination. Even nicer, you could incorporate a zipline cable ride with a gondola trip above the forest and a walk across a hanging bridge. Four-year-olds and older are welcome to participate, and knowledgeable tour guides will always be present.

    See Exoticca’s selection of “trips to Costa Rica” if this sounds like something you and your family might like. The flights, transfers, and accommodation are all included in each of these vacation packag-es, along with a guided hike to the Arenal Volcano.

    Rappelling

    Rappelling, which utilizes a rope to descend steep terrain, is yet another thrilling activity not to be missed when in Costa Rica. This is because rappelling here typically entails descending waterfalls amidst lush vegetation or cliffs near the shore, making it an exhilarating experience for families to en-joy. The Arenal Volcano Area, Monteverde Cloud Forest, and Manuel Antonio National Park are among the best destinations to go rappelling in the entire country. To make your outing to any of these places even more worthwhile and action-packed, add other adventure sports, like ziplining, horseback riding, and hiking, to your itinerary.

    White-Water Rafting

    White-water rafting is another activity that could make your heart race. The Pacuare River, which cuts through the center of the rainforest, has class II, III, and IV rapids that provide an unforgettable rafting excursion. For families with children at least 12 years old and older, there are several adventure compa-nies with highly experienced instructors that offer different rafting experiences.

    Surfing

    Anyone hoping to catch some waves will find ideal surfing conditions on Costa Rica’s Pacific coast. Tamarindo Beach, in the northwest of the country, is a popular surfing destination for both amateur and expert surfers. Its waves are consistent, and if you need help from an instructor, the beach is dotted with surf schools that welcome both adult and young learners. With the use of foam boards in shallow parts of the bay and personalized coaching, local instructors help beginners become more technical.

    The Tranquility

    Connecting to Nature

    While Costa Rica has a reputation for being a top destination for thrilling endeavors, there are many places to visit to experience tranquility and relaxation. National parks, including Manuel Antonio and Corcovado, provide visitors an opportunity to admire abundant wildlife in a pristine natural environ-ment and take things more leisurely. When children catch a glimpse of monkeys, sloths, and exotic birds in their native habitats, they become instantly intrigued.

    In addition, national parks typically consist of mountains, forests, beaches, and mangroves, among oth-ers, allowing visitors to experience various ecosystems in one trip. Manuel Antonio is a beautiful exam-ple, with its magnificent crescent-shaped beach and lush surroundings. However, be advised that there is an entrance cost for the nation’s national parks. Nevertheless, it’s worthwhile to spend the day taking in nature’s untainted beauty.

    Hot-Spring Bathing

    Costa Rica is home to a variety of hot springs spread around the land due to the amount of volcanoes and volcanic activity in the country. The Tabacon Hot Springs near La Fortuna, next to Arenal, is one of the most well-known and easily reachable. Natural hot springs inside the complex offer a range of temperatures ideal for a soothing bath. The quiet atmosphere is further enhanced by waterfalls and lovely gardens, which add to the relaxing effects of bathing in the mineral-rich water.

    Relaxing Beach Activities

    The beachfront resorts in this country are excellent for families seeking to unwind and unplug com-pletely. On the Peninsula Papagayo, the exclusive Andaz Papagayo Resort is located. It offers access to a private beach as well as kayaking, paddle boarding, and snorkeling. The hotel also has a kids’ club with regularly scheduled activities to keep the youngsters interested and happy, making it even nicer for families with small children. Another favorite is the 120-acre natural sanctuary that is the Four Seasons Resort Costa Rica, also situated on Peninsula Papagayo. In addition to activities like Ziplining and surf-ing, the resort’s outstanding setting offers family-friendly tours, marine excursions, and diving.

    Tips for Finding Balance

    Parents commonly make the mistake of jam-packing every vacation day with exciting activities and sightseeing in an attempt to keep kids from growing bored. To balance stimulation and rest, however, is essential for the family to recover and fully appreciate their trip to Costa Rica. Planning an itinerary that has a good balance of both may be a bit difficult, but with the following advice, you can do it:

    Plan ahead: List the sites and activities that you and your family wish to participate in, along with the dates that you will be visiting. This will give you a basic idea of how your travel will go and assist in helping you design an itinerary with ample breaks.

    Mix adventure and relaxation: Alternate days of intense activities, like ziplining or white-water raft-ing, with days of leisurely pursuits, like trips to the beach, a park, or hot springs.

    Plan around your kids: Consider your children’s interests, hobbies, and attention span while making timetable decisions. Consider giving kids enough time to relax because they can easily get overstimu-lated.

    Don’t overdo it: Limit your activities to give every family member time to enjoy the sights and the ex-periences and to prevent over-exhaustion at the end of the day.

    Live in the moment: Enjoy Costa Rica’s unique culture and stunning landscape by living in the mo-ment. Being in the present is the only way to create priceless experiences with your family that will last a lifetime.

    Take care of yourselves: Take care of yourself by setting aside time for a healthy diet, exercise, down-time, and sleep. Your happiness and energy levels will remain high the entire journey if you get enough sleep and are in excellent condition.

    Combine Excitement and Tranquility in Costa Rica

    With its natural wonders, mix of action-packed and relaxing activities, environmentally conscious tour-ist policies, and family-friendly attractions, Costa Rica is a destination that has something to offer eve-ryone. Create individual and family memories that will last a lifetime, whether by flying over the rain-forest canopy or unwinding in the hot springs, by letting your family unplug and recharge all at once on a trip to this Central American nation.


    Source link

  • Northern Lights Hunting In Norway: Tips For An Unforgettable Experience

    Northern Lights Hunting In Norway: Tips For An Unforgettable Experience


    A tapestry of greens, purples, and blues dancing in the night sky – the Northern Lights, or the Aurora Borealis, have been a subject of wonder and inspiration for centuries. Many brave the cold, traveling vast distances to witness this ethereal spectacle. Norway, with its pristine landscapes and clear skies, remains a favorite destination for this once-in-a-lifetime experience.

    If you’ve ever dreamed of chasing this natural marvel in the Land of the Midnight Sun, read on for some indispensable tips to make your experience truly unforgettable.

    1. Timing Is Everything: Visit During Winter

    The Northern Lights are visible in Norway between late September and late March. However, for the best chances and the darkest nights, plan your trip between November and February. Begin your tour of Norway in cities like Oslo, where you can first immerse yourself in rich Scandinavian culture. As you travel northward, you’ll progressively increase your chances of a clear Northern Lights display.

    2. Head North But Don’t Neglect The South

    While Tromsø and the Lofoten Islands are famed Northern Lights destinations, don’t forget the southern gems. Places like Bergen, a coastal city, provide a unique backdrop of fjords, making the lights even more mesmerizing. Geilo, nestled between Bergen and Oslo, is another underrated destination to consider, with its crisp mountain air and expansive, dark skies.

    3. Find The Darkest Spots

    Light pollution is an aurora hunter’s enemy. Steer clear of city lights. Venturing just a few kilometers outside urban centers like Stavanger can make a significant difference. Wilderness areas in regions like Telemark, with its dense forests and serene lakes, offer perfect conditions for an uninterrupted view of the spectacle.

    4. Be Prepared For The Cold

    The Northern Lights may be stunning, but the cold in Norway can be biting, especially when you’re standing still for extended periods. Layer up! Opt for thermal underclothes, a down jacket, woolen socks, and a good pair of insulated boots. Don’t forget gloves, hats, and scarves to keep every part of you toasty.

    5. Extend Your Stay

    The Aurora Borealis is unpredictable. Even with a perfectly clear sky, there might be nights when they choose to remain elusive. Stay for at least a week to increase your chances of witnessing the magic. Plus, Norway has so much more to offer — from the vibrant streets of Oslo to the scenic beauty of Stavanger.

    6. Equip Yourself

    If you’re keen on capturing the Northern Lights, a DSLR camera with manual settings, a tripod, and a wide-angle lens are essential. A slower shutter speed can capture even the faintest of lights. And remember, smartphone cameras, no matter how advanced, might not do justice to this natural wonder.

    7. Engage With Locals

    Norwegians are proud of their natural wonders, and they often have the best tips on where and when to spot the lights. Engaging with locals can provide insights that no guidebook or website will offer. They might even introduce you to local myths and stories associated with the Northern Lights, enriching your experience.

    8. Stay Updated

    Several apps and websites provide forecasts for Northern Lights. While no prediction is foolproof, these platforms can give you a good idea of when the chances are high. Look for clear skies and high solar activity levels.

    9. Embrace The Experience

    Remember, chasing the Northern Lights is as much about the journey as the destination. Even if the lights decide to be shy, the stunning Norwegian landscape, with its snow-capped mountains, fjords, and starry skies, offers a breathtaking experience in itself.

    Conclusion

     Chasing the Northern Lights in Norway is more than just a visual feast; it’s a soul-stirring experience, a communion with nature at its most spectacular. Armed with these tips, you’re all set for an adventure that’ll be etched in your memories forever. So, pack those bags, set forth on your Norwegian journey, and let the dance of the Northern Lights illuminate your spirit.


    Source link

  • How to Travel for Cheap (or Free) in 2025

    How to Travel for Cheap (or Free) in 2025


    Nomadic Matt standing in a huge field of lavender flowers in France

    Whenever I ask readers what the number one thing holding them back from traveling is, I almost always get the same answer: money.

    This problem — and how to overcome it — is my most asked question. “Matt, I don’t know how to afford travel. Help!”

    I have answered this question in a plethora of posts, emails, tweets, and Facebook posts. Long-term readers might even be getting sick of me discussing this subject because it is one I talk about so much.

    But I know no matter how often I address this question, it will come up again.

    Since this question comes up so often, I like to constantly remind people of this fact: You do not need to be rich to travel.

    There are plenty of ways to travel on a budget (and for free) — you just need to be willing to get creative.

    Traveling the world with little or no money sounds like an impossible dream. But it is possible. It’s not glamorous, but it’s possible.

    It should be said that there are some expenses you shouldn’t compromise on (like travel insurance) but there are tons of ways you can travel the world on a budget — including plenty of ways you can actually travel for free.

    In this post, I’m going to show you two things:

    1. How to travel cheap
    2. How to travel for free

    With the right budget and the right mindset, you can make your travel dreams a reality. Even if you don’t earn a lot or you have debt, there are still plenty of ways to go overseas (I still had debt when I went on my first trip around the world). They may not be fancy or luxurious, but if travel is your priority then you can definitely make it happen!

    Ready to kick-start your budget travels and save money? Just click on either of the links below to jump directly to that section!

    1. Get a Job Overseas

    Not making enough money at your job? Working at a job you hate? Why not get a job overseas? There are plenty of opportunities in the world as long as you aren’t picky. After all, this isn’t a career you are starting — it’s just a way to earn money for travel. Here are some popular (and easy to find) jobs you can get when you travel:

    1. Au pair – An au pair is a live-in caregiver who helps a host family look after their kids. In exchange, you get free room and board and a small salary. You can read this post for more info on being an au pair.
    2. Bartender – It’s always 5 o’clock somewhere, so if you have the skills then this is an easy job to move overseas. It’s also an easy job to get under the table if you decide to go that route. If you don’t have the skills to tend bar, consider being a dishwasher or busser.
    3. Hostel worker – Hostel workers rarely stick around for long, which means there is always a demand for new help. It’s a great way to meet other travelers while adjusting to a new location. Three websites that can help you find hostels to volunteer at are Worldpackers, Workaway, and HelpX.
    4. Waitress/waiter – There are tons of seasonal restaurants around the world (and around the US) that need extra help during the busy tourist months. If you have experience, this is an easy job to find abroad.
    5. Dive instructorIf you have your certification, this is an easy job to travel with as dive instructors are needed everywhere. Best of all, these jobs are usually in picturesque tropical locations!
    6. Tour guide – If you’ve got a knack for history and don’t mind speaking in front of groups, this is the perfect job for you. It’s also usually a cash job, which means you get your tips directly.
    7. Cruise ship worker – This is a much more formal position than the ones above, but it’s a great way to travel. The hours are long, but there’s something to be said about living at sea!
    8. Seasonal worker at ski resorts – Instructors, restaurant staff, hotel staff, lifeguards — ski resorts need all sorts of staff to keep things moving, making this a goldmine for the overseas traveler (as long as you don’t mind the snow!).
    9. Yacht worker – While the hours can be long, you can make great money working for the rich and famous on their yachts. Best of all, you’re usually in some pretty amazing destinations!
    10. Yoga instructor – If you have the skills (and certification), teaching yoga abroad is an easy way to make some spending money. While you might need to know the language, there are yoga studios in pretty much every city in the world.

    Working overseas often gets discounted as an option because it seems hard to do. It’s not. Just be open. These jobs don’t require advanced degrees or a lot of work experience either.

    Are you going to get a high-paying office job? No.

    Will you get a shitty, low-wage job that will pay all your travel bills? Yep!

    I’ve met people from all walks of life, both from Western and non-Western countries, funding their travels this way. It’s an easy, fun way to lengthen your travels, deepen your experience, and make a little money so you can keep on traveling.

    READ MORE ABOUT WORKING OVERSEAS: 15 Ways to Find a Job and Work Overseas

    2. Teach English Overseas

    Teaching English Overseas in Asia


    One of the best ways to make money for travel is to teach English overseas. You can make a lot of money teaching — I replenished my travel funds while teaching in Thailand, and I have had friends leave South Korea with tens of thousands of dollars in the bank.

    All you need is the ability to speak English fluently and a TEFL degree, depending on the country you work in. If you have a college or university degree, you’ll be able to make more money and apply for better positions though it’s not necessary for many countries.

    Additionally, there are many websites and services out there that allow you to teach virtually. As long as you have a great Wi-Fi connection, you can help people learn English from anywhere in the world! Italki is one of the most popular online platforms.

    READ MORE ABOUT TEACHING OVERSEAS:

    3. Go WWOOFing and Work on a Farm

    WWOOF stands for World Wide Opportunities on Organic Farms. It’s a platform that allows you to work on a farm in exchange for free room and board. It’s a great way to see a destination in-depth while allowing you to commune with the great outdoors. You have to pay to get to the farm, but once you are there, everything else is covered! It definitely will help you travel cheap as well as have a unique experience and meet lots of cool people.

    WWOOF has opportunities available in 130 countries around the world, with over 12,000 hosts and 100,000 WWOOFers. Some of the most popular destinations for WWOOFers are Portugal, France, Italy, Costa Rica, Australia, New Zealand, and Hawaii.

    This post can give the complete low down on how to travel and work around the world with WWOOF.


    4. Use the Sharing Economy

    Nomadic Matt posing for a photo with his Couchsurfing host in France


    Use the sharing economy to find cheaper accommodation, quirky tour guides, rideshare options, and home-cooked meals with local chefs. You can bypass the traditional travel industry with sharing economy websites and gain access to locals using their own assets and skills to become small tourism companies with cheaper prices. Moreover, locals know where to find deals. They know which supermarket is cheapest, which stores offer the best sales, and where to find the hole-in-the-wall restaurants and bars with the tastiest food at the lowest prices. Talking directly to them gives you access to that knowledge.

    Here are some of my favorite websites:

    • BlaBlaCar – A ride-sharing app that connects you with drivers who have extra seats in their car (primarily for medium and long distances, and mainly in Europe).
    • EatWith – Platform that connects you with local cooks serving private meals.
    • RVShare – This website lets you rent RVs and camper vans directly from locals.
    • Turo – A car sharing marketplace that lets you rent vehicles from locals.
    • Campspace – This platform lets you camp on private property. Properties range from basic tent plots to luxurious glamping and RV stays.
    • Trusted Housesitters – Connects you with locals with whom you exchange pet and house sitting services for free accommodation.


    5. Cook Your Own Meals

    The best way to save money on the road is to cook all your own meals. While in Stockholm, I spent $60 USD for a week’s worth of groceries instead of an average of $15 USD per meal eating out! That’s a savings of $150 USD!

    I’ve done the same thing in dozens of countries all around the world — especially in expensive destinations like Iceland where eating out can really destroy your budget.

    If you are staying in hostels, book accommodation that has a kitchen so you have space to cook. If you’re Couchsurfing or using Airbnb, your host will probably have a kitchen.

    No kitchen? Pack your own container and cutlery and make some sandwiches and salads on the go. Not every meal requires a stove, right?

    Just because you are traveling doesn’t mean you need to eat out every meal. You won’t ruin your trip to Paris if you decide not to eat out one day! There’s simply no reason to be spending lots of money on food on your trip!

    READ MORE ABOUT SAVING MONEY ON FOOD WHEN YOU TRAVEL:


    6. Get Rail Passes

    Traveling on trains in Europe with a Eurail pass


    Rail passes (like the Eurail Pass in Europe or the JR Pass in Japan) are a great way to save money when it comes to train travel. If you’re traveling around the region for a while, rail passes will likely be much cheaper than just booking individual trips.

    If you are booking individual trips, booking ahead of time can usually save you about 50% of the cost of a train ticket. However, that fixes you to a set timeline. If you don’t want to be tied into a fixed schedule, rail passes can save you a lot of money while giving you the flexibility you need. I’ve saved hundreds of dollars in Europe doing this!

    READ MORE ABOUT RAIL PASSES:


    7. Sleep in Large Dorms

    Large hostel dorm rooms are the cheapest paid accommodation out there. The bigger the dorm, the cheaper it will be. While a 4-6 bed dorm might give you more privacy, a 12-18 bed dorm is going to be a bit cheaper. In the long run, this will add up. As long as you’ve got earplugs and a sleeping mask, opt for the bigger dorm to keep your budget intact!

    In a large dorm, you’re almost guaranteed to have some snorers. If earplugs don’t quite do the trick, download an app like Rain Rain, which plays rain sounds on a loop. You can set a timer so they stop playing after an hour or two, helping you ignore the noises of the dorm while you try to fall asleep. Spotify also has all kinds of rain and white noise playlists too.

    For discounts on hostels in Europe, check out HostelPass. This card gives you up to 20% off hostels throughout Europe. They’re constantly adding new hostels too. I’ve always wanted something like this and am glad it finally exists! (Use code NOMADICMATT for 25% off your membership.)

    READ MORE ABOUT HOSTELS:

    Want to travel the world for free?

    Download my free guide to points and miles and learn how to master the one thing all travel experts do to save money and get free flights and accommodation!

    Enter your info below to get the guide sent to you right away:

    8. Use Student and Other Discount Cards

    Are you a student, teacher, or under 26? Welcome to the world of 50%-off attractions and a plethora of discounts! Get a student/teacher/youth card and save big while you’re abroad. Even if you’ve recently graduated, chances are you can still get by with your expired ID card (as long as it doesn’t have an expiry date). Always ask if there are discounts available for students or youth as this is an easy way to save tons of cash as you travel around!

    Museums, galleries, and other major tourist attractions usually have discounts (especially in Europe). It never hurts to ask! (There are also often discounts for senior travelers and veterans as well, so always ask!)

    9. Get City Tourist Cards

    If you plan on seeing a lot of sights in a city, you should get a city tourism card. These will offer you discounted and/or free access to the major attractions and museums, as well as free public transportation. I saved over $100 USD with the London pass, $80 USD with the Paris Museum card, $50 USD with a Helsinki card, and tons more with other city tourism cards.

    They are an amazing way to save money on attractions that not enough people use. Just head to the local tourism office to find out what cards are available. They can help answer all your questions and make sure you save as much money as possible. Not every city has them, but most major destinations do and you’ll save a lot of money if you plan on seeing the major sights.

    10. Capitalize on Your Skills

    Need some cash? Use Craigslist (operates in 70 countries), TaskRabbit (mainly in the US and Canada, though also in Italy and Spain), or Gumtree (UK-based) to find paid odd jobs, like assisting people who need a few things done around the house. It’s a way to make money when you travel without committing to a long-term job.

    Additionally, if you have a skill, sell it. Offer haircuts to other travelers, busk for money, provide online services like editing, graphic design, or consulting. It’s never been easier to work online. As long as you have Wi-Fi you can make money. The sky is the limit here — get creative!

    11. Get Free Flights!

    Rows of seats in an airplane


    Collecting points and miles is the #1 way I’ve been able to afford so many flights and hotels over the years. By using a travel credit card for regular spending on groceries, restaurants, and shopping, I’ve been able to earn free flights and hotel stays — all by spending money I was going to spend anyway!

    These days, there are tons of ways to earn free flights. Simply sign up for a few travel credit cards, collect miles, and then fly for free.

    Most cards offer sign-up bonuses of 50,000 points (or more) — which is often enough for a free round-trip flight right there. And if you sign up for both an airline card (e.g., a United credit card) and a general rewards card, you can combine the two point balances and get a cheap flight faster. There’s even a card now — The Bilt Mastercard®– that lets you earn points on your rent!

    Collecting points and miles isn’t only for Americans either (though US residents have the best options). Canadians can collect points too, as can folks from Australia and New Zealand and the UK.

    READ MORE ABOUT POINTS & MILES:


    12. Stay for Free

    There are many services that connect travelers with locals who are willing to let them stay with them for free. Using these sites, you will never have to pay for accommodation. I’ve used this service dozens of times over the years and always meet amazing people. Sometimes you get a room, sometimes a couch, sometimes an air mattress, but it’s always free. These websites not only save you a TON of money but also get you off the tourist track and into the local life. Win-win! Here is a list of websites to use for free accommodation:

    13. Hitchhike

    Matthew Karsten hitchhiking in the USA holding a sign offering free cookies


    Hitchhiking is a free way to get around that is relatively safe and quite common in many parts of the world, including Central America, Scandinavia, Eastern Europe, Australia, and New Zealand.

    I’ve hitchhiked in more than a handful of countries (and I know solo female travelers who have done the same!). Sure, it has a bad reputation in North America, but with some common sense and a bit of patience, you can hitchhike almost anywhere — saving you tons of money in the process!

    Here are a few basic tips to help you get started:

    • Use a sign – Make a clear sign that lets people know where you’re heading. That will help drivers decide if they can help.
    • Look presentable – Wear clean clothing, smile, and don’t obscure your face with something like sunglasses. People want to see who they are picking up.
    • Check the laws – Hitchhiking is illegal in some places. Always check the laws to make sure it’s ok to do where you are.
    • Take precautions – Note the license plate of anyone who picks you up and text it to a friend. Chances are you won’t need it but it’s better to be safe than sorry!
    • Keep your valuables on you – Don’t leave any valuables in your bag if it goes in the trunk in case it gets left in the car (or stolen).
    • Consult Hitchwiki – Hitchwiki is the #1 hitchhiking resource there is. Always consult it before you hitchhike to pick up tips and ensure you’re hitchhiking in a safe place.

    READ MORE ABOUT HITCHHIKING:


    14. Take Free Walking Tours

    Want to learn about the city, get your bearings, and see the major sights? Take a free walking tour. You can find them in most major cities — just ask the local tourist office, your hostel staff, or Google “free walking tour (city name).”

    You’ll get a solid introduction to the city while also getting access to a local guide you can ask questions to. I always start my visits to a new city with one. Just be sure to tip your guide at the end (that’s how they get paid).

    This page has a list of all my favorite walking tours around the world broken down by city.
     

    15. House Sitting & Pet Sitting

    Sam, the lead researcher for Nomadic Matt, posing with a dog while house-sitting


    If you’re on a tight budget, you can pet and house sit for fellow travel lovers when they go on their own vacations! In exchange, you’ll get free accommodation while you’re watching their home and pets (animal care is involved 99% of the time).

    You can sign up for one of the sites below to start house sitting, allowing you to stay in one destination for a while without having to pay for accommodation. Everyone’s account is verified and has reviews so you know you won’t get cheated.

    This is a great way to travel long-term, with an important added bonus: you get a kitchen to cook your food (which saves you even more money!).

    You will also often get access to a vehicle and sometimes will be left a tip or free groceries. It’s generally people who are well enough off that they can afford multi-month vacations, so you’re usually in pretty nice homes and apartments too!

    The best website for this is Trusted Housesitters.

    You can read this post to learn more about how to start house sitting.
     

    16. Use Your Social Network

    Does your colleague have a relative in Spain? Or maybe you have a distant cousin who lives in New Zealand. Or maybe a childhood friend of yours is working down in Brazil.

    These days, we have a vast social network of friends and family that stretches across the globe. Don’t hesitate to use that! Ask your co-workers and friends if they know anyone where you’re going. Get your mom to ask her co-workers and friends, too.

    Using your social network can be hugely helpful in traveling the world. You never know who knows who!

    ***
    By implementing a variety of these tips, you’ll be able to travel for relatively little money. With a little planning and some creativity, you can travel the world for cheap.

    Because if I can do it, you can do it too!

    Whether it’s two months, two years, or just a two-week vacation, travel doesn’t need to cost a ton. The key is to get out of the mindset that you must travel in the typical manner of simply booking a flight and a hotel. Using out-of-the-box, nontraditional ways to travel can lead to big savings.

    But it all starts with a change in mindset. From there, with some patience and practice, you’ll be able to make your travel dreams a reality — without breaking the bank!

    Stop paying full price for travel!

    Download my free guide to points and miles and learn how to use points and miles for free travel! It’s how all the pros travel so much! In this guide, I’ll show you:

    • How to Pick a Credit Card
    • How to Earn Up to 10x Miles on Your Spending
    • How to Redeem Your Points
    • And a Ton of Other Money Saving Tips!
    Points and Miles

    How to Travel the World on $75 a Day

    How to Travel the World on $75 a Day

    My New York Times best-selling book to travel will teach you how to master the art of travel so that you’ll get off save money, always find deals, and have a deeper travel experience. It’s your A to Z planning guide that the BBC called the “bible for budget travelers.”

    Click here to learn more and start reading it today!

    Book Your Trip: Logistical Tips and Tricks

    Book Your Flight
    Find a cheap flight by using Skyscanner. It’s my favorite search engine because it searches websites and airlines around the globe so you always know no stone is being left unturned.

    Book Your Accommodation
    You can book your hostel with Hostelworld. If you want to stay somewhere other than a hostel, use Booking.com as it consistently returns the cheapest rates for guesthouses and hotels.

    Don’t Forget Travel Insurance
    Travel insurance will protect you against illness, injury, theft, and cancellations. It’s comprehensive protection in case anything goes wrong. I never go on a trip without it as I’ve had to use it many times in the past. My favorite companies that offer the best service and value are:

    Want to Travel for Free?
    Travel credit cards allow you to earn points that can be redeemed for free flights and accommodation — all without any extra spending. Check out my guide to picking the right card and my current favorites to get started and see the latest best deals.

    Need a Rental Car?
    Discover Cars is a budget-friendly international car rental website. No matter where you’re headed, they’ll be able to find the best — and cheapest — rental for your trip!

    Need Help Finding Activities for Your Trip?
    Get Your Guide is a huge online marketplace where you can find cool walking tours, fun excursions, skip-the-line tickets, private guides, and more.

    Ready to Book Your Trip?
    Check out my resource page for the best companies to use when you travel. I list all the ones I use when I travel. They are the best in class and you can’t go wrong using them on your trip.


    Source link

  • Student Travel Trends: The Preferred Destinations for Students

    Student Travel Trends: The Preferred Destinations for Students


    Traveling can bring about many positive changes in a person’s character and overall life, especially for college students. Young and adventurous students from all over the country have a deep fondness for traveling, and there are several compelling reasons for this. It’s not just an enjoyable and thrilling way to escape from their everyday routines; it’s also an excellent opportunity to create lasting memories, acquire valuable skills, boost self-confidence, and reap numerous advantages.

    Even though students’ lives are often jam-packed with responsibilities, there are always strategies to carve out time for travel. The most straightforward approach is to visit domyessay to get your essay written for the best price, a dependable essay writing service that can handle your academic assignments while you embark on your next adventure. Doing so allows you to explore the world without jeopardizing your academic performance.

    Now, you might be wondering where to go. To help you explore your options, we’ve compiled a list of the six most popular travel destinations among students, as recommended by tour operators. Let’s take a look at what these destinations have to offer!

    1. Boston, MA

    In 2020 and 2021, Boston emerged as the top choice for students planning their journeys. This vibrant city in Massachusetts offers a fascinating experience for every visitor. First and foremost, it’s a place where you can dive deep into U.S. history. A stroll along The Freedom Trail allows students to explore 16 distinctive historical landmarks and better understand their country’s past.

    Beyond its historical significance, Boston is renowned as America’s seafood haven. So, if you’re a fan of delectable seafood dishes, that’s another compelling reason to visit here. But that’s not all! Boston boasts an array of captivating museums, exquisite architecture, enchanting gardens and parks, and many other attractions waiting to be explored.

    2. New York City, NY,

     The next standout destination on students’ lists, is none other than the iconic New York City, and it’s no surprise why. With landmarks like the Statue of Liberty, Empire State Building, Times Square, Broadway, and Central Park, New York City is brimming with globally renowned attractions that everyone should experience at least once. It’s no wonder it ranks among the top choices for student travelers.

    However, it’s worth noting that planning a trip to the Big Apple requires ample time because there’s so much to see and do. Suppose you embark on this adventure during the academic year. In that case, consider enlisting the help of professional paper writers to ensure you have enough time to explore all the incredible sights this city offers. Don’t let anything overshadow the excitement of this journey.

    3. Philadelphia, PA

    Philadelphia is another favorite among students regarding travel choices, and it certainly has its unique advantages. To begin with, Philadelphia is renowned as one of the most historically significant cities in the country, and it’s also one of the oldest.

    The city is steeped in museums and historical sites, and its skyline and architecture are breathtaking. Additionally, Philadelphia offers many enjoyable activities for students during their stay. So, if you’re a fan of journeys that combine meaning and excitement, this destination is tailor-made for you.

    4. Washington D.C.

    Whether a local or an international student, another must-visit destination on your list should be Washington D.C. The United States capital city is undoubtedly a place worth exploring during your college years. A trip to this city allows you to see iconic landmarks such as the White House, the National Mall, the United States Capitol, national museums, and parks, among many other attractions.

    Despite its relatively small size, Washington, D.C., offers a wealth of experiences for tourists. From its stunning architecture to its unique historical sites, visiting Washington is much more than a leisurely getaway—it’s a chance to delve deeper into the country’s culture, history, and more. So, it’s no surprise to find it on our list of top destinations.

    5. Los Angeles, CA

    If you’re not inclined toward strolling through historical streets and visiting serious museums but seek fun and relaxation, Los Angeles is an excellent choice. This city has always been synonymous with perfect, sunny weather and a vibrant entertainment culture, making it a magnet for millions of tourists annually.

    During your trip to LA, you can enjoy endless days of surfing, soak in the beauty of its beaches, dine at many fantastic restaurants, dance the night away at clubs, explore Hollywood, and partake in numerous other activities. Undoubtedly, Los Angeles is the ultimate destination for having a blast. So, be sure to include it in your college travel plans.

    International Destinations Finally, for those who crave adventure and can’t wait to explore more of our beautiful world, many international destinations are well worth visiting during your student years.

    According to tour operators, the most sought-after international destinations for student trips include:

    • Ireland
    • France
    • Greece
    • Spain
    • United Kingdom
    • Germany
    • Costa Rica
    • Italy
    • Australia
    • China

    Each of these places boasts its unique charm, ensuring there’s something to suit everyone’s preferences. However, it’s worth noting that international travel can be pricier compared to domestic travel. In this regard, taking advantage of exchange programs is an intelligent alternative. This way, you can continue your studies while exploring new cultures, not to mention the myriad benefits of immersing yourself in another way of life.

    To Sum Up, In recent years, these destinations have gained popularity among student travelers, but of course, there are countless more incredible places to discover. The only thing left for you to do is choose the one that resonates with you the most and start planning your next adventure. Just remember not to neglect your studies while you’re out exploring. Here’s to happy adventures!


    Source link

  • Best Desktop Computer for Photo Editing

    Best Desktop Computer for Photo Editing


    As a professional photographer I am often asked what I think the best desktop computer for photo editing is. So, I thought I would give you my advice on choosing a desktop computer for your photo editing needs.

    A computer that is well-suited for a photographer is important in almost all aspects of your digital photography workflow, including organizing, editing, manipulating, and storing your photos.

    A computer with a slow processor or inadequate memory can lead to sluggish performance when editing photos, application crashes, difficulty using multiple programs at once, not enough storage space for your photo files, challenges running the latest versions of applications, and the inability to use certain features (such as those powered by AI).

    You want to spend your time editing your photos rather than waiting on your computer to catch up with you!

    I’ve been building my own desktop computers for years, and it’s actually a hobby I enjoy. I also have a degree in computer science and a background in software development. But you don’t need to build your own computer to get a high-performance photo editing computer —there are a number of great options on the market that come pre-built and ready to go. That is what I would recommend for most people.

    However, even when buying a pre-built computer, it is still key to know which specifications are important, and which aren’t. You need to know what to look for so you get the best results for your budget. This can be confusing, especially if you don’t know a lot about computers, and I will help break down the most important components and numbers.

    In this guide, I’m going to draw upon my experience of building my own computers for photo editing to share with you exactly what to look for when shopping for a computer for photo editing.

    This information will help you to understand what specifications to look for when buying a computer. Most computer models also have a variety of configurations and optional upgrades, so you’ll be able to decide which of those are actually important.

    Alternatively, if you decide to build your own computer for photo editing, my guide will also help you home in on the parts that are going to add the most power to your computer for photo editing.

    Finally, after sharing everything you need to look for when buying a desktop computer for photo editing, I’ll also share some suggested pre-built systems that you might consider. Let’s get started!

    Home Photography Office by Laurence Norah

    What is a Desktop Computer Anyway?

    For the purpose of this guide, I will be defining a desktop PC (personal computer) as a stationary computer that is meant to be used on a desk or table by a single user. Whereas a laptop or notebook is a smaller computer which is designed to be portable, normally featuring a built-in screen.

    It’s also worth noting that traditionally the term “PC” was used to primarily describe Windows based computers rather than Macs, but this guide will be covering both Windows and Mac as a Mac is also a personal computer.


    Desktop Computer versus Laptop for Photo Editing

    Before getting into the guide, you might be wondering if a desktop PC is better than a laptop for photo editing.

    I’ve already written a detailed guide to the best laptop for photo editing as well as the best monitors for photo editing. However, whilst a laptop can do a lot, it just can’t beat a high-powered desktop when it comes to editing your photos.

    This mostly comes down to power and heat. A laptop computer is always going to be constrained by how much power it can draw due to its small size. That small size makes it harder to dissipate heat, which can be an issue with high intensity workload like photo and video editing.

    A desktop PC on the other hand can use much higher-powered components as there is more room for airflow as well as for larger fans. So, the excess heat generated by higher powered components can be more easily removed. This is why desktop PCs often feature a number of fans.

    Of course, the argument isn’t one sided. If you travel a lot and need to edit on the go, or prefer not to be tied to a home office and like to work from places like coffee shops, then a desktop isn’t going to work for you.

    So I personally have always had a home desktop computer as well as a laptop. I use the laptop when traveling or working away from home (.e.g, coffee shop) and my desktop when I am at home.


    What to Look for in a Photo Editing Computer

    When you look at the specification sheet for a computer, it’s easy to become overwhelmed. There’s a lot of jargon involved, and a lot of numbers thrown around. I’m going to cut through all that and explain exactly what you need to be looking for and why, so you can be sure you are picking the right setup for your needs. This will also save you from spending unnecessary money on components you don’t need.

    There are four main specifications you need to focus on when it comes to picking a desktop computer for photo editing, and I’ll go through each of these now. I’ll also cover some other things to consider which are less critical but worth keeping in mind.


    Best Processor for Photo Editing Computer

    The first specification to consider is the processor the computer comes with. The processor is the part of the computer which actually does the majority of the computing. At its core, a computer is a very fancy calculator which spends a lot of time doing math. You don’t actually see any of that happening as it’s all hidden away thanks to clever software developers who create applications for us to use. But those applications are just code, and the code is turned into math.

    The processor is the component which does all that math. It is often referred to as the brain of the computer. The more powerful the computer, the more calculations it can do, and the faster it will let you do things.

    Photo editing can be quite a complex task for a computer to deal with as it usually involves working with millions of pixels of image data, so you need a fast processor to be able to handle that and not have to wait around as your photo editing software overloads the processor and slows you down.

    As of 2025, there are three main choices when it comes to processors for desktop computers. Those are processors made by Intel, AMD and Apple. I have used processors from both Intel and AMD inside my desktop computers for photo editing, and have had good results with both. I’ve also used Apple’s processors, which are only available in Apple laptop and desktop computers. If you buy an Apple computer these days, you’re going to get an Apple processor inside.

    Whoever actually makes the processors though, the main thing when choosing a processor for photo editing is to get a relatively recent mid-range or higher model.

    Best Desktop Computer for Photo Editing

    So, what are you actually looking for?

    First, some terminology and background.

    Pretty much every year, Apple, AMD and Intel release a new series of processors, which are known as a processor generation. Generally speaking, as long you purchase a mid-range or higher model from the current or previous generation, you are going to be fine.

    From time-to-time generational improvements are significant enough that it’s worth going for the most recent generation, but for the most part anything from the current or previous generation will be fine. A quick Google search for recent processor reviews will normally reveal if it’s worth paying a premium for the latest and greatest generation.

    Naming conventions tend to be somewhat confusing when it comes to computer processors, a fact which is not helped by the occasional decision by processor manufacturers to entirely change naming conventions.

    As a rule of thumb though, when comparing processors from the same company, the bigger the number the more powerful the processor. And, of course, the higher the price.

    I’ll now do my best to explain this naming convention, but honestly, you can skip this explanation if you want, and just take my recommendations at the end of this section. For those of you truly interested in learning more about this, read on.

    Let’s start with examples of processor names from the last three generations of processors from AMD, Intel and Apple:

    • Intel: Intel Core i5-13600k (2022), Intel Core i9-14900k (2023), Intel Core 265K (2024).
    • AMD: AMD Ryzen 5600X (2020), AMD Ryzen 7800X (2023) or AMD Ryzen 9950X (2024).
    • Apple: M2 Pro, M3 Ultra, M4 Max

    In all the cases, the numbers tell you what generation of processor you are looking at. Information is also provided to tell you and where in the range it falls.

    With Intel, the 13 in i5-13600k refers to the generation, which preceded the i9-14900k. The numbers after the generation refer to the relative performance, so the 13600k is a mid-range processor, whilst the 14900k is a high-end processor.

    The i5 and i9 weren’t adding much to the party other than to say a bigger number meant a faster processor, which might be why, as of 2024, they just have names like Core 245K or 265K. This is the generation after the 14 series, and again, the bigger the number the more powerful the processor.

    So that was Intel.

    With AMD, the first number also refers to the generation, so the 5600X is from the generation before the 7700X, which in turn is the generation before the 9950X.

    Like Intel, the numbers after the generation refer to the relative performance, so the 5600X is a mid-range processor whilst the 9950X is a high-end processor.

    Finally, Apple has the easiest naming convention. The number after the “M” refers to the generation, the higher the number the more recent the chip. Then, a chip can be regular, Pro, Max or Ultra. Each of these just represents faster performance, the Pro being faster than the regular, the Max being faster than the Pro and so on.

    Explaining processors would definitely be easier if all the processor manufacturers followed naming convention as simply as Apple does.

    Anyway, you might be wondering what exactly makes the processor faster. Again, it’s not super important to understand, but basically it will have more processing cores, operate at a faster frequency (essentially perform more calculations per second), and as a side effect, consume more power.

    The best price to performance tends to be with the processor that is a couple of spots below the highest end processor in the line-up. The highest end processors are normally more expensive, and the extra performance is not usually worth that price premium.

    So for example, with AMD, I’d suggest the 9700X over the 9950X for example. With Intel, the 14700K is going to be better value than the 14900K. If you have an unlimited budget, then by all means get the top end processor. But for most people, the gains won’t make a very significant difference to their photo editing workflow.

    To cut a long story short, my processor recommendations for a photo editing computer in 2025 would be:

    Intel: 14700K or higher

    AMD: 7700X or higher

    Apple: M4 Pro or higher

    I’d also add that Intel generally has higher brand awareness with consumers, and so many pre-built desktop PCs tend to lean towards Intel processors as they sell better. Personally, I have an AMD processor and it works great, but as I said, any recent processor will work well from either AMD or Intel.

    Processor recommendation: Computer with an Intel 14700K processor or higher or an AMD 7700X or higher or an M4 Pro or higher


    Amount of Memory for Photo Editing Computer

    There are two types of computer memory to consider when buying a computer. One is volatile memory, also known as RAM (random access memory), and the other is non-volatile memory, also referred to as storage memory. Storage memory is where your actual data like photos is stored and I’ll cover that in the next section.

    RAM is basically short-term memory. It’s very fast, but has the downside that it needs to be powered to work. So when you turn your computer off, it gets wiped.

    RAM is used by the computer’s processor to store information while the computer is in operation. So when you open up a computer application, it’s loaded into RAM. The more complex the application, and the more applications you open, the more RAM you need. If you’ve ever opened up a few applications at once and noticed that your computer seems to slow down, it’s likely because it’s running out of free RAM.

    When your computer runs out of RAM, it has to start moving data in and out of RAM as it needs it. So for example, if you have a web browser open and then you switch to a photo editing application, if you have enough RAM this will happen very quickly as both applications can stay in RAM.

    However, if you have run out of RAM, your computer will have to take time to unload the browser from RAM and load the photo editing application into RAM from storage. This can take time and will make the transition between applications feel sluggish.

    Best Desktop Computer for Photo Editing

    When it comes to photo editing, you need to make sure you have enough RAM so your computer doesn’t have to swap anything in and out of RAM. Photo editing applications can use a lot of RAM, and I have observed Lightroom for example using in excess of 25GB of RAM by itself.

    The absolute minimum amount of RAM I’d recommend for a photo editing computer is 16GB, but unless you are on a very tight budget I’d suggest at least 32GB for a superior experience.

    Personally, I use 64GB for all my desktop and laptop computers as this means I can open up multiple applications and not have to worry about things slowing down if I have a lot of applications open, such as Lightroom and Photoshop at the same time, along with browser windows, e-mail applications, word process documents, and so on.

    That said, memory is a relatively easy upgrade to do yourself on most desktop computers. So, if you are working within a tighter budget then you can get a computer with 16GB of RAM and then upgrade it yourself later on.

    Memory recommendation: 16GB minimum, 32GB ideal, 64GB+ for large workloads


    Storage for Photo Editing Computer

    The other type of memory that is important for photo editing and storage is non-volatile memory. Unlike RAM, non-volatile memory doesn’t need power to retain data. So when you turn your computer off, the data stays in place until you turn your computer back on.

    Most people will refer to this kind of memory as a hard drive, storage drive, solid state drive (SSD), or disk drive.

    This type of storage is used for a number of things. When you install an application on your computer, that takes up some storage. When you actually launch the application, it is copied from the storage into RAM for fast access. All your files are also stored on non-volatile memory, such as your photos, videos, documents etc. When you actually open the file, it’s loaded into RAM for quick viewing.

    The first thing you need to decide is how much storage you need. This will be a personal decision as it’s based on how much data you have, or plan to store.

    Generally, a RAW image file will be somewhere between 20 megabytes and 80 megabytes. So, 20,000 images would require roughly a terabyte (1 TB) of storage space. You’ll also need room for your operating system, application files and anything else you choose to install.

    I’d recommend at least a 1TB storage drive, but ideally 2TB or more to give you some room to expand.

    Best Desktop Computer for Photo Editing

    The other decision you have to make is the type of drive technology. Storage drive technology has changed over the years, from mechanical hard disk drives (HDD) to solid state drives (SSD). The former can offer higher capacity at lower prices, but is significantly slower. An SSD is more expensive but much faster.

    I’d highly recommend an SSD for a photo editing computer. If you have a large archive of image files then a separate mechanical hard drive for image storage purposes might make sense, but I’d recommend that your main storage drive where you install your applications be an SSD.

    As with memory, storage is also quite easy to add to a desktop computer. So you don’t have to settle on a final amount to start with. You can always add more later, either as internal drives or as external drives.

    If you are wanting to add memory storage some options are this SSD from Western Digital, and this large hard drive from Seagate.

    Storage recommendation: 1 TB SSD minimum


    Graphics Card for Photo Editing Computer

    As photo editing applications become more and more sophisticated, they have started to require more specialized hardware to perform at their best. One example is the rise of AI powered editing features, such as object replacement and noise reduction, which can require a lot of processing power to work quickly and effectively.

    The computer’s central processing unit, or CPU, is a general processor, which can do a lot, but for specialist tasks such as specific graphics tasks and AI workloads, a different type of processor is needed. Enter the graphics processing unit (GPU), also known as a graphics card.

    For a long time, graphics cards in computers were primarily sold to people wanting to play computer games. Gaming involves generating a lot of image data on the screen, and a graphics card is a specialized chip that can process that type of data very quickly.

    Over time, GPU manufacturers like NVIDIA and AMD have expanded the capabilities of their graphics cards. The capabilities that make them good at processing image data also make them good at handling other workloads such as AI tasks and specific computational functions that CPU’s have often struggled with.

    Best Desktop Computer for Photo Editing

    The majority of photo editing applications these days, including Adobe’s Lightroom, Photoshop, and tools for image denoising for example, can make use of a systems graphics card to speed up their tasks. This is especially obvious in AI powered tasks, where the GPU can do in seconds what a regular CPU might take minutes to do.

    As such, I would highly recommend including a graphics card in your photo editing computer build. The good news is that you don’t need anything super high end, as even a mid-range graphics card can handle photo editing tasks with ease.

    In my experience, NVIDIA has traditionally produced the more capable graphics cards for photo editing tasks, and their products have always worked well for my needs. I’d recommend something like the NVIDIA RTX 4060. The first number in this case is the generation, with 4 referring to the 4xxx series. Previous cards were the 3xxx, and the latest generation (released in 2025) are the 5xxx. Then the higher the number after that first number, the faster (and more expensive) the card will be. For example, the 4070 is faster than the 4060.

    Again, you don’t need the latest and greatest graphics card for photo editing. Which is good, because graphics cards are very expensive bits of hardware.

    Note, if you are purchasing a Mac, the Apple “M” processors have powerful built-in graphics-card capabilities, so don’t need a separate card to perform well.

    Graphics card recommendation: NVIDIA RTX 4060 or higher.

    Nvidia GeForce Graphics Card by Laurence Norah


    So those were the key specifications that you will want to consider when it comes to choosing a desktop computer for photo editing. The above list will also be helpful if you already have a desktop computer and are wondering if there’s anything you can upgrade to make your photo editing application run better.


    Price for a Photo Editing Computer

    You might be wondering what sort of budget you need for a photo editing desktop. Below I’ve listed some ranges. Note that this price does not include your monitor for photo editing, and not all computers include peripherals such as a mouse and keyboard, which may add to the cost.

    • $600 – $1000 USD: whilst it is possible to get a photo editing computer at this price point, trade-offs will have to made to hit the budget. So you might have to skip a graphics card, have less RAM, or a lower end processor
    • $1000 – $2000 USD: I’d say this is a good sweet spot for a good desktop computer for photo editing. You should be able to hit all my recommended specifications
    • $2000 USD +: As with any purchase, you can always spend more! Above this price point you are starting to venture into higher end territory. Whilst this may make sense if you also plan to play the latest gaming titles, or work with massive image files like panoramas, for most users the return on investment will swiftly diminish as the price increases.

    The brands I list will also all have a range of different options at different price points, and most builds can be customized to suit your budget. With the knowledge you have gained from the previous section, you can decide where to save and where to spend your money appropriately for the best results.

    Of course, you can also build your own desktop PC for photo editing. These days the cost savings of doing that are only likely to be a couple of hundred dollars. It can also be fairly challenging if you aren’t familiar with the process, and of course you won’t get any support if you encounter issues. All that said, if you like the idea of having complete control and want to do it yourself, my guide should give you an idea of which parts to prioritize.

    Inside of a desktop computer by Laurence Norah-2


    Recommended Photo Editing Computers

    I’m now going to list a number of pre-built photo editing computers to consider. Many of these are going to be marketed as gaming PCs. That’s because the specifications required to run photo and video editing software well are not dissimilar from those required to run a computer game.

    You may also note that because they are gaming PCs, they are going to have features that gamers often appreciate, such as colorful lighting, lots of fans, and side windows.

    The good news is that these lights can be toggled off if you aren’t into that aesthetic. Fan speeds can also be controlled to reduce noise.

    However, I’ve also included some options that are a bit less “gamer looking” to suit all tastes.

    I’ve ordered these options approximately by price, but pricing always varies so do check.


    Acer Aspire TC-1775-UR12 Desktop

    My first desktop computer, which I got over three decades ago, was an Acer. In fact, Acer has been making desktop computers and laptop since the 1980s. So they have been doing this for a while.

    Best Desktop Computer for Photo Editing

    I’m including this option on the list for those of you with a tighter budget (although also check out the budget friendly Mac Mini for another option).

    The Acer is missing some key features I’d normally recommend in a photo editing computer, but if you are on a restricted budget it will still get the job done, and certainly most regular photo editing tasks will work just fine. However, if you were hoping on doing much advanced AI based edits such as object replacement or AI powered noise reduction you might want to look further down the list.

    The key components include an Intel Core i5-14400 processor, 16GB RAM, and a 512GB SSD. It doesn’t have a separate GPU, and the memory and storage are also a little low. However, for the price it is hard to argue with.

    Of course, with any desktop computers on this list, you can always upgrade some components later such as the memory down the road.

    Key specs: Intel Core i5-14400 processor, 16GB RAM, 512GB SSD, no GPU

    Check price on Amazon here


    MSI Codex R2 Gaming Desktop (B14NUC5-212US)

    If you’re looking to spend around $1,000 on a photo editing computer but still want a discrete GPU, then the MSI Codex R2 Gaming Desktop is a good option.

    This currently comes in at just over $1,000, but for your money you still get an Intel Core i5-14400F processor, NVIDIA GeForce RTX 4060 graphics card, 32GB RAM, and a 2TB SSD (note different variants and configurations are available).

    Best Desktop Computer for Photo Editing

    Ideally of course you’d get a slightly faster processor for photo editing, but considering this pre-built desktop from MSI does include a discrete GPU and 32GB of RAM, it should be able to handle most photo editing tasks relatively well.

    Key specifications: Intel Core i5-14400F CPU, NVIDIA GeForce RTX 4060 GPU, 32GB RAM,2TB SSD

    Check price on Amazon here and Newegg here


    iBUYPOWER Slate 8 Mesh Gaming PC (SMA7R78XT02)

    iBUYPOWER are a relatively popular brand of good value pre-built gaming PCs which you can purchase in the US from retailers including Newegg, BestBuy, Amazon, and Adorama.

    Best Desktop Computer for Photo Editing

    The Slate 8 Mesh gaming PC is one of the better specified desktop computers I’ve found at this price point, and it meets all the requirements you would want for photo editing.

    The key specifications include an AMD Ryzen 7 9700X CPU, AMD Radeon RX 7800XT 16GB graphics card, 32GB DDR5 RAM, and a 1 TB NVMe SSD. It also comes with a mouse and keyboard, so all you need to add will be a good monitor for photo editing.

    Key specs: AMD Ryzen 7 9700X CPU, AMD Radeon RX 7800XT 16GB GPU, 32GB RAM, 1TB SSD

    Check price on Amazon here and Newegg here. Best Buy have a similarly priced option but with an Intel processor and NVIDIA GPU here (model SMI7N4601).


    Apple Mac Mini

    The Apple Mac Mini is a diminutive device which packs a punch far above its size thanks to Apple’s impressive “M” line of processors. These processors have been custom designed by Apple to excel at the sort of tasks that Apple computers are commonly used for, which happens to include photo editing.

    The Apple Mac Mini is available in a number of configurations, but I’d recommend getting the version with the M4 Pro processors. This is notably faster than the M4 in tasks such as exporting images and performing AI tasks. That said, if you are on more of a budget the M4 processor is still more than capable and models are available for under $600, which is a bargain.

    Best Desktop Computer for Photo Editing

    The standard storage is 512GB but I would suggest getting the model with at least 1TB so you don’t run out of space for applications.

    The main downside to the Mac Mini is that it can’t be upgraded, so you can’t increase the RAM or internal storage. You can purchase it direct from Apple and add storage (up to 8TB), but Apple charges a hefty premium for storage upgrades.

    Of course, you can add external storage via USB or Thunderbolt, so that isn’t a huge issue, but it’s something to be aware of.

    Key specs: Apple M4 Pro processor, 24GB memory, 1TB SSD.

    Check price on Amazon here, B&H Photo here and direct from Apple here.


    CyberPowerPC Gamer Supreme (SLC8800BSTV8)

    CyberPowerPC is a US based company which specializes in building gaming PCs, which are available in a range of configurations and prices. Their products are available for sale in the US from retailers including Newegg, BestBuy, Amazon, and Adorama.

    They also offer a wide range of pre-built PCs, which tend to lean towards a more gamer aesthetic (think RGB lighting and glass side windows). They also have options across the budget range.

    A black Intel Core i7 computer with a keyboard and mouse.

    The model I suggest for photo editing is the Gamer Supreme, which comes with an Intel Core i7-14700KF processor, 32GB of RAM, an NVIDIA GeForce RTX 4060 Ti 16GB GPU ,and a 2TB SSD.

    It is slightly more expensive than the iBuyPower model, but you are getting a larger storage drive as well as a slightly faster graphics card. If you work with larger images or do a lot of tasks involving AI, this can make a difference.

    Key specs: Intel Core i7-14700KF – 32GB Memory – NVIDIA GeForce RTX 4060 Ti 16GB – 2TB SSD

    Check price on BestBuy here and Newegg here.


    ASUS – ROG Gaming Desktop (G16CHR-I7F4060TiVR)

    Asus are a well-known manufacturer of computer hardware, making both complete systems as well as individual component parts like motherboards, graphics cards, and cases. Personally, I own an ASUS laptop which I use for photo editing on the go, and it has proven very reliable.

    Asus has a gaming brand known as ROG (Republic of Gamers), which is where you will find their higher-powered products. Again, these are designed for gamers but work well for photo editing as well.

    Best Desktop Computer for Photo Editing

    The model I recommend is very similar to the CyberPowerPC, with the main difference being that the graphics card has slightly less memory available. This can be an issue in situations requiring a lot of graphics memory, such as running AI tasks on large images, but is unlikely to affect most situations.

    Key specs: Intel Core i7-14700F – 32GB Memory – NVIDIA GeForce RTX 4060 Ti 8GB – 2TB SSD

    Check price on Best Buy here and Amazon here


    Alienware Aurora Gaming Desktop (ACT1250)

    Alienware is the gaming brand of Dell, a company known worldwide for making both laptops and desktops. For a long time, I used Dell laptops as my primary photo editing laptops, before switching to Asus.

    The Alienware brand covers a number of models, and some of them are very expensive indeed. However, there are also some more reasonably priced models which would work well for photo editing. The majority of their models are also highly customizable, allowing you to pick and choose the exact parts you want. You can see all the current models here.

    View right-facing Computer with a purple light and hex vents.

    For this guide, my recommendation would be to customize the Alienware Aurora Gaming Desktop, model ACT1250, with an Intel Core Ultra 7 265F processor, an NVIDIA GeForce RTX 4060Ti graphics card, 32GB of RAM, and a 2TB SSD. That should be more than enough for your photo editing needs.

    Key specs: Intel Core Ultra 7 265F processor, NVIDIA GeForce RTX 4060Ti GPU, 32GB RAM, 2TB SSD.

    Check price and configure direct from Dell here.


    Apple Mac Studio

    If you liked the sound of the Mac Mini but wanted something even more powerful, then your best option is going to be the Apple Mac Studio.

    This is a larger and more powerful computer, featuring the M4 Max processor, up to 512GB of RAM (yes you read that right) and up to 8TB of storage.

    The 2025 edition features Apple’s custom designed processor and can handle photo editing with ease. It can be pricey, depending on how you specify it, but it’s the best desktop option for those of you who prefer the Apple ecosystem.

    Personally I’d recommend the model with M4 Max processor, 36GB of memory and 1TB SSD. You can always add storage via external drives, but if you want more RAM you’ll have to put up with the up-front price that Apple charges as it’s not user-upgradeable after purchase.

    Key specs: M4 Max processor, 36GB memory, 1TB SSD.

    Check price and configure direct from Apple here.


    Corsair ONE i500 Gaming PC

    Many of the desktop PCs I’ve listed feature a gaming focused aesthetic which often includes colorful lights and side windows. Which is great if you are into that. However, if your tastes run to something a bit more understated, you may be wondering what your options are.

    Well, you can either get an RGB equipped PC and turn off all the lights, or you can get something like the CORSAIR ONE gaming PC, which is designed with a bit of a different aesthetic in mind. It is fully enclosed, so you can’t see all those internals, and any lighting is very minimalist. It even comes with a real walnut wood panel on the front!

    Best Desktop Computer for Photo Editing

    Of course, looks don’t mean much if the hardware isn’t up to scratch. The good news is that this desktop PC is certainly more than capable of running any photo editing tasks you can throw at it. You get an Intel Core i9-14900F processor, an NVIDIA GeForce RTX 4070 Super graphics card, 1TB M.2 SSD for storage and 32GB DDR5 RAM.

    My only gripe is that at this price point the 1TB SSD is a bit on the low side, but adding storage is very easy.

    If you aren’t familiar with them, Corsair is an American computer peripherals and gaming brand. They have long been known for creating high end RAM, as well as accessories like mice and keyboards. They also build gaming computers.

    Key specs: Intel Core i9-14900F – 32GB Memory – NVIDIA GeForce RTX 4070 Super -1TB SSD

    Check price on Amazon here, and direct from Corsair here


    Where to Buy a Desktop PC for Photo Editing?

    The options available to you for where to buy will of course vary depending on your geographical location. In North America for example, good options include BestBuy, Newegg, Amazon, Adorama, and direct from the manufacturer if they offer a retail outlet. In the UK, you might also check Currys and Amazon UK.

    Amazon is now available in most countries, and many larger manufacturers such as Dell and Asus also have direct sales available to customers in different geographic locations.

    When purchasing, be sure to check what warranty and support is included with your product, so you know where to turn should you run into any difficulties.


    What about Video Editing?

    If as well as photo editing you also want to do video editing, you might be wondering if that changes the specifications. Generally, the answer is no. The specifications that make for a good photo editing computer also make for a good video editing computer.

    The one area you will need to consider carefully is storage space. Video can take up a lot of storage space, especially if you are shooting in high resolutions. So you will likely need to budget for a large storage drive.


    What if I am looking to Upgrade my Existing Computer?

    If you have an existing desktop computer that you want to make faster or more efficient for photo editing, there are some ways that you improve your computer without buying a new one.

    These upgrades are relatively simple to do, normally just requiring you to plug in a new device inside your computer. You’ll have to do a bit of research to figure out how to do that, but searching for “how to install an SSD”, “how to install a GPU” or “how to install memory” should yield lots of useful information.

    Here are some easy upgrades to consider:

    • Switch from a mechanical hard drive to a solid-state drive as the main system drive where your applications are installed. This will make your whole computer run more quickly.
    • Upgrade your RAM. If you have 8GB or 16GB of RAM, then upgrading to 32GB or even 64GB of RAM will make a big difference
    • Adding a dedicated GPU. If you only have a built-in GPU, or an older dedicated GPU, then adding a new GPU can make a big difference, especially for AI based tasks like noise reduction or object replacement


    Accessories for a Photo Editing Computer

    When you buy a desktop computer, there are a few things you will need in addition to the computer itself. These are all going to have a cost, so it’s worth keeping them in mind when putting your budget together. Here’s what we suggest you consider.

    A Gaming Mouse

    Not all pre-built desktop computers come with a mouse, which is obviously an essential component for interacting with your computer. I personally use and recommend using a gaming mouse for photo editing.

    The reason that I like to use a gaming mouse for photo editing is that it comes with a lot of buttons, the majority of which you can configure yourself.

    Best Desktop Computer for Photo Editing

    Most photo editing applications are full of keyboard shortcuts, and by assigning your most used keyboard shortcuts to various mouse buttons, you can make your editing process a lot quicker. Once you’ve tried it, you’ll wonder how you coped without one.

    Gaming mice are also very accurate, meaning when you are editing fine details, you are less likely to mess up. Personally, I use the Logitech G502, which is a fantastic mouse with 11 programmable buttons.


    A Good Keyboard

    As with a mouse, not all desktops come with a keyboard. If that’s the case, you’ll obviously need to pick up a keyboard. Now, there are hundreds of keyboards out there to choose from in a wide variety of styles.

    Personally I’d recommend going for a keyboard with mechanical switches as in my opinion they are nicer to type with. But you probably have your own preferences for keys types, formats, and feel.

    Best Desktop Computer for Photo Editing

    I personally use a Keychron C3 Pro keyboard which has been great, but there are lots out there to choose from!


    A Monitor for Photo Editing

    You are absolutely going to need a monitor for photo editing, it’s an accessory I recommend even if you are using a laptop as it’s going to really improve your experience.

    A high-quality monitor is obviously very important for photo editing work. Choosing a monitor is a big task, as there is a huge variety to choose from at different sizes and price points.

    I’d recommend reading my complete guide to the best monitors for photo editing, which a guide to what to look for as well as suggestions at a range of budgets.


    A UPS (Uninterruptable Power Supply)

    Unlike a laptop, a desktop computer doesn’t come with its own battery. So, you need to be plugged into a wall outlet all the time. The problem is that if you suffer a power brown-out or a black-out, your computer is going to shut down. This can cause you to lose anything you’re working on, and in a worst-case scenario, might even damage the sensitive electronics inside.

    For this reason, I always recommend using an uninterruptable power supply, or UPS, with your desktop computer. This is basically a large battery which also provides surge protection. If the power goes out, or there’s a brown-out, the UPS will switch to battery mode and your computer will keep running.

    Best Desktop Computer for Photo Editing

    Now, a desktop PC is very power-hungry, and the UPS won’t keep it running indefinitely. Generally, they are designed to give you enough time to save your work and shut down cleanly, rather than keep running for hours.

    Most UPS products these days come with a USB cable and software so you can plug it into your computer, and it can be set to automatically shut down your PC before the UPS battery runs out.

    I use a CyberPower UPS, but there are a number of options on the market. In the past I have also had an APC UPS.


    Further Reading

    Well, hopefully this guide has given you some options to consider when looking for a computer to edit your photos on. We also have a number of other photography resources that we think you will find helpful.


    Looking to Improve Your Photography?

    If you found this post helpful, and you want to improve your photography overall, you might want to check out my online travel photography course.

    Since launching the course in 2016, I’ve already helped over 2,000+ students learn how to take better photos. The course covers pretty much everything you need to know, from the basics of how a camera works, through to composition, light, and photo editing.

    It also covers more advanced topics, including astrophotography, long exposure photography, flash photography and HDR photography.

    You get feedback from me as you progress, access to webinars, interviews and videos, as well as exclusive membership of a Facebook group where you can get feedback on your work and take part in regular challenges.

    It’s available for an amazing one-off price for lifetime access, and I think you should check it out. Which you can do by clicking here.

    And that’s it for our guide to the best laptop for photography! As always, if you have any questions or feedback on any of the above, or have just found a laptop and would like our thoughts on it, let us know in the comments below!

    A guide to choosing the best desktop computer for photo editing. Includes what to look for and suggestions at a range of price points


    Source link