Your guide to Stromness South Georgia, a historic whaling station on the north coast that was part of Sir Ernest Shackleton’s epic overland journey.
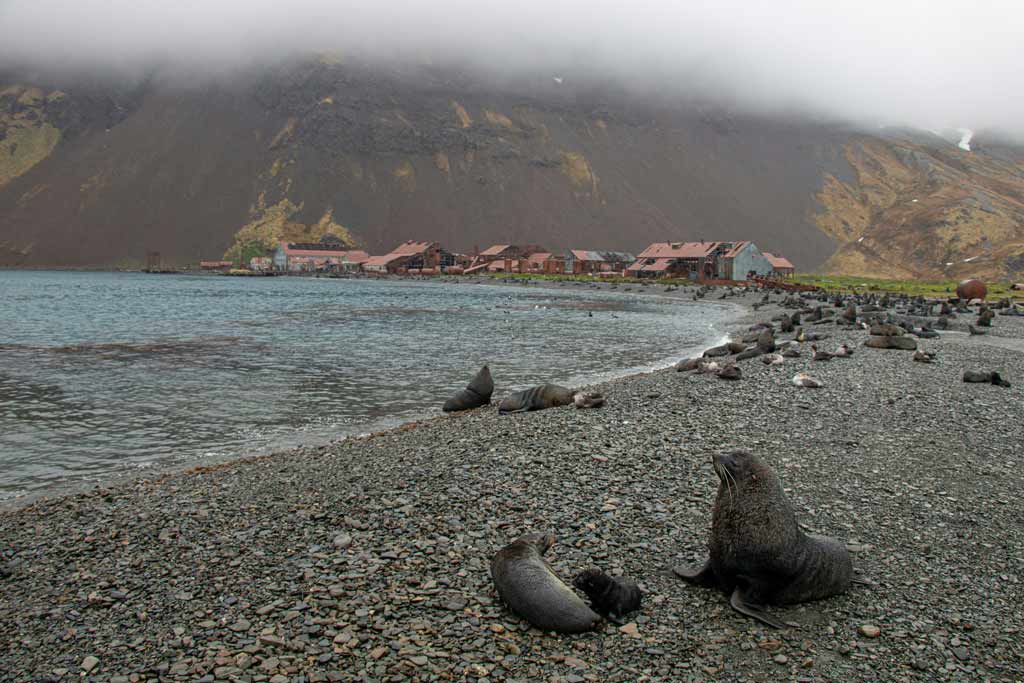
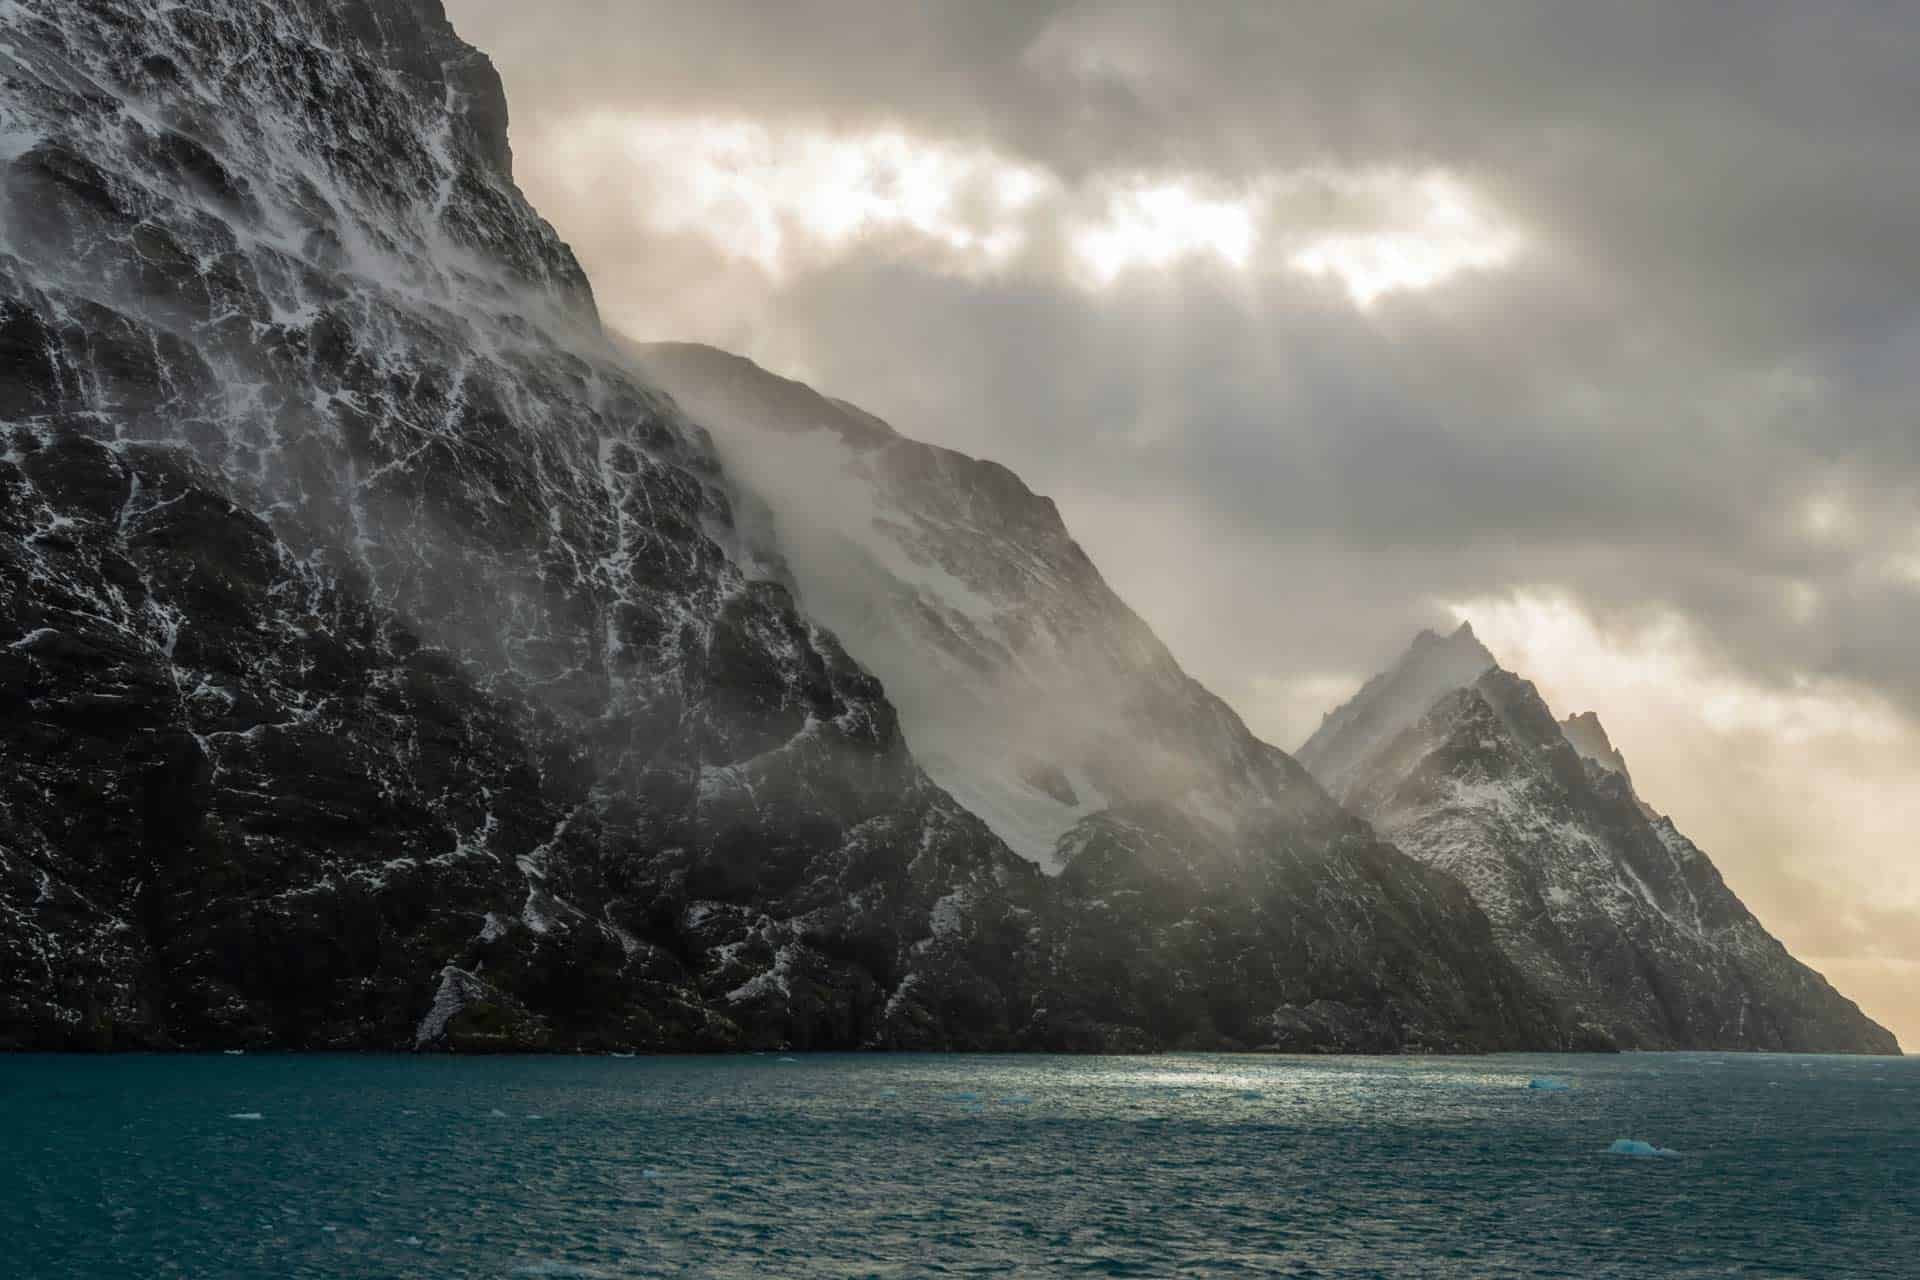
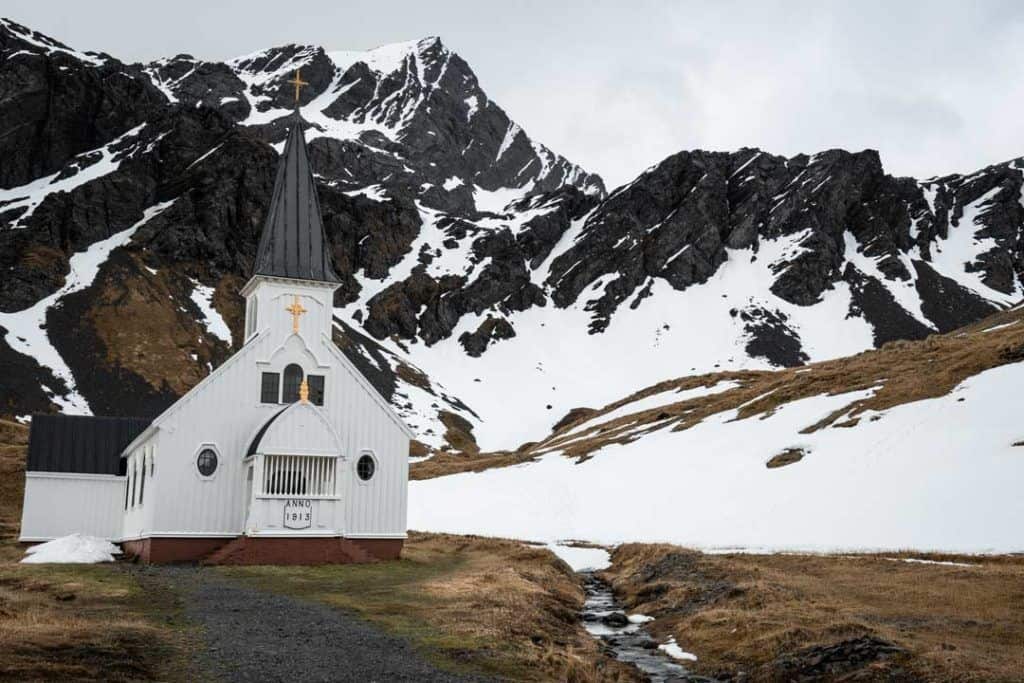
Stromness sits on the rugged north coast of South Georgia. Once a thriving whaling station, its rusting machinery and collapsing buildings now stand in silence.
It was here that Sir Ernest Shackleton and his men brought their epic ordeal to an end. In 1916, after an unimaginable journey across the mountains and glaciers of South Georgia, Shackleton’s team finally reached Stromness to seek rescue.
Although nowadays the station itself is off-limits for safety reasons, visitors can still visit Stromness and marvel at the dramatic scenery surrounding it.
If you’re planning an expedition to South Georgia soon and hope to include Stromness on your journey, here’s everything you need to know.
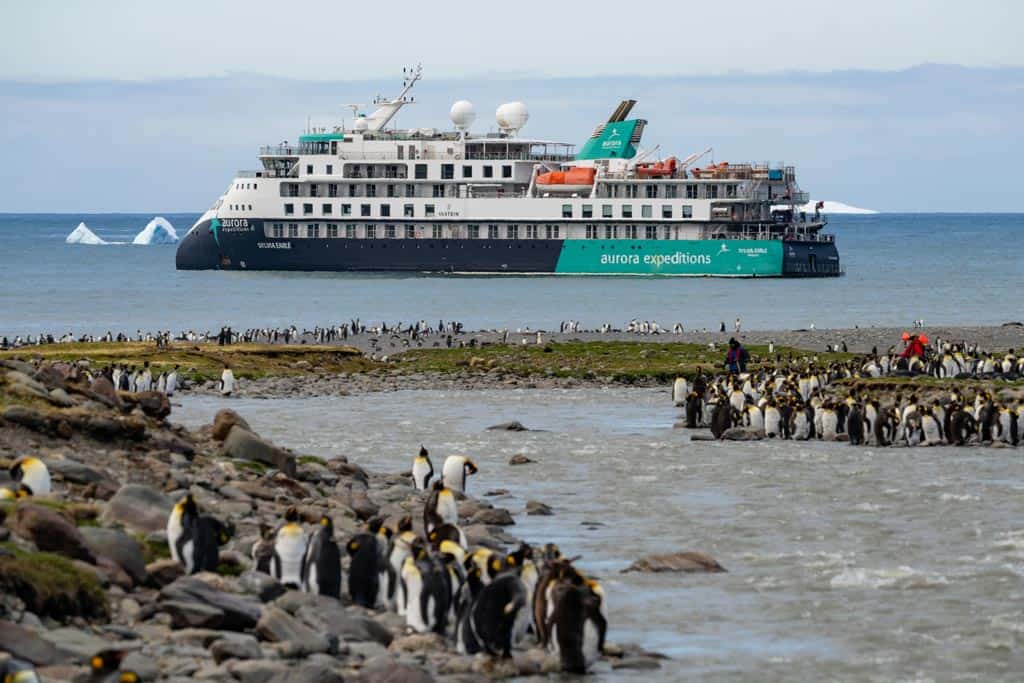
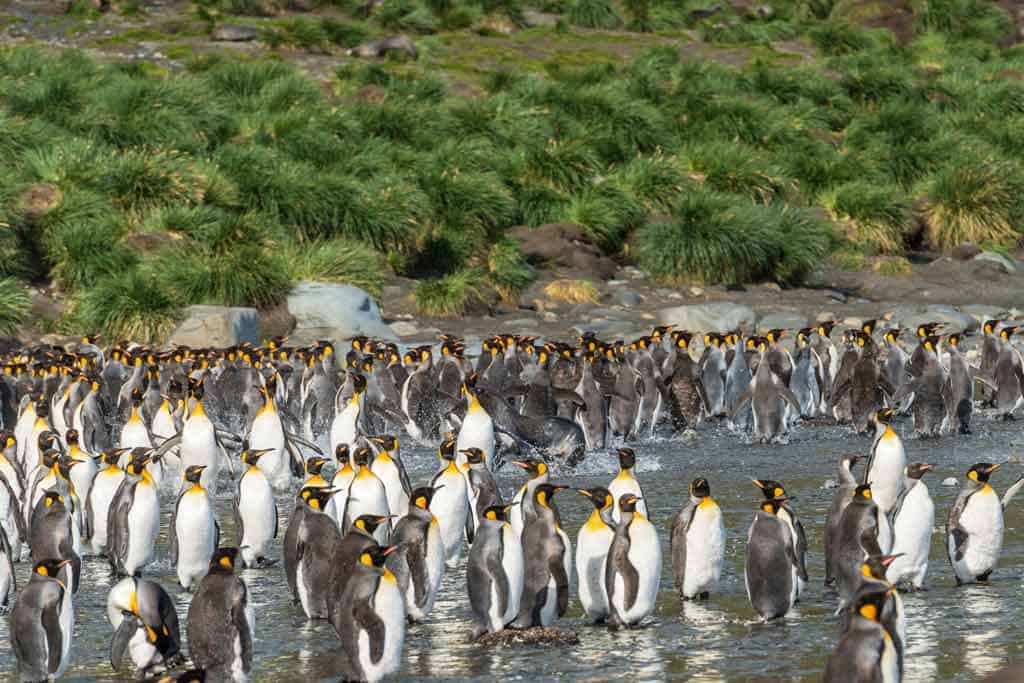
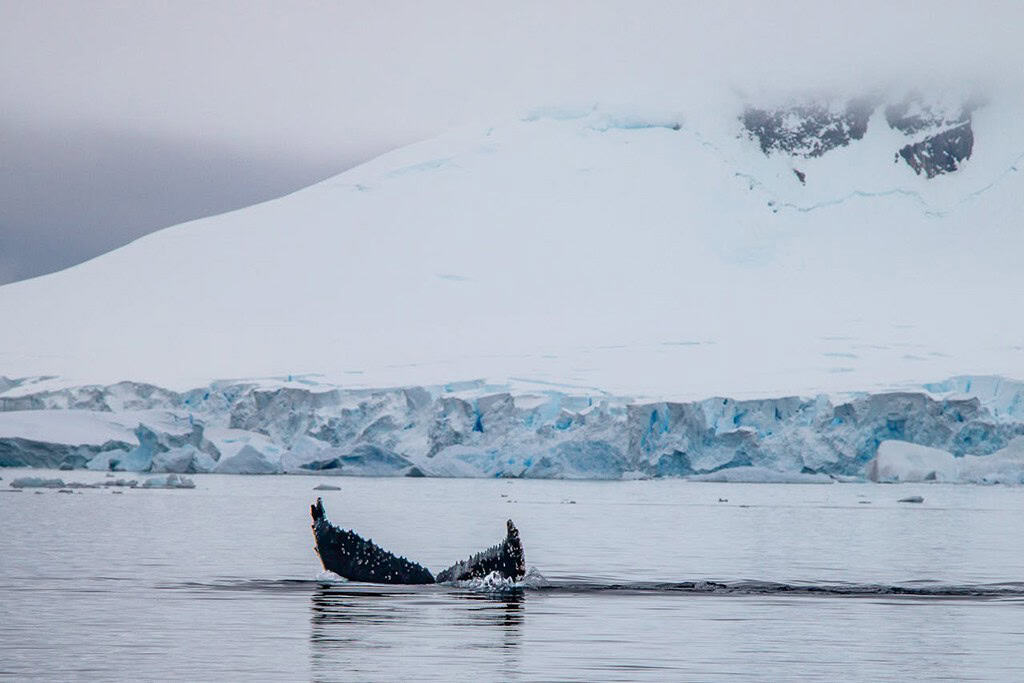
Seals at Stromness South Georgia
History of Stromness South Georgia
If you know the history of South Georgia, you have likely heard of Sir Ernest Shackleton’s daring adventure. Stromness Harbour played a pivotal role in that story.
After their desperate voyage from Elephant Island, Shackleton and his men made the perilous overland trek across South Georgia. In 1916, they reached Stromness, completing the final leg of the legendary Shackleton Walk and arriving at the home of the whaling station manager, where they finally secured rescue for their stranded crew.
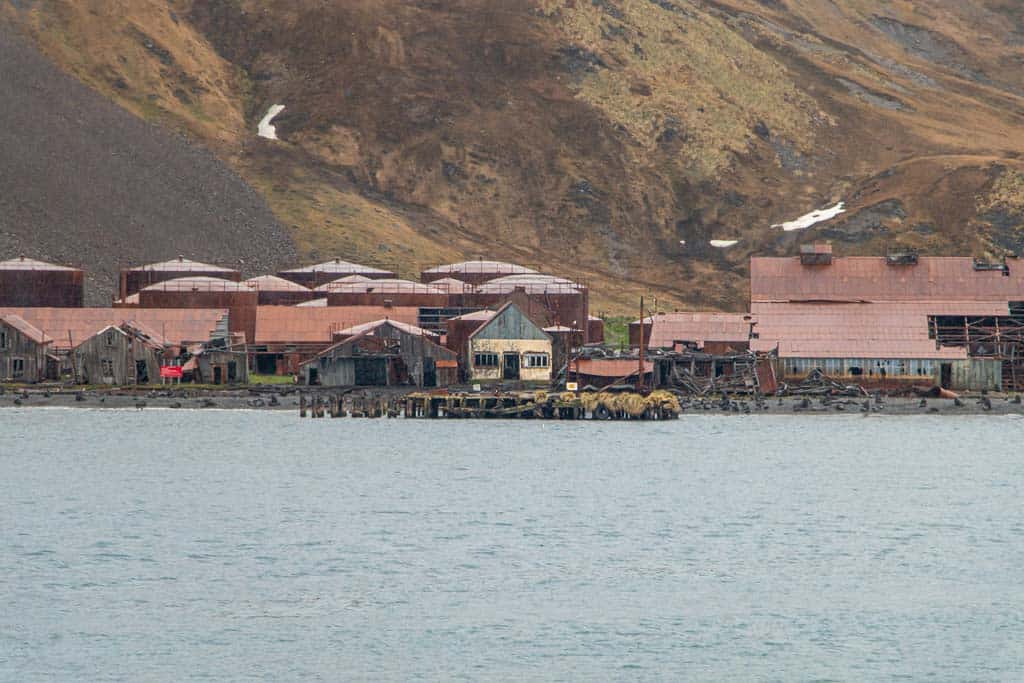
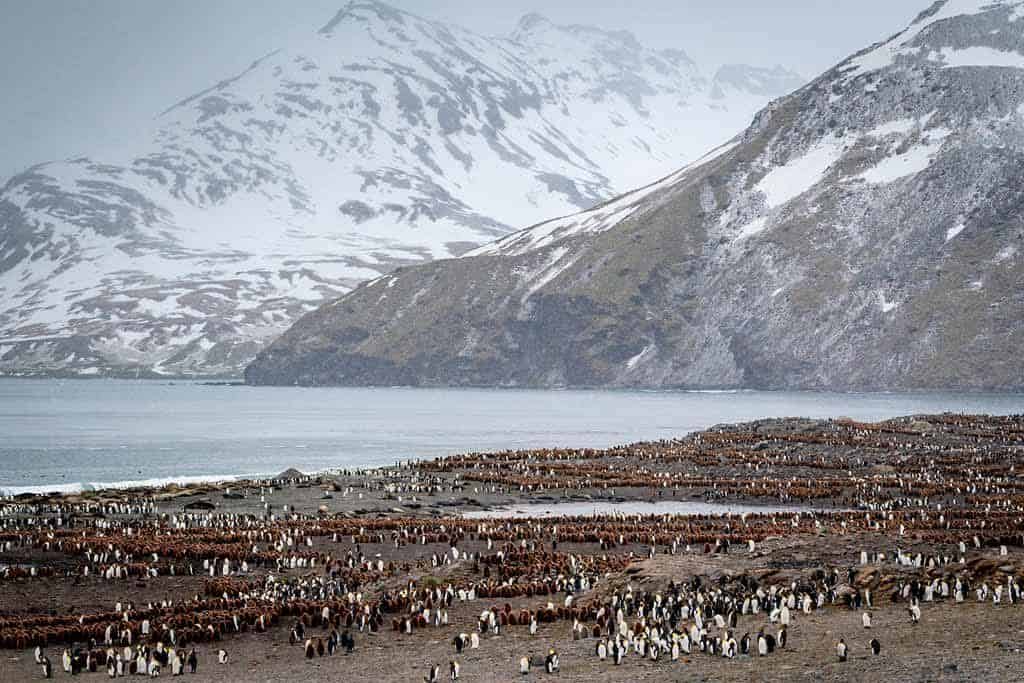
Once a bustling whaling station, Stromness later operated as a ship repair yard that serviced vessels working in the Southern Ocean and the South Sandwich Islands.
Today, it stands as an abandoned whaling station, its rusting remains a haunting reminder of a bygone era.
Visitors to this remote corner of the South Atlantic won’t find a working settlement anymore. However, the echoes of history and the dramatic landscapes make it one of the island’s most compelling sites.
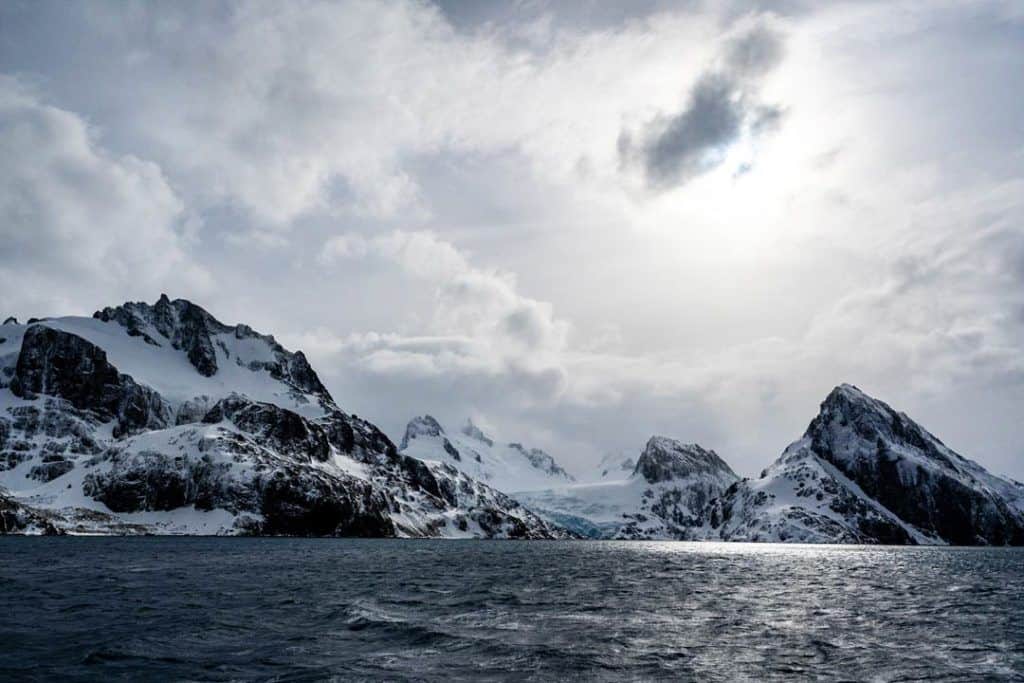
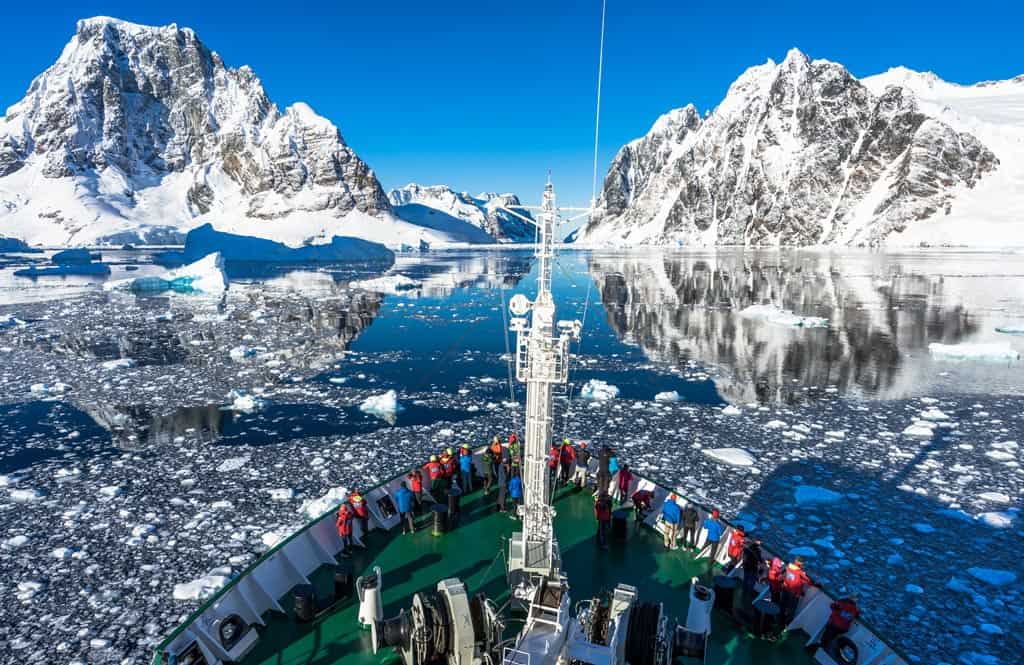
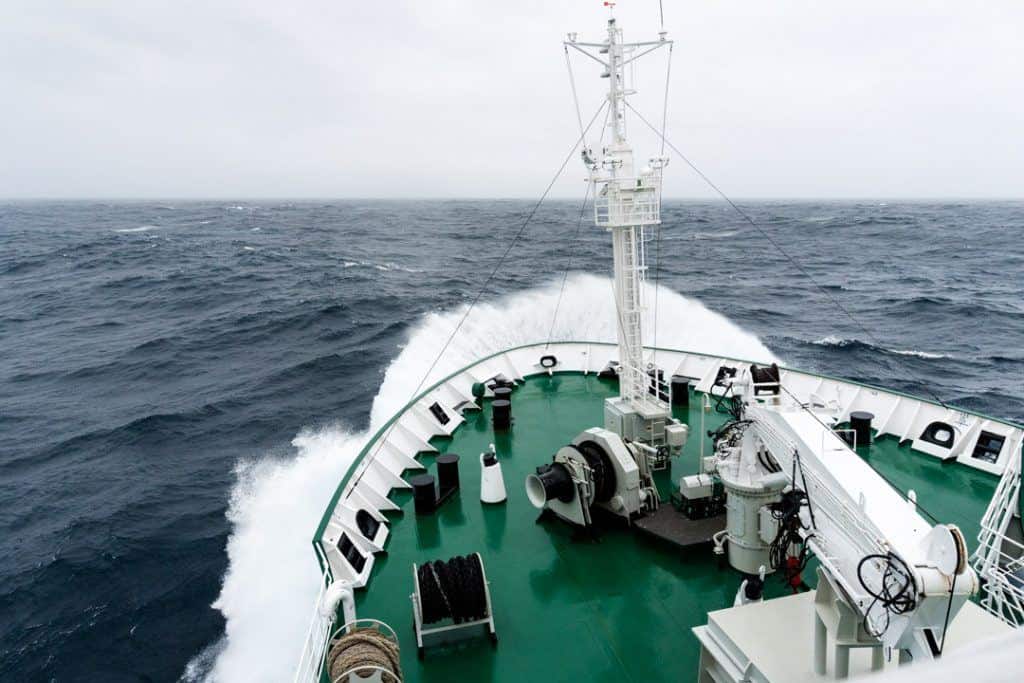
Here’s your guide to exploring Stromness on South Georgia Island! There are no roads or airports on South Georgia, so the only way to reach Stromness is by expedition ship.
Most voyages sail from the Falkland Islands or through the Weddell Sea, before making landings along South Georgia’s remote shoreline.
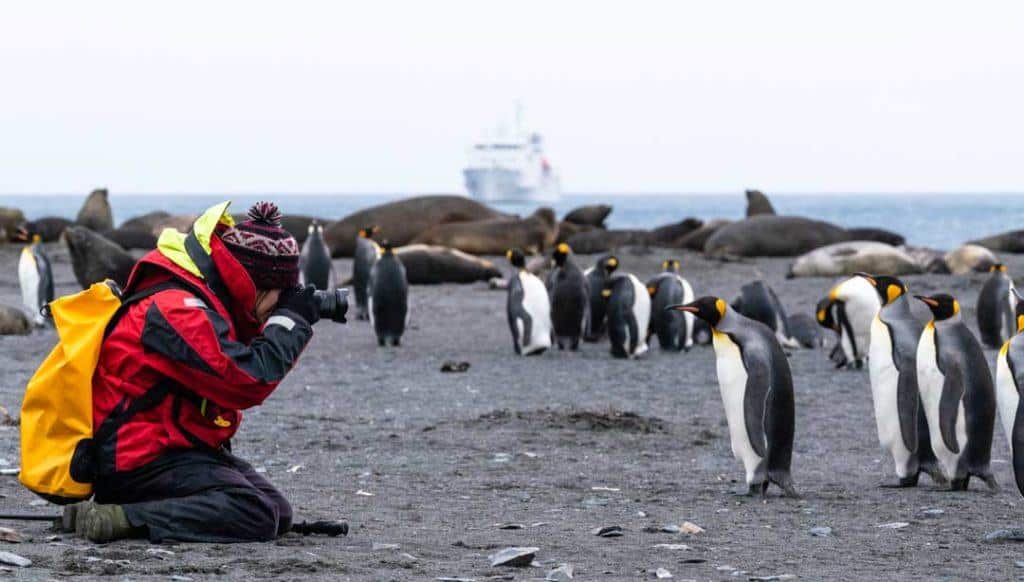
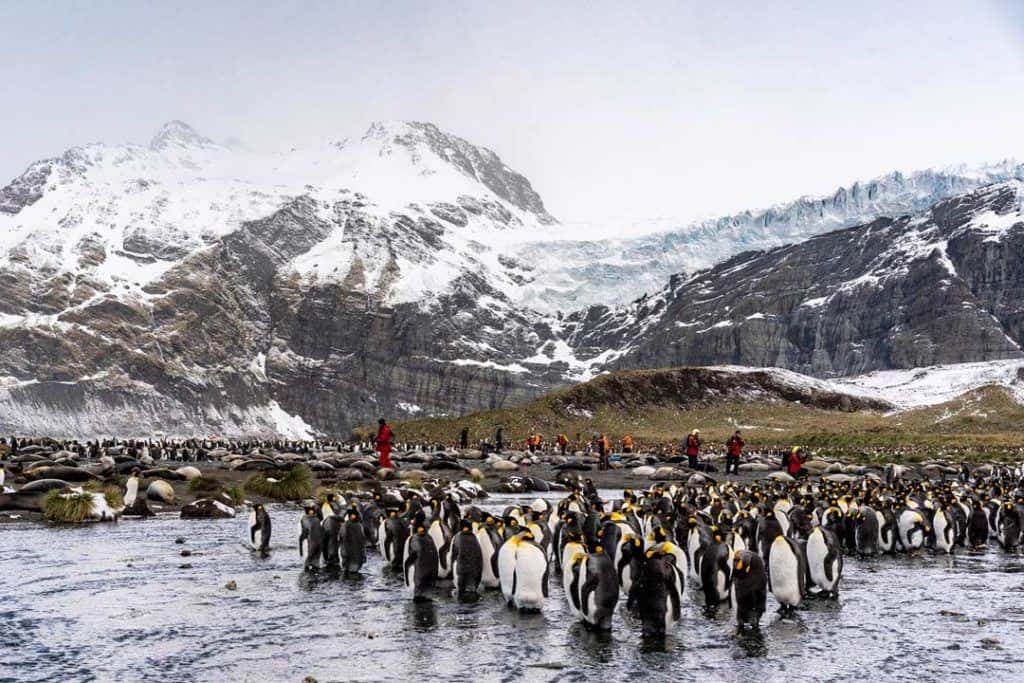
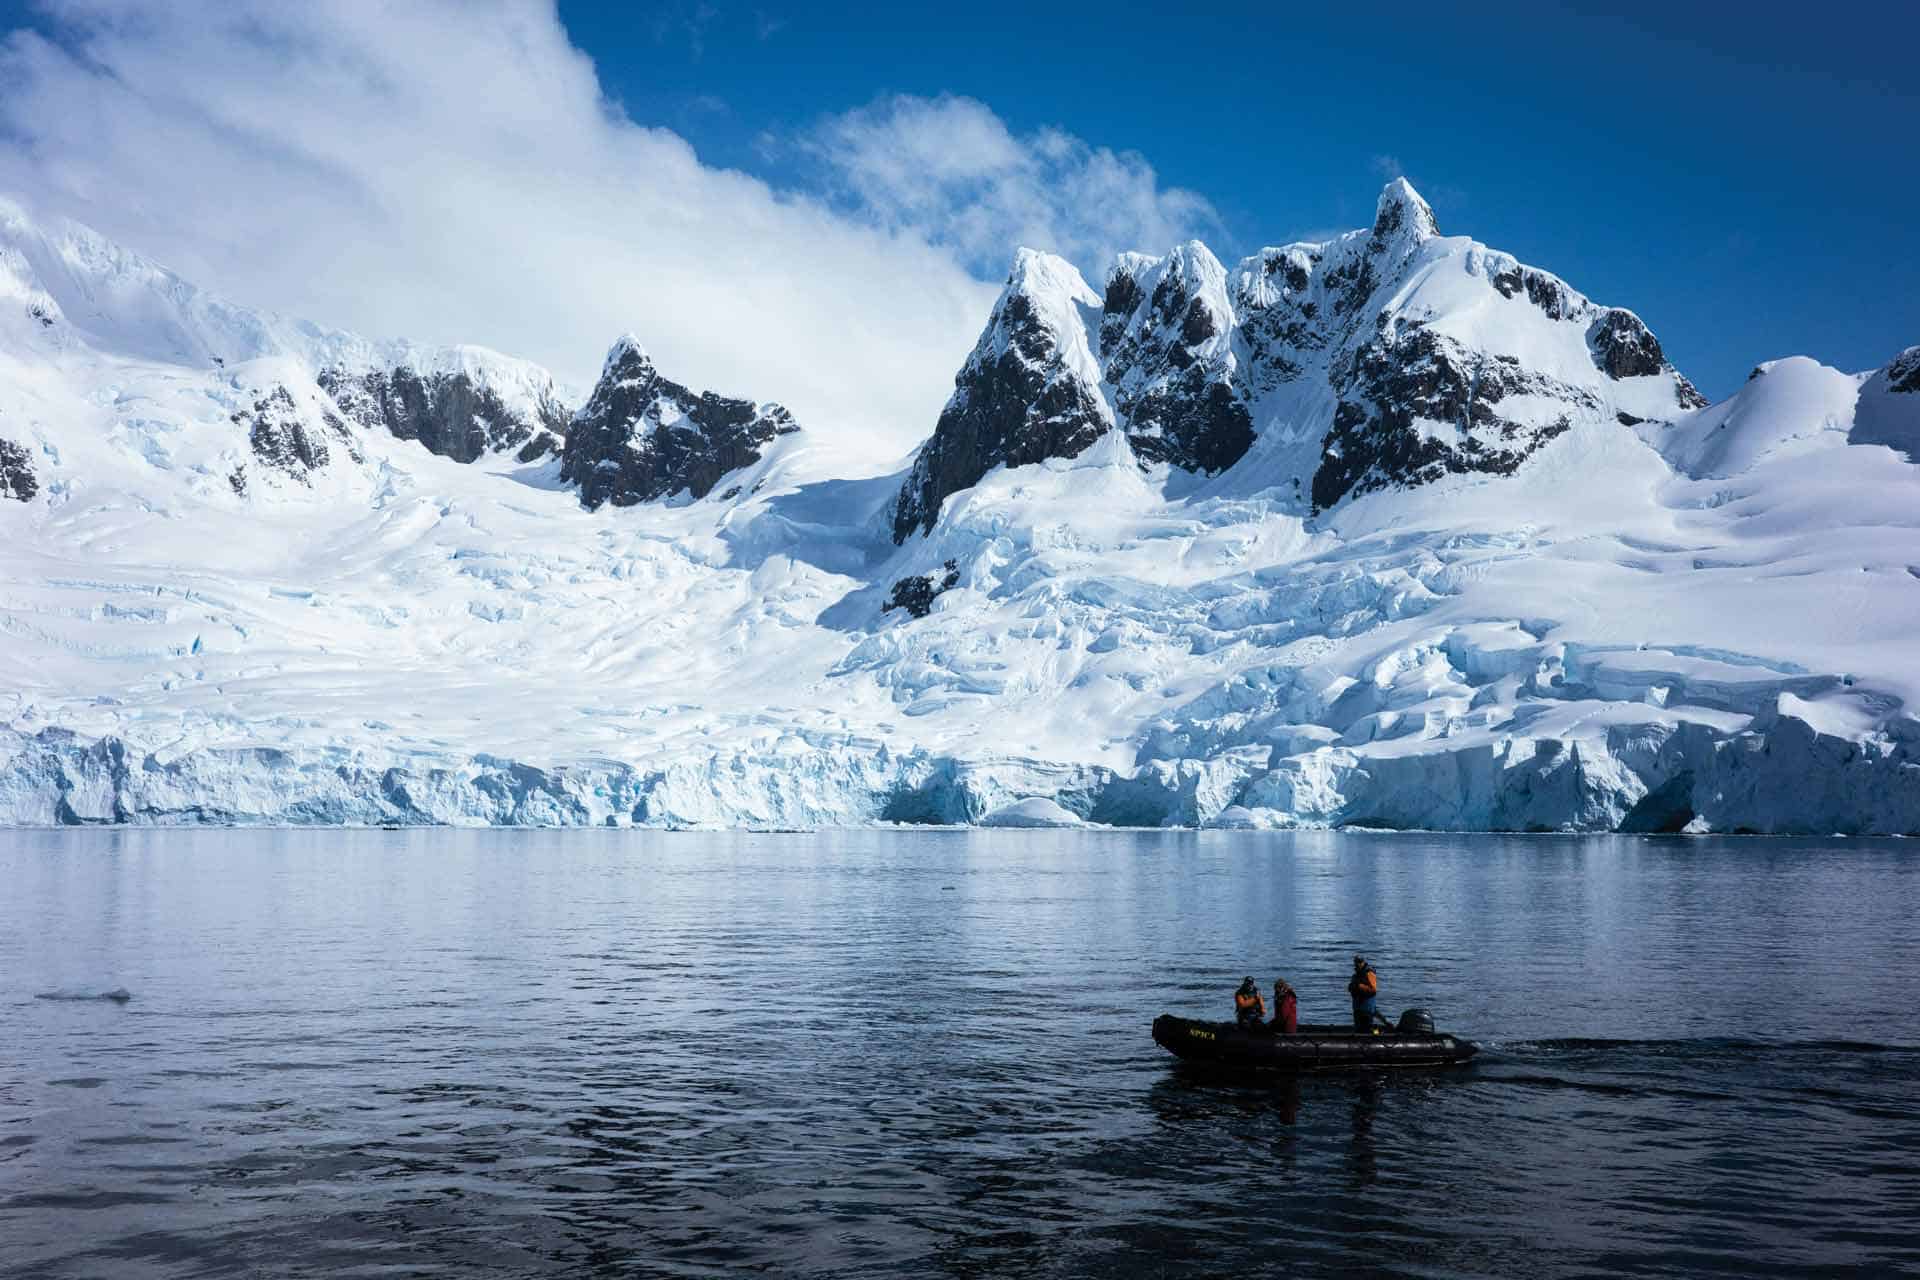
Expedition ships typically anchor in Stromness Harbour. Passengers are then brought ashore by Zodiac boats to view the rusting remains of the old shore station and admire the dramatic scenery of Stromness whaling station.
While entry to the abandoned buildings is prohibited for safety reasons, the area offers striking views across the bay and nearby historic sites, including Leith Harbour, another former whaling hub further east.
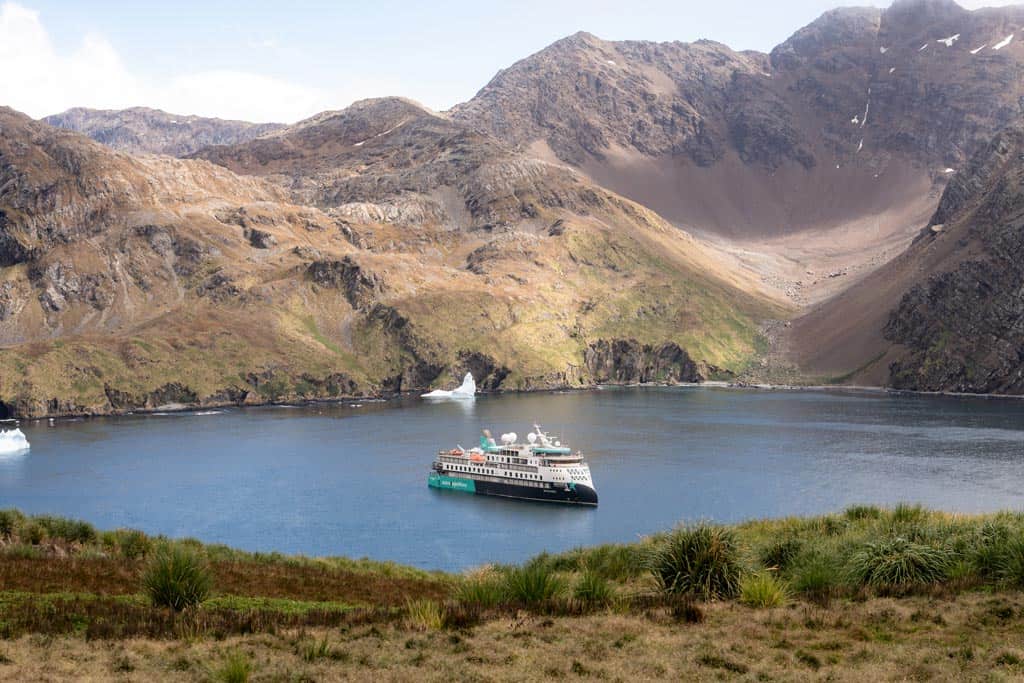
Expedition ship near South Georgia Island
Best Time to Visit Stromness
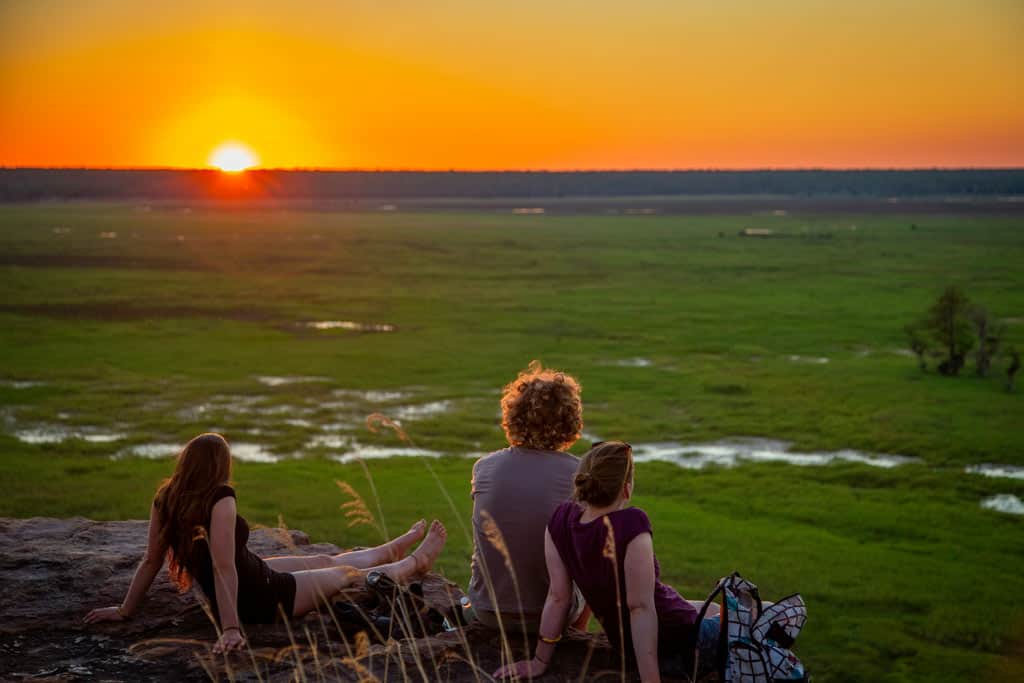
The best time to visit the whaling station at Stromness is during the austral summer, from November to March.
During the austral summer, the weather is relatively milder and the seas are calmer around South Georgia. This short season gives visitors the best chance for landing safely along the island’s rugged southern coast.
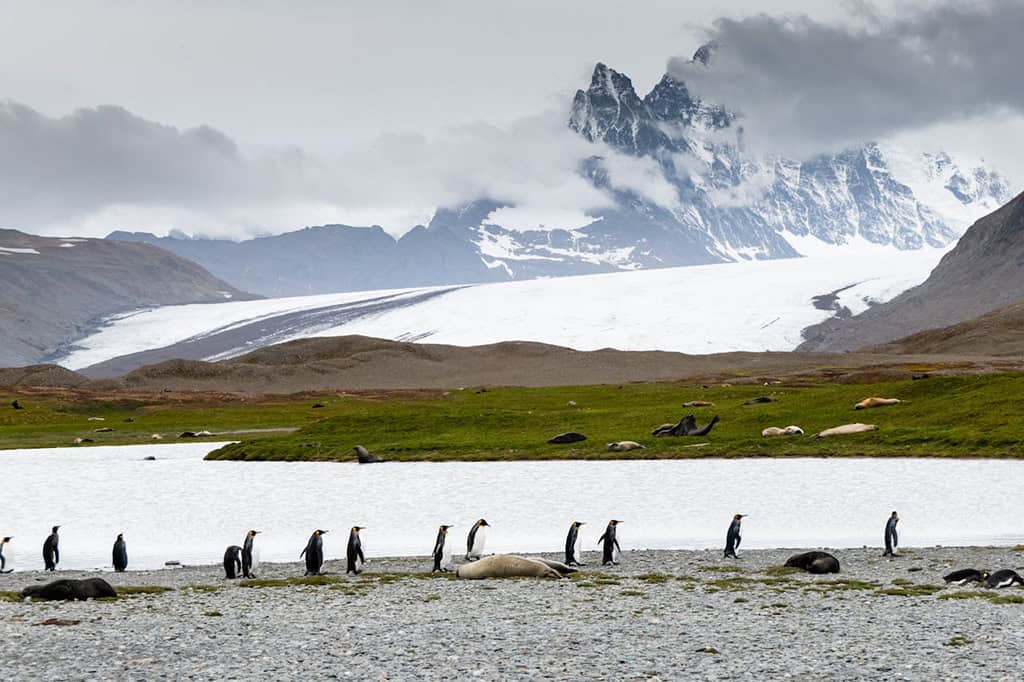
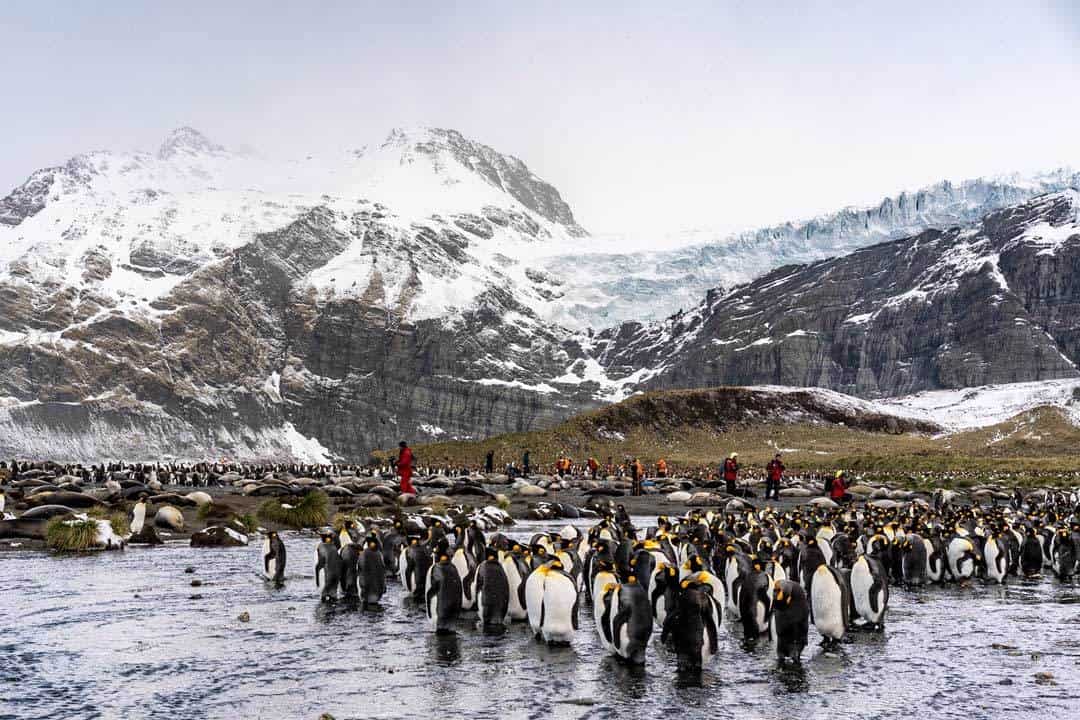
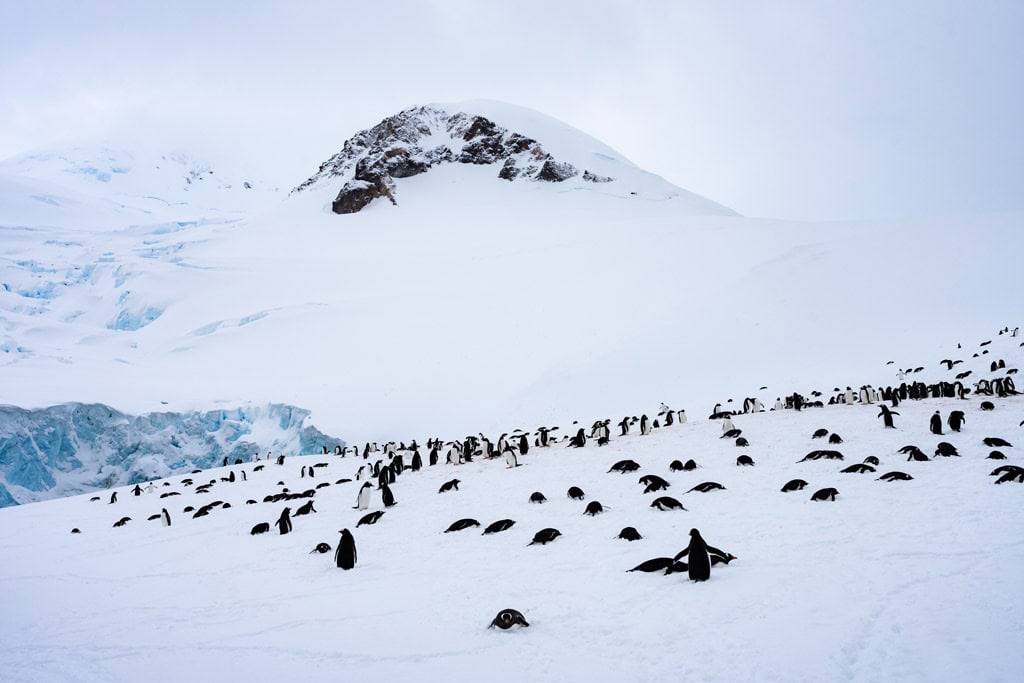
Like the rest of South Georgia, Stromness Bay is also home to some fascinating wildlife. And if you come here during the austral summer, you’ll find that these animals are at their most active.
You’ll see penguin colonies, fur seals, and elephant seals crowding the shores.
The austral summer is also the ideal time to reflect on Stromness’s layered past, from its early days as a ship repair yard to its role in Shackleton’s legendary expedition.
Outside of summer, harsh weather, heavy seas, and ice make visits almost impossible.
Important Note! Before you book any international trip, we honestly recommend getting travel insurance. You never know when things will go wrong, and medical bills can add up quickly if you get sick or injure yourself overseas.
Our personal recommendation based on our own experience is World Nomads.
What to Expect at Stromness
A visit to Stromness is as much about atmosphere as it is about history. Once a bustling whaling station, later a floating factory and ship repair yard, Stromness now lies in haunting silence, its rusting structures and collapsing machinery sealed off for safety.
Set at the head of Stromness Harbour in Stromness Bay, the site is usually admired from a distance.
Expedition ships often offer Zodiac cruises to Stromness Bay, allowing visitors a chance to glide past the Stromness harbour and see the glaciers and mountains.
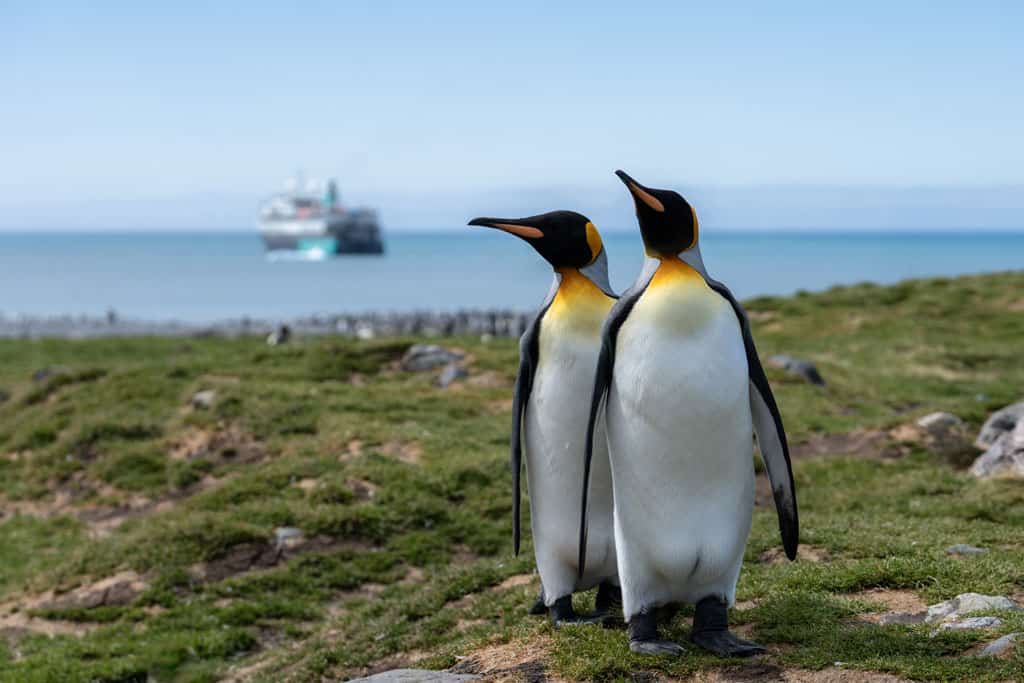
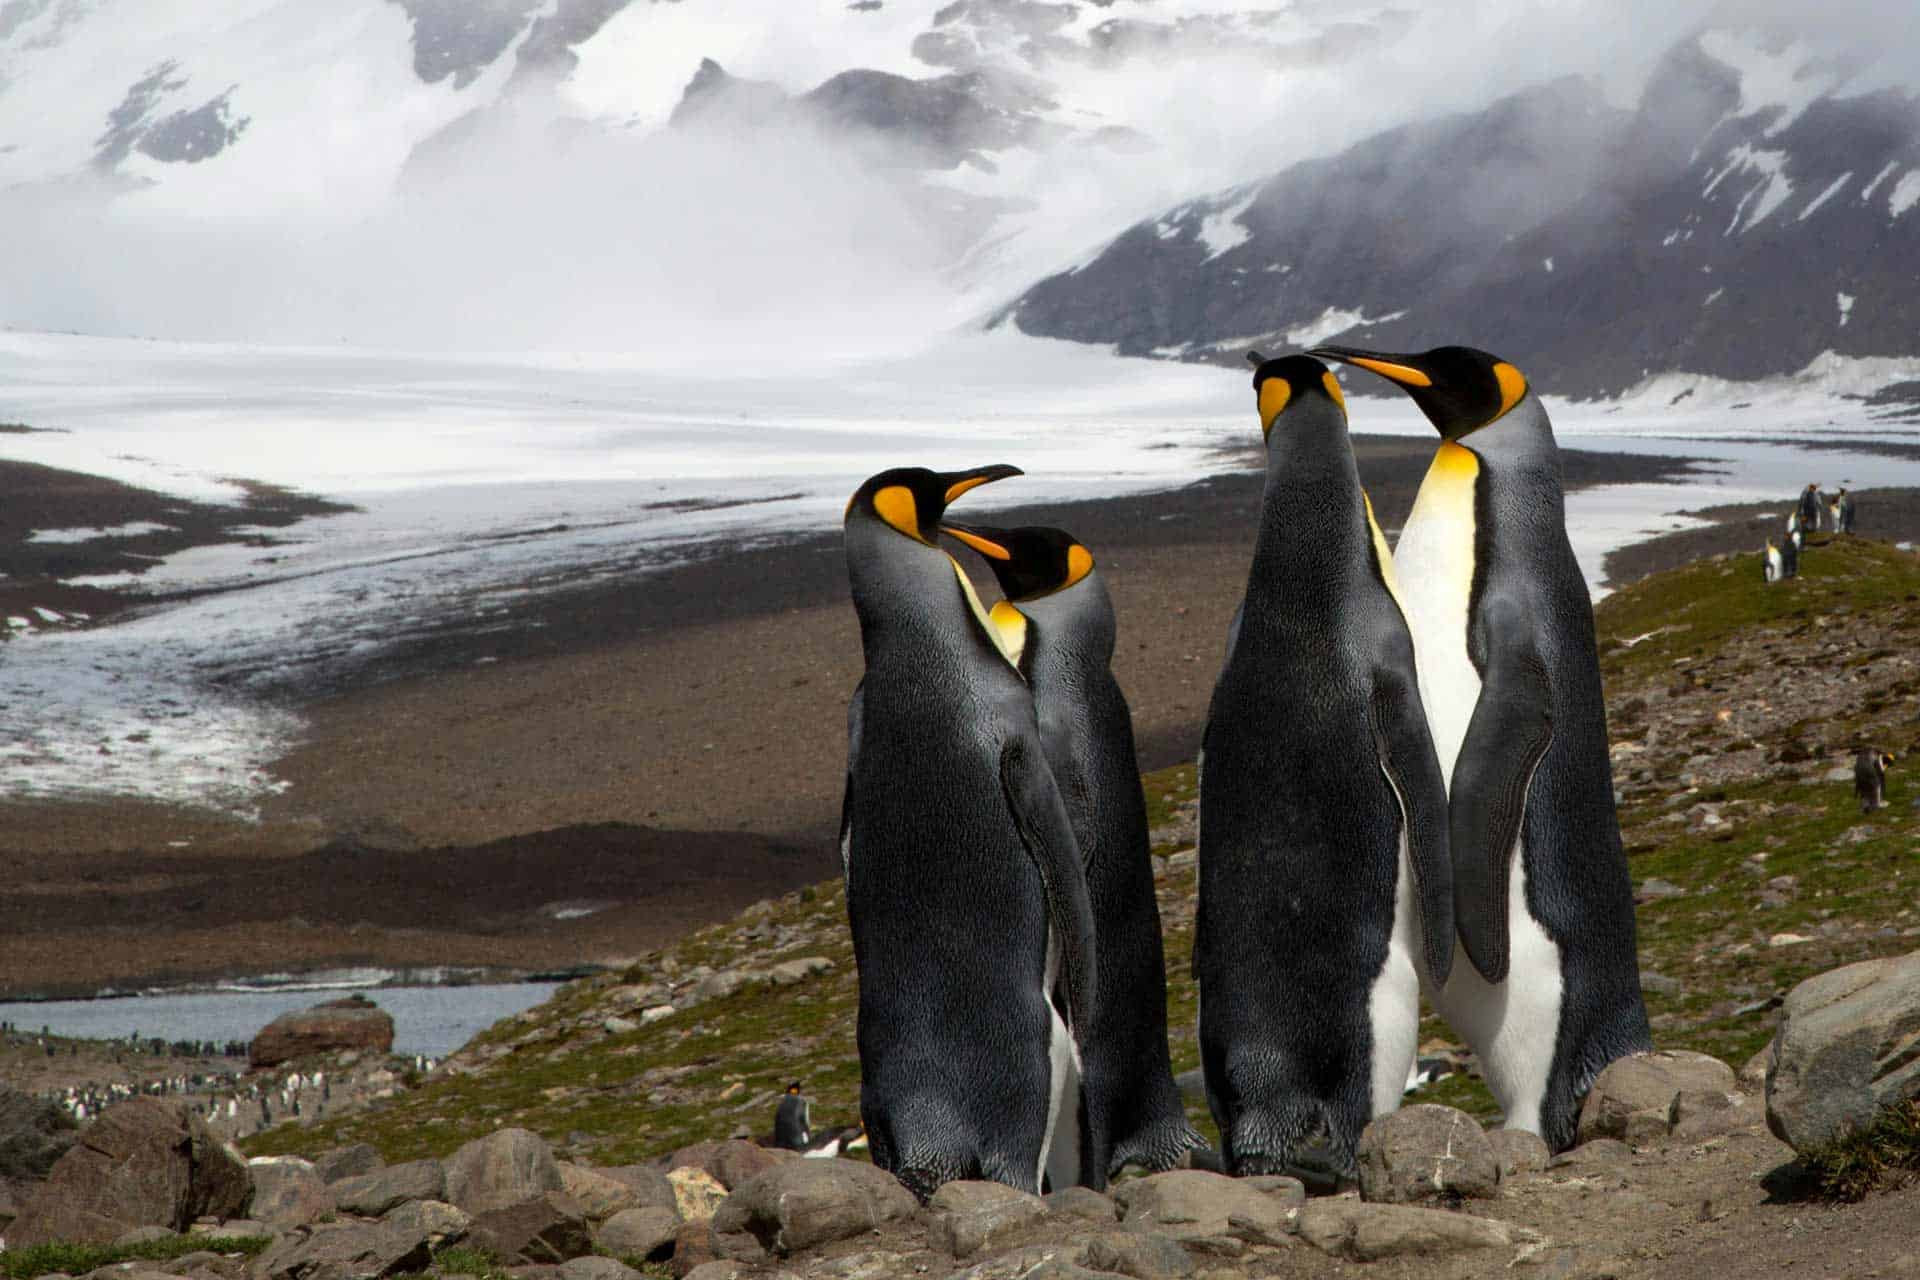
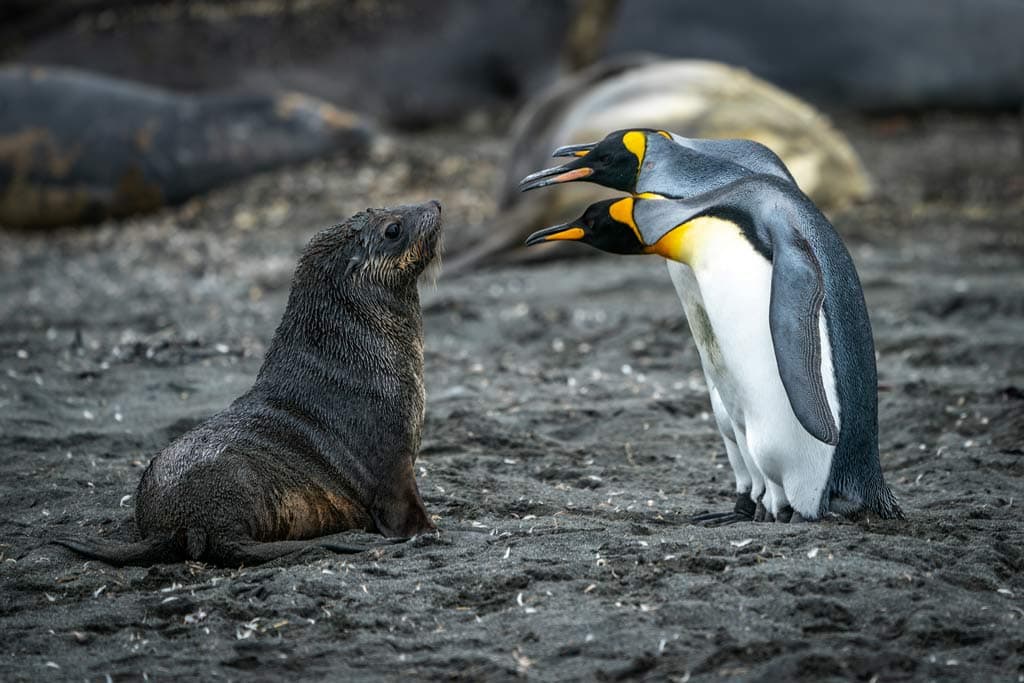
Expect to see Antarctic fur seals lounging on the beaches and King penguins gathered in nearby colonies.
While the wildlife is a highlight for many visitors, those with an interest in the history of the Antarctic will also find Stromness a fascinating place to explore.
As mentioned, this was the final leg of Shackleton’s route, where he and his men ended their desperate crossing of South Georgia and reached the home of the station manager to secure rescue.
Nowadays, Stromness remains one of the few places where visitors can experience the raw beauty of nature and the echoes of Shackleton’s legendary journey.
Ruins at Stromness South Georgia
Wrapping Up
Despite its remote location, Stromness South Georgia is well worth the effort and the cost of visiting here.
For travelers fascinated by polar history and the legendary journey of Sir Ernest Shackleton, few places capture the spirit of survival and exploration as vividly as this abandoned whaling station on South Georgia.
In Stromness, history, wildlife, and wild landscapes converge, offering an experience you’ll carry long after you’ve left the island behind.
DISCLAIMER: Some of the links in this article are affiliate links, which means if you book accommodation, tours or buy a product, we will receive a small commission at no extra cost to you. These commissions help us keep creating more free travel content to help people plan their holidays and adventures. We only recommend the best accommodations, tours and products that ourselves or our fantastic editorial team have personally experienced, and regularly review these. Thanks for your support, kind friend!
Your guide to St. Andrews Bay, a magnificent location home to South Georgia’s largest king penguin colony.
St. Andrews Bay is one of South Georgia’s most iconic destinations. Its sweeping shoreline is framed by rugged mountains and glaciers, setting the stage for some of the island’s most breathtaking landscapes.
But it’s the wildlife that truly steals the show here. This is where you’ll find South Georgia’s largest king penguin colony, offering a wildlife encounter unlike anywhere else on the island.
This guide will walk you through everything you need to know about St. Andrews.
Find out what makes the bay so extraordinary and how you can experience it on your own South Georgia adventure.
St. Andrews Bay is located on the north coast of South Georgia Island. It’s most known for being home to hundreds of thousands of king penguins!
Despite its remote location in the Southern Ocean, St. Andrews Bay is surprisingly accessible for expedition cruises. The itineraries often include other nearby spots like Antarctica.
The bay has long fascinated explorers, including early Captain Cook voyages and later British expeditions, all drawn to its dramatic landscapes and abundant wildlife.
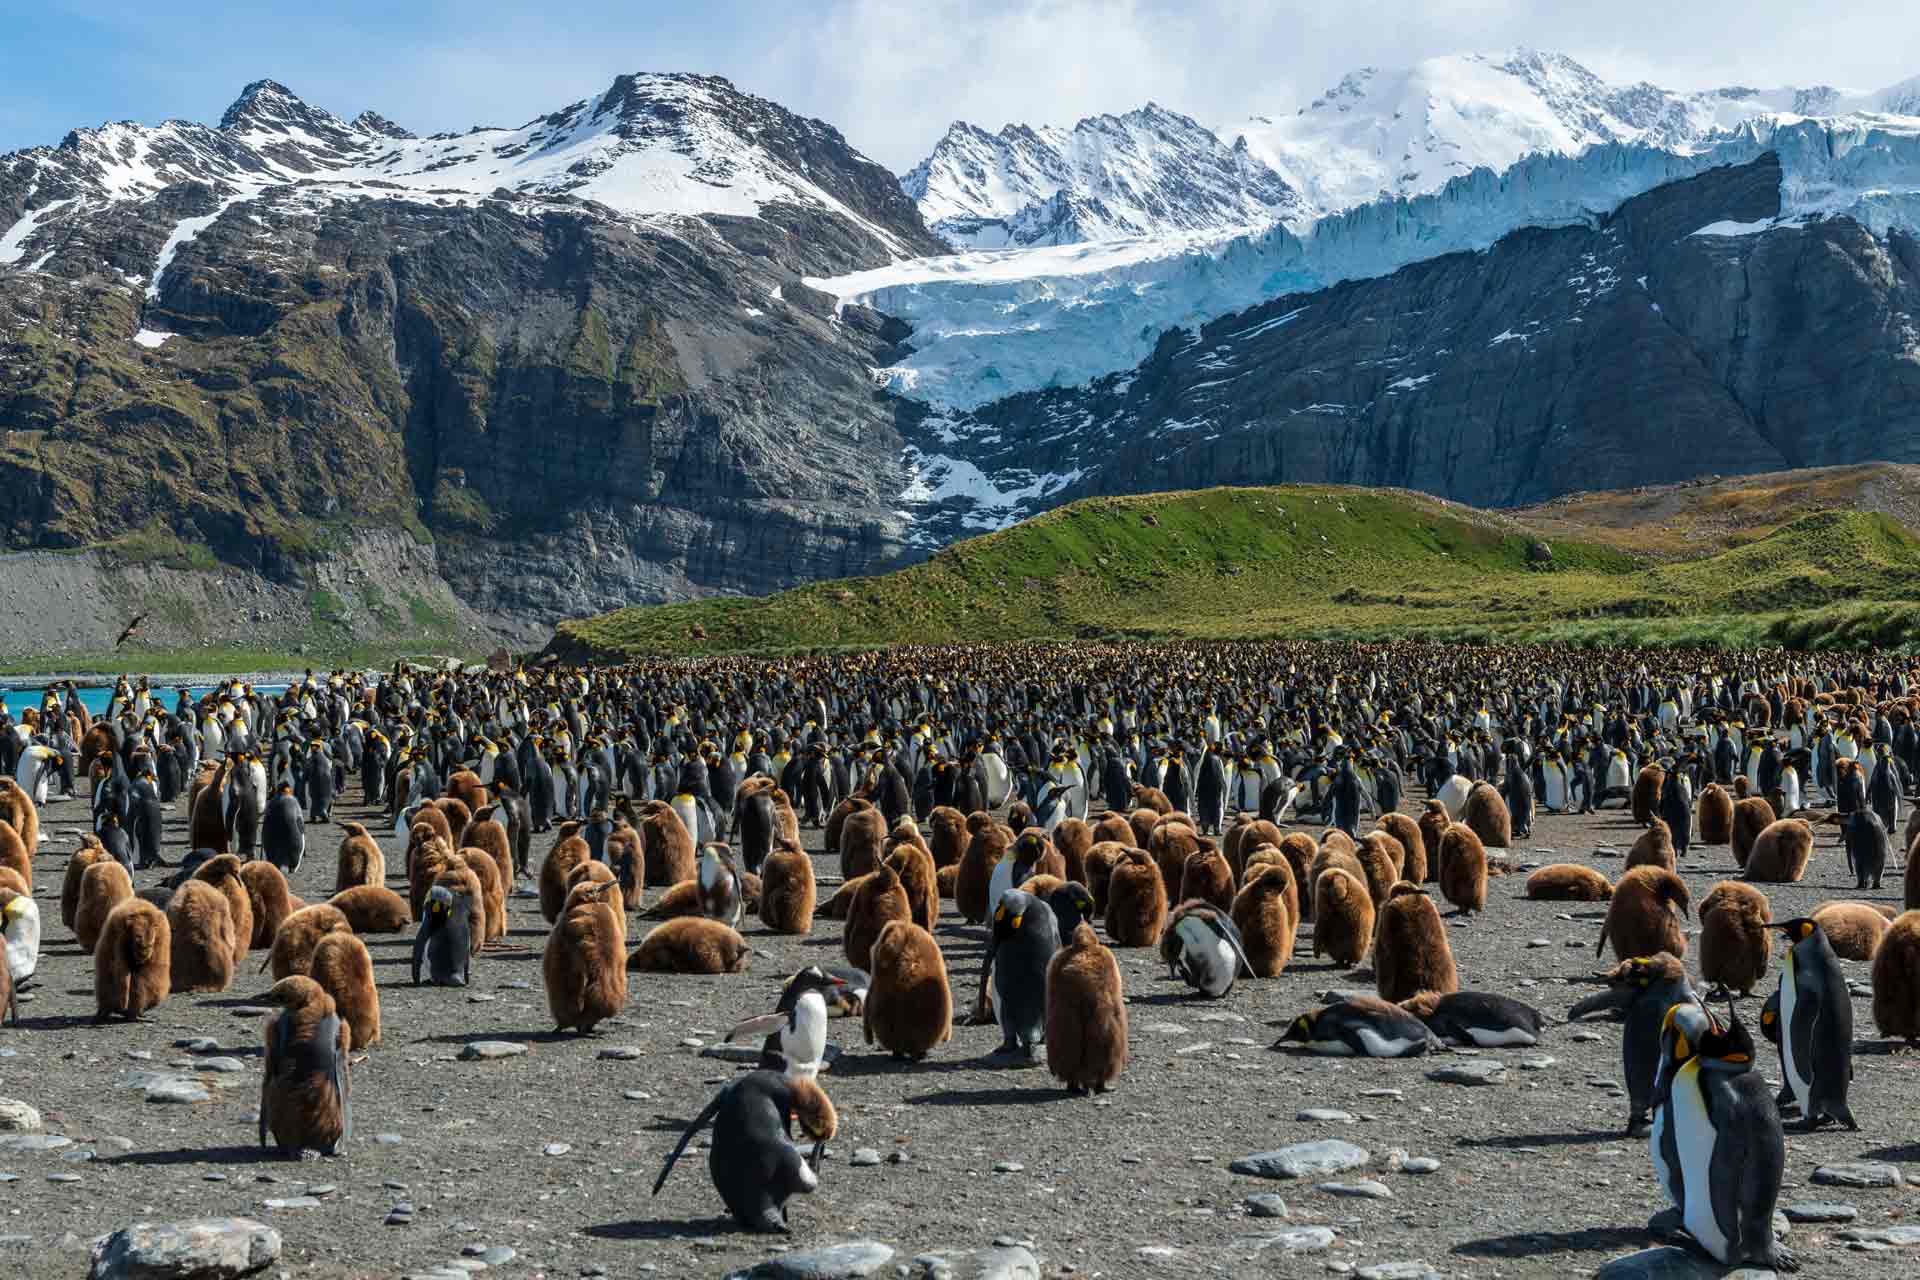
The main colony of king penguins in St. Andrews Bay is the largest on South Georgia, with thousands of adults and king penguin chicks moving across the beach constantly.
Elephant seals and fur seals also lounge along the shore. Surrounding glaciers, including the towering Cook Glacier and Heaney Glacier, rise around the bay.
Visitors arriving at the landing site will be struck by the sheer energy of the place, from the constant calls and waddling penguins to the occasional seals rolling by, all set against a backdrop that feels almost otherworldly.
Arriving into St. Andrews Bay, South Georgia
Visitor Guide to St. Andrews Bay, South Georgia
If you’re planning to visit St. Andrews Bay to see its huge breeding colony of penguins up close, here’s what you need to know:
Important Note! Before you book any international trip, we honestly recommend getting travel insurance. You never know when things will go wrong, and medical bills can add up quickly if you get sick or injure yourself overseas.
Our personal recommendation based on our own experience is World Nomads.
How To Get There
Getting to St. Andrews Bay is an adventurous feat. It’s located in the remote part of South Georgia, far from conventional travel routes.
The bay has long fascinated explorers, and early British expeditions made careful landings here to study its wildlife and rugged landscapes.
You can only get here via expedition cruises that explore the North Coast of the island, often as part of a longer journey through the Antarctic Peninsula and surrounding waters.
The expedition cruises sometimes extend to the South Sandwich Islands, offering a rare opportunity to explore some of the most isolated and pristine regions of the Southern Ocean.
As you step ashore at St. Andrews Bay, you’ll immediately be greeted by its vast penguin colonies, elephant seals, and dramatic scenery.
The ideal time to visit St. Andrews Bay is during the austral summer, from November to February. During this time, South Georgia’s wildlife is at its most active.
During the austral summer, the huge breeding colony of king penguins is in full swing, and playful seals dominate the beaches. You are sure to have an incredible wildlife encounter!
If you schedule your trip during the austral summer months, you’ll have the best chance to witness the dramatic interplay of penguins, seals, and the island’s stunning landscapes in all their glory.
Saint Andrews Bay is most famous for its colony of king penguins, where you’ll find king penguin chicks huddled together on the beach while adults waddle back and forth, tending to their young and calling to one another in a mesmerizing chorus.
Meanwhile, southern elephant seals and Antarctic fur seals dominate the shoreline, lounging in the sand or playfully sliding into the surf. These animals share space with smaller colonies of fur seals, creating a dynamic and ever-changing scene that captures the island’s raw energy.
At the southern end of the bay, you’ll find a large gathering of southern elephant seals, often alongside Antarctic fur seals.
Even away from the beaches, St. Andrews Bay supports a variety of birdlife, including the endemic South Georgia pipit, the southernmost songbird in the world.
If you want the rare opportunity to see fascinating wildlife species up close, from king penguins to southern elephant seals, St. Andrews Bay is definitely worth a visit.
Penguins walking around St. Andrews Bay, South Georgia
Is it worth visiting St. Andrews Bay?
Saint Andrews Bay is well worth visiting, as it’s a true highlight of any South Georgia itinerary. While getting here often means booking an expedition cruise, the experience is truly worth the splurge.
St Andrews Bay is one of the few places on Earth where you can witness sprawling king penguin colonies alongside playful elephant and fur seals.
So, if you’re feeling adventurous and want to explore one of the remotest places on Earth while encountering incredible wildlife, a visit to Saint Andrews Bay on the north coast of South Georgia Island is a must!
DISCLAIMER: Some of the links in this article are affiliate links, which means if you book accommodation, tours or buy a product, we will receive a small commission at no extra cost to you. These commissions help us keep creating more free travel content to help people plan their holidays and adventures. We only recommend the best accommodations, tours and products that ourselves or our fantastic editorial team have personally experienced, and regularly review these. Thanks for your support, kind friend!
Your guide to Right Whale Bay, a remote paradise on South Georgia’s northern coast famous for its massive colonies of king penguins and seals.
Few places can rival the remote, untamed beauty of South Georgia.
One of its most breathtaking spots is Right Whale Bay, with stark black-sand beaches framed by rugged peaks and alive with penguins and seals at every turn.
The moment you step ashore, a scene that feels almost prehistoric will come to greet you.
Hear the calls of thousands of king penguins echoing across the bay, watch fur seals dart through the shallows, and see massive seals lounging lazily on the sand.
Right Whale Bay is a place where raw nature takes center stage, untouched and spectacular. Its dramatic scenery and abundant animal life make it one of the most exciting landings in South Georgia Island.
Backed by jagged peaks and sweeping glaciers, the bay opens onto dramatic black-sand beaches that create a striking contrast with the abundant wildlife that thrives here.
Right Whale Bay is best known for its thriving colonies of king penguins, which can number in the tens of thousands. Their calls echo across the shoreline, mingling with the sounds of fur seals splashing in the surf and bellowing from the sand.
Overhead, seabirds circle constantly, adding to the sense that this is a place overflowing with life.
Arriving here feels like stepping into another world. There are no human settlements – not even signs of development. You’ll only see raw, untamed wilderness.
Ready to explore one of South Georgia’s most dramatic and wildlife-packed bays? Here’s everything you need to know about visiting Right Whale Bay.
Important Note! Before you book any international trip, we honestly recommend getting travel insurance. You never know when things will go wrong, and medical bills can add up quickly if you get sick or injure yourself overseas.
Our personal recommendation based on our own experience is World Nomads.
How To Get There
Reaching Right Whale Bay is only possible by expedition cruise, as there are no ports or settlements on South Georgia. Many itineraries also include the Falkland Islands, along with other fascinating destinations in the South Atlantic like Antarctica.
The ship anchors offshore, and you are brought to land by zodiac boats, weather permitting. An expedition team will assist during the landing, guiding you safely ashore and sharing expert insights about the wildlife and landscape.
Landings usually take place on Binder Beach, a sweeping stretch of black sand that serves as the main entry point to the bay.
Towering above it all is Mount Regulator, a dramatic peak that frames the landscape and adds to the sense of wild isolation.
Though Salisbury Plain often takes the spotlight for its penguin colony, Right Whale Bay delivers an equally amazing experience, luring visitors with its rich wildlife and spectacular scenery.
Hundreds of thousands of king penguins scatter the beaches of South Georgia.
Best Time to Visit
The best time to visit is during the austral summer. This is from October to March, when expedition cruises operate in South Georgia.
Every stage of the season brings its own highlights, making the timing of your visit an important part of the experience.
October – November: Seals are at their most active, with huge males battling for dominance on the beaches. King penguins are also beginning their courtship displays.
December – January: This is peak wildlife season. Penguin chicks are hatching, fur seal pups fill the beaches, and the king penguin colony is bustling with activity.
February – March: The weather can be calmer, and the wildlife remains abundant. Penguin chicks are growing fast, and the lighting is excellent for photography.
The wildlife is definitely the highlight of any visit here, particularly the thriving king penguin colony.
Thousands of king penguins gather on the black-sand beaches and surrounding slopes, and porpoising penguins dart through the surf..
The beaches are also home to massive southern elephant seals and countless fur seals.
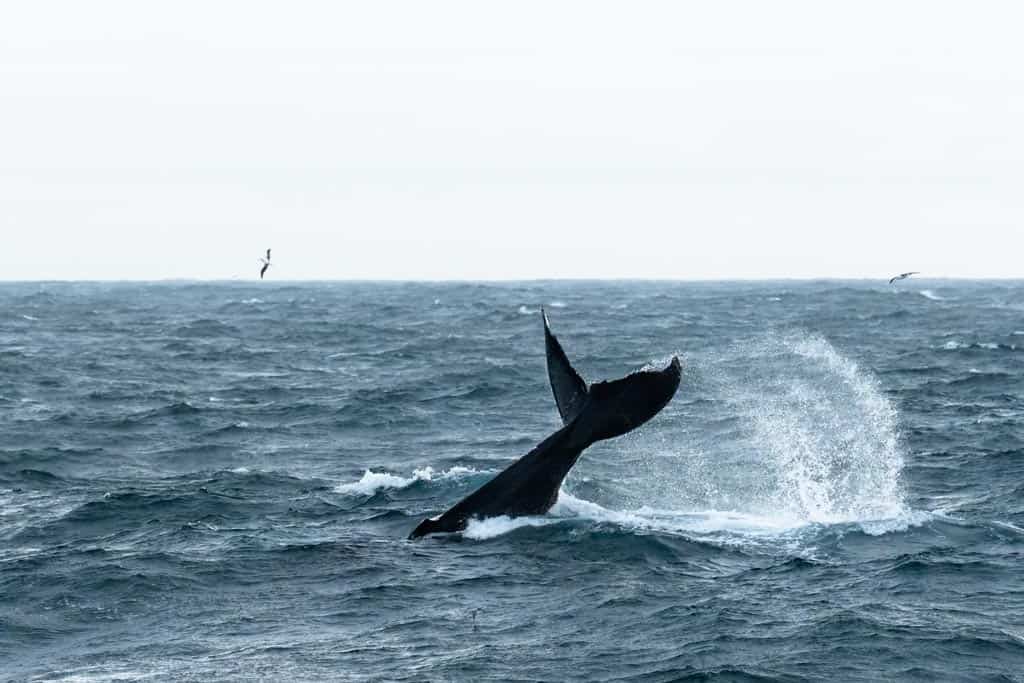
Offshore, the waters of South Georgia bring chances to encounter marine giants. Humpback whales are often spotted feeding in the nutrient-rich seas, their tails lifting high above the waves.
You can also occasionally spot southern right whales, though they are less common than they used to be. They are the origin for the bay’s name, and the British Antarctic Survey studied the recovery of the southern right whales here for many years.
So there is lots of amazing wildlife to spot in this corner of South Georgia!
Visitor Tips for Right Whale Bay
Follow all biosecurity guidelines carefully, especially with current concerns about avian flu in South Georgia’s bird colonies.
Wear waterproof boots for wet shore landings, as you’ll often step directly onto the shore from the zodiac.
Keep your belongings organized on the ship, since landings are quick and you will need to gear up efficiently. It’s essential to have good gear and packing cubes!
Be prepared for unpredictable conditions at sea, with strong winds and sudden changes in weather common around South Georgia. Pack lots of layers to suit all types of weather.
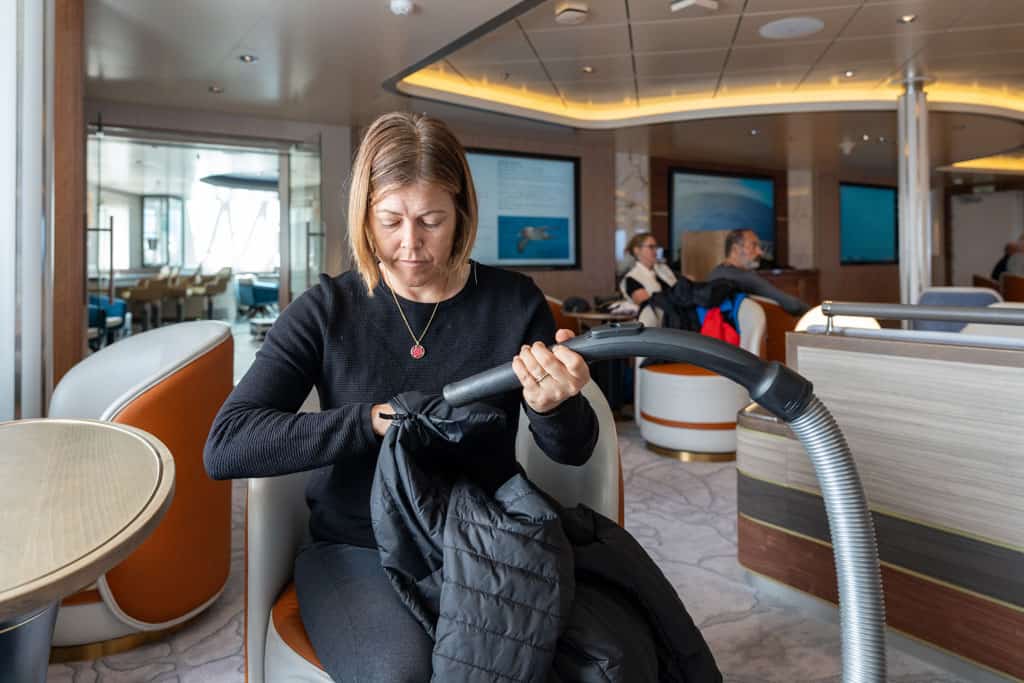
Alesha doing her part to biosecure all gear before we head to South Georgia and Antarctica.
DISCLAIMER: Some of the links in this article are affiliate links, which means if you book accommodation, tours or buy a product, we will receive a small commission at no extra cost to you. These commissions help us keep creating more free travel content to help people plan their holidays and adventures. We only recommend the best accommodations, tours and products that ourselves or our fantastic editorial team have personally experienced, and regularly review these. Thanks for your support, kind friend!
Welcome to the TPT Travel Guide to BACOLOD! In this article, we’ll share with you tips on which area to stay in Bacolod, how to get there from Manila, and how to get around. You’ll also find a sample itinerary with budget breakdown.
There are places that you will remember not because of what you saw but how it made you feel. Bacolod is one of those places.
Bacolod doesn’t have the spectacular sights that other destinations in the Philippines boldly and loudly brag about. But what it lacks in visual treats, it makes up for by delighting the other senses. It’s in good company, too. Bacolod may not have the sweeping landscapes, but its posse have more than their share. Neighbor Murcia makes a splash with her waterfalls. Silay and Talisay have lots of stories to tell. And just 4-5 hours away are Kabankalan, Cauayan, and Sipalay, all waiting to showcase their natural splendor to those who go the extra mile.
Before we dive into the details, here’s a checklist of travel essentials if you are traveling to Bacolod. You’ll also find links to some of our recommended hotels, tours, and attractions for easy reference in the future.
Bacolod Travel Essentials
Top Bacolod Day Tours
✅ You can also visit our The Poor Traveler Masterlist. Here, we compiled travel essentials, including all our recommended hotels and attractions. Just visit this page: TPT Masterlist. Then, scroll until you see the section about Bacolod. We also have a compilation for other destinations around the world.
UNDERSTANDING BACOLOD
Bacolod is widely known for three things: sweets, smiles, and the Masskara Festival. Oh, and chicken inasal. So okay, make that four things. Haha. It is the capital of Negros Occidental, one of the biggest provinces in the country in terms of land area and population. Yet, a big part of its territory remains unknown to non-residents.
Negros Occidental has 13 cities (including independent Bacolod) and 19 municipalities. That’s a lot of cities in just one province. But before you conjure up images of skyscrapers, know that Bacolod is the only one that is highly urbanized. The others are more like small towns, more laid-back and still pretty rustic.
Other info you need to know:
Language: Hiligaynon (Ilonggo). English and Tagalog are widely understood.
Timezone: GMT+8 (Philippine Standard Time), year-round. No daylight saving time observed. Same time zone as Beijing, Singapore, and Malaysia. One hour behind Japan.
Mode of Payment: Cash. ATMs are all around Bacolod, but they turn much fewer in other cities and municipalities. If you’re exploring other parts of Negros Occidental from Bacolod, you might want to withdraw money while you’re in the capital. Credit cards are often accepted in upscale establishments in Bacolod, but cash is still preferred.
WHERE TO STAY IN BACOLOD
In general, because there are plenty of transportation options, if you’re staying within the city center of Bacolod, you should be fine. But we usually use Lacson Street as our reference line because many of the city’s most popular attractions are located along this road. The closer you are to Lacson Street, the better. If you want something more specific, I like using Calea as the reference point because I always find myself craving their cakes when I’m in the city.
We have stayed at six different hotels across Metro Bacolod, but here are a couple of properties that we were able to try recently. First, UrbanView @ Lacson Street Bacolod City by RedDoorz, which is centrally located. Yes, it stands very close to Calea, Felicia’s, and the Negros Occidental Provincial Capitol. You’ll also find a branch of both Bongbong’s and Merczi pasalubong shops nearby.
UrbanView @ Lacson Street Bacolod
We stayed in a deluxe room with air-conditioning, WiFi, TV, in-room telephone, foldable bed table, electric kettle, and complimentary bottled water. As for the bathroom, basic toiletries were provided, the water heater was working well, and the water pressure was good. The room was good for two guests. It’s a budget hotel, and we only paid P1616.45 per night, which I think is a good deal! That’s only P808 per person.
The room is quite cramped, and it doesn’t have an elevator. But the staff were very helpful with the luggage and attentive to requests. If you’re a budget traveler and it’s your first time in Bacolod, UrbanView is a good place to start.
But if you want a proper full-service hotel close to the port or SM City Bacolod or SMX Convention Center, maybe Acacia Hotel Bacolod is the place for you. All their rooms are very spacious, have air-conditioning, free WiFi, safes, flat screen TV, refrigerator, electric kettle, and daily housekeeping. It is generally clean, and the service was great. It is also home to the city’s first wave pool — fun, family-friendly, and perfect for lounging.
Acacia Hotel Bacolod
The bar below offers buy-one-take-one cocktails, but the breakfast was so-so at best. We didn’t mind because, like we always say, we’re not big breakfast people.
It’s in a secluded area away from the main streets, but not far from the action and still very accessible. You can hail a tricycle, no problem.
It’s quiet in theory. The AC in our room, however, was rumbling a bit too loudly. But for PHP 2595 per night, I think it’s a good value for money.
Top Hotels in Bacolod
Here are some of the top-rated hotels in Bacolod City according to online traveler reviews.
🔥🔥🔥 Use AGODATPT for 10% off on select hotels! 🔥🔥🔥
The Poor Traveler readers and followers can now use a special discount code to score 10% discount, up to USD 100 (roughly PHP 5700)! To apply and avail of the promo code, visit AGODATPT Promo Code.
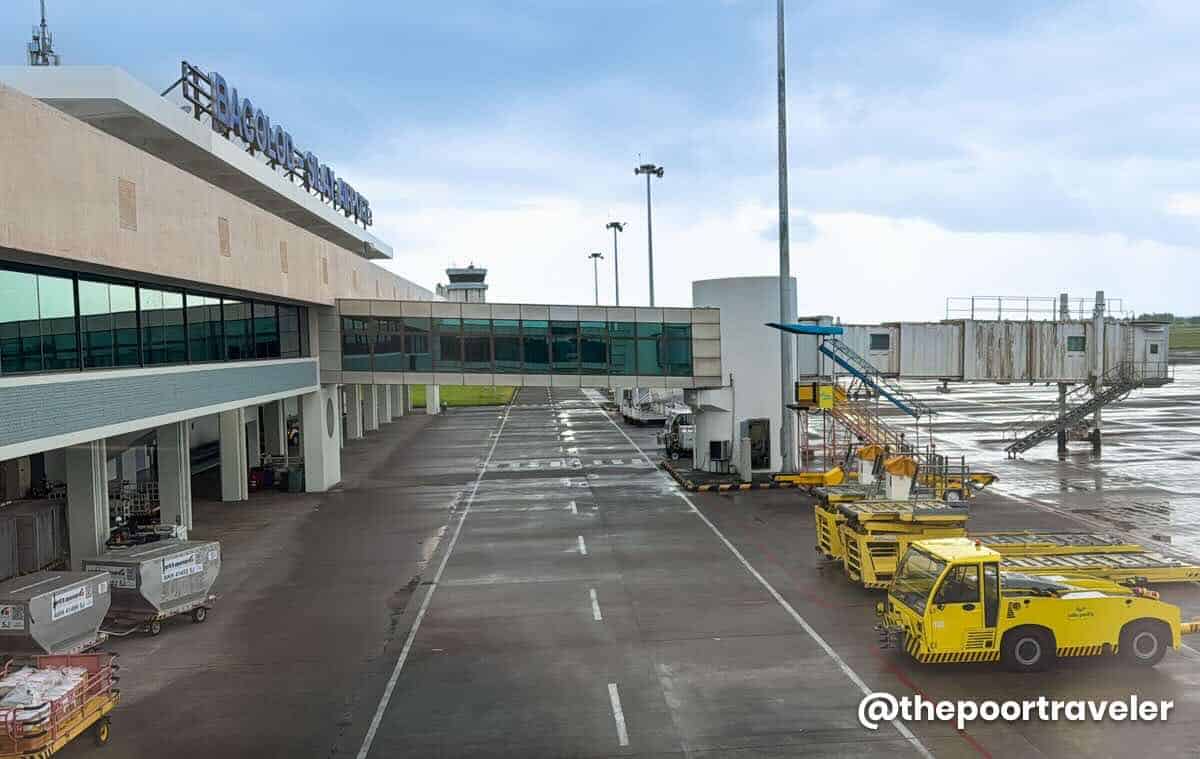
The Bacolod-Silay International Airport (BCD) is the gateway to the province. Although it has Bacolod in its name, it is entirely located in the city of Silay.
Bacolod – Silay International Airport
There are direct flights to and from this airport from Manila, Cebu, and Davao via the following airlines:
Manila to Bacolod
Philippine Airlines
Cebu Pacific
AirAsia
Cebu to Bacolod
Philippine Airlines
Cebu Pacific
Davao to Bacolod
If you book in advance, usual one-way fares are around PHP 1400 and can go as low as PHP 1200. Even lower when there is a SALE. That’s for off-peak season.
Bacolod-Silay Airport to Bacolod City Center
From the airport, you can reach Bacolod in 30 to 45 minutes. There are vans (shuttles) that can take you there directly for PHP 200-250 per passenger, depending on your stop and luggage.
But if you’re a group, it will be more cost-efficient to just book a Grab car. We were a group of three and paid only PHP 487, or roughly P162 per person. That’s cheaper than taking the van.
Travel Time: 30-45 minutes Fare: Van, P200-250 per pax; Grab, P400-500 per ride
HOW TO GET AROUND BACOLOD
As a highly urbanized city, Bacolod offers a lot of transportation options to its residents and visitors.
Jeepney
The cheapest is the traditional jeepney, which costs PHP 11 for short distances. The e-Jeep or electric jeepney is slightly costlier at PHP 15 per person. Either way, you need to be mindful of the route that the jeep will be taking to make sure you’re on the right path. You can wait for a jeepney by the roadside. And to get off, just say “Lugar lang,” which is their equivalent of “Para po.” The vehicle will then stop and wait for you to alight.
If you’re confused or you feel like you’re lost, just ask the driver or fellow passengers. Bacolod locals are some of the friendliest we have met, and I’m sure they will help you sort things out.
Fare: Regular Jeepney, PHP 11; E-Jeep, PHP 15
Tricycle ride (Left), eJeep/Modern Jeep (Top Right), and Traditional Jeep (Bottom Right)
Tricycle
Tricycles are also available, although not as popular or as common. A “special ride” usually costs PHP 50 for short distances. But there was an instance wherein we were charged PHP 150, which turned out much higher than Grab price.
Fare: PHP 50-150 (special ride)
Grab
We ended up taking Grab instead when we’re in a hurry. Based on experience, these are the usual Grab fares for most common tourist routes:
BCD Airport to City Center: P400-500
Within Bacolod to City Center: P80-P130
Bacolod City Center to The Ruins: P200
El Ideal to The Ruins: P330
Bacolod to Silay City Center (El Ideal): P350
Silay City Center to BCD Airport: P160
Bacolod City Center to BCD Airport: P400-500
Taxis also operate within the city. We were told InDrive was also available, but we never tried it here, so we can’t confirm.
If you’re going to Mambukal, make your way to Mambukal-Bacolod Bus Terminal in Libertad. The fare is 60/head, and the travel time is 1 – 1.5 hours. The bus terminates right at the entrance of Mambukal Hot Spring Resort.
If your itinerary involves visiting other destinations in the province, you can take the bus at either the North Terminal or South Terminal.
Note: Silay City, including the airport, Carbin Reef in Sagay, and Lakawon Island in Cadiz, are situated north of Bacolod; while Sipalay and Cauayan, including Danjugan Island, are in the south.
THINGS TO DO IN BACOLOD
Bacolod may be known as the City of Smiles, but its charm goes way beyond the friendly locals and the famous chicken inasal. When exploring the area, don’t just limit yourself to Bacolod proper — Metro Bacolod also includes the nearby cities of Talisay and Silay, plus surrounding towns that offer even more attractions. From heritage tours to food trips and nature escapes, here are some of the best things to do when you’re in and around Bacolod.
This is just a quick run down to get you started. For a more detailed version with additional information, check out our full article here: TOP THINGS TO DO IN BACOLOD
If you prefer a hassle free trip, you can simply purchase your tickets or book your tours via your trusted booking sites.
If you’re more comfortable using Klook services, please use our promo code THEPOORTRAVELERKLOOK for up to P300 OFF or TPTKLOOK5 for up to P500 OFF. These codes might change in the future, so best to just visit thepoortraveler.net/klook to redeem updated discount codes!
MassKara Festival
If you time your visit in October, you’ll get to experience Bacolod’s biggest event — the MassKara Festival. Expect vibrant street dances, parades of smiling masks, live concerts, and food fairs all over the city. It’s crowded and chaotic, but it’s also one of the most colorful and unforgettable festivals in the Philippines.
The Ruins
Located in nearby Talisay City, The Ruins is the skeletal remains of a grand mansion built in the early 1900s by a sugar baron for his late wife. At sunset, the structure glows beautifully, making it one of the most photogenic spots in the province.
Mambukal Resort
Warm Dipping Pool
If you’re looking for nature and relaxation, Mambukal Resort in Murcia is a top choice. The resort is famous for its seven waterfalls, hot sulfur springs, and lush forest setting. It’s a refreshing escape from the city and a favorite for both locals and tourists.
Mambukal is about an hour away from Bacolod City, with direct buses from Libertad. If you are a big group and traveling with kids and elderly people, consider booking a tour with Klook! This is inclusive of round-trip transfers, insurance, local guide/driver, and entrance fee.
Hofileña Ancestral House (TL), Balay Negrense (TM), Jalandoni Ancestral House (TR), Gamboa Ancestral House (BL), Morada Ancestral House (BM), and Golez Ancestral House (BR)
Silay City is a treasure trove of ancestral houses and cultural landmarks. Many of these heritage homes have been preserved and turned into museums, giving you a glimpse of the opulent lifestyle during the sugar boom era. The city itself is charming, with walkable streets lined with history at every corner.
Jojo Vito Designs Gallery
For something more artistic, check out the Jojo Vito Designs Gallery in Bacolod. The gallery showcases colorful, handcrafted masks and home décor pieces that reflect Bacolod’s creative spirit. It’s also a great place to shop for unique souvenirs, especially if you want to take home a piece of MassKara artistry.
Negros Museum
The Negros Museum houses exhibits that tell the story of Negros Island’s history, culture, and art. You’ll find a mix of artifacts, contemporary works, and even old sugar industry relics. It’s a good stop for anyone wanting to understand the island’s rich heritage beyond the festivals and food.
Capitol Park and Lagoon
At the heart of Bacolod lies the Capitol Park and Lagoon, a spacious public park with a man-made lagoon guarded by iconic carabao statues. It’s a popular spot for families, joggers, and even street performers. The surrounding area also has cafes and food stalls, making it a nice place to unwind.
San Sebastian Cathedral and Public Plaza
For a dose of history and spirituality, visit the San Sebastian Cathedral, one of Bacolod’s most important landmarks. Right across is the Bacolod Public Plaza, a lively hangout spot for locals and a great place to people-watch. Both sites are central to Bacolod’s cultural and religious life.
Food Trip
Chicken Inasal Pechopak, Grilled Chicken Liver, and Isaw
Of course, no Bacolod trip is complete without a food trip. From the iconic chicken inasal to sweet treats like piaya and cakes, Bacolod is a foodie paradise. On that note, let’s continue discussing this delightful topic in the next section.
Lakawon Island Day Trip
Lakawon Island lies off the coast of Cadiz, which is about one-hour drive north of Bacolod City. It is known for its white sand beaches, crystal clear waters, and a sandbar. It also hosts Lakawon Island Resort & Spa, offering water activities and amenities, including a restaurant, a beachfront bar, and one of the largest floating bars in Asia.
The jump-off point is Cadiz Viejo Port. It’s important to note that the last boat back to the mainland leaves at 3PM. From Bacolod’s North Bus Terminal, get on a bus bound for Cadiz City. Alight at Burgos Public Market, then hail a tricycle to the port. If you prefer a hassle-free trip, you can just book a day trip package from Bacolod via Klook!
The good thing about Bacolod? You surely won’t leave without tasting delicious, perfectly grilled chicken inasal. But this smoky, tangy goodness isn’t the only must-try food in Bacolod. We’ve been to Bacolod several times, and most of our trips, our main motivation is none other than…FOOD! From the city’s famed chicken inasal to its decadent sweet treats, Bacolod never fails to satisfy our craving — from appetizers to desserts!
We made a more detailed version of this article, where we listed down our favorite places to eat in Bacolod. You can check it here: WHERE TO EAT IN BACOLOD
SAMPLE BACOLOD ITINERARY & BREAKDOWN
Here are two sample itineraries for Bacolod with budget breakdown. The figures indicated are per person. But both of these itineraries assume you’re a party of two travelers, splitting all costs, and taking public transportation for the most part. Public transportation fares (jeepney, bus) are overestimated (rounded off) to be on the safe side. We chose Grab in instances when it makes more practical and financial sense.
As always, feel free to make the necessary adjustments to match your schedule and preferences.
Bacolod 4-Day, 3-Night Itinerary (Relaxed Option)
Pre-trip Booking: Hotel – P2430 (P1620/night x 3 nights, divided by 2 pax)
DAY 1 – ARRIVAL & CITY TOUR 08:30 AM – Arrival in Bacolod 09:00 AM – Grab/Van to City Center, P250/pax 10:00 AM – Hotel check-in 11:00 AM – Sharyn’s Cansi, P300 12:30 PM – Calle Luna Halo-Halo, P130 01:45 PM – Jeep/Grab/Walk to Negros Museum 02:00 PM – Negros Museum, P150 03:30 PM – Capitol Park & Lagoon 04:10 PM – San Sebastian Cathedral 04:50 PM – Bacolod Public Plaza 06:00 PM – Sugba Sugba or Chicken House, P300 08:00 PM – Calea, P250 09:00 PM – Back to hotel, P25 Day 1: P1,405
DAY 2 – MAMBUKAL 06:30 AM – Transfer to Mambukal-Bacolod Bus Terminal-Libertad, P25 07:00 AM – Bus to Mambukal, P60 08:00 AM – Arrival at Mambukal Resort, P140; Access to Japanese Ofuro, P100 11:00 AM – Lunch, P200 02:00 PM – Bus to Bacolod, P60 03:30 PM – Jojo Vito Design Gallery, P160 05:00 PM – Dinner at Lion’s Park, P250 07:15 PM – Grab to Buttery, P60 07:30 PM – Buttery Bacolod, P250 09:00 PM – Back to hotel, P25 Day 2: P1,330
DAY 3 – SILAY & TALISAY 08:00 AM – Jeepney to North Terminal, P15 08:30 AM – Ceres Bus to Silay, P25 09:15 AM – San Diego Pro-Cathedral 09:45 AM – Bernardino Jalandoni Museum*, P150 10:45 AM – Hofileña Ancestral House*, P150 11:45 AM – Cinco de Noviembre Marker, FREE 12:00 PM – El Ideal Lunch, P300 02:00 PM – Bus to Honda/Pepsi, P25 02:45 PM – Tricycle to The Ruins, P50 03:00 PM – The Ruins, P150; Sugarcane Juice, P100 07:00 PM – Grab to Gina’s Seafoods, P100 (P200/2pax) 07:30 PM – Gina’s Seafoods, P300 09:00 PM – Back to hotel, P25 Day 3: P1,390
DAY 4 – DEPARTURE 10:00 AM – Check out 10:30 AM – Pasalubong Shopping 12:00 PM – Quick Lunch, P200 02:00 PM – Grab to Airport, P250 03:00 PM – Flight check-in Day 4: P450
TOTAL: PHP 7,005 (USD 123, EUR 104, SGD 157)
Bacolod 3-Day, 2-Night Itinerary (Budget Option)
This itinerary will take you to almost all the attractions in the previous 4-day version, but made more compact.
In addition, since you will only be spending two nights in the city, we’re assuming you don’t have much baggage. Hence, you should be able to explore Silay on the last day without needing to leave it elsewhere.
Pre-trip Booking: Hotel – P1620 (P1620/night x 2 nights, divided by 2 pax)
DAY 1 – ARRIVAL & CITY TOUR 08:30 AM – Arrival in Bacolod 09:00 AM – Grab/Van to City Center, P250/pax 10:00 AM – Hotel check-in 11:00 AM – Sharyn’s Cansi, P300 12:30 PM – Calle Luna Halo-Halo, P130 02:00 PM – Negros Museum, P150 03:30 PM – Capitol Park & Lagoon 04:10 PM – San Sebastian Cathedral 04:50 PM – Bacolod Public Plaza 06:00 PM – Sugba Sugba or Chicken House, P300 08:00 PM – Calea, P250 09:00 PM – Back to hotel, P25 Day 1: P1,405
DAY 2 – MAMBUKAL & RUINS 06:30 AM – Transfer to Mambukal-Bacolod Bus Terminal-Libertad, P25 07:00 AM – Bus to Mambukal, P60 08:00 AM – Arrival at Mambukal Resort, P140 11:00 AM – Lunch, P200 02:00 PM – Bus to Bacolod, P60 03:30 PM – Jeep to Pepsi, P25 + Trike, P50; Alternatively, Grab to the Ruins, P100 (P200/2pax) 04:00 PM – The Ruins, P150 07:30 PM – Grab to Gina’s Seafood, P100 (P200/2pax) 08:00 PM – Gina’s Seafoods, P300 09:00 PM – Back to hotel, P25 Day 2: P1,135
DAY 3 – SILAY & DEPARTURE 07:30 AM – Early check out 08:00 AM – Jeepney to North Terminal, P15 08:30 AM – Ceres Bus to Silay, P25 09:15 AM – San Diego Pro-Cathedral 09:45 AM – Bernardino Jalandoni Museum*, P150 10:45 AM – Hofileña Ancestral House*, P150 11:45 AM – Cinco de Noviembre Marker, FREE 12:00 PM – El Ideal Lunch, P300 02:00 PM – Grab to Airport, P80 (P160/2 pax); If van, P100/pax 02:30 PM – Flight check-in Day 3: P720
TOTAL: PHP 4,880 (USD 85, EUR 73, SGD 109)
*Entrance fees to the Hofileña Museum and Bernardo Jalandoni Museum are assumed to be P150. In our experience years ago, it was less than P100. Online reviews claim it’s P150. Unfortunately, both were closed when we last visited, so we couldn’t confirm it. We just set it at P150 to be safe.
The total fees are inclusive of the hotel stay as indicated but exclusive of flights, pasalubong/souvenirs, and incidental expenses, since these widely vary and are highly dependent on your circumstances and preferences.
But please add at least P1000 more to the budget to cover price movements and other possible expenses we might have missed.
If you have more days, you can just insert other destinations or activities. For example, you can include a day trip to Lakawon Island in Cadiz. Or if you have extra two days, you can stay overnight on Danjugan Island in Cauayan or in Sipalay City, where you’ll find lots of noteworthy places to visit.
FREQUENTLY ASKED QUESTIONS ABOUT BACOLOD
When is the best time to visit Bacolod?
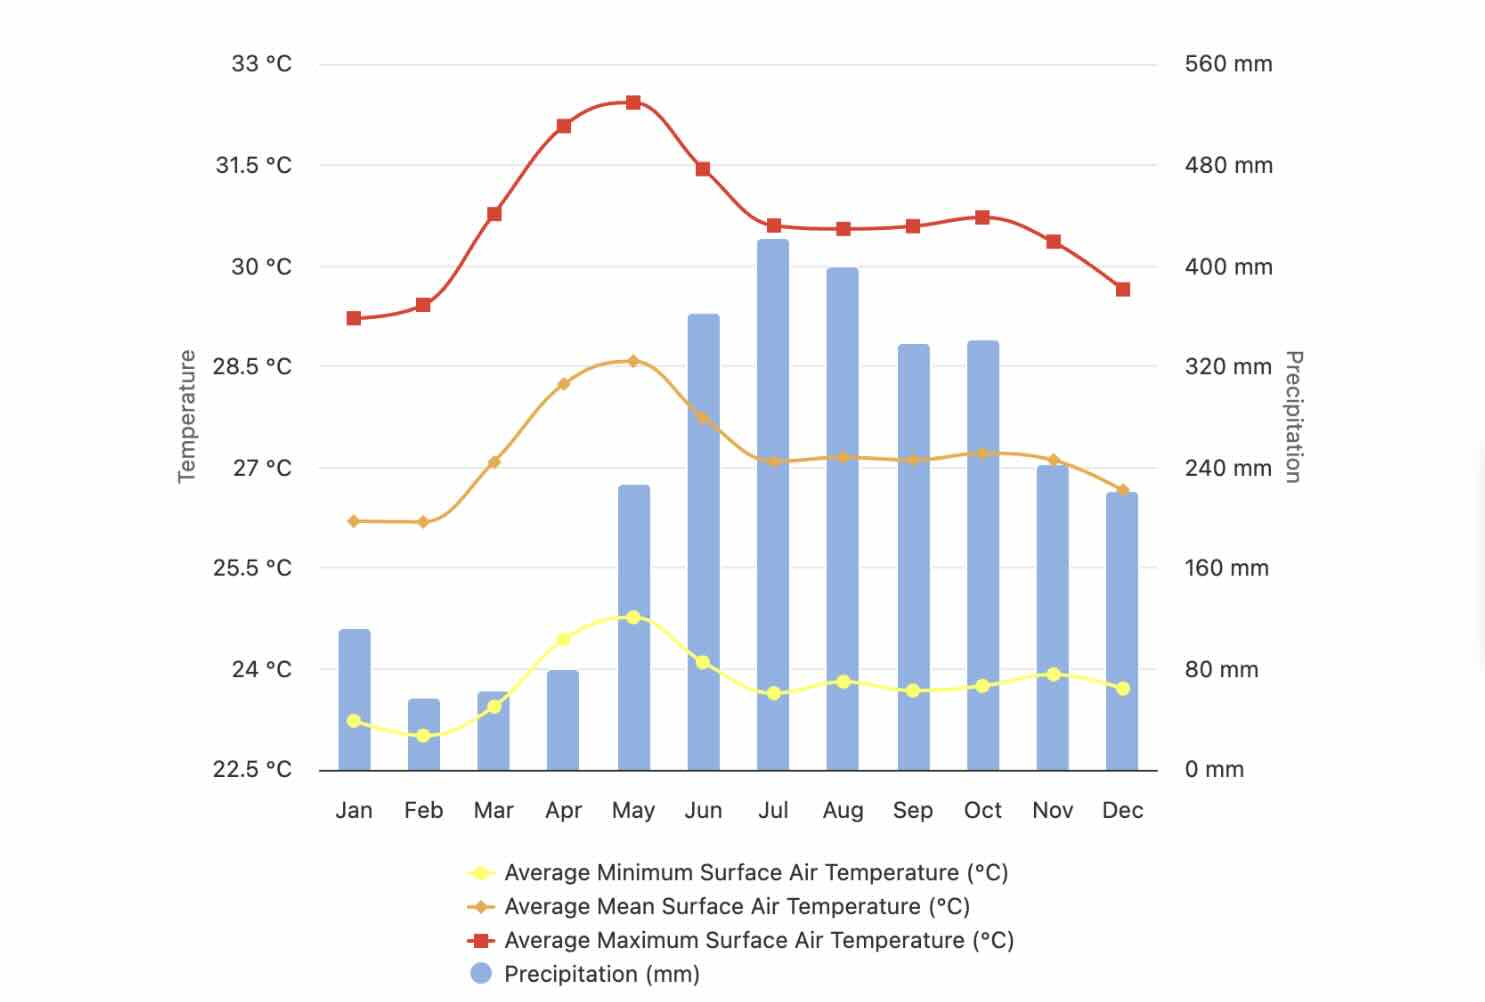
Weather-wise, definitely January to April. You’ll get plenty of sunshine for your food crawls, sightseeing, and side trips without worrying about the rain ruining your outfit. The shoulder months of November, December, and May are also pretty pleasant.
Just a warning: if you come between March and May, the heat can get intense, you’ll basically be marinating in your own sweat. On the bright side, it’s the perfect excuse to down halo-halo after halo-halo.
Photo Credit: World Bank Climate Knowledge Portal
Does that mean you should completely avoid June to October? No, not really. Yes, it’s the peak of the rainy season, but it doesn’t mean downpours happen all day, every day. In fact, our most recent Bacolod trip happened in JULY, but it never rained at all. Not even a little drizzle.
Now, if you’re the type who doesn’t mind a little risk, you could luck out, too. On the plus side, hotel rates drop, and you won’t be elbowing your way through crowds. Just pack an umbrella and maybe some patience, and make your itinerary as flexible as you can make it.
If you want to experience Bacolod in full party mode, come in October for the MassKara Festival. Picture Mardi Gras, but with more smiles, more food, and just as much traffic. It’s the city’s loudest, busiest, most colorful time of the year.
The downside? Hotel prices skyrocket, and restaurants get packed. If you want to experience MassKara, book as early as you possibly can.
What type of power plug / socket is used in Bacolod?
The standard voltage in the Philippines is 220V at a frequency of 60Hz. Generally, the plug and socket type used is Type A, which has two flat parallel pins.
Is Bacolod safe?
Yes, Bacolod is generally safe.
Again, Bacolod locals are some of the friendliest we have met. But it’s still best to be mindful of your surroundings. Always keep an eye on your belongings and don’t leave them unattended.
You can take note of these emergency contact numbers:
Photo Credit: Bacolod City Government Official Website
Updates Log
2025 9 25 – First uploaded
Additional Words by: Asta Alvarez (Lakawon Island & FAQs – Electricity Info & Safety)
Your guide to Salisbury Plain South Georgia in the remote South Atlantic, home to one of the world’s largest king penguin colonies!
If you’re dreaming of a wild, windswept paradise filled with fascinating animals, Salisbury Plain should be on your radar.
Tucked along the north coast of South Georgia, this place feels like something straight out of a nature documentary. It’s remote, magical, and full of incredible wildlife.
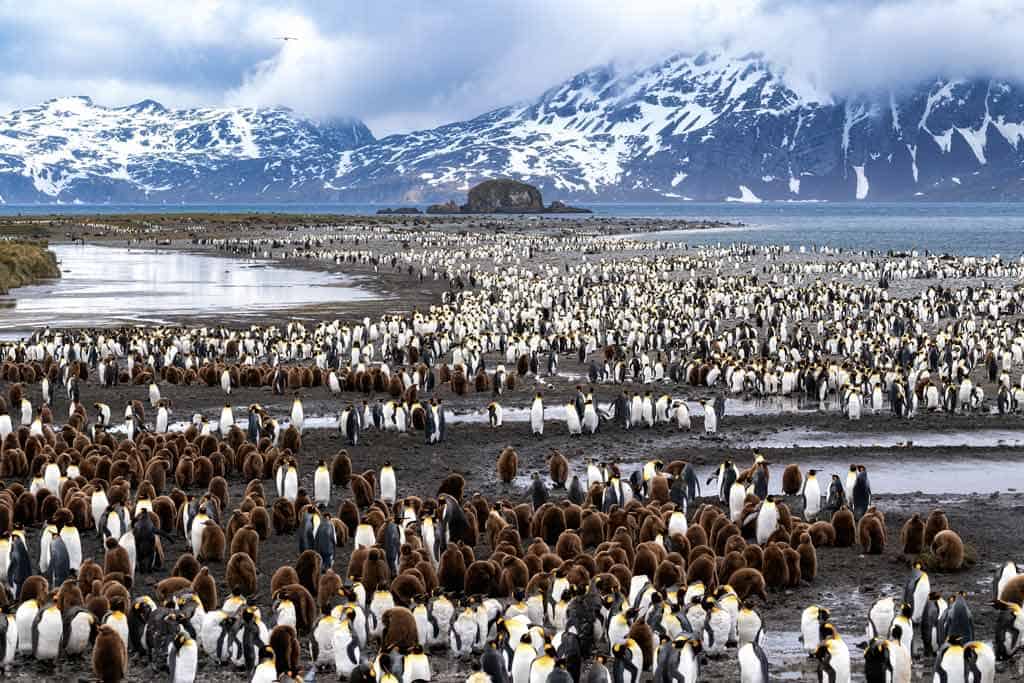
Most people come here for one reason: to see the king penguins. Tens of thousands of them waddle across the plain and it’s absolutely amazing.
But the king penguins aren’t the only stars here. You’ll also spot elephant seals, fur seals, and seabirds.
If you are a wildlife lover, nature enthusiast, or just curious about life in South Georgia, Salisbury Plain is absolutely worth the journey.
This guide will walk you through what to expect, how to get there, and why this remote stretch of land is one of the most magical places on Earth.
Despite sharing its name with the famous Salisbury Plain in Southern England, home to Stonehenge, the Salisbury Plain of South Georgia offers a completely different experience.
Located on South Georgia’s north coast, this remote sub-Antarctic landscape is rugged, wild, and bursting with life.
What the Salisbury Plain is really famous for is its massive king penguin colony, one of the largest in the world. The plain itself is formed by glacial outwash from the nearby Lucas Glaciers, resulting in a broad, flat area that’s ideal for nesting.
The moment you arrive, the sounds hit you first – chirping, squawking, roaring. Thousands upon thousands of animals crowd the shore, living their lives against a dramatic backdrop of glaciers and open sea.
Spanish speakers may call it llanura de Salisbury, but no matter the name, the magic is the same. Salisbury Plain is, without a doubt, one of South Georgia’s most spellbinding landscapes.
Important Note! Before you book any international trip, we honestly recommend getting travel insurance. You never know when things will go wrong, and medical bills can add up quickly if you get sick or injure yourself overseas.
Our personal recommendation based on our own experience is World Nomads.
Complete Guide to the Salisbury Plain South Georgia
Ready to experience South Georgia’s ultimate wildlife haven? Here’s everything you need to know to plan your visit.
How To Get There
Getting to Salisbury Plain is not as easy as booking a regular flight, and that’s exactly what makes it such an incredible destination.
Most visitors arrive by expedition cruise as part of a longer trip that includes the Falkland Islands, South Georgia, and even Antarctica. Some itineraries may also pass near the remote South Sandwich Islands, though landings there are rare.
As a remote landing site on the island’s north coast, Salisbury Plain is only accessible by small-boat landings, typically via Zodiac.
The boat landings are highly weather-dependent, so flexibility is key when planning a trip to Salisbury Plain. It’s a good idea to prepare for the cold and wet conditions. Follow your guide’s instructions carefully to ensure a safe and respectful visit.
The best time to visit Salisbury Plain is during the austral summer, from October to March, when conditions are most favorable and wildlife activity is at its peak. It also coincides with the breeding season for various species, including the iconic king penguins.
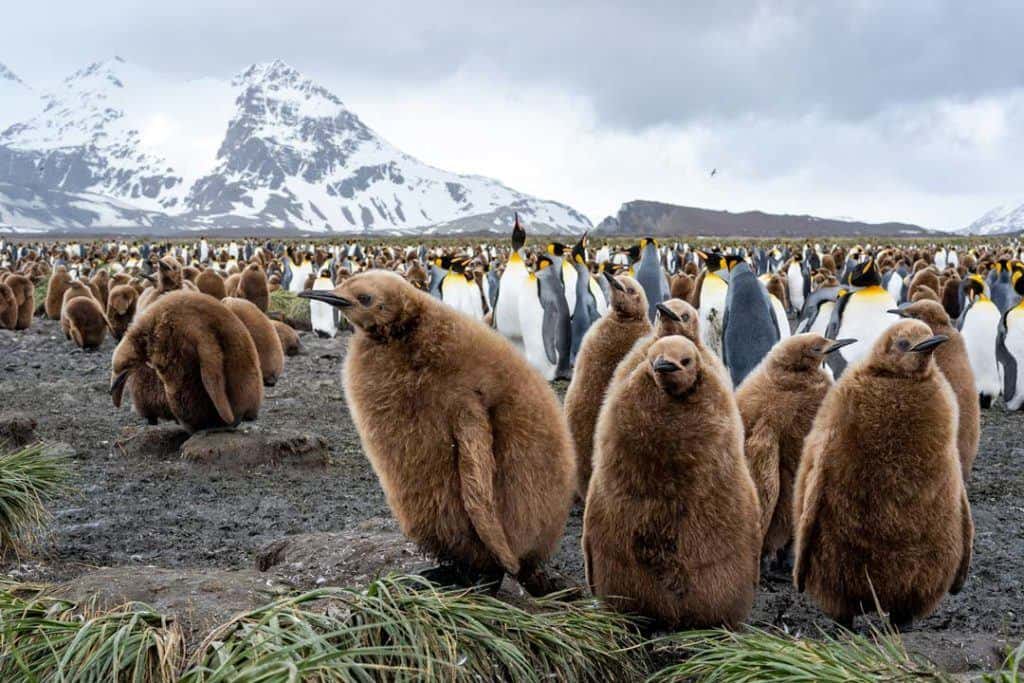
When you visit during the austral summer, expect to see king penguin chicks huddled together in brown fluffy coats and adults shuffling through the colony.
This is also when South Georgia experiences milder weather and longer daylight hours, which makes landings and wildlife viewing even more favorable.
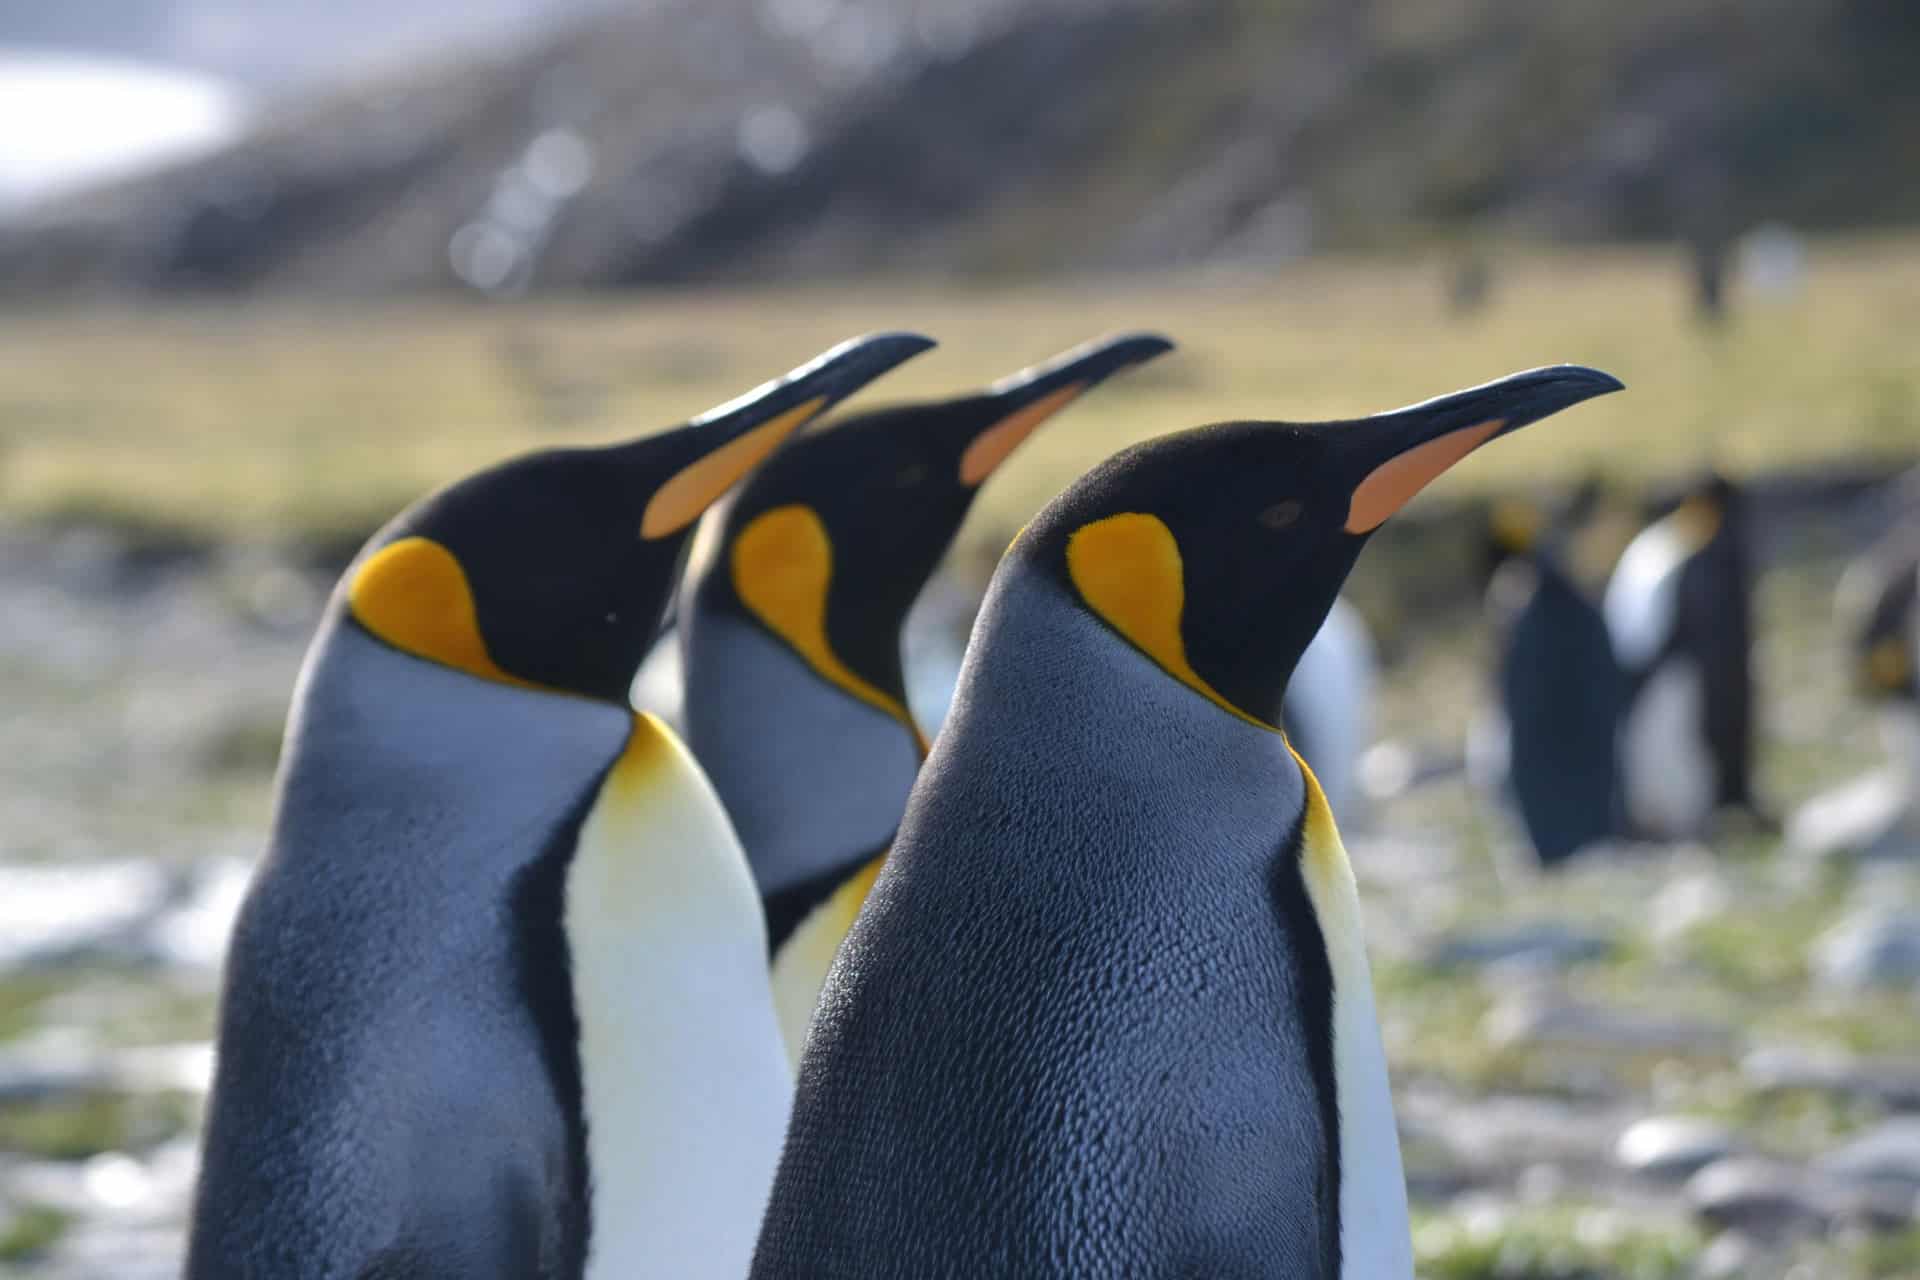
Alesha taking pictures of a couple of king penguins in South Georgia.
What to Expect During Your Visit
A visit to Salisbury Plain in South Georgia is truly an extraordinary experience.
As your Zodiac approaches the shore, you’ll be greeted by a seemingly endless stretch of king penguins and seals, backed by dramatic mountain peaks and the icy presence of the nearby Grace Glacier.
Though part of South Georgia, the island feels worlds away, even more remote than the South Sandwich Islands, which lie farther to the east.
Expect brisk winds, unpredictable weather, and an overwhelming sense of awe as you step into one of the most unspoiled natural wonders on the planet.
Explore more of South Georgia Island with a visit to Grytviken!
Wildlife You’ll See
The wildlife in Salisbury Plain is nothing short of spectacular. At the heart of it all is the king penguin colony, where tens of thousands of sleek adults gather in one of the world’s most impressive breeding grounds.
During the breeding season, you’ll spot king penguin chicks wrapped in thick brown down, looking so adorable as they huddle together and trail closely behind their parents.
Along the shoreline, elephant and fur seals can be seen piled together in huge groups, their sheer size and loud bellows hard to miss. If you visit during pupping season, you might spot elephant seal pups resting in the sand or nursing.
Scattered between them are smaller but feisty fur seals, including many Antarctic fur seals, which are especially active and vocal during the summer months.
Overhead, giant petrels circle the area, watching for scraps or signs of weakness among the young animals.
The surrounding terrain, backed by the icy slopes of Grace Glacier, is home to other species, including skuas, sheathbills, and other seabirds unique to South Georgia.
Penguin chicks in South Georgia
Practical Tips for Visitors
Keep these tips in mind to get the best experience during your trip.
1. Keep a Respectful Distance
When you visit South Georgia, it’s essential to maintain a respectful distance from wildlife, especially around king penguin colonies, seals, and nesting birds.
While the animals may seem unbothered, getting too close can cause stress or disrupt their natural behavior.
2. Dress Appropriately
Salisbury Plain can be cold, windy, and wet, even in summer. Wear waterproof layers, insulated boots, and gloves. The conditions near the bay or the nearby Grace Glacier can change quickly, so be ready for anything.
Landings are done by Zodiac boat and may require stepping into shallow water. The beach is often crowded with wildlife, so watch your footing and follow your guide’s instructions closely.
4. Watch Where You Step
Remember, Salisbury is home to hundreds of thousands of birds and seals. Take care not to trample fragile terrain or accidentally get too close to fluffy chicks or resting seals.
Salisbury Plain is full of wildlife!
5. Bring Binoculars and a Good Lens
You certainly don’t want to miss capturing the sheer scale of the king penguin colonies, the dramatic backdrop of the Grace Glacier, and other wildlife in the distance.
Some of the most breathtaking sights happen far from the trail, so don’t forget to bring binoculars and a good lens.
South Georgia is protected under strict environmental regulations. Always follow the rules provided by your expedition operator and the International Association of Antarctica Tour Operators (IAATO) to ensure that Salisbury Plain stays wild for future generations.
Wrapping Up
A trip to Salisbury Plain South Georgia feels less like a destination and more like stepping into the heart of a living, breathing wildlife spectacle.
Standing among thousands of king penguins, surrounded by seals and dramatic scenery, you’ll quickly understand why this corner of South Georgia leaves such a lasting impression.
For wildlife enthusiasts, photographers, and nature lovers, Salisbury Plain is a powerful reminder of just how wild and extraordinary our planet truly is!
DISCLAIMER: Some of the links in this article are affiliate links, which means if you book accommodation, tours or buy a product, we will receive a small commission at no extra cost to you. These commissions help us keep creating more free travel content to help people plan their holidays and adventures. We only recommend the best accommodations, tours and products that ourselves or our fantastic editorial team have personally experienced, and regularly review these. Thanks for your support, kind friend!
Your guide to the incredible Shackleton Walk, South Georgia, a must-see on this stunning island in the South Atlantic!
Few places on Earth can rival the raw, untamed beauty of South Georgia.
Tucked deep in the South Atlantic Ocean, this remote island was the final hope for survival during one of history’s greatest tales of endurance: Sir Ernest Shackleton’s legendary expedition.
The Shackleton Walk retraces the final leg of that epic journey, following in Shackleton’s footsteps as he crossed South Georgia’s rugged interior in search of rescue, together with Tom Crean and Frank Worsley.
This daring trek happened after the crew had endured months stranded on drifting ice and then on the remote Elephant Island, where 22 men waited while Shackleton set off in the James Caird to get help.
Nowadays, the Shackleton Walk, which begins in Fortuna Bay and ends in the abandoned Stromness whaling station, is one of the most meaningful and dramatic hikes in polar travel.
In this guide, we will share everything you need to know about the Shackleton Walk: the history, how to do it, what to expect, and why this small stretch of land in South Georgia leaves such a lasting impact on those who tread it.
Sir Ernest Shackleton is one of the most iconic figures of the Heroic Age of polar exploration. Born in Ireland in 1874, he led several daring expeditions to Antarctica.
However, it was the Imperial Trans-Antarctic Expedition (1914–1917) that cemented his legacy.
His expedition ship, Endurance, became trapped and crushed by ice in the Weddell Sea, forcing the boat’s crew to camp on drifting ice floes. Eventually, they reached the remote shores of Elephant Island, an uninhabited rock off the South Shetland Islands.
With no hope of rescue from such an isolated location, Shackleton decided to sail more than 800 miles across the treacherous Southern Ocean in a small lifeboat, the James Caird, accompanied by five men.
He left Frank Wild, his loyal second-in-command, in charge of the remaining crew on Elephant Island.
The James Caird had survived monstrous waves and freezing temperatures thanks to the expert navigation of Frank Worsley, the expedition’s ship’s captain.
After 16 brutal days at sea, the James Caird reached King Haakon Bay on the southern coast of South Georgia Island. But the ordeal does not end there.
With the James Caird being too damaged to continue, Shackleton realised he had to cross the island’s uncharted interior on foot.
In a final act of grit and determination, Shackleton and two companions undertook a grueling 36-hour, non-stop trek across glaciers and mountains. Ultimately, they reached the Stromness Whaling Station, where a rescue party found them.
Today, the Shackleton Walk honors that final land leg of the journey. Modern-day adventurers follow a shorter, more accessible route, believed to mirror the last part of Shackleton’s crossing.
The trail passes through dramatic scenery filled with seals, penguins, and echoes of history, ending at the rusting remains of the whaling station where Shackleton’s epic rescue mission began.
Penguins on the remote shores of South Georgia
Complete Guide to the Shackleton Walk
The Shackleton Walk may be relatively short, but it offers a powerful glimpse into the grit and determination behind Shackleton’s legendary journey across South Georgia Island.
If you’re eager to follow in Shackleton’s footsteps, here’s your guide.
Best time to go
The best time to do the Shackleton Walk is during the austral summer, from November to March.
During these months, South Georgia Island experiences its most accessible and stable weather. Temperatures are relatively mild (hovering around 0–10°C / 32–50°F), and there’s more daylight, so it’s much safer to trek.
While South Georgia is not located within the South Pole, it shares the dramatic weather patterns of the polar regions. Even in summer, sudden snow, fog, or strong winds can affect landings. Therefore, flexibility is essential when taking the Shackleton Walk.
Still, consider visiting during this window for the best chance to follow in Shackleton’s footsteps and witness the island’s fascinating wildlife and scenery at its peak.
The trek spans approximately 4 to 6 kilometers (about 2.5 to 3.7 miles) and takes around 2 to 3 hours to complete, depending on conditions and group pace.
Expect a mix of terrain, from grassy slopes to rocky ridges, with occasional patches of snow.
The best part? You’ll be surrounded by sweeping views of South Georgia’s dramatic mountains and glaciers.
While the walk only covers a fraction of Shackleton’s full journey across the island from King Haakon Bay, this section is believed to closely follow the final stretch of his route, ending at the abandoned whaling station where he secured help for the stranded crew of the Endurance.
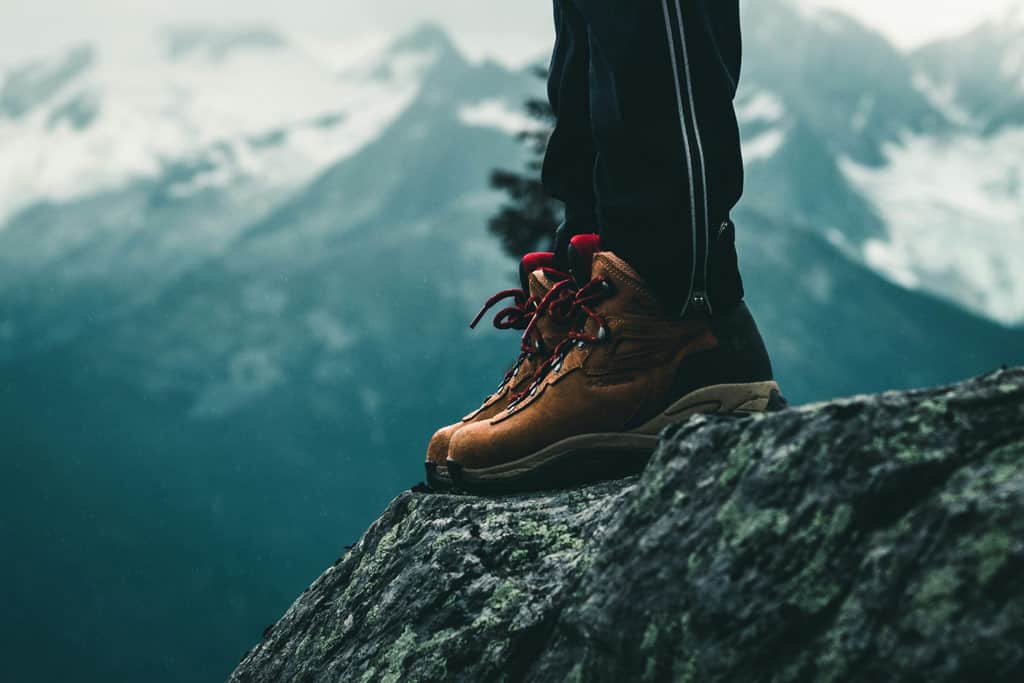
Make sure you have good hiking boots for the Shackleton Walk!
Required fitness level
While the Shackleton Walk is not particularly long, it does require a moderate level of fitness, especially given its remote location and ever-changing conditions.
This route, which echoes part of Shackleton’s legendary crossing of South Georgia, includes uneven ground, occasional steep climbs, and the possibility of snow or ice patches, especially in early or late in the season.
You don’t need to be an experienced hiker, but a basic level of hiking experience certainly helps. You should feel confident walking for a few hours over rugged, undulating terrain with some elevation gain. The route may include slippery rock, loose gravel, or wet grass, all of which demand careful footing.
Sturdy hiking boots with good grip are essential, along with warm, weather-resistant clothing.
In addition to proper gear, having decent balance, strong ankles, and a reasonable level of cardiovascular endurance will ensure you can fully enjoy this remarkable walk in safety and comfort.
The Shackleton Walk is typically done as part of an expedition cruise to South Georgia Island. The hike is usually offered as a guided shore excursion.
Most travelers reach South Georgia by ship, often on extended voyages that include the Falkland Islands, Elephant Island, the Antarctic Peninsula, and sometimes the Shetland Islands.
Cruises usually anchor near Fortuna Bay, where passengers are transported ashore via zodiac landings. From there, the guided hike follows the trail to the whaling station.
Due to the island’s remote nature and strict conservation regulations, independent trekking is not allowed. Joining a licensed expedition cruise is often the only way.
Expedition cruise ship in South Georgia
Restrictions, permits, or conservation guidelines
Due to its remote location and fragile ecosystem, South Georgia Island is protected by strict environmental and biosecurity regulations.
As mentioned, independent trekking is not permitted. All visitors must be part of a licensed cruise with expedition guides who are trained in conservation protocols.
Trekkers must follow established routes to minimize impact on native wildlife and vegetation. Before landing, all personal gear, including boots, backpacks, and clothing, must be thoroughly cleaned and inspected to prevent the introduction of non-native species.
No special permits are required for passengers on organized cruises. However, everyone is expected to follow the island’s visitor guidelines set by the Government of South Georgia & the South Sandwich Islands (GSGSSI).
Important Note! Before you book any international trip, we honestly recommend getting travel insurance. You never know when things will go wrong, and medical bills can add up quickly if you get sick or injure yourself overseas.
Our personal recommendation based on our own experience is World Nomads.
Points of Interest on the Shackleton Walk
These are some of the highlights you can expect to encounter on your walk:
Fortuna Bay
This is the starting point of the trek and a great introduction to the rugged beauty of South Georgia. Surrounded by towering peaks and often crowded with fur seals and king penguins, the bay has incredible wildlife and scenery.
Crean Lake
Named after Tom Crean, one of Shackleton’s companions on the final trek, this small glacial lake sits along the walking route. It’s a peaceful reminder of the grueling journey across South Georgia’s icy interior, which was shaped by extreme ice conditions.
This is believed to be the one Shackleton, Worsley, and Crean descended during the final stretch of their land crossing. It’s a dramatic natural feature that marks their descent into hope and rescue.
Stromness Whaling Station
The ruined whaling station at Stromness is the emotional end-point of the walk. This was where Shackleton finally found help.
Though now abandoned, its rusting buildings sit silently against the raw landscape, a powerful contrast to the surrounding wildlife and scenery.
Shackleton’s Grave at Grytviken
While not part of the walk itself, many cruises visit Grytviken nearby, where Sir Ernest Shackleton is buried. He died of a heart attack during his final Antarctic voyage in 1922 and was laid to rest on the north side of South Georgia, at his crew’s request.
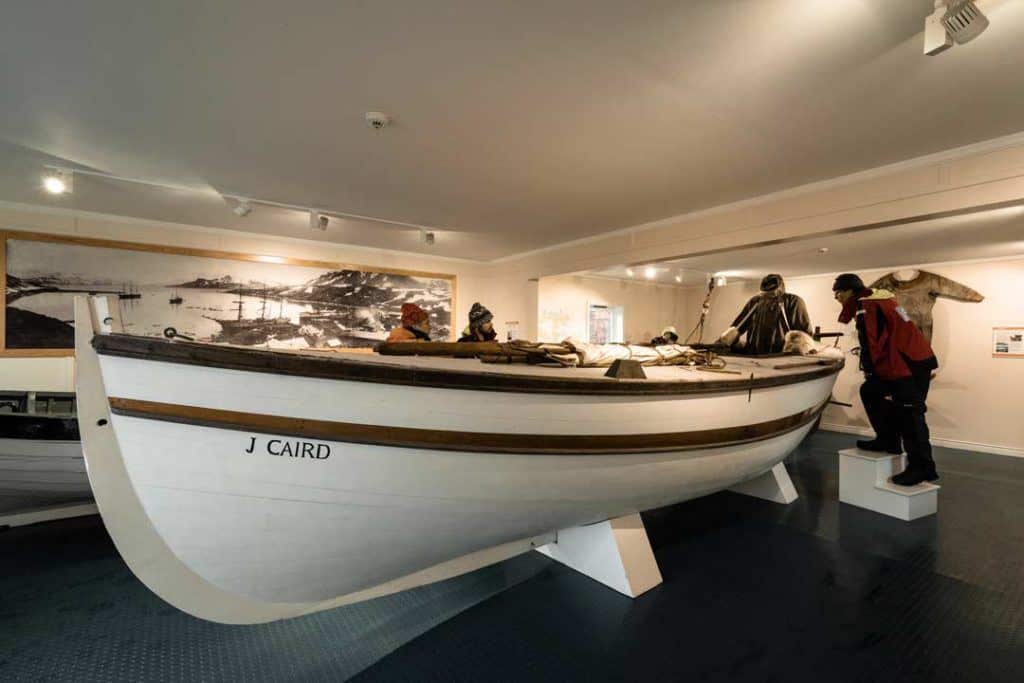
You can also see a replica of the James Caird here in Grytviken!
A life-size replica of the James Caird in Grytviken
Possession Bay (optional viewpoint)
If weather permits, some routes offer a view toward Possession Bay, another historic landing spot on the island. While not directly part of the trek, it’s worth noting for its dramatic cliffs, frequent elephant seal sightings, and breathtaking scenery.
Excited to venture into South Georgia? Before you go, here are some tips to keep in mind:
Prepare for changing weather
South Georgia’s weather is notoriously unpredictable. Even during the austral summer, sudden shifts in wind, snow, and fog can occur, especially on the south side of the island. Dress in warm, layered clothing and bring waterproof gear.
The trek involves uneven terrain, wet conditions, and occasionally snow or scree. Sturdy boots with good ankle support are essential, especially when navigating areas near Stromness Bay.
Read our list of the best hiking tips from years of outdoor adventures!
Respect wildlife and keep your distance
You may have close encounters with fur seals, elephant seals, and nesting seabirds during your walk. Make sure you maintain a respectful distance. These are wild animals, and many areas are sensitive breeding grounds protected under strict guidelines.
Be mindful of ice and terrain conditions
Depending on the timing of your visit, ice conditions can impact the safety and accessibility of certain parts of the walk. Your guide will assess the terrain, particularly during a longer crossing of South Georgia.
Leave no trace
Help preserve the pristine environment of South Georgia by not leaving behind any waste and avoiding disturbance to natural habitats. Follow all briefings given by expedition staff.
Book through a licensed operator
Cruises departing from the Falkland Islands or the Antarctic Peninsula typically include landings and guided hikes. Make sure you book through an operator experienced in responsible tourism and conservation standards.
Time your visit wisely
Plan your trip between October and March for the best weather and wildlife viewing. This also aligns with when most cruise ships operate in the South Atlantic region.
Keep your eyes peeled for wildlife along the walk!
Wrapping Up
The Shackleton Walk is more than just a trek across South Georgia Island. It is also a powerful journey through one of the greatest survival stories in polar history.
As you head on for your trek, starting in the rugged terrain of Fortuna Bay and into the haunting ruins of Stromness, you will not only witness breathtaking scenery but also step into a legacy of courage, endurance, and extraordinary leadership.
South Georgia’s dramatic scenery, remarkable wildlife, and the powerful legacy of the Endurance Expedition make this trek very rewarding.
It’s a rare and moving adventure, a tribute to human resilience, and a reminder that even in the harshest environments, hope and determination can prevail.
DISCLAIMER: Some of the links in this article are affiliate links, which means if you book accommodation, tours or buy a product, we will receive a small commission at no extra cost to you. These commissions help us keep creating more free travel content to help people plan their holidays and adventures. We only recommend the best accommodations, tours and products that ourselves or our fantastic editorial team have personally experienced, and regularly review these. Thanks for your support, kind friend!
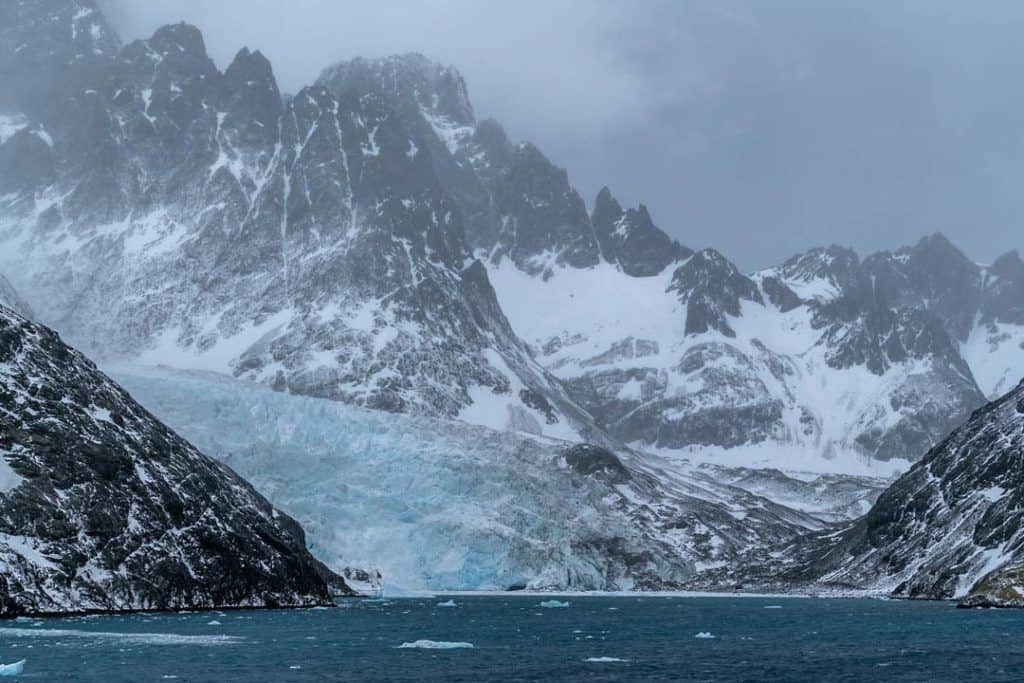
If you’re visiting South Georgia, don’t miss a visit to Drygalski Fjord! This majestic natural landmark boasts some of the best views in the area.
To see breathtaking glaciers, frolicking penguins, and rugged mountains against the backdrop of the Southern Ocean, be sure to check out Drygalski Fjord!
Located off the southeastern coast of South Georgia, this beautiful inlet is framed by dramatic mountains and ice-covered cliffs.
This remote environment is rich in wildlife, with seals, penguins, and seabirds commonly seen along its shores and on the ice.
The stunning scenery and abundant wildlife make Drygalski Fjord a highlight for visitors on polar expedition cruises.
Here is everything you need to know about the gorgeous Drygalski Fjord on South Georgia Island! A journey to South Georgia, one of the most pristine environments in the world, is well worth the trek.
Important Note! Before you book any international trip, we honestly recommend getting travel insurance. You never know when things will go wrong, and medical bills can add up quickly if you get sick or injure yourself overseas.
Our personal recommendation based on our own experience is World Nomads.
Where is Drygalski Fjord?
Drygalski Fjord sits at the southeastern tip of South Georgia Island in the South Atlantic Ocean.
It lies near Cape Disappointment, opening into the Southern Ocean, and is surrounded by the incredible views of South Georgia’s mountainous terrain.
Reaching Drygalski Fjord typically takes several days by ship, depending on the starting point.
From the Falkland Islands, it usually takes 3 to 4 days of sailing across the South Atlantic to reach South Georgia Island.
From Ushuaia, Argentina, it can take 4 to 6 days to reach South Georgia.
Once at South Georgia, reaching Drygalski Fjord itself may take another day or two, as ships often visit other key landing sites (like Grytviken or St. Andrews Bay) before circling to the island’s southeastern end.
Because Drygalski Fjord is one of the southernmost points of the island, it’s often visited toward the end of the itinerary, depending on sea ice and weather.
The beauty of Drygalski Fjord
Drygalski Fjord Landscape and Nearby Landmarks
As part of the sub-Antarctic region, the fjord is filled with glaciers and sheer cliffs, creating a narrow and enclosed passageway.
The fjord stretches about 14 kilometers inland, with some other notable landmarks nearby:
Risting Glacier: Located at the head of the fjord, this massive glacier often calves into the sea.
Mount Worsley: Part of the rugged mountain terrain nearby, this peak honors Frank Worsley, the captain of Shackleton’s Endurance.
Cooper Bay: Situated northeast of Drygalski Fjord, Cooper Bay is known for its rich wildlife, including colonies of macaroni and chinstrap penguins, and its steep, scenic cliffs.
Larsen Harbour: A narrow, glacier-fed inlet branching off the west side of the fjord. Larsen Harbour is often used as a safe anchorage for small vessels.
Cape Disappointment: A headland named by Captain James Cook during his 1775 voyage, when he realised South Georgia was not part of the fabled Southern Continent that he was looking for. A fitting name for his emotions at the time!
The history of Drygalski Fjord is closely tied to the era of polar exploration and early scientific expeditions in the South Atlantic.
It was named after Professor Erich von Drygalski, a German geographer and polar scientist who led the First German Antarctic Expedition (1901–1903) aboard the ship Gauss.
Although Drygalski himself never visited South Georgia, the fjord was named in his honour by later German explorers who admired his contributions to polar research.
The fjord and surrounding region were charted in more detail during the early 20th century, particularly by the Discovery Investigations—a British scientific program studying the Southern Ocean and whaling grounds around South Georgia from the 1920s onward.
While Drygalski Fjord never hosted permanent settlements or whaling stations, it was occasionally visited by vessels seeking shelter or conducting scientific surveys.
Today, its history is preserved in its name and in its role as a destination for modern expedition cruise ships.
The wildlife at Drygalski Fjord is incredible, with lots of amazing creatures that are well-adapted to the harsh sub-Antarctic environment.
Though the steep terrain filled with glaciers limits extensive breeding colonies, the fjord and its surrounding waters support a rich array of marine and bird life.
Humpback whale off the coast of South Georgia
Seals
Weddell seals, fur seals, and elephant seals often haul out on the rocky shores and floating ice around the fjord.
Weddell seals, in particular, are well-suited to the icy fjord environment and may be seen resting near the glacier fronts. Larsen Harbour, within Drygalski Fjord, is one of the few places where Weddell seals are known to breed on South Georgia.
Elephant seals and fur seals don’t breed in the area, but are still commonly spotted!
Penguins
Large penguin colonies are rare in Drygalski Fjord because of the steep and sometimes treacherous cliffs.
But chinstrap and macaroni penguins are frequently spotted in nearby areas like Cooper Bay, and individual penguins may be seen swimming or exploring rocky outcrops.
Gentoo penguins are also found on South Georgia and can occasionally be spotted in surrounding coastal regions.
South Georgia is also famous for its incredible colonies of king penguins. Though the colonies mostly congregate in flat, grassy places like St. Andrews Bay, Gold Harbour, and Salisbury Plain, king penguins can occasionally be spotted in the waters around Drygalski Fjord.
King penguins on South Georgia
Seabirds
The skies and cliffs around the fjord are frequented by sub-Antarctic bird species such as light-mantled sooty albatross, snow petrels, wilson’s storm petrels, and skuas.
These birds nest on nearby cliffs to escape the strong winds, but you can also see them flying on calmer days or hunting in the sea.
Whales and dolphins
The deep, nutrient-rich waters around South Georgia, including those near Drygalski Fjord, can attract humpback whales, fin whales, and orca, especially during the austral summer when feeding conditions are ideal.
Zodiac cruises around the island are amazing ways to see the beauty of the marine life on your trip!
Visiting Drygalski Fjord, South Georgia, is a rare and awe-inspiring experience, typically possible only as part of a polar expedition cruise that includes Antarctica.
Booking your cruise
The only practical way to reach the fjord is by booking a multi-day expedition cruise that includes South Georgia in its itinerary. These cruises often depart from Ushuaia, Argentina, or occasionally from Stanley in the Falkland Islands, and they usually include Antarctica as well.
Not all South Georgia cruises visit Drygalski Fjord, as it lies at the island’s remote southeastern tip. Look for itineraries that include specific mentions of Drygalski Fjord, Cape Disappointment, or Larsen Harbour, which are all in the area.
Due to its steep cliffs, strong wind, icy conditions, and lack of flat ground, most visits to Drygalski Fjord involve Zodiac cruises.
This type of trip means you will explore the fjord from small inflatable boats, getting close to glaciers, icebergs, and wildlife. Going ashore is rare.
Expedition routes are always subject to weather, and snow, wind, or sea ice can disrupt a trip at any given moment. So even if Drygalski is on the planned itinerary, a visit isn’t guaranteed.
Operators prioritise safety for everyone and adapt routes daily!
The fjord can be harder to pass through in stormy weather.
Travel Season
The best time to visit Drygalski Fjord is during the austral summer, from November to March, when the weather is not too cold and wildlife activity is at its peak.
November to early December: This is early in the season, when the landscape is still snowy and dramatic. Animals are active, which is an incredible sight. Fewer ships visit during this time, offering a quieter experience.
Mid-December to January: Peak summer brings the warmest temperatures (still cold by most standards), longer daylight hours, and increased wildlife activity. Penguin chicks hatch, and many species are actively feeding.
February to March: This is the best time for whale sightings, as species like humpbacks and orcas are more common in South Georgia’s waters. Penguin colonies are still active, and the melting icebergs reveal more of the land.
DISCLAIMER: Some of the links in this article are affiliate links, which means if you book accommodation, tours or buy a product, we will receive a small commission at no extra cost to you. These commissions help us keep creating more free travel content to help people plan their holidays and adventures. We only recommend the best accommodations, tours and products that ourselves or our fantastic editorial team have personally experienced, and regularly review these. Thanks for your support, kind friend!
Here is your guide to the best Kakadu National Park walks, including scenic lookouts, ancient Aboriginal rock art sites, and more.
Located in the Northern Territory, about three hours from Darwin, Kakadu National Park is Australia’s largest national park.
With stunning waterfalls tumbling into natural swimming holes, ancient rock art older than the pyramids, and lush landscapes that change with the seasons, Kakadu is also one of the country’s most impressive parks.
Kakadu National Park is also a UNESCO World Heritage site, celebrated for its cultural significance and breathtaking natural beauty. One of the best ways to truly appreciate it is on foot.
During your walks, expect to find bird-filled wetlands, dramatic escarpments, tranquil billabongs, and lush patches of monsoon forest.
In addition, Kakadu is home to the world’s oldest living culture. The park is jointly managed by traditional Aboriginal owners and Parks Australia, which makes a visit here even more meaningful.
If you’re into hiking, you’re definitely in for a treat. The walks here range from short and easy to long and rewarding.
There’s no better way to experience the magic of Kakadu than by hitting its trails. The park has a variety of walking tracks that showcase its most iconic landscapes and cultural sites.
From breathtaking escarpment views to wildlife-rich wetlands and fascinating rock art, these walks take you deep into the heart of Australia’s Top End, where you can watch the beauty of Kakadu unfold before your eyes.
We’ve put together this list to help you choose the best walks for your visit, whether you’re up for a short scenic stroll or a more challenging adventure.
Please note that some trailheads are only accessible by 4-wheel drive, especially during certain times of the year. Check the national parks website for alerts and other info!
The best way to get around is to rent a car and explore on your own! We recommend Rental Cars, which has the largest range of vehicles for the best value on the market.
1. Burrungkuy (Nourlangie) Rock Art Walk
Distance – 1.5 km loop
Duration – 45 minutes
Difficulty – easy
Start / Finish Points – Burrungkuy (Nourlangie) car park
If you’re interested in the area’s culture and history, the Burrungkuy (Nourlangie) Rock Art Walk is a great trail to explore. This easy 1.5 km loop takes you through ancient rock shelters and escarpments where you can view some of the park’s most impressive rock art.
One of the highlights along this trail is the Anbangbang Gallery, a well-known rock art site featuring vibrant depictions of ancestral beings, including Namarrgon, the Lightning Man, and traditional hunting scenes.
The galleries, created by Aboriginal people over thousands of years, offer a powerful glimpse into their stories, spirituality, and way of life.
Interpretive signs along the trail help bring the artwork to life and explain the deep connection between the Traditional Owners and the surrounding landscape.
The Burrungkuy Rock Art Walk is accessible year-round, including during the wet season, when the escarpment country bursts into color. It is suitable for a reasonably fit person and can be completed in under an hour.
Kakadu is home to rugged cliffs and ancient artworks.
2. Gubara Pools Walk
Distance – 6 km return
Duration – 2 to 3 hours
Difficulty – moderate
Start / Finish Points – Gubara car park (accessed via Nourlangie Road)
The Gubara Pools Walk is a rewarding 6 km return trail that takes you through savanna woodland and stone country to a series of shady rock pools fed by stunning waterfalls during the wet season.
This relatively gentle walk takes you to sun-exposed stretches and sheltered sections of rainforest, making it a great choice for those looking to escape the crowds and soak in Kakadu’s more tranquil side.
At the end of your adventure, you’ll reach the plunge pool area. Stop by for a refreshing dip when water levels allow.
While the waterfalls here are most active during or after the wet season, there’s water at the plunge pool year-round. It’s one of Kakadu’s quieter gems, ideal for those seeking nature, solitude, and a bit of swimming along the way.
3. Bowali Track
Distance – 4 km return
Duration – 1 to 1.5 hours
Difficulty – easy
Start / Finish Points – start at the opposite of the Mercure Kakadu Crocodile Hotel in Jabiru and end in the visitor centre
The Bowali Track links the Bowali Visitor Centre with the township of Jabiru. It’s perfect for stretching your legs while taking in some of Kakadu’s natural beauty at a relaxed pace.
The hiking trail winds through open woodland and clusters of paperbarks, where you can spot fascinating bird life, especially in the late afternoon when the area comes alive with movement and birdsong.
As you set out on your walks, take a moment to appreciate the deep connection the traditional owners, the Bininj/Mungguy people, have with this land.
The visitor centre itself is a fantastic place to learn more about their culture, as well as the plants, animals, and landscapes that make Kakadu so amazing.
4. Nawurlandja Lookout Walk
Distance – 600 m return
Duration – 30 minutes
Difficulty – easy
Start / Finish Points – Nawurlandja car park (near Burrungkuy/Nourlangie)
The Nawurlandja Lookout Walk may be a short hike, but it is a rewarding one. It’s a gentle climb up a sandstone slope that leads to one of the most breathtaking views in Kakadu National Park.
From the top, enjoy sweeping vistas over the Arnhem Land escarpment, Anbangbang Billabong, and the surrounding stone country.
The Nawurlandja Lookout may require a climb, but it’s one of those spots that gives you a real sense of Kakadu’s scale and ancient beauty, something you might also glimpse on a Kakadu scenic flight.
But hiking allows you to experience it up close, with the stillness and birdsong in the background. The lookout is especially magical around sunset, when the escarpment glows gold and red.
Although the trail is short, it’s important to come prepared, as conditions can be unpredictable.
5. Ubirr Walk
Distance – 1 km loop + 250 m optional lookout
Duration – 1 hour
Difficulty – easy to moderate
Start / Finish Points – Ubirr car park
The Ubirr Walk is one of the most iconic hiking trails in Kakadu National Park, and for good reason. This easy/moderate loop takes you through Ubirr rock, a site known for its stunning Aboriginal rock art, some of which is believed to be over 20,000 years old.
As you walk among the ancient galleries, you can gain insight into the stories and traditions of the traditional owners, the Bininj/Mungguy people, who have cared for this land for countless generations.
The hiking trail finishes with a short climb to the top of Ubirr rock, where you’ll be met with incredible sunset views over the Nadab floodplain and the distant Arnhem Land escarpment. This hiking adventure perfectly captures the sheer scale and beauty of this World Heritage area.
Kakadu National Park has some amazing lookouts.
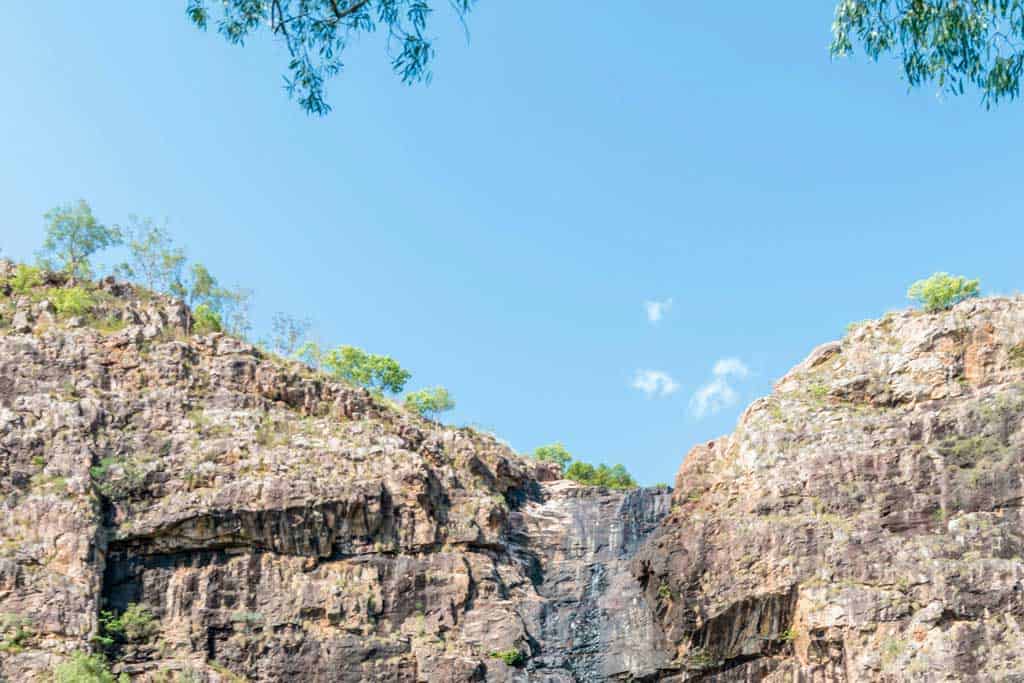
6. Jim Jim Falls Walk
Distance – 2 km return
Duration – 1 to 2 hours
Difficulty – moderate to difficult
Start / Finish Points – Jim Jim Falls car park (dry season access only; 4WD required)
The Jim Jim Falls Walk takes you deep into Kakadu’s dramatic stone country, where towering cliffs and lush forest surround one of the park’s most stunning waterfalls.
The 2 km return trail is a bit of a rocky scramble in parts, but the reward at the end is well worth it, especially in the dry season, when you can reach the plunge pool and gaze up at the sheer cliffs where the water drops from 200 meters above!
During the wet season, hiking trips to the plunge pool is not permitted. However, you can still take in their full glory on a scenic flight, an exciting way to see this iconic spot and appreciate the scale of Kakadu’s wild terrain.
7. Twin Falls Gorge Walk (via boat shuttle and boardwalk)
Distance – 1.8 km return
Duration – 1 hour
Difficulty – moderate
Start / Finish Points – After the boat shuttle, via Twin Falls car park (4WD + seasonal access)
The Twin Falls Gorge Walk is a true Kakadu highlight, leading you into one of the most spectacular corners of the national park.
After a short boat shuttle through the gorge (operates in the dry season), follow a scenic hiking trail that winds over rocks and alongside the crystal-clear creek. At the end, you’re rewarded with views of the stunning waterfalls that give the trail its name – twin streams plunging over towering cliffs into a shady gorge.
While swimming may not always be possible at the base of the falls, the views of these stunning waterfalls are epic! Plus, there are designated spots nearby where you can relax and dip your feet.
A park pass is required to visit this area. And if you’re coming here during the dry season, a 4WD vehicle may be necessary to access the site.
The Gunlom Lookout Walk is one of the most iconic trails in Kakadu National Park, featuring incredible views over the southern hills and stone country. The short but steep walk rewards you with panoramic scenery and access to the famous Gunlom plunge pool at the top.
As you go hiking along the Gunlom Lookout Walk, you’ll pass through classic outback terrain before reaching the natural infinity-edge plunge pool, which has become a favorite for many visitors to the national park.
Please note that the Gunlom plunge pool may be closed for cultural reasons at the request of Traditional Owners.
When planning your visit, check the official Kakadu National Park website for current access status and other info to help you plan a safe and respectful trip.
The Gunlom Lookout Walk is also considered one of the trickiest trails in the park due to its steep incline and rugged surface. For a safer and more enjoyable adventure, consider booking tours through operators like Willis’s Walkabouts. They have in-depth knowledge of the area and offer guided tours.
If you’re looking for a peaceful hiking experience with a high chance of spotting wildlife, the Mardukal Billabong Walk is a great trail to tackle.
Due to its flat terrain, it’s considered one of the easiest walks in the park, winding through thick woodlands and alongside tranquil billabongs.
Located near the famous Yellow Water Billabong, this walk is ideal for birdwatchers. During your hiking adventure, keep an eye out for magpie geese, kingfishers, and even the occasional jabiru.
Many visitors also choose to take a Yellow Water cruise to explore the billabong by boat, which offers a unique and equally stunning perspective of the wetlands and their wildlife.
Some travellers who book nature tours or stay at a nearby camp would walk this trail for its calm, accessible setting.
If you’ve done similar trips in Yellow Water, this walk makes a perfect addition. It’s a lovely way to start or end your day at Kakadu Park and a great chance to spot local wildlife without needing to go far.
10. Nanguluwurr Rock Art Site Walk
Distance – 3.4 km return
Duration – 1.5 to 2 hours
Difficulty – easy to moderate
Start / Finish Points – just off the Kakadu Highway, west of Burrungkuy (Nourlangie)
Nanguluwurr Rock Art Site Walk is a fantastic trail for those interested in hiking through Kakadu’s ancient landscapes while diving deep into its cultural history.
The 3.4 km return trail leads you through sparse bushland to a rock shelter that features a stunning collection of Aboriginal rock art.
The Nanguluwurr Rock Art Site features hand stencils, animal figures, and even contact-era depictions, such as sailing ships, which provide a powerful glimpse into thousands of years of storytelling and tradition.
This is one of those trails that have become a favorite stop on cultural walks with Willis’s Walkabouts, which offer immersive adventure experiences across Northern Australia.
Start / Finish Points – Maguk car park (4WD access only)
If you’re craving a bit of adventure in Kakadu National Park, the Maguk (Barramundi Gorge) Walk should be on your list.
This short but rewarding hiking trail leads you through light-dappled woodlands and over gentle rock crossings before arriving at a spectacular plunge pool.
At the end of your adventure, you’ll be greeted by one of the most stunning waterfalls in the park, cascading into a crystal-clear plunge pool that’s perfect for a refreshing swim.
Maguk offers that quintessential Australian outback experience. It’s raw, rugged, and incredibly spectacular!
This is one of those Kakadu walking trips that appeal to nature lovers, photographers, and anyone looking to escape the crowds and enjoy the peaceful side of the national park. If you want to explore with a guide, join a 3-day camping tour from Darwin!
12. Mamukala Wetlands Walk
Distance – 3 km loop
Duration – 1.5 hours
Difficulty – easy
Start / Finish Points – Mamukala Wetlands car park, off the South Alligator Road
The Mamukala Wetlands Walk is one of the best ways to experience the amazing wildlife and birdlife of Kakadu National Park. Located just a short drive from Jabiru, this easy walk takes you through different areas of wetland and woodland, with incredible views and a peaceful atmosphere that’s perfect for nature lovers.
Expect to see thousands of birds and other interesting wildlife species during your walks, especially at the end of the dry season. You will usually find them gathering around the water’s edge.
There are interpretive signs along the trail that help you understand the area’s delicate ecosystems, making this an ideal stop for educational trips, self-guided walks, or guided tours.
Kakadu’s wetlands are stunning!
13. Bardedjilidji Walk
Distance – 3.4 km return
Duration – 1.5 to 2 hours
Difficulty – easy to moderate
Start / Finish Points – small car park located 500 m from the upstream boat ramp on the East Alligator River
If you’re seeking a real adventure in the heart of Australia, hike along the Bardedjilidji Walk.
This loop trail winds through sandstone formations, lush forested pockets, and paperbark groves near the East Alligator River, creating a landscape that feels otherworldly and deeply connected to the land.
Along the way, you’ll have the chance to explore caves and crevices, many of which were used by Aboriginal people for thousands of years. The area is rich in wildlife, so keep an eye out for birds, reptiles, and other creatures that thrive in this unique habitat.
Ideal for short trips or daytime hiking tours, the Bardedjilidji Walk is a true adventure for those wanting to connect with Kakadu’s rugged beauty and vibrant wildlife.
DISCLAIMER: Some of the links in this article are affiliate links, which means if you book accommodation, tours or buy a product, we will receive a small commission at no extra cost to you. These commissions help us keep creating more free travel content to help people plan their holidays and adventures. We only recommend the best accommodations, tours and products that ourselves or our fantastic editorial team have personally experienced, and regularly review these. Thanks for your support, kind friend!
Where is South Georgia Island? Here is our detailed guide to South Georgia, a lesser-known destination in the world that is absolutely breathtaking!
Picture a rugged mountainous coast, dramatic glaciers, and unique wildlife like king penguins, Antarctic sea birds, and elephant seals roaming around you.
Temperatures are chilly and the Southern Ocean smashes against the rocky coastline of the mountainous island. Aside from research stations and former whaling stations, there are no other humans living here year-round.
This is South Georgia, a stunning and wild destination that may find its way onto any adventurous traveller’s bucket list.
We’re going to break down some FAQs you may have about South Georgia, as it’s not a super popular tourist destination. But those who do visit South Georgia are sure to leave with a lasting impression, as the stunning scenery and abundant wildlife is unmatched!
South Georgia Island is located in the southern Atlantic Ocean, near the southern tip of South America and the northern tip of the Antarctic Peninsula.
More specifically, it lies about 1,400 kilometers (870 miles) east of the Falkland Islands and roughly 2,150 kilometers (1,340 miles) southeast of South America’s southern tip.
It’s a very remote location that is only accessible by sea. But as it’s conveniently nestled between Antarctica and southern Argentina, South Georgia is a popular stopover location on polar expedition cruises that travel to Antarctica.
The beautiful church in Grytviken, South Georgia.
What country does South Georgia Island belong to?
South Georgia is part of the British Overseas Territory of South Georgia and the South Sandwich Islands (SGSSI). So it technically belongs to the United Kingdom, who has ruled over South Georgia since 1908.
However, Argentina also claims sovereignty over South Georgia. This dispute was one of the causes of the 1982 Falklands War, during which Argentine forces briefly occupied South Georgia before being expelled by British troops.
Today, South Georgia remains under the control and protection of the British Government.
South Georgia is not part of Antarctica, but it lies within the Antarctic Convergence zone and is governed under parts of the Antarctic Treaty System for environmental protection.
South Georgia is approximately 1,400 kilometers (870 miles) away from the Falkland Islands.
The Falkland Islands archipelago consists of two main islands and hundreds of small islets. Featuring gorgeous scenery and lots of cool wildlife, visitors often stop over to the Falkland Islands on their way to South Georgia from South America.
An expedition ship generally take 3 or 4 days to travel across the Southern Ocean between the Falkland Islands and South Georgia, depending on the conditions at sea.
The Falkland Islands
Does anyone live on South Georgia Island?
No humans live permanently on South Georgia. The island has no native or permanent population, but it does host a small, rotating group of government officials, scientists, and support staff.
There are rarely more than 20 people living on the island at any given time. These temporary residents are based mainly at King Edward Point, near the former whaling station of Grytviken.
Those residing on the island generally spend their time monitoring wildlife, patrolling fisheries, and working on environmental research, protection, and conservation.
Tourists occasionally visit by expedition cruise ship, but there are no hotels, towns, or civilian infrastructure on the island. Strict environmental regulations are in place as well to protect the island’s fragile coast and wildlife.
Cruise ship passing South Georgia Island
Visiting South Georgia by Ship
Visiting South Georgia Island is a rare and unforgettable experience! This remote destination is typically included as part of an expedition cruise to the sub-Antarctic region.
There are no airports or regular transport links on South Georgia, so visitors arrive by ship often on their way to Antarctica or the Falkland Islands.
Landings are made via Zodiac boats at select landing sites such as Grytviken, Salisbury Plain, and St. Andrews Bay, where visitors can witness vast colonies of king penguins, elephant seals, and fur seals up close.
Important Note! Before you book any international trip, we honestly recommend getting travel insurance. You never know when things will go wrong, and medical bills can add up quickly if you get sick or injure yourself overseas.
Our personal recommendation based on our own experience is World Nomads.
What is the best time to visit South Georgia?
The best time to visit South Georgia is during the austral summer, from October to March. This is when weather conditions are relatively milder and wildlife is most active. You can often spot sea birds like wandering albatross and southern giant petrels roaming the skies year-round.
Here’s a breakdown by month:
October–November: Early season with dramatic snow-covered landscapes and Southern elephant seals battling for mates. King penguins are arriving and starting to nest.
December–January: Peak season for king penguins and their chicks, fur seal pups, and long daylight hours. This is the most popular time for visitors.
February–March: Excellent for seeing penguin species, whales (especially humpbacks and orcas), and fewer visitors. It’s also the tail end of the cruise ship season in South Georgia.
South Georgia is a fascinating place with rich biodiversity, untouched natural landscapes, and a unique history.
South Georgia is best known in popular culture as the final resting place of the polar explorer Ernest Shackleton, who died there in 1922 during his last expedition.
Today, his grave lies in Grytviken, which was once a prominent whaling station and now an occasional stop for tourists. It’s a fascinating place to appreciate the history of polar exploration on South Georgia.
With its large populations of seabirds, seals, and penguins, most notably king penguins, South Georgia allows you to admire some of the world’s most intriguing wildlife.
Taking a polar expedition cruise ship to the South Georgia coast is an unforgettable adventure!
DISCLAIMER: Some of the links in this article are affiliate links, which means if you book accommodation, tours or buy a product, we will receive a small commission at no extra cost to you. These commissions help us keep creating more free travel content to help people plan their holidays and adventures. We only recommend the best accommodations, tours and products that ourselves or our fantastic editorial team have personally experienced, and regularly review these. Thanks for your support, kind friend!
If setting foot on the White Continent is on your bucket list, this Antarctica itinerary will show you what to expect on your trip.
Visiting Antarctica is a real bucket list experience. You have to visit with a registered tour operator, though there is rarely a fixed Antarctica cruise itinerary.
Operators post general schedules and activities, yes. But it’s the Antarctic Continent, and everything is at the mercy of the weather.
That means most Antarctic itineraries are subject to last-minute changes depending on the conditions of the wind, sea, and ice.
This article provides you with a possible Antarctica itinerary. It’s a glimpse into what could take place on your expedition cruise to the least-visited place on the planet.
We’ve also created various Antarctic itineraries to fit your schedule, budget, and sense of adventure.
A typical Antarctic expedition is 10 days, but it can vary from eight to 30 days or longer.
Ten days is short and sweet. You’ll see the highlights of the Antarctic Peninsula before crossing the Drake Passage back to Ushuaia, where your trip started.
An extended Antarctic expedition, 24 days or more, are perfect for hardcore Antarctic explorers with a flexible schedule. It often includes South Georgia and the Falkland Islands in addition to the Antarctic Peninsula.
For us, 14 days offer an immersive experience without being too costly or too long at sea. You get plenty of shore landings, zodiac cruising, and wildlife sightings. Maybe even cross the Antarctic Circle!
Important Note! Before you book any international trip, we honestly recommend getting travel insurance. You never know when things will go wrong, and medical bills can add up quickly if you get sick or injure yourself overseas.
Our personal recommendation based on our own experience is World Nomads.
10-Day Antarctica Itinerary
This 10-day Antarctica itinerary gives you an idea of what a typical journey to the Antarctic Peninsula might look like. The trip starts in the southernmost city in the world, Ushuaia, Argentina.
This Antarctic expedition features wildlife spotting, stunning landscapes, and unforgettable landings.
Again, due to unpredictable weather and sea ice conditions, every Antarctica cruise itinerary is flexible and different.
Almost all Antarctic explorers depart for Antarctica from Ushuaia. There are no direct international flights to the city. You’d have to travel to Buenos Aires and then fly to Ushuaia.
Some expeditions include transfers or charter flights from Buenos Aires to Ushuaia.
If you’re traveling to Ushuaia independently, we suggest you arrive a day earlier. As most ships depart for Antarctica in the afternoon, you can spend the morning exploring the city’s waterfront and museums.
After lunch, board your expedition ship at Ushuaia’s port. Start your Antarctic adventure sailing through the Beagle Channel.
Days 2 and 3 – Drake Passage
Crossing the infamous Drake Passage is a rite of passage for adventure lovers visiting Antarctica.
This waterway is notorious for its turbulent waters and waves that can reach up to 13 meters. But during the Antarctic summer (November to March), it can be pleasantly calm. It’s also where the Atlantic and Pacific Oceans meet.
Sailing the Drake Passage is probably the only fixed activity in your Antarctica cruise itinerary. Onboard, you can join lectures, safety briefings, and gear fittings (if included in the tour package).
Keep your eyes peeled for albatrosses and early whale sightings as you approach the Antarctic Peninsula.
The South Shetland Islands are your first glimpse of the White Continent. Some of the most popular landing sites here are Half Moon Island and the Aitcho Islands.
Half Moon Island is particularly known for its large colony of chinstrap penguins. It’s also home to other bird species, including kelp gulls and south polar skuas.
It’s small, but it boasts a 2,000-metre trail where you can stroll and get a better look at the wildlife. You may also spot some Antarctic fur seals and elephant seals hauling out on the beach.
The Aitcho Islands are another haven for birdlife. Plus, you may also see seals on the beach.
Note: Every time you land, the expedition team will give you and your fellow travelers a brief orientation about the place, so you’ll know which areas to visit and how to stay safe.
A beautiful Chinstrap Penguin
Day 5 – Deception Island
Antarctica has a slew of stunning places to see, and Deception Island is one of our top picks. The good thing is that it’s a staple in almost every Antarctica itinerary.
For the fifth day of your Antarctica cruise, you’ll sail to Deception Island.
Despite its name, Deception isn’t an island, but a horseshoe-shaped caldera. Yes, underneath is an active volcano!
Within Deception is a sheltered harbour called Port Foster, a popular spot for kayaking if the weather allows.
To enter the flooded caldera, you pass through Neptune’s Bellows, a narrow passage flanked by giant cliffs.
There are plenty of cool things to do in Deception. You’ll visit Whaler’s Bay, an abandoned whaling station with ruined buildings and graves. The vibe is eerie, but the view is enchanting.
Your expedition cruise may organize hikes inland to Mount Pond or Baily Head, the best spot on the island for penguin watching.
Another attraction is Pendulum Cove, its shore dotted with hot springs with temps that go up to 70°C. The warm waters are a lovely contrast to the frozen landscape.
A standard in Antarctica cruise itineraries is the polar plunge. Deception is one of the top places to do this daredevil stunt.
Some expedition cruise operators allow participants to walk on the beach, while others just let them jump off the boat. No matter, the polar plunge is a one-of-a-kind experience worth bragging about. Plus, you get a certificate as proof.
Finally, you’re in the Antarctic Peninsula! The first stop is Neko Harbour, an inlet along the Andvord Bay.
Neko is excellent for wildlife-spotting. You’ll witness sea birds high above and humpback whales feeding in the icy waters. Keep an eye out for penguins perched on massive ice glaciers and seals sleeping on ice floes.
There are guided hikes up a hill overlooking the harbour. Before you reach the peak, you’ll pass penguin highways on the hillside.
Neko Harbour, with its unique marine life, is a scuba diving hot spot for seasoned cold-water divers. That said, scuba diving is not a regular option in most expedition cruise itineraries.
In the afternoon, you’ll cruise to Paradise Bay, a natural harbour about 22 km from Neko. In summer, the bay’s waters are so still, you can see the surrounding icy cliffs reflected on its mirror-like surface.
Paradise Bay is a magnet for wildlife. It has seals, birds, humpback whales, and more Gentoo penguins.
Thanks to its calm waters, the bay is a favorite spot for kayak tours and zodiac cruises. If you’re a photographer (amateur or pro doesn’t matter), you’ll have a blast snapping away image after image of one of the most picturesque places in Antarctica.
Some tour operators offer overnight camping in Paradise Bay when the weather conditions are right.
Gentoo colony at Neko Harbour.
Day 7 – Cuverville Island and Danco Island
Continue your Antarctic adventure on Cuverville Island. Rugged and rocky, the island is backed by endless white mountains permanently capped with snow.
It’s best known for its colony of Gentoo penguins, the largest one on the Antarctic Peninsula. Naturally, wildlife-spotting is the most popular activity here.
Nearby, in the Errera Channel, is Danco Island. Its frozen terrain is broken occasionally by craggy outcrops.
Just 2 km long, the island hosts a growing colony of Gentoo penguins. Apart from penguins, you’ll also find seals and minke whales.
You can climb to the top of the island, about a kilometer walk, to get a better look at the landscape and the penguin rookery.
Stunning scenery at Danco Island
Day 8 – Port Lockroy, Lemaire Channel and Petermann Island
First stop is Port Lockroy, one of the most historic sites in Antarctica. It opened as a British base in 1944 and served as a research station until 1962.
Now, it’s a museum with a gift shop and a post office (the southernmost postal service in the world!)
You can send postcards to over 100 countries from Port Lockroy, but delivery could take months. Understandable, considering there are around 70,000 mails sent during the cruise season and only four British ladies running the entire operation.
After mailing out postcards, you’ll continue cruising south. In about two hours you’ll reach the surreal Lemaire Channel.
Fringed on both sides by steep glacial cliffs, the channel spans 11 km long and 1600 metres wide. It’s hands down the most photogenic passageway in Antarctica. No wonder it’s nicknamed Kodak Gap.
As you enter the channel from the northern end, you’ll see the Una Peaks, twin ice-capped basalt towers.
When the waters are clear and calm, your expedition cruise might allow kayak or zodiac rides.
Be on alert for humpbacks, minkes, and orcas. There are also Weddell, crabeater, and fur seals. You might even see a Gentoo penguin colony on the icy bluffs.
From the channel you’ll exit into Petermann Island. It’s the southernmost point of the Antarctic Peninsula and typically the last stop for many expeditions.
Petermann is rocky and riddled with crevassed icecaps, so be extra cautious when walking.
A guided hike will take you to Megalestris Hill, the island’s highest point. At the summit is a cairn and cross honoring three British Antarctic Survey members who perished in their attempt to cross to the Vernadsky station.
Cruising through the Lemaire Channel
Day 9 and 10 – Drake Passage
You’ll be leaving the Antarctic Peninsula to begin the return journey. If you had the Drake Lake (calm waters) on your first crossing, keep your fingers crossed for the same sea conditions.
But perhaps a little Drake Shake (crazy waters) isn’t too bad after all the wonders you saw on your Antarctica cruise?
Return trips are always great for unwinding (some ships have a spa), sorting photos, and reflecting on the unforgettable adventure. There’ll also be last-minute lectures and a celebratory farewell dinner.
You’ll disembark in Ushuaia, where you can catch a domestic flight back to Buenos Aires.
14-Day Antarctica Itinerary with Antarctic Circle Expedition
If you have a few extra days, you can venture farther south of the Antarctic Peninsula to the Antarctic Circle. The aim is to cross this legendary line, a feat only about 100,000 people have achieved.
In this 14-day Antarctica itinerary, you’ll spend seven days sailing the Antarctic Peninsula. Most places, we’ve already mentioned in the 10-day itinerary, so we’ll breeze through them. But we’ve added new places to fill the extra couple of days.
Note: The exact route of your Antarctica cruise is dependent on the weather and sea ice.
Day 1 – Arrival in Buenos Aires, Argentina, South America
Your trip begins in Buenos Aires, where you’ll meet with your Antarctic expedition operator and fellow travelers.
You can spend the evening exploring the city (Tango Show at the Piazzolla, anyone?) or sleep early to store energy for the upcoming Antarctic adventure.
Most expedition cruise companies host a welcome dinner at your designated hotel.
Day 2: Flight to Ushuaia and Embark for Antarctica
It’s wise to pick an Antarctic expedition company that includes a charter flight to Ushuaia for a smooth journey. Most flights are in the morning, usually after an early breakfast at your hotel.
You’ll arrive in Ushuaia in the afternoon. Your tour operator will transfer you from the airport to a ‘waiting lounge’ downtown. Explore the charming port city, but don’t wander too far away.
Late afternoon, your ship will leave for Antarctica, sailing along Beagle Channel, where you’ll pass Tierra del Fuego, the southernmost tip of South America.
Days 3 and 4 – Drake Passage
Hope for calm waters as you cross the passage. Calm waters or not, the crossing is utterly safe.
Don’t miss the lectures, workshops, and safety orientations. On your second day at sea, you typically do gear prep for land excursions.
You’ll see petrels and albatrosses on your trip, maybe whales, too. Feel free to go up the deck for a bit of wildlife spotting. You can also enjoy the ship’s amenities, like the bar or gym.
Crossing the Drake Passage to Antarctica
Days 5 and 6: South Shetland Islands
The South Shetlands are composed of several isles and 11 main islands.
You might stop at King George Island, the gateway to Antarctica. It’s the largest among the South Shetlands. It’s also the most populated, with its nine permanent research stations.
You’ll likely have epic wildlife encounters on the island, as its home to several penguins, mostly Gentoos, but also Adélie and chinstrap.
You can join a guided tour to some of the research stations. There’s also a Russian Orthodox Church, a rare sight in Antarctica.
After, you might sail to the icy and mountainous Livingston Island. Numerous seals and penguins live on there. You’ll see most of them at Hannah Point, a peninsula on the southern coast.
Your Antarctica cruise might offer a guided walk from Hannah Point to the adjacent Walker Bay and Liverpool Beach, a favorite haunt of elephant seals.
At the height of the breeding season, usually in December, Hannah Point and the nearby areas may be closed to visitors to protect the nests and newly hatched penguin chicks.
Half Moon Island is only 1.3 km from Livingston, so you can easily visit it. Deception Island, 18 km away, is often paired with Livingston in many Antarctica cruise expeditions.
Days 7 to 9 – Antarctic Peninsula
The Antarctic Peninsula is one of the top places for a scenic helicopter flight. A few Antarctica cruise operators offer this option.
If the conditions are right, you may fly over the Antarctic Sound, at the northeastern end of the Antarctic Peninsula. It’s dubbed the Iceberg Alley because of the tabular icebergs and pack ice congesting its waters.
Some Antarctica cruise expeditions sail to the northeast side of the Antarctic Peninsula. One of the top stops here is Paulet Island.
Just 1.5 km wide, this circular island is a striking sight with a 335-meter volcanic cone rising at its center.
You may land on the island, weather permitting. But visitor numbers are often limited, especially during breeding season.
Your Antarctica cruise will also visit the usual stops: Neko Harbor, Paradise Bay, Cuverville Island, Danco Island, and Port Lockroy.
On the ninth day, you’ll cross Lemaire Channel into Petermann Island. The Antarctic Circle isn’t too far away.
You’ll start your day crossing the Antarctic Circle at 66°33′ South. It’s a moment worth celebrating, considering only 0.001% of the world population will ever get to experience it.
Everyone gathers at the bow of the ship as it approaches the invisible circle. The moment you cross, the captain toots the horn, passengers cheer and raise their cups of coffee or glasses of champagne in a toast.
There are rituals, too, usually presided over by someone dressed up as Neptune, the Roman god of the sea. You may end up kissing a frozen fish, stamped on the forehead with an anchor, or splashed on the head with saltwater.
Congrats! You’re officially an Antarctic Circle Crosser.
The scenery south of the Antarctic Circle doesn’t change much, but it’s colder, icier, and more pristine, if that’s even possible.
You might spend the rest of the day sailing around Marguerite Bay. If the weather allows, you can land on Horseshoe Island.
On the island, you can walk to Station Y, a British research base that dates back to 1955. Keep your eyes peeled for Emperor penguins. They’re a rare sight on the island, but they’ve been sighted since 2023.
Some expedition companies hold their polar plunge on the Antarctic Circle. Others offer scenic helicopter flights over the ice-laden sea and its floating icebergs.
Note: Antarctic Circle crossings are not a guarantee because the sea ice can block the waters, and the winds can get ominously strong. In such cases, the ship may turn back.
Alesha enjoying the views, somewhere north of the Arctic Circle.
Day 11 – Antarctic Peninsula
Today, you’ll head back north and sail along the Antarctic Peninsula. If there are stops you missed, your expedition cruise may organize some final landings.
You may cruise on a zodiac on Wilhelmina Bay and Gerlache Strait for close encounters with whales.
Weather permitting, you may land on Orne Harbour and trek up the steep ridge where a colony of chinstrap penguins lives.
Days 12 and 13 – Drake Passage
The journey back to Ushuaia begins. Take time to relax and reflect on your Antarctic expedition. There’ll also be lectures and orientations onboard.
Days 14 – Ushuaia and Buenos Aires
In the morning, you’ll be in Ushuaia. After enjoying breakfast on the ship, you’ll head to the airport for your flight back to Buenos Aires.
23-Day Antarctica Itinerary: Falkland Islands, South Georgia, and the Antarctic Circle
If you’re seeking a more in-depth Antarctica expedition cruise, this 24-day itinerary might be the best one for you.
Not only will you get to explore the Antarctic Peninsula, you’ll also visit the Falkland Islands and South Georgia Island.
Then, you’ll have the opportunity to cross the Antarctic Circle!
Note: We’ve talked about most of the stops in the other itineraries, so we’ll focus on the additions, specifically the Falkland Islands and South Georgia.
Day 1 – Buenos Aires, Argentina
Arrive in the Argentinian capital, then head to your designated hotel. You can explore the city in the evening or relax for the next day’s activities.
Day 2 – Ushuaia
Your expedition operator will transfer your group to the airport for your charter flight to Ushuaia. Because your ship embarks for Antarctica late in the afternoon, you’ll have some time to check out the port city.
The main street of Ushuaia.
Day 3 – South Atlantic Ocean
Your ship will sail east into the remote waters of the South Atlantic Ocean. Onboard, there’ll be workshops, lectures, and orientations facilitated by the expedition team.
Days 4 to 5 – Falkland Islands (Islas Malvinas)
The Falkland Islands are an archipelago composed of 700 islands, including the two main ones, East Falkland and West Falkland.
You’ll make your landing at the capital, Stanley. It’s a quaint port town with a collection of churches, museums, and pubs.
But the real stars on the Falkland Islands are the penguins, five species of them. Your expedition team will organize tours so you can see these birds. Popular stops include Gypsy Cove, Yorke Bay, and Seal Bay.
The Falkland Islands have beautiful beaches, too. You’ll see many of them as your ship cruises along the coast. And you might even get a chance to land on some.
As you leave the Falkland Islands, you’ll sail southeast toward South Georgia. You’ll pass the Antarctic Convergence, an invisible boundary where the Antarctic, Atlantic, Indian, and Pacific Oceans meet. The area abounds with krill, which draws various marine life, including whales.
Days 8 to 11 – South Georgia
Dubbed the Galapagos of the Poles, South Georgia is stunning, secluded, and bursting at the seams with wildlife. It’s a breeding ground for fur seals, elephant seals, and nearly half a million king penguins.
Seabirds, such as albatrosses, terns, and petrels, nest on the island. It also has two endemic birds, the South Georgia pipit and the South Georgia pintail.
While South Georgia’s wildlife will captivate you, its history will touch you. Between the 18th and 20th centuries, South Georgia was a base for whale and seal hunting. Around the island are abandoned whaling stations and outposts, poignant reminders of the past.
You’ll spend three days exploring South Georgia by land and sea. Like in Antarctica, many spots in South Georgia are only reachable by zodiac. Landings are dependent on the weather. There’s also a strict limitation on the number of visitors.
Grytviken, the largest settlement on the island, is a popular stop. It’s the resting place of Sir Ernest Shackleton, a key figure in Antarctic exploration. You can check out the old whaling station, the well-preserved Norwegian church, and the South Georgia Museum.
If you’re looking for king penguins, you’ll find hundreds of them at Saint Andrew’s Bay or the Salisbury Plains. Apart from the king penguins, you’ll also see elephant seals lounging on the shore.
On the southeastern tip of South Georgia is Drygalski Fjord, a frozen bay flanked by glacial peaks and calving glaciers. The place looks (and feels) otherworldly in a nice way. It’s one of the best places in South Georgia for a cruise.
There are countless things to see in South Georgia. A three-day stop on a cruise may not be enough to enjoy them all. But you can always visit South Georgia another time on a separate expedition from the Falkland Islands.
South Georgia Island has incredible wildlife!
Days 12 and 13 – Southern Ocean
You’ll leave South Georgia and sail southwest to the Antarctic Peninsula. This route lets you skirt the Drake Passage.
South Georgia lies east of the passage in the South Atlantic Ocean. That means when you sail from South Georgia to the Antarctic Peninsula, you move southwest across the Scotia Sea.
Days 14 to 16 – South Shetlands and Antarctic Peninsula
Antarctica, finally! You’ll be exploring iconic spots on the South Shetlands, then head to the Antarctic Peninsula. There’ll be penguins, seals, whales, seabirds, and some of the most breathtaking scenery ever.
If the conditions permit, your expedition cruise will organize landings so that you can see wildlife (hopefully) up close.
Other activities include kayaks, hikes, and zodiac cruises. If you’re up to it, go for the polar plunge.
Days 17 and 18 – Antarctic Circle
Crossing the Antarctic Circle is a big exploit, even for the most adventurous travelers. It’s not as simple as traversing an invisible line. It’s also finding the right timing, because the weather can easily wreck your plan.
Down south, everything is more raw and more pack ice. You’ll sail around Marguerite Bay, maybe land on Horseshoe Island.
Days 19 to 20 – Antarctic Peninsula
Your ship heads northward back to the Peninsula. You may be landing or zodiac cruising along locations not yet visited.
Keep an eye out for whales around the Antarctic Peninsula!
Days 21 to 22 – Drake Passage
If it’s your first time crossing this notorious body of water, remember it’s part of the adventure.
As always, there’ll be lectures, presentations, and discussions on board. This trip could give you your final whale sightings, so keep scanning the waves.
Day 23 – Ushuaia and Buenos Aires
You’ll disembark after breakfast, but this may not be the end of your trip. You can stay a bit in Ushuaia or visit the nearby attractions before flying back to Buenos Aires. Some operators offer tours to Tierra del Fuego or even to the Chilean Fjords in Patagonia.
Note: There are also Antarctic expeditions that depart from Hobart, Australia, usually via the Ross Sea. However, these trips have limited availability and are typically longer and more expensive. The appeal is that they often venture into less-visited destinations, such as East Antarctica.
DISCLAIMER: Some of the links in this article are affiliate links, which means if you book accommodation, tours or buy a product, we will receive a small commission at no extra cost to you. These commissions help us keep creating more free travel content to help people plan their holidays and adventures. We only recommend the best accommodations, tours and products that ourselves or our fantastic editorial team have personally experienced, and regularly review these. Thanks for your support, kind friend!