Being the second largest country in the world, Canada has a wide variety of attractions that draw tourists. It has natural wonders, rich cultural diversity, and vibrant cities. Its most notable natural wonder, the Niagara Falls, is just one of the several waterfalls you can see in the country. Countless national parks, some of which are recognized as a UNESCO World Heritage Site or UNESCO Biosphere Reserve, also await nature lovers. And in between its towering rockies and extensive coastlines, you can admire its pristine lakes, prairies, and wildlife.
Aside from its stunning geography, Canada has a rich culture and history too. You can get glimpses of that within its cities like Vancouver, Toronto, and Montreal. To top it all off, Canada is also among the places where you can see the elusive Northern Lights. Every corner of Canada really offers something for different types of travelers to enjoy. It’s no wonder why millions of tourists around the world goes to the Maple Leaf Country to explore.
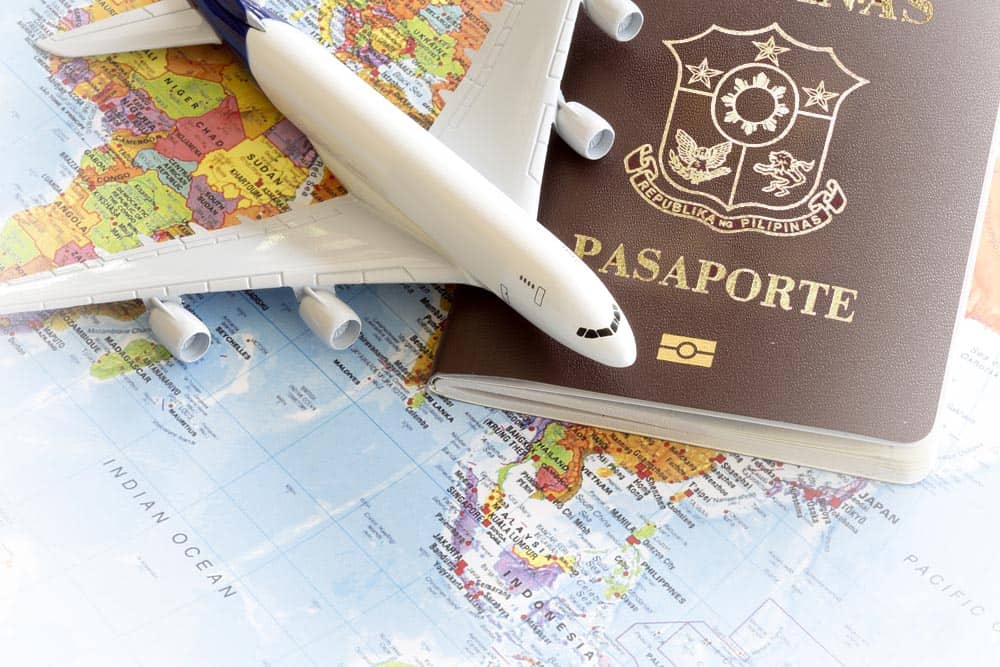
But how do you get to Canada? This would depend on which country you’re from. Some countries enjoy visa-free travel, while others need to secure a visa. For some visa-required countries, their citizens may be eligible to apply for an electronic travel authorization or eTA instead of a visa. In this guide, we’ll explain who is eligible to apply for a Canada eTA and discuss the step-by-step application process on how you can get one.
An eTA or electronic travel authorization is a requirement for visa-exempt foreign nationals who are entering Canada by air. Travelers from select visa-required countries including the Philippines can also apply for an eTA provided that they meet the ALL of these requirements:
You’ve held a Canadian visitor visa (temporary resident visa) in the past 10 years OR you have a valid US non-immigrant visa on the day of your eTA application.
You’re going to Canada for a temporary stay (usually for 6 months or less).
You’re flying to or transiting through an airport in Canada using a valid passport from an eligible visa-required country.
Eligible Visa-Required Countries
As of 2025, here is a list of select visa-required countries that are eligible to apply for an eTA:
Antigua and Barbuda
Argentina
Brazil
Costa Rica
Mexico
Morocco
Panama
Philippines
St. Kitts and Nevis
St. Lucia
St. Vincent and the Grenadines
Seychelles
Thailand
Trinidad and Tobago
Uruguay
eTA-Eligible Visa-Exempt Countries
As of 2025, here is a list of visa-exempt countries that require an eTA if flying to Canada:
Andorra
Australia
Austria
Bahamas
Barbados
Belgium
British Citizen
British National (Overseas)
British Overseas Citizen (re-admissible to the United Kingdom)
British Overseas Territory Citizen with citizenship through birth, descent, naturalization or registration in one of the British overseas territories of: -Anguilla -Bermuda -British Virgin Islands -Cayman Islands -Falkland Islands (Malvinas) -Gibraltar -Montserrat -Pitcairn Island -Saint Helena -Turks and Caicos Islands
British Subject with a right of abode in the United Kingdom
Brunei Darussalam
Bulgaria
Chile
Croatia
Cyprus
Czech Republic
Denmark
Estonia
Finland
France
Germany
Greece
Hong Kong Special Administrative Region of the People’s Republic of China (must have a passport issued by Hong Kong SAR)
Hungary
Iceland
Ireland
Israel (must have a national Israeli passport)
Italy
Japan
Republic of Korea
Latvia
Liechtenstein
Lithuania
Luxembourg
Malta
Monaco
Netherlands
New Zealand
Norway
Papua New Guinea
Poland
Portugal
Romania (electronic passport holders only)
Samoa
San Marino
Singapore
Slovakia
Slovenia
Solomon Islands
Spain
Sweden
Switzerland
Taiwan (must have an ordinary passport issued by the Ministry of Foreign Affairs in Taiwan that includes the personal identification number)
United Arab Emirates
Vatican City State (must have a passport or travel document issued by the Vatican)
How to Apply for a Canada eTA
1. Prepare the necessary information.
Before you start filling out the application form, make sure you have the following with you:
Valid Passport
Valid Email Address
Debit or Credit Card
You will need these to fill out the form and pay for the eTA fee.
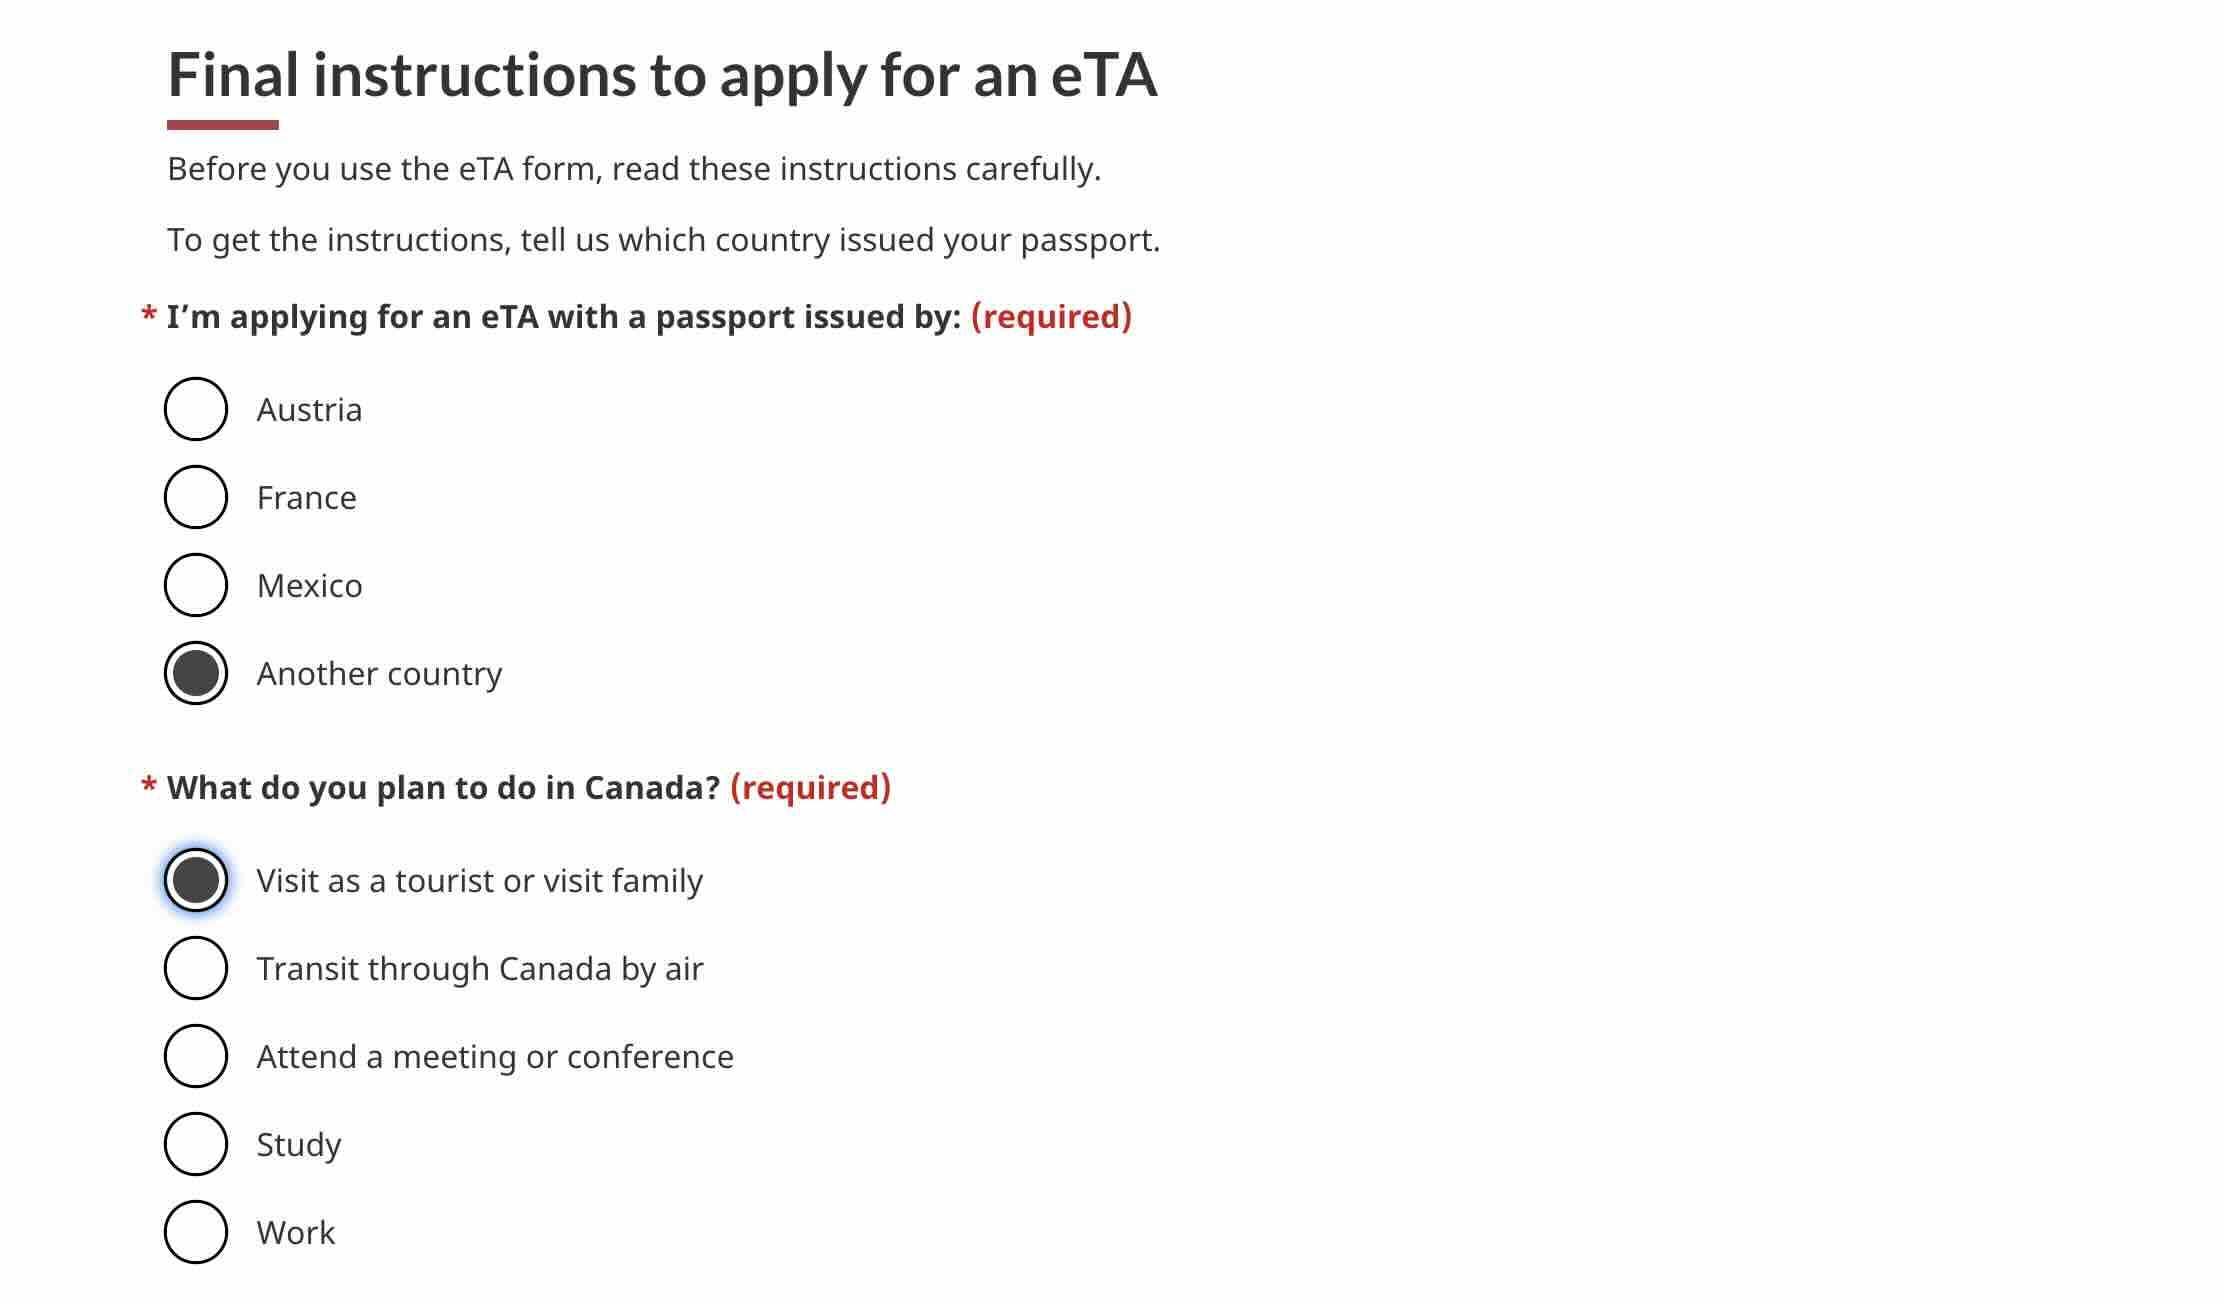
2. Find out if you’re eligible for a Canada eTA.
Go to the Canada eTA website. You will be led to a page where you have to answer which country issued your passport and the purpose of your travel to Canada. After that, you will be directed to the actual eTA form.
Then, you will answer a few questions to determine whether you’re eligible to apply for an eTA. If you’re not eligible, you will see a note that will tell you that you cannot apply for an eTA and you may need a visa or other type of document to travel to Canada. If you are eligible, you will see the next part of the application form.
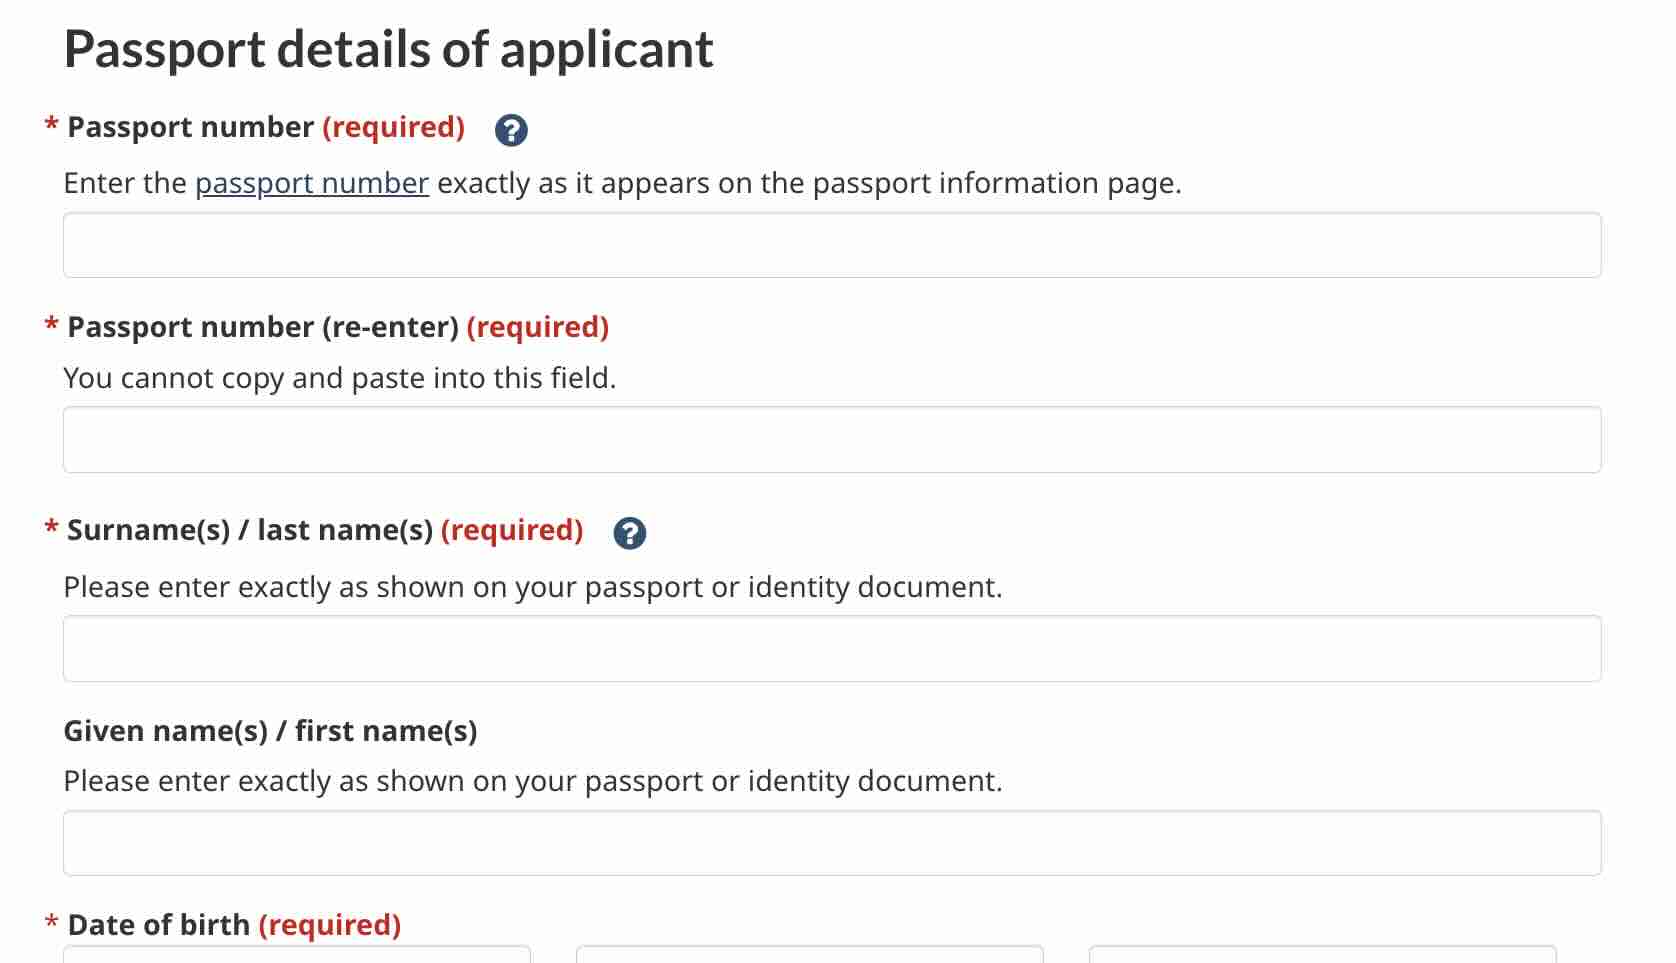
3. Enter your passport details.
You will be asked to enter your passport number, surname, given name, and date of birth among other passport details. Make sure to enter the correct details as indicated on your valid passport.
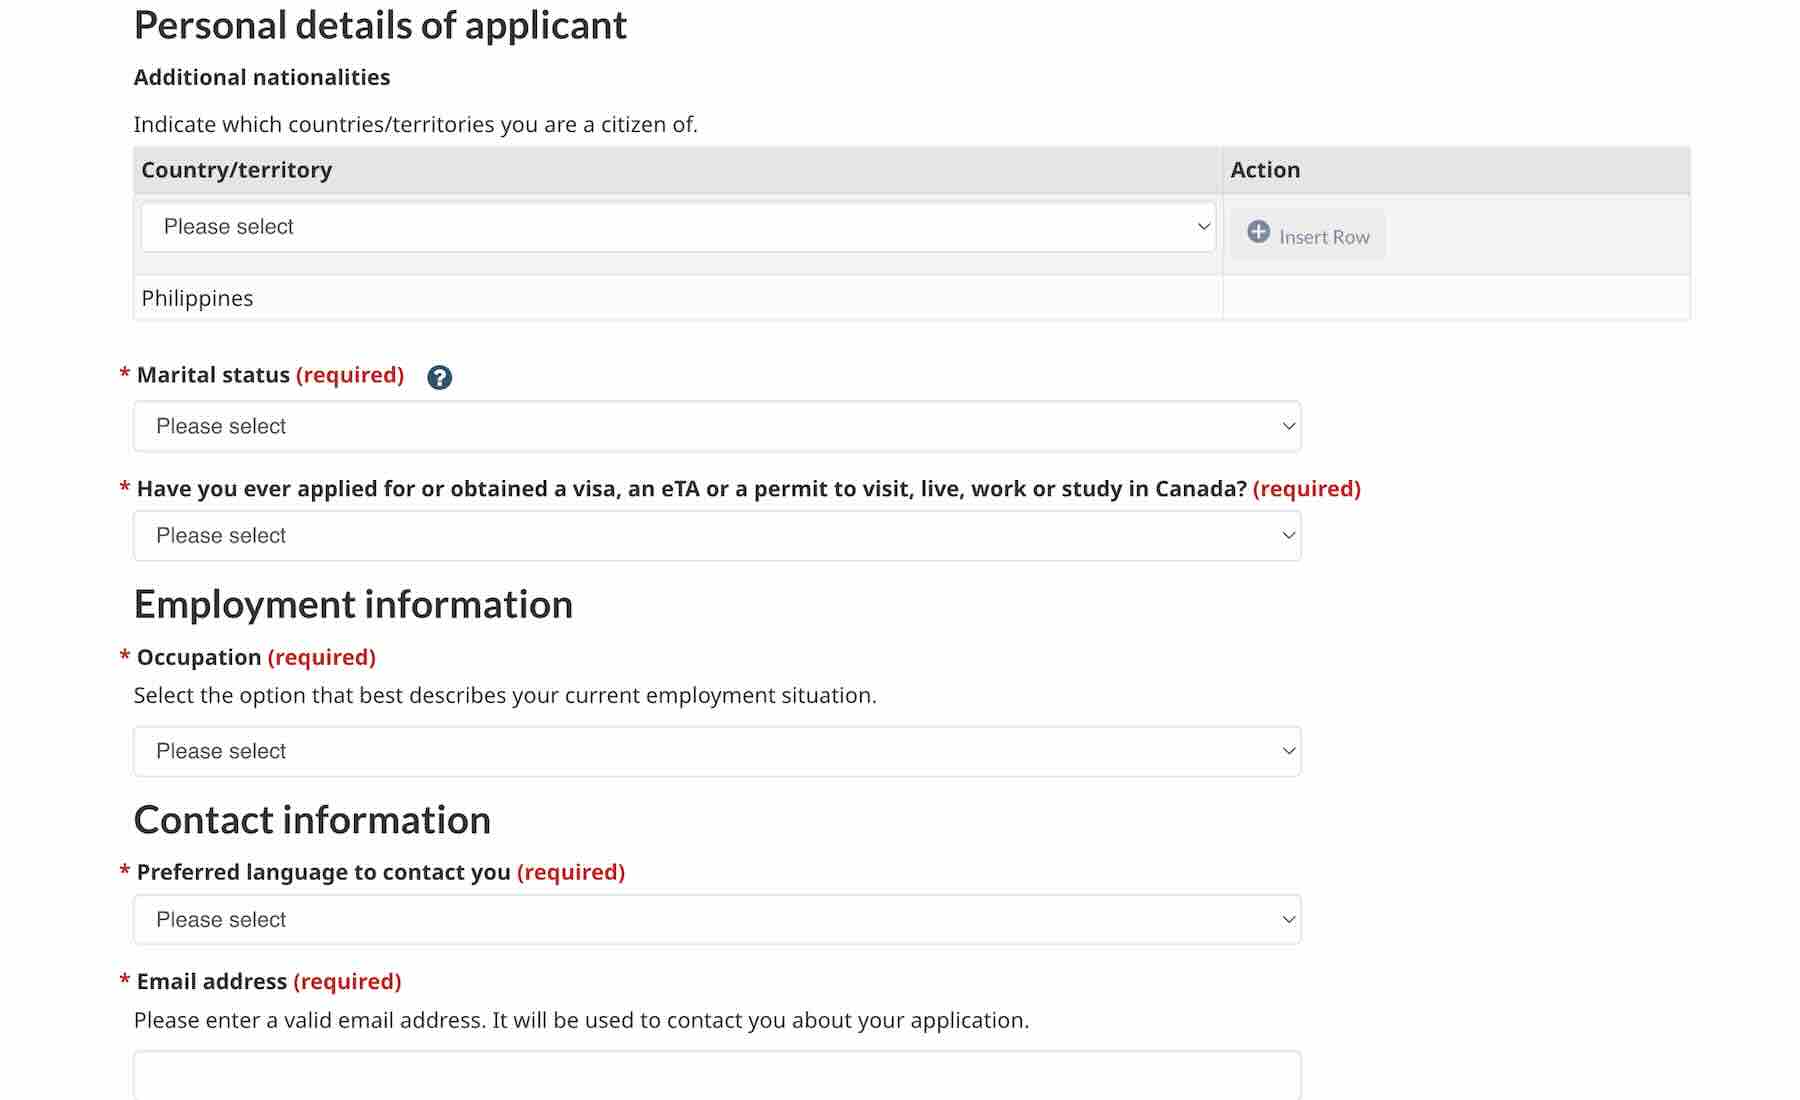
4. Enter your personal details.
In this part of the form, you need to answer whether you’ve previously applied for or held a visa, an eTA, or permit to enter Canada. If you have, you may enter your Unique Client Identifier (UCI) or visa/eTA or permit number.
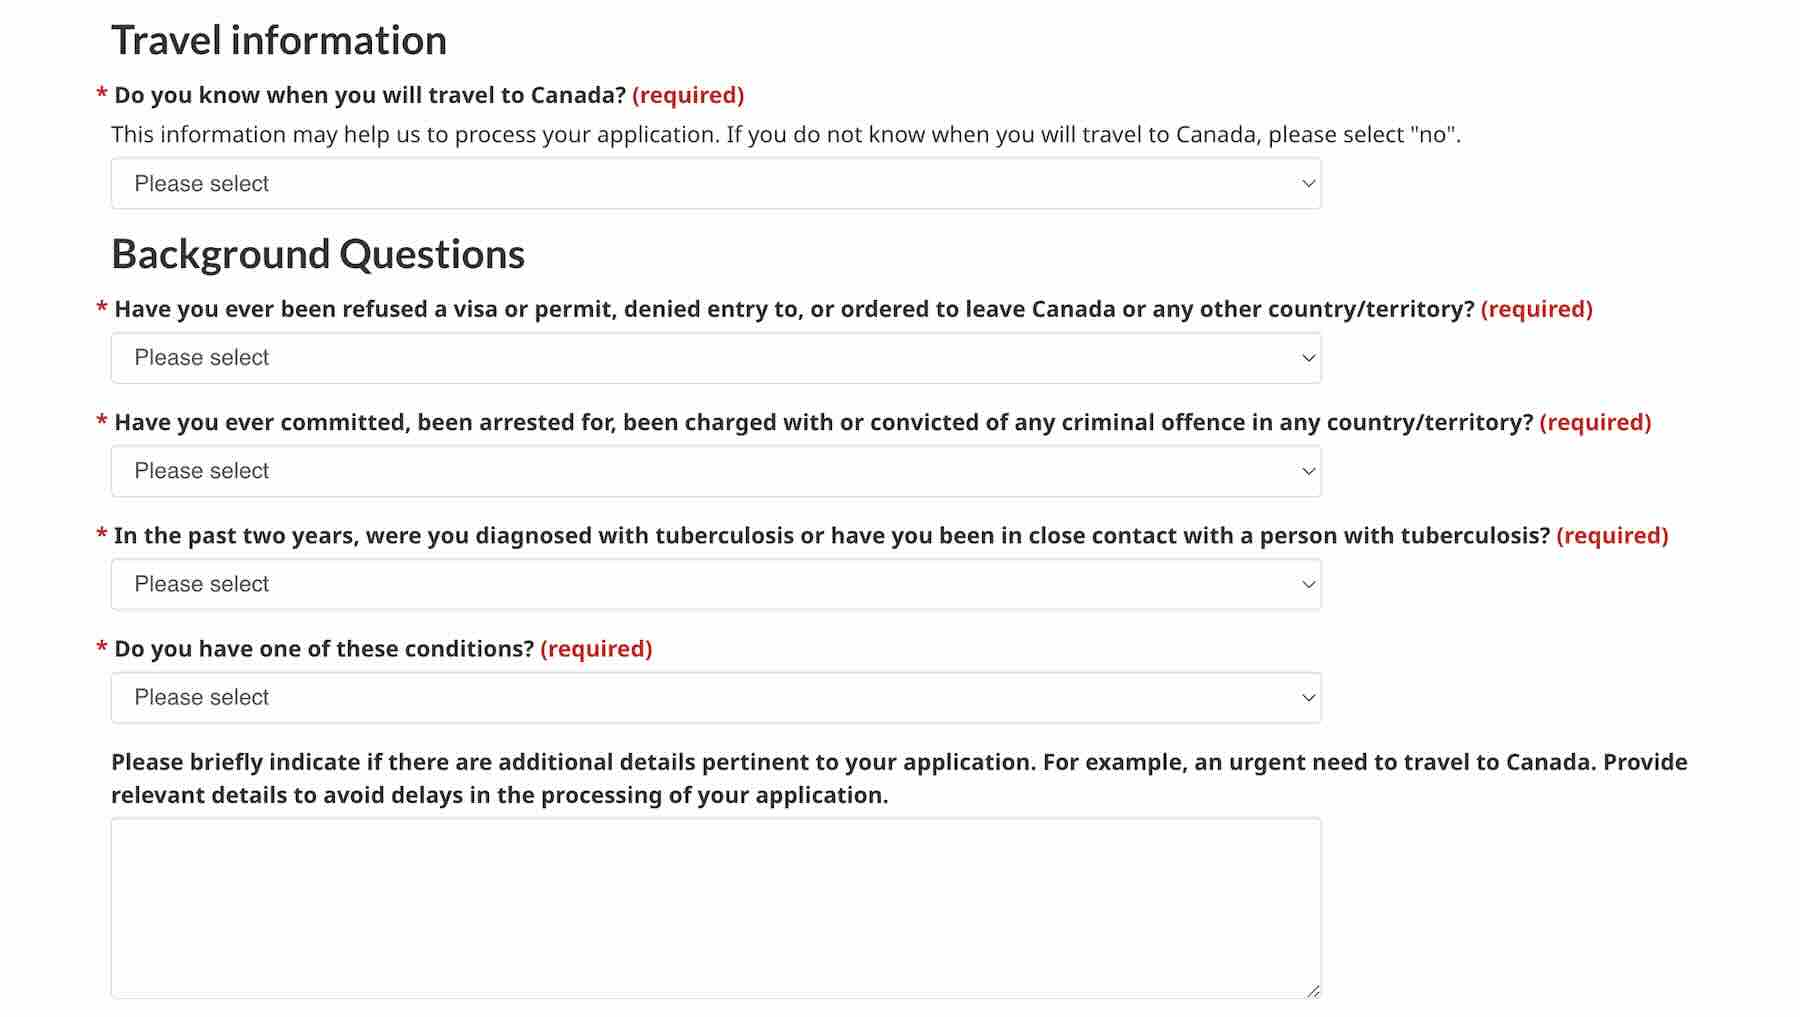
Next, you need to enter your employment information, contact information and residential address. If you already know when you’re traveling to Canada, you will be required to enter your travel information too. If not, just select no and proceed to answering the background questions.
Once you’ve completed all the information, double check if they are correct. Then, read the privacy notice and click ‘I Agree’ and enter your complete name as indicated on your passport to sign.
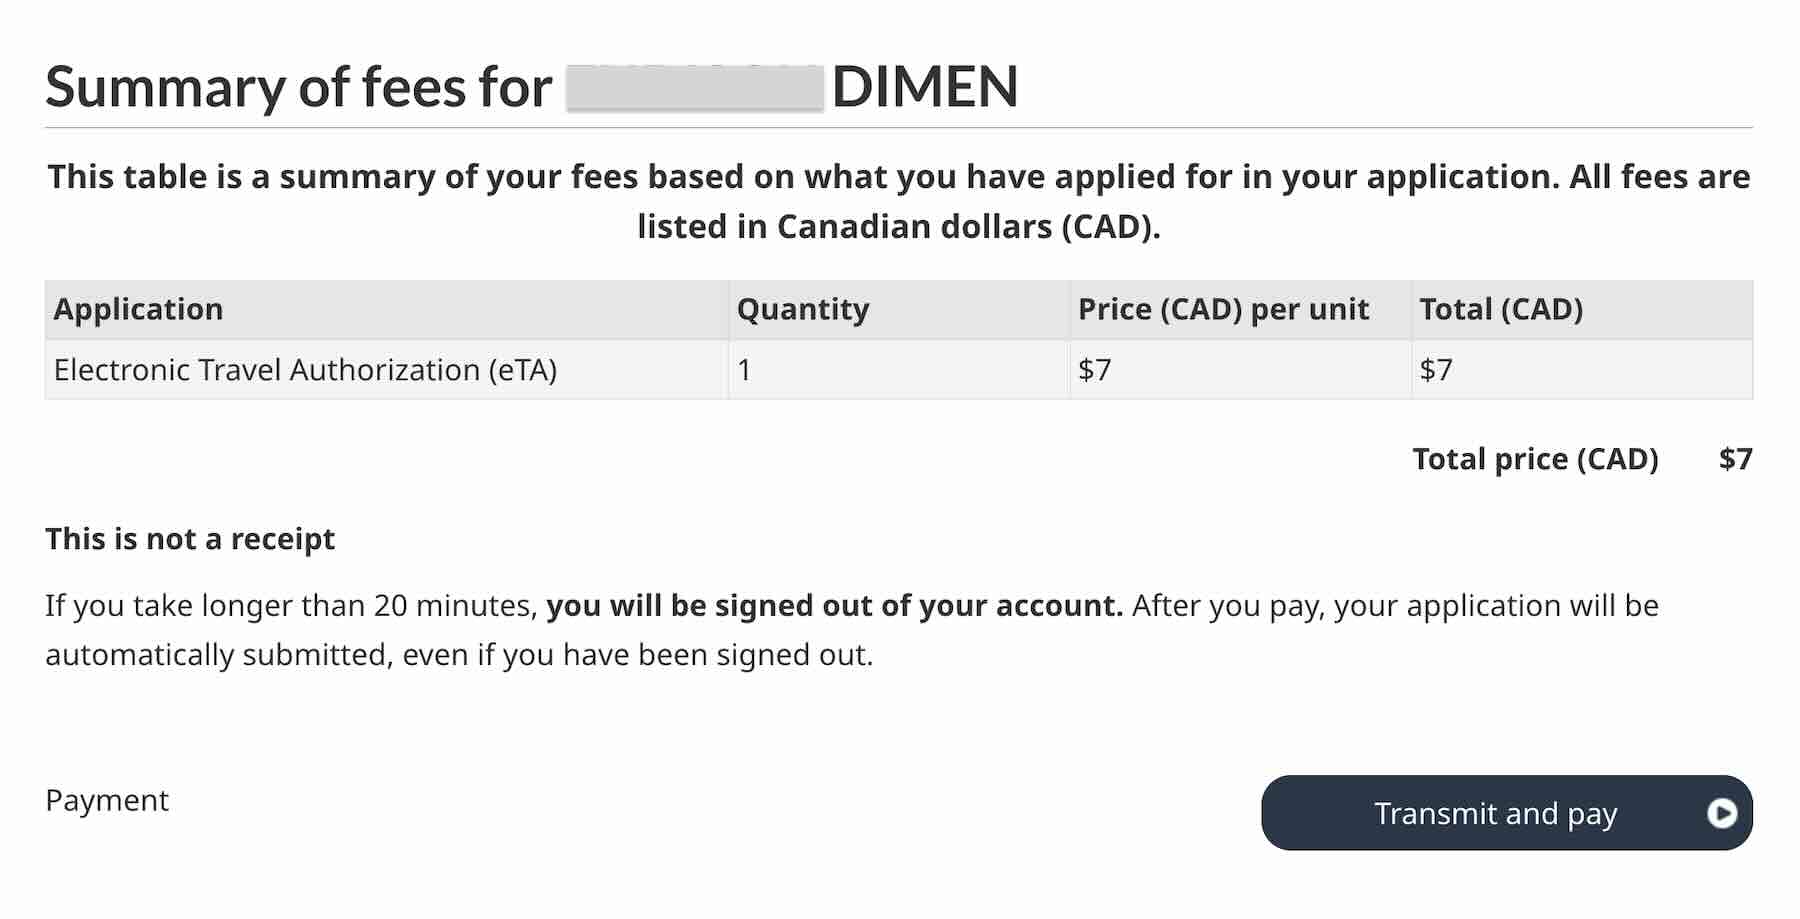
5. Pay the eTA fee.
After filling out the application form, click Proceed to Payment. You’ll be directed to a summary of fees, which is a total of CAD 7 for the eTA. Then, click Transmit and Pay.
Enter your debit or credit card information and click checkout. You might need to enter an OTP to verify your transaction.
Once you’ve successfully paid, your application will be automatically submitted.
6. Wait for an email about your eTA.
After submitting your application and paying the fee, expect an email from Immigration, Refugees, and Citizenship Canada. According to the Canada eTA website, most eTAs are approved within minutes. If you don’t see anything in your inbox, make sure to check the junk or spam folder too.
If your eTA is approved, the email you will receive will include your eTA number. Make sure to save this number in case you need to contact the IRCC or check the status of your eTA in the future.
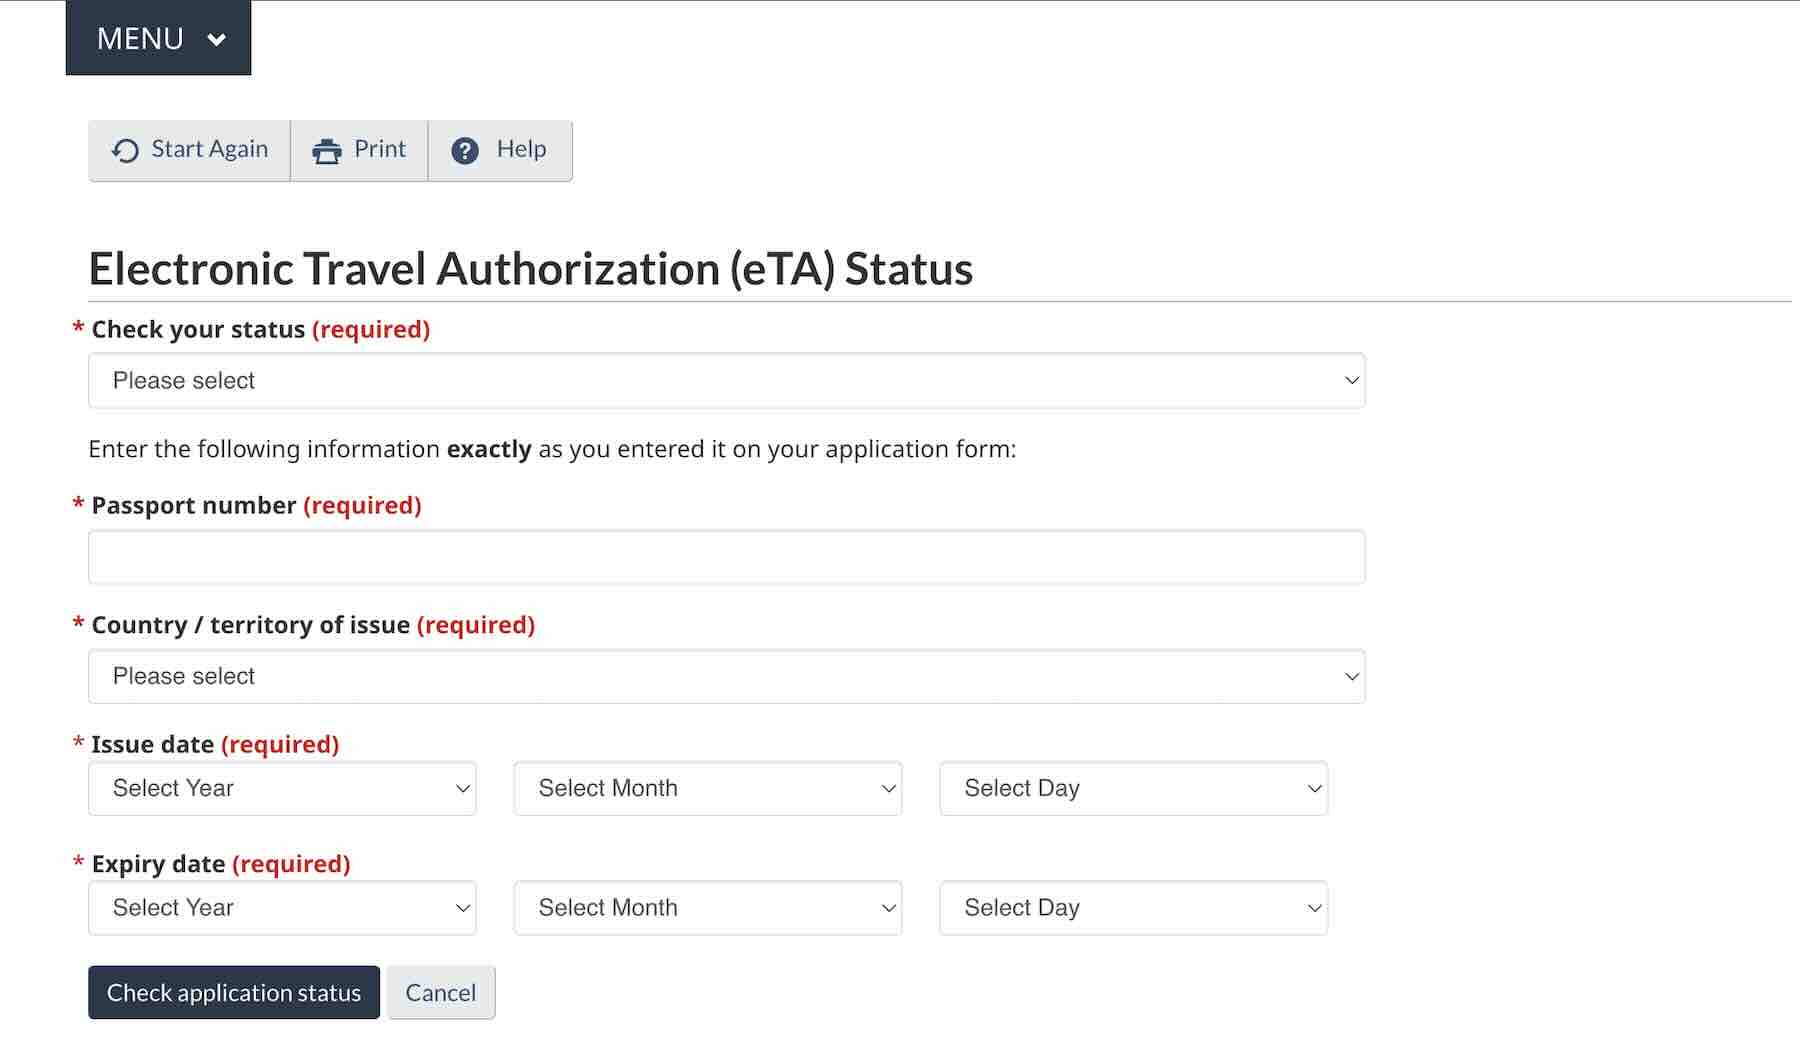
If you don’t receive an email right away, your application may be taking longer to process. In such cases, the IRCC will send you an email within 72 hours with instructions for the next steps. After receiving this email, you may use the eTA Check Status tool to check the progress of your application.
Frequently Asked Questions
How much is the Canada eTA?
The Canada eTA costs CAD 7. You can pay the fee online after filling out the application form. Accepted mode of payments are debit and credit cards.
Am I eligible to apply for a Canada eTA?
You can find out if you are eligible to apply for a Canada eTA by visiting this page and answering the questions provided.
Can I apply for a Canada eTA for my family?
Yes. However, a separate eTA application must be submitted for each person.
If you’re applying for eTA for your dependents/family members, make sure to answer “yes” to “Are you applying on behalf of someone?” You will also need to enter your details on the Parent/guardian or representative details section.
Recently, we had to get these vaccines in preparation for a trip to South Africa. And while these vaccines are not required to enter South Africa if you’re coming directly from the Philippines, the yellow fever vaccine is required if you’re coming from or transiting in a country within the yellow fever belt. You can find the list of countries with risk of yellow fever transmission and countries requiring yellow fever vaccination in this publication of the World Health Organization.
We had to get vaccinated since our Africa trip would include a visit to Kenya first before heading to South Africa.
The International Certificate of Vaccination (ICV), sometimes called the yellow card is a document with records of an individual’s vaccinations required to travel abroad. Is is recognized by countries that are members of the World Health Organization. This serves as a proof of vaccination, but note that not all countries require ICV. It’s best to double check the requirements of your destination country to avoid wasting your time and money.
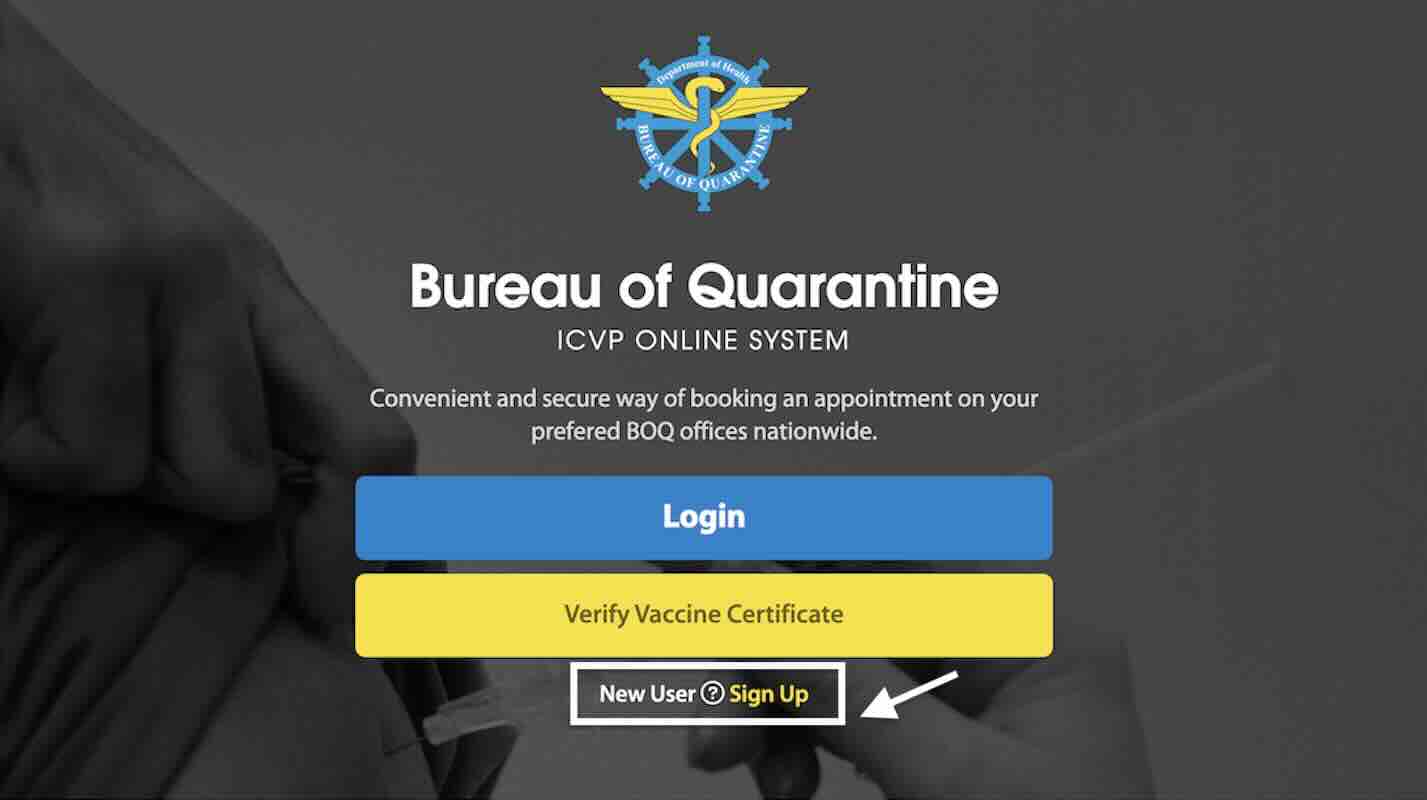
On the homepage, click “Sign Up”. Then, agree to the terms and enter your email address. Tap “Verify” and follow the steps after that.
Already have a yellow card before but no account yet?
Don’t worry! You can retrieve your record. Here’s how:
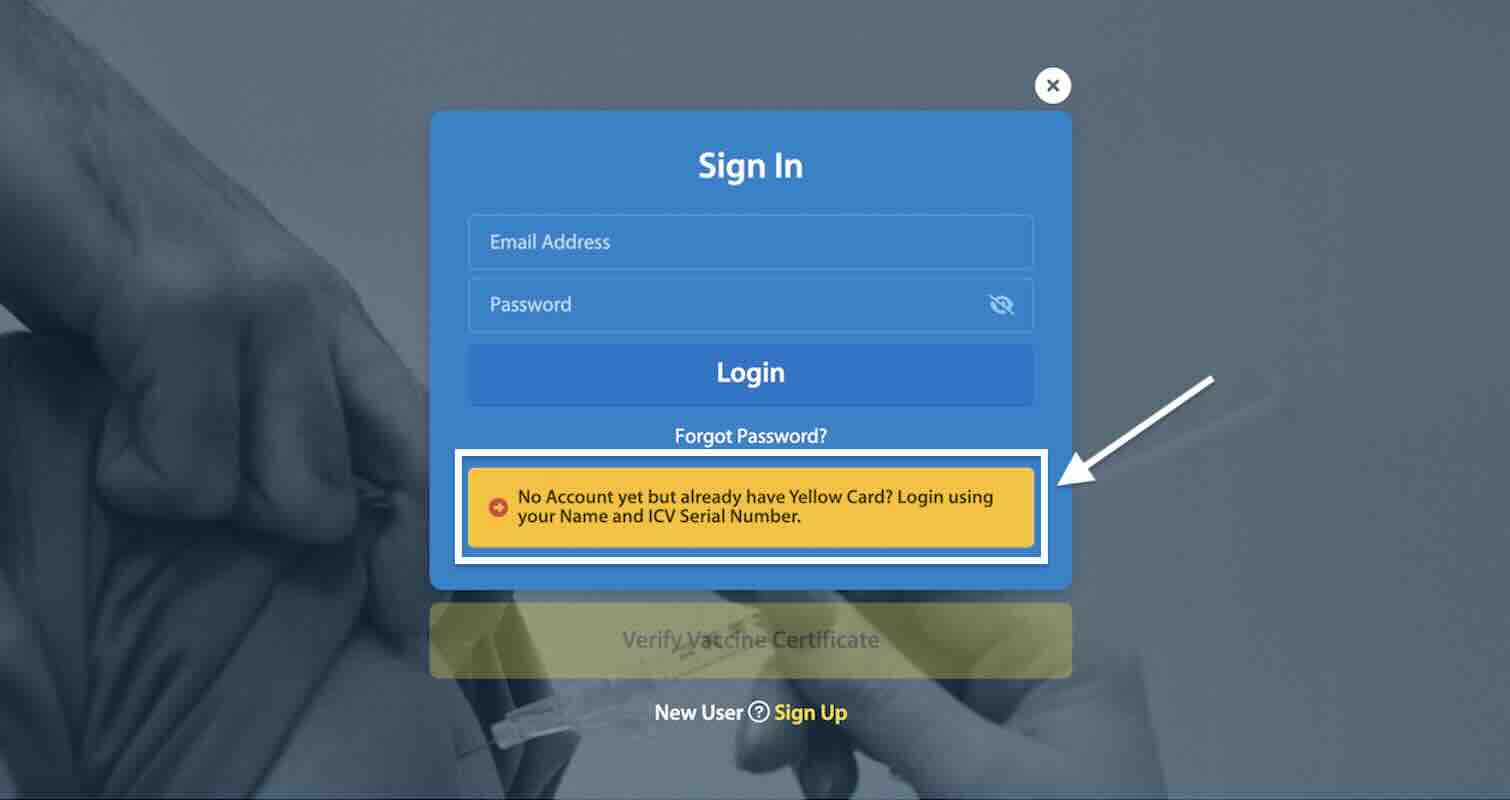
Step 1: On the homepage, click “Login”.
Step 2: Tap the yellow button that says “No Account yet but already have Yellow Card? Login using your name and ICV serial number.”
Step 3: Enter your name (first name, middle name, and last name) and ICV number.
Step 4: You’ll then need to enter your personal details and upload a valid government ID like passport or UMID.
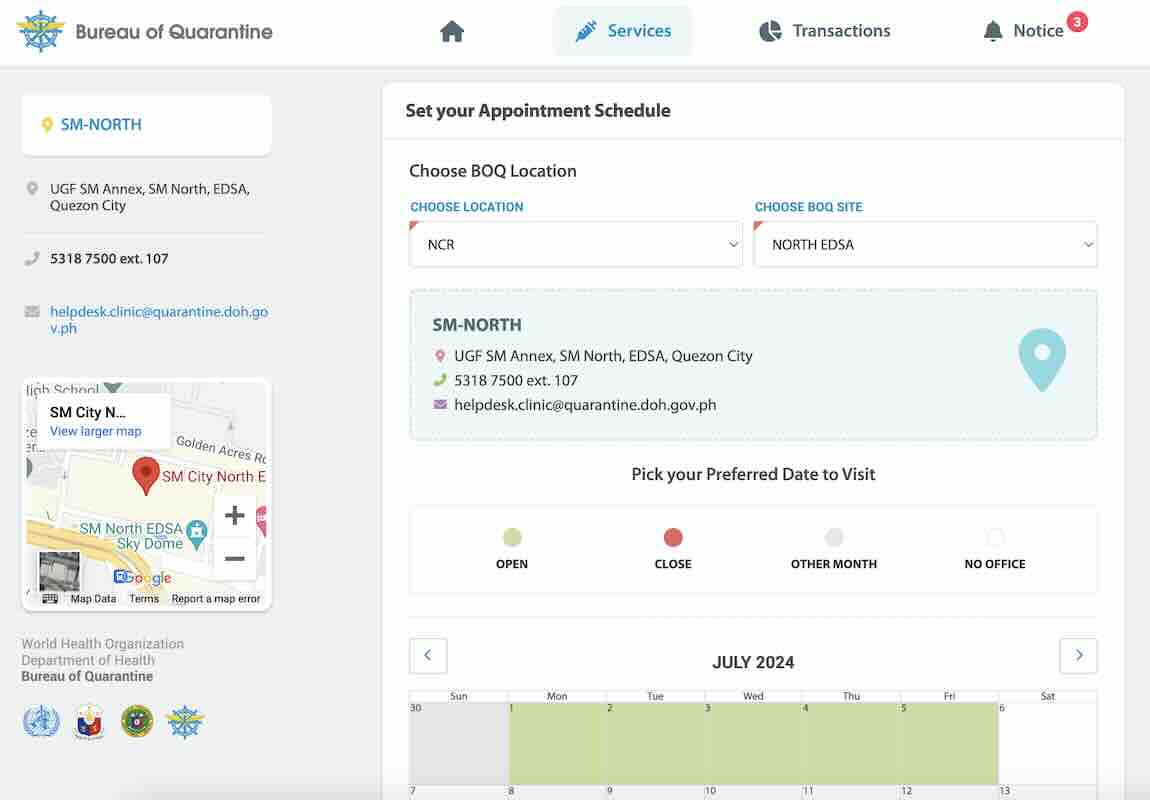
2. Schedule an appointment.
After creating an account, your next step is to schedule an appointment. On the dashboard, click Vaccination Services icon under the BOQ Services.
On the next page, you will be shown the available vaccines that the BOQ can administer. Usually, yellow fever and polio vaccines are available. Sometimes, mumps vaccine is also offered. However, there are also times when NO vaccine is available. So if you’re in need of a vaccination, just check every now and then for the availability. The prices are also indicated here. Select which vaccine you need and click “Next”.
On the next page, choose a BOQ location and site. Below is the list of BOQ locations and the BOQ sites under them:
NCR
Manila Main Office
Manila – Robinsons
Mall of Asia (MOA)
North Edsa
Eastwood
McKinley
Ayala Malls Fairview Terraces
81 Mall Newport
Luzon
Bataan
Batangas
Pampanga
La Union
Subic – Quay Global
Laoag
Tabaco
Palawan – Main
SM Palawan
Tuguegarao
Visayas
Cebu Main
Cebu – Robinsons Galleria
Bohol
Iloilo
Bacolod
Kalibo
Tacloban
Dumaguete
Mindanao
Davao
Cagayan de Oro
General Santos
Zamboanga
Once you choose a BOQ site, you will find its address and contact information. You will also see a calendar below. Just choose a date that’s best for you.
The dates highlighted in GREEN are available, while the ones highlighted in RED are fully booked. If a calendar does not show, it means that there are no available vaccine on that site yet. Vaccines are subject to availability at each BOQ site, so make sure to check the ones that are accessible to you.
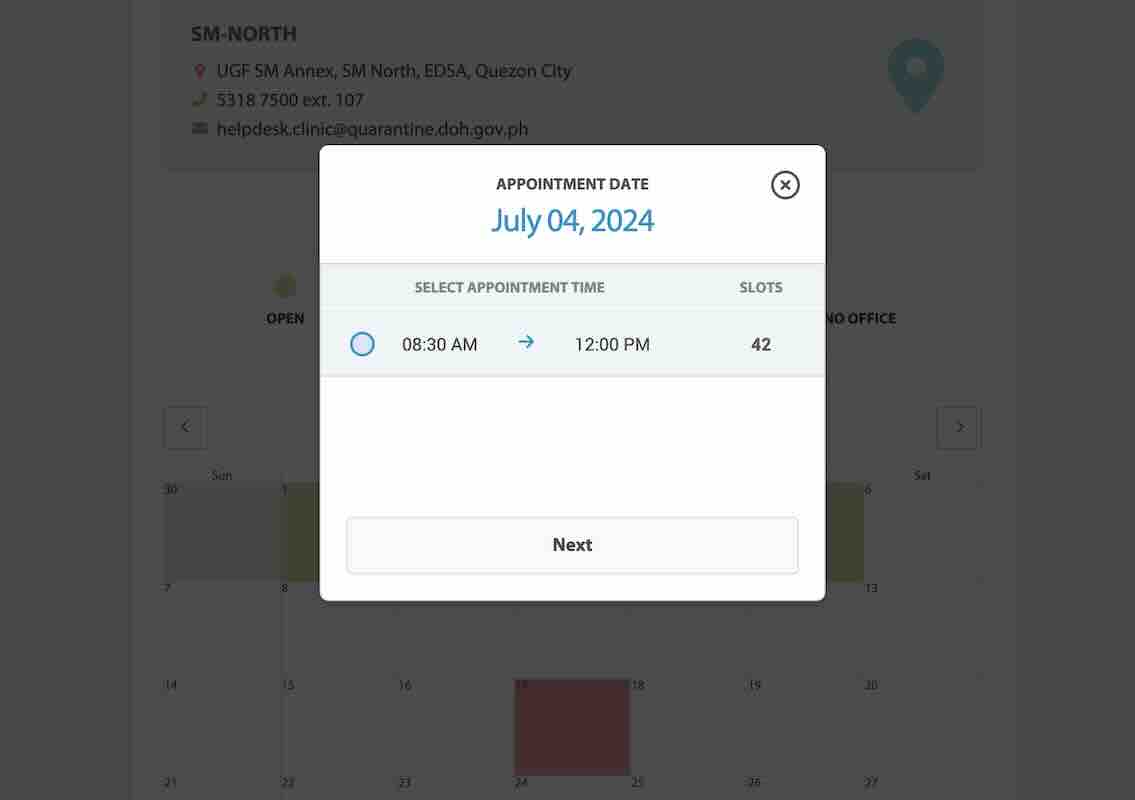
Click the date you chose and a pop-up will appear. This is where you can choose the time you prefer. It will also tell you how many slots are available in each time slot.
If you’re booking for the yellow fever vaccine, note that there’s a chance for your schedule to be canceled if they don’t reach 10 patients on your appointment date. If this is the case, the system will ask you to reschedule. Otherwise, you will receive a confirmation for your appointment right away.
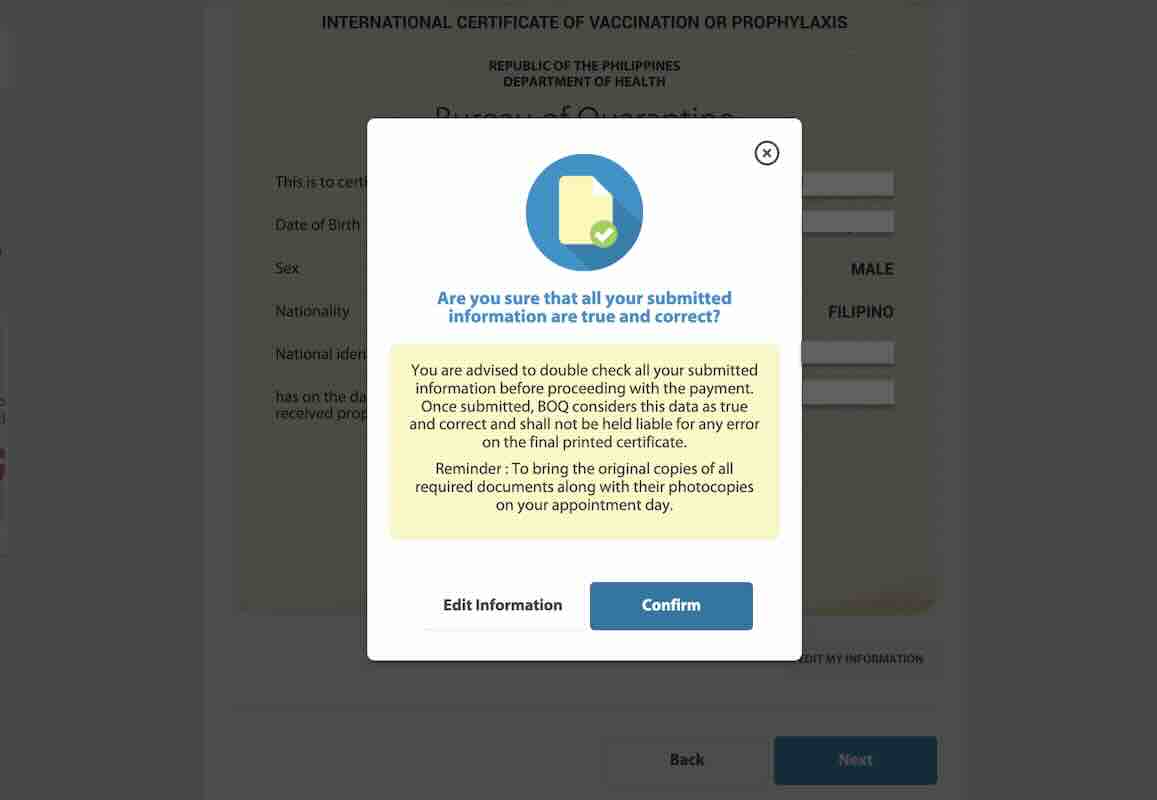
3. Confirm your details.
After choosing your vaccine schedule, the next page will show all your details. Make sure they are correct.
When you scroll down, you’ll see a screening checklist with questions about your health. Just select your answer for each question and click “Next”.
Then, you’ll see a preview of your ICV card. Double check all the information. If everything is correct, click “Next”.
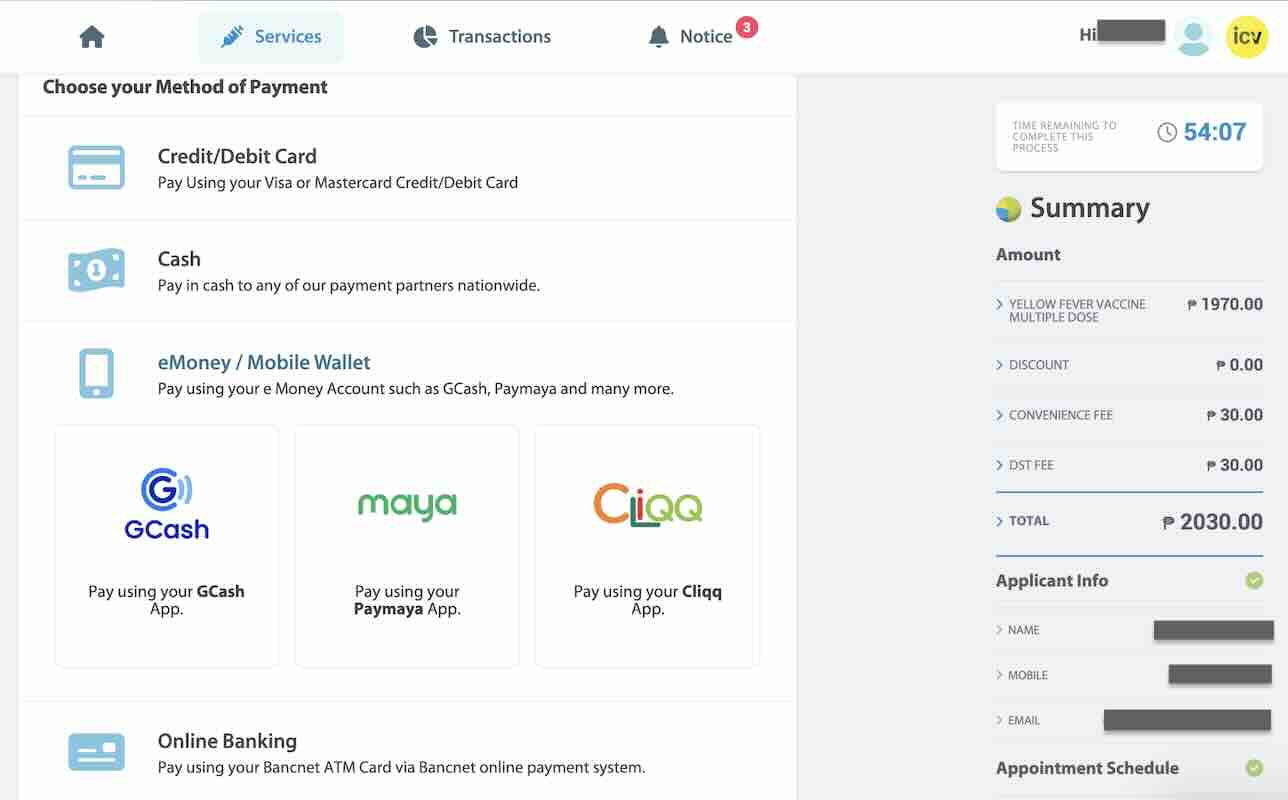
4. Pay the fees.
The final step to confirm your vaccination schedule is to settle the payment. You can pay using your credit/debit card, cash, mobile wallet, and online banking. If you want to pay with cash, you can do so at their authorized payment centers like 7Eleven, LBC, Family Mart, and Cebuana Lhuiller.
Whichever payment method you choose, they’ll have detailed instructions you can follow. Note that aside from the cost of the vaccine, there’s also an additional convenience fee and DST fee.
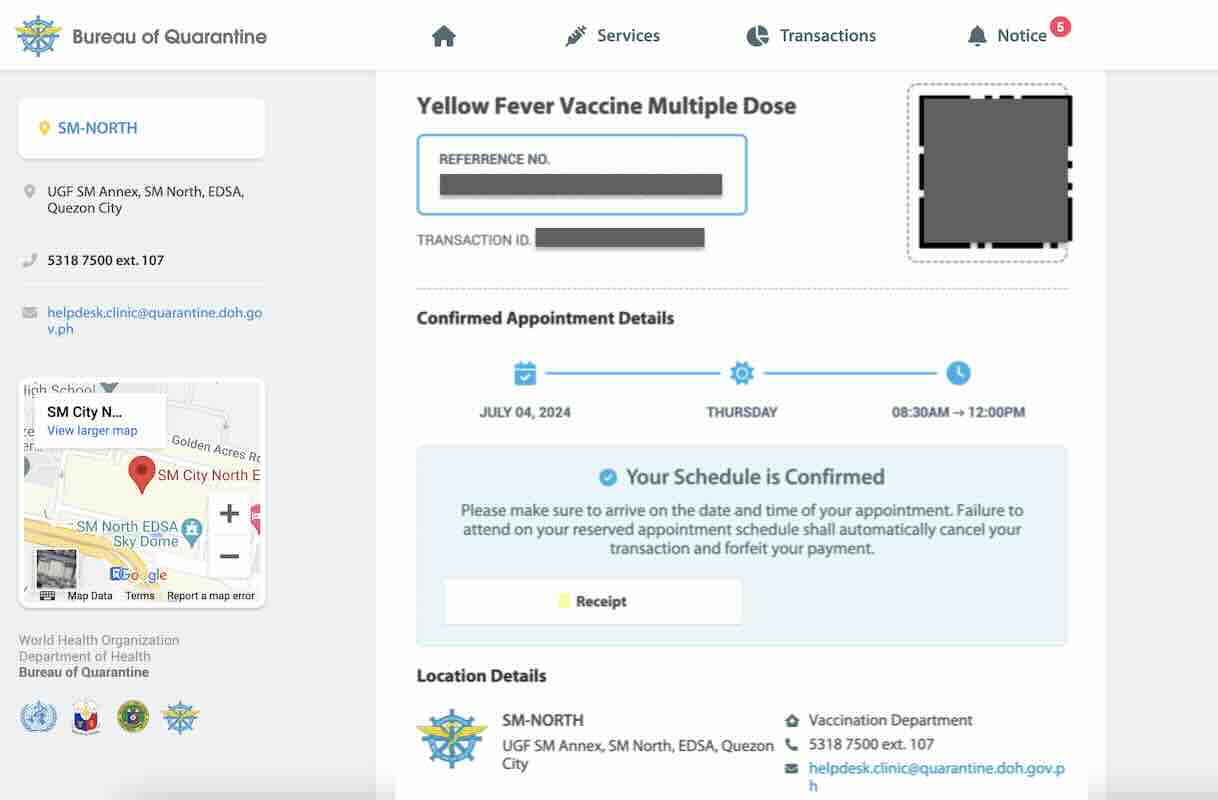
5. Save the QR code.
Once your payment is confirmed, you will get a QR code for your appointment. Just save this by taking a screenshot on your mobile device.
6. Get your vaccine.
On the day of your schedule, go to your chosen BOQ site. Make sure to have your QR code and passport with you. They will check these when you get to the site. If you already have an ICV card, you can bring it to your appointment as well. If you don’t have one yet, they will issue a new one for you.
After getting your vaccine, just wait for your ICV to be released. Make sure to check your name and passport number on the card before you leave.
Frequently Asked Questions
How much is yellow fever vaccine from BOQ?
Yellow fever vaccine costs PHP 1,970.
This does not include the PHP 30 convenience fee and PHP 30 DST fee. Total of PHP 2,030.
Your chosen payment method might also incur additional charges.
What should I wear to my vaccination appointment?
The vaccine will be administered on your upper arm, so make sure to wear something that you can roll up the sleeves easily. They also have this infographic on the proper attire with a note saying that wearing shorts is not allowed.
Can I get the yellow fever and polio vaccine at the same time?
Yes! These two vaccines can be administered at the same time, which we did. However, if you’re getting other vaccines, make sure to consult the BOQ first if it would be okay to get them at the same time.
If I renew my passport, would I need a new ICV?
That depends on you. You can choose to have the vaccine recorded on your existing ICV or you could opt to have a new ICV issued instead. Just remember that if you use your existing ICV, you need to bring your old passport when you travel because the officers refer to the passport number to verify the ICV.
You also have the option to have your previous vaccine records transferred to a new ICV. However, you would need to make a separate appointment for ICV issuance to be able to do this.
Japan is among the most visited countries for Filipino travelers, and it isn’t difficult to understand why. There’s so much to love about Japan that its proximity to the Philippines is just a bonus. Even our team has visited The Land of the Rising Sun over a dozen times.
The country has a good mixture of ancient tradition and modernity that makes for a memorable travel experience. With a total of 47 prefectures, it is packed with countless stunning landscapes, an excellent culinary scene, a rich history, and hospitality like no other. One thing is for sure: you’ll end your trip wanting for more.
Another thing travelers love about Japan is the convenience it offers. One, its train system connects every major city, making many attractions easily accessible. Two, it is never short of accommodation and food options. Another thing that Japan made more convenient in recent times is their immigration procedures. They now have Visit Japan Web for a smoother arrival clearance at the immigration area.
In this article, we’ll guide you on how to accomplish your Visit Japan Web and how you can use it for your trip to Japan.
What is Visit Japan Web?
Visit Japan Web is a website that allows travelers going to Japan to pre-register the necessary information for immigration procedures. Once you register, you will get a QR code that you can use for immigration clearance and customs declaration. With this, you can go through the arrival process quicker, saving you a lot of time. Tourists can also use this service to create a tax-free QR code that they can use when making tax-free purchases at eligible stores.
How to Register for Visit Japan Web
1. Create an account.
Go to Visit Japan Web site. You can do this on your mobile device or your computer. Click “Sign up” for a new account at the bottom of the page.
Then, read the Terms of Use and Privacy Policy. Tick the boxes to agree and click “Next” to proceed.
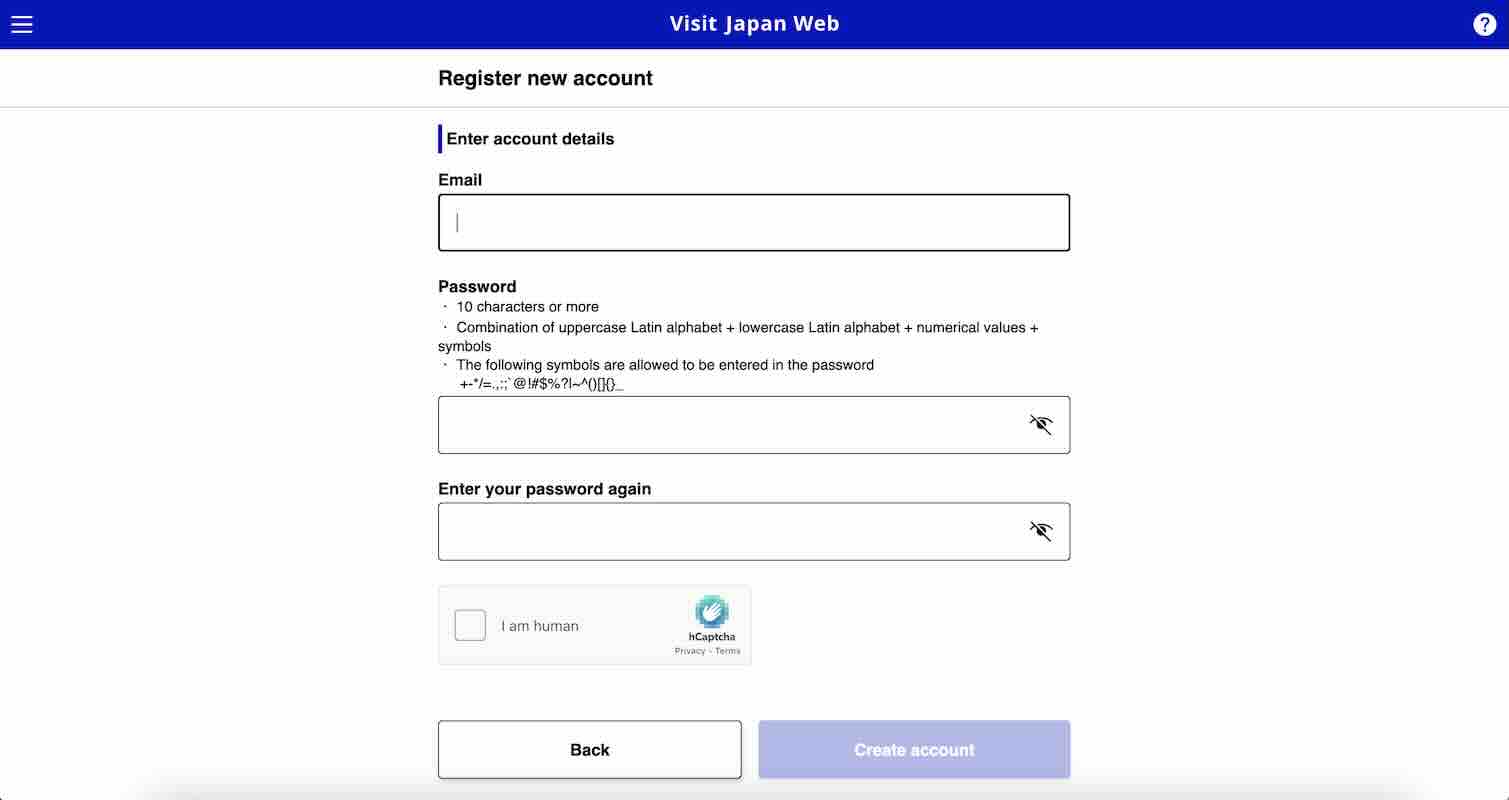
2. Enter account details.
Type in your email address. Make sure that it’s a working email address that you can access since a confirmation will be sent here. Then, create a password and make sure it meets the following criteria:
Has 10 characters or more
Has both uppercase and lowercase letters
Has numerical values
Has one or more of these symbols: +-*/=.,:;`@!#$%?|~^()[]{}_
Re-enter your password and complete the captcha. Then, click “Create account”.
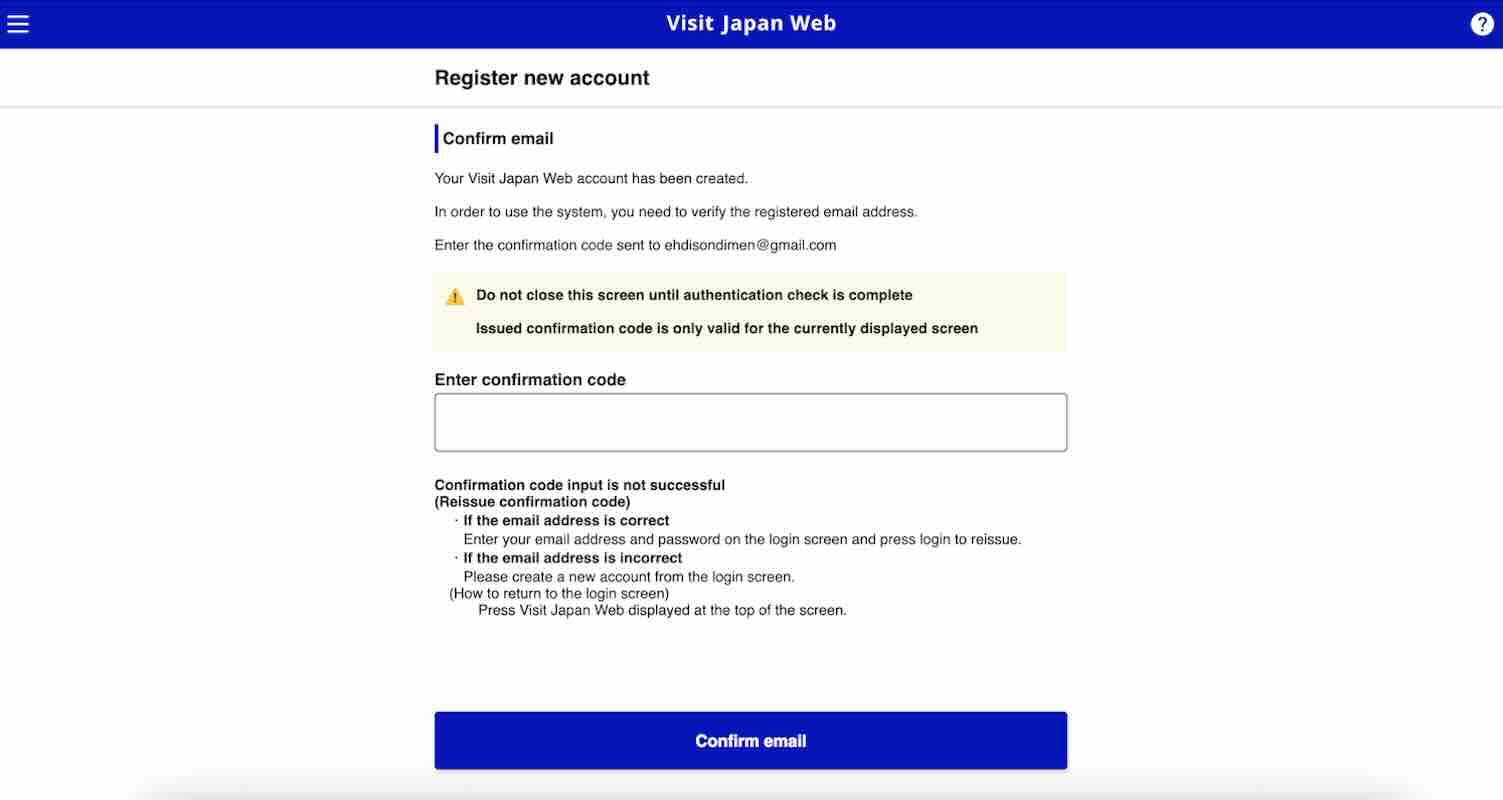
3. Confirm email.
A confirmation code will be sent to the email address you used to register. Check your email and enter the code. Then, click “Confirm email”.
If the confirmation is successful, a pop-up window will appear with that message. Click “Go To Login Screen”.
4. Login to your account.
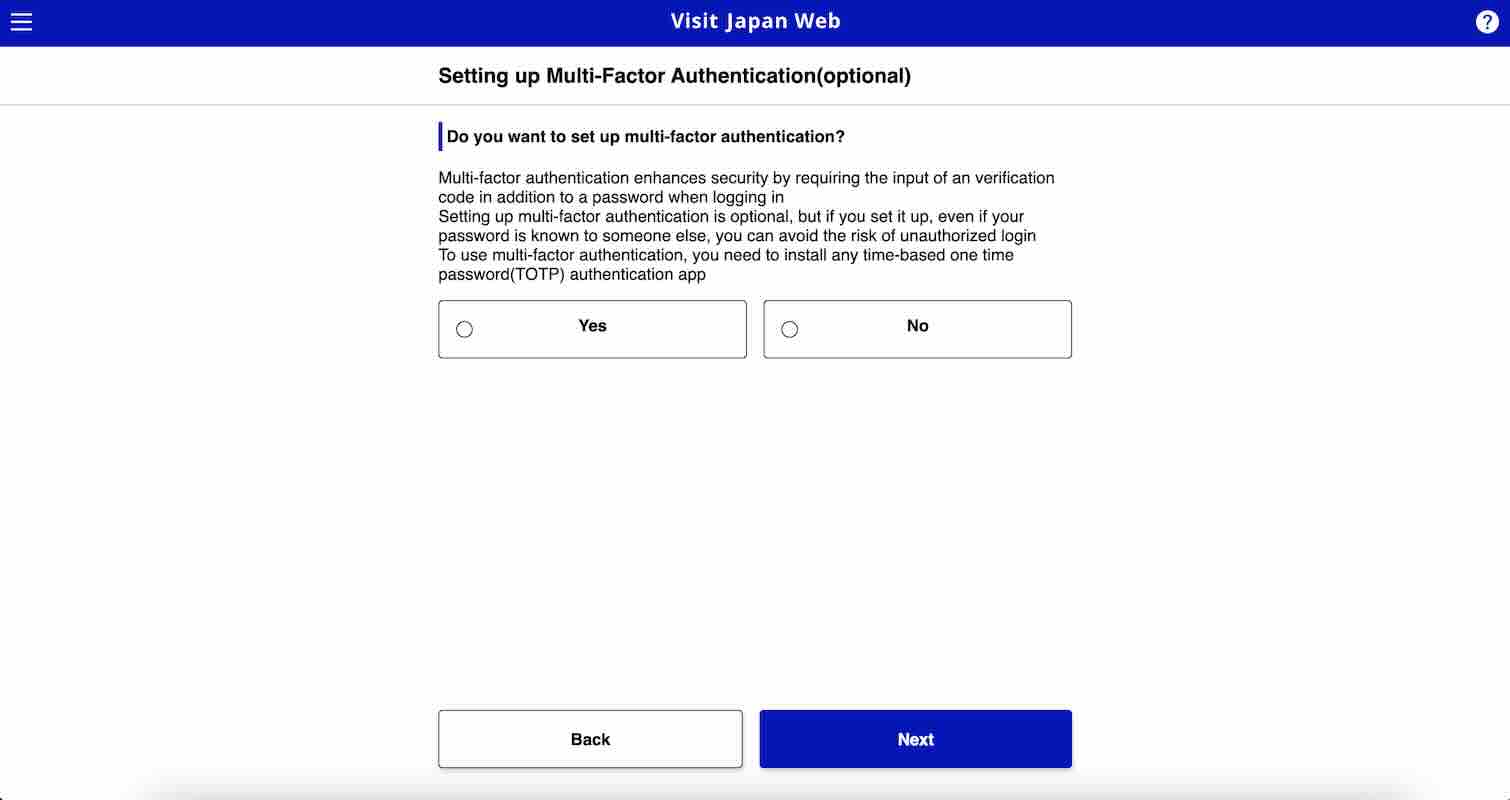
Enter the email and password you registered and click “Login”.
After this, you can opt to set up multi-factor authentication. This will give you extra security to your account. But note that choosing to set up multi-factor authentication will require you to install an authentication app like Google Authenticator or Microsoft Authenticator.
If you don’t want to use multi-factor authentication, click “No”. Then, click “Next”.
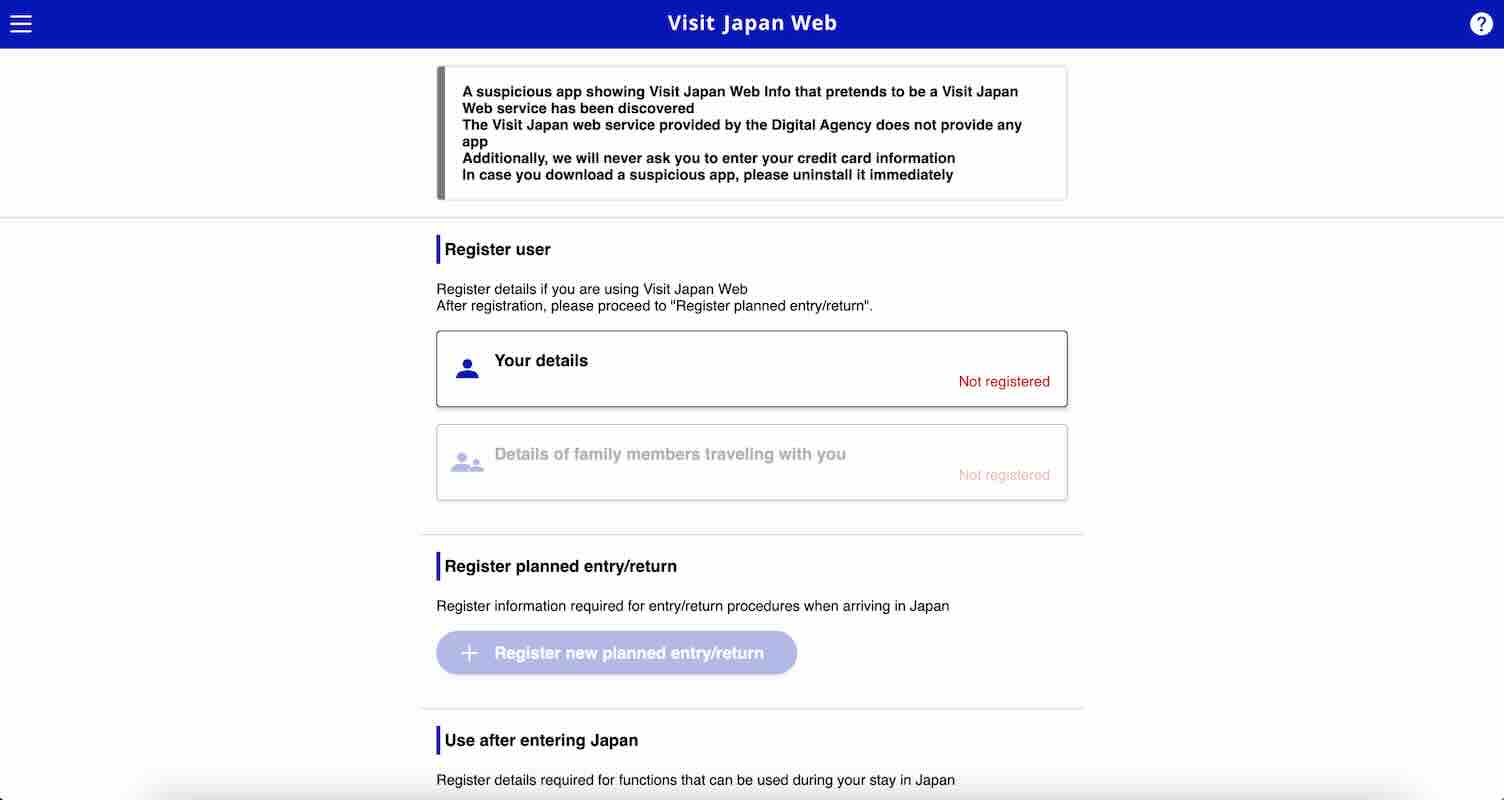
5. Choose your entry/return procedure category.
Click “Your details” to start entering your personal information.
On the first page for this section, you’ll answer the following questions for the entry/return procedure category:
Do you have a passport issued by the Japanese government?
Do you live in Japan and will re-enter Japan with a (special) re-entry permission?
If you’re a tourist, your answer to both these questions will most likely be “No”. Then, proceed to answering whether you’ll use a tax-free QR code or not. After that, click “Next”.
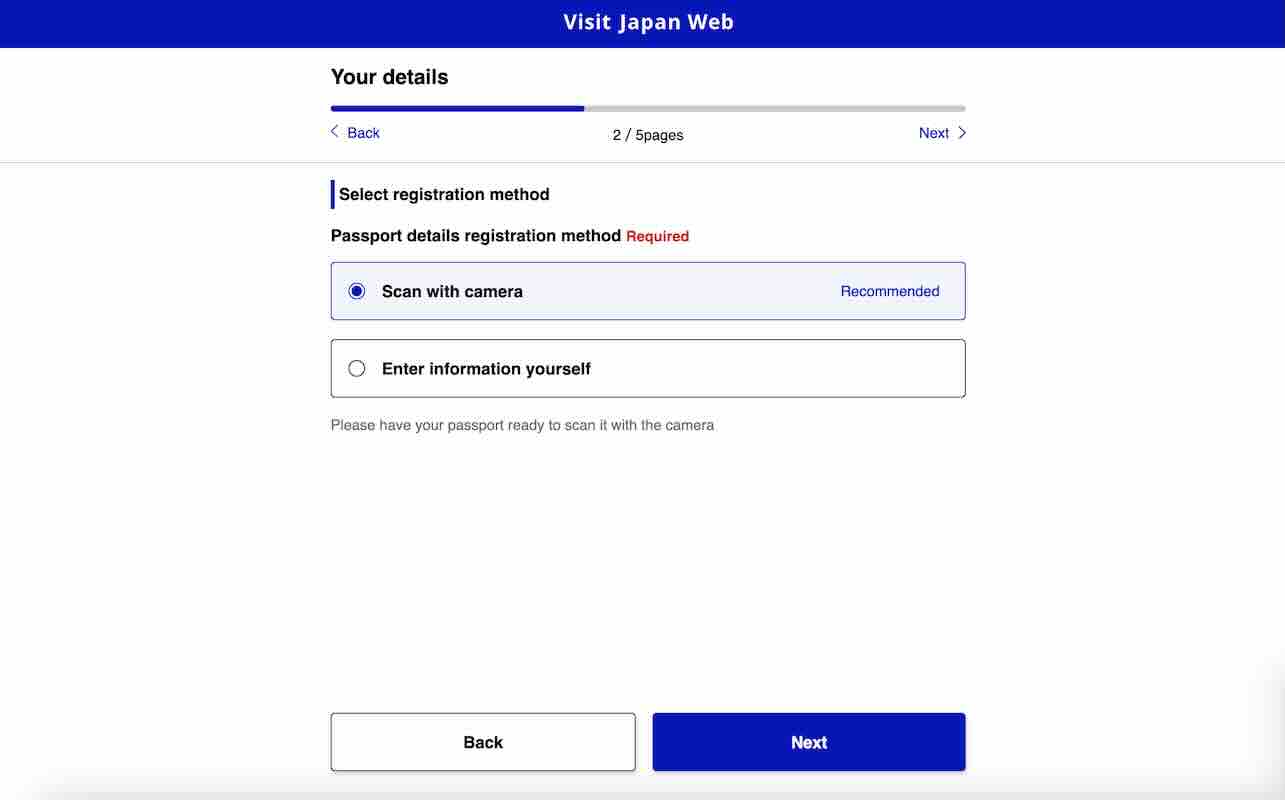
6. Register passport details.
Make sure to have your passport with you when you do this step. You have two options to register your passport details: scan with camera and manually entering the information. Choose which method you prefer, then click “Next”.
If you’re entering the information manually, here are the details you would need to provide:
Passport Number
Surname
Given Name
Nationality
Date of Birth
Date of Passport Expiry
Once you’ve successfully entered all the details, click “Next”.
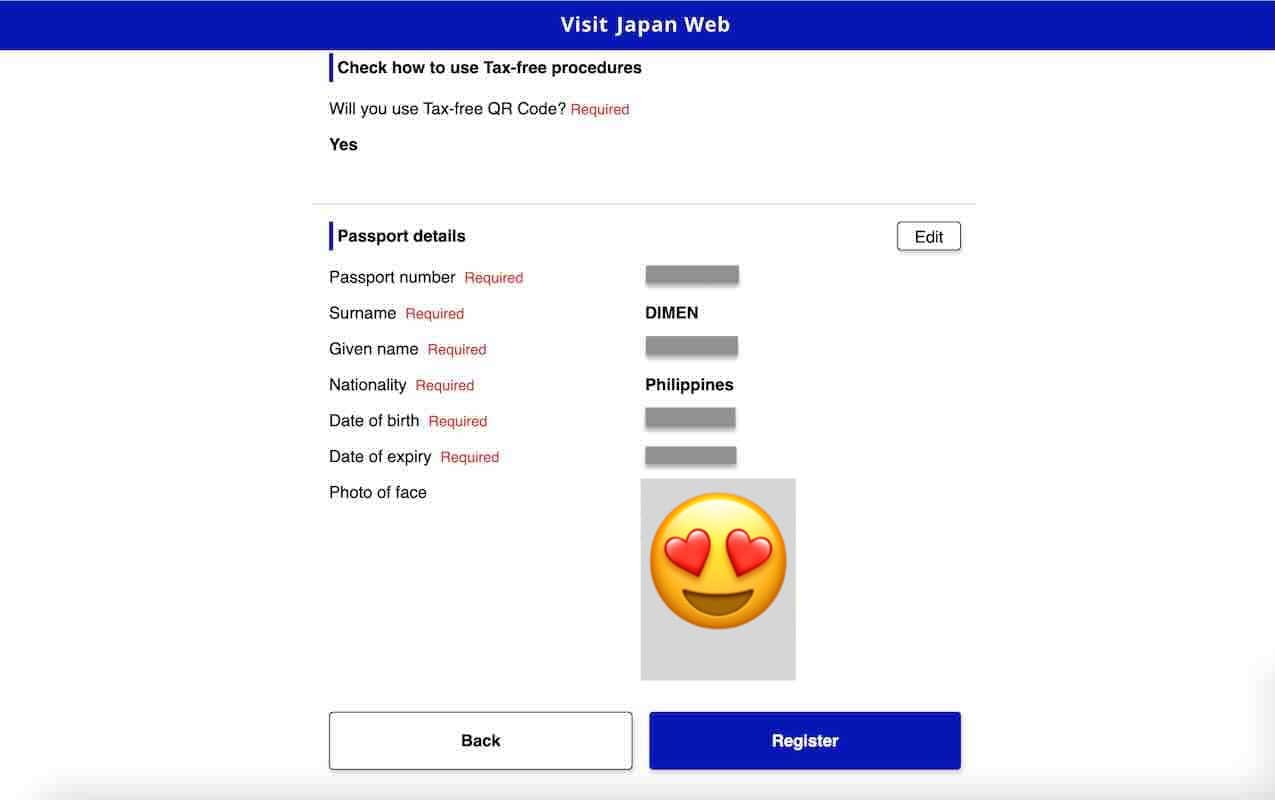
7. Confirm the details you entered.
In this page, you’ll see a summary of all the details you provided. If there’s any mistake, just click the “Edit” button on the right side of the section you need to edit. If everything is correct, click “Register”.
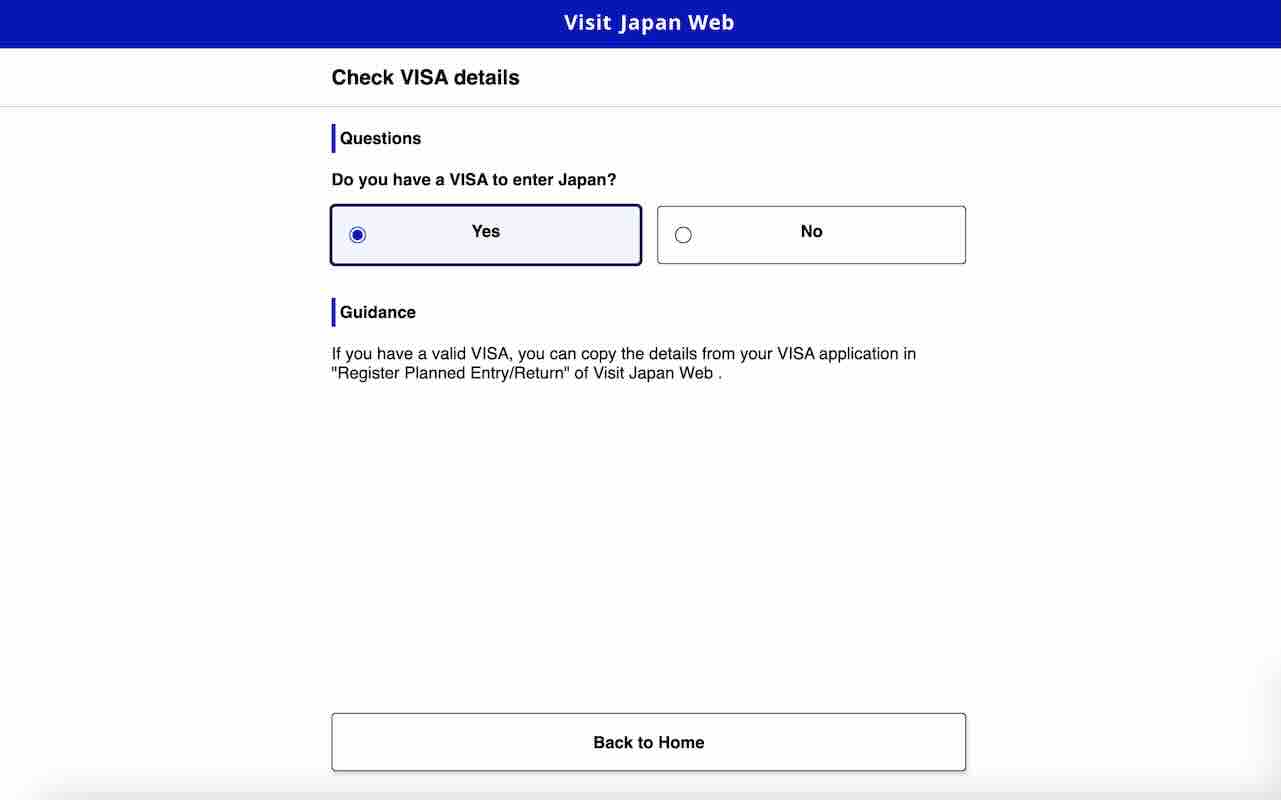
8. Check visa details.
Upon successful registration, you will see a pop-up window telling you so with a prompt to check whether you need to apply for a visa. Click “Check VISA requirement”.
Then, click “Yes” to confirm if you have a VISA to enter Japan. After that, click “Back to Home”.
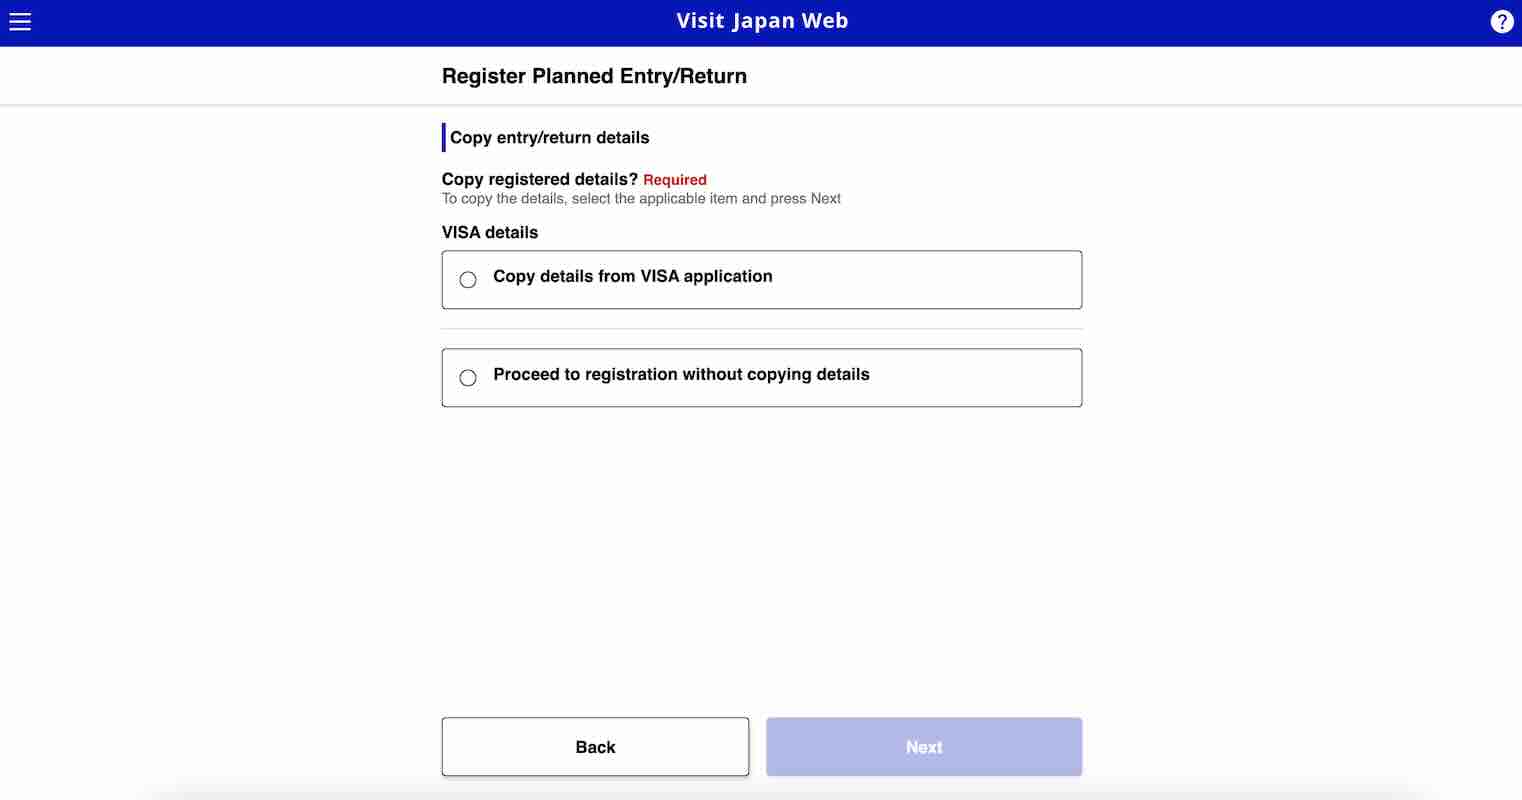
9. Register Planned Entry/Return.
On the homepage, click “Register new planned entry/return”. You can choose to copy the details of your trip from your visa application or enter the details manually.
If you choose to copy the details from your visa application, you’ll need to enter your visa issue number.
Meanwhile, if you opt to enter your details manually, here are the fields you need to accomplish:
Trip Name
Planned Arrival Date in Japan
Airline Name
Flight Number
After completing all these details, click “Next”.
On the next section, you need to enter the address of your accommodation in Japan. Here are the details you’ll need to provide:
Prefecture
City
Address
Hotel Name
Contact number
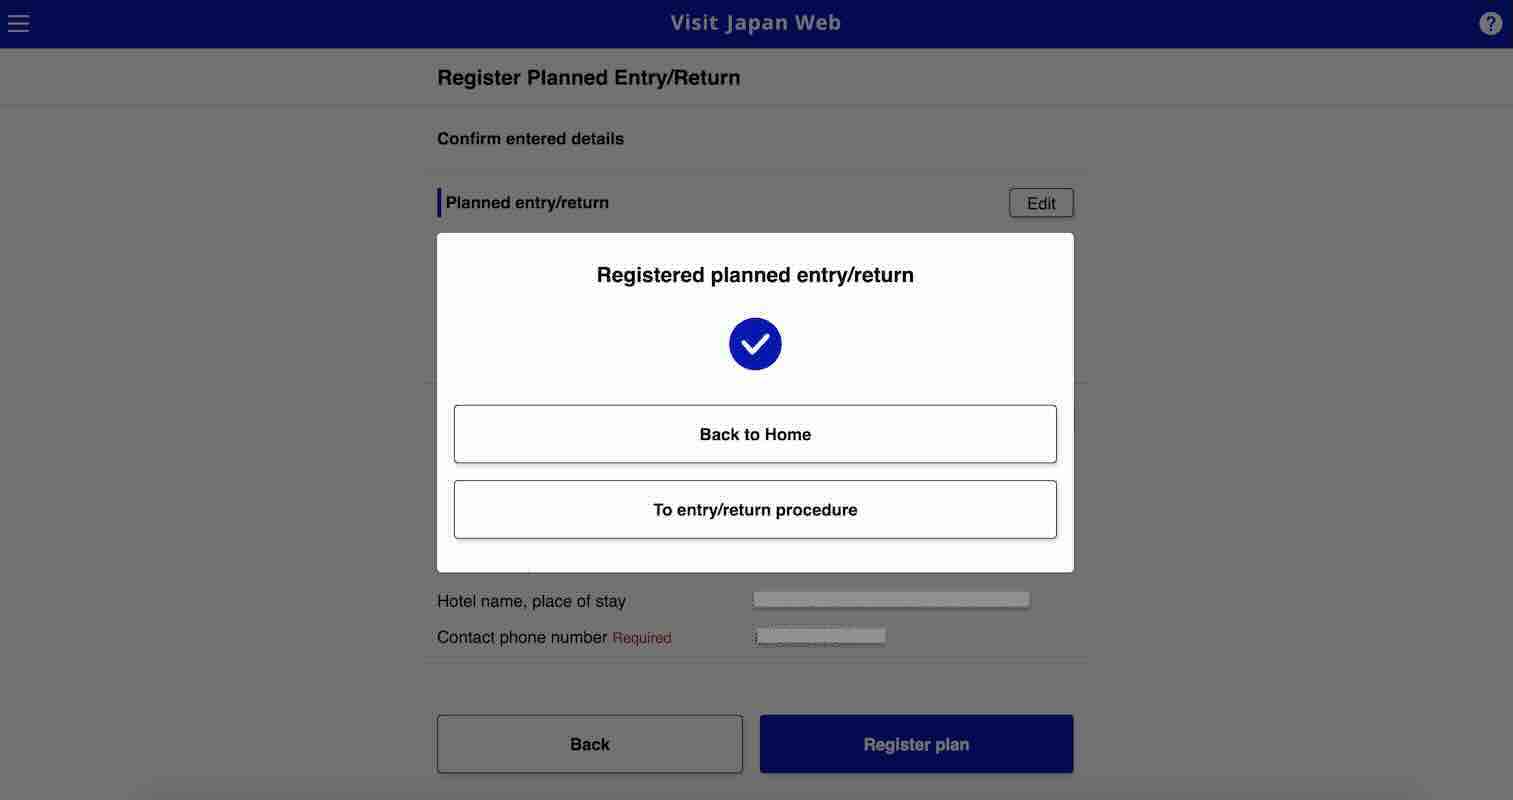
Once you’re done entering all the necessary details, click “Confirm entered details”.
Then, on the pop-up page, click “To entry/return procedure” to proceed to the next step.
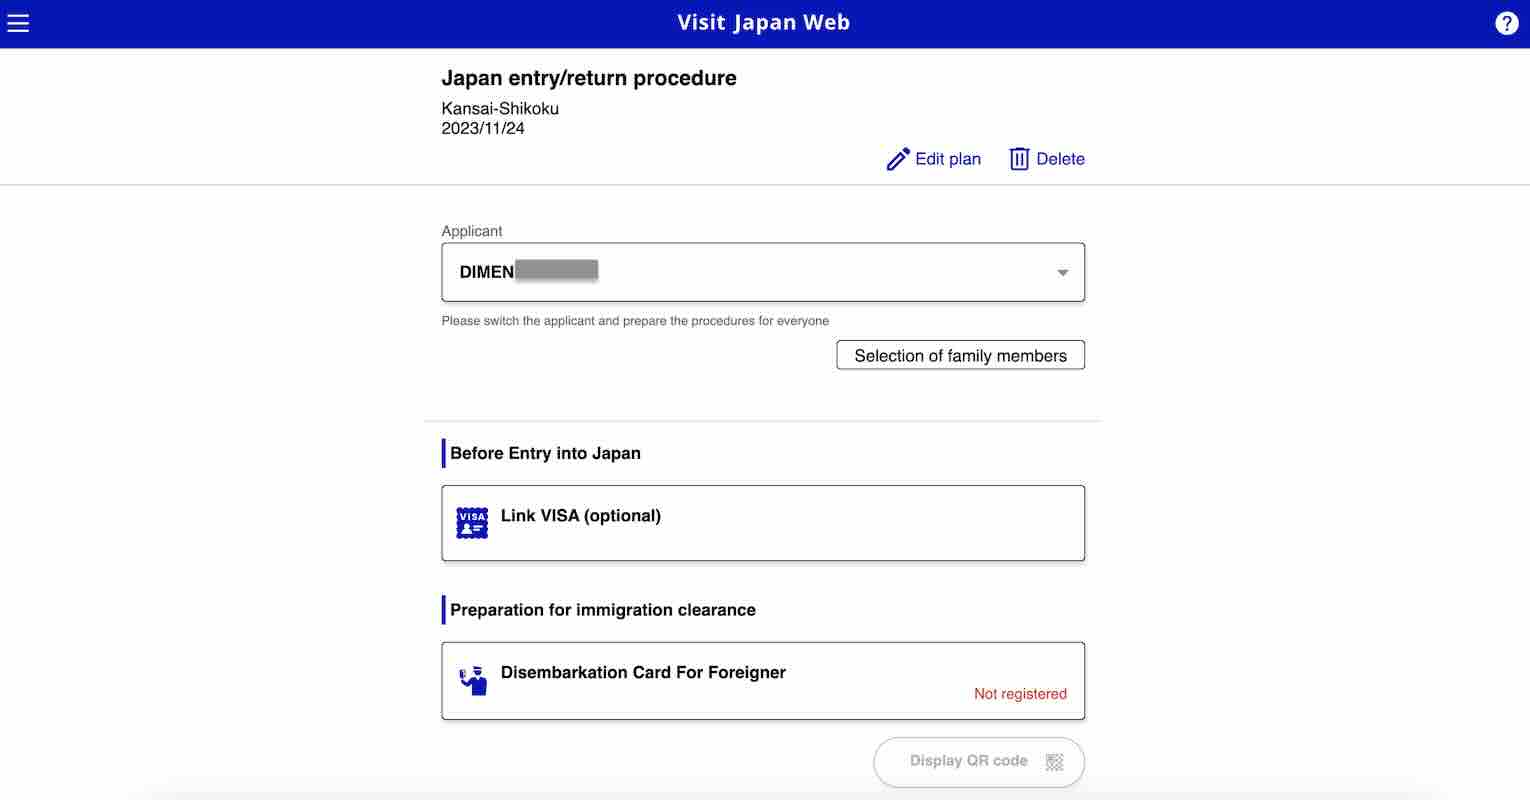
10. Generate QR code for immigration clearance.
On this page, you’ll see that you can also link your visa here, but that’s optional. We’ll skip that process here and proceed to the preparation for immigration clearance.
Click “Disembarkation Card for Foreigner”. This is the form you’d typically fill out manually before landing. On the pop-up window, click “Next” to start your registration process.
Here are the details you need to fill out:
Home Address
Purpose of Visit
Last Flight Number
Duration of Stay
Prefecture
City
Address
Hotel Name
Contact Number
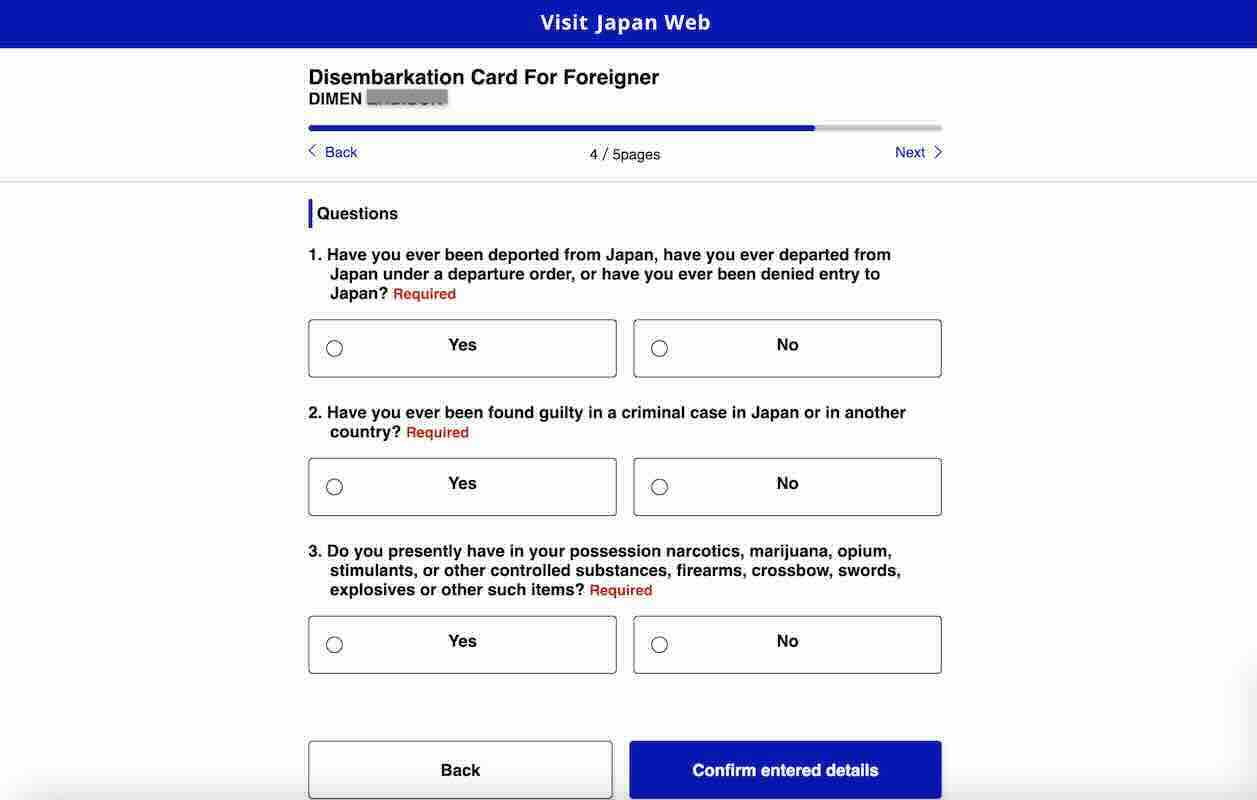
After entering all these information, click “Next”. Then you’ll need to answer a few questions. Once everything is set, click “Confirm entered details”.
On the next page, you’ll be shown a summary of all the details you entered. If everything is correct, click “Register”. Then click “Back to Entry/Return” to proceed to the next step.
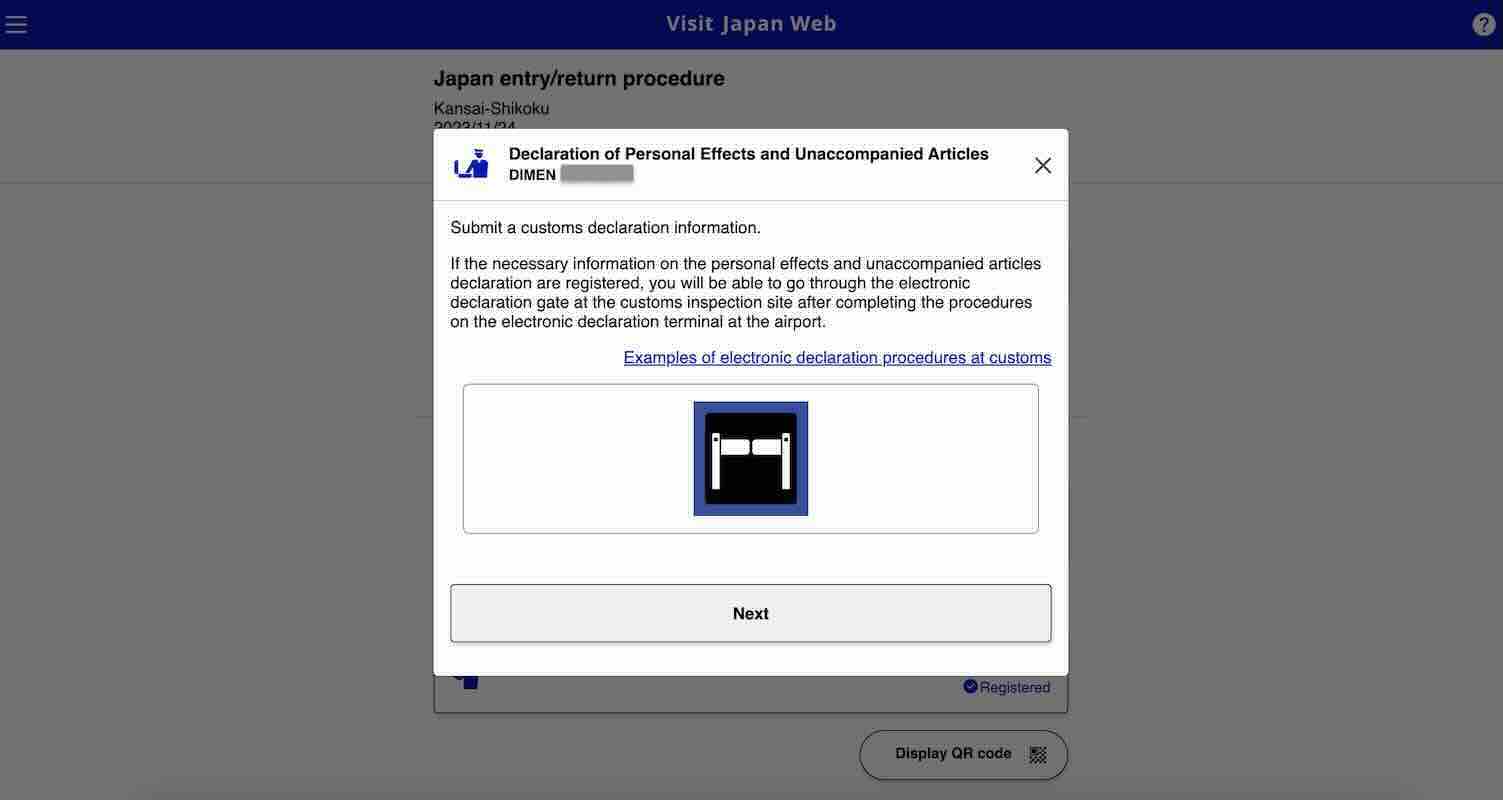
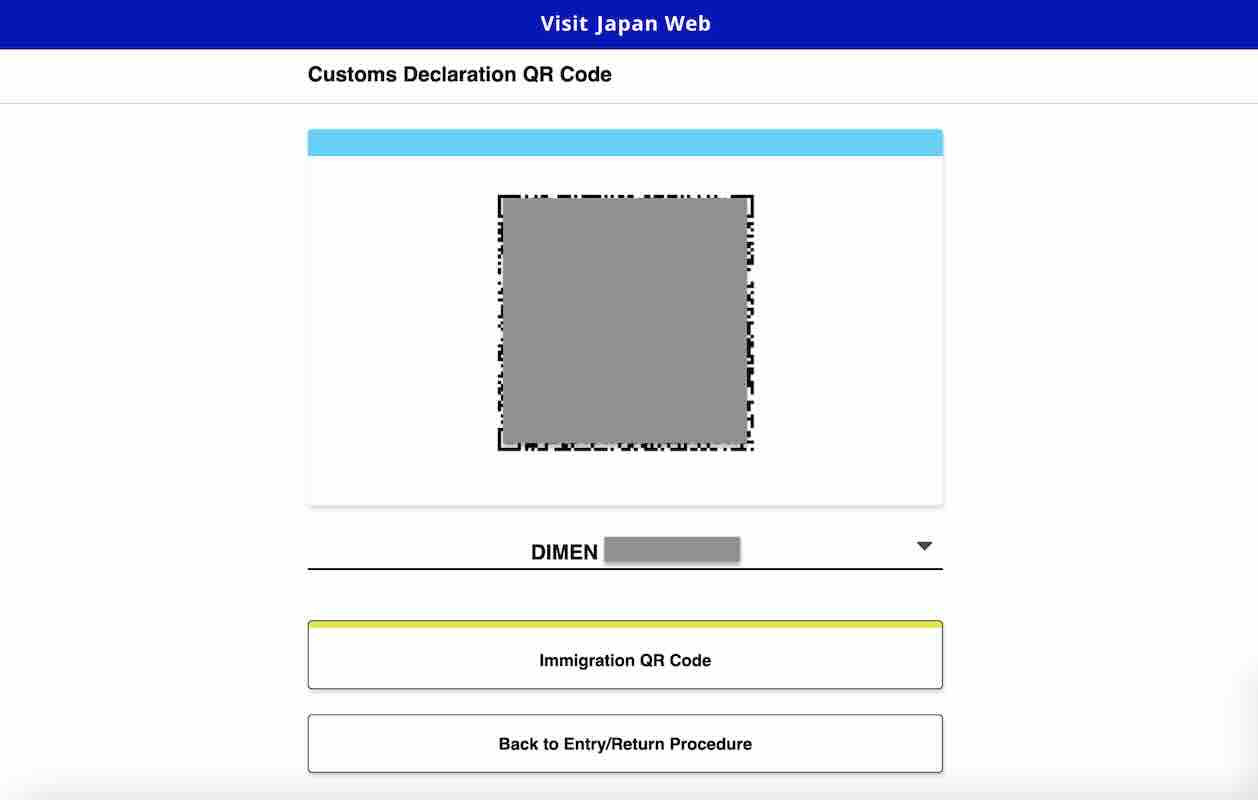
11. Generate QR code for customs declaration.
On a pop-up window, you can read about how the electronic customs declaration works. Once you’ve read the details, click “Next” to start filling out the form.
Below are the details you need to submit:
Occupation
Date of Arrival in Japan
Flight No./Name of Vessel
Point of Embarkation
After typing in all the required details, click “Next”.
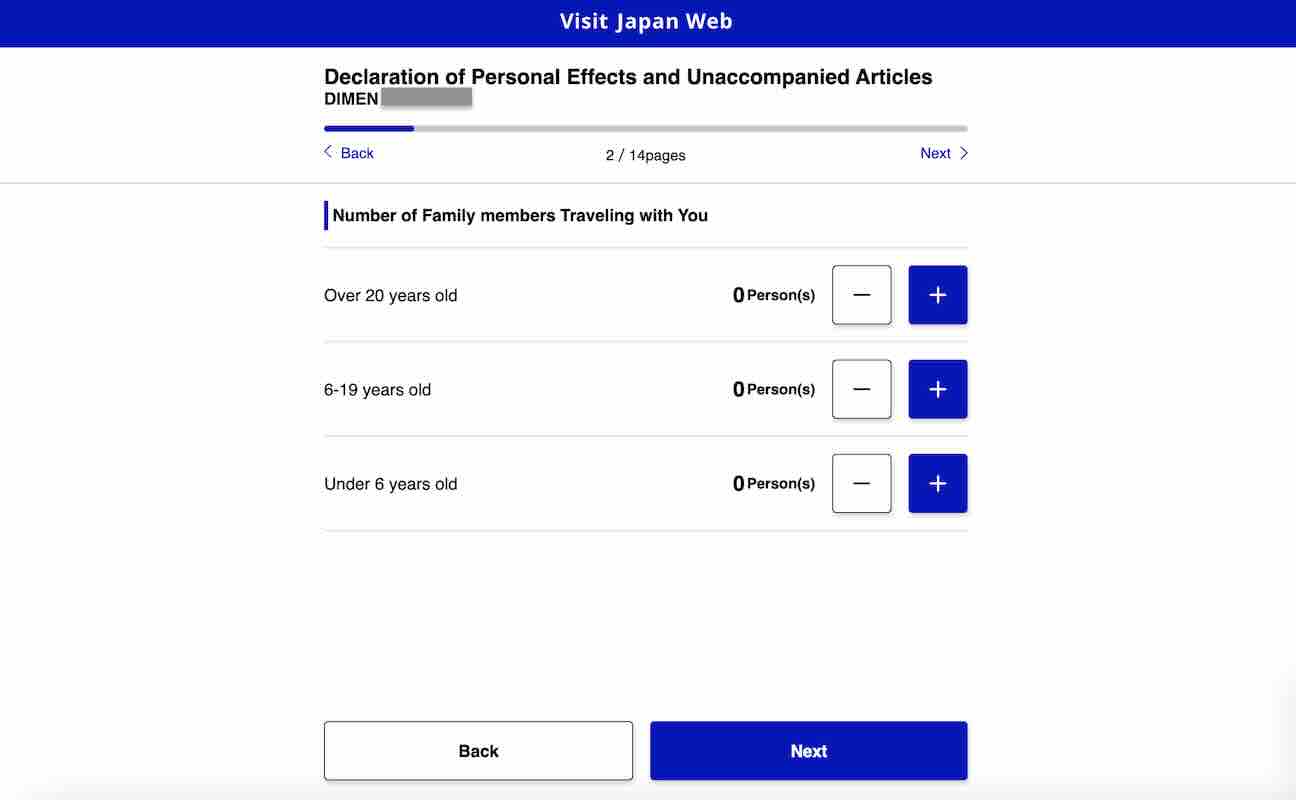
On the next page, you need to enter the number of family members traveling with you. If you’re not traveling with any family, just leave them at zero (0) and click “Next”.
11.1 Declaration Information
In this section, you’ll answer questions about items you’re bringing into Japan. Among the prohibited items are firearms and explosives. There are also restricted items including meat products, fruits, vegetables, and plants. Read every item to be informed about the restrictions and other information you need to know for customs declaration.
Once you’re done, click “Next” to generate your QR code for customs declarations.
Have Peace of Mind While Traveling!
Getting a travel insurance is optional, but we highly recommend this, especially when traveling abroad. Travel can be unpredictable, and though we hope we’ll never use it, having it gives us peace of mind in case of unexpected delays, cancellations, or emergencies.
For international destinations, consider PGA Sompo’s TravelJOY Plus insurance. You can GET IT HERE. Don’t forget to use WORTHIT for a special affordable rate.
When we plan trips, part of our pre-travel preparations is protecting ourselves from anything that would come our way during the trip. We make sure we have all the right documents, especially visas. We make sure we have travel insurance to protect our finances. But most importantly, we make sure we are shielded from illnesses that we might encounter in the places we will be exploring by getting vaccinated before the trip. One of the vaccines we were able to get is for polio.
In this article, we’ll give you a step-by-step guide on how you can get polio vaccines along with the ICV or International Certificate of Vaccination.
The International Certificate of Vaccination (ICV), also known as the yellow card, is an official document that records a person’s vaccinations needed for international travel. It’s recognized by countries that are members of the World Health Organization. While it serves as proof of vaccination, not all countries require it—so it’s important to check the entry requirements of your destination to avoid unnecessary hassle or expenses.
On the homepage, click “Sign Up”. Then, agree to the terms and enter your email address. Tap “Verify” and follow the steps after that.
Already have an ICV before but no account yet?
Don’t worry! You can retrieve your record. Here’s how:
Step 1: On the homepage, click “Login”.
Step 2: Tap the yellow button that says “No Account yet but already have Yellow Card? Login using your name and ICV serial number.”
Step 3: Enter your name (first name, middle name, and last name) and ICV number.
Step 4: You’ll then need to enter your personal details and upload a valid government ID like passport or UMID.
2. Secure an appointment.
After signing up for an account, the next step is to book an appointment. On the dashboard, under BOQ SERVICES, click the Vaccination Services icon.
On the next page, you will be presented with the available vaccines that the BOQ can provide. Usually, yellow fever and polio vaccines are available. Sometimes, but less frequently, mumps vaccine is also offered. We’ve also experienced seeing NO AVAILABLE VACCINE at all.
Return to this page every now and then to check if a certain vaccine is available. The cost per vaccine is also indicated here. Select which vaccine you need and click “Next”.
On the next page, choose a BOQ location and site. Below is the list of BOQ locations and the BOQ sites under them:
NCR
Manila Main Office
Manila – Robinsons
Mall of Asia (MOA)
North Edsa
Eastwood
McKinley
Ayala Malls Fairview Terraces
81 Mall Newport
Luzon
Bataan
Batangas
Pampanga
La Union
Subic – Quay Global
Laoag
Tabaco
Palawan – Main
SM Palawan
Tuguegarao
Visayas
Cebu Main
Cebu – Robinsons Galleria
Bohol
Iloilo
Bacolod
Kalibo
Tacloban
Dumaguete
Mindanao
Davao
Cagayan de Oro
General Santos
Zamboanga
Once you choose a BOQ site, you will find its address and contact information. You will also see a calendar below. Just choose a date that’s best for you.
The dates highlighted in GREEN are available, while the ones highlighted in RED are fully booked. If a calendar does not show, it means that there are no available vaccine on that site yet. Vaccines are subject to availability at each BOQ site, so make sure to check the ones that are accessible to you.
Click the date you chose and a pop-up will appear. This is where you can choose the time you prefer. It will also tell you how many slots are available in each time slot.
You’ll get your appointment confirmation immediately.
3. Confirm your details.
After choosing your vaccine schedule, the next page will show all your details. Make sure they are correct.
When you scroll down, you’ll see a screening checklist with questions about your health. Just select your answer for each question and click “Next”.
Then, you’ll see a preview of your ICV card. Double check all the information. If everything is correct, click “Next”.
4. Pay the fees.
The final step to confirm your vaccination schedule is to settle the payment. You can pay using your credit/debit card, cash, mobile wallet, and online banking. If you want to pay with cash, you can do so at their authorized payment centers like 7Eleven, LBC, Family Mart, and Cebuana Lhuiller.
Whichever payment method you choose, they’ll have detailed instructions you can follow. Note that aside from the cost of the vaccine, there’s also an additional convenience fee and DST fee.
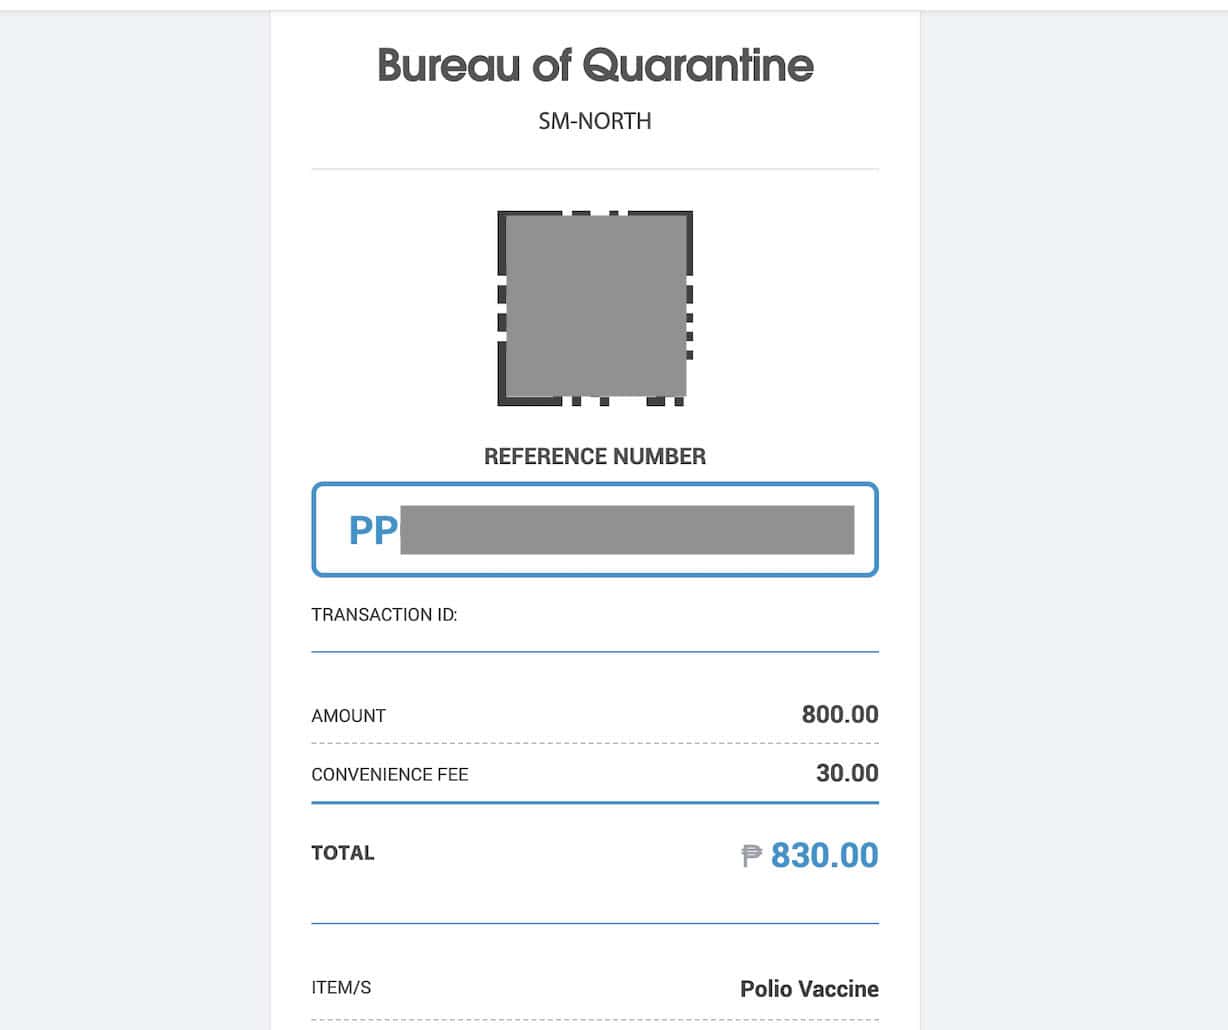
5. Save the QR code.
Once your payment is confirmed, you will get a QR code for your appointment. Just save this by taking a screenshot on your mobile device.
6. Get your vaccine.
On the day of your appointment, head to your chosen BOQ site and bring your QR code and passport—these will be checked upon arrival. If you already have an ICV card, bring that too. If not, don’t worry—they’ll issue a new one for you.
After getting your vaccine, just wait for your ICV to be released. Before leaving, double-check that your name and passport number are correct on the card.
Frequently Asked Questions
How much is polio vaccine from BOQ?
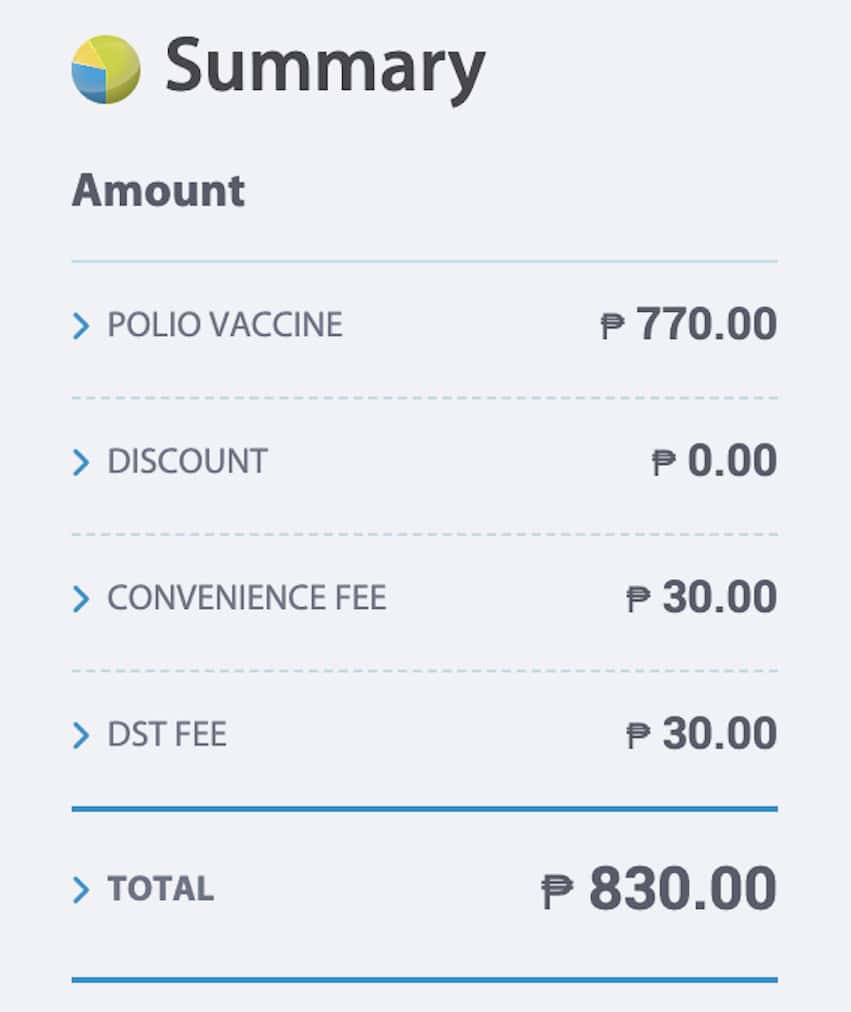
The price of polio vaccine from BOQ is PHP 770.
On top of the vaccine cost, you will also be charged a PHP 30 convenience fee and PHP 30 DST fee. Total of PHP 830.
Some credit cards or e-wallets might also add extra service fees.
What should I wear to my vaccination appointment?
The vaccine will be administered on your upper arm, so wear something with sleeves that can be easily rolled up. BOQ even has an infographic on proper attire, which also mentions that wearing shorts is not allowed.
Can I get the yellow fever and polio vaccines at the same time?
Yes! These two vaccines can be administered together—we actually got both at the same time. But if you’re getting additional vaccines, it’s best to consult the BOQ first to make sure it’s safe to receive them all in one go.
If I renew my passport, do I need a new ICV?
That’s up to you. You can either keep using your current ICV or request a new one. If you choose to use the old one, just remember to bring your previous passport when traveling, as immigration officers may check the passport number listed on your ICV.
You also have the option to transfer your vaccine records to a new ICV, but you’ll need to book a separate appointment for ICV issuance to do that.
When we plan trips, part of our pre-travel preparations are making sure we have all the requirements our destination country asks for. Sometimes these are documents like visa, but other times, vaccines. And in this article, we’ll give you a step-by-step guide on how you can get yellow fever and polio vaccines along with the ICV or International Certificate of Vaccination.
Recently, we had to get these vaccines in preparation for a trip to South Africa. And while these vaccines are not required to enter South Africa if you’re coming directly from the Philippines, the yellow fever vaccine is required if you’re coming from or transiting in a country within the yellow fever belt. You can find the list of countries with risk of yellow fever transmission and countries requiring yellow fever vaccination in this publication of the World Health Organization. We had to get vaccinated since our Africa trip would include a visit to Kenya first before heading to South Africa.
If you’re also traveling to a country that requires yellow fever or polio vaccine soon, just follow this guide on how you can get your vaccines and ICV.
The International Certificate of Vaccination (ICV), sometimes called the yellow card is a document with records of an individual’s vaccinations required to travel abroad. Is is recognized by countries that are members of the World Health Organization. This serves as a proof of vaccination, but note that not all countries require ICV. It’s best to double check the requirements of your destination country to avoid wasting your time and money.
On the homepage, click “Sign Up”. Then, agree to the terms and enter your email address. Tap “Verify” and follow the steps after that.
Already have a yellow card before but no account yet?
Don’t worry! You can retrieve your record. Here’s how:
Step 1: On the homepage, click “Login”.
Step 2: Tap the yellow button that says “No Account yet but already have Yellow Card? Login using your name and ICV serial number.”
Step 3: Enter your name (first name, middle name, and last name) and ICV number.
Step 4: You’ll then need to enter your personal details and upload a valid government ID like passport or UMID.
2. Schedule an appointment.
After creating an account, your next step is to schedule an appointment. On the dashboard, click Vaccination Services icon under the BOQ Services.
On the next page, you will be shown the available vaccines that the BOQ administer. Usually, yellow fever and polio vaccines are available. Sometimes, mumps vaccine is also offered. However, there are also times when no vaccine is available. So if you’re in need of a vaccination, just check every now and then for the availability. The prices are also indicated here. Select which vaccine you need and click “Next”.
On the next page, choose a BOQ location and site. Below is the list of BOQ locations and the BOQ sites under them:
NCR
Manila Main Office
Manila – Robinsons
Mall of Asia (MOA)
North Edsa
Eastwood
McKinley
Ayala Malls Fairview Terraces
81 Mall Newport
Luzon
Bataan
Batangas
Pampanga
La Union
Subic – Quay Global
Laoag
Tabaco
Palawan – Main
SM Palawan
Tuguegarao
Visayas
Cebu Main
Cebu – Robinsons Galleria
Bohol
Iloilo
Bacolod
Kalibo
Tacloban
Dumaguete
Mindanao
Davao
Cagayan de Oro
General Santos
Zamboanga
Once you choose a BOQ site, you will find its address and contact information. You will also see a calendar below. Just choose a date that’s best for you.
The dates highlighted in GREEN are available, while the ones highlighted in RED are fully booked. If a calendar does not show, it means that there are no available vaccine on that site yet. Vaccines are subject to availability at each BOQ site, so make sure to check the ones that are accessible to you.
Click the date you chose and a pop-up will appear. This is where you can choose the time you prefer. It will also tell you how many slots are available in each time slot.
If you’re booking for the yellow fever vaccine, note that there’s a chance for your schedule to be canceled if they don’t reach 10 patients on your appointment date. If this is the case, the system will ask you to reschedule. Otherwise, you will receive a confirmation for your appointment right away.
3. Confirm your details.
After choosing your vaccine schedule, the next page will show all your details. Make sure they are correct.
When you scroll down, you’ll see a screening checklist with questions about your health. Just select your answer for each question and click “Next”.
Then, you’ll see a preview of your ICV card. Double check all the information. If everything is correct, click “Next”.
4. Pay the fees.
The final step to confirm your vaccination schedule is to settle the payment. You can pay using your credit/debit card, cash, mobile wallet, and online banking. If you want to pay with cash, you can do so at their authorized payment centers like 7Eleven, LBC, Family Mart, and Cebuana Lhuiller.
Whichever payment method you choose, they’ll have detailed instructions you can follow. Note that aside from the cost of the vaccine, there’s also an additional convenience fee and DST fee.
5. Save the QR code.
Once your payment is confirmed, you will get a QR code for your appointment. Just save this by taking a screenshot on your mobile device.
6. Get your vaccine.
On the day of your schedule, go to your chosen BOQ site. Make sure to have your QR code and passport with you. They will check these when you get to the site. If you already have an ICV card, you can bring it to your appointment as well. If you don’t have one yet, they will issue a new one for you.
After getting your vaccine, just wait for your ICV to be released. Make sure to check your name and passport number on the card before you leave.
Frequently Asked Questions
What should I wear to my vaccination appointment?
The vaccine will be administered on your upper arm, so make sure to wear something that you can roll up the sleeves easily. They also have this infographic on the proper attire with a note saying that wearing shorts is not allowed.
Can I get the yellow fever and polio vaccine at the same time?
Yes! These two vaccines can be administered at the same time, which we did. However, if you’re getting other vaccines, make sure to consult the BOQ first if it would be okay to get them at the same time.
If I renew my passport, would I need a new ICV?
That depends on you. You can choose to have the vaccine recorded on your existing ICV or you could opt to have a new ICV issued instead. Just remember that if you use your existing ICV, you need to bring your old passport when you travel because the officers refer to the passport number to verify the ICV.
You also have the option to have your previous vaccine records transferred to a new ICV. However, you would need to make a separate appointment for ICV issuance to be able to do this.
I’m not quite sure how to start this. it’s been a while — and by a while, I mean a year.
Honestly, I’ve been putting off writing this post. I wanted to write something eloquent and touching, to summarize COVID and BLM and what it’s like to live through these times. But every time I started, I fell short. So I quit.
But I’ve realized I don’t have to write something meaningful and profound. I just have to write.
Life updates
I feel fortunate that this pandemic hasn’t been too hard on me. When lockdown happened, my parents were kind enough to let me move out of my tiny apartment and move into their house. I haven’t lost any friends or family. I spent most of the summer quarantining in Northern Michigan, which is the perfect place to quarantine because there’s basically no one there.
I feel bad admitting that a lot of positive things have happened to me in the past year. I finished graduate school. I got a job as a UX designer at Deloitte. I got a puppy (!) named Alfie. I fell in love with road-tripping, visiting seven national parks. And I found a place to live that I love! I now live in Austin, Texas.
My sweet puppy, Alfie
But, of course, it hasn’t been all roses. There have been weeks when I’ve doomscrolled endlessly, refreshing the New York Times’ home page an embarrassing amount of times. I’ve strengthened some friendships, but others have fallen by the wayside. Job-hunting during a pandemic was grueling — it took me six months to land a job after I graduated. And don’t even get me started on being single during a pandemic.
But all in all, I know how lucky I am. In the grand scheme of things, I can’t complain.
A year away from blogging has taught me that I really do miss it. I miss writing. I miss sharing book recommendations (you guys always have the best ones). I miss having a space that is all mine.
I’m not sure I’ll ever blog as regularly as I used to, but I still want to check in from time to time.
Which leads me to the question: How are you, really? What has this year been like for you? Are you feeling hopeful or worn out, or both?
Sending you love, wherever and however you are.
Enjoyed this post? Subscribe here!
Subscribe here to receive new Ashley Abroad posts straight to your inbox.
Thanks for subscribing! Now check your email to confirm your subscription.
This post may have affiliate links, which means I may receive commissions if you choose to purchase through links I provide (at no extra cost to you). Please read my disclosure for more info.
Before I first went traveling in 2006, I had these expectations in my head based on nothing but my imagination and popular culture.
My trip was going to be a nonstop adventure filled with colorful and exciting people. Crazy things were going to happen to me. I’d make friends everywhere. I’d be talking to strangers on buses. Locals would invite me out for drinks. I’d be sipping a latte, strike up a conversation with my beautiful waitress, and then the next thing I’d know, we’d be at a wine bar, staring into each other’s eyes while she taught me French.
It was going to be just like those articles I’d read or travel movies I saw. One adventurous scene after the next.
Then I went overseas.
There I was in the hostel, on the road, seeing amazing attractions in historic cities. I could do whatever I wanted, when I wanted. I was finally marching to the beat of my own drum.
At first, it was exciting, as I set my daily schedule and did things by myself. I was so busy those first couple of days that I had forgotten I was alone. And that was fine — until it wasn’t.
As the days wore on and my tongue forgot what speech sounded like, that excitement dissipated. I began to crave human interaction and companionship.
Suddenly, I was alone — and in the bad way.
Aloneness had turned to loneliness.
Where were the locals who were supposed to show me around? The cool travelers I’d spend nights out with? Once I ran out of things to do, I could no longer hide my aloneness.
Sure, I could move on to another city, hoping that the magic would happen there, that it was the destination’s fault and not me.
But it was me. Life doesn’t just happen to you — you have to make it happen.
As an introvert, it isn’t natural for me to just walk up to strangers and talk to them. That was especially true way back in 2006, when I first started traveling. (Heck, it takes me a lot to overcome that today.)
But that fear was keeping me from living the dreams I had in my head. If I wanted those dreams to happen, I was going to have to make them happen.
A lot of people wonder if traveling alone means they will always be alone. How will they make friends? Is it hard?
It’s a valid concern and, for us to whom socializing doesn’t come naturally, it’s a challenge. But let me tell you: it’s a lot easier than you think.
There are a lot of people traveling solo.
People just like you.
People looking for an adventure.
People who crave interactions with others.
And that other is you.
I overcame being alone when people in my hostel in Prague started talking to me. They were the first ones to reach out, luckily. They broke the barrier I was too afraid to break myself, sitting there, waiting for “something to happen.”
But, after they broke the ice, I realized that it was actually easier and less scary than I thought. Those travelers were like me and looking for a friend.
It took the introvert in me a while to learn that truth, but once I did, I had no trouble meeting people. After those travelers said hello and showed me how easy it was, I realized I was making a mountain out of a molehill. There was nothing to be scared of. I just had to say hi.
Because we all start off in the same boat: in a foreign country without any friends, not speaking the language, and looking for people to spend time with. Once you realize that, you also realize how simple and easy it is to make friends…because everyone is just like you.
That’s the big secret. There’s nothing more to overcome being alone than to get over yourself and say “hi.”
The key is to start small and break out of your shell. Talk to the person in your dorm room. Say hello. Ask them about themselves. Trust me, they will respond. They’ll ask you about you, your home, your travel plans, and more.
From there, just do the same to other travelers you see. Look for a group leaving for the bar and ask, “Can I join you?”
Walk over to that pool table in the hostel and ask, “Who’s next?”
People will say yes. Conversation will begin. Friendships will blossom.
And thanks to the sharing economy, there are lots more ways to meet people beyond meeting them at hostels,
For example, I’m sure you have one thing you are passionate about, right? Well, people around the world have that same passion. Use a website like Meetup.com to find local groups that form around that passion. Maybe it’s swing dancing, maybe it’s pickleball or Dungeons & Dragons. Whatever it is, I’m sure there are locals who do it too. Finding local groups with a shared interest is a great way to break the ice because you already have something to talk about, something that creates an instant connection.
Moreover, you can try the website Couchsurfing. It’s not only a place to find accommodation; it also has tons of meet-ups you can attend to find other travelers and like-minded people.
I’ll be honest, at first, I found it hard to speak to others. Conversations stumbled from time to time. But you either sink or swim on the road. My options were to be alone (and risk potentially going home early) or to get over my fear, take the plunge, and talk to people.
I choose the latter.
And on the occasions I was sinking instead of swimming, other travelers came up to me and said hello. They made the first move so I didn’t have to.
Why? Because they were looking to make friends too. Like me, they understood that if they didn’t do something, they too would have been alone.
Travelers are a friendly bunch. They want to meet new people and make new friends.
And one of those friends is you.
For that reason, you are never alone on the road. There are people everywhere who will be constantly talking to you and inviting you out (especially if you’re staying in hostels).
Take it from this introvert: you’ll meet more people than you’ll know what to do with. (In fact, there will be points when you wished you had some personal “me” time.)
Eventually, you’ll realize there was never a reason to worry in the first place. And you’ll never be alone again.
How to Travel the World on $75 a Day
My New York Times best-selling book to travel will teach you how to master the art of travel so that you’ll get off save money, always find deals, and have a deeper travel experience. It’s your A to Z planning guide that the BBC called the “bible for budget travelers.”
Book Your Flight Find a cheap flight by using Skyscanner. It’s my favorite search engine because it searches websites and airlines around the globe so you always know no stone is being left unturned.
Book Your Accommodation You can book your hostel with Hostelworld. If you want to stay somewhere other than a hostel, use Booking.com as it consistently returns the cheapest rates for guesthouses and hotels.
Don’t Forget Travel Insurance Travel insurance will protect you against illness, injury, theft, and cancellations. It’s comprehensive protection in case anything goes wrong. I never go on a trip without it as I’ve had to use it many times in the past. My favorite companies that offer the best service and value are:
Want to Travel for Free? Travel credit cards allow you to earn points that can be redeemed for free flights and accommodation — all without any extra spending. Check out my guide to picking the right card and my current favorites to get started and see the latest best deals.
Need a Rental Car? Discover Cars is a budget-friendly international car rental website. No matter where you’re headed, they’ll be able to find the best — and cheapest — rental for your trip!
Need Help Finding Activities for Your Trip? Get Your Guide is a huge online marketplace where you can find cool walking tours, fun excursions, skip-the-line tickets, private guides, and more.
Ready to Book Your Trip? Check out my resource page for the best companies to use when you travel. I list all the ones I use when I travel. They are the best in class and you can’t go wrong using them on your trip.
In fact, eating is one of my favorite activities, and also one of my favorite aspects of traveling.
Food is such an integral part of so many cultures that to skip out on meals when you travel is to miss out on a part of the travel experience.
I’m always disappointed when I meet travelers who cook all their meals in a hostel kitchen or spend so much of their time just getting food at grocery stores.
I mean, don’t get me wrong, grocery stores and markets teach you a lot about a place. And you don’t need to eat out for every meal.
But why come to Italy to cook pasta in your hostel? Or skip a sushi dinner in Japan or paella in Spain?
Of course, eating out all the time is expensive. Imagine if you ate out every day while at home — your food budget would be astronomical! And, when you are traveling long term (or just on a tight budget), you have to think about making your money last.
Additionally, many people have dietary concerns that prevent them from fully embracing new foods. And many travelers are vegan or vegetarian, as well, which might impact their options.
To make sure I can eat out without breaking the bank, I have had to learn how to balance eating 99% of my meals out while still finding a way to save money. Here’s how to eat out on a budget while you travel the world:
1. Follow the Five Block Rule
I live by what I call The Five Block Rule. I don’t eat within five blocks of a major tourist attraction or area. I simply walk in any direction and search for a place to eat when I hit five blocks. There’s an invisible line at this area: tourists don’t go past it. All of a sudden you notice that the crowds are gone, and that’s when you want to start looking.
Sure, you might find a good meal in a tourist area, but you’ll find a better, cheaper meal outside it. Go where the menus aren’t in multiple languages. Go to those little tiny hole in the wall places that you are unsure about. The meal might not knock your socks off each time but it will be a memorable and more local experience.
2. Use Local Knowledge
If you are unsure of where to eat (and don’t like the idea of randomly wandering into restaurants), try apps where locals post reviews. I use them often to find recommendations for food in the cities and towns I visit. You can also ask the tourist office or the staff at your hostel/hotel or taxi drivers, who tend to eat at cheaper food stalls. They will have good recommendations. After all, local workers aren’t going to eat in the tourist area!
My two favorite apps are Yelp and The Fork. For vegan and vegetarian recommendations, check out Happy Cow.
3. Ask The Right Question
Be sure to ask locals the question, “Where do you eat?” not “Where should I eat?” If you ask people the second question, most people will think to send you to the popular restaurants tourists visit because that will be what comes to mind. They’ll think, “Hmmm where do visitors go eat? What’s popular in town?”
However, by asking where they eat, you will get recommendations for more local restaurants because they will tell you all the hole in the wall spots they eat at on a day-to-day basis. Small word change, much better results.
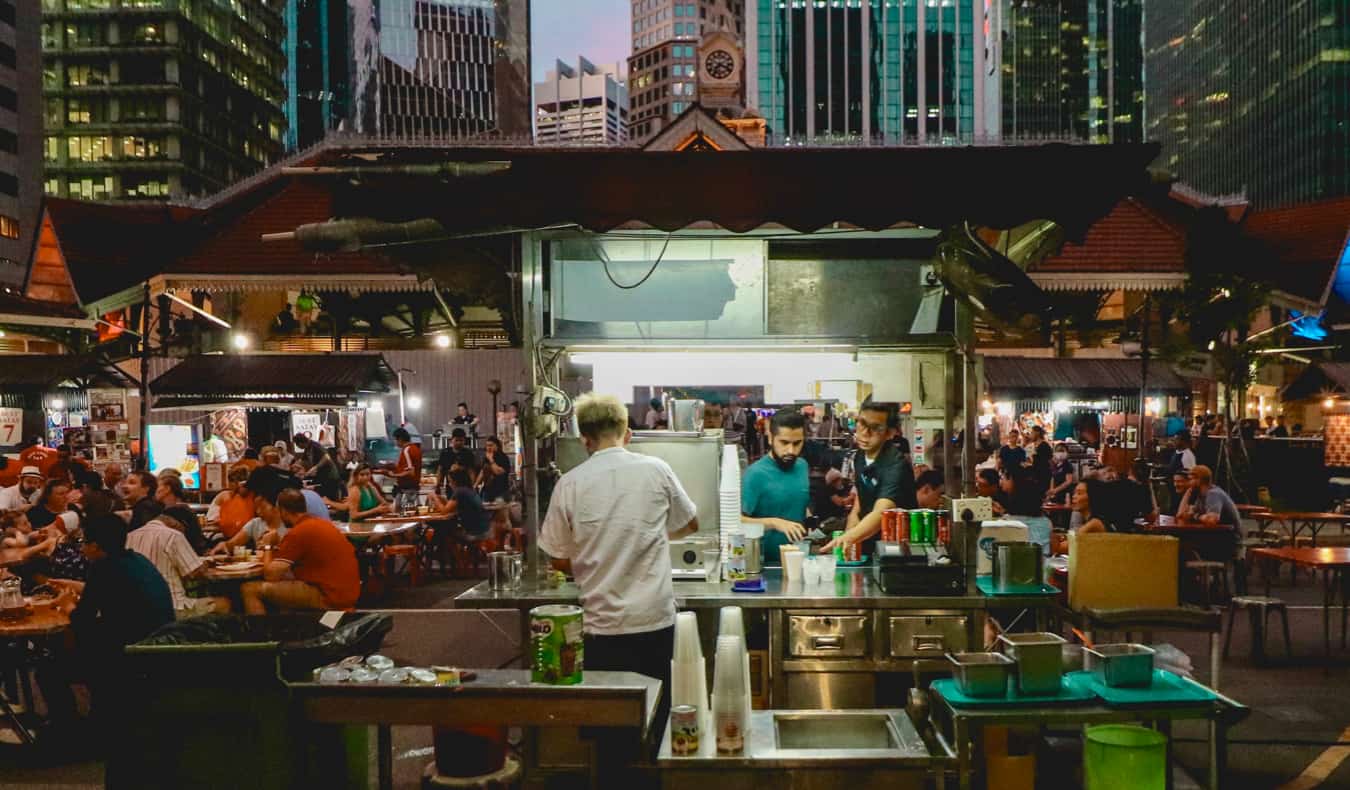
4. Eat Street Food
In most places around the world (and especially in Asia), the streets are lined with little food stalls and areas where food is cooked openly on the street. You grab a plate, sit down in a little plastic chair, and enjoy a delicious meal. Street food is some of the best food in the world. Meals at street stalls and vendors cost just a few dollars (if that) most of the time and are a great way to really experience the local cuisine.
While in Sweden, I lived off these types of vendors. In Amsterdam, FEBO and their croquettes kept my stomach full. In Costa Rica, the empanada seller filled me up for a dollar and I bought local food from vendors at markets for mere pennies in Madagascar.
Many places, like Thailand and Vietnam, for example, wouldn’t be the same if the street food disappeared. (And yes, it’s safe. The locals wouldn’t eat it otherwise.)
5. Eat Fast Food (Sometimes)
Fast food isn’t the best food, but it is another option if you want a cheap meal in inexpensive parts of the world. For as little as $5 USD (more in expensive countries like Norway, home of the $13 Whopper), you can get a filling (and hugely caloric) meal.
Sure, it’s not the greatest food, and I am going to skip the philosophical debate about traveling around the world only to eat McDonald’s to say that it’s cheap and just another way to help you rein in your spending.
6. Stick to Local Ingredients
When you’ve been traveling for a while, it’s only normal to crave a taste of home every now and then. That means that sure, sometimes I get sick of Greek food when I’ve been traveling there for a bit. Other times, I can’t eat any more Thai food and just want a burger. And that’s OK.
However, non-local food is almost always more expensive than local cuisine. For example, in Vietnam, a bowl of pho is less than a dollar, but a burger is about three times as much (or more!). Try to stick to the local cuisine as much as possible and also try to avoid any food that is imported as that will increase the price of your meal too!
7. Find the Lunch Specials
Many restaurants, especially in Europe, offer lunch specials, where items on the dinner menu are offered at a huge discount. You can get an amazing afternoon meal for a fraction of the cost you’d pay for the same meal in the evening.
I usually tend to eat my “nice” meal during lunch, because lunch specials and plates of the day are about 30–40% off what I might pay at dinner. The options will usually be more limited, but the savings more than justify it.
Sadly, there is no one website where you can find all the restaurants in the world that offer lunch specials. They vary from city to city and region to region. What you can do other than wander aimlessly around the city in hopes of finding a place (though I have done that) is to ask the tourist office or the staff at your hostel/hotel if they know where to find lunch specials. They are usually very aware of what places have specials.
8. Bring a Refillable Water Bottle
As you walk around and sightsee, you need to stay hydrated. But buying a bottle of water every day is not only environmentally wasteful, it also makes foolish budget travel sense. Carry a refillable bottle of water (with a filter) with you instead and just use the tap water. I suggest a Lifestraw bottle. It ensures your water is always clean and safe — even if the tap water isn’t.
9. Cook 50% of Your Meals
I don’t cook a lot on the road as I don’t like hostel kitchens. They never have everything I need, and I hate traveling with a portable kitchen so I can have all the ingredients I want. Yet when I am in one place for a while (or if I’m Couchsurfing), I cook a few meals.
Cooking is one of the best ways to keep your travel costs down, and supermarkets are also great places to go see what the local people eat. The only place where cooking your own meals isn’t the most economical option is Asia, where street food is usually cheaper.
As I mentioned, I’ll often go out for a nicer meal at lunch when I can find a good deal. That will usually mean for dinner I’ll be cooking my own food. That way, I’ll still get to try the local cuisine but I’ll also get to keep my budget intact. Double win!
10. Have a Picnic
Another good option is to picnic. This is something I do a lot for lunch if I’m somewhere where the weather is nice. I usually head to a local food market, pick up a bunch of food, and go picnic in the park. Not only am I saving money (sandwiches aren’t expensive), but it affords me a good chance to watch the locals scurry about their daily lives.
If you’re staying at a hostel, this is a great ice-breaker for meeting new people. Just invite everyone along to join you and you’ll be making new friends in no time!
11. Use Tourism Cards
Most people think of tourist cards like the iAmsterdam card or the Oslo Pass as just a way to save money on transportation and attractions. But these cards also offer discounts at many restaurants. Typically, discounts are around 15–25%, but sometimes lunch specials can be up to 50% off.
Visit the local tourism office when you arrive and ask what food discounts are included. Chances are you’ll be able to save even more money if you just take the time to learn about the tourism pass. It’s a worthwhile investment!
12. Get Free Breakfast
If you can find hostels or hotels that include breakfast, you’ve already eliminated the cost of one meal. Plus, if you have a huge breakfast that fills you up for most of the day then you don’t need to eat as many meals out. Moreover, many hostels around the world also offer free dinners, free coffee and tea, and other food-related perks. Search them out to save money and lower your food costs.
13. Eat Where the Students Do
Where there are universities, there are students, and since students are usually broke, that means there are likely cheap places to eat nearby. Check Google Maps for local post-secondary institutions and see what you can find in the nearby area. Many bars in the area will likely have cheap drinks and happy hours too, so you can save even more.
Additionally, use Google to search for places. Type in “Student friendly restaurants in [X]” to get lots of suggestions on where to eat. You can also ask your hotel/hostel for information too.
14. Use Supermarket Deals
In many countries, supermarkets offer lunchtime specials for workers in the surrounding areas. These usually entail fresh sandwiches or some soup or salads. Additionally, many supermarkets also discount food that expires soon, including bread, baked goods, meat, and produce. For example, pre-made meals in Japan are often 50% off right before the grocery store closes because they can’t keep it overnight. Tight food laws in Scandinavia also mean that food that has “expired” is discounted too. (And, since food, especially imported meats, are so expensive in those countries, most locals buy the “expired” food).
Buy groceries in the evening and you can likely find yourself some discounted (but still totally safe and edible) food.
***
I love a nice restaurant. I don’t mind paying money for a good meal with a nice glass of wine. But doing that EVERY meal is simply too expensive.
But, by using the tips above, I can afford to keep my costs down while still being able to afford a quality meal every so often.
And that’s what is really important — finding the right balance.
Because if you can manage to balance eating great food with saving money, both your wallet and your stomach will thank you.
How to Travel the World on $75 a Day
My New York Times best-selling book to travel will teach you how to master the art of travel so that you’ll get off save money, always find deals, and have a deeper travel experience. It’s your A to Z planning guide that the BBC called the “bible for budget travelers.”
Book Your Flight Find a cheap flight by using Skyscanner. It’s my favorite search engine because it searches websites and airlines around the globe so you always know no stone is being left unturned.
Book Your Accommodation You can book your hostel with Hostelworld. If you want to stay somewhere other than a hostel, use Booking.com as it consistently returns the cheapest rates for guesthouses and hotels.
Don’t Forget Travel Insurance Travel insurance will protect you against illness, injury, theft, and cancellations. It’s comprehensive protection in case anything goes wrong. I never go on a trip without it as I’ve had to use it many times in the past. My favorite companies that offer the best service and value are:
Want to Travel for Free? Travel credit cards allow you to earn points that can be redeemed for free flights and accommodation — all without any extra spending. Check out my guide to picking the right card and my current favorites to get started and see the latest best deals.
Need a Rental Car? Discover Cars is a budget-friendly international car rental website. No matter where you’re headed, they’ll be able to find the best — and cheapest — rental for your trip!
Need Help Finding Activities for Your Trip? Get Your Guide is a huge online marketplace where you can find cool walking tours, fun excursions, skip-the-line tickets, private guides, and more.
Ready to Book Your Trip? Check out my resource page for the best companies to use when you travel. I list all the ones I use when I travel. They are the best in class and you can’t go wrong using them on your trip.
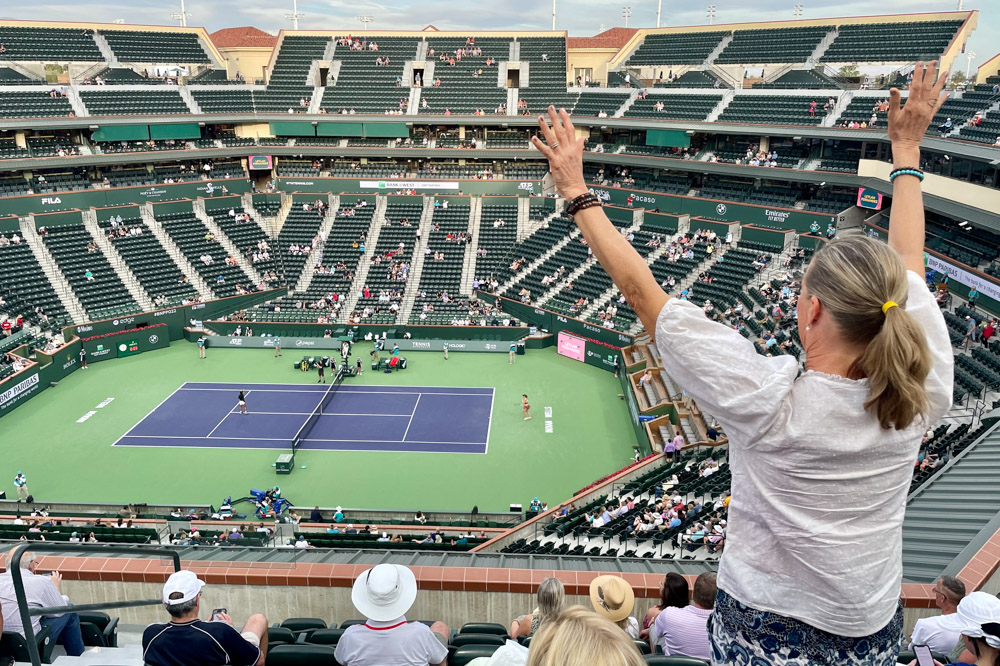
When my mom and I were planning a trip to Indian Wells, one of the major tennis tournaments, a couple years back, I had so many questions. What sessions should we buy? Where should we stay? And how many days on site is enough? This is California, after all; we’ll likely want to see more of the Palm Springs area beyond tennis, right?
This post was last updated in March 2025.
And with the latest BNP Paribas Open underway from now through March 16, let’s talk all thinks Indian Wells.
About the “fifth Slam”
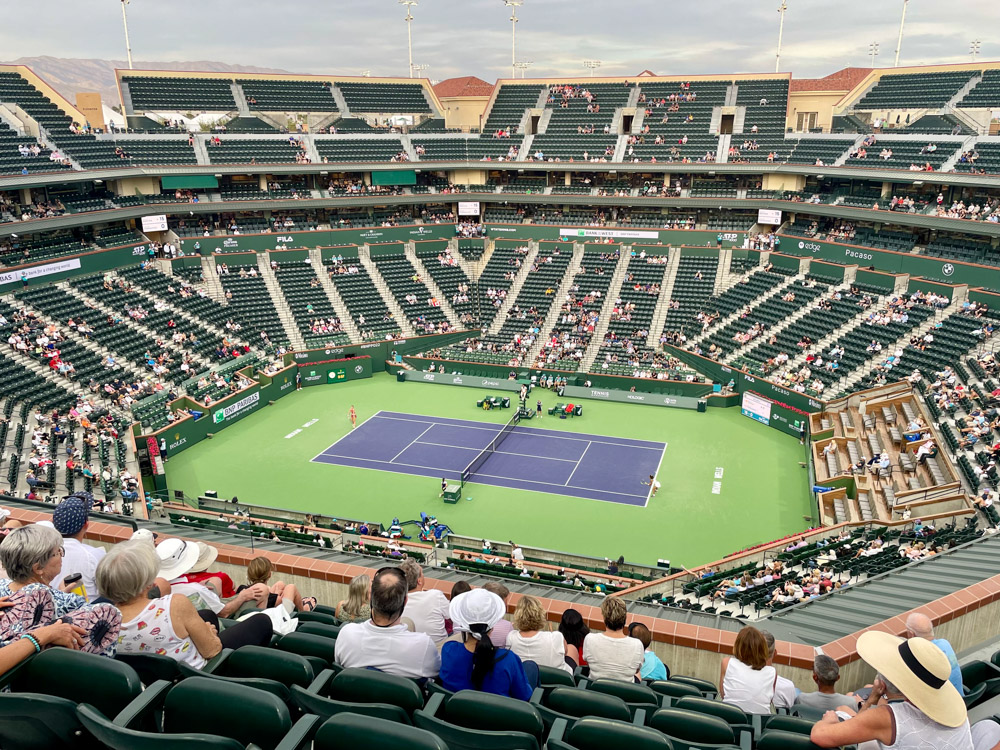
Though Indian Wells is not one of the four grand slams—which, in order, are the Australian Open, Roland-Garros, Wimbledon and the U.S. Open—it’s one of the biggest master events. The fifth-most attended tournament after the slams boasts the second-largest permanent tennis stadium in the world after Arthur Ashe in New York, and all your favorite pro tennis players will be there assuming they aren’t sidelined with an injury.
In fact, it’s a mandatory WTA 1000 and ATP Masters 1000 event, and the player field includes the top 75 male and female players in the world, as well as wild cards and qualifiers. It’s also in a stunning setting referred to as “the Garden,” sheltered between desert and mountains.
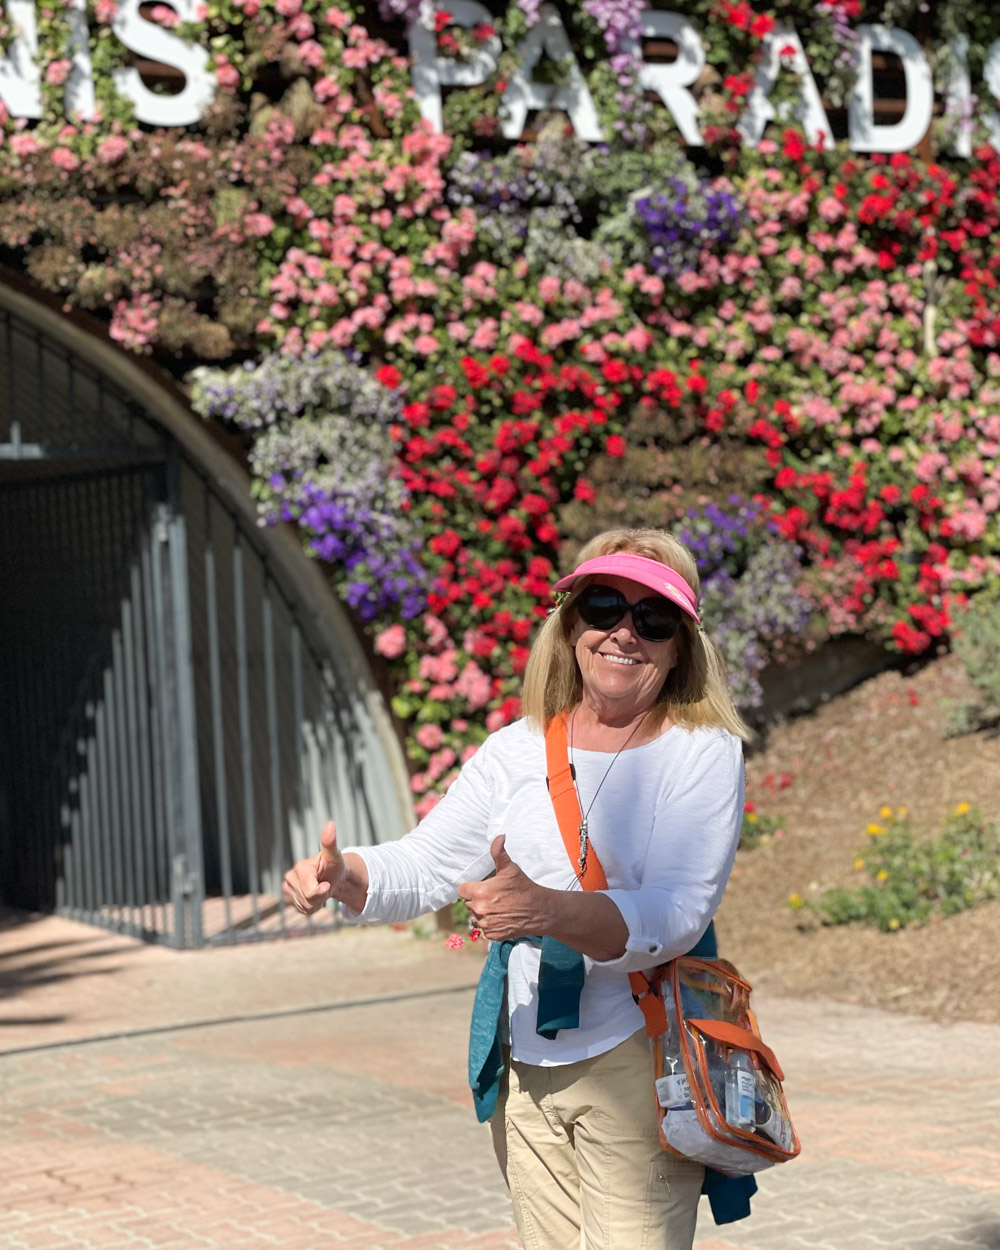
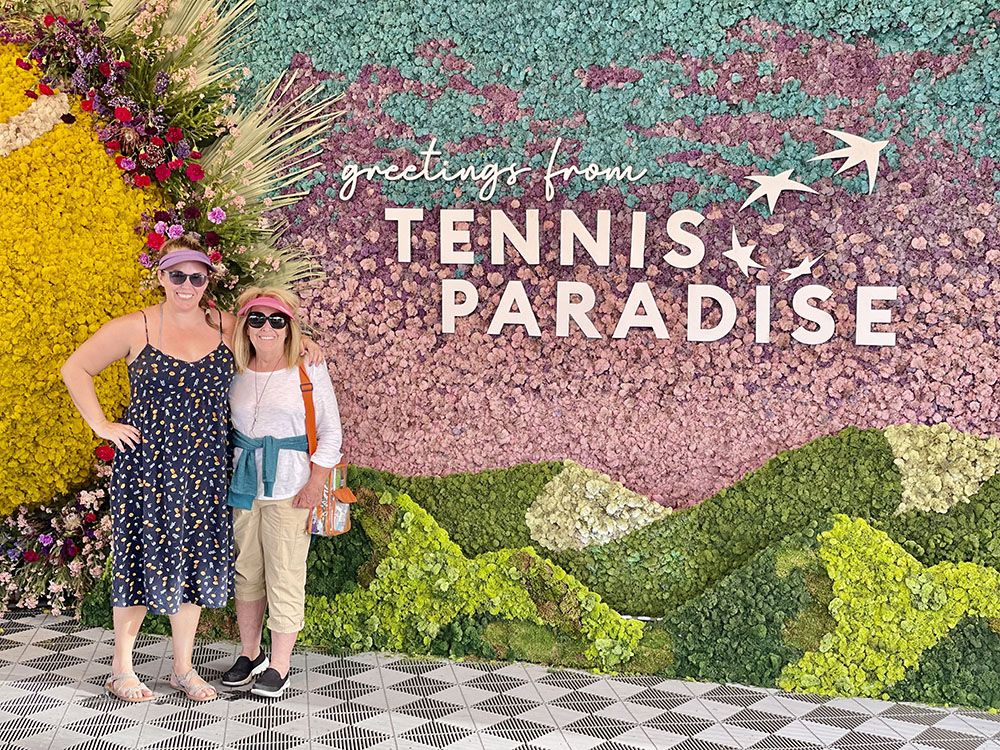
As a former tennis player on the USTA circuit and a big fan in my adult years, I took copious notes during our five days at BNP Paribas Open in Indian Wells in hopes it’s easier for you to plan your own trip to one of the most prestigious tournaments in pro tennis. Even if you’re a fair-weather fan, you’ll love this event, I promise you.
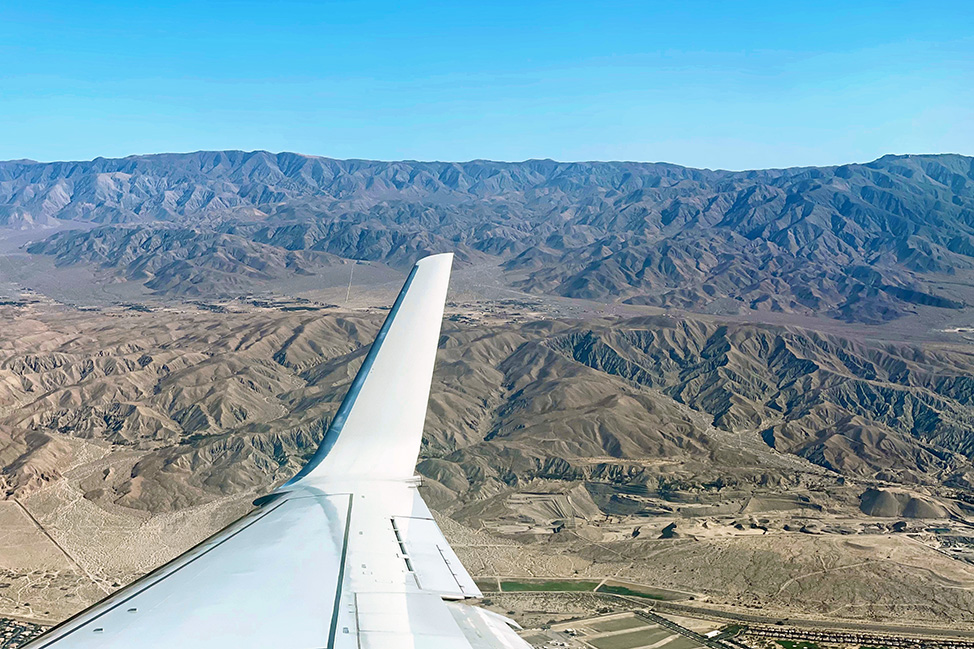
How to get to Indian Wells
First things first: How do you even get to Indian Wells? Palm Springs International Airport (PSP) is just 15 miles west of the tennis garden and services many direct flights a day. I’ve flown into Palm Springs via Dallas on American Airlines, and I’ve also flown direct from Nashville to Palm Springs on Allegiant Airlines. If you’re flying internationally or don’t have an easy connection to PSP, you can arrive via any of the LA-area airports like LAX, rent a car and drive the two hours to the desert. In our case, it was cheaper to fly into Palm Springs.
You absolutely will need a rental car when you arrive, especially for getting out to and around Indian Wells. The desert area of Southern California is very spread out, and while ride-sharing does exist out there, it’s not the most reliable mode of transportation in the area. On my last two visits to Palm Springs—March of the two past years—I’ve rented a car and only taken an Uber if parking was going to be an issue.
Also worth noting is the Indian Wells tennis tournament falls during prime Spring Break season every year, so you’ll also be competing with families looking for a little late-winter sun. In other words, book your rental car as far out as you can when planning a future Palm Springs vacation, a lesson we learned the hard way when I spaced on booking a car and could not find a single vehicle for rent three weeks out. You can check rental car prices and availability for Expedia here or Discover Cars here.
Where to stay for Indian Wells
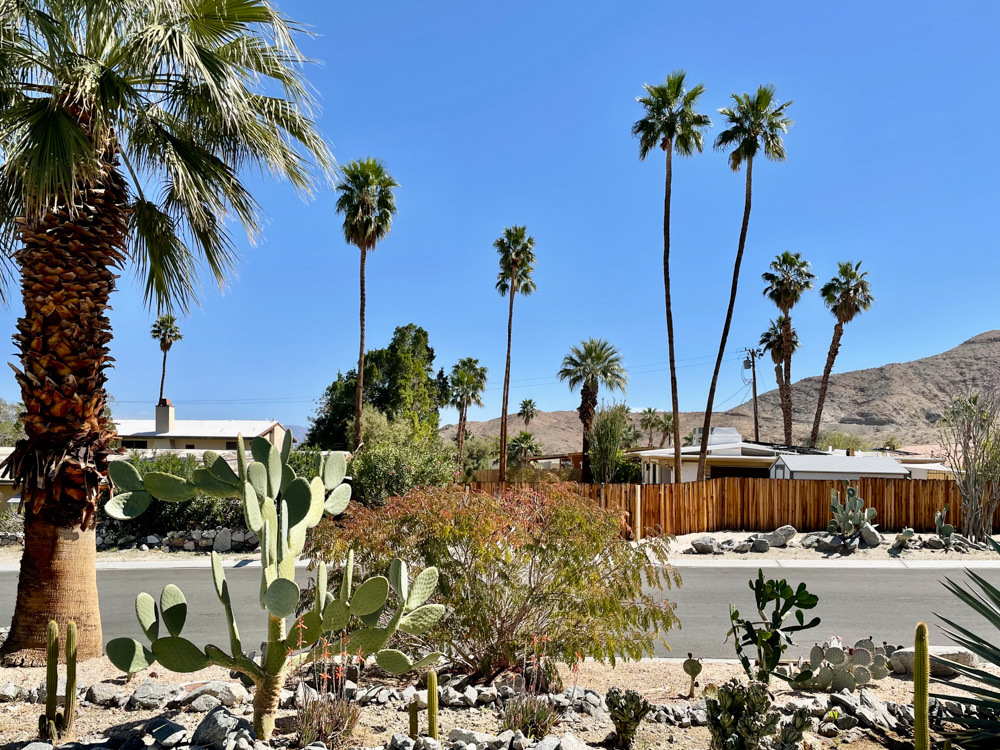
The Greater Palm Springs area spans nine cities—Palm Springs, Desert Hot Springs, Cathedral City, Rancho Mirage, Palm Desert, Indian Wells, La Quinta, Indio and Coachella—and it’s all positively stunning desert terrain, so it can be hard to figure out where to stay for Indian Wells. If I were going to the area simply to enjoy the food, dining and art, I would stay in Palm Springs, as we’ve done several times before.
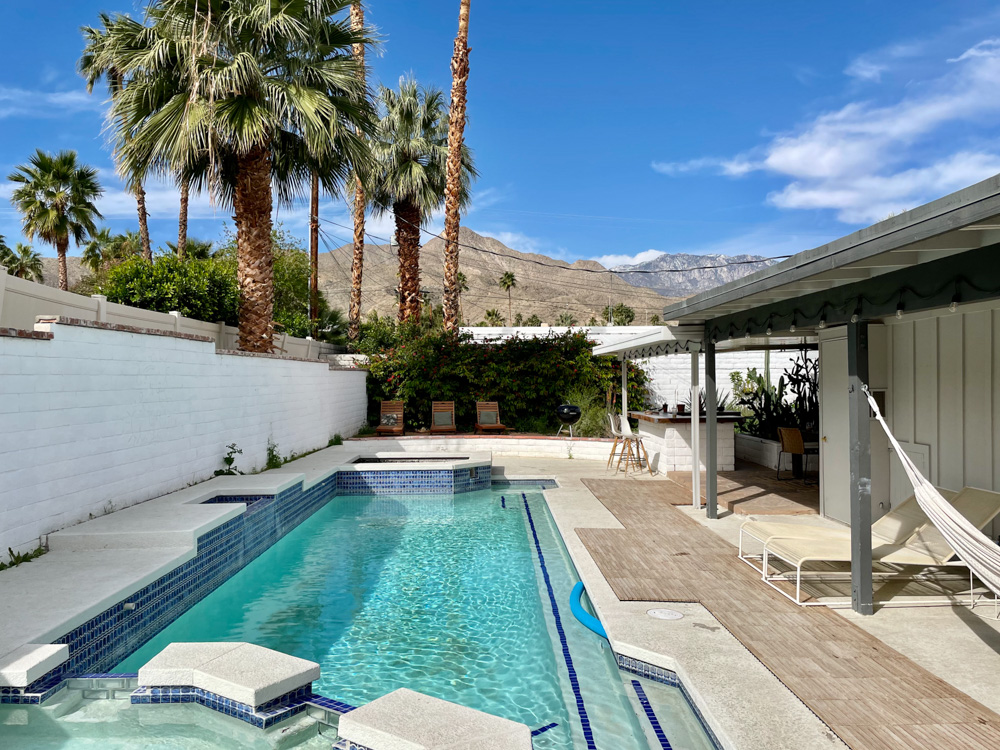
However, traveling to Palm Springs for tennis is a different ball game. If you’re a mega-fan and plan to be on site from start time till well after dark each day, you’ll want to stay as close to the grounds as possible: in Indian Wells, Rancho Mirage or Indio. For our own Indian Wells experience last year, Mom and I booked a vacation rental in Cathedral City with a pool. It was great to kick it by the pool each morning before heading to the tennis center grounds each afternoon.
That 25-minute drive to and from Indian Wells, plus parking then walking to the courts, at the start and finish of each day got old quickly, though. If we were to do it again, I’d book much further out and snag a rental house in Indian Wells instead. It’s a good strategy for groups, too; if some individuals don’t want to stay as long as you do, they can easily Uber or Lyft back to your hotel or rental.
Hotels and rental houses can be pricey during the BNP Paribas Open, and we booked our rental about six months before when inventory was still high. Here are a few hotels in Indian Wells and rentals near the tennis garden where you might start with your lodging search:
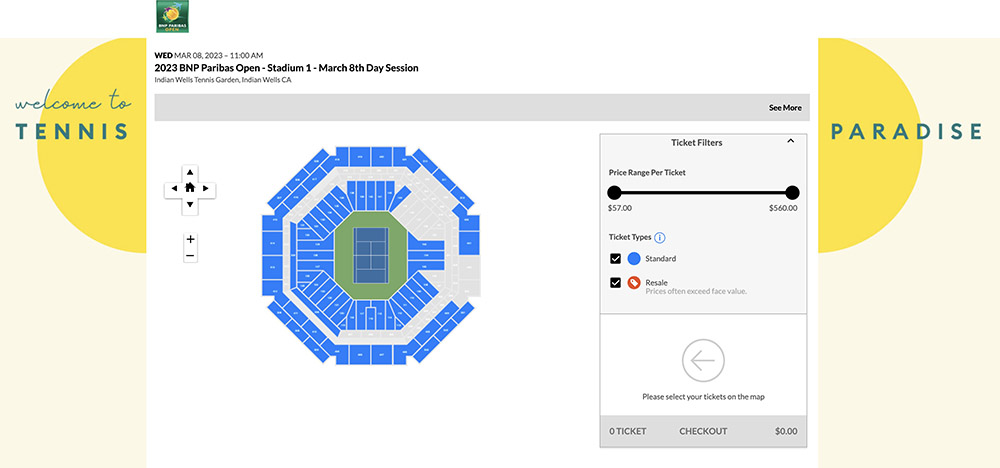
How to pick seats at Indian Wells
By far the most annoying thing about Indian Wells was hacking the ticketing system. There are so many options, and while I’ve been to tennis Grand Slams, seating for every tennis tournament is different. When I first booked our seats at Indian Wells, I had no idea what sessions to book and whether I needed seats or not—and wound up wasting a lot of money. Hopefully, my errors helps others in the same situation. The short of it is: If you plan to watch the center court matches, you’ll need to book seats.
Grounds passes at Indian Wells
Grounds passes (from $30 to $60 a day) are available for day sessions only through the fourth round play, which goes March 2-12, 2025, and will allow you to stay at the Indian Wells Tennis Garden for the evening sessions, as well. Grounds passes do give you access to non-reserved seating for Stadiums 2 through 9 the entire day; that said, a good majority of night sessions take place on Court 1, so only having a grounds pass is not the best option if you want to see night matches.
Pro tip: If you’re on a tight budget, grounds passes for qualifying matches on the first three days—in 2025, that’s March 2, 3 and 4—are just $10.
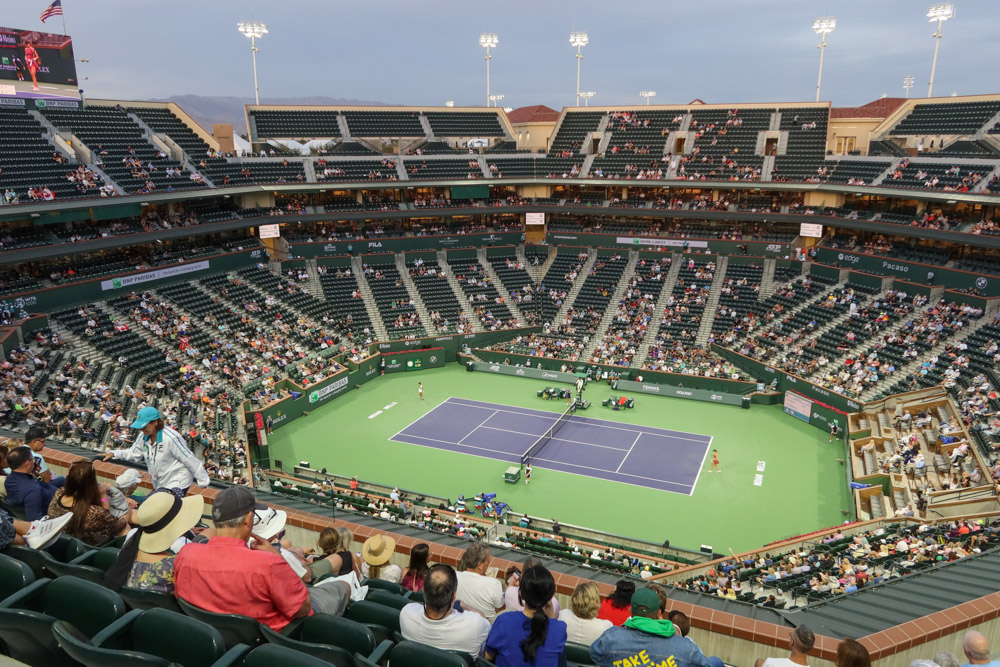
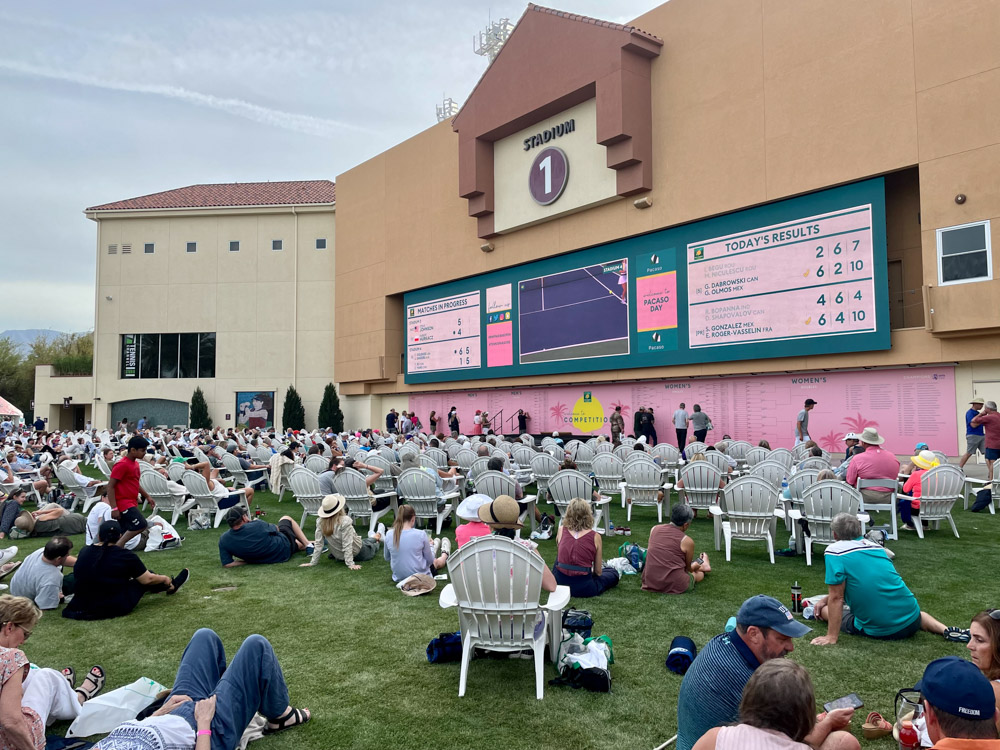
Stadium 2 is included in the day session as well as the night session and many of the big players who aren’t assigned the main stadium will play their matches there. The only issue we found is that a lot of Stadium 2 is reserved, so seats can be tough to come by during big matches and on the opposite side of the stadium from the entrance. Also, Stadium 2 is half-shaded and half-direct sun in the height of afternoon, which can not only be brutally hot but also tough conditions for watching a match.
Access to the main court at Indian Wells
If you want access to the matches at the main court, Stadium 1, day or night, you must purchase a separate ticket, which is attached to a seat. We didn’t realize this in advance and found ourselves buying night tickets each day to ensure we saw the big matches.
Stadium 1 prices range dramatically from $60 in the earlier rounds into the thousands for the quarterfinals, semis and finals. On average, I’d say we spent around $175 per person for seats every time we booked a Stadium 1 ticket. This was often on top of what we had already spent for day session passes. A few times we sat in nosebleeds, and two nights we sprung for the lower bowl. The 400 levels are so high, it’s incredibly hard to follow the match, so I’d say if you’re going to spend the money, do so when you can get tickets in a 100 or 200 section.
Since they scan your tickets via the BNP Paribas app to get into Stadium 1, you will only be able to access the section for which you bought your ticket. In other words, no seat-creeping to move up to a vacant section.
For Stadium 1, there’s a Daily Double option where you can reserve the same seat for the entire day; this is the more economical option now that I realize how much extra we spent to see matches at Stadium 1 after already purchasing day grounds passes. Next time we go, I’ll go this route on the days when all of our favorite players are scheduled for the main court.
My biggest tip for booking tickets is to wait until the week you’re attending—even day of in some cases—so you know what matches you’ll want to see. We made a classic rookie move and booked all our tickets months out being afraid sessions would sell out, then wasted so much money on tickets we didn’t use once we arrived to the garden and realized we needed a separate ticket for some matches. We wound up springing for several nighttime sessions because my mom is tennis’ number one fan and wanted to see many of her favorites take the court.
Luckily, we were able to buy tickets day of on the app. We also stopped in the box office to buy some tickets in person, but that was a much lengthier experience. When possible, I recommend buying tickets through the app.
Buying the series packages
If you’re planning for next year, you could set your calendar for when tickets open in the fall and splash out on the series package instead, which gives you access to every match, every day on every court with an assigned seat. Series packages start at $800 for Loge or $1200 for Prime Loge, then start at $2,850 per person for a stadium box.
Honestly, with as much as we spent going four days and buying day sessions and night sessions a la carte, we will be going this route next time. Per the Indian Wells website, Series Packages patrons are able to sell or transfer their tickets for any individual session they are unable to attend, so this is ideal if you want to see a whole lot of tennis.
Note: Tennis is not a spectator sport for the budget traveler; that said, if you don’t care about seeing the biggest names in tennis, you can get away with just purchasing single day sessions and it will be much more affordable.
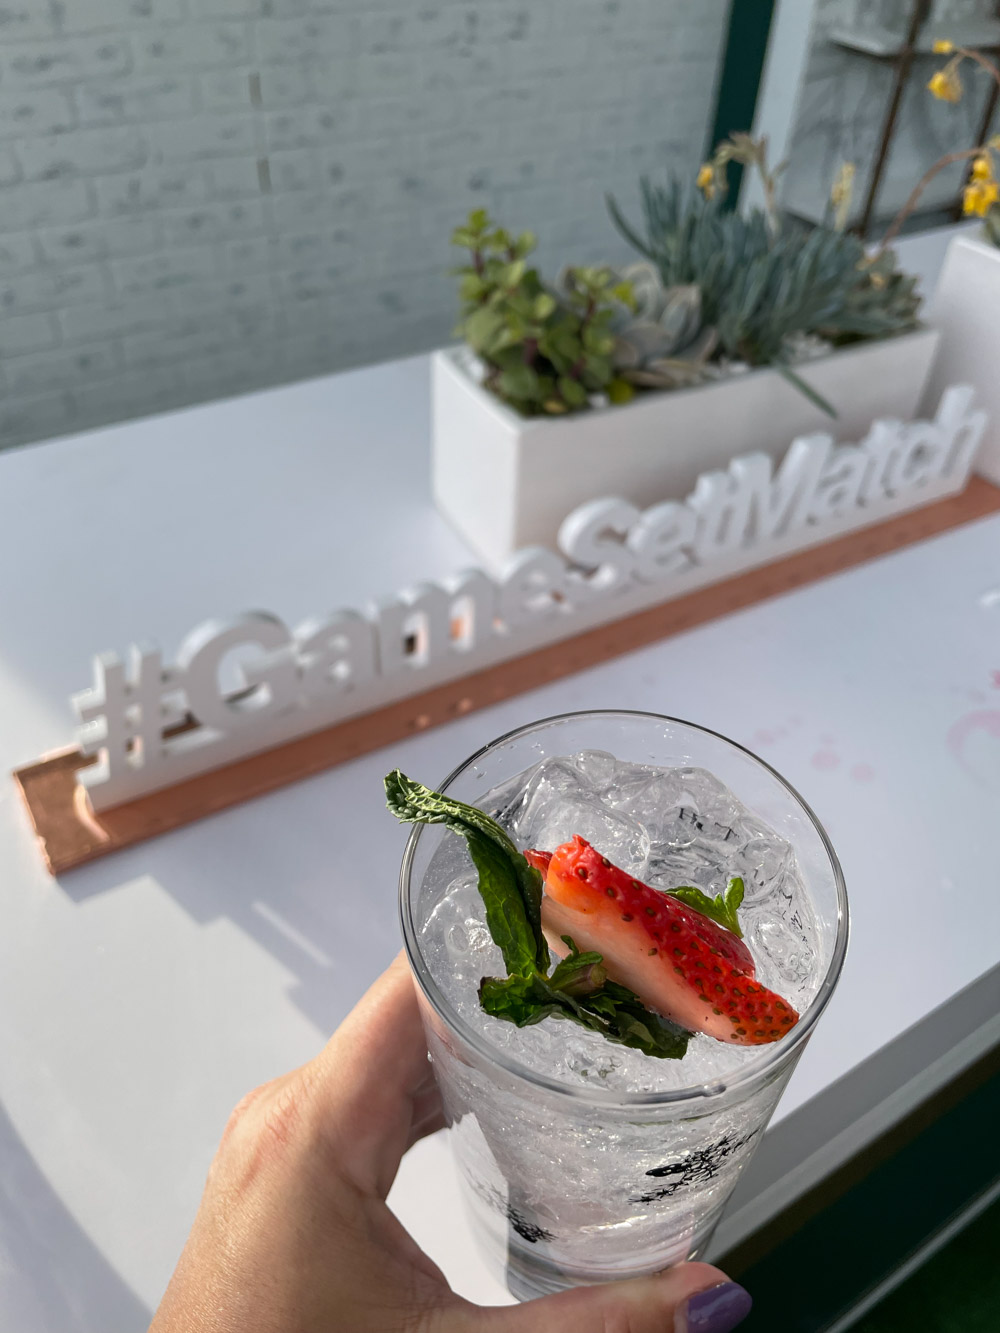
The food and drink at Indian Wells
We ate many meals on-site at the tennis garden, and they were fine, nothing impressive but they did the trick when we didn’t want to leave between matches. The lines were often long, and if you want to get into any of the handful of seated restaurants like Nobu, you need to get there early as they don’t do reservations, only walk-ins.
We also had quite a few drinks, which were limited to frozen margaritas and a limited selection of domestic beers. That said, if you go to the center of the garden, you’ll be able to buy more cocktails from whatever tournament sponsors have activations that year.
When is the best time to attend Indian Wells?
This is all personal opinion. Like any tennis tournament, I prefer attending right in the middle. We got into Palm Springs on a Saturday at the end of the first week and went to Indian Wells every day but one from Saturday through Wednesday and, as a result, saw second, third and fourth round matches for men’s and women’s, both singles and doubles.
While seeing the semifinals or finals would be awesome, my mom and I both agree that we love attending a tennis tournament right smack in the middle due to the sheer number of matches we get to see and the fact that we have a better chance of seeing all our favorites play.
Other things to know about attending Indian Wells
There’s a clear bag policy for larger bags. Like most sporting events, Indian Wells requires the use of clear bags. Since the weather changes dramatically in the desert and you likely will need a light jacket after the sun sets, I recommend buying a clear plastic backpack that’s the maximum size (12” x 6” x 12”) to use as a day bag for your time at the tennis tournament. You can also bring in a purse (does not have to be clear) so long as it isn’t larger than 4.5″ by 6.5″, and I use this clear belt bag (or fanny pack) often when I don’t feel like the added weight on my back.
Bring a hat or visor and sunscreen. No big surprise, but the sun in the desert is brutal. Even when the temperatures hover in 70, the direct sunlight beating down on you is court side. Be sure you put some sort of hat in your bag, lather up on sunscreen and plan on a touch-up every few hours. I’m a big fan of these visors and also have this visor in several colors.
Bring in your own water. The refreshment lines at Indian Wells were long, and it was rare we didn’t have to wait 10 minutes or more just to get water. Had I known you could bring in your own canister, I would have packed my S’well (and also cut back on single-use plastic in the process).
The grounds open at 10am every day. While the matches don’t start until 11am—and often, there weren’t any we wanted to see until 2 or 3—it was nicer being there early in the day when crowds were fewer and parking lots not as packed.
Make sure your phone is charged before you arrive. Everything at Indian Wells—tickets, food and drink sales, merch—is cashless. Because the service is so bad in the desert, this will very quickly drain your phone battery, and you’ll need your phone to check the app for updated match times, as well as to scan in and out. A few times, my phone died entirely and there’s virtually nowhere to charge it inside the grounds, so I’d recommend also packing a portable external charger in your purse or day bag, as well as a phone lanyard so you can keep your phone close but not have to worry about losing it.
Note where you parked. Be sure and drop a pin on your phone reminding you where you parked. The parking lot is massive, and it all looks the same (because, well, desert!). Make a note before you go in the grounds and take a photo of it to help as a visual reminder. And then also write it down in case your phone does die!
Would I go back to Indian Wells?
Absolutely. This was such a fun tennis tournament in the most magical setting. We got to see so many of our favorite players take the court—Coco Gauff, Emma Raducanu, Taylor Fritz, Rafael Nadal, Shelby Rogers, Jenson Brooksby, Maria Sakkari, Paula Badosa, Jack Sock, Caty McAnally, the list goes on—and I’ve rarely seen my mom happier. We just returned from the Australian Open and are slowly working our way through other WTA 1000 events, but I’m really hoping we can make a repeat trip to the Indian Wells tennis tournament in the years to come.
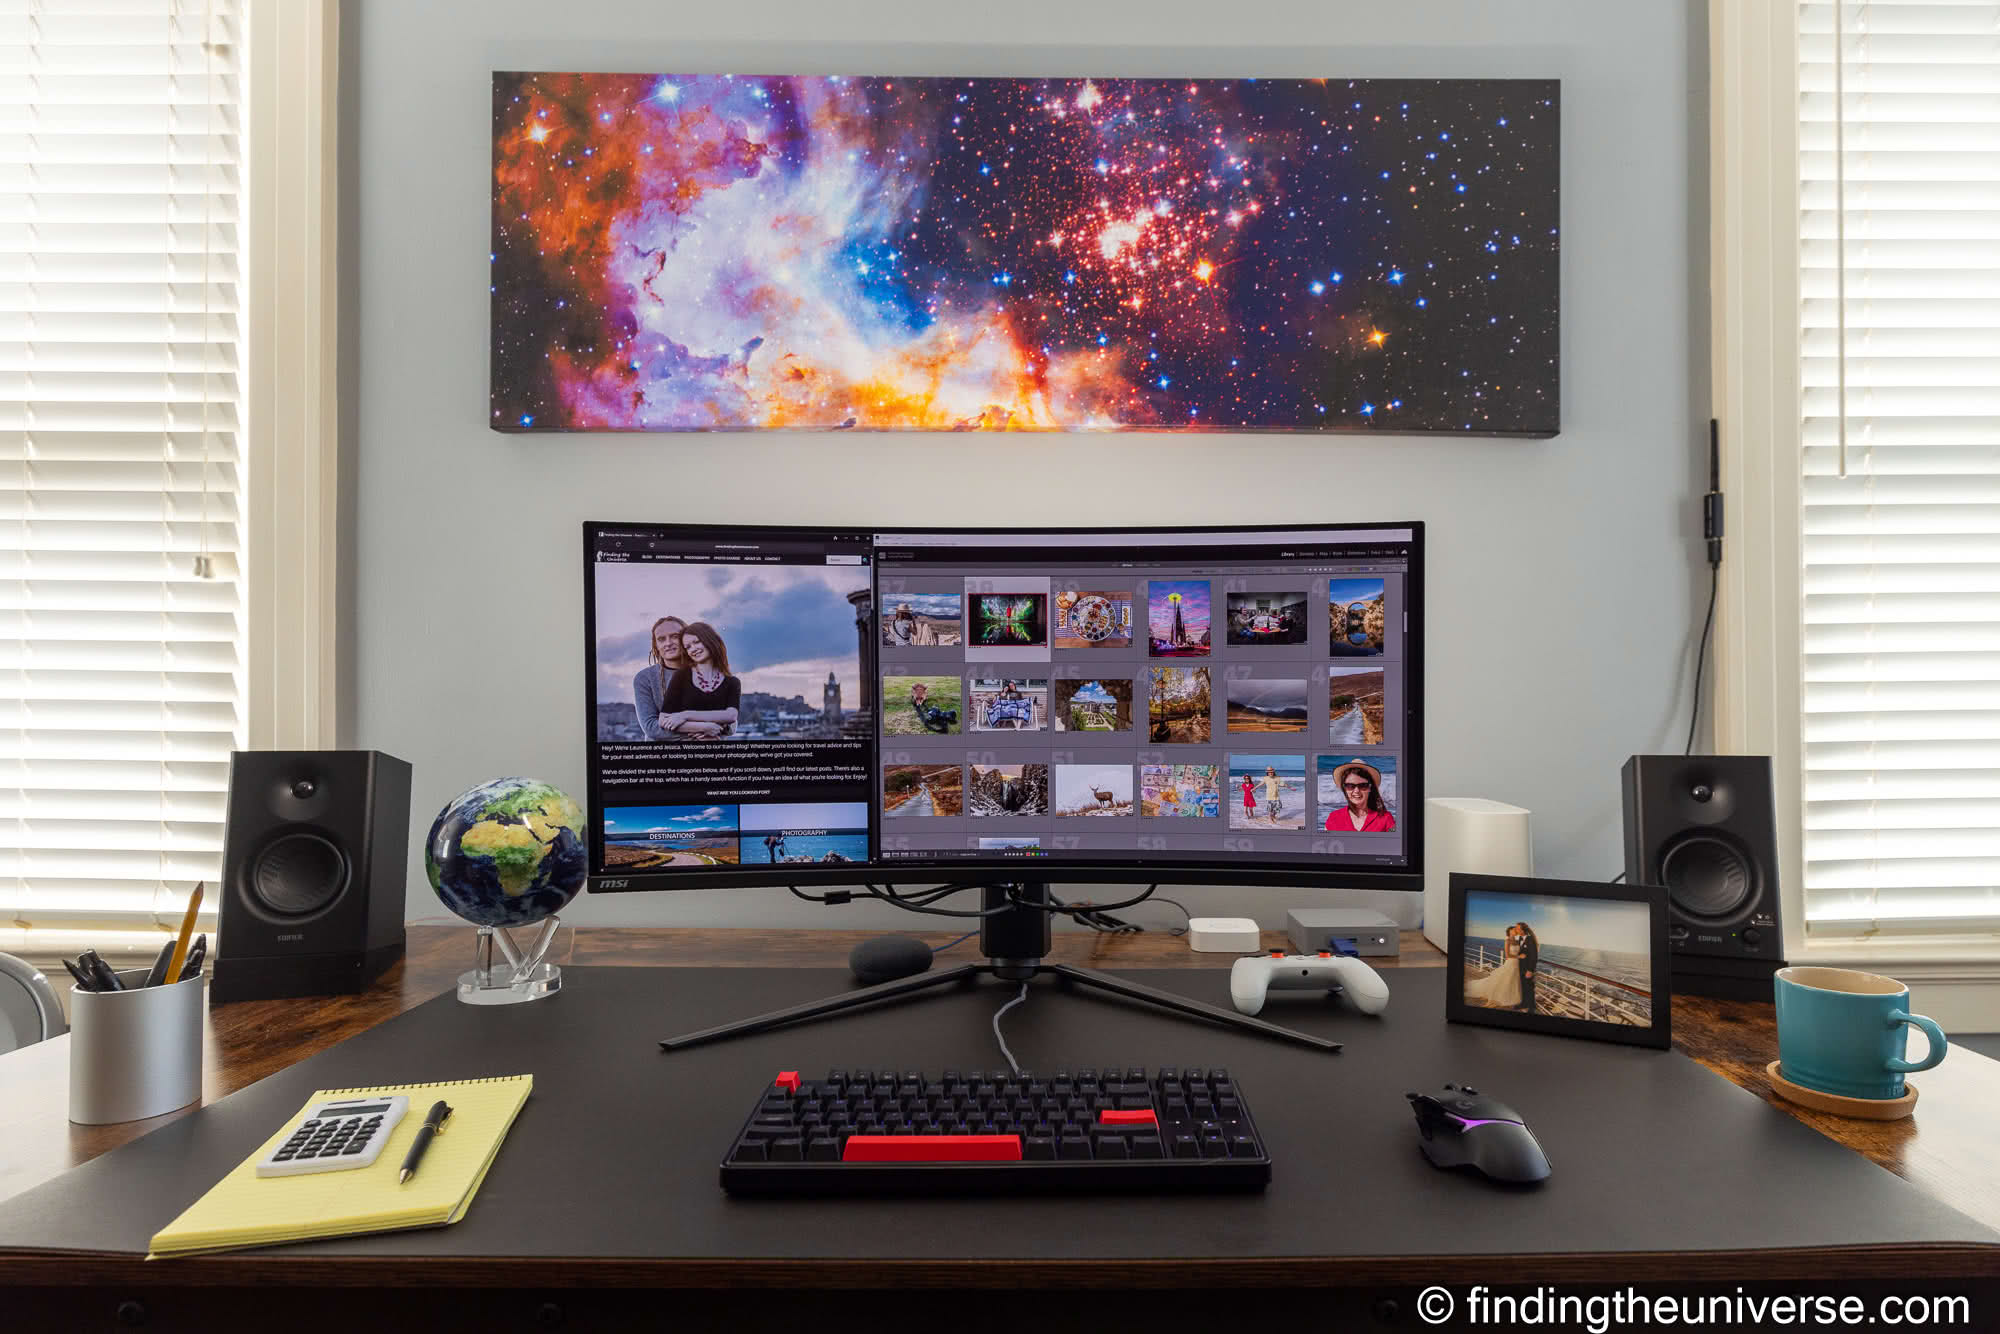
I wanted to share a guide of how I designed and furnished my home office as a photographer. As a travel photographer, I spend a lot of time out in the world taking photos of beautiful places. On the flip side of that, I also spend a good chunk of time at home sitting in front of a computer screen editing photos and creating content like this.
Jessica and I bought our first house together last year and have been busy fixing it up and trying to make it a home. One of the first rooms I focused on was setting up my home office where I do the vast majority of my blog writing and photography editing.
Sure, it’s possible to work on the road. Personally though, I find that I get better results if I focus on capturing content on the road and creating content at home. Editing photos for example is certainly possible with a good photo editing laptop, but nothing beats a nice big monitor for editing photos, an ergonomic chair, and a powerful desktop computer.
I’ve also found that creating a dedicated home photography office helps separate work time from other time. My office is a place where I can get work done and really focus.
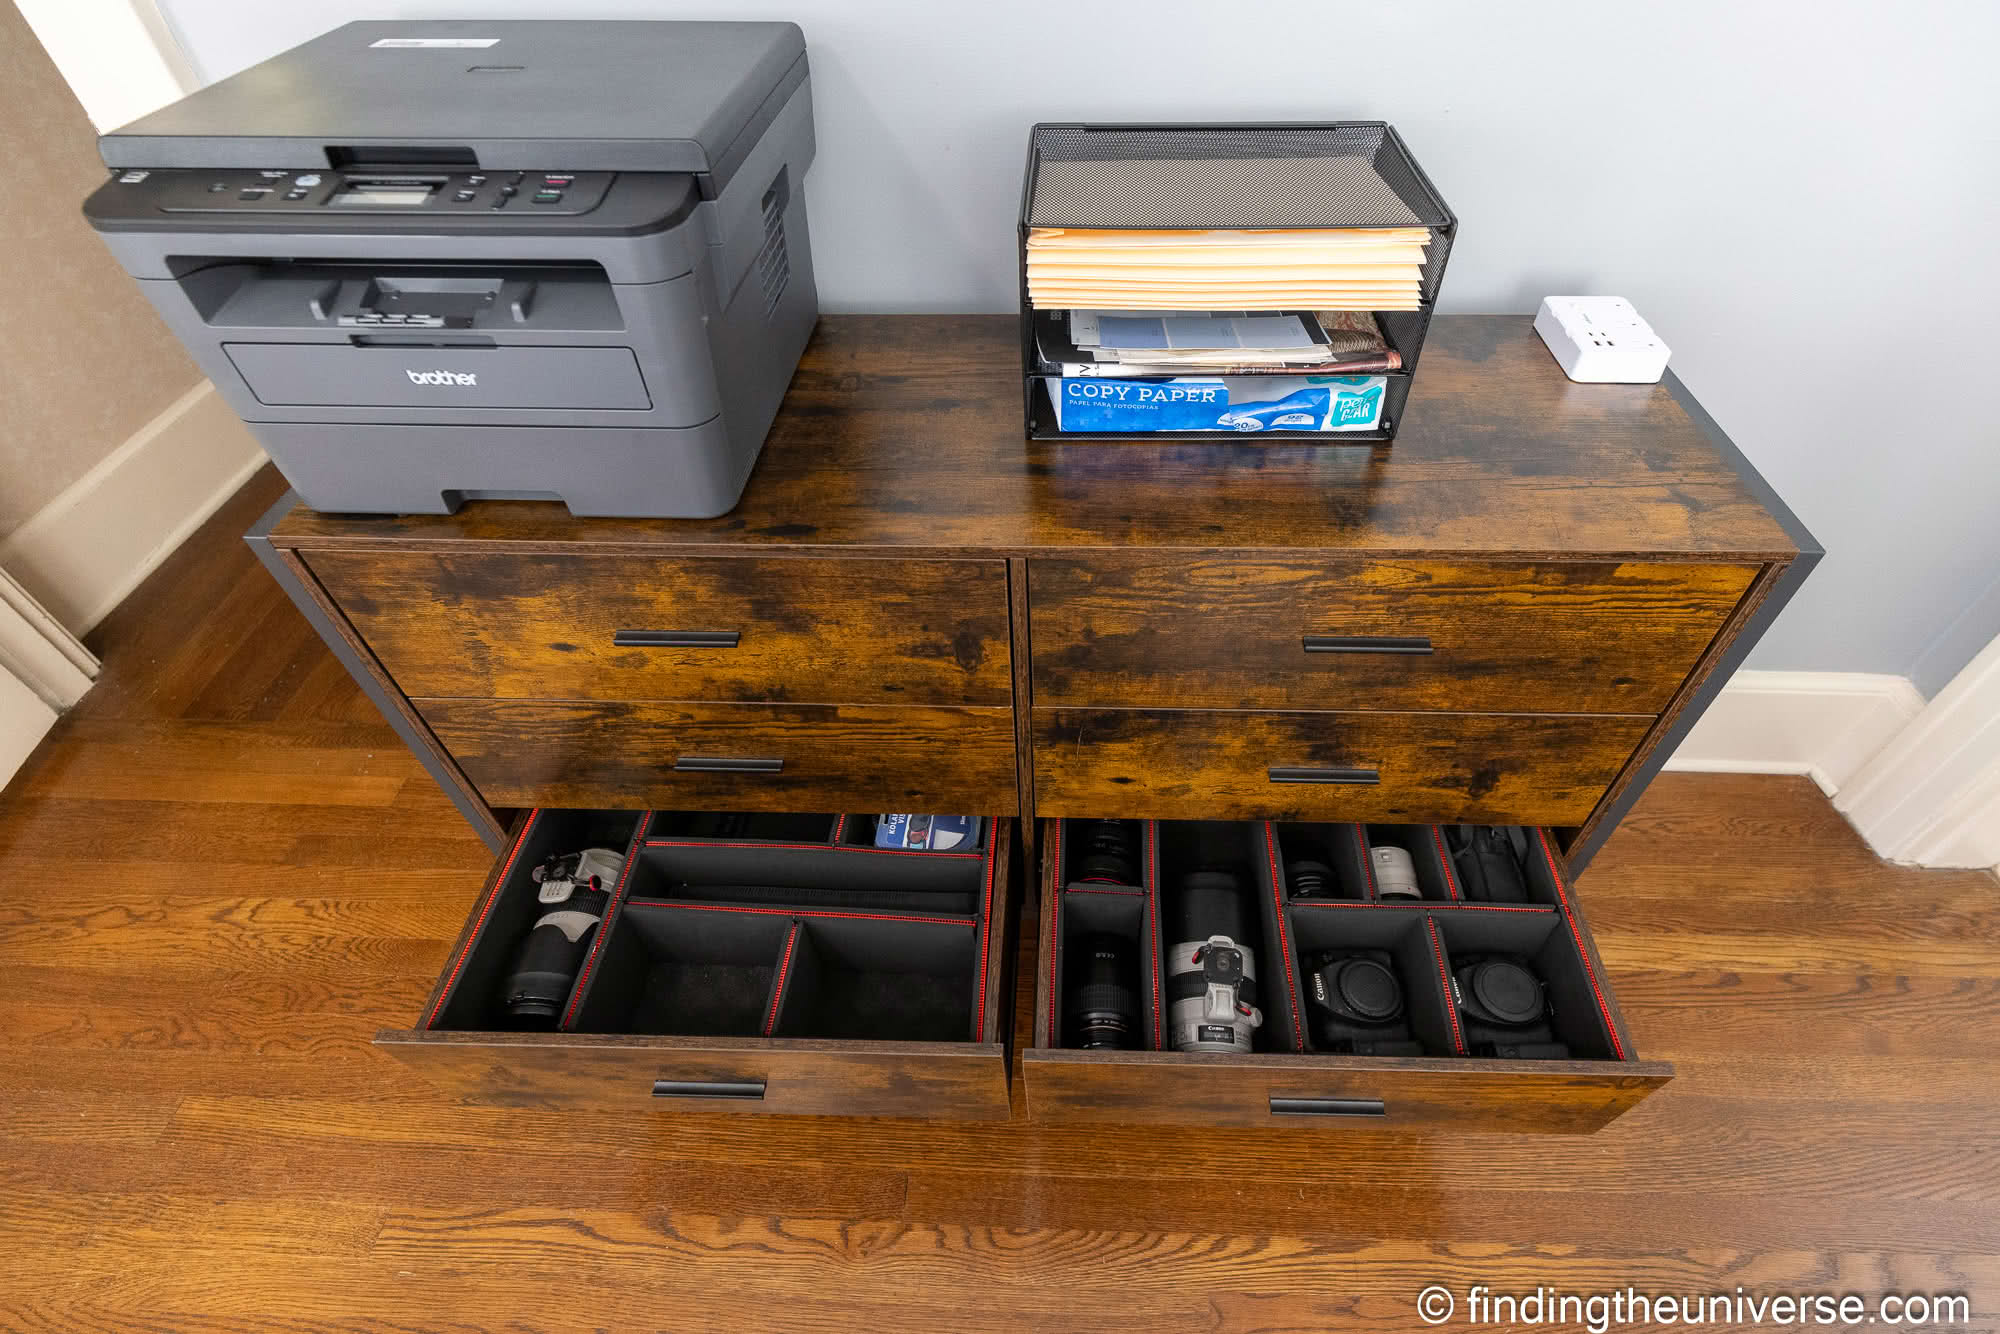
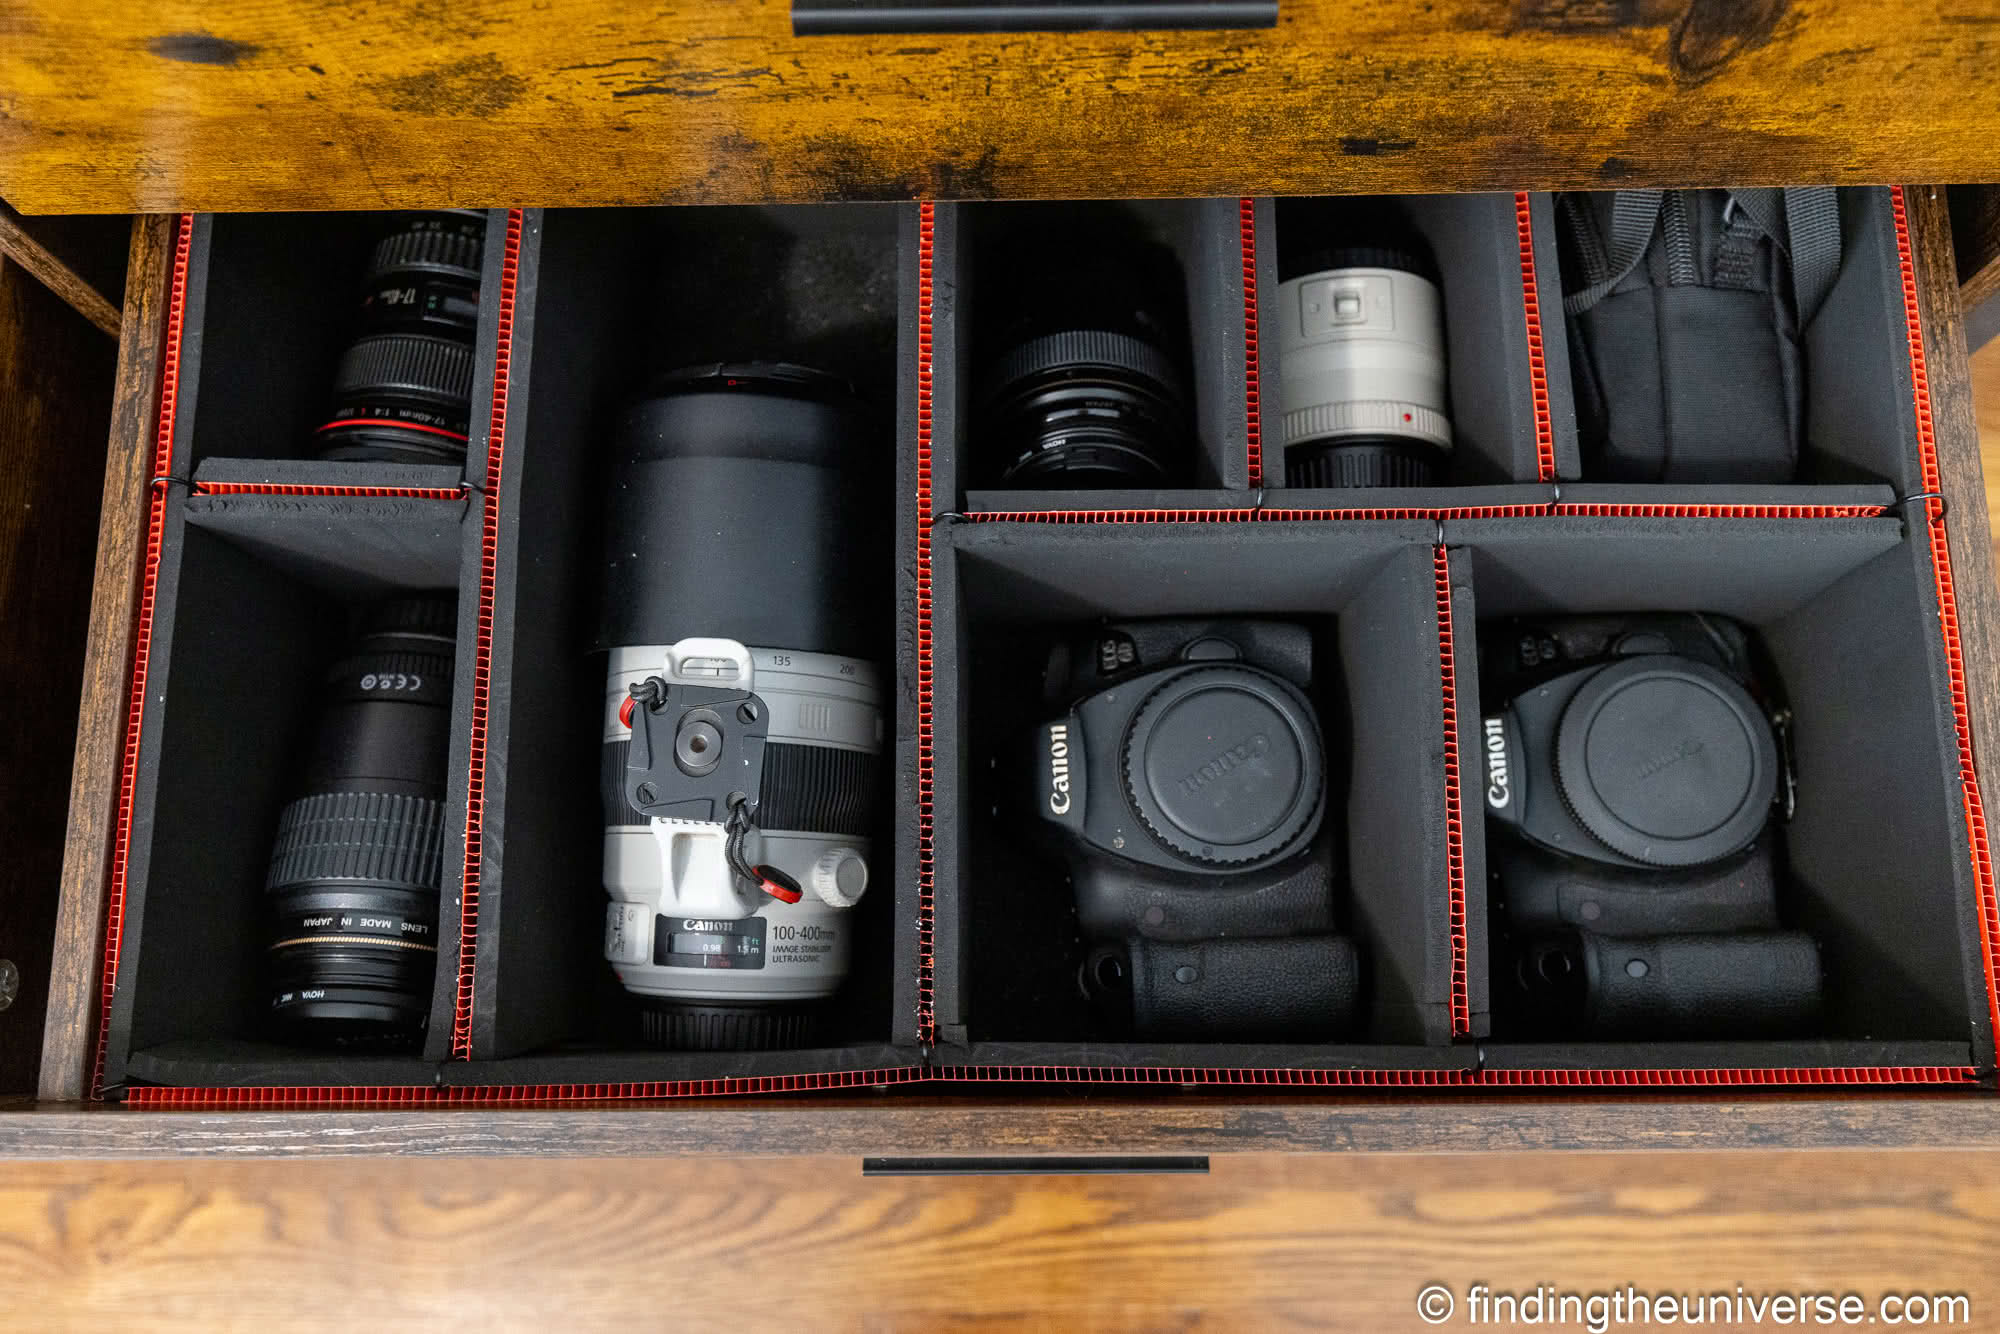
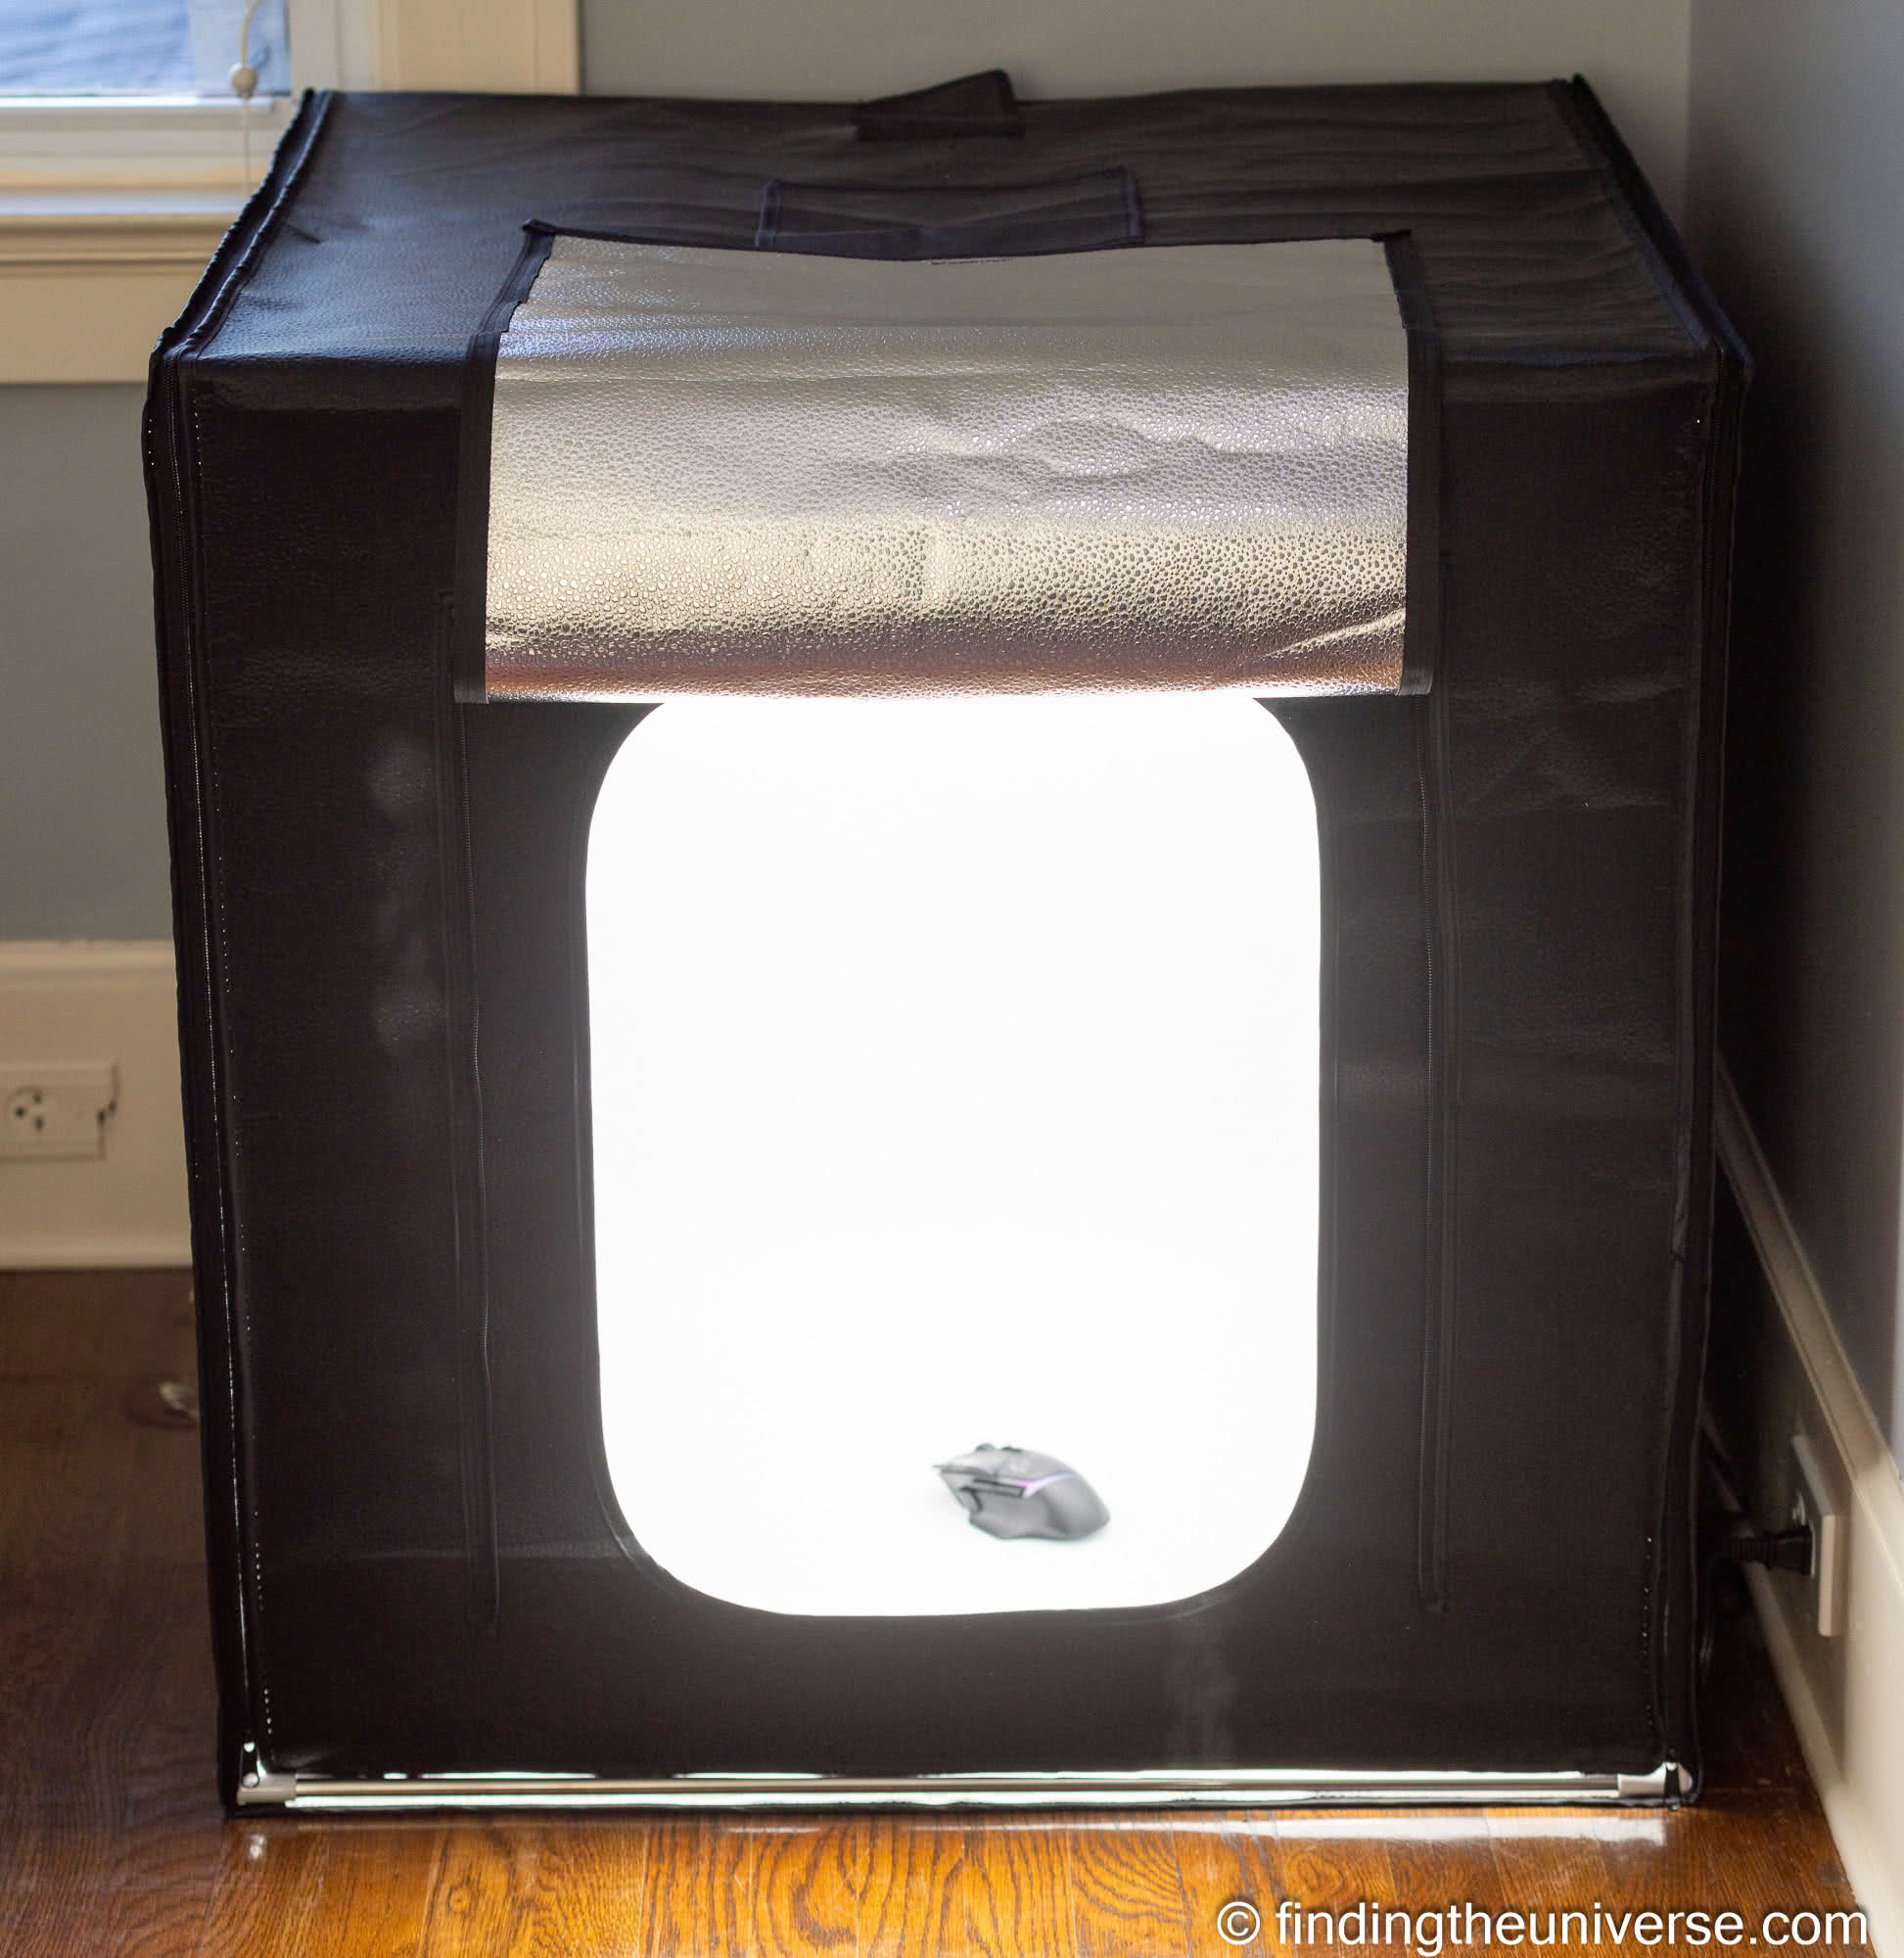
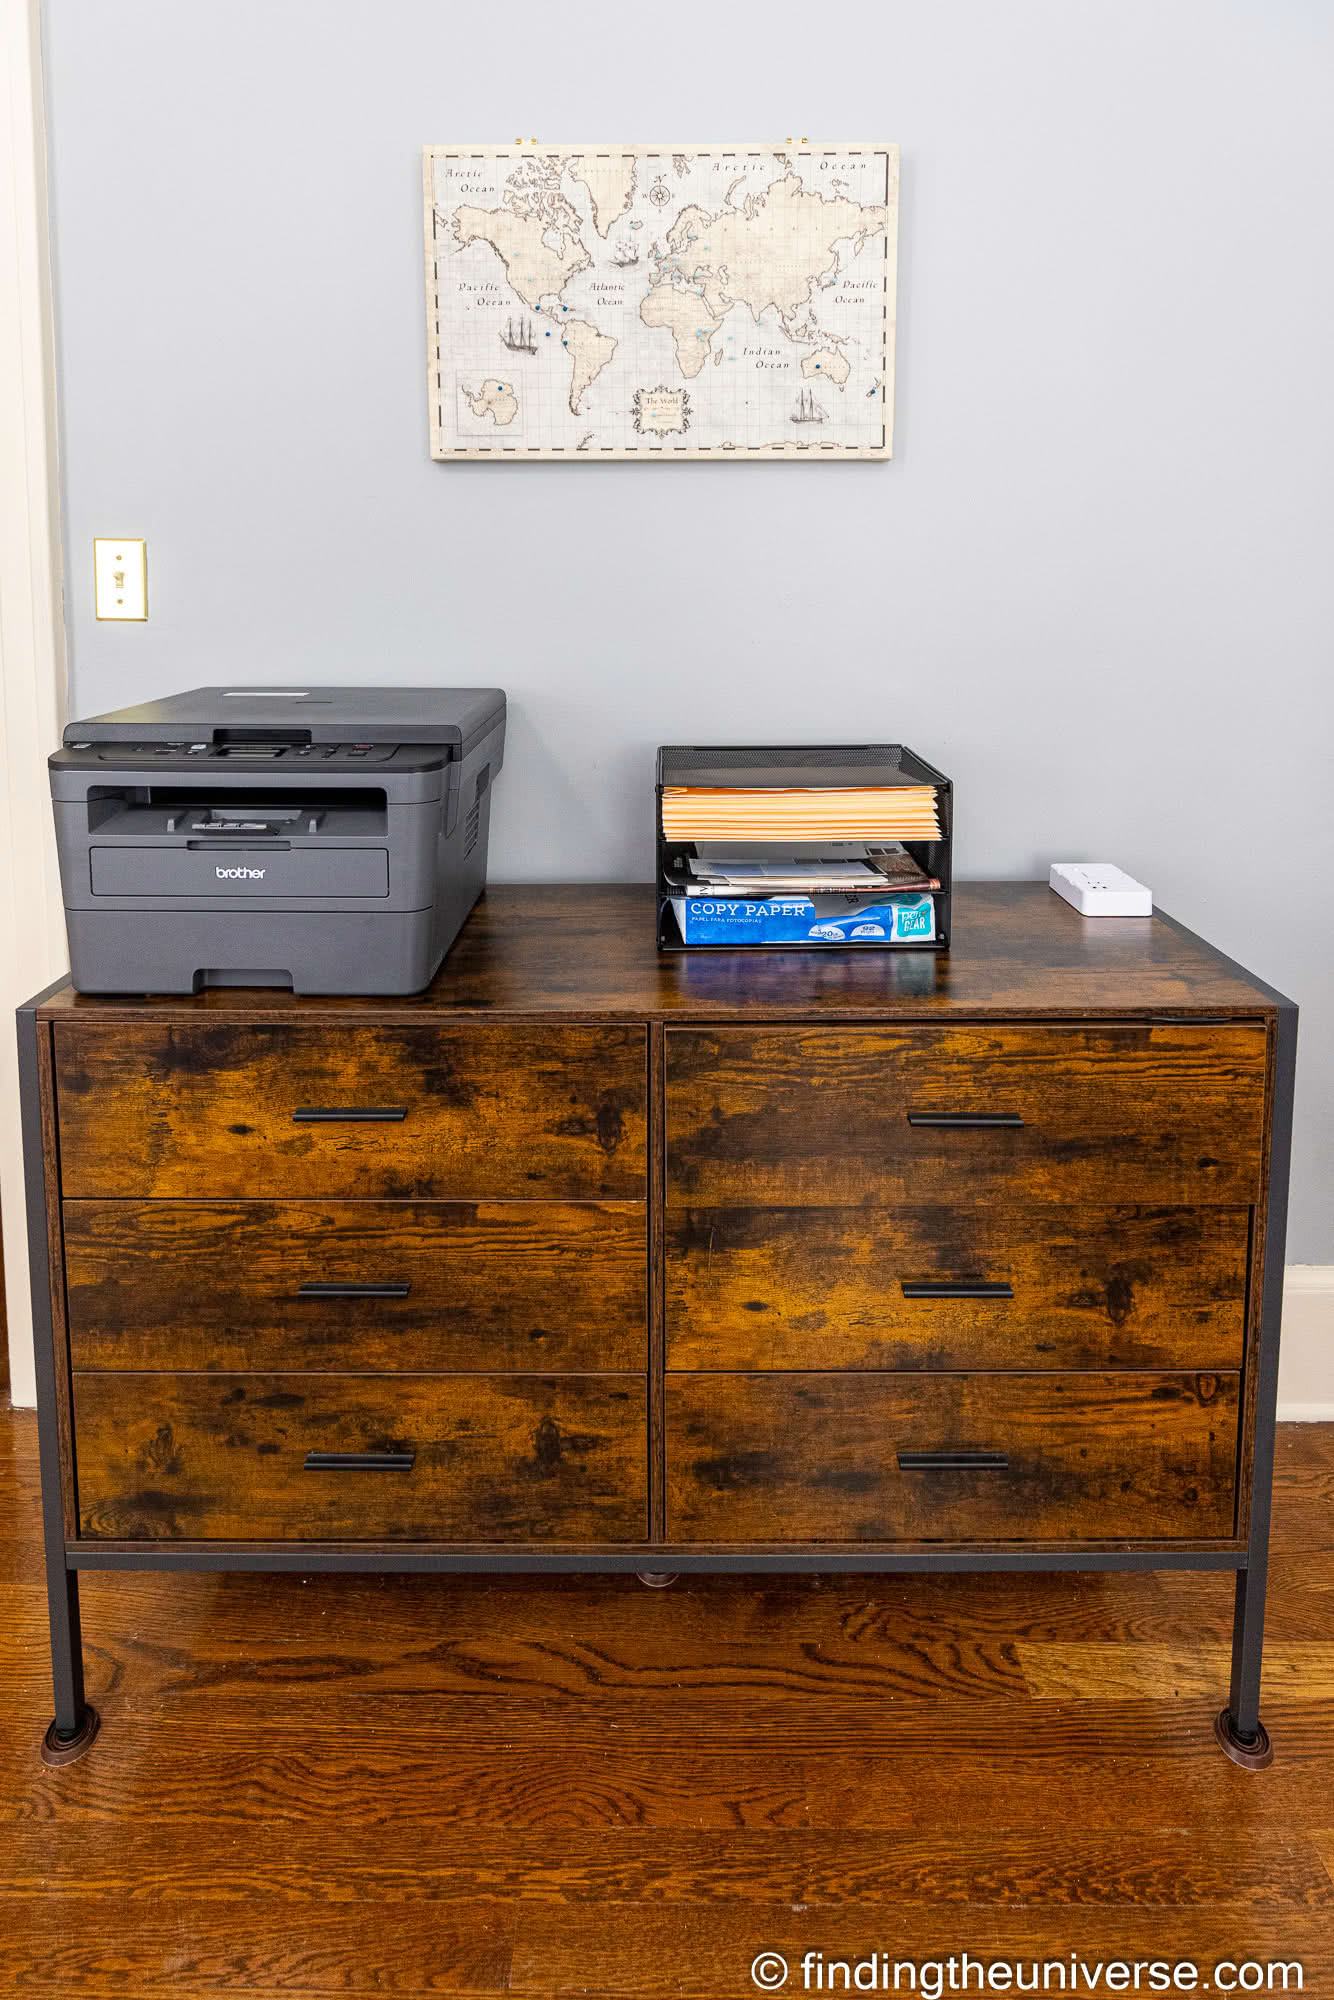
Obviously, function is important, and I wanted to design my office so if would fulfill all my main needs. For me, these included having a comfortable place to edit and organize my photos, an area for camera and photography equipment storage, a mini photography studio area, and a place to file paperwork and business documents.
Still, despite it being an office, where function is important, that doesn’t mean I can’t give it some personality. I spend a fair amount of time here, so it’s nice to make it personal to me, and be a place where I actively want to spend some time.
When we moved internationally, we came with no furniture and little equipment, so I had to start almost from scratch in terms of equipping, furnishing, and decorating my office. So I’ll go through all those decisions, what I chose to do, and some options for different budgets and styles.
In this guide, I’m going to go through what I think are the important things to think about when setting up your own home photography office. This is all based on my personal experience creating a dedicated office space for us in our home.
Whilst some of this content will be specific to working as a photographer, the majority of it will apply to any home office space. With so many of us switching to remote working in the last few years, I hope that you find the content in this useful for helping you set up your own home office space!
Things to Consider
Let’s first go over what you need to think about when planning your dream home photography office.
Size and Layout of the Room
The first thing you’re going to need to know is the size and layout of the room you have to work with. If you are lucky, you might have a choice of rooms in your room where you can setup your home office. However, if you’re like me, you likely aren’t going to have a vast choice of empty rooms to choose from.
In my case, there was a spare bedroom that I was able to utilize as a home office. For many people, turning a spare bedroom into an office can make a lot of sense. Maybe you have kids who have left the house, or you just have a spare guest bedroom that doesn’t get a lot of visitors.
It’s also possible that you don’t have an entire room to dedicate to a home office. Maybe the spare bedroom does get some use, so you have to leave the bed in there, or a sofa bed at the least. Maybe you have more of a hallway office situation going on or need to carve out a space in your family room or dining area.
My one piece of advice is to try to find at least a small dedicated area for yourself to work. Even if this is a small corner area with your own desk and storage, this is often nicer than trying to share a space with others for other purposes such as a kitchen table.
Whatever your situation, my suggestion would be to try to find the best option that works for you and the rest of your household. Once you have found a space, I’d suggest measuring it out. Graph paper can be useful to create a sketch of the space.
Once you know the size and layout you have to work with, you can start to plan things like furniture. After all, there’s no point planning on having a huge desk and dedicated studio area if you won’t have room for it. You’ll also be able to start planning exactly where you want to place different items of furniture in the room. Which leads me on to my next point.
Light Sources
When designing your home photography office, one thing you are going to want to consider is the various light sources, and how you are going to be able to control them.
Most spaces are going to have a number of light sources, which may include windows, overhead lights, lamps, and so on. I recommend having a variety of sources of light other than just an overhead ceiling light such a a floor lamp, desk lamp, and natural light.
Having lots of light is going to be great for lots of type of activities you might want to do in your office and having some natural light can help boost our mood.
However, whilst it may seem like a good idea to always have a nice bright working environment, this can be problematic. First, for photo editing, you are obviously going to be working on a monitor. And the brighter the room you are in, the harder it will be to see the monitor. If you’ve ever tried to work on a laptop outside, you’ve probably quickly realized how hard it can be to see the screen.
If you work in a bright environment, you have to turn the brightness on your monitor up to compensate for it. This can have the unfortunate side effect of you editing your photos on a screen that is too bright, meaning that when other people see your images on their devices, or when you print your images out, they don’t look as you imagined them.
The other issues with lots of light sources is that they can cause annoying reflections on your screen. Even on a monitor with an anti-reflective coating this can create a distracting effect.
Now, I’m not suggesting you move your office to a basement and embark on a troglodytic existence (unless you are also using it as a dark room). Although that will give you lots of control over your lighting!
Instead, think carefully about the light sources in your office and how you can control them. Ideally, you don’t want any bright light sources like a window behind you, as this will likely reflect in your monitor. Having your desk facing the windows if you have any will help cut down reflections, if this is possible.
If it’s not possible, and even if it is, you’ll also want to look at how you can control the light situation. So this will be things like using blinds or windows shades that you can adjust when necessary, allowing you to darken the room as needed. Also, plan the lights in your room so they don’t create reflections.
Noise
When planning your home office, you’ll want to think about what levels of noise you are happy to deal with, and what you can do to mitigate noise. From time to time for example I give video talks and presentations, and like many people who work from home I also have conference calls from my office.
Outside of those, I also prefer to work in a fairly distraction free environment if possible.
If you are choosing between various options for where your home office space is going to be, you will want to factor in the sources of noise in each area and if you think you can work with them. These may be external things like road noise or a neighbor’s dog, or internal noise like a lounge TV, kitchen noises, or your kid’s music.
It’s also worth mentioning that as well as external noise coming into your office, you should consider any noise you will be making and how that might affect the other occupants of your home. If you like to listen to music through speakers, or regularly take part in calls, locating your office in a location which won’t disturb other members of your home will be appreciated.
Storage Requirements
Any home office is going to need storage for things like documents, paper, pens and other office accessories. In my experience, a photographer’s home office also benefits from storage for camera equipment and accessories, from lenses and camera bodies to tripods, lights, batteries, filters, memory cards, chargers, cables, and more.
When planning out your home office and your furniture requirements, take into account everything you would ideally like to keep in your office. Don’t forget you’ll need storage for non-photography items as well, from paperwork to general office supplies. Think about the best options you have for storing everything, which might be drawers, shelves, filing cabinets, or something else.
Getting all your photography equipment stored in your office will make it easy to find and manage. It also moves it out the way of the occupants of the rest of the house, which can be a good thing for peace of mind.
How to Set up the Perfect Photography Home Office
Now I’ve covered the things you want to think about when planning your photography home office, I’m going to share some ideas for the key components you need. I’ll share what you need to think about for these components, as well as some recommended options based on my personal experiences.
Desk
One of the most important parts of any home office set up is the desk. You have a few choices to make when it comes to a desk.
First, and most importantly, the size of the desk. Obviously, this will be largely determined by the size of your room. If you have a larger room, then you’ll be able to fit a larger desk. If you have as smaller room, well, you’ll have to work with what you have.
To get an idea of the size that is best for you, I would write a list of all the things you would ideally want to sit on your desk and their size. This might include your monitor, keyboard, speakers, office organizers, mouse, computer tower, external hard drive, headphones, microphone, framed photos, coffee mug, desk calendar, plants, stapler, etc.
What else would you ideally like to be able to fit on your desk when needed such as your laptop, gaming gear, ring light, filming equipment, planner, or an extra monitor?
To save space, getting a desk where you can store things like your computer tower, speakers, and/or external storage underneath is a good idea. Just be sure when planning that your chair and legs will still have plenty of room.
For a home office I’d generally recommend a desk size that is no smaller than 48 inches wide and 24 inches deep. However, I personally believe that larger is better.
A wider desk will give you more room, so if you need to keep a notepad handy, or use a graphics tablet for example, you won’t be worrying about having enough space.
A deeper desk will allow for larger monitors, and a larger monitor can really benefit photo editing. If you have more than one monitor, then you definitely want to choose a larger desk.
So, if you have the space, I’d recommend looking at a desk that is more like 60 inches by 30 inches. Personally, I have a desk which is 71 inches wide and 35 inches deep and I love how much room I have.
There are also a number of other factors to consider. One of these is whether or not you want a standing desk. These have become very popular, with the idea that you can vary your position through the day from standing to sitting.
There are some downsides to a standing desk though, not least of which is cost, as a standing desk requires additional engineering to build and so obviously costs more. Some standing desks may also be less stable than regular desks and may not accommodate large monitors. You also need to think carefully about cable management with a standing desk and how you will manage the desk changing height with your setup.
You also have to think about if you want storage in your desk and how much you want or need. Drawers can be great for limiting the amount of stuff on your desk as you have places to store your pens, notebooks, paper, office supplies, extra cables, headphones, USB sticks, etc. The downside of a lot of drawers is limited space for storage under your desk. So think about if there are things you would ideally like to sit on the floor under your desk.
I personally chose a desk with no drawers as I wanted to be able to use the space underneath my desk for a large computer tower, Internet box, UPS battery storage tower, my office waste basket, and a bunch of cables. However, ideally I do wish I had at least a pencil drawer.
Finally, there are aesthetic decisions to be made, including what material the desk is made from, desk color, design style, and so on. Desks are available in all sorts of materials, including solid wood, engineered wood, and metal. Different materials will result in different prices, but this is primarily an aesthetic decision rather than a functional one. The main functional concern is to ensure it is a solid desk that will hold all the things you need and that it will hold up over time.
My main priority was getting a really solid desk at a good price. I initially thought I was going to get an IKEA gaming desk but when I went to get it in person I didn’t like the quality as it didn’t seem that solid. I also considered getting a simple vintage solid oak wood desk but there were practical issues given the size and weight of such a large heavy desk and getting it up our stairs.
I spent a lot of time researching desks, and I finally ended up going with this 70.8 x 35.4 Tribesigns desk. It is an engineered wood top set on a powder coated steel frame. It offered a great balance of size, weight, and price. It is a very sturdy desk and I have been pleased with it.
The other desk I seriously considered, and would recommend adding to your shortlist, is the Secretlab MAGNUS Pro. That’s an all metal desk which does include the sit to stand feature. It also has a really neat accessories system which works with magnets and which helps with organizing your desk.
Another popular brand that I looked at and which gets good reviews is the Uplift Standing Desk. They offer a range of standing desks with various options of color and material to choose from.
Finally, you can also get good value desks from somewhere like Ikea. A popular hack is to get a pair of Alex drawers, and then purchase a tabletop separately.
For me, it came down to wanting a slightly larger desk. I also really couldn’t justify the price difference for a more premium desk whose features I might not use that often, deciding instead to invest that money in a more premium monitor rather than the desk the monitor sits on!
Chair
Another important decision you’re going to have to make when putting your home office together is a chair. This is where you are going to be spending a lot of your time, so it’s critical that you choose the right chair.
Having been down the chair rabbit hole myself, I should warn you that there is a lot of choice out there. There are also seemingly endless office chair reviews out there which are going to have you second guessing yourself.
The main things you will want to decide are what material the chair is made of (foam vs mesh are the main decisions), and then things like whether or not the chair has armrests, a headrest, what type of upholstery, and how adjustable it is.
Chairs, like seemingly everything in life, are available at a wide price range, from under $100 through to well in excess of a thousand.
I did a huge amount of research when purchasing an office chair. I concluded I wanted a headrest and armrests, a mesh back for air circulation, adjustable height and back, and a foam base for comfort and longevity. A price sweet spot seemed to be between $200 and $500 for a good chair that would last me a while and offer all the features I need.
In the end I settled on this office chair, which I have been very happy with. The seat is very comfortable, it’s adjustable in all the ways I could want, and it is very well built and solid.
From my research, other chairs that you might consider include the Herman Miller range and Steelcase chairs. Both these manufacturers make excellent chairs but they are definitely more expensive options. The good news is that you can sometimes find them used or refurbished for a better price.
Other well reviewed mid-range options include chairs from Branch, Humanscale and Haworth. At the more budget end of the spectrum, look at brands like Sihoo and Staples. The Staples Hyken chair in particular offers great value.
The main thing to remember when choosing a chair is that everyone is different, and so the perfect chair for me is unlikely to be the perfect chair for you. So keep this in mind when reading reviews and getting advice. In an ideal world, you’ll want to visit a store that actually sells a variety of office chairs so you can try them and see what works.
The next best option is to buy a chair from a store with a no questions asked free returns policy, so you can return a chair if it doesn’t work out for you.
If you are a particularly small, large, or tall person, I would encourage you to pay closer attention to reviews for people of similar size and build. For example, Jess is a tiny person so most office chairs are not particularly comfortable for her as they are built for someone larger and taller than her. Some office chair brands offer some of their chairs in different sizes such as Herman Miller, Haworth, and Steelcase.
From a photography perspective I would say there is nothing specific you need for a photography home office chair compared to a regular home office chair. You just want it to be really comfortable and supportive for long periods of sitting down.
Computer & Monitor
A computer is pretty much an essential item for any home office, but especially so for a home photography office. This is where you are going to be doing all your photo editing, a task which requires a pretty powerful computer and a high quality monitor.
I’ve already put together a guide to the best photo editing monitors, so I won’t replicate that information here. That has everything you need to know to choose a good monitor for your photo editing needs, including the specifications to look for and what is important. It also has a number of recommended models at various price points.
I would also add when choosing a monitor to also consider what else you plan to use it for. If you are going to be using for anything else beyond photo editing, such as watching movies or TV shows, or even gaming, then you might want something that is good across a range of tasks.
As an example, many photo editing monitors have lower refresh rates, say around 60Hz. Whilst this is fine for photo editing, it can result in issues when playing computer games. So, you might consider a monitor with a higher refresh rate that works for both photo editing and gaming.
Size wise, I’d suggest something in the 27″ – 34″ range, although this will depend on the size of your desk.
I ended up going with an MSI 34″ ultrawide OLED monitor, which works well for everything from photo editing to gaming to consuming content.
For the computer itself, I do have a guide to choosing the best laptop for photo editing. I would recommend reading that guide as it covers which specifications are important for a photo editing computer and why. However, rather than buying a laptop, I would personally recommend a desktop computer for home office use.
Desktop computer components are nearly always more powerful than their laptop counterparts, as they don’t have the same size and thermal restrictions as a laptop. However the naming convention is the same, so my laptop guide will still prove useful.
I actually built my own desktop computer from parts as it’s something I enjoy doing (and have a computer science background). However, you can purchase excellent pre-built desktop systems. Just be sure to check that the specifications include a recent processor from Intel or AMD, a discrete graphics card (GPU), at least 32GB of RAM, and a 1 TB SSD. Again, check my guide to the best laptop for photo editing for the specifications that matter.
Lighting is important for any office, but particularly so for a home office where you plan to do photo editing, as outlined previously in this guide. I recommend having your lighting coming from a number of different sources (e.g., floor light, desk lamp, window, overhead light, etc.) and being able to control that light as needed (e.g., dimmable bulbs, blinds, diffusers, etc).
In terms of actual lighting suggestions, I have a couple of ideas. First, I would advise a monitor bias light. This goes behind your monitor and bounces light off the walls around you to create a diffuse light source that will reduce eye strain.
I’d also suggest one or more floor standing lamps. You can place these in strategic places around your office to provide light as required. I’d also highly recommend getting a lightbulb that lets you change it’s color temperature, from warm to cool, and which is also dimmable.
This way you can change the lighting in your room depending on your mood and needs, and to ensure a neutral background light when you are editing your photos. I like these Philips Hue bulbs for this purpose. You can also get bulbs like these which change color across the RGB spectrum but those aren’t really necessary.
For photo editing, you want to ensure that your room lighting is not affecting your color perception, so having lighting in the range of 5000K – 6500K (to match your monitor calibration) is going to be ideal. But you might not want a cooler tone all the time, so having adjustable lightbulbs is a good idea, so you can have a more normal warmer light when not editing.
Useful Accessories
There are a few useful accessories that I have which you might consider for your home photography office. In no particular order, these are:
Desk Pad
A desk pad, as the name suggests, is a large pad that sits on your desk. It’s a bit like a mouse pad, but larger. It can make the working area a bit more comfortable and is a better writing and typing surface. If you have a more budget table like I do or a worn one, a desk pad can also be a clever way to disguise that fact and protect the surface from damage.
Desk pads can also be customized so you can do anything from monogramming it to choosing an artwork you like. They’re also available in all sorts of material, including felt, leather, cork, vegan leather, and wool, and in myriad colors and designs.
Personally, I went with a Grovemade desk pad in natural linoleum with a cork backing. I really love all the material choices they offer including leather, natural linoleum, cork, and wool. I chose a simple black because I already have a pretty dramatic canvas print and rug choice in my office, and didn’t want to go entirely crazy. But as with everything, it’s your office, so go with what makes you happy!
Mouse
I actually think a good mouse is a really important accessory for photo editing at home. I particularly recommend you buy a gaming mouse. The reason for that is because most gaming mice come with lots of extra buttons, which you can assign to keyboard shortcuts. I use these to speed up my photo editing workflow, with common Lightroom shortcuts that I use all the time assigned to specific buttons.
I specifically recommend the Logitech line of gaming mice , which I have been using for many years, with my personal favorite being the G502. This is available in a number of varieties. I prefer the wireless version as I find it easier to move without a cord. But it’s also available corded, and I had the corded version for years.
I’d also add that if you decide against a desk pad, then I can recommend getting a nice mouse pad for your mouse instead, which will improve accuracy and protect your desk surface.
Monitor Calibration Tool
If you are serious about your photo editing, it’s important that your display is correctly calibrated. This is particularly important if you plan on having prints of your work made, as it will ensure that what is printed matches what you see on your monitor.
I have a whole guide to monitor calibration here, but the key takeaway is that for the best results you should use a hardware monitor calibration tool like one of these, which is what I use.
External Hard Drive / Network Attached Storage
A backup system for your photos is an essential part of your home photography office setup. If your computer stops working or a hard drive fails, you don’t want to lose all your images.
I have a complete guide to backing up your photos, but the key takeaway is that you need two backup systems in place. First, you need a cloud backup that stores your digital image files offsite. This will protect you in case of a disaster at home. I use and recommend Backblaze, but there are other options.
You should also have a local backup system in place. This will let you get a quick restore of your image files should a local drive fail. A large external hard drive or network attached storage device is the best solution in this case. Personally I have a large external drive I use for on-site backup.
How to Store Camera Equipment
If you’re anything like me, then you probably have a fair amount of photography equipment to store away. Prior to setting up my home office, my camera gear primarily lived between various photography bags I had. This did keep it protected, but wasn’t an ideal solution as I had to go rooting through bags to find what I needed for any given shoot.
It also meant that if I needed that specific bag, I’d have to move everything out of it. In my research for storing my camera gear at home, I came up with a few options.
Ideally, you will have a more permanent storage area in your home that will keep your cameras and photography gear organized, safe, free of dust, and protect it from damage. You want to keep it out of direct sunlight, away from water and humidity, and in a place with stable normal temperatures.
Using Camera Cases
One thing many photographers have is a camera bag, or, if you’re like me, a variety of camera bags for different scenarios. These might include backpack style bags like these, hard cases like this or this, and roll on bags like these. I happen to own all of these types of photography bags and cases.
For storage I particularly like this hard case which is also highly recommended for storing photography items when moving or doing shoots in rough terrain locations. Personally, I concluded that the case would look a little out of place in my home office. Instead, I use it for storing extraneous gear in a closet, where I also keep other items I don’t need on a regular basis like my photography bean bags, extra tripods, extra cables, photography bags, and so on.
However, if you already have a spare camera bag or two, and you don’t have too much gear to store, then using these can be a good option to store your gear in between shoots.
Cabinets / Drawers
The next option to consider is to use cabinets or drawers to store your photography gear. These look more natural in a home office setting, and they are available in a huge range of sizes and materials.
The downside of using cabinets or drawers is that generally the drawers are not designed to store camera equipment specifically. So the drawers might not be deep, tall, or wide enough for your equipment. Additionally, most drawers are not padded or set up in a way that provides any protection for camera equipment.
Some kind of padding or protection is essential for your gear as you don’t want it moving around or bumping around in a drawer when you open and close it as that could lead to damage. So you will likely have to add some kind of padding and divider system, which will take up additional space in the drawers.
If you do decide to go down the cabinet / drawer route, you will want to consider the size of your equipment and how it will all fit into the solution you purchase.
Other factors to consider are how sturdy and secure drawers are (can they be locked for example?), the material they are made from, and of course the price.
One popular option is to adapt a tool chest for your camera gear. Most tool chests are well made, constructed of durable metal, and can be locked as they are designed to store and protect high value tools. There are many brands available, such as Husky and Kobalt, with a wide range of products available.
Of course, you can also purchase a cabinet or chest of drawers from a furniture store and work with that. Just be sure it is large and sturdy enough to accommodate your storage needs.
My Home Office Camera Storage Solution
For my office, I wanted a solution that would let me store my camera gear in an existing set of drawers. I decided that a set of drawers wouldn’t look out of place in an office, and I was able to find this set of drawers that matched my desk, and were within budget. They are designed for clothing storage and have deep drawers, which meant they had the dimensions I needed to store all my equipment.
However, for this to work I would need a solution that provided protection and prevented equipment from rolling around when the drawer opened, as most drawers are not generally designed to keep camera equipment in.
I really liked the look of the Pelican TrekPak Divider System. However, I calculated that I’d need at least four of them to hold my gear, making the cost somewhat excessive in my opinion. I also looked into using ICU systems like these, but again the cost would end up being a bit higher than I wanted.
My solution was to create my own system. I purchased this neoprene adhesive sponge foam, this corrugated plastic, some 1″ acoustic foam for the base, and some stiff craft wire to create the pins which hold it all together. A few careful hours with a sharp knife and measuring tape later, and I had built my own camera drawer storage system where I can keep all my camera gear and accessories.
As previously mentioned, I also use my existing hard case for storing extra gear out of the way that doesn’t fit in the drawers or is more rarely used.
Filing Cabinet
Whatever you use your home office for, the reality is that you are going to need some kind of storage for paperwork. If you regular print photos, then you’ll probably need a space to store and file them. if you do film photography, you’ll need a safe and clean space to store film and negatives.
Even if you don’t print out your photos often, you’re likely going to have business paperwork and receipts that need filing, as well as bit and pieces of electronic gear and adaptors that need somewhere to live.
If you don’t have much of this, then you might consider getting a desk with a file drawer if that is all you need. But if you think you might need more than one drawer of storage, I’d probably opt for a separate filing unit.
Personally, I like having a filing cabinet to keep all my paperwork filed away neatly. You can pick up filing cabinets online, but they are also an item that can easily be purchased (if you have the right vehicle) at a thrift store or second hand somewhere like Facebook Marketplace. Often, the secondhand models are going to be clearance models from old offices, and will be a pretty high quality.
All that said I ended up getting mine online because my car isn’t big enough to fit in the size of filing cabinet I wanted. I got a locking lateral three drawer filing cabinet which went together pretty easily and does the job.
Light Box / Studio Setup
Depending on the type of photography you do, you may want to incorporate some sort of studio setup in your home office as well so you can take the photos you need.
For example, if you do portrait photography, then putting together a dedicated area to do that would be a good idea if you don’t have a dedicated studio space. You’ll need studio lights and a backdrop against which to shoot. A pull down backdrop can be a good idea if you don’t have a lot of space but have a blank wall.
Personally, as I’m primarily a travel photographer I don’t do a lot of photos that require a home studio setup. However, I do review products from time to time, and being able to take photos of them in a controlled lighting environment is handy. For this purpose, I use a large photography lightbox.
If you plan on printing your photos at home, then you’ll want to invest in a good photo printer. There are a number of options to consider, with key decision points being your budget, and the size of prints you want to print
One thing to bear in mind when purchasing a printer is that you will also have to pay for suitable paper as well as printer ink. Both of those supplies can quickly increase the cost of your print.
Personally, I use a photo lab for printing my photos. It’s more convenient, and it also gives me access to a huge array of print mediums. I generally use SmugMug for my photo needs. I also host my image portfolio with them, and if someone orders a product they handle all the printing and shipping for me. You can see my detailed SmugMug review here.
All that said, I do still have the need to print things out at home from time to time, but these are paperwork rather than images. So I ended up purchasing a wireless black and white Brother Laser Printer. I’ve had one of these for years, first in the UK and then in the USA.
Whilst the upfront cost of a laser printer is a little higher than that of an inkjet, the ink toner cartridges last forever, meaning in the long run it is way more cost effective. I also highly recommend a wireless printer so you can have more flexibility in where you place it in your office.
Other Accessories
There are lots of additional accessories you might consider for your photography home office.
Office supplies and organization tools
If you are running a business like I am or just pursing a passion, you’re still going to want some basic office supplies such as pens, stapler, writing pads, paper clips, printer paper, scissors, surge protectors, and the like.
While not exciting, you are also going to want to keep your office organized so you can easily find things. I found that when I just threw stuff in drawers in the past, I was often losing things or buying duplicates of things I already owned.
So these are things like pen holders, file folders, file organizers, drawer trays, wire organizers and cables, and the like. I would evaluate what all you need in your office and then figure out what type of organization tools would be best for you and your space.
Artwork and personal touches
You are likely going to be spending quite a lot of time in your home office, so you will want to personalize it to your tastes and give it some personality. It is the one room of the house where my wife has given me pretty much free range to decorate how I want.
Some of the things I love are space, travel, science fiction, gaming, and photography, and my favorite color is purple. If you came to my office, you would probably be able to pick up on most of these things pretty quickly.
Personally I’m a big fan of space, so I added a canvas print of a James Webb image (freely available from NASA), as well as this galaxy themed rug under my desk.
If you’re interested in a MOVA globe specifically for your desk, we have been given a 10% off discount code that can be used for any 6 inch or 8.5 inch MOVA globe purchased from their website. Just put in coupon code TRAVELCATS at checkout.
In relation to photography, I have displayed some of my old cameras on the filing cabinet. I also have a framed wedding photo on my desk. I am also likely going to frame some of my photos in the future for one of my blank walls.
Gaming wise I haven’t chosen a particularly strong gamer aesthetic, although my PC case does have a bit of RGB lighting, and I have a game controller within easy reach! The nice thing about building a photo editing PC is that it happens to double up well for gaming as well.
The color purple is scattered throughout the room. I even have a purple dragon door topper peeking from atop of my door.
Of course, you’ll want to personalize your office in a way that suits you, which could mean anything from hanging prints of your own work, to other artwork or decor. If you do want to display your own images, don’t feel restricted to print, it’s amazing what you can put images on these days from coffee mugs to rugs to metal.
The main thing though is to make your office a place where you enjoy spending time.
Plants
I love having some greenery in my office and it can really add some visual interest and naturalness to what can be a pretty utilitarian space. You want to go with hearty plants that don’t require too much maintenance. And ones that can thrive indoors in the amount of light available to you in your office space.
I personally favor spider plants as they have proven difficult to kill, and it is a plant that just keeps giving as I start with one and soon have half a dozen of them. I keep mine in a plant pot that sits on a black metal drink tray stand next to one of my windows.
Now, if you don’t have much light or know that you won’t be able to care for a live plant, then I recommend looking for preserved dried flowers and greenery. These are going to look better than fake ones and don’t require really any maintenance, just occasionally blowing them with some air for dusting. Dried and preserved flowers can last for years in a climate-controlled space.
MOVA Globe
One of the things on my desk which I noted above is a MOVA Globe. We first saw these magical contraptions whilst traveling in Venice, Italy.
They are powered by solar energy and will spin when they have enough natural or artificial light. They are a very fun addition to a desk, especially if you like travel as much as we do.
If you’re interested in purchasing one, we have been given a 5% off discount code that can be used for any 6 inch or 8.5 inch MOVA globe purchased from their website. Just put in coupon code TRAVELCATS at checkout.
Scents
You may also want to work in a place that has your favorite scent. Fresh flowers can be one way to infuse some nice scents to your office. You can also go with candles, potpourri, diffusers, incense, wax melts, etc.
One of my favorite scents in sandalwood so I have one of those scent diffusers on my desk with the little wooden sticks and sandalwood essential oils.
Further Reading
That’s it for my guide to setting up a home photography office! If you found this useful, you might enjoy some of my other photography related content. Here are some articles to get you started.
Knowing how to compose a great photo is a key photography skill. See our guide to composition in photography for lots of tips on this subject
We have a guide to what depth of field is and when you would want to use it.
We are big fans of getting the most out of your digital photo files, and do to that you will need to shoot in RAW. See our guide to RAW in photography to understand what RAW is, and why you should switch to RAW as soon as you can if your camera supports it.
You’re going to need something to run your photo editing software on. See our guide to the best laptops for photo editing for some tips on what to look for.
If you found this post helpful, and you want to improve your photography overall, you might want to check out my online travel photography course.
Since launching the course in 2016, I’ve already helped over 2,000 students learn how to take better photos. The course covers pretty much everything you need to know, from the basics of how a camera works, through to composition, light, and photo editing.
It also covers more advanced topics, including astrophotography, long exposure photography, flash photography, and HDR photography.
You get feedback from me as you progress, access to webinars, interviews and videos, as well as exclusive membership of a Facebook group where you can get feedback on your work and take part in regular challenges.
It’s available for an amazing one-off price for lifetime access, and I think you should check it out. Which you can do by clicking here.
And that’s it! I’d love to hear about your thoughts and tips on what has worked for your home photography office and as always am happy to answer any questions you have. Just pop them in the comments below and I’ll get back to you as soon as I can.