برچسب: Process

  • How to Get Married in AUSTRALIA • Straight & Gay/LGBTQIA+ Wedding Step-by-Step Process

    How to Get Married in AUSTRALIA • Straight & Gay/LGBTQIA+ Wedding Step-by-Step Process


    Planning to get married in Australia? Well, we’ve recently just had our wedding there, and in this article, we’ll share with you the full process and requirements, and all the steps that we’ve taken for a stress-free wedding down under!

    TPTKLOOK5
    BlogDisclaimer

    Planning a wedding can be a difficult experience. There’s so much to think about, from the guest list and the attire to the venue and the food. But throw in the added challenge of a destination wedding, and the pressure ramps up even more. It’s like planning a wedding and a group trip at the same time. It’s especially true if you don’t have a hired wedding planner, like us. We took on the entire challenge on our own.

    But it doesn’t have to too stressful. Not gonna lie, there will be some amount or some form of stress in the process, but it doesn’t need to be overwhelming. With the right preparation and the right guidance, you’ll be able to tackle these hurdles and create the wedding of your dreams, even if it’s going to be on the other side of the world.

    By the way, I am NOT a wedding planner or an immigration adviser. But my blogging partner (now husband) Vins and I recently got married in Australia, and I’m simply sharing our experience.

    WHAT’S COVERED IN THIS GUIDE?

    Why Australia?

    First, let’s talk about why NOT Australia. I could think of a number of reasons why you SHOULDN’T choose Australia for your destination wedding. It’s far (8-10 hours away by plane in our case), it’s expensive (the flight alone can be too much), and the visa requirement can severely affect your guest list. While an Australian visa is not as hard-to-get as a Schengen Visa, it is not an easy one to obtain either. There’s always a chance that you or your loved ones will be denied a visa. So take that into consideration.

    But for me, the pros totally outweigh the cons. And I have three major reasons.

    • It’s easy to get married in Australia. There’s no residency requirement. You can just fly into the country as a tourist and get married immediately. There’s not much paperwork involved.
    • It is a beautiful, diverse country. And out of the 65 countries we have visited so far, it’s definitely one of our favorites. We first set foot here in 2015 when we backpacked across the continent from Darwin to Brisbane. And even to this day, 10 years later, it remains our most memorable trip ever. So it does hold a special place in our hearts.
    • Lastly and most importantly, same-sex marriage is legal in Australia since 2017, when the Marriage Act was officially amended to define marriage as the union of two people. And that’s a biggest, most important thing for us, since we are an LGBT couple.

    There’s no difference in the legal process for straight and LGBTQ+ marriages in Australia. The process is exactly the same for all couples, regardless of gender or sexual orientation, including for foreign citizens getting married in Australia. So if you’re straight and you’re planning to get married in Australia, this article applies to you, too. So yes, Same-sex couples can legally marry anywhere in Australia.

    Melbourne Gay Wedding
    Photo by King Abbott Films

    And this is one of the closest countries where we could get married. Taiwan is much closer and it has marriage equality too. But we found out that LGBT couples can only get married in Taiwan if both parties are from countries that legally recognize marriage equality. So even, say, a Filipino-Taiwanese couple can’t get married in Taiwan because one of them is a citizen of the Philippines, which does not recognize it.

    But don’t get me wrong, we didn’t settle for Australia. It was really one of our first choices. The other one was Denmark because I dreamt of a winter wedding, but getting a Schengen visa for our relatives could prove much more challenging than an Australian visa.

    OK, so how did we plan it?


    Step 1: Decide on the wedding type and size.

    What kind of wedding do you want? Is it gonna be a traditional wedding with at at least 50 guests? Or a micro wedding with fewer than 40 guests? Or do you prefer an elopement wedding with just a couple of witnesses?

    This is the first thing that you need to figure out and decide on because it will dictate many aspects of your wedding including the venue, logistics, and the budget.

    Most destination weddings tend to be smaller primarily because there are a lot of factors that your guests need to overcome or take into consideration including the cost, time, and visa.

    Initially, we wanted an elopement type of wedding with just one or two family members. In Australia, you’ll find a lot of elopement packages. Basically, you’ll hire an officiant to wed you and they will be taking care of all the legal paperwork. And that’s it. No big reception needed.

    Some also choose to get married at the City Hall or Courthouse. For example, in Melbourne, the Victorian Marriage Registry offer two main marriage packages:

    • Classic Ceremony Package: AUD 480 on weekdays, AUD 580 on weekends. This includes the service of a celebrant or officiant, traditional wedding script, and a reservation at one of their ceremony rooms at the Old Treasury Building. You can invite guests. One room can accommodate 8 guests, the other up to 55 guests.
    • Legal-only Package: Weekdays only, AUD 380. They’ll take care of the paperwork and provide a celebrant, but nothing else.

    For more information about this, you can visit the official website of the Victorian Marriage Registry.

    I’ve also heard of super private weddings. You can even do it in a hotel room or in a private room at a restaurant, if you’re OK with that. Just make sure you have an authorized celebrant and two witnesses, and that you complete all the paperwork.

    Like I said, it was something we seriously considered: a very simple wedding without any bells and whistles at all.
    But since we got engaged a few years ago, some of our friends and relatives expressed that they would love to be there even if it meant flying to Australia and spending on tickets and hotels. So as the days passed, we started entertaining the thought of more guests. We ended up with a guest list of 20, which was quite intimate and manageable. I think it was the perfect size for us.


    Step 2: Pick a wedding date.

    The next two steps in this guide are actually interchangeable. Step 2 is about the date. Step 3 is about the venue. So prioritize what matters to you more.

    For us, the date was non-negotiable because it was the same date that we became a couple officially. We have been together for 16 years and we always celebrated in February, and we don’t wish to change that. The venue can change, but our wedding had to happen on a specific day in February.

    Earlier, I mentioned that we wanted a winter wedding, with snow and all, which would’ve been perfect. But since we moved it to the southern hemisphere, where seasons are flipped, everything else had to adjust. February is summer in Australia, so the overall look and feel of the wedding would be very different.

    The date is also very important to nail first when it comes to Australia because some of its places can have pretty extreme weather. In some cities, summer can be a sweltering hell of a season. Likewise, in some cities like Melbourne, the weather is notorious for being incredibly fickle. It can be sunny in the morning but then drench you in the afternoon.

    Knowing your date early helps you plan around local conditions, take advantage of off-peak deals, and avoid holiday crowds or monsoon rains.

    The season and weather can also affect not just what you and your guests could wear on your wedding but also the type of venue that is more appropriate. So let’s talk about venue.


    Step 3: Find an appropriate venue.

    Choosing the right venue for a destination wedding is massive—it sets the tone, vibe, and even the logistics of your big day. Do you want a beach wedding? Do you prefer a farm or a vineyard? Or are you OK with getting married in a public park or city hall?

    There are countless of wedding venues in Australia. I simply googled “best small wedding venues in Melbourne” and it bombarded me with a gazillion options.

    Montsalvat Artist Community
    Montsalvat Artist Community. Photo by King Abbott Films

    Some venues are for ceremonies only. This applies to town hall rooms like the Margaret Craig and Thomas Hyde Room at the Old Treasury Building in Melbourne.

    We also encountered bars and restaurants that allow reception only, not the ceremony. One of the venues we seriously considered was this rooftop bar in the city center, but unfortunately they don’t allow ceremonies anymore.

    But there are those that can accommodate both. Here are three venues that we shortlisted because they are great for both the ceremony and reception and they were available on our chosen date.

    • Sandbar Beach Café, which is great for beach weddings. Although we did not prefer it, we weren’t particularly opposed to the idea. Ceremony at the beach. Reception inside.
    • Prince Deck St. Kilda, which is a function hall that would be great for reception and has an outdoor timber deck, overlooking the beach, which would be ideal for the ceremony. But we decided against them because they’re too big. Given that we were expecting only 20 guests and we didn’t really plan on decorating it too much, either would feel virtually empty.
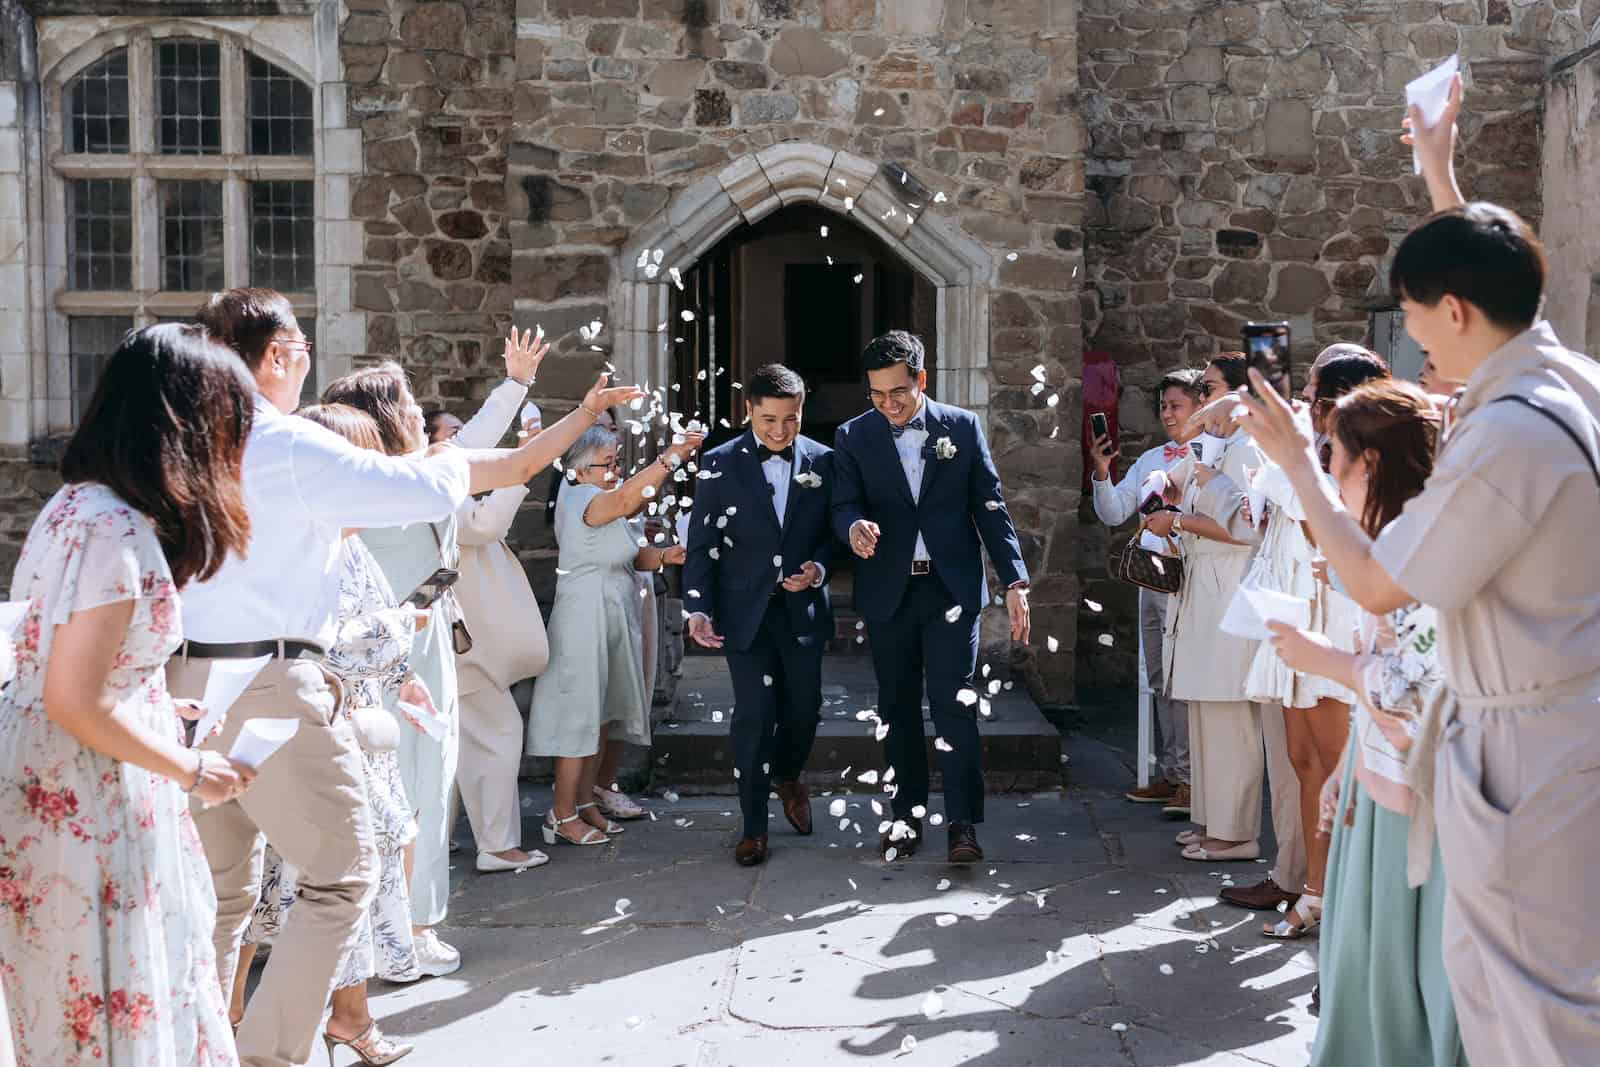
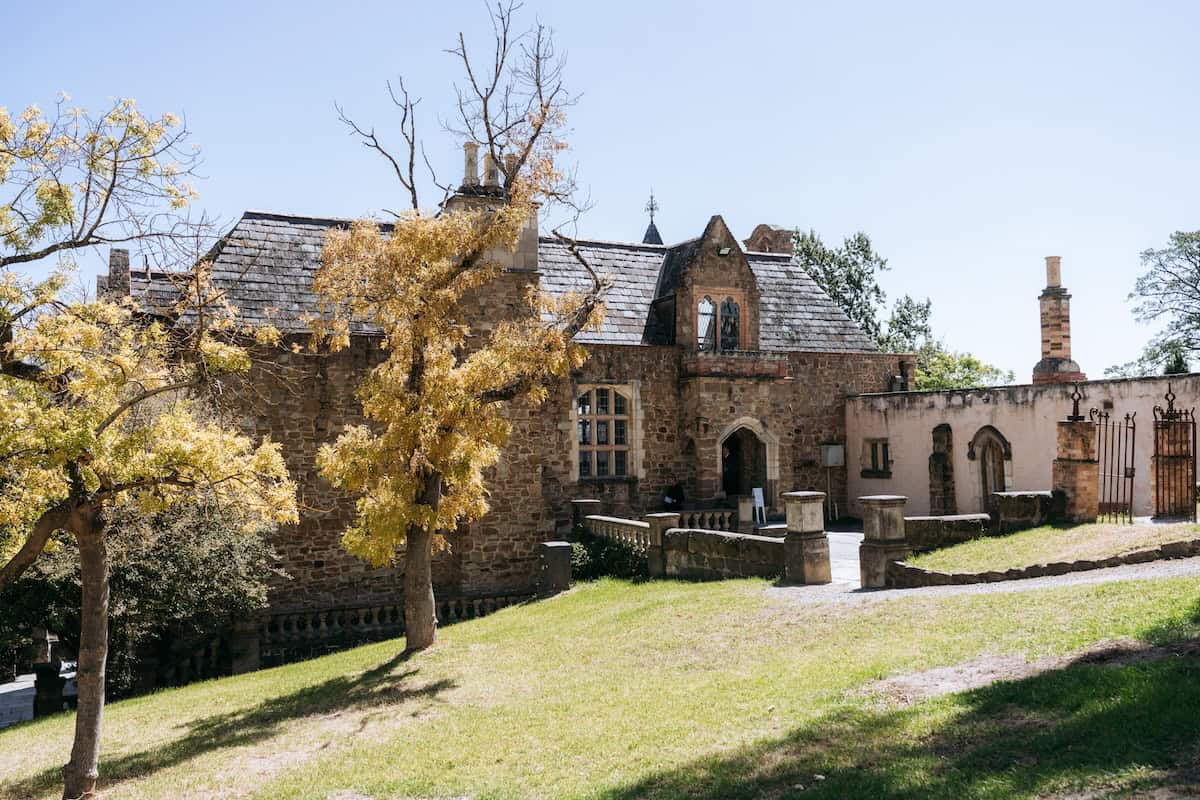
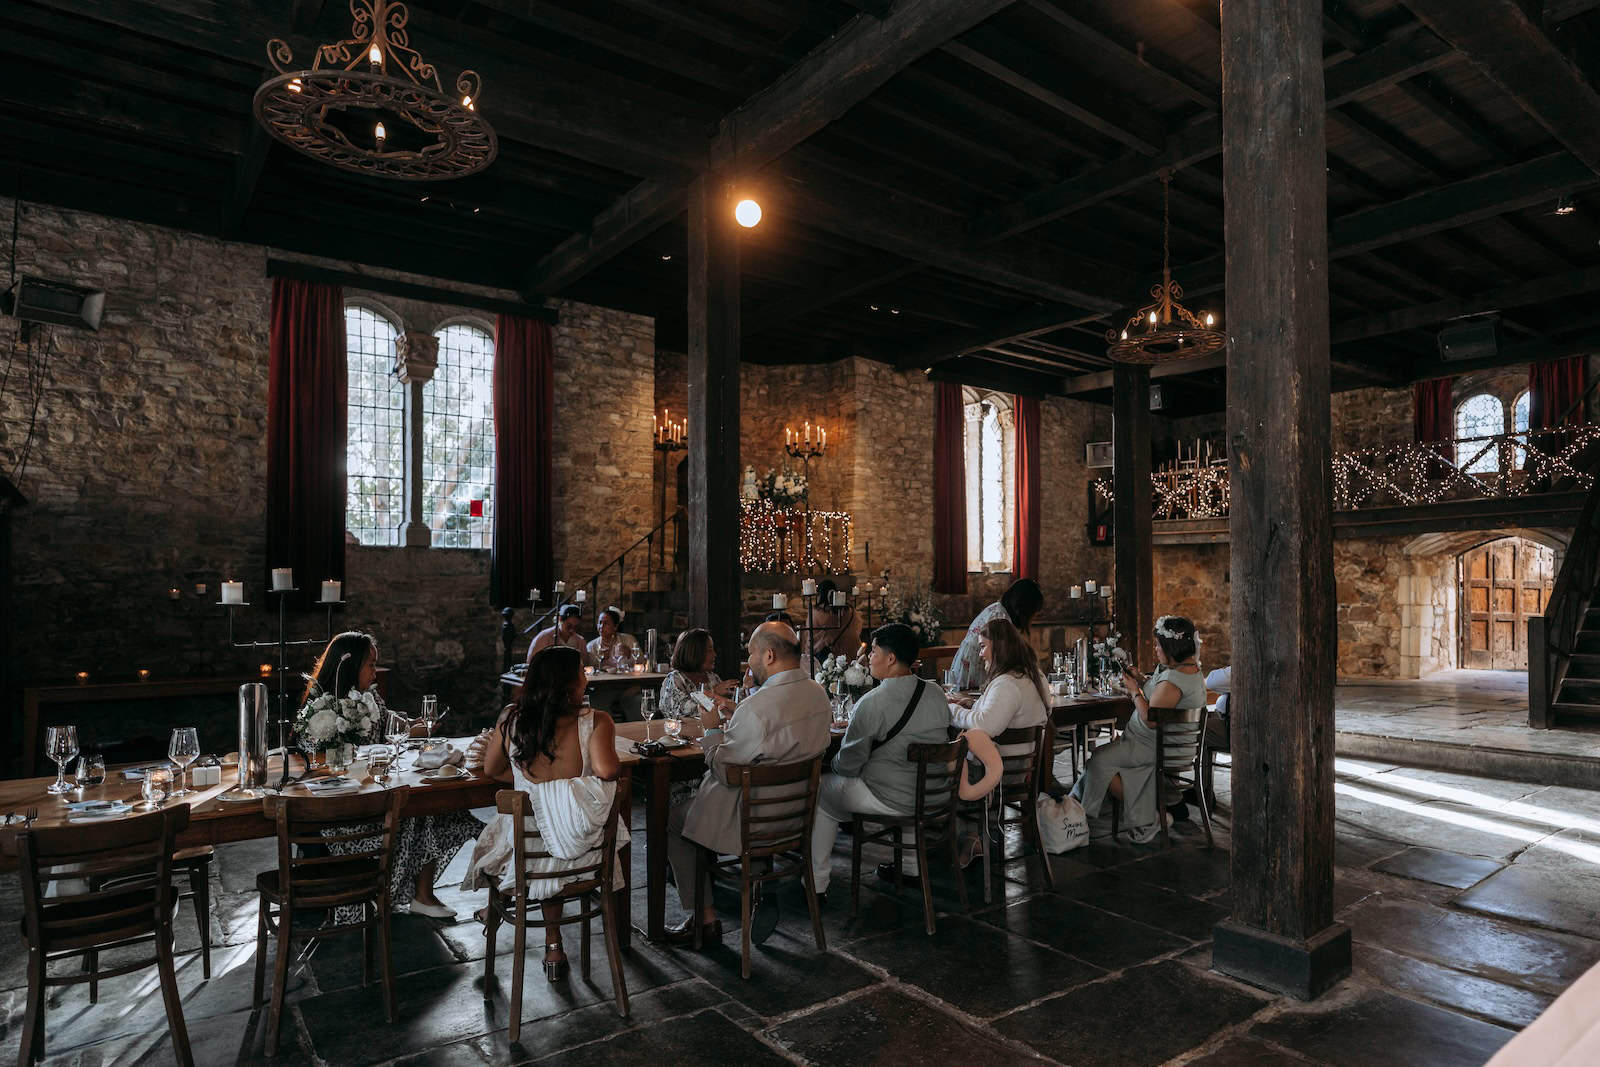
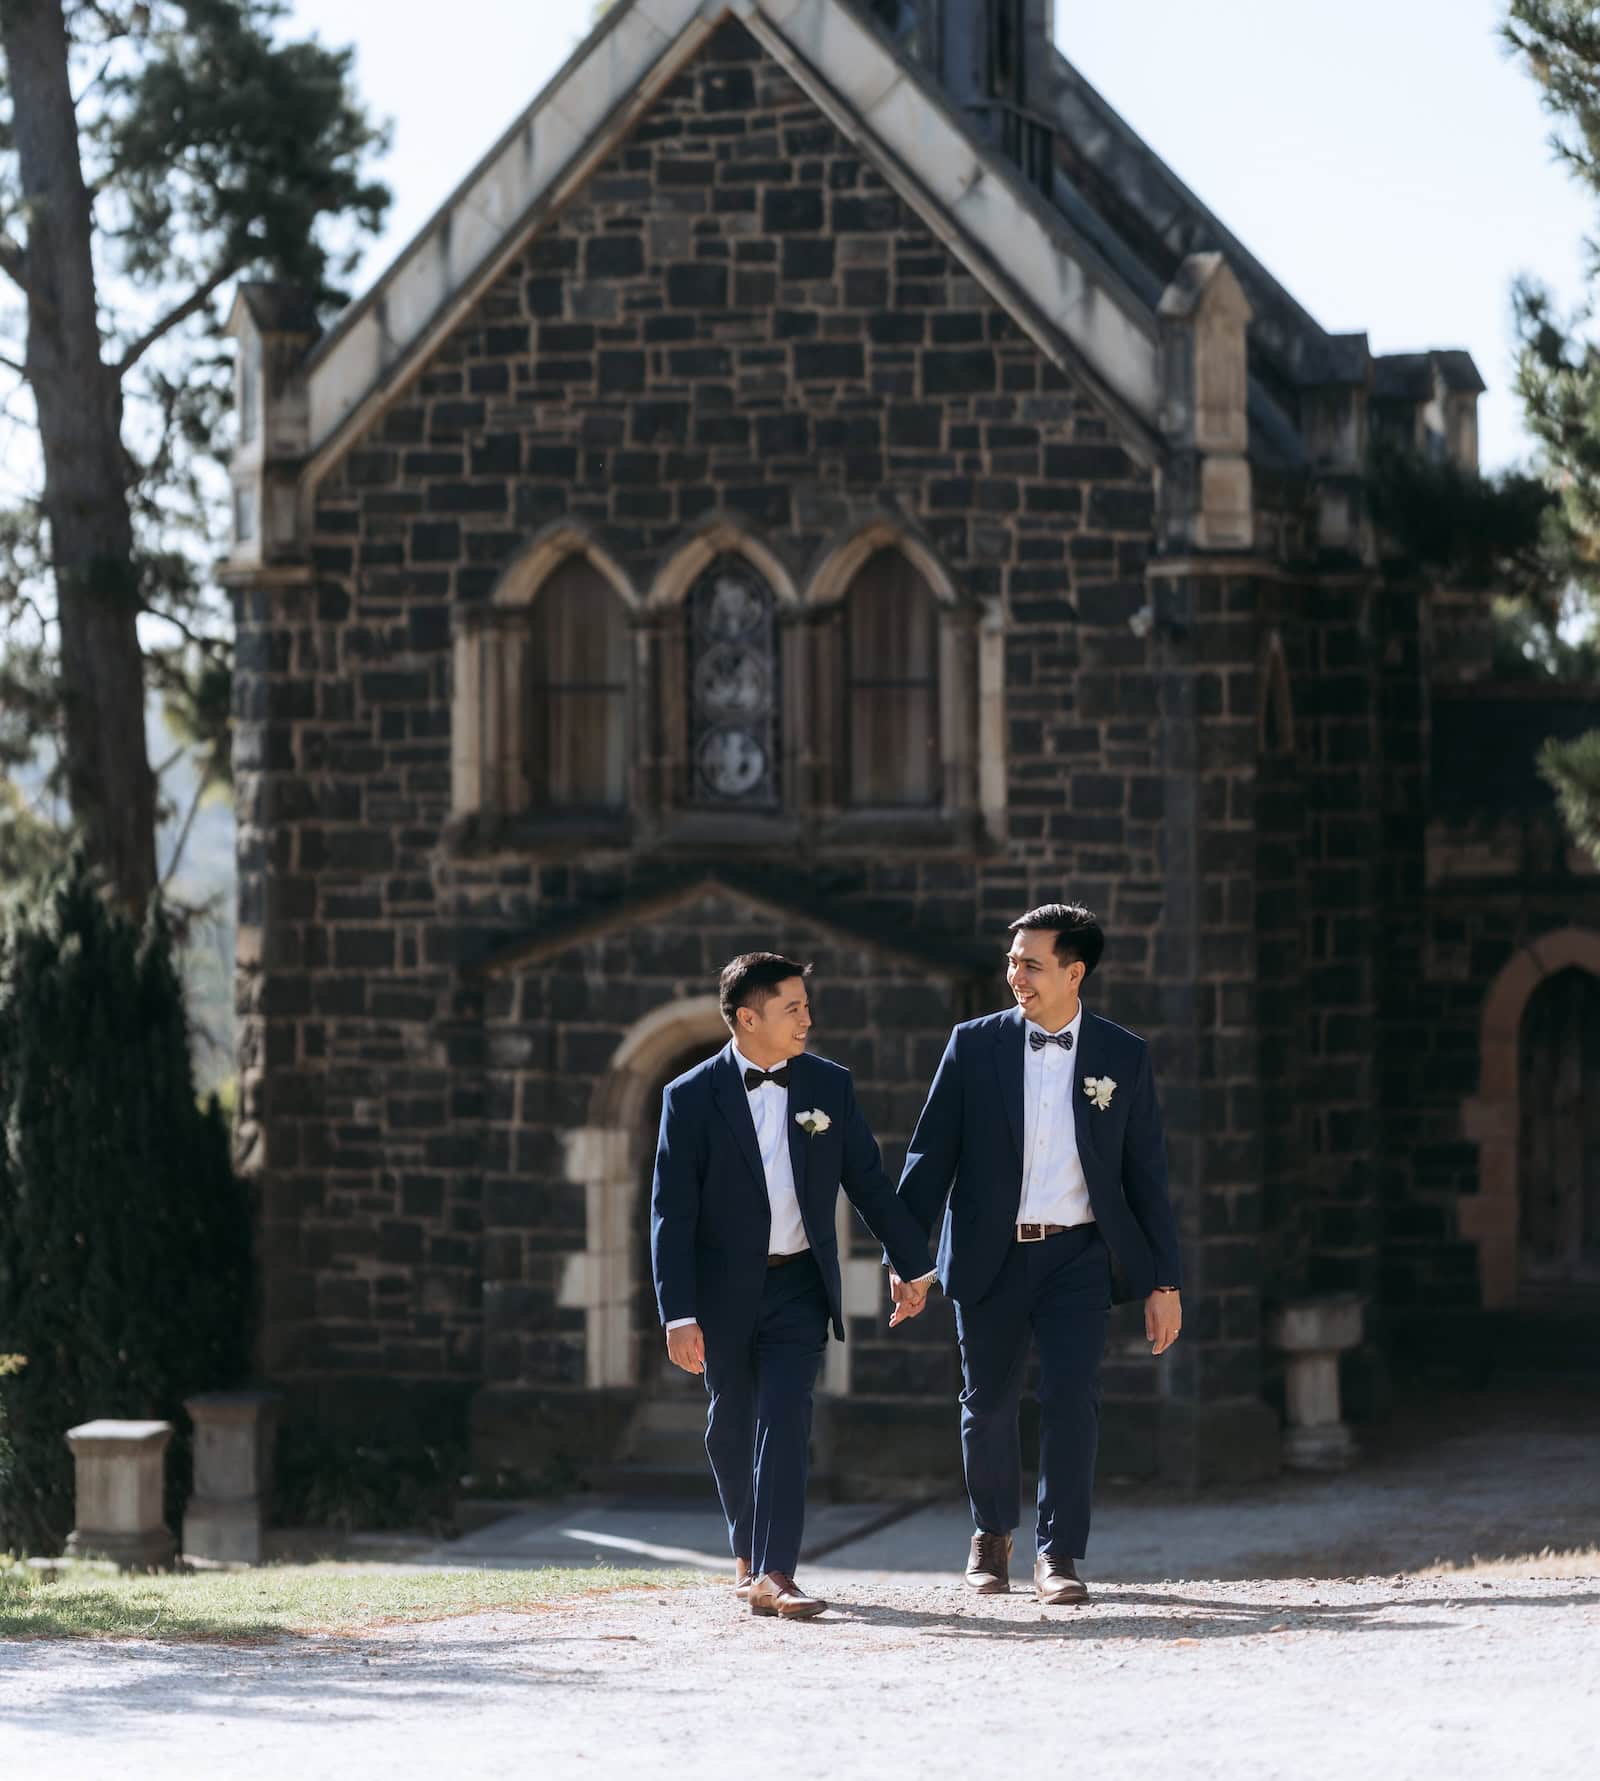
    • Montsalvat Artist Community, which is located not in Melbourne proper but in Eltham. And although it’s 30-40 minutes from the city center, when I first saw it, I had a really good feeling about it. In the end, we chose this! We have a winner!

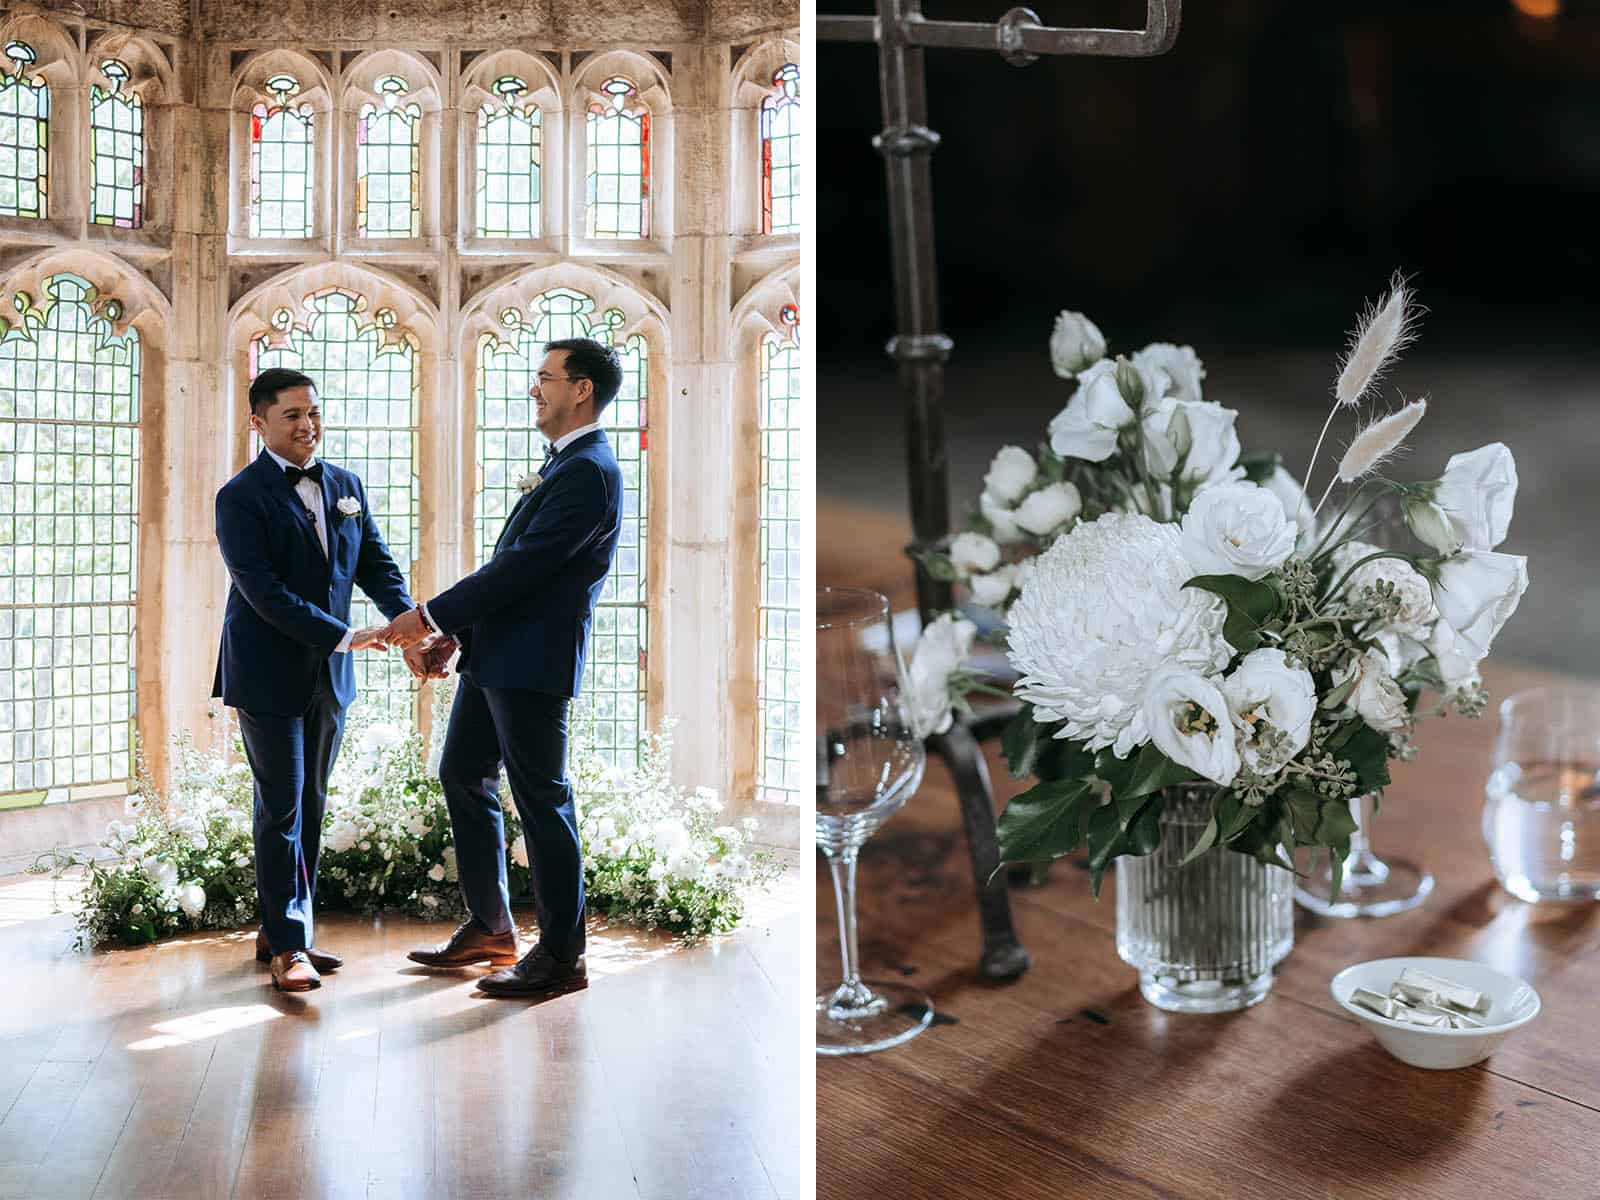
    Montsalvat’s ceremony and reception areas were inside a heritage building, which meant the weather won’t be an issue. And it was just the right size.

    Montsalvat Wedding Ceremony Venue
    Montsalvat Wedding Ceremony Venue. Photo by King Abbott.
    Montsalvat's Great Hall.
    Montsalvat’s Great Hall Reception. Photo by King Abbott Films.

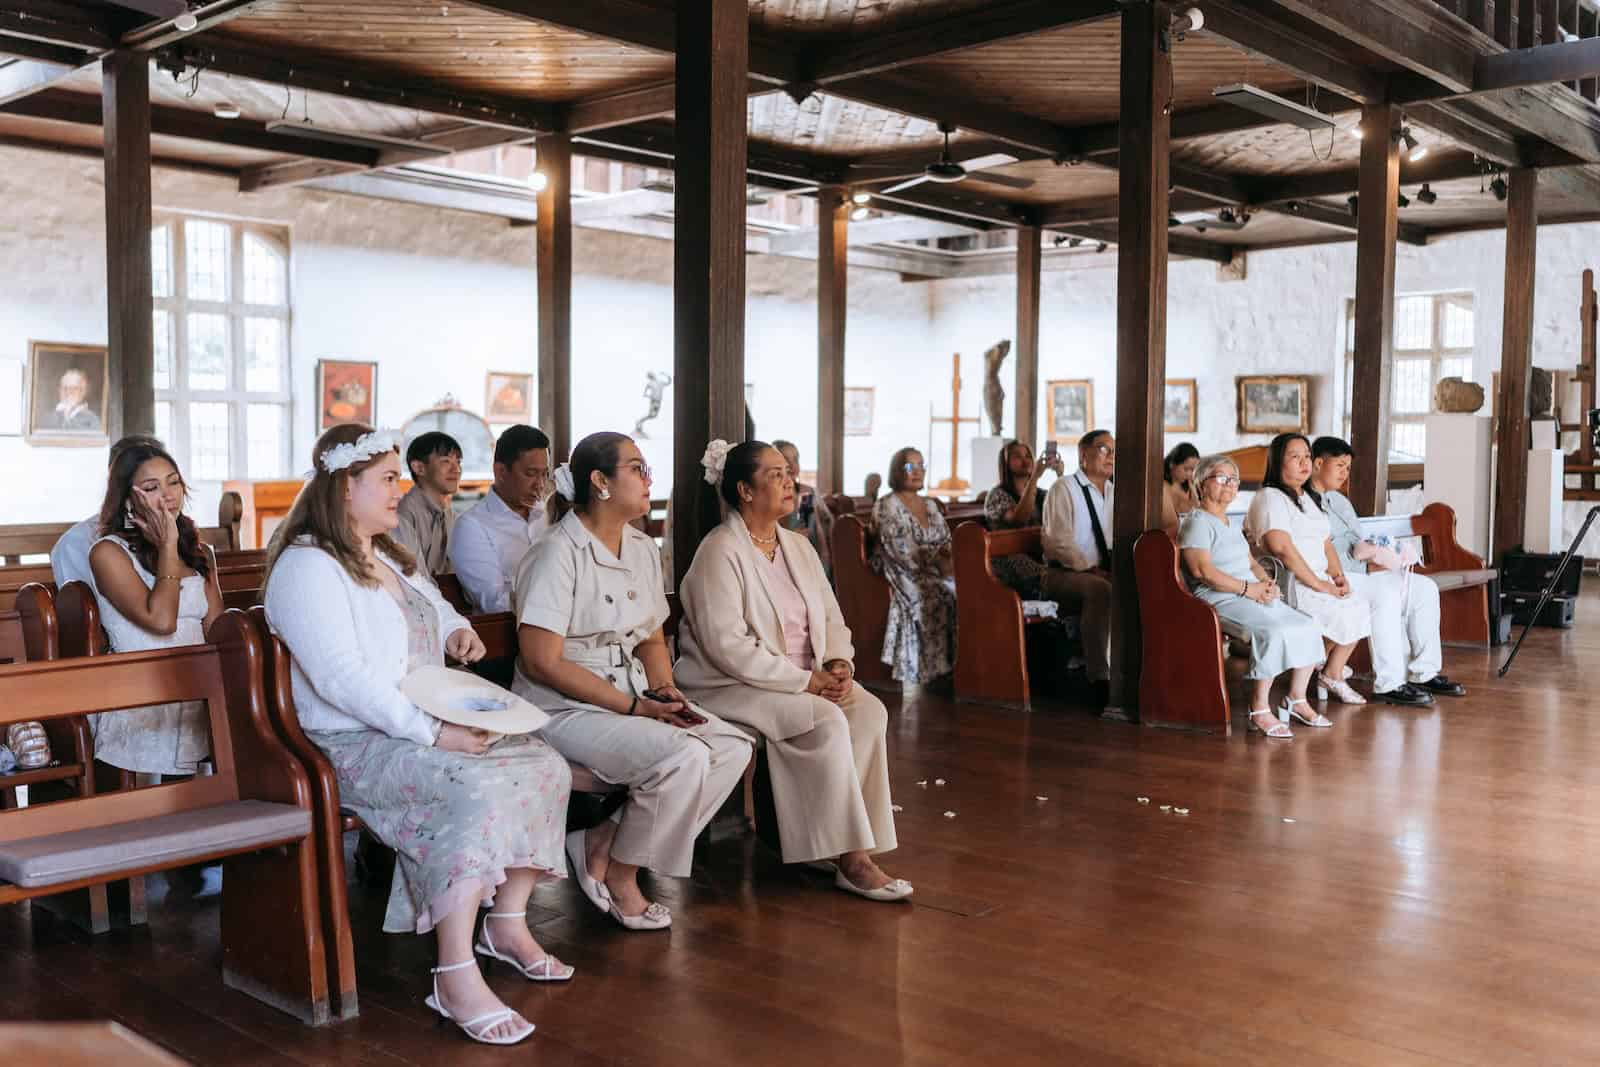
    And there are plenty of scenic spots for wedding photography. There’s even a chapel, but we did not use it as this is a secular ceremony. And bonus point: It had the European aesthetic that we initially wanted. Remember, we originally wanted to do the wedding in Europe. Best of both worlds!

    Montsalvat Wedding Photography
    Photo by King Abbott Films

    Each booking comes with the services of a venue coordinator, too!

    The prices were not bad, either. For the food, there were high tea, cocktails and proper plated meal options. This includes free-flowing drinks including white wine, rose, red wine, beer, apple cider, and non-alcoholic drinks.
    If we availed of the proper plated dining package, the ceremony fee would be waived. But there was a catch: they had a 40-guest minimum policy. We were only 20 pax, but we still went ahead, even if it meant paying for food good for twice our expected crowd size. We just had it carvery or buffet-style.

    However, the management decided to not enforce the minimum 40-guest policy. In the end, we only paid for 23 pax. So thank you to the Montsalvat management. (Note that none of these are sponsored. We intentionally avoided having any aspect of our trip sponsored by any brand. We paid for every single thing at our wedding.)

    • Montsalvat Artist Community
      Carvery Dining: AUD 218/pax

    Because the venue is in Australia and we’re Manila-based, we never had a chance to do an ocular inspection of the venue. And we didn’t have anyone in Melbourne to check it. We only relied on online reviews and their photos, and we took a virtual tour on Google Maps. Thankfully, the place was well-documented on Streetview.

    But we still finalized our booking, thinking we’d just fly to Melbourne a few days ahead of the wedding and adjust accordingly.


    Step 4: Book a Celebrant.

    Any wedding in Australia must be officiated by someone legally recognized by the Australian government. They may be civil celebrants, ministers of religion, or registered officiants. Fortunately, it’s not hard to find an authorized celebrant or officiant in Australia, even for LGBTQIA+ couples.

    Most venues have preferred celebrants, someone that they usually work with in the past. You could do that, too. But our first choice was Bronte Price because:

    • He’s the first celebrant in Australia to have completed the Certificate in Gay and Lesbian Weddings.
    • Most of his clients are LGBT couples from the Philippines.

    And thankfully, he was available on our wedding date and could marry us.

    Bronte offers a few packages, depending on the scope of work that you expect him to take on and the size of the wedding. But even for the most basic option, he’ll take care of all the necessary paperwork from start to finish.
    And he did that for us. He also checked in on us every now and then to make sure that everything was alright, especially regarding the legal papers.

    The most important document that you need to file is the Notice of Intended Marriage (NOIM).


    Step 5: Lodge a Notice of Intended Marriage (NOIM).

    Regardless of the state, you must accomplish and submit a Notice of Intended Marriage at least 1 month before the wedding. You can do it as early as 18 months before. It looks like this:

    Notice of Intended Marriage NOIM Australia

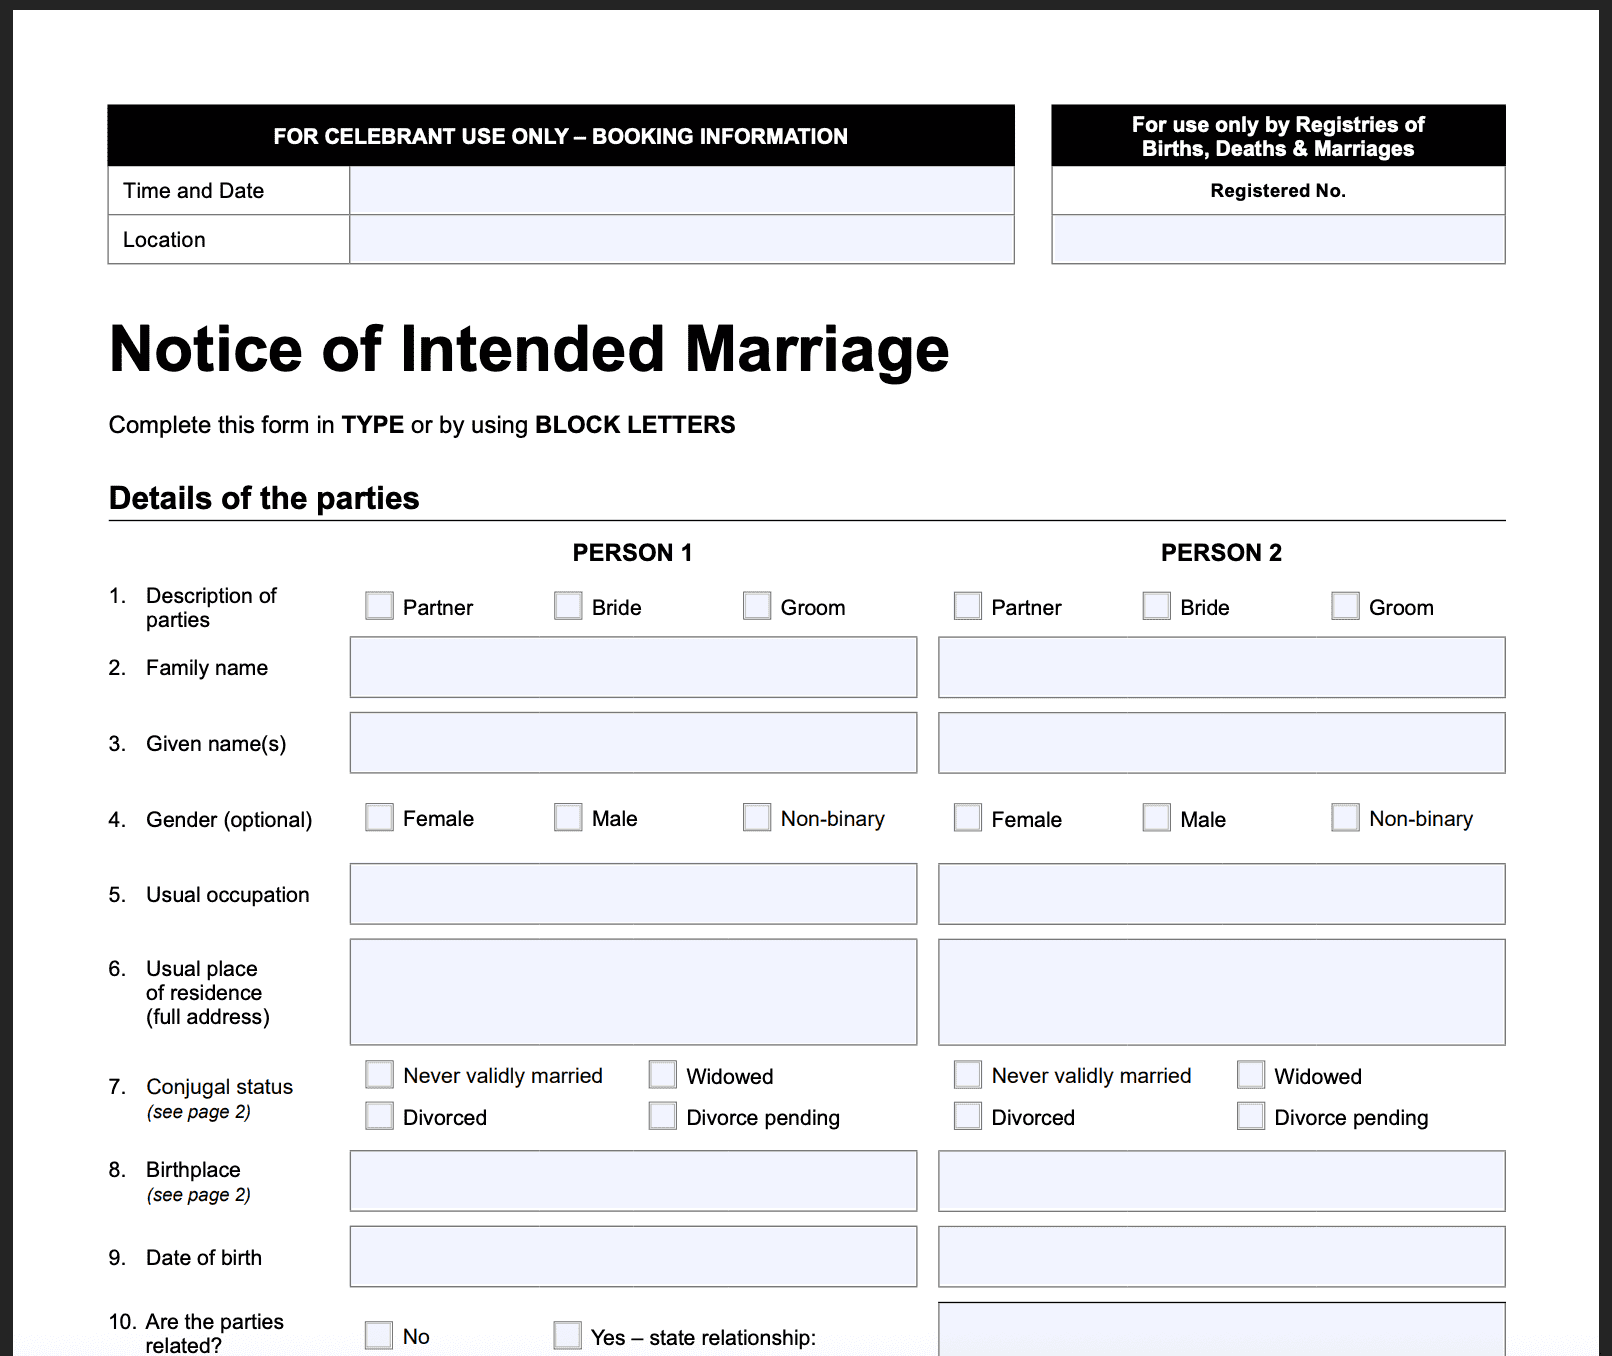
    You and your partner must be at least 18 years old to sign this, and you must sign it in front of an authorized witness.

    If you’re signing this outside Australia, an authorized witness can be: an Australian Consular Officer, an Australian Diplomatic Officer, or a notary public, among others. For us, we signed it in front of a Notary Public here in Manila. Then, we emailed it together with a scanned copy of our passports to our Celebrant, who then lodged the application in Australia on our behalf.

    Notice of Intended Marriage NOIM Authorized Witness Australia

    The passport is needed as proof of date of birth. If you’re divorced or a widow/widower, you should also submit the corresponding certificates of divorce or death of spouse.

    Make sure that all details are correct, and write in block letters. And let me repeat because it’s of utmost important: Submit the NOIM at least 1 month before your wedding date. Otherwise, if you do later, you cannot be married on your target date.


    Step 6: Secure your wedding suppliers.

    Once you have finalized the venue, chosen a celebrant, and lodged a marriage notice, it is time to scout vendors for your big day. Depending on how grand you want your wedding to be, you might want to look for a florist for your flowers and decors, a photographer and/or videographer for documentation, wedding cake baker, and, if your venue doesn’t have it in-house, a caterer for the reception.

    Usually, your venue also has a list of their recommended suppliers, so you might want to check ask them first. But most will allow you to source outside if you prefer.

    Flowers/Florist

    One of the reasons we like Montsalvat is: It’s the type of venue that doesn’t need to be glammed up to look special. It has a rustic, almost medieval character to it that you can totally get away with having no to little adornments. So we only ordered for a few flower arrangements, and that was it. The name of the flower shop is Indigo Flower House, recommended by the venue coordinator. These are the costs of the arrangements we ordered:

    Indigo Flower House Melbourne
    Flowers by Indigo Flower House Melbourne. Photos by King Abbott Films
    • Button holes (2x): AUD 36
    • Floor piece (2-meter): AUD 600
    • Table vase arrangements: AUD 200
    • Big ceremony vase arrangements (2x): AUD 200
    • Fresh rose petals for tossing (18x): AUD 81
    • Delivery/set up: AUD 200
    • Total (inc. tax): AUD 1558.70

    Wedding Cake

    Our cake was baked and designed by Froggy by What Froggy Bakes. He just asked us what we wanted, and we described that we just wanted a travel-themed cake, preferably with a world map done pallete-knife style and with white flowers. And he was able to make it a reality. It was 3-tier, which was pretty excessive for 20 guests.
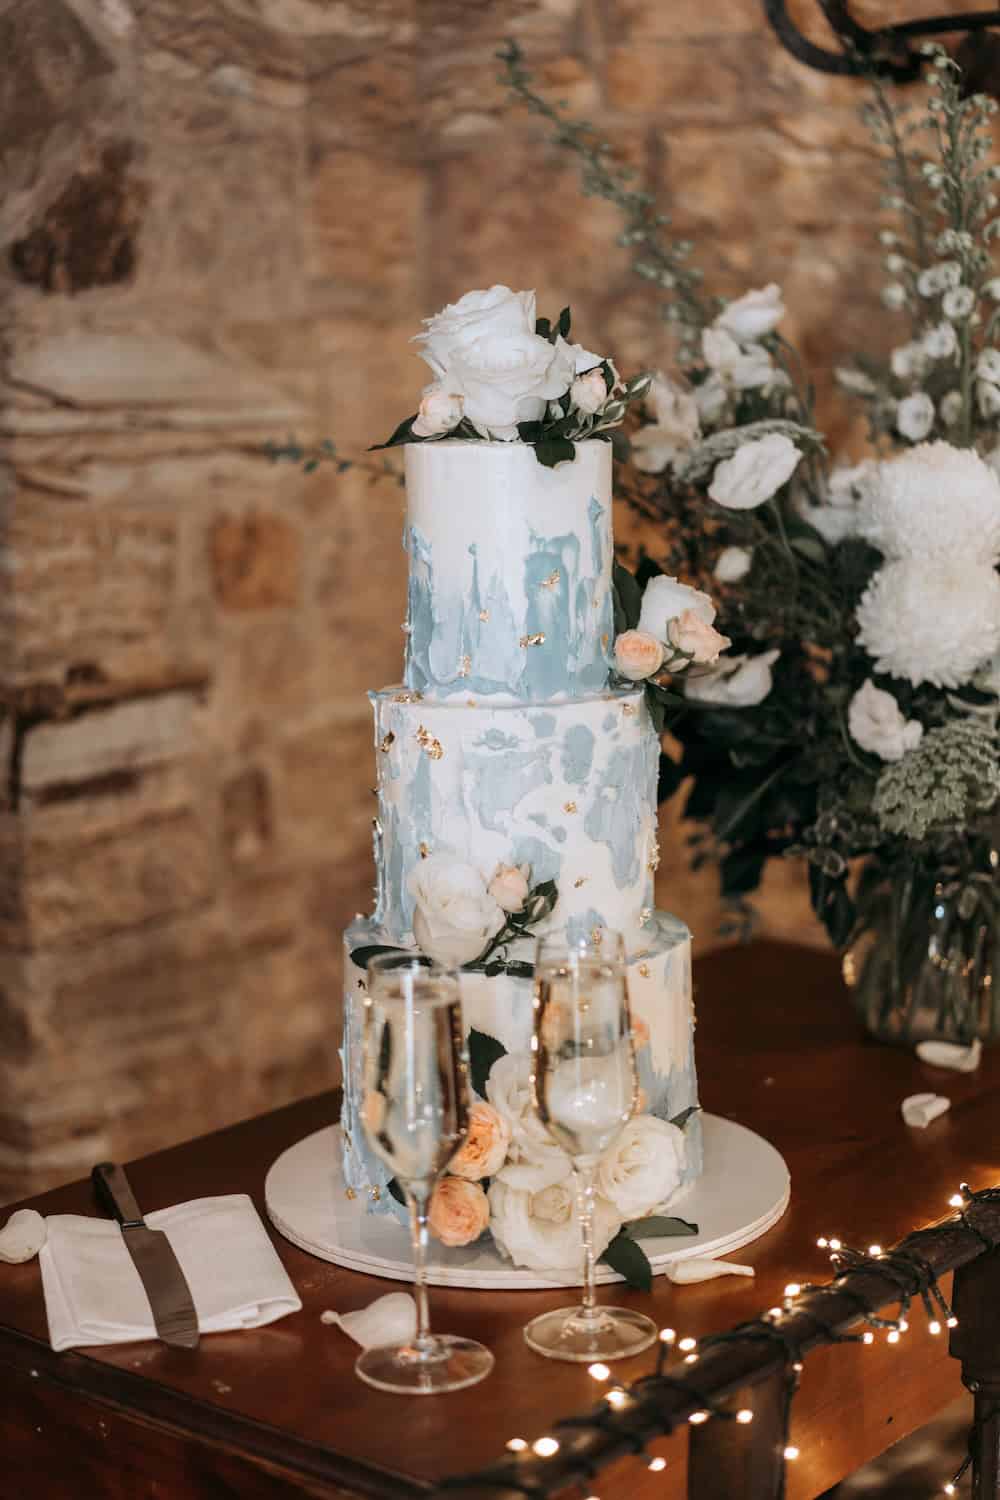
    World Map Wedding Cake
    Cake by What Froggy Bakes. Photo by King Abbott Films
    • Wedding Cake
      3-tier: AUD 846.20

    But this was a gift from one of our best friends, and she insisted on making it 3-tier regardless. It looked stunning! Every layer was a different flavor: carrot cake on top, chocolate in the middle, and caramel at the bottom.

    Photographer & Videographer

    And for our photos and videos, we hired a talented Pinoy who is based in Melbourne. His name is King Abbott. We found him on Instagram and immediately fell in love with his work.

    At the time, he was still offering a Basic Package (AUD 3300 for 6 hours), which was what we picked. But I’m not sure if this is still available.

    Transportation for Guests

    And oh, one more thing, since our venue was situated round 30 minutes from Melbourne City Center, we also had to think about transportation. While it is accessible by Uber and public transportation, Vins and I wanted to make it a lot more convenient for everyone, so we just hired a mini-bus good for 23 pax with driver.

    We paid AUD 750 for the roundtrip transfer (with driver) with BusCharter.com.au. Note that the bus won’t be waiting on site. It picked us up in Melbourne, dropped us off at the venue in the afternoon, and then left. It came back 7 hours later to take us back to the city center after the reception.

    Most suppliers would require that you pay a deposit first and then settle the balance later, usually a week or two before the wedding date, in our experience.

    Hotel Accommodations

    If you’re getting married in Melbourne like we did, best to book your hotel way in advance because accommodation rates can go crazy expensive especially in peak season. We and most of our guests ended up staying at an AirBnB, but if you prefer a proper full-service hotel, here are some that our party tried that you can suggest to your guests:

    Search for more Australia Hotels:

    Hotel Codes

    Once you’ve locked in the venue, date, and NOIM, it’s time for Step 7.


    Step 7: Send out invitations promptly.

    Yes, as early as you can provided that everything’s been finalized. You need to do it sooner than later because remember, this is a destination wedding. There is travel involved. Most of them will need or want to:

  • File a leave of absence from work way in advance. They would probably want to stay longer in Australia to maximize the cost of flights. Most of our guests stayed for a week or two. Some even toured other parts of Australia and New Zealand.
  • Book flights and hotels. And usually, you’ll get them cheaper if you book way ahead of time. Informing your guests early will also allow them more time to save money. Australia is not cheap.
  • Apply for a visa. And visa application entails gathering a number of requirements. We have a separate video about it here: Australian visa application requirements and process!
  • To be honest, this is something that we failed to follow. Our wedding was in February, and up until November of last year, we were still traveling a lot. We only started preparing for the wedding in December. Thankfully, (almost) everyone was able to secure a visa in time.


    Step 8: Do an ocular visit/rehearsal before the big day.

    If you didn’t get a chance to check the venue before, make sure to fly at least a couple of days early to check it and identify possible problems. We inspected the place, mapped out how the guests would move from one area to another, tested the sound system, learned the ropes at the venue.

    By the way, Vins and I did not have the traditional wedding party. We didn’t have sponsors, bridesmaids, groomsmen. We only had a ring bearer and a flower girl. Vins and I planned and took care of everything up until the big day. And at this meeting, we turned it over to some of our friends, who volunteered to do certain tasks. They took charge of certain aspects. And it was perfect. Everything went without a hitch.

    OK, let’s talk about the big day itself.


    Step 9: Follow the wedding mandatories/legalities.

    Before the ceremony, there are still a lot of things to take care of. The Celebrant will be meeting you to do 2 things:

    • To double-check your identity documents again (usually your passports) and verify your two witnesses are over 18.
    • To confirm consent. And this will be done separately. Your celebrant must speak with each of you individually to confirm you’re entering the marriage freely and willingly. This is to ensure there’s no coercion or pressure involved. I was asked to step out of the wedding suite so Vins could confirm, and Vins had to do the same when it was my turn. It’s a legal requirement, not just a formality.

    At one point during the ceremony, you must read the Monitum, a formal paragraph that explains the nature of marriage under Australian law. It goes something like:

    “Before you are joined in marriage… I am required to remind you that under Australian law, marriage is the union of two people to the exclusion of all others, voluntarily entered into for life.”

    If this isn’t said, the marriage might not be legally valid.

    Aside from any personal vows you write, you each have to say a very specific line in front of the celebrant and your witnesses:

    “I call upon the persons here present to witness that I, [Name], take you, [Name], to be my lawful wedded [husband/wife/spouse].”

    You can personalize your vows around this, but the legal sentence must be said in full.

    Don’t worry, your Celebrant should be able to provide the correct wording.

    And before the ceremony ends, you should also sign the marriage certificates, as overseen by the Celebrant and your chosen witnesses. You’ll sign three copies of the certificate:

    • One goes to the Registry of Births, Deaths & Marriages
    • One the celebrant keeps
    • One you get as a keepsake

    The Celebrant will make sure it’s done correctly and witnessed properly.

    After signing, the Celebrant will officially pronounce you MARRIED.

    Outside these mandatories, you can get creative, especially at the reception. Just make sure to follow the local laws especially regarding alcohol consumption.

    But it’s not over yet.


    Step 10: Submit the Paperwork.

    This step is more for your Celebrant, who should lodge your marriage registration with the appropriate state registry — usually within 14 days.

    After the marriage is registered, you can request an official marriage certificate from the state registry. This certificate is the legal document you’ll need to change your name, update your marital status, apply for joint visas, and handle any legal or financial matters.

    It can take a few weeks to a few months to receive, depending on the state. But don’t worry, if you don’t need to stay in Australia for this. You can ask your Celebrant to do this for you, usually as an add-on or for extra fee.
    The Celebrant can then send it to you by mail. We got ours roughly a month after our wedding.

    That’s it! You’re officially and legally married!


Source link

  • 2025 NEW ZEALAND VISA Application Requirements & Online Process for Filipinos

    2025 NEW ZEALAND VISA Application Requirements & Online Process for Filipinos


    How to apply for a New Zealand tourist visa? In this article, we’ll be enumerating all the requirements we submitted and the steps we’ve taken in order to be granted a short-stay New Zealand visa for tourism or visiting family or friends. Please note that this is simply a compilation of everything I know based on my own and my friends’ personal experience. This should NOT be taken as official Immigration advice. If you’re after a Resident visa, student visa, or work visa, know this article will not be able to help you as it is focused only on Visitor Visa.

    TPTKLOOK5
    BlogDisclaimer

    New Year, new adventure! It does feel like a new start because last year, we have closed our country count at 60. And what better way to kick off a new era than by exploring the breathtaking landscapes of New Zealand! Yes, New Zealand is our Country #61!

    Whether you’re dreaming of hiking through Milford Sound, saying hello to the glowworms of Rotorua, or finally living out your Lord of the Rings fantasy, there’s one thing you’ll need before booking that flight: a New Zealand visa.

    The good news? The entire application process can be done online! No need for embassy visits or long queues: just a few clicks, some documents, and you’re on your way to Middle Earth. In this guide, we’ll walk you through the step-by-step process of applying for a New Zealand visa for Filipinos, including requirements, fees, and some tips to boost your chances of approval. Let’s get started!

    WHAT’S COVERED IN THIS GUIDE?

    1. Determine the right visa type for you.

    New Zealand offers plenty of visit visa options, with varying lengths of stay allowed and documents required. If your purpose of visit is tourism and you enter it on the official Immigration website, you’ll mainly be presented with three types:

    New Zealand Visitor Visa Types
    • New Zealand Electronic Travel Authority (NZeTA), the e-visa version, but unfortunately, most Filipinos are not eligible for this for now unless they’re arriving by cruise ship. You may check eligibility criteria here.
    • Visitor Visa, which will allow you to visit on a holiday or for tourism, stay with family and friends, play amateur sport, or get married in New Zealand.
    • Group Visitor Visa, similar to the regular Visitor visa but a more convenient option for groups traveling together with the same purpose and travel arrangements (same flights, same accommodations).

    In this article, we’ll be focusing on the Visitor Visa only because that’s what I applied for.

    2. Complete the requirements.

    While the entire application can be done online, before you start the process, you must first gather all the requirements. But take note of the following:

    • Scan all these documents and save them as a PDF file, except the photo which must be JPEG.
    • You can only upload one file per item. If your document has multiple individual pages, combine them all in one file. For example, if your bank statement has one page per month, make sure to merge all these pages to create just one file.
    • Submit as many document types as you can for better chances of approval. Only the first three items — passport, photo, and itinerary — are tagged as “required” on the website. The other items on this list are marked “Optional”. Technically, you can submit your application with just the passport, photo, and itinerary. But of course, we highly urge you to also submit the other documents, too, because it is not realistic to expect being granted a visa with only those three.

    Anyway, below is the list of the documents to submit for your New Zealand visa application.

    a. Passport

    Must be valid. Make sure you still have at least 6 months of validity so you won’t run into PH Immigration problems later.

    Text must be readable.

    b. Photo

    • Passport-size. Dimensions should NOT be smaller than 900 x 1200 pixels, but not larger than 2250 x 3000 pixels.
    • Soft copy (JPEG). File size should be between 500 KB and 3 MB.
    • Non-white background. Gray, ideally.

    New Zealand Visa Photo Guidelines

    You can take the photo yourself as long as you follow the specifications listed by the government. You can find the full photo guidelines here.

    But I suggest that you just go to a photo studio and let the professionals do it.

    c. Evidence of Purpose of Visit

    This can be an itinerary detailing your day-by-day stay in New Zealand.

    This is the format I submitted:

    New Zealand Visa Sample Itinerary

    d. Evidence of Genuine Intent

    With this, you must prove that the purpose of travel that you declared is true, and that you will be coming back home after your trip. You can submit any or all of the following:

    1. Proof of leave of absence from work, showing that you have a job to return to after the trip. I submitted a Certificate of Employment that also indicates that my leave of absence has been filed and approved.
    2. Passport stamps and visas, proving you have visited other countries before.
    3. Proof of accommodations, which can be a hotel booking for tourists. This is optional and you may choose to skip this. But if you want to submit to increase your odds, book a hotel that has a FREE CANCELLATION policy so you can easily refund should you be refused a visa. Search for free-cancellation hotels here! Make sure the room you’re booking is marked “Free cancellation.” Use promo code THEPOORTRAVELERKLOOK for extra discount!
    4. Flight booking, to show you plan to exit New Zealand. Again, this is optional only. If you already have this, then go ahead and submit. But if you don’t have it yet, you may opt to not submit. But if you really want to submit this for better chances, don’t submit an actual ticket. Submit a flight reservation instead, which can be cancelled in case you get denied a visa. You can get this from travel agencies. We usually get ours from Gazelle Travel & Tours, a licensed and accredited travel agency here in the Philippines. You can order flight reservations online here!
    5. Australian visa, only if applicable. If you don’t have this, you can ignore this. If you do, submit it. I think this could massively help your application. In our group, those who submitted an Australia visa got approved a lot faster than those who didn’t.

    e. Evidence of Funds

    This can be bank statements and/or bank certificates.

    I submitted two bank accounts: payroll account and savings account. I created one PDF file per bank account. One file, I uploaded under Evidence of Funds, while the other under Other Evidence (which I will discuss below).

    f. Evidence you are visiting family or friends

    Only if applicable. If you have family or friends in New Zealand that you plan to visit, you must provide your contact’s:

    • names
    • addresses
    • contact numbers
    • their New Zealand visa or citizenship status

    I didn’t provide any of these because I was traveling for tourism.

    If you’re visiting a partner or family member working in New Zealand but they cannot support a visa for you, you may also be asked to submit a cover letter stating the details of your trip and the purpose of your visit.

    g. Credit card or debit card

    You will be paying the NZD 100 visa fee online, so make sure you have a valid credit card of debit card.

    Other Optional Documents

    You’ll also encounter a section for “Other Evidence.” This refers to other documents that can help prove your character and genuine intent. It can be any of the following:

    • Cover letter
    • ITR (tax document)
    • Certificate of Employment
    • Additional bank accounts (other financial information)
    • Birth certificate

    Yes, I also uploaded a cover letter because remember, everything’s online. Having a cover letter allowed me to properly explain my purpose of travel and clarify any aspect that needs clarification. You can use the cover letter to explain if you’re just new at your current job or why your bank account is newly opened, or whatever.

    I also uploaded a birth certificate only because I had a digital copy of it. If you don’t have one, it’s OK. I don’t think it’s going to make or break your application. But if you have it, feel free to submit it.


    3. Create a RealMe Account.

    RealMe is the official account management portal of the New Zealand Immigration department. To be able to apply for a New Zealand visa, you must first register for a RealMe account. Here’s how:

    New Zealand Visa RealMe Account

    1. Visit the Visitor Visa page.
    2. Click on APPLY ONLINE.
    3. Click on the LOG IN button. It will then take you to the REALME page.
    4. Click on CREATE A REALME LOG IN button. If you’re viewing the site on a mobile phone, you first need to tick off “I need to create a log in” in order for the log-in button to appear.
    5. Enter a valid email address. Then click SEND CODE. Check your inbox and enter the confirmation code in the designated field. Click CONFIRM CODE.
    6. Set a username and password. Click CONTINUE.
    7. Enter your mobile number. You’ll also be asked a choose security questions and provide answers. Click the CONTINUE button.

    That’s it!

    You’ll be redirected to your RealMe dashboard. You may be asked to log in again.


    4. Start your online application.

    To do this:

    New Zealand Visa Application Website

    1. Click on MY VISAS. On the next page, you’ll find a section called DRAFT APPLICATIONS.
    2. Click on APPLY FOR A VISA. On the next page, scroll down.
    3. New Zealand Visa How to Apply Website

    4. Under YOUR SITUATION, select TEMPORARY VISA. Since this guide is for those traveling for tourism only, make sure you select answers pertaining to TOURIST or HOLIDAY purpose. Towards the bottom of the page, you should see GENERAL VISITOR VISA.
    5. Click on START MY APPLICATION.

    That’s it. Now, it’s time to fill out the application form.


    5. Fill out the application form.

    If you’re coming from the application dashboard and you’re applying for yourself, look for the row labeled PRINCIPAL APPLICANT under the APPLICANTS section. Then click CONTINUE on the same row. It will then take you to the application form.

    The good news is: this form is not too complicated. There are only a few questions. Unlike the US Visa and Australian visa application form which have around 20 pages, the New Zealand visa application form has only seven (7) pages, which are about the following:

    • Page 1: Identity Details. You’ll be asked to enter your name, passport details, immigration history, photo with gray background, email address, contact numbers, and physical address.
    • Page 2: Purpose of Visit. You’ll be asked to declare that you can afford to pay for this trip. It will also ask you if you possess NZD 1000 per person per month, if you have already booked your accommodations, and if there is anyone below 16 in this application.
    • Page 3: Character. Questions are about whether you have been convicted for a crime, deported from another country, or refused a visa before. You must answer truthfully.
    • Page 4: Health. In particular, you’ll be asked whether you have tuberculosis, whether you’ll be needing medical care during your stay in New Zealand, and whether you have undergone a medical examination for this application. The last bit made me pause for a bit because it made me think a medical test was required. But don’t panic. I answered NO to this but I was not asked for medical test results.
    • Page 5: Employment History. Input your employer’s details including the name of the company and how long you have been employed. If you’re self-employed, enter your business information. The form only requires your CURRENT employment.
    • Page 6: Relationships. You’ll be asked for your relationship status: single, married, engaged, widowed, etc. You’ll spot a Partner/De Facto option, which refers to people in a relationship and live together in the same address for a considerable length of time. Straight and LGBTQIA+ relationships are covered here. You’ll also be asked if your partner is included in this visa application. If so, enter their details.
    • De Facto Relationship Meaning

    • Page 7: Immigration Assistance. You need to declare whether you’re accomplishing the form on behalf of someone else or you have sought the assistance of an Immigration adviser. I answered NO to both questions.

    That’s it!

    💡 TIP! At any point, you can SAVE your progress. You don’t need to complete the form in one sitting. If there are details that you don’t have yet or are unsure of or you simply cannot finish it, you can click on SAVE & EXIT to save your progress and pick up where you left off another time.

    But once you’re through, you’ll be led to the next section, which is….


    6. Upload supporting documents.

    Before you could upload, you’ll be asked if all the documents you’re submitting are in English. If so, select YES. Having your documents in English will make things easier.

    Then it’s time to upload your supporting documents. To do that, just click on BROWSE and select the file you intend to upload.

    New Zealand Visa Supporting Documents

    1. Identity evidence: a copy of your passport. You’ll also find this question: Are you living in a country that is not your country of citizenship? If you’re based in the Philippines, answer NO.
    2. Purpose of visit evidence: detailed itinerary.
    3. Evidence of genuine intent. proof from employer that your leave of absence is approved. There is also a section about Australian visa. An AU visa is NOT required, but if you have one, upload it because it’ll help improve your chances. Otherwise, you can just skip this part. You’ll also be encouraged to upload other documents that can serve as proof of genuine intent. I attached a Certificate of Employment, flight reservation, and hotel booking.
    4. Evidence of funds. Under “Are you providing bank or financial statements…?”, answer YES, upload your bank documents, and enter the details of your bank account.
    5. Other evidence. You can upload your BIR Income Tax Return (ITR) and additional bank accounts under OTHER FINANCIAL INFORMATION. You can also submit a cover letter.

    💡 IMPORTANT NOTES!

    • Your documents must all be in PDF file format. Make sure they are all readable and NOT password-protected. Bank statements, especially those downloaded online, are usually encrypted. If that’s the case, ensure that you remove the password before uploading so the evaluator could access them.
    • If you upload the wrong file, you can delete and replace it with the right one. It’s not final until you submit the application.

    If everything looks good and correct, check the tickboxes under DECLARATION and click SAVE & CONTINUE.


    7. Submit and pay for your application.

    After uploading, on the next page…

    1. Review all the information you entered. If you spot a mistake, you can go back and correct it.
    2. If everything is in order, click READY FOR SUBMISSION. You’ll be redirected back to the Application dashboard.
    3. On the right side of the dashboard, find the button labeled PAY & SUBMIT APPLICATION. Hit it and review the application costs.

    The total amount for a Visitor Visa is only NZD 100 (roughly PHP 3,300).

    New Zealand Visa Cost

    You can pay via credit card, debit card, or Union Pay. Once done, you should receive a message stating that the transaction is successful.

    After this, there’s nothing else you can do but wait.


    8. Wait for the result.

    According to the New Zealand Immigration website, the usual wait time is 4 weeks.

    New Zealand Visa Processing Time

    But to be honest, I got my visa after only 2 days, while Vins got his after 6 days. Below are our timelines:

    • YOSH
      December 11 – I submitted my application
      December 13 – I received the visa (approved)
    • VINS
      December 21 – Vins submitted his application
      December 27 – Vins received the visa (approved)

    Note that both Vins and I had valid Australian visas, too, and submitted them as supporting docs. One of our companions who didn’t have an AU visa got approved after exactly two (2) weeks or 14 days.

    That said, you’re highly encouraged to apply early and have at least four weeks of allowance to be safe. We actually applied two months before our travel date.


    FREQUENTLY ASKED QUESTIONS

    What is the validity period of the visa?

    I was granted a multiple-entry visitor visa, valid for one (1) year, starting on the day the visa was issued.


    How long can I stay in New Zealand?

    Two months per trip, in our case.


    How much money should you have to get approved?

    No idea. At the very least, you should have NZD 1000 per month because that’s what’s indicated on the application form. But of course, you should have more.

    At one point in the uploading process, you will be asked the following questions:

    New Zealand Visa Show Money

    It’s important to remember, however, that it’s not just the funds that are being inspected. More importantly, you should be able to show that you have strong rootedness or ties to the Philippines and that you have no reason to overstay in New Zealand.


    Is flight ticket required?

    No, flight booking is optional. But if you already have one — say, you got it from a seat sale — go ahead and submit. If you don’t have one yet, you may opt to not submit.

    But if you really want to submit this for better chances, don’t upload an actual ticket. Use a flight reservation instead. This is different from an actual flight booking because a flight reservation can be cancelled in case your application is rejected. You can get one from travel agencies.

    We usually get our flight reservation from Gazelle Travel & Tours, a licensed and accredited travel agency here in the Philippines. Since we’re always asked about where we get ours, we decided to put up a page where you can easily order one.

    GET A FLIGHT RESERVATION HERE!


    Is hotel booking required?

    No, this is optional and you may choose to skip this. But if you want to submit to increase your odds, book a hotel that has a FREE CANCELLATION policy so you can easily refund should you be refused a visa. Search for free-cancellation hotels here!

    Here are some top-rated hotels available online. Make sure the room you’re booking is marked “Free cancellation.” Use promo code THEPOORTRAVELERKLOOK for extra discount!

    SEARCH FOR MORE AUCKLAND HOTELS!


    Is a cover letter required?

    NO, a cover letter is NOT required. But we recommend submitting one especially if your case is complicated or if you have to explain something.

    Remember, there will be NO interview, so a cover letter is your only opportunity to explain away anything that could be confusing or dubious.


    What are the common reasons for visa denial?

    I don’t know what the most usual reasons for refusal are, but a friend of mine who was denied a visa showed me the refusal letter. In her case, the main reasons cited were “weak ties in home country” and “weak family ties.”

    This is why you should submit as many relevant supporting documents that you could, especially those proving genuine intent and rootedness in the Philippines. You must be able to show that you have a good life here in the Philippines and you have a stable job or source of income here.

    We think that in particular, the reason for her denial was that she has just transferred to a new company, so the employer details in the application form and the employer in her ITR didn’t match. And she didn’t submit a cover letter to explain this, either.


    Can you appeal after being rejected a visa?

    NO, if you applied outside New Zealand. I’m assuming most of you reading this article are not based in NZ.

    New Zealand Visa Refusal Letter Reconsideration
    Here’s an excerpt from the Refusal Letter that a friend received when she was denied a New Zealand visa.

    What you can do is reapply. This means you’ll need to start a new application and pay another visa fee. But before you reapply, make sure you have new supporting documents to add that could address the reasons for refusal. If you’ll be submitting the exact same pile of documents, you might just be wasting another NZD 100.

    If you’re currently in New Zealand, YES, you can appeal as long as you make the request within 14 days.

    New Zealand Visa Reapply
    This screenshot is from the official New Zealand Immigration website

    What does a New Zealand visa look like?

    Like this:

    New Zealand Visa Sample

    It’s a simple PDF file with an NZ Immigration logo and visa conditions. It’s NOT the sticker type that is affixed on the passport.

    That’s all for now. Remember, plan smart, travel safe, and make every trip WORTH IT!


    Updates Log

    2025 04 18 – First up


    Source link

  • How to Apply for a CANADA ETA • Requirements + Online Process for Filipino Tourists

    How to Apply for a CANADA ETA • Requirements + Online Process for Filipino Tourists


    Being the second largest country in the world, Canada has a wide variety of attractions that draw tourists. It has natural wonders, rich cultural diversity, and vibrant cities. Its most notable natural wonder, the Niagara Falls, is just one of the several waterfalls you can see in the country. Countless national parks, some of which are recognized as a UNESCO World Heritage Site or UNESCO Biosphere Reserve, also await nature lovers. And in between its towering rockies and extensive coastlines, you can admire its pristine lakes, prairies, and wildlife.

    TPTKLOOK5
    BlogDisclaimer

    Aside from its stunning geography, Canada has a rich culture and history too. You can get glimpses of that within its cities like Vancouver, Toronto, and Montreal. To top it all off, Canada is also among the places where you can see the elusive Northern Lights. Every corner of Canada really offers something for different types of travelers to enjoy. It’s no wonder why millions of tourists around the world goes to the Maple Leaf Country to explore.

    But how do you get to Canada? This would depend on which country you’re from. Some countries enjoy visa-free travel, while others need to secure a visa. For some visa-required countries, their citizens may be eligible to apply for an electronic travel authorization or eTA instead of a visa. In this guide, we’ll explain who is eligible to apply for a Canada eTA and discuss the step-by-step application process on how you can get one.


    WHAT’S COVERED IN THIS GUIDE?

    What is a Canada eTA?

    An eTA or electronic travel authorization is a requirement for visa-exempt foreign nationals who are entering Canada by air. Travelers from select visa-required countries including the Philippines can also apply for an eTA provided that they meet the ALL of these requirements:

    1. You’ve held a Canadian visitor visa (temporary resident visa) in the past 10 years OR you have a valid US non-immigrant visa on the day of your eTA application.
    2. You’re going to Canada for a temporary stay (usually for 6 months or less).
    3. You’re flying to or transiting through an airport in Canada using a valid passport from an eligible visa-required country.

    Eligible Visa-Required Countries

    As of 2025, here is a list of select visa-required countries that are eligible to apply for an eTA:

    • Antigua and Barbuda
    • Argentina
    • Brazil
    • Costa Rica
    • Mexico
    • Morocco
    • Panama
    • Philippines
    • St. Kitts and Nevis
    • St. Lucia
    • St. Vincent and the Grenadines
    • Seychelles
    • Thailand
    • Trinidad and Tobago
    • Uruguay

    eTA-Eligible Visa-Exempt Countries

    As of 2025, here is a list of visa-exempt countries that require an eTA if flying to Canada:

    • Andorra
    • Australia
    • Austria
    • Bahamas
    • Barbados
    • Belgium
    • British Citizen
    • British National (Overseas)
    • British Overseas Citizen (re-admissible to the United Kingdom)
    • British Overseas Territory Citizen with citizenship through birth, descent, naturalization or registration in one of the British overseas territories of:
      -Anguilla
      -Bermuda
      -British Virgin Islands
      -Cayman Islands
      -Falkland Islands (Malvinas)
      -Gibraltar
      -Montserrat
      -Pitcairn Island
      -Saint Helena
      -Turks and Caicos Islands
    • British Subject with a right of abode in the United Kingdom
    • Brunei Darussalam
    • Bulgaria
    • Chile
    • Croatia
    • Cyprus
    • Czech Republic
    • Denmark
    • Estonia
    • Finland
    • France
    • Germany
    • Greece
    • Hong Kong Special Administrative Region of the People’s Republic of China (must have a passport issued by Hong Kong SAR)
    • Hungary
    • Iceland
    • Ireland
    • Israel (must have a national Israeli passport)
    • Italy
    • Japan
    • Republic of Korea
    • Latvia
    • Liechtenstein
    • Lithuania
    • Luxembourg
    • Malta
    • Monaco
    • Netherlands
    • New Zealand
    • Norway
    • Papua New Guinea
    • Poland
    • Portugal
    • Romania (electronic passport holders only)
    • Samoa
    • San Marino
    • Singapore
    • Slovakia
    • Slovenia
    • Solomon Islands
    • Spain
    • Sweden
    • Switzerland
    • Taiwan (must have an ordinary passport issued by the Ministry of Foreign Affairs in Taiwan that includes the personal identification number)
    • United Arab Emirates
    • Vatican City State (must have a passport or travel document issued by the Vatican)

    How to Apply for a Canada eTA

    1. Prepare the necessary information.

    Before you start filling out the application form, make sure you have the following with you:

    • Valid Passport
    • Valid Email Address
    • Debit or Credit Card

    You will need these to fill out the form and pay for the eTA fee.


    2. Find out if you’re eligible for a Canada eTA.

    Go to the Canada eTA website. You will be led to a page where you have to answer which country issued your passport and the purpose of your travel to Canada. After that, you will be directed to the actual eTA form.

    Canada eTA Application Eligibility

    Then, you will answer a few questions to determine whether you’re eligible to apply for an eTA. If you’re not eligible, you will see a note that will tell you that you cannot apply for an eTA and you may need a visa or other type of document to travel to Canada. If you are eligible, you will see the next part of the application form.


    3. Enter your passport details.

    You will be asked to enter your passport number, surname, given name, and date of birth among other passport details. Make sure to enter the correct details as indicated on your valid passport.

    Canada eTA Passport Details


    4. Enter your personal details.

    In this part of the form, you need to answer whether you’ve previously applied for or held a visa, an eTA, or permit to enter Canada. If you have, you may enter your Unique Client Identifier (UCI) or visa/eTA or permit number.

    Canada eTA Personal Details

    Next, you need to enter your employment information, contact information and residential address. If you already know when you’re traveling to Canada, you will be required to enter your travel information too. If not, just select no and proceed to answering the background questions.

    Canada eTA Travel Info

    Once you’ve completed all the information, double check if they are correct. Then, read the privacy notice and click ‘I Agree’ and enter your complete name as indicated on your passport to sign.


    5. Pay the eTA fee.

    After filling out the application form, click Proceed to Payment. You’ll be directed to a summary of fees, which is a total of CAD 7 for the eTA. Then, click Transmit and Pay.

    Canada eTA Payment

    Enter your debit or credit card information and click checkout. You might need to enter an OTP to verify your transaction.

    Once you’ve successfully paid, your application will be automatically submitted.


    6. Wait for an email about your eTA.

    After submitting your application and paying the fee, expect an email from Immigration, Refugees, and Citizenship Canada. According to the Canada eTA website, most eTAs are approved within minutes. If you don’t see anything in your inbox, make sure to check the junk or spam folder too.

    If your eTA is approved, the email you will receive will include your eTA number. Make sure to save this number in case you need to contact the IRCC or check the status of your eTA in the future.

    If you don’t receive an email right away, your application may be taking longer to process. In such cases, the IRCC will send you an email within 72 hours with instructions for the next steps. After receiving this email, you may use the eTA Check Status tool to check the progress of your application.

    Canada eTA Check Status


    Frequently Asked Questions

    How much is the Canada eTA?

    The Canada eTA costs CAD 7. You can pay the fee online after filling out the application form. Accepted mode of payments are debit and credit cards.

    Am I eligible to apply for a Canada eTA?

    You can find out if you are eligible to apply for a Canada eTA by visiting this page and answering the questions provided.

    Can I apply for a Canada eTA for my family?

    Yes. However, a separate eTA application must be submitted for each person.

    If you’re applying for eTA for your dependents/family members, make sure to answer “yes” to “Are you applying on behalf of someone?” You will also need to enter your details on the Parent/guardian or representative details section.


    Updates Log

    2025 4 19 – First uploaded


    Source link