From sea to shining sea, the United States is a very diverse country – both when it comes to culture and natural beauty.
I’ve traveled across the continental United States many times over (you never really realize how big Texas is until you drive through it. Damn that state is big!). I think, just on my roadtrips alone, I’ve spent a collective two years exploring the country. That’s a lot of time and doesn’t even take into account that visit to Portland or Nashville or weekend in Savannah. In short, I’ve seen a lot of this country.
And there is a lot worth seeing.
In the past, I’ve talked about my favorite restaurants and lessons learned, so it only seems proper to give you a list of the best places to visit in the USA.
All these places are near and dear to my heart and really showcase just how special this country is and how many wonderful places there are here. (It took me awhile to narrow down this list!)
In no particular order, here’s my detailed list of the best places to visit in the USA:
(Note: This list is based only on where I myself have been. There are a lot more breathtaking places I haven’t explored yet, which is why they may not be on this list. It doesn’t mean they aren’t worth seeing. It just means I haven’t been there.)
1. Memphis
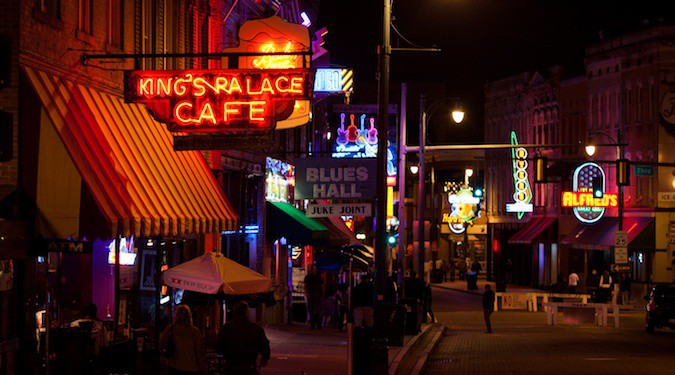
Gritty, industrial, and a bit run down, Memphis appears like its best days are behind it, but don’t let the rough exterior fool you — the city is still home to some killer food and a vibrant blues music scene. Additionally, there’s Graceland (Elvis’s home) for fans of the King, a big waterfront for walking, and the phenomenal, detailed, and moving Museum of Civil Rights (it’s huge, so don’t rush it!). I enjoyed the city more than I expected and was disappointed when I had to leave. To use a cliché, it’s a hidden gem!
WHERE TO STAY IN MEMPHIS: Hostel Memphis – A hip hostel in a century-old building with a fully-equipped kitchen and free Wi-Fi. The hostel is also a non-profit that donates 100% of its profit to social justice causes around the city.
2. Austin

I love Austin (I actually moved there in 2016 and stayed for several years before returning to NYC). The warm weather, the lively honky-tonks and live music, funky house bars on Rainey Street, amazing hiking and biking trails, and tons of outdoor activities…Austin has it all.
Thanks to everything from the growing food truck population to the flagship Whole Foods store with the incredible salad bar (grilled pineapple!), I eat — and eat well — whenever I’m here. The Austin campus of the University of Texas provides a youthful vigor to the city, and its liberal attitude attracts a diverse and eclectic population. In short, you can’t skip Austin, because if you do, I’ll find you and drag you there.
WHERE TO STAY IN AUSTIN: Firehouse Hostel – This centrally-located hostel is located in an old firehall from 1885. They have fast Wi-Fi, plenty of chill common areas, and an amazing on-site bar that serves top-notch craft cocktails.
For more travel tips on Austin, check out these posts:
3. New Orleans

New Orleans is a city with soul. It’s seen some hard times, but it lives on with a zest for life unmatched by most places. It has a rich and long history (don’t miss taking a haunted walking tour while you’re here) and is filled with scrumptious French-inspired Creole and Cajun food, live jazz music, street performers, and an appreciation for all the temptations of life. Life is lived well here in the Big Easy. You don’t come here to relax — you come here to indulge! In my opinion, New Orleans one of the most eclectic and vibrant cities in the United States.
WHERE TO STAY IN NOLA: HI New Orleans – An award-winning hostel with spacious dorms, comfy beds, privacy curtains, and fast Wi-Fi. Everything a budget traveler needs!
For more travel tips on traveling New Orleans, check out my suggested itinerary on how to spend your time there!
4. Asheville

Asheville is Portland in the North Carolina mountains: full of tasty craft beer, food, and hipsters. I liked the area a lot, including its proximity to some wonderful and scenic mountain hikes such as the Carolina Mountain Trail. Moreover, the town has a lot of parks for those wanting something closer — and be sure to check out the Asheville Botanical Gardens near the university campus. The beautiful Smoky Mountains are a short drive away, and the gigantic Biltmore estate, the largest privately owned home in the US and once home to George Vanderbilt, is on the outskirts of the city. (If you’ve ever seen Downton Abbey, that’s what the house is like! And, if you haven’t, you should! The show is addicting!)
WHERE TO STAY IN ASHEVILLE: Bon Paul & Sharky’s Hostel – A laid-back hostel with a spacious front and back porch for relaxing. There’s free parking, free Wi-Fi, and plenty of nearby restaurants and cafes.
5. The Pacific Coastal Drive
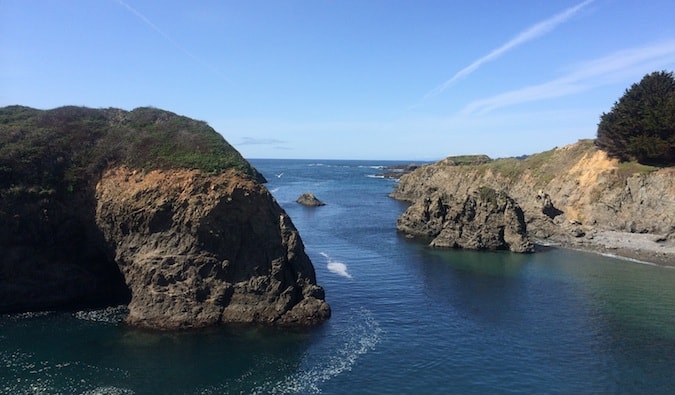
The drive up the Pacific Coast is considered one of the most scenic in the world. I have to agree. I didn’t travel the whole coast but the portion I drove (San Francisco to Portland) was incredible: sheer cliffs, forests descending to the shoreline, miles of beaches, and giant redwoods. It’s jaw-dropping all the way. Be prepared to make slow progress, as you’ll be pulling over frequently to stop, hike, and admire the view. I especially liked Bandon and Coos Bay, Oregon, and Mendocino, California.
6. Redwood National Park

Along the Pacific Coast is Redwood National Park, a large expanse of giant redwood trees filled with picnic areas, places to camp, and miles upon miles of hiking trails. Trails range from easy to strenuous, and there are many loops that head out to nearby beaches. It’s utterly beautiful, awe-inspiring, and humbling in every way. It’s a must for anyone road-tripping around California.
WHERE TO STAY IN REDWOOD NATIONAL PARK: View Crest Lodge – Located on the coast in Trinidad, this rustic budget-friendly lodge has basic amenities like free Wi-Fi and TV, and some of their rooms also have full kitchens. It’s a clean, comfy no-frills place to crash for a night.
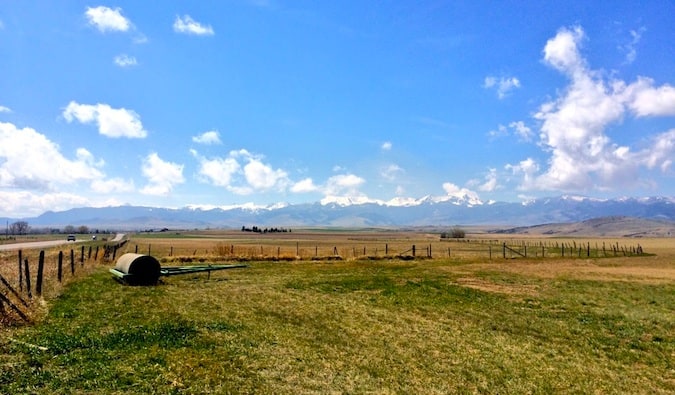
7. Glacier National Park

Even though I visited when most of the park was still closed (it was too early in the year and there was still snow around), I was still stunned by the area: gorgeous snow-capped mountains rising high into the sky; a beautiful, still lake in which to admire those mountains and large glaciers; and hiking trails galore. It was the most mind-blowing place I saw on my trip, and I can understand why everyone raves about it. I can’t recommend a visit there enough.
WHERE TO STAY IN GLACIER NATIONAL PARK: Camping – Pack (or rent) a tent and cozy up for a few nights under the stars. You won’t be disappointed.
8. Denver

Denver has a mix of outdoor ruggedness and big-city living. It has a huge craft beer scene (be sure to take a beer tasting tour), excellent restaurants (including, Sushi Sasa, one of my favorite sushi restaurants in the world), a large international airport with lots of connections, and proximity to the mountains. It’s clean, and the locals are incredibly friendly. There are few cities in the US I want to live in, but I love Denver enough to say that it’s one of them.
WHERE TO STAY IN DENVER: Ember Hostel – This boutique hostel is rated one of the best in the country, offering a swank interior, free jacuzzi, outdoor firepit, comfy beds with blackout curtains, cheap overnight parking, and more.
9. Chicago
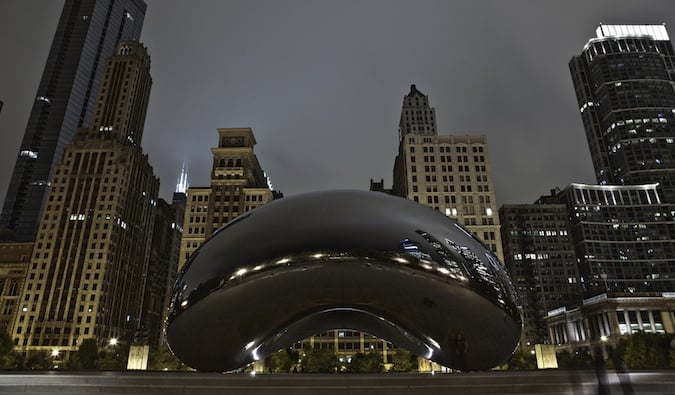
When the weather is nice, I don’t think there’s a better city in the United States. Set on the shores of Lake Michigan, Chicago has world-class food (try the deep dish, sushi, and hot dogs), the fun and kitschy Navy Pier, Millennium Park with its famous bean-shaped statue, a kick-ass aquarium, and iconic architecture (be sure to take an architecture tour).
And, once the winter deep freeze is over, Chicagoans burst out of their homes to enjoy the summer weather, so there’s a positive, happy vibe emanating through the city. Take advantage of it.
WHERE TO STAY IN CHICAGO: HI Chicago – A spacious, clean hostel with female-only dorms, free Wi-Fi, and a great location. The beds are comfy and the common area is huge so it’s easy to meet people.
For more travel tips on Chicago, check out these posts:
10. New York City

The city that never sleeps. ‘Nuff said. I mean, there’s a reason I moved here — and then moved back again after living in Texas. You can’t go wrong here. New York sells itself and there’s nothing I can say here. I know you already want to go.
WHERE TO STAY IN NYC: HI NYC – This is one of the biggest and best hostels in the city. It’s super easy to meet people here, they have a chill outdoor patio, and the kitchen is huge so you can cook more meals and save your budget.
For travel tips on New York City, check out these posts:
11. Natchez

I was most surprised by this Mississippi city. I didn’t know anything about it, but Natchez was recommended as a place to see historic 19th-century homes, built by isolated plantation owners wanting to get away in the summer and interact and socialize with each other. As cotton became king, the houses became ever larger and more elaborate.
Now, they are historic monuments, and you can tour them while enjoying a view of the Mississippi River. It’s far off the beaten path — and my favorite discovery from my last road trip.
WHERE TO STAY IN NATCHEZ: The Beaumont House – If you want to splash out, this recently-renovated B&B in a mansion includes free breakfast and spacious historic rooms as well as modern amenities like Wi-Fi, air-conditioning, and flatscreen TVs.
For more travel tips on Natchez, check out this post on my visit there.
12. Savannah
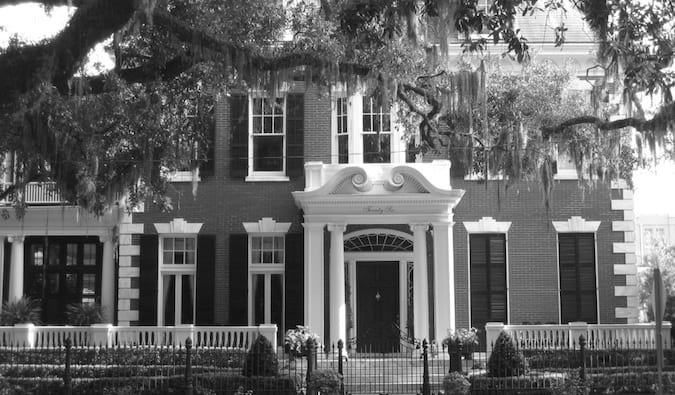
Sitting on Georgia’s coast, Savannah escaped the wrath of the Civil War, allegedly because General Sherman thought it was too pretty to be destroyed. With streets lined with Spanish moss–covered trees, large and inviting parks, and a bustling waterfront, Savannah is a wonderful place to experience the slow pace of the Old South. I had visited this city many, many years ago, but its beauty, Southern comfort food, and tranquility stuck with me over the years.
WHERE TO STAY IN SAVANNAH: Thunderbird Inn – This affordable three-star motel is just a short five-minute walk from downtown. Boasting a retro vibe, there’s free coffee and juice every morning, as well as free popcorn available in the lobby.
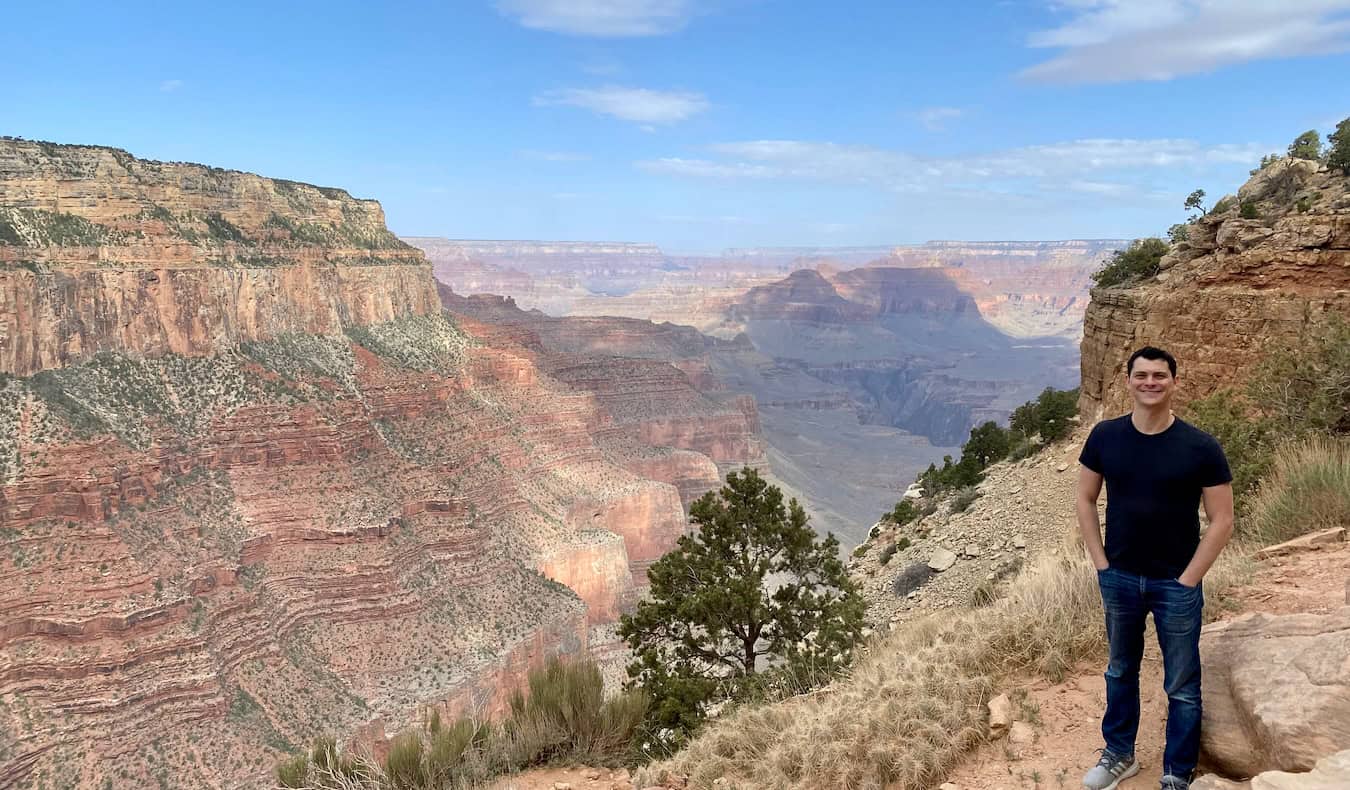
13. The Grand Canyon

Words can’t accurately describe how incredible the Grand Canyon is. It’s breathtaking in so many ways — its sheer size, fantastic depth, red hues, and striking vistas. Most people simply stand at the edge of the canyon and look out across it, but its true size and beauty are best appreciated with a hike down to the bottom. Make the time to hike down to the Colorado River, hike the less visited trails, spend the night, and hike back up for sunset.
WHERE TO STAY IN THE GRAND CANYON: Camp – Pack (or rent) a tent and cozy up for a few nights under the stars. You’ll need to reserve a spot early though as they disappear fast!
For more travel tips on the Grand Canyon, read this post on hiking the canyon.
14. Nashville
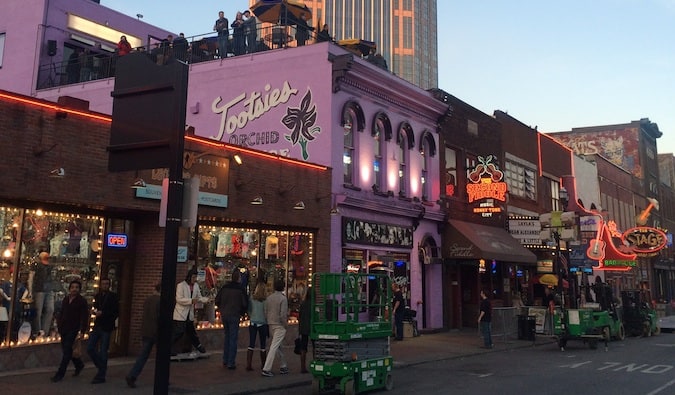
A little bit country, a little bit tech, Nashville is one of the fastest-growing cities in the US, and rightly so. It’s got a wonderful music scene (including the famous Grand Ole Opry), a growing cocktail bar scene, and some down-home Southern restaurants.
There’s not a lot of “touristy stuff” to do here, but what makes this city one of my favorites are the music, the food, the wildly friendly and happy people, and the positive energy the city seems to exude. When you’re here, plan to spend a few hours at the Tennessee State Museum. It goes into great (though sometimes very one-sided) detail about the state’s history, but it’s more exciting than you might think.
WHERE TO STAY IN NASHVILLE: Red Roof Inn – While it’s not centrally located, this is one of the city’s few affordable two-star options. A quick 13-minute drive from the Grand Ole Opry, this budget-friendly joint boasts an outdoor pool, free Wi-Fi, and free coffee.
For more travel tips on Nashville, check out these posts:
15. San Francisco
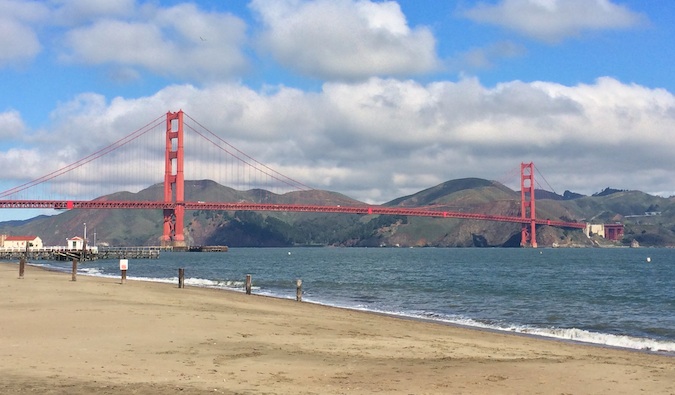
Food of every nature, hipsters, high tech, and a diverse population make San Francisco one of my favorite places to visit. Additionally, it’s close to some wonderful national parks, like Muir Woods, where you can escape the city and go hiking amid giant trees (there are lots of half-day guided tours you can take). San Francisco has so much to do that you need at least four days to really appreciate it.
WHERE TO STAY IN SAN FRANCISCO: Green Tortoise – As one of the oldest in town, this hostel is an institution in San Francisco. It offers free breakfast, free dinners multiple times per week, and even a free sauna! It has a huge common room so it’s easy to meet people and has a very fun, social atmosphere.
For more travel tips on San Francisco, read these posts:
16. Miami
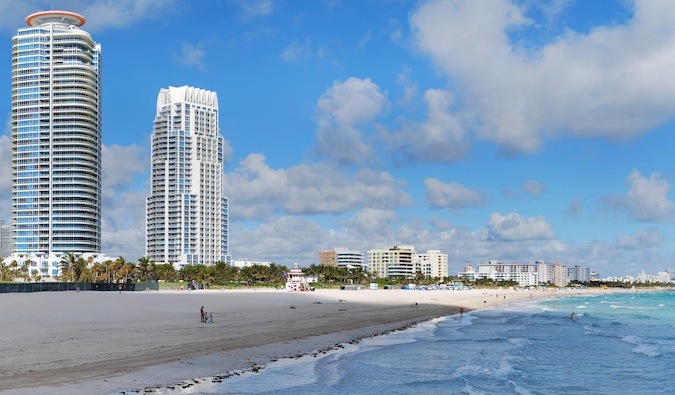
White sand beaches, Cuban food, wild nightlife, gorgeous people, and amazing warm weather — what’s not to love about Miami! I don’t think I could ever live here, but for a weekend of fun in the sun, Miami is perfect.
WHERE TO STAY IN MIAMI: Generator Miami – This hostel has a pool, two restaurants, a bar, and is just minutes away from the beach. It’s massive (there are 8 floors), the beds are more comfortable than the cheap ones you’ll find at the party hostels.
For more travel tips on Miami, read these posts:
17. San Diego

Forever warm and sunny, San Diego’s weather creates a permanently happy population that’s friendly and outgoing and that loves the outdoors — from hiking, days at the beach, or running. And they are always happy to show people their city.
The downtown Gaslamp area — as well as the famous Pacific Beach — is full of trendy seafood restaurants, bustling bars, and some seriously life-changing taco stalls. I love San Diego.
WHERE TO STAY IN SAN DIEGO: ITH Adventure Hostel – With a focus on sustainable travel (there’s a vegetable garden and backyard chickens), this chill hostel is very friendly and social. It’s clean, and the water pressure in the showers is decent, and the beds are comfy. (For more hostel suggestions, you can read this post.
19. Lake Tahoe
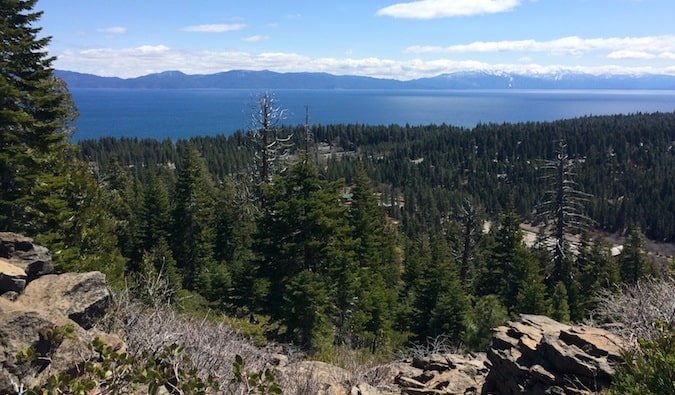
Though the water level of the lake, as well as the flora and fauna around it, is sadly depleted due to the California drought, Lake Tahoe is still nonetheless impressive and beautiful. Ringed by tiny mountain communities, this is a terrific place for hiking and boating in the summer and skiing in the winter.
WHERE TO STAY IN LAKE TAHOE: Camping – Pack (or rent) a tent and cozy up for a few nights under the stars. You won’t be disappointed.
20. Anywhere in Montana
A lot has been written about how stunning Montana is, but it’s all wrong. It’s even better than words can describe. It’s the most crazy beautiful state I’ve ever been to, filled with wondrous mountains and hills as far as the eye can see. The people are super cool, welcoming, and outdoorsy, too. If I had to pick a favorite state, it would be Montana. I just love it.
WHERE TO STAY IN MONTANA: Treasure State Hostel – Located in downtown Bozeman, this hotel is quiet, clean, and is home to friendly staff. They organize all kinds of events too, like pub crawls and movie nights, so it’s easy to hang out and meet people.
21. Washington D.C.

The capital of the United States is a vibrant, international city, and that’s what I love about it. It’s second only to NYC in diversity of people and food (which is to be expected with so many people from international aid organizations and embassies). You hear a million accents in this town! Throw in the free Smithsonian museums, lots of parks, a riverfront for strolling or running, and some historic government buildings and monuments, and D.C. becomes one phenomenal place to visit, relax, eat, and drink! Be sure to take a tour of Capitol Hill while you’re here!
WHERE TO STAY IN WASHINGTON: Highroad Hostel – Offering pod-style bunks, this cool hostel is located in an old Victorian mansion. The beds have thick mattresses, there’s a fully-equipped kitchen, there’s free coffee and tea each day, and they even host a free happy hour each week!
For more travel tips on Washington D.C., here are some other articles I’ve written:
22. Cape Cod

I spent a lot of summers on the Cape since it’s where New Englanders escape for the summer. You’ll find plenty of small beach towns along the coast (Provincetown and Hyannis being the most famous but I also love Chatham, Falmouth, Wellfleet, and Brewster). If you’re looking for seafood, beaches, boardwalks, and that perfect family vacation, visit the Cape!
WHERE TO STAY IN CAPE COD: Cape Sands Inn – Just a short walk from the beach in West Yarmouth, this three-star property has all the standard amenities (TV, free Wi-Fi), as well as free parking and a relaxing sauna and hot tub.
23. Boston
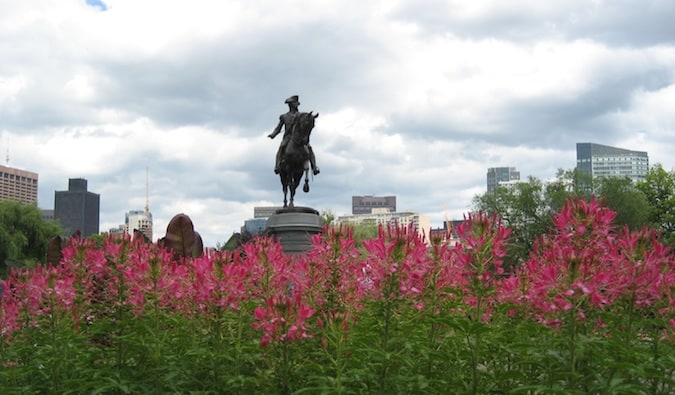
I may be biased because I grew up here, but I love Boston and cherish my visits home. Boston rocks (Go Red Sox!). It’s historic (founded in 1630), small-ish, easy to get around, and filled with awesome and loyal people. It’s home to a ton of activities, like the Freedom Trail and Faneuil Hall, the JFK Museum, and the Boston Commons and Public Garden, as well as some of the best Italian and seafood restaurants in the country. Be sure to eat at Zaftigs for the best brunch in the city! It’s wicked!
WHERE TO STAY IN BOSTON: HI Boston – This spacious and clean hostel is just a short walk from pretty much everything in the city. They have female-only dorms, free Wi-Fi, and several chill common areas where you can meet other travelers.
For more travel tips on Boston, check out these posts:
24. Las Vegas

Vegas, baby, Vegas! A lot of people are turned off by the bright lights and gambling, but Vegas is much more than the casinos, expensive clubs, and hotels on the famous Strip. There’s incredible hiking nearby at Red Rocks National Park, a growing art scene, a booming tech scene, and lots of concerts and shows.
Get off the Strip, explore the real Vegas (because technically the Strip is located in Paradise, NV, not Las Vegas), and see why people decide to live here.
WHERE TO STAY IN LAS VEGAS: Sin City Hostel – Just a short walk from the (in)famous Fremont Street, this is a social hostel that hosts all kinds of events (such as bar crawls, pasta & wine nights, BBQs, casino nights, and more). It’s a great place to connect with other travelers.
For more travel tips on Las Vegas, these articles can help:
25. Portland

Portland, Oregon is incredible. I would move there if it had a bigger airport with better connections. Here you’ll find an impressive food truck scene, cool bespoke bars and cocktail lounges, a craft beer scene that’s a religion to residents, relaxing parks (including a peaceful Japanese garden), a vibrant art scene, and hiking in the nearby mountains. There’s even an underground donut scene here.
WHERE TO STAY IN PORTLAND: HI Portland – Northwest – Rated one of the best hostels in the world, this centrally-located HI hostel offers free breakfast, in-house made craft beer, an outdoor courtyard with a firepit, regular live music, and much more.
For more travel tips on Portland, read this post on the city.
26. Seattle
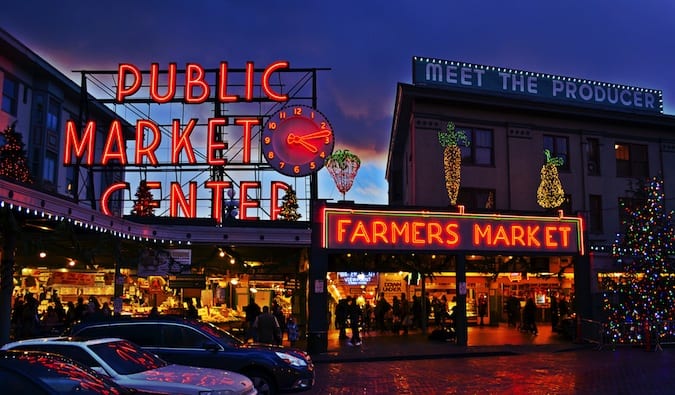
Home to a little business called Starbucks, it also boasts an exciting downtown, fresh fish, authentic Asian food, art museums, and funky nightlife. In historic Pioneer Square, you can go on an underground tour of the city’s ruins (a hella cool experience). Moreover, you’re right on the water and, weather permitting, can head out onto Elliott Bay to explore some little islands. Seattle is just a cool city. There’s always something to do there, it’s techy, and everyone is relaxed. Plus, there’s craft beer and coffee — what’s not to love about that!
WHERE TO STAY IN SEATTLE: Green Tortoise – Located right across from the iconic Pike Place Market, this social hostel organizes all kinds of activities so it’s easy to meet people. They also offer free breakfast and daily events. It’s one of my favorite hostels in the country.
For more travel tips on Seattle, read this detailed planning guide!
27. Deadwood
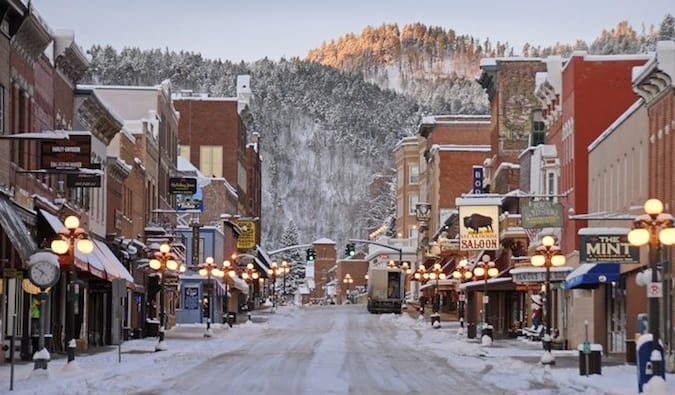
Tucked away in western South Dakota, this town was famous during the Old West days, noteworthy enough to be the focus of an HBO series. Sort of kitschy and re-created, it’s nonetheless a very cool place where you can experience a taste of the old frontier days. It’s also conveniently located near the Black Hills and Mount Rushmore.
WHERE TO STAY IN DEADWOOD: Gold Country Inn – This kitschy hotel is one of the cheapest places in town. Located right downtown, they have a mini gambling hall on-site, free Wi-Fi, and free parking. It’s nothing fancy but it won’t break the bank either.
28. Kansas City
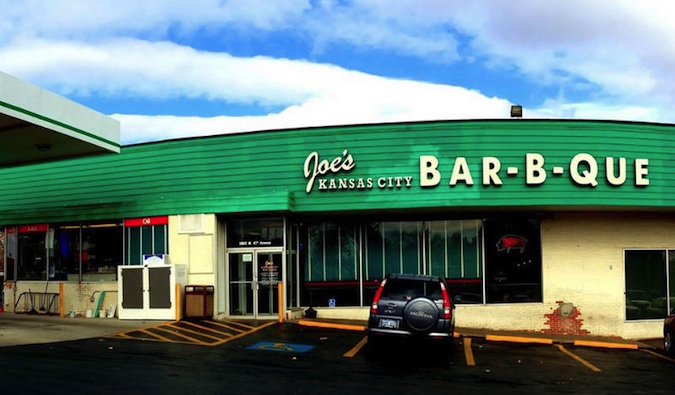
I really loved this city, which features some of the world’s best BBQ and a lively downtown. There’s also a detailed and enlightening jazz museum here, as well as the eye-opening Negro Leagues Baseball Museum (that was the actual name; I’m not being racist). I wish I could have spent more time, but that’s just more reason to come back.
WHERE TO STAY IN KANSAS CITY: Home2 Suites Downtown – With a fitness center, pool, and a decent breakfast spread, this three-star hotel in downtown KC is one of the more affordable places to crash in the city.
29. Louisville
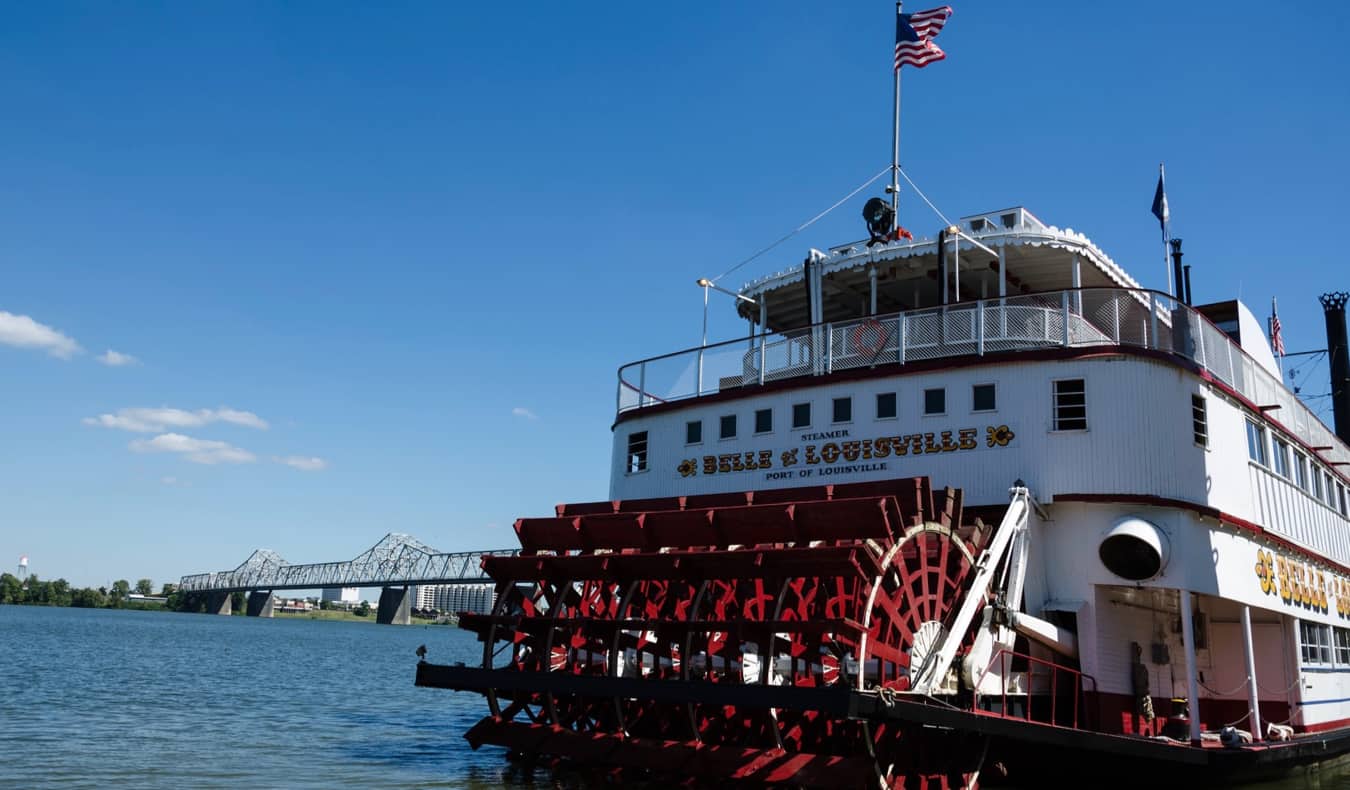
Louisville sits on the Ohio River and is the largest city in Kentucky. I was surprised at how much I liked it and how much there was to do here. There’s an established theatre scene, a handful of museums and galleries, tons of delicious places to eat (it’s a solid foodie city), and all the bourbon you can drink.
Louseiville has a laid-back, artsy vibe to it. It feels much more like an Austin or a Portland than your traditional southern/midwest city. In the past, it was considered a fly-over city and was skipped by most people. It’s definitely not now.
WHERE TO STAY IN LOUISVILLE: Microtel Inn – While it may be 20 minutes from downtown, this budget-friendly inn is affordable, includes free breakfast and free parking, and has free Wi-Fi. It’s a no-frills choice but clean and comfy.
30. Charleston
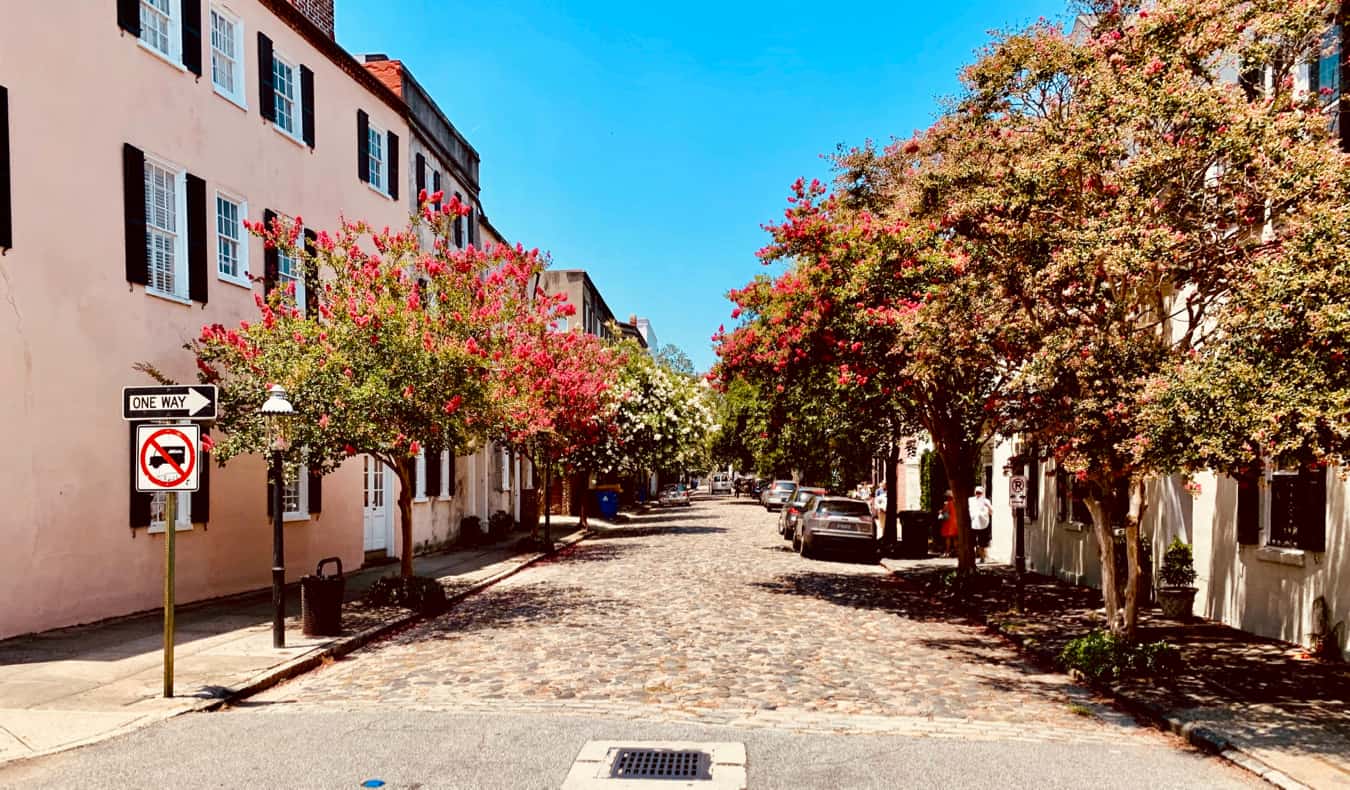
Charleston is another lively city full of delicious food, fun bars, lots of history, and all the southern charm you’d ever need. It’s beautiful, the people are nice, and there’s a high, high concentration of world-class restaurants for such a small city. (If you love seafood, you’re going to love it here. This is one of the best cities in the country for seafood.)
WHERE TO STAY IN CHARLESTON: Charlestons NotSo Hostel – Located in a historic neighborhood, this laid-back hostel includes free coffee/tea and oatmeal and free Wi-Fi. The rooms are small but the beds are perfectly comfy.
31. Franklin
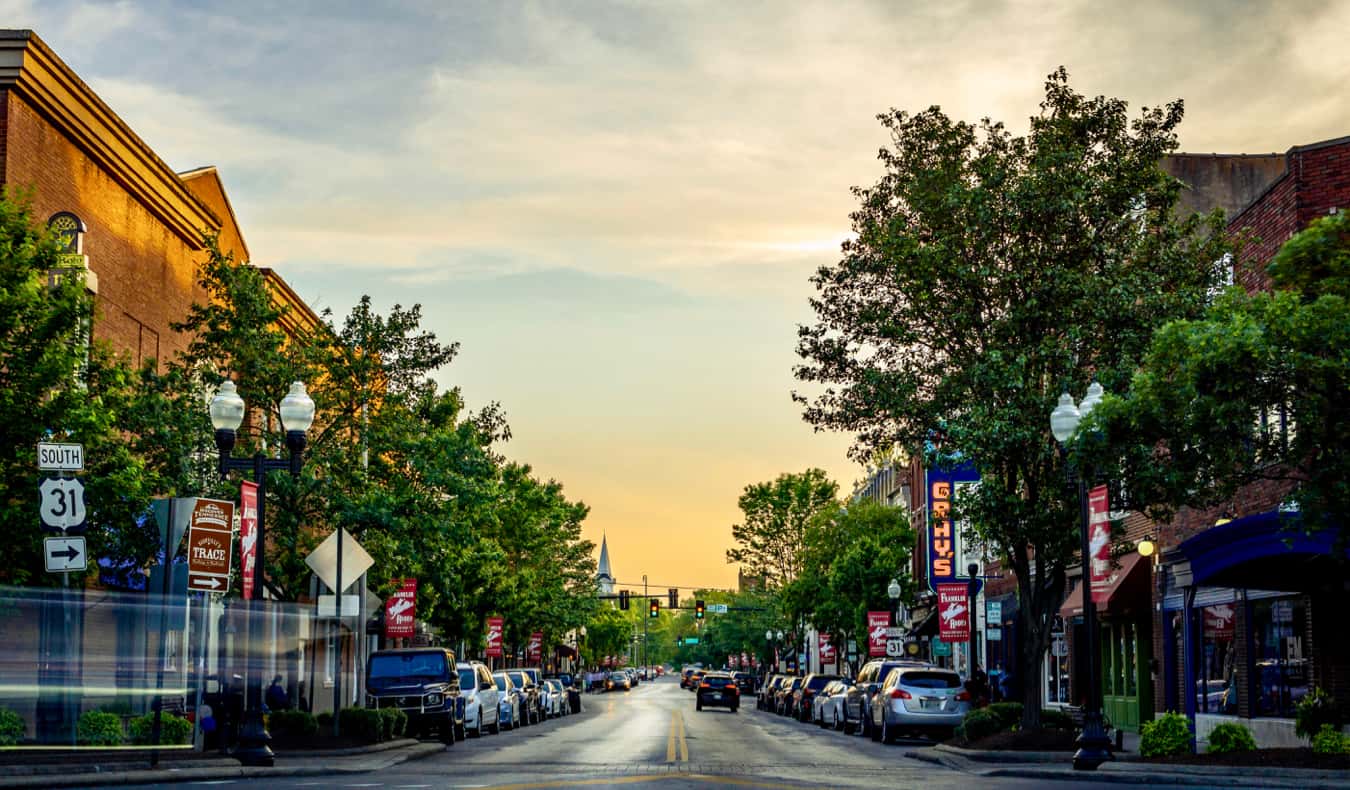
Located just outside of Nashville, Franklin is bursting with small-town charm. The city is full of history (there was a major Civil War battle here), a historic main street, and some really delicious bars and restaurants. I didn’t expect much and the city really surprised me. It’s the perfect two-night destination.
WHERE TO STAY IN FRANKLIN: The Harpeth Hotel – This upscale property features a restaurant on-site, fitness center, bar, and terrace. If you don’t want to splash out, check Booking.com for other options.
The United States is filled with too many “must-sees” places to visit to list in a single blog post. After all, the country is home to over 329 million people and covers 3.8 million square miles.
Just be sure to turn off the highways, head to the small towns, and discover some favorites of your own. The best of the USA is always away from the major highways in the little no-name towns with little diners, quirky shops, and friendly people!
For more travel tips on traveling the USA, read these other blog posts:
Book Your Trip: Logistical Tips and Tricks
Book Your Flight
Find a cheap flight by using Skyscanner. It’s my favorite search engine because it searches websites and airlines around the globe so you always know no stone is being left unturned.
Book Your Accommodation
You can book your hostel with Hostelworld. If you want to stay somewhere other than a hostel, use Booking.com as it consistently returns the cheapest rates for guesthouses and hotels.
Don’t Forget Travel Insurance
Travel insurance will protect you against illness, injury, theft, and cancellations. It’s comprehensive protection in case anything goes wrong. I never go on a trip without it as I’ve had to use it many times in the past. My favorite companies that offer the best service and value are:
Want to Travel for Free?
Travel credit cards allow you to earn points that can be redeemed for free flights and accommodation — all without any extra spending. Check out my guide to picking the right card and my current favorites to get started and see the latest best deals.
Need a Rental Car?
Discover Cars is a budget-friendly international car rental website. No matter where you’re headed, they’ll be able to find the best — and cheapest — rental for your trip!
Need Help Finding Activities for Your Trip?
Get Your Guide is a huge online marketplace where you can find cool walking tours, fun excursions, skip-the-line tickets, private guides, and more.
Ready to Book Your Trip?
Check out my resource page for the best companies to use when you travel. I list all the ones I use when I travel. They are the best in class and you can’t go wrong using them on your trip.


![GoPro HERO 13 Review – The Ultimate Camera Guide [2025]](https://farasar.ir/wp-content/uploads/2025/07/GoPro-HERO-13-Black-Review-Feature-Image.jpg)


![The BEST Camera Accessories – Photography Essentials [2025]](https://farasar.ir/wp-content/uploads/2025/07/Best-Camera-Accessories.jpg)


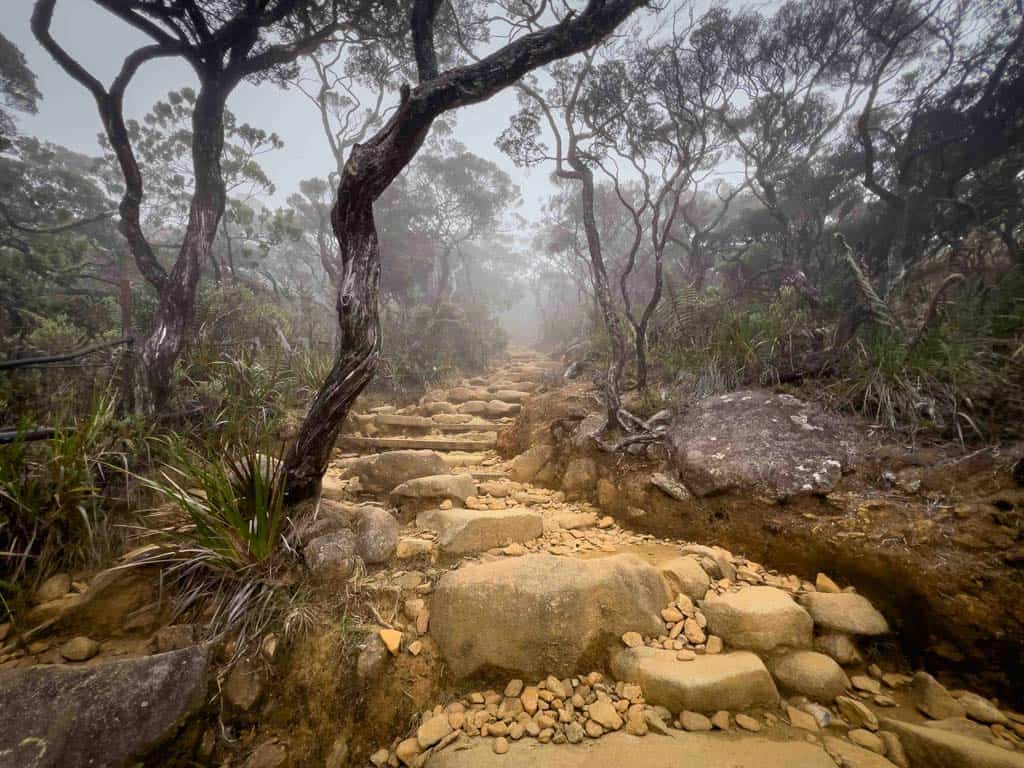
![Climbing Mount Kinabalu – The Ultimate Trekking Guide [2025]](https://farasar.ir/wp-content/uploads/2025/07/Mount-Kinabalu-Climb-Trek-Guide-Featured-Image.jpg)