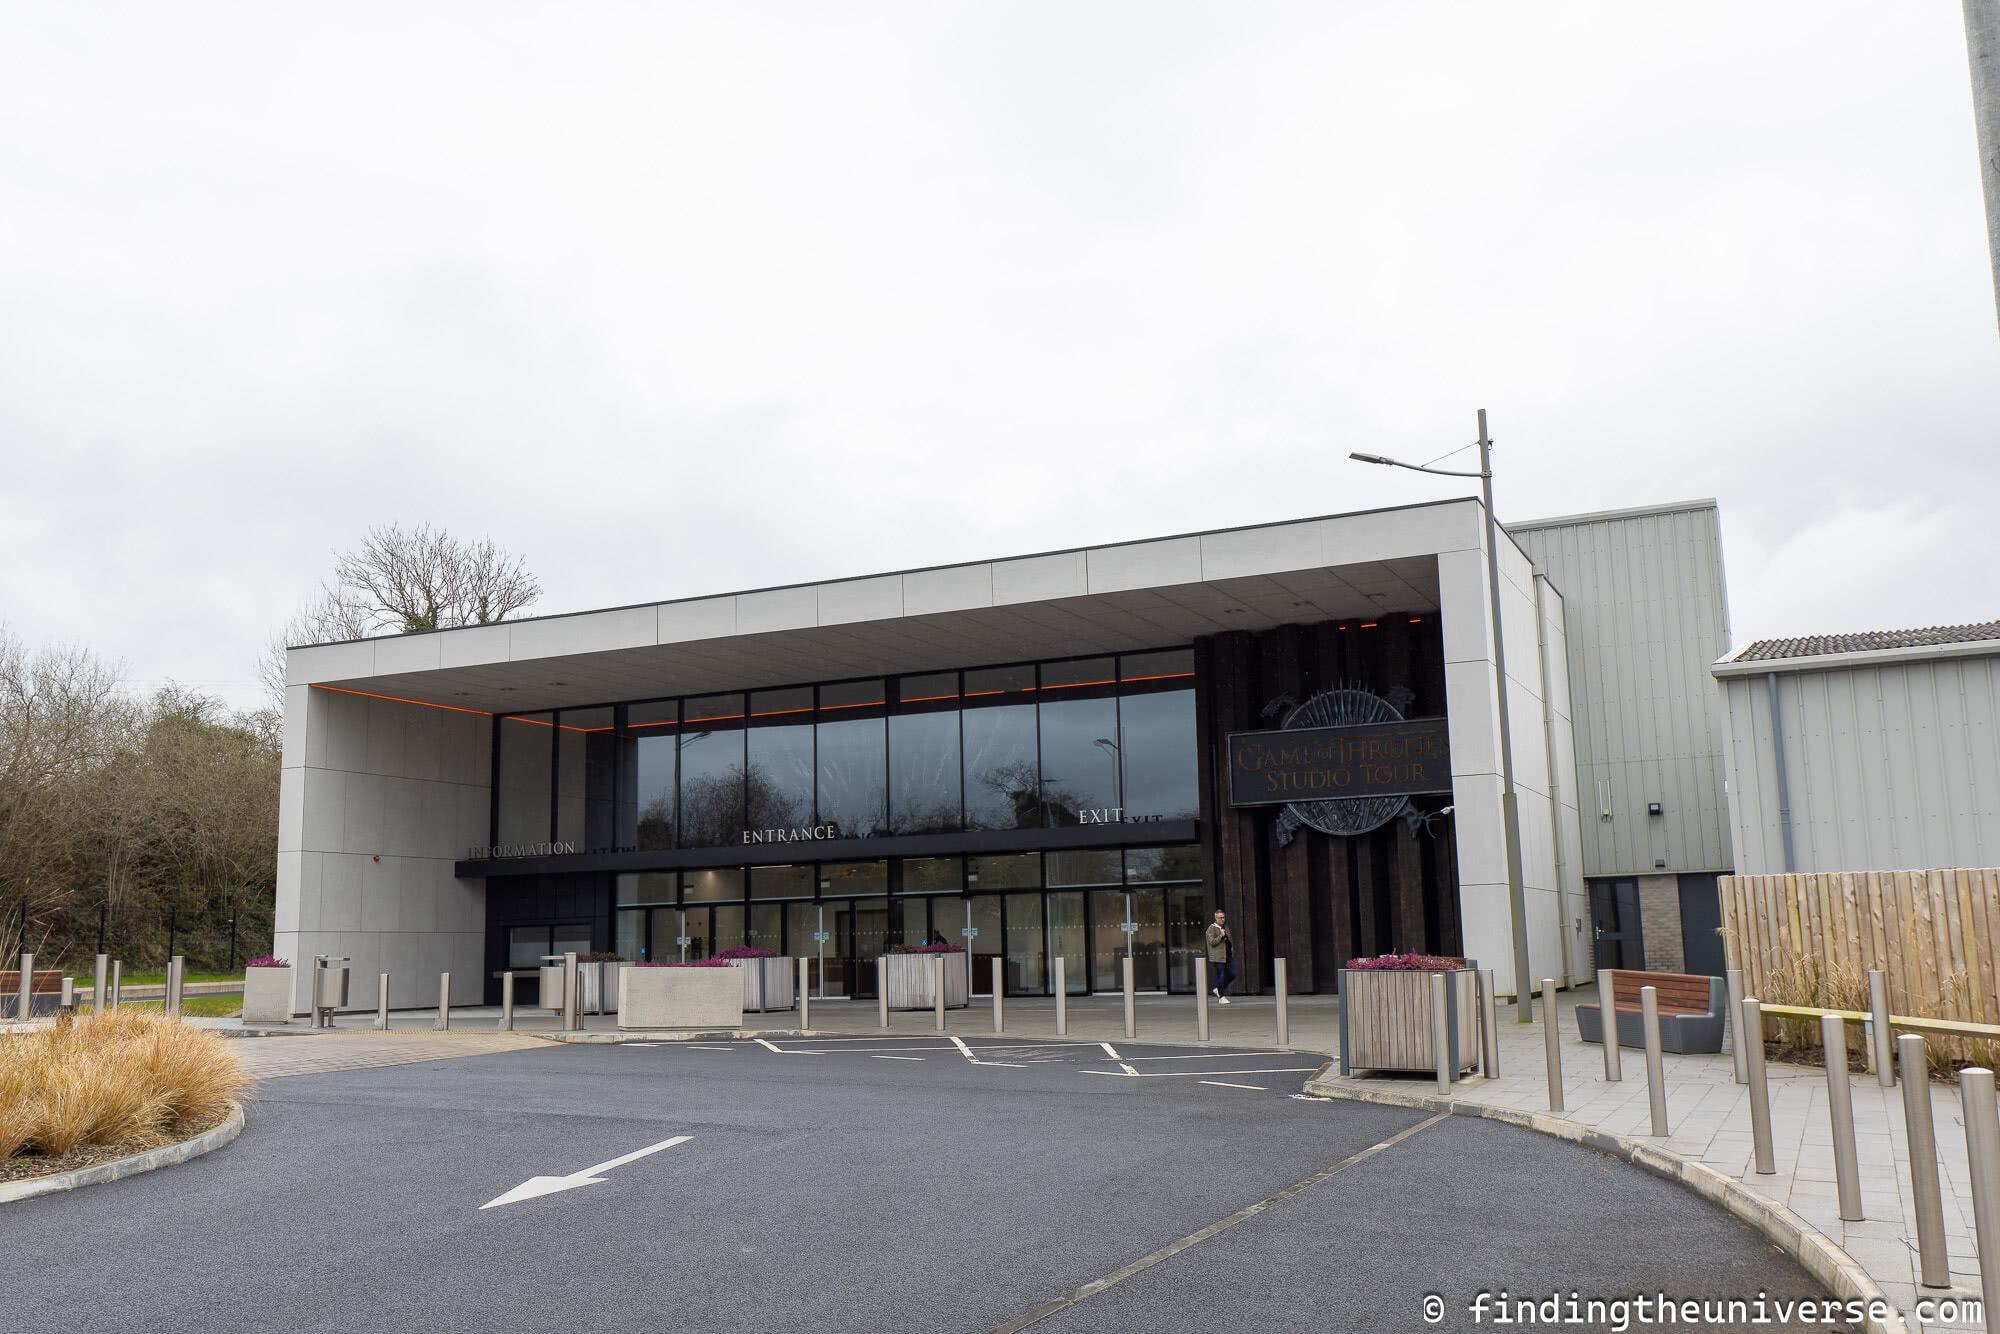
If you’re a fan, as I am, of the Game of Thrones TV show, you should know that you can actually tour the Game of Thrones studio where many scenes from the show were filmed.
The Linen Mill Studios is found in Banbridge, Northern Ireland, just outside Belfast. It is where many iconic scenes from the show were filmed.
The original sets for the Winterfell Great Hall and Castle Black were constructed here and in fact the tour was built around them. In addition to the amazing film sets, you’ll also find props, costumes, artwork, weapons, prosthetics, exhibits, and lots of information on the making of the show.
There is also, of course, a large gift shop filled with Game of Thrones merchandise.
I’ve already written about visiting the main Game of Thrones filming locations in Northern Ireland as well as in Iceland, however until now I hadn’t put together a guide to the studio tour. I think it’s well worth a visit for both fans of the show, and those interested in how TV shows are put together in general.
If you are planning on visiting a number of Game of Thrones locations during your visit to Northern Ireland, then I can recommend including the studio, ideally as one of the first locations you visit.
Coming here is going to give you a huge appreciation for the amount of work that went into creating the show. There’s loads of information on display, with details on the filming locations, set design, props, costumes, and lots more!
In this guide I’m going to cover everything you need to know to visit the Game of Thrones studio tour, from how to get here, to buying tickets, to how long to stay, and more. Let’s get started.

Where is the Game of Thrones Studio Tour?
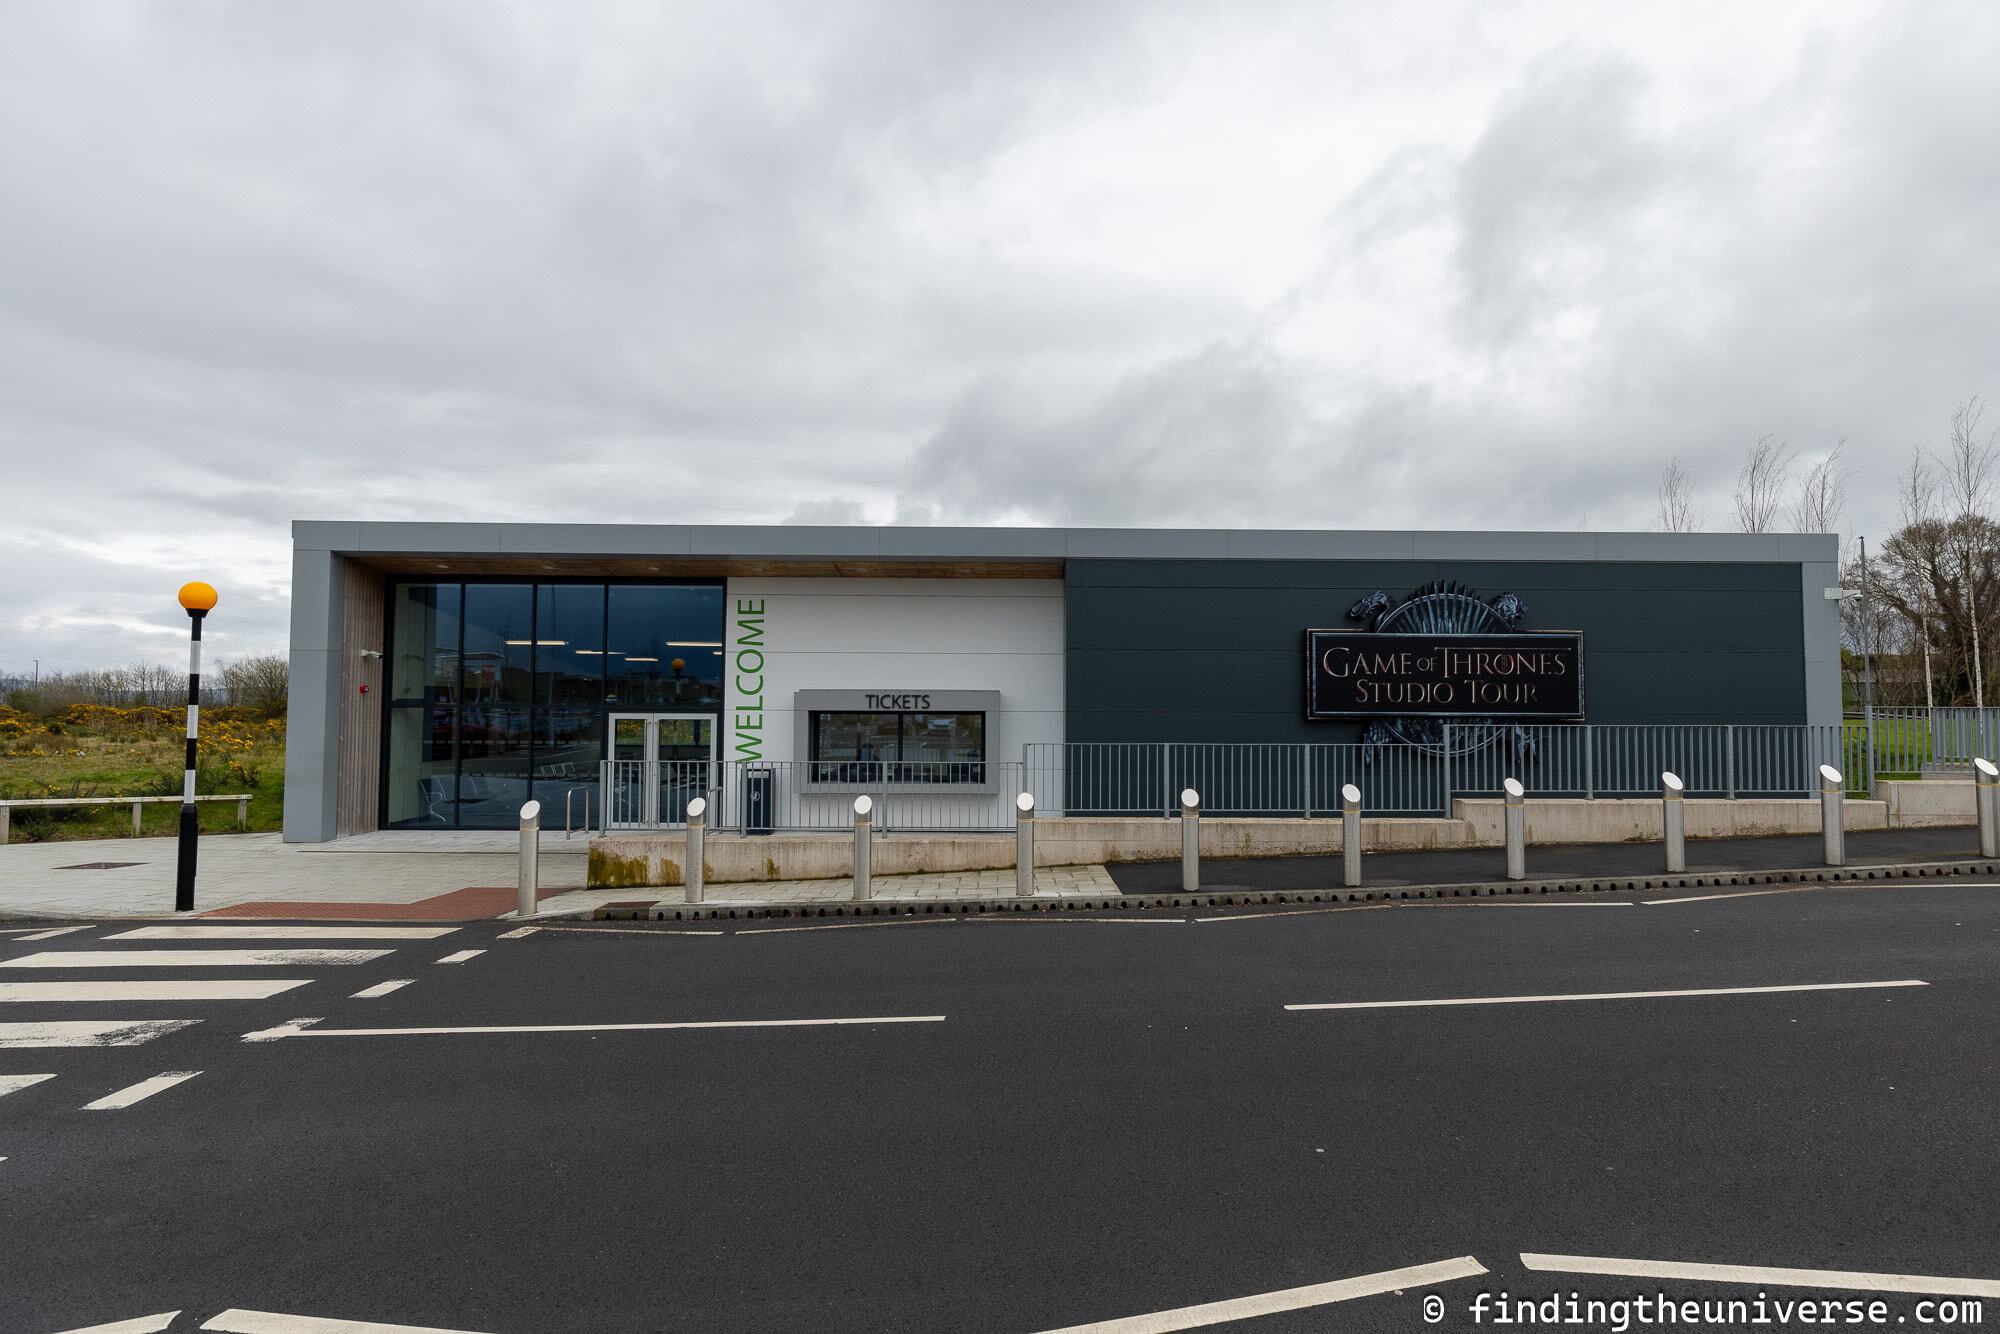
The Game of Thrones Studio Tour is located in the Linen Mill Studios. These are situated just outside the town of Banbridge in County Down, Northern Ireland.
This is about 25 miles (30 minutes drive) southeast of Belfast, or around 80 miles (80 minutes drive) north of Dublin.
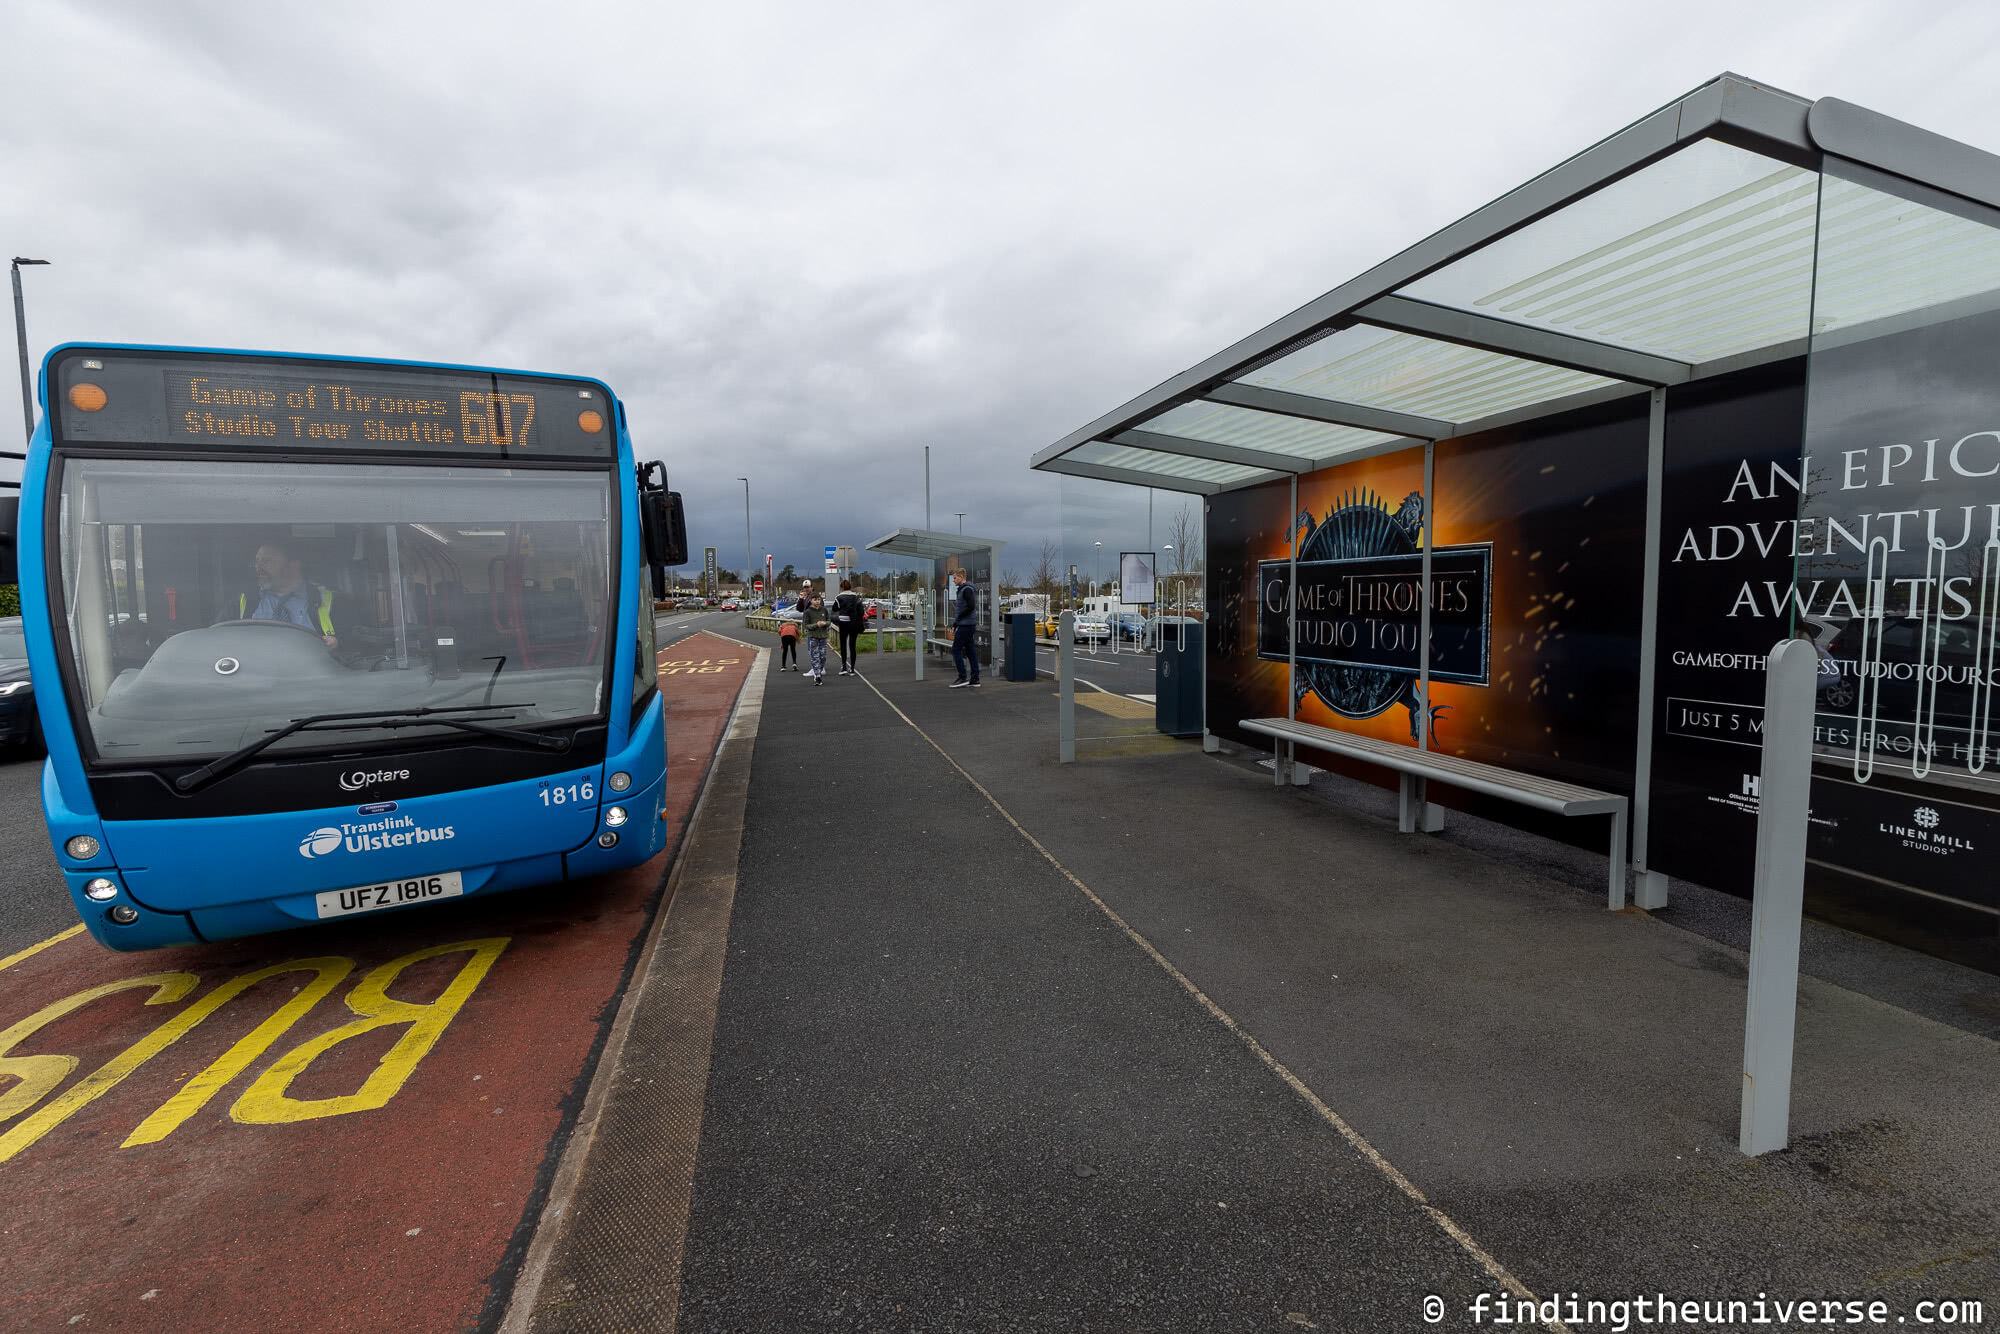
Note that there is no public parking at the Linen Mill Studios. If you are making your own way to the studios by public transport or by car (more on getting here soon), you need to head to the Game of Thrones Studio Tour parking lot.
This is found at the Boulevard shopping center in Banbridge, just off the A1. Here there is free parking and a free shuttle service for ticket holders of the studio tour.
Does the Game of Thrones Studio Tour include House of the Dragon & A Knight of the Seven Kingdoms?
Game of Thrones is not the only TV show set in Westeros. House of the Dragon started airing in 2022, with new show A Knight of the Seven Kingdoms announced in 2024. Both are series created by writer George R. R. Martin.
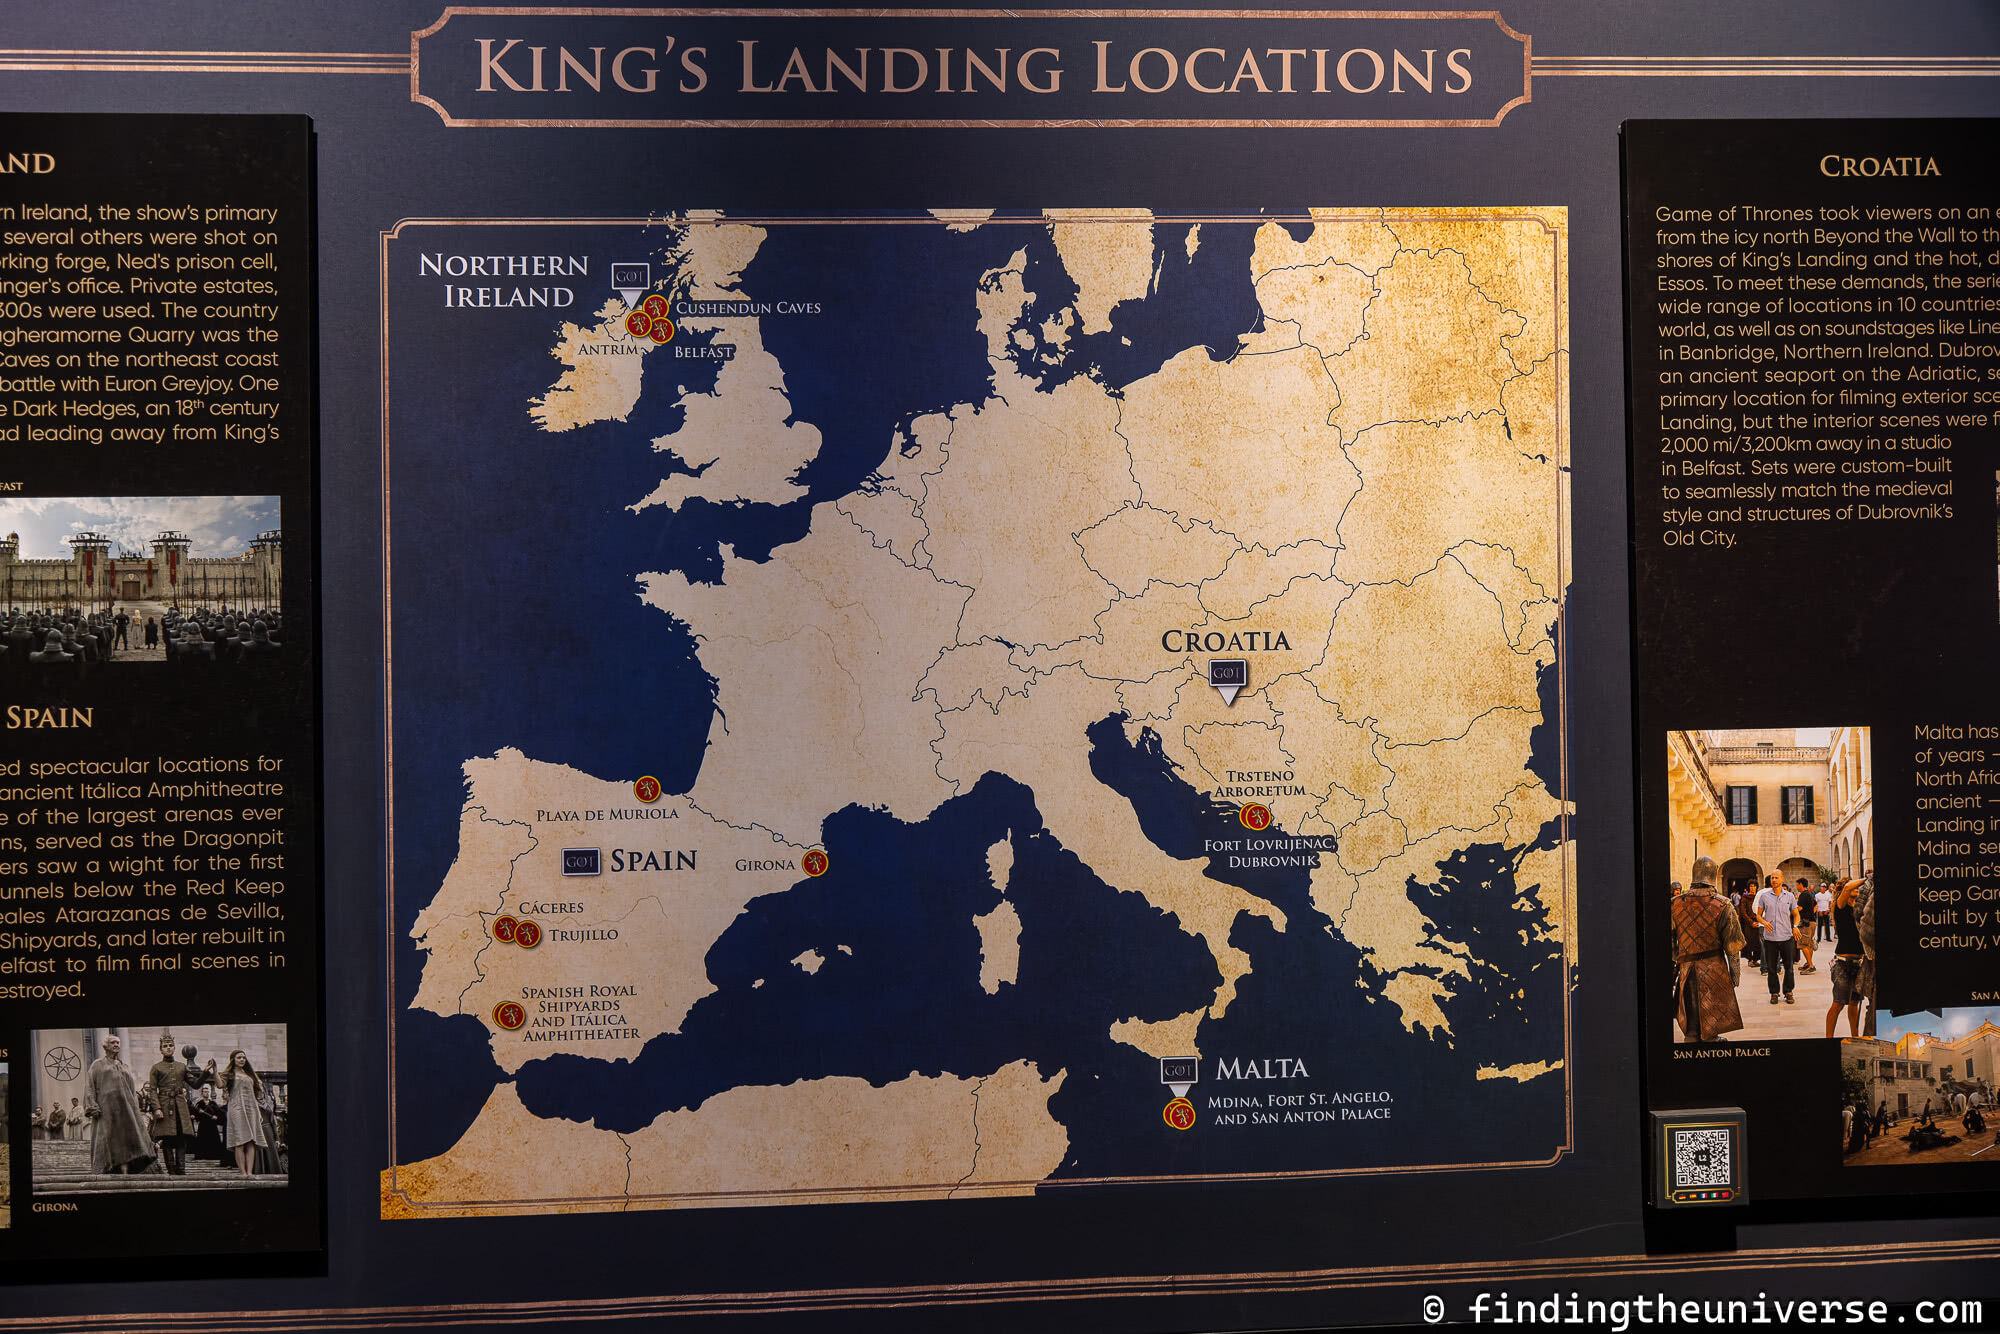
However, currently the Game of Thrones Studio tour focuses primarily on the Game of Thrones TV show which was filmed between 2009 (pilot episode) and 2018 and aired from 2011 to 2019 on HBO. Much of the filming took place in Northern Ireland.
Whilst some props from House of the Dragon have been put on display, that show is not being filmed at this studio or in Northern Ireland. Instead, it’s being filmed at the Warner Bros Leavesden studio in Watford, England. This is the same studio where you can take the Harry Potter Studio tour.
A Knight of the Seven Kingdoms was announced in 2024 and production is taking place at the Titanic Studios in Belfast, where parts of Game of Thrones was also shot. As the show has only just been announced, there’s no further information as to whether this will be included in the Game of Thrones Studio tour.
Game of Thrones Studio Tour Opening Times
The Game of Thrones Studio tour is typically open from 10am to 6.30pm. It’s open every day with some exceptions for public holidays.
How Much Does the Game of Thrones Studio Tour Cost?
The tour, which includes parking and shuttle bus from the parking area, currently costs as follows (prices as of June 2024)
- £29.50 for adults (16-65)
- £24 for students with student ID and seniors (66+)
- £12 for teenagers (13-15)
- £5 for children (5 – 12)
- Free for children under age 5
There is also a family ticket which costs £67.25 and which includes two adult admissions and two teen admissions.
You can see the various ticket options and purchase tickets online here.
Game of Thrones Studio Audio Guides
There are audio guides available for the Game of Thrones Studio tour for an additional fee. These contain narration through the tour as well as additional information and details not on display.
You can either get this through the official app for Android or iOS, (must bring your own headphones to use) or you can rent an audio guide handset on site for around £5.
Currently the audio guides (both physical handsets and app) are available in English, French, Spanish, Italian, German, and Mandarin Chinese.
The audio guide is not necessary for enjoying or understanding the experience as there are a lot of signs and placards you can read along the way. But they do enhance the experience and add extra information. For non-English speakers, they are likely to be very helpful in giving background information about the exhibits as the information is displayed only in English.
You can book a audio guide handset or download the app in advance, or you can wait to do so once you are at the studio. You can get the audio guide handsets from the Information Desk. So you don’t need to decide before your visit, but you do need to decide before you start the tour.
Game of Thrones Studio Afternoon Tea
If you are interested in having a Game of Thrones themed afternoon tea experience, you can pre-book an afternoon tea experience to have before or after your tour.
The afternoon tea includes themed food such as Kings Rocky Road, Hot Pie’s Sausage Rolls, Chocolate Crunch Dragon Eggs, and High Garden Sandwiches. It currently costs £30 per person.
You do need to pre-book the experience in advance of your visit, so you will want to book it along with your admission tickets.
You can book your ticket (and optional transport) with an afternoon tea here.
Is the Game of Thrones Studio Tour Kid Friendly?
Although the show itself was not exactly a child friendly show (with quite a lot of violence, gore, sex, and nudity and complicated plots), the studio tour is designed to be a family-friendly experience.
There are no minimum age restrictions although all children age 16 and under must be accompanied and supervised by an adult during their visit.
Buggies, pushchairs, and strollers are allowed on the studio tour.
I haven’t visited with kids but when we visited there were several families with children of all ages, and everyone seemed to be enjoying the experience.
Is the Game of Thrones Studio Tour Accessible?
The Game of Thrones Studio Tour takes place on one level, so there are no elevators or steps to content with. As such, the tour is fully wheelchair accessible.
For those arriving by car with a wheelchair, the parking situation is the same, and the shuttle bus can take one wheelchair or mobility scooter per trip.
Registered guide dogs are also welcome, identification for the dog will be required.
For other needs, you can read more details about accessibility here. That page also contains contact information where you can enquire about other accessibility needs.
How to Get to the Game of Thrones Studio Tour
There are a number of options for getting to the Game of Thrones Studio Tour, which are as follows.
By Tour Bus
If you do not have your own transport, or would rather just visit the studio with round trip transport from where you are staying, then you can book a tour which includes a coach bus transfer.
Tours depart from both Belfast and Dublin. From Belfast it’s around a 30 minute coach ride, and from Dublin it’s around 90 minutes. You then will have 3 or more hours (depending on shuttle time) to visit the studio on your own.
The visit itself is self-guided and most people spend 2 to 3 hours doing the tour.
You can purchase tickets with round-trip transport from Belfast and Dublin here.
By Public Transport
There is no direct public transport from Belfast or Dublin to the Studio Tour shuttle bus departure location.
It is possible if you are determined, to take a series of 3 buses to get from Belfast to the Boulevard shopping center, but it will take you between 90 minutes and 2 hours each way.
Dublin is a similar story, it is theoretically possible, buy you are looking at a 3 hour trip each way.
We’d suggest instead booking a tour with round-trip transport, it’s going to be a lot less hassle, much quicker, and honestly not much more expensive.
By Car
If you have your own car then you can drive to the Game of Thrones Studio Tour. Just remember that you can’t drive to Linen Mill Studios where the tour is located.
Instead, drive to the Game of Thrones Studio tour parking location in the Boulevard Shopping Center (it is well sign posted). From here it’s a 10 minute shuttle ride to the studio.
Car parking and the shuttle ride are included as part of your Game of Thrones Studio ticket price.
Where to Buy Game of Thrones Studio Tour Tickets
You need to buy your Game of Thrones Studio Tour tickets online in advance of your visit. Entries are timed, and there is a limit to the number of people allowed per timeslot so the attraction does not get overcrowded.
When booking, you can choose whether you just want the entry ticket, or if you want a ticket which includes round trip transport from Dublin or Belfast.
Tickets are available:
Note the official website has a fee if you need to change the date or time of your ticket. Last time we checked, GetYourGuide offered free cancellation up to 24 hours in advance of your visit. The price is normally the same so I’d recommend booking there if you can.
Last time we visited, we booked on GetYourGuide which is the site we normally choose to use for tickets, tours and attractions when we travel as we like that tickets are often more flexible than booking direct.
The Game of Thrones Studio tour is also included on the Go City Dublin Pass (see our full review of the Dublin Pass here). However, round-trip transport is not included. So you will either need to have your own vehicle, or you can book a round-trip shuttle bus from Dublin here.
How Long Does the Game of Thrones Studio Tour take?
The Game of Thrones Studio tour is self-guided, so you can take as long or as short as you want to complete it. However, most visitors come for two to three hours.
I would make sure to book your timeslot to come at least 3 hours before closing to ensure you have enough time. If you are planning to eat lunch or do an afternoon tea experience, I would add an extra hour.
Where to Stay Near the Game of Thrones Studios
There are a number of hotel options to choose from, both near the studio, and also in major cities within easy driving distance such as Belfast and Dublin.
I’ll share some of these options below.
Hotels in Belfast
If you plan to drive to the Game of Thrones Studio tour yourself, then you will likely want to find accommodation with parking. Many hotels do offer parking but as this is a city center many locations do charge for this option.
If you are taking the coach transfer option, then you might consider staying near where the coach departs from, which is the Visit Belfast visitor information center. This is located on 9 Donegall Square N in the city center.
-
- Belfast International Youth Hostel – If you are looking for a hostel in Belfast this is a good, well located option, around 14 minutes walk from the coach departure point. It has both shared and private dormitory rooms, an on-site cafe, linens, a communal kitchen, a breakfast menu and self-service laundry. It also has free parking.
- Leonardo Hotel 4-star hotel offering good sized rooms, a breakfast buffet, bar, and restaurant. In our experience this hotel chain offers good value for money. 5 minute walk from the coach departure point. Paid parking is available nearby
- Ramada – A well-rated 3-star hotel. Has an informal restaurant and bar, 24-hour front desk, and free Wifi. 14 minutes walk from the coach departure point. Paid parking is available nearby.
- Bullitt Hotel – Centrally-located 4-star hotel offers a range of room options to suit most budgets. There’s also a bar, a cafe, a restaurant, a rooftop bar area, and 24-hour desk service. It is a 7 minute walk to the coach departure point for the tour. Parking is also available. We spent 4 nights here and can definitely recommend it if you are looking for a central hotel!
- The Merchant Hotel – A 5-star historical luxury hotel located in a beautiful 1860 building. This hotel offers all the luxury amenities you would expect, including a restaurant, bar and lounge, spa, hot tub, and a rooftop gymnasium. 11 minutes’ walk from the coach station. Paid parking is available nearby.
For more ideas of where to stay in Belfast, see our guide to things to do in Belfast, which has everything you need to know to plan your visit here.
Hotels in Dublin
Dublin is only around an 80-minute drive from the Game of Thrones Studio Tour, meaning you can easily visit here as a half-day trip. If you have your own car, you could even add in some Game of Thrones filming locations in Northern Ireland as well.
If you are planning on taking advantage of the transport coach service from Dublin, this departs from the Busarus bus station in central Dublin. Here are some hotel options to consider.
- Jacob’s Inn Hostel – a good option for those looking for a hostel experience. This hostel is just a 2 minute walk from the coach departure point, and five minutes from the lively Temple Bar area of town. Private and shared accommodation is available and there’s also a bar, restaurant, roof terrace and on-site laundry. There’s no on-site parking but paid public parking is available within a 5 minute walk.
- Moxy Dublin City – this is a very well located mid-range hotel just 7 minutes walk from the coach station. We’ve stayed at a number of Moxy hotels around the world and always appreciated the fun decor and comfortable rooms. Paid parking is available nearby.
- Leonardo Hotel Dublin Parnell Street – well rated excellent value mid-range central hotel, a 14-minute walk from the coach departure point. Parking is available nearby for a fee.
- Maldron Hotel Parnell Square – this is a good value mid-range hotel 20 minutes walk from the coach departure point. We’ve stayed here and enjoyed it. Parking is available nearby for a fee.
- Merrion Hotel – a five star luxury property which has everything you could want for a luxury stay in Dublin including a 2* Michelin restaurant, Italian marble bathrooms and a spa. On-site parking is available for a fee, and it’s a 20-minute walk to the coach station.
For more suggestions in Dublin, see our guide to spending three days in Dublin, which has hotel recommendations as well as sightseeing suggestions.
Hotels near the Game of Thrones Studios
If you’d rather stay near the studio itself, then there are also a number of options to choose from, as follows:
- Belmont House Hotel – just 5 minutes drive from the shuttle departure location for the studio tour, this 4* hotel has an on-site restaurant and free parking. It’s definitely the closest option we are aware of for the Studio tour, and the hotel the studio themselves recommend if you want to stay nearby.
- Mourne Country Hotel – found 15 minutes drive south of the studio tour parking near the city of Newry, this quiet 3 star hotel offers free on-site parking, en-suite rooms, a bar and restaurant.
Is Food Available at the Game of Thrones Studio Tour?
Yes, you can purchase food and drinks at the Studio Tour. There are two options for food and drinks.
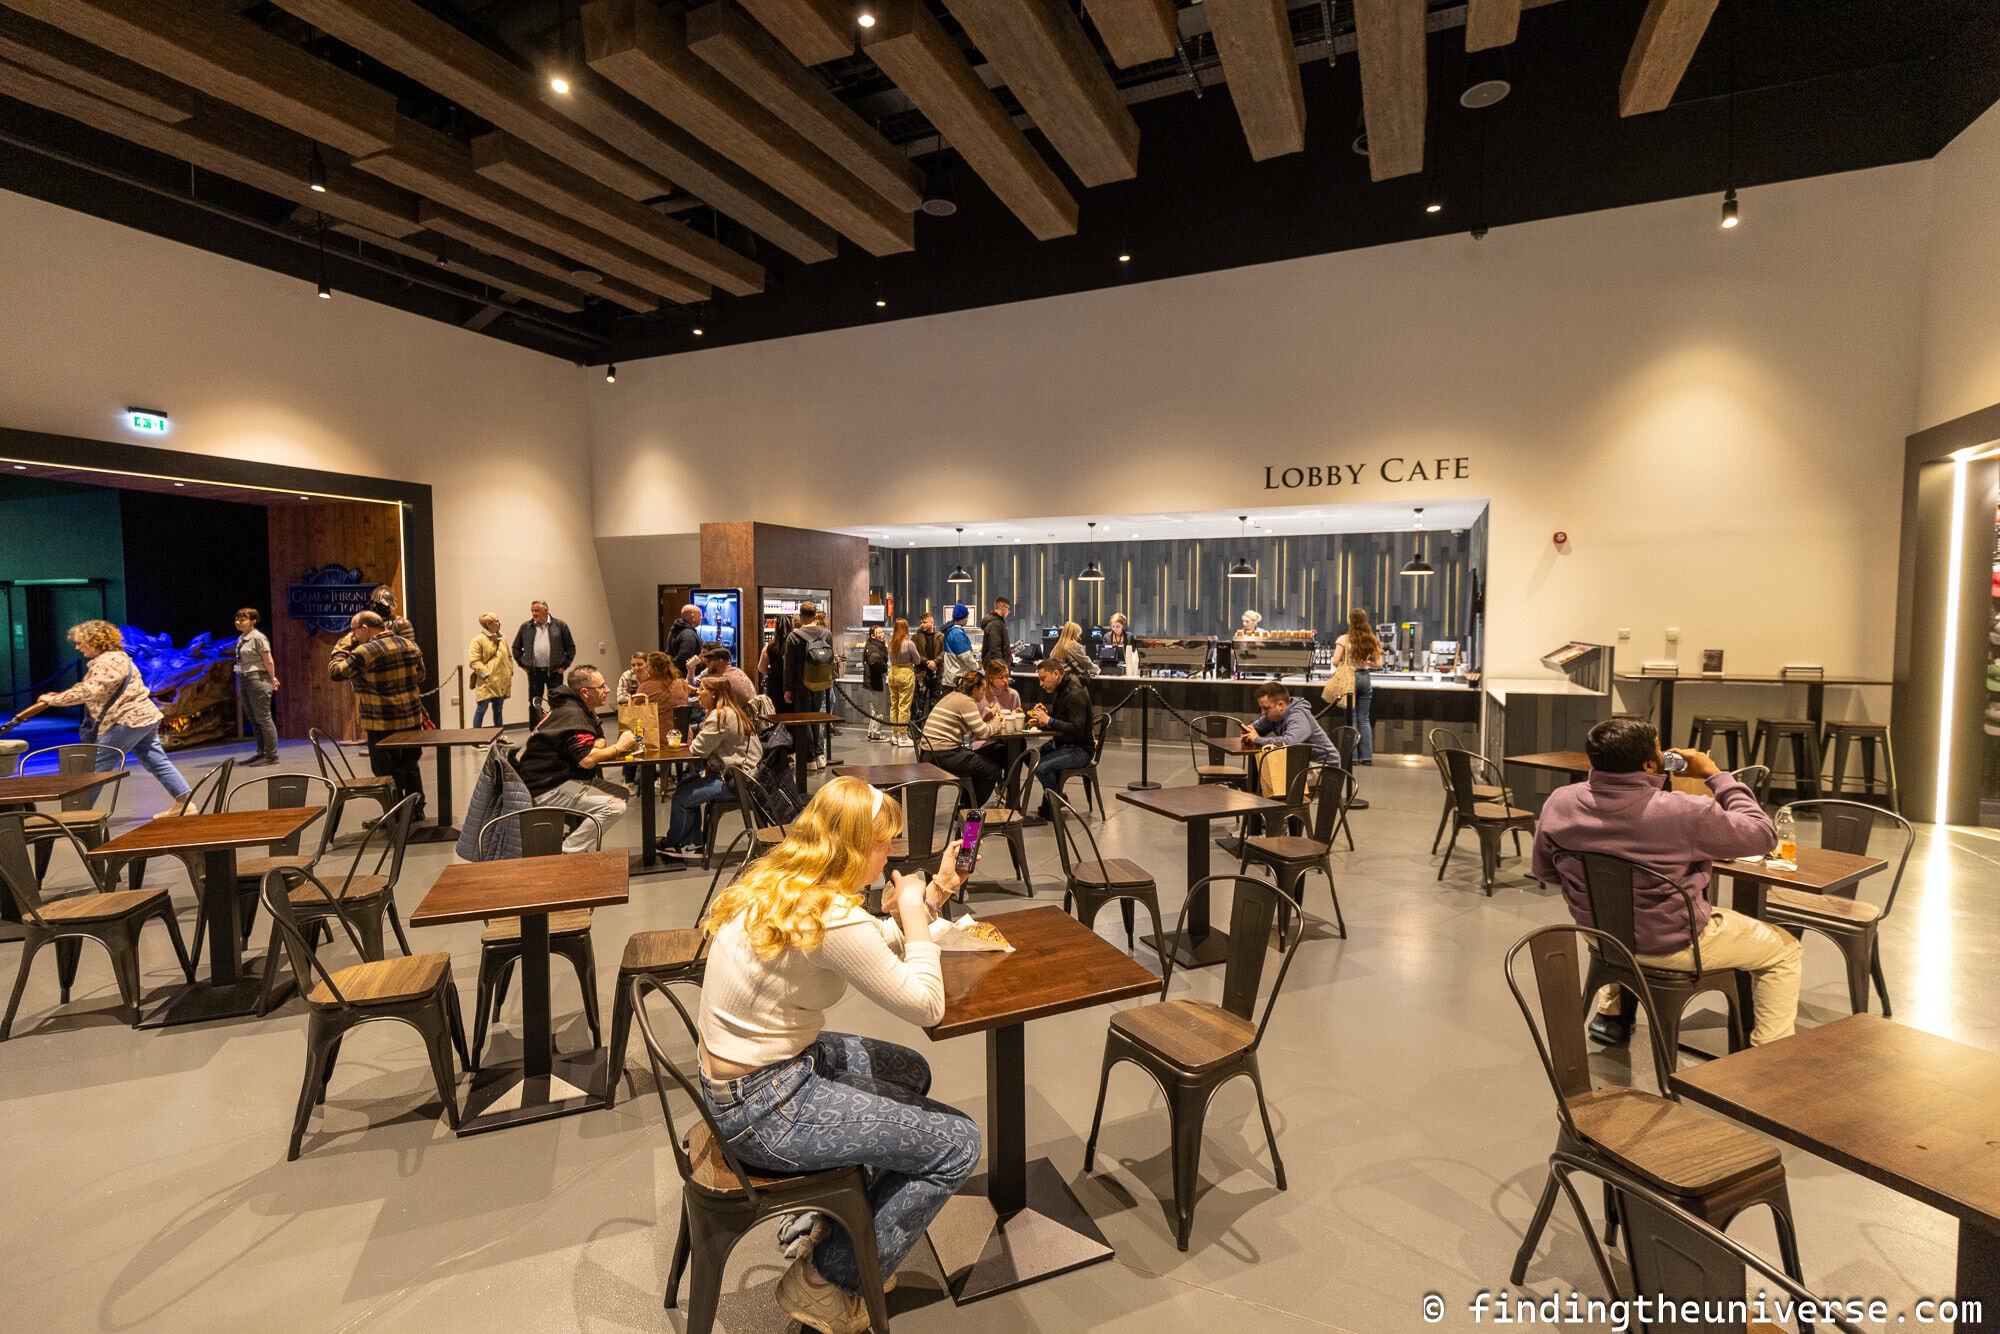
First, in the foyer of the tour building before you enter the main tour area there is the Lobby Cafe which serves hot and cold drinks as well as snacks like sausage rolls and cakes.
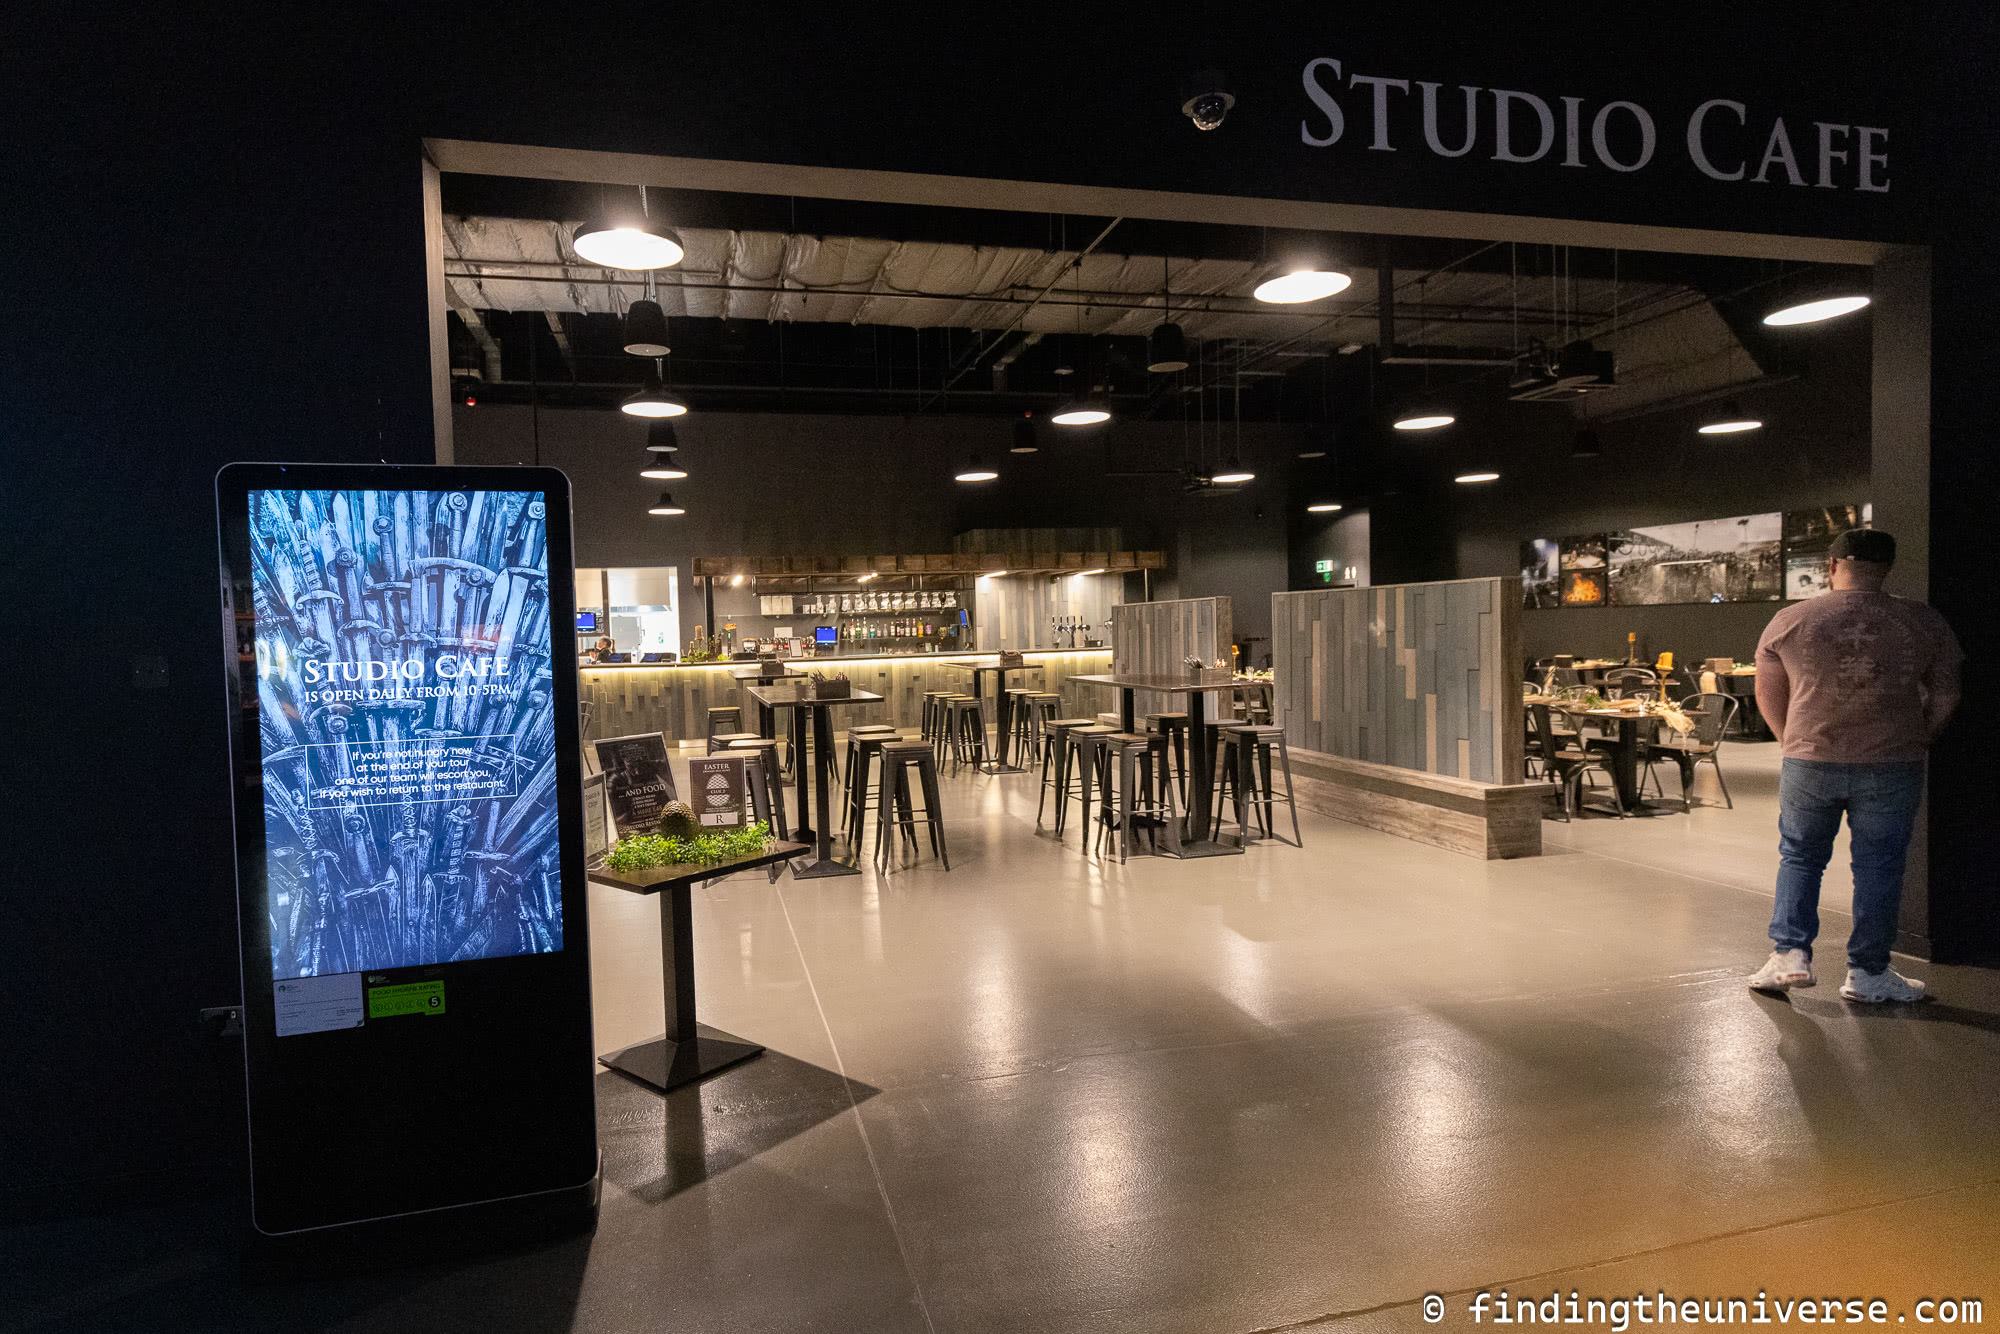
If you’d prefer a larger meal, or want to take a break part way through your tour, then the Studio Cafe is a good option.
Found just before the halfway point of the experience, this has a menu which includes things like burgers, breakfast items, soups and sandwiches, as well as dessert and drink options. It also has a kids menu.
There is also as mentioned the Game of Thrones afternoon tea experience, but that must be pre-booked before your visit. You can do that here.
Is there a Cloakroom at the Game of Throne Studio Tour?
Yes there is a cloakroom at the Game of Thrones Studio Tour. It’s next to the information desk right where you first enter the tour building. You can leave coats and bags here for free, which will save you carrying them through the tour.
I left my coat and small backpack here when we visited which was very convenient.

Game of Thrones Studio Tour Review and Experience
Now I’m going to talk a bit about our experience actually visiting the Game of Thrones Studio Tour, including lots of photos so you can see what it’s actually like inside and what to expect from your visit.
First, we drove from Belfast, which would have taken around half an hour except we got a flat tire on the way! That slight mishap aside, we arrived at the car parking area just after midday. The parking area and shuttle bus stop was very easy to find.
The shuttle ride took around 10 minutes, the bus was comfortable and fairly busy but everyone had a seat. The shuttle is free you just need to have a studio tour ticket.
On arrival, I dropped off my small backpack and coat at the information desk. We then got a coffee and sausage roll at the cafe before entering the experience. Entrances into the actual tour were every 15 minutes or so, and we were told we didn’t have to go in straight away if we wanted to have a coffee or something to eat first, which was nice.
We then joined the line for the actual entrance where we had the option to have our photo taken against a green screen. Photos were then made available for purchase.
The first part of the actual experience is in a movie theatre, where you take a seat and watch a ten minute video which covers the show and its production as well as a bit about the tour. This was really well done and definitely got us excited for the experience ahead.
This was the only part of the studio tour where photography and video were not allowed.
After the video was over, the cinema screen moved aside and a fog filled tunnel was revealed. This was really cool, as it felt like we were stepping into the world of Game of Thrones, specifically walking through The Wall to Wildling and White Walker territory.
Walking through the fog shrouded tunnel led us into the main self-guided tour, where the first sight to greet us were Wildings and White Walkers, as fog tendrils drifted across the floor.
From here the tour was entirely self-guided, with information panels to read and video screens to watch. A nice touch was that the voice over for the video was done by Nathalie Emmanuel, who had the roll of Missandei in the show.
The tour is set up as a journey through the world of Westeros. When we visited the order of exhibits was as follows:
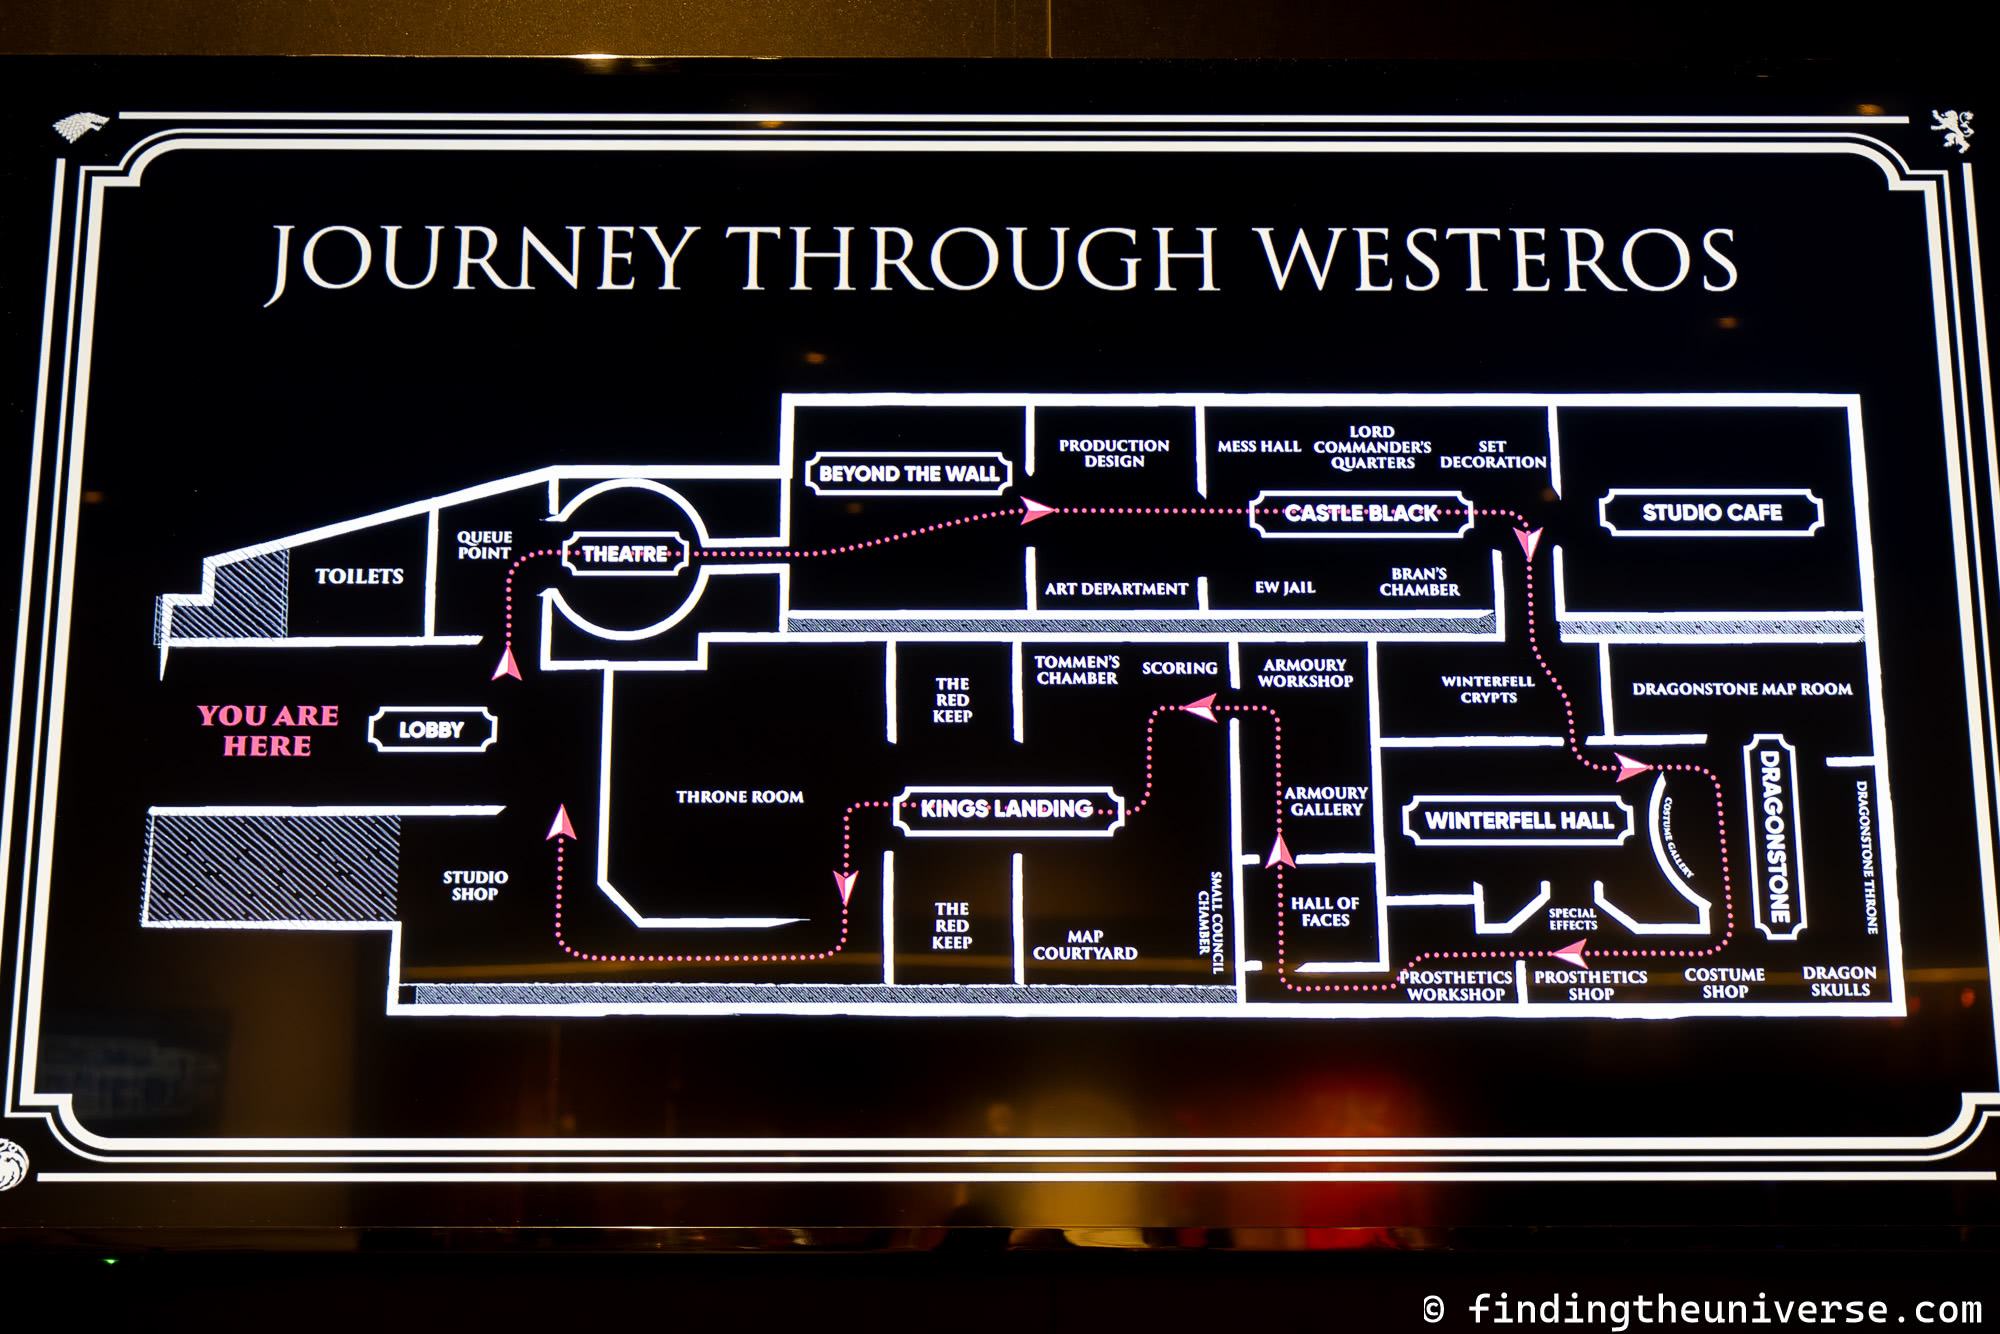
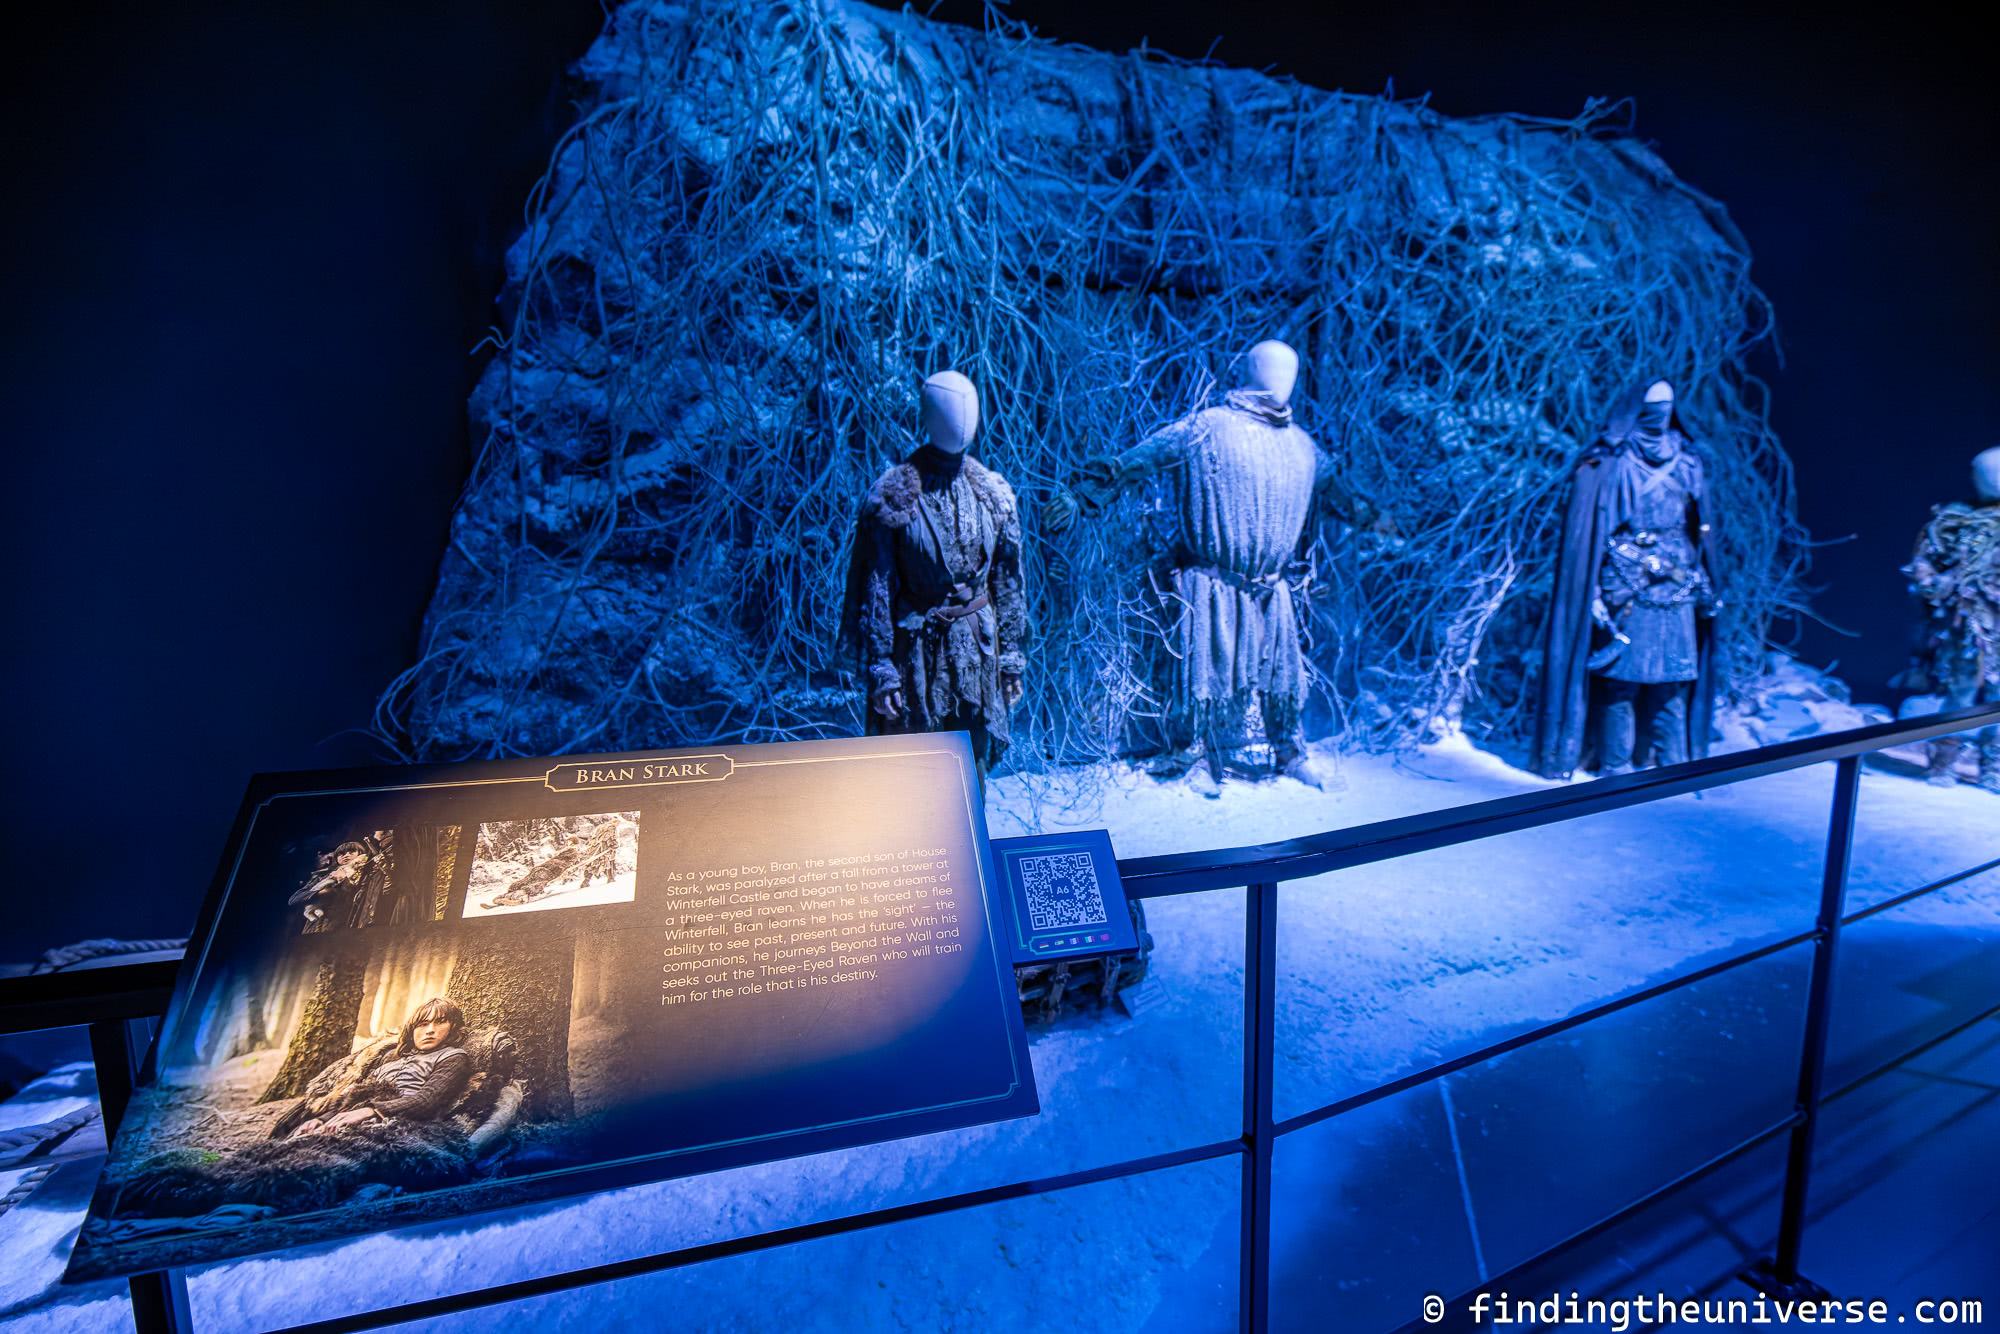
Beyond the Wall
The entrance set piece had statues of the Wildings and Whitewalkers, as well as the Giant Wun Wun.
Fun fact, Wun Wun was so big they had to present him kneeling down so he would fit!


Production Design / Art Department
This part of the tour showed how the production team conceptualized the world of Westeros.
There are incredible artworks, set design concepts, drawing boards, and more which show the amount of time and effort it takes just to design a world for the screen.


Castle Black / Prop Design
The Castle Black part of the tour is home to one of the original sets that was filmed on. This section of the tour includes the Mess Hall, Lord Commanders Quarters, Jail, and Bran’s Chamber.
There’s also information here on how sets were decorated and how the props were made, with lots of props to look at including dragon eggs, books, cookware, and loads more. This area also has as a fun interactive where you can design your very own House shield!

Studio Cafe
Between Castle Black and the Winterfell Crypts is the Studio Cafe, where you can get food and drinks. We didn’t eat here but the menu looked good!
If you want more of a meal, this is definitely where I would recommend coming rather than the cafe in the lobby area.
Note that if you do miss this and decide to return after you exit, just let a team member know and they will escort you back here.
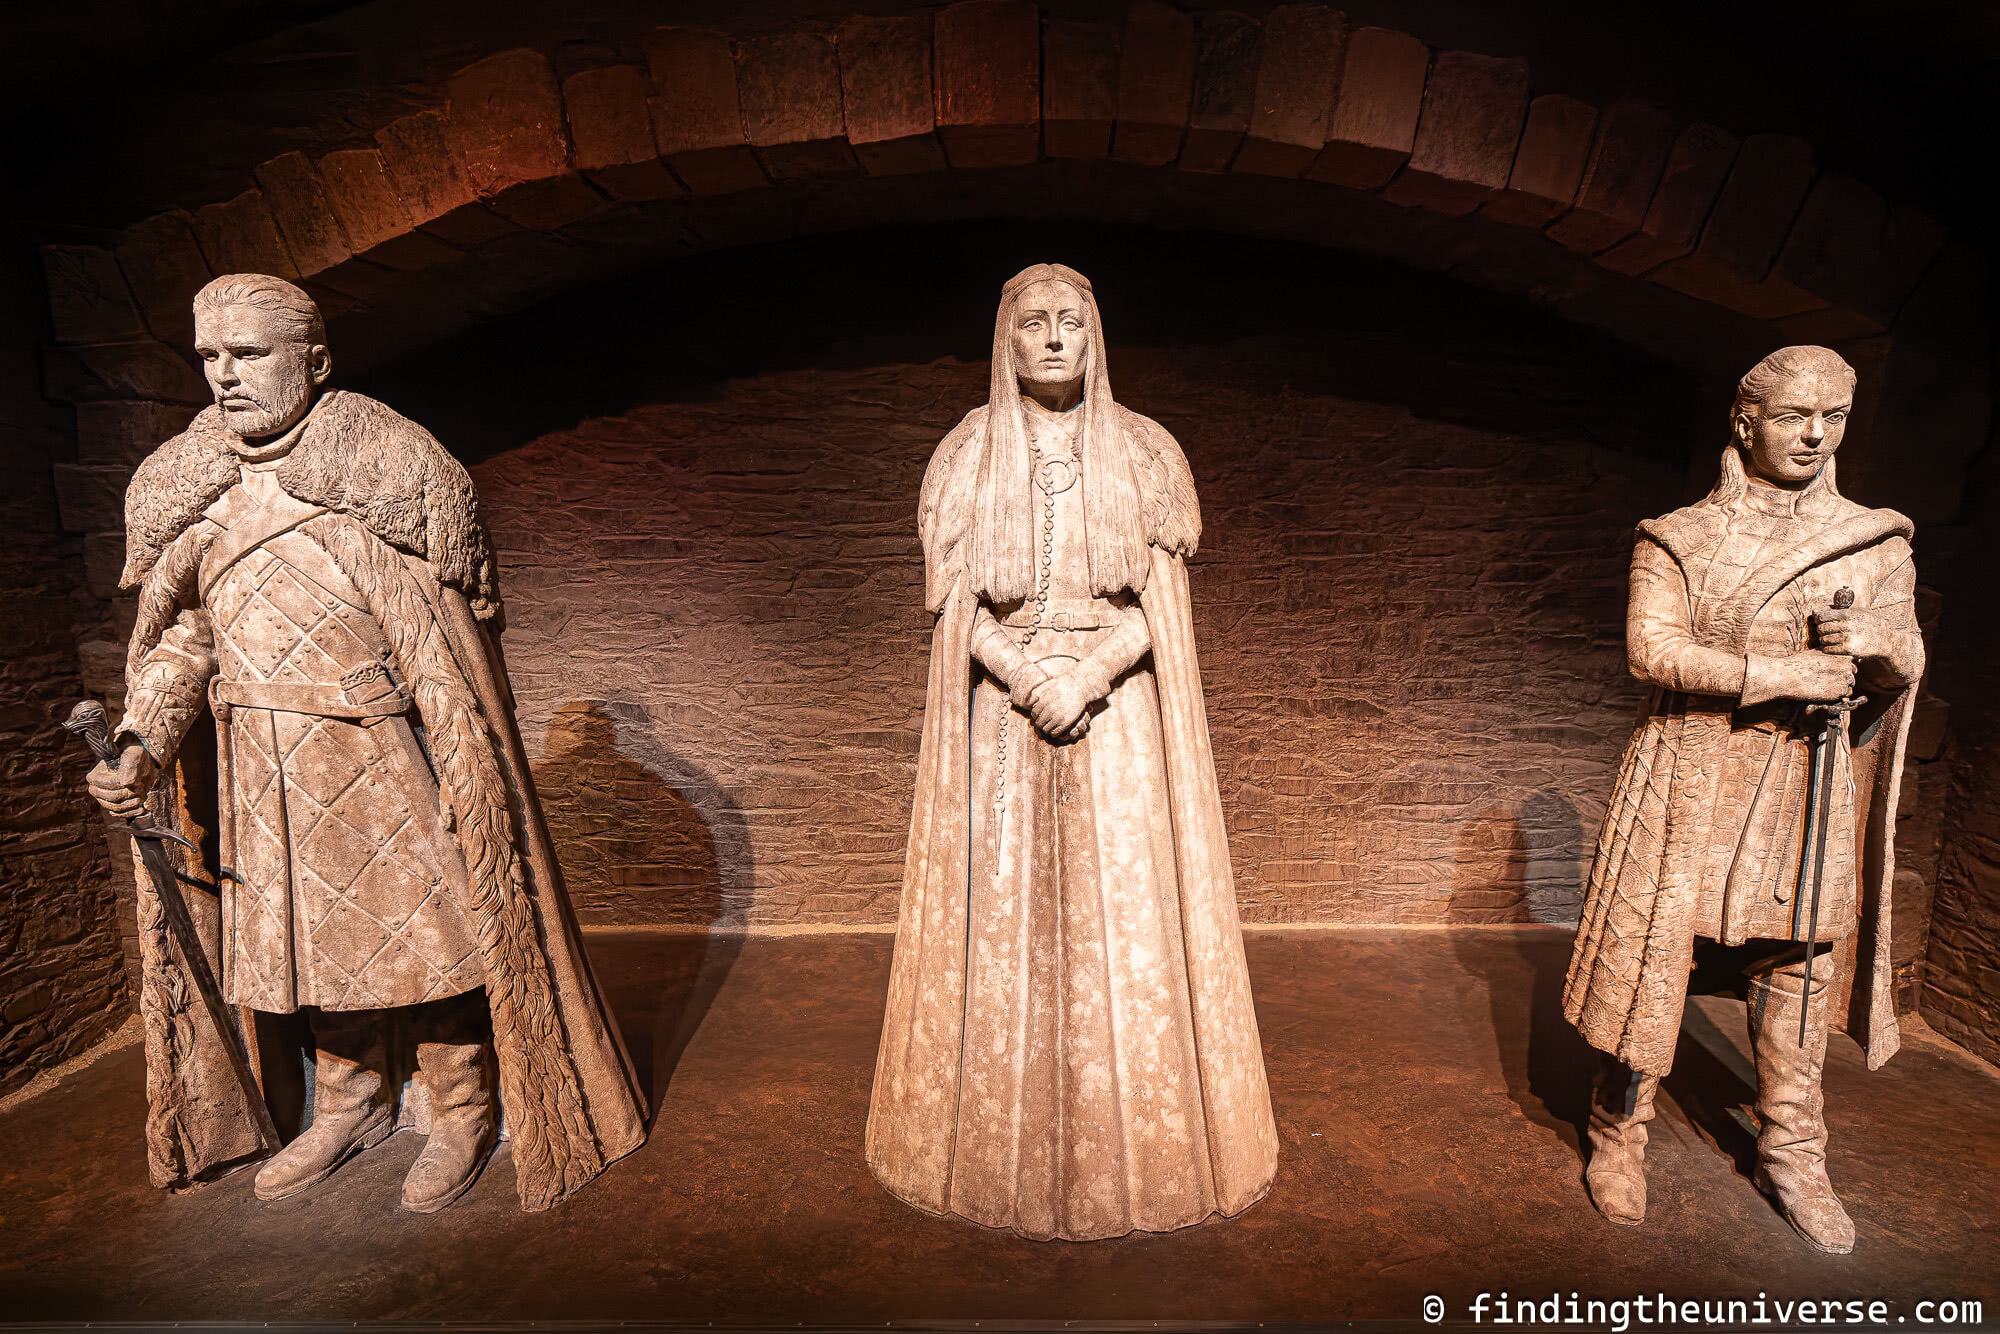
Winterfell Crypts
After the Studio Cafe you will go into the Winterfell Crypts, which is set up to look just like the crypts in the show.
The actual scenes were filmed not too far away in Shane’s Castle on Lough Neagh. There are also statues here of members of the Stark family.
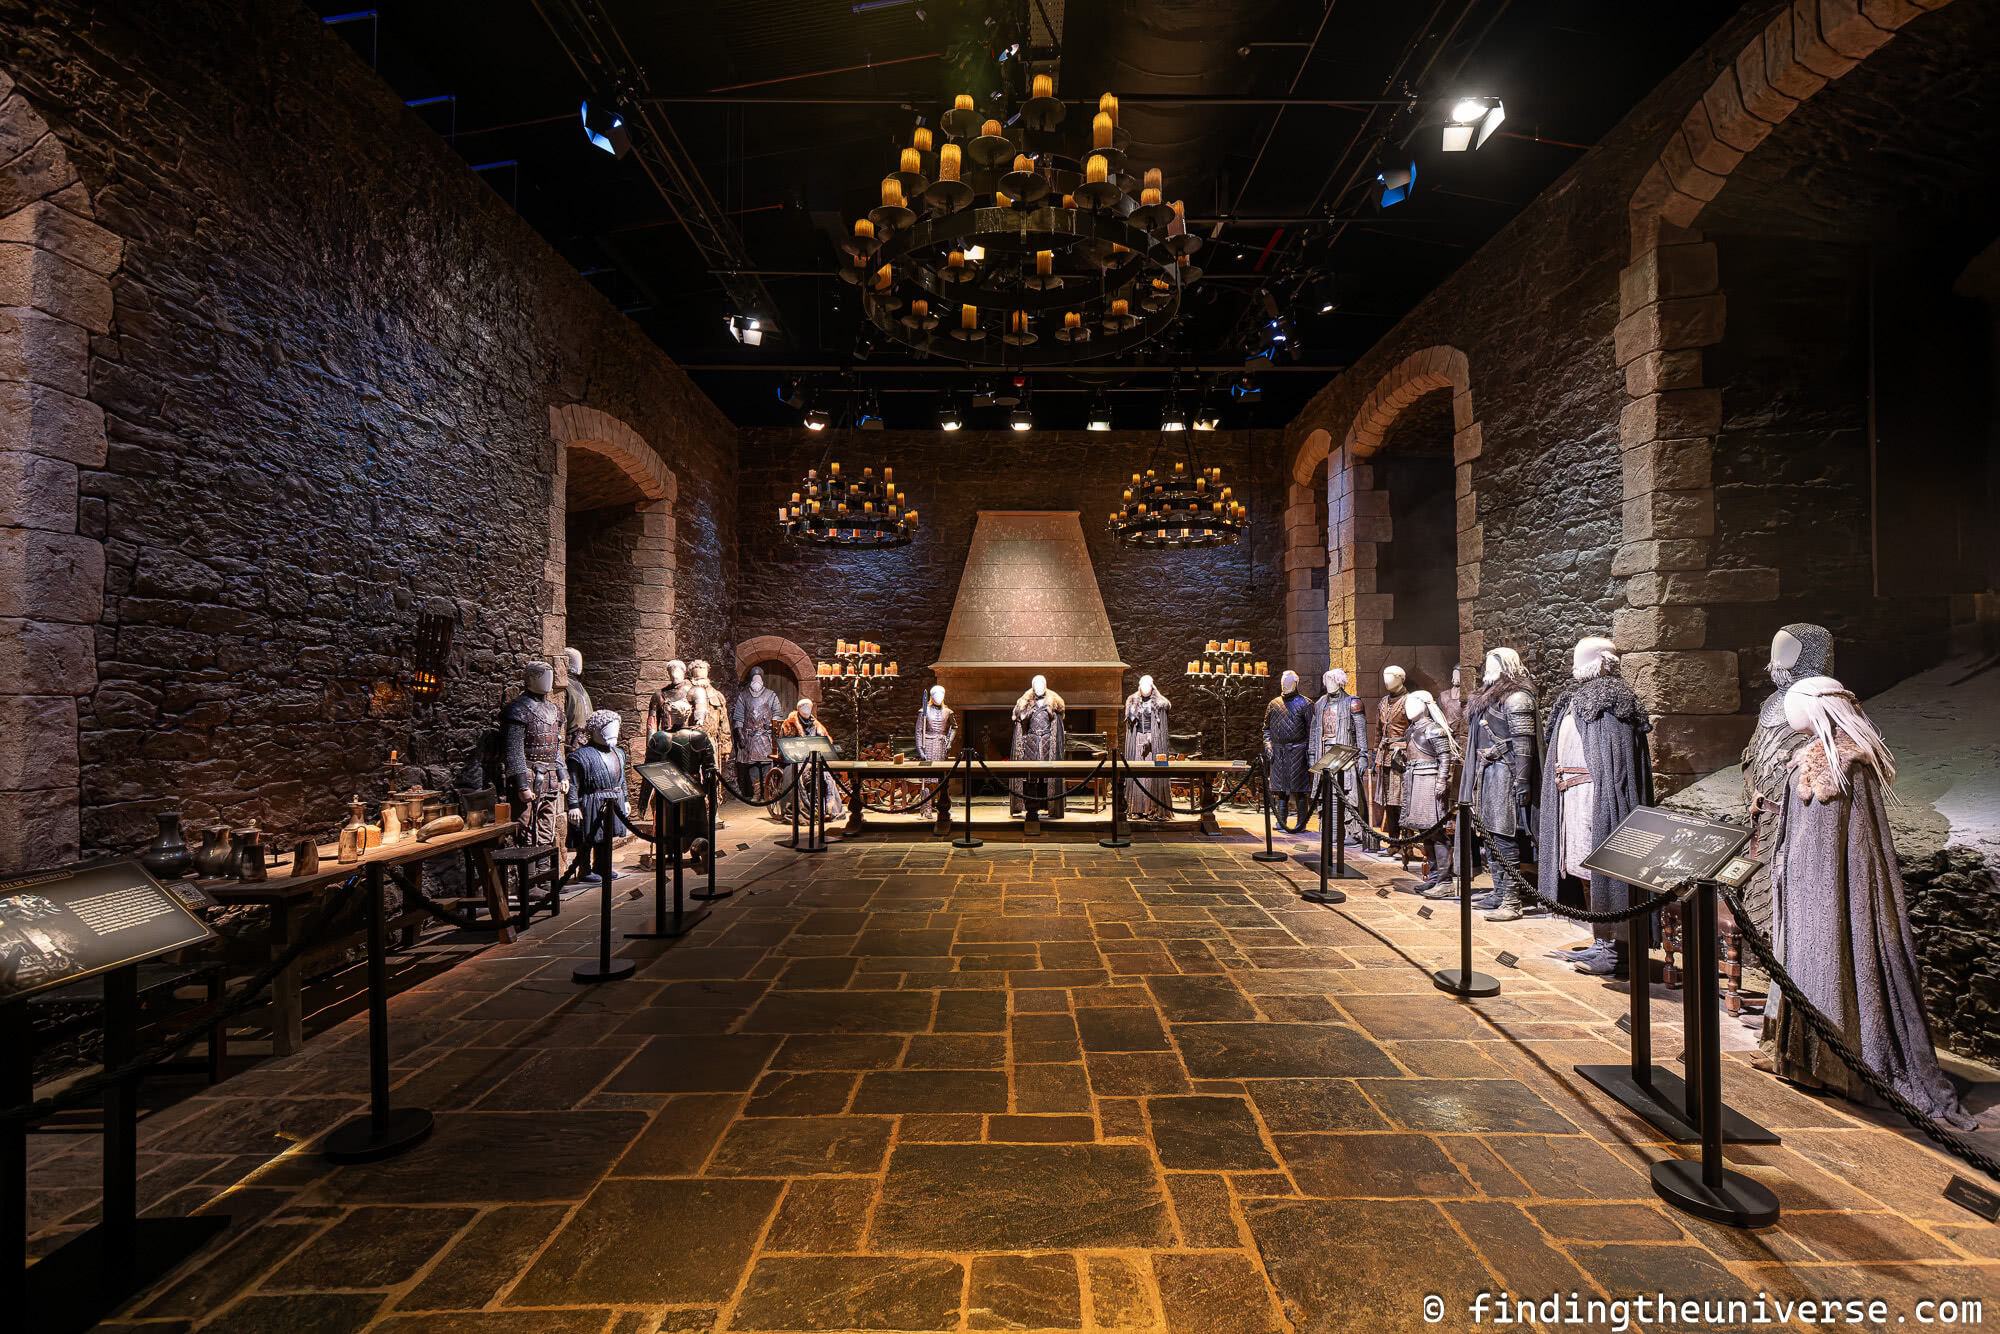
Winterfell Hall
In my opinion, the Winterfell Hall is definitely one of the main attractions in the tour.
This is one of the actual sets from the show (over a hundred sets were built for each season!), which has stayed in the same location since it was built (the tour was built around it).
You can walk around the hall itself, and see key moments that were filmed here recreated with mannequins, such as the knighting of Brienne of Tarth.
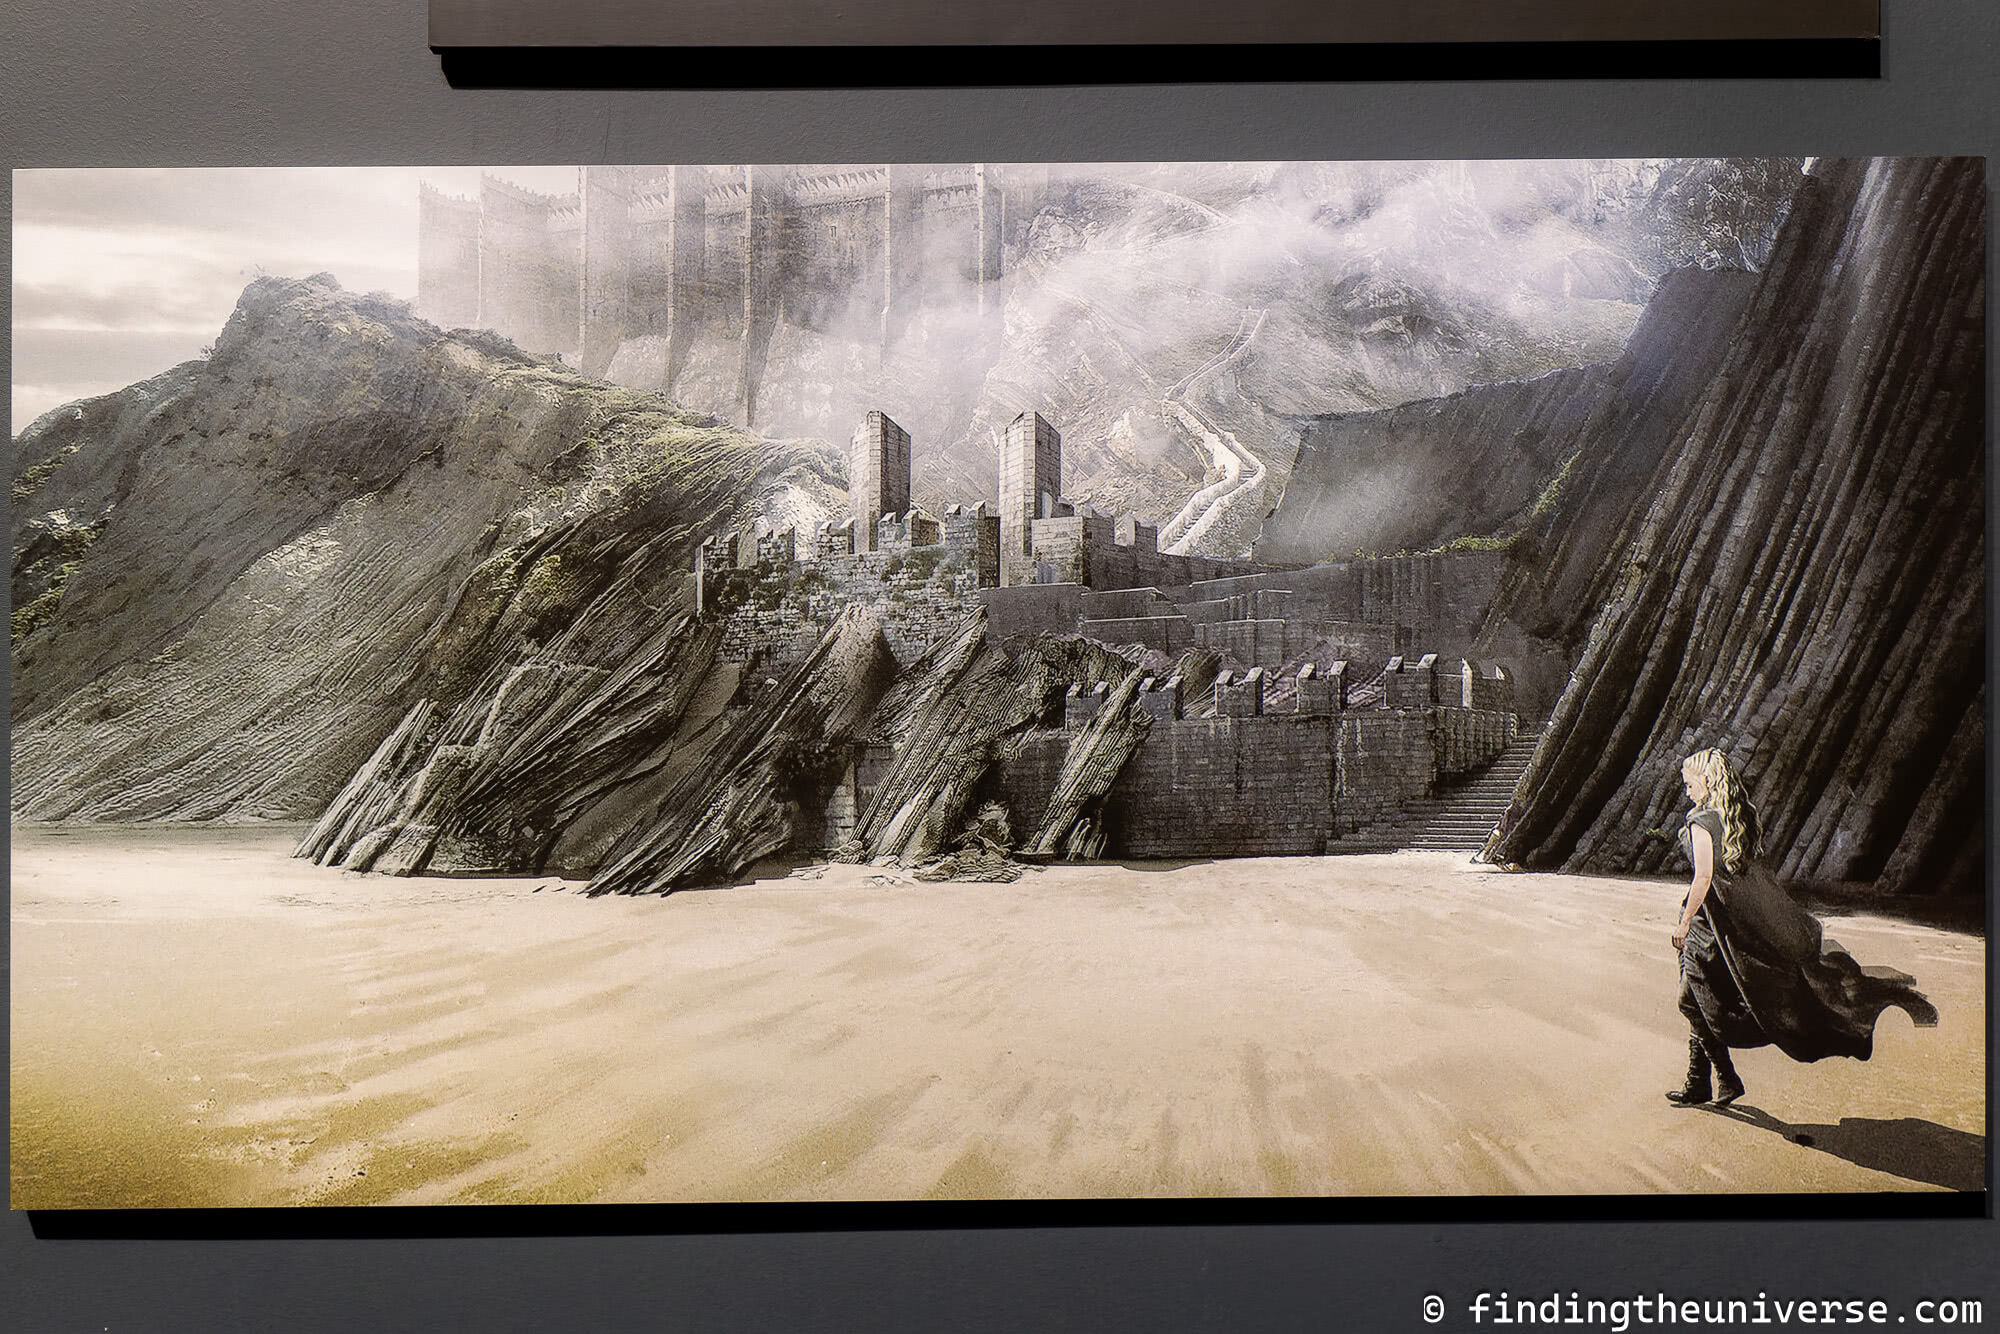
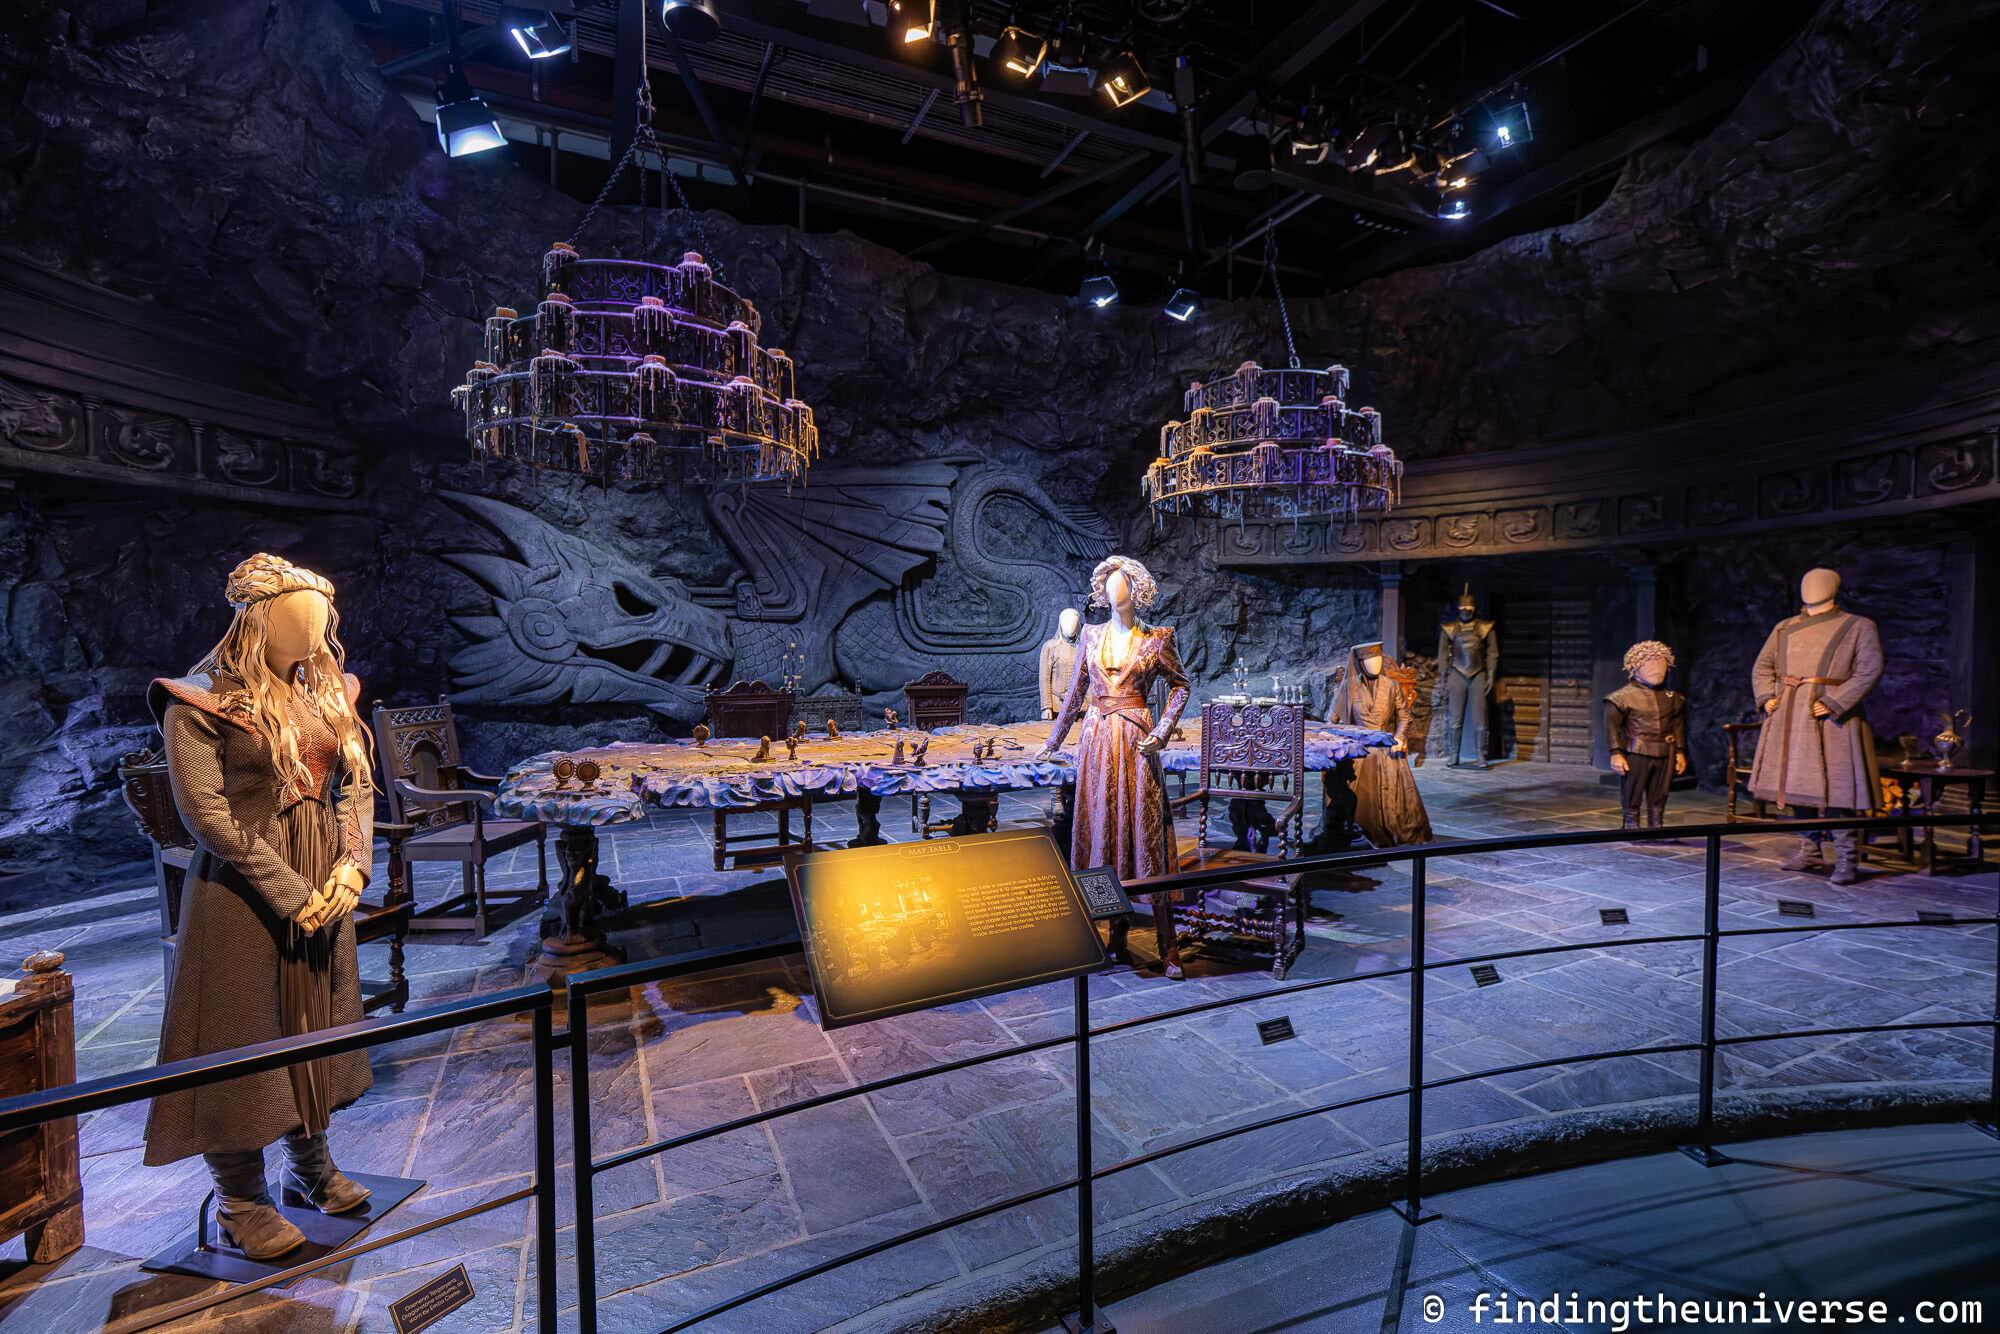
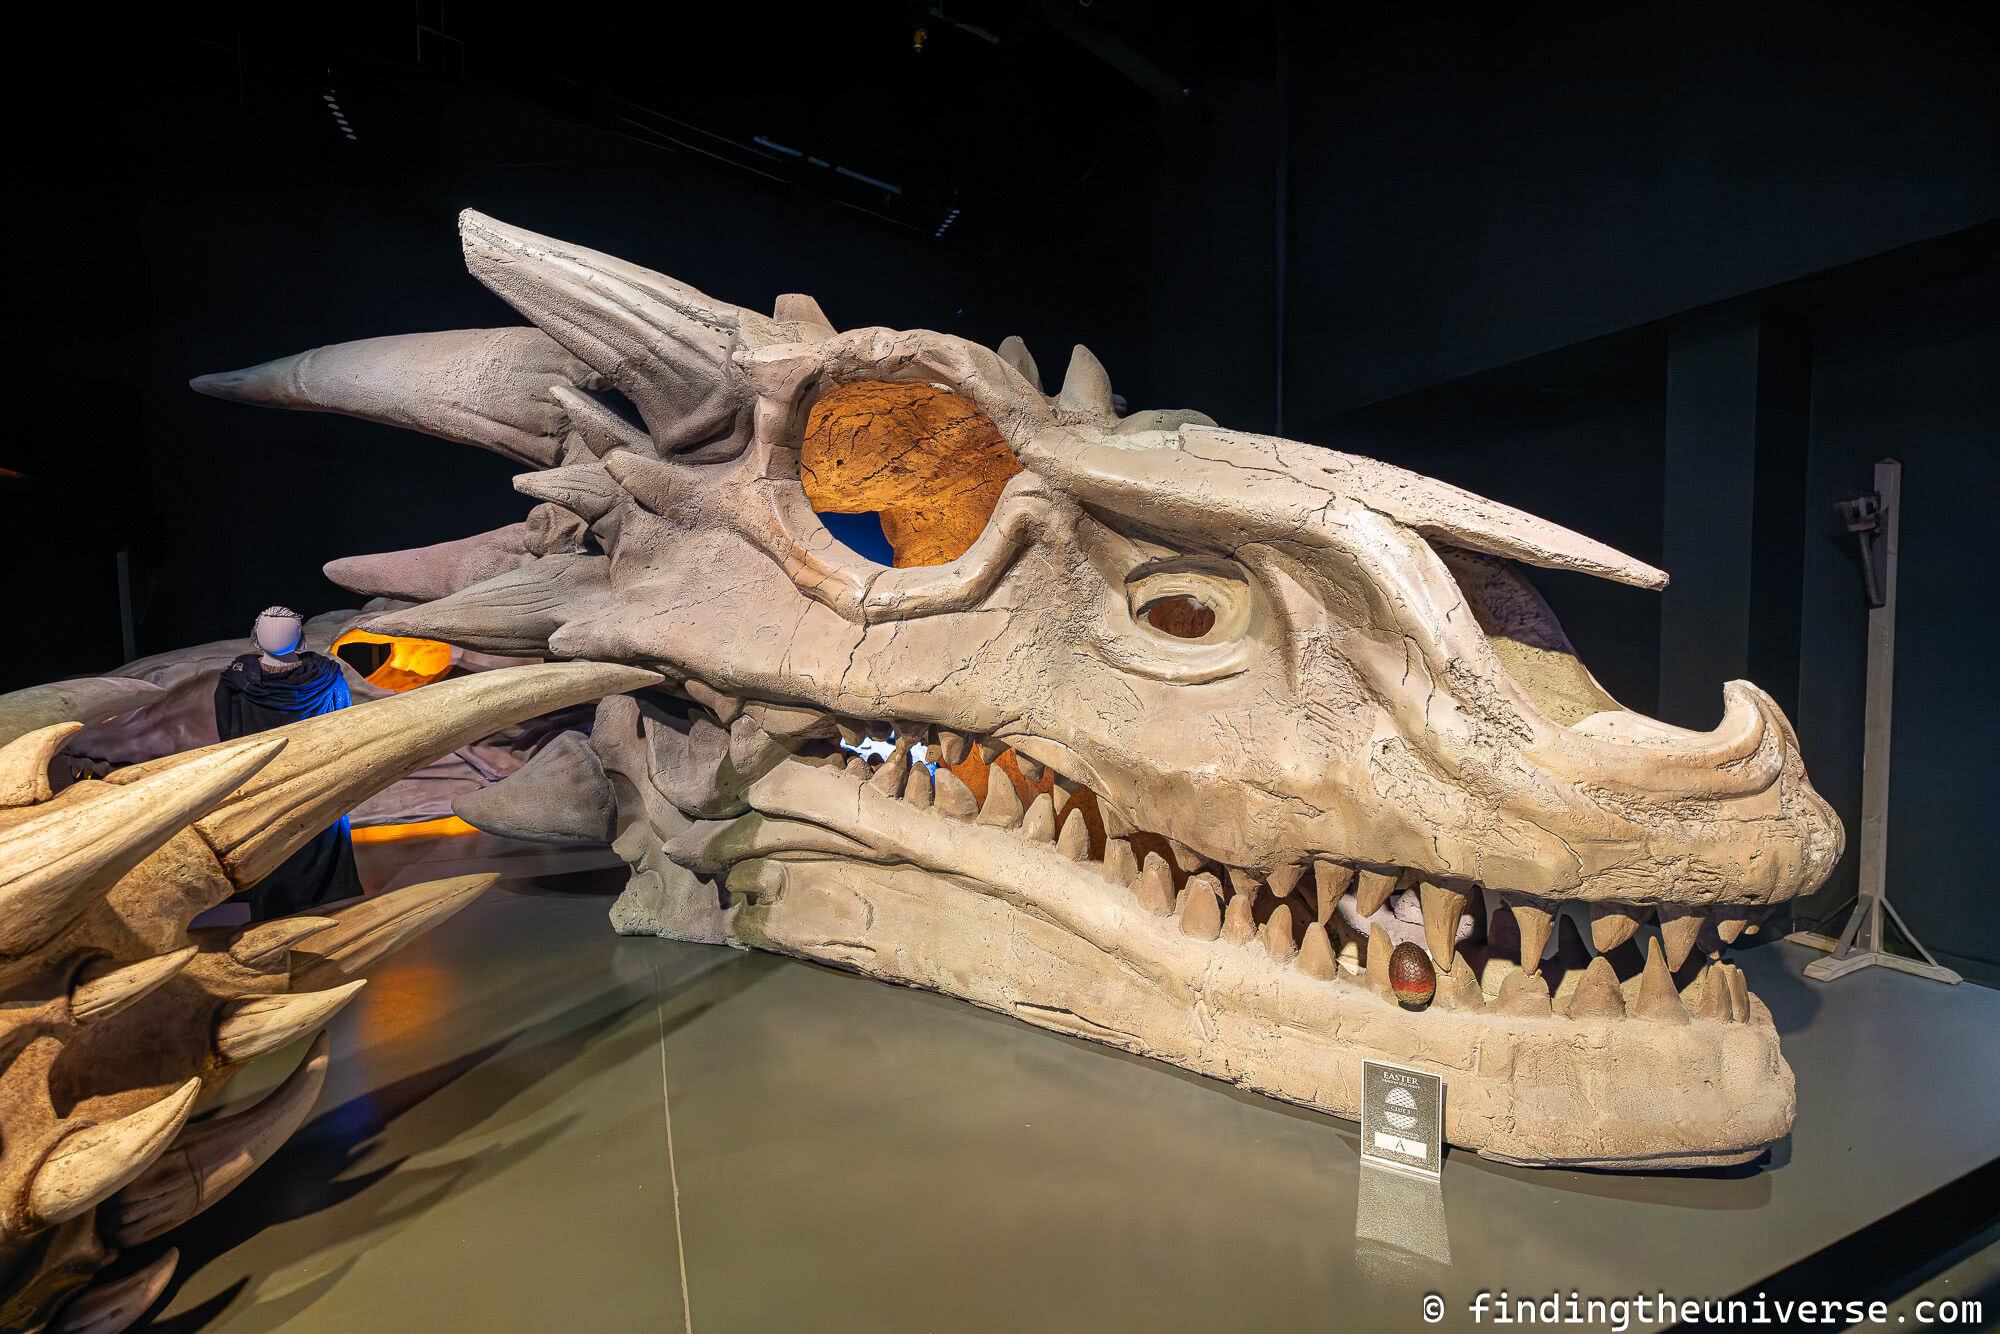
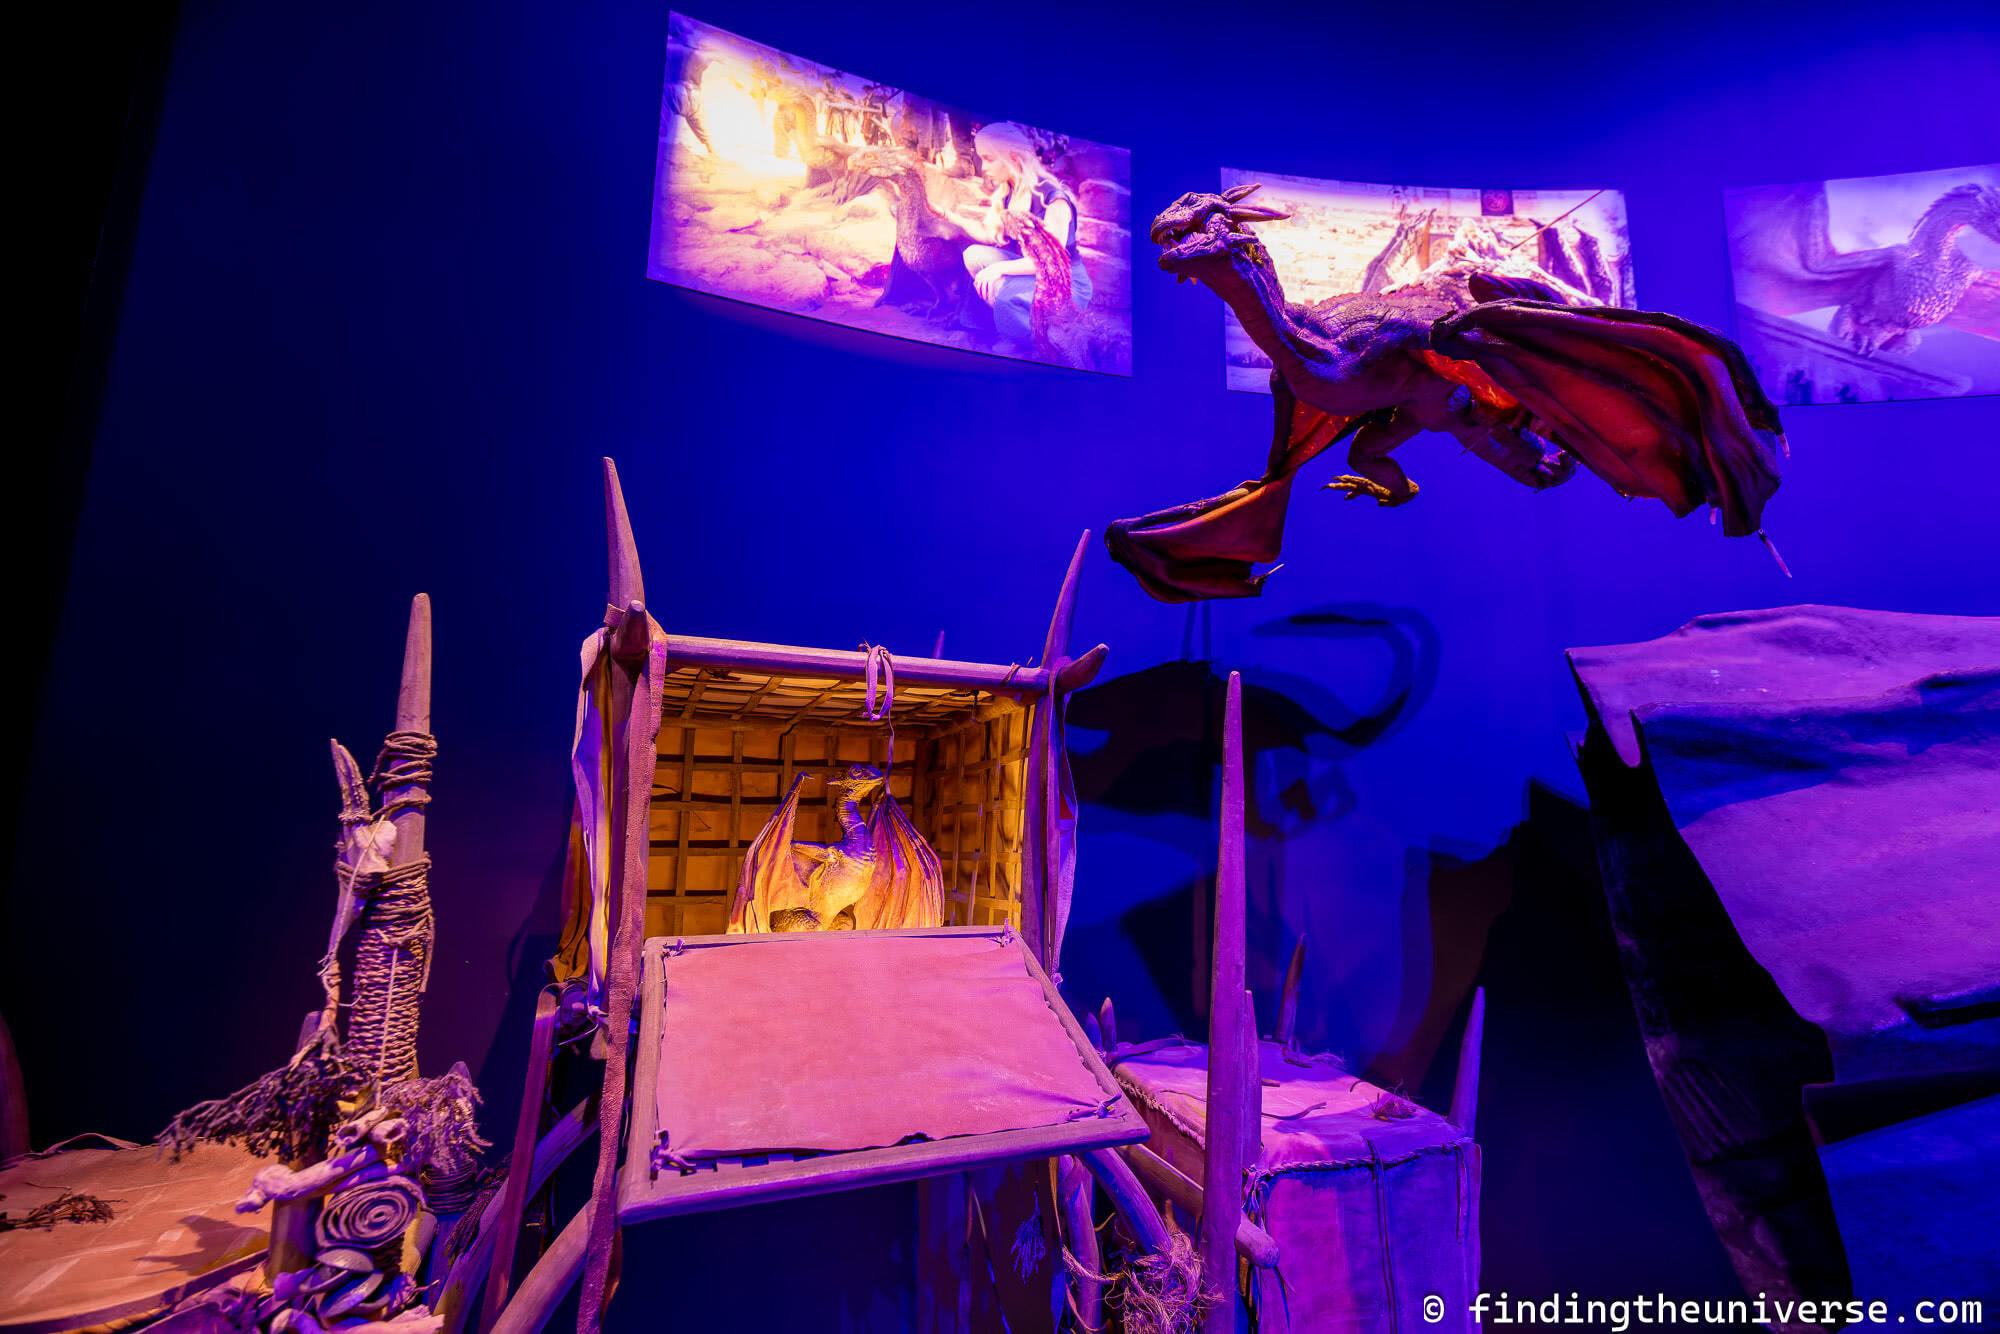
Dragonstone
The next area you visit is themed around Dragonstone, the ancestral seat of House Targaryen.
Here you will see rooms set up as the impressive Dragonstone Map Room and the Dragonstone Throne. There are also some enormous dragon skull props here to admire.

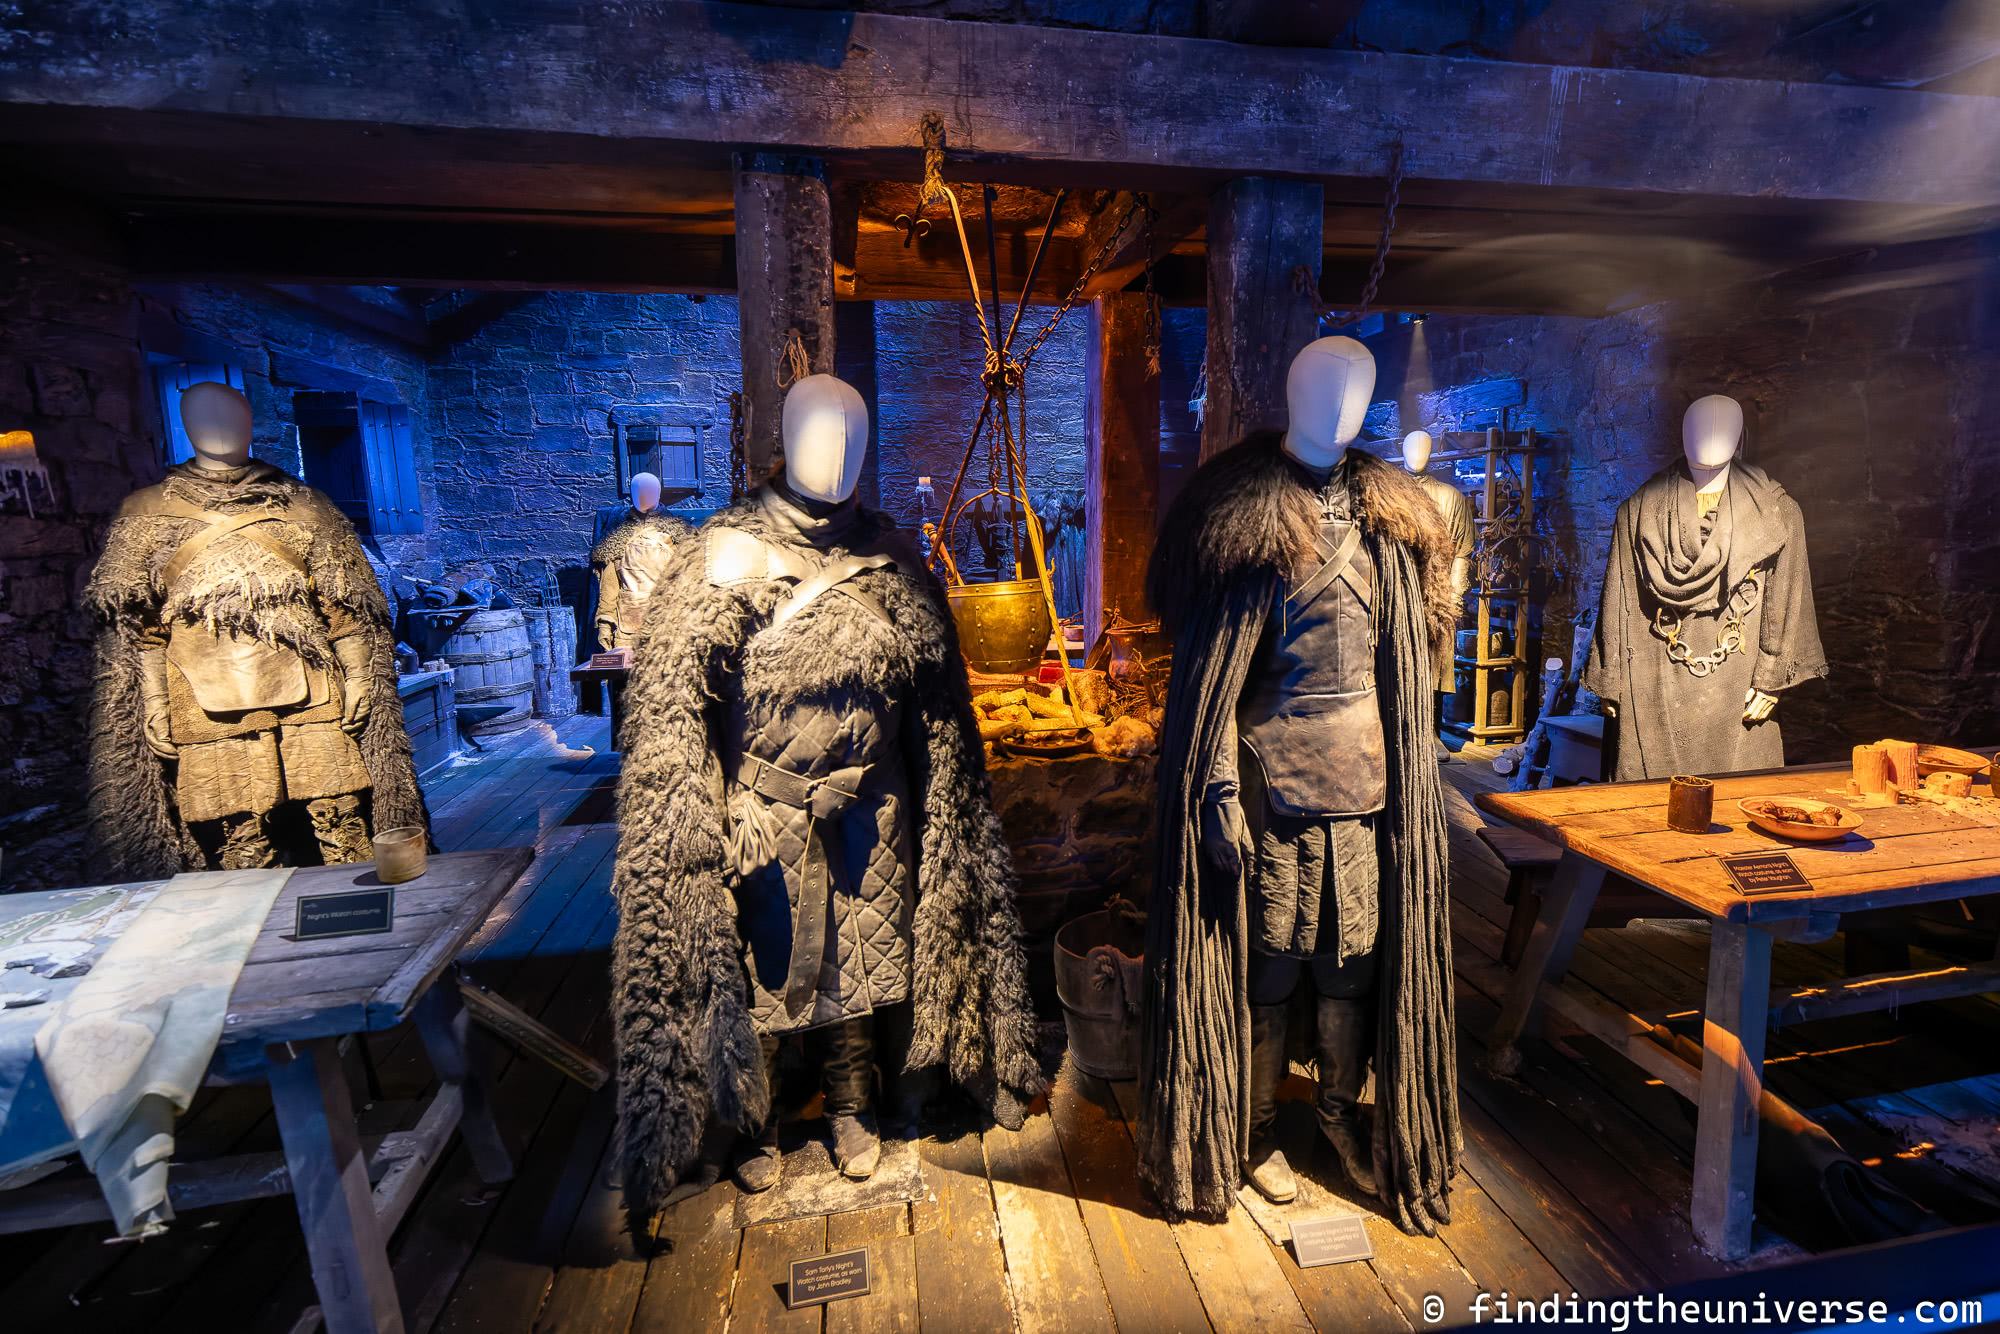
Costume shop / Special Effects / Prosthetics Workshop
From Dragonstone you will enter an area which is dedicated to helping you understand how different parts of the production were put together.
The costumes in the show were truly spectacular, and there’s a whole area dedicated to some of these amazing items as well as information on how they were created.
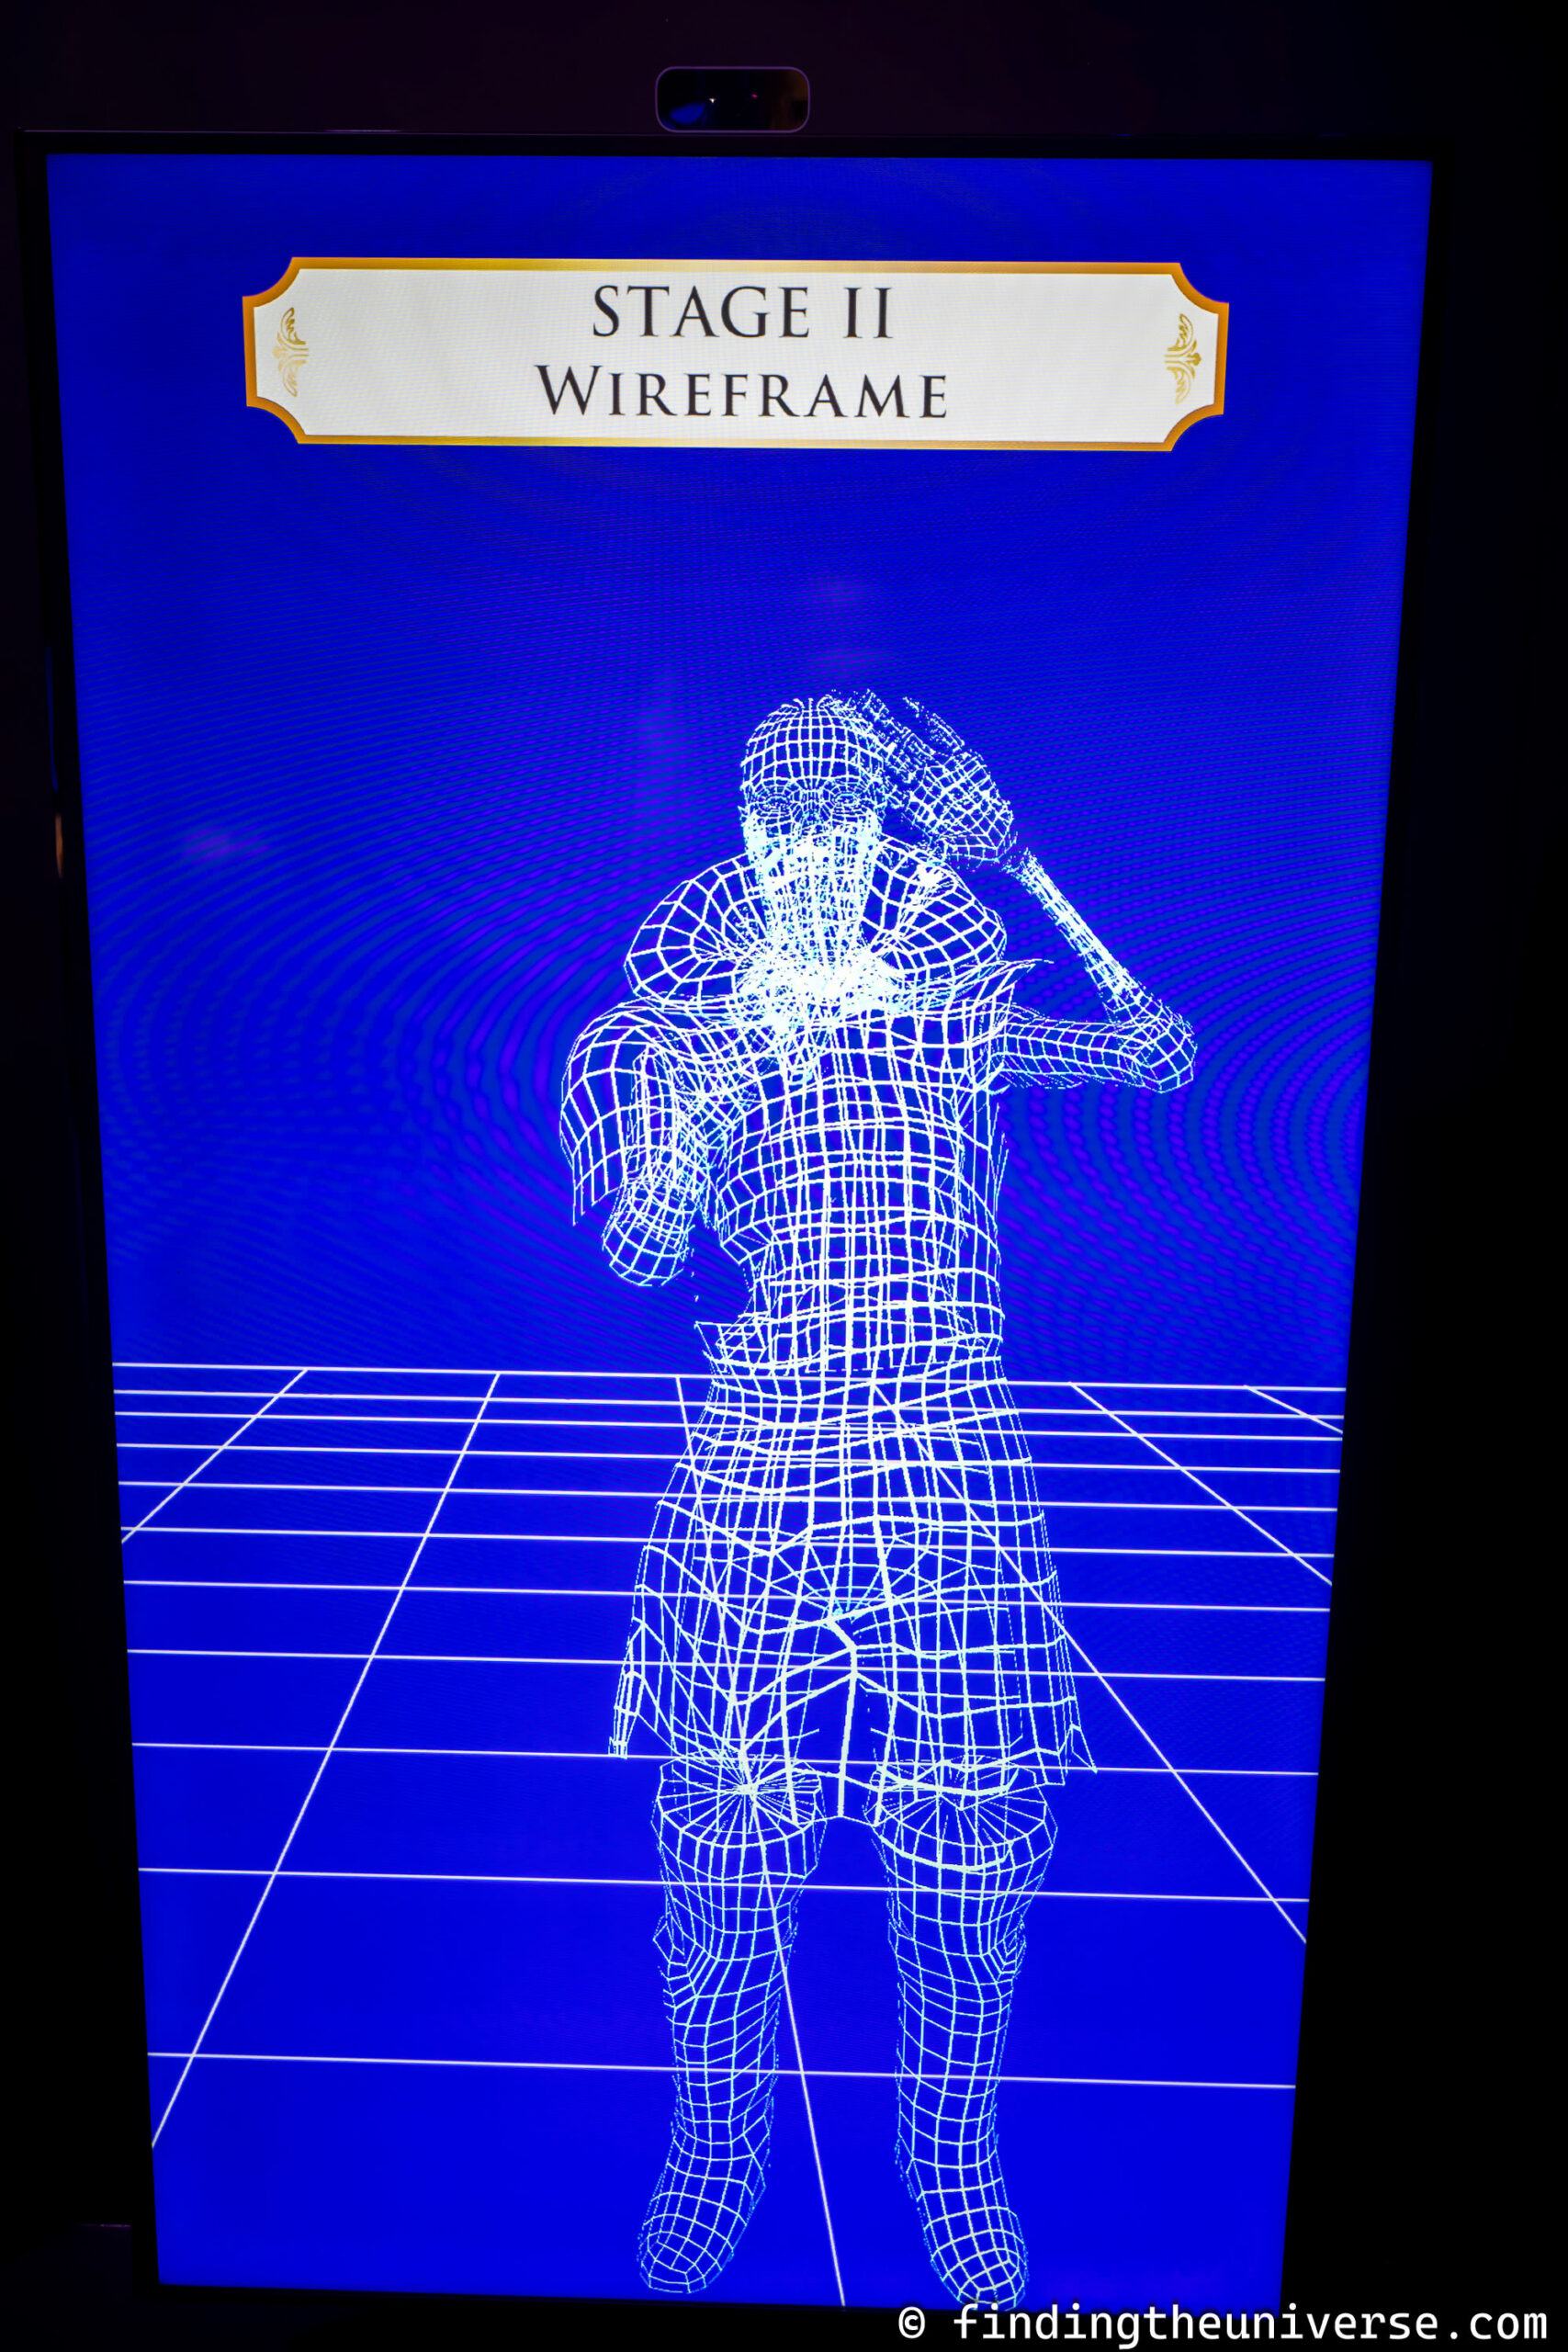
Special effects and visual effects were also a big part of the show, and you can learn about how these were created. There’s also a fun interactive here where you can animate your own Game of Thrones character by moving around.
Finally, this area also has a lot of information on the prosthetics that were used in the show, and how these were made. There’s another interactive experience here where you can virtually apply your own prosthetic!


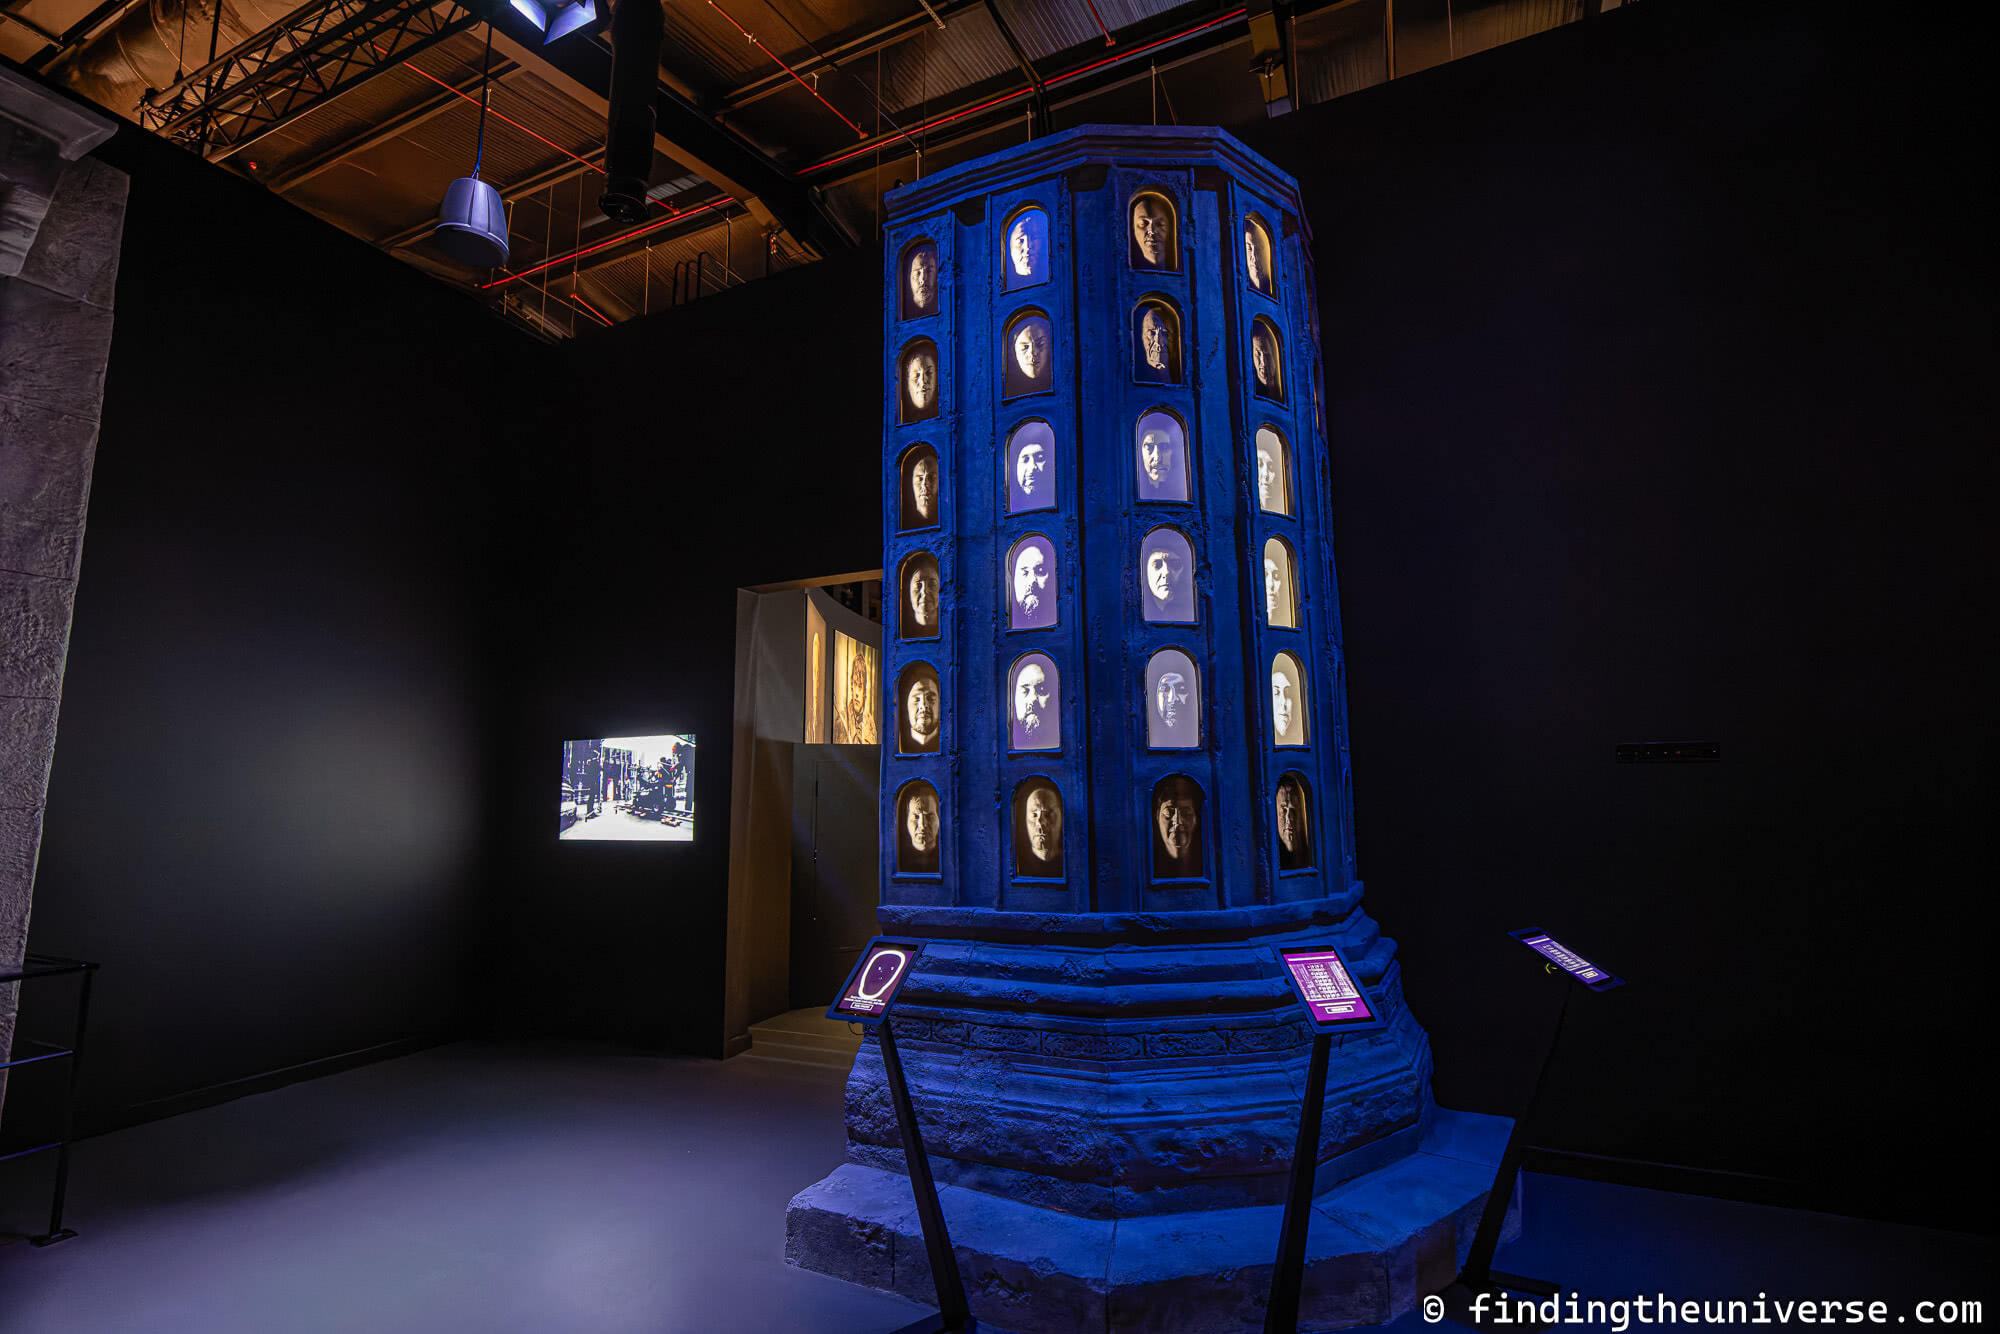
Hall of Faces
In the show, the hall of faces is a large, pillared hallway, with the pillars home to the faces of the dead. Which is kind of creepy.
The studio tour version looked pretty much the same, except instead of dead people’s faces, the faces of previous visitors are displayed in the pillars. And yes, I made my own face which was added to the Hall of Faces, before hurrying along to somewhere slightly less creepy.
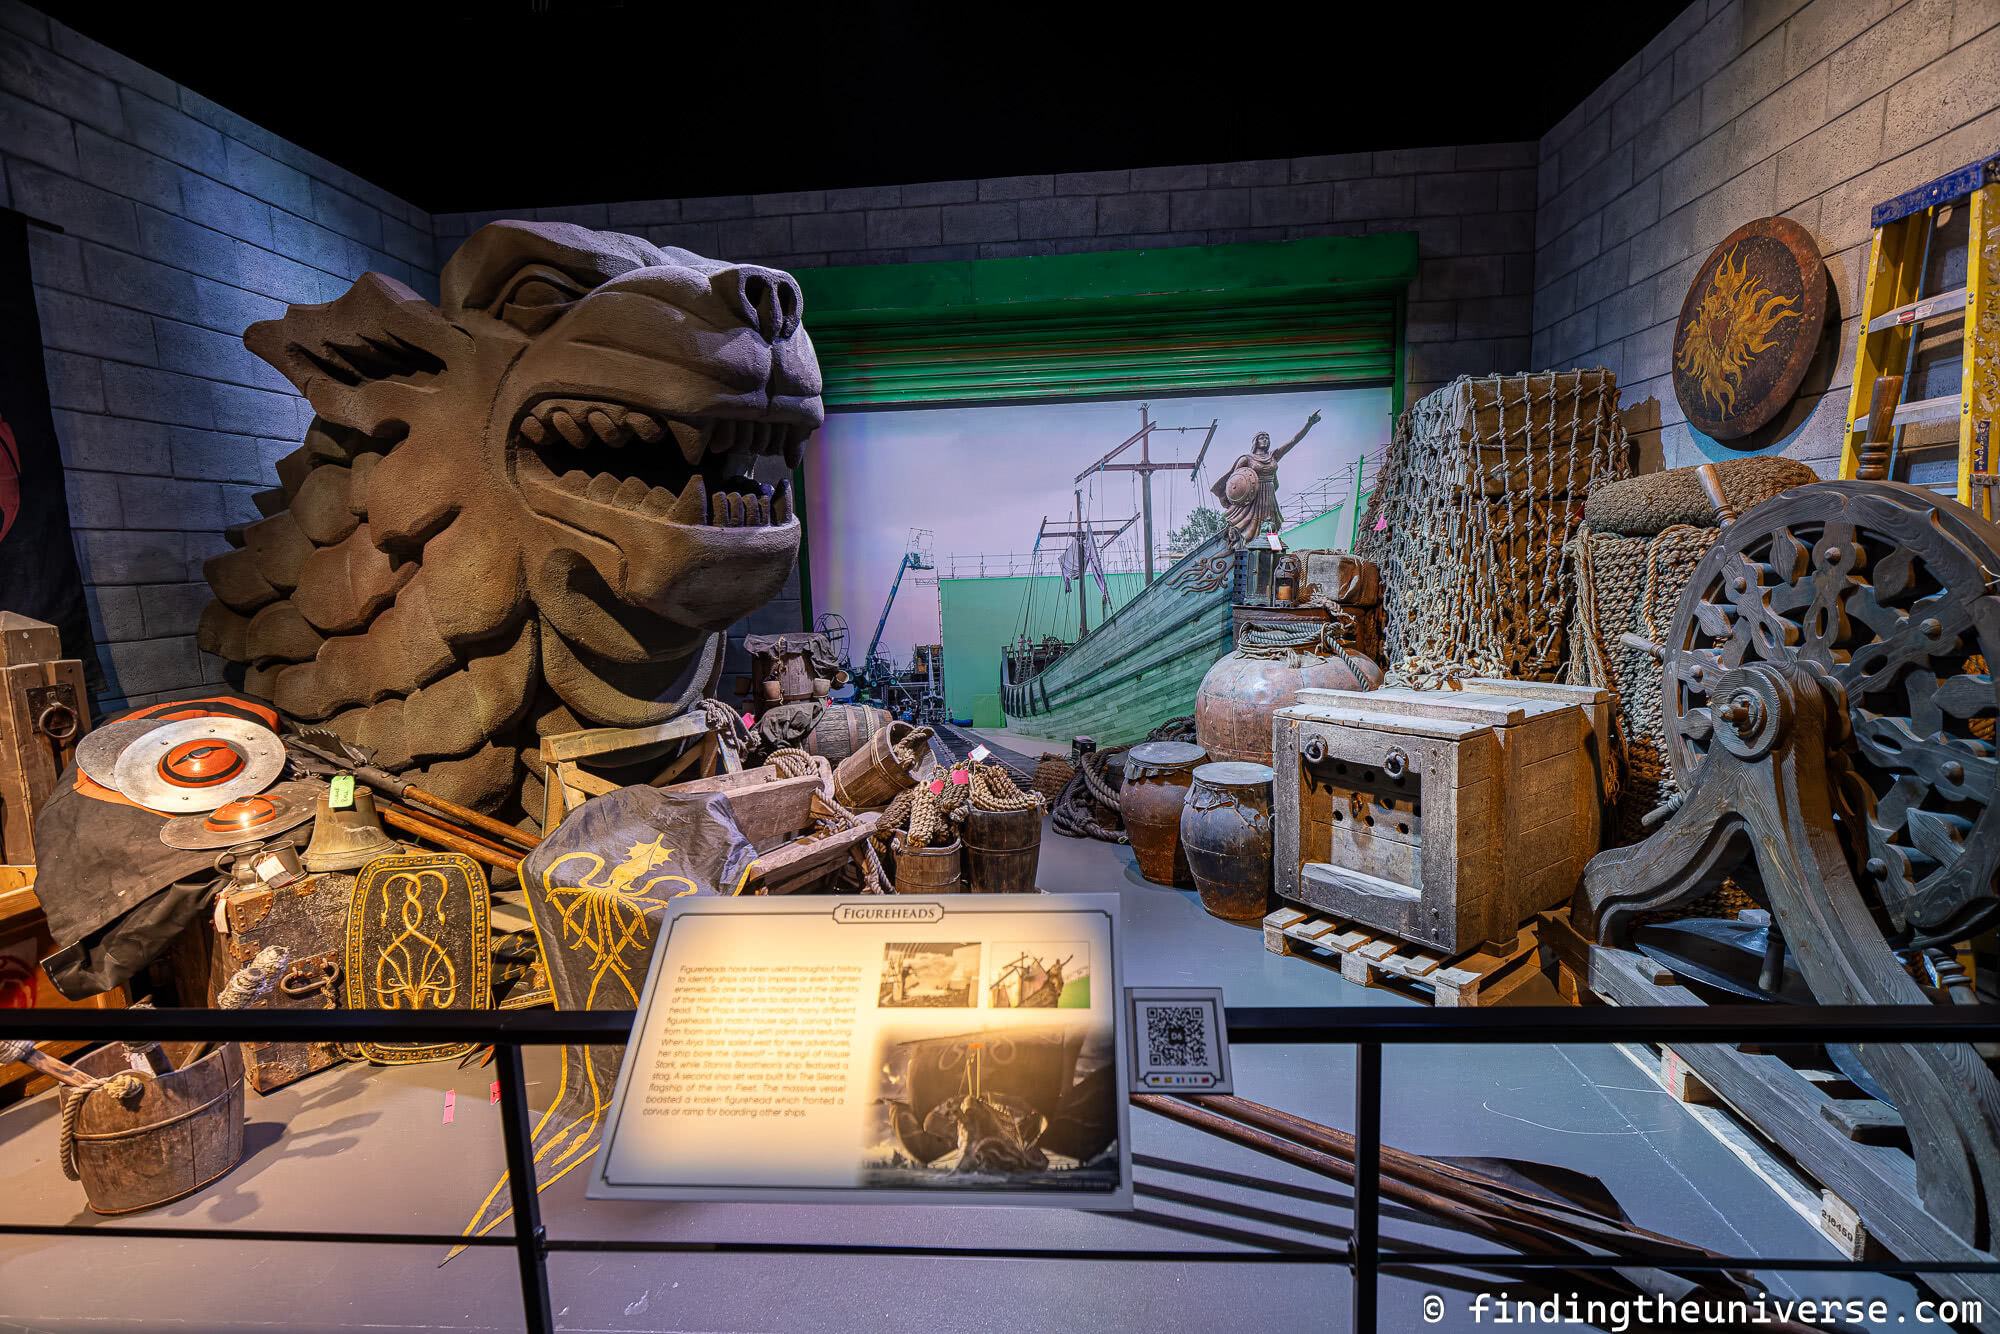
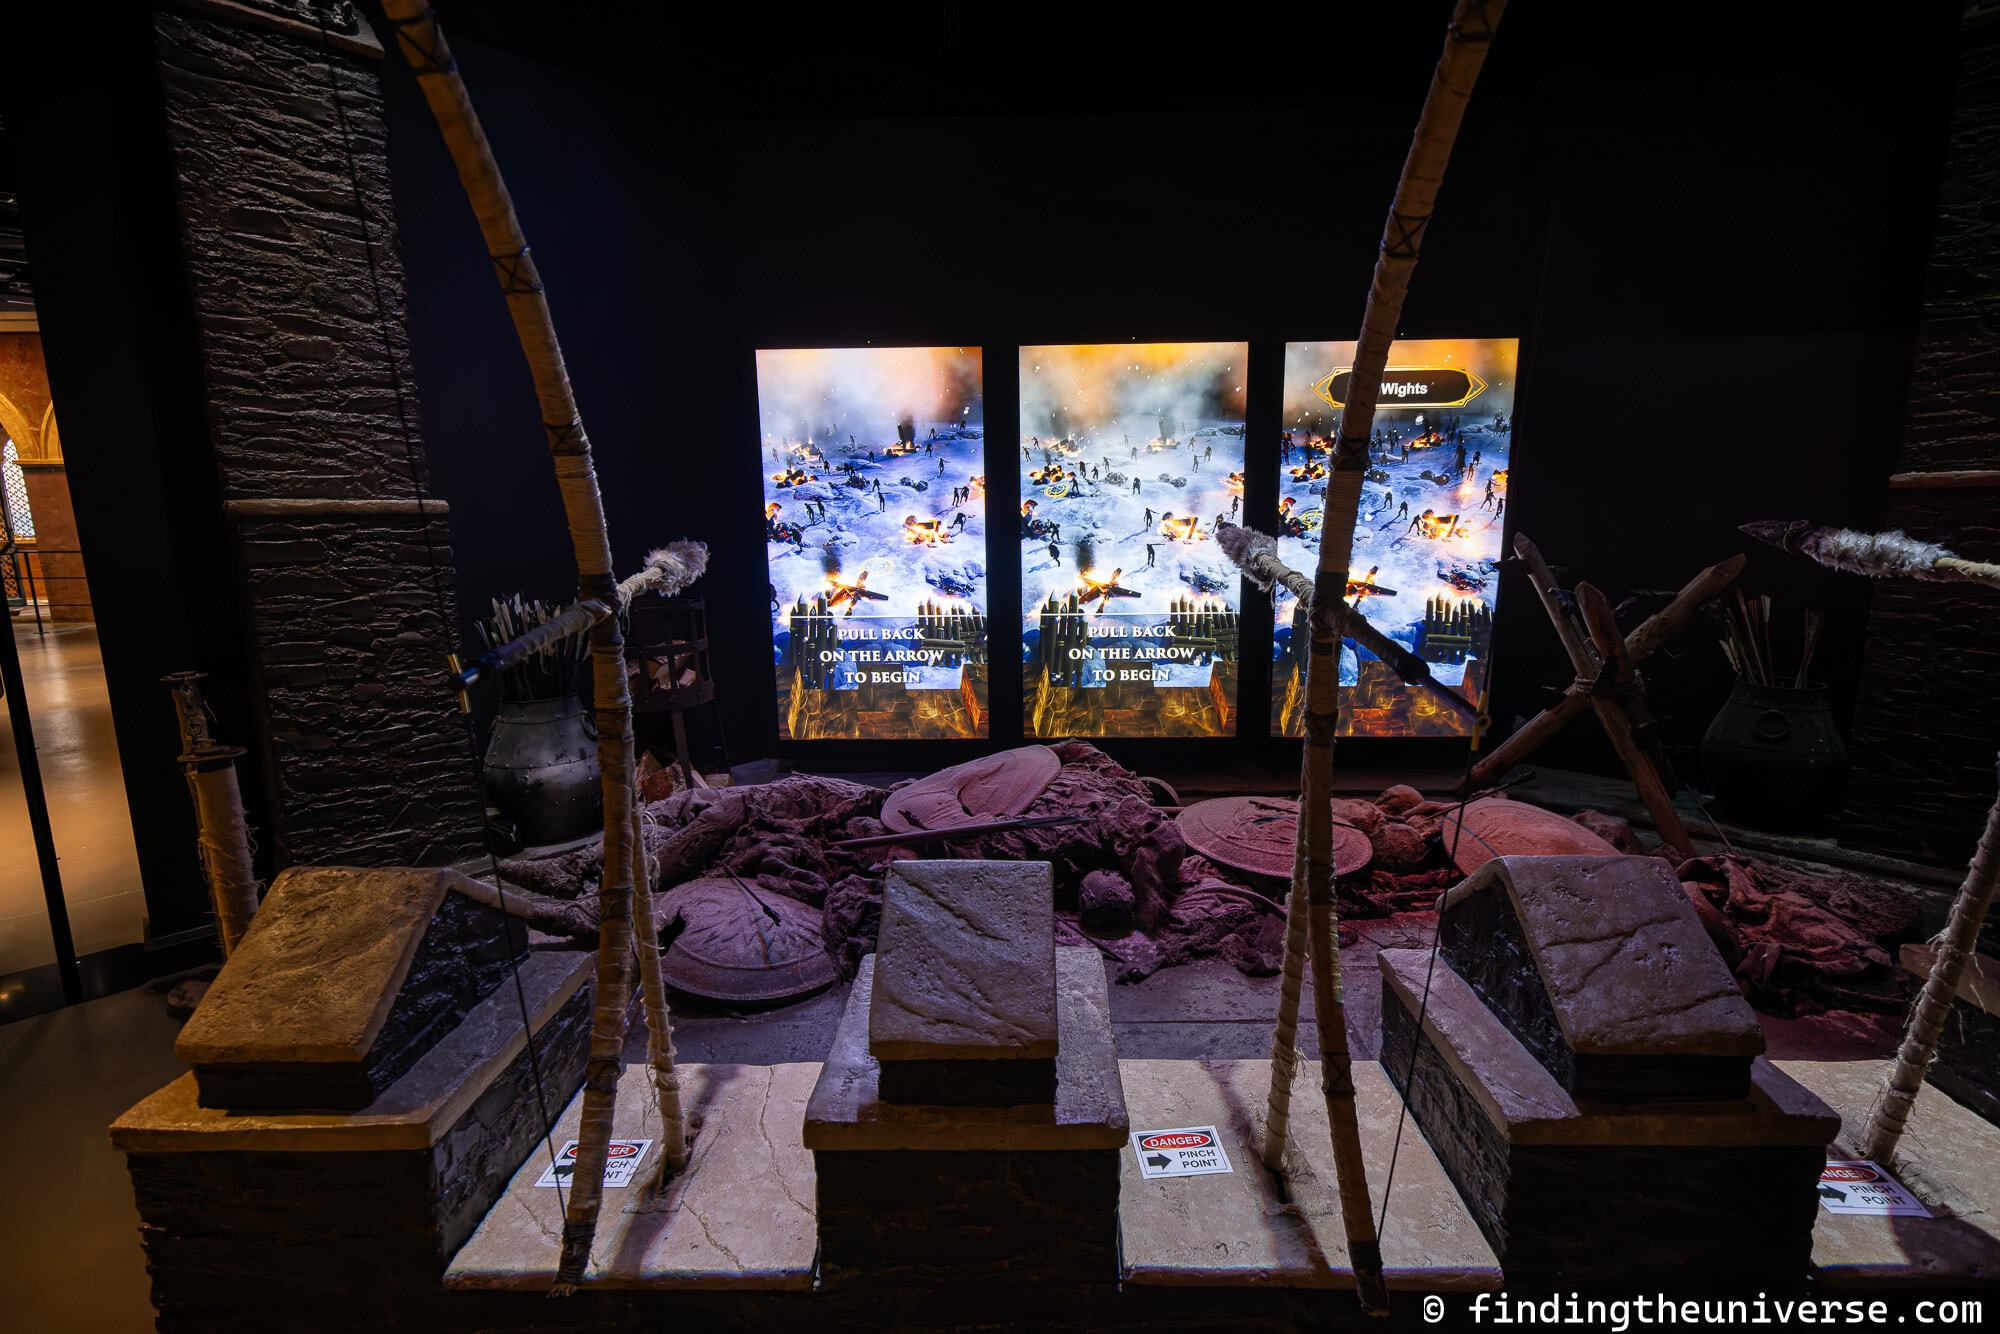
Armory Gallery & Armory Workshop
Game of Thrones was obviously a fairly violent show, and as such it included a lot of weaponry and armor.
These two areas of the tour showcase some of the incredible weapons and armor from the show, including the massive dragon-killing Scorpion artillery weapon.
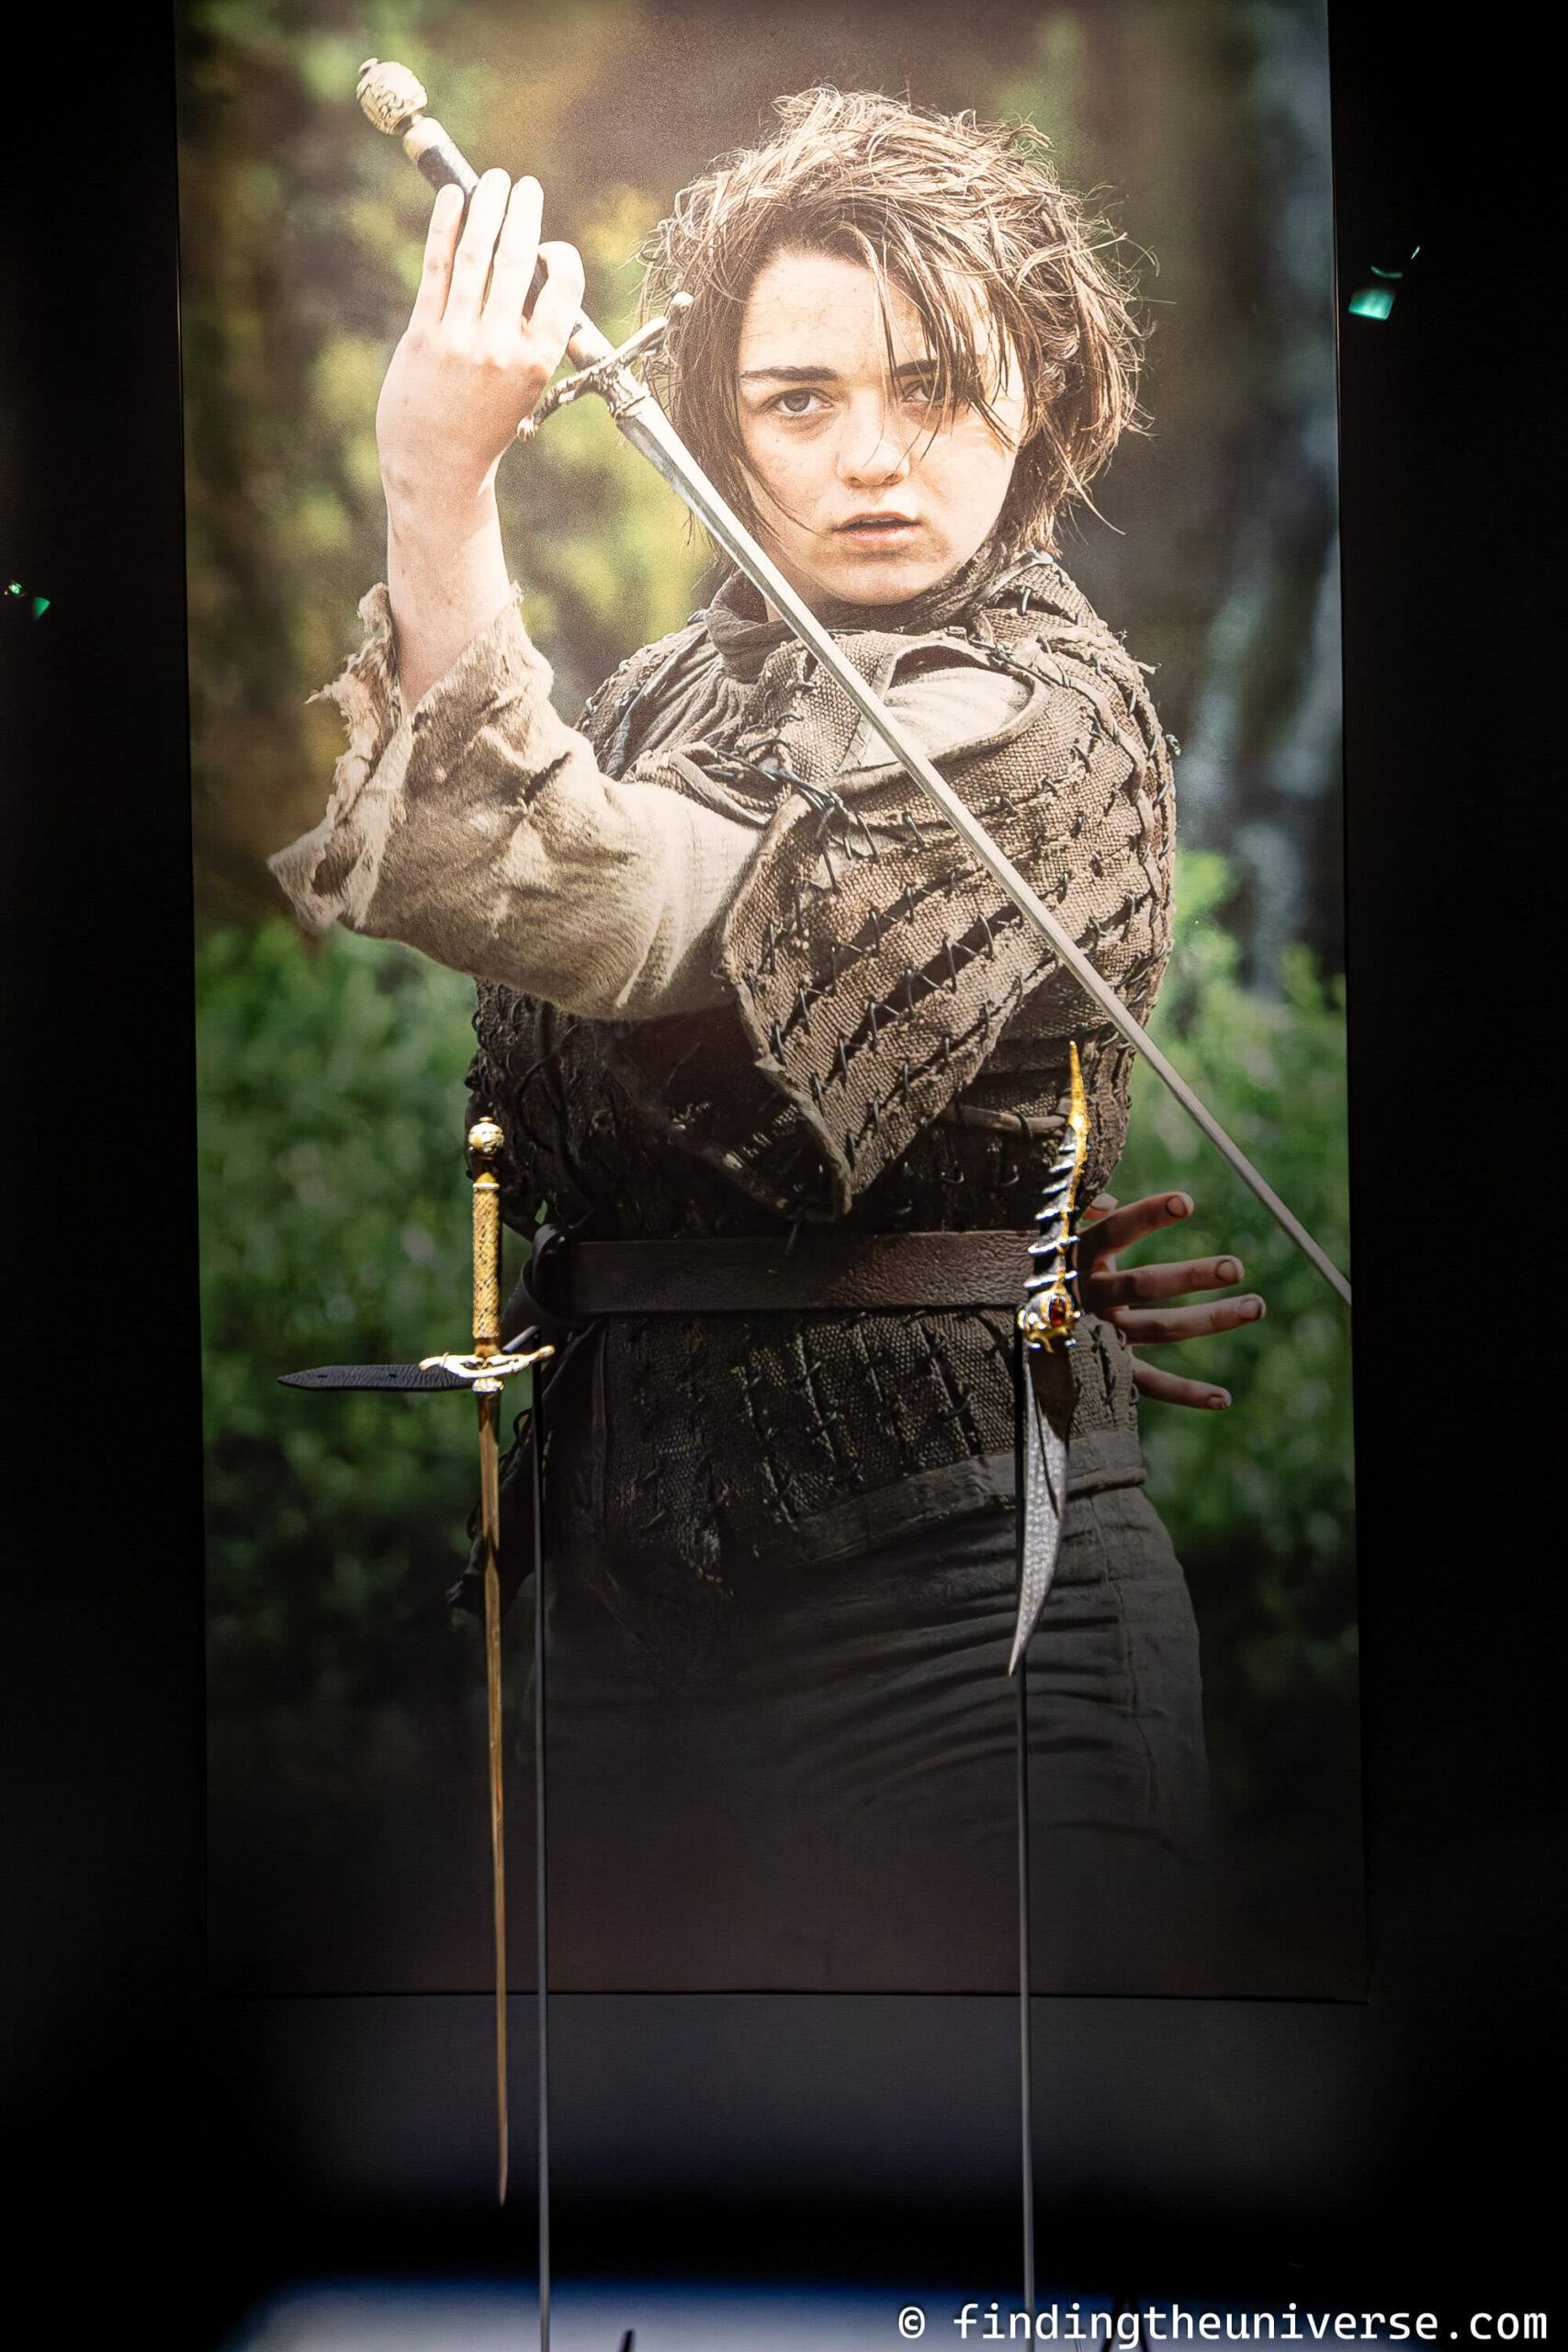
There are also lots of other well-known weapons from the show on display, including Arya’s needle.
This area also goes into detail as to how the weapons were created, the work involved, and the sheer volume of weaponry that was required for the show. Hint – it was a lot!
Finally, this area also has a really fun game where you can use your own bow and arrow to blow up hordes of the undead on screen. I really enjoyed this game, it was definitely my favourite of all the interactive experiences we tried.

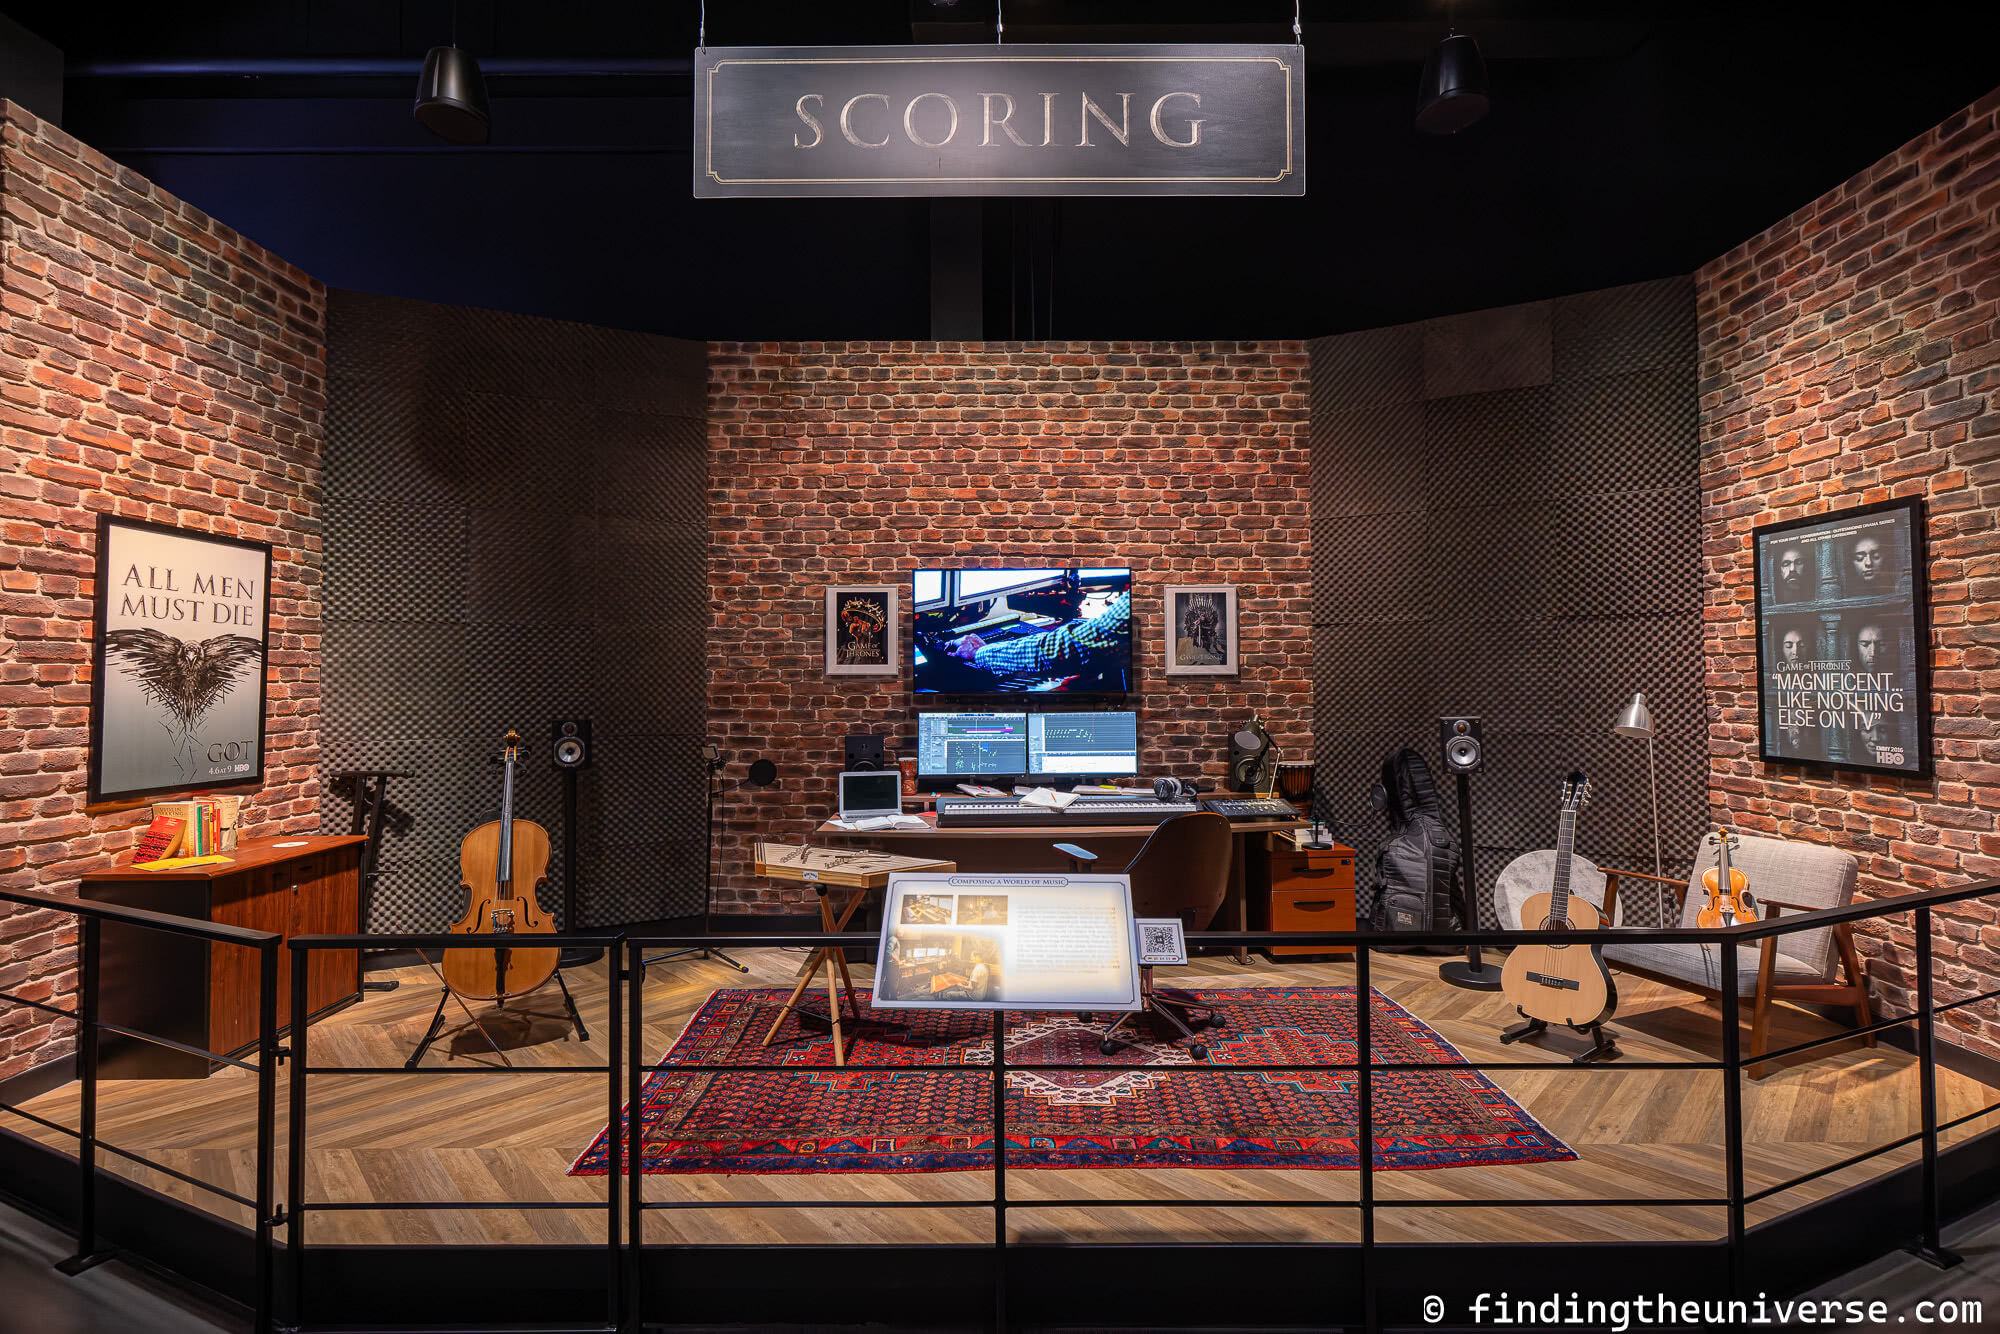
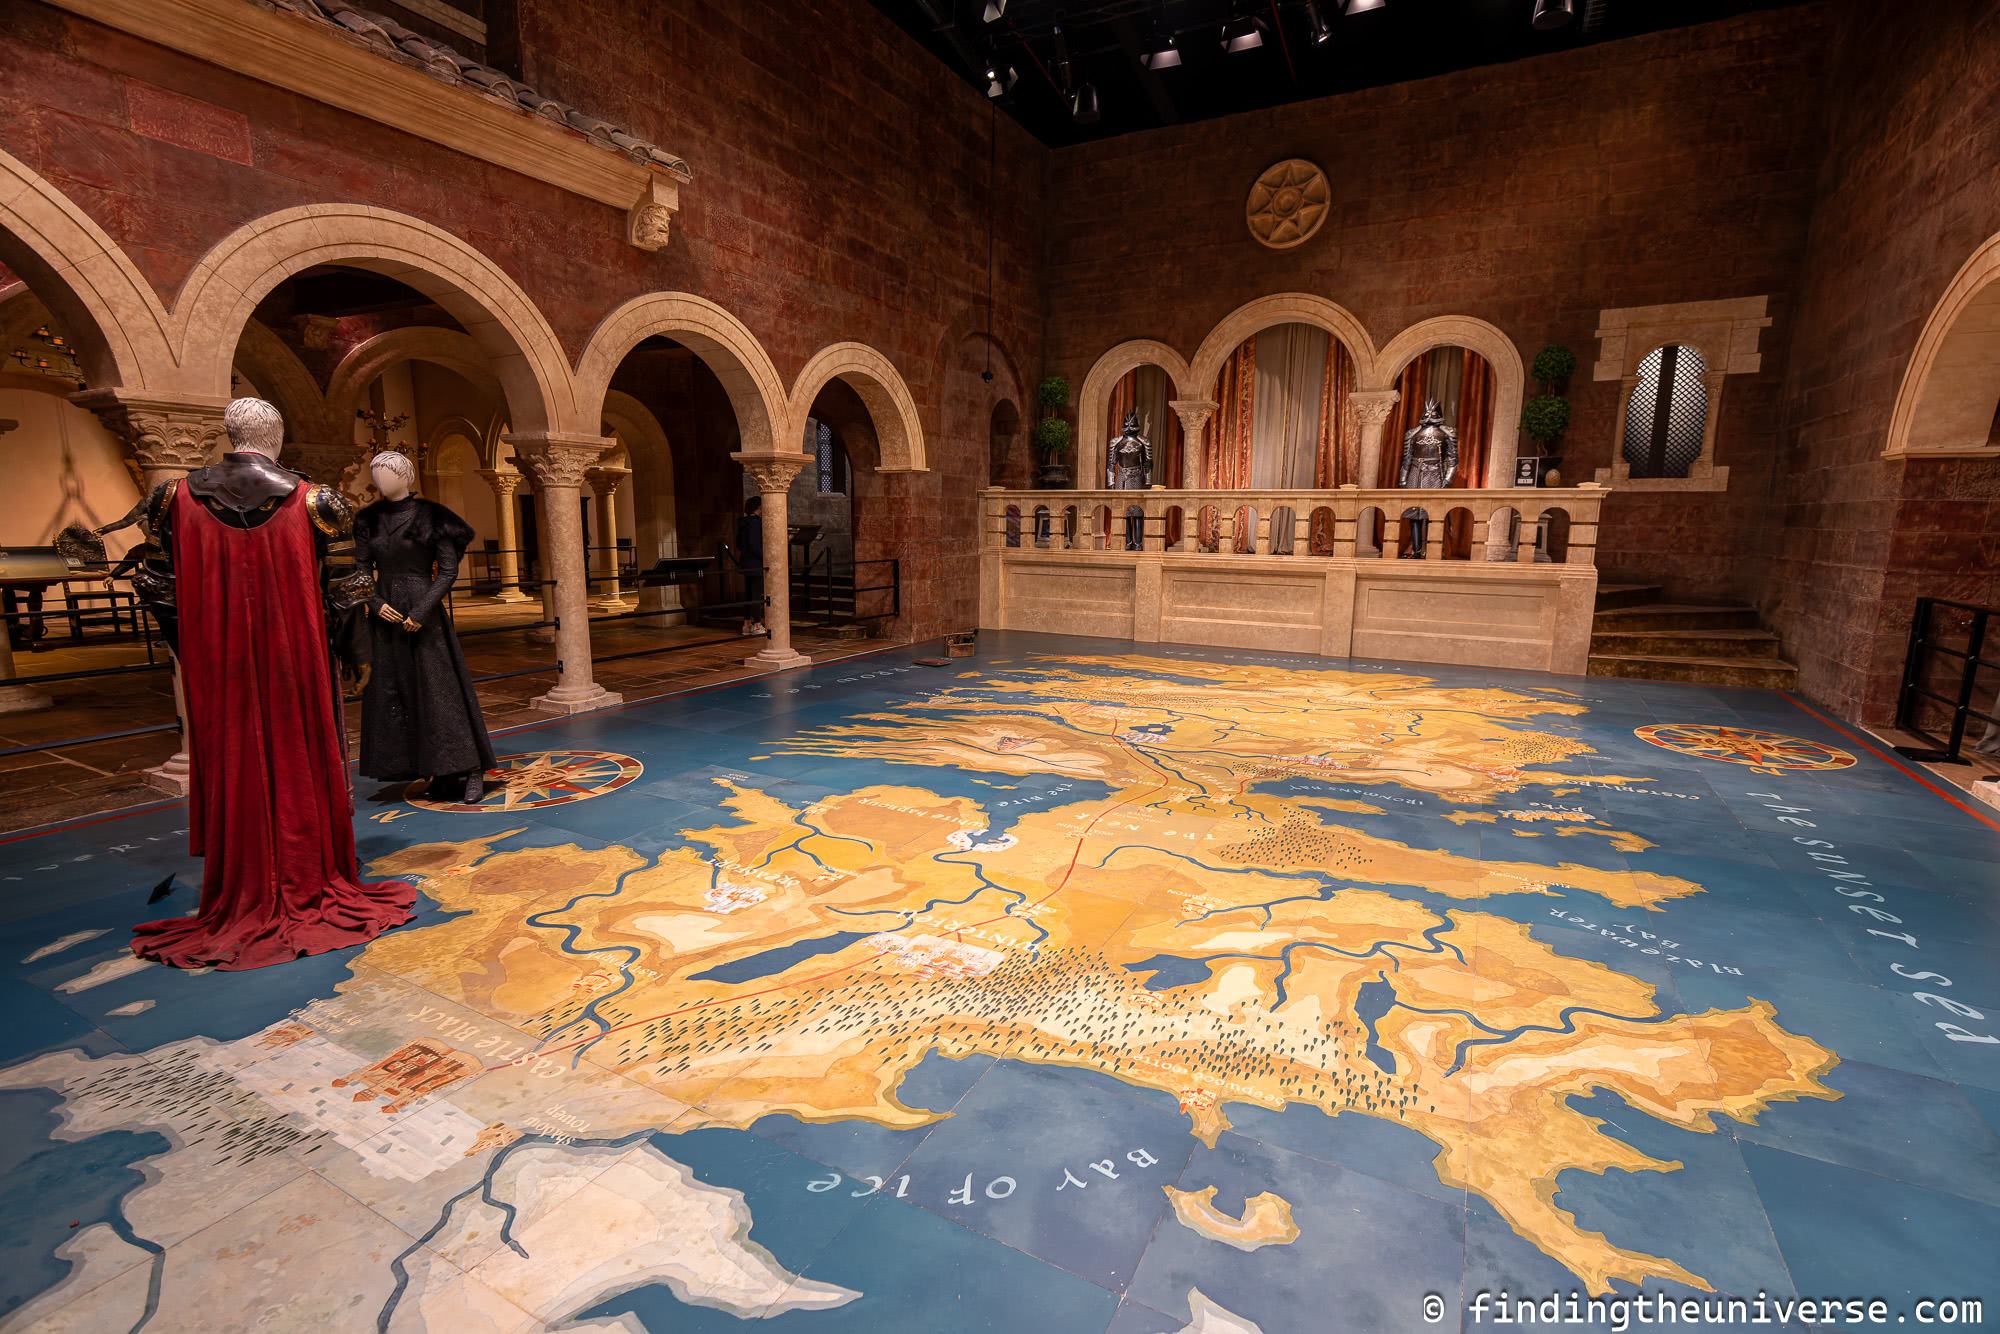
Kings Landing
Towards the end of the tour you come to the Kings Landing themed area. This is actually home to a lot of different areas, so don’t worry, there’s still lots to see.
There’s Tommen’s Chamber, the Small Council Chamber, Map Courtyard, and Red Keep. I thought the Map Courtyard set piece was particularly impressive.
In this area you will also find information on the incredible musical score for the show and how that was put together.
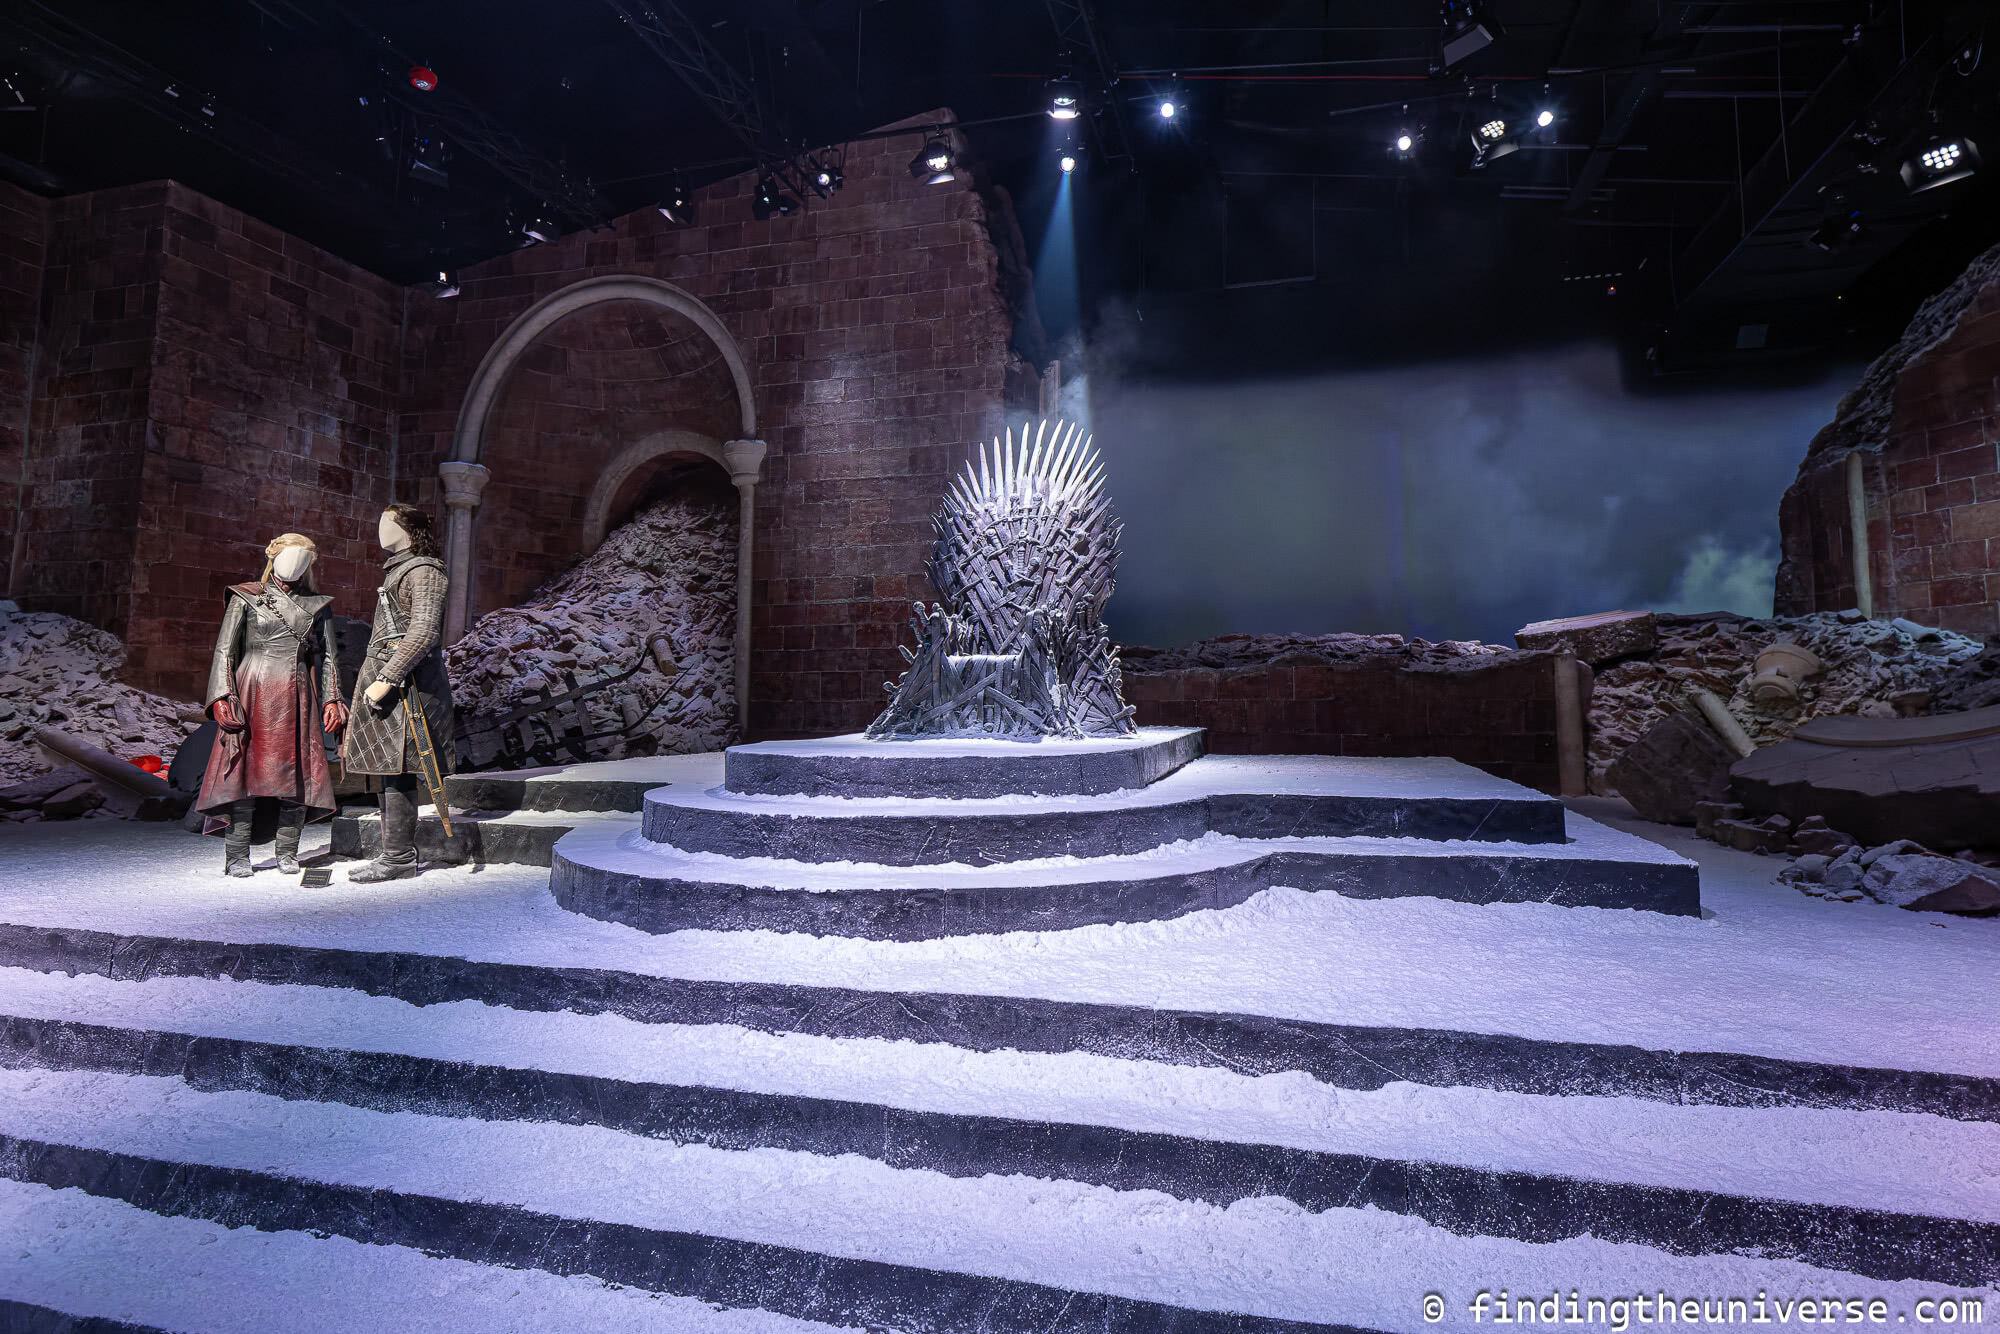
Throne Room
The final set piece in the tour is the Throne Room in Kings Landing, where the Iron Throne sits.
This is set up as it was shown towards the end of Season 8, with much of the room in ruins and snow dusting the floor.
It’s an impressive way to end the tour.
Shop, Throne & Exit
The Throne Room is the final room of the tour. If you feel you missed something, this is the time to turn back as once you exit to the shop you can’t go back inside.
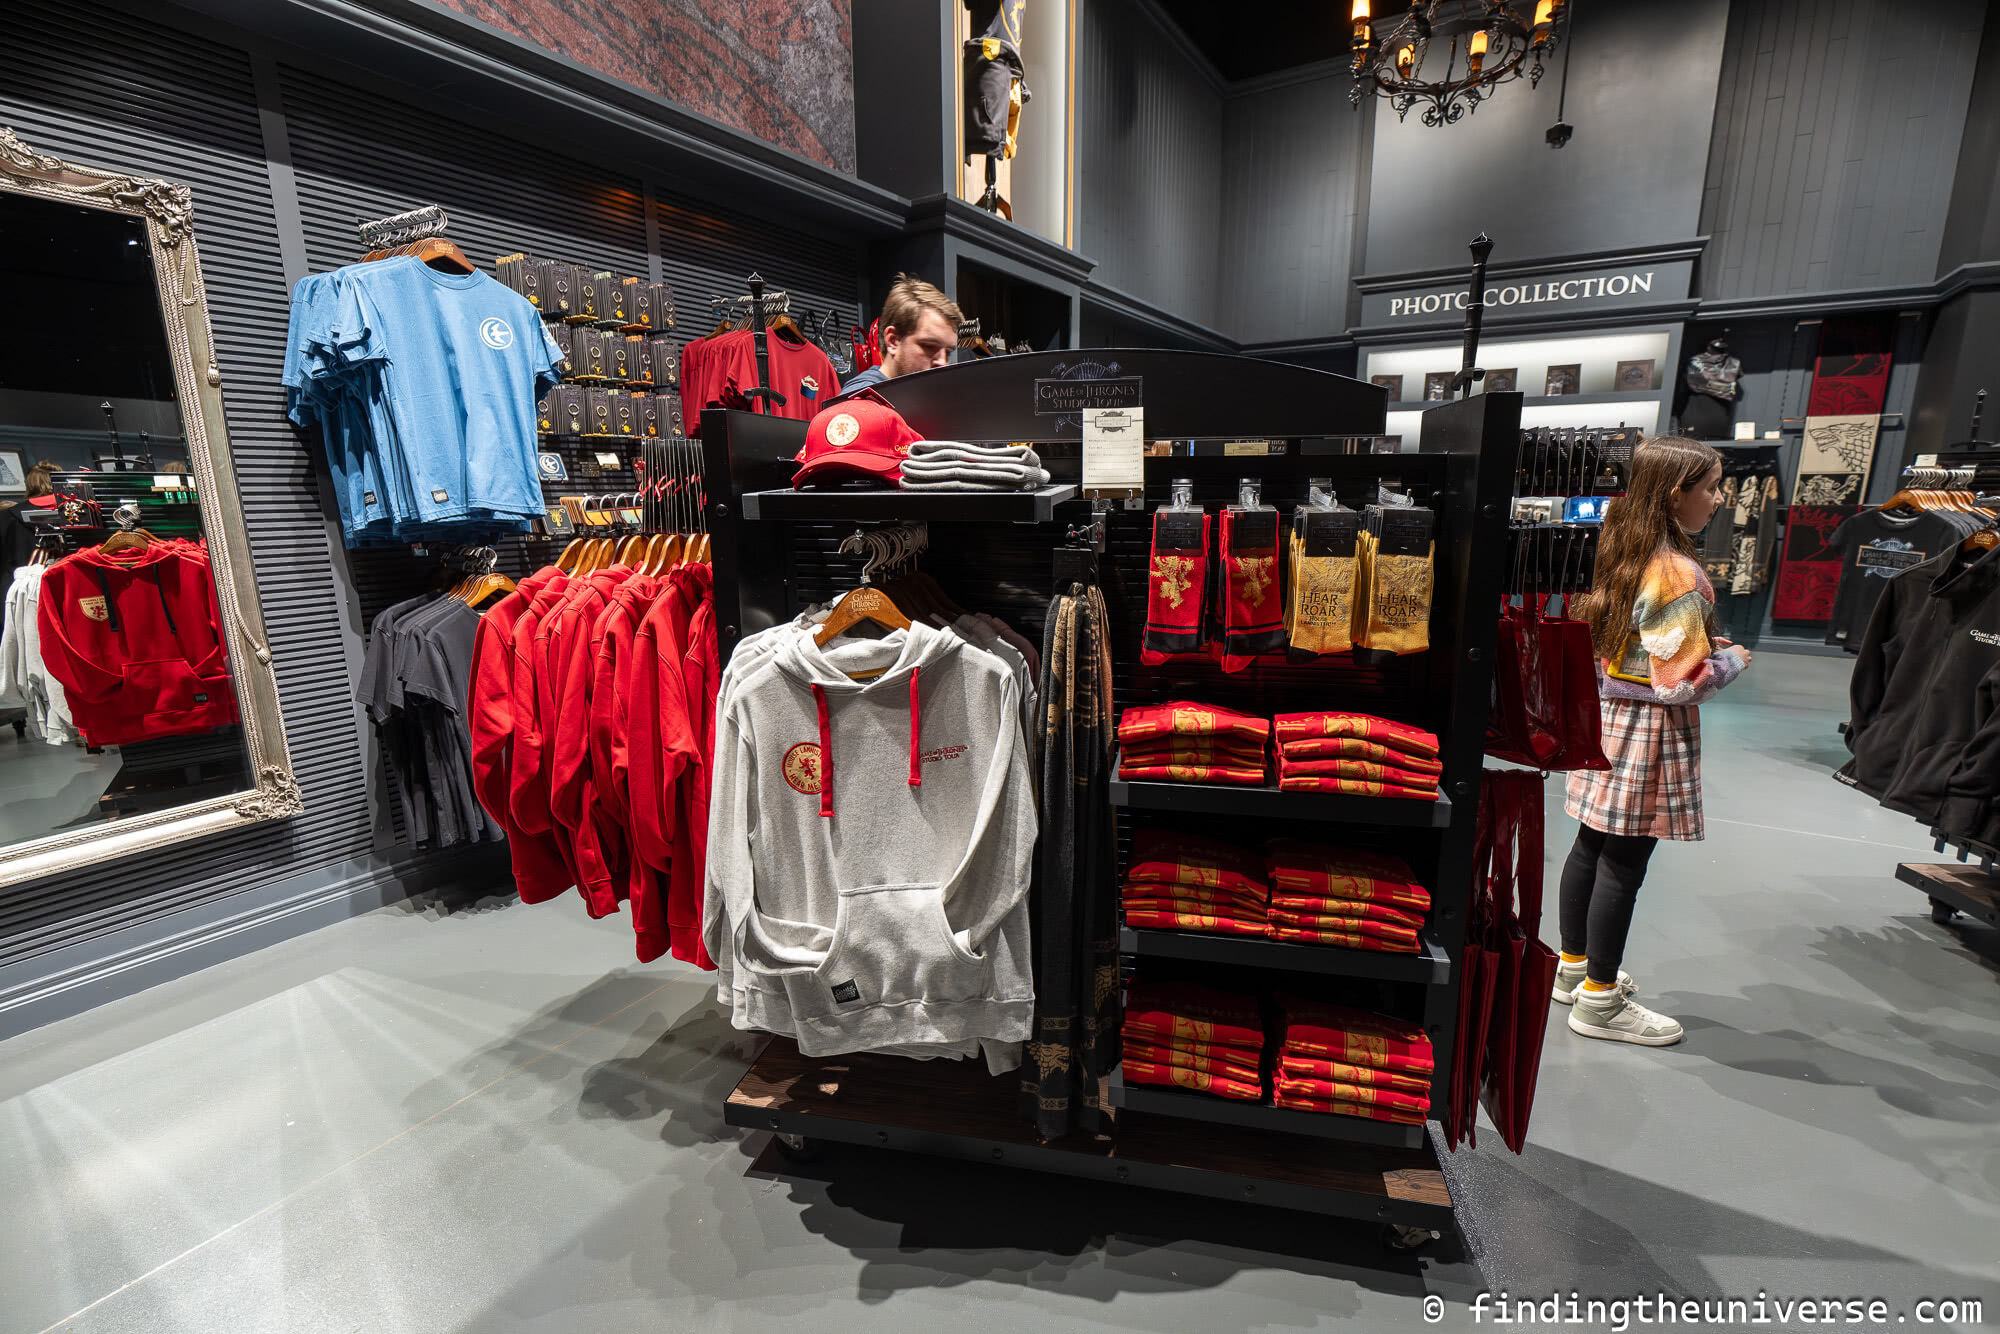
We’d already spent a couple of hours inside by this point so was ready to hit the shop. The gift shop is absolutely full of items from the show, so if there’s anything you need, from clothing to magnets to coasters, they’ve got you covered.
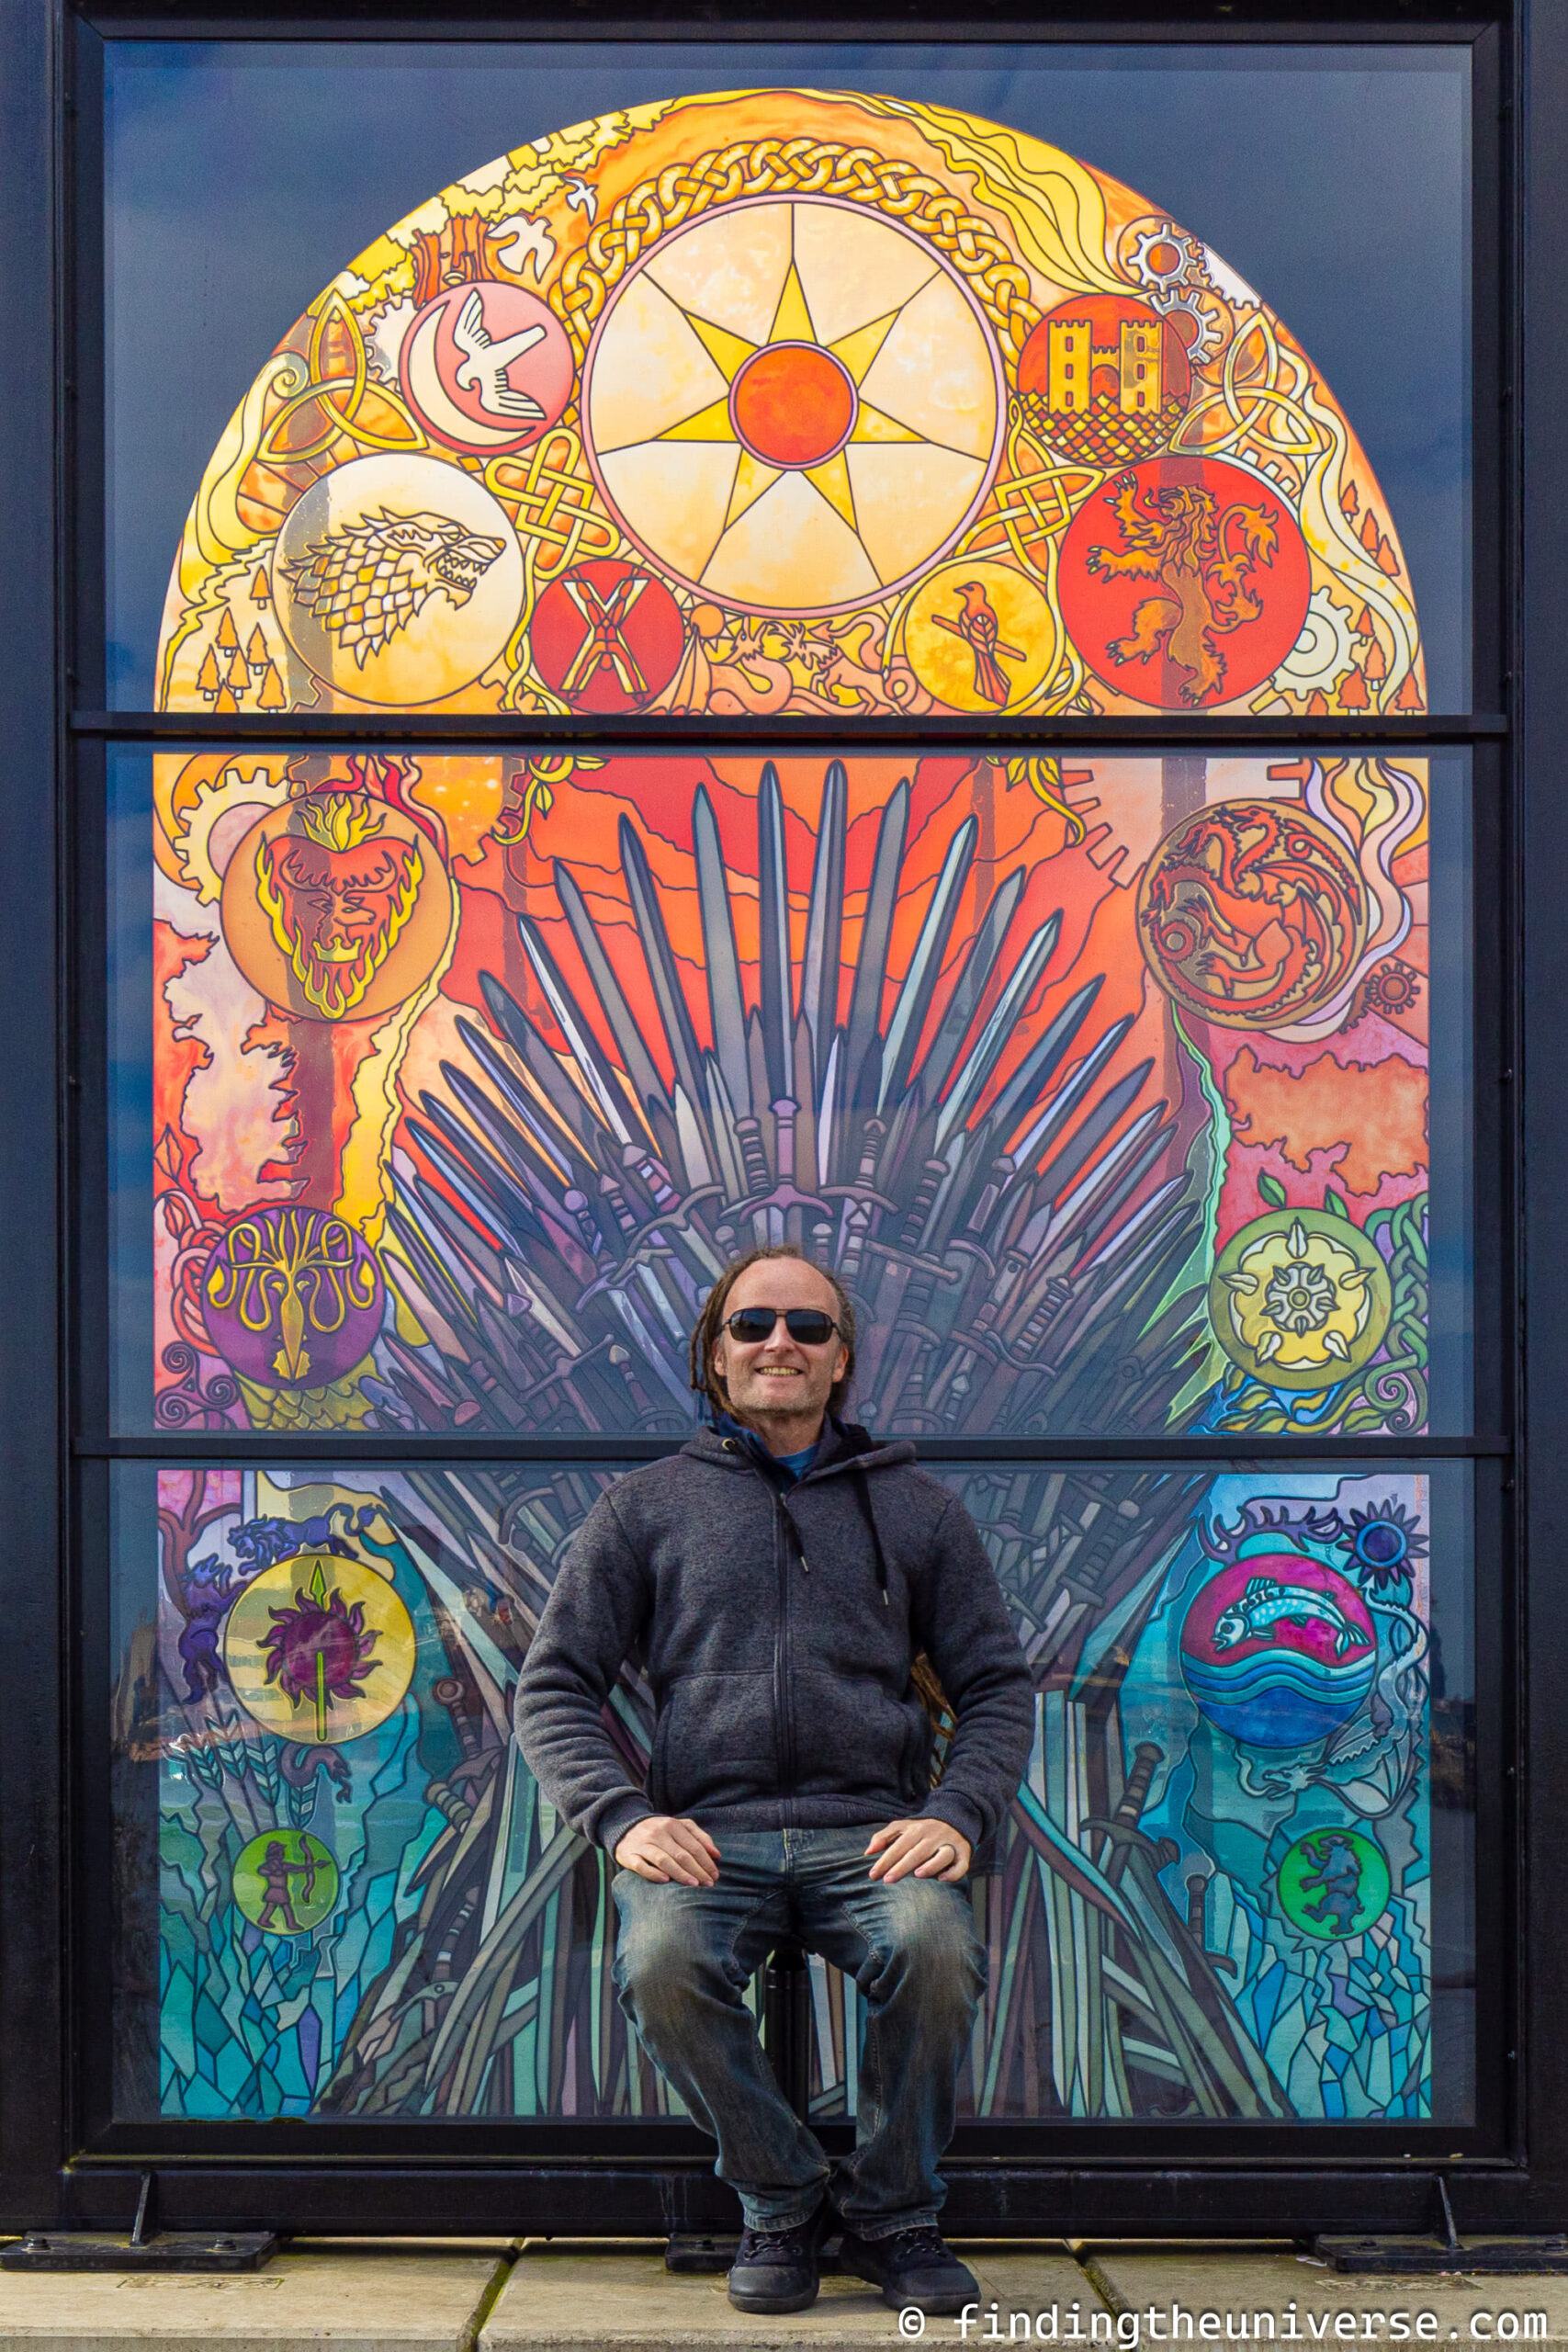
The shop is also where you can actually sit on the Iron Throne! Ok, so it’s a replica and not the actual one from the show. But you can sit on it in front of a green screen, and live your own fantasy of winning the Game of Thrones.
Once you’re done shopping and taking photos, you return to the lobby where you can collect any belongings, refresh with a drink or snack at the cafe, and wait for your shuttle bus or coach transfer.
There’s a helpful screen here which shows all the upcoming departure times. For the return shuttle to the parking lot there’s no specific timeslot, you just get on the next available shuttle when you are ready to leave.
And that’s it!

Overall Thoughts on our Visit to the Game of Thrones Studio
We really enjoyed our visit to the Game of Thrones Studio tour. We learned a lot about how the show was made, and we appreciated all the interactive displays and photo opportunities.
Personally, I think it is a must visit for Game of Thrones fans. However, even if you are not a fan of the show it is really interesting just in learning all the behind the scenes work that goes into make a big tv show like this.
Overall, it reminded us a lot of the Warner Bros Harry Potter Studio Tour in Watford, If you have done that and enjoyed it, you’ll probably enjoy this experience as well. The bonus is that this doesn’t get as many visitors and isn’t as crowded.
Tips for Visiting the Game of Thrones Studio
If you are planning to visit, here are some tips to help you prepare for your visit and make the visit itself go as smoothly as possible.
Decide how you are going to get there
The first thing you’ll need to do when planning your visit to the Game of Thrones Studio Tour is decide how you are going to get here. Your choices are to drive and take the short shuttle from the parking lot, or to book a ticket with round-trip transport from Dublin or Belfast.
The advantage of driving is that it will let you be more flexible in your timing in terms of how long you stay at the attraction. The round-trip transport coaches obviously have to operate to a timetable, and you don’t want to miss your return coach.
That said, they do allow for enough time for people to have a great time at the studio.
Book your tickets in advance
You need to book your tickets in advance when visiting the studio as you can’t buy tickets at the studio. Tickets have a timed entry slot and you need to show up at the time on your ticket.
If you are driving, make sure you arrive in plenty of time to take the shuttle.
Also note if you are interested in the afternoon tea experience, you need to book that in advance as well.
Decide if you want the audio guide
You should decide if you want the audio guide before you visit. You can either rent this in person and use their handset or you can use your own smartphone and headphones and download the app.
Both options incur a fee, but obviously you will get more out of your visit if you opt for the audio guide. You can hire this on site.
If English is not your first language, then an audioguide will probably really help you make the most of your visit if it is available in your native language.
Personally we didn’t hire the audioguide and we felt that we still had an amazing time. However, if you have plenty of time and really want to nerd out, then it’s probably a good thing to get.
Don’t Rush
The average visitor spends between 2 hours and 3 hours on the studio tour. So I would be sure to allow yourself at least 3 hours here to fully enjoy the experience without feeling rushed. There is a lot to see, read, and do here.
In addition you may also want extra time to explore the gift shop or have a meal. If driving you need to allow for the 10-minute shuttle rides at the beginning and end.

Take Part!
The Game of Thrones Studio tour has a lot of interactive games and experiences you can take part in as you go around. From adding your face to the Hall of Faces to blowing up the undead with a bow and flaming arrow to taking photos on the Iron Throne, these are a lot of fun.
They really add to the experience in my opinion, and as most of them are included in your ticket (with the exception of the photos) you should definitely take advantage of them all!
Further Reading
We’ve been lucky enough to both explore a number of Game of Thrones locations around the world, as well as a lot of Ireland. Based on our experiences, we have a number of other posts we think you will enjoy and find useful for your trip planning.
- If you want to visit the real world filming locations for the show while you are in Northern Ireland, see our guide to the Game of Thrones Filming Locations in Northern Ireland.
- Many of the GoT locations in Northern Ireland can be found along the Causeway Coastal Route – check out our guide to the highlights of the Causeway Coastal Route for more inspiration on what to see on the way.
- We have a detailed 2 day itinerary for Belfast, to help you make the most of the city. We also have a guide to things to do in Belfast.
- We have a detailed guide to visiting the Dark Hedges, one of the more popular GoT locations in Northern Ireland.
- If you are basing yourself in Belfast for a few days, we have a complete guide to the best day trips from Belfast
- If you plan to spend time in Dublin, check out our guides to spending 2 days in Dublin and 3 days in Dublin, as well as our tips for taking a day trip to the Cliffs of Moher from Dublin
- You can save money in Ireland with a Dublin Pass, a Belfast Visitor pass, and a National Trust Touring Pass, depending on what you plan to do and see
- We have an overview of how much it costs to travel in the UK to help you with budget planning
- Our guide to spending 2 weeks in the UK, which includes time in Belfast and Dubin
- A guide to driving in the UK, in case you choose to hire a car and do a road trip
- If you enjoy a road trip, take a look at our guide to some of the best road trips in the world, as well our guide to Scotland’s North Coast 500
- If you are looking for a guidebook, we recommend the Lonely Planet guide to Ireland, the Rick Steves Northern Ireland guide or the DK Eyewitness Ireland Travel Guide
- Game of Thrones fans heading to Iceland will definitely want to check out our guide to Game of Thrones in Iceland. The show was also filmed in Girona, and you can see our guide to Girona here.
And that’s it for our guide to visiting the Game of Thrones Studio Tour in Northern Ireland! As always, we’re happy to hear your comments and feedback. Just pop them in the comments below and we’ll get back to you as soon as we can!