برچسب: Trekking

  • Climbing Mount Kinabalu – The Ultimate Trekking Guide [2025]

    Climbing Mount Kinabalu – The Ultimate Trekking Guide [2025]


    There’s something deeply satisfying about standing on top of a mountain, watching the sun rise over the clouds after a tough hike.

    Especially when that mountain is Mount Kinabalu; Malaysia’s highest peak and one of the most iconic climbs in Southeast Asia.

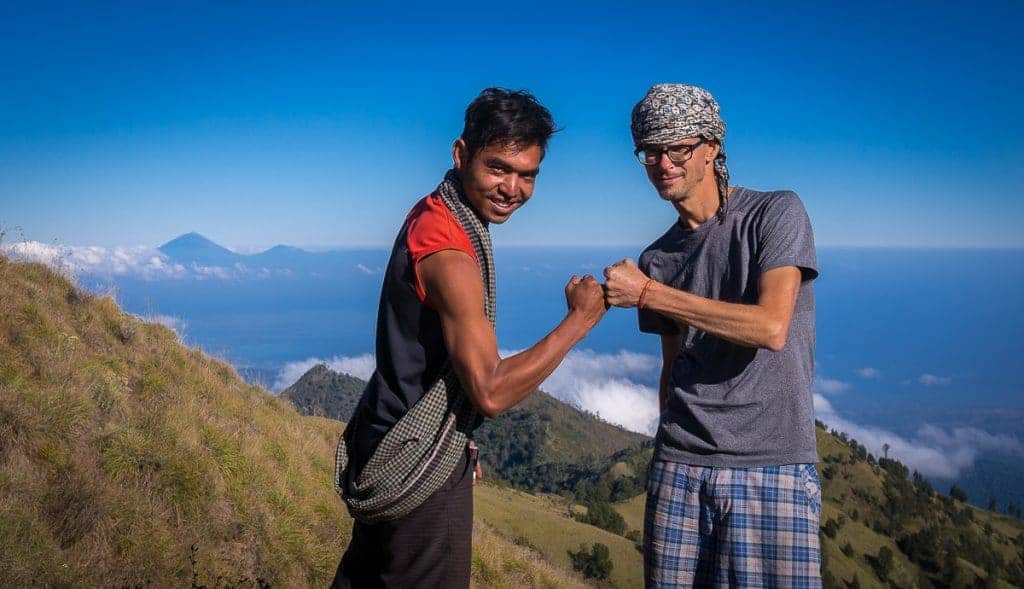
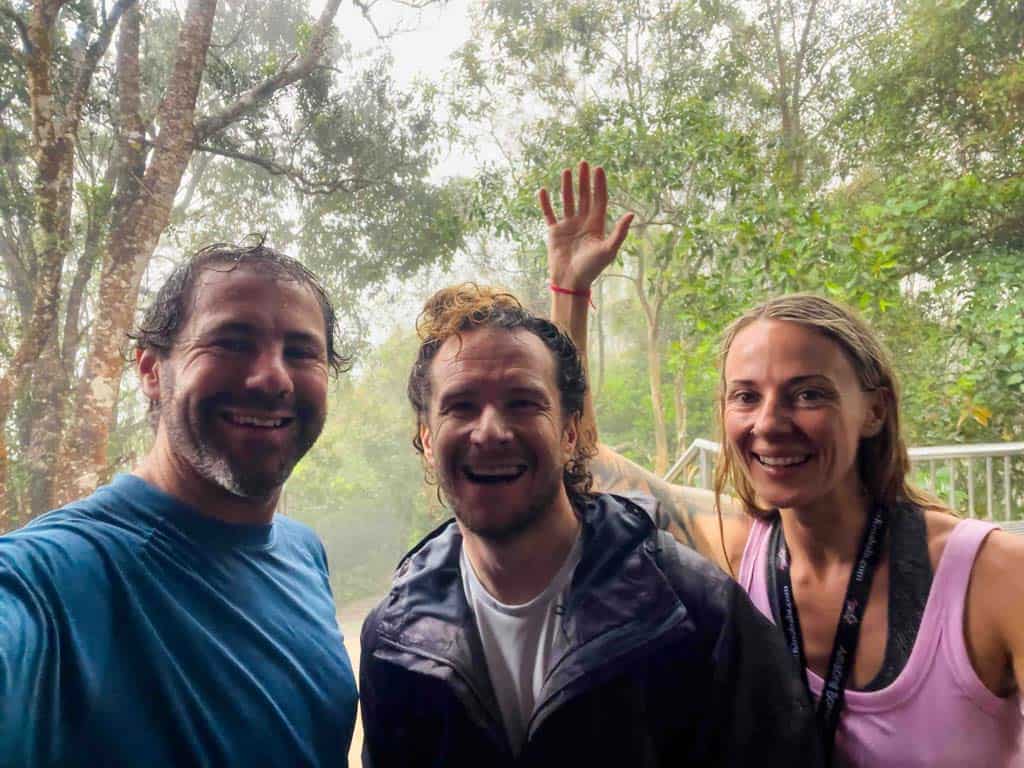
    I’d wanted to tackle this beast for years, and when the chance came up to do it with two of our best mates, Hannah and Bertie, we locked it in.

    We signed up with Amazing Borneo for their 2-day, 1-night summit and via ferrata package, and honestly, the entire experience was superb.

    From start to finish, the adventure was smooth, fun, and a memorable challenge to tick off from the bucket list.

    Here’s how our Mount Kinabalu climb went down.

    Climb Mount Kinabalu Trek Hiking Down
    Climbing down from the summit of Mount Kinabalu during a sensational sunrise.

    A Bit of Background: The Story of Mount Kinabalu

    Before we get into the trip itself, a quick bit of history because this mountain isn’t just a pretty rock.

    Mount Kinabalu stands at 4,095 metres (13,435 feet) and dominates the skyline of Sabah, in Malaysian Borneo.

    It’s the tallest mountain between the Himalayas and New Guinea, and it holds deep spiritual significance for the local Kadazan-Dusun people.

    The name is thought to come from “Aki Nabalu,” meaning “the revered place of the dead,” and according to tradition, it’s where spirits go to rest after passing on.

    The first recorded ascent happened in 1851 by British administrator Hugh Low, who made it to the summit plateau (the peak is now named Low’s Peak after him).

    But it wasn’t until 1888 that someone – zoologist John Whitehead – actually reached the highest point. Since then, Kinabalu has become a magnet for adventurers, nature lovers, and anyone chasing that feeling of standing on the roof of Borneo.

    In 1964  Kinabalu Park was established to protect the area, and in 2000, it became Malaysia’s first UNESCO World Heritage Site thanks to its biodiversity. It is after all one of the most important ecological zones in the world.

    So as you can see, it’s more than just a climb. It’s a journey into culture, nature, history and serious altitude.

    Summit Views On Mount Kinabalu
    Summit views on Mount Kinabalu.

    Day 1: Kota Kinabalu to Panalaban Base Camp

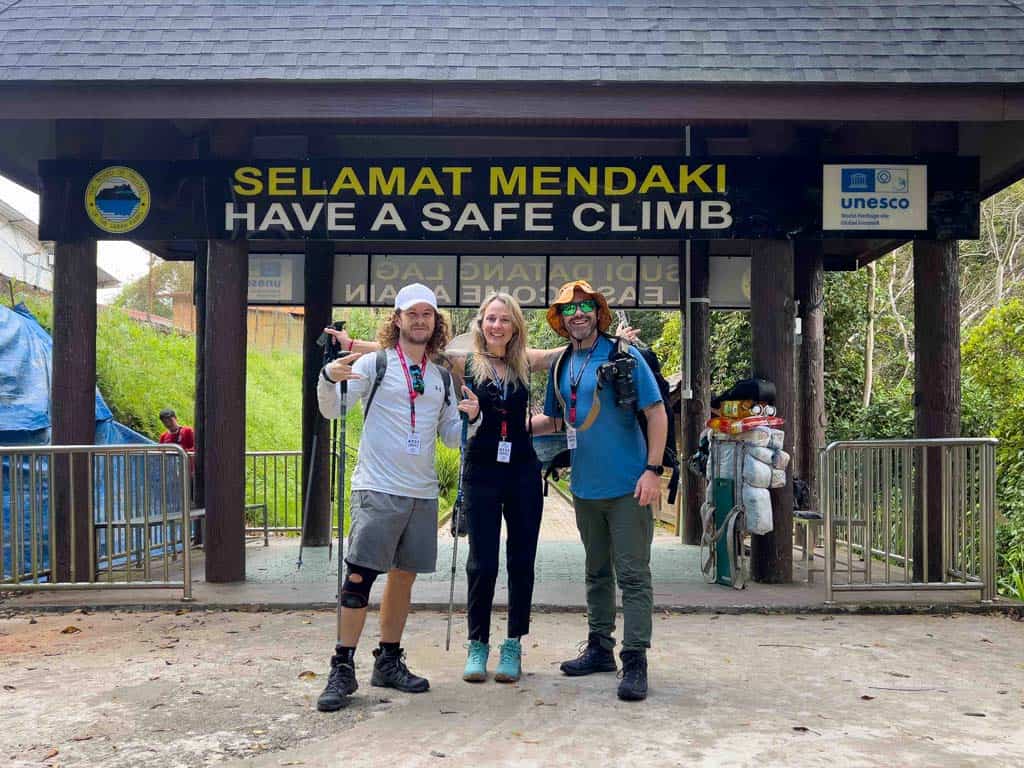
    Our alarm went off at 5am in Kota Kinabalu.

    We dragged ourselves out of bed, zipped up our packs, met the Amazing Borneo team downstairs with a comfortable private van, and within moments we were ready to roll.

    Coffee in hand and packs in the back, we hit the road toward Kinabalu Park HQ.

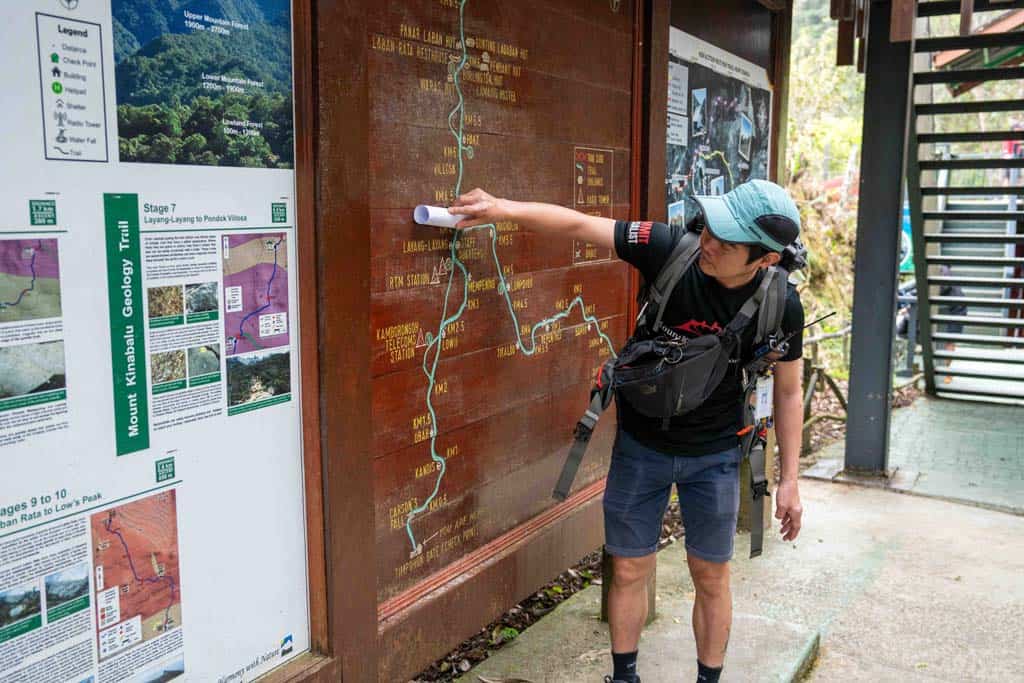
    The drive took about two hours, winding through jungle hills and past misty ridgelines. When we arrived we signed in, got our permits and tags, met our mountain guide, and did the final prep at Timpohon Gate (1,866m) – the starting point of the climb.

    Our Group Beginning Of Mount Kinabalu
    Bertie, Hannah and myself at the starting point of the Mount Kinabalu trek.

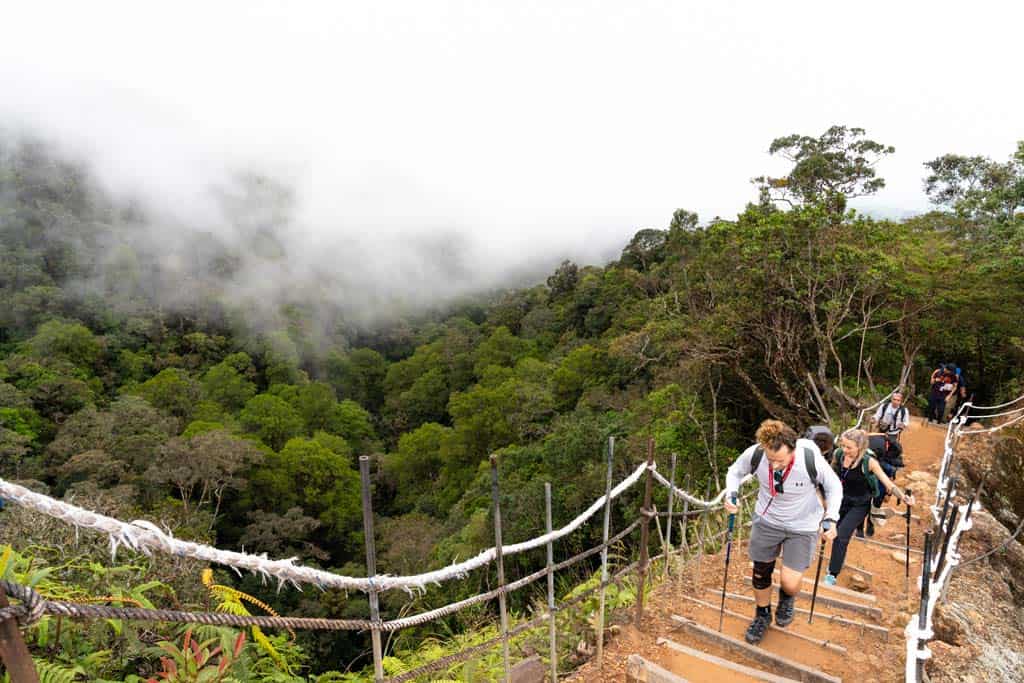
    Now, I’ll be honest, we weren’t sure how tough it was going to be.

    The blogs we had read and friends we spoke with said “it’s not technical,” but that doesn’t mean it’s easy.

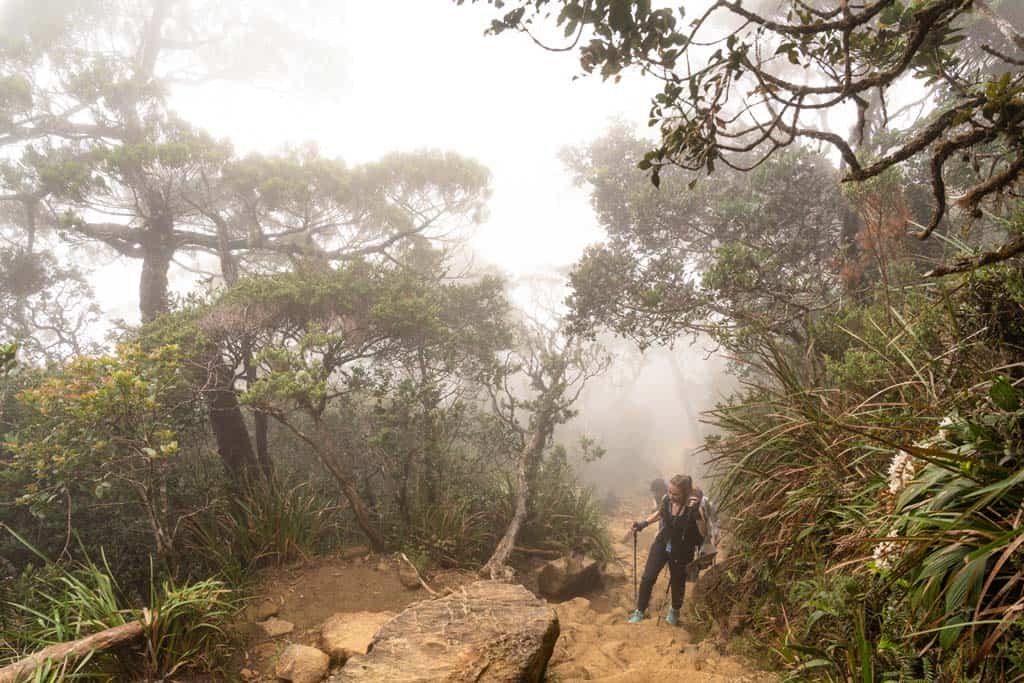
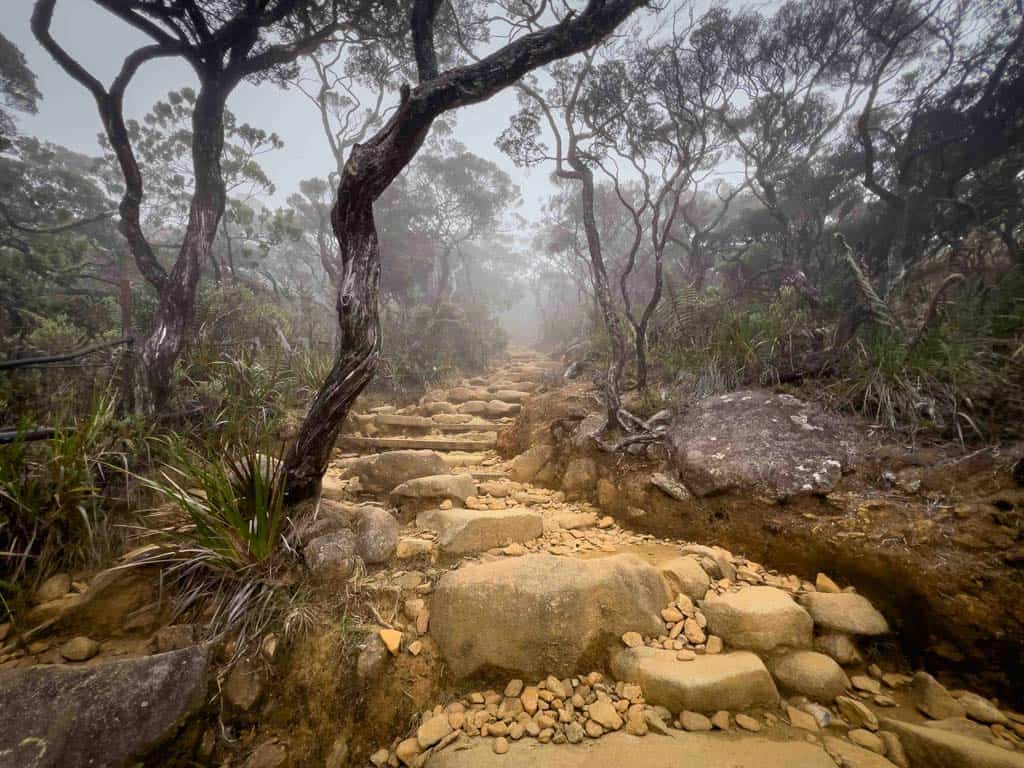
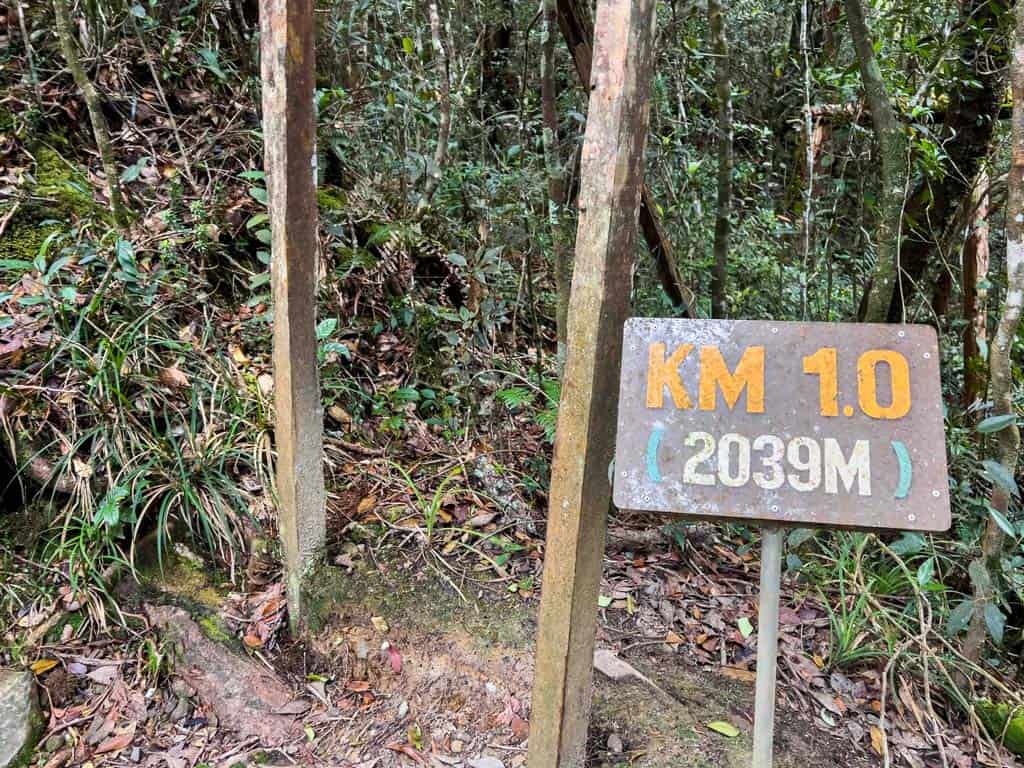
    Right from the start, it’s a constant slug uphill. You’re on well-built trails, mostly stone steps and packed dirt, but it’s relentless.

    We kept a good pace, stopping to rest and hydrate every now and then at the break station.

    READ MORE: Check out our best hiking tips!

    The higher we climbed, the more the landscape changed, from thick rainforest to cloud forest, then open alpine scrub.

    The air got cooler, the mist rolled in, and soon we began to get the real sense of being at altitude.

    Us On Steps Of Mount Kinabalu
    Gaining altitude quickly on the climb up Mount Kinabalu.
    Mount Kinabalu Borneo Climb Through Mist
    Out of the mist.

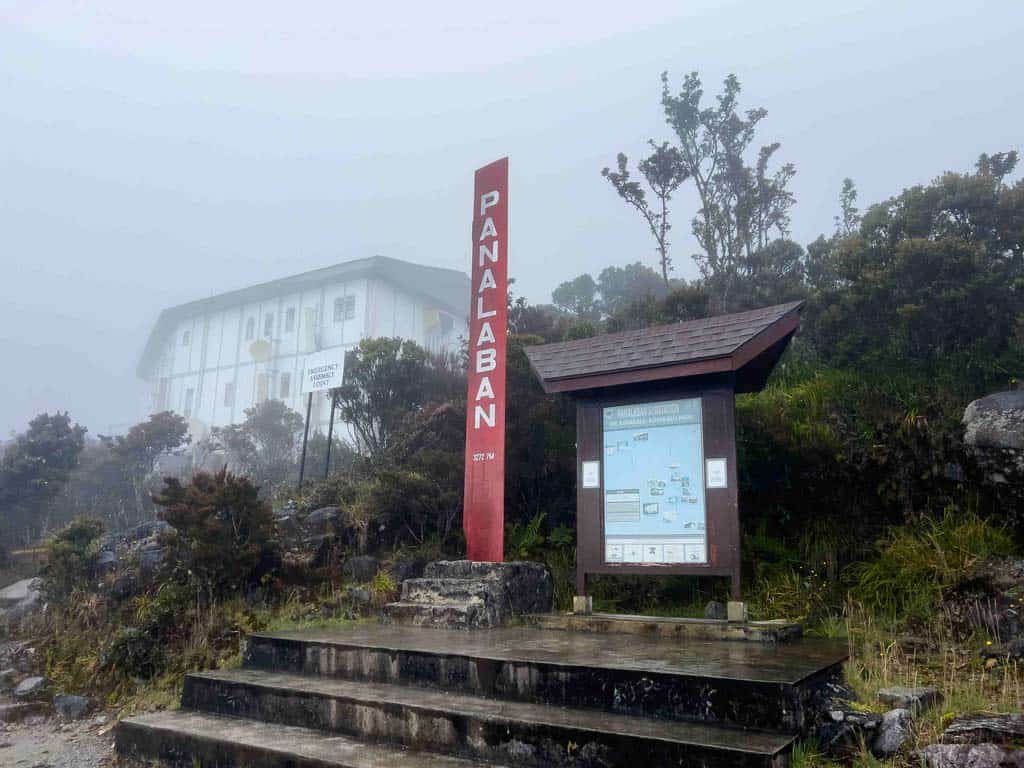
    After about 4 hours, we arrived at Panalaban Base Camp (3,270m), where climbers sleep before the summit push.

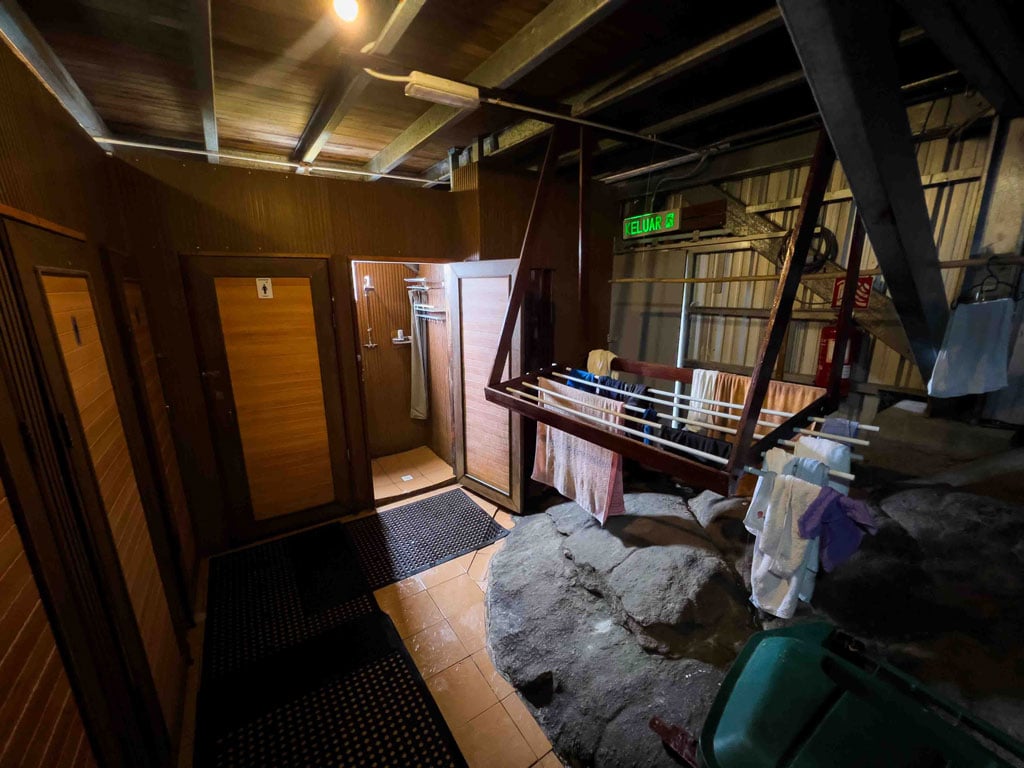
    The heated lodge is well-built and surprisingly comfortable. We had expected something extremely basic, but were quite impressed with its standards.

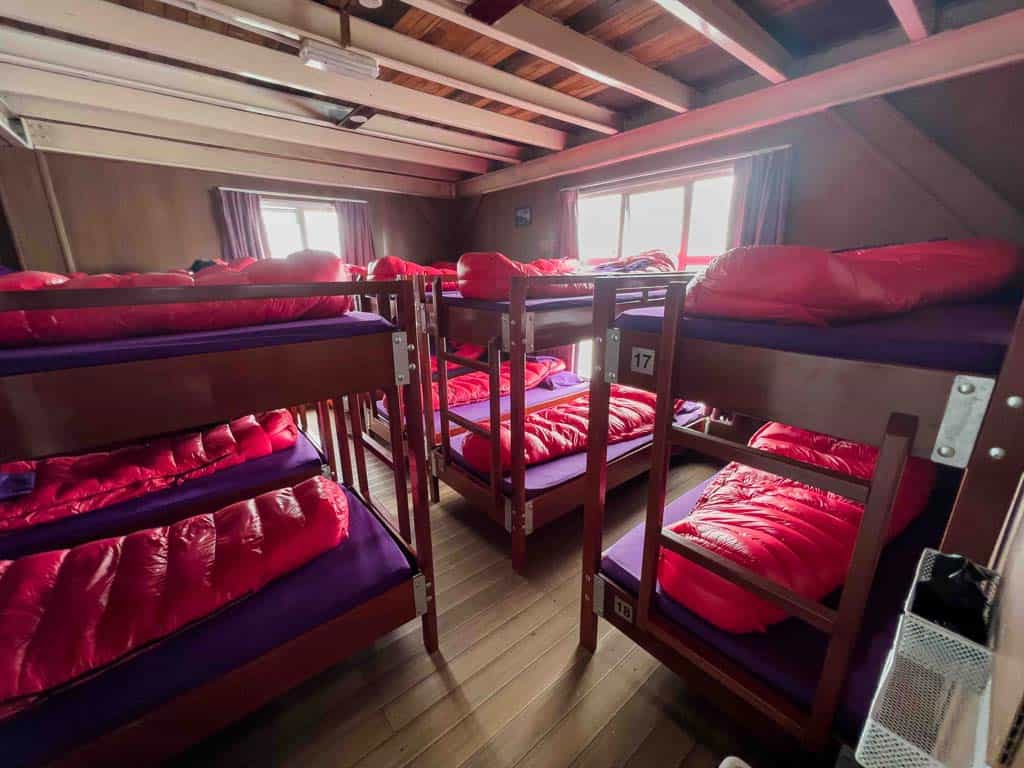
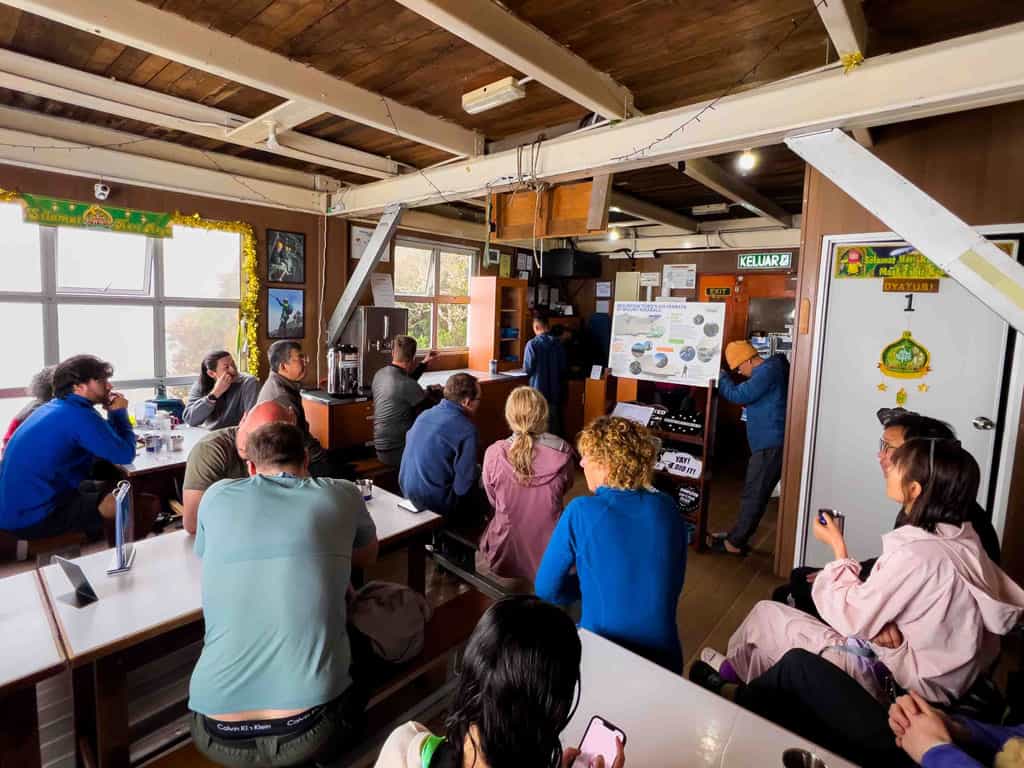
    We checked into our dorm beds (which admittedly were jampacked with over 20 people to a room), had a quick hot shower, which we had not anticipated, changed into, clean dry clothes, and poured ourselves a cup of tea while waiting for the mandatory summit briefing.

    Once the rest of the hikers had made it to the lodge the mountain guides came and gave us a full breakdown on what the next morning would look like.

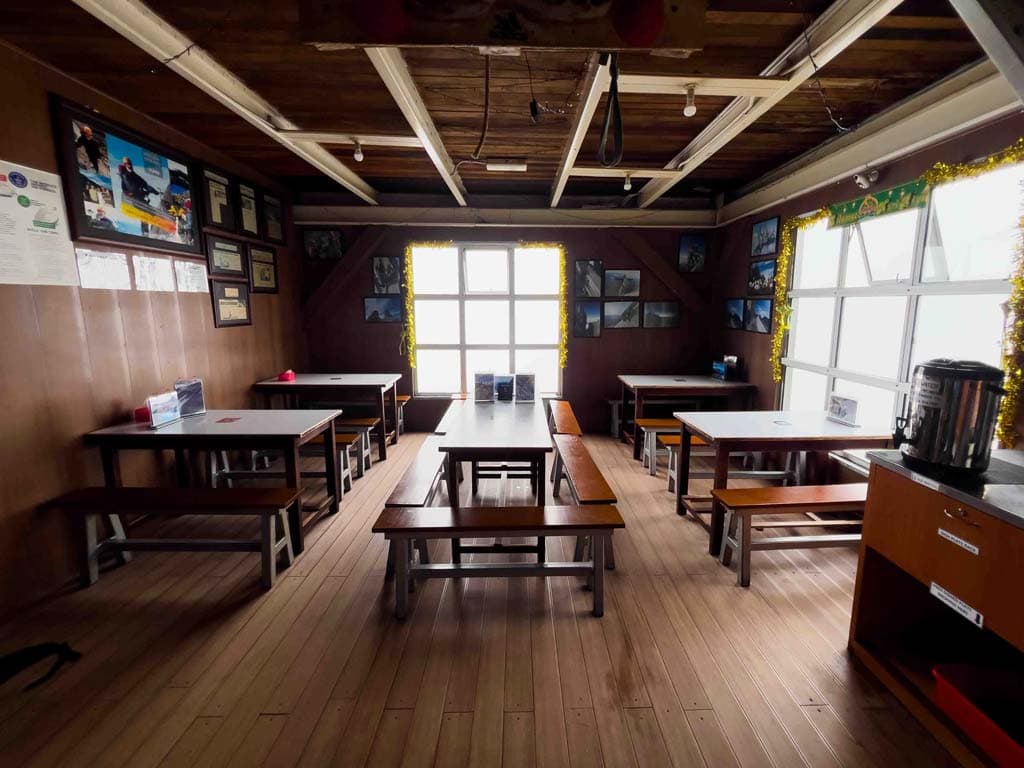
    Afterwards we wandered down to the common room for a hot buffet dinner. Our timing was spot on and it started pouring just after we arrived. Huge drops hammering the roof, clouds swallowing the view and more impressively waterfalls poured down the huge granite rock faces.

    Summit Climb Briefing Panalaban Camp
    Getting a briefing on the summit push and Via Ferrata the next morning.

    Once we realised the rain was settling in for a while we braved the downpour and headed back up to the lodge to prepare for bed.

    We sat inside sipping tea, playing cards, and chatting with the other hikers.

    There’s a real sense of camaraderie up there. Everyone’s a little nervous, a little excited, and a bit in awe of what they’re doing.

    Each person has their own reasons for being up there. For some, it’s just another fun activity to do during their travels. For others it was a lifelong goal. And for quite a few, it was the most extreme thing they had ever done.

    The mountain attracts some special people.

    By 8pm we crawled into bed, with our alarms set for 2am.

    Buffet Dinner At Mount Kinabalu
    The full buffet spread.

    Day 2: The Summit Push

    I crashed out hard and managed to sleep right through the night. The provided sleeping bags were very warm and I ended up just wearing underwear to ensure I didn’t overheat.

    The room stirred and in the dark we pulled on our thermals, jackets, gloves, headlamps, made ourselves a quick coffee to wake up, and headed out into the cold dark morning.

    The climb to the summit is about 2.7km from base camp, but don’t let the distance fool you. It’s steep, rocky, slippery in sections and challenging after a full day of hiking the day before.

    Sunrise On Mount Kinabalu
    First light near the summit.

    Guided by only the beams from our headlamps, we hiked through low trees before the trail quickly becomes more exposed.

    You’re gripping ropes in some sections, climbing up smooth granite slabs with nothing but moonlight and headlamps to illuminate the way.

    It’s not technical, nor dangerous if you pay attention, but it’s a grind.

    One step at a time, slowly but surely.

    The altitude kicks in hard above 3,500 metres. We were all feeling it in our breathing, but the Diamox we took seemed to help stave off any real symptoms.

    We made good time and our guide soon suggested that we slow down and take more breaks in order to not spend the unnecessary time exposed on the summit.

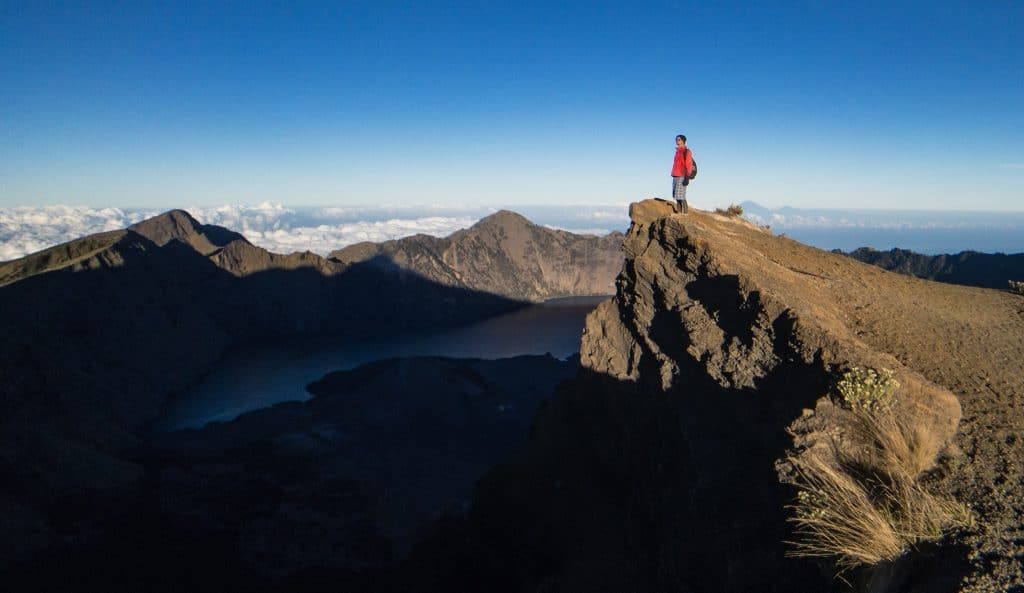
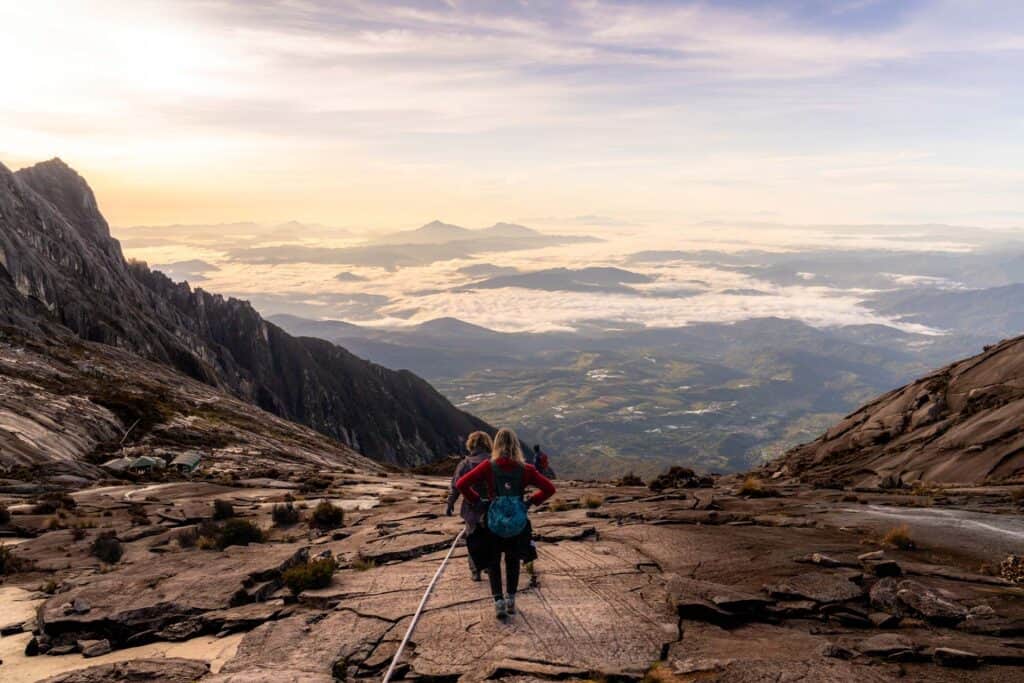
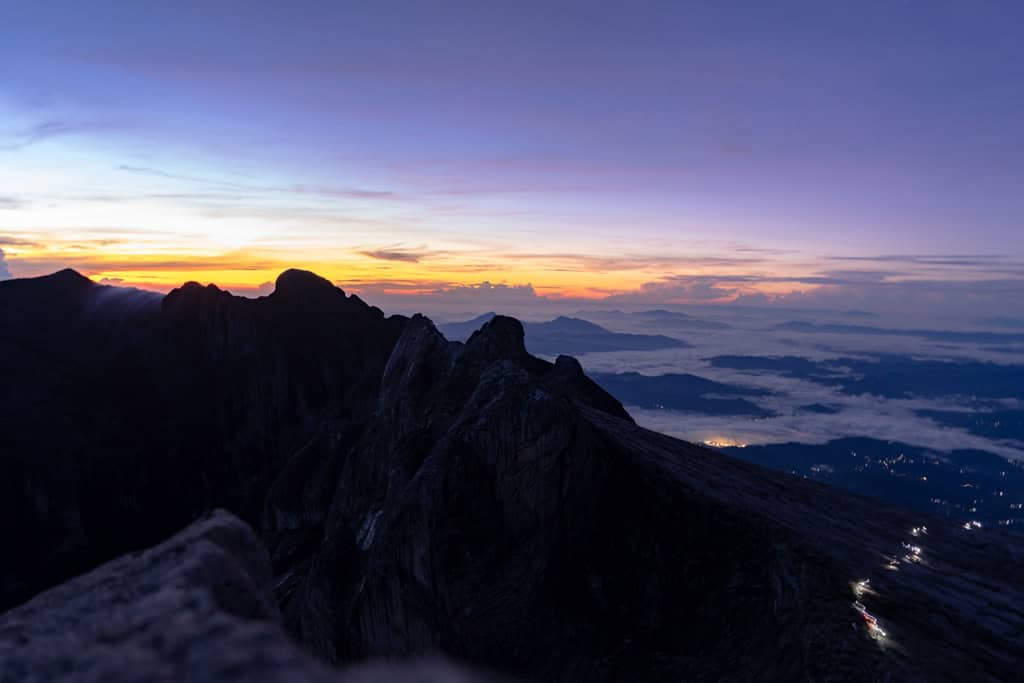
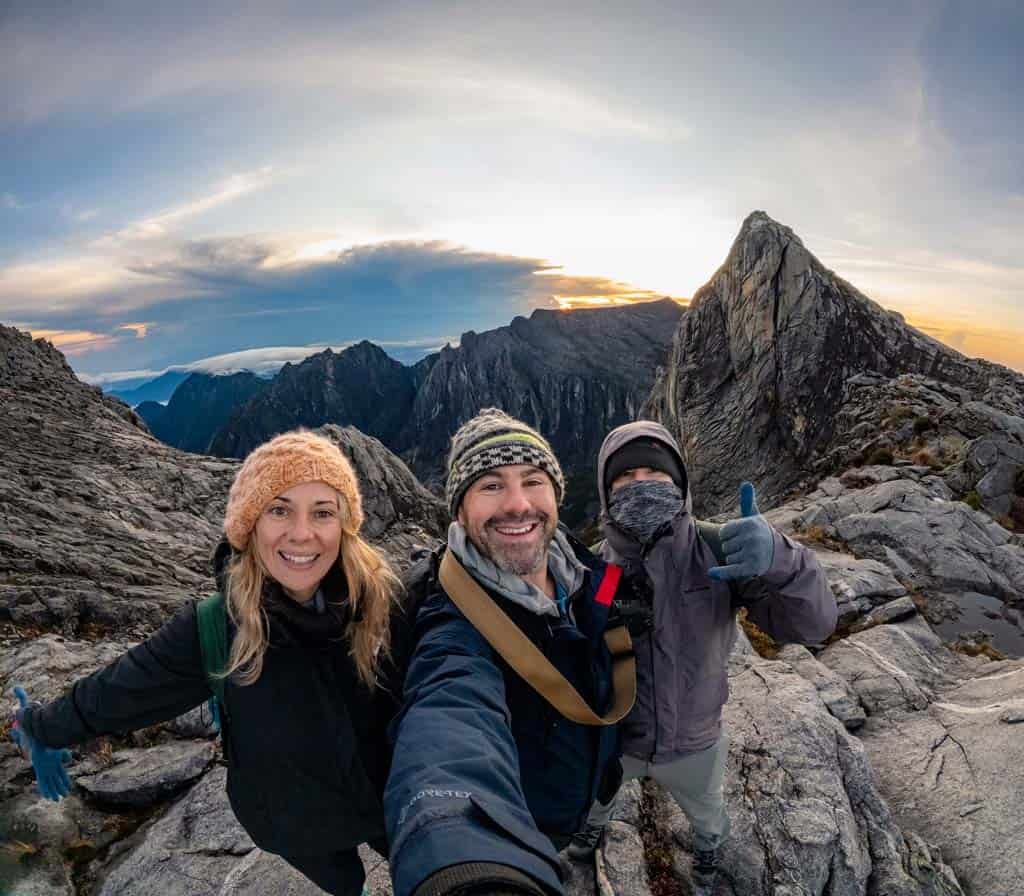
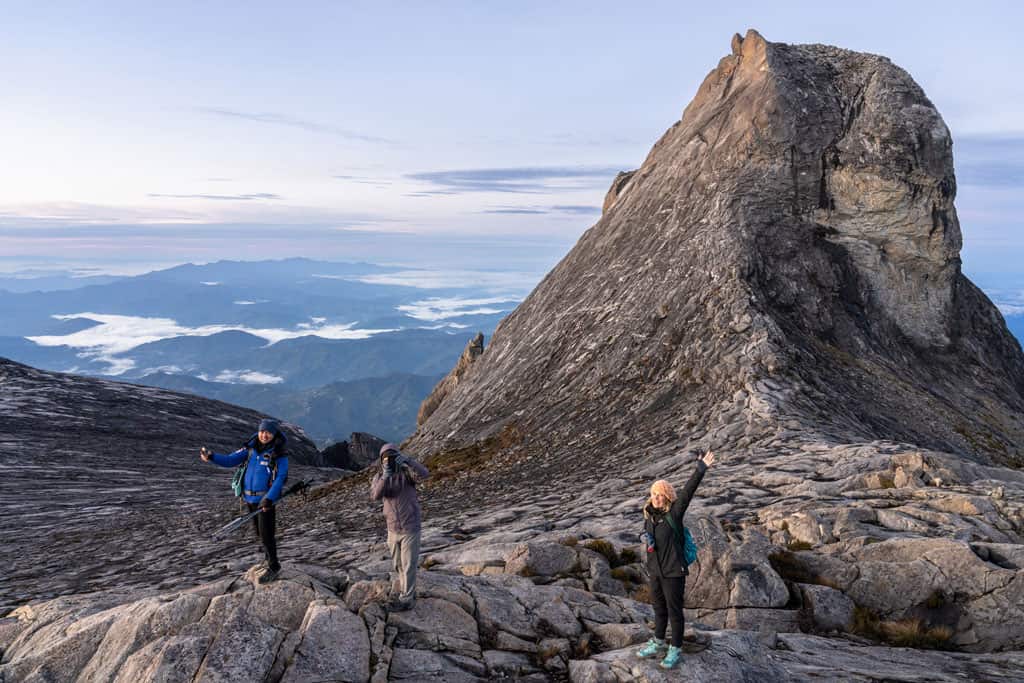
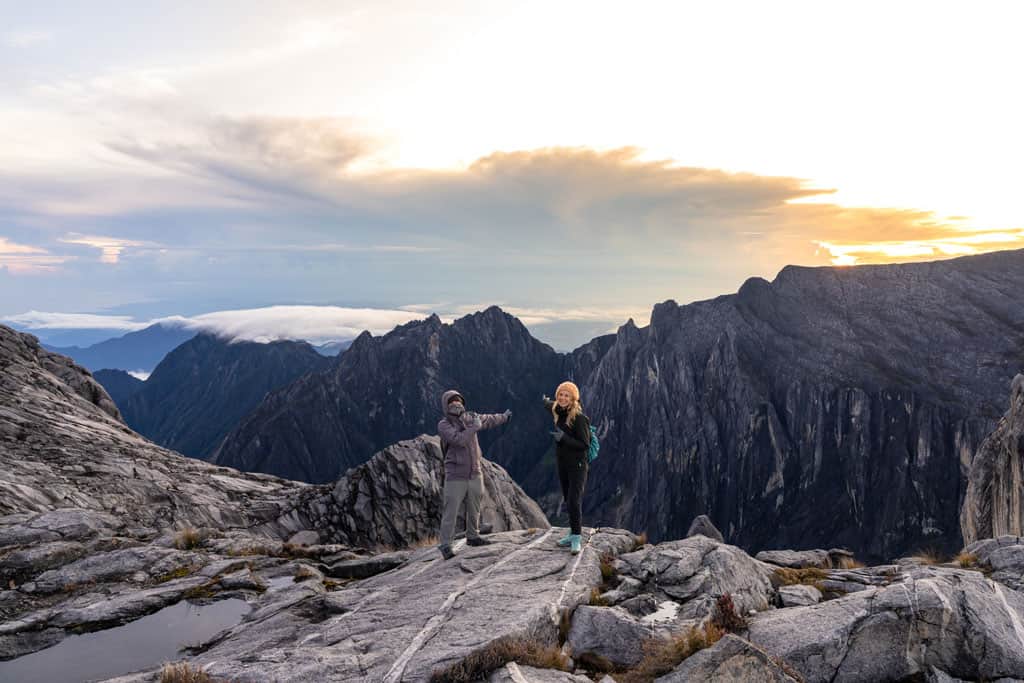
    With twilight approaching we reached Low’s Peak at 5am. 4,095 metres above sea level.

    Us At Summit Mount Kinabalu
    All rugged up at the summit of Mount Kinabalu.

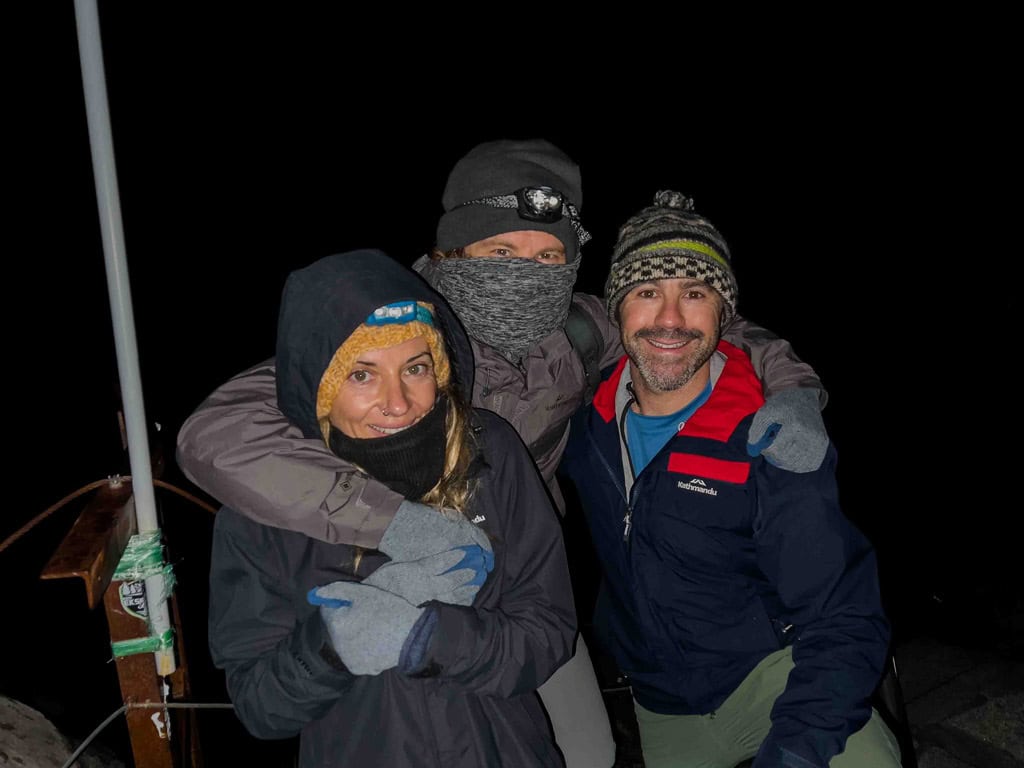
    The temperature was below freezing, our fingers were numb and noses red from the cold.

    But the feeling of standing on Borneo’s highest summit was truly remarkable.

    It was still pitch black at the summit and we could just make out the lights of Kota Kinabalu in the distance.

    Once we had taken our photos we wandered down from the tiny summit to a protected ledge that had more room to sit.

    Mount Kinabalu Sunrise Views
    Watching the sunrise from just below the summit was a spectacular experience.

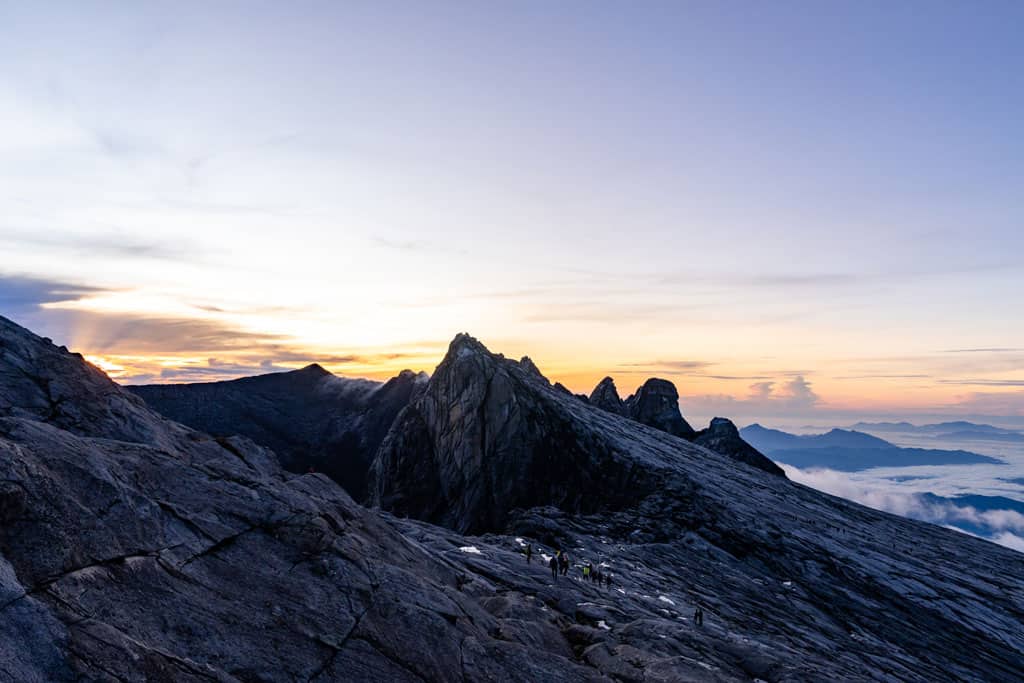
    We wrapped ourselves in all of our layers, snacked on muesli bars and chocolate, and waited for the sun to rise above the magical island.

    High above the clouds we wateched the sky morph from pitch black to golden pink. The sky didn’t explode in a kaleidoscope of colour like we had hoped, but that didn’t matter.

    Watching the sunrise from the highest point in Borneo with two of my best friends made it one of the most beautiful mornings I’ve ever had.

    We stood there, hugged, took some photos, and soaked it all in. You don’t get many moments like that in life.

    Summit Mount Kinabalu Climb
    We made it!

    The Descent and the Via Ferrata

    Before the sun rose too high in the sky it was time to leave the summit and make our way back down the mountain.

    From here there are 3 options that need to be pre-booked.

    Either head straight back down to camp and then onwards to the base, or take one of the two Via Ferratas to descend.

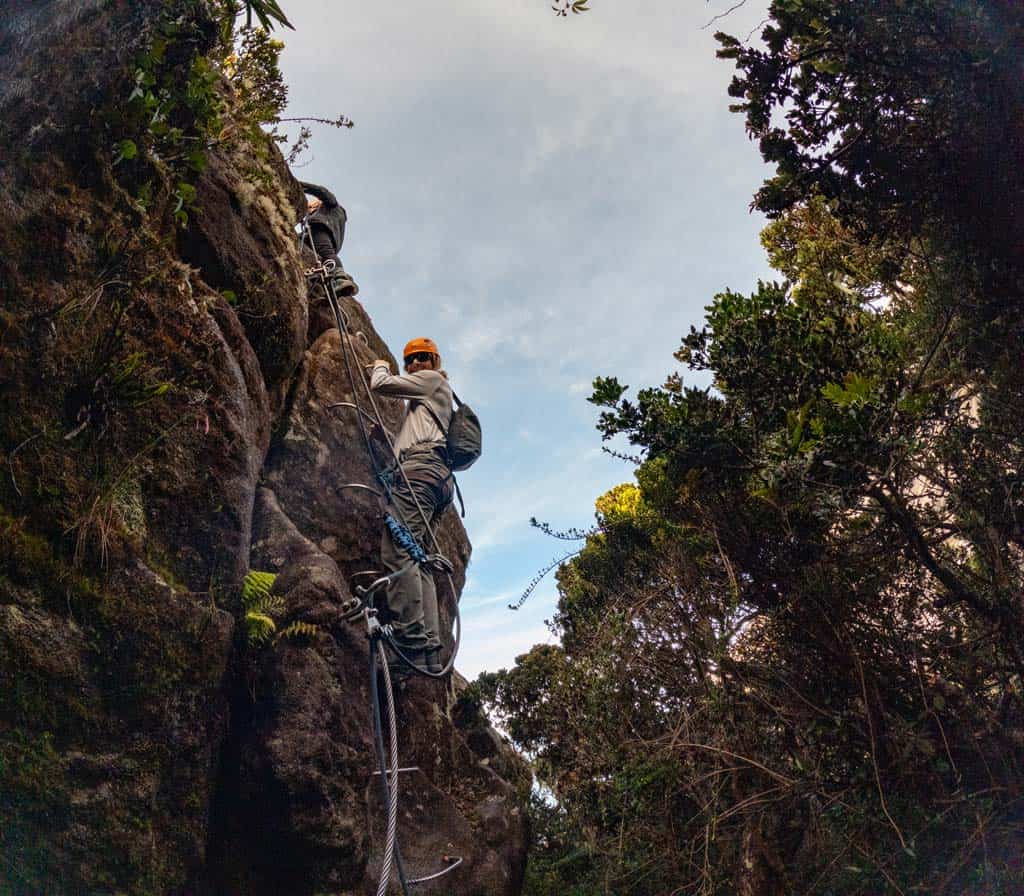
    A via ferrata is a protected climbing route with steel cables, rungs, and suspension bridges built into the mountain.

    You clip in with a harness and two carabiners and make your way across the cliffs. It’s part scrambling, part adventure course.

    Us On Via Ferrata Walk The Torq
    Bertie coming across the Via Ferrata.

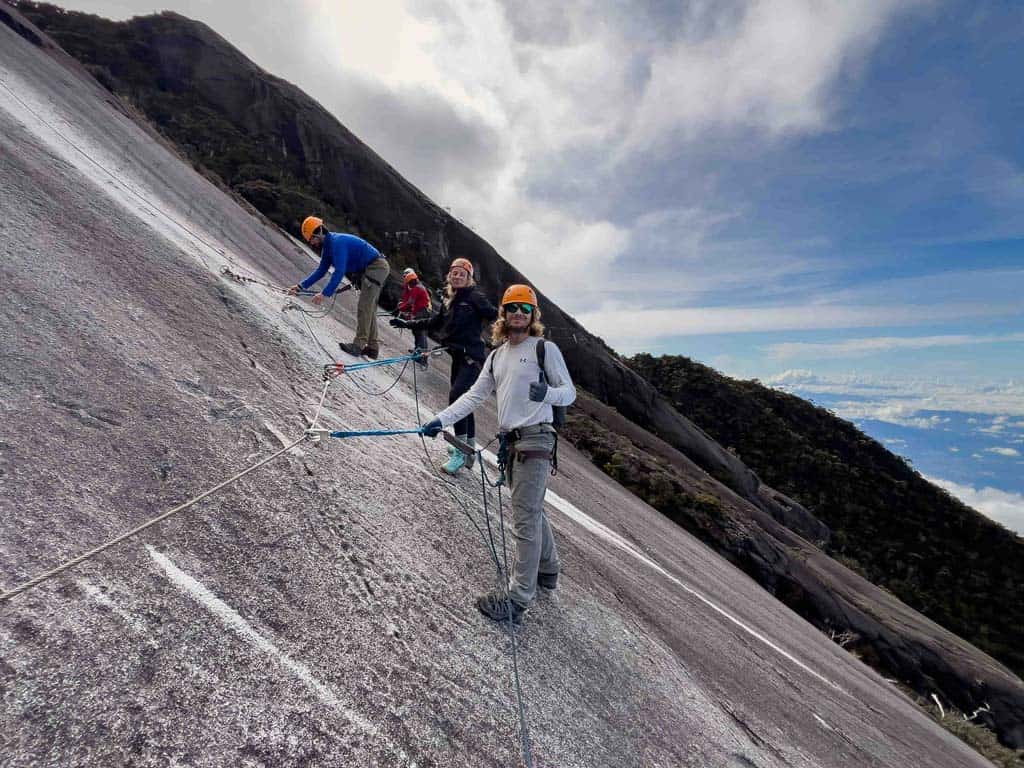
    We signed up for the “Walk the Torq” which is the shorter of the two options offered, as the full Via Ferrata was fully booked.

    But don’t let that fool you – it’s still a tonne of fun.

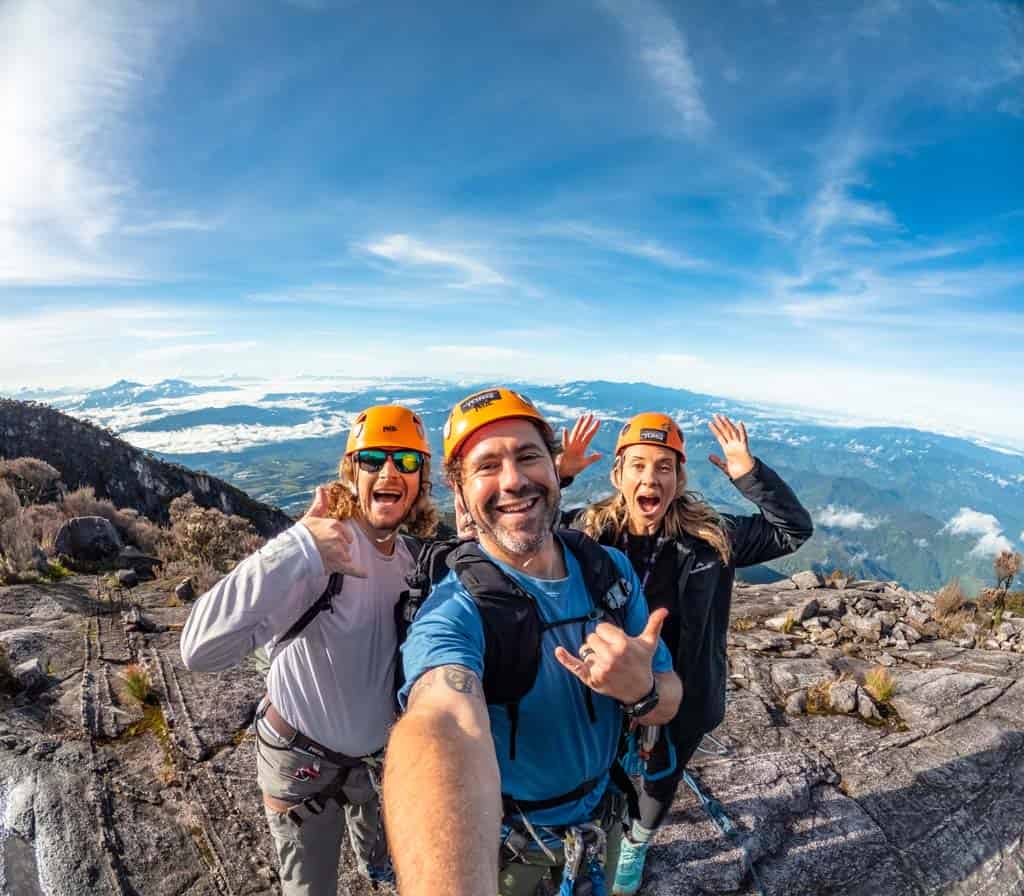
    We left the track and met our Via Ferrata guides near the ranger’s hut. After a short safety briefing we clipped in and started our descent across sheer granite walls with nothing but 1,000 metres of air beneath us.

    It was a fantastic experience. Enough of a rush to get the adrenaline pumping but safe and accessible for most people with moderate fitness.

    The views were next-level. We were literally walking across a cliff with sweeping views of the jungle valleys below.

    It took about 2 hours to complete the via ferrata, and then it was time to hike back to the Panalaban lodge to collect the rest of our gear and then navigate all the way back down to Timpohon Gate.

    Jarryd Bertie Hannah Via Ferrata Mount Kinabalu
    We loved the Via Ferrata.

    The descent is relentless. Endless steps and switchbacks pounding your calves and knees for hours.

    We were tired, sore, and soaked in sweat and rain by the end, but still buzzing from the experience.

    At around 1pm we arrived to the gate and met our transfer. We were shutled back to the main base camp and then jumped in our private van to leave the mountain and enjoy the ride back to Kota Kinabalu.

    Us At End
    At the bottom of the hike, wet, sore but incredibly happy.

    Final Thoughts

    Climbing Mount Kinabalu isn’t just a hike, it’s a full-blown adventure. The altitude, the early morning summit push, the changing ecosystems, the cultural significance, the camaraderie with fellow hikers – it all adds up to something truly special.

    Amazing Borneo were fantastic throughout the whole experience. Professional, friendly, organised, and passionate about what they do.

    Amazing Borneo Guide
    Our awesome guide made the experience so much more enjoyable, and safe as well.

    Our guide was knowledgeable and supportive, our driver was safe and on time, and the logistics all ran like clockwork.

    Once we had made our booking all we had to worry about was the early wake up call on that first day, and they looked after the rest.

    If you’re thinking about doing this climb, do it. Book early, train, pack smart, and go with an open mind. You’ll come down with sore legs and a big smile.

    And trust me – the sunrise at the summit is worth every single step.

    Us Near Summit Mount Kinabalu
    100% worth it for views like this!

    Things to Know Before Climbing Mount Kinabalu

    Planning to climb Mount Kinabalu? Whether you’re an experienced trekker or this is your first big mountain, there are a few essential things you need to know before lacing up your boots and heading into the clouds.

    From when to go to what to pack, this guide will help you prepare for an unforgettable adventure.

    Crazy Steps Up Mountain Kinabalu
    Step after step on the way to and from the summit.

    1. How to Book Your Climb

    Unlike many other hikes around the world, you can’t just show up at Mount Kinabalu and start walking. The mountain is tightly regulated with daily climbing permits capped to protect the environment and ensure safety.

    You must book through an approved tour operator, and we highly recommend Amazing Borneo. They handle everything: permits, transport, meals, accommodation, guides, and even the optional via ferrata.

    Book early: Ideally 2–3 months in advance, or longer during peak seasons (April to August). The climb often sells out quickly, especially with fewer permits available post-pandemic.

    Markers On Climbing Mount Kinabalu
    The markers on the climb let you know how far you’ve gone and what altitude you have reached.

    2. Best Time of Year to Climb

    Mount Kinabalu can be climbed year-round, but March to September is considered the best window. This is the dry season in Sabah, and you’ll have the best chance of clear skies and safe summit conditions.

    October to January is wetter, and while it’s still possible to hike, you’ll face more rain, slippery trails, and a higher chance of summit closure due to storms.

    Always check the weather forecast before your trek, but remember: on the mountain, conditions change fast. It can be sunny at base camp and stormy at the summit.


    3. How Hard Is the Hike?

    Mount Kinabalu is not a technical climb, but it is tough. You’ll ascend over 2,200 metres in elevation in just under 9km, and altitude affects everyone differently.

    Expect sore legs, short breath, and a test of endurance. But if you’re moderately fit and pace yourself, it’s totally achievable. The key is mental resilience and steady movement, not speed.

    The final push to the summit involves some scrambling over granite rock with ropes for support. It’s safe, but you’ll feel it.

    In the days that follow you’ll likely be walking funny. Stairs will suck, getting out of bed will be slow and you’ll have a funny shuffle as you bounce around the rest of Borneo.

    We highly recommend giving yourelf a few relaxing days after the climb to recover.

    Hannah Bertie Mount Kinabalu
    Hannah and Bertie enjoying the views.

    4. What to Pack

    Packing right is essential, especially since you’ll be going from steamy lowlands to freezing altitudes.

    Here’s what you’ll need:

    Essentials:

    Clothing:

    • Moisture-wicking base layers
    • Fleece or insulated jacket
    • Waterproof jacket and pants
    • Gloves and beanie
    • Extra socks and underwear
    • Comfortable clothes for sleeping at base camp

    Other useful items:

    • Altitude sickness tablets (we took Diamox bought in Kota Kinabalu -consult your doctor)
    • Sunscreen and lip balm
    • Toiletries (toothbrush, wet wipes, etc.)
    • Cash for tipping guides and buying snacks at camp
    • Camera or phone with a power bank

    Your operator may carry a porter bag or store overnight gear at base camp, but you’ll need to carry your own daypack during the hike.

    You can also hire a porter for an additional fee.

    Climbing Down At Sunrise Mount Kinabalu
    Make sure whatever you take can fit inside a nice, comfortable daypack and doesn’t weigh too much.

    5. What’s Included in a Tour

    When you book with a reputable company like Amazing Borneo, you’ll typically get:

    • Return transport from Kota Kinabalu (we opted for the package with the private van and it was well worth it)
    • Climbing permit and park entrance fees
    • Certified mountain guide
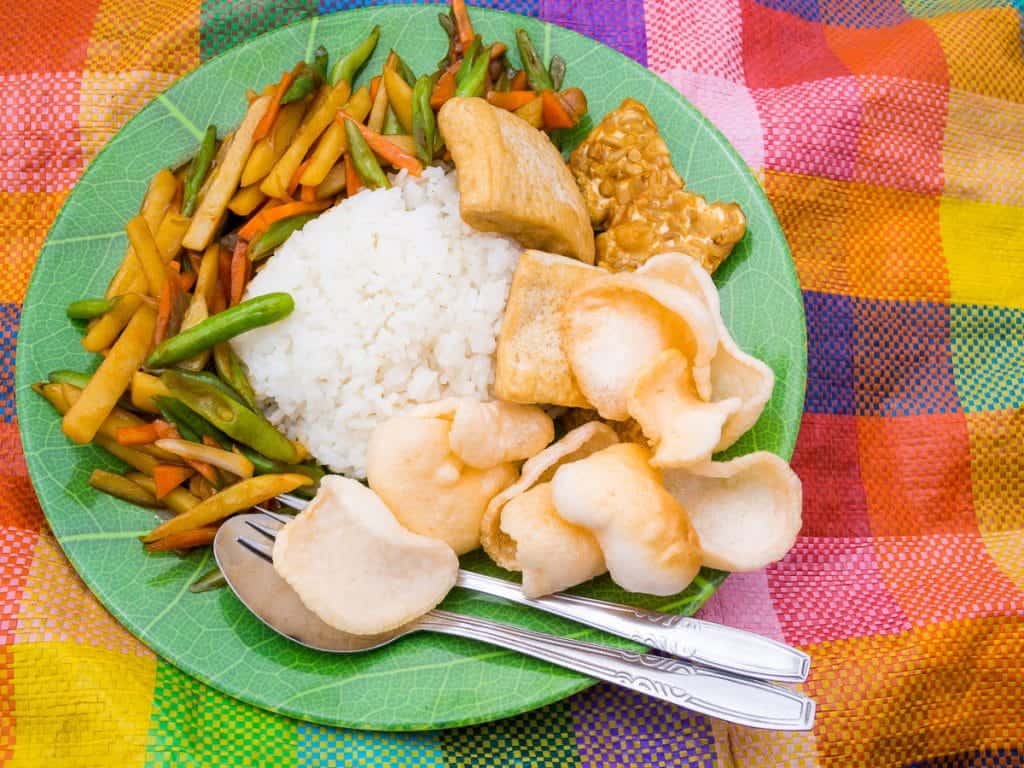
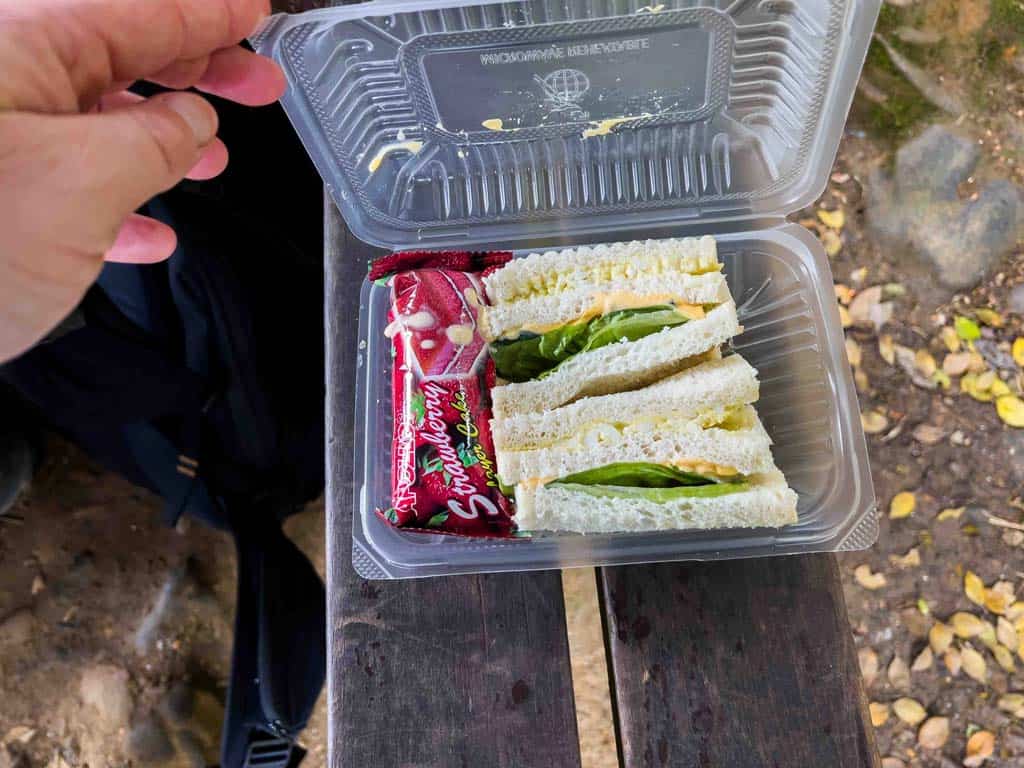
    • Meals (dinner and breakfast, as well as a lunch at base camp)
    • Accommodation at Panalaban Base Camp (shared dorms or private rooms)
    • Certificate of completion
    • Optional via ferrata experience (must be booked separately)

    All meals are cooked at altitude and are hearty. Think rice, noodles, eggs, vegetables, and chicken. Dietary requirements can usually be catered for with notice.

    Sandwich Snack Pack
    A sandwich and snacks provided by Amazing Borneo, but we recommend bringing extra.

    6. Altitude: How It Affects You

    Mount Kinabalu is just over 4,000m high, and altitude sickness is a real risk. You’ll be sleeping at 3,270m and summiting early the next morning.

    Symptoms can include headache, nausea, fatigue, dizziness, and shortness of breath. Most people are fine if they hydrate, pace themselves, and don’t overexert.

    We took Diamox (acetazolamide) as a precaution and had no issues. You should speak with your doctor before your trip to see if it’s right for you.


    7. The Via Ferrata: Should You Do It?

    The via ferrata is a highlight of the Mount Kinabalu experience, and the highest one in the world! You clip into a series of steel cables and climb along cliff edges with incredible views.

    There are two options:

    • Walk the Torq: Easier, shorter, and perfect for beginners.
    • Low’s Peak Circuit: Longer, more exposed, and better for confident adventurers.

    You must book the via ferrata when you reserve your climb. You can’t add it on last-minute, trust me I tried to upgrade to Low’s Peak Circuit and couldn’t.

    Safety briefings happen the day before at Panalaban, and you need to be at the summit by a certain time to participate, so don’t dawdle in the morning.

    Bertie On The Via Ferrata
    Definitely book one of the Via Ferratas!

    8. Tips for a Successful Climb

    • Train beforehand: You don’t need to be a marathon runner, but regular cardio and leg strength training will help.
    • Take your time: Go slow and steady. The guides are used to all fitness levels.
    • Layer up: It’s hot at the bottom and freezing at the top. Layers are your best friend and you’ll like strip down and dress up every hour.
    • Start early: The summit push starts at 2am to catch the sunrise—get to bed early and pack everything the night before.
    • Respect the mountain: It’s a sacred place for locals. Don’t litter, don’t blast music, and keep your voice down.

    9. Staying in Kota Kinabalu

    Most people base themselves in Kota Kinabalu (KK) before and after the hike. It’s a relaxed seaside city with good restaurants, a buzzing night market, and affordable accommodation.

    We recommend arriving in KK at least a day before your climb to get organised, and spending another night after your descent to rest and recover.


    Final Word

    Climbing Mount Kinabalu is one of the best adventures in Southeast Asia. It’s tough, stunning, and unforgettable.

    Go in with the right mindset, book with a trusted operator like Amazing Borneo, and prepare properly – and you’ll come away with sore legs, big smiles, and a sunrise memory you’ll never forget.

    Summit Sunrise Mount Kinabalu
    A sunrise view you’ll never forget.

    DISCLAIMER: Some of the links in this article are affiliate links, which means if you book accommodation, tours or buy a product, we will receive a small commission at no extra cost to you. These commissions help us keep creating more free travel content to help people plan their holidays and adventures. We only recommend the best accommodations, tours and products that ourselves or our fantastic editorial team have personally experienced, and regularly review these. Thanks for your support, kind friend!


    Source link

  • The Ultimate Mount Rinjani Trekking Guide (2025 Update)

    The Ultimate Mount Rinjani Trekking Guide (2025 Update)


    A Mount Rinjani trekking tour is not for novice hikers or casual travellers. But if you’re ready for an epic 3-day journey to the summit of the second highest volcano in Indonesia, here’s everything you need to know before you go in our guide.

    At 3,726 metres above sea level, Mount Rinjani looms large over the entire island of Lombok in Indonesia.

    Of the 130 volcanoes in the country, Rinjani is the second-highest (topped only by Mount Kerinci on Sumatra).

    Rinjani’s ominous silhouette is a constant reminder of the powerful forces rumbling just beneath the surface of the earth.

    That power is what draws hundreds of intrepid hikers to Rinjani every day.

    Mount Rinjani Trekking
    You can see Rinjani from almost everywhere on Lombok.

    Why Do a Rinjani Trek?

    The tough hike to the crater rim is rewarded by absolutely magnificent views.

    Rocky black soil at the summit drops off into a lush valley filled with purples so deep and greens so bright they don’t look like they should exist in nature.

    Lake Segara Anak, nestled in the bottom of the gaping crater, is a deep turquoise, echoing the spectacular colour of Lombok’s seas.

    On the edge of the lake sits an active volcano, Mount Barujari, which steadily spews threatening clouds of smoke into the air.

    Mount Rinjani Trekking
    Mount Barujari, inside the Rinjani crater, is still active and can erupt at any time.

    And at night, the sky is blanketed with stars so thick they look painted on.

    While the views inspire awe, the most compelling reason to trek Mount Rinjani is to challenge your body and your mind, leap firmly out of your comfort zone, and be able to shout “Hell yes, I did it!”

    If that sounds good to you, read on for everything you need about…

    How to Plan Your Epic Mount Rinjani Trekking Adventure

    Could You Handle a Rinjani Trek?

    I’ll admit, we went into the Mount Rinjani trek with a bit of a cavalier attitude. Sure, we’d read the stories about how hard it was supposed to be, but we’re experienced trekkers with decades of challenging mountain hikes behind us.

    We’ve trekked all over Canada, Europe, and even in Vietnam.

    How much harder could trekking Mount Rinjani possibly be?

    As it turns out, trekking Rinjani is hard. Really freaking hard.

    The Rinjani trek starts with a climb of 1500 m over 8 km. Most of that elevation change takes place during in the final 4 km, which take about 4 hours.

    Yep, that’s just one measly kilometre an hour.

    To make matters more difficult, there is next to no trail maintenance, so the route is sandy, slippery, and ridiculously steep.

    Unless you’re a trail running hero or an actual superhero, be prepared to have your will and your body pushed to their limits on your way up Mount Rinjani.

    And that’s just the first day.

    The second day starts in the middle of the night, so hikers can summit for sunrise. To get the summit, there’s another 1000 m of elevation gain, along a narrow trail of slippery loose scree.

    It’s cold up there, too. Even in August, the temperature hovers around freezing.

    After all the climbing, the descent should be a relief. Instead, it seems to go on for days, requiring every ounce of hamstring strength you can muster, plus knees of steel, and an excellent sense of humour.

    Trekking Mount Rinjani
    The descent from Mount Rinjani will put your whole body to the test.

    If you come away without any scraped knees or sore muscles, you’re definitely part mountain goat!

    So, could you handle trekking Rinjani?

    If you’ve read all of this and you’re thinking “Hell, yeah! Bring it on!” then keep reading.

    If you’re still not sure, check out my 7 Essential Tips For Surviving A Mount Rinjani Trek

    What Are The Options For a Rinjani Trekking Tour?

    Sembalun Or Senaru: Where To Start?

    There are two main points of entry to Rinjani National Park.

    You can ascend from the village of Sembalun or from Senaru. On three- and four-day hikes, you depart from one village and descend to the other.

    We highly recommend starting in Sembalun because of the way the trails are configured.

    The first day of ascent from Sembalun is steep and sandy. It looks like it would be absolutely brutal going in the opposite direction.

    Likewise, the descent to the crater lake is so steep and rugged, that it would be a real leg-breaker going the other way.

    If you want a more off-the-beaten track experience, book a private tour and ask about one of the less-used routes, like the trails from Aik Berik or Torean. We wish we had known about them before our trek!

    How Many Nights on Rinjani?

    Three Days, Two Nights

    The most popular option (and the one we recommend) is the 3-day, 2-night trek. This gives you just enough time to climb to the summit and also visit the crater lake and hot springs.

    If you’re in no rush, consider the 4-day, 3-night option, which goes to the same locations but provides a little more free time to relax and enjoy Mount Rinjani.

    Two Days, One Night

    The 2-day, 1-night tour from Sembalun includes the option to summit at sunrise. If you’re in amazing shape and love to punish your machine, go for it!

    Otherwise, take pity on your poor body and give yourself more time on the mountain.

    The 2-day, 1-night trek from Senbaru takes trekkers to the crater rim opposite the summit. This is the easiest (not to say that it’s easy) of the Mount Rinjani trekking options.

    You don’t get near the summit or the lake but it does provide incredible views of the crater. If you think you can’t handle a longer trek but still want to experience Rinjani, this is probably the best option.

    If you book the full 2-day, 1-night tour on Klook they will pick you up from anywhere in Lombok and provide everything for you.

    BONUS – Booking ahead of time ensures you won’t miss out on the tour, and get the best price too! And just for NOMADasaurus readers, if you use the Klook discount code “NOMADS10” on the website when checking out, you’ll get $10 off your first booking!

    Mount Rinjani Trekking
    The view of the crater lake from the Sembalun side is worth the trek!

    Be aware that “one night” or “two nights” refers to number of nights on the mountain. Most Rinjani trekking companies encourage you to spend a night in Senbaru before the tour to get an early start. This hotel is often included in the price, but be sure to check!

    Private Tours and Hiking Rinjani Without A Guide

    While it is technically possible to trek Mount Rinjani without a tour or a guide, it is actively discouraged both by the government and the community. Unless you are an extremely experienced hiker and have hiked in the tropics before, don’t even consider it. If you’re injured on the mountain without a guide or porters, you’ll be in some serious trouble.

    If you do decide to trek Rinjani independently, please sign in at the park office and pay the entrance fee. Though it’s questionable whether the fees are used to maintain Rinjani, signing in is for your own safety.

    What’s The Food Like On A Rinjani Trek?

    On our day-one lunch break, we were astonished to see full-on camp kitchens being set up by all the guides and porters on the mountain.

    In Canada, you’re lucky to get a squashed peanut butter sandwich for lunch on a long hike.

    On Rinjani, you get a heaping plate of fried vegetables, tofu and tempeh, a pile of freshly cooked rice crackers, all the rice you can eat, plus a massive fruit plate for dessert. And that’s just the vegetarian option!

    Mount Rinjani Trekking Meals
    Not bad for a camp meal!

    This meal was not unusual. Everything we ate on Rinjani, and everything we saw being served to fellow trekkers, was freshly cooked and plentiful. There was so much food, we were rarely able to finish our meals.

    Where Do You Sleep On Rinjani?

    You’ll sleep snuggled in a tent at a campsite on the crater rim or by the lake.

    Our tent was clean and modern, if a little bit short for our long bodies! The sleeping bags had been freshly laundered and the camp pillows were also clean.

    You won’t find much solitude at your campsite though, since hundreds of other trekkers will be camping right alongside you.

    What Does A Rinjani Trekking Tour Cost?

    There’s a huge range of prices for trekking Rinjani, depending on which company you go with, where and when you book, and which tour option you choose. I saw prices quoted anywhere between $80 and $450 US for similar tours.

    Avoid the cheapest companies, as many don’t provide essential services like an experienced guide, good sleeping bags, garbage pack-out, and a toilet tent.

    You can save money by booking once you’re already on Lombok. Just make sure you know which Rinjani trekking company you’re going with so you can ask the essential questions and check their reviews.

    If you don’t have time to wait around on Lombok looking for a tour with availability, it is best to book ahead. Check out some of the tours I’ve linked to on this page.

    Rinjani Trekking Porters
    Porters carry around 40kg on bamboo poles. Please tip them!

    Budget a little extra for tipping. After you see how hard your porters and guide work, you will be happy to supplement their incomes.

    A minimum of 100,000 IDR (around $8 US) per guide/porter from each hiker is a good guideline.

    Other Important Things To Know For Your Trek

    All visitors are not allowed to bring any plastic that can potentially become waste. So visitors are advised to bring refillable drinking water bottles, food containers to carry food such as snacks, biscuits, bread, and the like.

    There are only 400 trekking permits issued a day (240 permits for international hikers and 160 permits for domestic hikers). So make sure you reserve your place in advance!

    How To Choose The Best Rinjani Trekking Service

    Choose your Mount Rinjani trekking package carefully. Yes, you can pick up el cheapo tours after you arrive in Lombok but you tend to get what you pay for on Mount Rinjani.

    I recommend ignoring the cheapest options and spending a little more to ensure you are comfortable and safe on the mountain.

    Hajar Trekking took excellent care of us during our Mount Rinjani tour. We can enthusiastically recommend them.

    Hajar grew up in Senbaru and he cares deeply about the mountain and the future of tourism there. Our guide, Adi, was funny, informative, and always put our safety first.

    He has been up the mountain hundreds of times, knows every rock and tree root on the trail, and was patient with our endless stops for photos and videos.

    If you mention the code “NOMAD TO RINJANI” when you contact them via WhatsApp or email they’ll offer you a special discount 🙂

    Mount Rinjani Trekking
    Stephen and our guide, Adi, still smiling after three days with us!

    The two porters who took care of us were just amazing, too, working their butts off to lug our camping gear and food up the mountain and to get our campsite set up and perfect before we arrived.

    What’s Included On A Mount Rinjani Tour?

    These are the things that should be included in your Rinjani trekking package. If they aren’t, look for another company.

    • One English-speaking, licensed, experienced guide
    • One porter per person in your group
    • Meals, snacks, soft drinks and water
    • Tent and sleeping bag
    • Transportation to and from any town on Lombok
    • Transportation between Senbaru and Sembalun
    • Hotel stay in Senbaru the night before the trek

    Some companies provide a few nice-to-have extras. This is what we got:

    A toilet tent allowed us to do our business in private and to bury our waste. Without a toilet tent, you take your chances in the bushes where privacy is very hard to come by.

    A camping pillow which helped us get a better night’s sleep.

    Two camping chairs that kept us out of the thick Rinjani dust at mealtimes.

    Winter jackets to keep us warm at the top of the mountain. Even in August, the summit was around 5 degrees celsius! Brrrr.

    We recommend having a good backpack for hiking as well.

    Rinjani Trekking
    It’s cold at the top of Rinjani all year round.

    Headlamps to make the ascent to the Rinjani summit possible. A headlamp leaves your hands free to carry trekking poles or help you scramble up the steepest sections.

    Trekking poles to save your knees on the steep descents and give you extra ability to balance on the often treacherous trails.

    Other Essential Questions To Ask About Your Rinjani Trekking Package

    What do the porters carry? Usually, hikers carry all their personal items (clothes, toiletries etc) and the porters carry food, water and camping equipment.

    What is the group size? We were on a private tour, but if you go with a group, be sure to ask about the group size. The larger groups on the trail tended to be noisy and experience more delays.

    What do they do with garbage? You are going to go through a lot of food and water on the trail. Make sure your tour company pays their porters to carry your garbage out, instead of dumping it or burning it on the mountain. There is a lot of garbage on Rinjani – please don’t add to it!

    Are there restrictions for what we can bring? To reduce waste on the mountain, visitors are not allowed to bring any plastic. Pack food and drinks accordingly!

    Who runs the company? What is their story? We love to travel with private companies run by local people. They tend to care deeply about the environment and the longevity of their business and less about earning a quick buck.

    Tips For Trekking Mount Rinjani

    Request trekking poles. We had never trekked with poles before but they were indispensable for this trip. They’ll help keep you upright through the sandy, slippery slopes and will save your knees after hours of steep descents.

    Be prepared. The trail will probably be harder than you think. Take your time, stopping every few steps to catch your breath if you need to. If you just keeping taking the next step and then the next, you will eventually make it to the top. Read up on our top hiking tips for beginners for more help.

    Be OK with not summiting. Don’t be ashamed to say “no” to the sunrise summit trek. Plenty of people don’t go up! If the first day nearly killed you, stay in your tent and rest. There is plenty of exciting hiking to come without risking injury or exhaustion just to see the summit.

    Don’t get too cocky on the descent. The trail down is steep and precarious. It’s easy to slip and fall and even easier to injure your knees. Just because the porters are running down the trail in flip-flops doesn’t mean you have to do it too!

    Be respectful. Try to stay aware on the trail, even when you’re exhausted. Let faster hikers go by you and always move over for porters. Remember, they are working while you are there for fun!

    Don’t add to the Rinjani litter problem. It’s no secret that there is a lot of garbage on Mount Rinjani. Bring a bag with you and please pack out your own toilet paper, baby wipes, cigarette butts and other personal garbage. If you want to do more, bring a garbage bag and pick up rubbish along the trail. You are not allowed to bring plastic!

    Rinjani Trekking Packing List

    Bring as little as possible. If you think you’ll survive without something, leave it behind! You’ll regret the extra weight when you’re on your 1200th metre of ascent for the day!

    • Hat, gloves & scarf (it’s very cold at the top)
    • Good hiking shoes (running shoes are not grippy enough)
    • Headlamp (for the night hike to the summit)
    • One/two sweat-wicking t-shirts
    • One pair of shorts
    • One pair of long pants
    • Toothbrush & toothpaste
    • Sun hat (if you don’t have one make this easy DIY hat)
    • Sunscreen
    • Lip sunscreen (our lips got burned – not a good look)
    • Sunglasses
    • Socks & undies
    • Swim suit
    • Tiny towel
    • ID and cash for tipping

    Optional items:

    • Base layer (it gets freaking cold at the summit)
    • Baby wipes (if you pack them in, pack them out)
    • Soap or hand sanitizer
    • Flip-flops

    That’s everything you need to know before you book your Rinjani trekking tour. If we missed something or if you have questions, ask away in the comments section below!

    Disclaimer: We were guests of Hajar Trekking for our Rinjani trip. But we would never recommend something we didn’t love ourselves and you know Jarryd and Alesha wouldn’t let us get away with it either!

    Save this Pin for later?

    Mt Rinanji Pinterest Image


    Source link